Two-way Binding in Angular
Two-way binding in Angular fosters bidirectional data flow between parent and child components, enabling simultaneous event handling and value updates. This connection allows information display and user-driven modifications to the underlying data through the UI, establishing a direct link between the view (template) and the corresponding component class, reminiscent of WPF's two-way binding.
Prerequisites
Before we move ahead, we will take a look at some highlights of prerequisites.
Property Binding
Helps to update specific element properties.
Syntax
- In the above expression propertyName is the property
- Wrapped with [](square brackets) indicates it is a property binding
- modelValue value that exists in a component.
- For eg. ngStyle and ngClass are built-in directives using property binding.
ts
Output
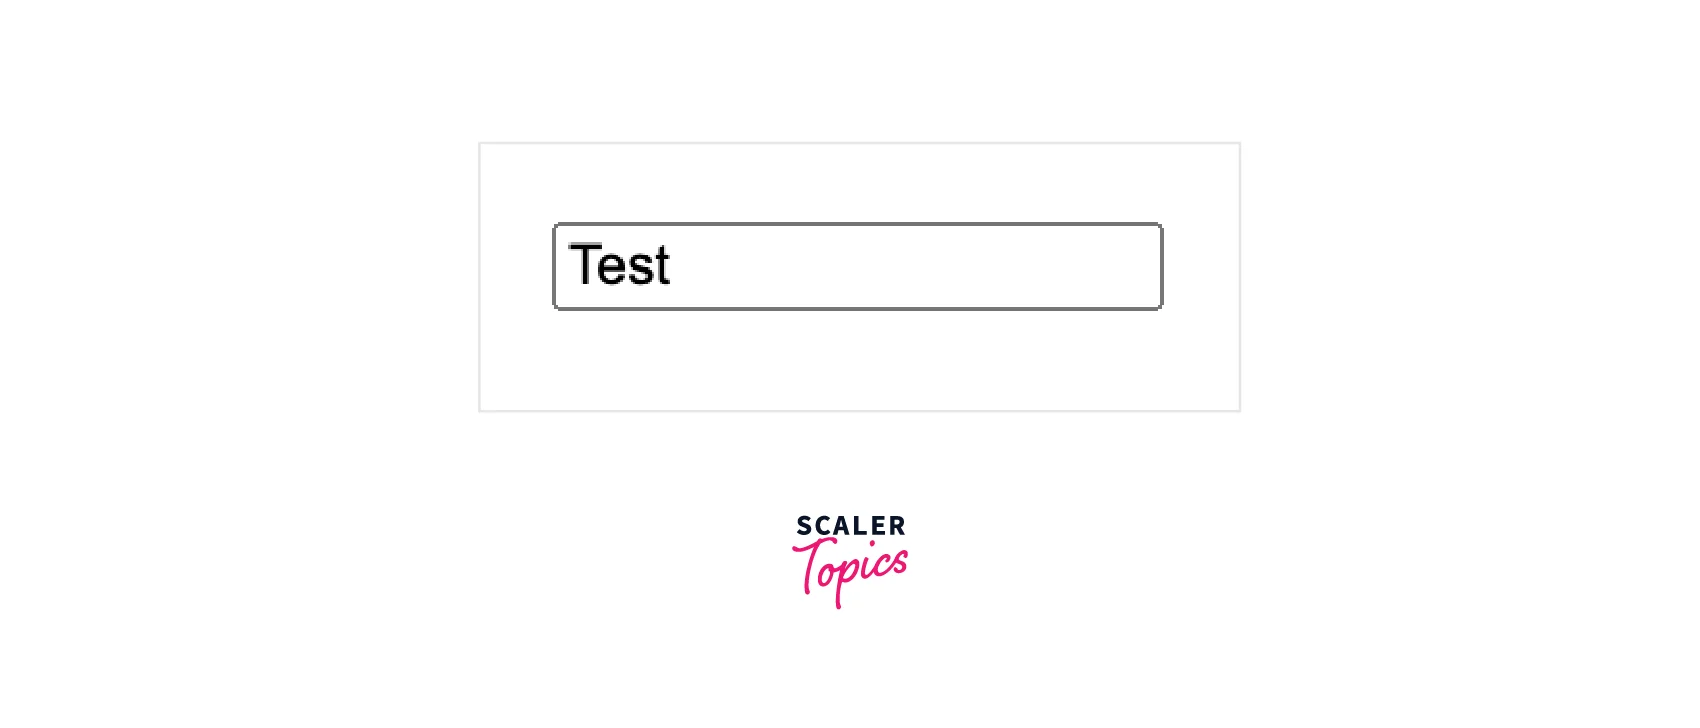
The above code snippet is the simplest example of Property binding. The template is using [value] property binding. What it does is, extract a value from modelValue and put it inside the input value property.
Scaler Placement Report and Statistics
Scaler learners achieved 2.5x salary growth with average post-Scaler CTC reaching ₹23L.
Event Binding
Helps to bind events on DOM.
Syntax
- In the above expression keyup is the event name
- Wrapped with ()(parenthesis) indicates it is an event binding
- onKeyup($event) is a function called when the click event is triggered.
- $event is similar to the event object emitted. It is a special symbol in Angular.
- These events are automatically detached when DOM is removed.
ts
Output
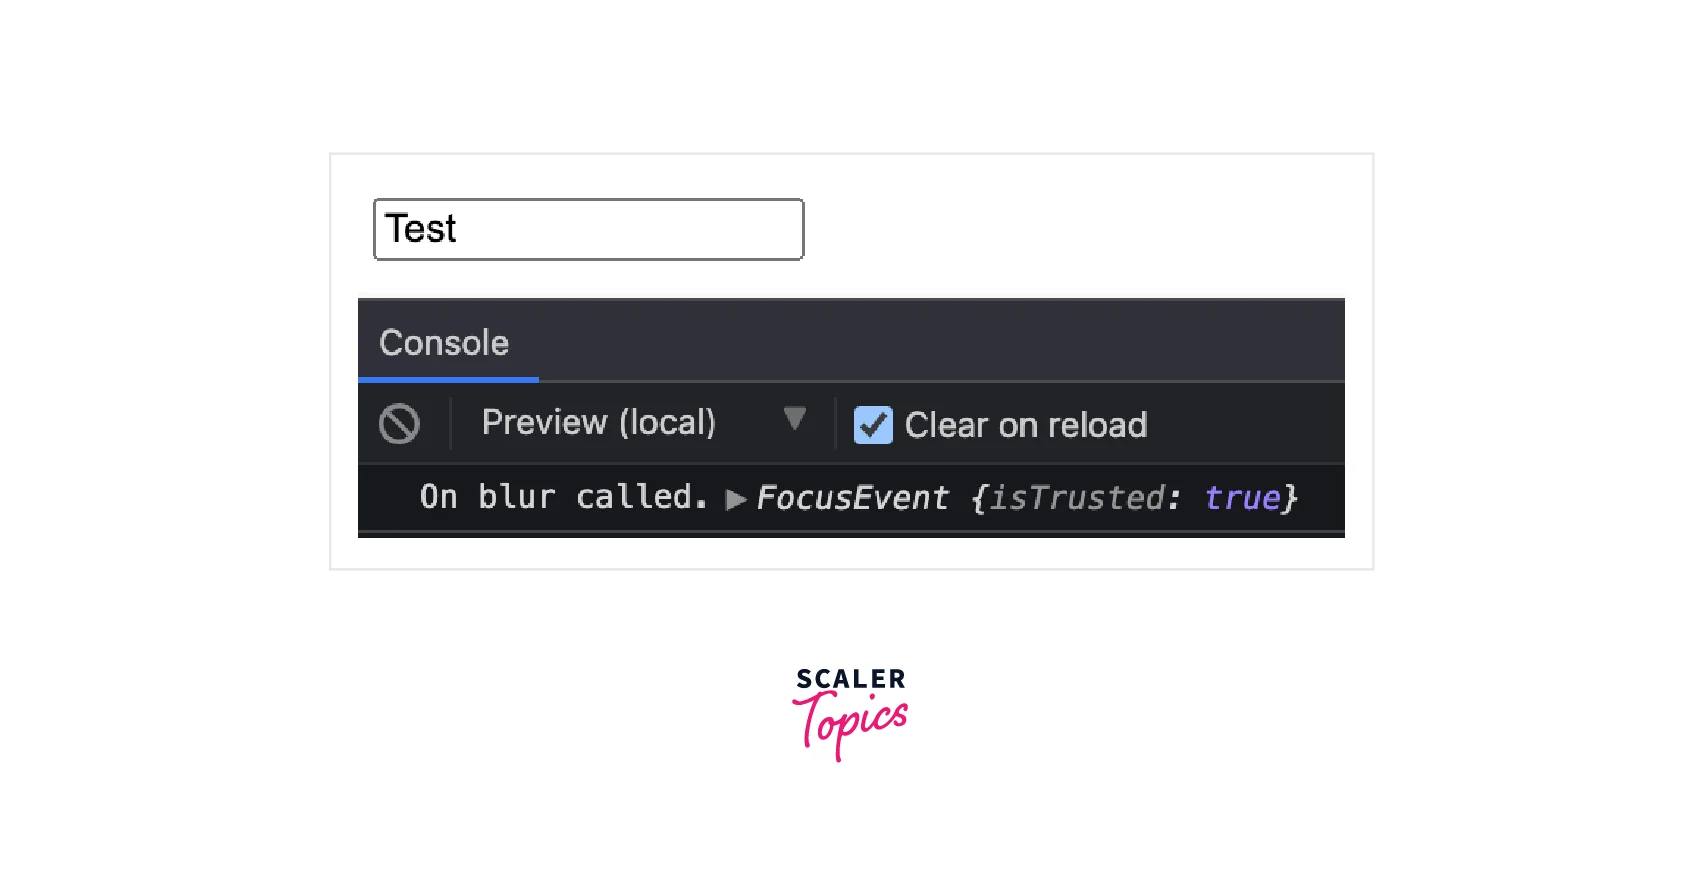
The example demonstrates that by using the (blur) event, we kept the blur event on the input element. And calling the onBlur method whenever the blur event is fired.
Transform Your Career
Choose from our industry-leading programs designed for career success
Modern Software and AI Engineering Program
Master full-stack development with AI integration

Modern Data Science and ML with specialisation in AI
Advanced data science techniques with AI specialization
Advanced AIML with Specialisation in Agentic AI
Deep dive into AIML with focus on Agentic systems
DevOps, Cloud & AI Platform Engineering
Build and manage AI-powered cloud infrastructure
AI Engineering Advanced Certification by IIT-Roorkee
Premier AI engineering certification from IIT-Roorkee
Inputs and Outputs
@Input - is used when the parent component wants to share data with the child component. The POJO object can be passed from the input.
@Output - is used when an event has to be listened to by the parent component from the child component. Only EventEmitter would have to call the emit method on the emitter instance.
ts
Usage
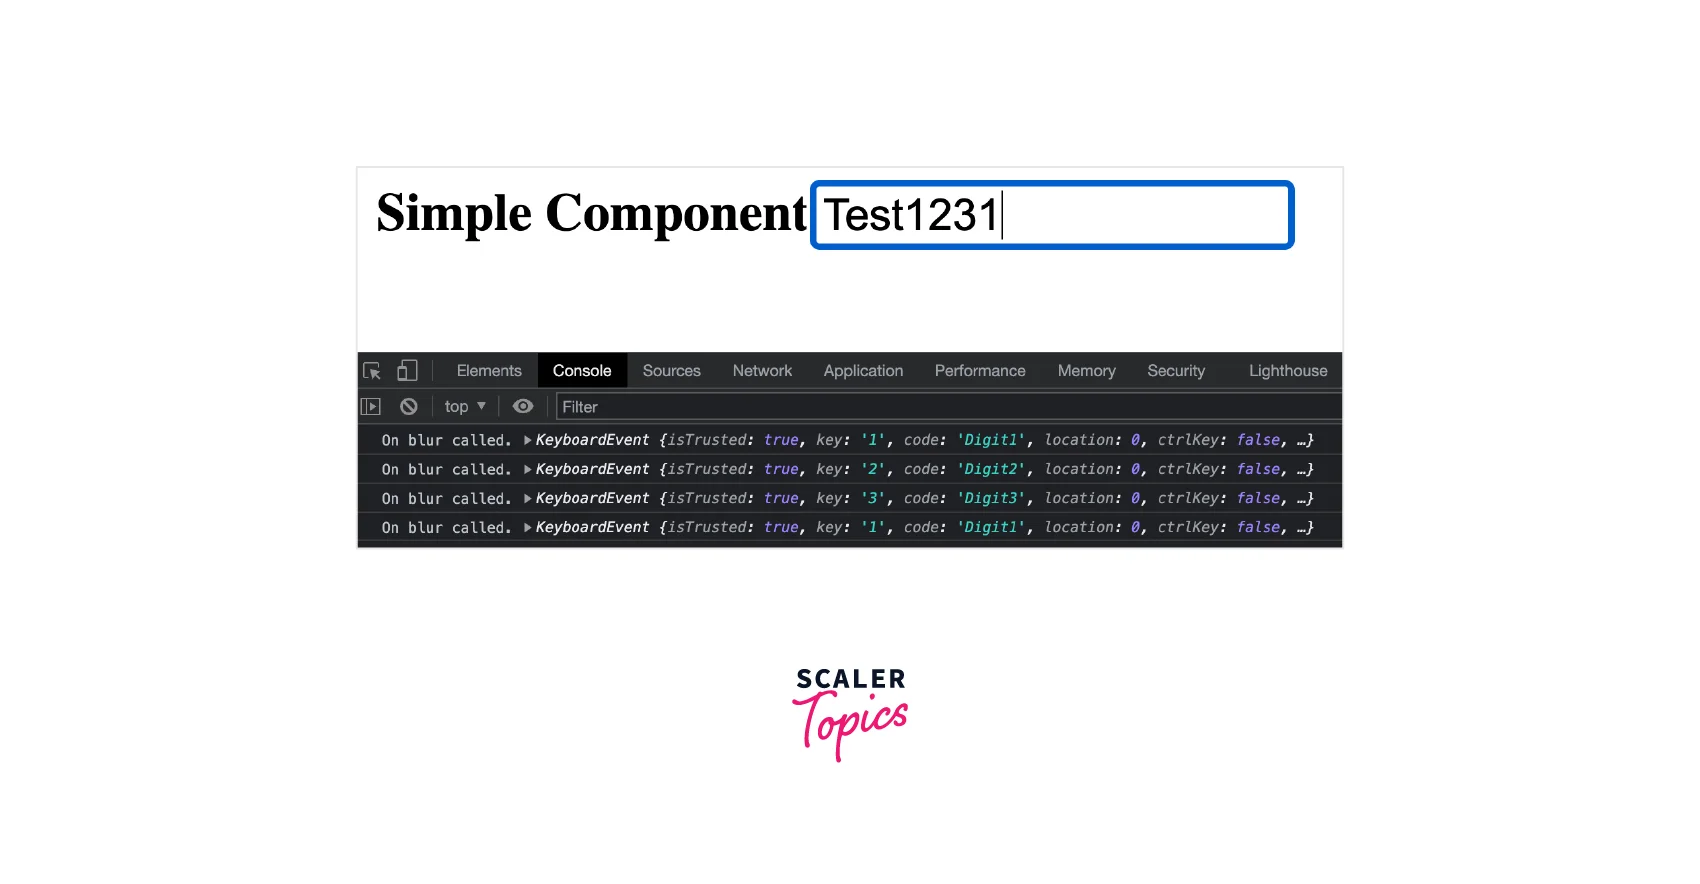
In the above example, we're using the @Input property text of the SimpleComponent class. Passing the same on the element selector using [text]="modelValue". keyup event is attached using (keyup)=onChange(). When the user types in anything in the text box, it triggers a keyup event. That calls the onChange function, which calls the textChange.emit($event) function with the $event parameter.
What is One-Way Binding?
It's a technique of updating model values to the view. We can call it data flows in a single direction (unidirectional). Any updates that happen on the model will reflect to view. Vice versa is not true.
HTML ---> View
What is Two-Way binding?
It's an advanced technique where model value and view simultaneously update if any changes occur in any of them. These updates are seamless and blazing fast.
HTML <---> View
Turn Learning into Career Growth
Syntax: Adding Two-Way Data Binding
- Two-way binding syntax is a combination of ()(event binding) wrapped with [](property binding).
- You can remember the syntax by saying Banana-in-the-box [()]
- The built-in directive for two-way binding is [(ngModel)]
Make sure, you import FormsModule in a NgModule's imports array. If you don't do that you will get an error in the console.
How Two-Way Binding Works
In earlier sections, we have seen how two-way binding in angular can be used. Let's move a bit ahead and spend some time understanding how it exactly works. For that, we will create a custom version of two-way binding, from the knowledge that we have learned so far.
- Use the [value] property binding to populate modelValue on the input element.
ts

Initially, when the page loads, we bind modelValue to the input field. Later we try to update the input box, but it does not reflect in the modelValue printed just above the input box. We can conclude that we're so far consumed one-way binding.
- Use the input event and update modelValue using the $event object.
The initial page which renders is completely fine as we have seen in Step 1. As soon as the user updates the input field, it changes the input value to [object KeyboardEvent]. OH! Something seems wrong here.

Okay, let's understand what is going on. It is emitting KeyboardEvent on each key press. It is called an input function handler, that assigned the $event(generated event) object directly to modelValue. Hence you see this output.
- Consume relevant value from the $event object i.e. $event.target.value.

Fantastic! We've successfully created two-way binding. You may still wonder
- Why this much effort to just achieve two-way bidding?
- Can we do a better job here?
- Why we did not use ngModel?
Okay, focus on the last point. It could provide an answer to all of our doubts.
- Replace [value] with the ngModel directive.
Here ngModel act as a property binding, we've achieved one-way binding.
- Now there is a ngModelChange event, and it triggers when the ngModel value is updated.
The above code will work as expected in step 3. One more thing to notice here is $event object emitted by the ngModelChange event just contains an input value, not an event object.
- Last step - use [(ngModel)] for two binding
Until now it is one-way binding, using property binding we've achieved that.
Now you can see that on changing testValue in input, it refreshes the binding when anything is entered in the input field. These are the optimistic changes that you have to do for using the [(ngModel)] directive.

The resultant of ngModel and ngModelChange is [(ngModel)] and the Change keyword is strikethrough.
Understanding ngModel
ngModel can be used for both one-way and two-way binding. ngModel directive internally keeps an eye on the event, and react to these events when the control value changes. Apart from all these, it also takes care of updating input control validity and state like dirty, pristine, touched, etc. ngModel is massively used in forms. ngModel directive is in charge of all form control elements like input, textarea, select, or custom form control.
Creating Custom Two-way Data Bindings
It is very easy to implement custom two-way binding if you have understood the earlier concepts. When you think of using two-way binding, first, you would think of the [(propertyName)]="name" expression. That's right. But would you develop a two-way binding apart from input form elements?
First, we will look at the code, and then we will take a depth look at it with the help of a diagram of data flow. It helps to update specific element properties.
app.component.ts
simple.component.ts
Awesome! Magical right? But how? That's the question. Don't worry about that, we're going to see how exactly it happened. Take a look at the below diagram.
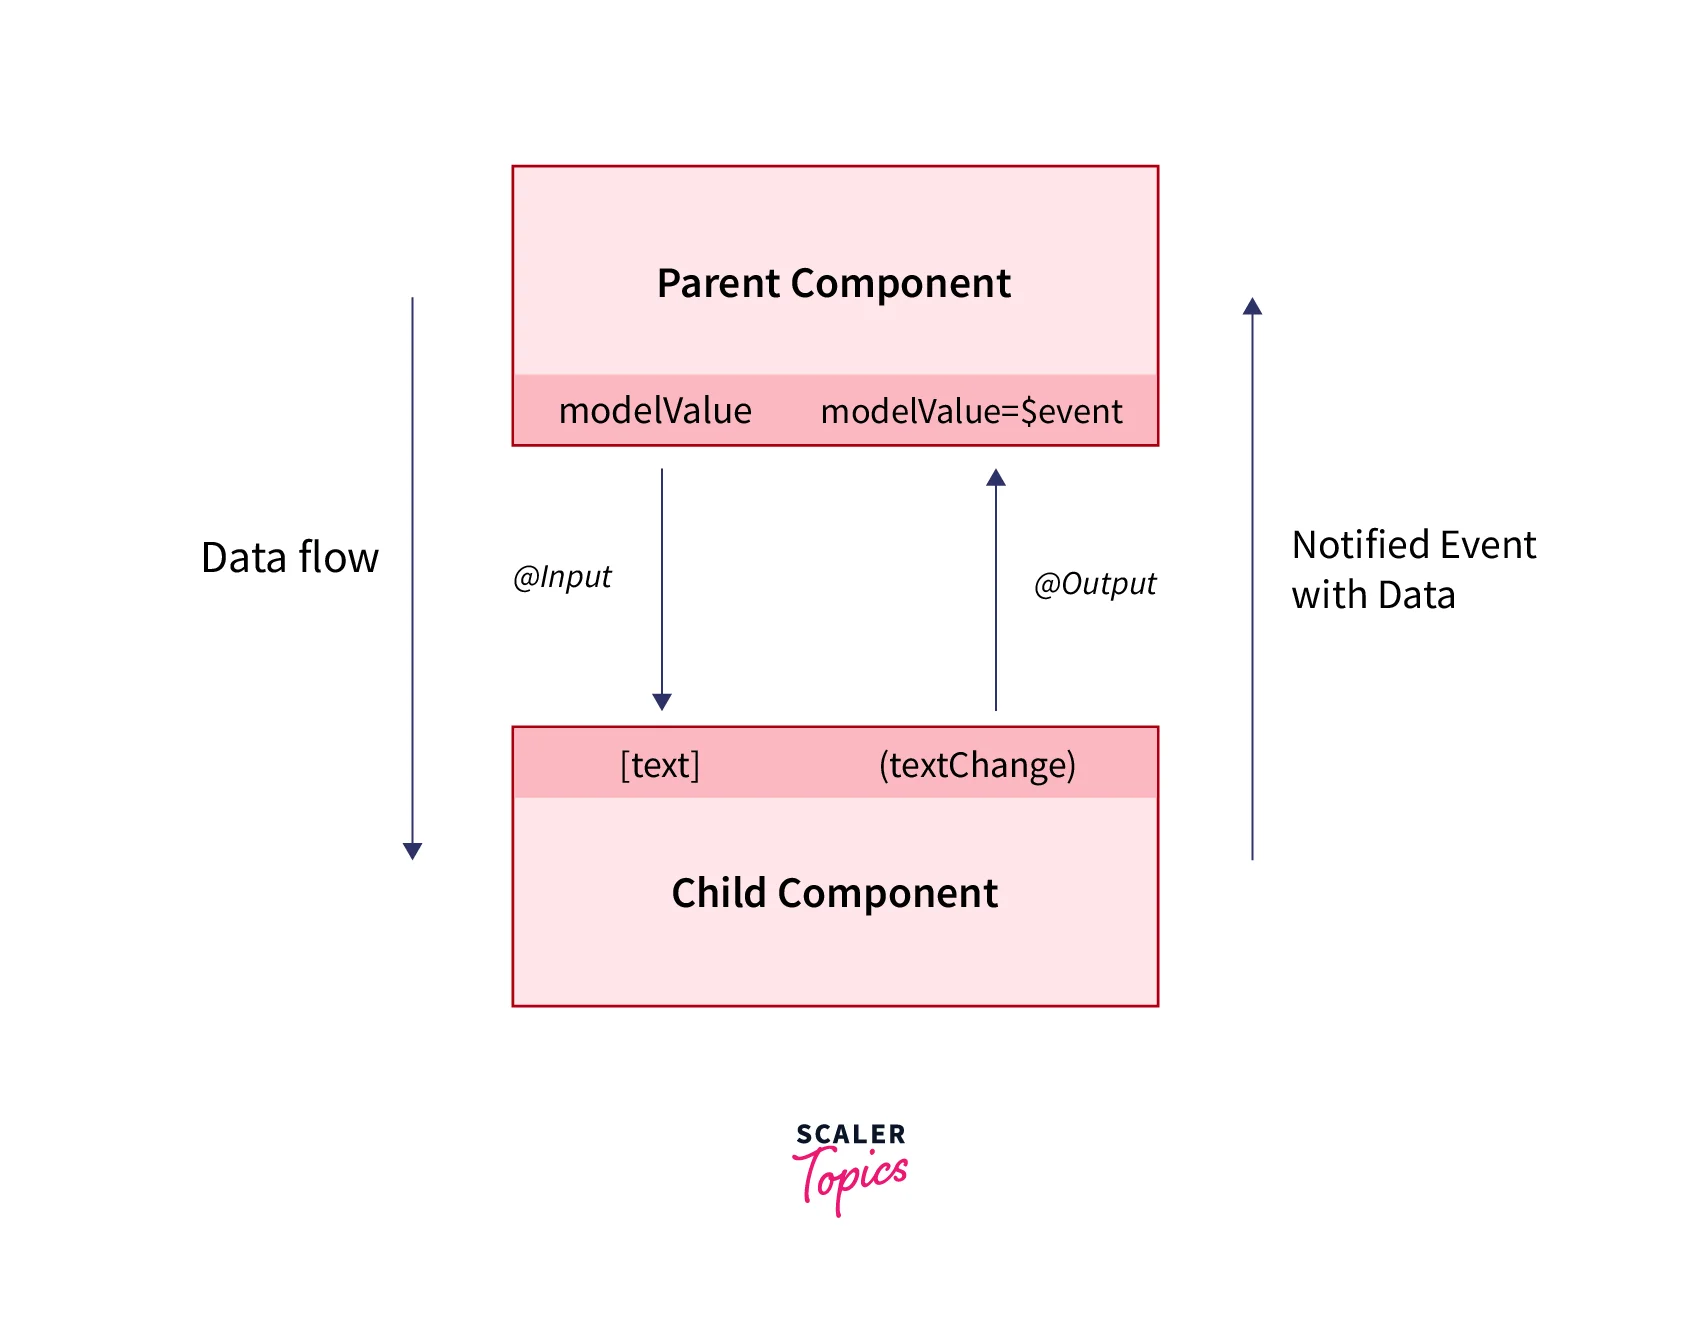
Parent and Child components interact with each other. The data can be passed from top to bottom (aka unidirectional data flow) inside the @Input prop. Consider the @Input prop name as text. The value can be passed like [text]="modelValue".
On the other hand, the child component can react to events. It sends back the data using the @Output prop EventEmitter to the parent component by emitting an event along with data. For eg. the textChange event can be emitted with data i.e. textChange.emit('data') and can be listed by parent component (textChange)=name=$event.
OH WAIT! Isn't this similar to what we have seen just before? Ok, let's apply the same fundamental here:
Thus, the parent component is simply written [(text)]="modelValue" in two-way binding form.
How to Implement Two-way Data Binding in Angular
There are few ways to implement two-way data binding in Angular
- ngModel directive
- Custom two-way binding
- Custom form control
Conclusion
- We have learned what is two way binding in Angular.
- Existing ways to implement and use two-way binding
- How data binding works
- Understanding on ngModel directive.