How to Burn an ISO File to a USB Drive in Linux?
Transform Your Career
Choose from our industry-leading programs designed for career success
Modern Software and AI Engineering Program
Master full-stack development with AI integration

Modern Data Science and ML with specialisation in AI
Advanced data science techniques with AI specialization
Advanced AIML with Specialisation in Agentic AI
Deep dive into AIML with focus on Agentic systems
DevOps, Cloud & AI Platform Engineering
Build and manage AI-powered cloud infrastructure
AI Engineering Advanced Certification by IIT-Roorkee
Premier AI engineering certification from IIT-Roorkee
Introduction
Burning a Linux ISO to a USB, a crucial tech skill, equates to carrying an entire operating system in your pocket. It facilitates the ease of trying out new Linux distributions and is not confined to Linux alone; you can also create bootable Linux USBs from Windows, assisting with Windows troubleshooting.
With this mastery, handling multiple operating systems becomes straightforward. It's not just about portability, which allows you to take your Linux distribution anywhere and use it on any machine.
The real game-changer lies in its convenience of bypassing DVD installation, the potential for data recovery from crashed systems, and the ability to test new versions like Ubuntu or Debian without disturbing the existing setup.
Let's refresh some key terms before learning to burn Linux ISO to USB:
- File Systems:
- They define how an operating system organizes files on a disk or partition.
- Disk Image:
- This is a complete, unaltered file copy from a CD or DVD, including data, file system details, and boot code if present.
- USB Drive:
- A storage device featuring flash memory with an integrated USB interface.
- Bootable USB Drive:
- A type of USB drive designed to boot a computer, loaded with an operating system or a utility program for startup.
- ISO File:
- This archive file contains an exact copy of data from an optical disc like a CD or DVD, used for creating disc backups or distributing large file sets.
- Burning:
- Burning an ISO file involves copying its data onto a USB drive or a CD/DVD, making the data easily retrievable and interpretable by a computer.
Understanding these terms and concepts will help you burn Linux ISO to USB much smoother. In the next section, we will look at the steps involved. Are you excited? I am sure you are!
Burn ISO to USB From Linux Command Line (With Steps)
Before embarking on the task of creating a bootable Linux USB from the command line, there are some requirements you need to ensure:
- USB Drive: Depending on the size of the ISO file, you would typically need a USB drive of at least 4GB.
- Linux ISO File: You'll need the ISO file of the Linux distribution you want to install. Download the ISO file of the required system from the internet.
- Linux System: You need a running Linux system where you will execute the commands.
- Remember to back up your data before starting the process because these tools will erase everything on your USB drive.
Now, let's dive into the step-by-step guide on how to burn Linux ISO to USB using the Linux command line:
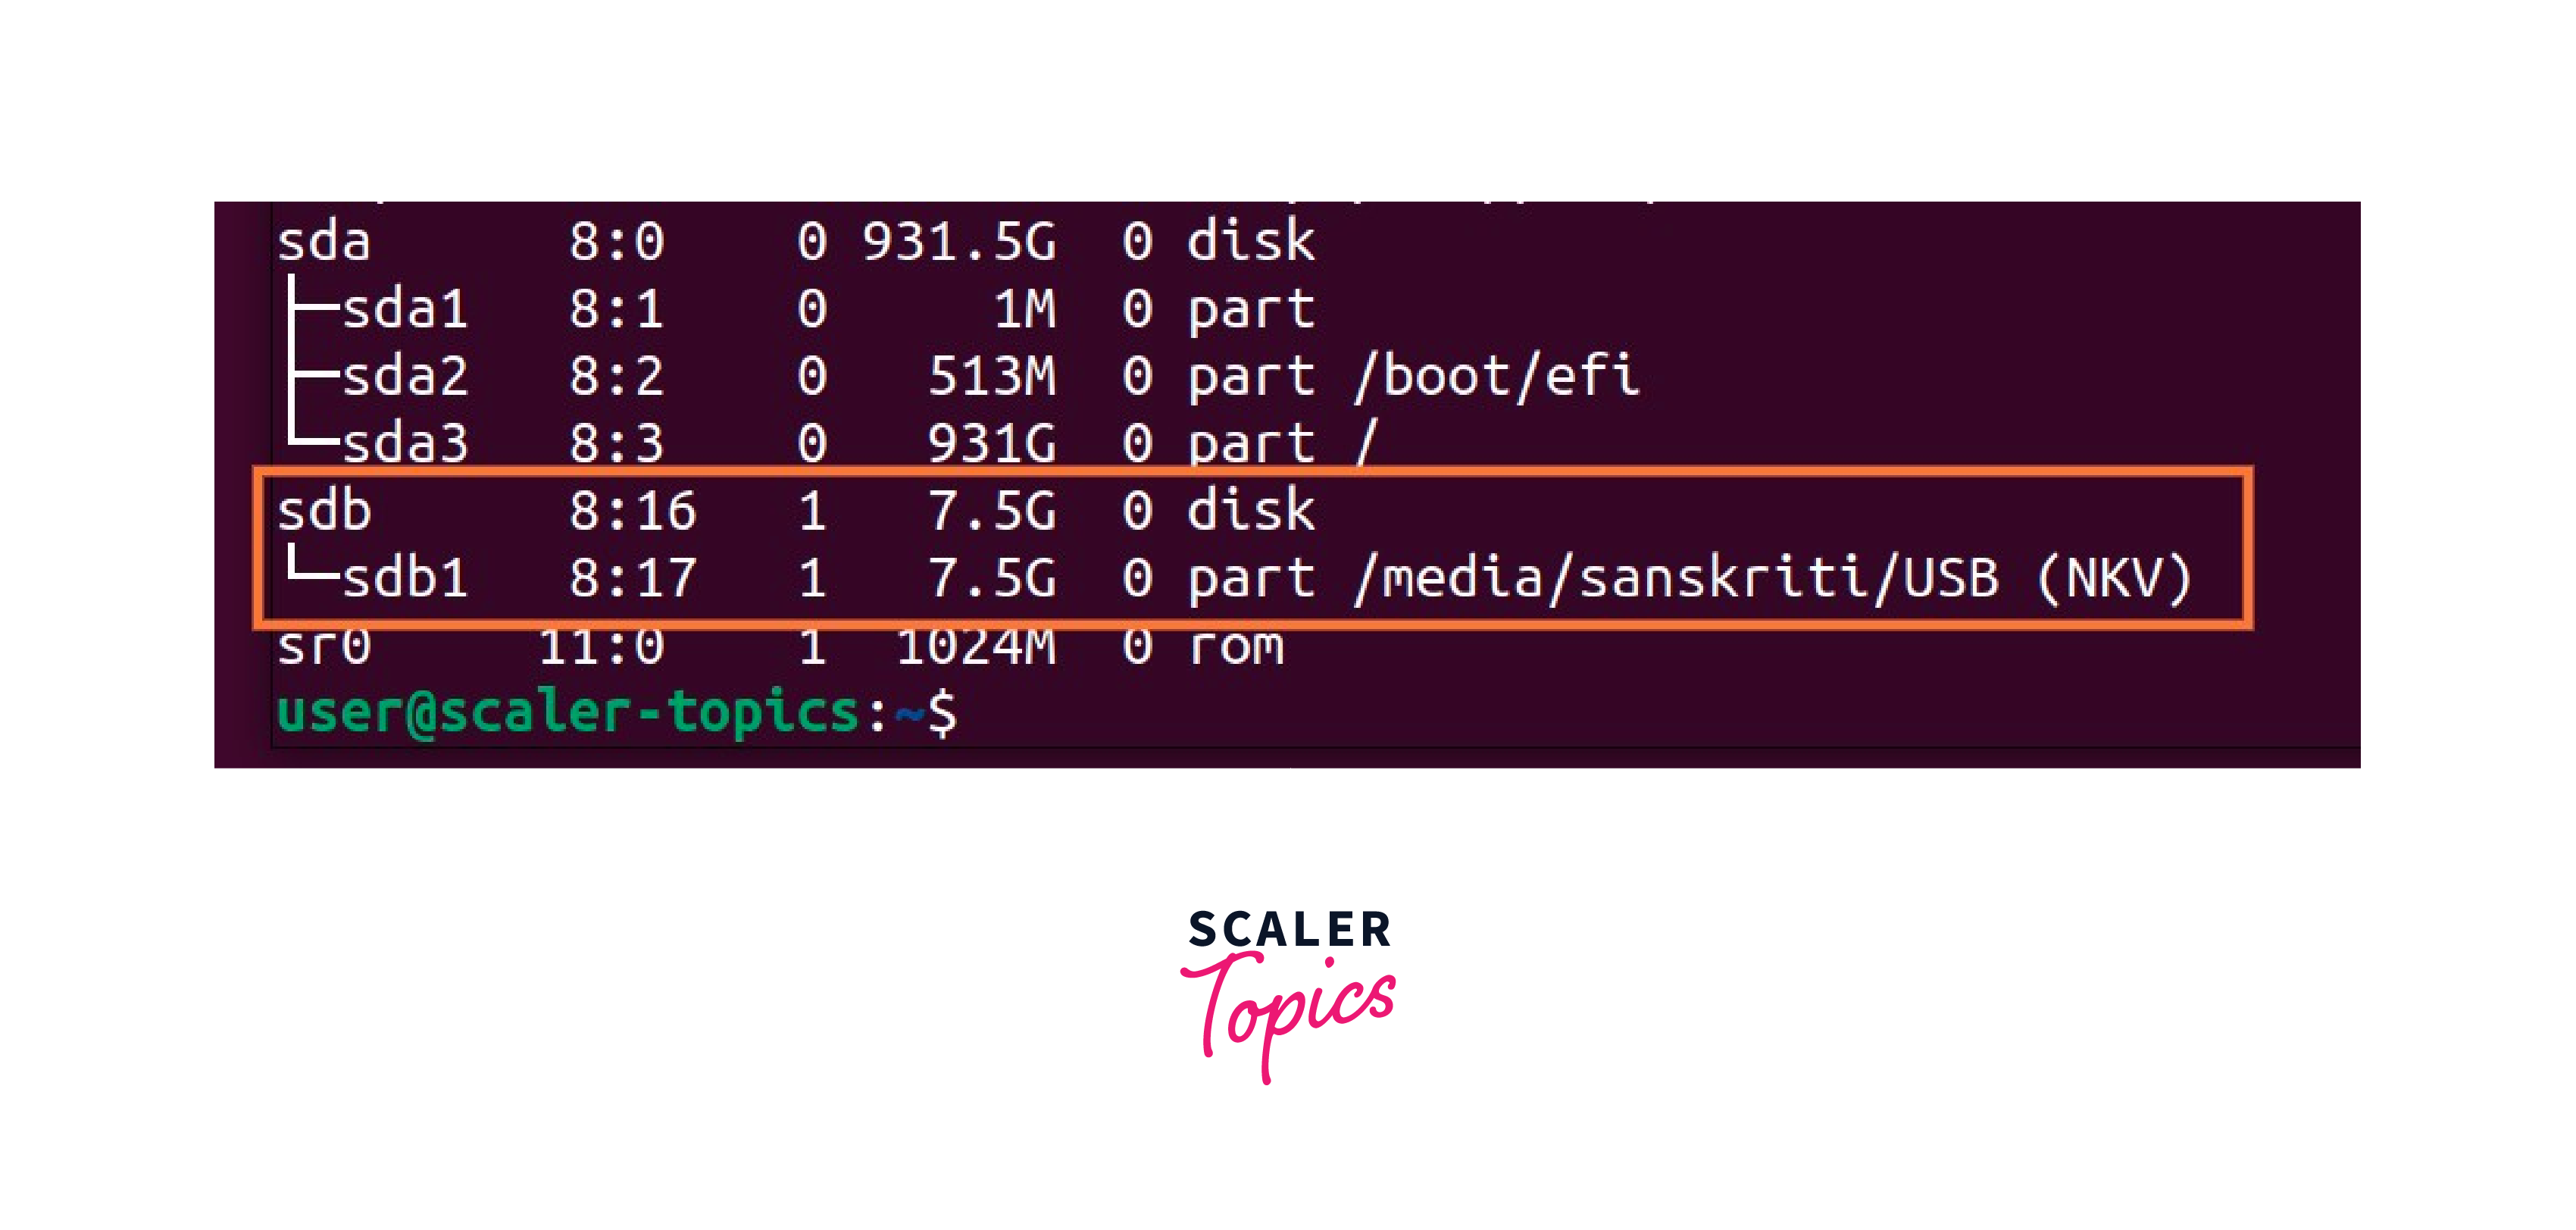
- Identify Your USB Drive
- Plug your USB drive into the computer. Now, open the terminal and type the following command:
- This command lists all block devices and helps identify your USB drive. It's typically named /dev/sdb1 or similar.
- Plug your USB drive into the computer. Now, open the terminal and type the following command:
- Unmount the USB Drive
- Before you start the burning process, unmount the USB drive. Assuming your drive is /dev/sdb1, you would type the below command in the terminal:
- To check if the USB is unmounted, execute the lsblk command again.
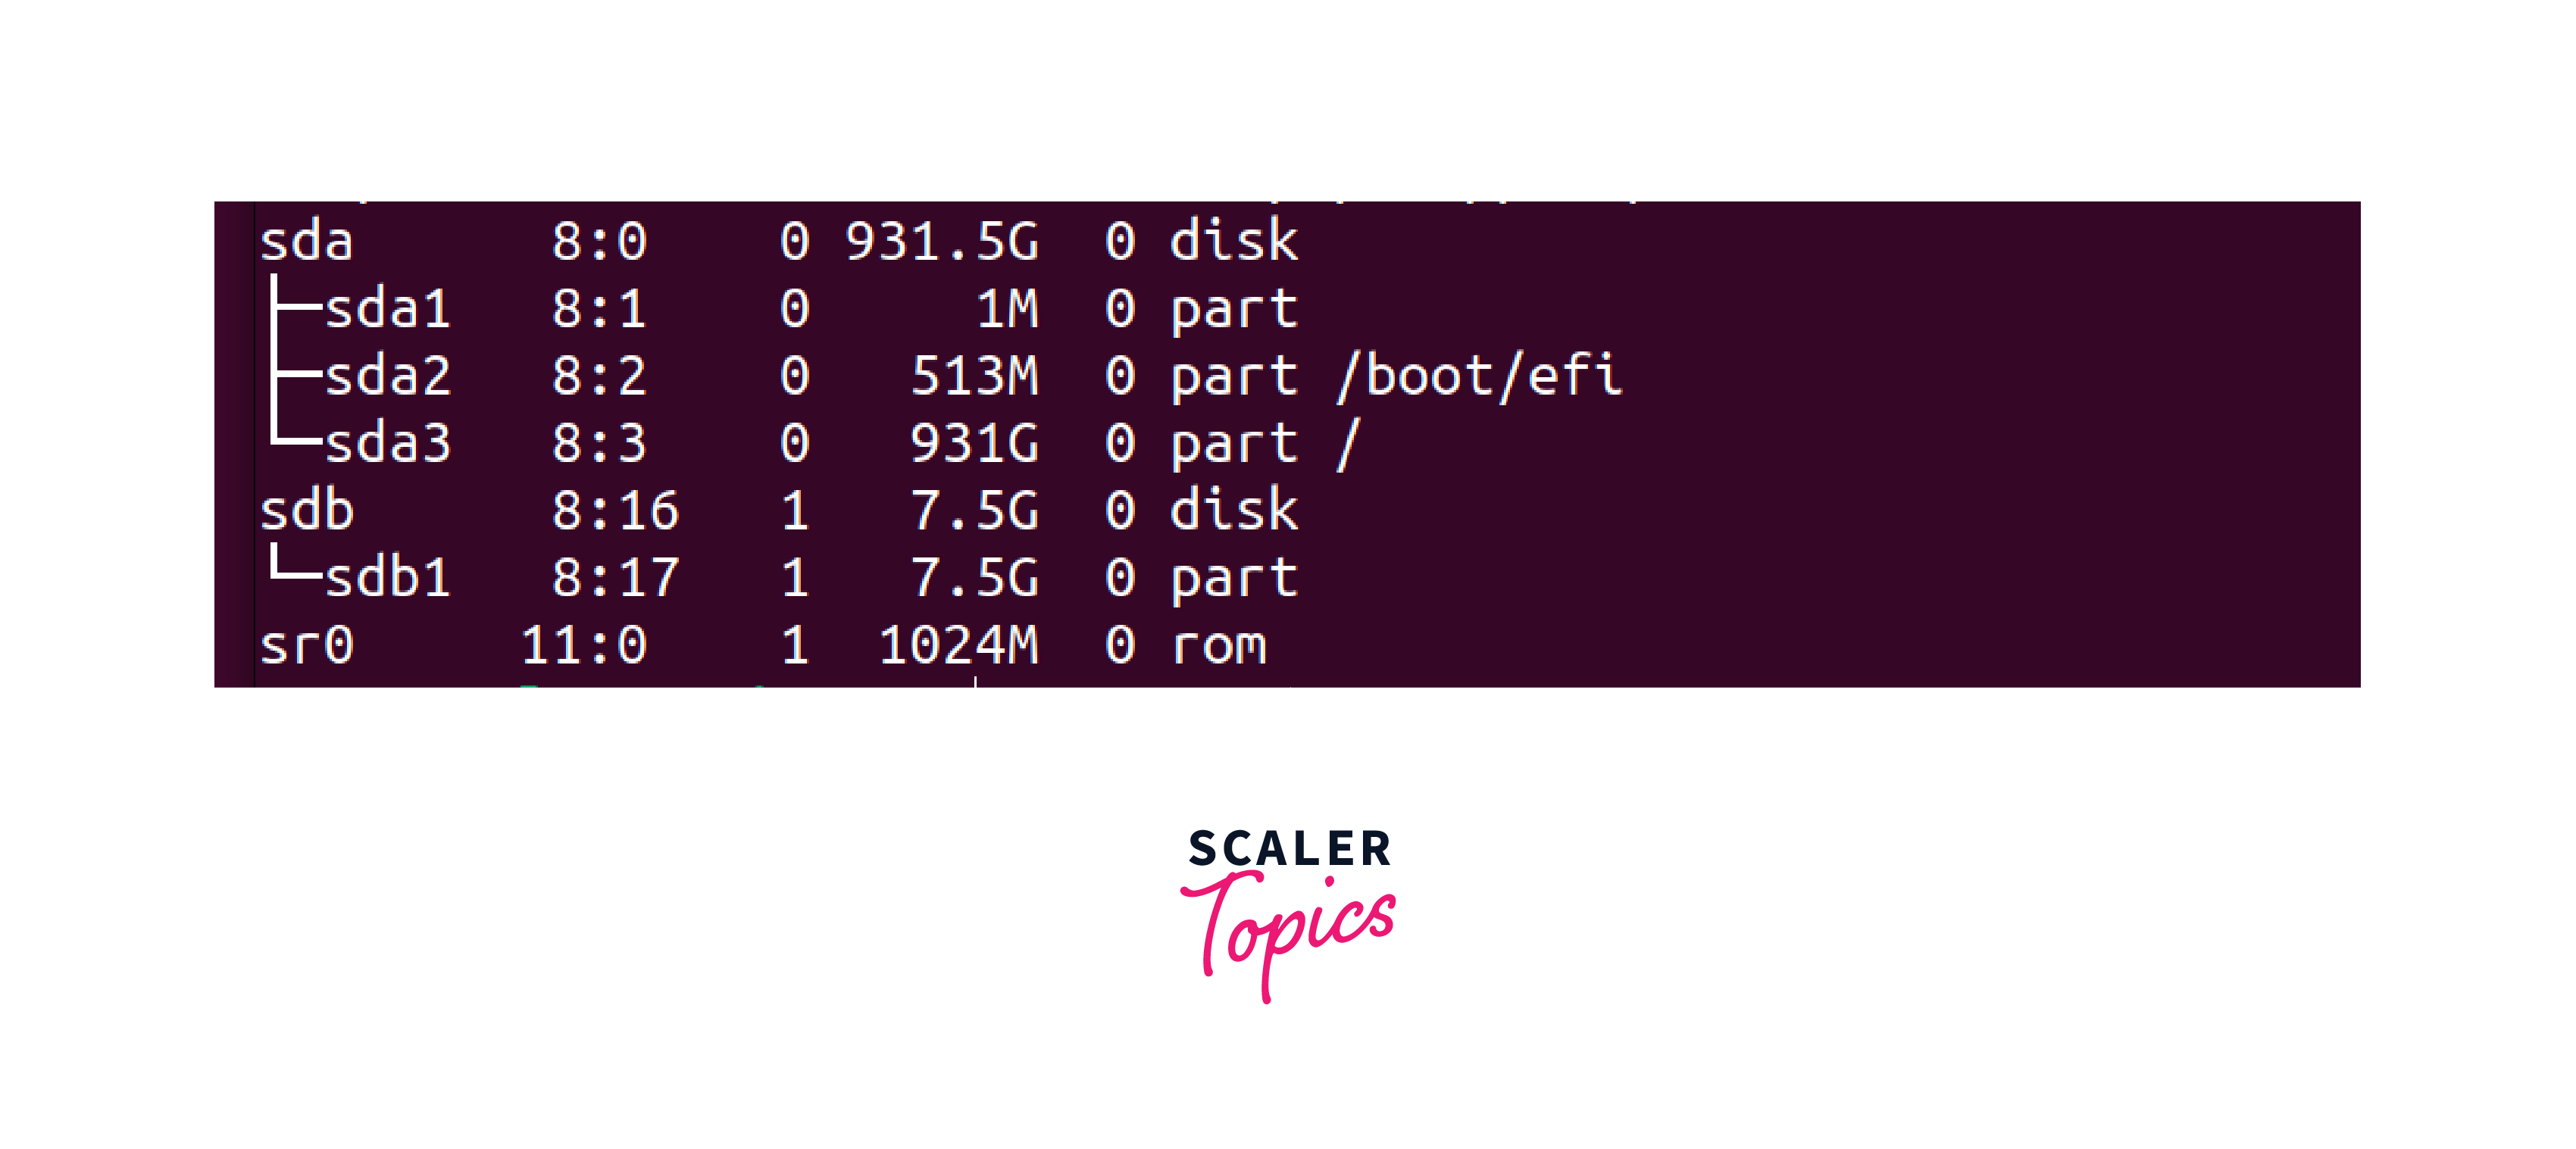
- Before you start the burning process, unmount the USB drive. Assuming your drive is /dev/sdb1, you would type the below command in the terminal:
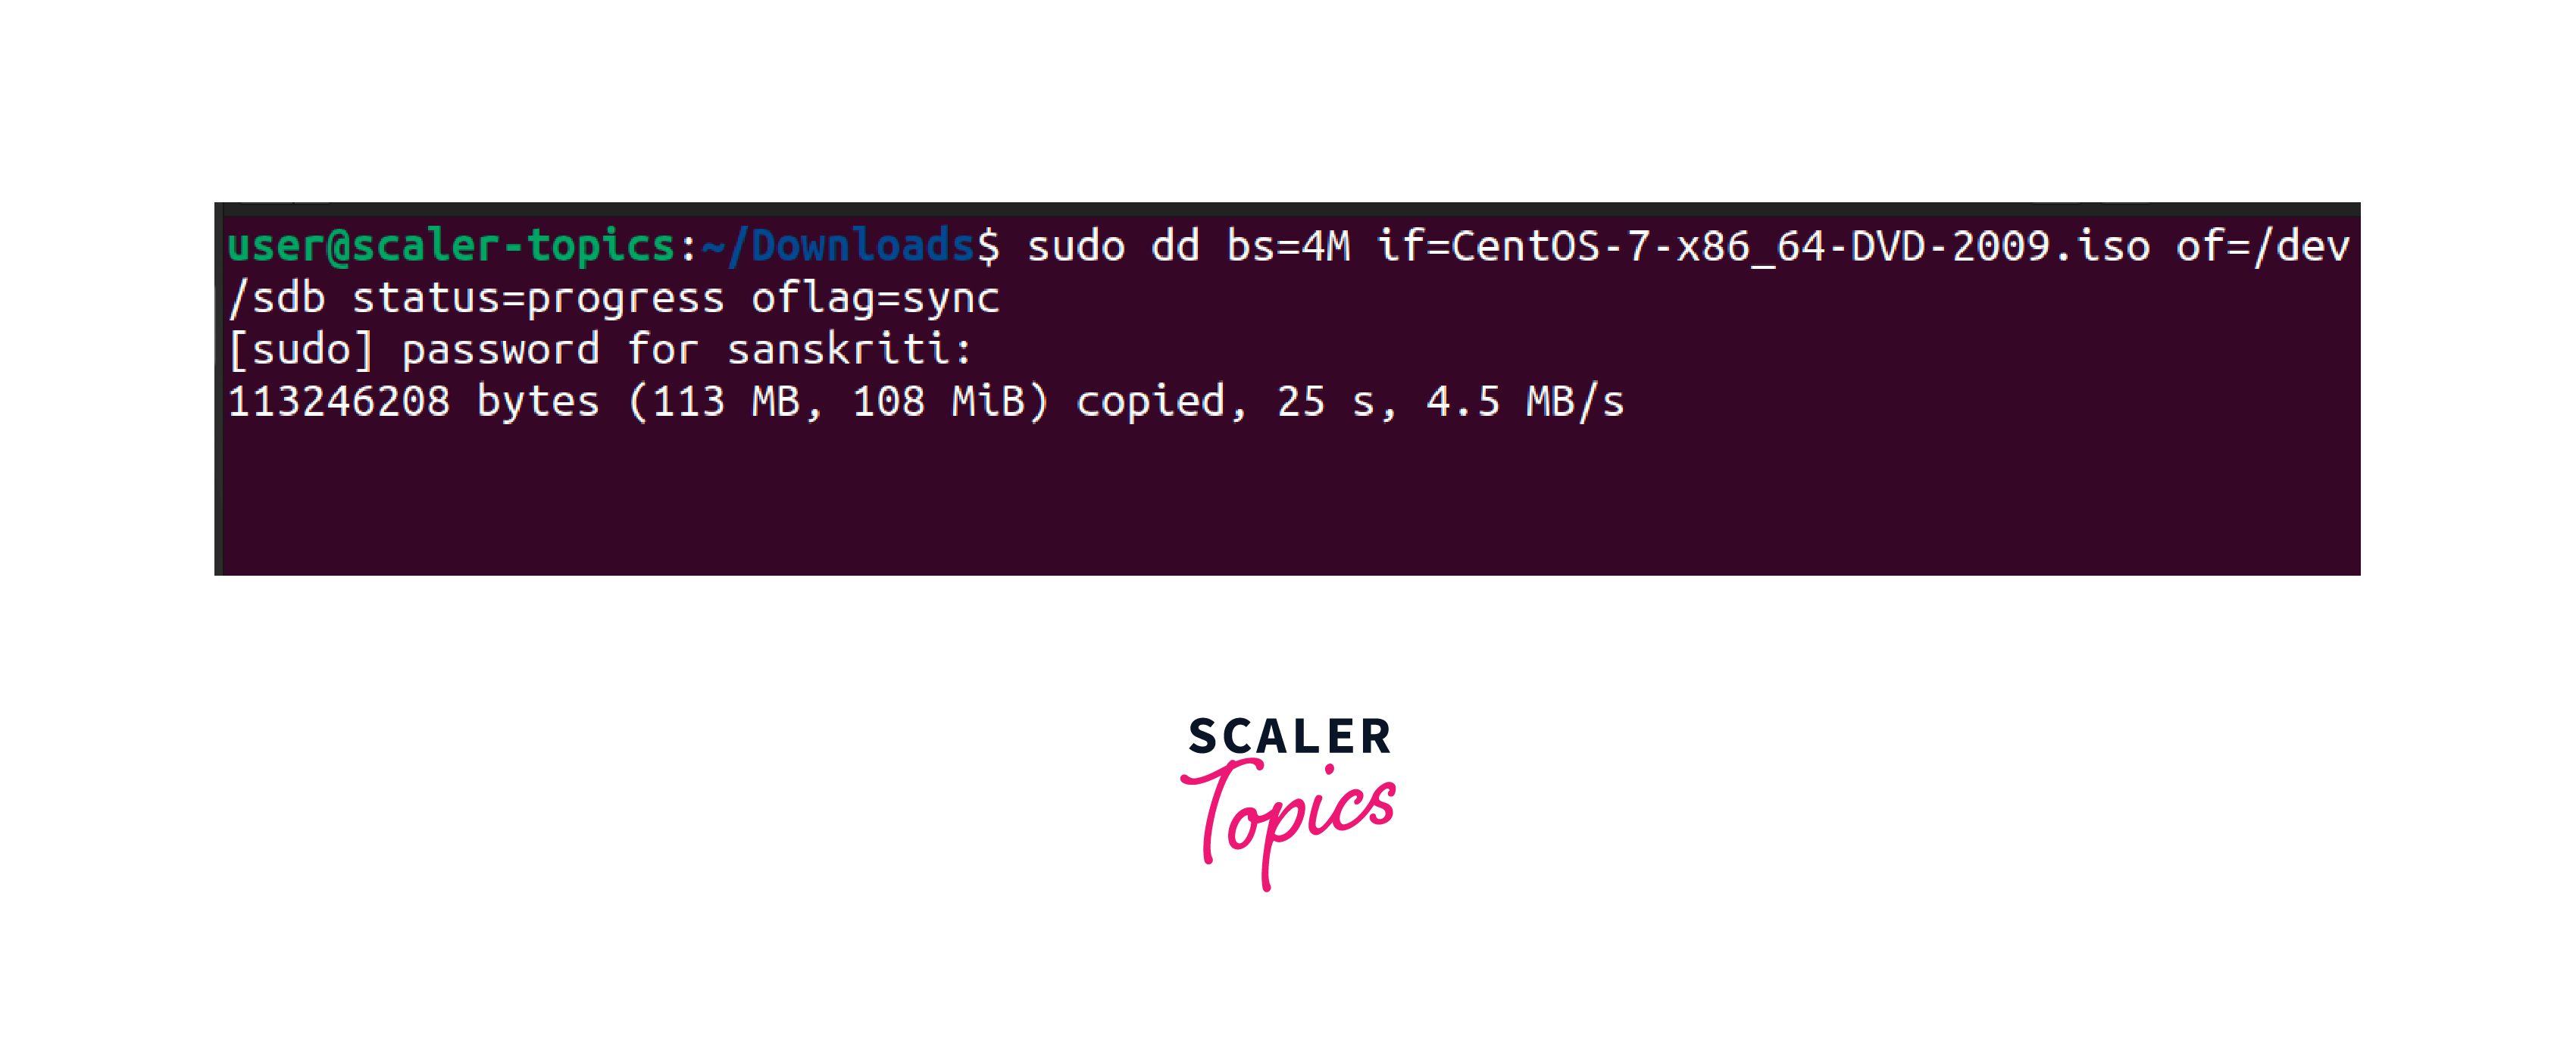
- Burn the ISO to the USB Drive
- Suppose your ISO file is CentOS-7-x86_64-DVD-2009.iso and your USB drive is /dev/sdb.
- Now it's time to burn Linux ISO to a USB drive using the dd command.
- Here's what each part means:
- dd is the command that copies and converts data.
- bs=4M sets the block size to 4MB for efficient data transfer.
- if=linux-distro.iso specifies your ISO file as the input file.
- of=/dev/sdb specifies your USB drive as the output file.
- status=progress shows a progress bar during the process.
- oflag=sync ensures that the command doesn't finish until the USB drive has received all the data successfully.
- Wait for the Process to Complete
- Depending on the size of the ISO file and the speed of your USB drive, this process could take some time. Do not remove the USB drive while this process to burn Linux ISO to USB is ongoing.

- Depending on the size of the ISO file and the speed of your USB drive, this process could take some time. Do not remove the USB drive while this process to burn Linux ISO to USB is ongoing.
- Verify the Bootable USB
- Once the dd command completes, your USB drive should have the burned Linux ISO file on it. You can verify this by exploring the USB drive's contents.
By following the steps discussed above, you have successfully mastered how to burn a Linux ISO to a USB drive using the command line.
Remember to practice caution while using the dd command, as it is powerful and can lead to data loss if not used correctly. Always double-check your drive names and ensure your data is backed up.
Scaler Placement Report and Statistics
Scaler learners achieved 2.5x salary growth with average post-Scaler CTC reaching ₹23L.
Tools to Create Bootable USB from an ISO Image
Creating a bootable USB from an ISO image can be simple with the correct tools, turning it into a breeze.
Here, we'll examine some top tools to burn Linux ISO to a USB drive:
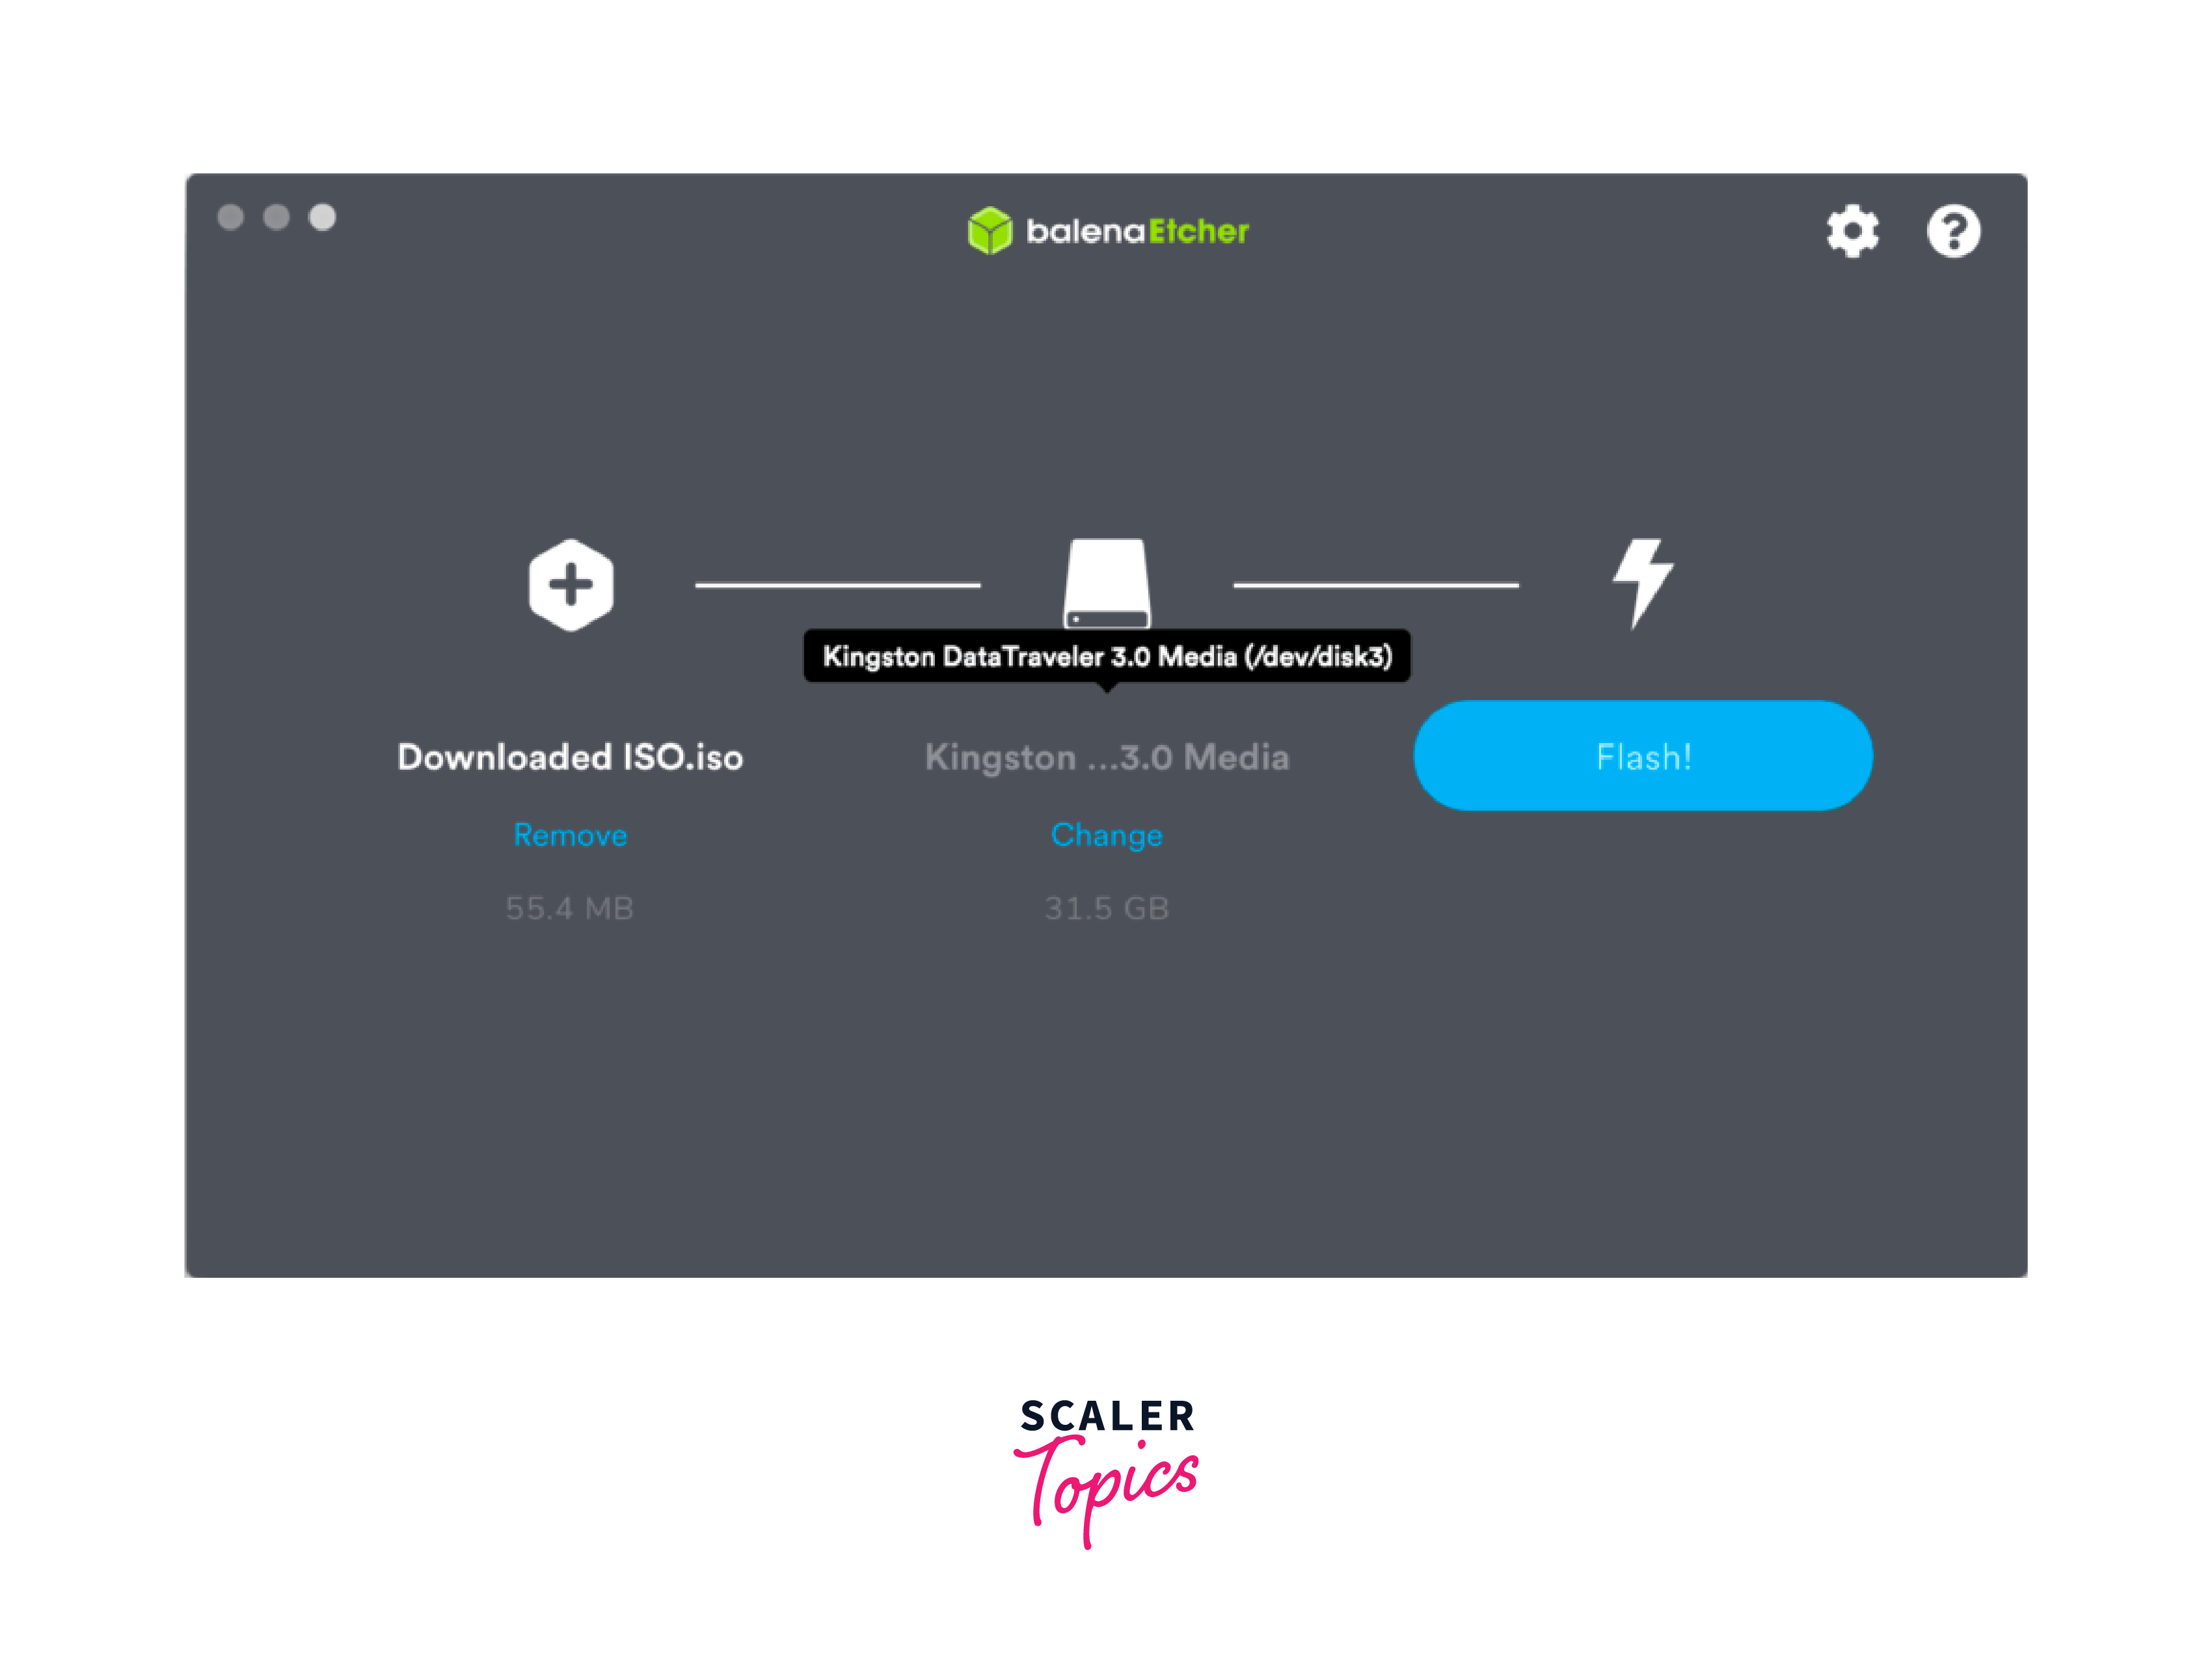
- Etcher:
- Often called the user-friendly star of the bunch, Etcher offers a clean, minimalist interface that's easy to navigate.
- Select your ISO, choose your USB, and hit "Flash!" Etcher does the rest, making it an excellent choice for beginners or those seeking a no-nonsense solution.
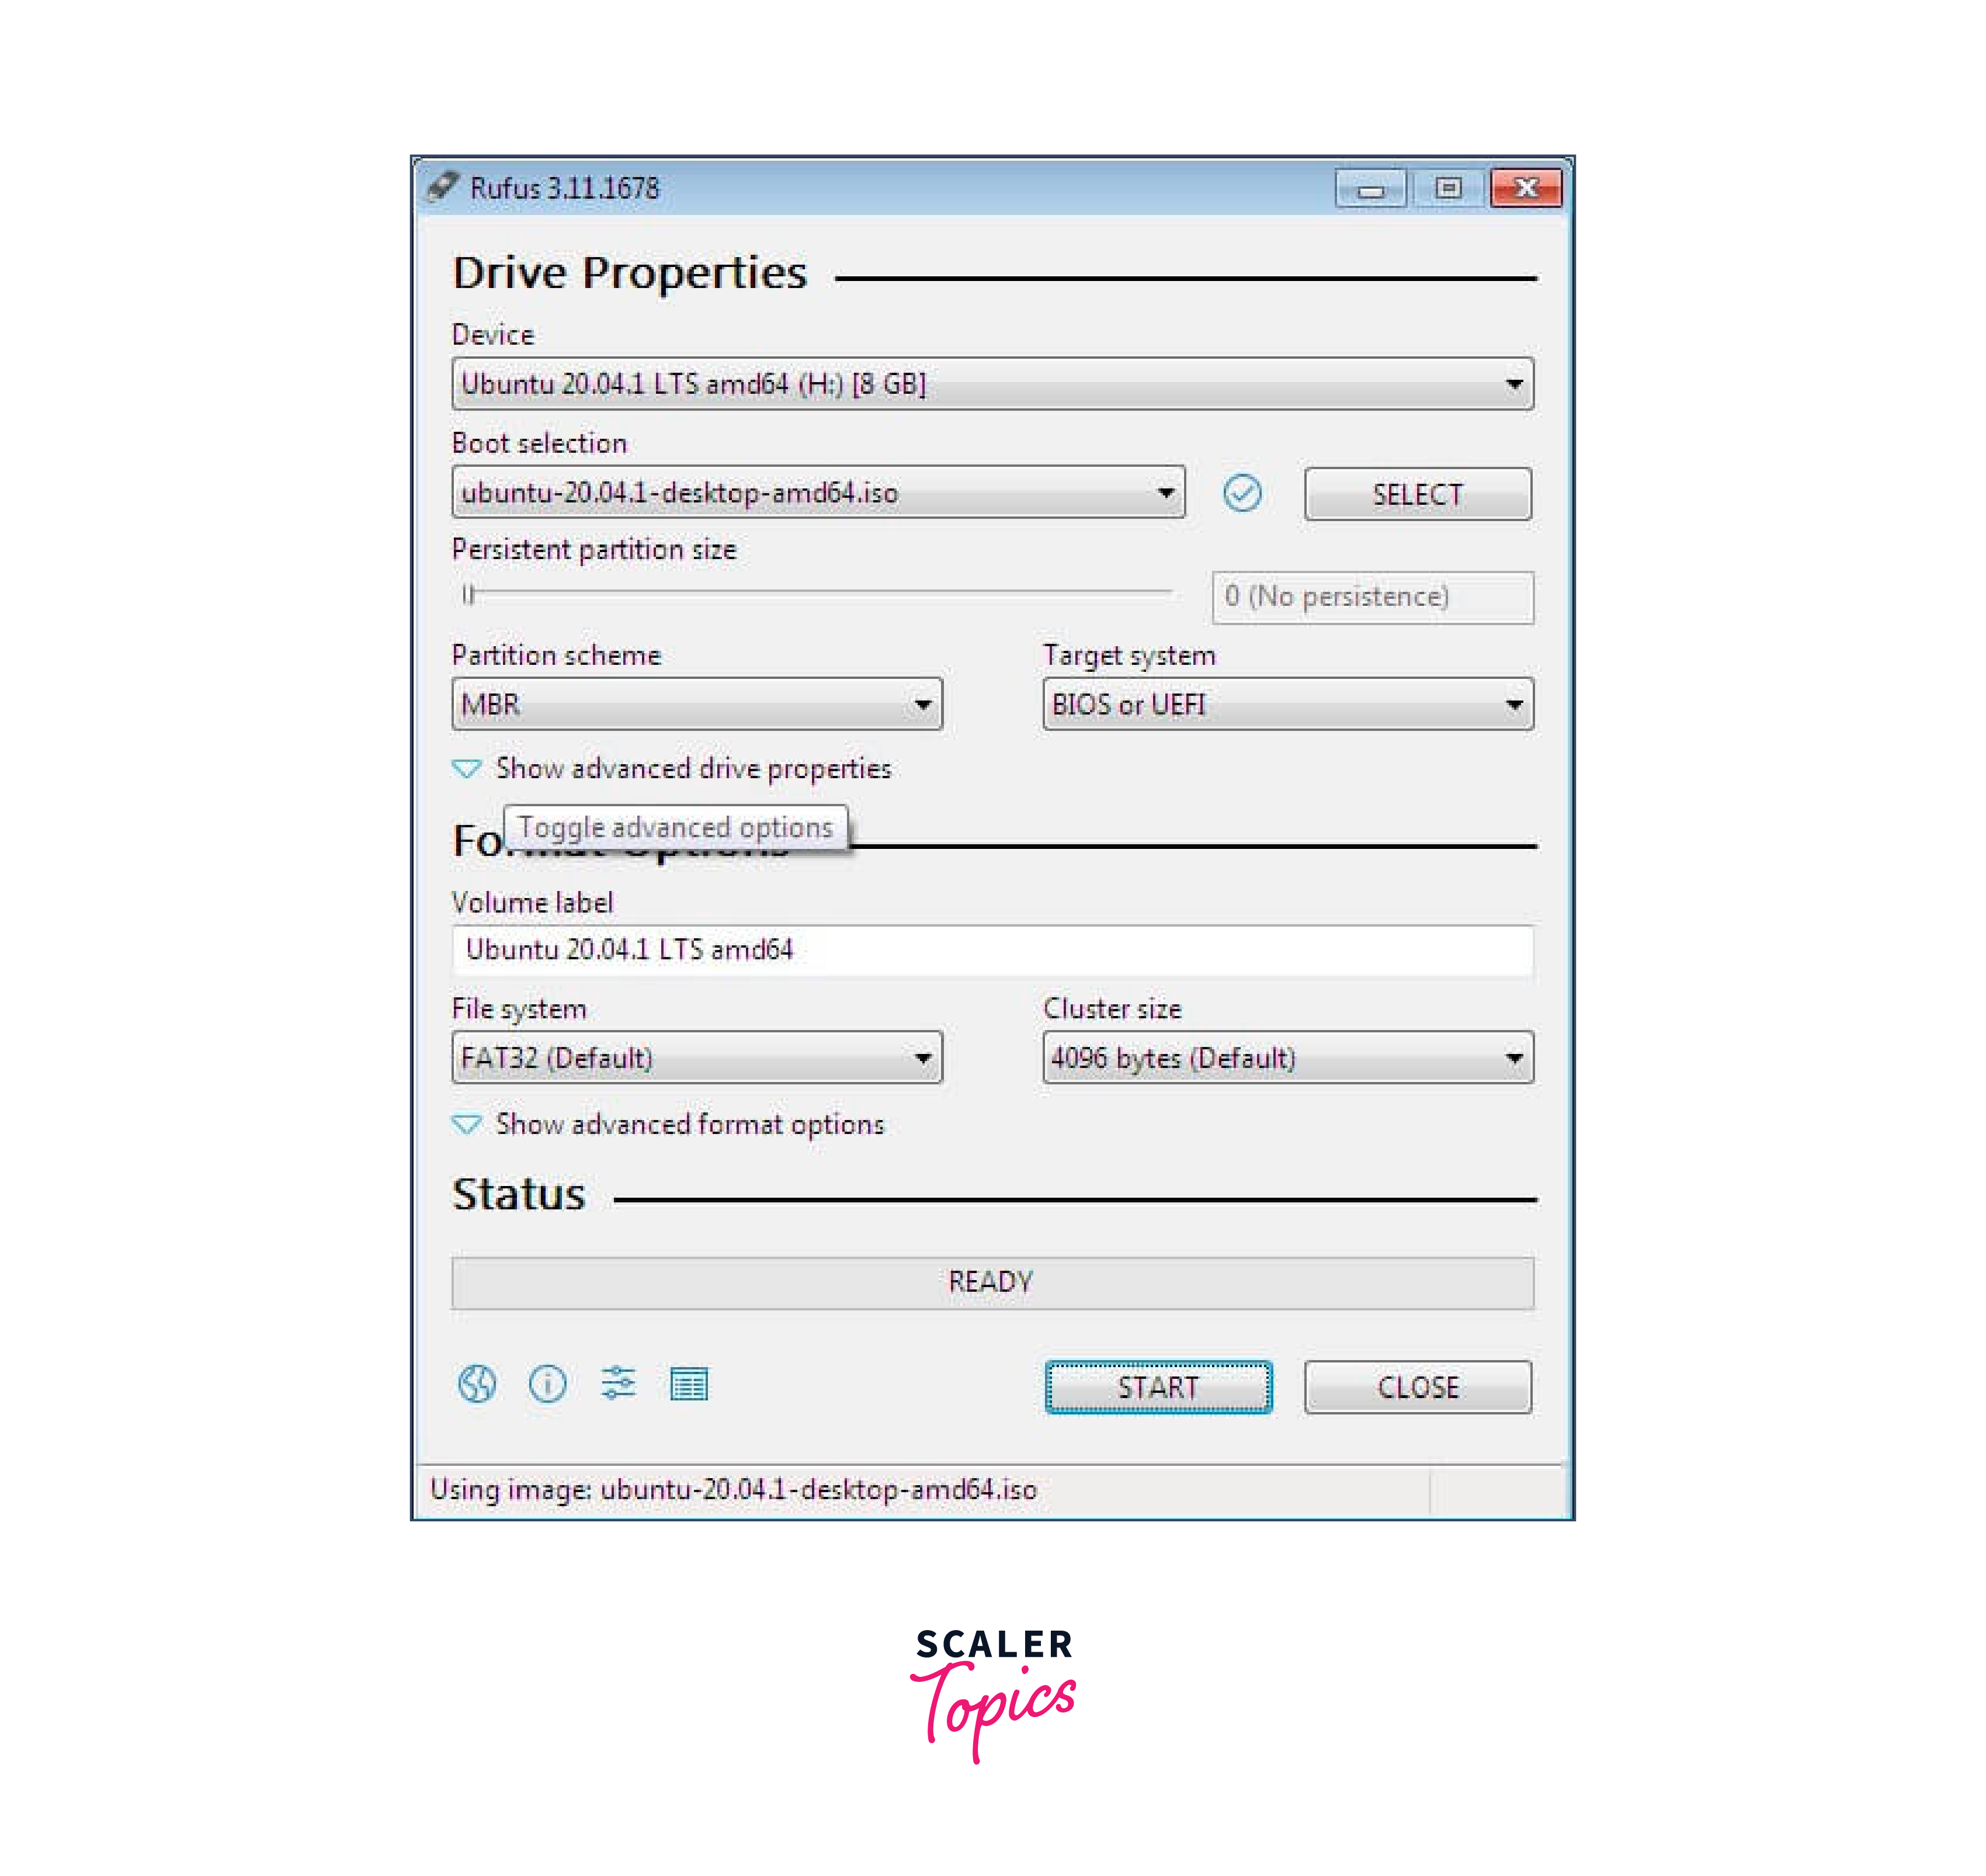
- Rufus:
- Rufus is a free and open-source tool that is available for Windows.
- It is fast and can be used to burn Linux ISO to USB drives from ISO and other types of files.
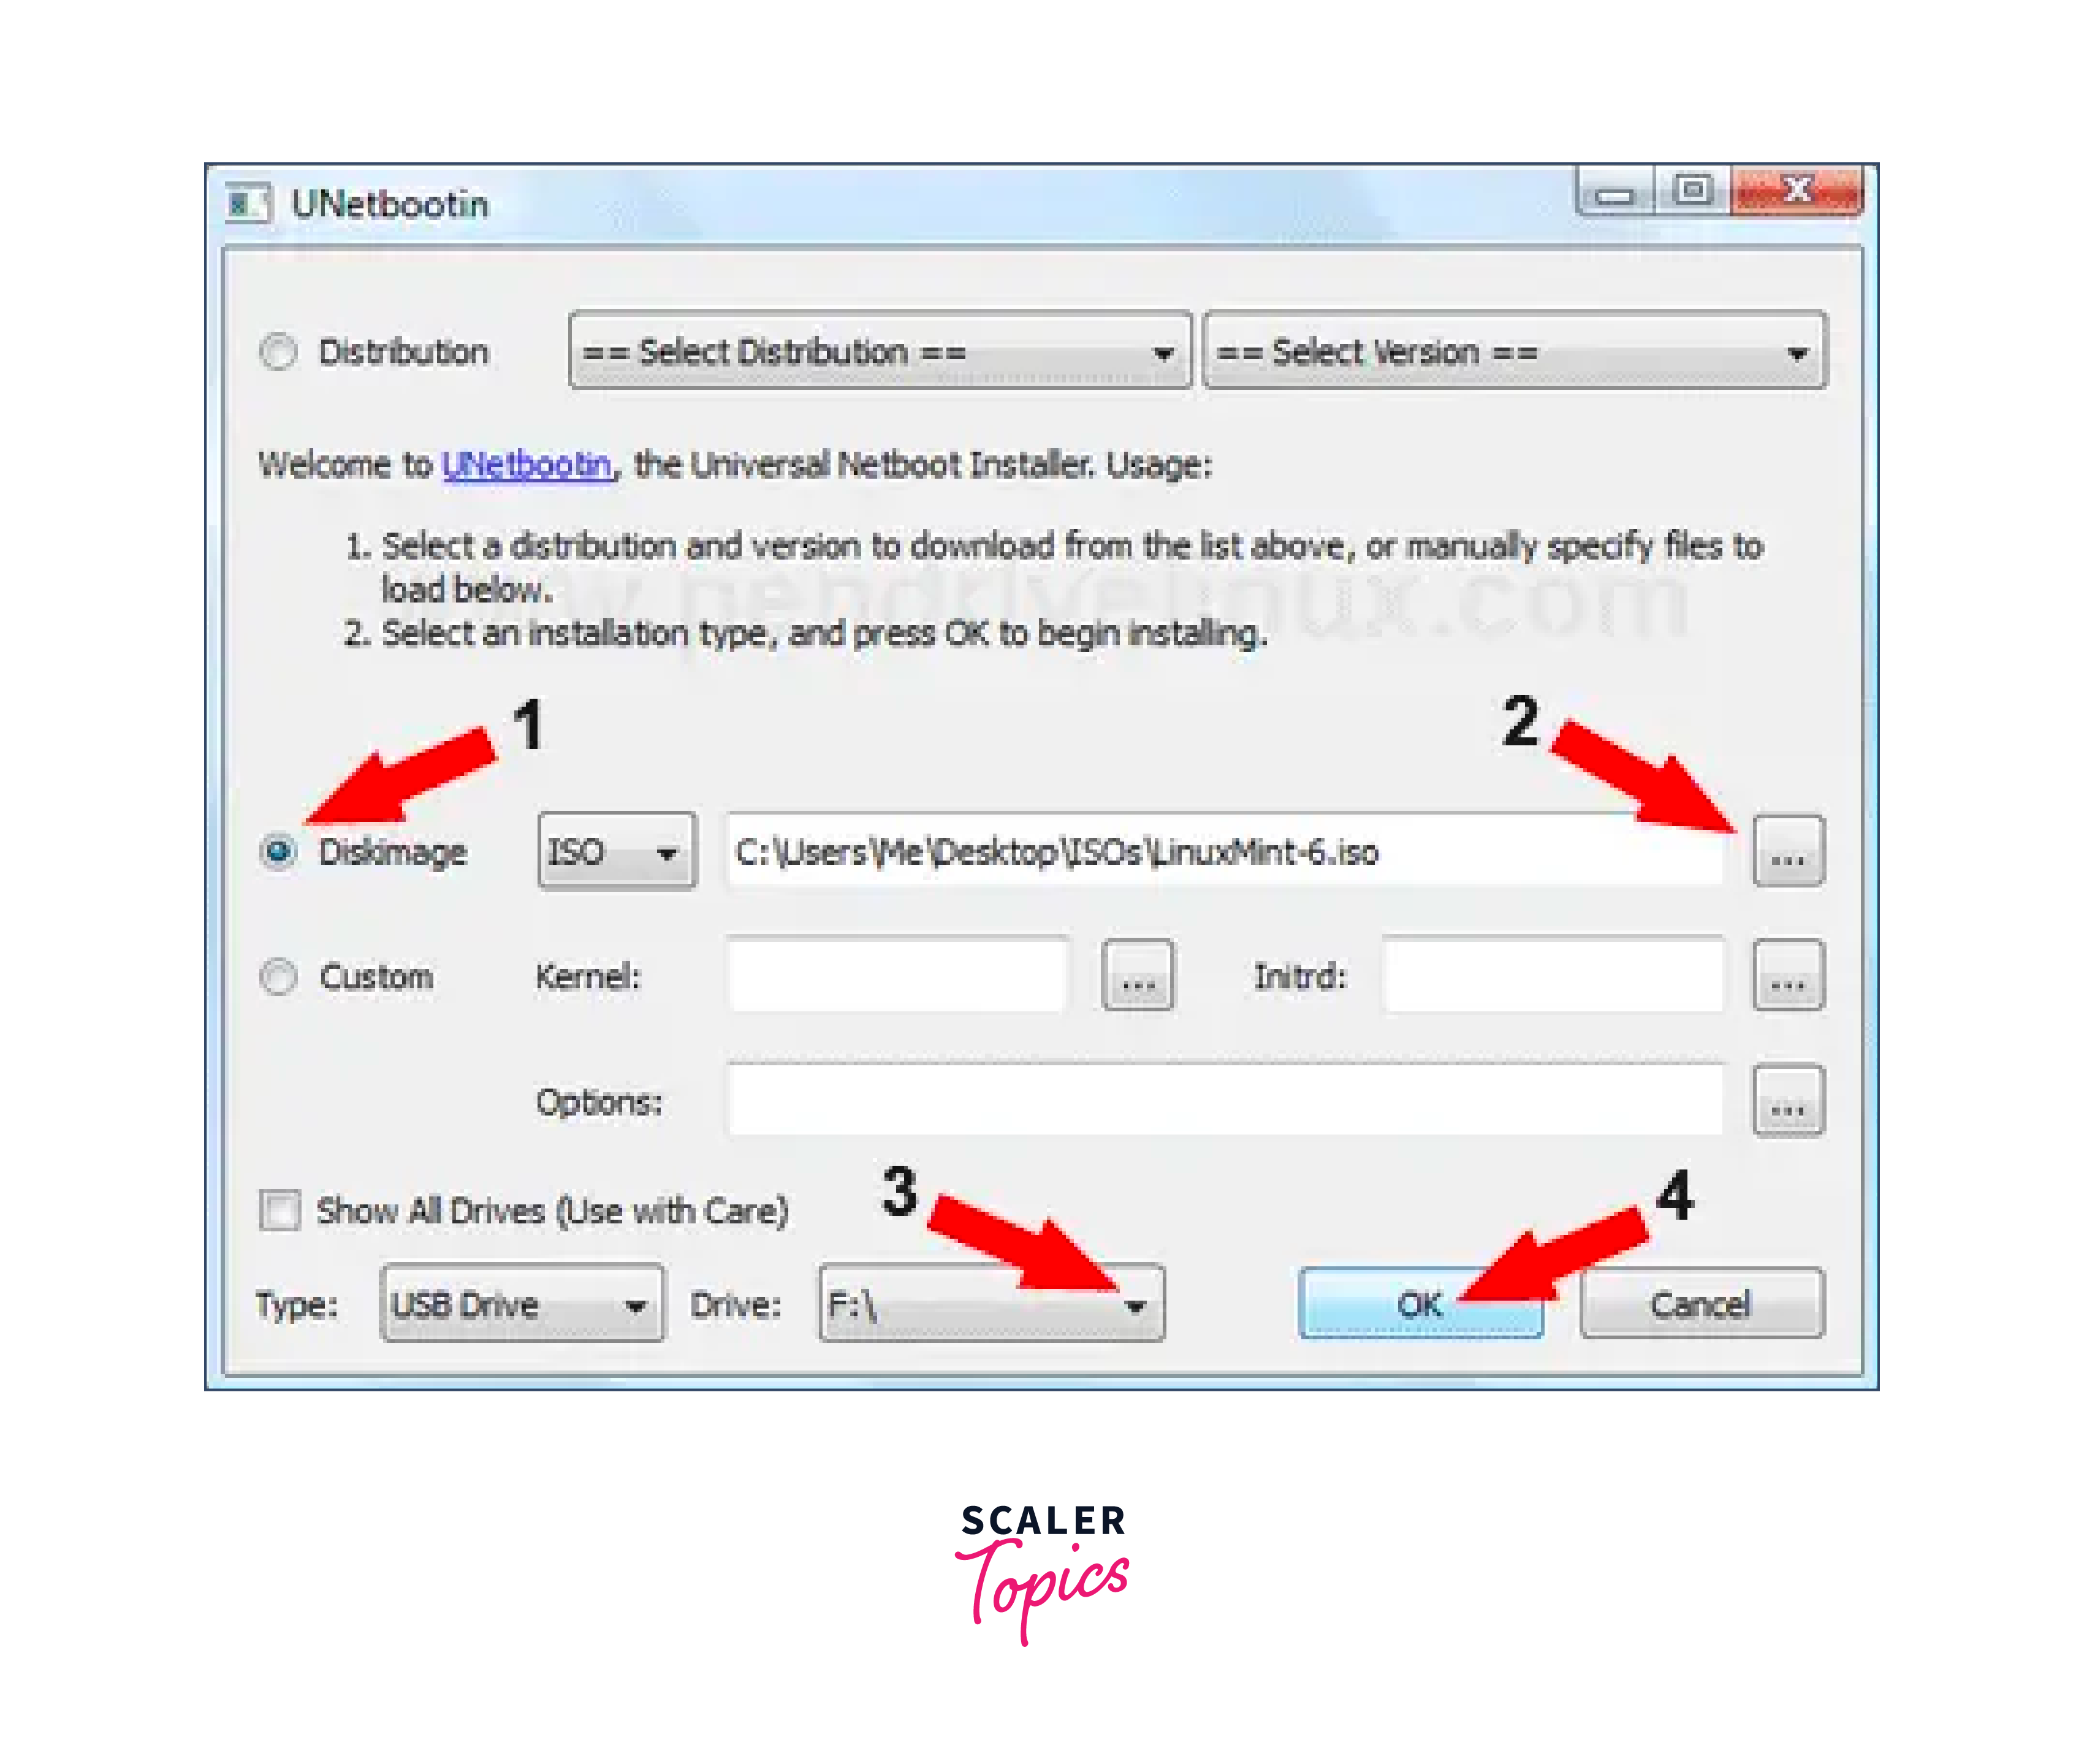
- UNetbootin:
- UNetbootin works well across Windows, Linux, and MacOS. It offers you the ability to download a variety of Linux distributions directly from the application. It's a top choice if convenience is vital for you.
- UNetbootin works well across Windows, Linux, and MacOS. It offers you the ability to download a variety of Linux distributions directly from the application. It's a top choice if convenience is vital for you.
- Fedora Media Writer:
- Fedora Media Writer is a free tool available for Windows and macOS. It creates bootable USB drives from Fedora ISO files.
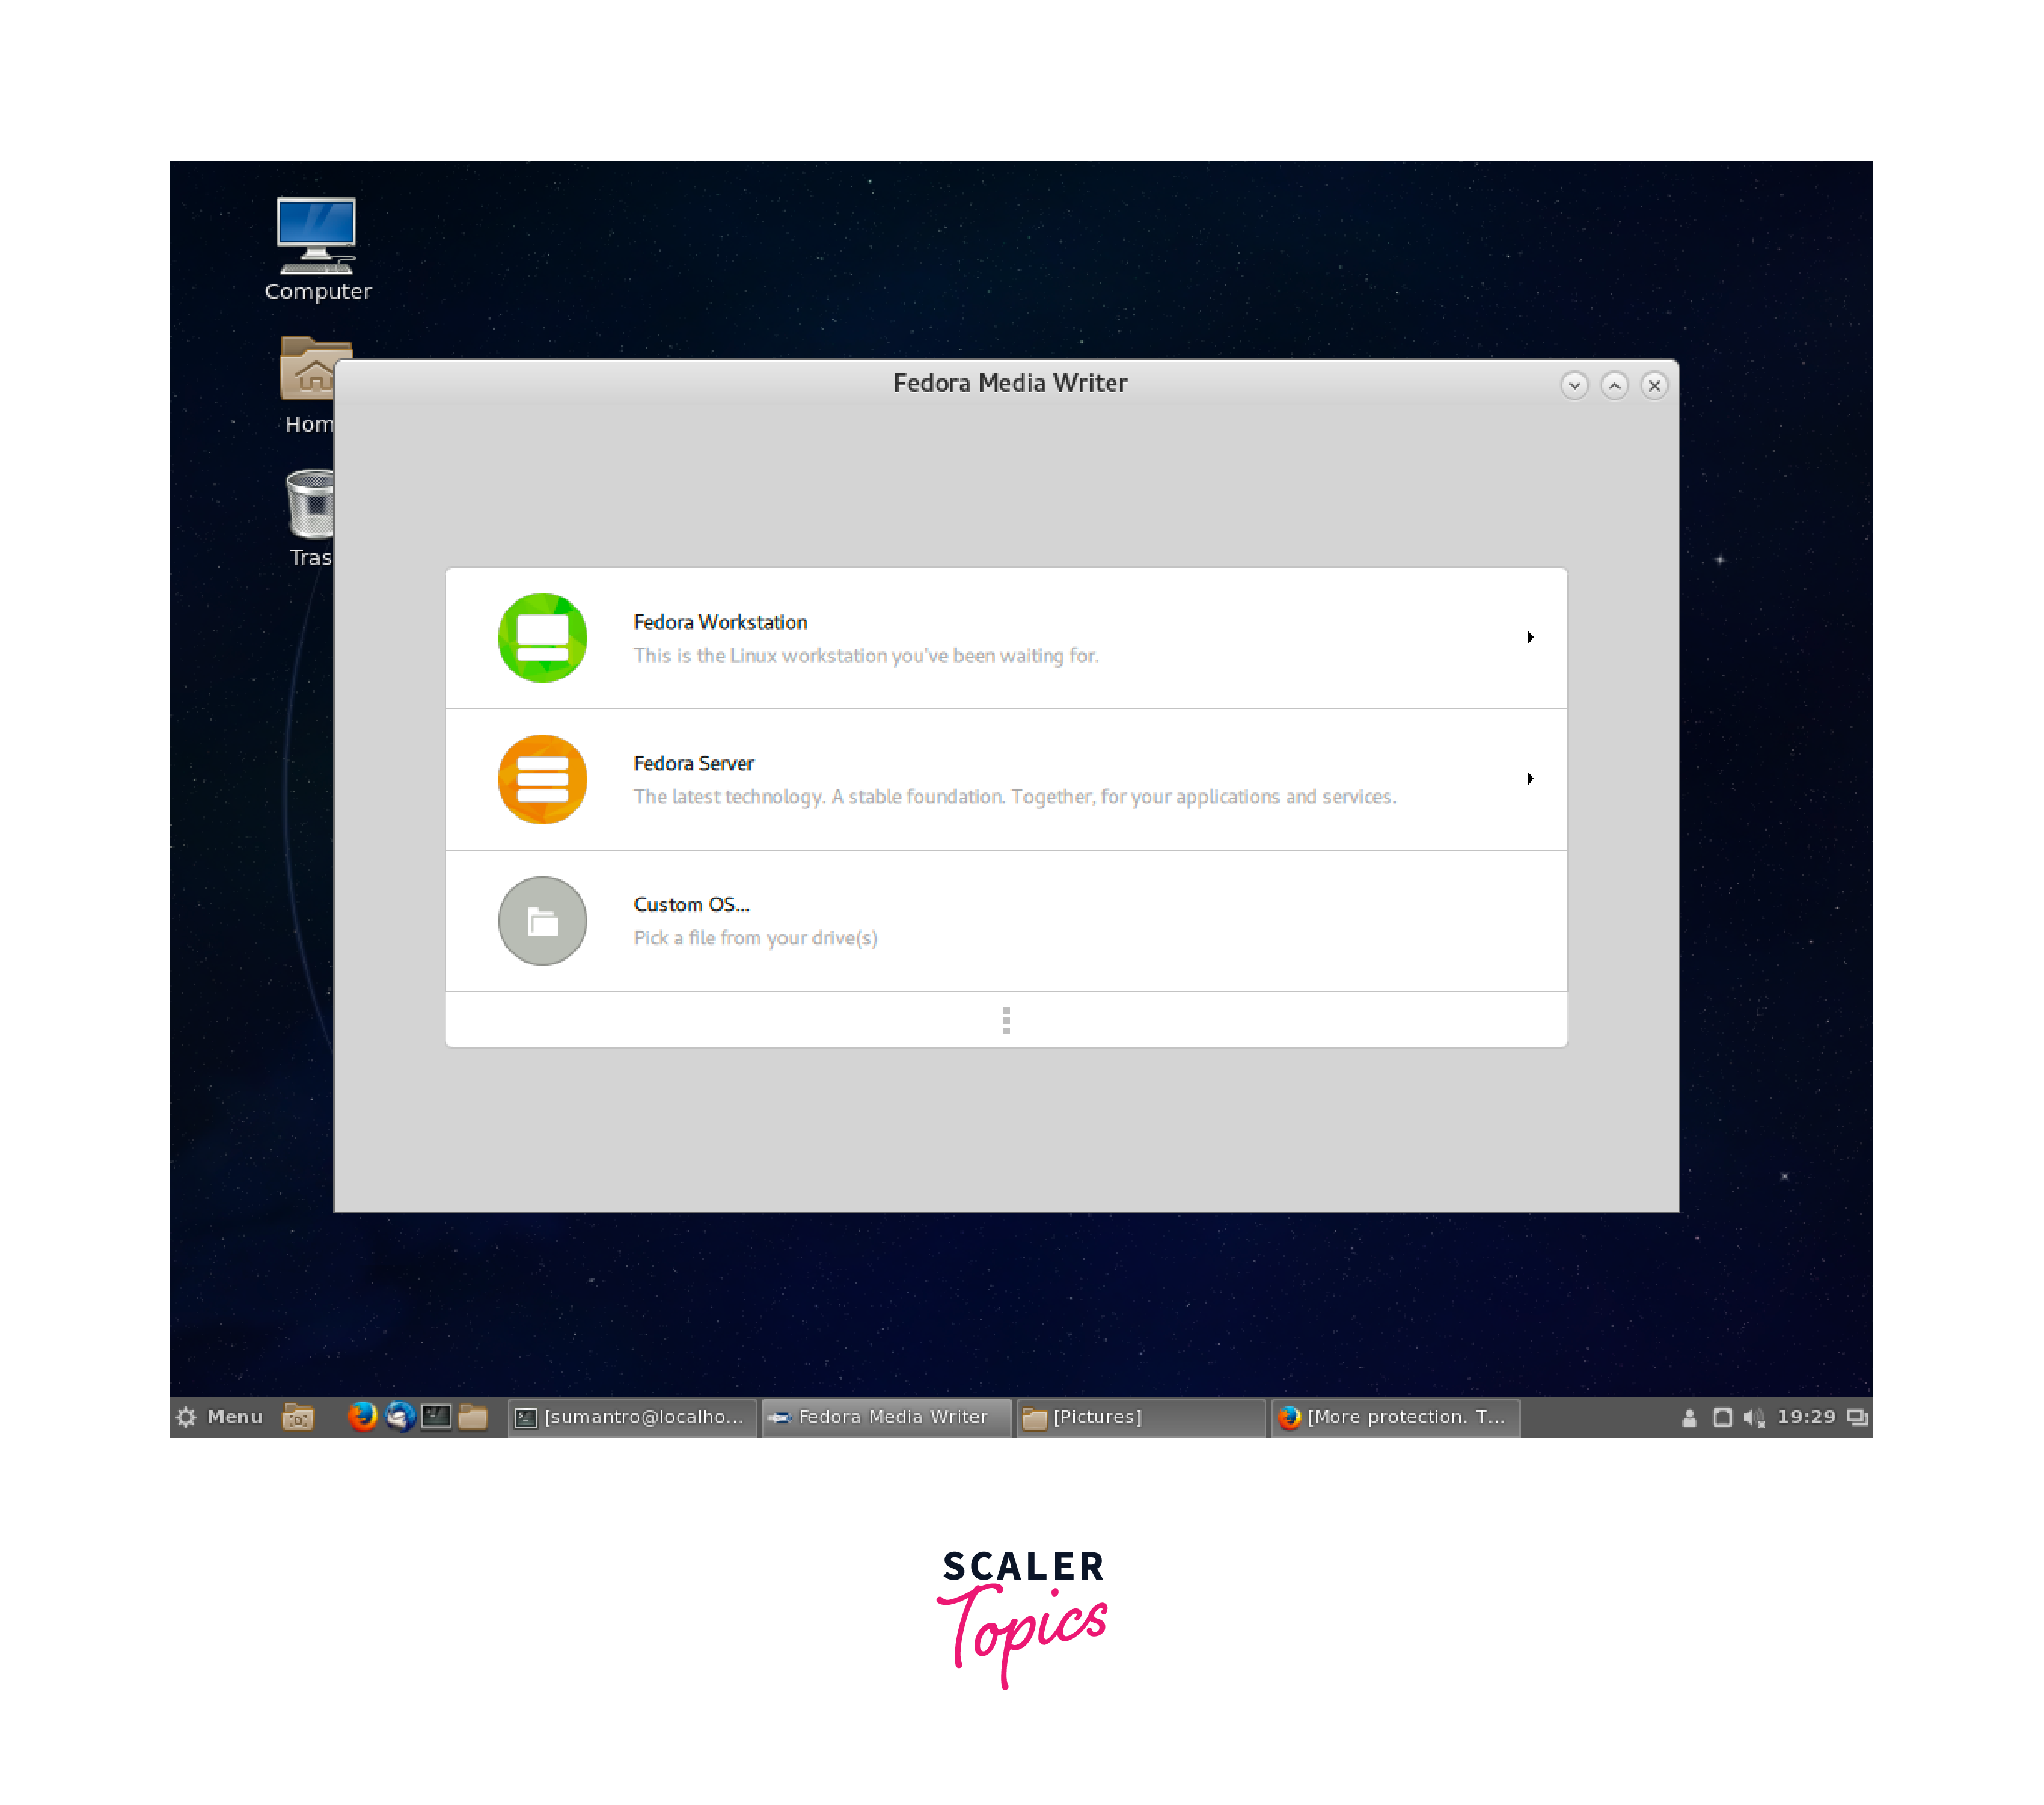
- Fedora Media Writer is a free tool available for Windows and macOS. It creates bootable USB drives from Fedora ISO files.
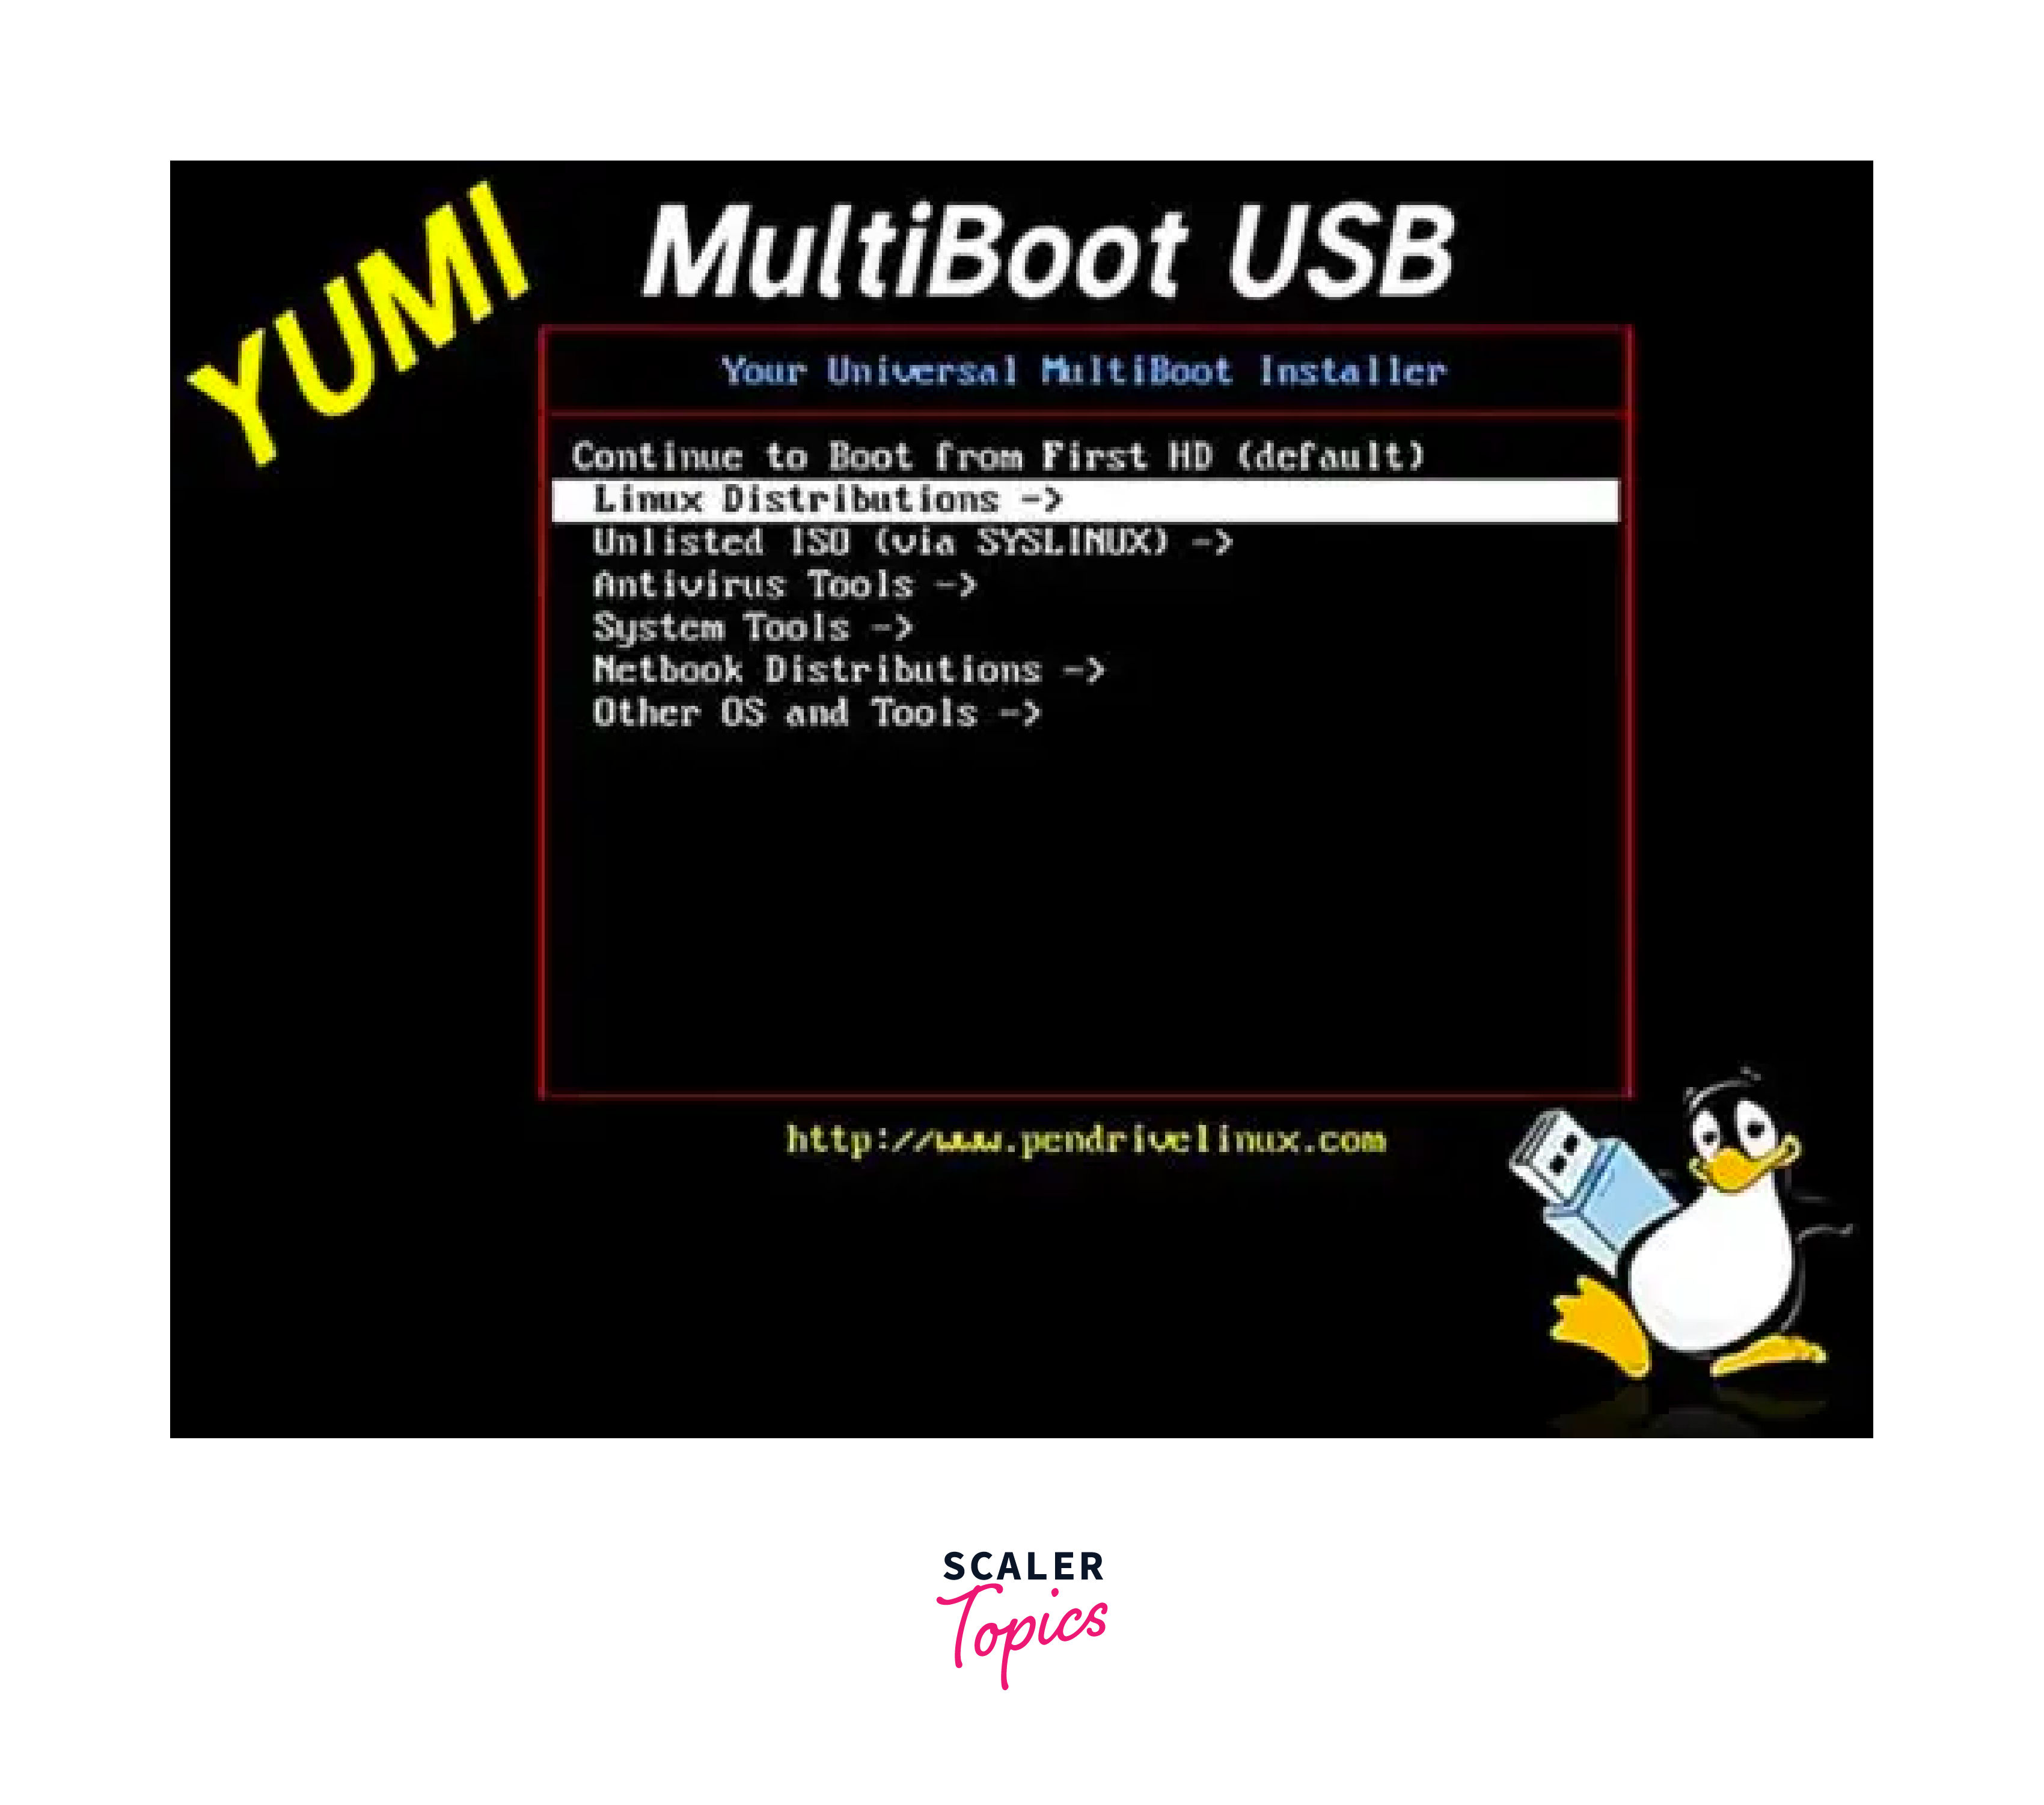
- YUMI (Your Universal Multiboot Installer)
- Yumi is a free and open-source tool available for Windows. It creates bootable USB drives from various operating systems. It also supports multiple ISO files on a single USB drive.
- Yumi is a free and open-source tool available for Windows. It creates bootable USB drives from various operating systems. It also supports multiple ISO files on a single USB drive.
Regardless of your tool choice, the basic steps remain the same: pick the ISO file, set your USB drive as the target, and initiate the burn. After completing these, you get a ready-to-use bootable USB, perfect for installing or running Linux on a suitable system.
Conclusion
Here are the key takeaways from the article:
- We've dived into how to burn Linux ISO to a USB drive from the Linux command line, a vital skill for any Linux user.
- We've explored various user-friendly tools for creating bootable USB drives from an ISO image, including Etcher, Rufus, UNetbootin, etc.
- Remember, all these methods will format your USB drive, so backup any important data before you start.
Now that you've gained the knowledge, it's time to put it into practice. Go ahead and create your own bootable Linux USB drive!