Connected Component Analysis in Image Processing
Overview
Image processing is the process of extracting information from images. One important aspect of image processing is connected component analysis, which involves identifying connected regions of pixels with similar properties in an image. In this blog post, we'll explore what connected component analysis is, why it's important, and some of the algorithms used in this process. We'll also look at some applications of connected component analysis and how it can be performed using OpenCV.
Connected Component Analysis in Image Processing
Connected component analysis (CCA) is a technique in image processing that is used to group pixels in an image that belongs to the same object or entity. The basic idea behind CCA is to identify and label all the connected components in an image, where a connected component is a set of pixels that are connected via some predefined criterion.
The most common criterion used for defining connected components is 4-connectivity or 8-connectivity. In 4-connectivity, two pixels are considered connected if they share a common edge, while in 8-connectivity, two pixels are considered connected if they share a common edge or corner.
The process of CCA typically involves several steps:
-
Thresholding:
The first step is to threshold the image to separate the object from the background. This can be done using a variety of thresholding techniques, such as Otsu's method or adaptive thresholding. -
Labeling:
Once the image has been thresholded, the next step is to label each pixel with a unique identifier based on its connectivity to other pixels. This is typically done using a labeling algorithm, such as the two-pass algorithm or the connected-component labeling algorithm. -
Filtering:
After labeling, some post-processing may be necessary to filter out noise or small components that are not of interest. This can be done using various filtering techniques, such as area filtering or circularity filtering. -
Analysis:
Once the connected components have been identified and filtered, various analyses can be performed on them, such as feature extraction, object recognition, or motion tracking.
Why is Connected Component Analysis Important in Computer Vision?
Connected component analysis (CCA) is an important technique in computer vision that is used for a wide range of applications, such as image segmentation, object recognition, and motion tracking. The basic idea behind CCA is to group pixels in an image that are connected and form a single object or entity.
Here are some reasons why connected component analysis is important in computer vision:
-
Image segmentation:
One of the primary applications of CCA is in image segmentation, where it is used to group pixels that belong to the same object or region of interest. This is useful in a variety of computer vision tasks, such as object detection, tracking, and recognition. -
Object recognition:
CCA can also be used to identify and classify objects in an image or video stream. By grouping pixels that belong to the same object, it becomes easier to extract features and recognize objects based on their shape, color, or texture. -
Motion tracking:
CCA can be used to track the movement of objects in a video stream by identifying the connected components that correspond to each object. This is useful in applications such as surveillance, robotics, and sports analysis. -
Data compression:
CCA can be used to compress data by identifying and removing redundant or unimportant information. This can lead to significant savings in storage space and processing time.
Algorithms Used in Connected Component Analysis
There are several algorithms used in connected component analysis, including Breadth-First Search (BFS), Depth-First Search (DFS), and Union-Find.
Breadth-First Search (BFS) Algorithm
Breadth-First Search (BFS) is a graph traversal algorithm that can be used in connected component analysis to label the connected components of an image. The basic idea behind BFS is to start from a given pixel and explore its neighbors before moving on to the neighbors of its neighbors. This process is repeated until all pixels in the connected component have been explored.
In BFS, a queue data structure is used to keep track of the pixels that need to be explored. The algorithm works as follows:
-
Initialize the label of all pixels in the image to 0, indicating that they have not yet been visited.
-
Choose a starting pixel and set its label to a unique identifier (such as 1).
-
Add the starting pixel to the queue.
-
While the queue is not empty, do the following:
- Remove the first pixel from the queue.
- For each of its neighboring pixels that have not yet been labeled, set their label to the same identifier as the starting pixel, and add them to the queue.
-
Repeat steps 2-4 with another starting pixel until all pixels in the image have been labeled.
At the end of this process, all pixels in each connected component will have the same label. The BFS algorithm is particularly useful for images with complex connectivity, where other labeling algorithms may not work efficiently.
Depth-First Search (DFS) Algorithm
Depth-First Search (DFS) is another graph traversal algorithm that can be used in connected component analysis to label the connected components of an image. The DFS algorithm explores the depth of the image first before moving to its neighbors. The DFS algorithm can be implemented recursively or iteratively. In the context of image processing, the iterative implementation of the DFS algorithm is usually preferred due to memory constraints.
The DFS algorithm works as follows:
-
Initialize the label of all pixels in the image to 0, indicating that they have not yet been visited.
-
Choose a starting pixel and set its label to a unique identifier (such as 1).
-
Push the starting pixel onto a stack.
-
While the stack is not empty, do the following:
- Pop the top pixel from the stack.
- For each of its neighboring pixels that have not yet been labeled, set their label to the same identifier as the starting pixel, and push them onto the stack.
-
Repeat steps 2-4 with another starting pixel until all pixels in the image have been labeled.
At the end of this process, all pixels in each connected component will have the same label.
Union-Find Algorithm
The Union-Find algorithm is another approach to label the connected components of an image in connected component analysis. It is a disjoint-set data structure that provides an efficient way to track the connected components of an image by maintaining a forest of trees.
The Union-Find algorithm works as follows:
- Initialize each pixel in the image as a separate tree with only one node.
- For each pixel, iterate over its neighbors, and if they belong to the same component, union the trees to which the pixels belong. This can be done efficiently using the Union-Find data structure.
- Once all pixels have been processed, the connected components can be determined by finding the roots of each tree in the forest.
The Union-Find algorithm is an efficient method for labeling the connected components of an image, especially for sparse graphs with a large number of components. It has a time complexity of , where N is the number of pixels in the image and α is the inverse Ackermann function, which is almost constant for all practical purposes.
Application of Connected Component Analysis
Connected component analysis has many applications in computer vision and image processing, including:
Object Detection
Object detection in OpenCV is the process of detecting and recognizing objects of interest within an image or video stream. OpenCV provides several pre-trained models for object detection, such as Haar cascades and deep neural networks, which can be used to detect a wide range of objects in real time.
Here is an overview of the process for object detection in OpenCV:
- Load the image or video stream:
The first step is to load the image or video stream that you want to perform object detection on. This can be done using the cv2.imread() function for images or the cv2.VideoCapture() function for videos. - Preprocess the image or video:
Before object detection can be performed, the input data needs to be preprocessed. This can include operations such as resizing, normalization, and color space conversion. - Define the object detection model:
OpenCV provides several pre-trained models for object detection, including Haar cascades and deep neural networks. These models can be loaded using the cv2.CascadeClassifier() or cv2.dnn.readNet() functions. - Perform object detection:
Once the model is defined, it can be used to perform object detection on the input data. This is typically done using the detectMultiScale() function for Haar cascades or the forward() function for deep neural networks. - Display the results:
Finally, the results of the object detection can be displayed on the input data using functions such as cv2.rectangle() and cv2.putText().

Segmentation
Segmentation in OpenCV refers to the process of partitioning an image into multiple segments or regions, each of which represents a different object or part of the image. Segmentation is a fundamental step in many computer vision tasks, such as object recognition, image analysis, and medical image processing.
Here is an overview of the process for image segmentation in OpenCV:
-
Load the image:
The first step is to load the image that you want to segment using the cv2.imread() function. -
Preprocess the image:
Before segmentation can be performed, the input image needs to be preprocessed. This can include operations such as resizing, filtering, and color space conversion. -
Choose a segmentation method:
OpenCV provides several methods for image segmentation, including thresholding, contour detection, and clustering. The choice of method depends on the characteristics of the image and the specific task. -
Apply the segmentation method:
Once the segmentation method is chosen, it can be applied to the preprocessed image using the appropriate function. For example, cv2.threshold() can be used for simple thresholding, while cv2.findContours() can be used for contour detection. -
Post-process the segmentation result:
The segmentation result may need to be post-processed to improve its accuracy or remove noise. This can include operations such as morphological operations, filtering, and region merging. -
Visualize the segmentation result:
Finally, the segmentation result can be visualized using functions such as cv2.imshow() and cv2.drawContours().

Tracking
Tracking in OpenCV refers to the process of locating and following an object or multiple objects over time in a video stream. It is a crucial step in many computer vision applications, such as surveillance, motion analysis, and robotics.
Here is an overview of the process for object tracking in OpenCV:
-
Load the video stream:
The first step is to load the video stream that you want to track objects in using the cv2.VideoCapture() function. -
Select the object to track:
Next, you need to select the object or objects that you want to track in the video stream. This can be done manually by selecting a region of interest using the mouse or programmatically using object detection algorithms. -
Initialize the tracking algorithm:
Once the object is selected, you need to initialize the tracking algorithm. OpenCV provides several tracking algorithms, including MeanShift, CamShift, and Optical Flow. The choice of algorithm depends on the characteristics of the object and the specific task. -
Update the object position:
Once the tracking algorithm is initialized, it can be used to update the position of the object in each frame of the video stream. This is typically done using functions such as cv2.meanShift() or cv2.calcOpticalFlowPyrLK(). -
Visualize the tracking result:
Finally, the tracking result can be visualized using functions such as cv2.rectangle() and cv2.putText().
![]()
Recognition
Recognition in OpenCV refers to the process of identifying an object or pattern in an image or video stream. Recognition is a critical step in many computer vision applications, such as face recognition, object detection, and character recognition.
Here is an overview of the process for object recognition in OpenCV:
-
Load the image or video stream:
The first step is to load the image or video stream that you want to recognize objects in using the cv2.imread() function for images or cv2.VideoCapture() function for videos. -
Preprocess the image or video:
Before recognition can be performed, the input data needs to be preprocessed. This can include operations such as resizing, filtering, and color space conversion. -
Choose a recognition method:
OpenCV provides several methods for object recognition, including feature-based recognition, template matching, and neural network-based recognition. The choice of method depends on the characteristics of the object and the specific task. -
Extract features:
If using a feature-based recognition method, the next step is to extract features from the input data using algorithms such as SIFT or SURF. These features are then used to identify the object in the image or video stream. -
Match features:
Once features are extracted, they can be matched against a pre-existing database of features or templates using algorithms such as k-NN or SVM. -
Visualize the recognition result:
Finally, the recognition result can be visualized using functions such as cv2.rectangle() and cv2.putText() to draw bounding boxes and labels around the identified object.

Connected Component Analysis with OpenCV
- OpenCV is a popular library for computer vision and image processing that includes tools for connected component analysis.
- It provides functions for performing connected component analysis on both binary and grayscale images.
Performing Connected Component Analysis on Binary Images
- To perform connected component analysis on a binary image in OpenCV, we can use the cv::connectedComponents() function.
- This function takes a binary image as input and returns a labeled image, where each connected component is assigned a unique label.
Performing Connected Component Analysis on Grayscale Images
- To perform connected component analysis on a grayscale image in OpenCV, we first need to threshold the image to create a binary image.
- We can then use the same cv::connectedComponents() function to label the connected components in the binary image.
Output of Connected Component Analysis
Output:

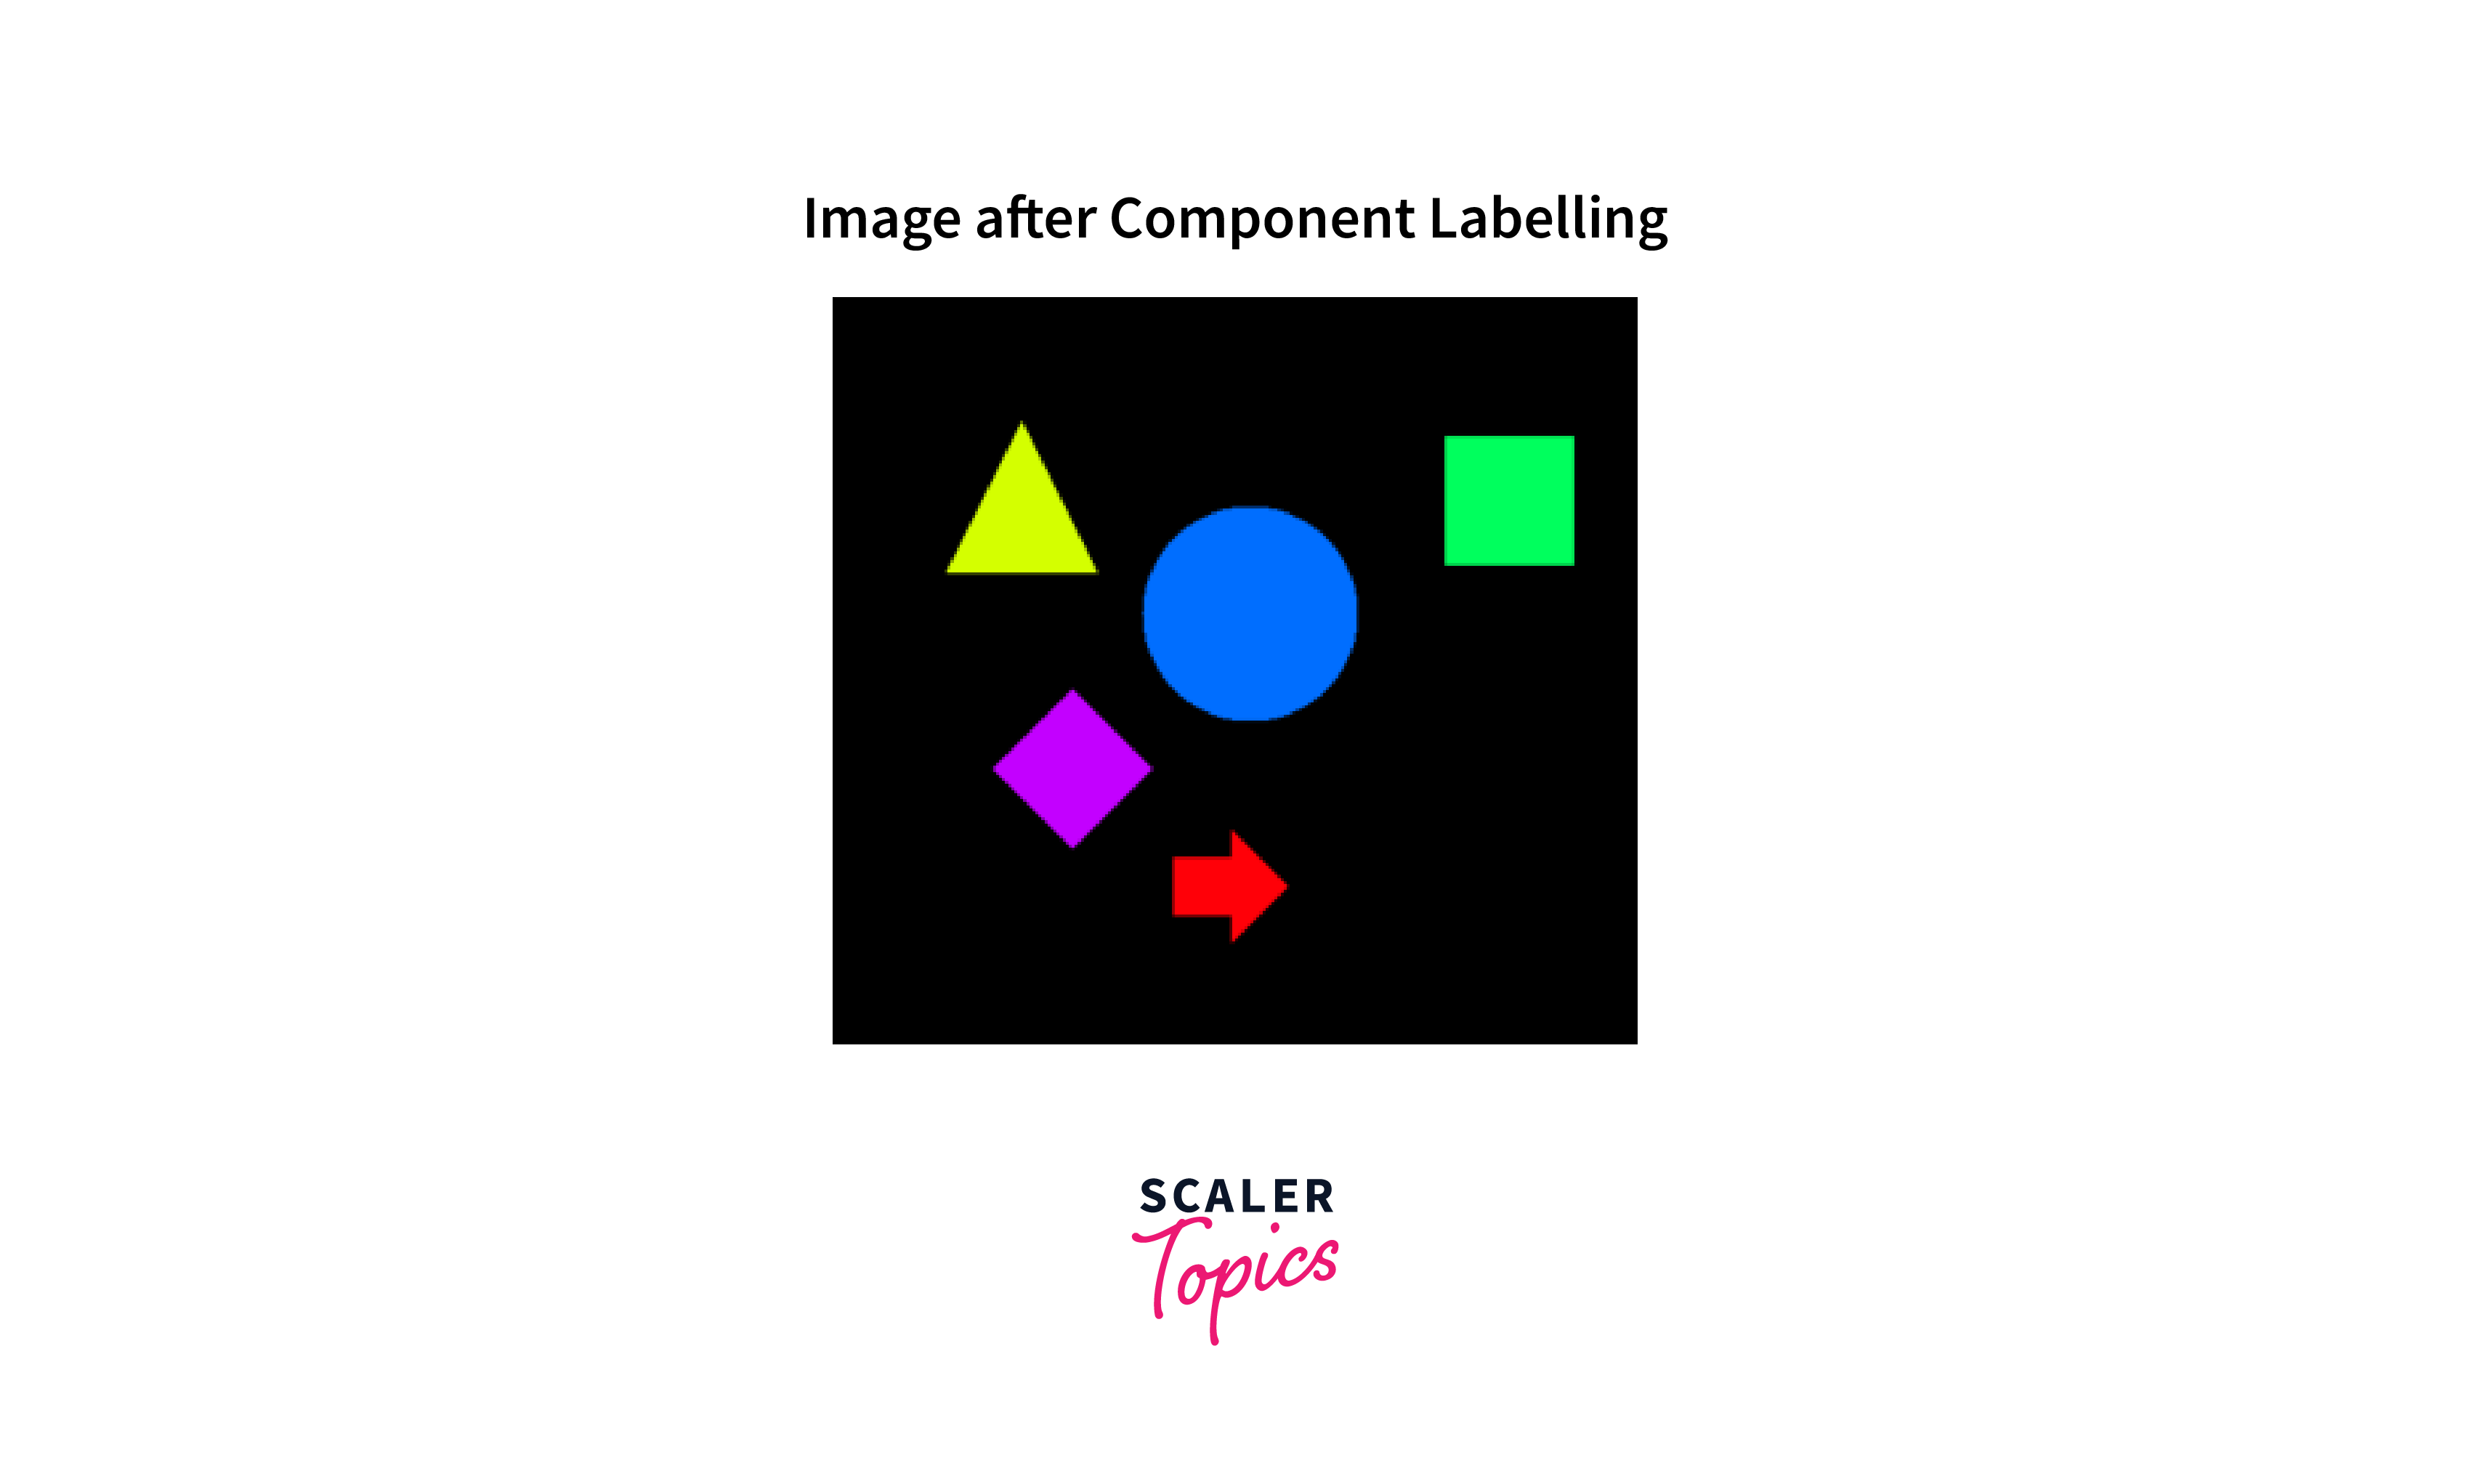
Explanation of Labeled Regions and Objects in the Output of Connected Component Analysis
-
The output of the connected component analysis is a labeled image, where each connected component is assigned a unique label. The labeled image can be visualized by assigning a different color to each label, making it easier to identify and analyze the different regions and objects in the image.
-
The labeled regions in the output of connected component analysis represent groups of pixels that belong to the same object or region. By examining the properties of these regions, we can extract useful information about the image, such as the location and size of objects, the shape of regions, and the distribution of colors or intensities.
-
The labeled objects in the output of connected component analysis represent individual objects in the image. By comparing the properties of these objects to known patterns or templates, we can recognize and classify them, allowing us to perform tasks such as object detection and recognition.
Importance of Labeled Regions and Objects for Further Analysis and Processing of Image Data
The labeled regions and objects in the output of connected component analysis are important for further analysis and processing of image data. By identifying and labeling regions and objects, we can extract features and properties that can be used for tasks such as object tracking, segmentation, and recognition.
- For example, by tracking the movement of labeled objects over time, we can analyze their behavior and interactions, providing insights into the underlying processes and dynamics of a scene.
- Similarly, by segmenting labeled regions from the background, we can focus on areas of interest and filter out noise or irrelevant information.
Challenges and Limitations of Connected Component Analysis
Challenges:
- Connected component analysis can be a powerful tool for image processing, but it also has some challenges and limitations. One challenge is dealing with noisy or complex images, where it may be difficult to distinguish between different regions or objects.
- Another challenge is determining the appropriate threshold values or parameters for different algorithms, which can affect the accuracy and efficiency of the analysis.
Limitations:
- Connected component analysis also has some limitations in terms of the types of images and objects that can be analyzed.
- For example, it may not be well-suited for analyzing images with highly variable backgrounds or lighting conditions, or for detecting objects that are partially occluded or have complex shapes.
Conclusion
- Connected component analysis is a powerful technique for identifying and analyzing connected regions and objects in images. It has many applications in computer vision and image processing, including object detection, segmentation, tracking, and recognition.
- By using OpenCV and appropriate algorithms, we can perform connected component analysis on both binary and grayscale images, extracting valuable information about the underlying structure and dynamics of the image.