C++ Environment Setup

Overview
C++ is a general-purpose programming language. C++ runs on many platforms like Windows, Linux, Mac, etc. Before starting programming in C++, we need to set up an environment on our local computer to compile and run our C++ programs successfully. If you do not want to set up a local environment, you can also use online IDEs for compiling your program.
C++ Environment Setup
To execute a program in C++ language on your local computer, you will need to install two softwares on your computer.
1. Text Editor
A text editor is software used to type code in any language. Examples of a few text editors are Windows Notepad++, VS Code, Linux Vim, MAC TextEdit, etc.
The files created with editor are called source files, and for C++, they typically are named with the extension .cpp
Scaler Placement Report and Statistics
Scaler learners achieved 2.5x salary growth with average post-Scaler CTC reaching ₹23L.
2. C++ Compiler
When we write code in any computer language, it is not machine-readable since the machine only understands machine code (0/1), so here comes the role of a compiler. C++ compiler compiles your source code into a final executable program (machine code). A compiler is a program that converts instructions into a machine-code or lower-level form so that they can be read and executed by a computer.
The most frequently used and free available compiler is the GNU C/C++ compiler. If we use VS Code, we do not need to download a compiler separately. Visual Studio comes with Microsoft's Visual C++ compiler.
Continuous Integration
Continuous integration is a software development practice where developers regularly merge their code changes into a central repository, followed by automated builds and tests.
Developers regularly merge their code changes (also known as commit) to a shared repository using a version control system such as Git. Before every commit, developers run local unit tests on their code to check for errors and correct them. Then this continuous integration service runs some automated tests to catch the errors immediately.
Continuous Integration benefits :
- Improve Developer Productivity.
- Find and Address Bugs Quicker.
- Deliver Updates Faster.
Transform Your Career
Choose from our industry-leading programs designed for career success
Modern Software and AI Engineering Program
Master full-stack development with AI integration

Modern Data Science and ML with specialisation in AI
Advanced data science techniques with AI specialization
Advanced AIML with Specialisation in Agentic AI
Deep dive into AIML with focus on Agentic systems
DevOps, Cloud & AI Platform Engineering
Build and manage AI-powered cloud infrastructure
AI Engineering Advanced Certification by IIT-Roorkee
Premier AI engineering certification from IIT-Roorkee
Online IDE
An integrated development environment (IDE) is a software application that facilitates computer programmers to write code without setting up a local environment on their personal computer. If you do not want to have a local setup for C++ programming, you can always compile and execute your programs through online IDEs.
One of the popular IDE is:
- InterviewBit comes with a user-friendly IDE to compile, test, and run C++ programs online. Link to the IDE

Given below are some of the steps of InterviewBit Compiler which users might find helpful:
- Code Editor: Write code in the code editor (which has syntax highlighting for more code readability). For users logged into the InterviewBit Platform, the total number of characters in their code can go up to five thousand characters. For non-interview bit users, C++ code can have up to five hundred characters if a user is not logged in.
- RUN: To run a C++ program, a user can write C++ code in the editor and then click on the ‘RUN’ button after selecting the appropriate compiler version from the scroll bar given on the top.
- SAVE: The C++ code written in the editor can be saved by clicking on the ‘SAVE’ button on the top right corner of the webpage. The saved codes can be accessed using the ‘MY SNIPPETS’ button on the webpage. The programs saved can be made public - available for all - or private - accessible to only the code owner.
- STDIN & STDOUT: To feed input to the C++ Code, users can use the Standard Input (stdin) console of our compiler, and the output of the code appears on the Standard Output (stdout) of the compiler.
- FORK: Public code snippets can also be forked or downloaded in the ‘NEW’ section using the ‘FORK’ button. After forking a code, one can reuse it as per requirement.
- SHARE: If you want to share your code with others, click on the ‘SHARE’ button on the top right corner of the webpage. The shared code is in the Read-Only Format.
Setting up Local Environment
As discussed above, to set up a local environment on our computer, we need two softwares, a text editor and a compiler. This section will teach how to set up VS Code on our computer. We do not need to install compiler software separately by installing VS Code. It comes with Microsoft's Visual C++ compiler. We will discuss how to set up VS Code on Windows, Linux, and MAC.
1. Windows
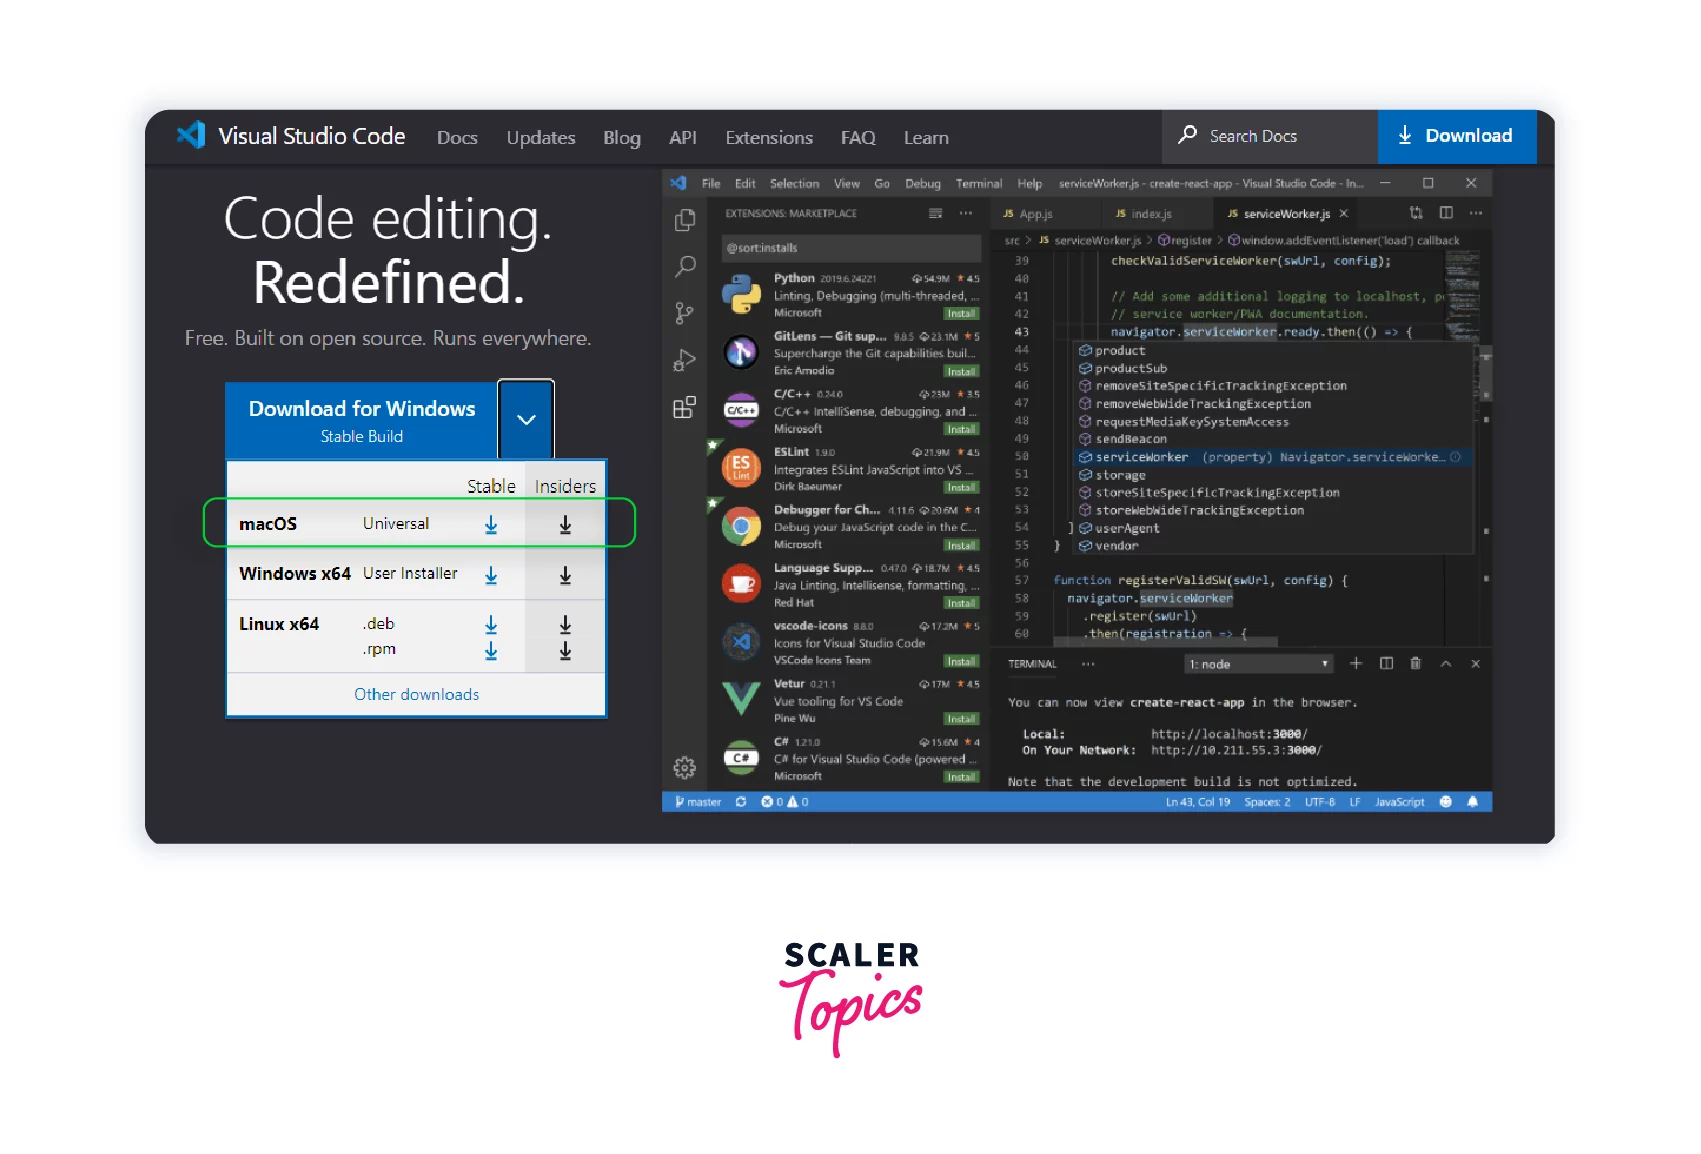
- Download the Visual Studio Code installer for Windows. Link to download page

- Once it is downloaded, run the installer (VSCodeUserSetup-{version}.exe). This will only take a minute.
- By default, VS Code is installed under C:\users{username}\AppData\Local\Programs\Microsoft VS Code.
- Accept the agreement and click on next.
- Click on Finish to complete the installation.
2. Linux(Debian and Ubuntu-based distributions)
- Install the .deb package (64-bit) to use Visual Studio Code in Debian/Ubuntu-based distributions. To download and install the .deb package (64-bit), write the below command in the command line:
If you are on an older Linux distribution, write the following command:
- The .deb package will automatically install the apt repository and signing key to enable auto-updating using the system's package manager. Another way to install the apt repository and signing key is through command line using the below command:
- Then update the package cache and install the package using:
3. MacOS
- Download Visual Studio Code for macOS.
- Open the browser's download list and locate the downloaded archive.
- Extract the archive contents. Use double-click for some browsers or select the 'magnifying glass' icon with Safari.
- Drag the Visual Studio Code.app to the Applications folder, making it available in the macOS Launchpad.
- Add VS Code to your Dock by right-clicking on the icon to bring up the context menu and choosing Options, Keep in Dock.
Role of C++ Compiler
When we write code in any computer language, it is not machine-readable since the machine only understands machine code (0/1), so here comes the role of a compiler. Compilers are the computer softwares that convert high-level source code to executable machine-level instructions made up of 0s and 1s, that computers can understand.
Compilers scan the high-level code line by line and show different errors present in the code in the command line.
Turn Learning into Career Growth
Setting C++ Compiler
Once we install the text editor and type and save our program in a file with the .cpp extension, we will need a C++ compiler to compile this file. Below are the details about setting up a compiler on different platforms.
Scaler Placement Report and Statistics
Scaler learners achieved 2.5x salary growth with average post-Scaler CTC reaching ₹23L.
1. Linux Installation
To install and work with the GCC compiler on your Linux machine, proceed according to the below steps:
- Run the below three commands from your Linux terminal window to install the GCC compiler on your system.
- Run the below command to install all the libraries required to compile and run a C++ program.
- Run the below-given command to check whether the GCC compiler is installed in your system correctly or not.
Now we will learn how to compile and run a C++ program on Linux using the GCC compiler.
- Write your program in a text file and save it with any file name and .cpp extension. Now, you have to open the Linux terminal and move to the directory where you have saved your file. Then you have to run the below command to compile your file:
eg) g++ HelloProgram.cpp -o hello
- Now run your program using the below command:
2. Windows installation
To install and work with the GCC compiler on your windows machine, proceed according to the below steps:
-
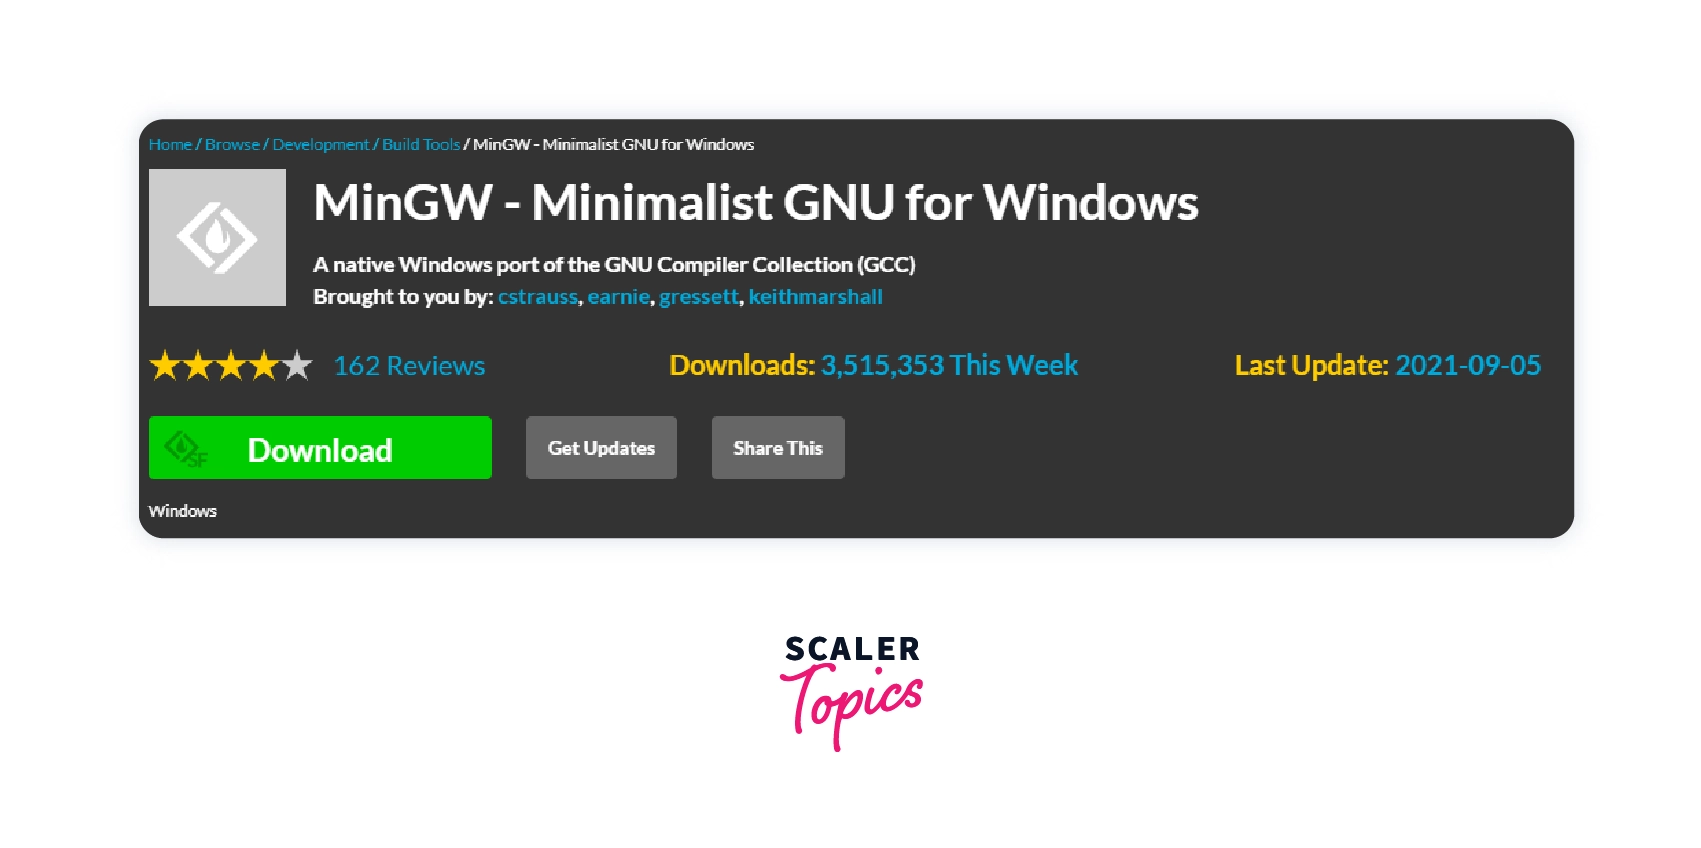
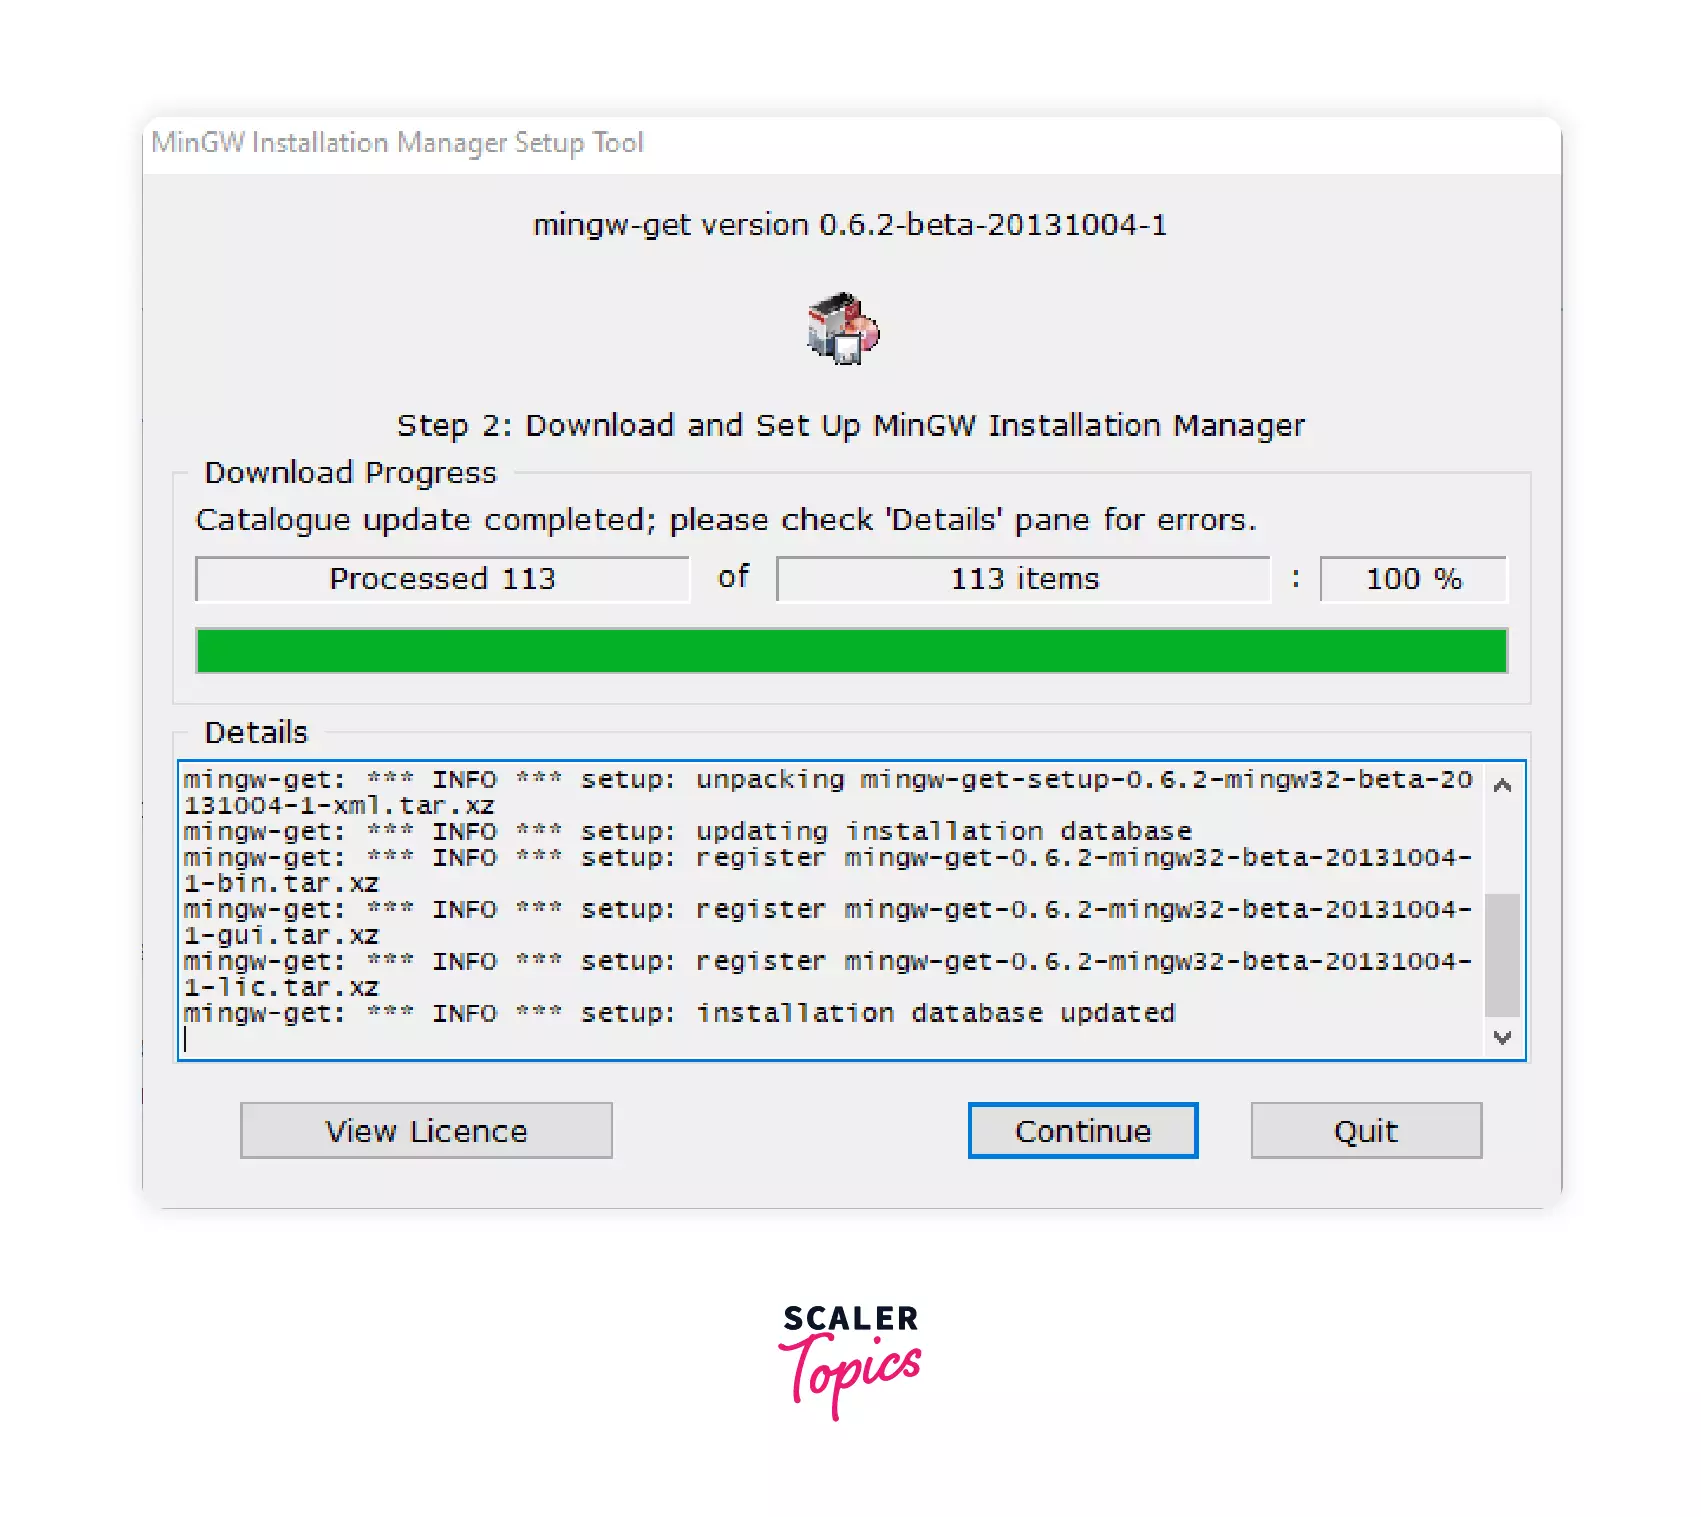
Download minGW compiler from this link
-
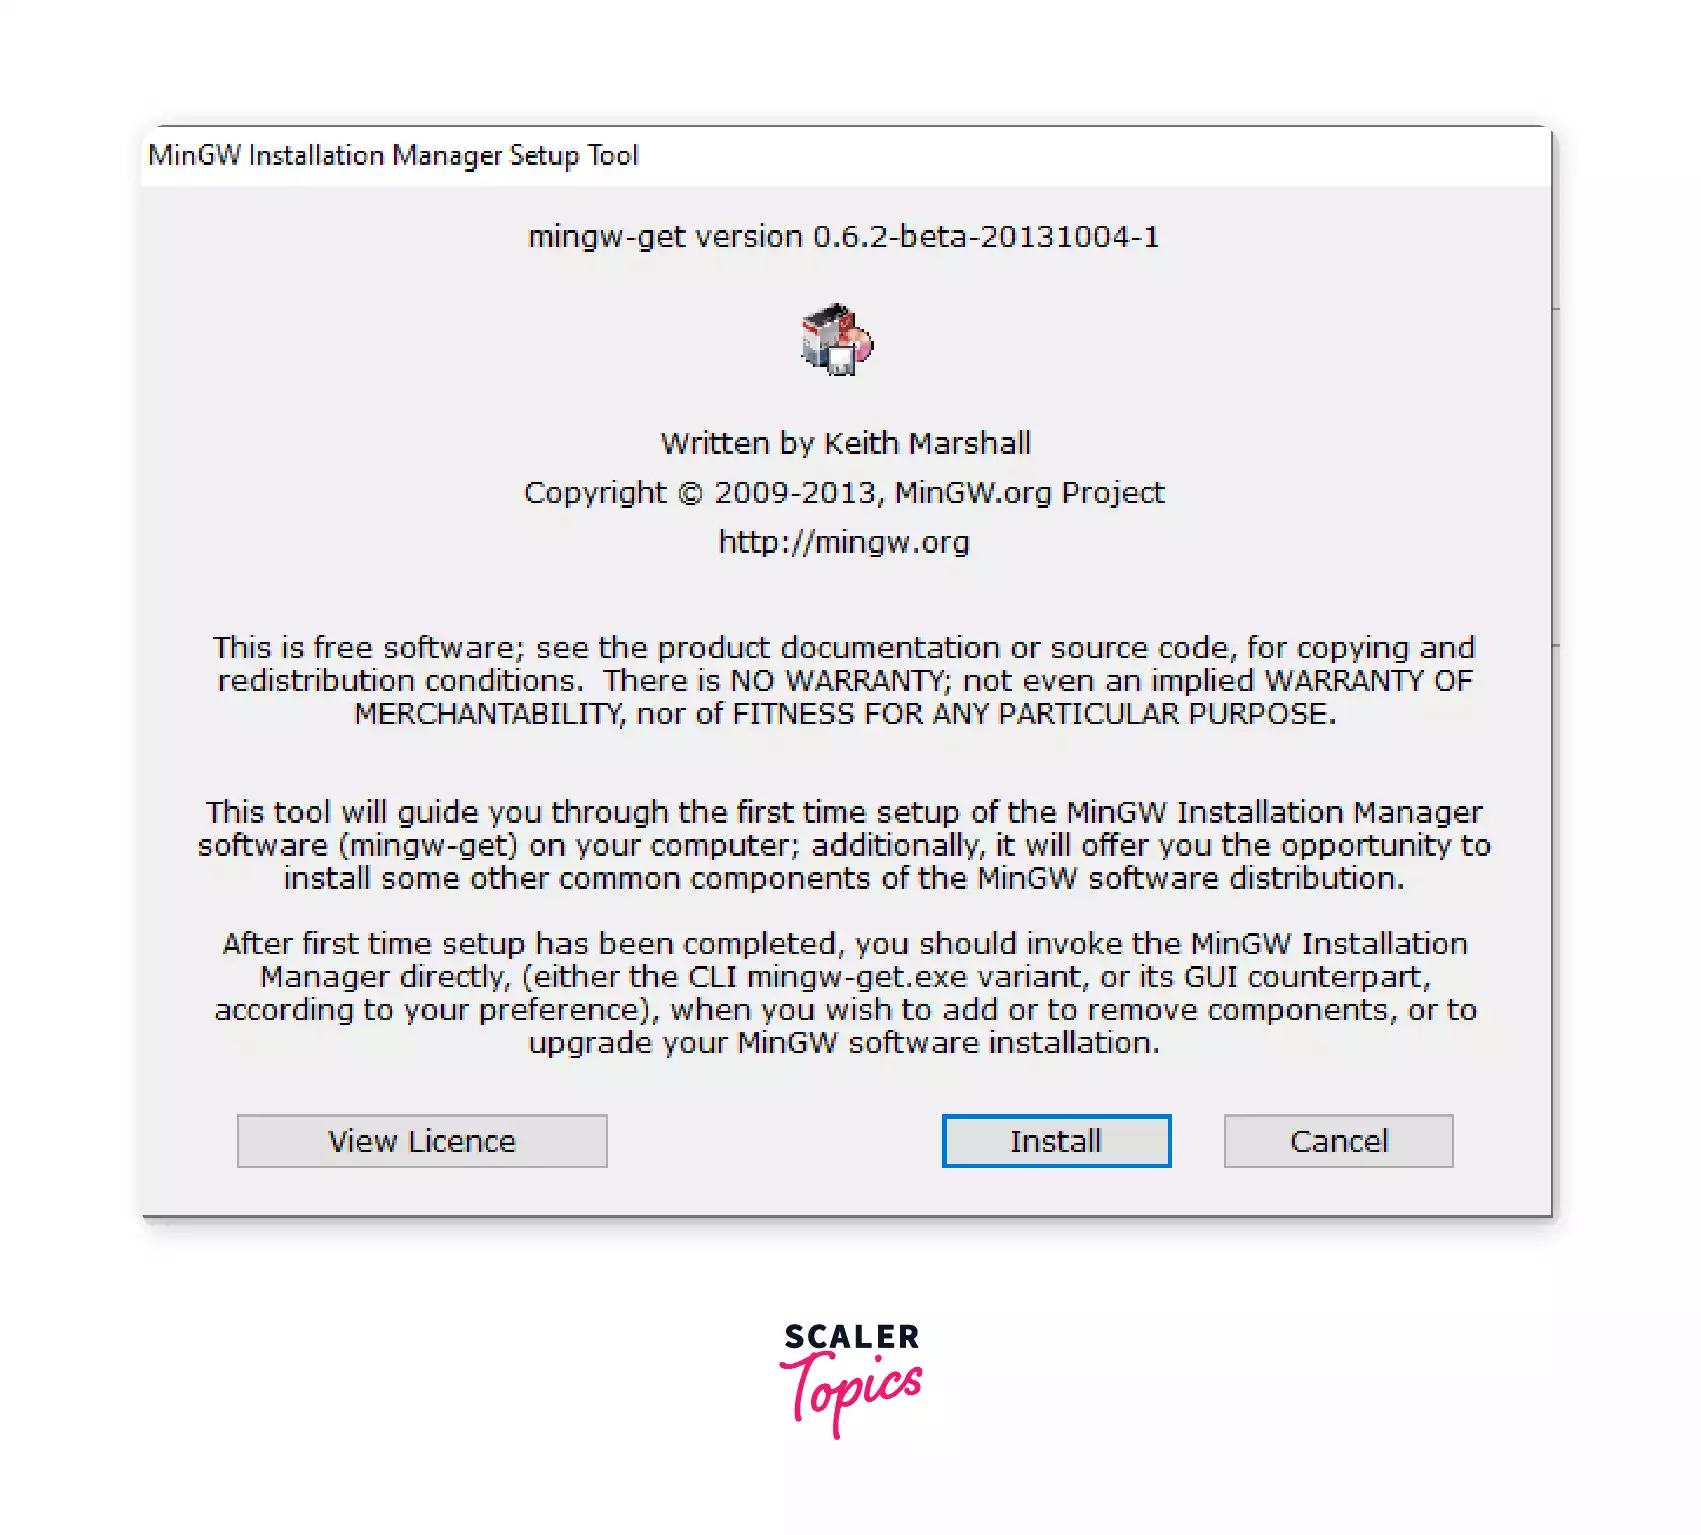
Run the .exe file and click on the install button.
-
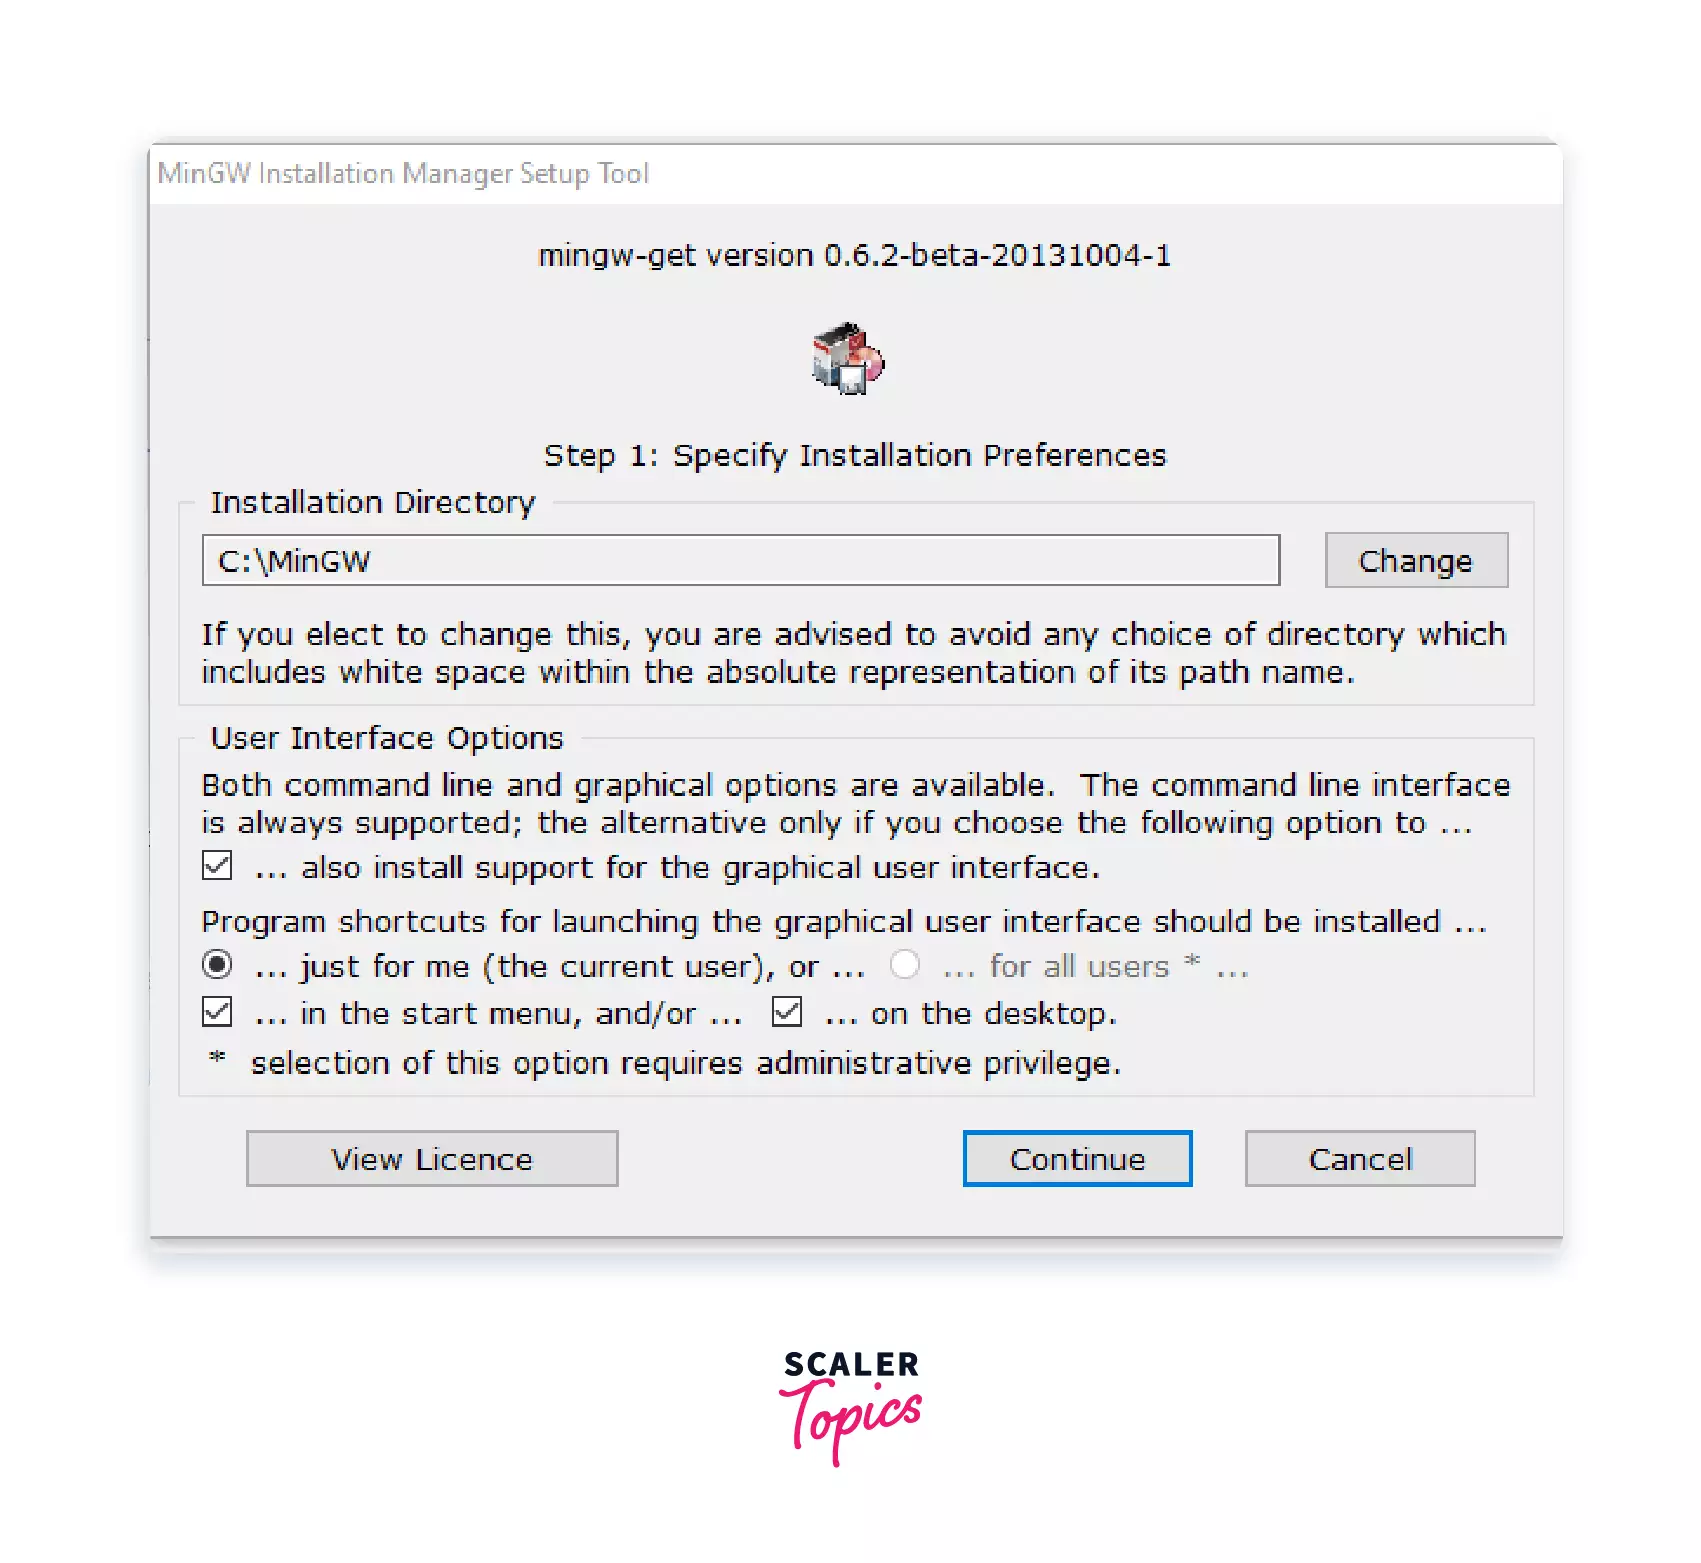
If you want to change the location of the compiler, then you can otherwise leave it to default and wait for the process to complete and then click on continue.
-
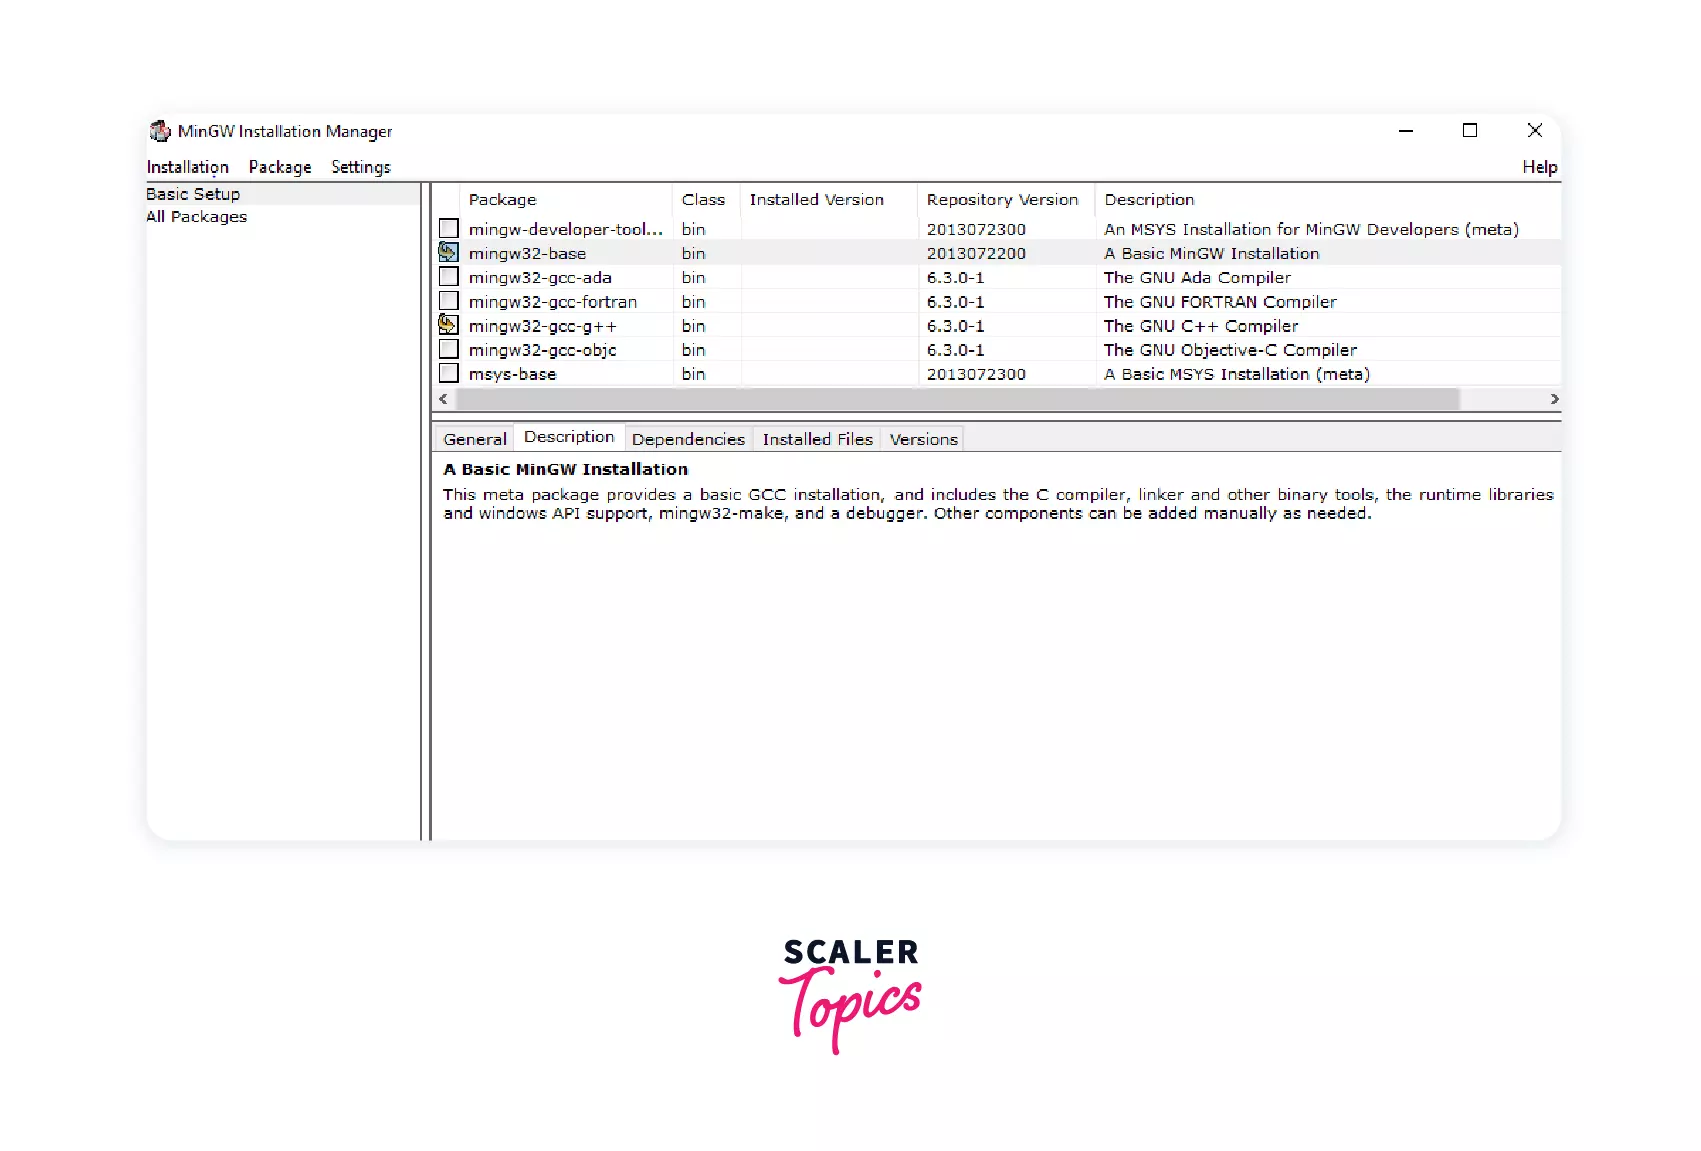
Select mingw32-base and mingw32-gcc-g++ and mark them for installation, then go to the installation tab and click on apply changes.
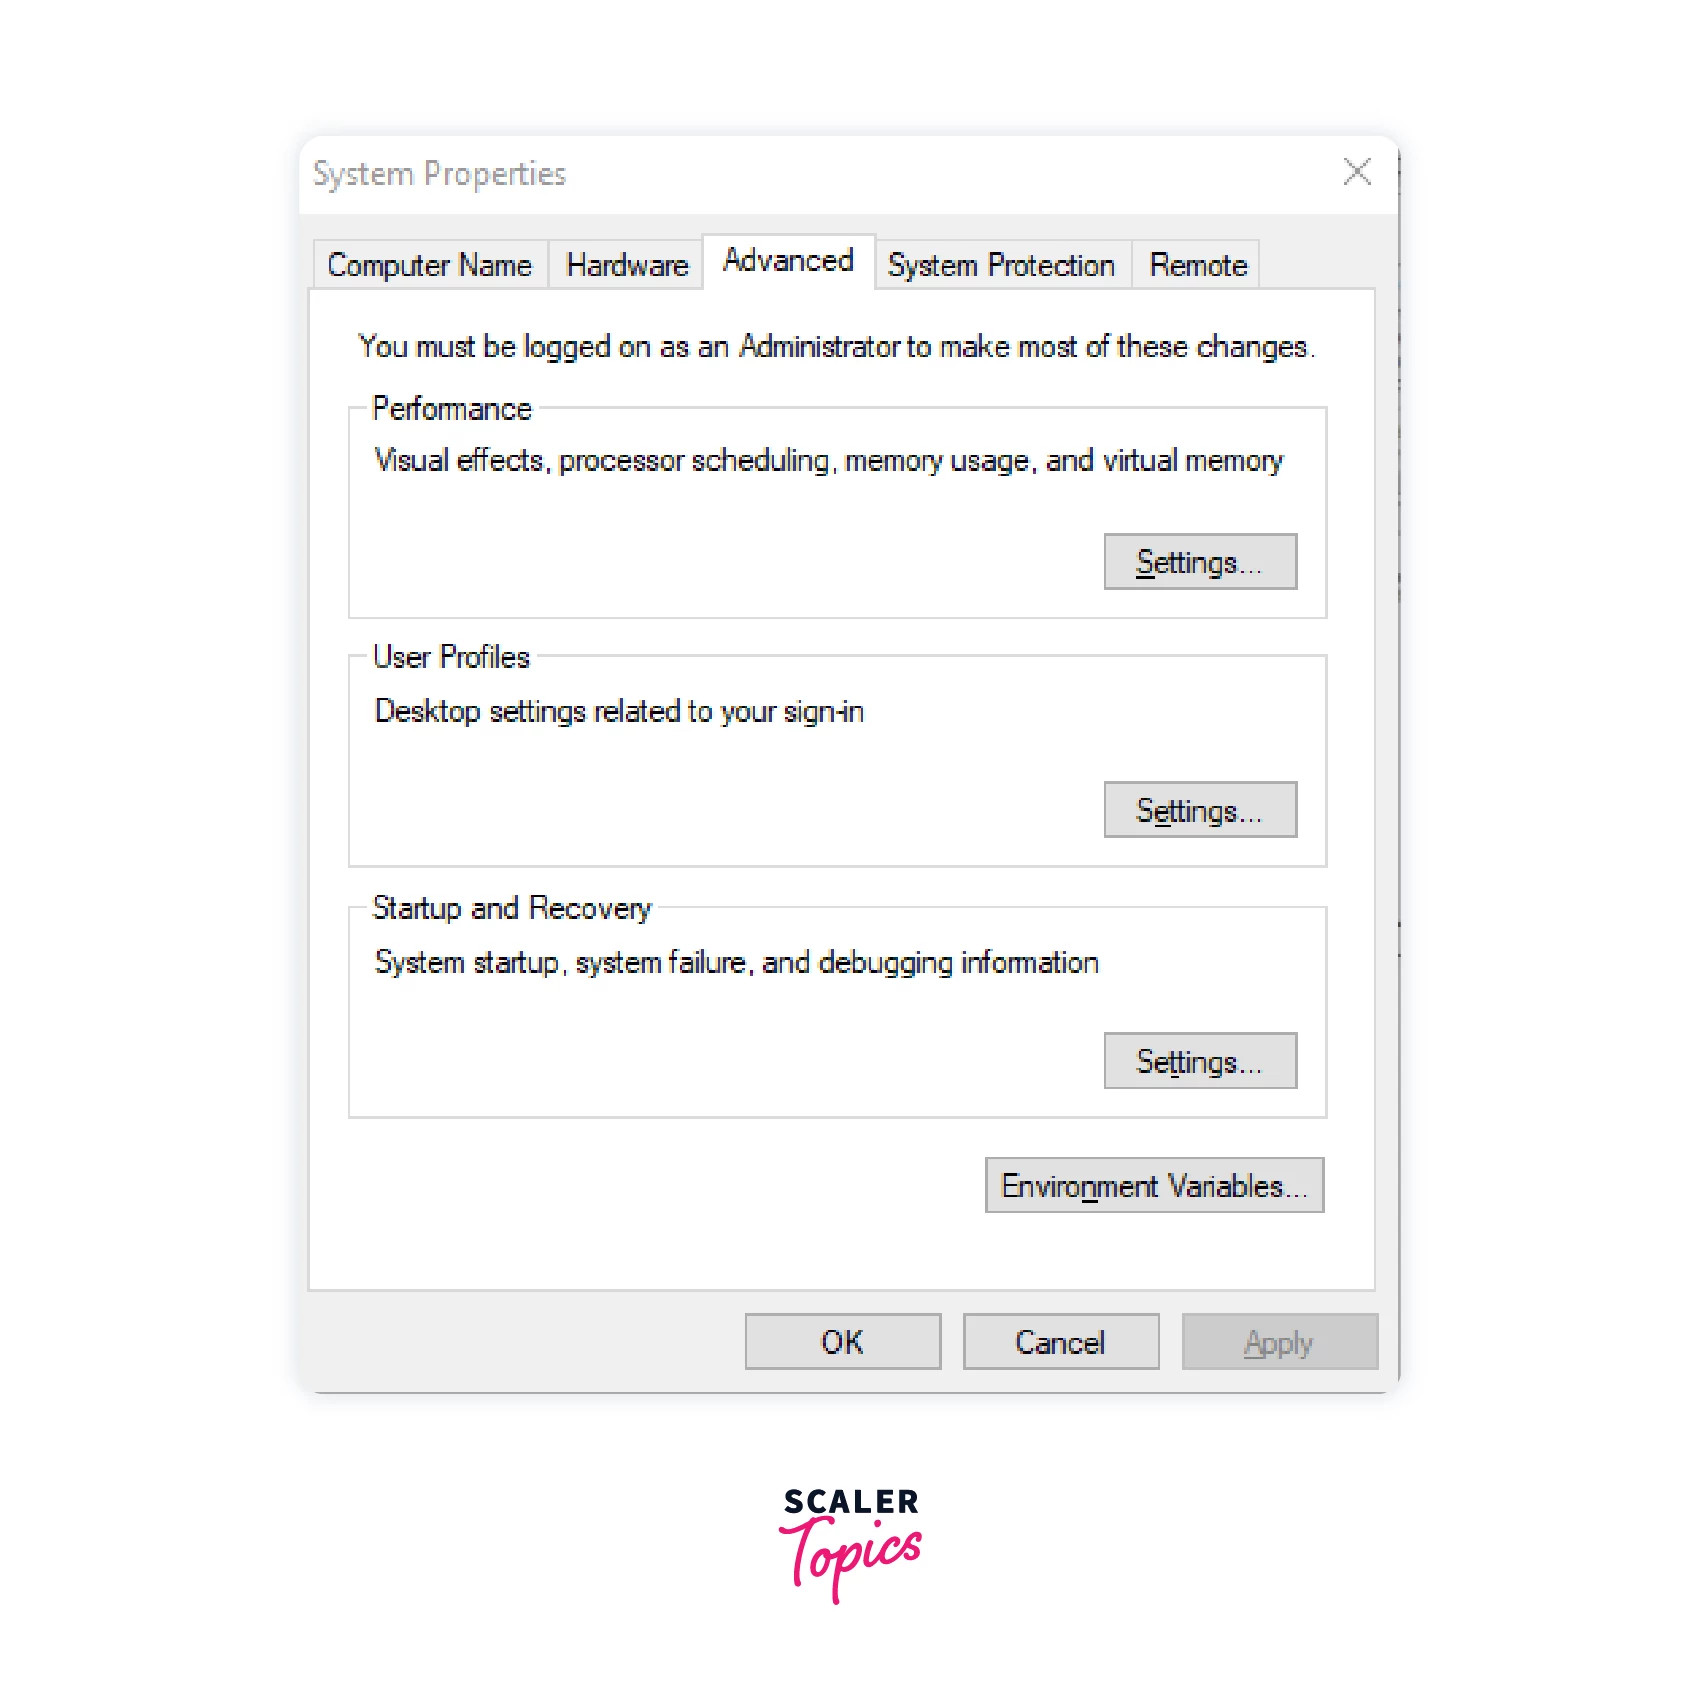
This will complete the installation part. Now we have to set an environment variable for gcc compiler. For that, follow the below steps :
-
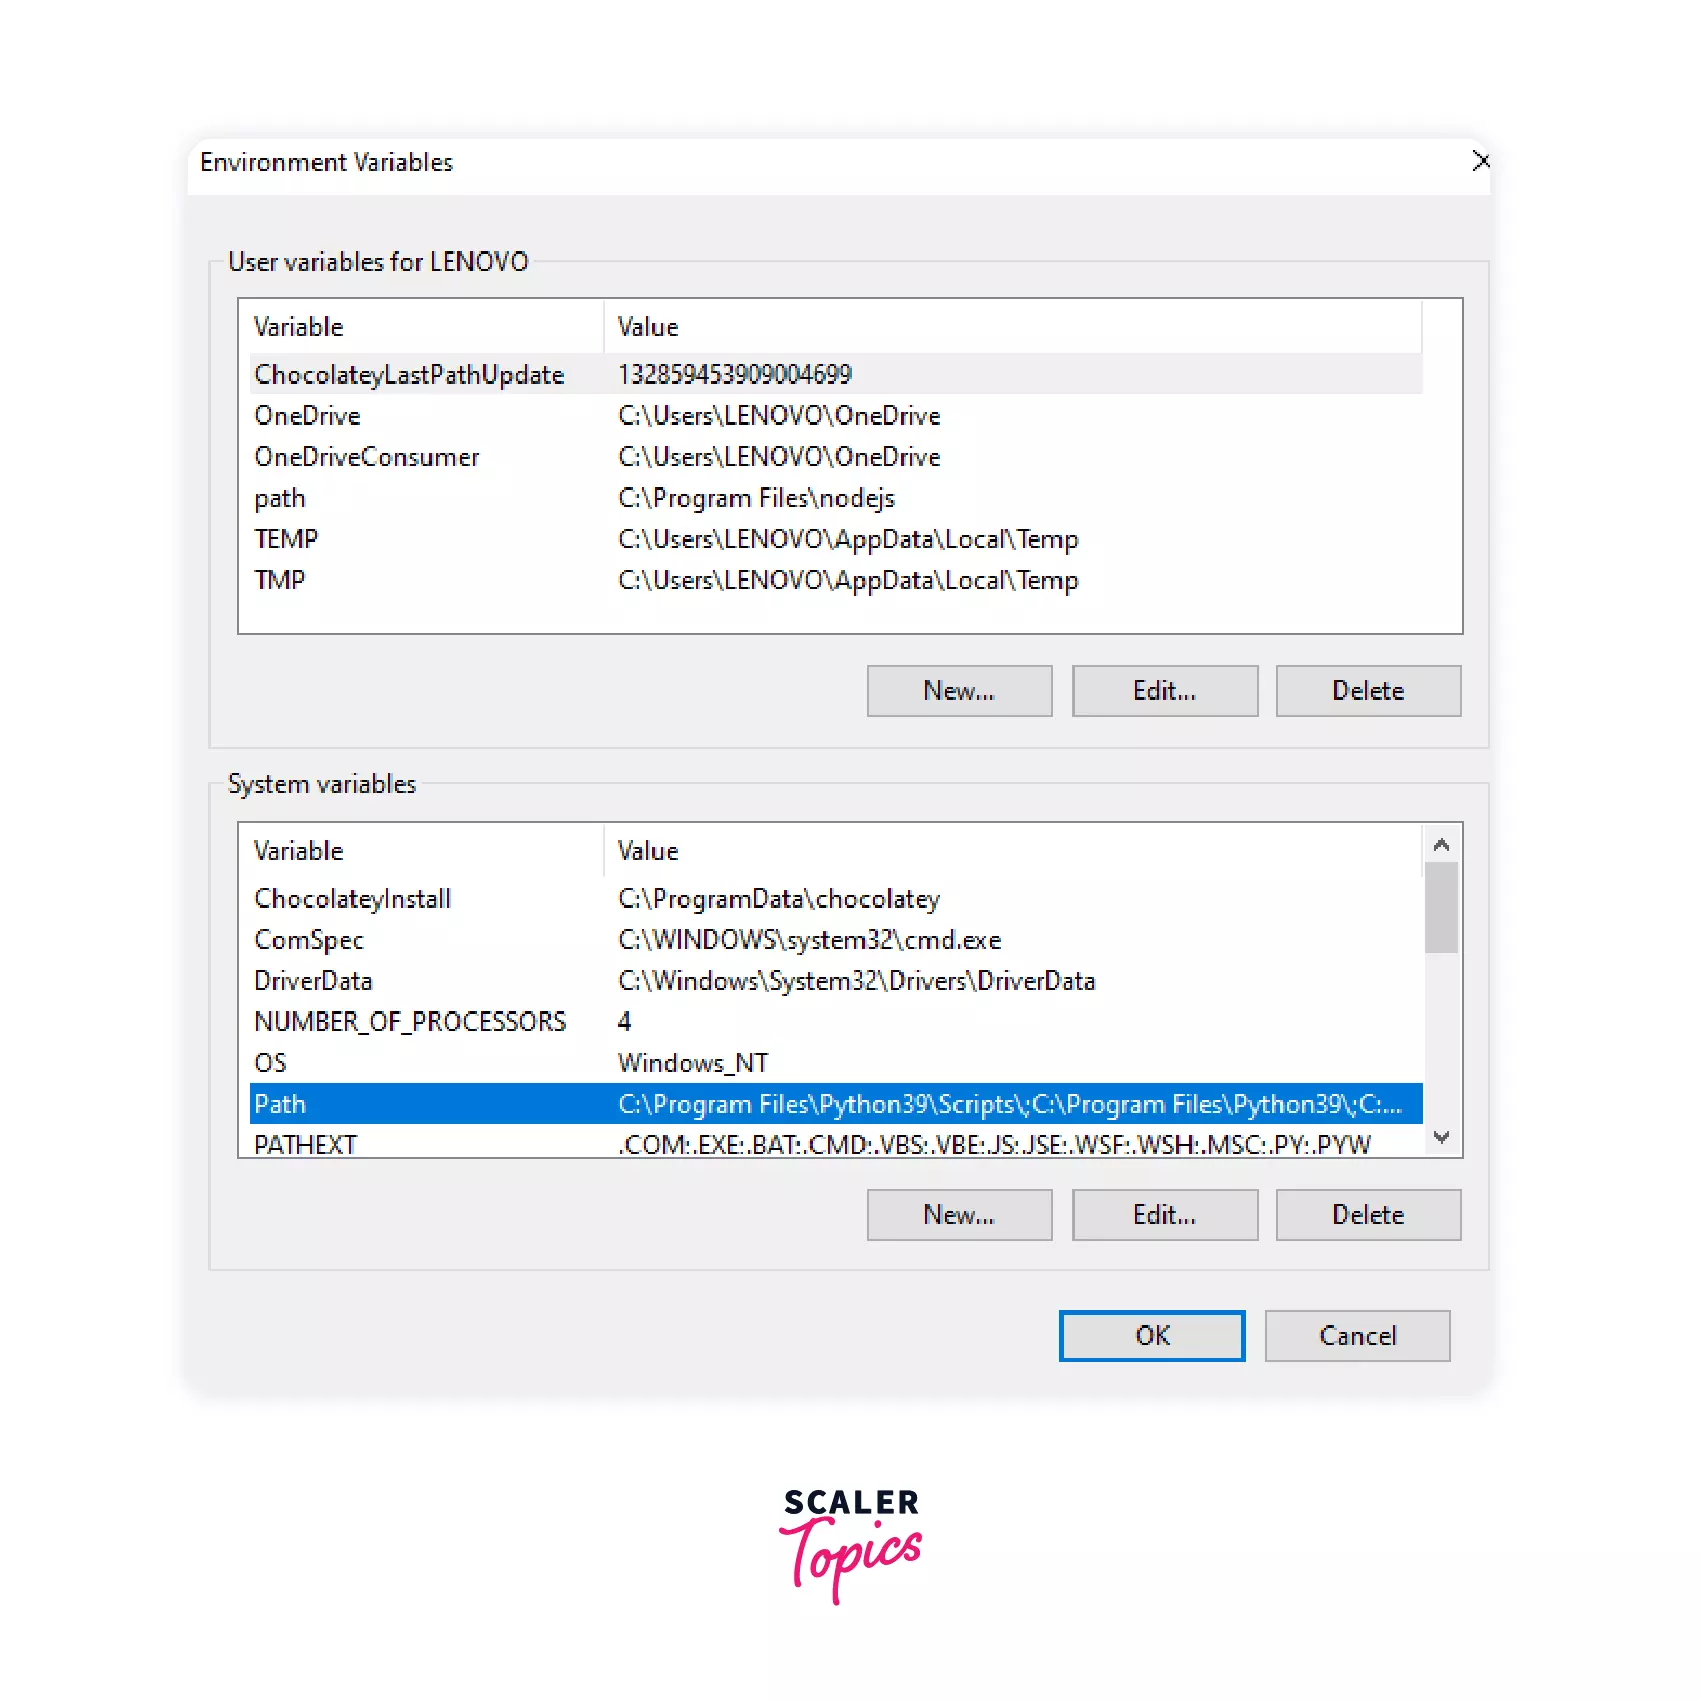
Go to C drive -> minGW folder -> bin folder and copy this path.
-
Search environment variables in the search section of windows and select environment variables.
-
Double click on this path variable.
-
Click on new and paste the path you copied earlier and click OK.
-
Open command prompt and write gcc --version. If you did every step properly, you would see something like this.
Now you can use this compiler to run your c++ codes.
To run your code, follow the below steps:
- Type your code in your favorite text editor and save it with the .cpp extension.
- Open the command prompt and go to that directory where you saved your code file, and write the below line to compile your code.
- After compilation completes, write file_name to run your code.
3. Mac OS X Installation
Many C++ development environments like Xcode and jGrasp are available freely for Mac users.
Installation steps for Xcode and jGrasp:
- Install Xcode and jGrasp.
- Run jGrasp.
- Go to settings, go to Compiler Settings, and go to Workspace.
- Change the language to C++.
- Select "c++ (g++) - Mac OS X" or "g++ - generic", click on Use, and click on OK.
Depending on your personal preferences, you can use jGrasp or Xcode as your IDE.
To test your installation using jGrasp:
- Run jGrasp.
- Click on File, go to New, and then go to C++. Write any simple code in the editing window.
- Click on File, go to Save As, and name the file with the .cpp extension.
- Click on Build and go to Compile and link.
- Click on Build and go to Run.
Debugger
Debugging is the process of detecting and removing existing and potential errors (also called 'bugs') in a code that can cause the software to behave unexpectedly or does not produce the desired output. A debugger or debugging tool is a computer program used to test and debug other programs. The primary use of a debugger is to run the target program under controlled conditions means you can add some breakpoints in your code. Whenever program execution reaches that break-point, the debugger suspends further program execution. The programmer can see if there is an error in that line of code by monitoring changes in computer resources or analyzing the output generated by that line of code.
Some widely used debuggers are:
- Arm DTT, formerly known as Allinea DDT
- GDB - the GNU debugger
- LLDB
- Microsoft Visual Studio Debugger
Version Control
Imagine working on a software project with your team where everyone works on their personal computers and adds new code or changes to the existing code. The question is how the team will keep track of all this because everyone works on their personal computers. Here come version control systems that keep track and manage the whole software code.
Using these version control systems, developers can compare their code with earlier versions of the code since these version control systems keep track of every modification made to the code, so if a developer commits any mistake, they can always compare their code with the previous versions and correct the mistake, or they can switch back to the previous one.
One of the most popular version control systems is Git, a free and open-source distributed version control system that keeps track of the software code and manages small to substantial software projects.
CMake/Bazel/Build-file Generator
Make is a tool that controls the generation of executables and other non-source files of a program from the program's source files. Make uses makefile to know how to build your program, and makefile lists each of the non-source files and how to compute it from other files. When you write a program, you should write a makefile for it so that it is possible to use Make to build and install the program.
However, writing instructions for make (i.e., makefile) can be pretty challenging. CMake makes the process of creating a makefile easier and allows you to think about the compilation of your source code more abstractly.
Bazel is also an open-source building and testing tool similar to Make. Still, in addition to that, it uses human-readable language to describe the build properties of our project, and it supports multiple platforms like Windows, Linux, and macOS.
Other C++ IDEs
1. Code:: Blocks

Code::blocks is an open-source and free IDE for C and C++ which can be used on multiple platforms, build in C++ using a GUI widget tool called “wxWidget”. This IDE is specially used for programming in C++ with smooth performance.
Features:
- Open-source.
- Runs on Linux, Mac, Windows.
- It is written in C++. No interpreted languages or proprietary libs are needed.
- Many plugin options are available, which increases coding speed.
2. Eclipse

Eclipse is one of the most popular and powerful IDE for C++ developers. It is also open-source and free to use with excellent community support. It supports multi-platforms like Windows, Linux, and macOS, and many users find it easy to use.
Features:
- Coding shortcuts.
- Autocorrection of code.
- Formatting of code.
3. Atom

Atom is a powerful text editor developed by GitHub. It can be used for development in C++ as well as for a host of other languages.
Features:
- Coding shortcuts.
- Autocorrection of code.
- Syntax checking of the code.
- Mouse hover option by which you can see additional information about an object.
4. Sublime Text

Sublime text is also a powerful IDE with simple UI and can be used for multiple programming languages like C++.
Features:
- Coding shortcuts.
- Autocorrection of code.
- Syntax highlighting of the code.
- Snippets: type a word, and it will generate your snippet. For example, typing lorem generates lorem ipsum text.
Conclusion
- To execute a code on the local machine, we need two softwares: a text editor to code and a c++ compiler to compile.
- Some popular IDEs that we can use are Visual Studio, Sublime Text, Atom, etc. We can also use online IDEs like Interviewbit Online IDE, GFG, CodeChef, ideone, etc., to avoid setting up the local environment on our personal computer.
- To compile our code, we use compilers that convert high-level source code to executable machine-level instructions of 0s and 1s.
- For detecting potential errors in our code, we use debuggers.
- For tracking every modification, such as the addition of new code and the updation of the previous one, we use version control systems like git.