Django Channels
Overview
Django is an efficacious Python web development framework. It is quick, safe, and dependable. The asynchronous protocols WebSockets, MQTT, chatbots, and others can all be handled by Django projects using Django channels.
Channels maintain Django's synchronous behavior as well as add a layer of asynchronous protocols, enabling users to create views that are either entirely synchronous, entirely asynchronous, or a hybrid of the two. In essence, channels enable "long-running connections" for the application. It switches Django's built-in WSGI for its ASGI.
Introduction to Django Channels
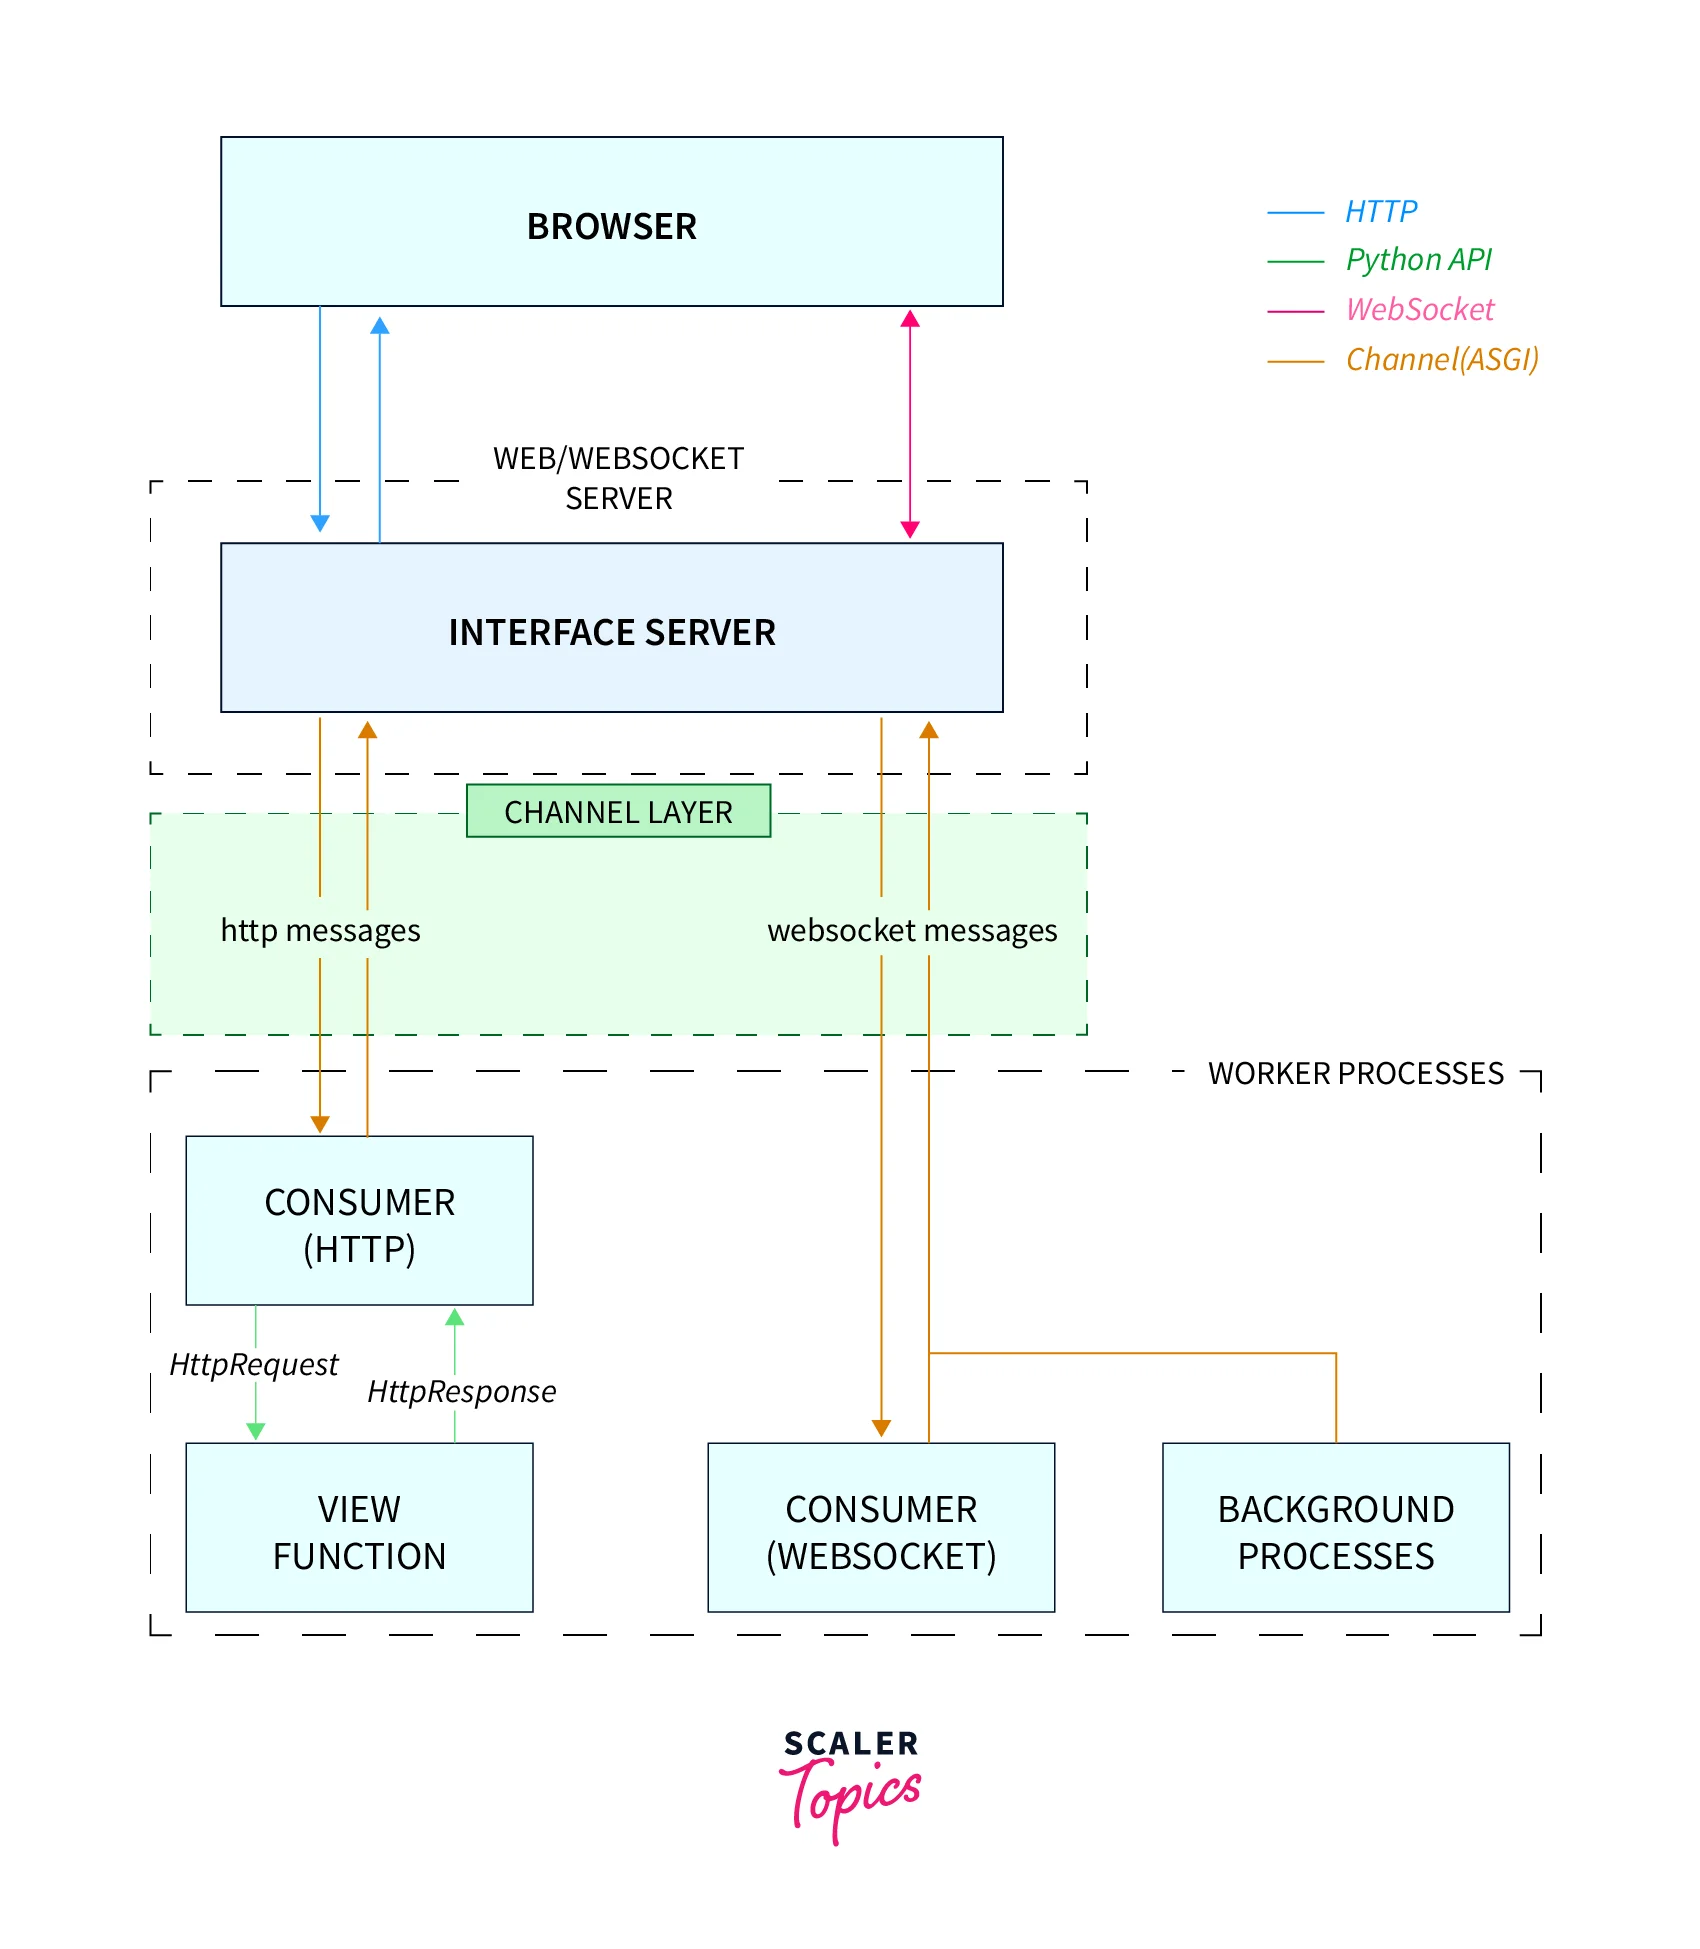
Django's capabilities are expanded by the Channels project to support WebSockets, chat protocols, IoT protocols, and many more in addition to HTTP. It is constructed utilizing the ASGI Python specification.
Channels expand on Django's native ASGI support, which has been around since version 3.0 and offers a Django v2.2 implementation. While Django continues to manage conventional HTTP, Channels allows you to manage those certain connections in either an asynchronous or synchronous manner.
Furthermore, Django Channels include channel layers, a system that enables simple interprocess communication and divides your project into various processes. Django Channel layers are bundled with this event-driven architecture.
ASGI
The long-standing Python standard for backward compatibility between web servers, frameworks, and applications, WSGI(Web Server Gateway Interface), is being replaced by ASGI (Asynchronous Server Gateway interface), which is its spiritual successor. With the help of WSGI, Python web developers were able to operate with a great deal more creativity and freedom. ASGI aims to carry this success into the world of asynchronous Python.
How Does ASGI Function?
A single, asynchronous callable serves as the structure of ASGI. It requires a scope, a dict containing information about the particular connection, send an asynchronous callable that enables event messaging between the application and the client, and receive an asynchronous callable that enables event messaging between the application and the client.
This permits each application to receive and send multiple events and a background coroutine that lets the application perform other tasks (such as listening for events on an external trigger, like a Redis queue).
An application can be created as an asynchronous function in its most basic form, as shown here:
Each event you send or receive is a Python dict with a standard format. These event formats serve as the foundation for the standard and enable application switching between servers.
Each of these events has a type key that has been defined and can be used to determine the event's structure. An example event that you might receive from an HTTP request's body is as follows:
Here is an illustration of an event you might pass to send a WebSocket message outbound:
Consumers and Groups
Although Django Channels is based on a simple low-level specification called ASGI, it is more suited for interoperability than developing sophisticated applications. To make ASGI applications quickly, Channels offers your Consumers a rich abstraction.
Consumers specifically engage in the following actions:
1. Instead of forcing you to write an event loop, organize your code as a set of functions that will be called when an event occurs.
2. Allow you to develop synchronous or async code and take care of threading and handoffs for you.
However, they're typically the most efficient way to write your application code. You can ignore consumers and use the other Django Channels components instead, such as routing, session handling, and authentication, with any ASGI app.
Let's build our first consumer to manage the server's and client's fundamental connections. Make a brand-new file called example_channels/example/consumers.py:
Consumers are Django views' antithesis. Any user who connects to our application will be added to the group "users" and receive messages sent by the server. The channel is removed from the group when the client disconnects from our application, and the user will no longer receive messages.
Next, add the following code to a new file named example_channels/routing.py to configure routes, which function almost identically to Django URL configuration:
As a result, we defined route(() and channel_routing in place of urlpatterns and url(), respectively. Please take note of how we connected WebSockets to our consumer functions.
Templates
Using the Django template language, a text file or Python string is marked up as a Django template. The template engine understands and recognizes some constructs.
Let's create some HTML to allow WebSocket communication with our server. A "templates" folder should be created inside of "example", and then an "example" folder should be added there: "example_channels/example/templates/example".
Include a base.html file:
And user_list.html:
A confirmation message will print to the console when the client establishes a WebSocket connection with the server.
Transform Your Career
Choose from our industry-leading programs designed for career success
Modern Software and AI Engineering Program
Master full-stack development with AI integration

Modern Data Science and ML with specialisation in AI
Advanced data science techniques with AI specialization
Advanced AIML with Specialisation in Agentic AI
Deep dive into AIML with focus on Agentic systems
DevOps, Cloud & AI Platform Engineering
Build and manage AI-powered cloud infrastructure
AI Engineering Advanced Certification by IIT-Roorkee
Premier AI engineering certification from IIT-Roorkee
Views
Create a supporting Django view so that our template can be rendered there. example_channels/example/views.py:
Include the URL to example_channels/example/urls.py:
Additionally, in example_channels/example channels/urls.py:,modernise the project's URL:
Scaler Placement Report and Statistics
Scaler learners achieved 2.5x salary growth with average post-Scaler CTC reaching ₹23L.
Test
Ready to take the test?
Note: to evaluate the worker servers and the interface as two distinct processes, you can also run python manage.py runserver —noworker and python manage.py runworker in two different terminals. They both function!
You ought to be able to observe the following connection message printed to the terminal when you visit http://localhost:8000/,
Add Channels
Let's now configure Django Channels. First, install the package:
(env)$ pip install channels==3.0.4
Next, add channels to INSTALLED_APPS inside thecore/settings.py list:
ProtocolTypeRouter
channels.routing.ProtocolTypeRouter This ought to be the main item in your routing file and the top level of your ASGI application stack.
In accordance with the type value that is contained in the scope, it enables you to dispatch to one of numerous other ASGI apps. You can use this to differentiate between different sorts of incoming connections because protocols define a defined type value that their scope encompasses.
It only needs one argument, a dictionary that links type names to the appropriate ASGI applications:
Use a URLRouter with Django's get asgi application() specified as the final entry with a match-everything pattern if you wish to divide HTTP handling between long-poll handlers and Django views.
Since WebSockets will be used in place of HTTP for client-to-server communication, we must wrap our ASGI configuration in ProtocolTypeRouter in core/asgi.py:
Depending on the protocol being used, this router will direct traffic to different areas of the web application.
Next, we need to tell Django where our ASGI application is located. Just below the WSGI_APPLICATION setting in your core/settings.py file, add the following:
You notice that Channels is being utilized when you launch the development server right now:
Launching the ASGI/Channels 3.0.4 development server at http://127.0.0.1:8000/
Add Chanel Layer
A channel layer is a communication system that enables communication between various application components without having to route every message or event through the database.
They can additionally be utilized in conjunction with a worker process to create a simple task queue or to offload tasks.
We could use a channel layer to enable consumers to communicate with one another (which we'll incorporate in the following step).
Since we're in development mode, we could use the InMemoryChannelLayer layer, but since RedisChannelLayer is production-ready, we'll use it instead.
Run the following command to get this layer up and running with Docker because it needs Redis:
(env)$ docker run -p 6379:6379 -d redis:5
With this command, a Redis Docker container is started on port 6379, and the image is downloaded.
Django requires the installation of a separate package called channels_redis to connect to Redis:
(env)$ pip install channels_redis==3.3.1
After that, modify the layer as follows in core/settings.py:
Here, we inform channels_redis of the location of the Redis server.
Unlock the Django shell to see if everything operates as anticipated:
(env)$ python manage.py shell
Then run:
Here, we used the settings outlined in core/settings.py to connect to the channel layer. Then, we sent a message to the test_channel group using channel_layer.send and read every communication delivered to that specific group using channel_layer.receive.
For the shell to exit, type quit().
Add Channels Consumer
The fundamental building block of a channel's code is the consumer. They are relatively small ASGI applications that are triggered by events. They resemble Django views. Consumers, on the other hand, are long-running by default, in contrast to Django views. A Django project can now have multiple consumers which are merged utilizing Channels routing (which we'll look at in the next section).
Each consumer has a scope, a collection of information about only one incoming connection. They include data like protocol type, path, headers, routing arguments, user agents, and more.
Inside "chat" create a brand-new file called consumers.py:
Here, a ChatConsumer that descended from WebsocketConsumer was created. Three methods are offered by WebsocketConsumer: connect(), disconnect(), and receive().
- To accept the connection, we called accept() inside of connect(). The user was then added to the group for the channel layer after that.
- The user was removed from the channel layer group in the disconnect() function.
- We converted the data to JSON and extracted the message inside of receive(). We then sent the message to chat_message using group_send.
When working with the channel layer, we used the async_to_sync function because WebsocketConsumer is a synchronous consumer. We chose a sync consumer because the chat application is closely related to Django (which is sync by default). In other words, using an async consumer wouldn't improve performance.
Note: By default, you ought to use sync consumers. Use only async-native libraries and async consumers if you are confident that what you are doing would benefit from async handling (such as long-running tasks that could be completed in parallel).
Add Channels Routing
We can combine and stack consumers using the different routing classes that Channels offers. They resemble the URLs used by Django.
Routing.py should be added to "chat":
Inside core/asgi.py, register the routing.py file:
Turn Learning into Career Growth
WebSockets
We'll employ the WebSocket API to communicate with Channels from the front.
The use of WebSockets is effortless. It would be best if you first created a connection by entering a url before you can start listening for the following events:
- When a WebSocket connection is made, the onopen method is invoked.
- When a WebSocket connection is lost, the onclose method is invoked.
- A WebSocket that receives a message calls the onmessage function.
- A WebSocket's onerror function is called whenever one occurs.
Add the next to the rooms.js bottom to incorporate WebSockets into your application:
After establishing the WebSocket connection, we identified the message type using data.type in the onmessage event. Note how the WebSocket was enclosed within the connect() method so the connection could be re-established if it dropped.
Last but not least, change the TODO in chatMessageSend.onclickForm to read:
The complete handler should now appear as follow:
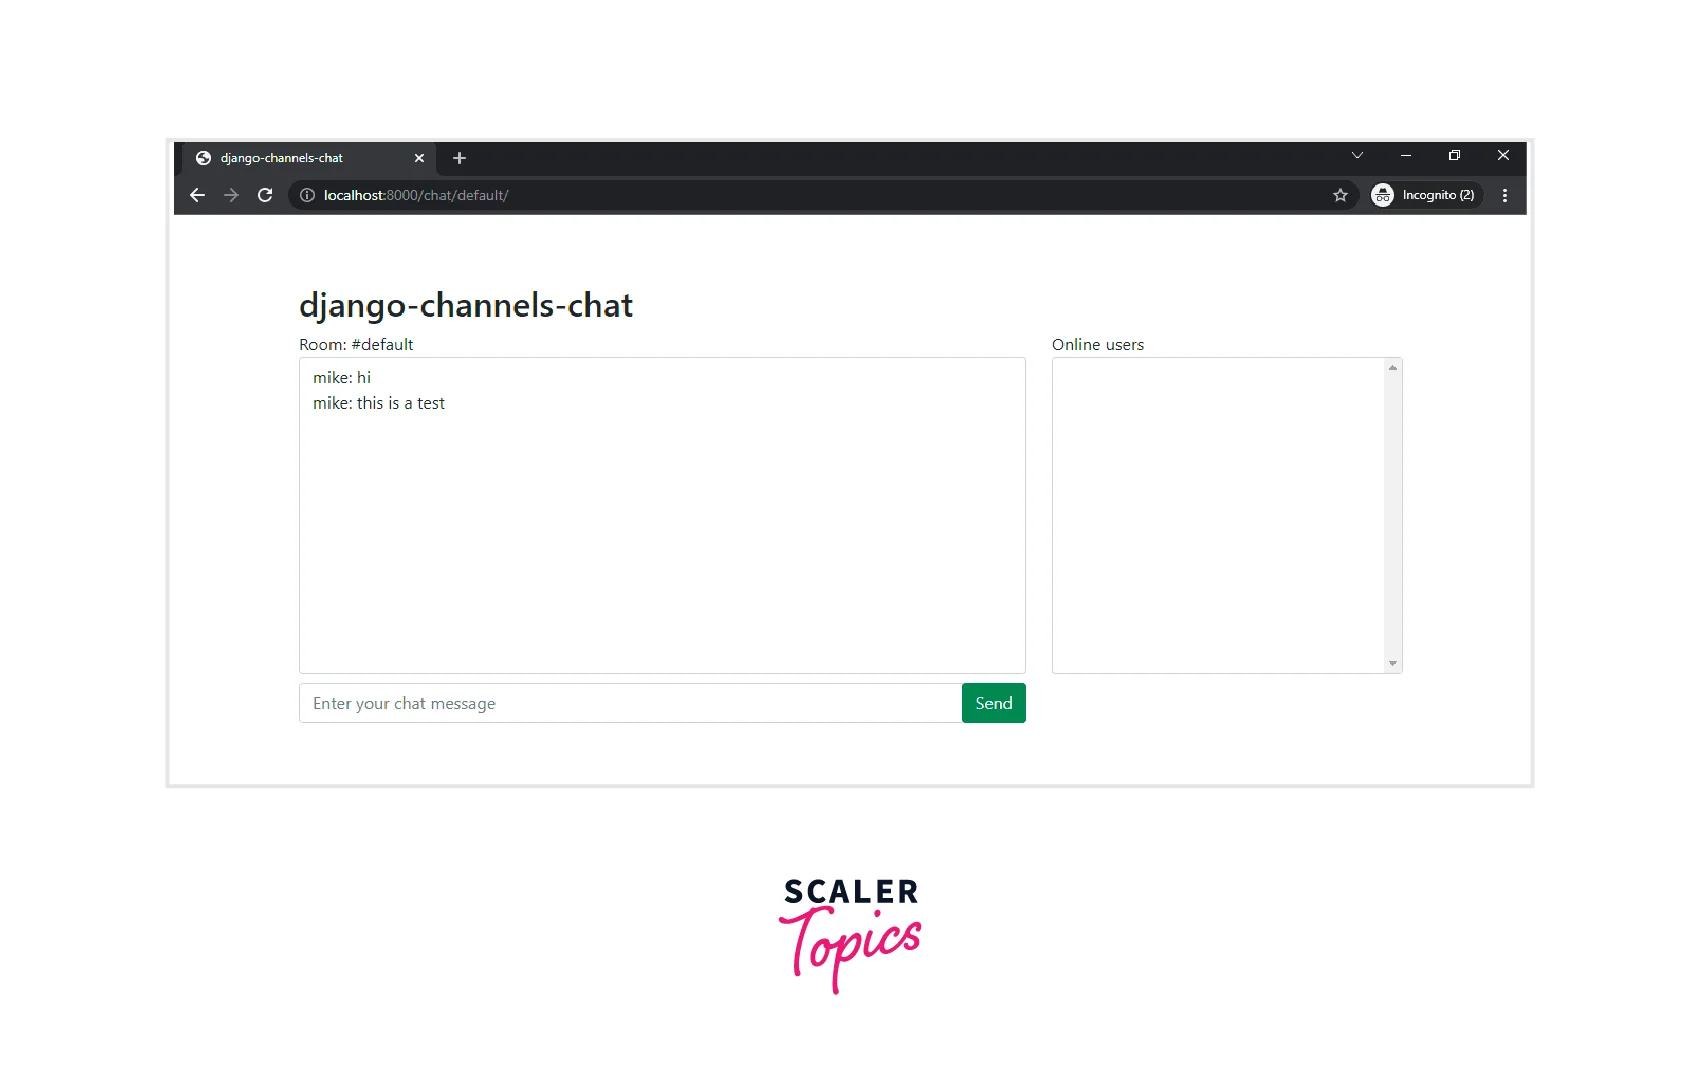
The chat's initial version has been completed.
Run the development server to test. Next, open two private or incognito browser tabs and go to http://localhost:8000/chat/default/ in each one. You ought to have the ability to send messages:

User Authentication
After demonstrating that we can establish a connection, we will take care of user authentication.
Remember: When a user logs into our app, we want them to be able to see a list of all the other users who have joined their group. We must first provide users with a method of account creation and login. Create a specific login page to get things started so that can log in using their username and password.
In "example_channels/example/templates/example," add a new file called log_in.html.
Following that, modify example_channels/example/views.py as follows:
Django includes forms that support standard authentication features. The AuthenticationForm can be used to manage user login. When a valid user is found, this form returns a User object after verifying the supplied username and password. After confirming a user, we log them in and send them to our home page. We design a logout view that offers that functionality and returns the user to the login screen because a user should be able to log out of the application.
Update example_channels/example/urls.py after that:
We also require a method for adding new users. Create a sign-up page by including a new document namedsign_up.html to "example_channels/example/templates/example": in the same way you created the login page:
You'll see links from the login page to the sign-up page and from the sign-up page to the login page.
Add the following feature to the views:
For user creation, we make use of another built-in form. When the form validation is successful, we direct you to the login page.
Ensure that the form is imported:
Refresh example channels/example/urls.py as necessary:
Currently, we must create a user. Launch the server and open your browser to http://localhost:8000/sign_up/. To generate our first user, complete the form and enter a strong username and password.
Note: Remember to try Username= Michael and passcode= Johnson123.
We could also authenticate our freshly formed user from the log_in view after the sign_up view directs us there.
We can check out our new authentication views once we've logged in.
To prepare for the following section, use the signup form to create several new users.
User Messages
Following that, we'll include the following three message types:
- user_list is the message sent to a newly registered user (data.users = collection of online users).
- When a user enters a chat room, the message user_join is sent
- user_leave, sent whenever a user exits a chat room
Backend
In ChatConsumer, add the following after the connect method:
In ChatConsumer, add the following after the disconnect method:
We also need to add the channel layer's methods even though we added new message types. Add the following after chat/consumers.py:
After completing this step, your consumers.py should appear as follows: consumers.py.
Frontend
Add the following cases towards the switch statement in the chatSocket.onmessage handler to handle the messages from the frontend:
Testing
Restart the server, sign in, then go to http://localhost:8000/chat/default.
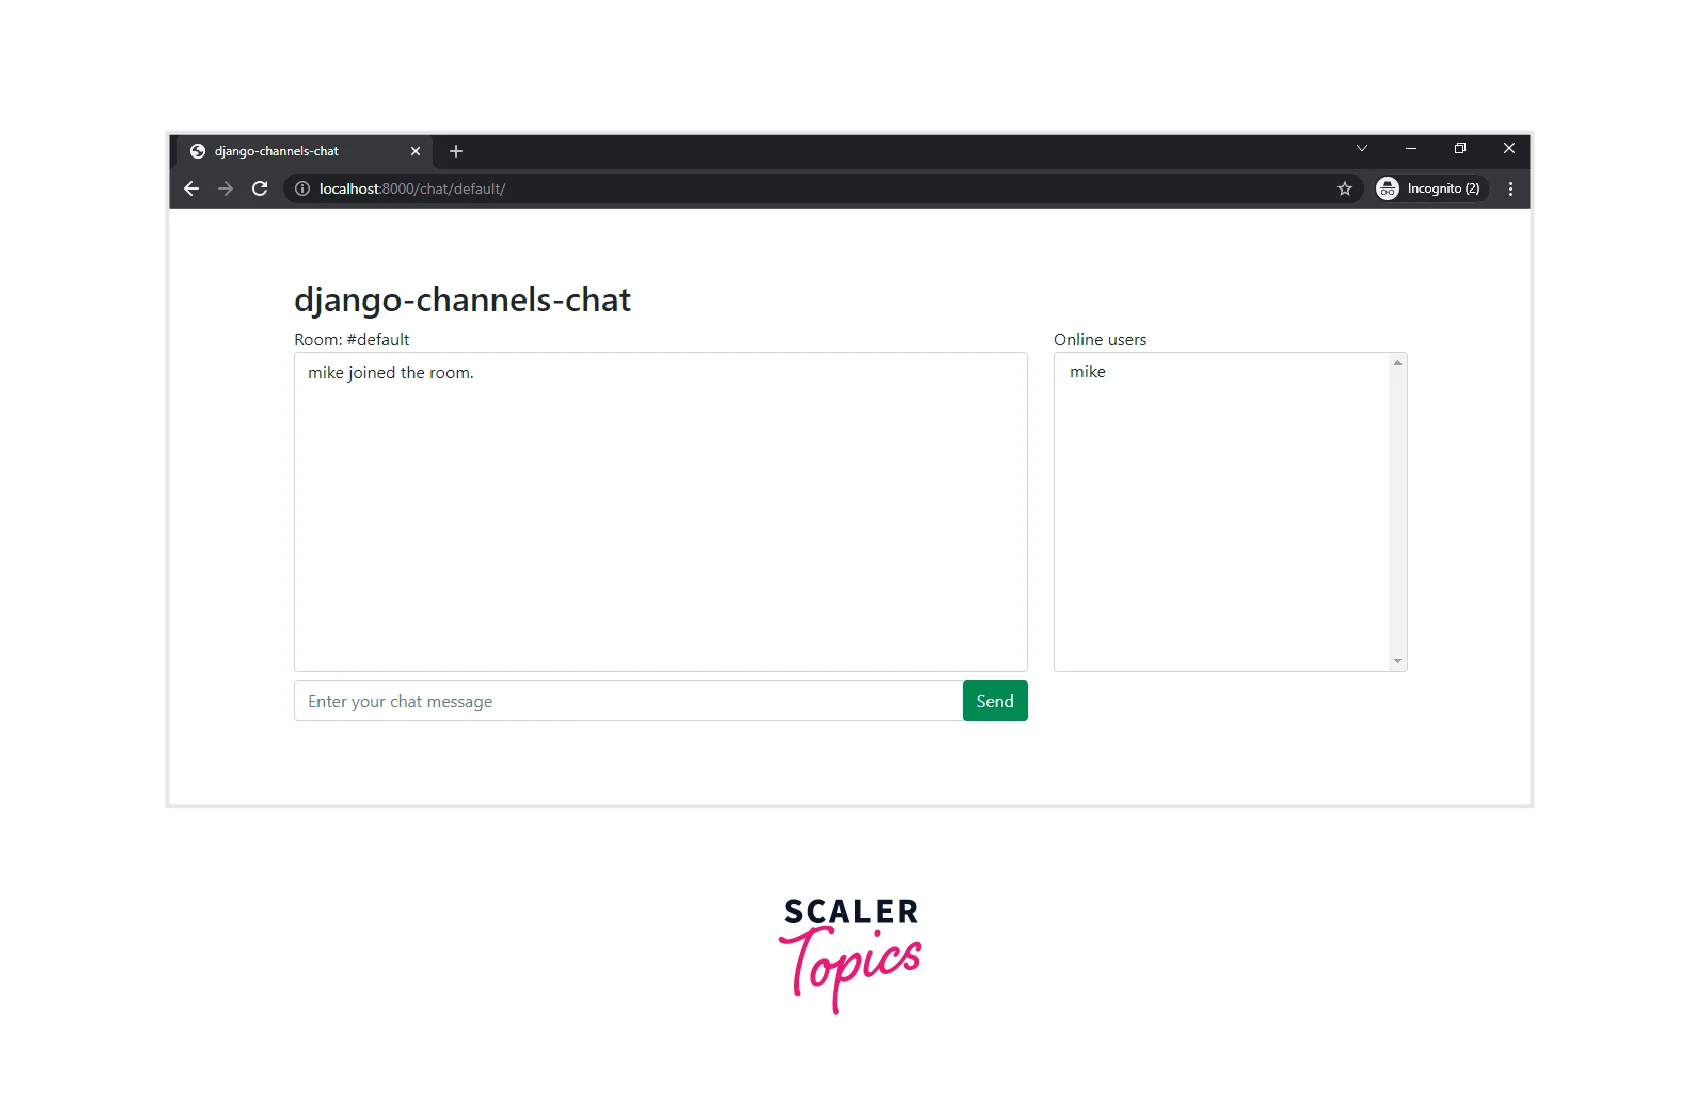
You ought to be able to see the join and leave messages at this point. Additionally, the user list needs to be filled out.
Scaler Placement Report and Statistics
Scaler learners achieved 2.5x salary growth with average post-Scaler CTC reaching ₹23L.
Private Messaging
Since the Channels package does not support direct filtering, there is no built-in mechanism for sending messages from one client to another. You can send a message using Channels to:
- The client of the consumer (self.send)
- (self.channel_layer.group send) is a channel layer group.
Therefore, in order to establish private messaging, we will
- Each time a client joins, make a new group called inbox_ %USERNAME%.
- Add the client to the inbox_%USERNAME% group that belongs to them.
- When client disconnect, remove them from the inbox group (inbox_%USERNAME%).
Each client will eventually have a separate inbox for private messages. The inbox_%TARGET_USERNAME% will then receive private messages from other clients.
Backend
Modify chat/consumers.py.
So, we:
- To ChatConsumer, user_inbox was added, and it was initialized on connection().
- When the user connects, the user_inbox group is added to their membership.
- Upon disconnecting, the user was taken out of the user_inbox group.
Next, alter receive() so that it can handle private messages:
At the conclusion of chat/consumers.py, include the following methods:
This file should be your final chat/consumers.py file: consumers.py
Frontend
Add the private_message and private_message_delivered cases to the switch(data.type) statements to manage private messages in the front end.
An individual who clicks one of the users that are online onlineUsersSelector, the message input can be changed to pm %USERNAME% to make the chat a little more user-friendly. At the bottom, incorporate the following handler:
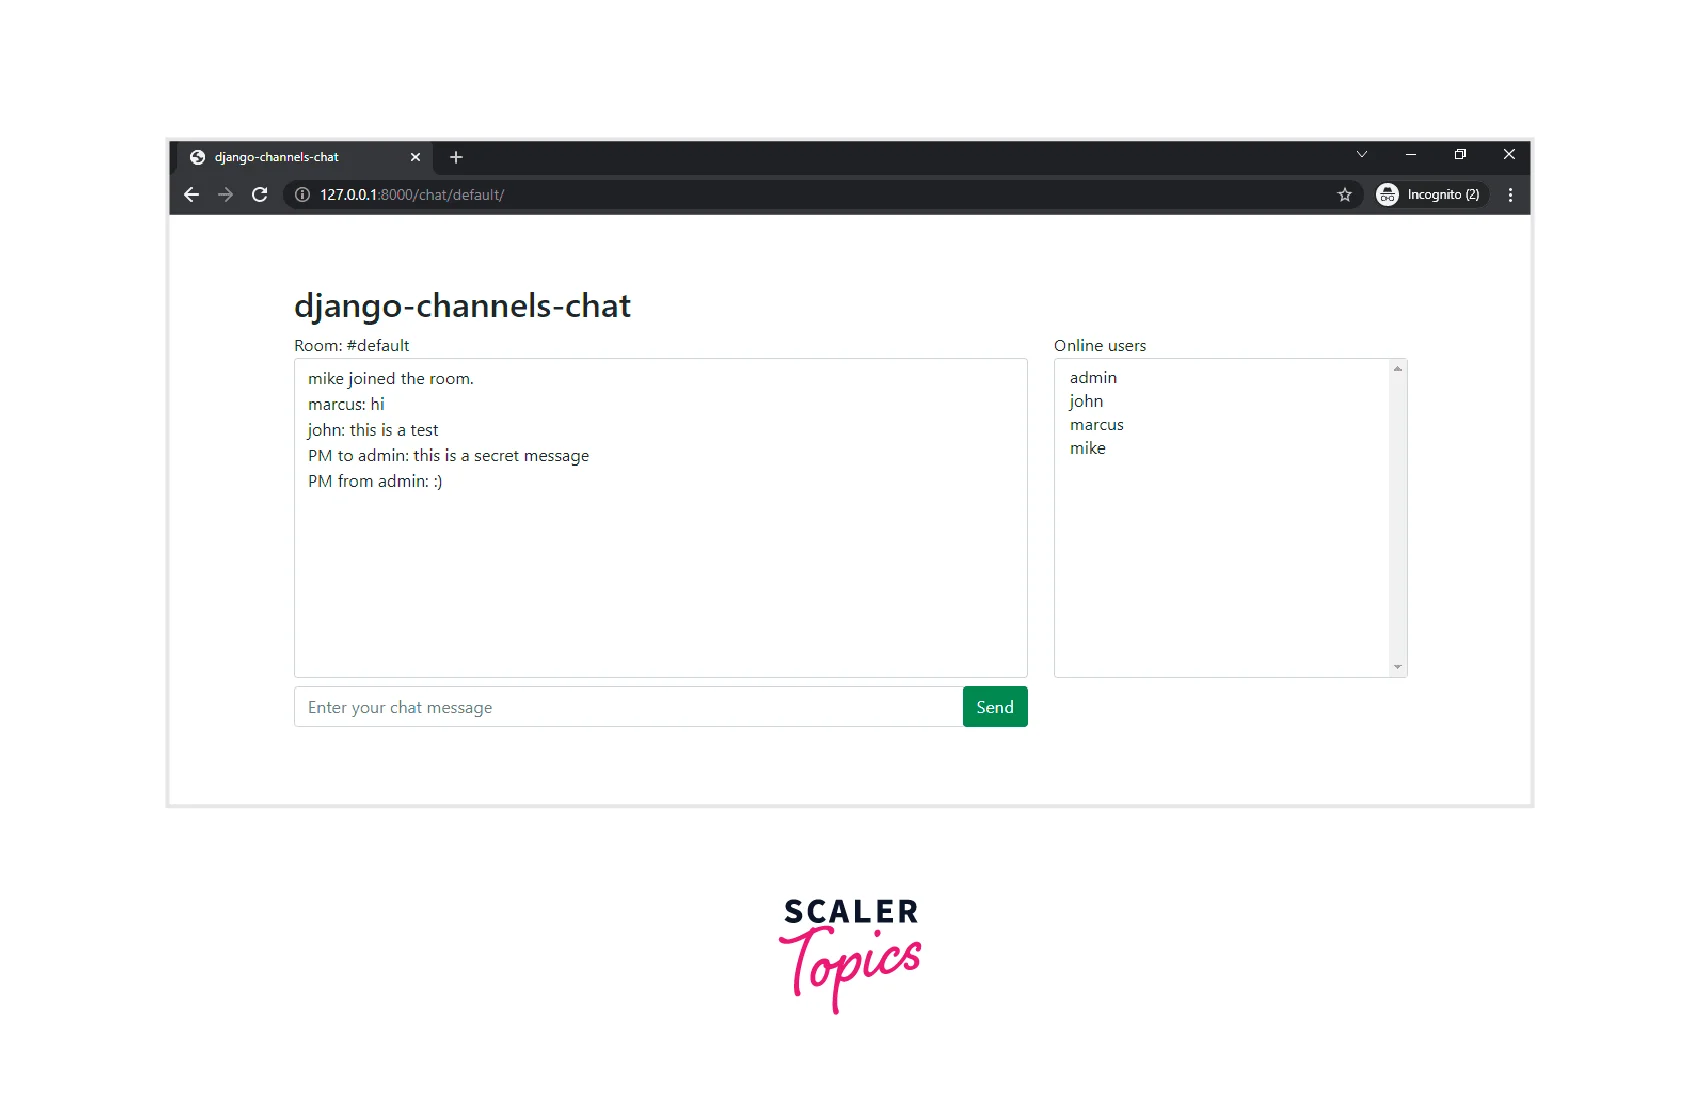
Testing
I'm done now! The chat application has been finished. Let's give it one more try.
Run the server after creating two superusers for testing.
Activate two private/incognito browsers, each of which should be logged at http://localhost:8000/admin.
Then open both browsers and go to http://localhost:8000/chat/default. Click on one of the associated users to send them a private message.
Login Alerts
When a user logs in and out, the server must notify the group, and we continue to display a list of users even though we have a basic authentication process working. We need to change our consumer functions to send messages immediately following and immediately before client connections and disconnections. The username and connection status of the user is included in the message data.
In example_channels/example/consumers.py, update it as follows:
Please take note of the decorators we've added to the functions to retrieve the user from the Django session. Additionally, since every message must be able to be serialized into JSON, we unload our data into a JSON string.
Then, alter example_channels/example/templates/example/user_list.html as follows:
We extend our user list and publish a list of users on our main page. To make it simple to locate each user's item in the DOM, we keep each user's username like a data attribute. Our WebSocket additionally gains an event listener that can manage server-side message handling. After parsing the JSON data in a message, we change the status of the specified user by locating the <li> element for that user.
We must build a straightforward model to track whether a user is logged in because Django does not do that automatically. Create a LoggedInUser model in "example_channels/example/models.py" that is connected directly to our User model.
When a user logs in to our app, a LoggedInUser instance is created, and when the user logs out, the instance is deleted.
Before migrating our database to implement the changes, migrate the schema.
Next, modify example_channels/example/views.py to retrieve a list of users for rendering in our user list view:
A user's status is recorded as "Online" if there is an associated LoggedInUser; otherwise, it is "Offline". To limit access to only registered users, we also added a @login_required decorator to both our user list and log-out views.
Also, include the imports:
Currently, users can log in and out, causing the server to send texts to the client, but we now have no way to determine which users are logged in when a user first logs in. Only when another user's status changes do they appear to the user. This is when the LoggedInUser comes into play, but we require a way to create an instance of the LoggedInUser when a user_logged_in and then delete it when the user_logged_out.
Signals, a feature of the Django library, broadcast notifications when specific events occur. Applications may be able to listen to these notifications and respond accordingly. The (user_logged_in and user_logged_out) built-in signals can be used to handle our LoggedInUser behavior.
Add a new file named signals.py to "example_channels/example":
We must enable the signals in example_channels/example/apps.py, the configuration file for our app:
Additionally, update example_channels/example/__init__.py:
default_app_config = 'example.apps.ExampleConfig'
Sanity Check
Now that we have finished the coding, we are prepared to connect to our server and test our app with a large user base.
Start the Django server, sign up for a user account, and go to the home page. Each user in our app should have the status "Offline," and we should see a list of them. Watch both screens after opening a new Incognito window and logging in as a different user. The default browser changes the user status to "Online" immediately after we log in. The logged-in user's status is "Online," as we can see from our Incognito window. The WebSockets can be tested by logging in and out on various devices with different users.

WebSocket connections are created when a user logs in and are destroyed when a user logs out, according to our observation of the developer console here on the client and the server activity in our terminal.
Conclusion
- When a user is authenticated, an event is broadcast to all other connected users via Django channels, which essentially manage communication between the client and the server using WebSockets. Without requiring them to reload their browsers, each user's screen will automatically change.
- Applications such as chats or easy games are perfect candidates for WebSockets. The client typically receives messages from other people involved over a considerable amount of time during lengthy chat sessions.
- This is the crucial idea to remember: Through the use of WebSockets,the Django Channels allow us to push messages from the server to groups of users, extending the functionality of a standard Django app.
- Consider a few possible applications. We can design real-time communication tools like chat rooms, multiplayer games, and collaborative apps.
- WebSockets can improve even the most routine tasks. For instance, the server could push a status update to the client when a long-running task is finished rather than having the client repeatedly poll the server to check if it has finished.