How to Build a Dockerfile for a Ruby Application?
Overview
Developing and deploying applications can be challenging, especially when managing various dependencies and environments. Docker, an advanced containerization platform, simplifies this process by packaging applications and their dependencies into lightweight containers that can be easily deployed and managed on any web server. This article aims to guide you on building a Docker file specifically for a Ruby application, empowering you to create consistently and efficiently packaged applications.
What is Docker?
Docker is a platform that offers a range of services for creating, running, and maintaining containers. This platform streamlines the deployment and management of applications by utilizing containers. These containers are self-contained and efficient instances that package an application, along with its dependencies and the required runtime environment. They ensure a uniform and portable execution environment, regardless of the underlying infrastructure.
Here's a breakdown of the key concepts related to Docker:
- Docker Containers:
Containers are like virtual machines but with a key difference. Instead of emulating an entire operating system, containers share the host operating system's kernel, making them lightweight and efficient. Think of containers as individual compartments that isolate applications, allowing them to run independently without interfering with each other. Each container has its own isolated file system, network interfaces, and processes. - Docker Images:
Docker images serve as the building blocks for containers. An image is a file system snapshot that includes everything needed to run an application, such as the code, libraries, and system tools. It's like a blueprint that defines the contents and configuration of a container. Docker images are portable and can be shared across different environments, ensuring consistent application behavior. - Dockerfile:
A Dockerfile is a plain text file that includes instructions for constructing a Docker image. It outlines the necessary steps for image creation, such as specifying the base image, adding dependencies, copying files, and configuring the container. By utilizing a Dockerfile, developers can effortlessly replicate the required environment and dependencies for their application. This approach ensures high reproducibility and prevents compatibility problems. - Docker Registry:
Docker Registry is a repository that stores and distributes Docker images. The default public registry is Docker Hub, which hosts a vast collection of pre-built images. Developers can also set up private registries to store custom images for their organization. - Docker Engine:
The Docker Engine is the core component of Docker that manages containers. It provides the runtime environment to create, start, stop, and monitor containers. Docker Engine interacts with the host operating system's kernel to manage the resources and isolation provided to containers.
One way to understand Docker's work is through an analogy of shipping containers. Just as shipping containers provide a standardized way to transport goods, Docker containers provide a standardized way to package and deploy applications. Docker images are like shipping containers loaded with all the necessary items for an application. The Docker Engine acts as the crane that loads and unloads these containers onto ships (hosts), ensuring they are isolated and secure during transit.
Docker simplifies application deployment by providing a consistent environment for developers, eliminating compatibility issues, and reducing dependencies on specific operating systems or hardware configurations. It enables faster development cycles, efficient resource utilization, and easy scalability. With its rich ecosystem and extensive community support, Docker has become an integral part of modern application development and deployment workflows.
What Makes Docker Different from a Virtual Machine?
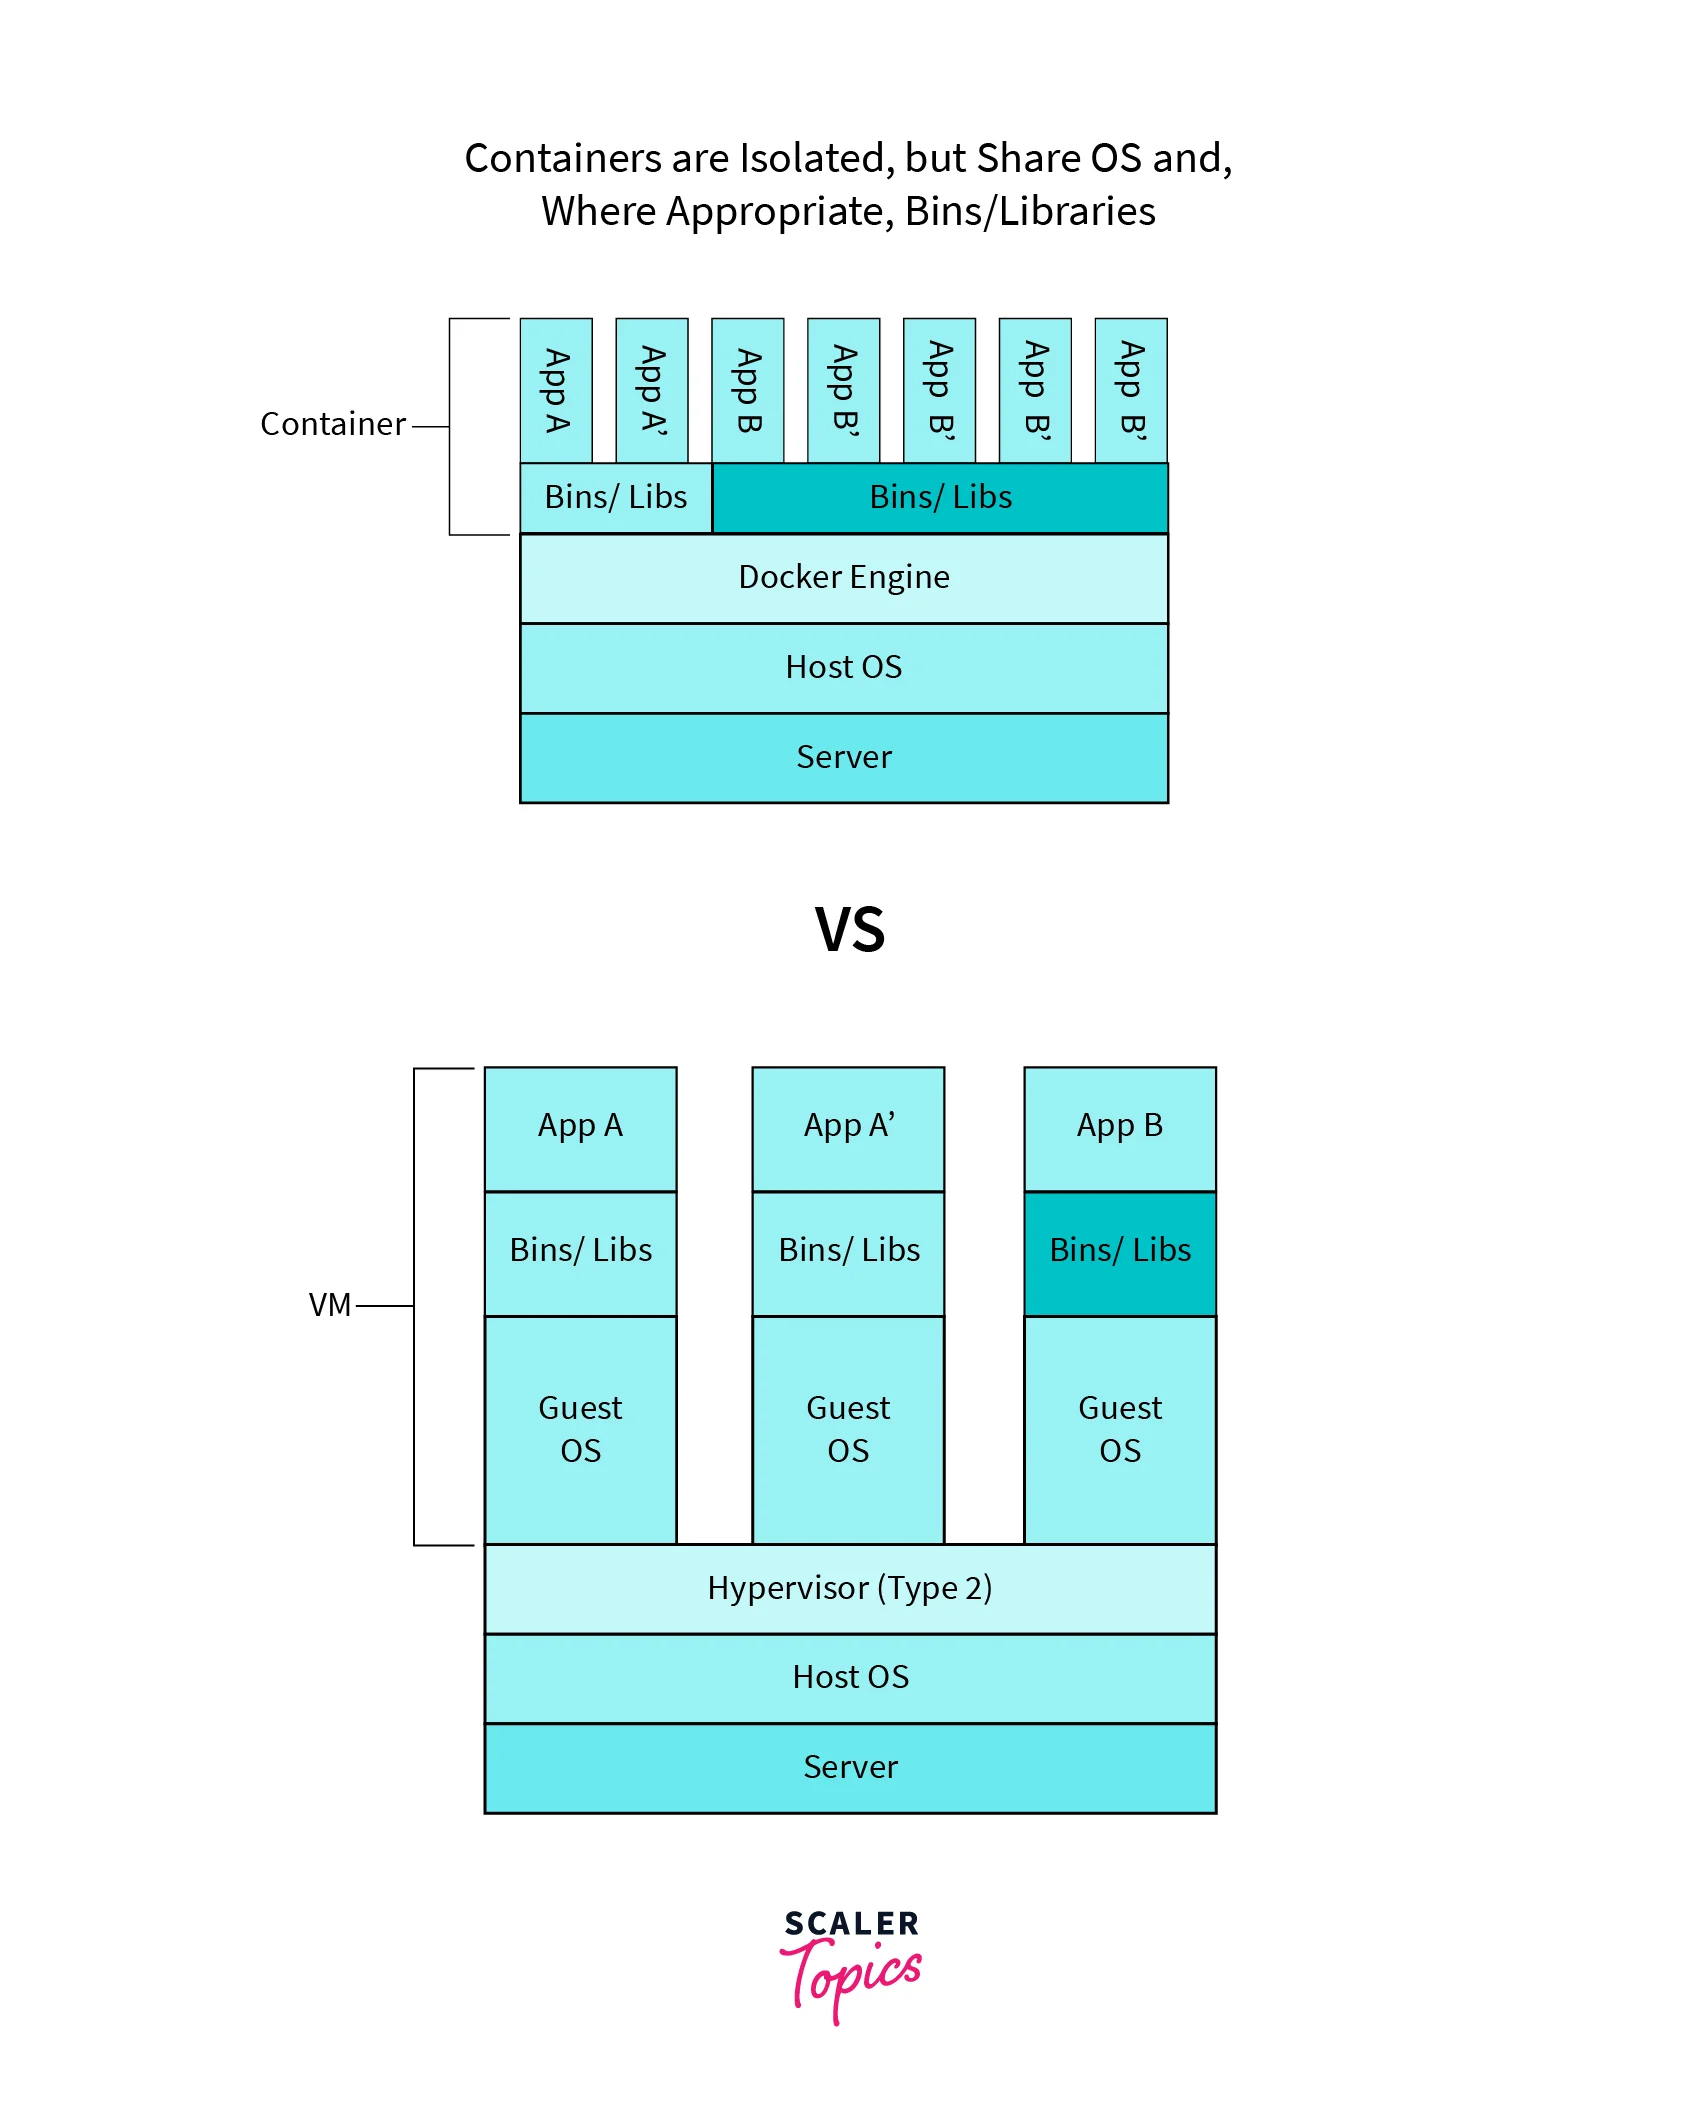
Docker distinguishes itself from virtual machines (VMs) by offering a more lightweight and efficient approach to application isolation and deployment. While VMs emulate a complete operating system, including the kernel, on top of the host OS, Docker containers take advantage of the host operating system's kernel, eliminating the need for emulating an entire OS.
Let's see the differences between a docker container and a virtual machine:
| Docker Containers | Virtual Machines | |
|---|---|---|
| Technology | Uses OS-level virtualization | Uses hardware-level virtualization |
| Resource Usage | Lightweight and efficient | Heavier and resource-intensive |
| Startup Time | Quick | Slower |
| Operating System | Shares host OS's kernel | Emulates complete OS |
| Scalability | Highly scalable | Limited scalability |
| Deployment | Portable and easy to deploy | More complex deployment process |
| Resource Sharing | Shares host OS's resources | Requires dedicated resources |
Thus, Docker stands apart from virtual machines due to its lightweight and efficient nature. By sharing the host operating system's kernel, Docker containers offer faster startup times, reduced resource consumption, and improved scalability. These advantages make Docker containers a highly suitable solution for application deployment and streamlining the management of intricate environments.
Prerequisites
Before diving into building a Dockerfile for a Ruby application, you need to have the following prerequisites:
Docker:
- Install Docker according to your operating system's instructions.
Ruby Environment:
- Ensure that Ruby is installed on your development machine
- And install the necessary Ruby version manager (RVM or rbenv) to manage multiple Ruby versions if required.
Installing Docker
-
Visit the official Docker website (https://docs.docker.com/get-docker/) and download the Docker installation package for your operating system.
-
Run the installer and follow the instructions specific to your OS.
-
After successful installation, verify Docker by opening a terminal and running the following command:
If Docker is installed correctly, you should see the version information printed on the console.
Creating a Docker Ruby Application
To create a Dockerfile for a Ruby application, follow these steps:
-
Begin by creating a new directory for your Ruby program using the command line.
-
Navigate to the newly created directory.
-
To create a Dockerfile for your Ruby application, you need to follow these steps:
- Begin by opening your preferred text editor.
- Create a new file named Dockerfile without any file extension.
- Save the Dockerfile to the desired location on your system.
-
Open the Dockerfile in your text editor and add the following lines:
The provided Dockerfile utilizes the official Ruby base image and incorporates several essential steps. It begins by specifying the Ruby version (in this case, 2.7.4) and establishing the working directory within the container as "/app".
To ensure that the necessary dependencies are installed, the Gemfile and Gemfile.lock files are copied to the container. By doing so, you can take advantage of Docker's layer caching feature, which optimizes the build process by reusing previously installed dependencies if the Gemfile and Gemfile.lock hasn't changed.
Following the dependency installation, the entire application code is copied to the container using the COPY command. This encompasses all the essential Ruby scripts, configuration files, and any additional files required by the application.
To execute the application, the default command is set as ["ruby", "app.rb"]. This command employs the Ruby interpreter to run the app.rb file. Keep in mind that you can adjust this command to match your Ruby application's specific entry point.
-
Once you have finalized and saved the Dockerfile, you can proceed to build the Docker image by executing the following command in the terminal:
This command builds the Docker image using the current directory (containing the Dockerfile) and tags it with the name my-ruby-app.
-
After the build process is finished, executing the following command will start the Docker container:
By following the above steps, you have successfully constructed and executed a Docker container to deploy your Ruby application.
Utilizing Docker Ruby empowers us to consolidate your Ruby application, including its dependencies and environment configurations, within a cohesive container. This methodology ensures that your deployment process remains consistent and reliable, regardless of the specific host system. Docker offers a lightweight and isolated runtime environment, guaranteeing consistent behavior across various platforms.
Once the Docker Ruby image has been built and the container is up and running, you can conveniently access your application from the host machine. This can be accomplished either through the exposed ports or by direct interaction with the container itself. Docker furnishes you with a flexible and scalable platform, enabling the seamless execution of Ruby applications while maintaining consistency and reproducibility.
Best Practices while Writing a Dockerfile for a Ruby Application
The Dockerfile format has become popular for its simplicity and user-friendly nature. When creating a Dockerfile for a Ruby application, it's crucial to adhere to recommended guidelines to maintain a secure, compact image without exposing any sensitive data. In the next section, we will explore the best practices for crafting a Dockerfile specifically tailored for Ruby applications.
Pin the Base Image Version
To maintain consistent builds and minimize risks, the specific version of the base image must be specified. This ensures reproducibility and helps in the prevention of future issues. For example:
Bad
Good
By specifying the version, you gain control over when to update the base image and can effortlessly revert if needed.
Use only Trusted or Official Base Images
When selecting base images for Docker ruby, follow these guidelines:
- Be cautious and selective:
Choose base images carefully, considering factors such as reliability and security. - Opt for trusted or official images:
Look for base images that are trusted and have undergone rigorous testing. Official images are a reliable choice.
Let's take a look at an example to illustrate this point:
Bad
Good
Official images offer reliability and security through rigorous testing. If no suitable official image is available, we can create a custom base image based on a trusted one, ensuring both reliability and customization.
Pin the Application Dependencies
Similar to pinning the base image version, it is essential to pin the application dependencies. This ensures that the same versions of dependencies are used consistently across different builds and avoids unexpected issues caused by version changes. Use the package manager's lock file (e.g., Gemfile.lock for Ruby) to specify the exact versions of the dependencies. For example:
Bad
Good
By pinning the dependencies, you gain control over the timing and manner of updates, enabling us to manage them effectively.
Add a .dockerignore File to the Repository
To improve the Docker ruby image-building process and avoid including unnecessary files, it's important to use a .dockerignore file in the repository. Similar to .gitignore, the .dockerignore file allows you to specify which files and directories should be ignored during the image build. Including the .git/ directory in the .dockerignore can optimize image size and build speed by minimizing unnecessary file transfers.
Creating a .dockerignore file in the same directory as our Dockerfile and specifying the files and directories to be excluded helps reduce the image size and speeds up the build process. Common entries may include log files, temporary files, and development-specific directories.
Here's an example of a .dockerignore file:
By implementing a .dockerignore file, we can streamline the Docker image-building process and optimize the resulting image size while excluding irrelevant files and directories.
Group Commands by how Likely they are to Change Individually
Organize the commands in our Dockerfile based on their likelihood of change to enhance the build process and minimize the creation of intermediary images. By grouping commands that are less likely to change together and separating those that are more prone to change, we can optimize Docker's rebuilding process. This approach ensures that when modifications are made to a specific set of commands, Docker only rebuilds that particular section instead of the entire image. Consequently, this strategy helps streamline the build process and reduce unnecessary overhead.
Place the Least Likely to Change Commands at the Top
It is important to prioritize the least likely to change commands at the top when organizing the commands in our Dockerfile. Docker ruby rebuilds the image from top to bottom, starting from the point where changes are detected. By placing commands that are less likely to change at the top, we ensure efficient usage of the Docker cache, resulting in shorter build times. Let's consider the following order:
Bad
Good
This order allows Docker to leverage the cache effectively during the build process.
Avoid Running our Application as Root
To enhance security, it is important to avoid running our application as the root user. When the application runs as root inside the Docker container, it can expose potential security vulnerabilities. If an attacker manages to exploit a vulnerability in the application, running as root increases the risk of malicious activities. Therefore, it is advisable to create a dedicated user specifically for running the application within the container. Consider the following example:
Bad
Good
By creating a dedicated user and executing the application under that user, we minimize the potential impact of a security breach. This practice greatly enhances the overall security of the application.
When Running COPY or ADD (as a Different User), Use "--chown"
When we use the COPY or ADD command with a different user, it's important to specify the ownership using the --chown argument to avoid permission issues. This ensures that the files copied into the container are owned by the correct user instead of the root user. For instance:
Bad
Good
By specifying the user ownership with --chown, we ensure that the files are owned by the appropriate user within the container. This helps to avoid any potential permission-related issues.
Avoid Leaking Secrets Inside our Image
To prevent the unintentional exposure of sensitive information in our image, it is crucial to use secure techniques when adding secrets to our Dockerfile. It is recommended to avoid directly using secrets in plain text within the Dockerfile. Instead, we should consider using secure alternatives such as build-time arguments, environment variables, or external secret management systems. For example:
Bad
Good
By employing build-time arguments or environment variables, we can maintain a separation between the secrets and the Dockerfile itself, effectively safeguarding them from exposure within the build history.
Always Clean Up Injected Secrets within the Same Build Step
It is crucial to remove injected secrets within the same build step to avoid any potential security breaches. When injecting secrets into our image using build-time arguments or environment variables, it is important to ensure that the cleanup process occurs within the same build step. Storing secrets across multiple build steps can lead to their exposure in the build history. To mitigate this risk, it is recommended to combine the actions of injecting and requiring the secret with the cleanup step. Here's an example illustrating the approach:
Bad
Good
By combining the actions into a single build step, we ensure that the secret is cleaned up immediately, minimizing the exposure in the build history.
Obtaining Private Dependencies through a GitHub Token Injected via "gitconfig"
Sometimes, applications necessitate private dependencies stored in repositories that are not publicly accessible, such as Ruby gems or NPM packages. To retrieve these dependencies while conducting the build process, we can adhere to the subsequent steps by utilizing a GitHub token:
- Create a machine user account on GitHub.
- Grant our machine user restricted access to our private dependencies, allowing only read permissions.
- Create an individual access token solely for the machine user on GitHub.
- When using the bundle install or npm install command, use the GitHub token to fetch dependencies.
- Remove the .gitconfig file to prevent the inadvertent disclosure of the GitHub token within the built image.
Here's an example Dockerfile:
We can build this image by running the following command:
This methodology replaces the SSH protocol within the repository URLs with the GitHub token, employing URL rewriting within the .gitconfig. The token is injected during the build process and subsequently removed.
Minimizing Image Size by Using Small Base Images When Possible
Reducing image size through the utilization of smaller base images whenever feasible is a recommended approach. This practice can enhance deployment speed and minimize storage expenses. For lightweight operating systems, Alpine Linux is widely favored.
Take a look at the following comparison between a larger and a smaller base image:
Bad
Good
We can see that the ruby:2.5.5 image is larger by comparing the sizes of the two basic images since it has extra dependencies and components that may not be necessary for our specific Ruby application. On the other hand, the ruby:2.5.5-alpine image is condensed to just contain the essential parts required for running the Ruby program.
While selecting a compact operating system, it is essential to consider the following factors:
- Package manager and available packages:
Leverage the package manager whenever feasible to avoid source code compilation. - Shell availability:
Verify whether the chosen base image provides a shell. - Security and stability:
Opt for battle-tested operating systems rather than experimental ones.
Use Multi-stage Builds to Avoid Leaking Secrets Inside our Final Image
To ensure the exclusion of sensitive information like API keys, access tokens, or passwords from the Docker image, it is essential to employ multi-stage builds. This approach separates the built environment from the final runtime image, thereby preventing any secret leakage.
Here is an illustrative example that showcases the implementation of multi-stage builds while avoiding the inclusion of secrets in the final image:
In this instance, the builder stage undertakes the actual building and compilation of the application, incorporating any essential steps that might involve sensitive information. On the other hand, the final runtime stage utilizes a distinct image and solely copies the built artifacts from the builder stage.
Ensure the configuration settings or secret keys pertinent to the runtime stage are appropriately defined as environment variables. These variables can be supplied at runtime using the -e flag during the execution of the docker run command or via a container orchestration platform.
Utilize Caching for Dependencies to Speed Up Builds
To accelerate the building process of our Docker images, we can take advantage of Docker's caching mechanisms. By implementing caching, we can avoid redundant reinstallation of dependencies when they remain unchanged from the previous build. This approach can greatly enhance subsequent builds, particularly when dealing with sizable dependencies.
To make use of caching effectively, we can partition the installation of dependencies into a distinct step within our Dockerfile. This ensures that the installation process is solely executed when alterations are detected in the dependencies.
Here's how caching works in Docker:
- Docker builds an image in a series of steps defined in the Dockerfile.
- Each step in the Dockerfile produces an intermediate container, and Docker caches the result of each step.
- When building an image, Docker checks if a step has been executed before and if the inputs to that step have changed.
- If the inputs remain unchanged, Docker uses the cached result from the previous build, skipping the execution of that step.
- If the inputs have changed, Docker rebuilds the subsequent steps from that point onwards, ensuring the image reflects the latest changes.
Below is an example that illustrates this approach:
This revised Dockerfile separates the installation of dependencies, allowing Docker to leverage caching for improved efficiency. First, it copies the Gemfile and Gemfile.lock files to the Docker image. Then, it performs the bundle install command, which installs the dependencies. Subsequently, the remaining application code is copied into the image. Finally, the CMD directive initiates the execution of the Rails server using the bundle exec command.
Implementing this approach can help expedite our build process and optimize the utilization of resources.
Improving Asset Precompilation Efficiency
When it comes to Rails applications, asset precompilation can be a time-consuming task during Docker builds. However, there are ways to optimize this process and speed up asset compilation by utilizing parallel workers.
To achieve parallel asset precompilation, we can include the RAILS_MAX_ASSETS_COMPILE environment variable in the build command. This variable determines the maximum number of parallel workers that will be utilized for asset compilation.
Here's an example Dockerfile that demonstrates parallel asset precompilation:
Docker has become an invaluable tool for Rails developers, offering a consistent and reproducible environment for application deployment. By following the best practices mentioned in this article, we can optimize our Rails Docker workflow and enhance the efficiency of our development process.
Conclusion
- Docker serves as a containerization platform that streamlines the deployment process by encapsulating applications and their dependencies into lightweight containers, resulting in simplified management and enhanced efficiency.
- Docker containers differ from virtual machines as they share the underlying operating system's kernel, enabling them to operate more effectively while consuming fewer resources.
- We must first ensure that Docker is installed on our system and that a Ruby environment has been set up before we can create a Dockerfile for a Ruby application.
- Adhering to best practices when crafting a Dockerfile for a Ruby application includes utilizing a specific Ruby version, leveraging layers and caching mechanisms, employing a .dockerignore file, keeping the images compact, segregating build and runtime dependencies, and employing multi-stage build.
- Once the Dockerfile is prepared, construct the Docker image through the use of the docker build command and launch the Docker container utilizing the docker run command.
- Docker provides a consistent and portable environment for deploying Ruby applications, simplifying dependency management and ensuring uniformity across distinct environments.
- By adhering to Docker's best practices, we can optimize our Dockerfile and produce efficient, lightweight containers, consequently minimizing the image size and enhancing deployment performance.
- Docker's containerization technology simplifies the development workflow and enhances the scalability and portability of Ruby applications.
- Use the power of Docker to streamline our application deployment process and create robust, scalable Ruby applications that can be deployed effortlessly on any system.