Creating MVC architecture for restful API
Overview
When programming, developers adhere to many conventions that may or may not be rigid rules but are frequently the cornerstones of outstanding development projects. Because they are effective, these conventions are applied so frequently and are widely adopted.
In this tutorial, we'll learn about the Model-View-Controller (MVC) architectural pattern and then construct and structure an application in Node.js using MVC.
Introduction
As we move on to the backend development, we have a wide range of options. We have several technologies that are more especially for web development or REST APIs. JavaScript is the dominant platform in use today, whether it's for developing online applications or mobile ones.
The MEAN stack and the MERN stack are the two development stacks that developers in the field of JavaScript development most frequently utilize.
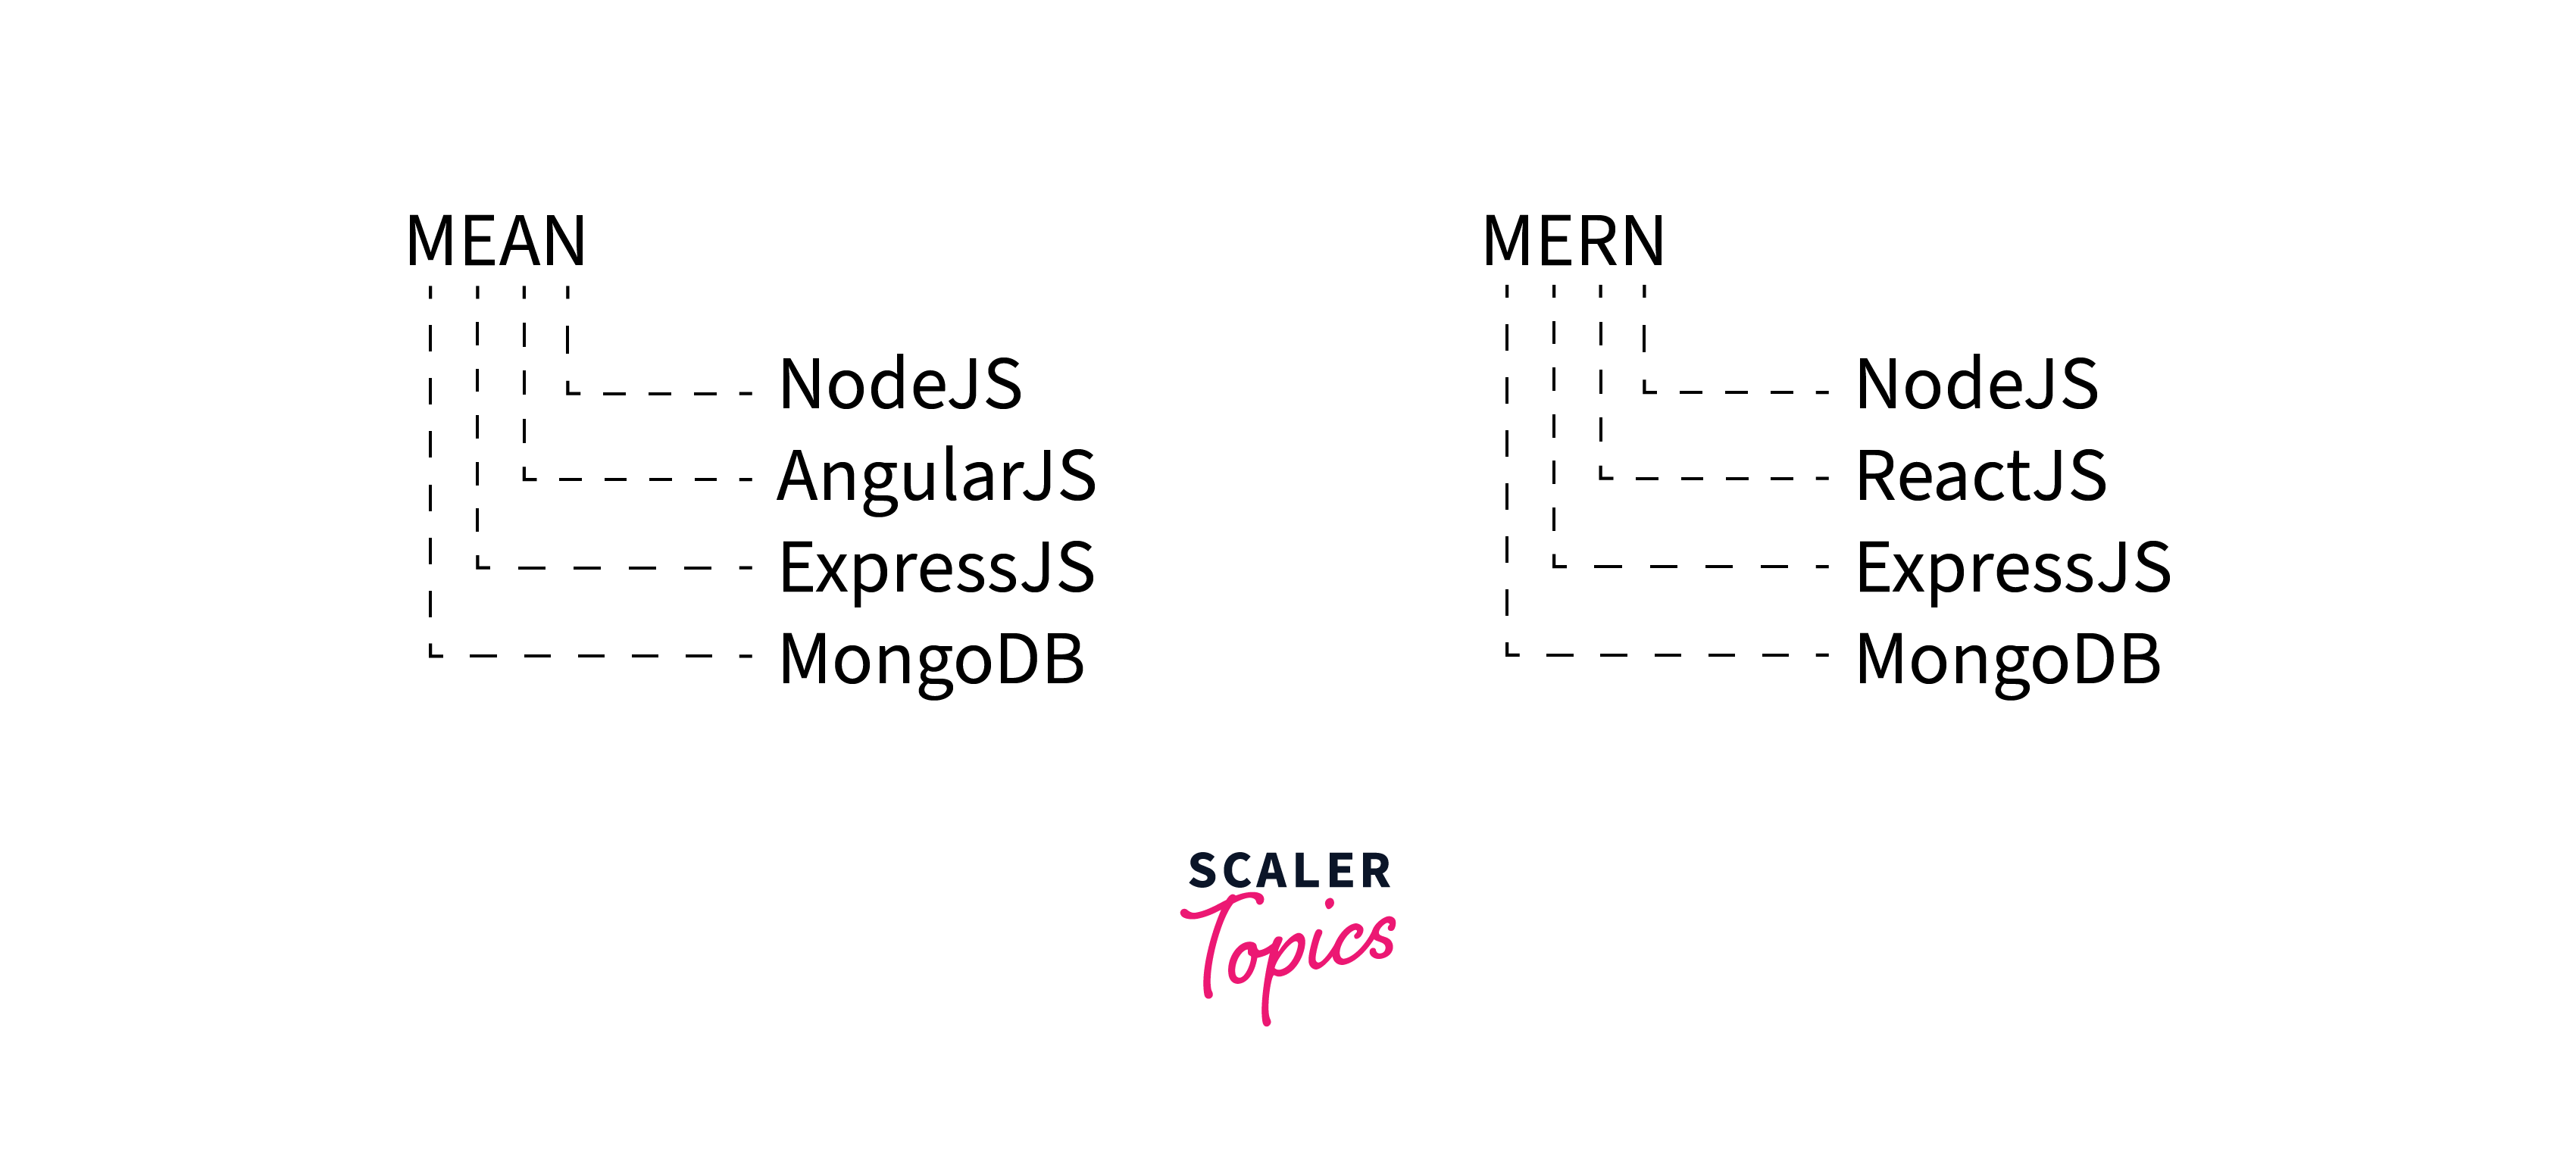
As you can see, ExpressJS is used by both stacks in this instance. The Node-based backend framework ExpressJS is very popular today.
MVC, or Model-View-Controller, is a popular architectural pattern used in web development to separate concerns and improve the maintainability of the code. Creating the MVC architecture for restful API expressjs can help to organize the code, and make it more modular, and easier to test.
When creating a RESTful API, the model represents the data in the database, the view represents the response sent to the client, and the controller acts as an intermediary between the two. The controller receives HTTP requests from the client, retrieves the necessary data from the model, and returns the response in the form of JSON or XML.
In addition to the main components, the MVC architecture also includes a routing mechanism that maps the incoming requests to the appropriate controller action. This can be done using a router library, such as Express.js in Node.js.
Following the MVC architecture for a RESTful API can make the code more modular and easier to test, as each component can be developed and tested independently. It also helps to keep the code organized and maintainable, which can be especially important for larger projects.
Build an AI-First Career, Master the Complete Skillset
Choose from our industry-leading programs designed for career success
Modern Software and AI Engineering Program
Master full-stack development with AI integration


 +1000 more
Modern Data Science and ML with specialisation in AI
Advanced data science techniques with AI specialization
+1000 moreAdvanced AIML with Specialisation in Agentic AI
Deep dive into AIML with focus on Agentic systems
+1000 moreDevOps, Cloud & AI Platform Engineering
Build and manage AI-powered cloud infrastructure
+1000 moreAI Engineering Advanced Certification by IIT-Roorkee
Premier AI engineering certification from IIT-Roorkee

AI Forward Deployed Engineer Program
Full-stack engineering, production AI and client-facing consulting
+1000 moreWhat is MVC ?
MVC is merely an architectural or design pattern applied to software engineering. While not a rigid rule, this pattern aids in helping developers narrow their attention to one particular aspect of their application at a time. The primary objective of MVC is to divide complex programs into distinct portions, each with a distinct function. Creating the MVC architecture for restful API expressjs helps directly in the development of fast websites.
Additionally, it enables secure logical application structuring, as we will demonstrate in this tutorial. Let's first examine what each feature of the pattern offers.
Model
A model is, as its name suggests, a design or structure. With MVC, a section of the application that communicates with the database is defined by the model, which also determines how a database is organized. The properties of a user that will be stored in our database will be defined here.
Through the model, the controller has access to the database. You could say that the application's model is its beating heart.
View
Users interact with the application through the view. In other words, this is the location of all the HTML template files.
Controller
The controller communicates with the model and provides the view with functionality and response. When an end user submits a request, the controller, which works with the database, receives it.
Consider the controller as a waiter taking care of the orders of the patrons, in this instance the view. After that, the waiter, who represents the model/database or the controller handling the request, goes to the kitchen to get food to serve the customers.
Why is MVC Needed?
Model View Controller is an acronym. Parallel processing is becoming more popular these days as a means of resource conservation and effective work. This strategy is also acceptable in the programming of apps, where programmers from various modules should depend as little as possible on one another. MVC was introduced as a result.
Model, View, and Controller are the three logical components separated into three independent apps by the MVC framework. Each of these parts is designed to carry out a certain function. Since the presentation layer and business logic are separated in this case, it is ensured that employees of the presentation module won't be dependent on the latter.
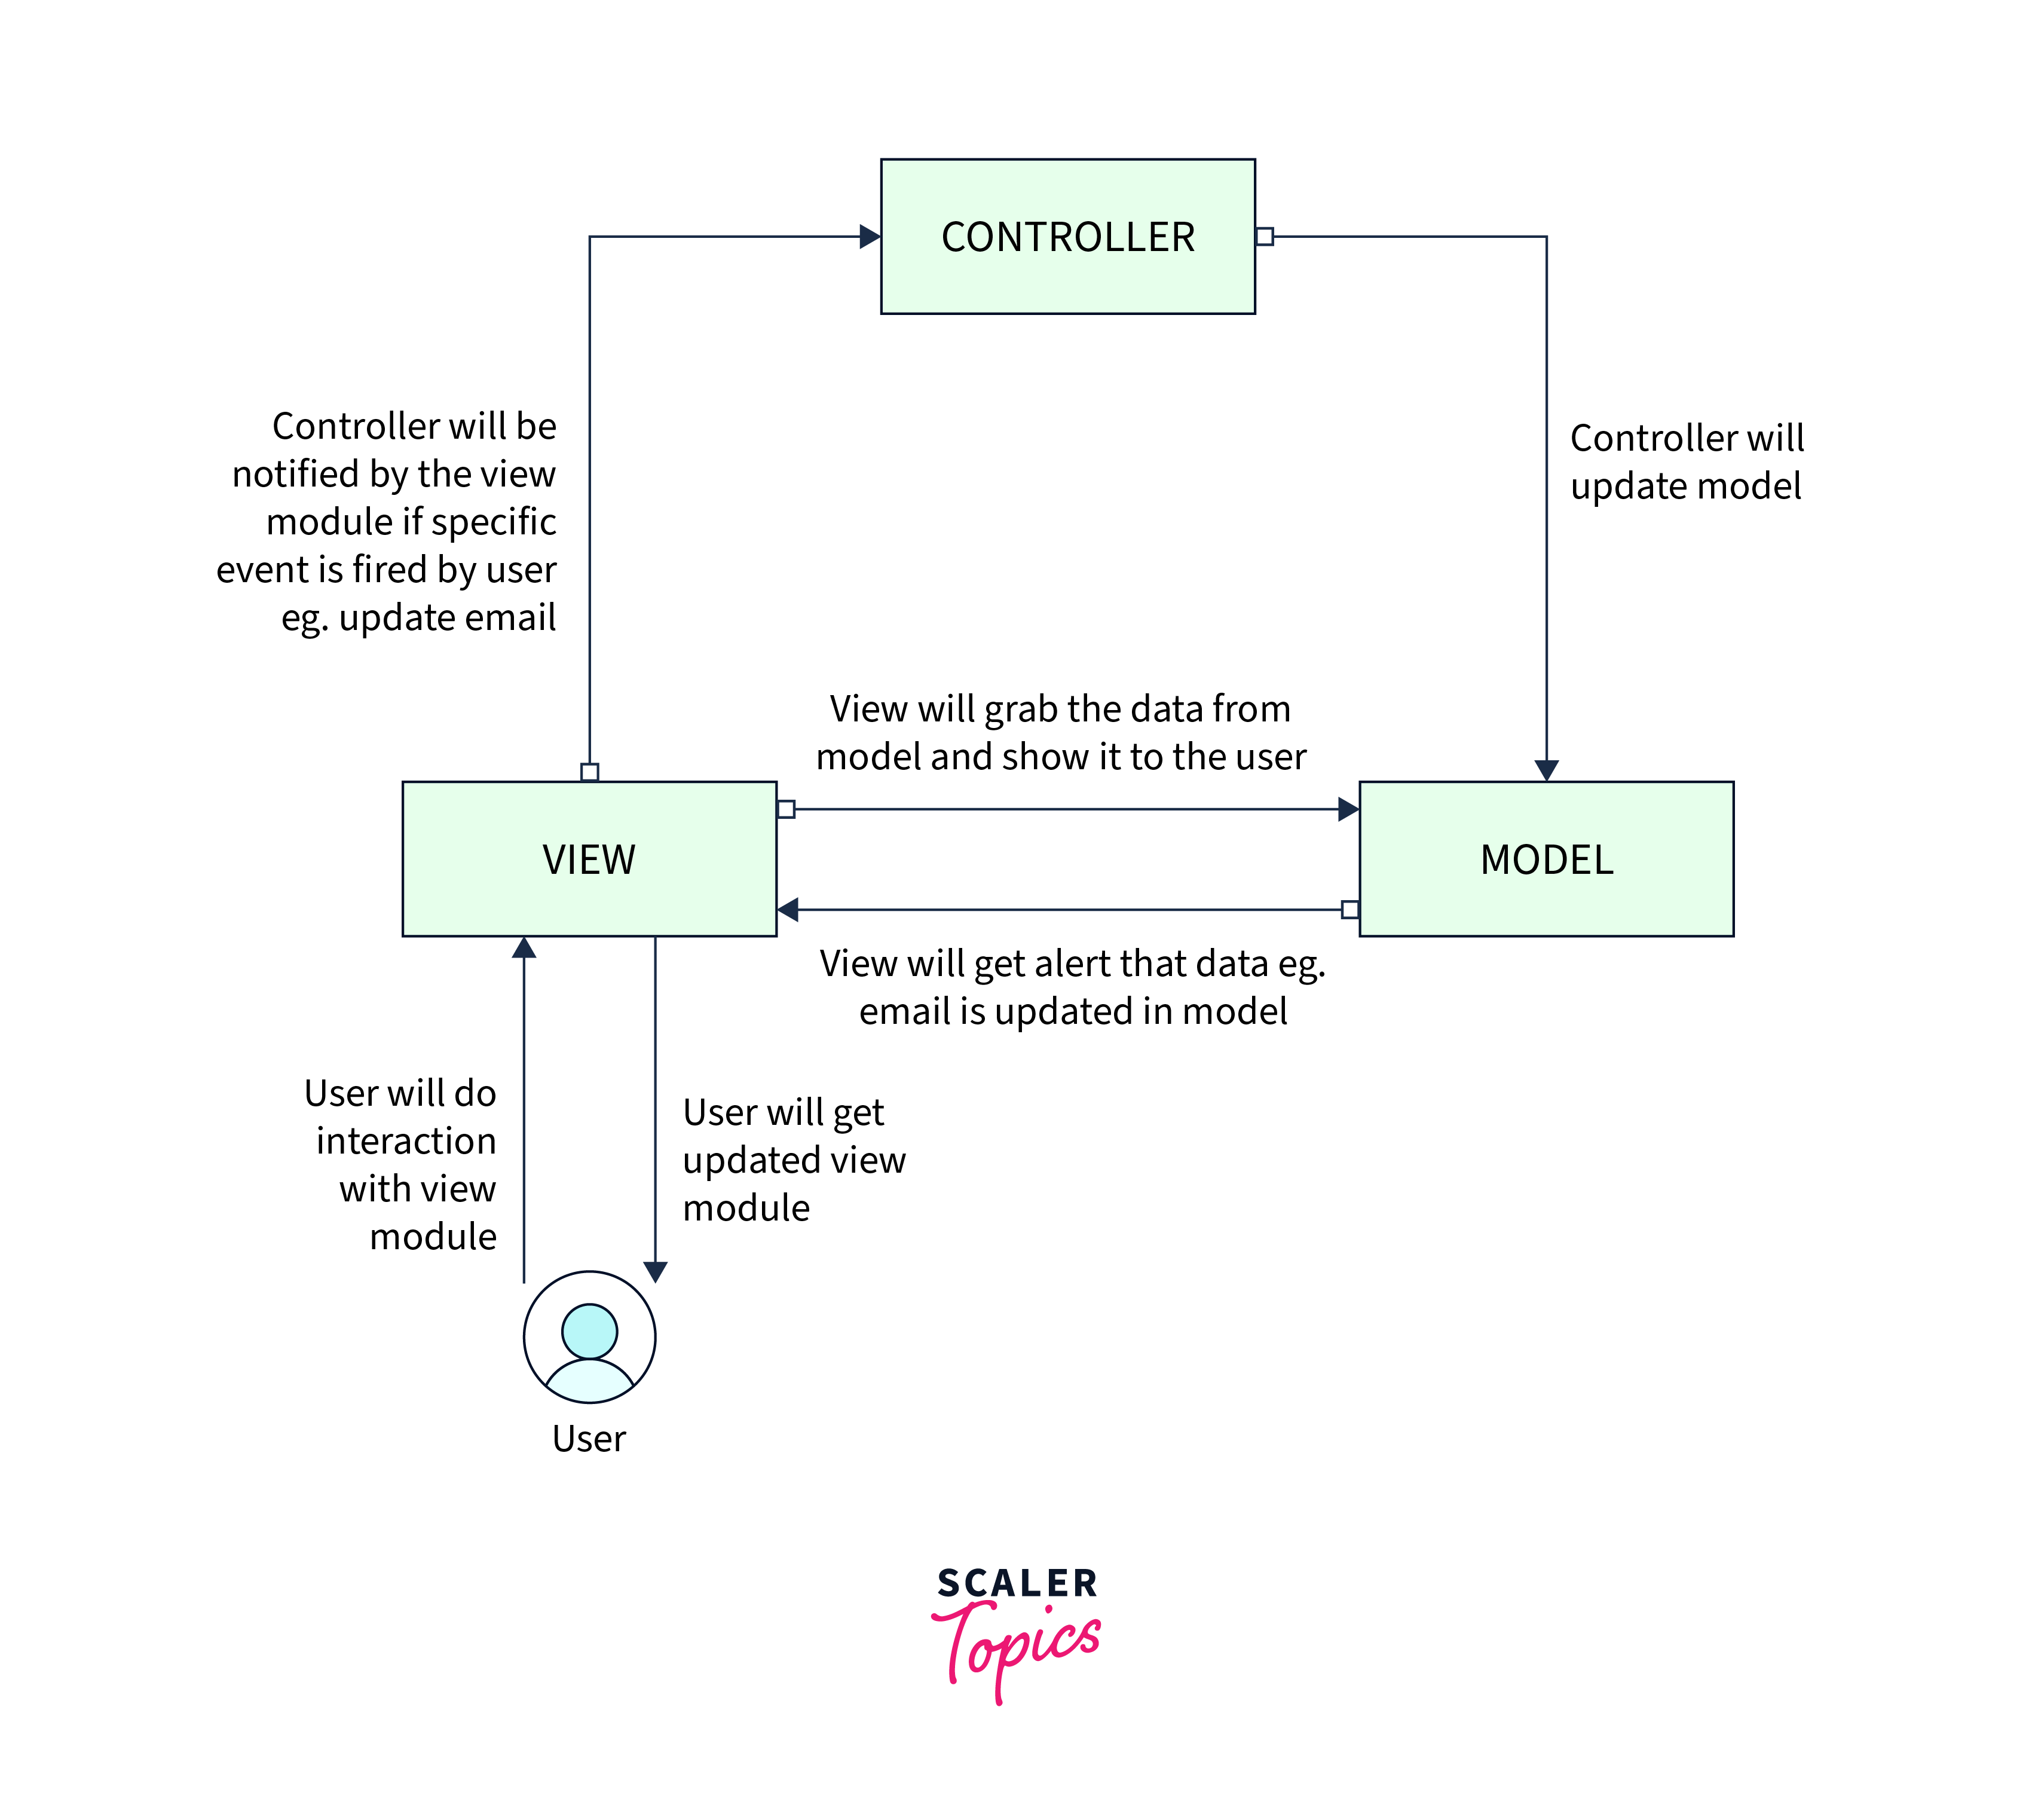 MVC Architecture
Any user will only be able to interact with the view component, which is the webpage, as illustrated in the above figure, which also includes a model and controller. When a user fires a specific event, such as wanting to update his or her email in the database, the view will make a call to the controller. For this process, the controller then makes a call to the model API, which updates the database with the new data. The program displays the most recent view as soon as the data is updated because the view needs to re-render the web page for up a dated presentation.
Advantages of MVC Architect for Restful API
There are several advantages to creating the MVC architecture for restful API expresses:
- Separation of concerns: The MVC architecture separates the application into three distinct components, each with its responsibilities. This helps to keep the code organized, makes it easier to maintain, and makes it more modular. It also allows different team members to work on different parts of the application independently.
- Better testability: Since each component of the MVC architecture can be developed and tested independently, it makes testing the application much easier. This reduces the risk of introducing bugs and makes it easier to troubleshoot issues.
- Reusability: The separation of concerns in the MVC architecture makes it easier to reuse components of the application in different contexts. For example, the same model can be used in multiple controllers, and the same view can be used to present data from different models.
- Improved scalability: RESTful APIs need to be scalable to handle increasing amounts of traffic. By creating, the MVC architecture for restful API expressjs the application can be easily scaled horizontally by adding more servers. It can also be scaled vertically by adding more resources to each server.
- Flexibility: The MVC architecture provides a lot of flexibility when it comes to designing and developing the application. Developers can choose different frameworks and libraries for each component, depending on their specific needs and preferences.
Overall, creating the MVC architecture for Restful API expressjs provides a solid foundation for building RESTful APIs that are scalable, modular, and easy to maintain. By separating concerns and providing clear boundaries between different components, it helps developers create robust and reliable applications that can handle a variety of use cases.
Set Up Express
One of the top Node.js frameworks is Express. It has a tonne of helpful features and excellent support. There are many excellent articles available that go through all the fundamentals. This time, though, I want to delve a little bit deeper and reveal my process for building an entire website. This post covers Express in general as well as how to use it in conjunction with some other excellent Node.js development tools.
I'm assuming that to follow along with this tutorial, you are already familiar with Node and have it set up on your computer.
Connect is the engine of Express. This middleware framework has a lot of helpful features. Here is a brief illustration of middleware in case you're still unclear about what it is:
In its simplest form, middleware is a function that accepts request and response objects as well as a next function. Each piece of middleware can choose whether to react by calling the subsequent callback or to transfer control to the following function by utilizing a response object. If the second middleware in the aforementioned example doesn't call the next() method, the browser will never receive the string "hello world." That's generally how Express operates.
There is also some middleware that is already defined, which will undoubtedly save you a tonne of time. For instance, the Body parser supports application/json, application/x-www-form-urlencoded, and multipart/form-data while parsing request bodies. Additionally, the Cookie Parser analyses cookie headers and adds an object keyed by the cookie name to the request. cookies file.
Express encapsulates Connect and provides new features like routing logic, which greatly improves the process. Here is an illustration of how Express would handle a GET request:
Express can be set up in one of two ways. First, add it to your package.json file and then run npm install.
The code for the framework will be put in node_modules, and you can make an instance of it there. However, I favour using a command-line tool as an alternative. Now that you are utilizing the npx express-generator, you have a completely new CLI tool. Say you were to run:
Express will build an application skeleton for you with some settings already set. The following are the next express-generator command's available uses:

As you can see, there aren't many choices, but for me, those are sufficient. Typically, I use handlebars as the templating engine and Less as the CSS preprocessor. The --sessions parameter fixes the issue in this example because we also need session support. When the aforementioned command completes, our project appears as follows:
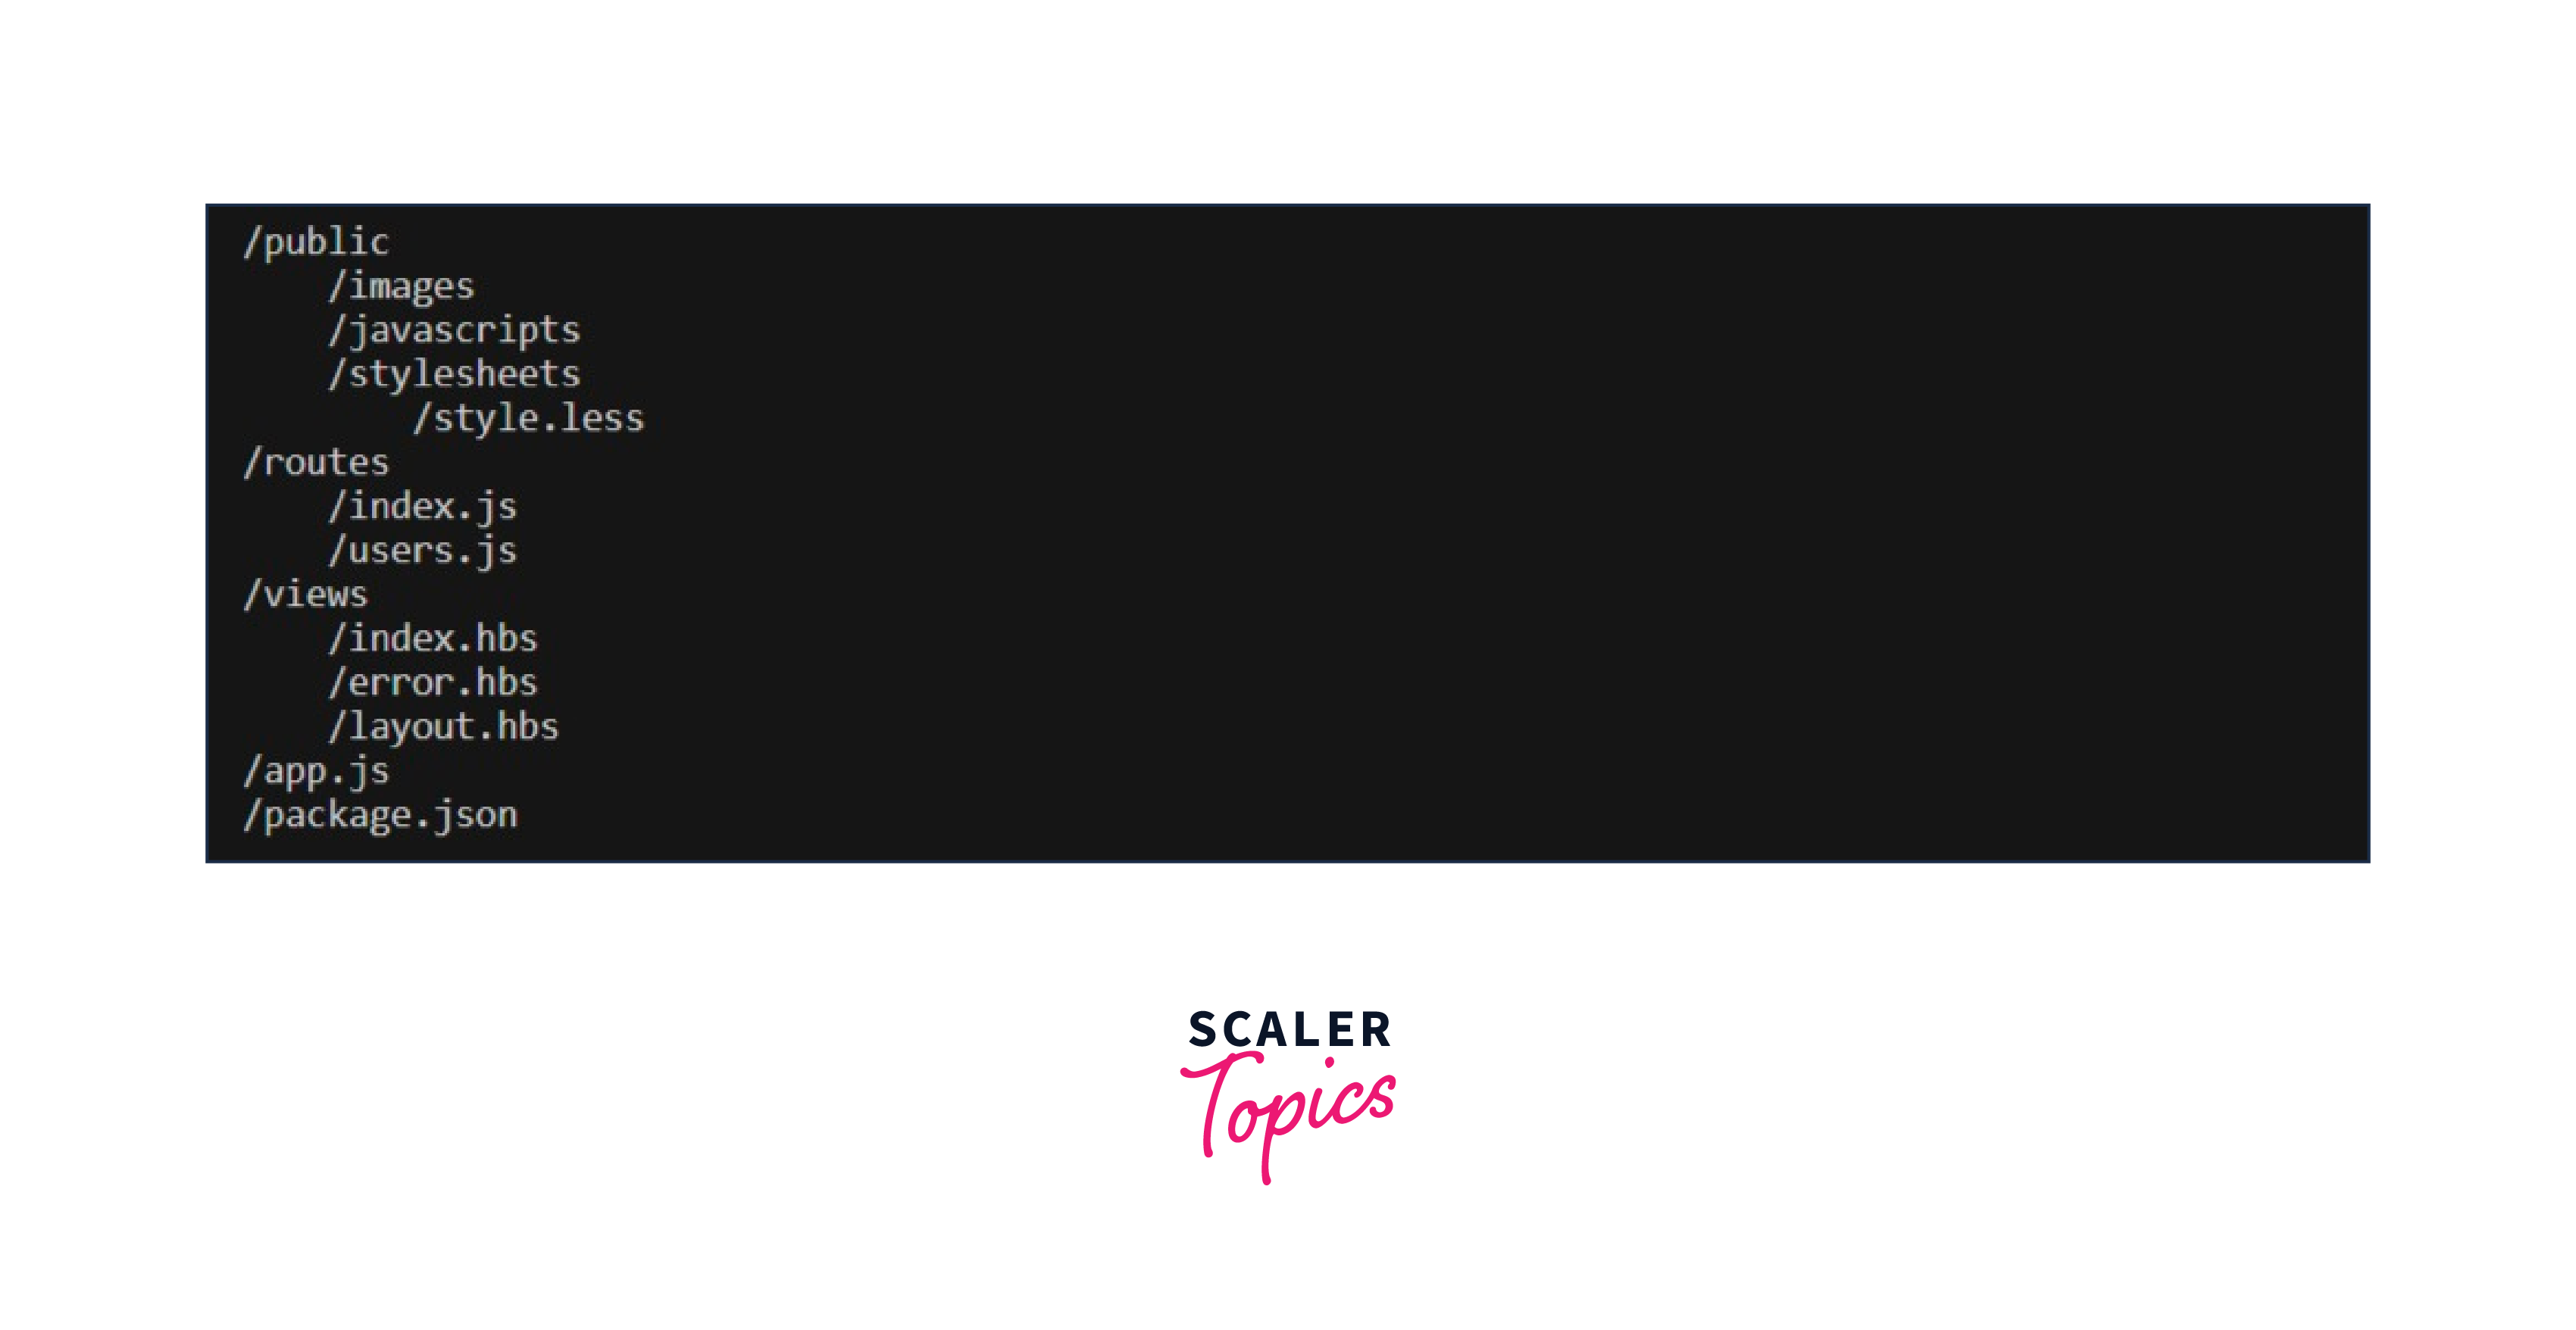
All the dependencies that we require are added here, even if they haven't been installed yet, if you look at the package.json file. Simply type npm install to accomplish this, and a node_modules folder will appear.
I'm aware that the strategy described above isn't always acceptable. Your route handlers might need to be stored in a different directory or something similar. However, as you'll see in the following few sections, I'll modify the automatically generated structure, and doing so isn't particularly difficult. Therefore, the npx express-generator command should only be viewed as a boilerplate generator.
How Scaler Transformed Careers in Different Fields
Scaler learners achieved 2.5x salary growth with average post-Scaler CTC reaching ₹23L.
 Google
 Amazon
 Microsoft
 Flipkart
 Adobe1200+ more
Scaffold the Express Project
To get everything ready to begin, there are a few things we must complete. Which are:
Step 1. File Structure
To prepare the files, we must take two steps. To match the file structure above, we must first remove the incorrect files and upload the correct ones. In order for our new file structure to work, we must secondly modify app.js. These two lines must be deleted:
Step 2. Configuration
We must now configure the system. Imagine that three servers—a local server, a staging server, and a production server—should be used to deploy our small website. Naturally, the conditions in each environment vary, thus we need to develop a method that is adaptable enough. Every node script is executed as a console program, as you are aware. Therefore, sending command-line arguments that define the current environment is simple. To eventually construct a test for it, I wrapped that portion in a new module. This is the file /config/index.js:
Mode and port are the only parameters available (at the moment). The application uses different ports for the various servers, as you would have anticipated. We must therefore adjust the website's entry point in app.js.
Simply add the environment at the end to change between configurations. For instance:
The server will be running at port 4000. Now that all of our settings are in one location, they are simple to control.
Turn Learning into Career Growth
Step 3. Create a Test Framework
Test-Driven Development (TDD) is something I strongly support. I'll make an effort to discuss every base class utilized in this article. Of course, if there were tests for everything, this article would be far too long, but in principle, that's how you should go about making your apps. Uva is one of my preferred testing frameworks because it is quick and simple to use. Naturally, it is accessible through the NPM registry:
Next, add a fresh script to your package's "scripts" property.JSON is used to test.
Let's create a tests directory which will hold our tests. The first thing that we are going to check is our configuration setup. We will call the file for testing configuration config.js, and put it in tests.
Run the npm test, and the following should appear: