Git Basic Commands
Overview
Git is a widely used modern version control system that facilitates the process of collaboration among different people in different parts of the same project. While working on git, we actively use basic git commands of local as well as remote repositories like init, add, commit, branch, merge, revert, push, remote, etc.
Transform Your Career
Choose from our industry-leading programs designed for career success
Modern Software and AI Engineering Program
Master full-stack development with AI integration

Modern Data Science and ML with specialisation in AI
Advanced data science techniques with AI specialization
Advanced AIML with Specialisation in Agentic AI
Deep dive into AIML with focus on Agentic systems
DevOps, Cloud & AI Platform Engineering
Build and manage AI-powered cloud infrastructure
AI Engineering Advanced Certification by IIT-Roorkee
Premier AI engineering certification from IIT-Roorkee
Pre-requisites
- Git installation
Introduction to Git Basic Commands
Git is a version control system that is used to build large projects with a big team. Multiple members are supposed to work on various parts of the project at the same time. Git supports collaboration by keeping records of the changes made and specific versions can be considered whenever needed.
To work with Git, basic commands are very important. Basic Git commands can be used to create a repository or a branch, commit the changes, merge the branches, push and pull from and to the remote repository, etc.
Basic Git Commands
Basic Git Commands are further subdivided into Local Repository commands and Remote Repository commands.
-
Local Repository Basic Git Commands: Local repository consists of all the files and folders of the project present on our computer. It is used to make changes to these files and folders locally, commit when offline, and review history.
List of Local Repository Basic Git Commands:
- git init
- git add
- git commit
- git status
- git config
- git branch
- git checkout
- git merge
- git fetch
- git diff
- git revert
- git reset
- git rm
- git show
- git tag
-
Remote repository Basic Git Commands: The server repository may be present at any location in the world which is different from the location of the team members. The repository is used by all the team members present anywhere to exchange the progress made.
List of Remote Repository Basic Git Commands:
- git remote
- git clone
- git pull
- git push
Turn Learning into Career Growth
Working With Local Repositories
Let us now discuss a few of the basic but important Git Basic Commands
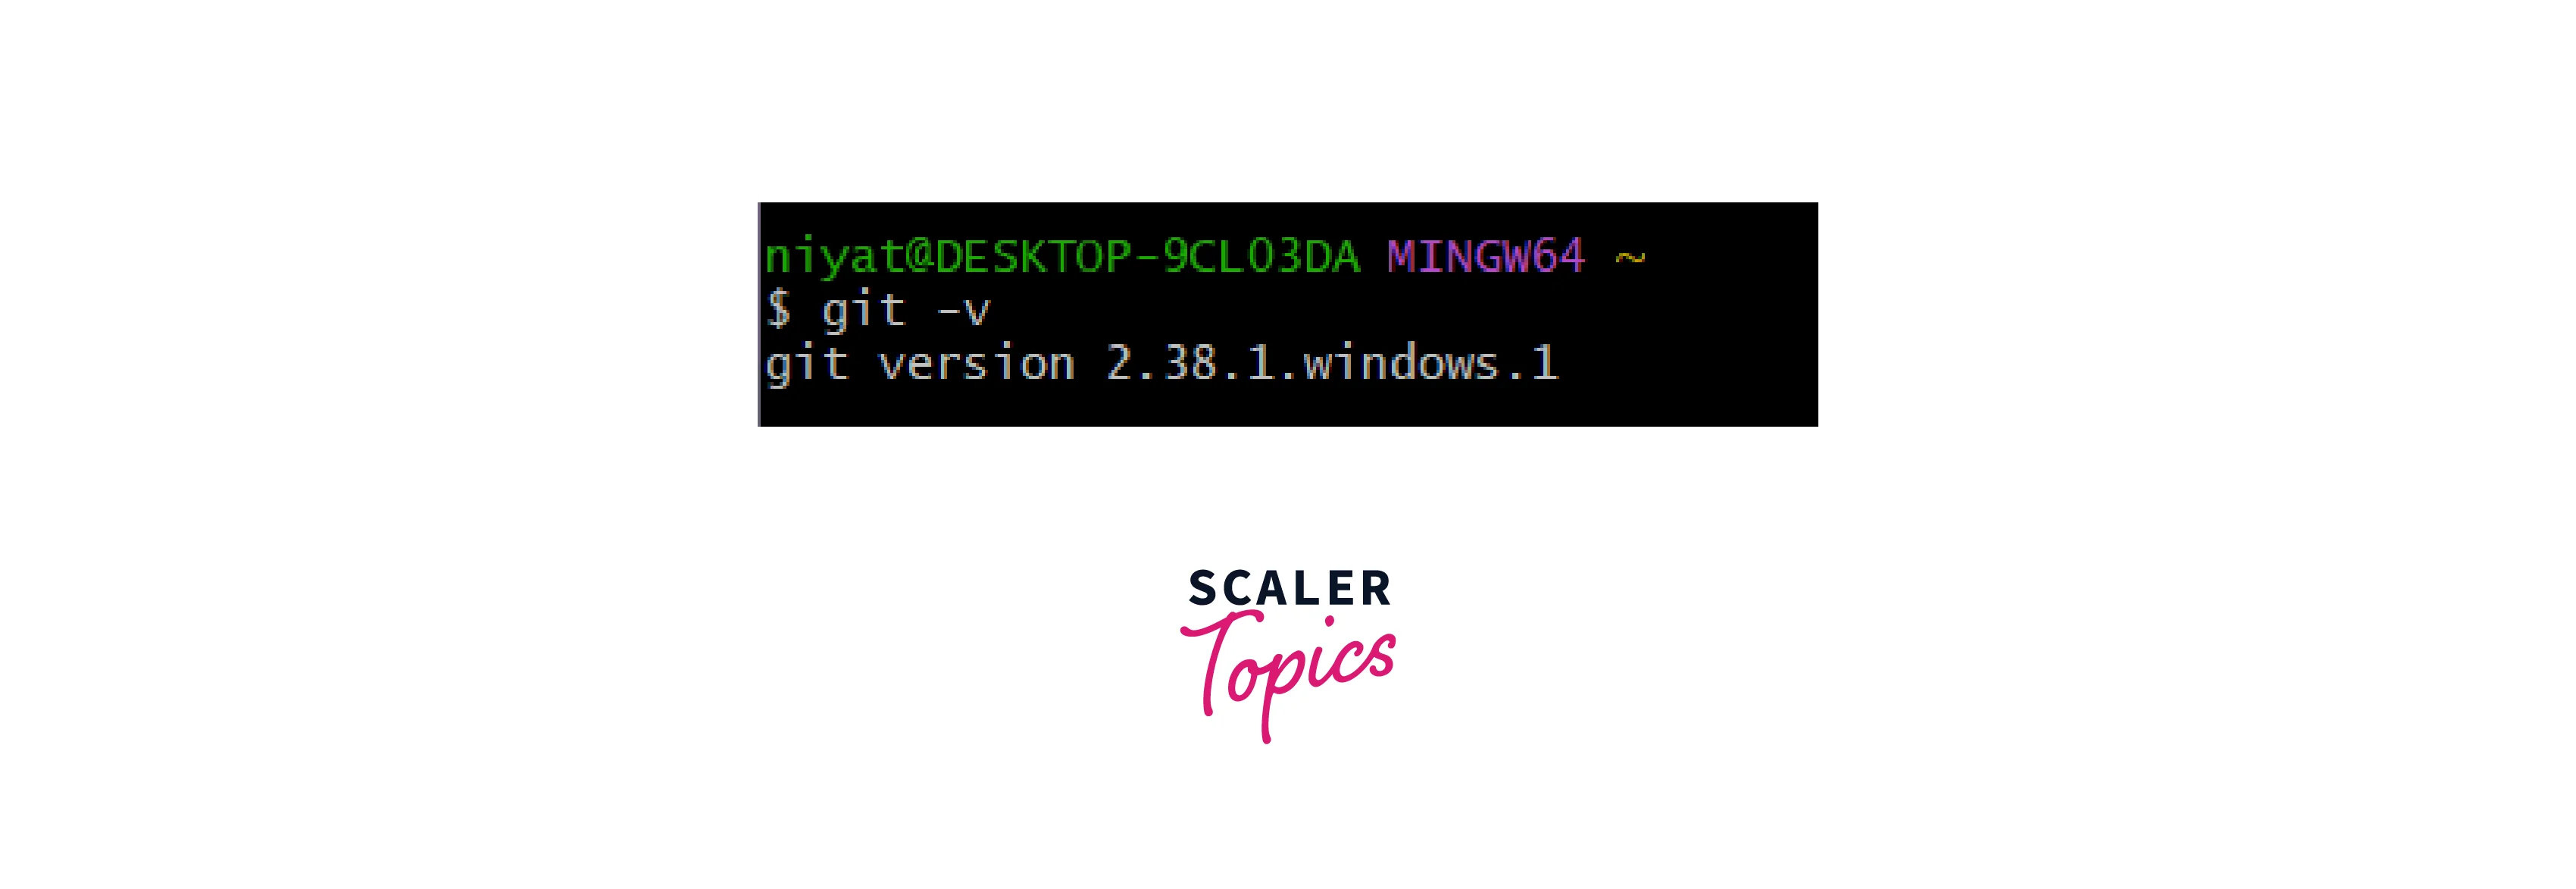
- git -v
It is used to check the version of Git installed on the device. It can also be used to check if git is installed or not by typing the command in the CMD prompt.
Syntax:
Output:
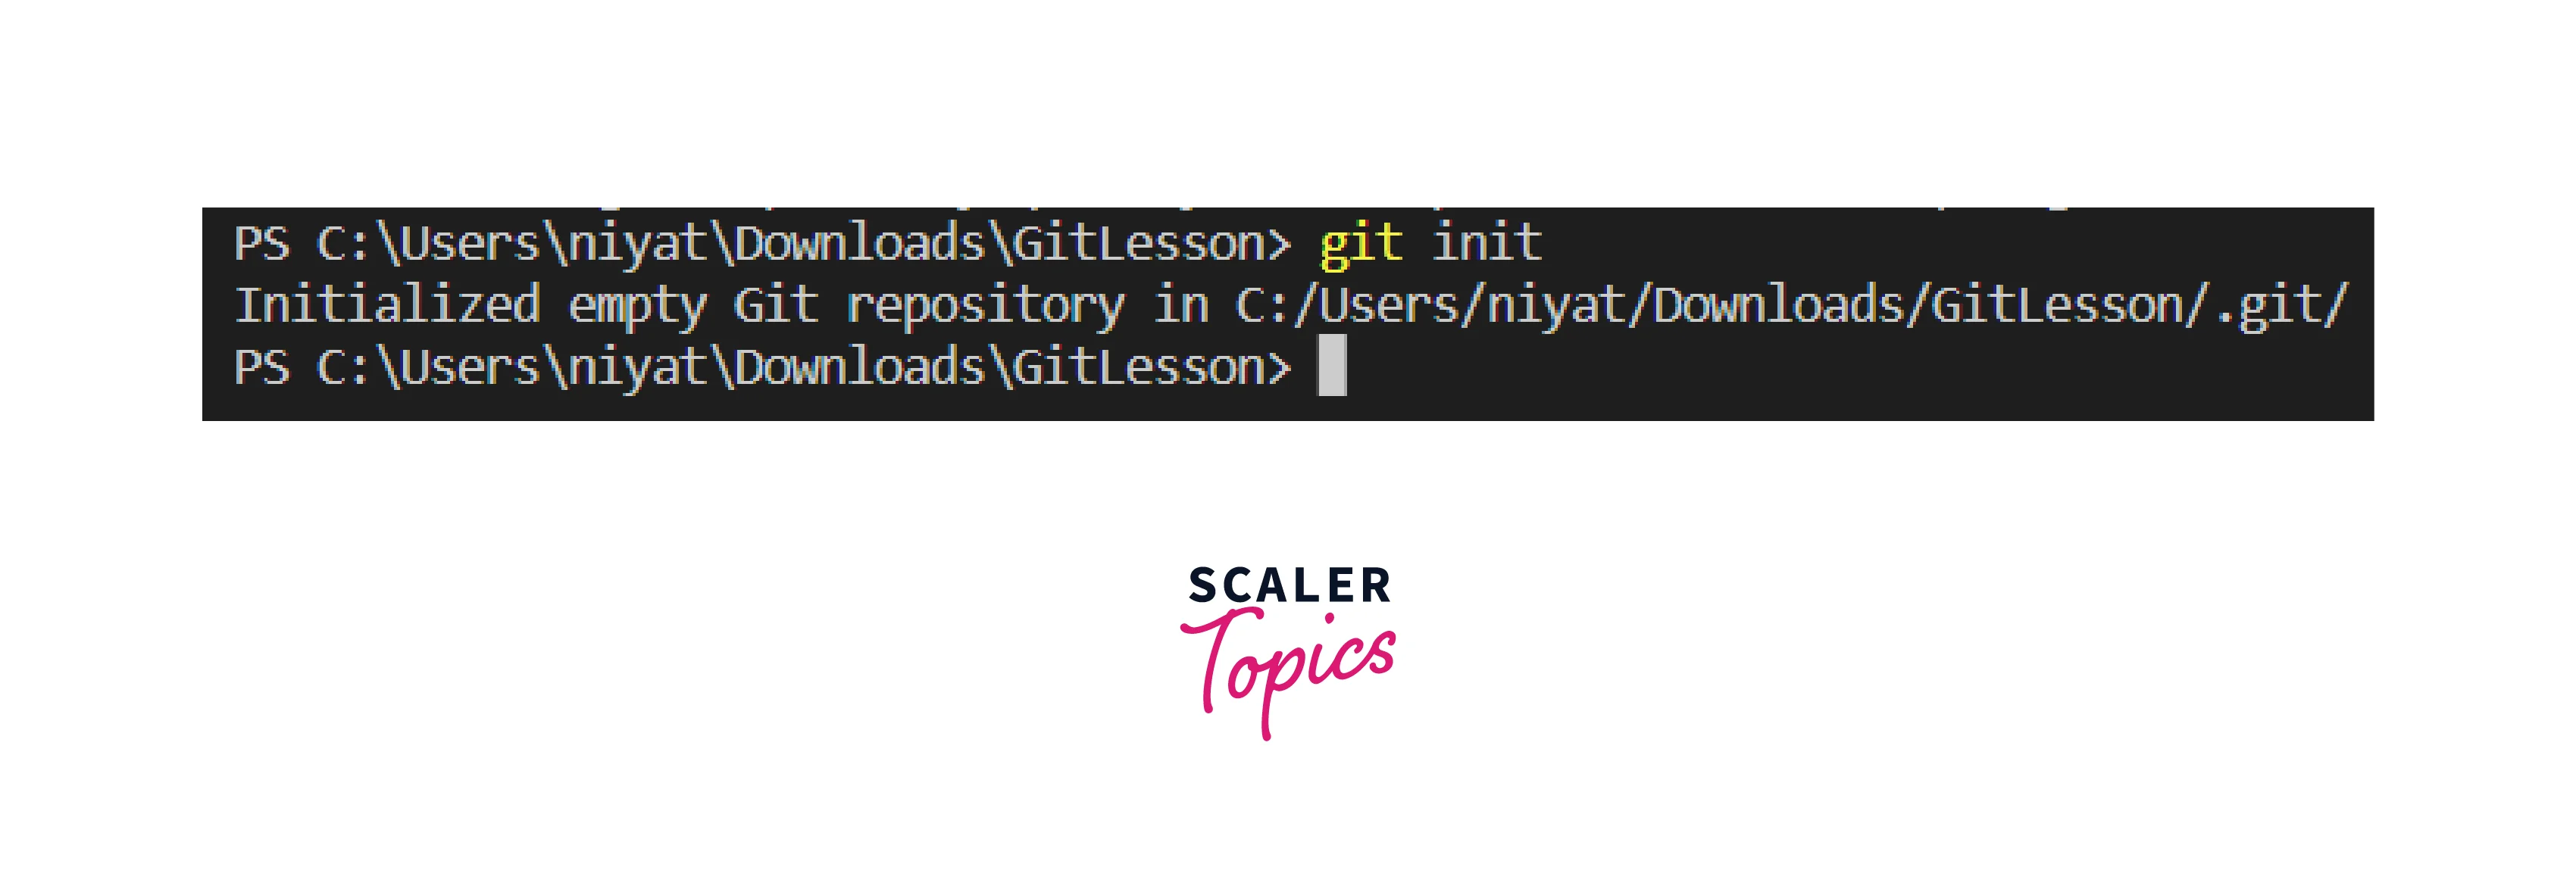
- git init
To create an empty Git repository this command is used. Creating a repository is the first step even before starting to work on the project. The command creates a .git folder in the directory with some directories. After creating the repository we can begin the process of creating other files.
Syntax:
Output:
- git add
Git adds commands and adds files to the staging area which is the pre-commit area so in the next commit command these files will be committed. It is usually used after checking the status of the file by using git status.
Syntax:
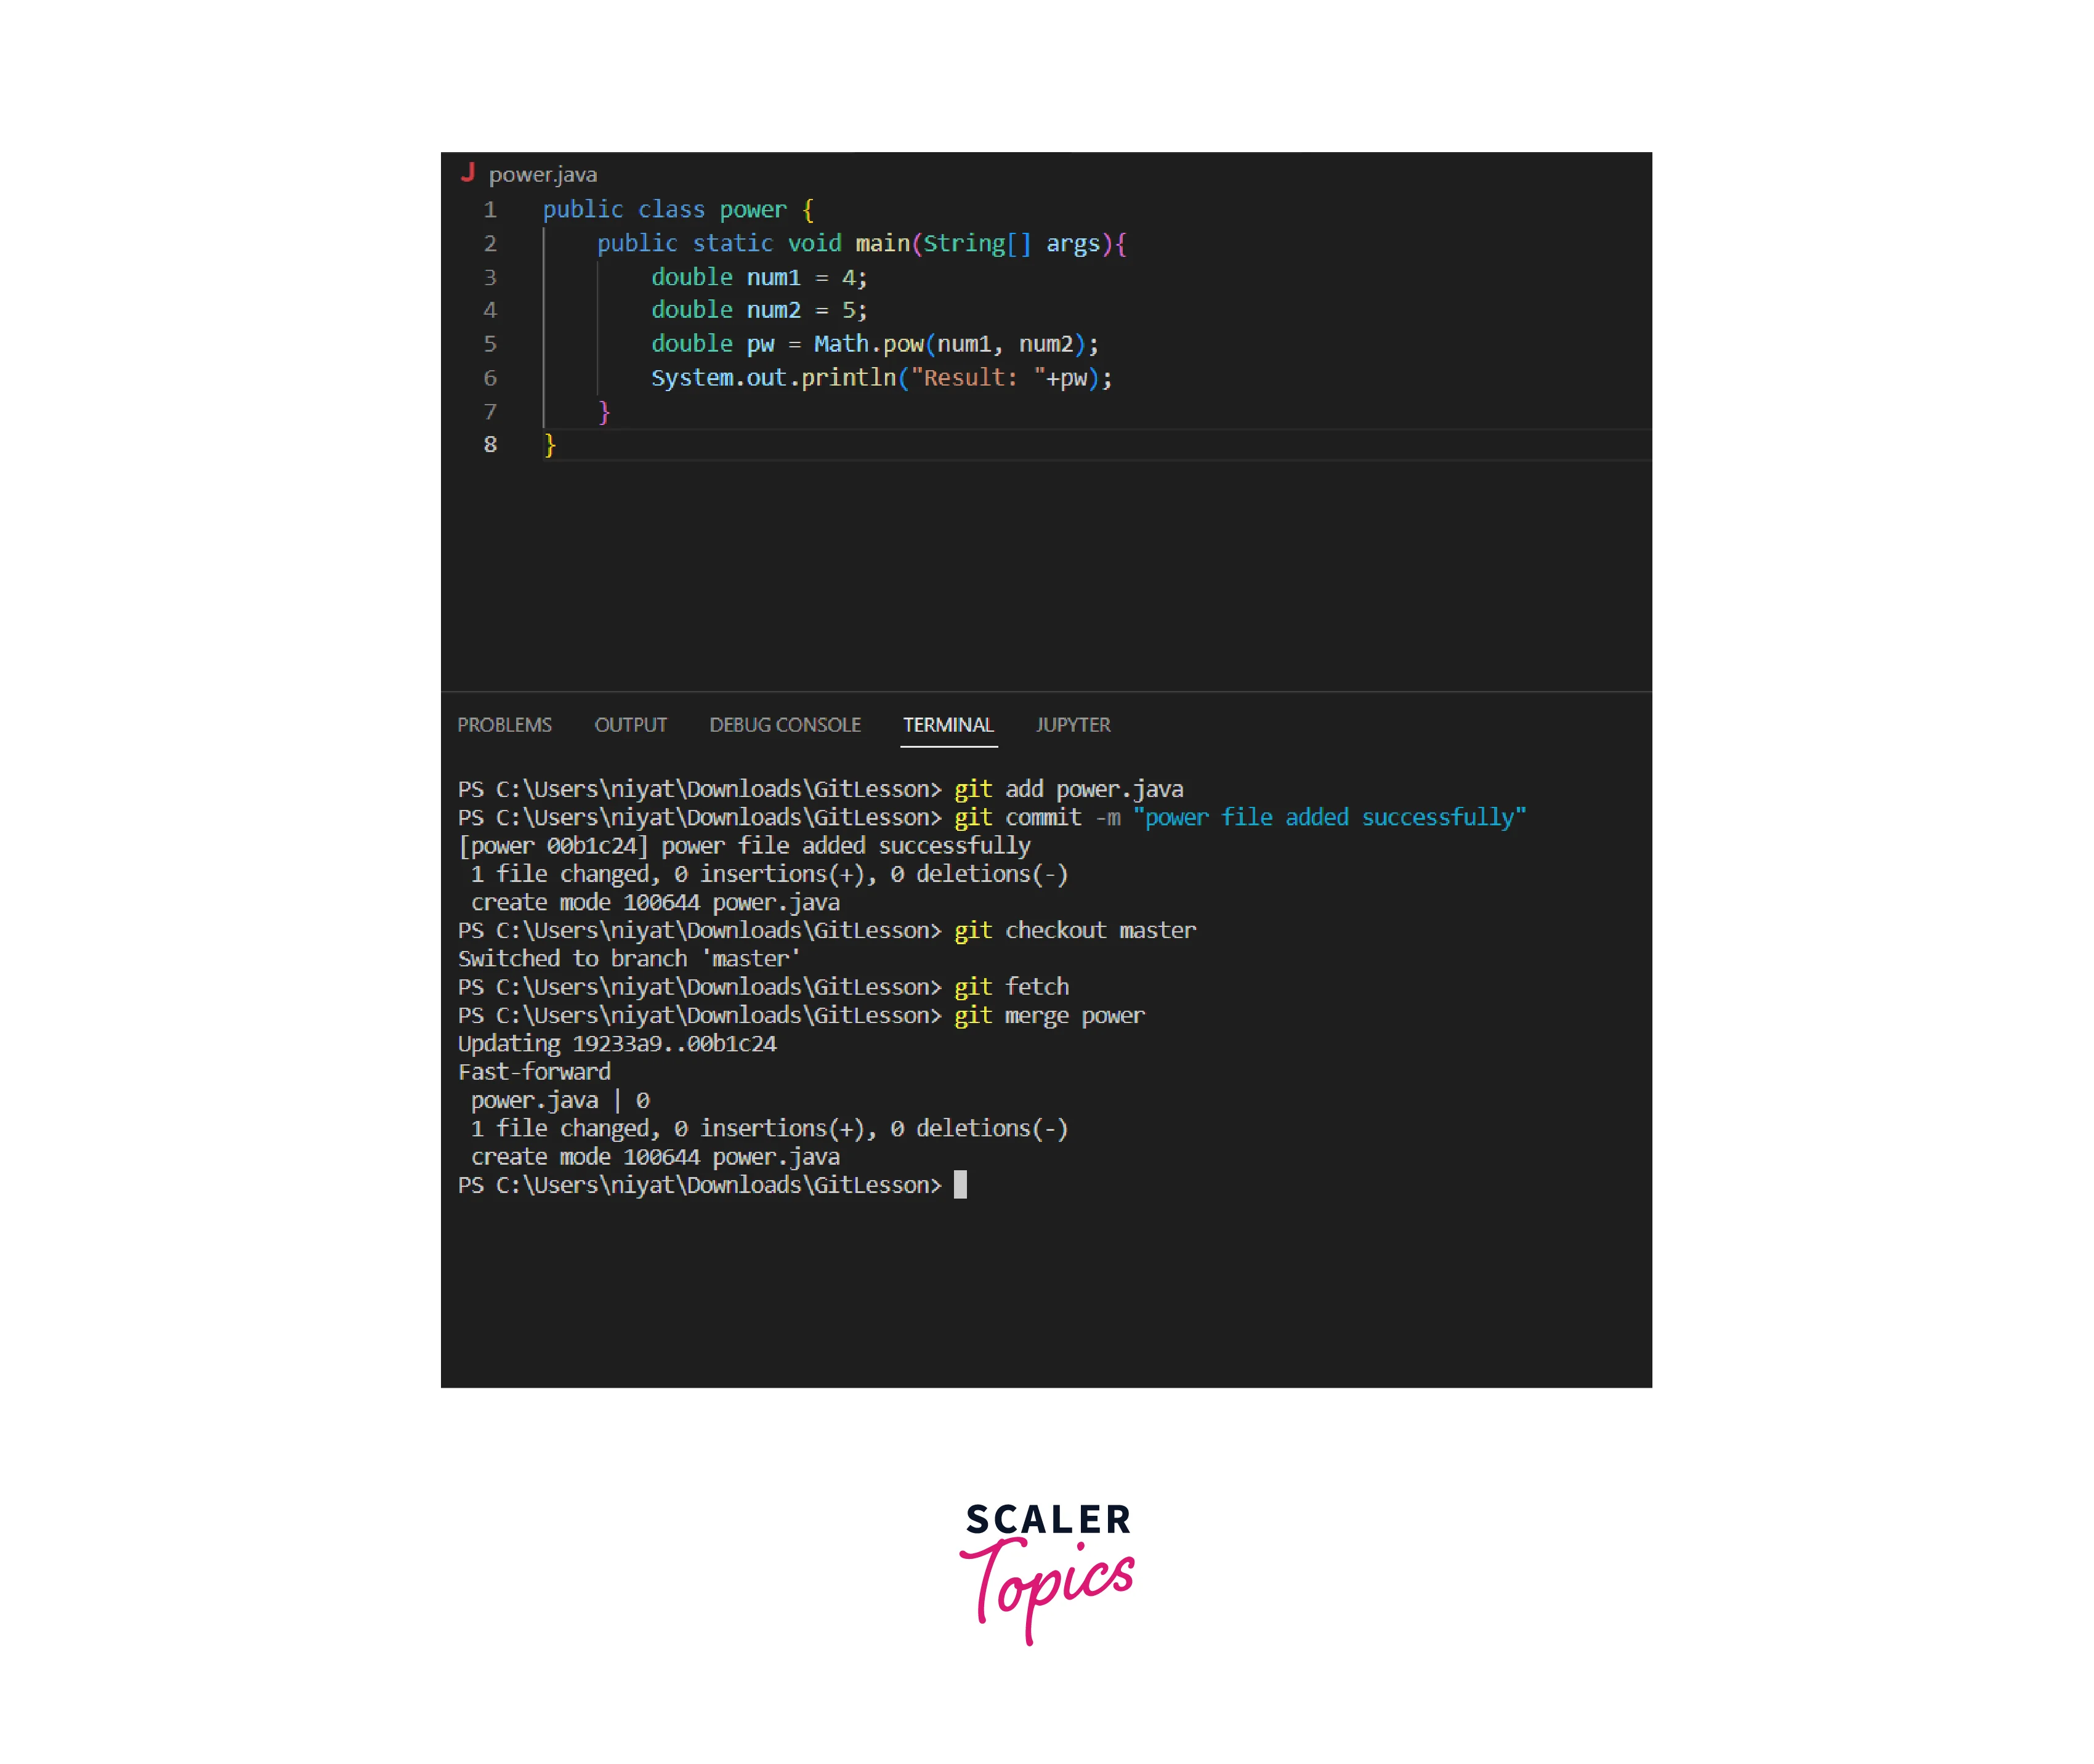
To add the file to the repository we will have to create a file in the repository folder. Let us create a java file named sum.java and add it to the repository.
Output:
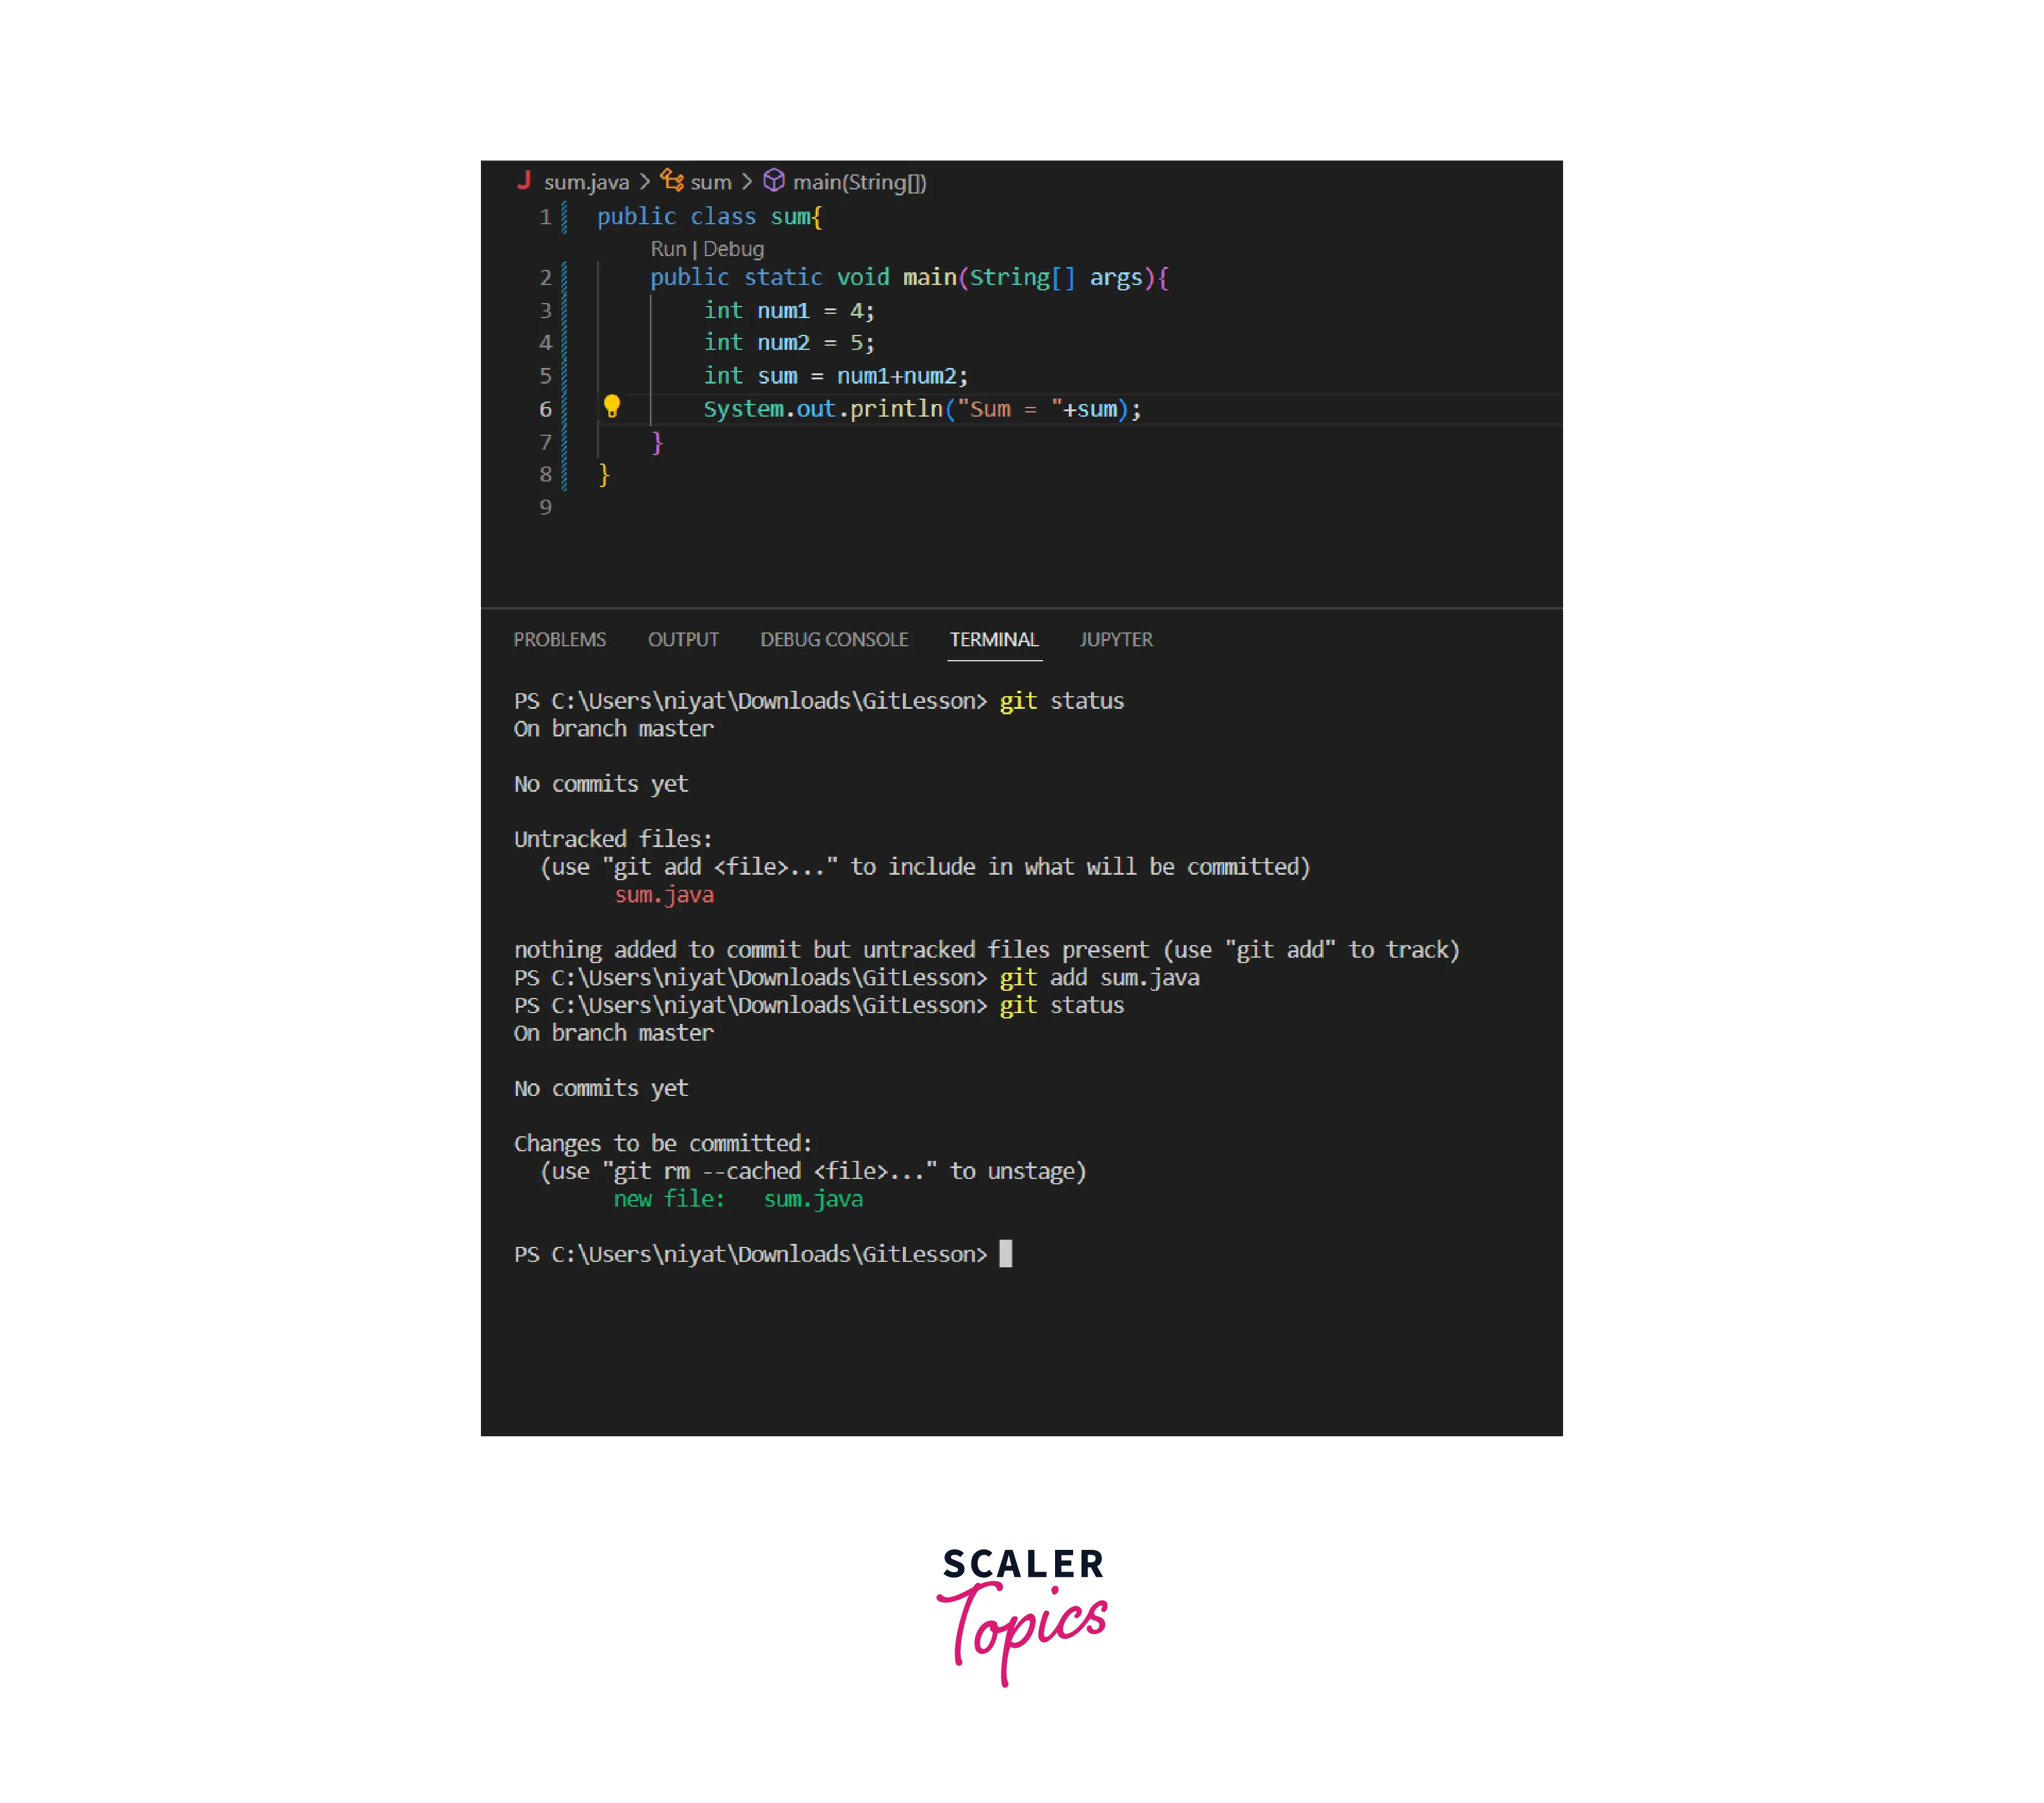
On checking the status we see that one file is created but not tracked or added to the staging area. Once we add this file to the staging area we again check the status and now we are ready to commit the file to the master branch.
- git commit
The commit command ensures that the changes are saved to the local repository. The message is compulsory with the commit command to help other users understand the changes made to the project. It should be useful, appropriate, and meaningful. The commit command only saves the files in the staging area.
Syntax:
Let us now commit the sum.java file.
Output:
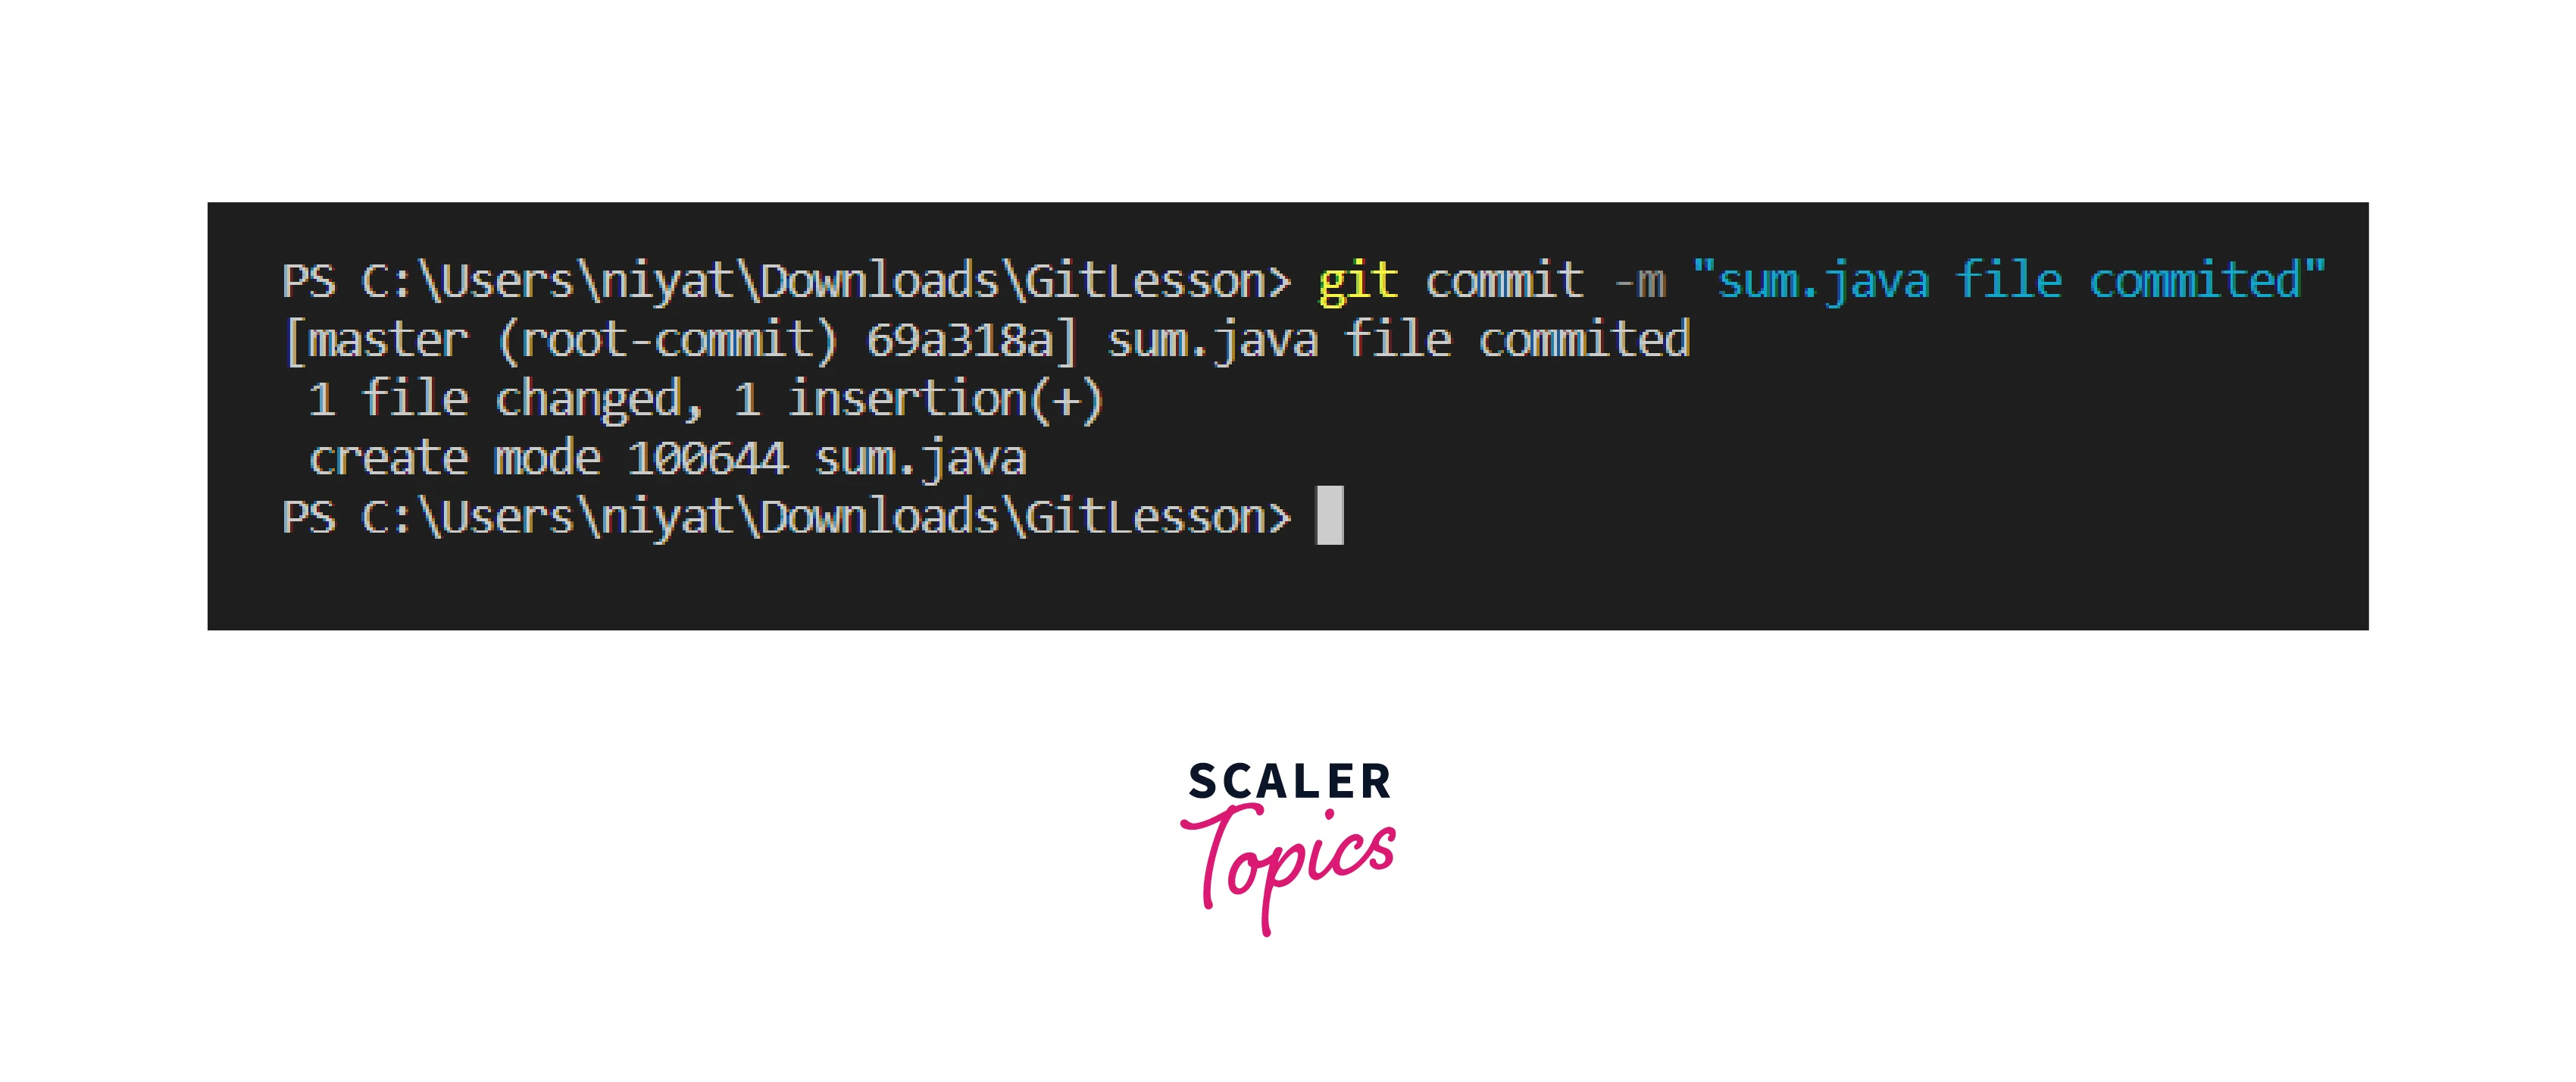
The output tells the user number of files committed and also gives a commit id that can be used to revert the changes made.
- git status
The git status command returns the current status of the repository. It shows the current working branch, files in the staging area, or files to be moved to the staging area i.e. the modified or newly created files. If no changes are made after the last commit it shows no changes to commit, working tree clean.
Syntax:
Output:
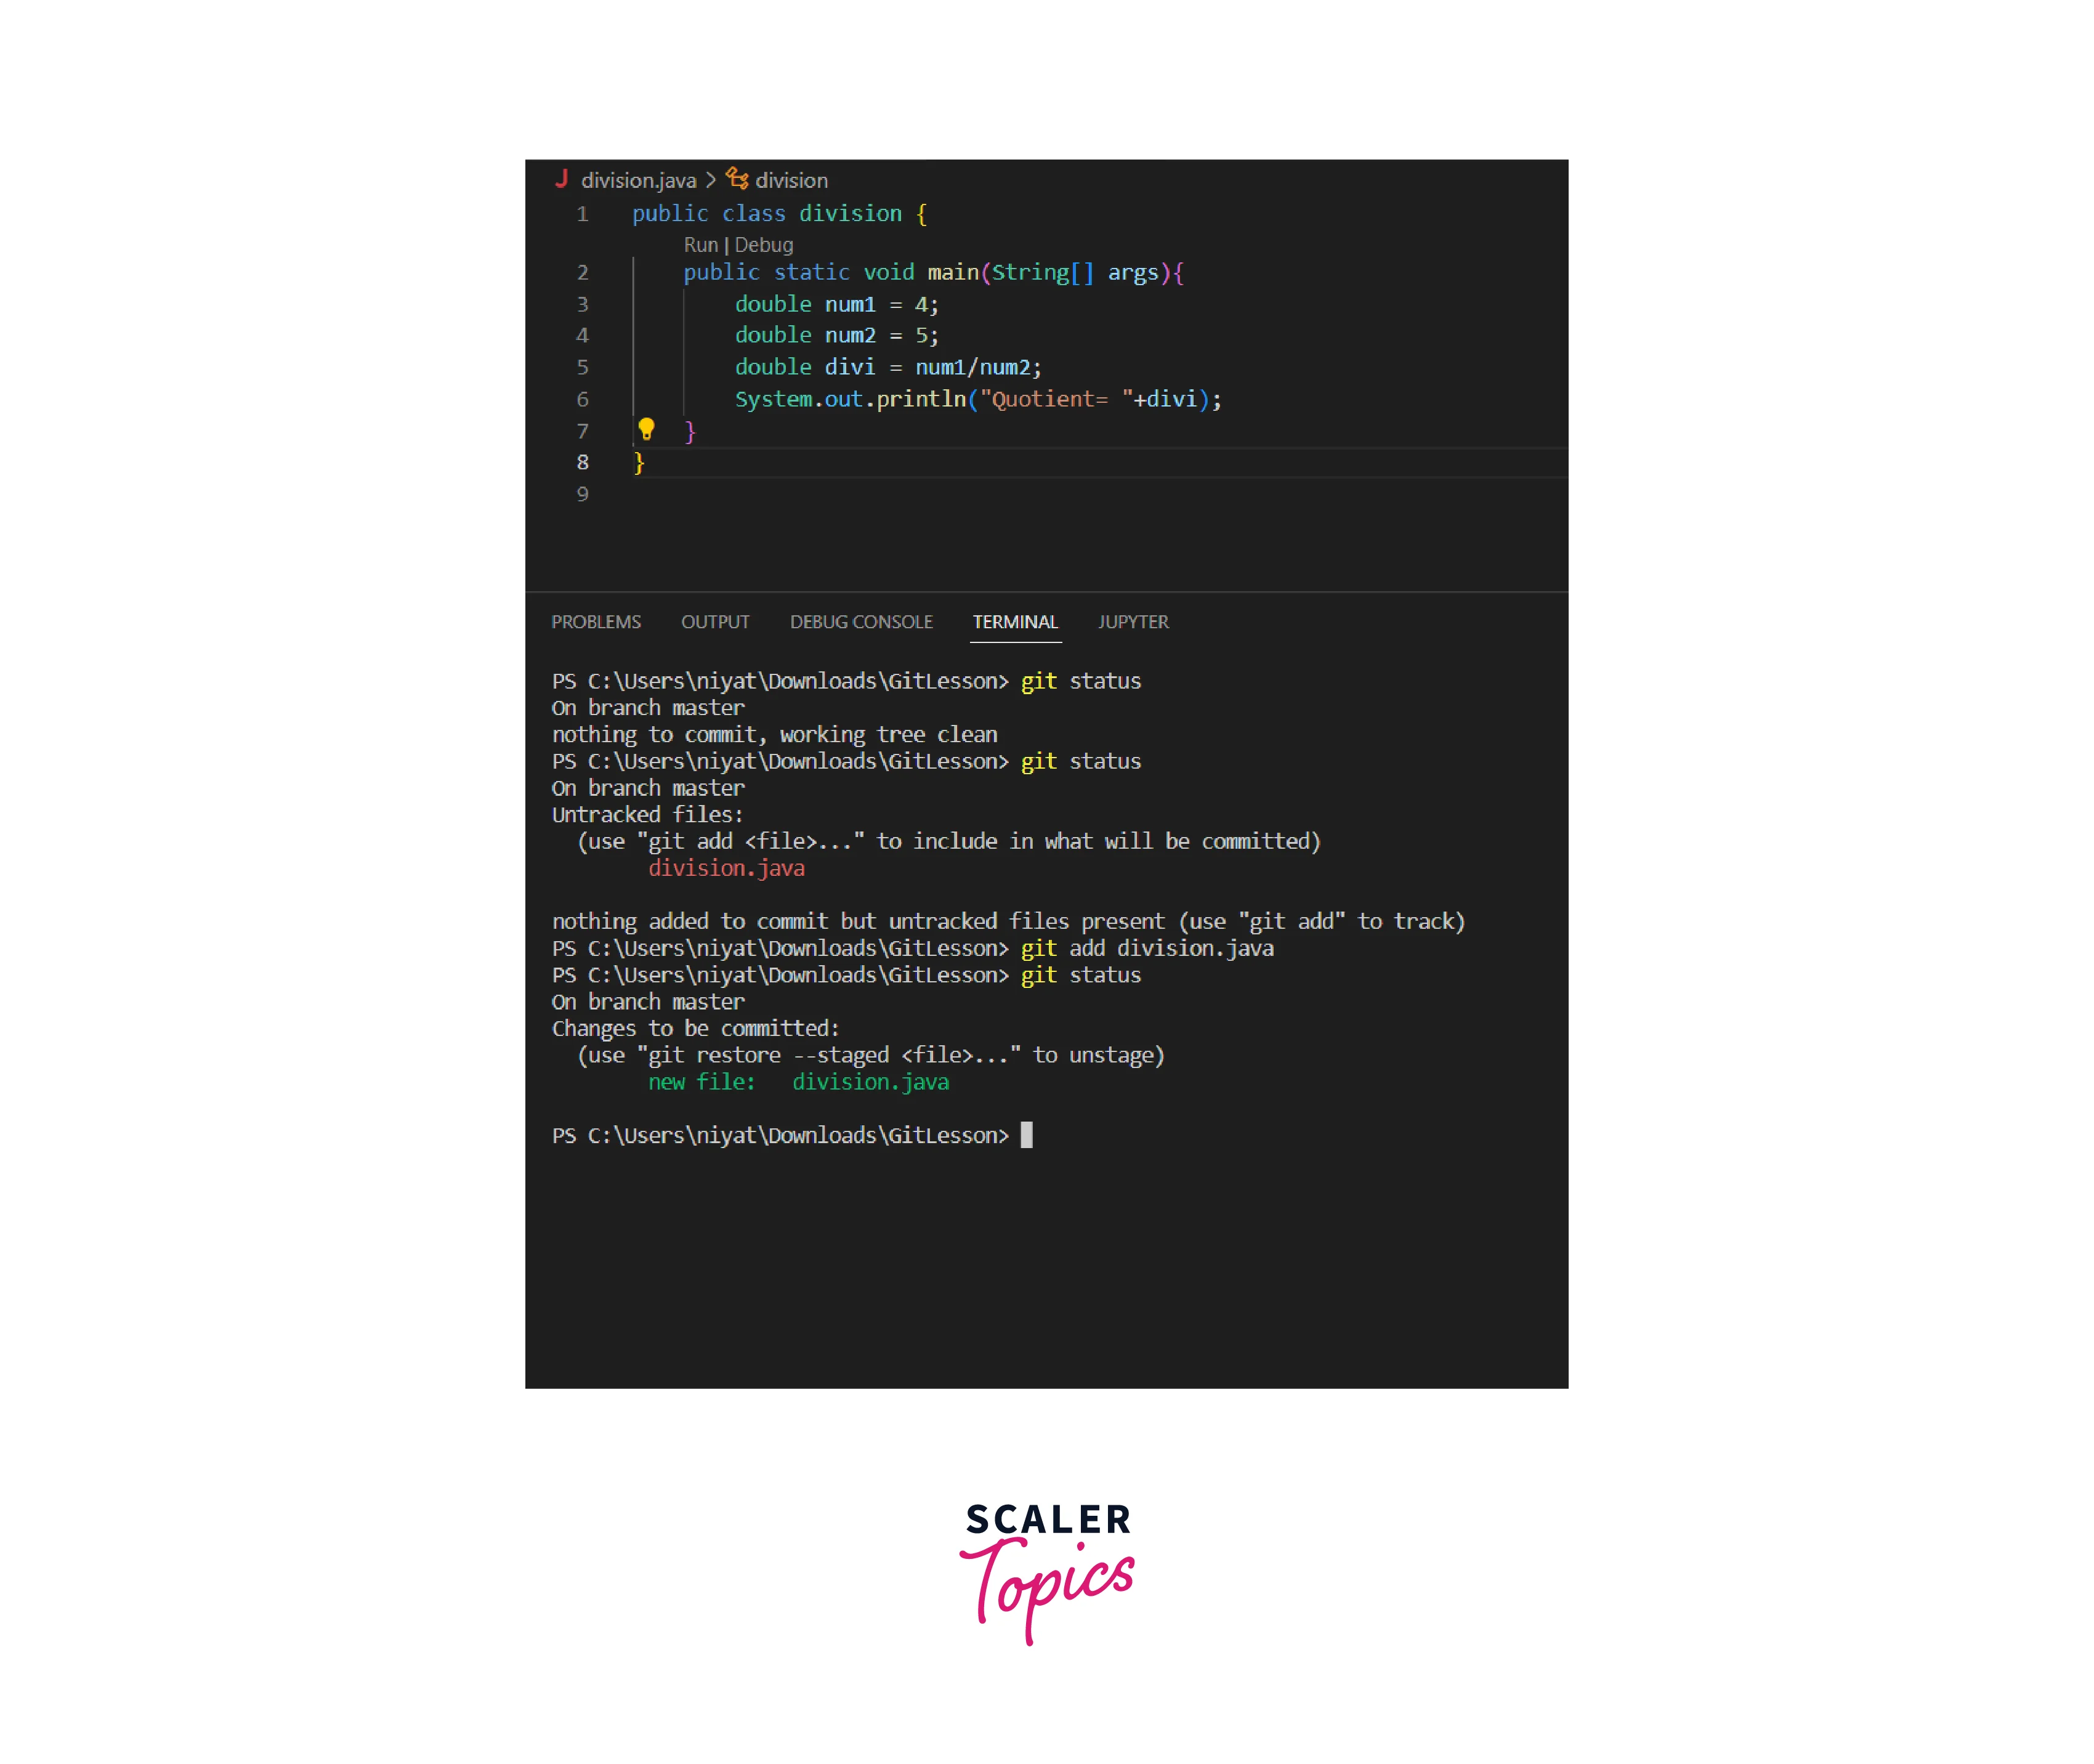
The first status is when all the files of the repository are committed, the next file is created and modified but is not added to the staging area. After adding the file to the staging area status returns that the file is all set to be committed to the master branch. It also returns the branch we are working on.
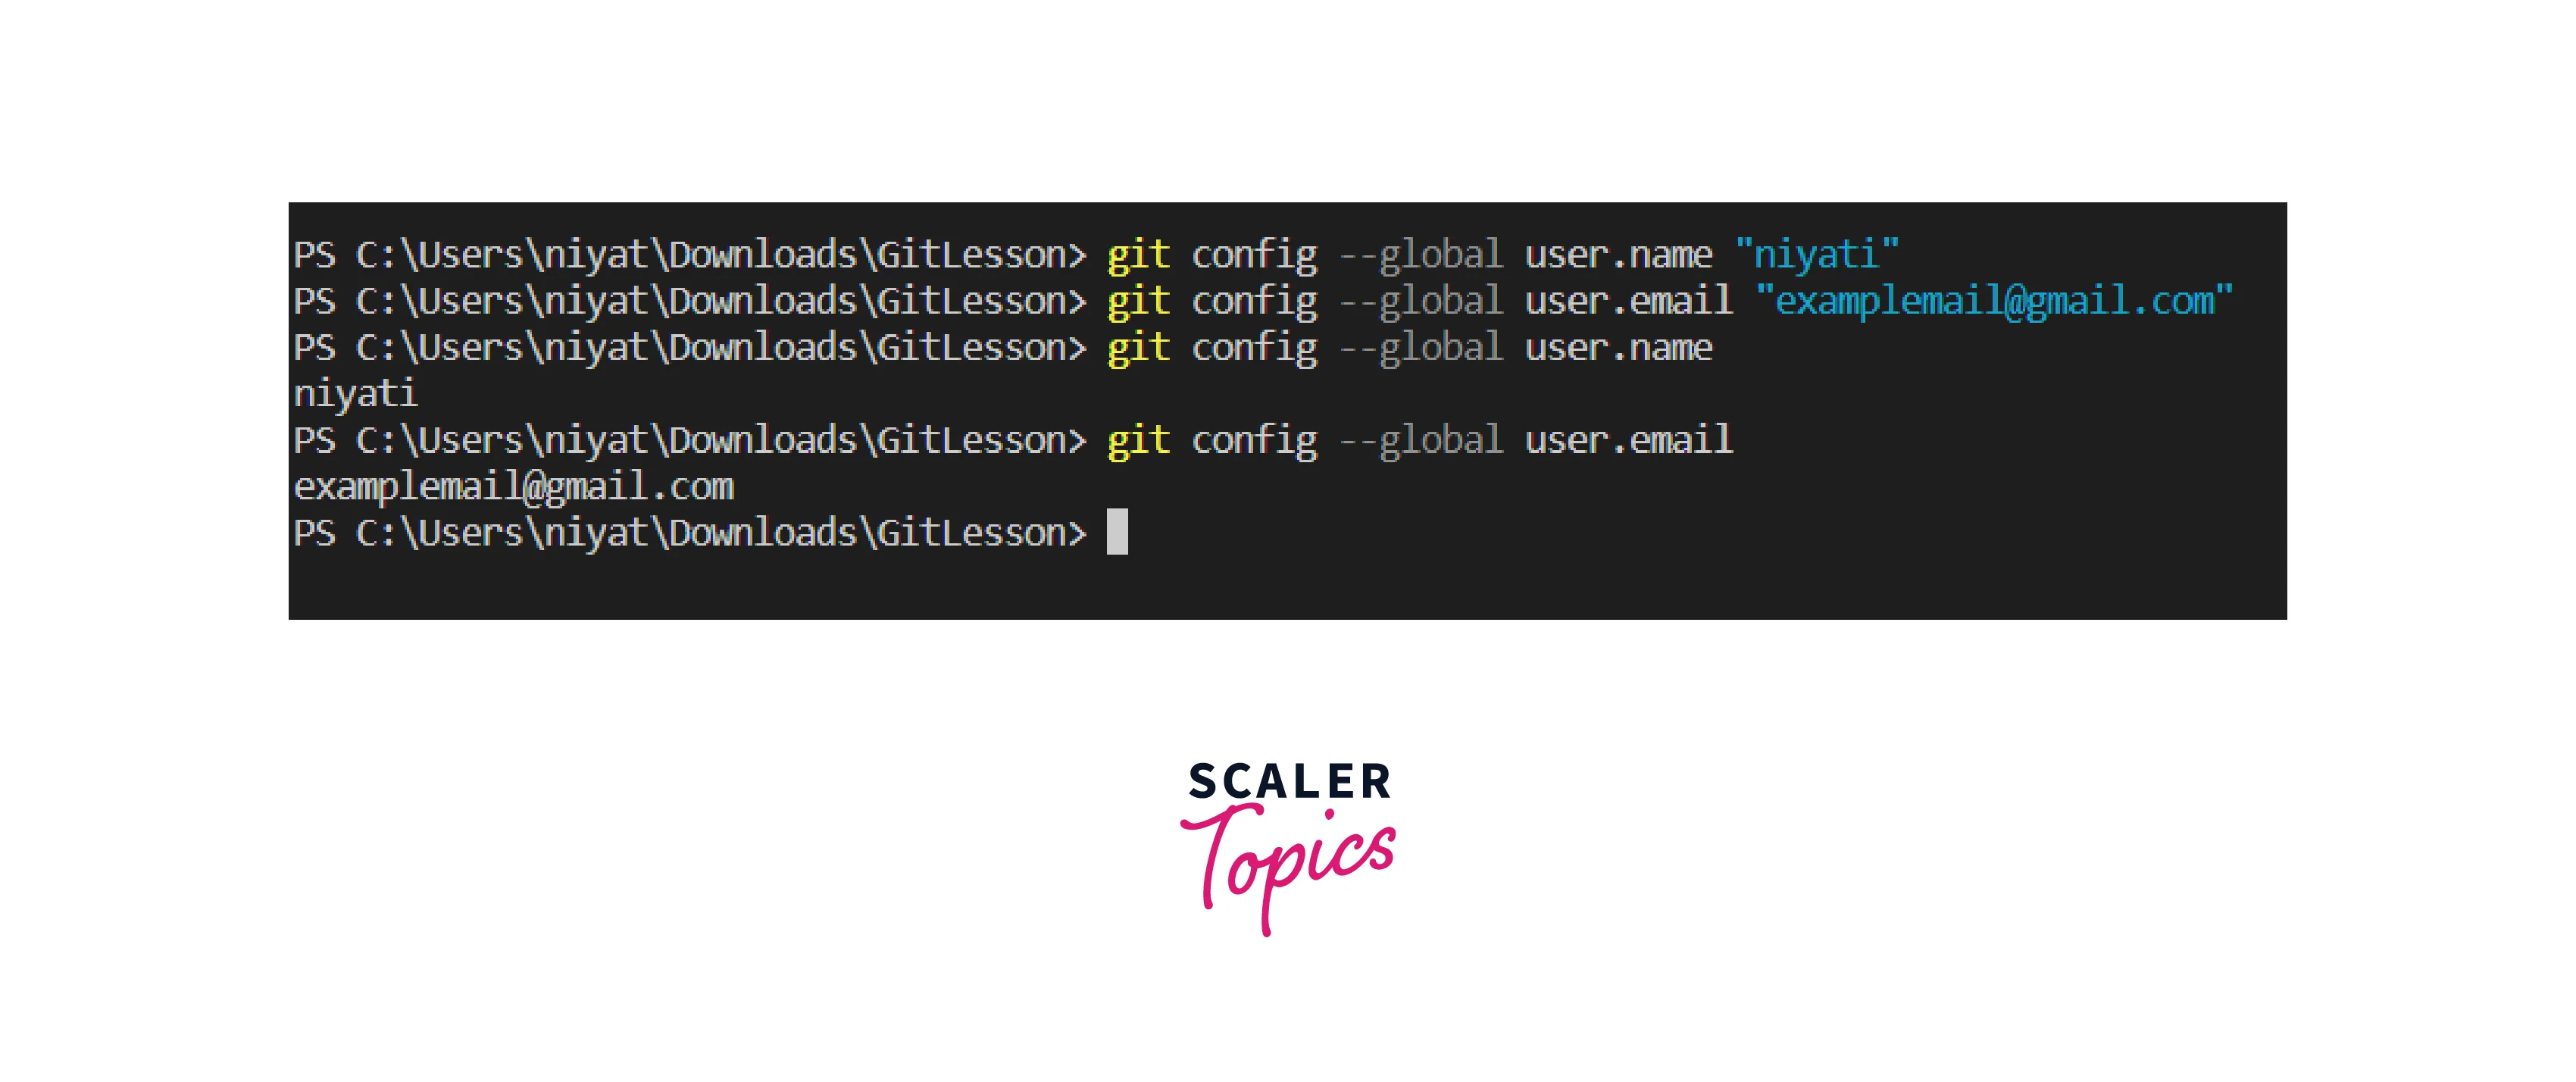
- git config
The git config command is used to configure the user's name and email. It is initially used to specify the username and the email.
Syntax:
The first two commands set the username and email and the next two commands are used to display the username and user email.
Output:
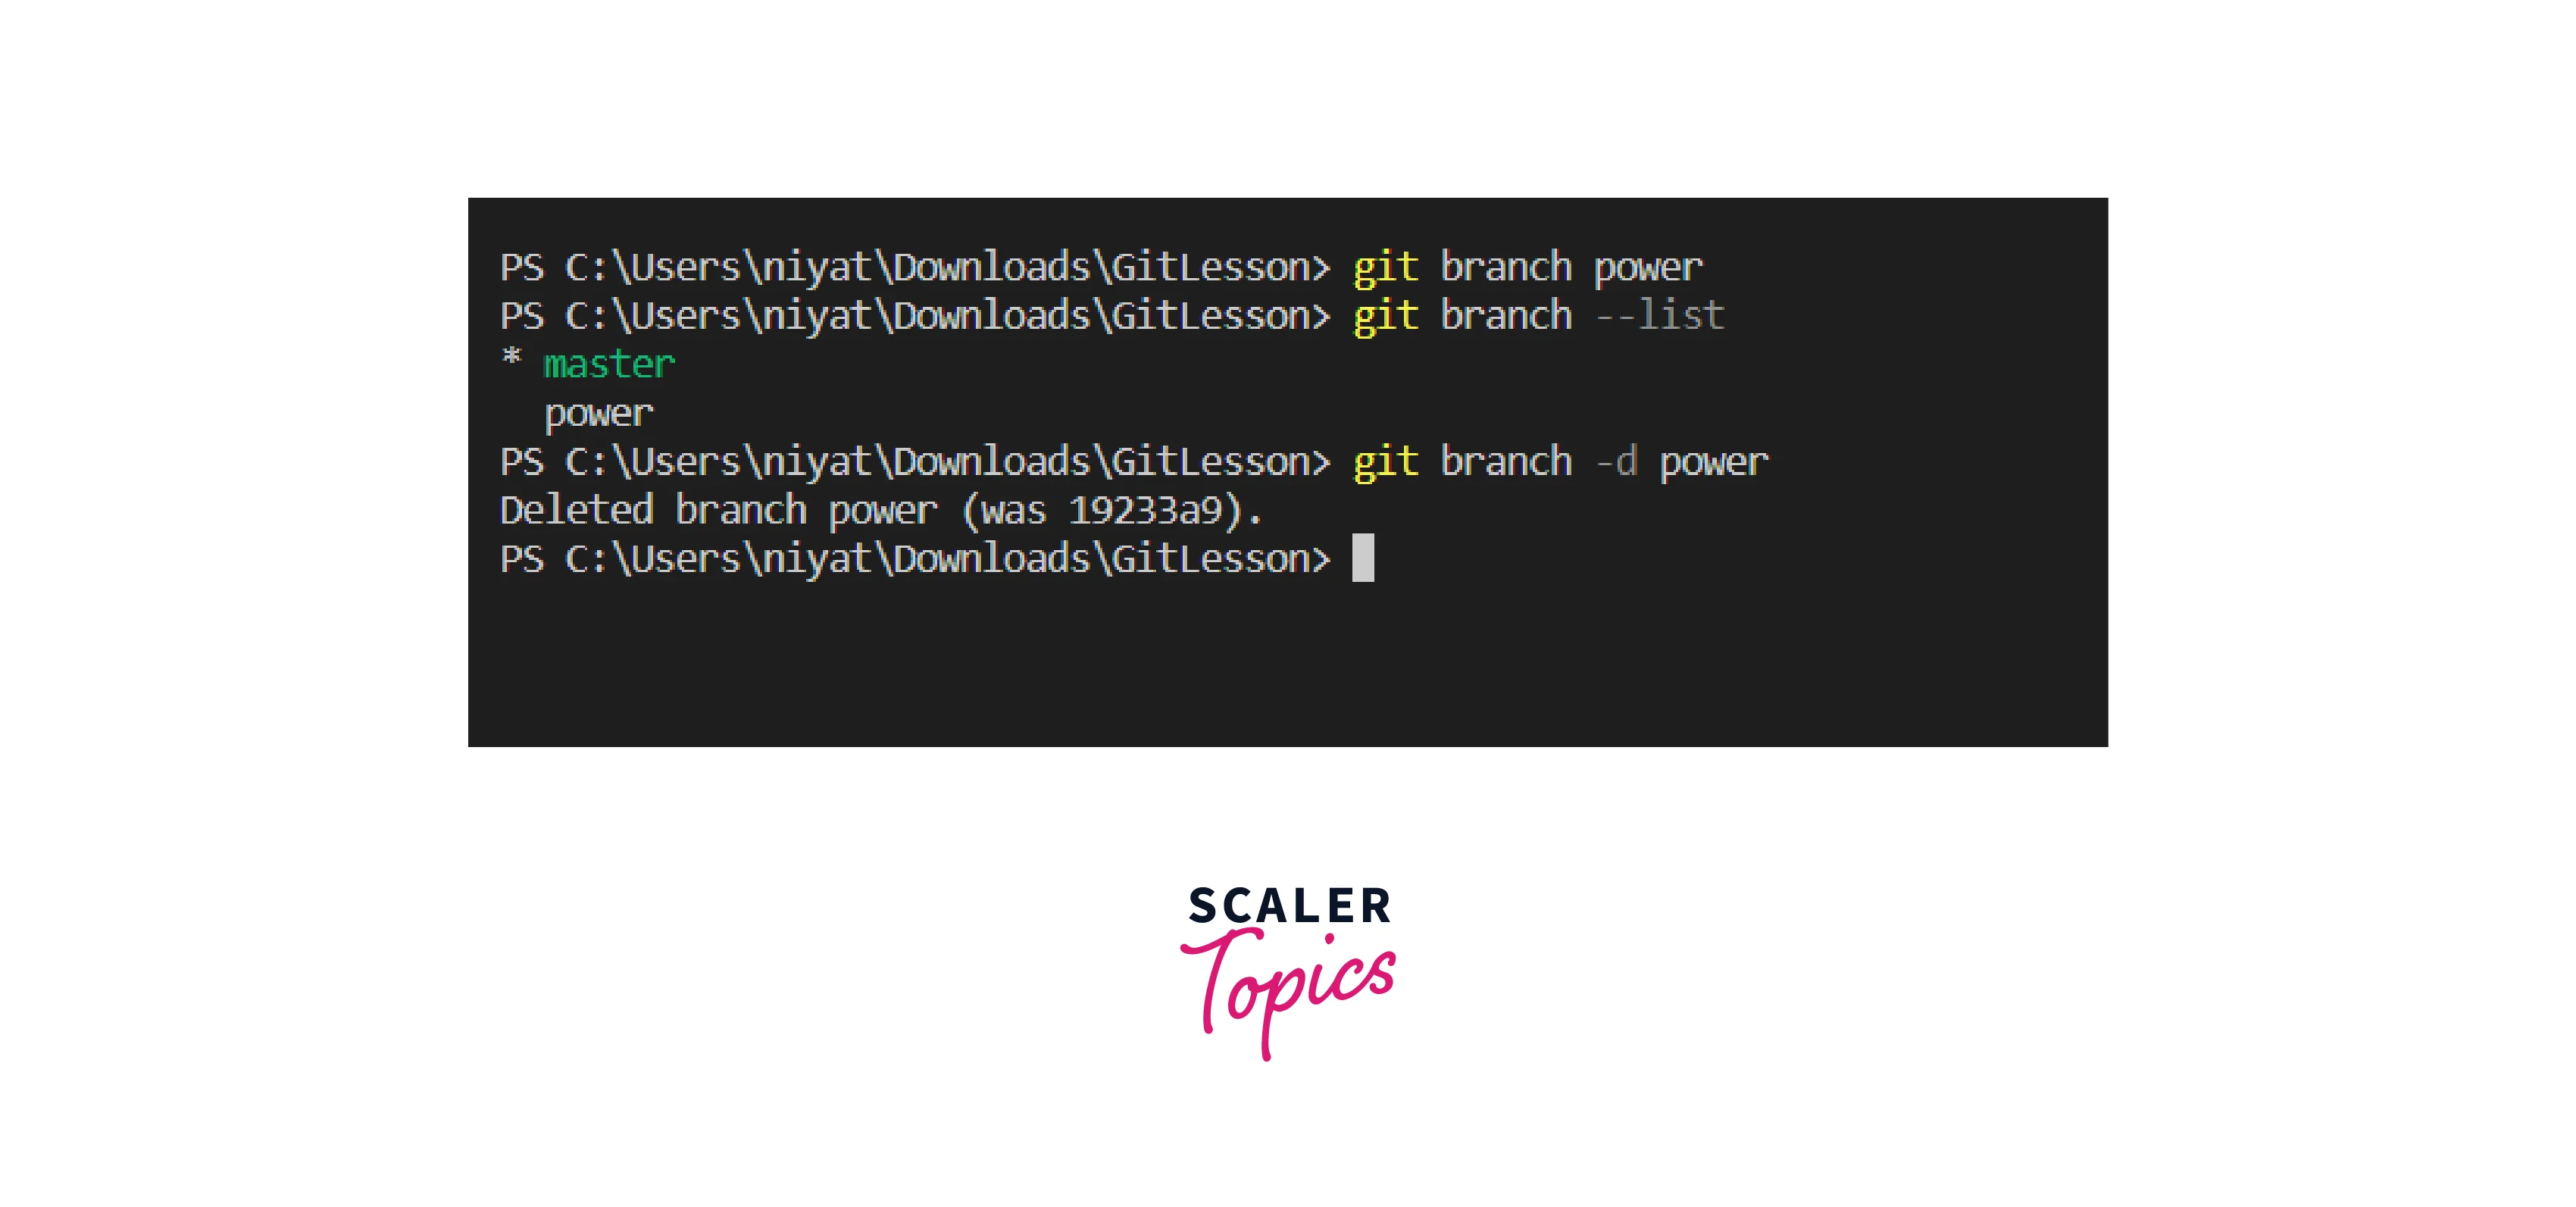
- git branch
Branches allow several developers to work in parallel and finally merge all the progress to the master branch.
Git branch commands are used to create branches, delete branches, or list the branches. We can also view the available local or remote branches.
Syntax:
- To create a branch:
- To list the branches:
- To delete a branch:
Output:
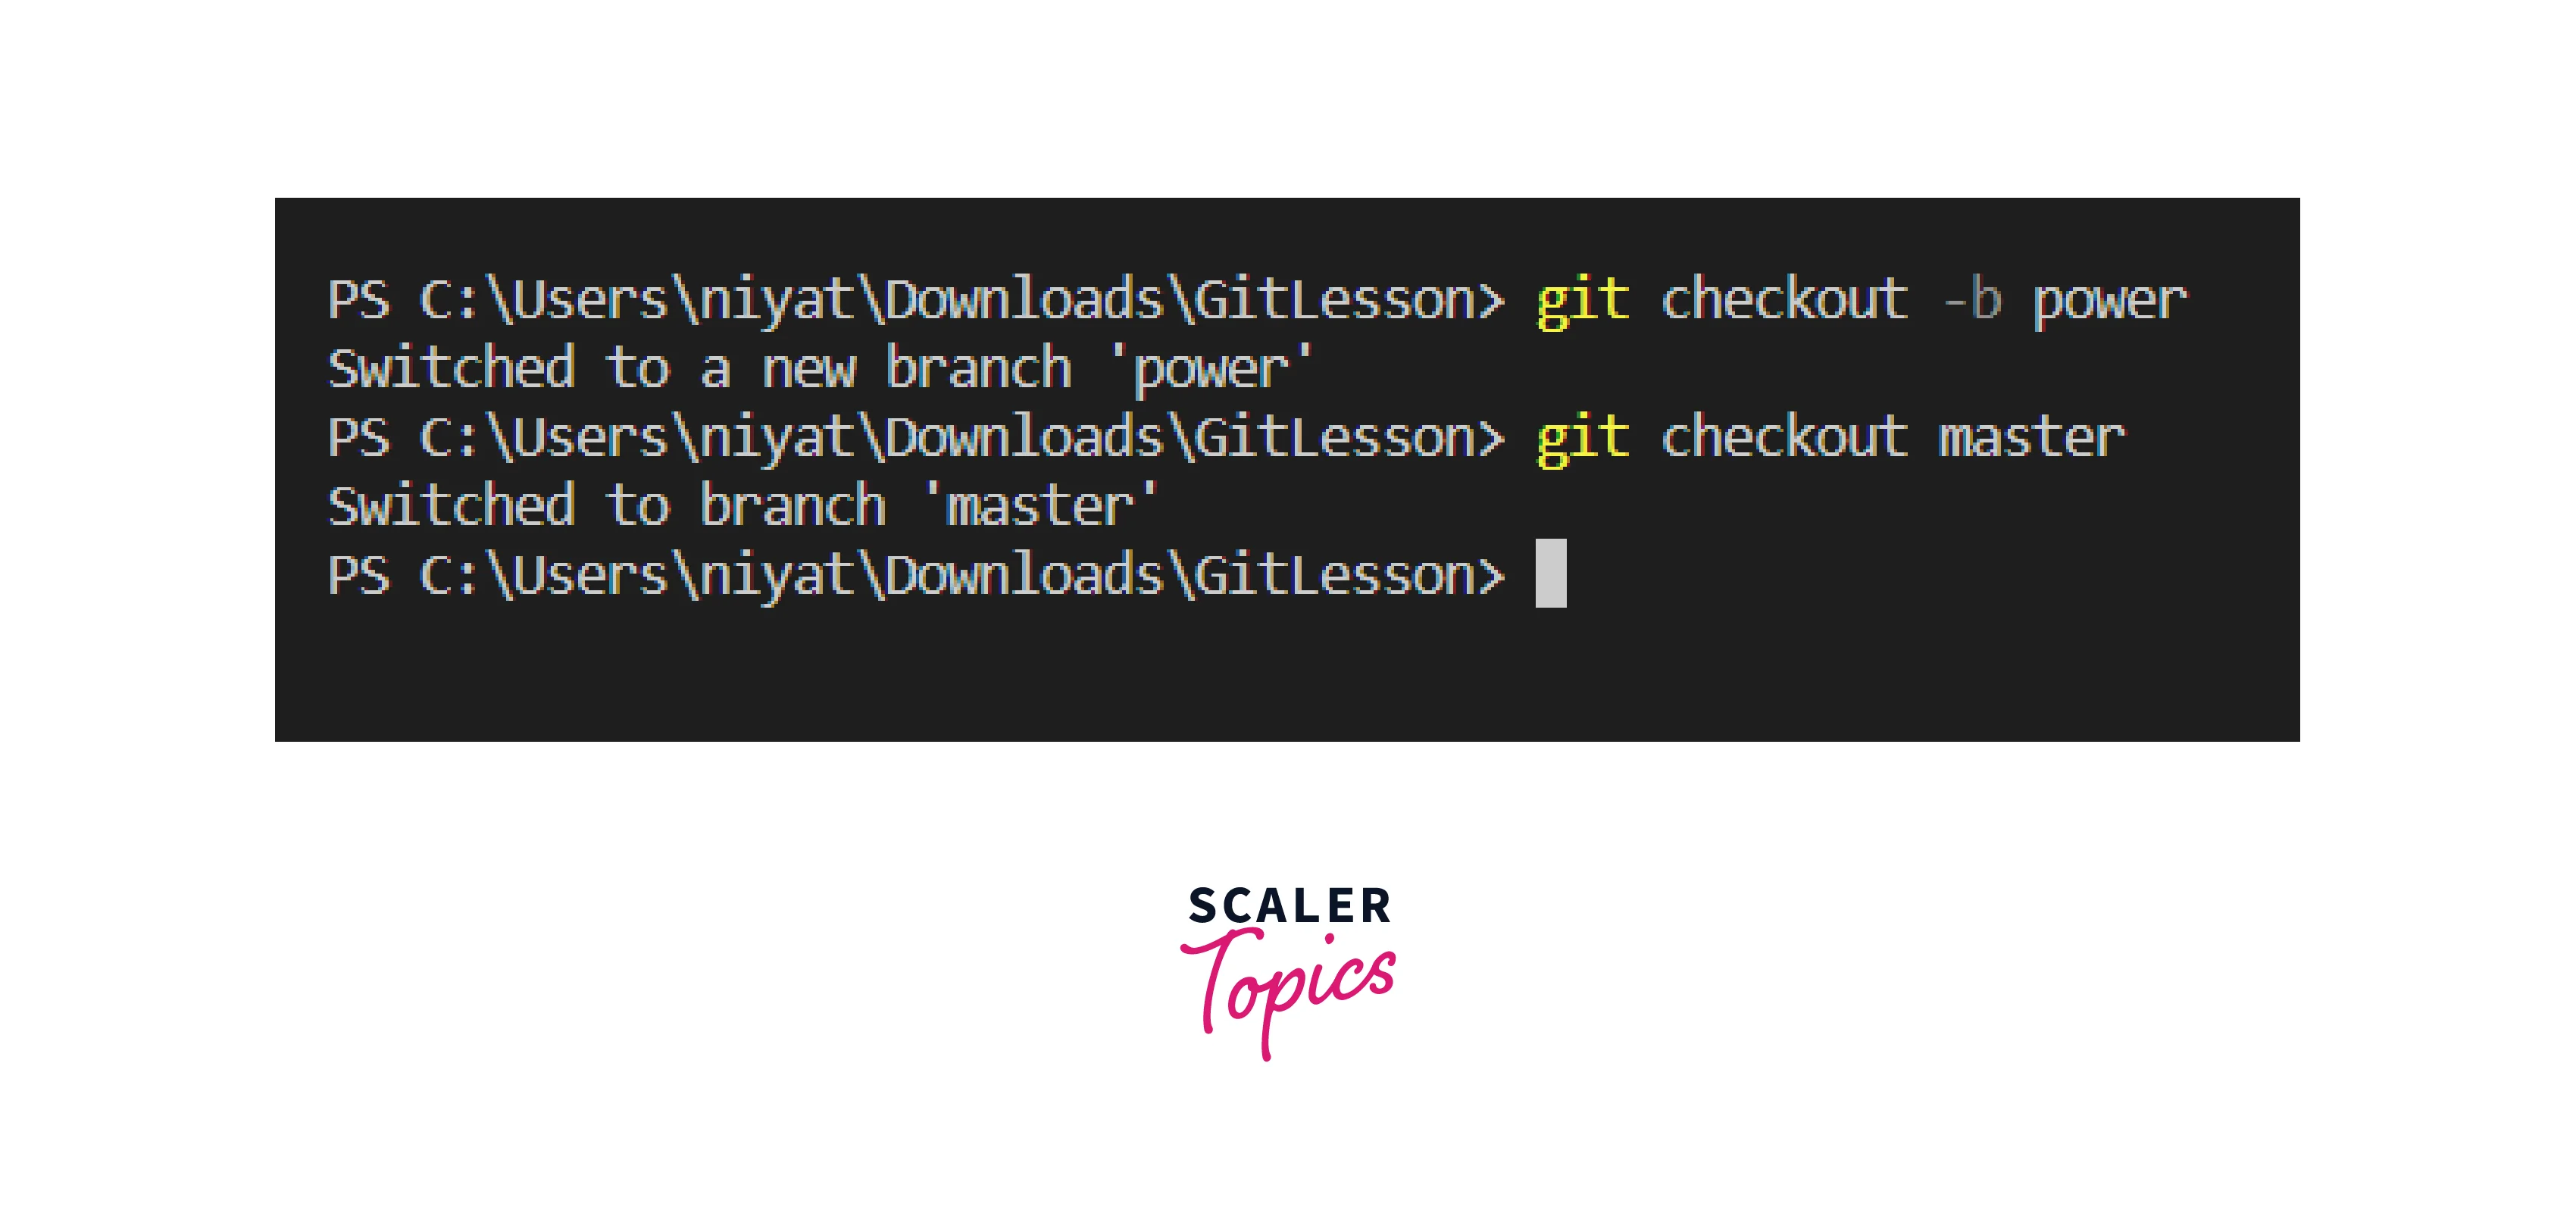
- git checkout
The branch that we created using the branch command, now it's time to switch branches and start working on them. The checkout command is used to switch branches, i.e. move from one branch to another whenever necessary. It is also used for checking out the files and commits on the branch.
Syntax:
- To switch to another branch:
Output:
- git merge
Once all the development on the current branch is done, it should be merged with the parent branch. This is done using the git merge command.
To merge the current branch i.e. child branch to the parent branch we should be on the parent branch first. Also, the parent and the child branches must have all the changes committed and they have the latest version before merging.
Syntax:
- Switch to the parent branch
- Updating the parent branch
- Merging the child branch with the parent branch
Output:
- git diff
This command is used to see the unstaged changes on the current branch. It can be also used to compare two branches.
Syntax:
- To see the untagged files on the current branch
- To compare two branches
Output:
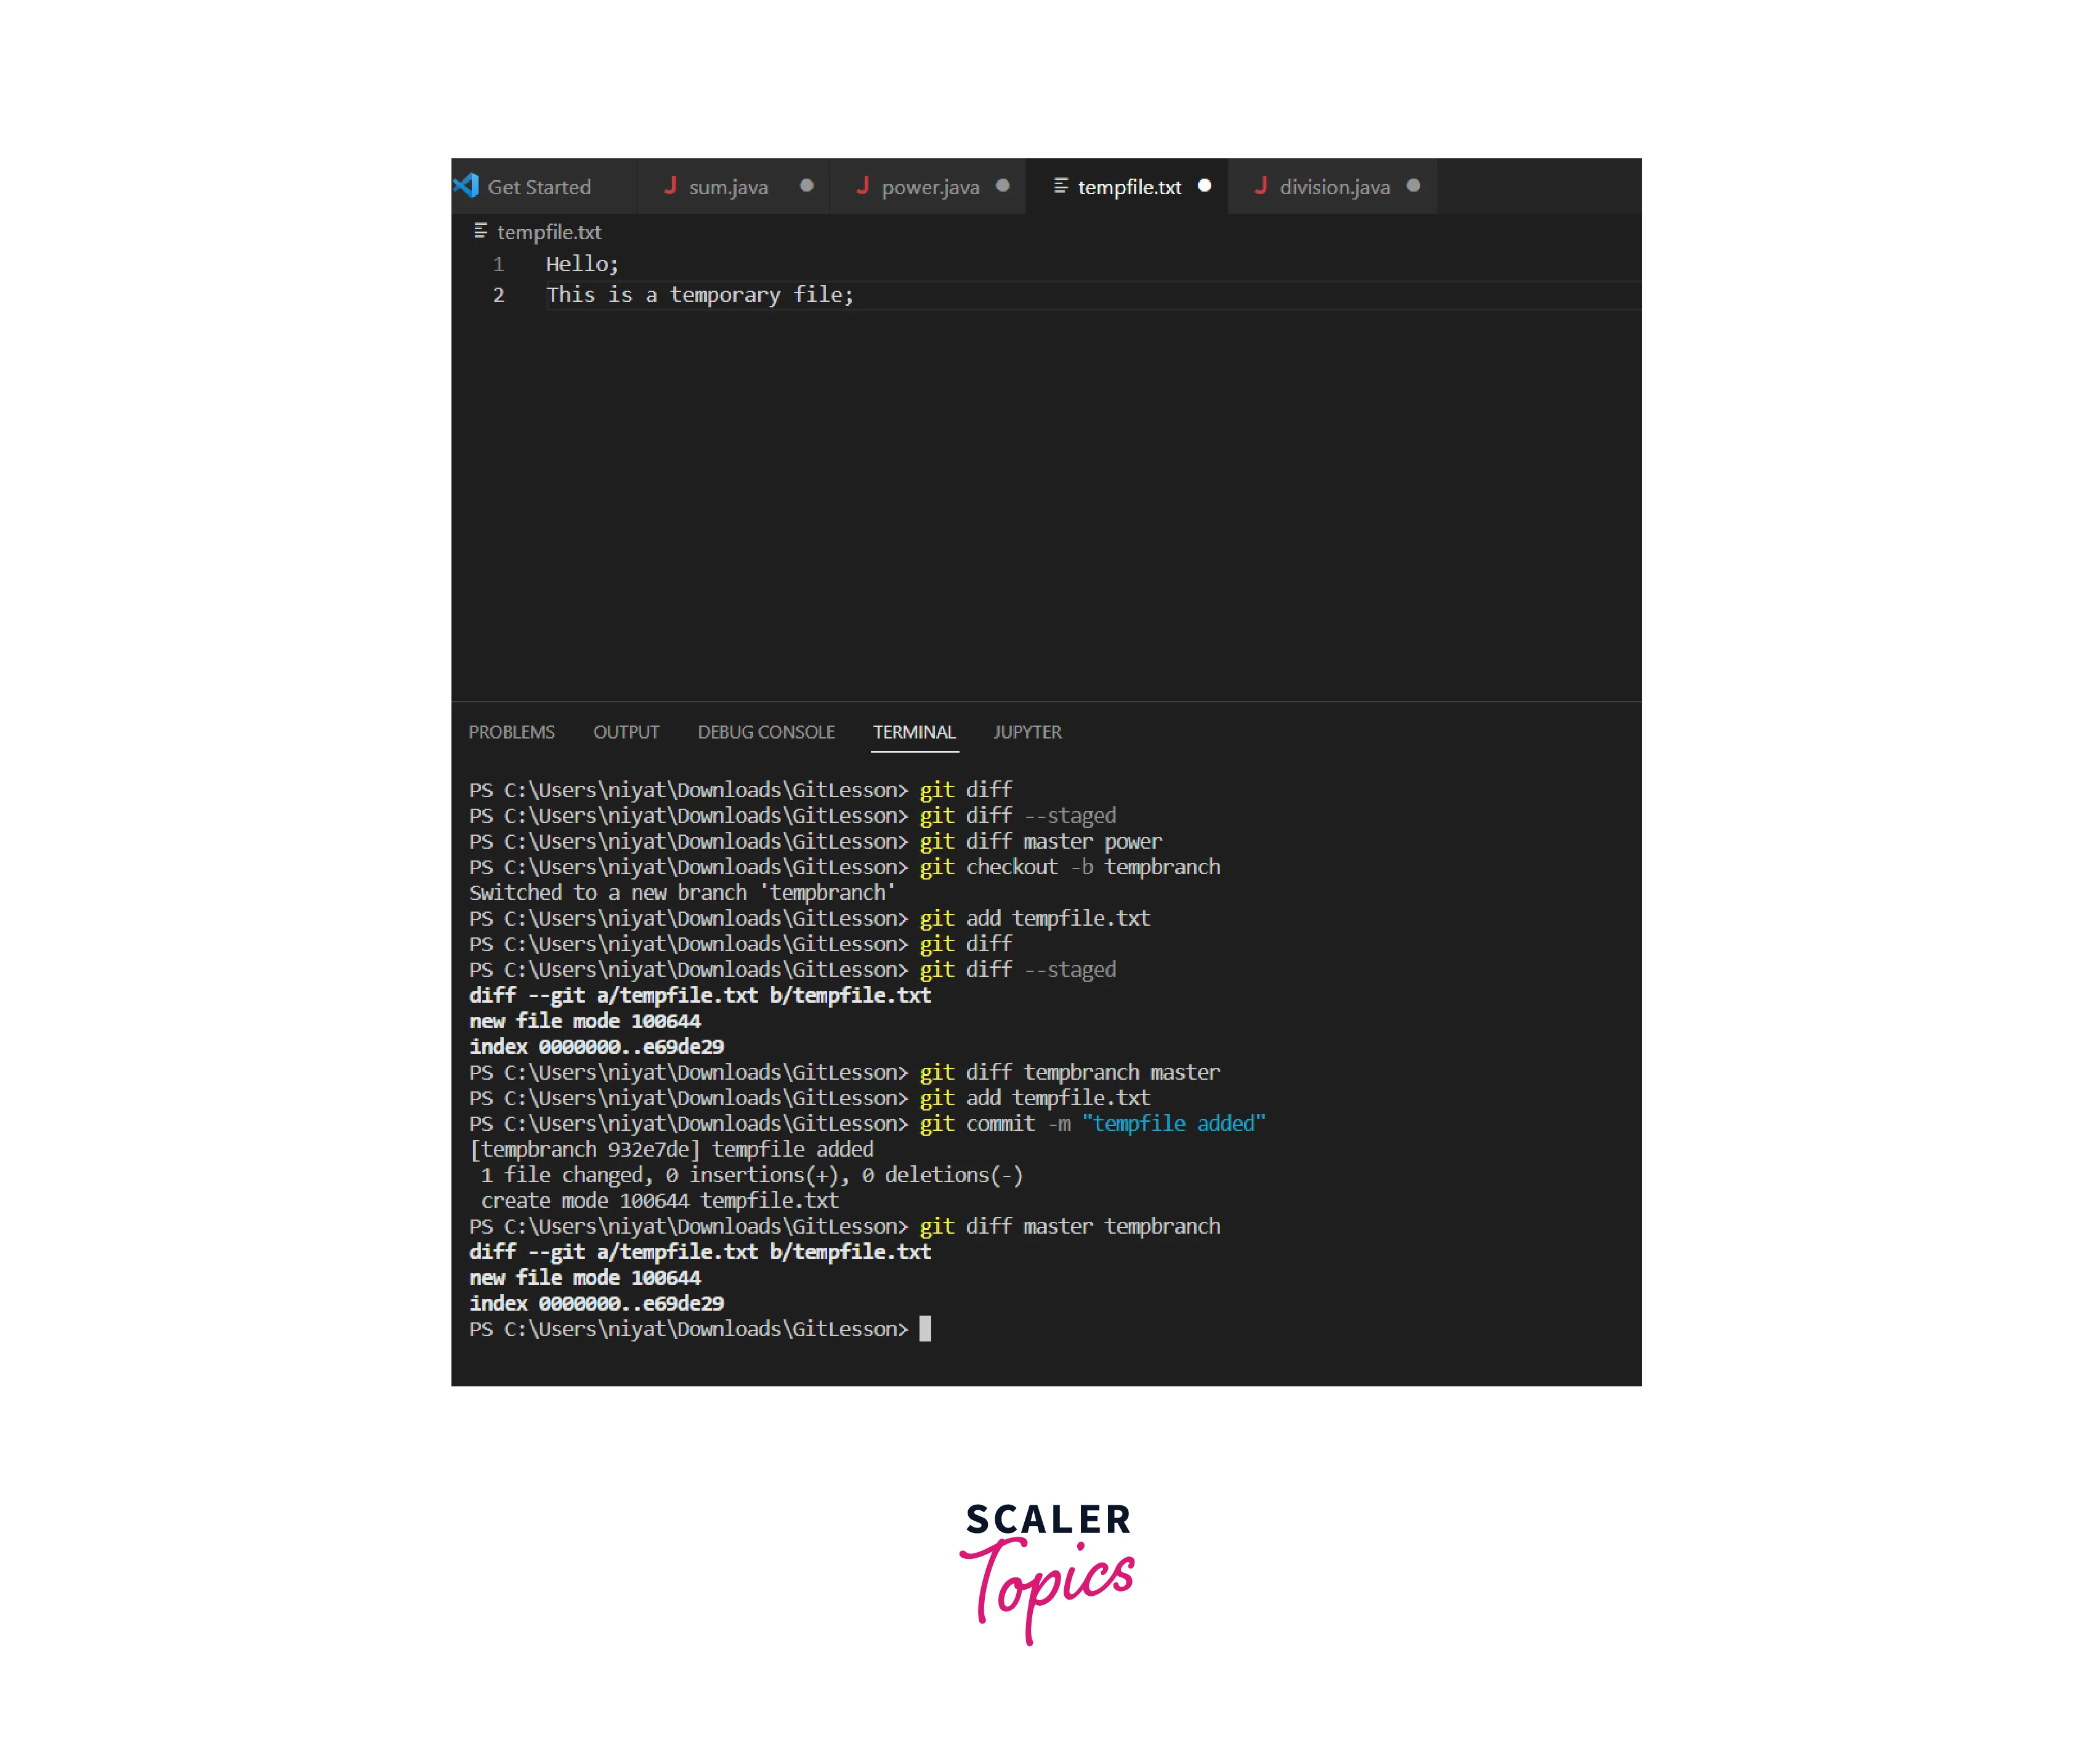
Initially, as there is no difference, the output is empty. Next, as one file is untagged in the new branch temp the git diff command returns that a new file can be added to the staging area. Lastly when this temp file is committed to the temp branch comparison between the master and the temp branch returns that one file is in the temp branch but it is absent in the master branch.
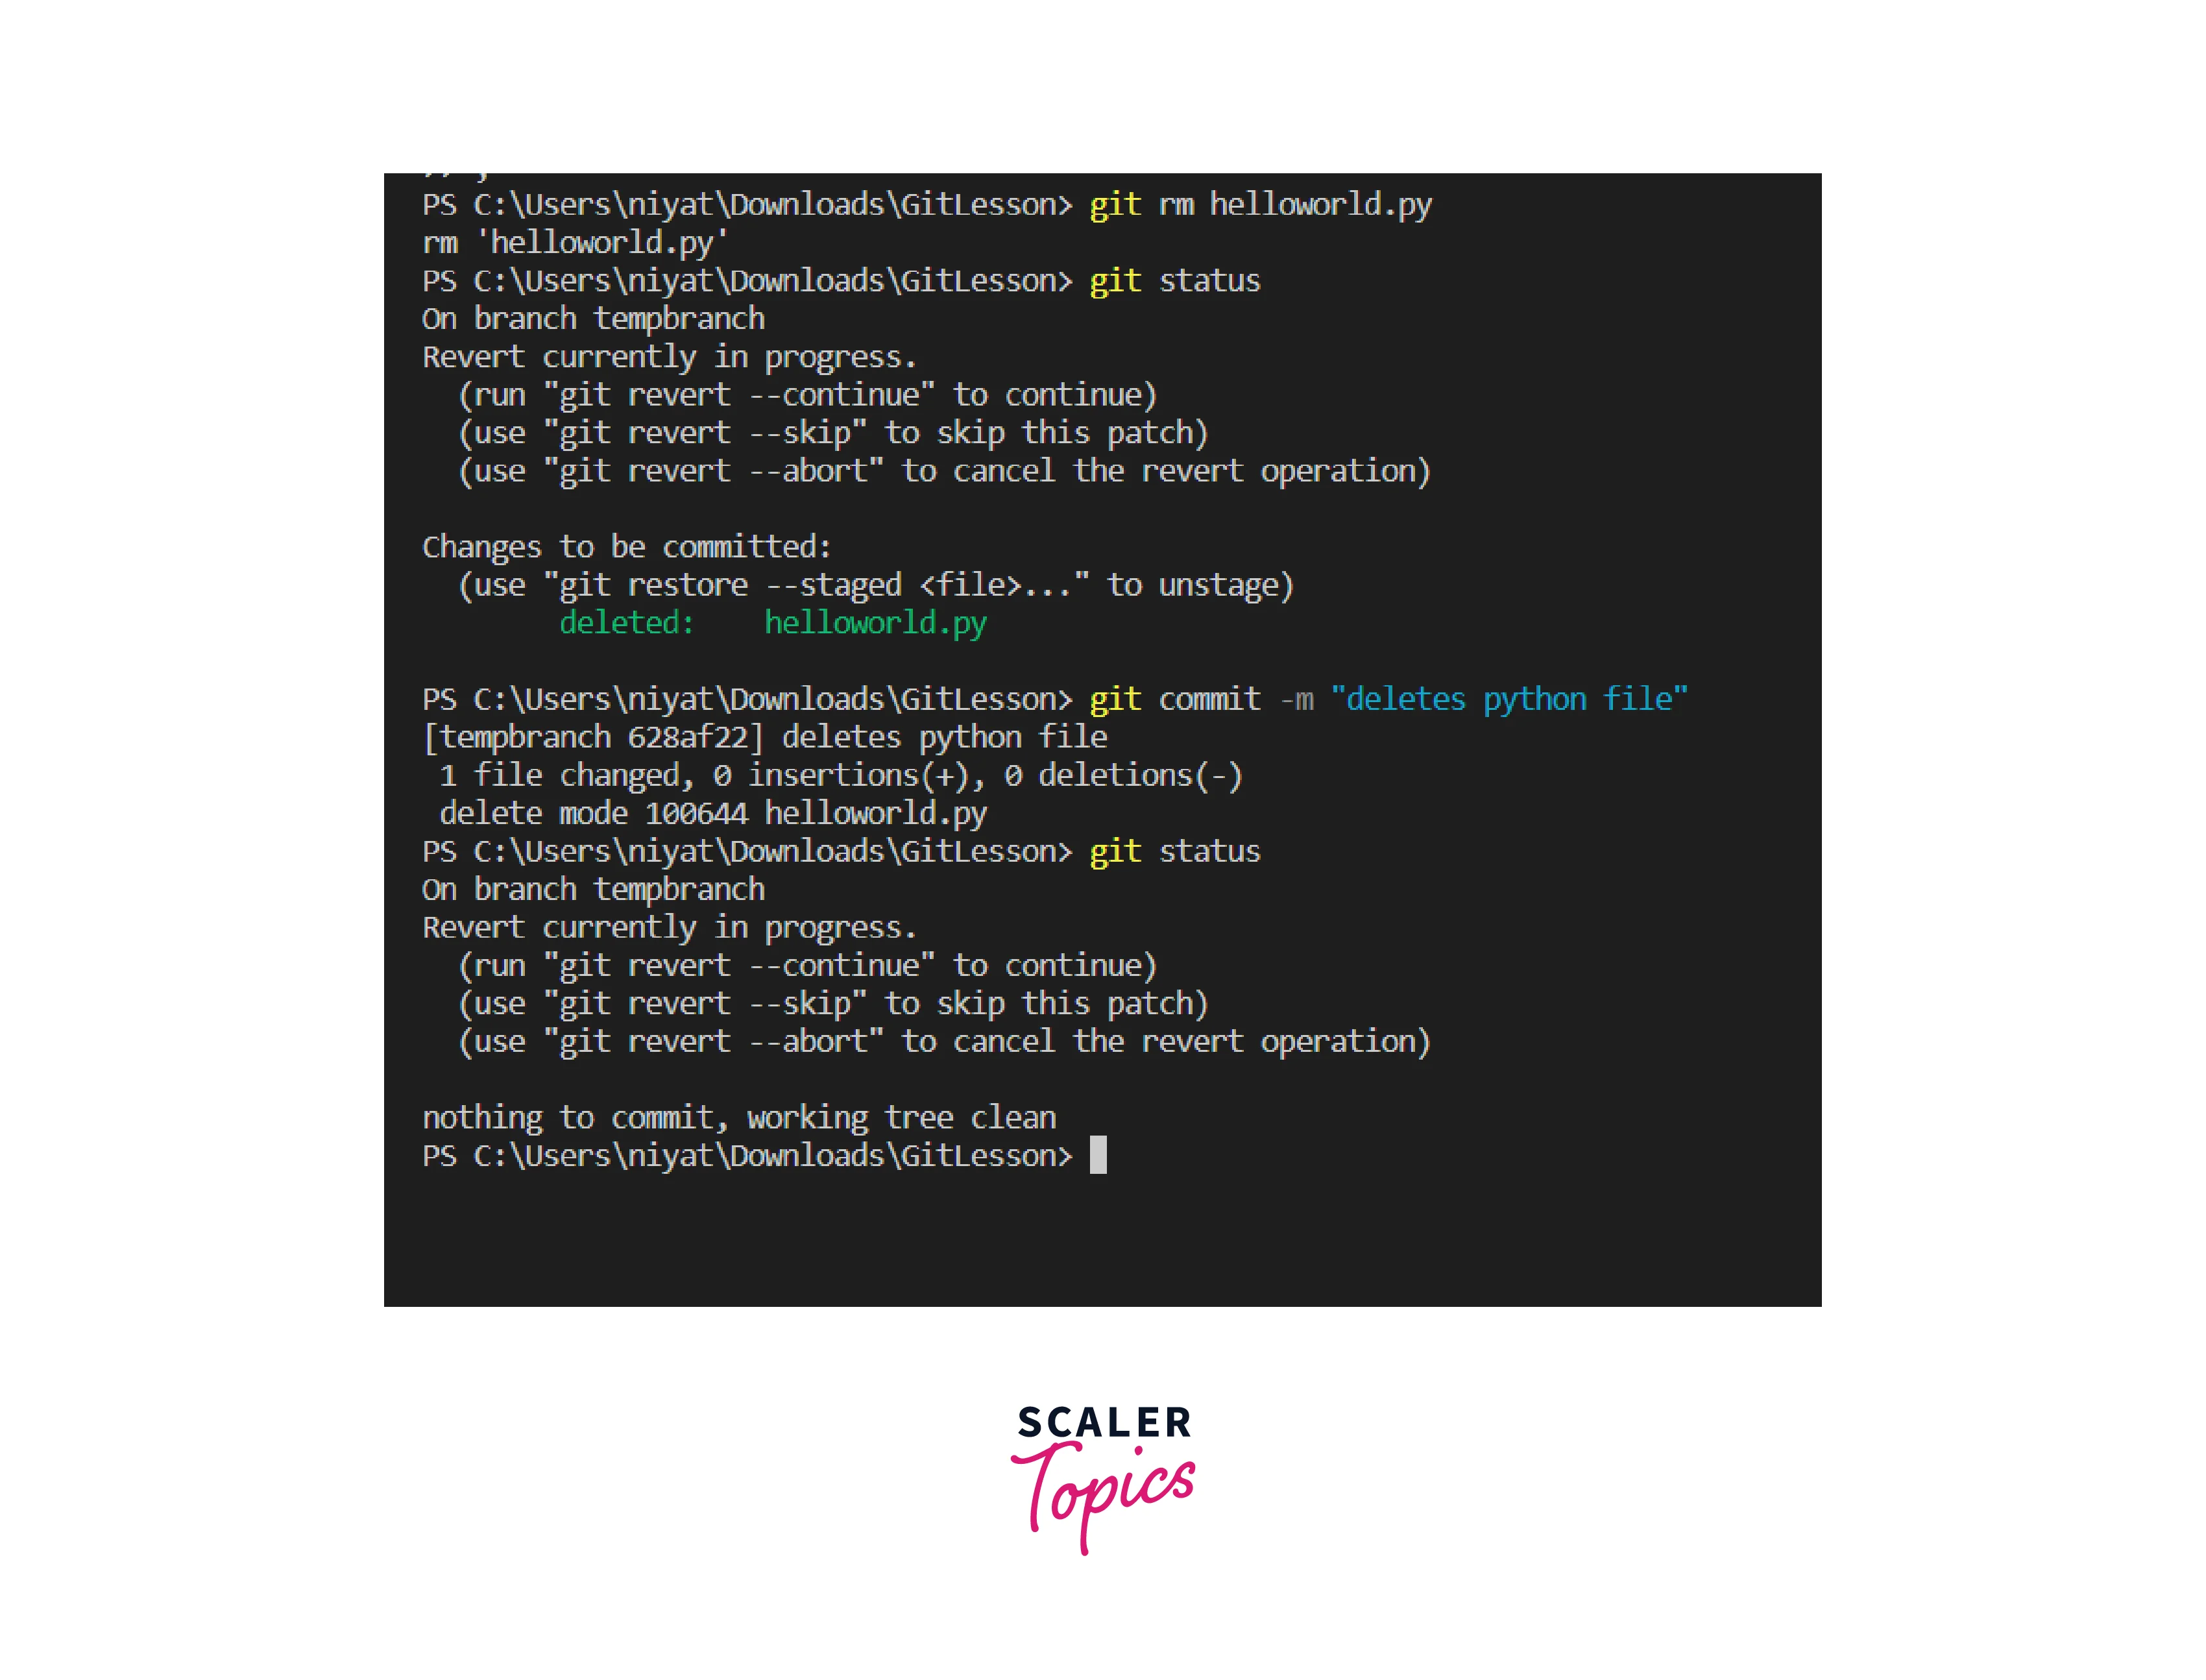
- git revert
We might wish to undo changes made sometimes due to errors or undesirable changes. Git lets us revert changes using the git revert command. But these should be made with a lot of care as import files or updates will be lost. Every commit has a unique hashcode. To revert a particular commit we are supposed to enter the commit hashcode. The hashcode can also be searched in the logs.
The Git revert command will not remove the above commit, it will simply create another commit after reverting the changes.
Note: The hashcode can be figured out using the git log command. To exit the git log press q.
Syntax:
Output:
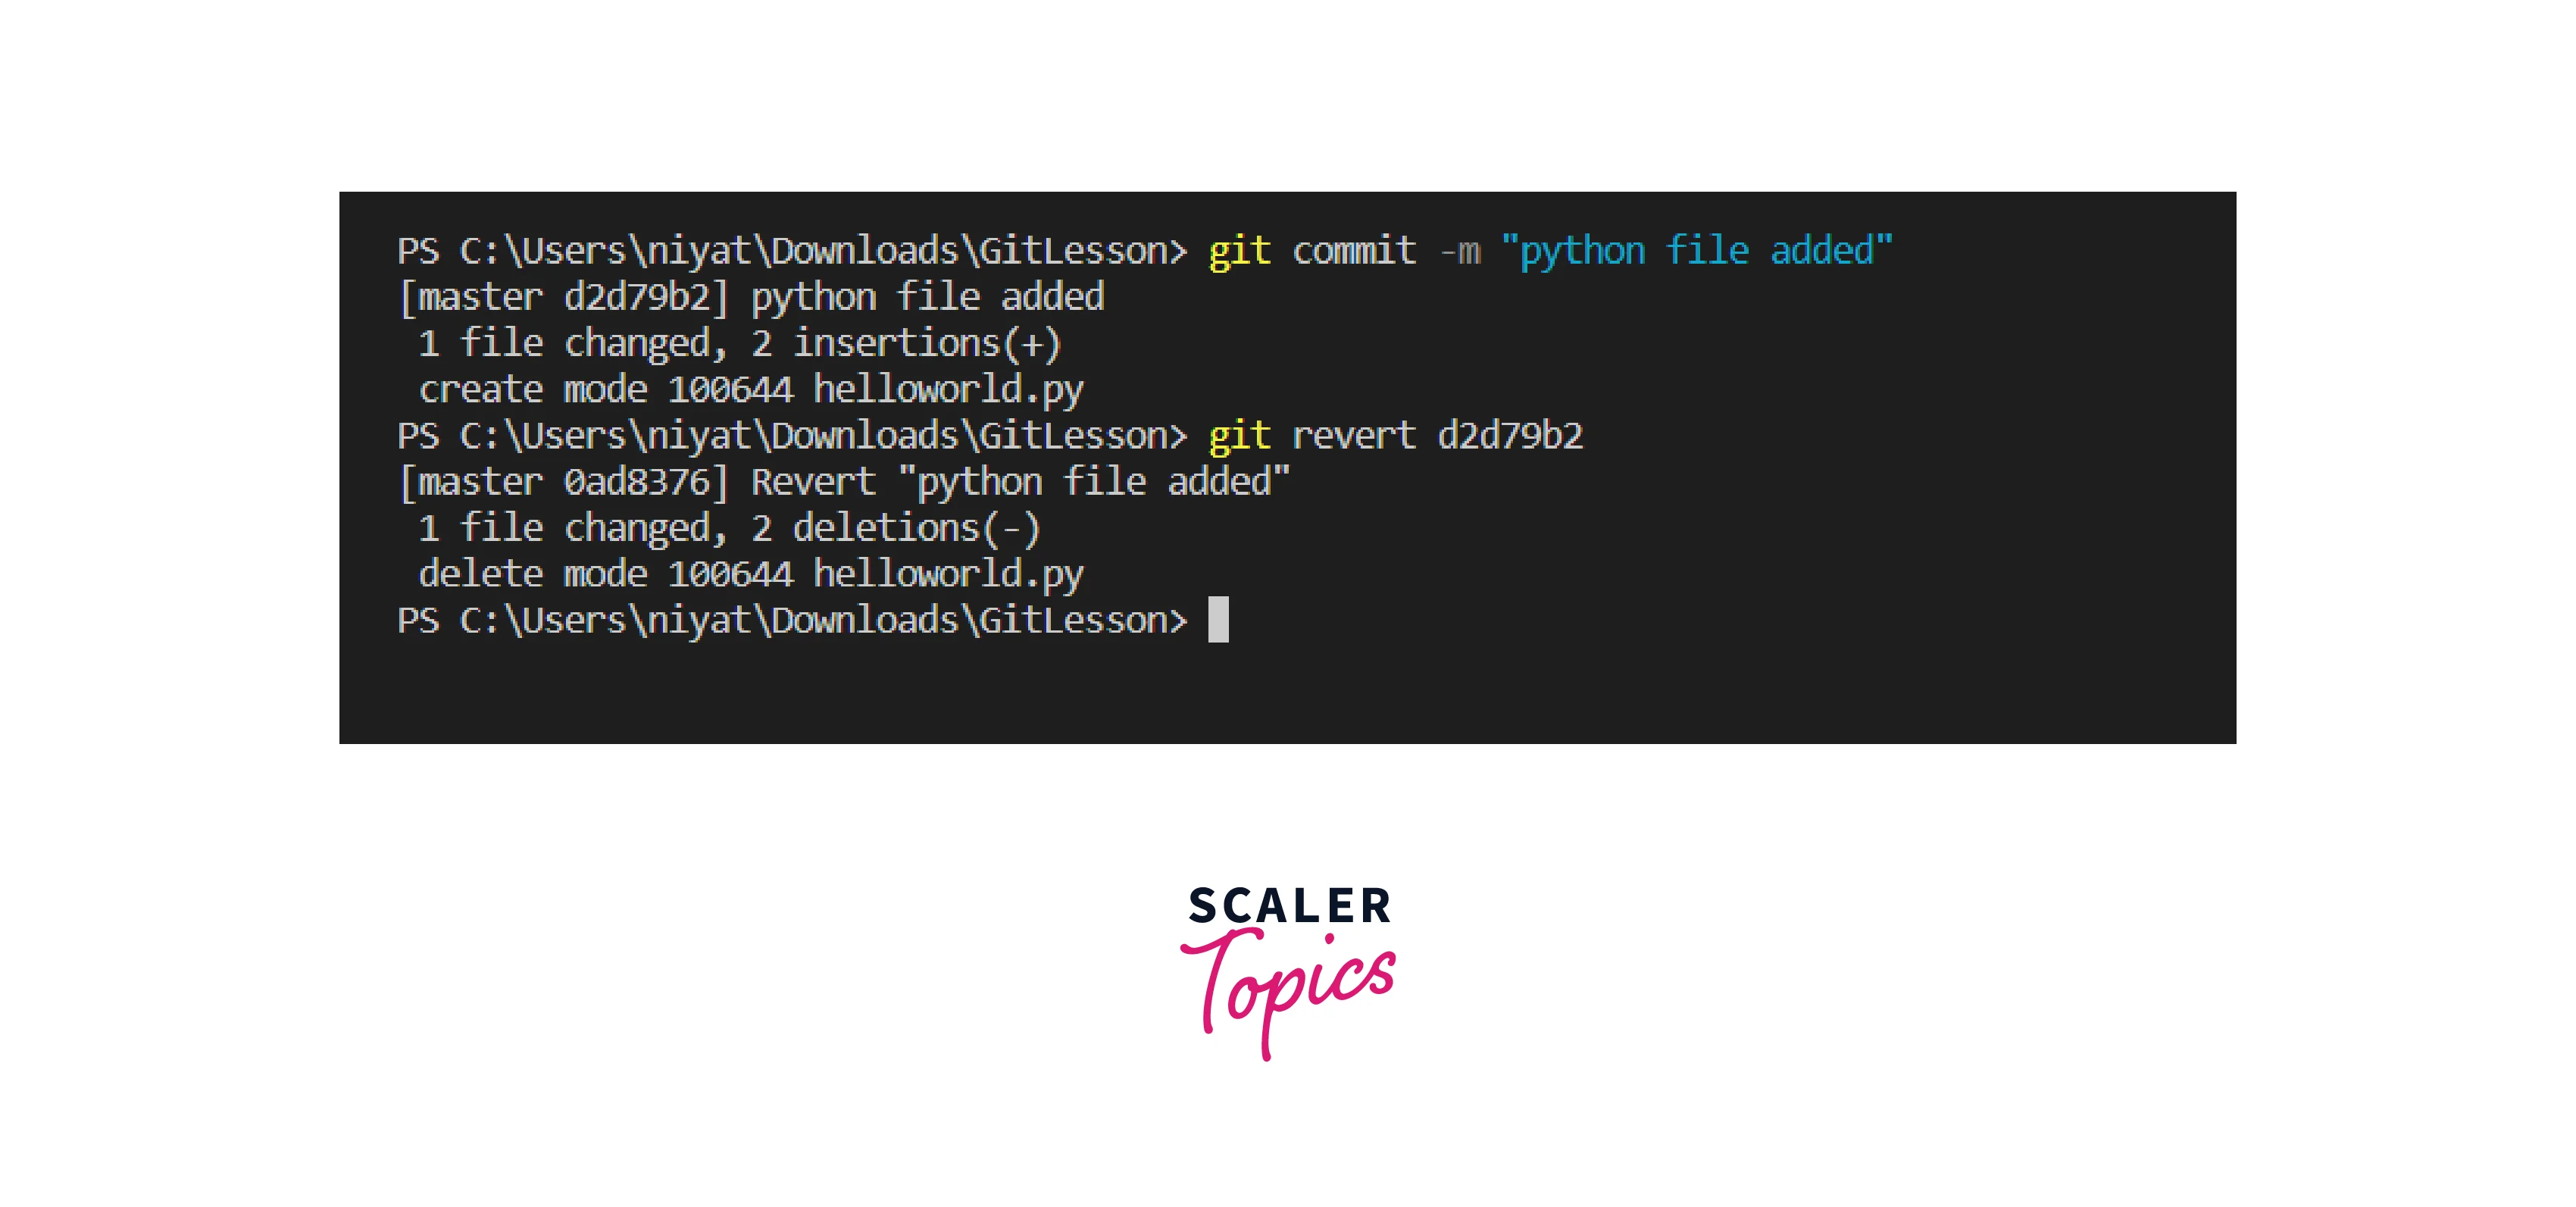
In the example above, after writing the above code, you may see a message that is requesting a commit message, to resolve that press Esc, then type :q! and press Enter. The terminal shows the commit made above along with its hashcode and the revert process using the hashcode.
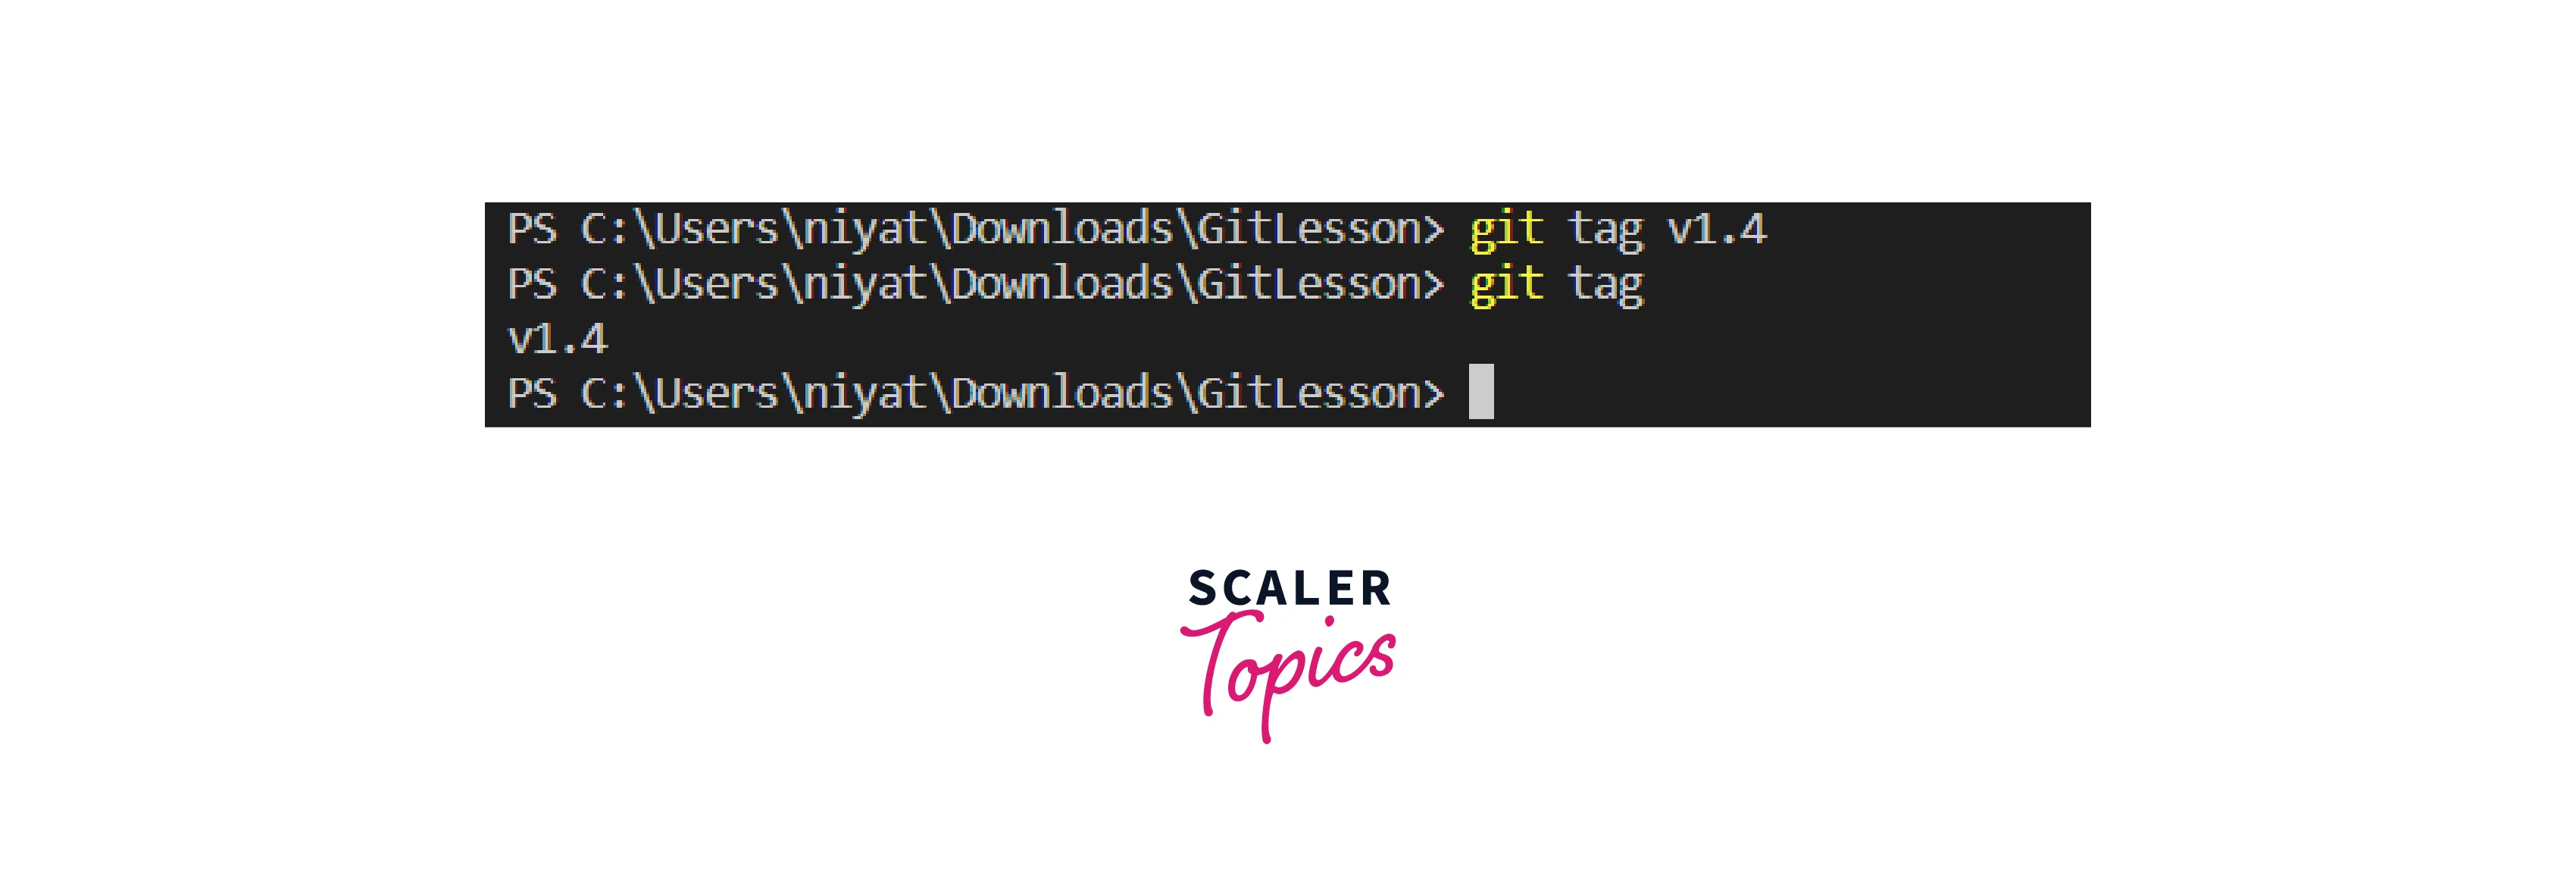
- git tag
It is used to tag or mark important checkpoints of the project such as versions.
Syntax:
We can have multiple tags but each commit is not required to be tagged. Only noteworthy ones should be tagged to find them easily.
Output:
- git rm
The command git rm deletes the file specified from the current working directory. To delete it permanently we need to commit the changes to the respective branch.
Syntax:
Output:
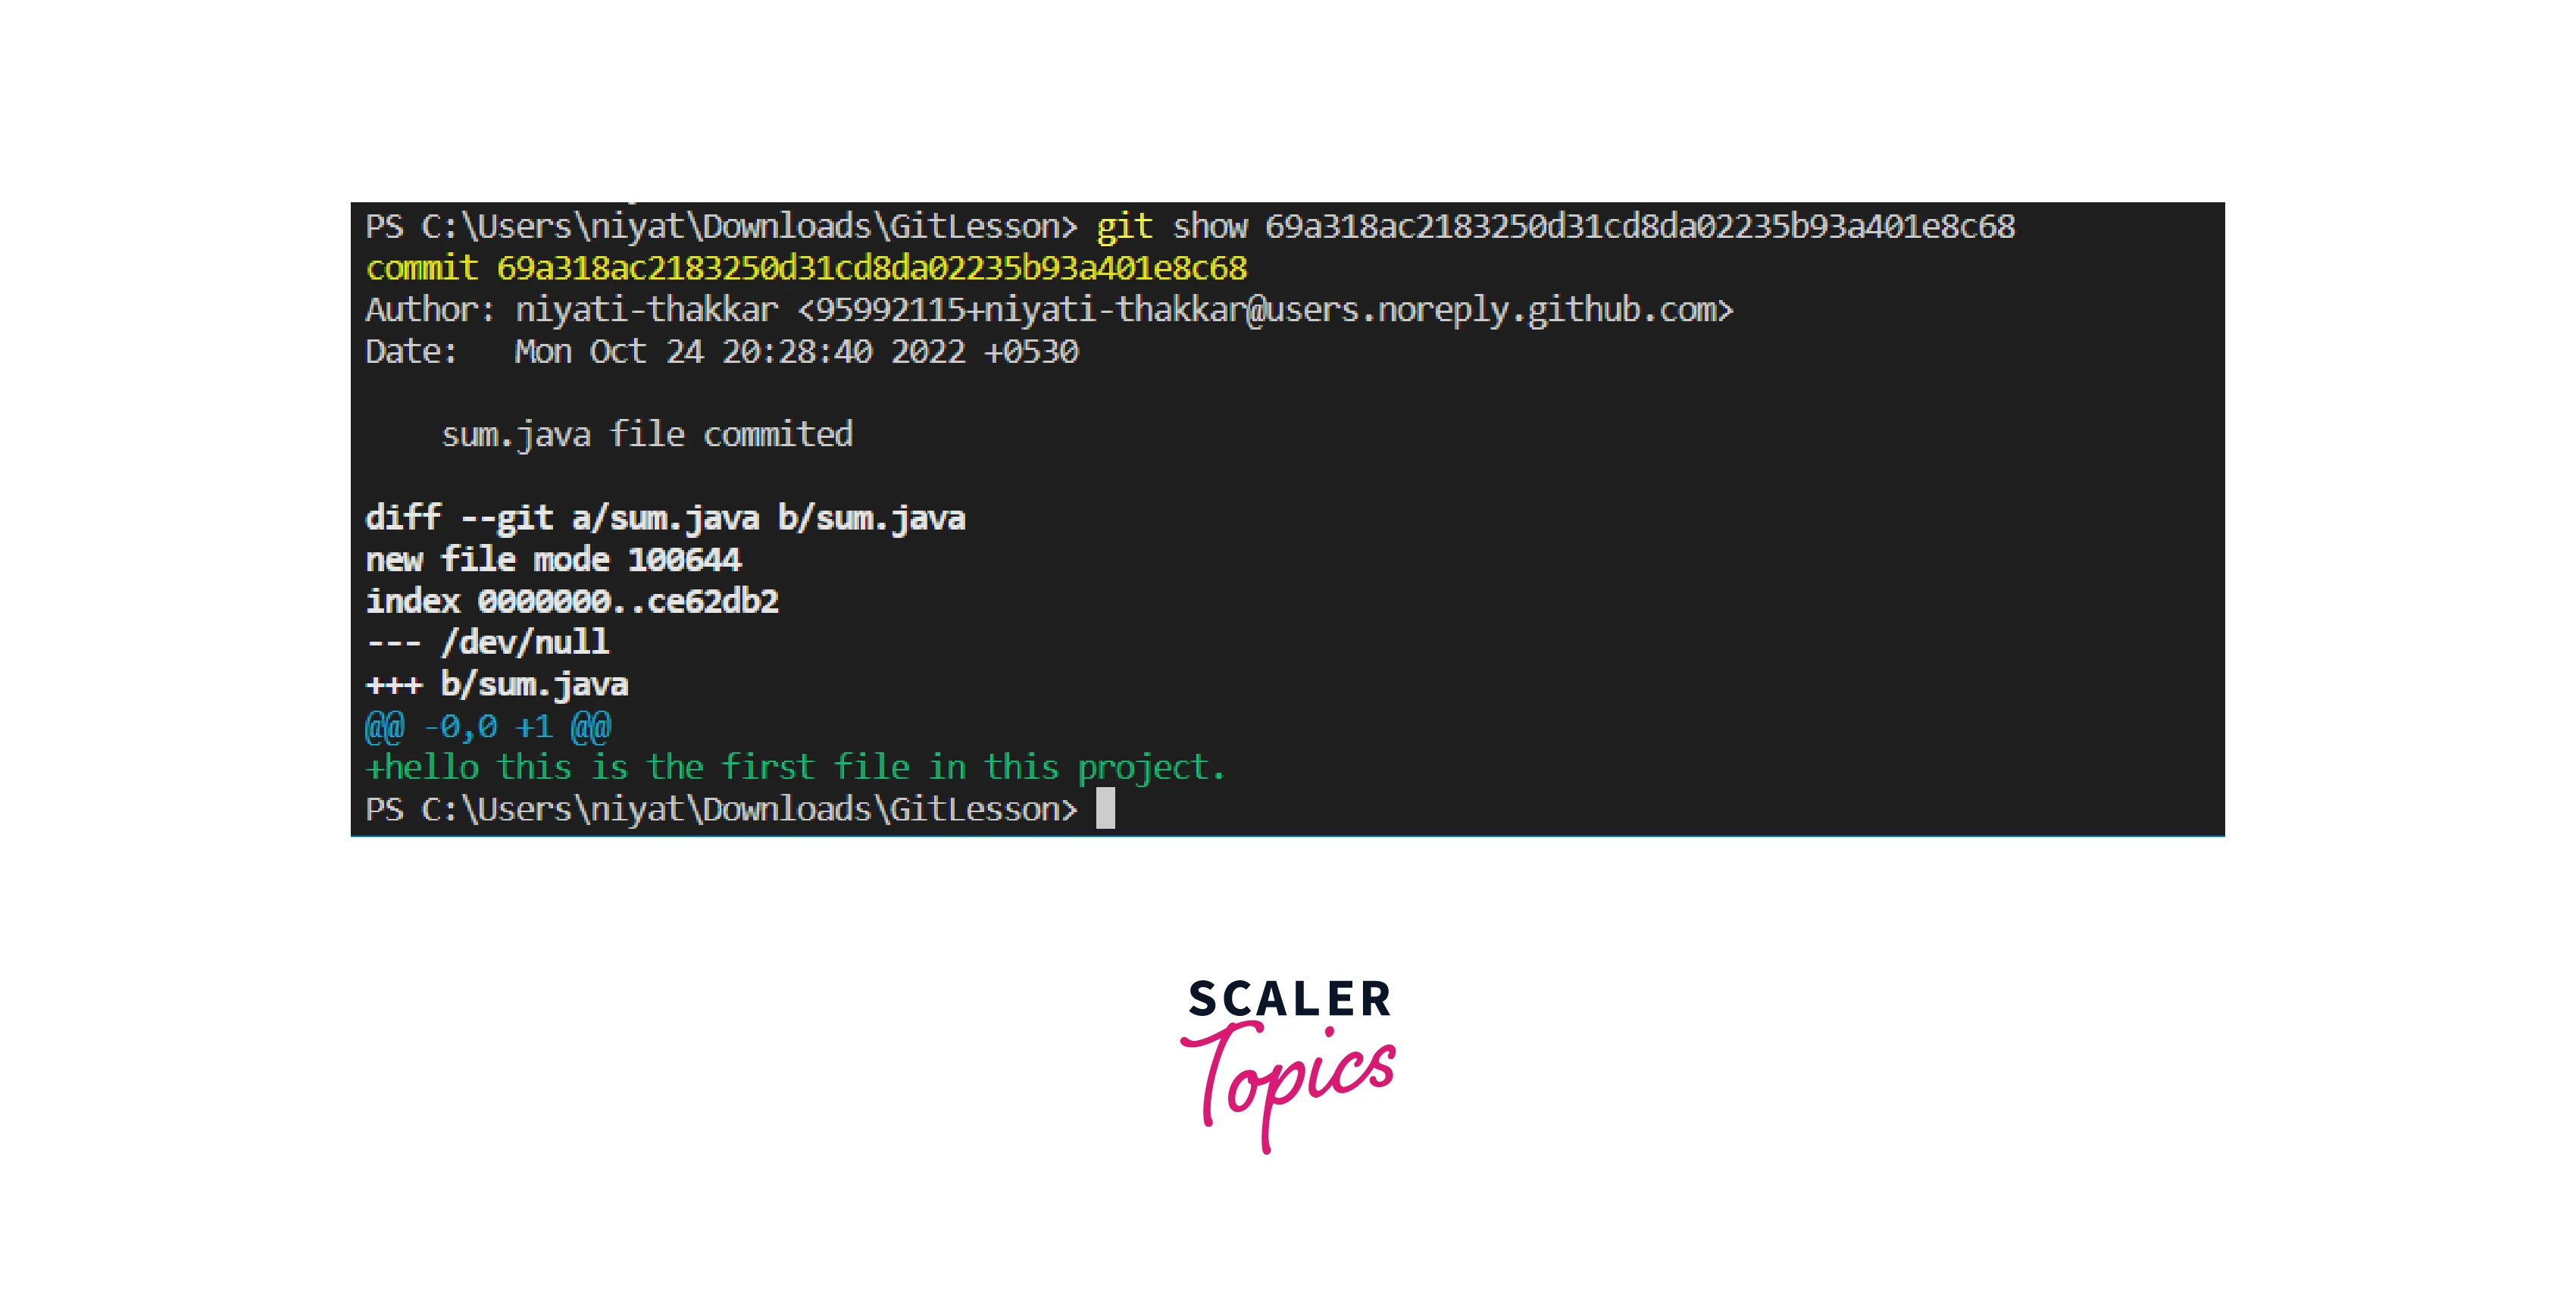
- git show
It is used to view the metadata and the content changes in a particular commit.
Syntax:
Output:
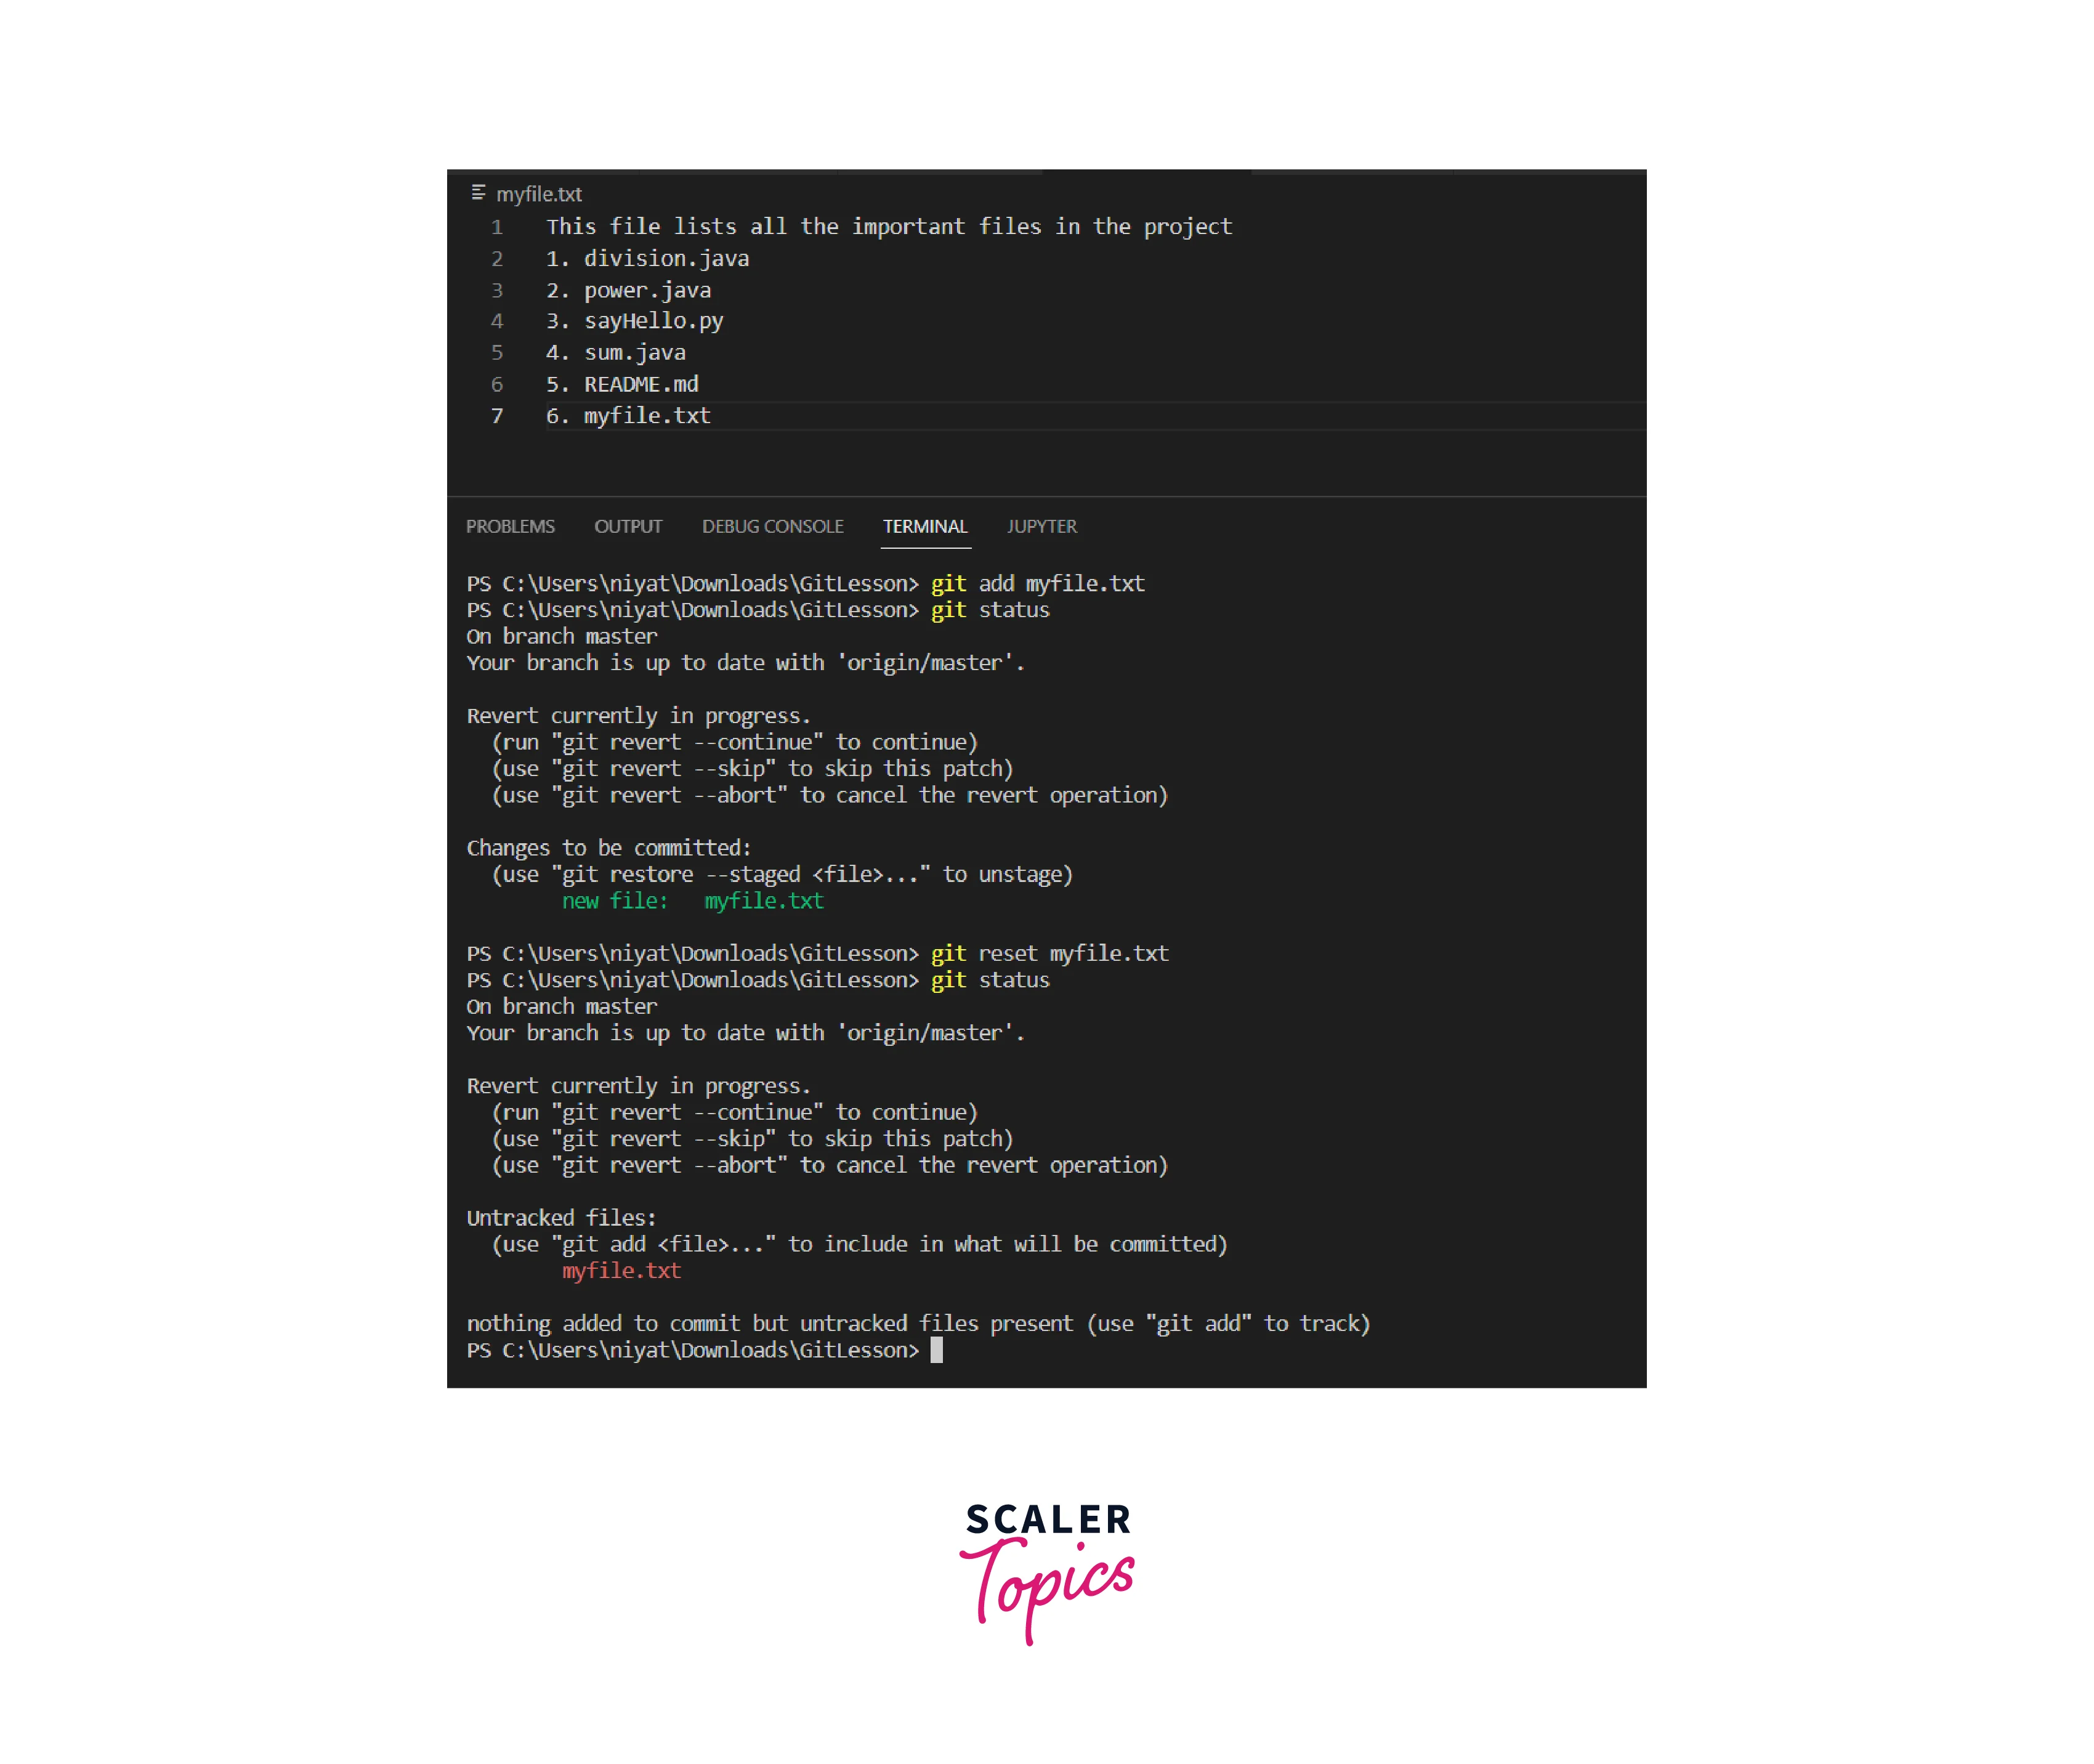
- git reset
The git reset command can remove the files from the staging area i.e. upstaging the file. It can also be used to undo all the commits after the specified commit and preserve the changes locally. It forcefully also discards all the commits and their history and goes back to the specified commit.
Syntax:
To remove a file from the staging area:
To undo all the commits:
To discard all history and go back to the specified commit:
Output:
Working With Remote Repositories
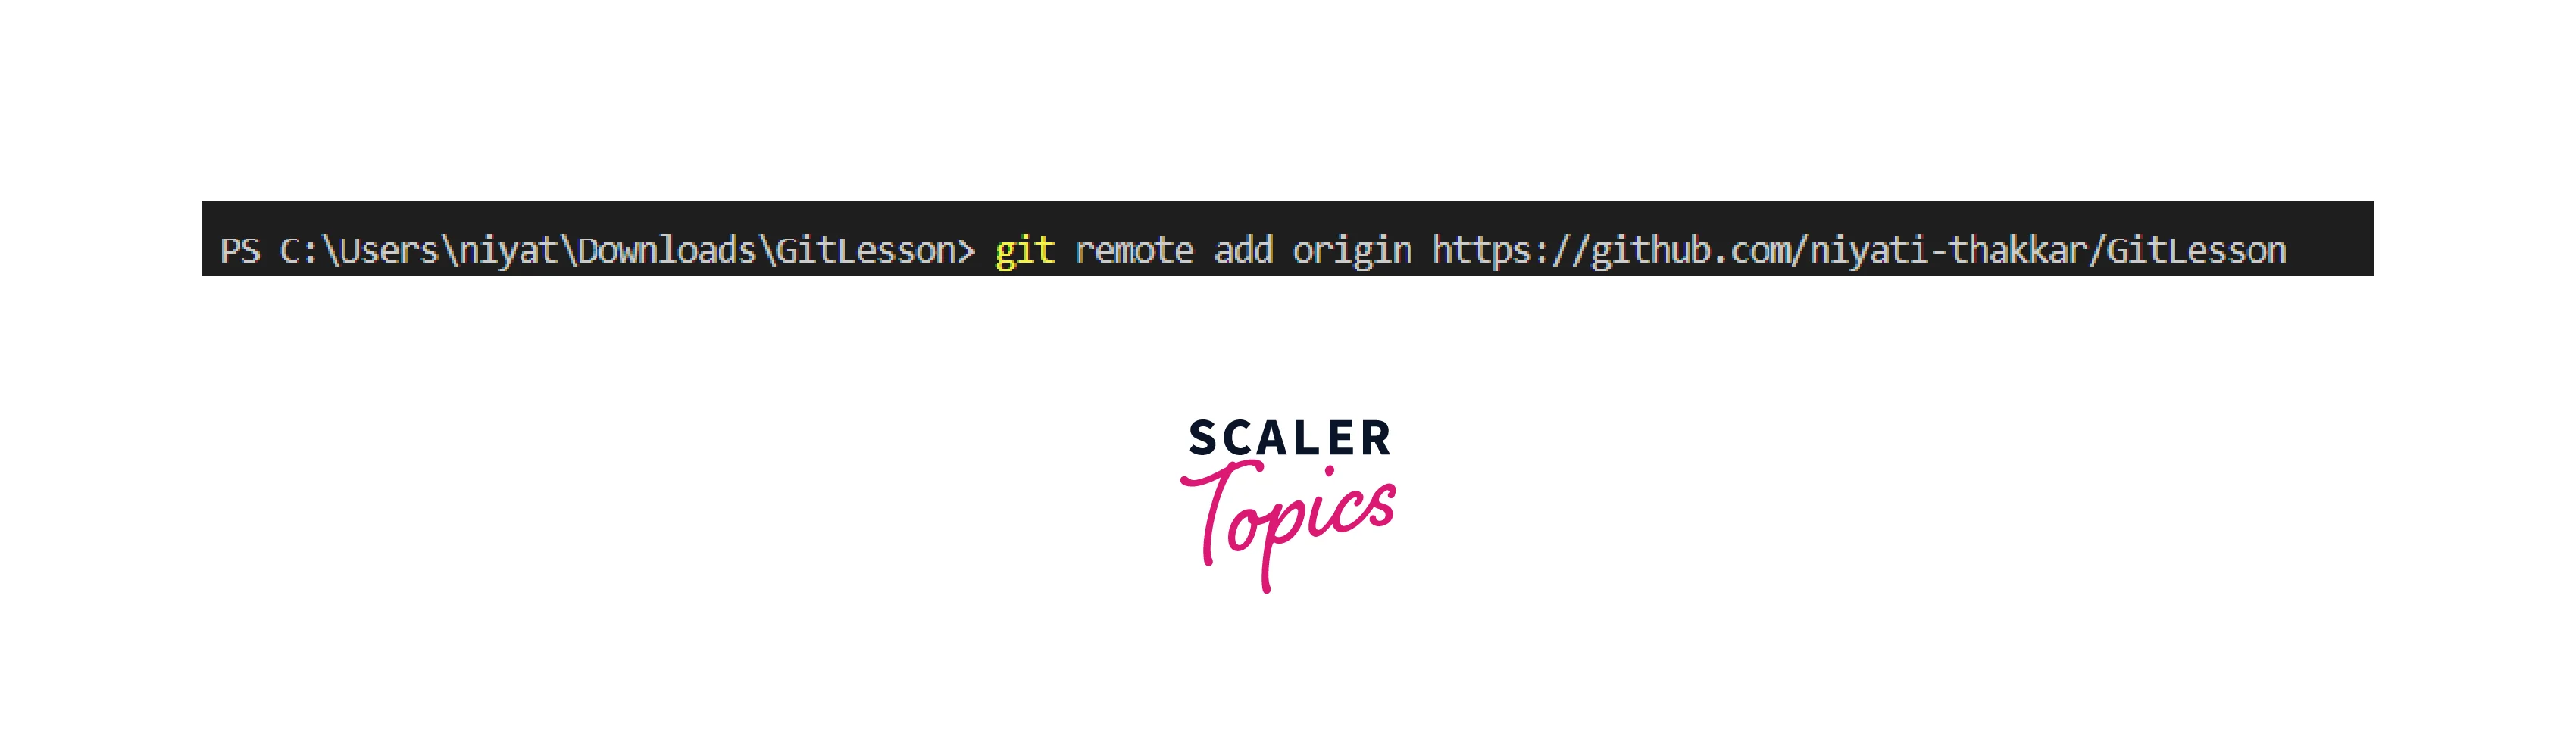
- git remote
Git remote command is used to connect the local repository to the remote server. It allows creating, viewing, and deleting connections to other repositories.
Syntax:
Output:
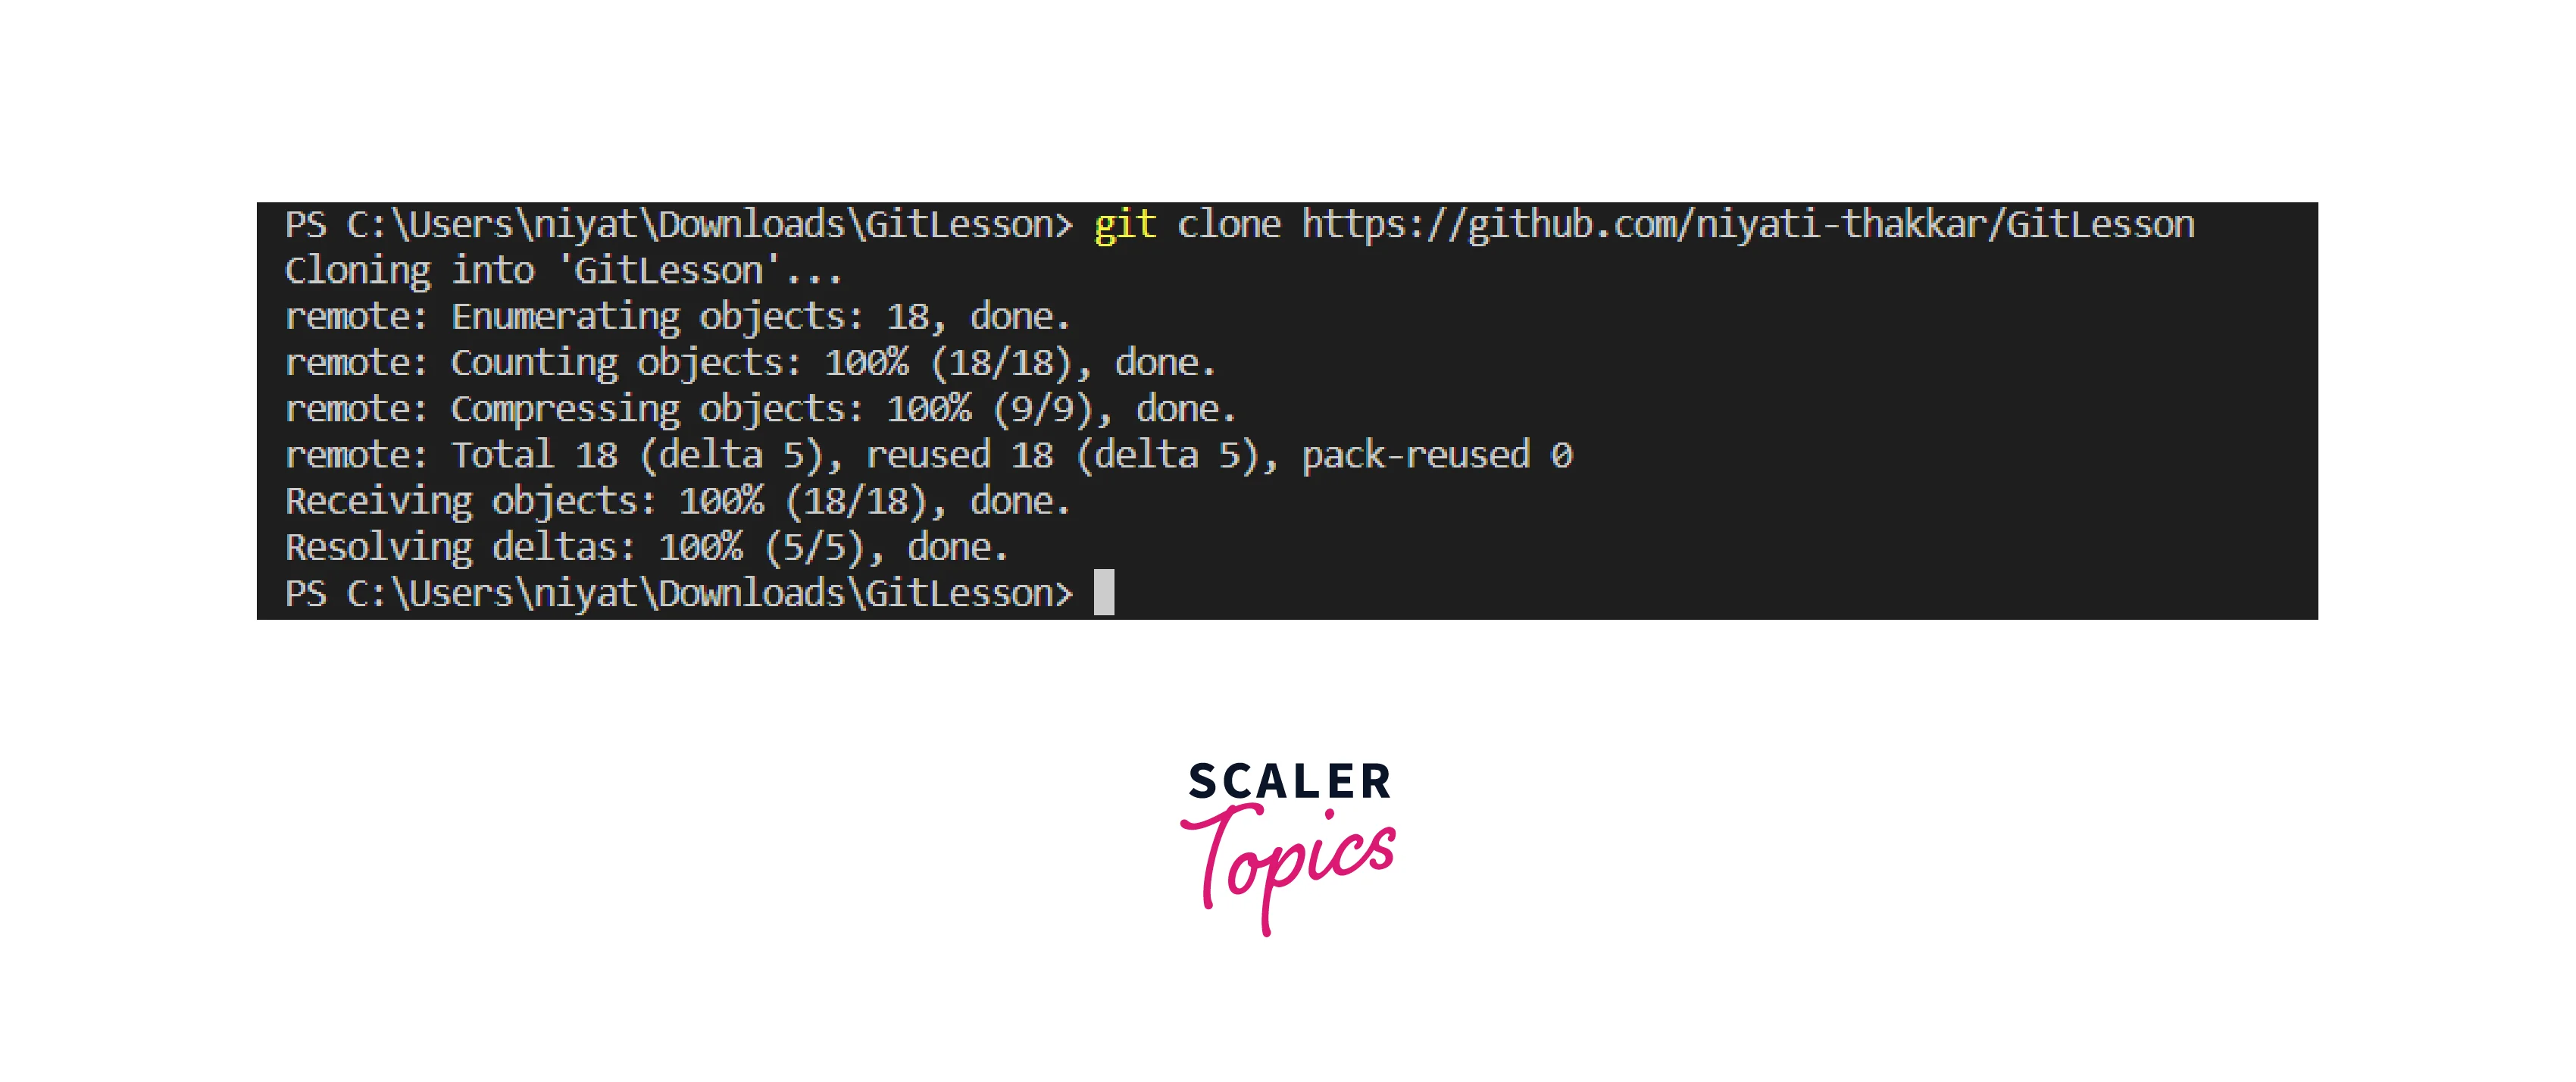
- git clone
The Git clone command is used to clone an existing project from the remote server or repository to the local computer. It makes a copy of the latest version of the project and stores it locally.
Syntax:
Output:
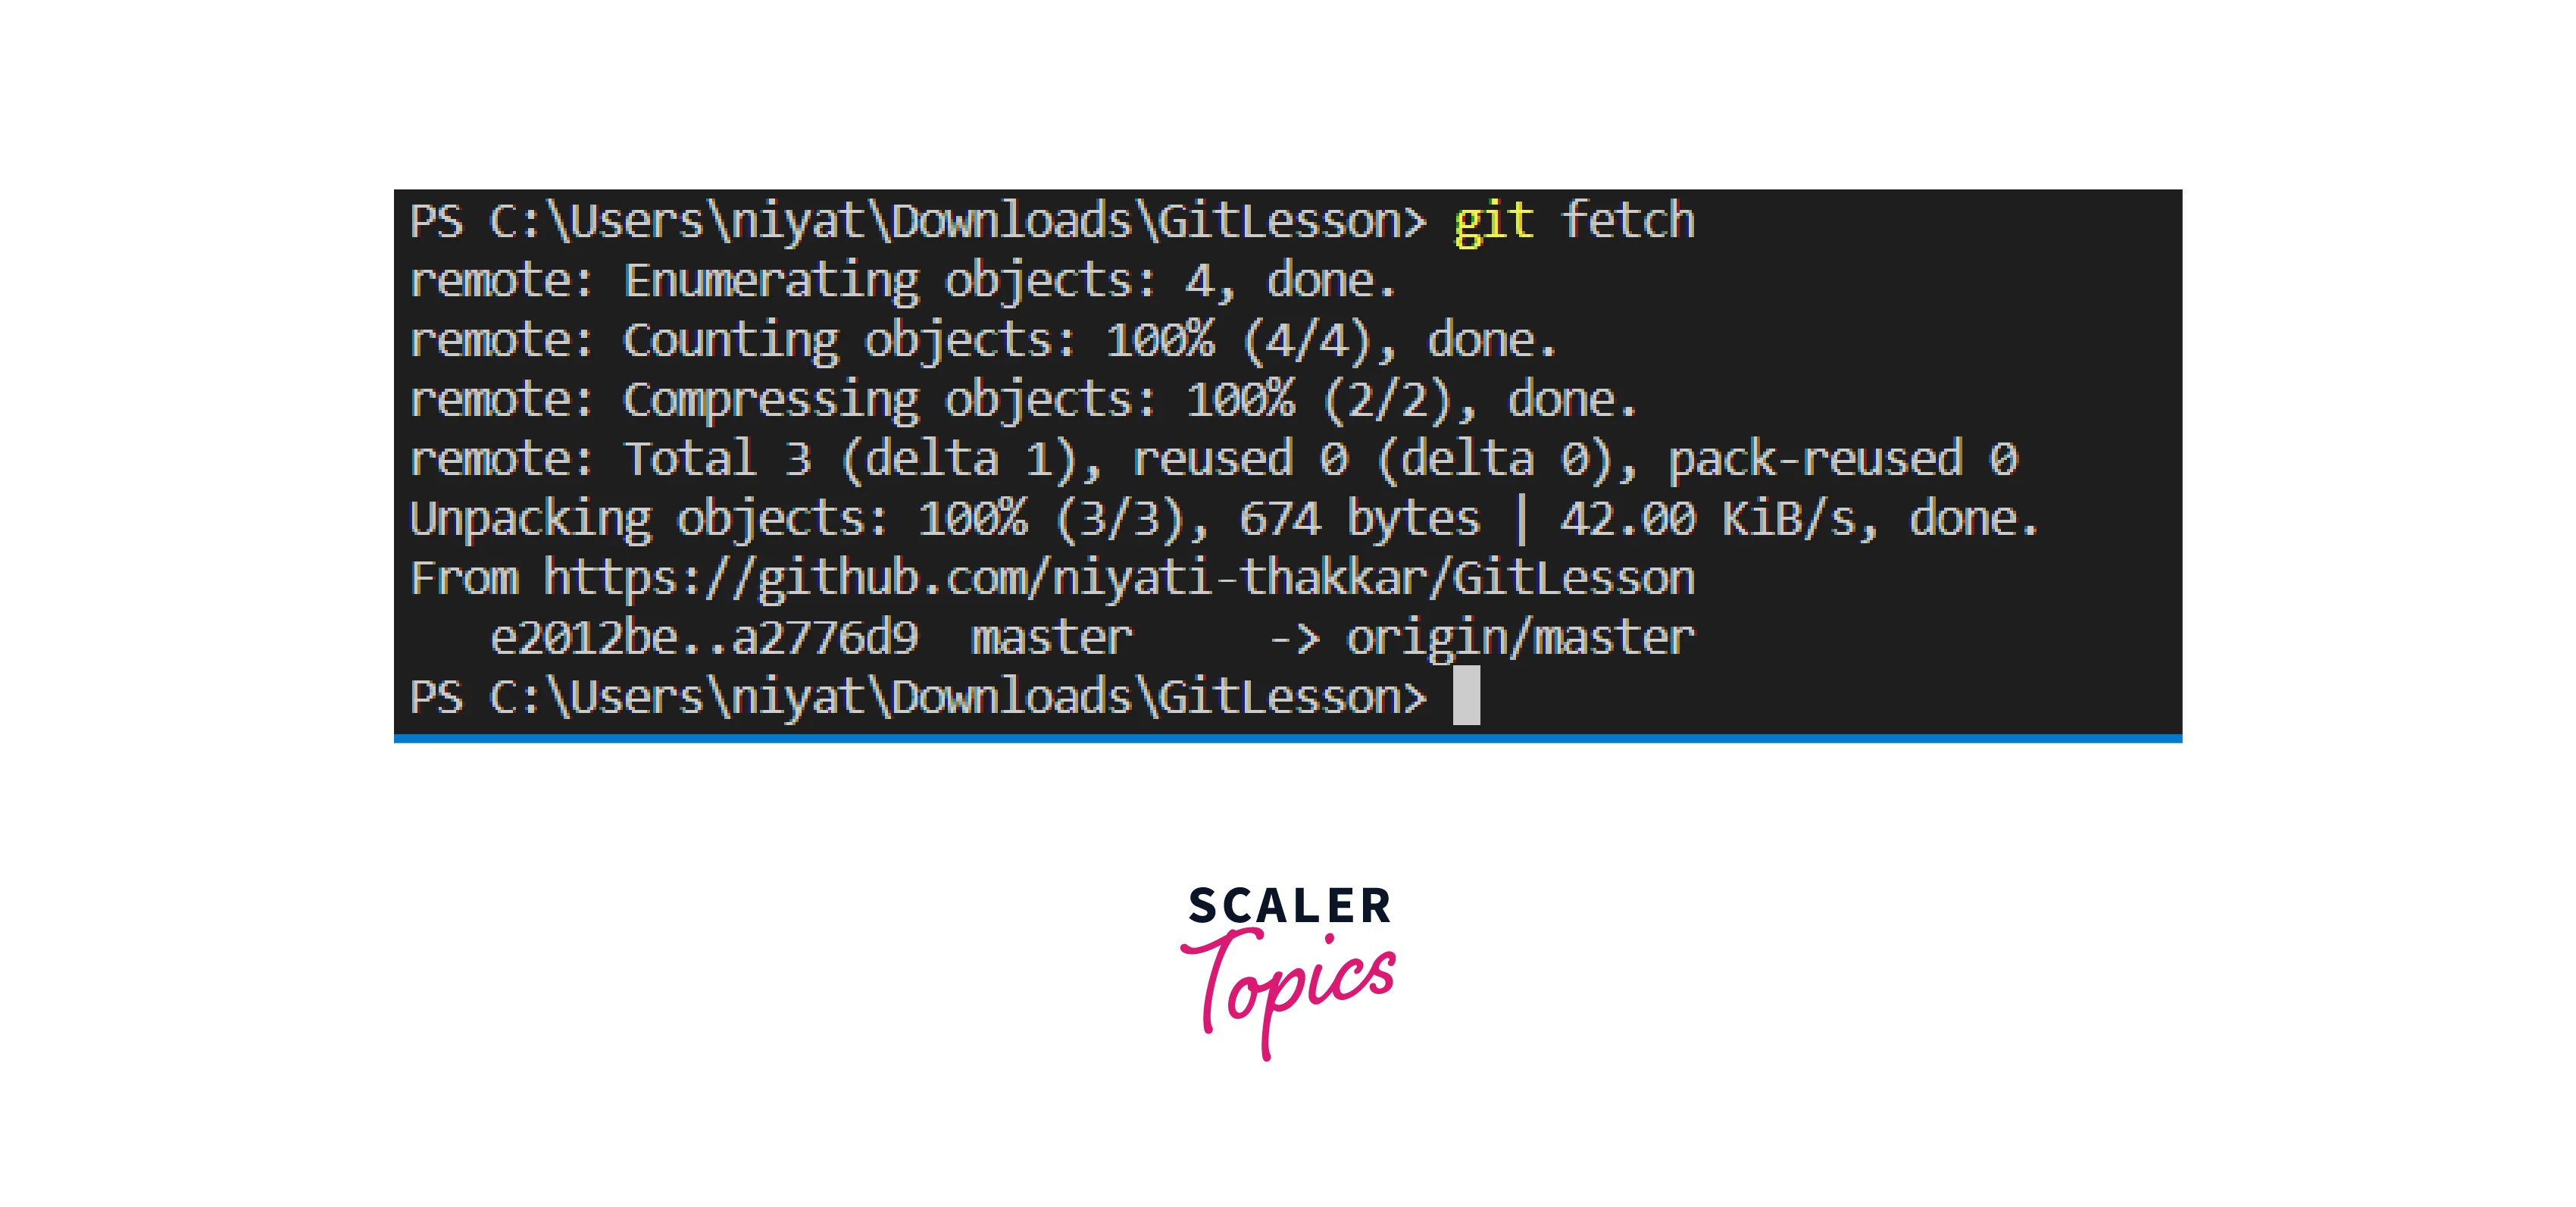
- git fetch
The Git fetch command fetches all the updates and commits from the remote repository, including new branches.
It only fetches the updates, to update our project we are supposed to merge it.
Syntax:
Output:
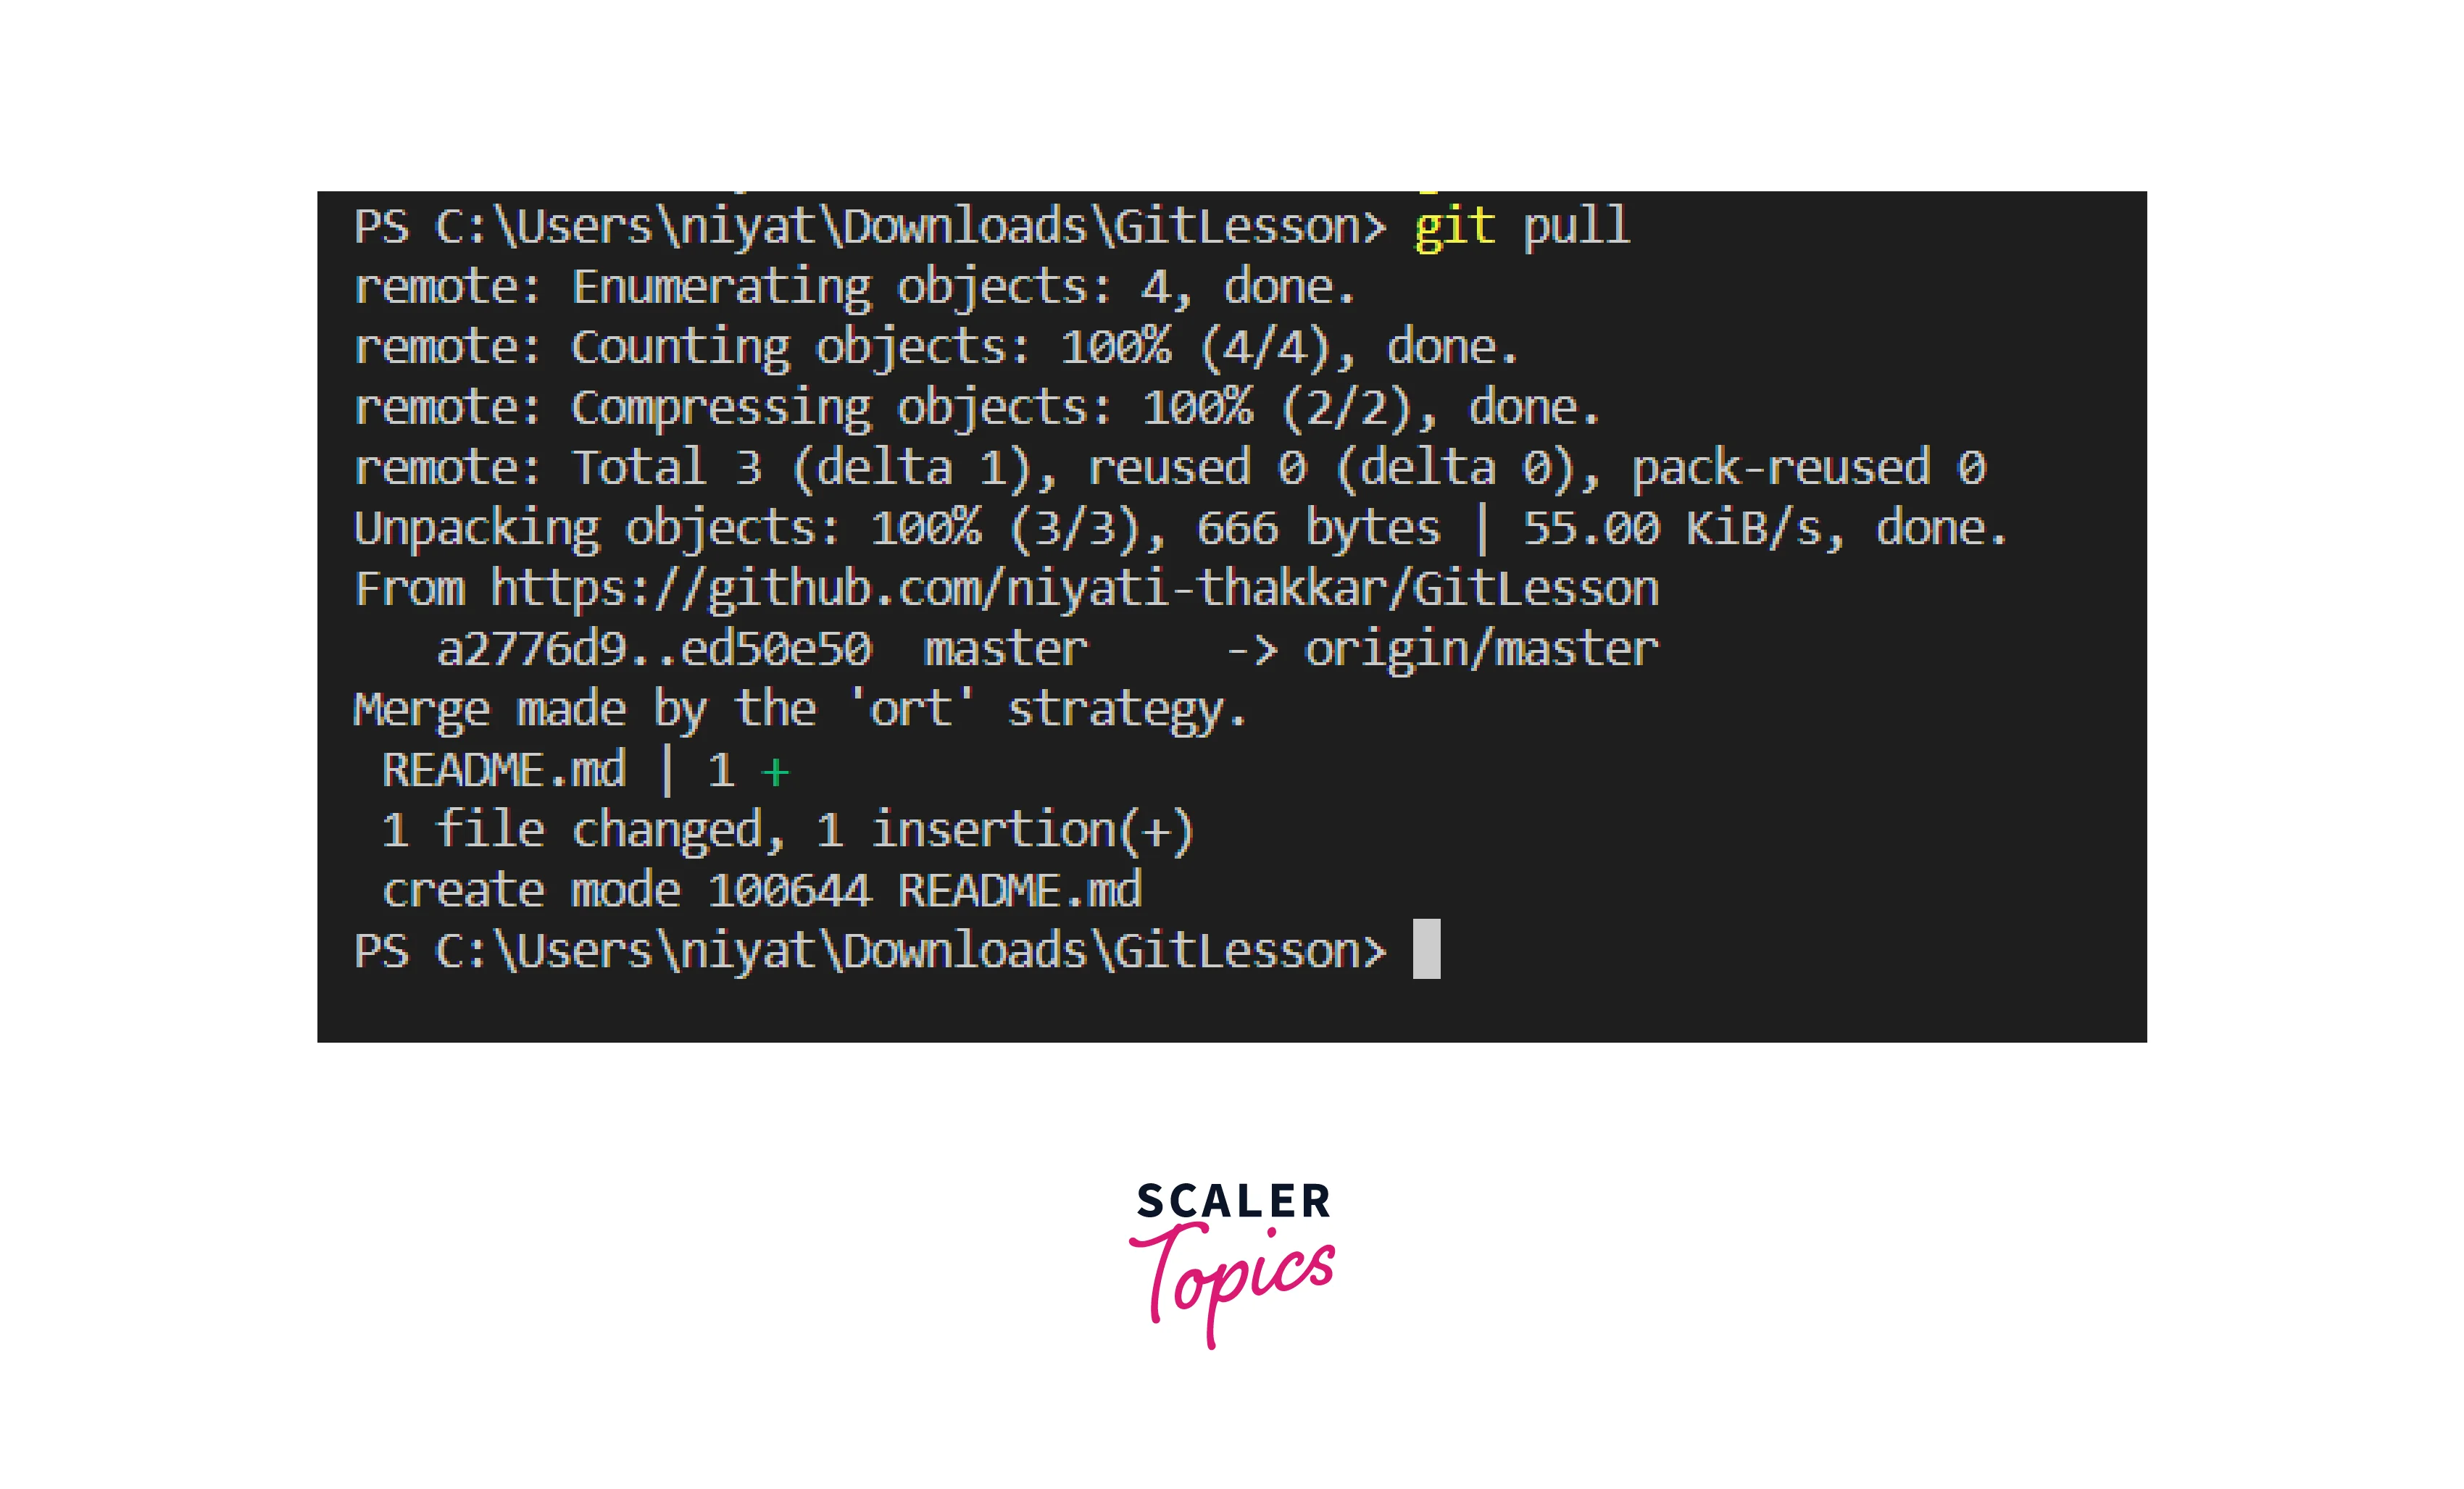
- git pull
The git pull command will fetch all the changes made to the remote repository and merge them into the current local repository.
Note: Fetch only fetches the changes, it does not merge them to the local repository whereas the pull command merges the changes as well.
Syntax:
Output:
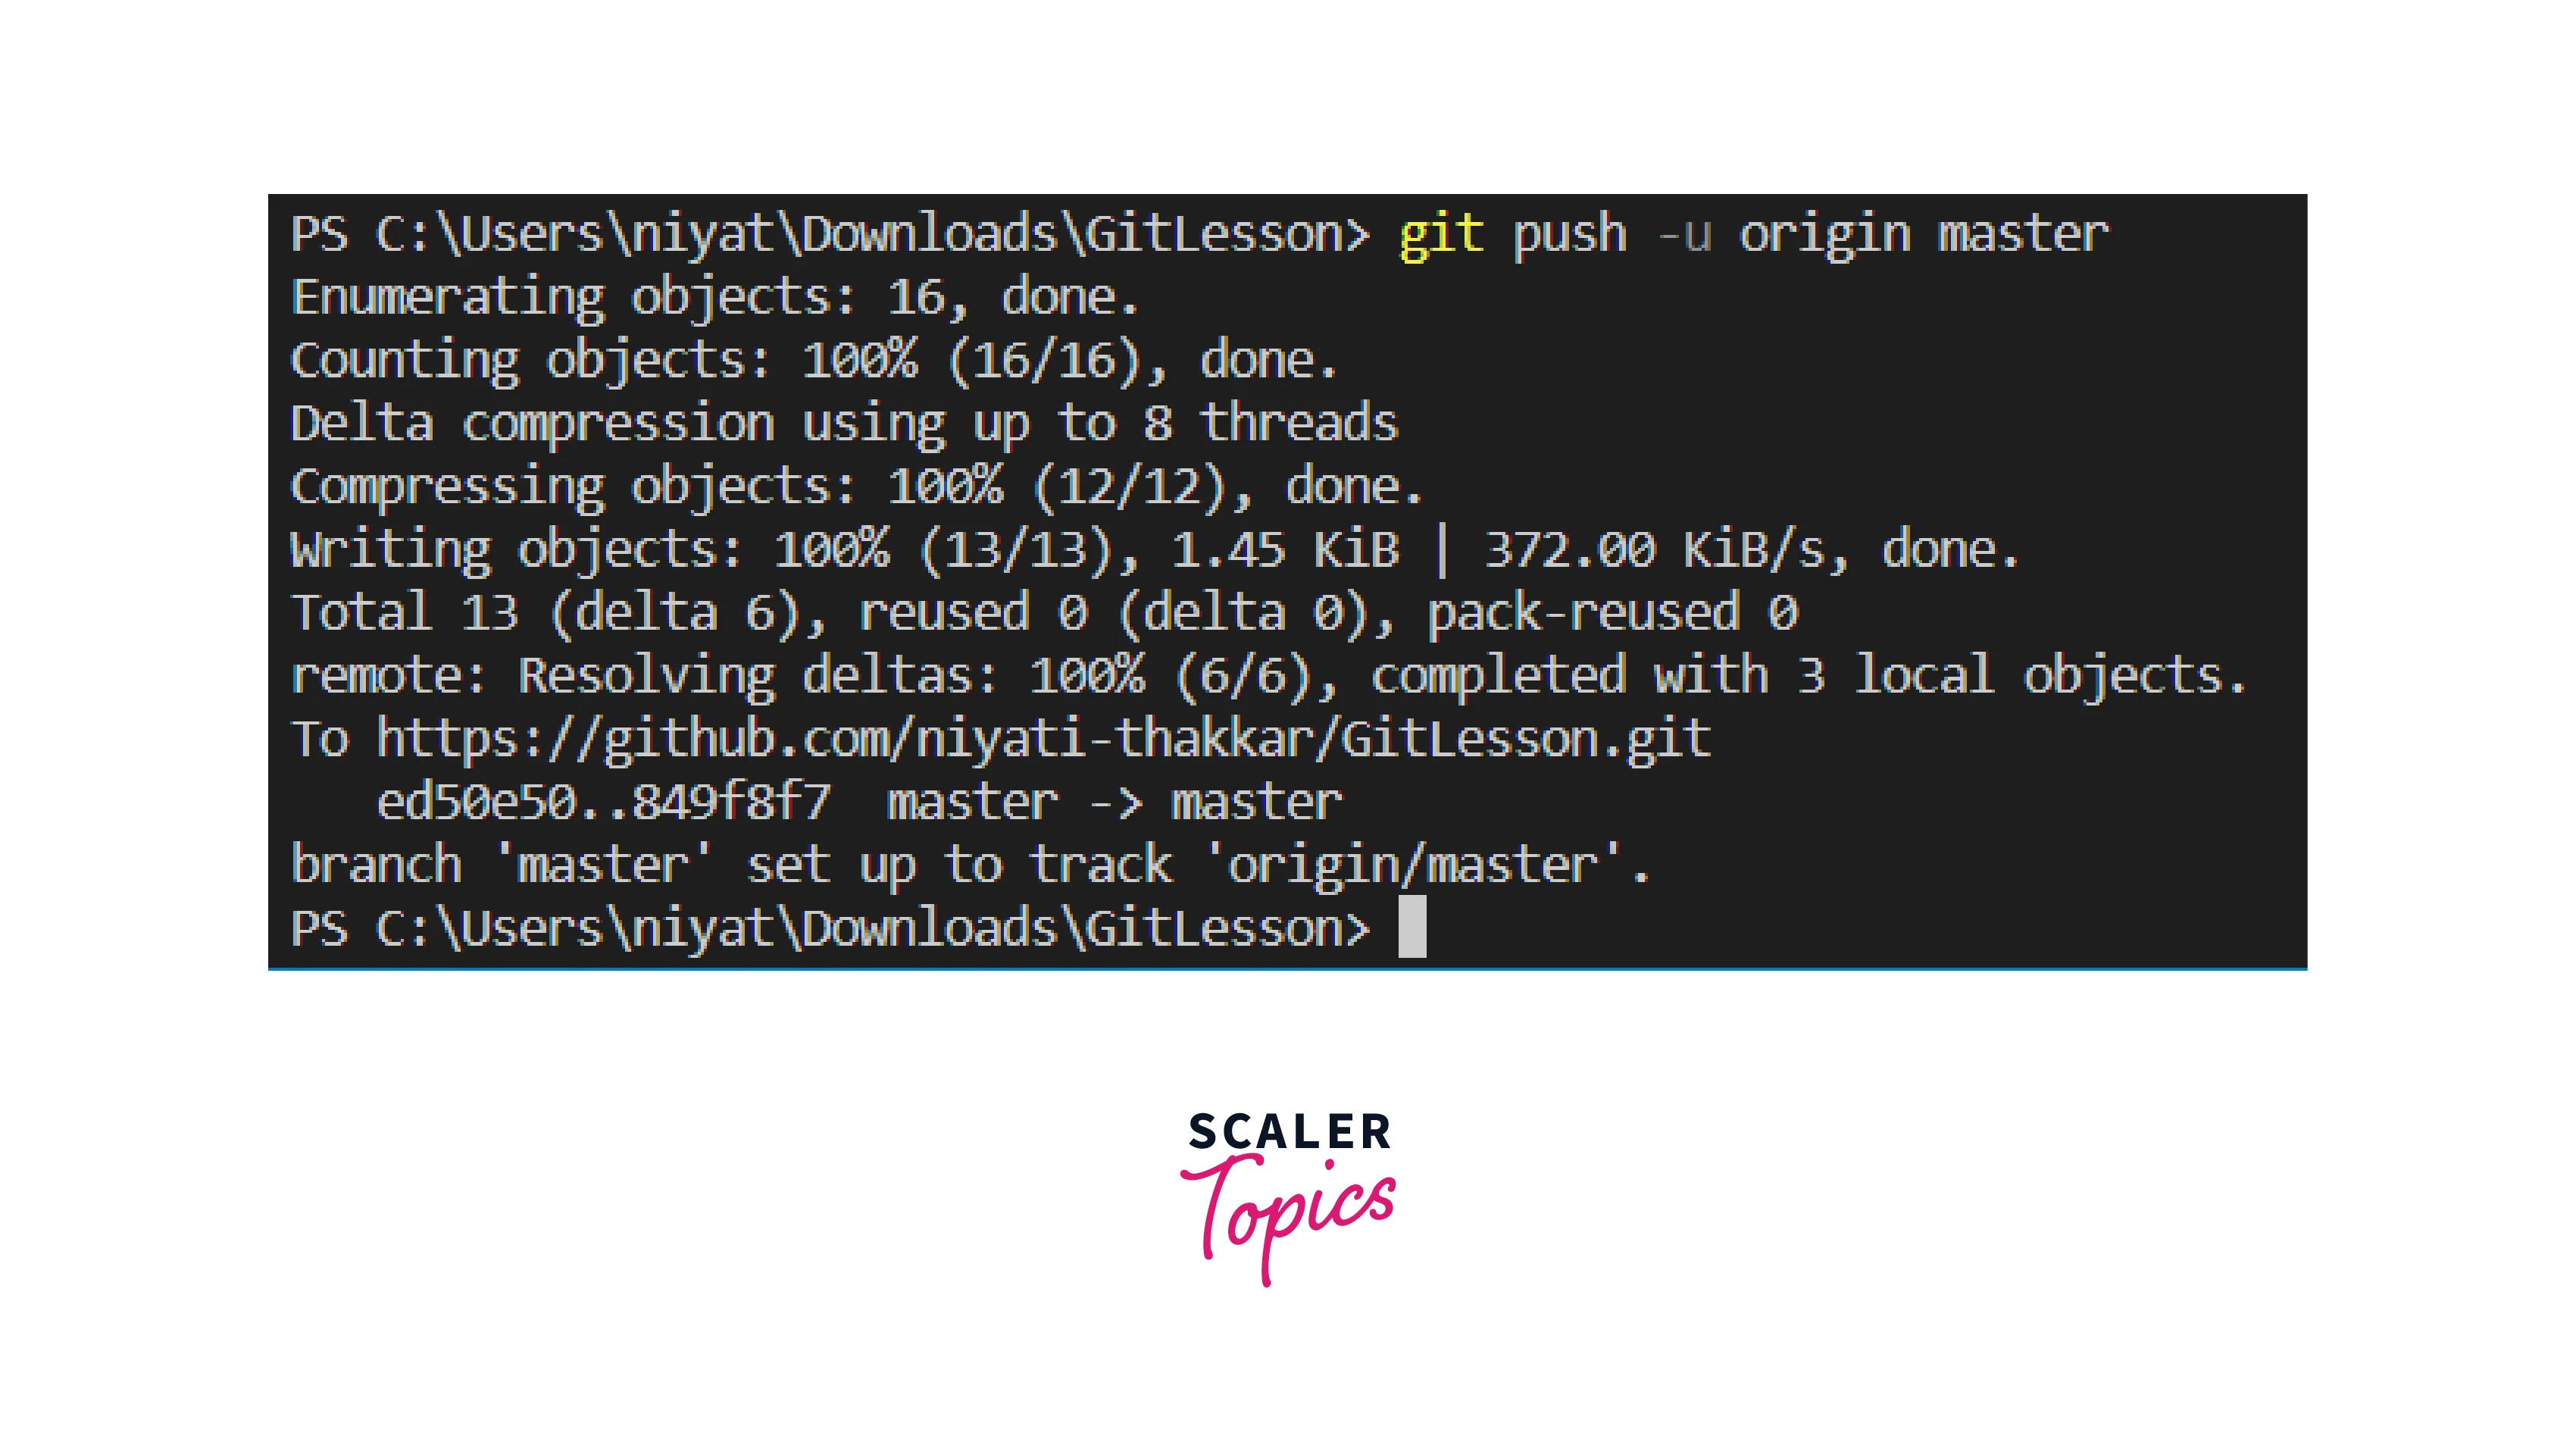
- git push
The Git push command will push the locally committed changes to the remote branch.
Syntax:
Output:
Scaler Placement Report and Statistics
Scaler learners achieved 2.5x salary growth with average post-Scaler CTC reaching ₹23L.
Advanced Git Commands
- git stash
The Git stash command helps developers switch branches to work on without having to save the previous work. In simple words, if a developer is working on branch1 and wants to switch to branch2, he is not required to save or commit the changes on branch1 to move to branch2.
Git stash keeps the records of the modified tracked files and saves them on a pile of pending changes that a developer can access at any point in time.
Syntax:
- To store current work with untracked files
- To bring stashed work back to the working directory
- git log
The git log command shows the history of commits for the repository. It is very much helpful to track the progress, get the hashcode for the commits for revert, etc. To exit the log press q.
Syntax:
Output:
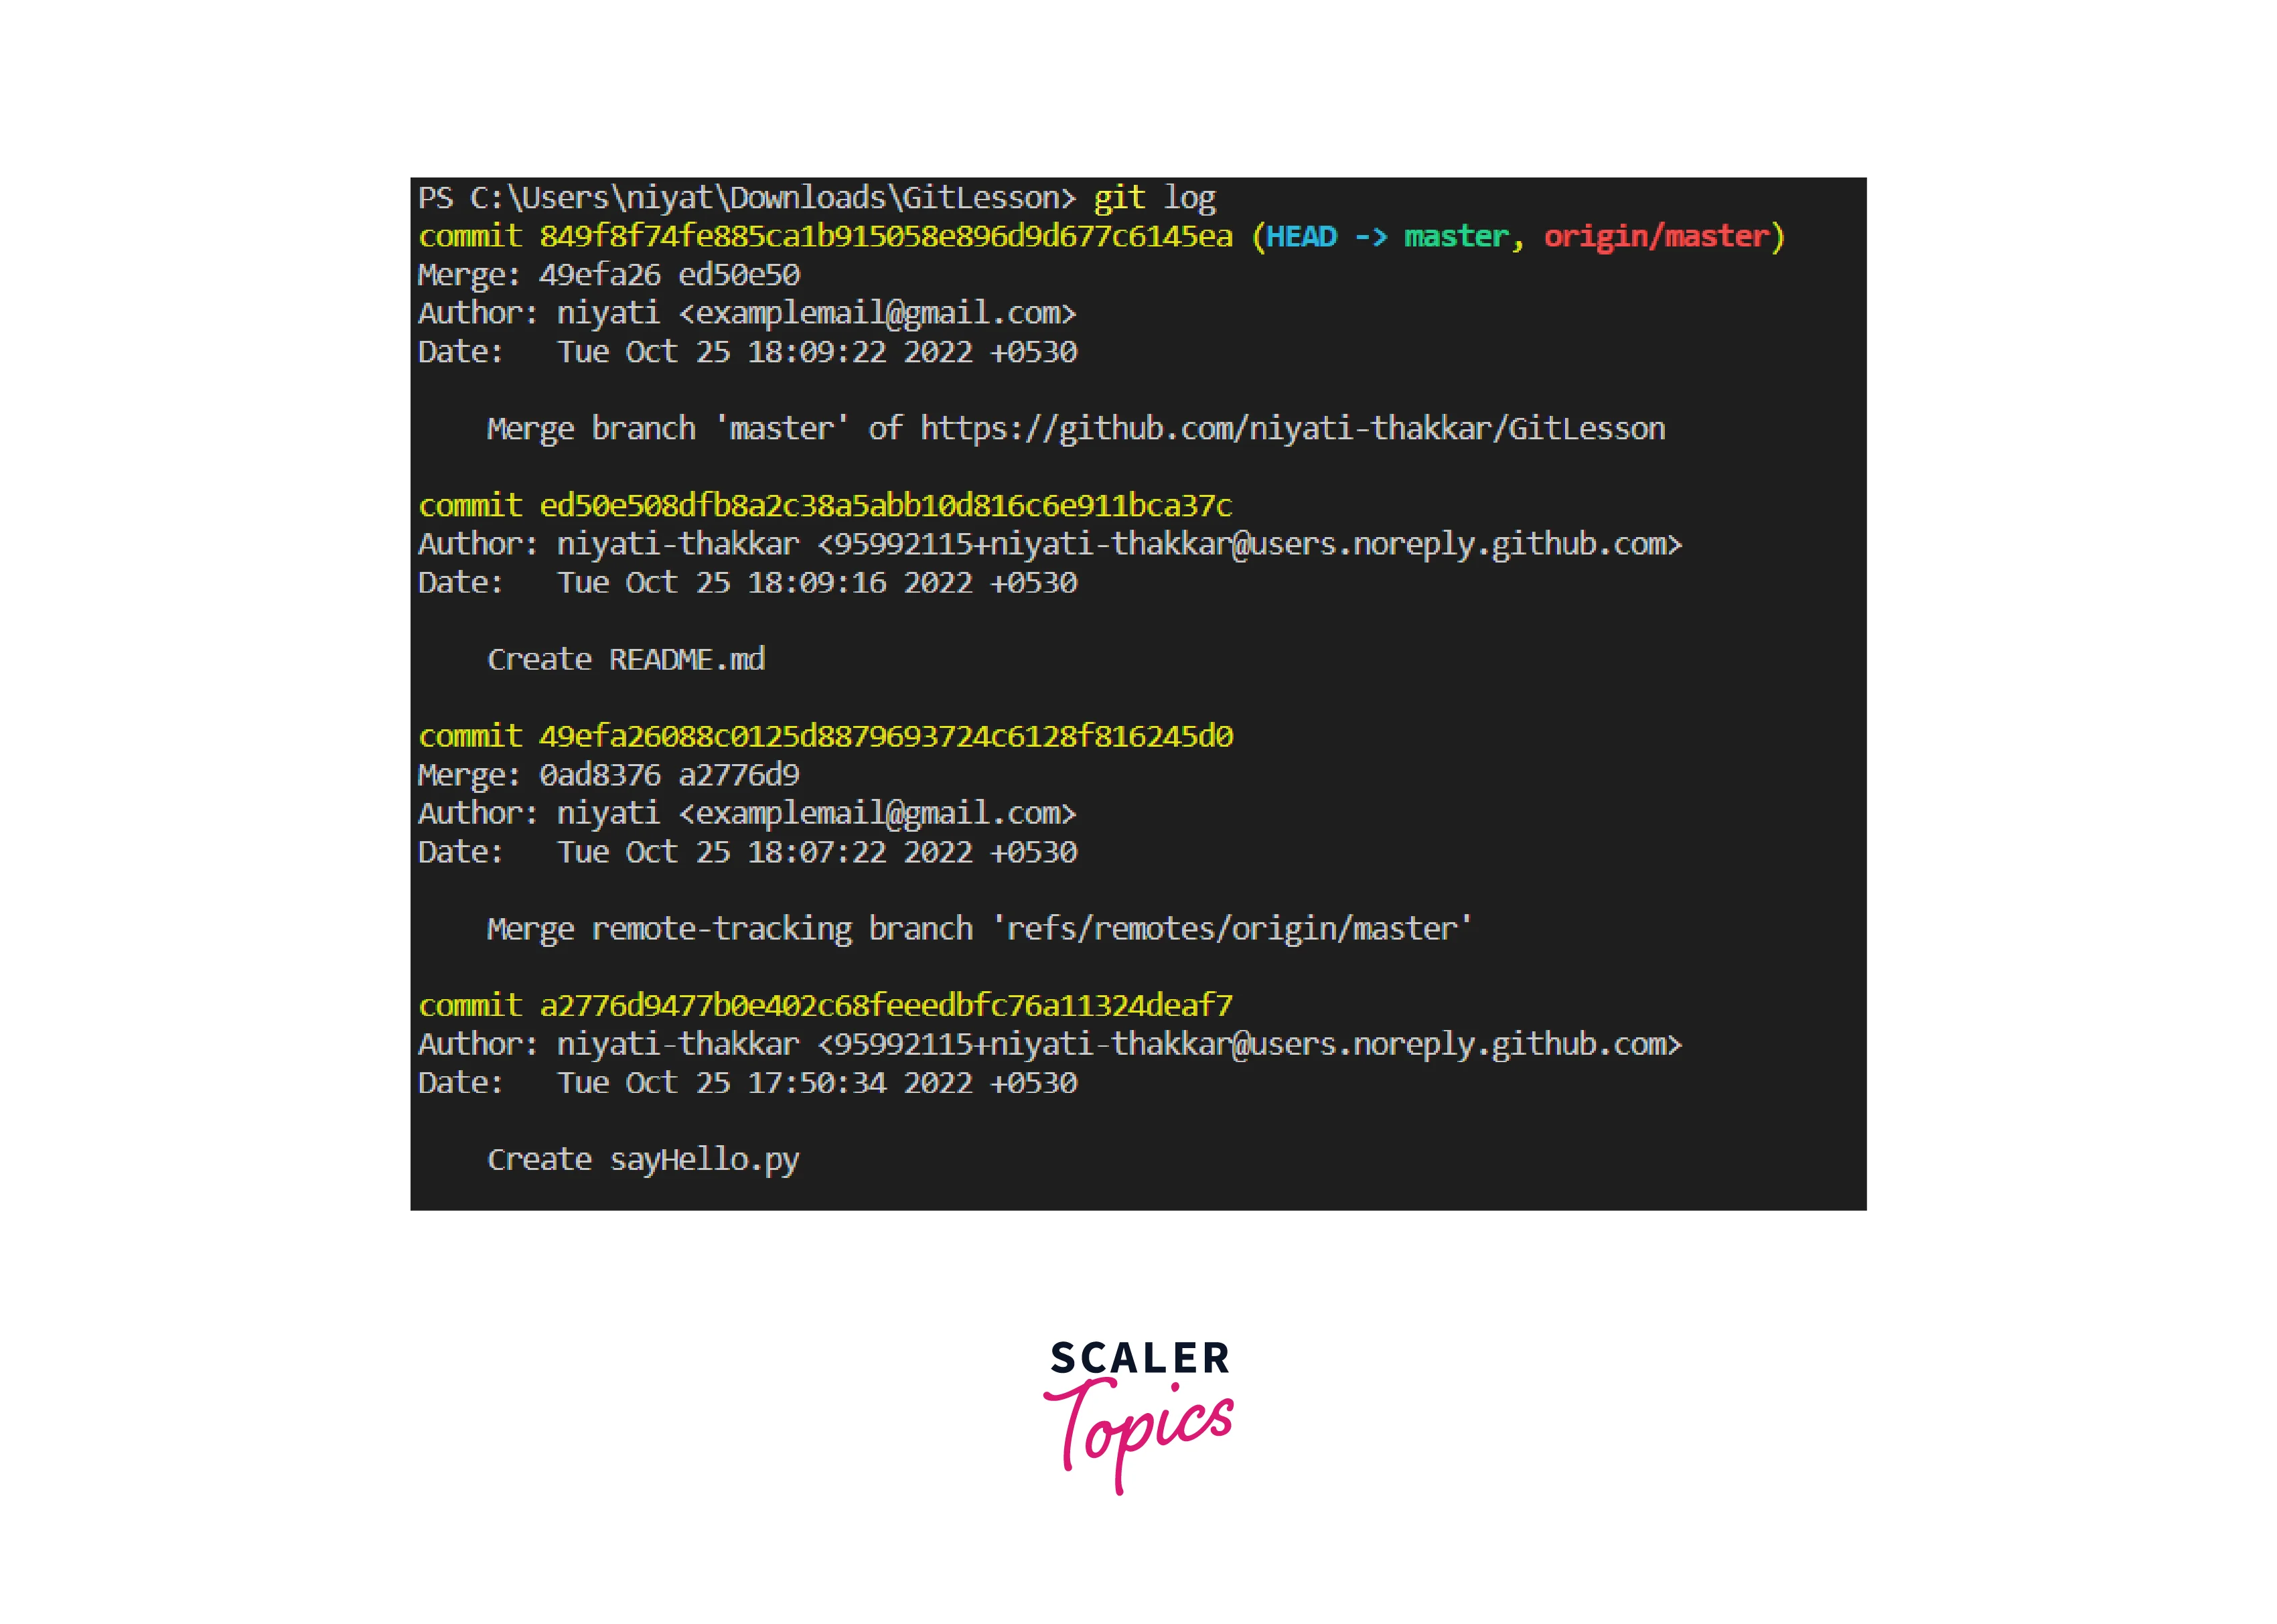
The code right next to the commit is its hashcode. Below given is the date and time and lastly the message of the commit. The message must be meaningful to track commits in the project.
Conclusion
- Git is used for version control projects. It facilitates collaboration among the members of the team from different geographic locations and different systems.
- Basic Git Commands are used to update the changes in the project, update the progress at the remote level, fetch updates from the remote repository, revert changes, save changes, etc.
- Local repository commands are only applicable to the repository available locally on the Personal Computer or system.
- Important local repository commands include git init, git commit, git add, git branch, git revert, git rm, git tag, etc.
- Remote repository commands are used for local and remote repository communication. They are used to keep the local up to date with the remote one and vice versa.
- Important and Basic Git Commands of remote repository includes git remote, git clone, git push, git pull, and git fetch.
- Advance commands include git log and git stash. Git log helps in tracking the commits in the project and stash allows developers to switch branches without having to commit changes.