Git Cheat Sheet
The Git Cheat Sheet serves as a vital reference tool, encompassing Git concepts from foundational to advanced levels for developers and DevOps engineers alike. Recognizing the complexities of Git commands, this guide streamlines both learning and quick command retrieval, aiding efficiency. Git and GitHub are indispensable for code management, collaboration, and open-source contributions. The cheat sheet is meticulously organized, covering essential topics such as Git configuration, commands, branching, merging, and history management. Designed for accessibility, it assists newcomers in grasping Git fundamentals while offering seasoned professionals a valuable refresher. This resourceful guide encourages users to print or save it for swift command references, ensuring smooth development and deployment workflows.
Git Cheatsheet
This cheat sheet features the foremost important and commonly
used Git commands for straightforward reference. It also takes into care some of the high-level concepts of Git.

Uses of Git
Git is the most widely used version control system because of the various absolute benefits offered by it :
- Git is well known for providing the best performance when it comes to the different distributed version control systems. The operations of branching, committing, and merging are all optimized for a far better performance than other systems.
- Git is employed to maintain the history and keep track of the changes in the source code files.
- Git helps in independent collaborative working and allows multiple developers to collaborate and share their work.
- One of Git's main benefits of Git is that it supports working in offline mode without having internet connectivity, So, just in case you have internet connectivity issues, it won't be affecting your work at all.
- Git gives you the power to undo almost any command or action.
- It is known to be a non-linear development due to its thousands of parallel branches.
- It is scalable and provides the user to work in a distributed environment.
- Git has an intermediate stage called the "staging area" where commits are often formatted, edited, and modified before completing the commit.
- It is free and open source and allows the creation of a backup.
- This is an industry-standard as most IDEs support Git.
- Git is meant to ensure the safety and integrity of versioned content.
- Each command in Git only takes some seconds to run and output results, so it saves a lot of developers' effort and time.
Install Git : Installation in Windows/Linux/Mac OS X
You can install git as a package or via another installer or you can directly download it from its official site. However, to check if Git is already installed on your computer, you can use this command :
If git is already installed on your computer then the output will tell you which version of Git is installed, or if it is not installed there then it will alert you that git is an unknown command.
Install Git on Windows :
-
Download the newest version of Git for Windows from the official Git Website.
-
After the installer starts, click the subsequent button to complete the installation. 3 Open the command prompt in Windows.
This will help to configure Git on your system with the username and email provided by you.
Install Git on Linux :
-
Open the terminal and insert the following commands to install git using apt-get.
-
Configure your username and email using the following command :
This will configure the Git on your system with the username and email provided by you.
Install Git on Mac OS :
-
Download the newest version of Git from the official website and open the installer.
-
Now, open the terminal and configure your username and user email.
This will configure the Git on your system with the username and email provided by you.
You can also use HomeBrew for Git installation on Mac. It is a very popular package manager for macOS.
-
If you don't have homebrew manager installed then you can install it using the below command :
-
Open your terminal and install Git using Homebrew :
-
Verify the installation was successful by typing git --version.
-
Use the following commands to configure your Git username and email address :
Git Configuration
-
The command used to return a list of information having the details about your user name and email :
-
The command used to set up and configure your username :
-
The command used to set up and configure the email address that will be used in commits :
-
The command used to store the login credentials in the cache so you can directly access it from the cache next time and you don't have to type them each time :
-
The command is used to enable some sort of colorization formatting on your git output, it is automatically set because of easy reviewing :
-
The command used to set the default editor :
-
the command used to set the git alias for each of these commands :
Starting a Project
Create and initialize a repository on the local machine :
-
Create a local repository with any name you want for your project.
-
Then initialize a repository by using the below command :
Local Changes
Adding file to the staging area :
-
If you want to add all the untracked files in your project to the staging area, then you can use this command :
-
If you want to add only a specific file to the staging area, then you can use the below command :
Here, file_name is the name of the file you want to add to the staging area.
-
If you want to add some of the files together to the staging area, then you can use the above command having the spaces between the different file names, like this :
-
To add all files starting with the prefix 'fil', you can use the below command :
Committing changes :
-
Git commit is used to record all the code changes in the repository :
-
You can use the above command with the -m flag as it lets you write a commit message on the command line. It will allow you to modify and add the code changes to the most latest commit.
-
The -am flag can be used along with the git commit command and it will allow you to write the commit message on the command line for already staged files. This will help in adding and committing the tracked files with a single command by using both the -a and -m options :
-
The amend flag in the commit command is used to edit the last commit message and for that, you can use the below command :
Track Changes
-
Git diff command helps you to view the changes you have made to the file. It will show the changes between the files in the staging area and the working directory :
-
To track the code changes that have been staged out but have not been committed yet :
If you want to do this for any specific file, then you can use the command like this git diff --staged file_name
-
If you want to track the changes after committing a file, you can use the below command, it will allow you to find the difference between your last commit and the working directory :
-
The status command is used to display the current state of the changes in the working directory. It helps you to track all the changes and to point out the untracked files.
-
Git show command in git is used to view the expanded details on the git object :
Transform Your Career
Choose from our industry-leading programs designed for career success
Modern Software and AI Engineering Program
Master full-stack development with AI integration

Modern Data Science and ML with specialisation in AI
Advanced data science techniques with AI specialization
Advanced AIML with Specialisation in Agentic AI
Deep dive into AIML with focus on Agentic systems
DevOps, Cloud & AI Platform Engineering
Build and manage AI-powered cloud infrastructure
AI Engineering Advanced Certification by IIT-Roorkee
Premier AI engineering certification from IIT-Roorkee
Commit History
-
The log command is used to show the commits history made on a branch :
-
You can use the below command to do the same work as done by the above git log command along with the ability to limit the number of logs you want to view, so, it will list the commit history of the current branch for the count limits list to the last n numbers.
-
The command used to show the commit's history including all the file names and their code changes on specific lines :
-
The command which is used to analyze the data and the statistics about the changes for each of the commits, including the line(s) changed with their file names :
-
Command used to display the output as one commit per line :
-
Command used to display the commit log in form of a graph :
-
Command used to list down the commits that are present on the ref but have not been merged into the current branch :
-
Command used to note down all the commits with their id that are present on the current branch but have not been merged into the ref.
-
Command used to list all the operations like checkouts or commits made on the repository (local) :
-
Command used to view the changes in a detailed manner :
-
Git command is used to examine the contents of a file line by line and allows you to see when the change in each line was last modified and who was the author of that change.
Ignoring Files
If you want to ignore files in git, then you can create a .gitignore file and commit it. List down all the file names (that you want to ignore) in it .gitignore file. The command used to create a .gitignore file :
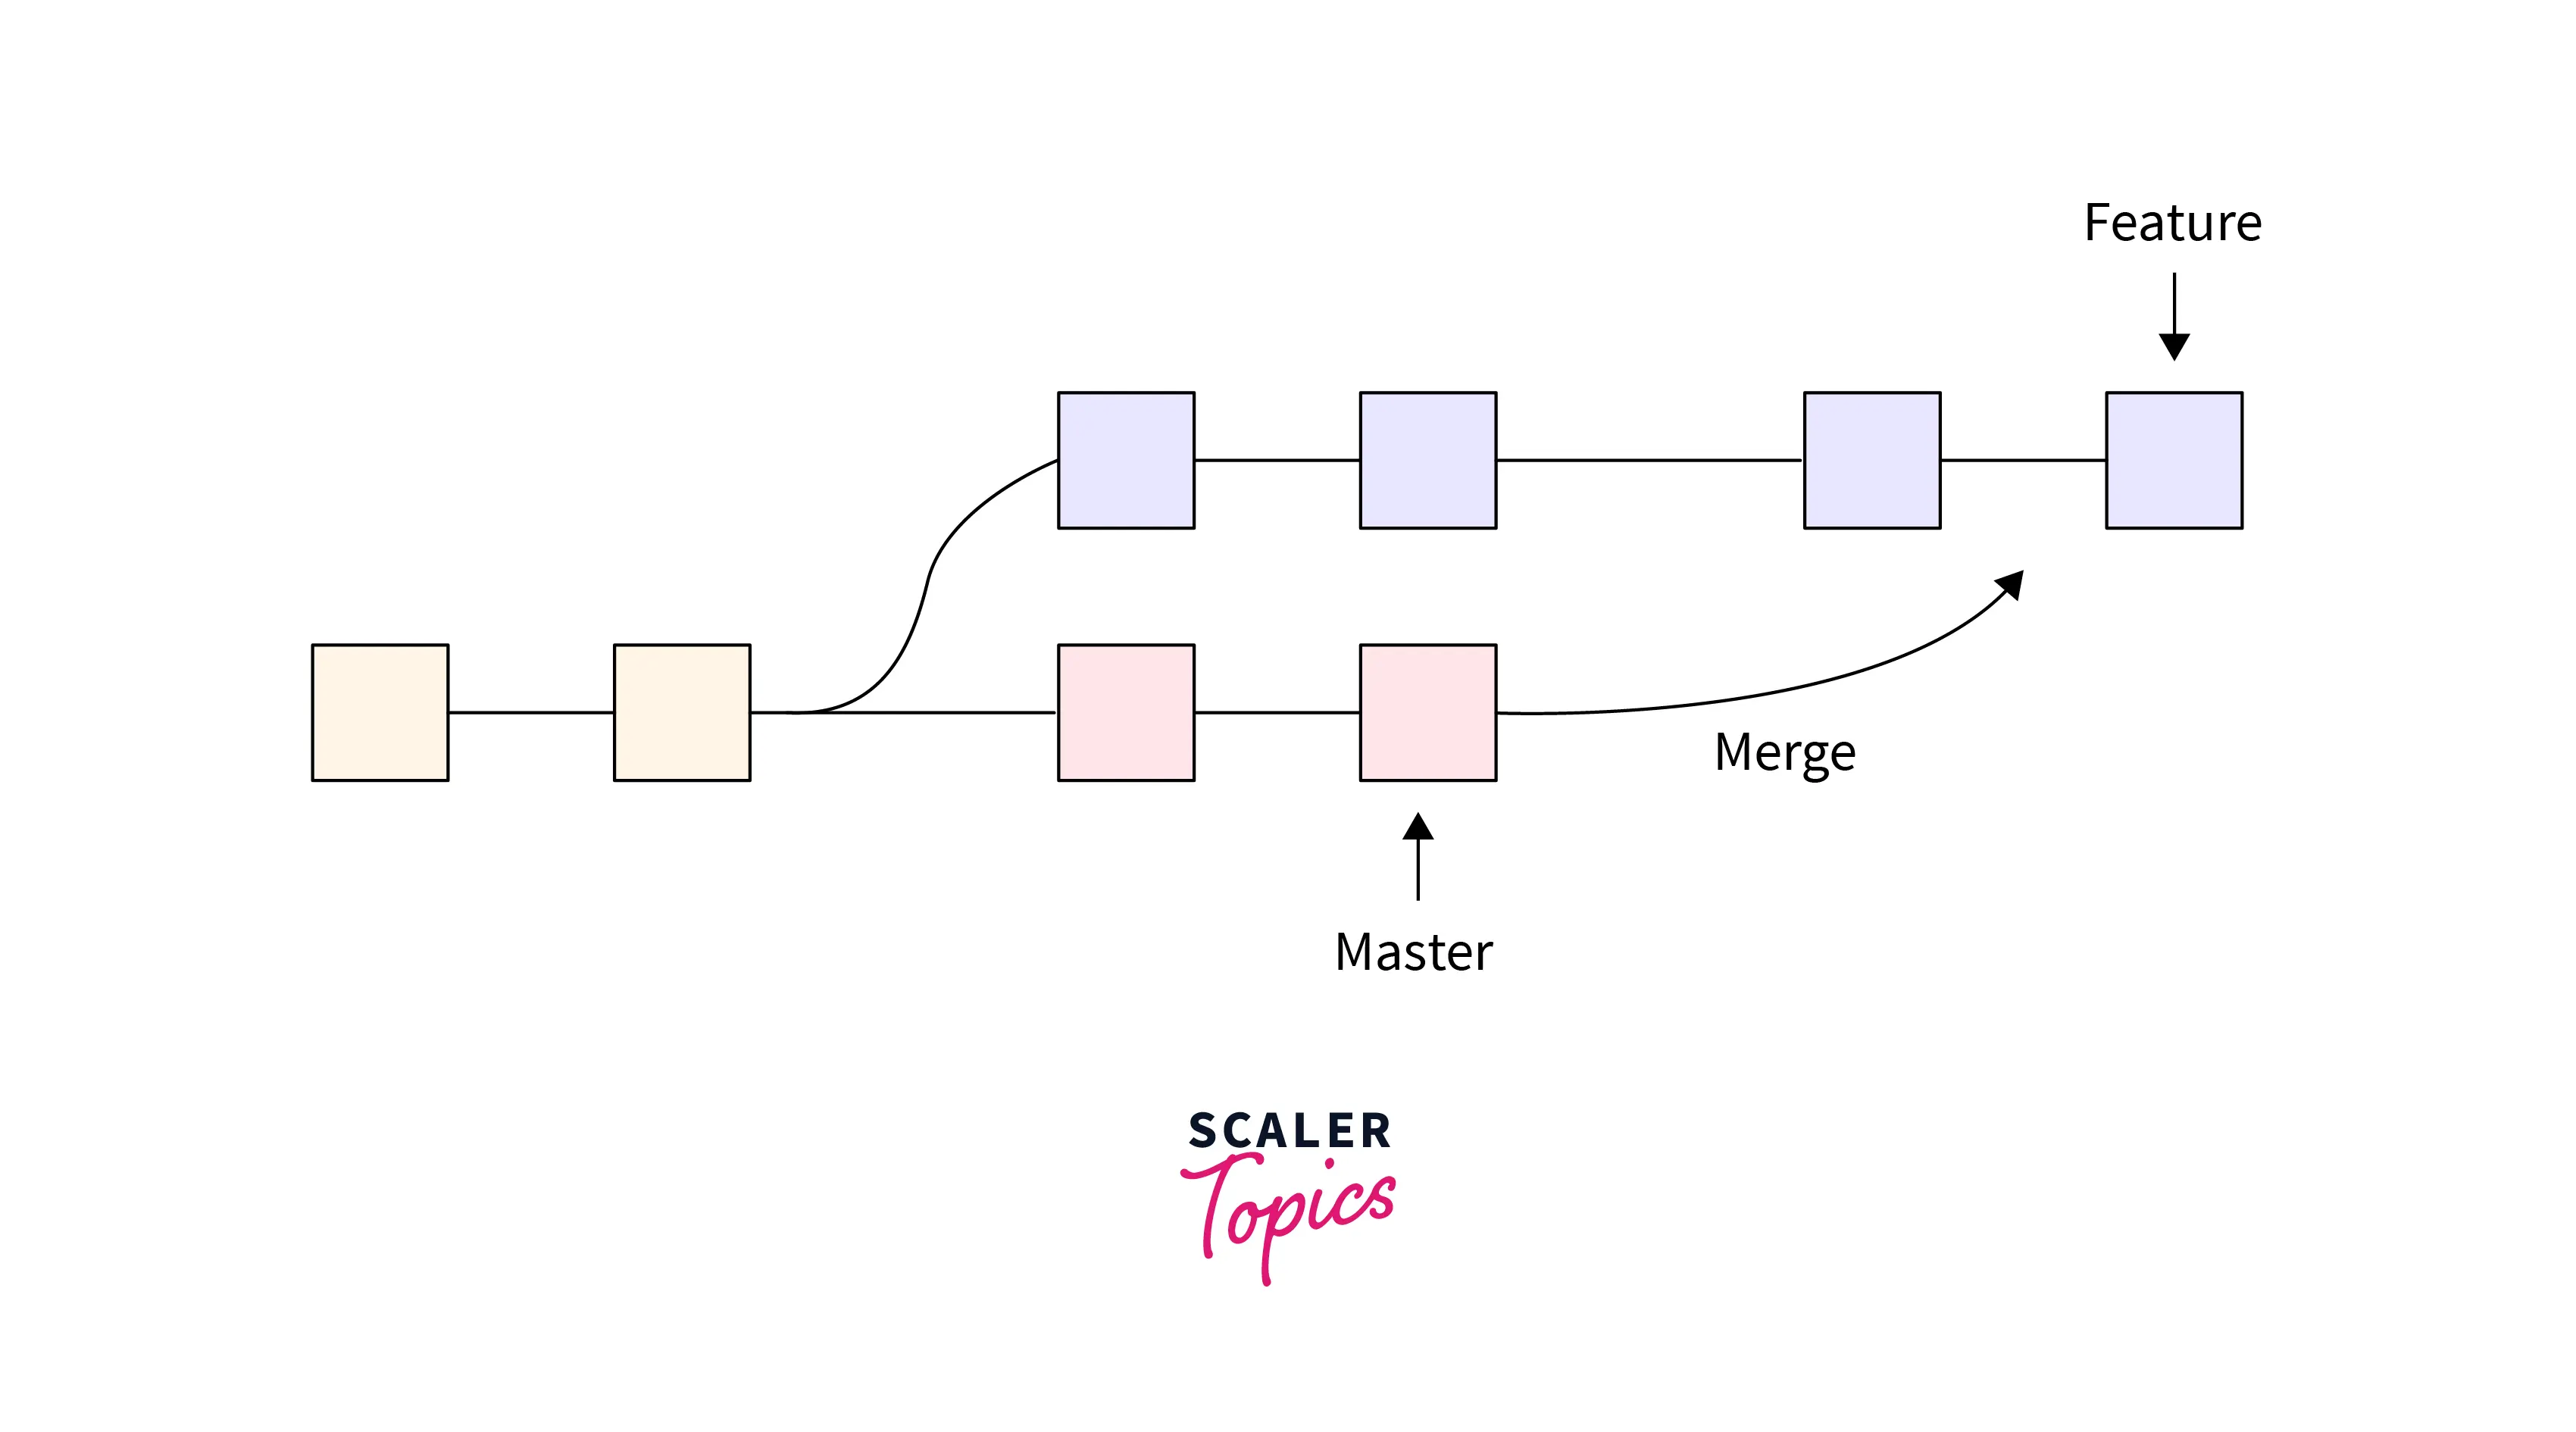
Branching
Branching is one of the main concepts in git which allows you to diverge from the main branch and continue to work in an isolated manner without taking care of the changes with the main branch. Each branch is an independent line of development, and any repository can have as many branches each having a different version of the repository.
-
Command used to create a new branch in Git :
-
Command used to view all the created branches along with an asterisk symbol and a green highlight on the current branch.
-
Command used to delete a branch locally :
-
The -d option in the above command is used with the git delete command and will only delete a branch if its changes have been pushed and merged into the remote branch. But if you want to force the branch to be deleted even though the changes have not been pushed or merged yet, you can use the following command :
-
If you want to delete the remote branch, then you can mention the name of the remote and can delete the branch using :
-
The command used to list down all the remote branches along with the local branches :
-
To create a branch from a particular commit, you can use the below command :
-
Command used to display the name of all the remote branches that Git is keeping track of for the current repository :
Merging
Git merge is a command you can use to merge different Git branches. To merge the history of the branch you are currently in with the <new_branch_name>, you can use the below command :
This new branch name will be merged into your current branch (the one you are on).
If you want to abort a conflicting merge in Git and want to throw a merge away and start over, you can run the following command :
Remote
-
Command used to check the configuration (like user name or email id) of the remote server :
It will allow you to see all the existing remote repositories for your local repository.
-
Command used to add a remote repository to your local repository by using the command :
-
Command used to get detailed information about a remote repo in Git :
-
Command used to change an existing remote repository URL with a new URL :
-
Command used to rename an existing remote :
-
Command used to remove a remote URL from your repository :
-
Command used to show the additional information about a particular remote server :
Pushing Updates
-
Command used to push all your committed code changes from your local repository to a remote server :
-
Command to push a new branch to a remote repo in Git :
-
Command used to delete a remote branch in Git using the push command :
-
Command used to force push your code changes :
Pulling Updates
-
Command used to pull or retrieve the latest changes made to the remote repository on the local repository :
-
Command used to pull the changes from a new branch of a remote repo in Git :
Undo Changes
-
Command used to revert or undo the operation and changes done in Git :
-
Command used to revert and roll back a particular commit with its commit id :
It works by creating a new commit that is the exact opposite of the work done in the given commit.
-
To revert back a particular commit along with editing the commit message, you can use the :
-
Command used to revert the latest commit :
-
Command used to revert the staged changes in Git :
Turn Learning into Career Growth
Removing Files
-
Command used to remove the tracked files from the current working directory in Git :
-
Command used to remove a file from the staging area, but it will still keep the files in your local repository :
Scaler Placement Report and Statistics
Scaler learners achieved 2.5x salary growth with average post-Scaler CTC reaching ₹23L.
Git Clone
-
The below command copies and downloads a project with the entire history from the remote repository :
-
If you don't want to clone the entire repository and want to just clone a specific branch, then you can replace the above command with this :
-
To clone a bare repository in Git, you can use the command :
-
Open GitHub and navigate to the repository that needs to be cloned.
-
Click on the Clone tab under the repository name.
-
You will see the option to Clone using HTTPS or SSH.
-
Copy the clone URL and apply the above command to the clone.
Git Checkout
-
The command used to switch to another branch :
Here, <branch_name is the name of the branch on which you want to check out.
-
You can use the below command to create a new branch and right away switch to it :
-
Command used to revert back the unstaged changes in Git :
Git Status
The command is used to display the current state of the changes in the working directory. It allows you to keep a track of all the code changes made and to point out the untracked files.
Git Rebase
Git rebasing is the process of combining/merging/squshing a few commits into a new commit. The main reason for doing rebasing is to maintain a linear and clean project commits history. The command used for this is :
To combine the last n numbers of commits, you can use :
Consider the case when there are a large number of commits that you want to squash, then it will not be easy to count the number. So for that, you can find the commit id or the commit hash for the commit that you want to rebase "onto", and run the same interactive git rebase command by replacing the count with the commit hash :
The command used to continue the process :
The command used to abort the rebasing process :
Git Fetch
The Git Fetch command downloads only the latest changes to the local repository. The changes of other developers that they have pushed to the remote repository will be fetched. It provides the additional benefit of allowing you to manually review the changes and merge them later using the Git Merge command. You can use it with confidence because it will not change the code stored in the working directory or the staging area.
The command used for this is :
If you want to download the changes from a specific branch on a remote repo, you can use the command :
Git Pull Remote Branch
The command used to pull a remote branch in Git :
Git Stash
Sometimes you don't want to commit code, but at the same time, you don't want to lose unfinished code. So under these conditions, when you try to switch to another branch to work on another feature, git will not allow you to switch without committing your changes to the current branch. In situations like this, the concept of stash comes into play, which helps you temporarily hide changes you've made to your working copy. It will store the unfinished code to stash and clean the current branch of all uncommitted changes. Now you can easily work in a clean working directory.
If in the future, we again need to visit that code, we can simply use the stash and apply those changes back to the working repository.
-
Command used for stashing the changes :
-
Command used to list all the stored stashes :
-
Command used to delete all the available stashes in one go :
-
Command used to delete a particular stash using its id :
-
To save a stash along with a message, you can use the below command :
-
Git stash pop is used to reapply the previously stored changes to your working directory.
This pop command will allow you to remove the changes from the stash and apply them to your current working directory.
-
Command used to re-apply the changes along with still wanting to store them in the stash, you can use :
-
If you want to re-apply any particular stash and not just the latest one, then you can pick that revision, then you can use :
-
You can view the summary of the stashed changes by using the command :
It will help to track the stashes and their changes.
-
To create a new branch from your stash, you can use the command :
-
If you want to create a new branch from any particular stash and not the latest one, then you can mention the stash revision while creating a new branch using the command :
-
If you have multiple stashes and you want to view the stash diff of an arbitrary stash, so to view the contents of a specific stash :
-
Command used to iterate through each of the changed “hunk” in the repository and it will ask you if you want to stash that specific change or not by entering y or n :
OR
-
Command used to delete a most recent stash from the queue :
Advanced Git Concepts
Easily Select Files to Commit with "git add -p" :
The command used to see and review the code changes in each file in form of patches before deciding whether to move them to the staging area or not, you can use the command :
Git Refs and the Reflog :
A git ref is an informal and indirect way of referring to a commit, and to track the changes on top of a branch using the mechanism of git, you use the term reference log or reflog. The references are stored as a plain text file in the .git/refs directory.
Git Hooks :
Hooks in Git are the automatic scripts that run whenever any event occurs in Git. You can even customize the workings of Git and trigger the customizable events in your development cycle. These git hooks are the shell scripts that are discovered secretly.
Different merging strategies :
There are various strategies for merging in git but the foremost commonly used strategies are Recursive merging and Fast Forward merging. A fast-forward merge occurs when the destination branch of the merge doesn't contain any new commits. In those cases, only the branch pointer is advanced to the specified commit and no new commits are added.

A recursive merge occurs when both the starting and the destination branches of the merge contain new commits. In such cases, a replacement commit is introduced to the destination branch and all the changes are then merged.
Squashing in Git :
Git squash is not a command, but a feature available in Git that helps squash (merge) multiple previous commits into a single commit. The two main ways to squash commits are to use interactive Rebase and merge. In the above section, we saw the interactive rebase method git rebase -i HEAD~[X] or git rebase --interactive HEAD~[X]. Another way to do this is to merge the feature branch into the main branch while squashing commits.
Other Git Commands
git reflog :
git reflog is employed to view the hash code of your commits :
The Reflog command is used to note and record updates made to the head of a branch. You can revert to a commit, even whether it is referenced or not by any branch.
git bisect :
The git bisect command is employed to find the middle position. It is a tool in git used for debugging purposes. Suppose you've got a large code base and there is some commit that is causing a bug, but you do not know which commit caused the bug. So, for that, you can use the bisect command in Git.
It goes through all the previous commits and uses the approach of binary search to seek out the failed commits.
This is the command used to start the bisect and the command that will mention the latest commit :
The command used to find a particular commit that has the bug :
Cherry-picking :
Cherry-picking in Git is the concept of selecting specific commits from one branch and applying them to another branch. This is useful in scenarios where you just want to merge changes from some specific commits into another branch (other than the branch where the commits reside). The purpose of cherry-picking is to provide the advantage of selectively merging specific commits instead of merging entire branches. The command used for this :
If you want to just stage the changes to this branch without committing them, you should use the :
Additional Resources
Conclusion
- Git is the most widely used free and open-source distributed version control system used to efficiently handle small to very large projects.
- To see if Git is installed on your system, open your terminal and type git --version.
- git cherry-pick <commit-id> is the command used to cherry-pick the commit to the current branch.
- To delete a local branch, we can use the command git branch -d <branch_name>.
- To delete a remote branch, we can use the command git push origin --delete <branch-name>
- To list all the local branches in a repository, we can use the command git branch.
- git add . is used to add untracked files to the staging area, and the git commit command is used to commit the staged changes to the remote git repository.
- You can delete a branch from the local using the command git branch -d <branch_name>
- git pull origin master command is used to pull the repository where origin is the location of the remote repository and master is the main default branch name of the repository.
- To create a branch in git, we can use the command git branch <new_branch_name>.
- To switch between different branches of the repository, we can use the command git checkout <branch_name>.
- You can pull a remote repository by just using thegit pull command. To fetch the changes from a particular remote branch, you can use the git pull <url_of_remote_branch> command.
- The git remote -v command is used to fetch and list down all the existing remotes.
- To remove a remote URL from your repository you can use the git remote rm <remote_name> command.
- To rename an existing remote repository on the server you can use the git remote rename <old_repo_name> <new_repo_name>.
- You can use the git remote add origin <remote_repo_url> to connect your local repository to Github.
- To initialize the new bare git repository you can use the git init -bare command.