Git Commit
Overview
Committing is one of the core concepts of Git, used to create a snapshot of your repository at a particular time. It helps you to capture the current project repository. The git commit command can serve you with the history of your git repository till the time this commit was made, or snapshot was created. We can include a message or a description in the commit telling more about the purpose of that commit. Commit also consists of a lot of metadata, like details about the author name, commit id, and the timestamp at which the commit was created.
Pre-requisite
Git add is a handy command to add a change from the working directory to the staging area. It takes a modified file in your working directory and places the revised version in a staging area. Here, the staging area is the area where it stores the changes. It is the intermediate area where the code can be viewed, reviewed, changed, and formatted before committing, and it behaves as a preview place for the commit. So, the git add command is used to add the changes to the staging area, and then the git commit can record those changes by creating a commit.
Hence, git add and git commit are the fundamental and primary commands used in the git workflow.
To add a single file to the staging area, we can write:
To add multiple files to the staging area, we can specify the file names, each having space between them:
To add all the modified files in the working directory to the staging area, we can write:
Introduction to Git Commit
Git commit is the most frequently used command in Git. It takes a snapshot of your git repository staged changes at a specific time. It behaves as a save point, which means that anytime in the future, we can go back to this point, and it is considered the safe version of a project because Git asks before changing them. The changes to be considered for committing should be in the staging area as staging allows us to store them for the preview before committing, and when we want to commit these changes to the git repository, the git commit command allows us to record these changes.
git commit helps us to keep track of the history and the changes in the project repository. It can help us in the future if we want to go back or if we find a bug, or if we want to make any changes.
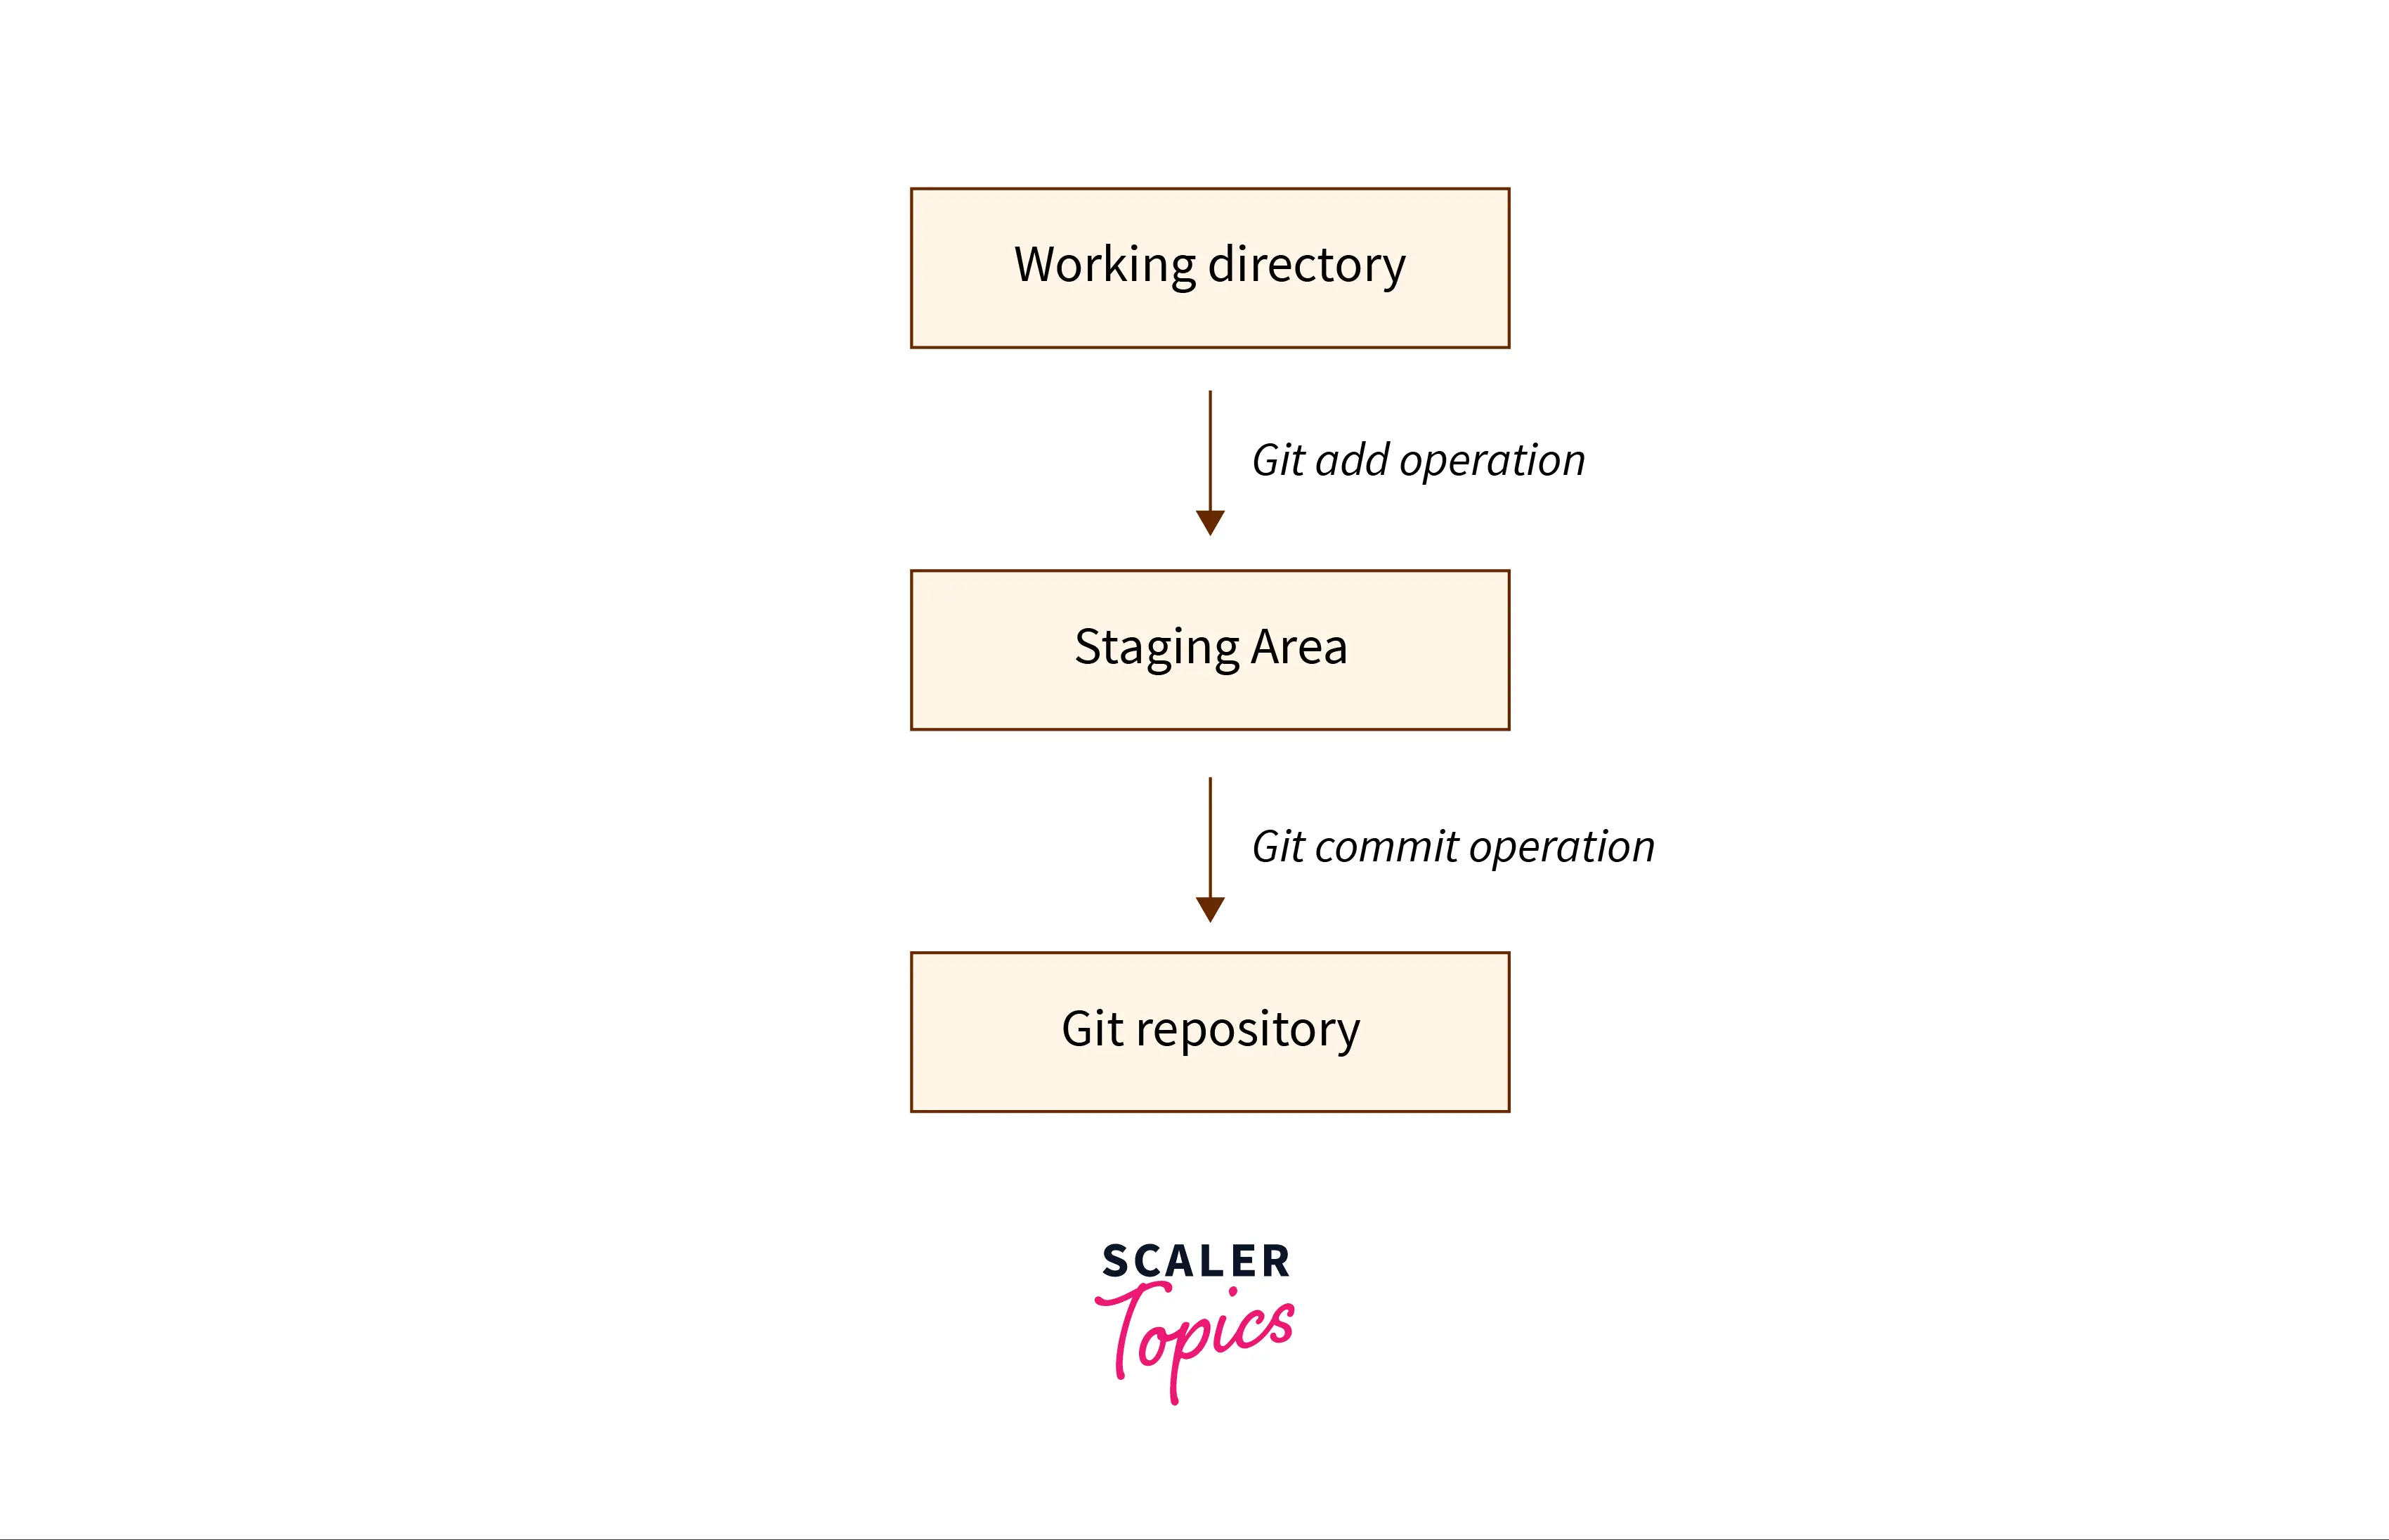
As we can see from the image above, the changes are added to the staging area from the current working directory. Then, the git commit operation is used to save or commit the changes to the git repository.
Each commit has a unique commit id automatically generated at the time of commit, and a commit id is an encrypted number generated using Secure Hash Algorithms, also known as SHA. We should always include a message along with the commit, as it helps to summarise and describe the change being committed and will make it easy for others to see what has changed and when.
Scaler Placement Report and Statistics
Scaler learners achieved 2.5x salary growth with average post-Scaler CTC reaching ₹23L.
The Git Commit Command
Git commit command is:
It will commit the changes and generate a commit-id. When run in a command line, the above command will commit all the changes in the staging area and prompt a default editor to request a commit message or a description. We can type an explanatory commit message and then save and exit from the editor to create the actual commit.
You can include many options with the git commit command to serve different purposes. Let's see a few standard options in this article.
Transform Your Career
Choose from our industry-leading programs designed for career success
Modern Software and AI Engineering Program
Master full-stack development with AI integration

Modern Data Science and ML with specialisation in AI
Advanced data science techniques with AI specialization
Advanced AIML with Specialisation in Agentic AI
Deep dive into AIML with focus on Agentic systems
DevOps, Cloud & AI Platform Engineering
Build and manage AI-powered cloud infrastructure
AI Engineering Advanced Certification by IIT-Roorkee
Premier AI engineering certification from IIT-Roorkee
Git Commit -a
One of the most popular options with the git commit command is the -a option; here, -a means all. It is used to commit snapshots of all the changes in the staging area. This option only considers already added files in Git and will not commit the newly created files not present in the staging area.
Let's understand this with the help of an example; suppose you have two files; one is the hello_world.py file already in the staging area, and we have made some updates to that, and another file is a newly created hello_people.py file, which is not added to the staging area, then this git commit command will commit all those files that have been added with git add to the staging area and not the newly created files which are still not added to the staging area and are untracked.
After running the above command, a text editor will be prompted, and there we can type the commit message, save it and close the editor to create the commit.
Git Commit -m
Git commits -m option is the most common and popular option with the commit command. It helps you to write the commit message on the command line.
This command starts the commit process and allows you to include the commit message simultaneously, so this will not prompt the text editor. The above command will make a commit with the given commit message.
Git Commit Amend
The git commit amend command helps us to change the commit message of the last commit. This command can be handy if we have committed a wrong message. The main purpose of passing this option is to modify/update the previous commit.
The command can be written as:
The above command will prompt the text editor and ask us to edit the previous commit message. After editing the message, we can save it and close the text editor; this will transform the commit message of the last commit.
In case you don't want the text editor to appear, then you can include the commit message at the same time using the command.
The amend command is a very important command to fix up the most recent commit. The git commit amend command works by combining all the staged changes till that point with the previous commit instead of capturing it as a new snapshot.
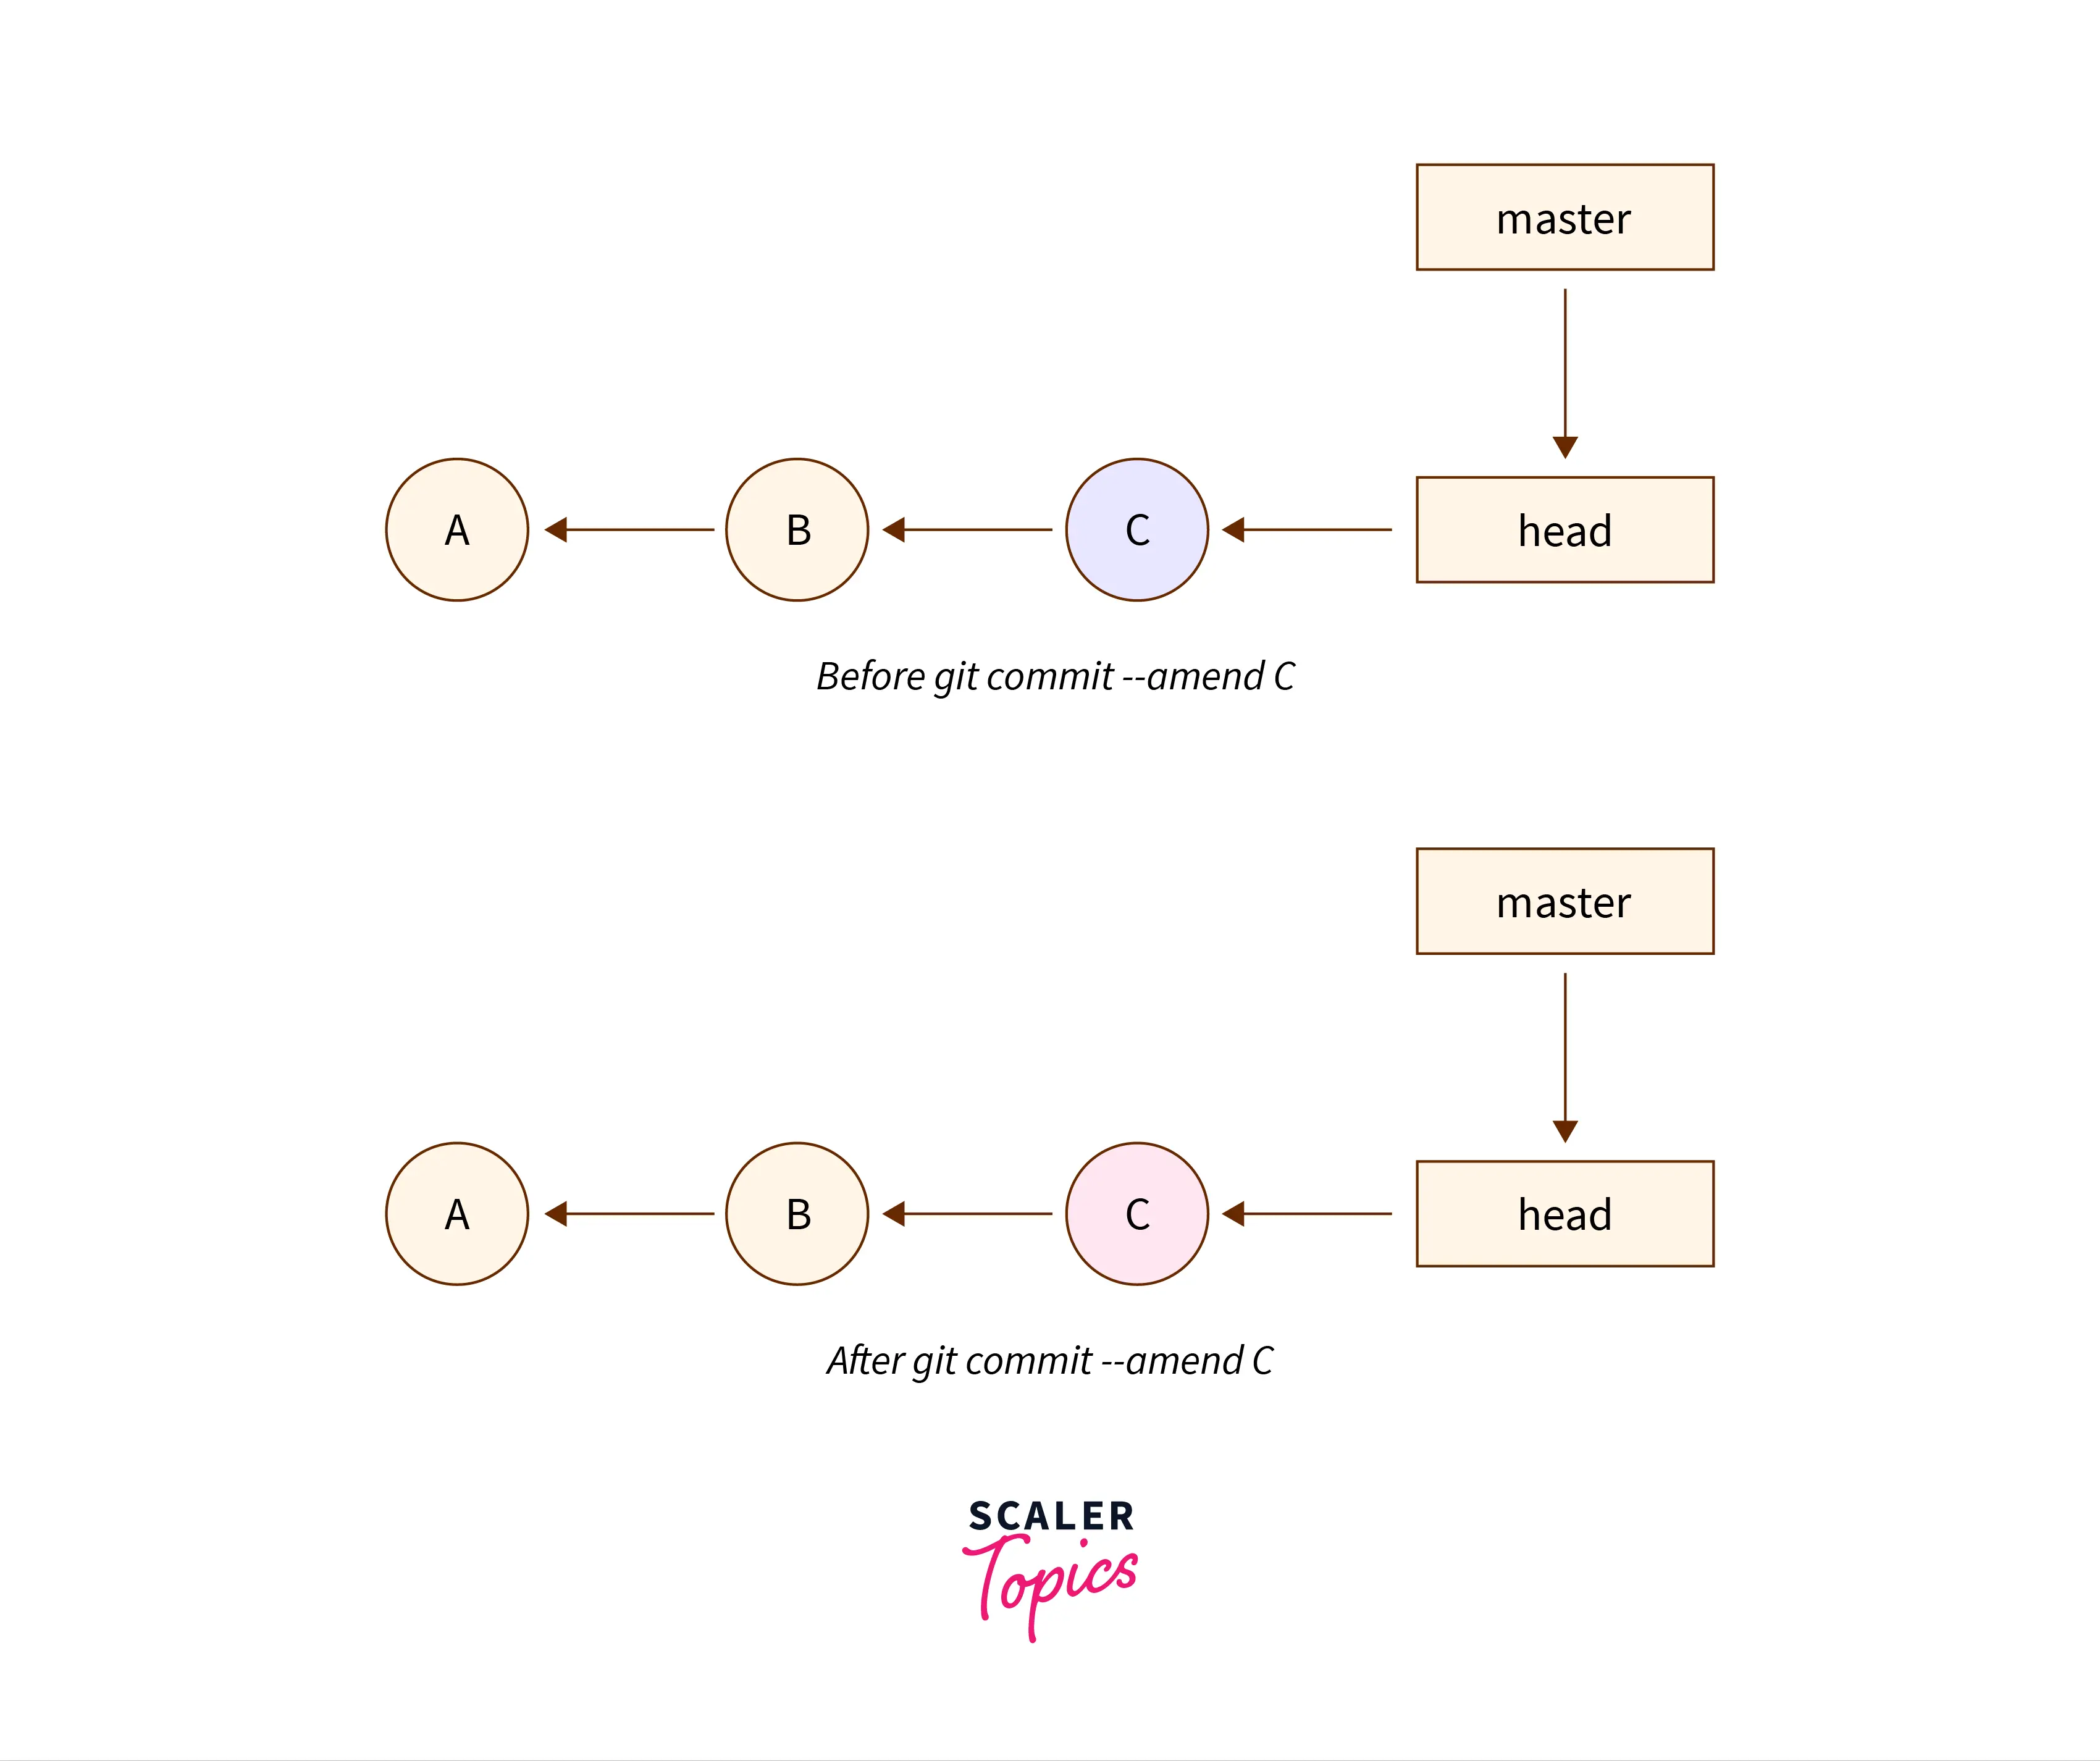
We can also see the commit history from the diagram above; no new commit has been created after amending.
Note:
Commits should only be rewritten on commits that have not been pushed to a remote repository.
Git Commit without Stage
For the simple scenarios, we generally add the untracked changes to the staging area and from there, we commit out changes to the git repository, we can also skip the git add command, which would add files to the stage area, and we can directly go with the -a flag along with the commit command like :
Here, we can add the changes and then directly commit them by using the above command. However, skipping the staging environment is not generally recommended as it can sometimes make you include unwanted changes.
Git Commit Log
Git commit log is a command used to view the history of commits for a given repository. The git log command helps you to view the whole project commit history, and with the help of this, we can filter and search for specific changes.
Each commit in the logs has a unique commit id, information about the author, timestamp, and the message or description associated with the commit.
The basic git log command will display the most recent commits and can be written as :
Git log output can be customized and filtered in several ways. Some of the most common options associated with the git log command are presented below :
1. git log --oneline
git log with the --oneline option is used to display the output as one commit per line. It is useful when we want to get only a high-level overview of the project repository to commit history.
Turn Learning into Career Growth
2. git log --patch
OR
Git log with the --patch option is used to display the details of the files that have been changed. It also shows the location of updated lines in the file, like those added, removed, or modified. This command is the opposite of the git log --oneline command, as it gives a detailed view of your project repository commit history.
3. git log -n <limit>
The Git log command and limit are used to limit or constrain the number of commits we want to list. For example, git log -n 10 will only display the 10 recent commits. This way, we can focus on the specific recent commits.
4. Filtering the Commit History
We can filter the commits we want to see according to our needs. We can apply filters like author, date, amount, time, and more to the output. Each filter has its specifications and usage.
a. By Author:
This command will display all the commits in the project repository which were made by the given author only.
b. By Date and Time:
This command will display all the commits in the project repository which were made after the given date.
This command helps to track all the commits in the project repository that were created between two dates, --before the given date and --after the given date.
c. By Commit message:
We can also filter the commits in the repository by the commit message. For this, we can use the grep option :
The above command will display all the commits containing the words we provided above in the commit message.
Signing Your Commits
Before we understand how to sign commits, let's first look at why signing is necessary and what signing means.
As you know, every commit has two properties associated with it.
1. Author:
The name of the person who contributed or performed the work, according to the stored information.
2. Committer:
The person who committed the changes.
The two are the same because, in most cases, the author commits the changes. But, there might be some cases when someone configures their git settings by taking your details. For example, someone can set their email and name using your details by applying the commands :
Git assumes that the name and email address provided by that person is genuine. Therefore, commits and changes made by that person are mistakenly believed to have been made by you because your details are visible in the context of the changes.
So, if any user sets both email and name as yours, then the commits become indistinguishable on GitHub. This means that someone can set their email address to yours, which will appear as if you committed. In this case, the author and the committer are different.
To avoid this, commits can be signed. This allows you to prove that the commitment came from you. If the commit is not signed, there is no guarantee that the author of the commit is not the person who created it. In some cases, this can hide the true author of the Malicious code.
Signing will ensure that the author of the commitment is the person he claims to be. Signing doesn't prevent someone from adding you as the author of a commit, but it results in an unsigned commit that doesn't guarantee that the author of the commit is the same as the committer.
You'll see a Verified badge next to the commit to confirm that a commit has been signed.
Let's sign a commit using GPG (Gnu Privacy Guard). GPG is an encryption technique initially developed for email transmission. GPG is a two-key encryption approach in which the messages exchanged (plaintext) are first compressed, and then a session key is created as a one-time-use secret. The compressed plaintext is encrypted with the session key. The session key is then encrypted with the target's public key and bundled into an encrypted message known as the ciphertext. The target can use the private key to decrypt the session key and unzip it to recover the original plaintext. This article needs to go into detail about the GPG technique.
Here, we'll focus on how to sign commits using this technique.
To generate a GPG key, you can use the following command:
Now you can list the GPG keys using:
You should see an output similar to 9BJ5C34989567Y19.
Now you need to add your GPG key to GitHub so that you can verify your commits.
To do this, follow these steps:
- Go to GitHub.
- Go to Settings.
- Click SSH and GPG Keys.
- Click New GPG Key.
- Get his GPG key with the following command gpg --armor --export 9BJ5C34989567Y19.
- Paste the key into GitHub
- Save and exit
After creating a GPG key and uploading it to Github, you can configure Git to use your key.
Add the key to your Git global configuration by running the following command:
To sign a commit each time, you can use the -S option with the normal commit command like this git commit -S.
You can also auto-sign all commits using:
To check if a commit is signed, go to GitHub and navigate to the commit and see if it has a "verified" badge next to it.
Usage Examples
Let's create an empty file named hello_world. cpp and add some code to our file.
Let us add the file to the staging area using the git add command.
The above command will add the hello_world. cpp file to the staging area; now, we can commit the file using the git commit command.
The above command will commit the changes along with the commit description as Written in the code for printing "Hello, everyone!" statement.
If you want to add all the changes in your working copy in the next commit, then you can make use of the "-a" parameter along with the "-m" option and thus can skip the Staging Environment step and thereby omit the "git add" command, it can be written as :
Now, consider the case when you mistyped the last commit's message and want to modify that; then, there is no need to create a new commit. We can edit the commit message of the last commit using the amend option.
To view the commits we have done in our project history, we can use the git log command :
It will display the record of commits created in the history of the project repository. Also, there may arise the case you run the git log command and you are stuck there. When you press the Enter key, it will navigate you to the older command until the end flag. So, in that condition to exit the git log window, you can press the q key, it will quit you from the window, and you will be back on to the command line.
Let's suppose we only want to see the last two commits we just created to use the filtering options in the git log command.
The above command will display the recent 2 commits only.
Conclusion
- Git commit is the most frequently used command in Git to take a snapshot of your repository staged changes at a specific time.
- -a option with the git commit command is used to commit snapshots of all the changes in the staging area.
- -m option with the git commit command is used to write the commit message on the command line.
- --amend option is used to change the commit message of the most recent commit.
- The amend command is a very important command to fix up the most recent commit. The git commit amend command works by combining all the staged changes till that point with the previous commit instead of capturing it as a new snapshot.
- The commit message should be short, explanatory, and descriptive about the committed change.
- -a option, used along with the -m flag, can help us to commit changes directly by skipping the staging environment.
- Git commit log is a command used to view the history of commits for a given repository.
- git log with the --oneline option is used to display the output as one commit per line.
- Git log with the --patch option is used to display the details of the files that have been changed.
- Git log command and limit are used to reduce the number of recent commits we want to display.
- We can view specific commits by applying filters to the git log command like author, date, commit id, commit message, and time.
- Signing of commits helps you verify if the code's author is the same as the writer of the code.
- Signing doesn’t prevent someone from adding you as the author of a commit, but it results in an unsigned commit that doesn’t guarantee that the author of the commit is the same as the committer.