Git Hooks
Overview
In this article, we are going to learn about Git hooks. So, before getting started with the topic, let us get an overview of what are Git hooks.
Git Hooks: Git hooks are programs that automatically get triggered and executed whenever a specific event takes place in a Git repository. It gives you the ability to alter Git's core operations and start customized processes at significant stages of the development life cycle. Some of the common use cases for Git hooks consist of promoting a commit policy, then based on the state of the repository it changes the project environment.
Pre-requisites
Before getting started with the topic, you must have a clear understanding of a few topics like :
What are Git Hooks?
Git hooks are programs that automatically get triggered and executed whenever a specific event takes place in a Git repository. Git hooks give you the ability to alter Git's core operations and start customized processes at significant stages of the development life cycle. Some of the common use cases for Git hooks consist of promoting a commit policy, then based on the state of the repository it changes the project environment, and also implements the continuous integration workflows. However, since scripts can be altered in any way, you can utilize Git hooks to automate or improve just about any part of your development process.
Every Git hook is just a regular script that Git runs when specific things happen in the repository. They are really simple to install and set up as a result.
Either in server-side or local repositories hooks can reside, and in the response to the repository actions, hooks are executed.
Git hooks basically consist of two different groups: client-side and server-side hooks. Actions like committing and merging trigger the client-side hooks, whereas network operations like receiving pushed commits trigger the server-side hooks. These hooks are useful for a variety of purposes.
Transform Your Career
Choose from our industry-leading programs designed for career success
Modern Software and AI Engineering Program
Master full-stack development with AI integration

Modern Data Science and ML with specialisation in AI
Advanced data science techniques with AI specialization
Advanced AIML with Specialisation in Agentic AI
Deep dive into AIML with focus on Agentic systems
DevOps, Cloud & AI Platform Engineering
Build and manage AI-powered cloud infrastructure
AI Engineering Advanced Certification by IIT-Roorkee
Premier AI engineering certification from IIT-Roorkee
Installing a Hook
In all the Git repositories there is a .git/hooks directory, where hooks are stored. When you initialize a repository, this .git/hooks directory will automatically populate including the example scripts in Git. The .git/hooks directory consists of the following files given below :
The majority of the hooks are in the files mentioned above. However, With the .sample extension, the hooks are by default prohibited from running. If you want to use any of the hooks, simply removing the .sample extension will do the work. Or, in case you want to write your own script from the ground up, you may just create a new file with a name that matches any of the filenames listed above, but without the .sample extension.
Example
Let us try to install the prepare-commit-msg hook from the .git/hooks directory. For that we need to eliminate the .sample extension from the hook script, after that, we have to write the following code in the prepare-commit-msg hook file :
If you want to execute the hooks, you might need to adjust the script's file permissions you are writing it from the ground up. For instance, to execute the prepare-commit-msg hook successfully, you will have to execute the following given command :
Now, whenever you run git commit, this message should appear rather than the default commit message. We will learn about the working of this in detail in the section Prepare to Commit Message. For now, let us just keep in mind that we can alter some parts of Git's internal functions.
The built-in sample scripts serve as excellent resources because they list the inputs that each hook is provided with (they alter from hook to hook).
Scripting Languages
The built-in script languages such as PERL and shell scripts are mostly used for execution. However, there is no restriction to it, that is, any scripting language can be used, that we like but it should have an executable format. How your file should be interpreted is been defined by the shebang(#!) line (#!/bin/sh) in each and every script. So, if we are using any different scripting language, all we have to do is set the path of it to your interpreter's path.
For example, to execute our prepare-commit-msg file we can use a runnable Python script rather than using the shell command. The given hook will carry out the same action if we use any different scripting language as the shell script in the above part.
Explanation :
- From the above code, we can observe how in the first line we have to change the path of the interpreter to Python.
- Here in the code we are using the sys.argv[1] to access the first parameter sent to the script, rather than using the $1 which we used in the shell scripting language.
- Due to the fact that it enables you to work in the language in which you feel most at ease, this is a particularly useful feature for Git hooks.
Local Hooks
The only repository that is impacted by the local hooks is where it resides. As you go through this part, Keep in mind that every user has the ability to modify their local hooks, hence you cannot use them to put a commit policy in place. But they can make it considerably simpler for users to follow certain rules.
In this part, we will be discussing 6 of the most helpful local hooks:
- pre-commit
- prepare-commit-msg
- commit-msg
- post-commit
- post-checkout
- pre-rebase
The last two hooks allow you to carry out some additional safety or action checks, and you may access the whole life cycle of the commit using the aforementioned first four hooks for the git rebase and git checkout commands, respectively.
While the post-hooks are only used for alerts and notifications, all pre-hooks allow you to change the action that is going to happen.
We will also see how by using the lower-level Git commands we can request information about the repository and also see some helpful techniques for parsing hook arguments.
Let us now discuss all the local hooks in detail.
Pre-Commit
Whenever you execute a git commit, the pre-commit script is run before Git prompts the user for a commit message or creates a commit object. This pre-commit hook can be used to examine the snapshot that will soon get committed. For instance, you might wish to execute a few automated tests to confirm that the change doesn't affect any currently functional features.
The pre-commit script receives no arguments, and if it exits returning a status code that is non-zero, the whole commit is canceled. Here is a more verbose and condensed pre-commit hook of the built-in version. If the script detects any whitespace mistake, it will cancel the commit, as explained by the Git diff-index command (Errors by default include lines containing only whitespace and leading whitespace, and a space and a tab within a line's first indent).
We must determine which commit reference the index is compared to in order to use git diff-index. Usually, it is HEAD; but when the initial commit is made, HEAD doesn't exist, therefore our first goal is to take into account this edge situation. We can use the Git rev-parse --verify, using which we can determine whether the parameter (HEAD) is a legitimate reference. Any git rev-parse output is silenced by the >/dev/null 2>&1 line. For usage with git diff-index, the against variable stores either HEAD or a blank commit object. A magic commit ID that stands in for a vacant commit is the 4b825d... hash.
When using the git diff-index —cached command, a commit is compared to the index. We instruct it to alert us if there are any changes that generate whitespace mistakes by giving the —check option. If there is any mistake, we cancel the commit and return a 1 status code, or else, with a status code of 0 we exit, and the commit process goes on as usual.
This is only one illustration of a pre-commit hook. It really uses the most recent Git commands to perform tests on the changes made by the suggested commit, however, we can write any other scripts, run a third-party test suite, or use Lint to check the style of your code in pre-commit.


Prepare Commit Message
After the execution of the pre-commit hook, the prepare-commit-msg hook is executed to add a commit message to the text editor. To change the automatically created commit message for squashed or merged commits it is a good place.
The prepare-commit-msg script receives one to three arguments, including:
- The temporary file's name that consists of the message. By making in-place changes to this file, you can modify the commit message.
- The commit's type. It can be either message type (-m or -F option), template type (-t option), merge type (if the commit is a merge commit), or squash type (if the commit is squashing other commits)
- The SHA1 hash of the applicable commit. This argument is only given if the --amend, -c, or -C option is given.
Just like the pre-commit, the commit will be canceled if exiting with a non-zero status code.
We've already seen a straightforward example that changed the message by commit, now Let's examine a more realistic script. Whenever we use an issue tracker, the standard practice is to approach each problem in a distinct branch. You can create a prepare-commit-msg hook to add the issue number automatically in every commit message on a branch if you include it in the branch name.
Explanation:
- In the above code, firstly the prepare-commit-msg hook described how to gather all of the script's input parameters.
- After that, the Git symbolic-ref --short HEAD is called to fetch the branch name that matches the HEAD. If the branch name begins with the term issue-, it rephrases the commit message file and includes the in the first line. So, let's say your branch name is issue-248, it will create the following commit message.
One thing to notice, while using prepare-commit-msg is that it continues to function even if a message is supplied by the user using the -m git commit option. This indicates that the ISSUE-[#] string will be automatically inserted by the above script without allowing the user to alter it. By checking to see if the second parameter (commit type) equals the message, you can deal with this situation.
The prepare-commit-msg hook, however, permits the developer to alter the message once it has been prepared without the -m option, thus this script serves more as a convenience than as a means of enforcing the policies of the commit message. You require the commit-msg hook, which is covered in the following section, for that.
Commit Message
The commit-msg hook is almost similar to the prepare-commit-msg hook, however, it is called after a commit message is been entered by the user. This is the right area to let developers know when their message does not meet the standards set by your team.
The file name containing the message is the sole argument supplied to this hook. It can in place modify the file (similar to prepare-commit-msg) or cancel the commit completely by departing with a status code other than zero (non-zero) if it disapproves of the message that the developer entered.
For instance, the script that follows verifies that the ISSUE-[#] string, which was created by the prepare-commit-msg hook in the preceding section, was not deleted by the user.
Despite the fact that the given script is executed each time the developer initiates a commit, It is your responsibility to refrain from doing anything else but reading the commit message. Use the post-commit hook instead in case you are required to inform other services that a snapshot has been committed.
Post-Commit
The post-commit hook is immediately called once the commit-msg hook is executed. This hook is specially used for notification purposes, as the result of the Git commit operation can't be changed by it.
The script does not accept any parameters, and the commit is not affected by its exit status in any form. You'll need access to the most recent commit in order to run the majority of post-commit scripts. To obtain the new commit's SHA1 hash, git rev-parse HEAD can be used, or to obtain the full commit's details, git log -1 HEAD can be used.
For instance, we might add the following post-commit hook if we want to contact our boss each time a snapshot is committed by us (Not the best idea for the majority of workflows).
Although to execute a local continuous integration system we can use the post-commit hook, you should often perform this in the post-receive hook. Rather than using the local machine of the user, this hook will run on the server, and whenever any user pushes any changes in their code, this hook will run. It is now a lot better location to carry out your continuous deployment as a result.
Scaler Placement Report and Statistics
Scaler learners achieved 2.5x salary growth with average post-Scaler CTC reaching ₹23L.
Post-Checkout
The post-checkout hook is almost similar to the post-commit hook, however, it is invoked anytime a reference is successfully checked out using git checkout. the post-checkout hook is useful for removing generated files from your working directory that else would be unclear.
This post-checkout hook consists of three different arguments, and the exit status code of this hook doesn't affect the Git checkout command in any way.
- Previous HEAD's ref
- New HEAD's ref
- A flag indicating whether it was a file checkout or branch checkout. The flag will be, correspondingly, 0 and 1, respectively.
A most common issue with Python developers occurs when created .pyc files persist after altering branches. Sometimes the .pyc file is used instead of the .py source file by the interpreter. The following post-checkout script can be used to remove all.pyc files each time you check out a new branch to avoid any misunderstandings :
The os.walk('.') call loops through each file in the repository since Hook scripts' default working directory is always assigned to the repository's root. Then, if it has an a.pyc file extension, we examine its name and remove it.
The post-checkout hook can also be used to change the directory in which we are working according to our checked-out branch. For instance, To keep all of your plugins separate from the primary source, we might work on the plugins branch. Only when you're on the plugins branch can you selectively build these plugins if they need a large number of binaries, which other branches don't.
Pre-Rebase
Before the Git rebases change anything, the pre-rebase hook is executed, which makes it a better place to ensure that something horrible is not going to happen.
Basically, the pre-rebase hooks consist of two arguments :
- The upstream branch, from which we fork the series.
- The branch which is being rebased.
While rebasing the current branch, the 2nd argument is void. To cancel the rebase, the hook will terminate with a status code other than zero (non-zero).
For instance, you can use the rebase script, if we wish to entirely forbid rebasing in our repository :
Now, whenever you execute the git rebase, you will see this message.
Client-Side Hooks
The client-side hooks consist of different Git processes which include committing, email workflows, and other processes like checkout and merge. As we have already discussed the committing workflow hooks such as pre-commit, prepare-commit-msg, and commit-msg. Let us discuss the email workflows.
Email Workflow
For the email-based workflow, we can arrange three client-side hooks. They are all triggered by the git am command, hence, you can safely skip this section, if you are not using this command in your workflow. If you are working over the email which is prepared by Git format-patch, then this section might be helpful to you.
applypatch-msg is the first hook that is executed. This hook takes only a single parameter: the temporary file's name that consists of the proposed commit message. This patch is canceled by Git if the script exits with a non-zero status. Using this hook we can check whether a commit message is properly formatted, or by having the script edit in place and normalizing the message.
pre-applypatch is the next hook that is executed after applying patches through the git am command. This hook is quite confusingly, gets executed before a commit is made and after the patch is applied, hence, to check the snapshot before performing any commit you can use this hook. You can also check the working tree or run tests with the help of this script. In case, something is missing, or the tests do not pass, non-zero status exiting halts the git am script without committing the patch.
post-applypatch is the last hook that is executed during a git am command operation. This hook runs after the commit is done. We can use this hook to alert a group or the writer of the patch you pulled in that you have done so. The patching process cannot be stopped with the help of this script.
Turn Learning into Career Growth
Getting started
Throughout the article we have discussed a lot of things about Git hook, let us now learn how we can automate actions in our Git repo, with the help of a practical example.
Create a Git Repository
To get started, create a sample Git repository:
You can take a glance at the directory .git/hooks to see some of the default hooks :
The above files are sample Git hooks that are provided in our new repo and work as a common trigger available to us. For example, when enabled, the commit-msg.sample script runs after a commit message has been submitted, and the pre-commit.sample script runs after a commit is submitted but before it is authorized.
Write a Simple Git Hook
When you are performing the git commit command to your Git repository, do you want to install safeguards to guard against errors? One of the simple Git hooks tricks is to ask the user for approval the moment they execute the commit command to the branch. For that follow the steps given below :
- At first, make a new file termed as .git/hooks/pre-commit, and then open that file in a text ide.
- Inside the text editor, add the below code, which will ask Git for a collection of files that will be committed under the current branch name.
- After that run a while loop until the user puts any response.
- Mark the file executable with the command :
- After that test it out by creating, adding, and committing a file :
- You can test it for another time to make sure that it lets you decline a commit.
Check Commits for Binary Data
Generally, if a repository consists of a few binary data, the actions will work smoothly. However, if there is a lot of binary data in the repository, and all of them are committed at the same time, it would affect a repository's actions down. You can use the Git portal to manage this issue, you can also install a pre-commit hook to double-verify, that whether any binary drops make it into a commit:
The above script checks each staged file (acquired with a simple git diff command), decide whether it is a binary or not, by using the file command and then takes action accordingly.
An interesting quirk is, Empty files are also treated as binary objects :
Push Hooks
It is not necessary to happen everything during the committed time. The act of pushing to a repository is another legal trigger. Pre-push hooks are called with parameters, so you don't always need to ping Git for some values like you would for pre-commit hooks. The arguments are:
$1 = The remote's name which is being pushed to
$2 = The URL of the remote
Those arguments are equal if you push without mentioning a name remotely.
The committed information which is being pushed is given as lines to the standard input in this format :
To synchronize offline space with Git pushes, you can use the pre-push hook. In the remote storage mirror, a user's local binary blobs (such as 3D models, 4K pictures, and other huge artifacts that are too huge for the Git repository) are noted. when they make a commit. What this script does is :
Despite the script's appearance of verbosity, it is actually quite straightforward because it makes advantage of the built-in variables offered by the way Git uses pre-push. Git does not automatically disclose the top level of the repository, which can make referring to file locations challenging. The solution is straightforward:
The above code creates the variable TOP. Now, The Git repository directory's outmost bounds are represented by the $TOP variable
Functionally, now the absolute path can be set by you starting at $TOP.
Git Hooks
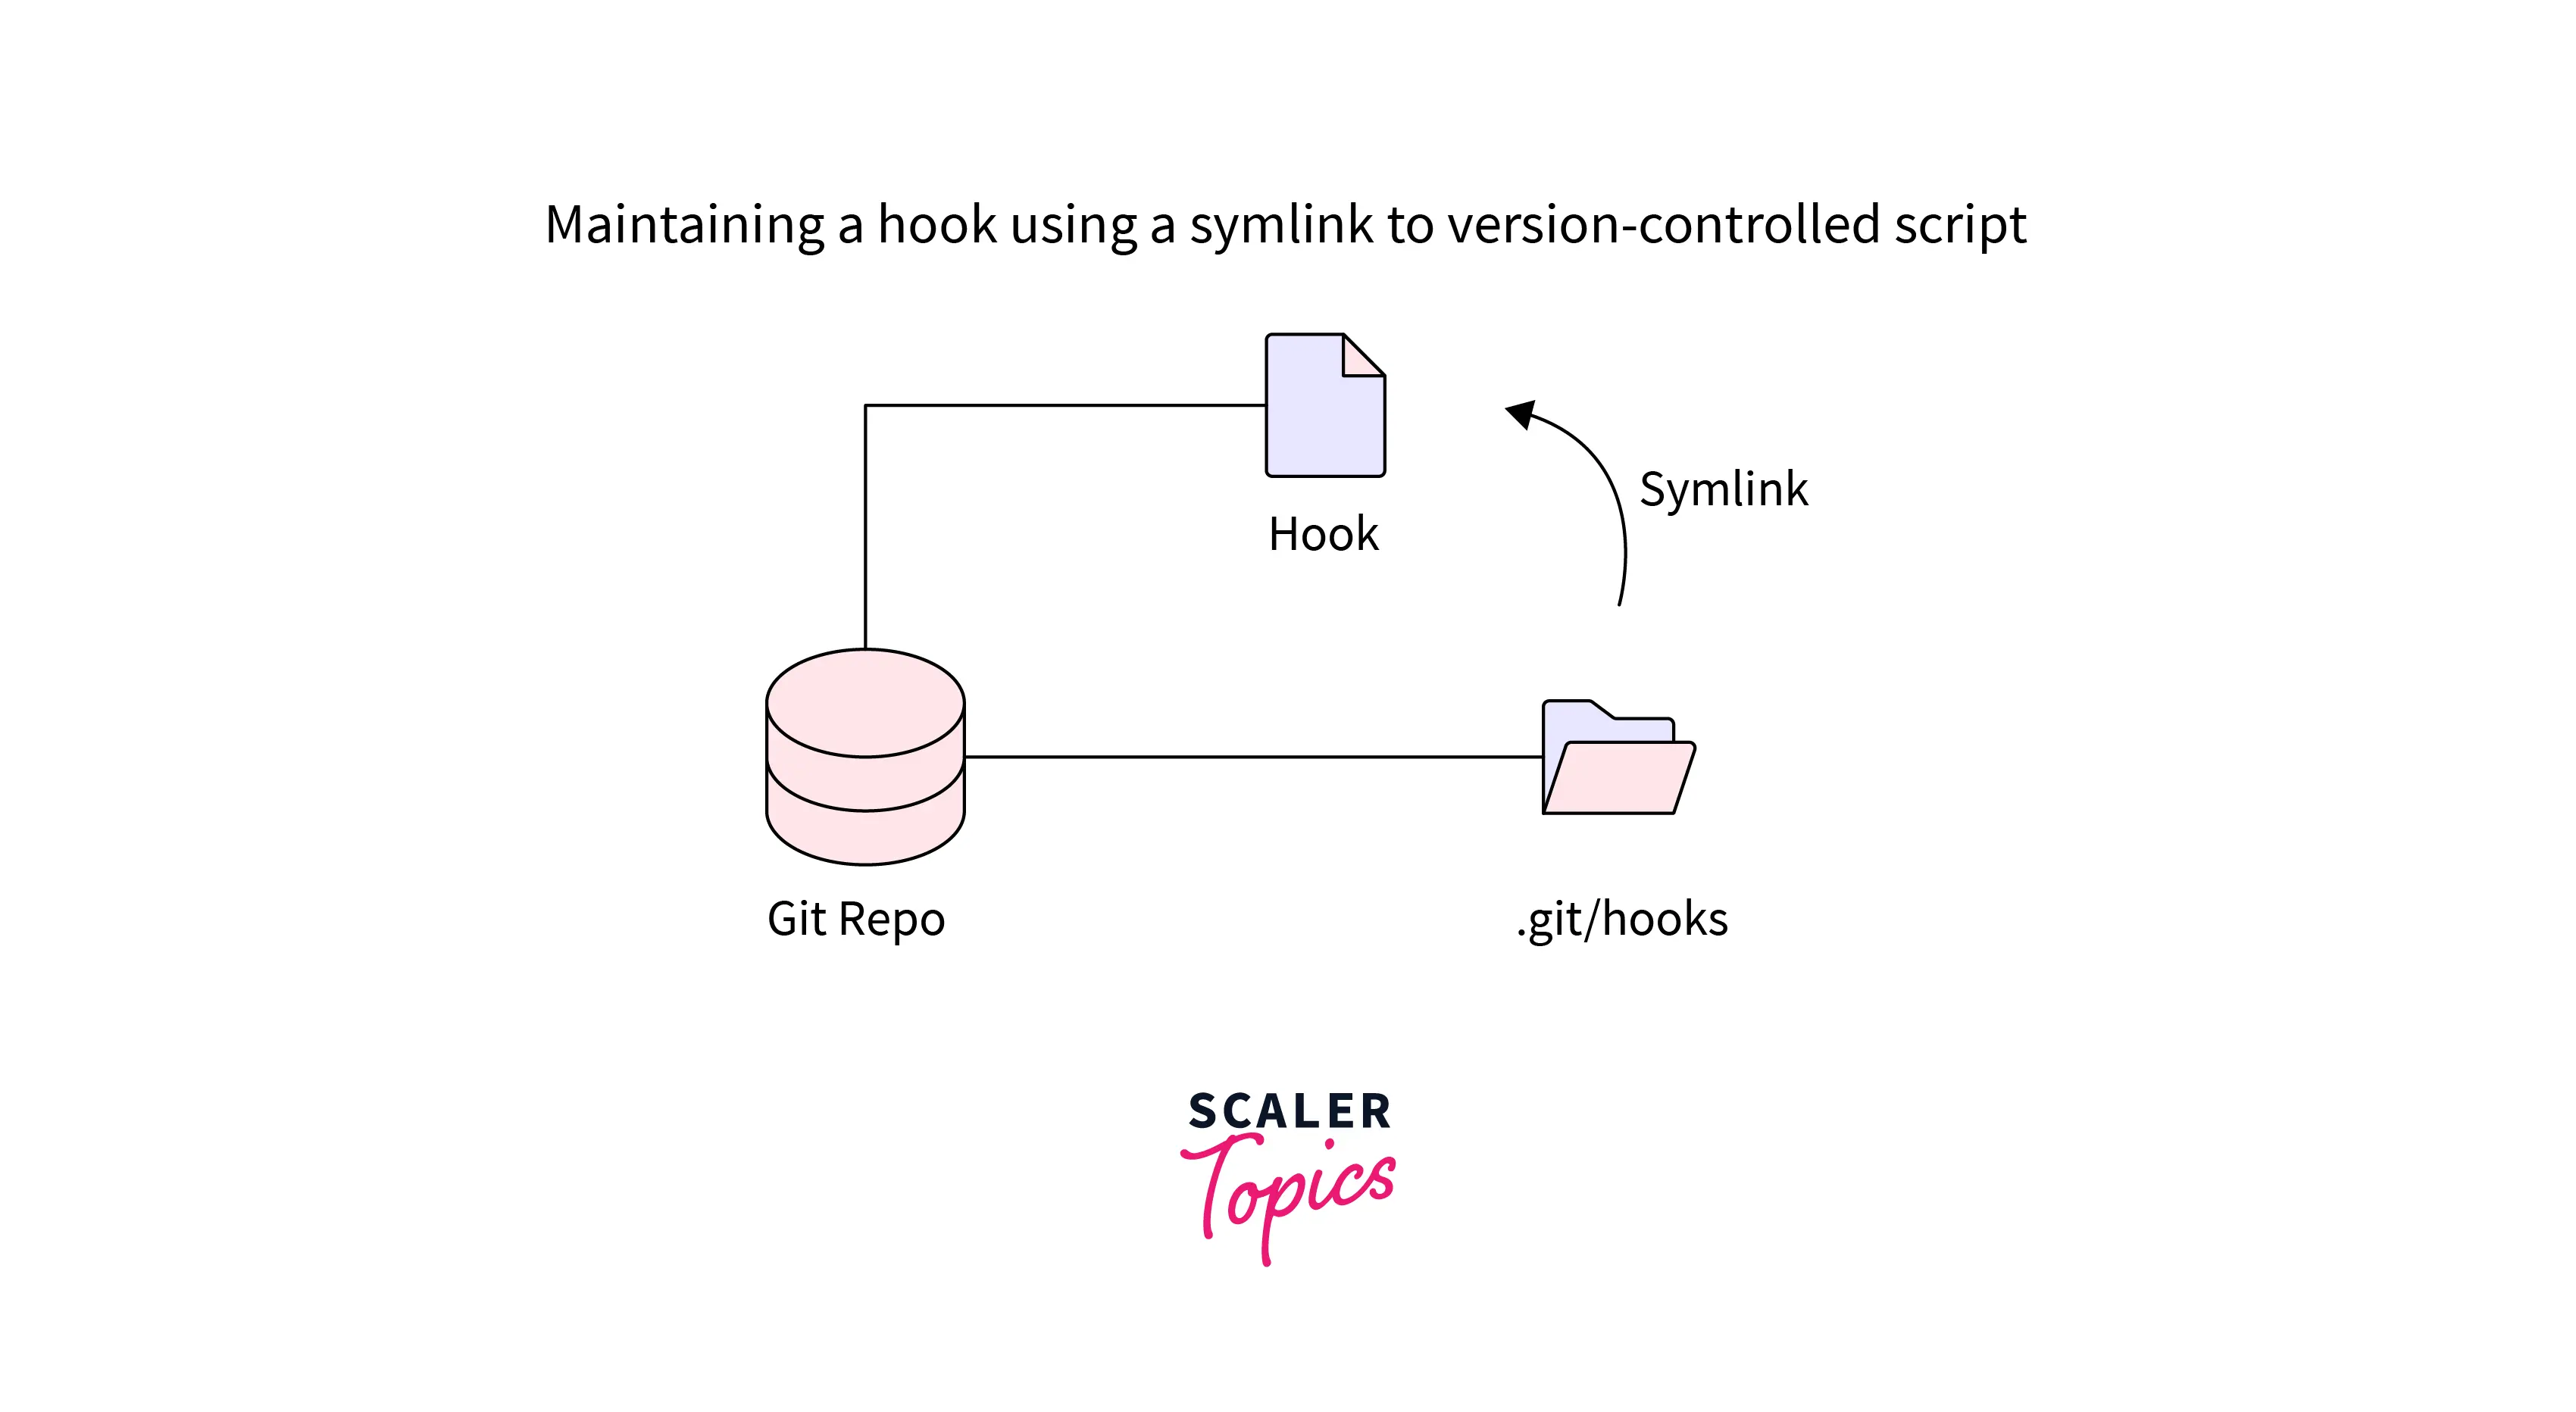
Git hooks are not actually committed to a Git repo themselves. They are untracked, local files. Copy the important hook which you have written and want to keep around, into a directory managed by Git!
Git hooks are a crucial component of Git that is all too frequently overlooked because they are obscured. Use the man githooks command for further information on the many trigger types available, even if only 12 are included as samples in a repository. Once you're comfortable with them, Git hooks can perform a lot of things, like gathering information about Git activity, automating tedious tasks, and securing your Git repository against careless mistakes.
Pre-commit
Every time you run git commit, the pre-commit script is run before Git prompts the developer for a commit message or creates a commit object. This pre-commit hook can be used to examine the snapshot that will soon be committed. For instance, you might wish to execute some automated tests to confirm that the change doesn't affect any currently functional features.
The pre-commit script receives no arguments, and if it exits with a non-zero status, the entire commit is canceled.
Conclusion
In this article, we learned about Git Hooks. Let us recap the points we discussed throughout the article:
- Git hooks are programs that automatically get triggered and executed whenever a specific event takes place in a Git repository.
- Git hooks basically consist of two different groups : client-side and server-side hooks. Actions like committing and merging trigger the client-side hooks, whereas network operations like receiving pushed commits trigger the server-side hooks.
- In the .git/hooks directory of every Git repository, hooks are stored.
- The built-in script languages such as shell and PERL scripts are mostly used for execution. However, there is no restriction to it, that is, we can use any scripting language we like as long as it has an executable format.
- The 6 of the most helpful local hooks are: pre-commit, prepare-commit-msg, commit-msg, post-commit, post-checkout, pre-rebase.
- Then we have seen how we can automate actions in our Git repositories, with the help of a practical example.