Git Merge Squash
Overview
Git squashing is one of a feature in Git that allows developers to merge sequential commits into an integrated single commit, which is also known as a parent commit or a base commit. This helps developers to maintain a clean Git commit history. If you’re working with multiple branches, then you’re probably familiar with the Git merge command. This command helps you to merge the commits from source branch to a destination branch. This article explains how to squash commits on one branch before merging it with another branch to maintain a clean Git history on the destination branch.
Pre-requisites
To understand the concept of Git merge squash, you should be familiar with the separate concepts of merging and squashing in Git.
git merge squash helps you to combine multiple previous commits into an integrated single commit. This helps developers to maintain a clean Git commit history by compressing multiple small commits with a single base parent commit. The feature of squashing is very useful when you're working with a team and there is only a need to push the final changes. So it's a good idea to combine some small commits into one and then propagate it to other team members.
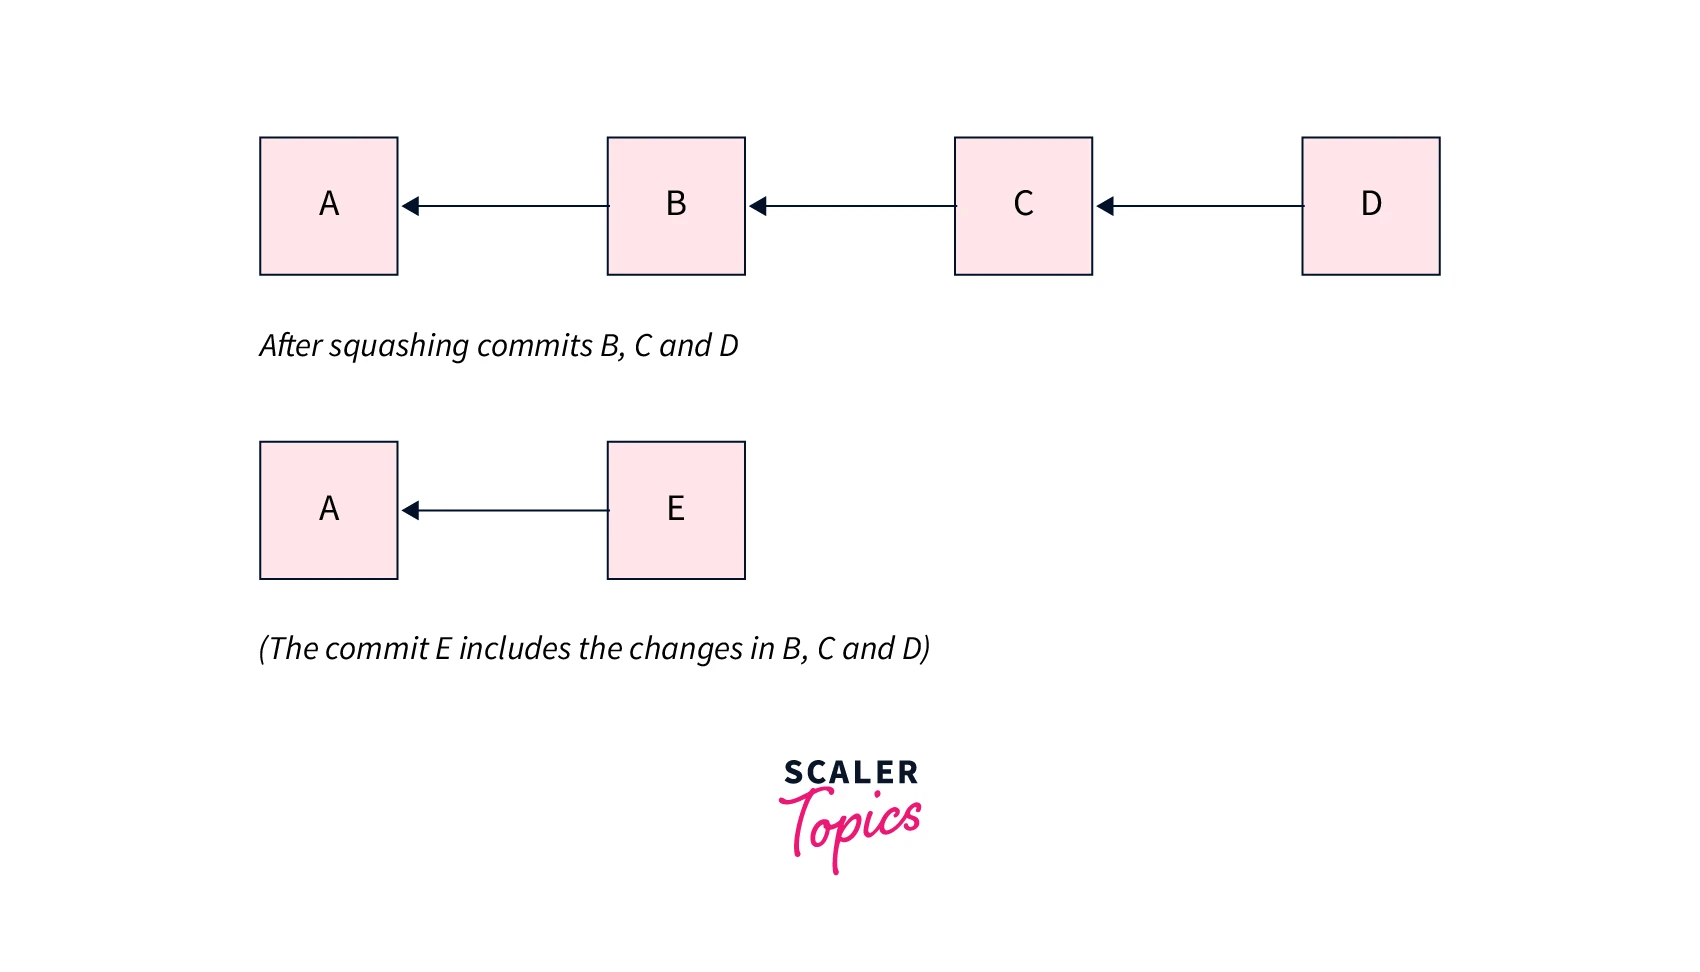
From the above image, we can see that the code changes from the commits B, C, and D are combined into a single commit named as E. By using the Git squash command we lose our commit history along with the granularity of commits because of squashing them. So it is recommended to do a minimal squashing in Git.
The concept of merging connects two or more lines of development together. The Git merge command makes it easy to merge data created on one Git branch into a different branch. Generally, the Git merge command is used to combine the changes of two different branches.
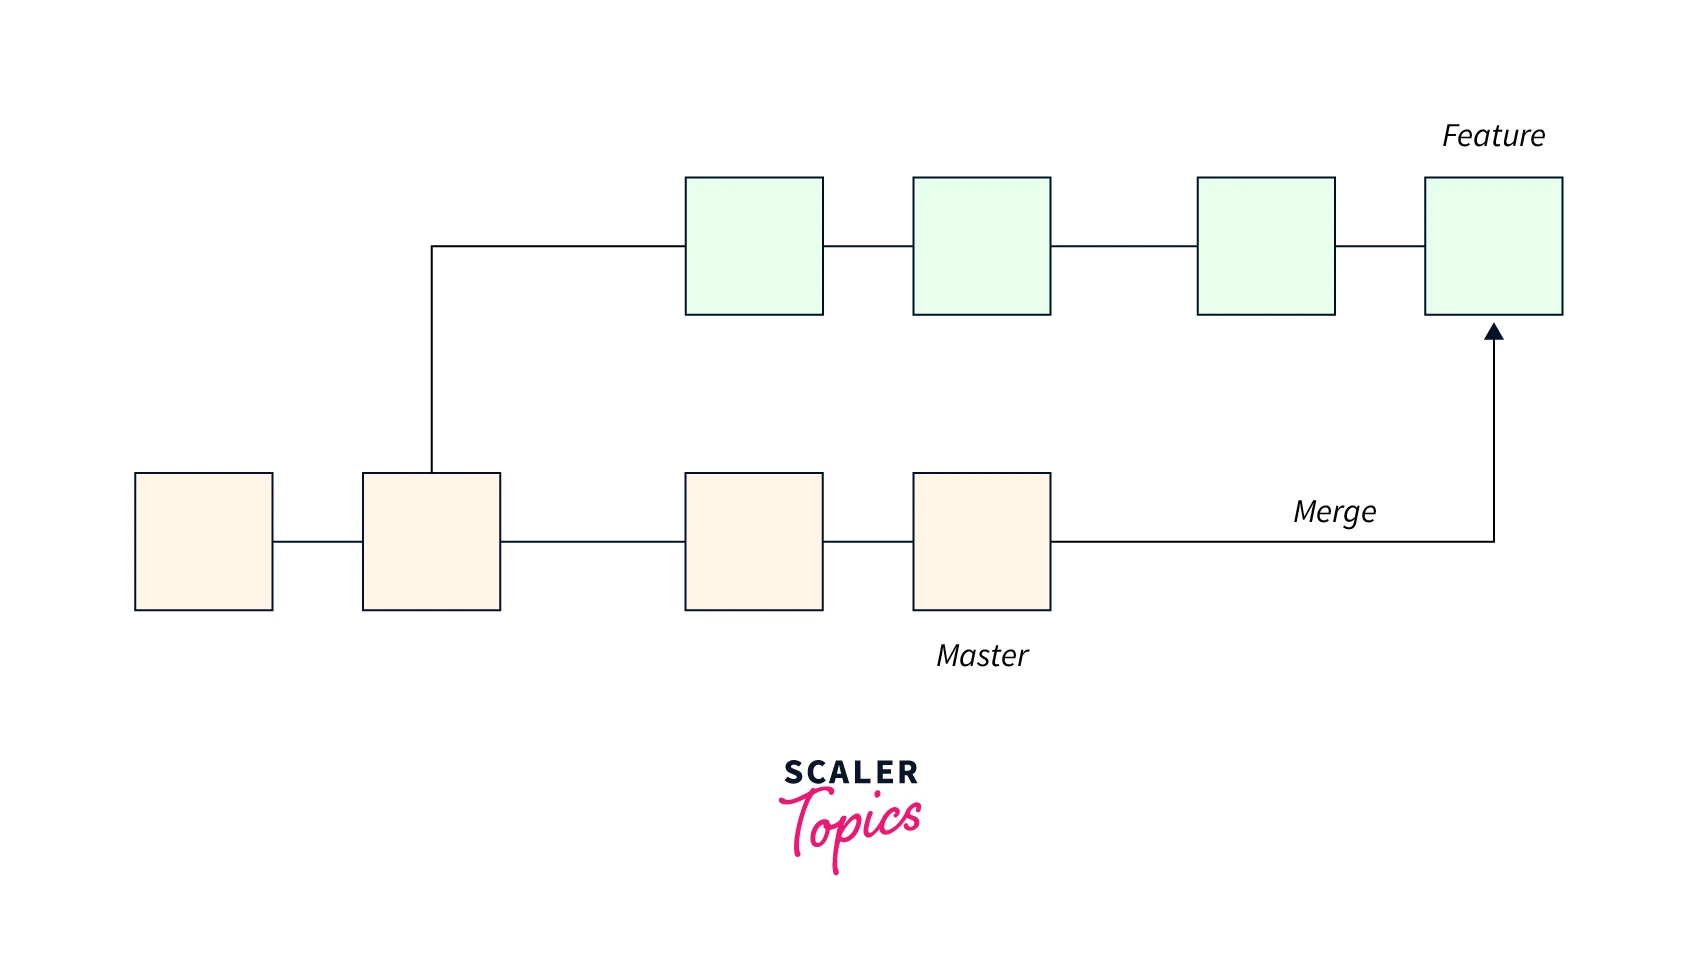
In the picture above, we have two branches, master and feature. We can see that we made some code commits in both the feature and the master branches and then we merged them together. The functionality of merging works by iterating over both the branches as a pointer and the pointer will stop when it will find a common base commit between two different branches. Git creates a new merge commit as soon as it finds a common base commit and combines the changes for each merge commit sequence in the queue.
In summary, Git Squash is a popular Git feature that allows developers to simplify their Git history by merging sequential commits, and Git Merge is used to combine two or more branches into a single branch. This article describes how to use merge squashing to combine commits and merge a source branch into a target branch.
Transform Your Career
Choose from our industry-leading programs designed for career success
Modern Software and AI Engineering Program
Master full-stack development with AI integration

Modern Data Science and ML with specialisation in AI
Advanced data science techniques with AI specialization
Advanced AIML with Specialisation in Agentic AI
Deep dive into AIML with focus on Agentic systems
DevOps, Cloud & AI Platform Engineering
Build and manage AI-powered cloud infrastructure
AI Engineering Advanced Certification by IIT-Roorkee
Premier AI engineering certification from IIT-Roorkee
Introduction
A git merge squash is a merge feature that helps you to combine multiple commits from the Git history of a feature branch upon completing a pull request. Instead of adding all commits of a feature branch to the history of the main branch, squash merge adds all commit changes to a single new commit on the main branch.
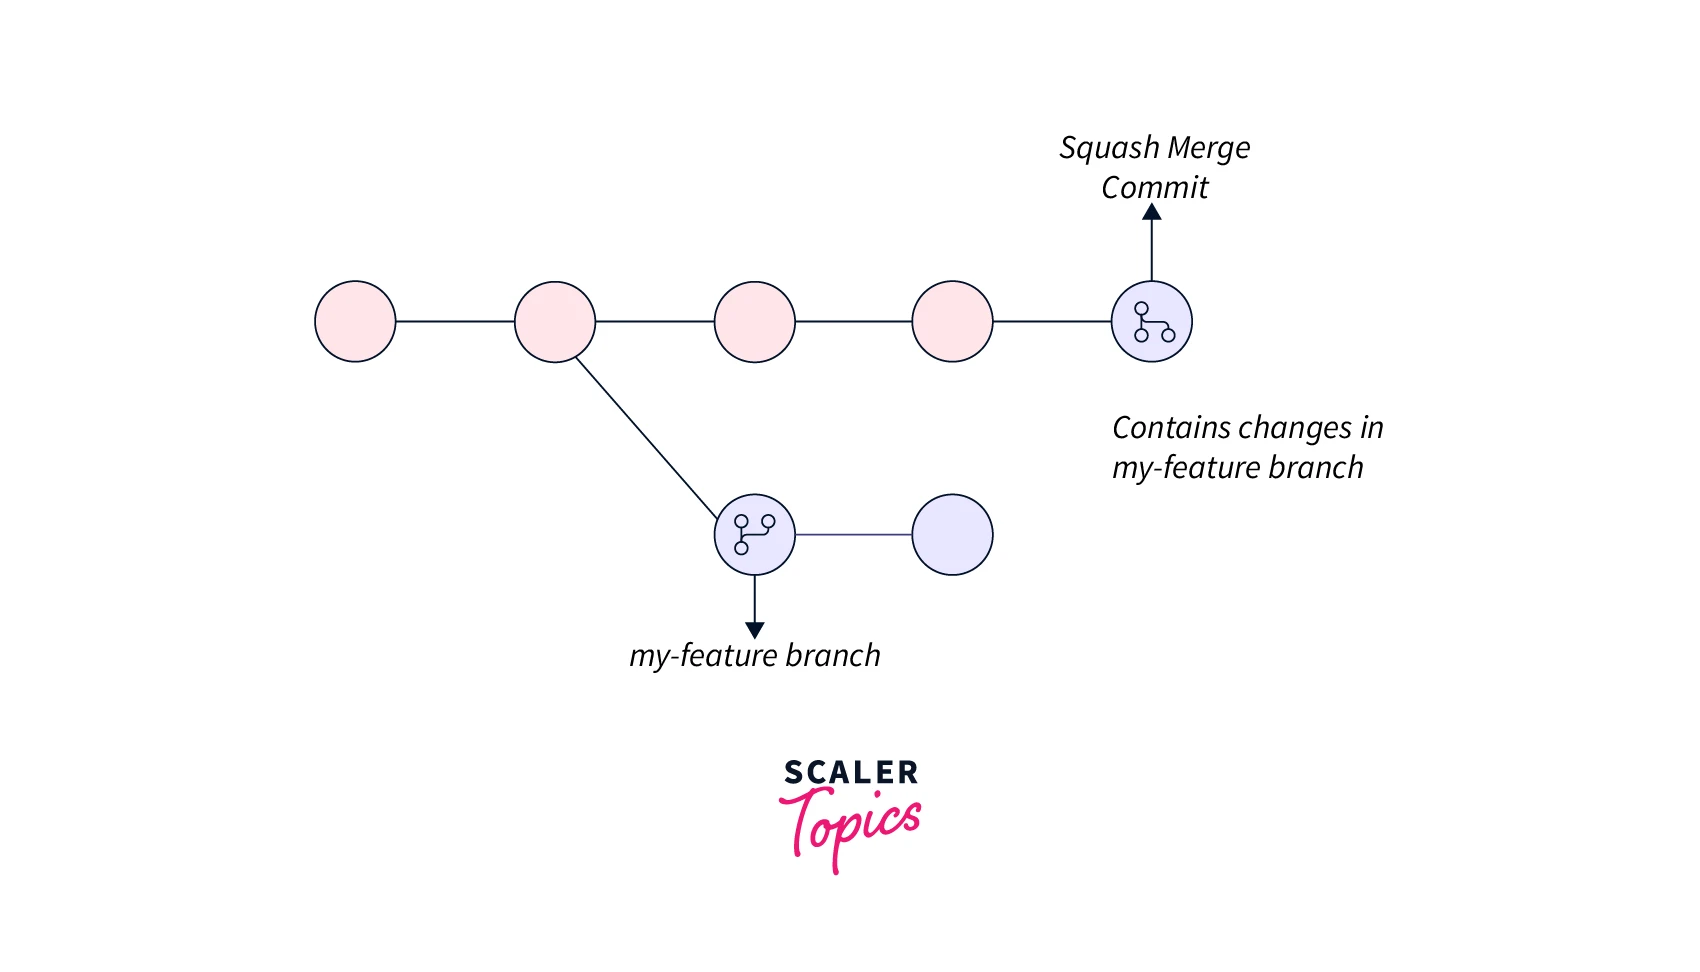
An easy way to think about this is that a squash merge command only gives you the final changes, while a normal merge command gives you code changes as well as the whole commit history of the feature branch.
What is Squash Merging?
Squash merging keeps the main branch histories clean and easy to follow. You can work on your feature branch the way you want to, and the default branch uses squash merging to keep the history clean. The commit history of the main branch updated with the squash merge will only contain the commits from each merged feature branch and you can verify this history to know exactly when the job was completed.
Let's see the steps to do squash merging in Git with the help of an example, suppose you have two branches named master and feature, where the master branch is the default branch and the feature branch is the branch where you are working on a specific feature and usually while working, we often come across the situations where there is a need to send a single commit from the feature branch to the master branch. However, there can be multiple commits for a single feature branch. For that, we can squash and merge all commits from a feature branch into the master branch.
To do so:
1. You should first switch to the master branch with the Git checkout command.
2. Now, to perform the squash operation along with merging, you should run the below command:
This command will work by fetching all the commits from a feature branch and will create one single squashed commit for all those commits and will merge it from the feature branch to the master branch. Any conflicts faced in between can be resolved manually.
The point to note here is that the above command does not create a squashed merge commit, so we need to commit that explicitly.
3. For that, you can commit merged changes in one integrated message.
You can also skip the -m flag. This allows you to design a commit message for the final commit that contains all messages from all the squashed commits.
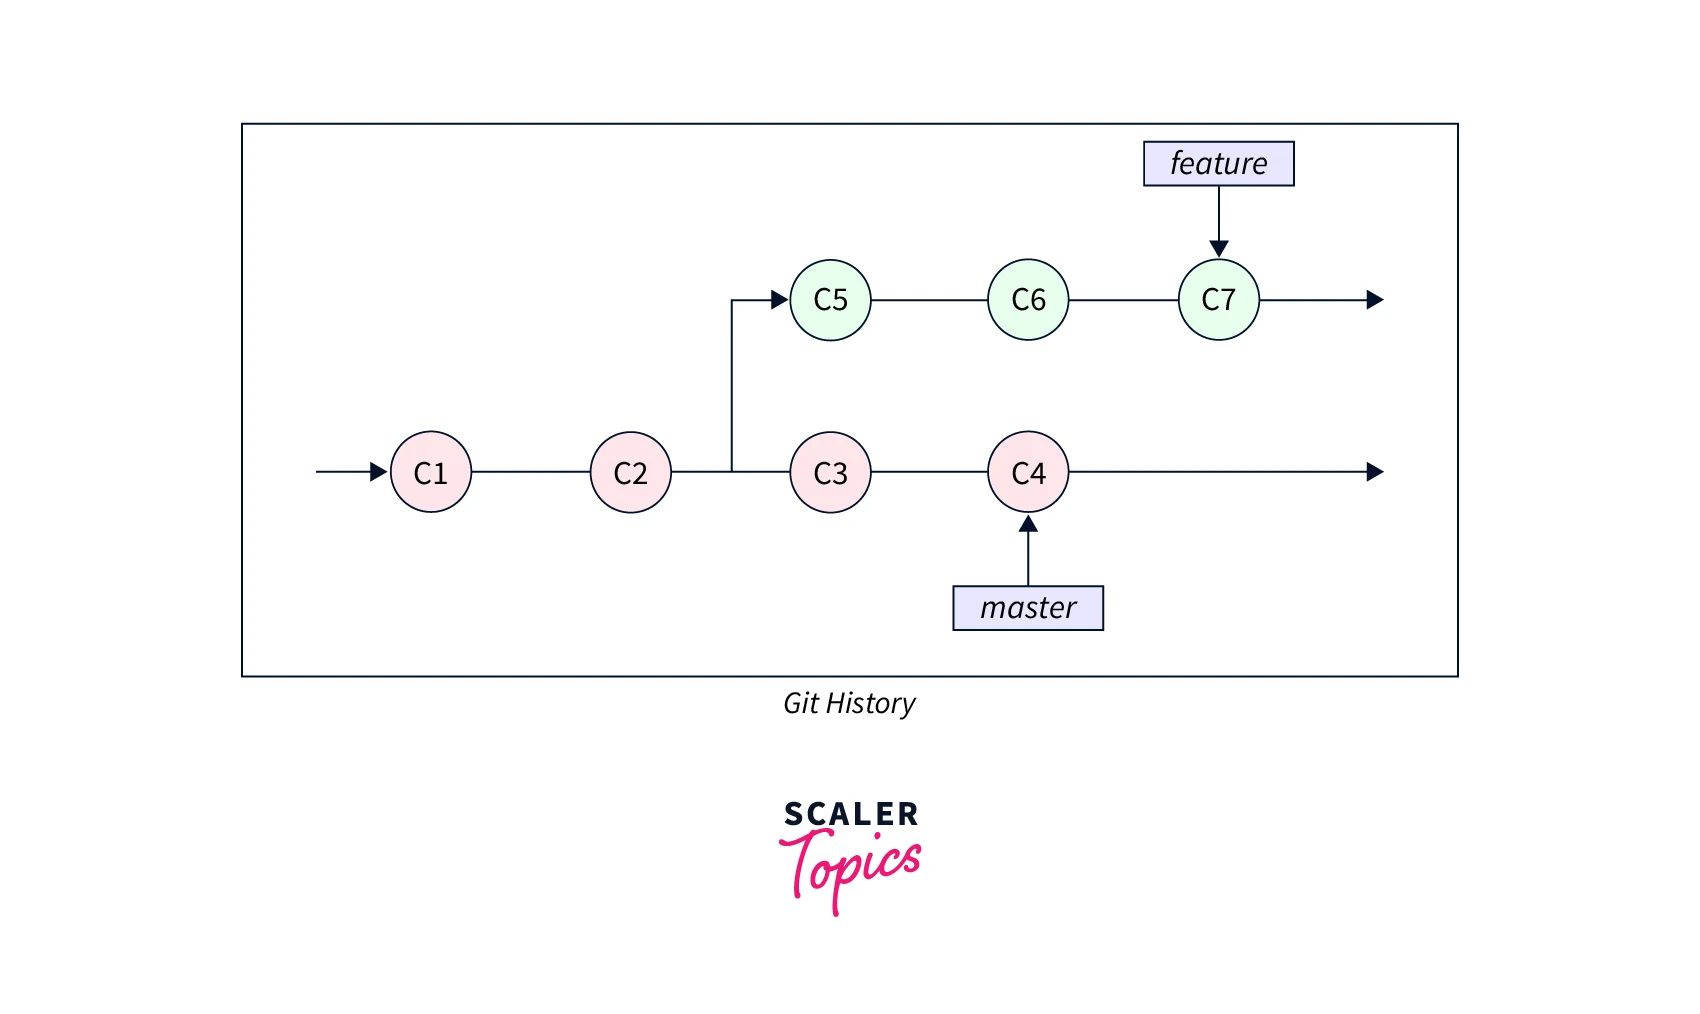
After performing all the above steps, your commit history in Git will look like this:
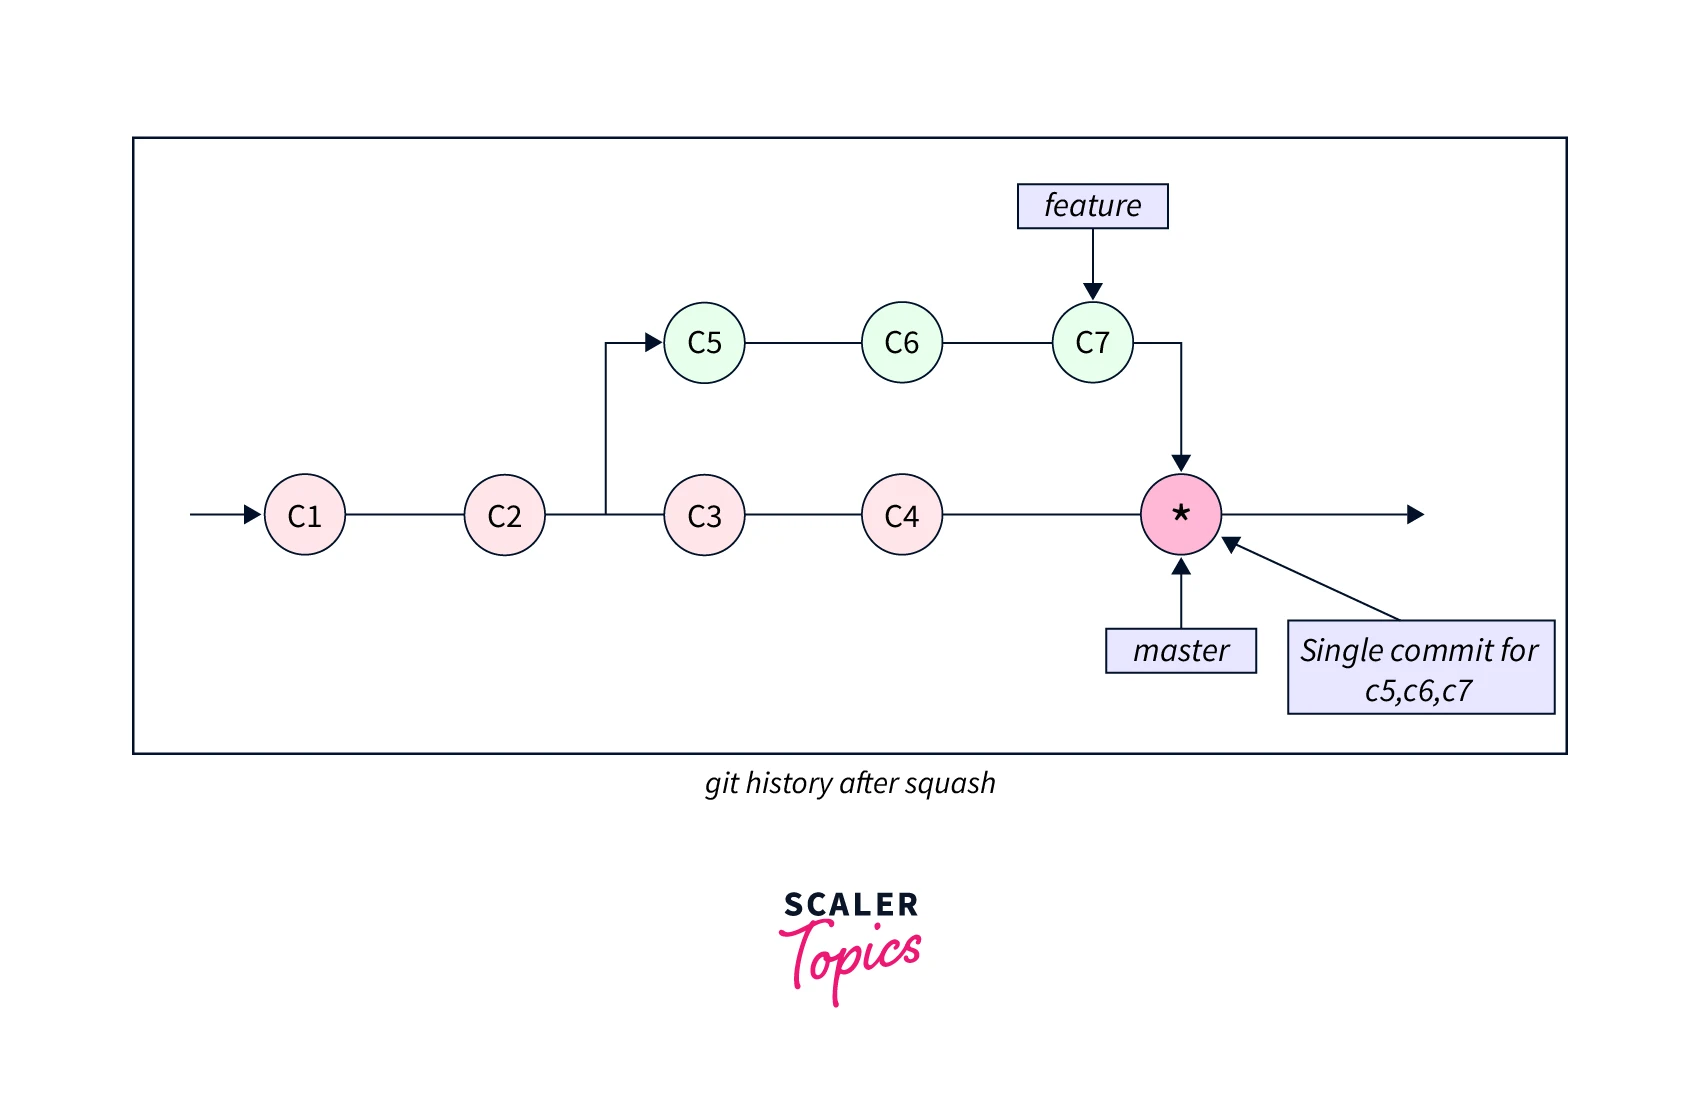
Here's the commit history of the master branch after running the git merge --squash command:
The main benefit of git merge squash is that you don't have those commits in your main branch. Instead, there is only one commit per feature branch or pull request, which makes it much easier to revisit the commit history in the future.
Considerations when Squash Merging
As we know that squash merging compresses the commit history of the main branch, so it's important to discuss and decide with your team as to when to do a squash merge according to team guidelines and when to keep the transparent commit history of the feature branch. Generally, it is recommended to delete the source branch when merging squash. As it prevents the confusion because after deleting the source branch itself will not have the commits to merge with the master branch.
Scaler Placement Report and Statistics
Scaler learners achieved 2.5x salary growth with average post-Scaler CTC reaching ₹23L.
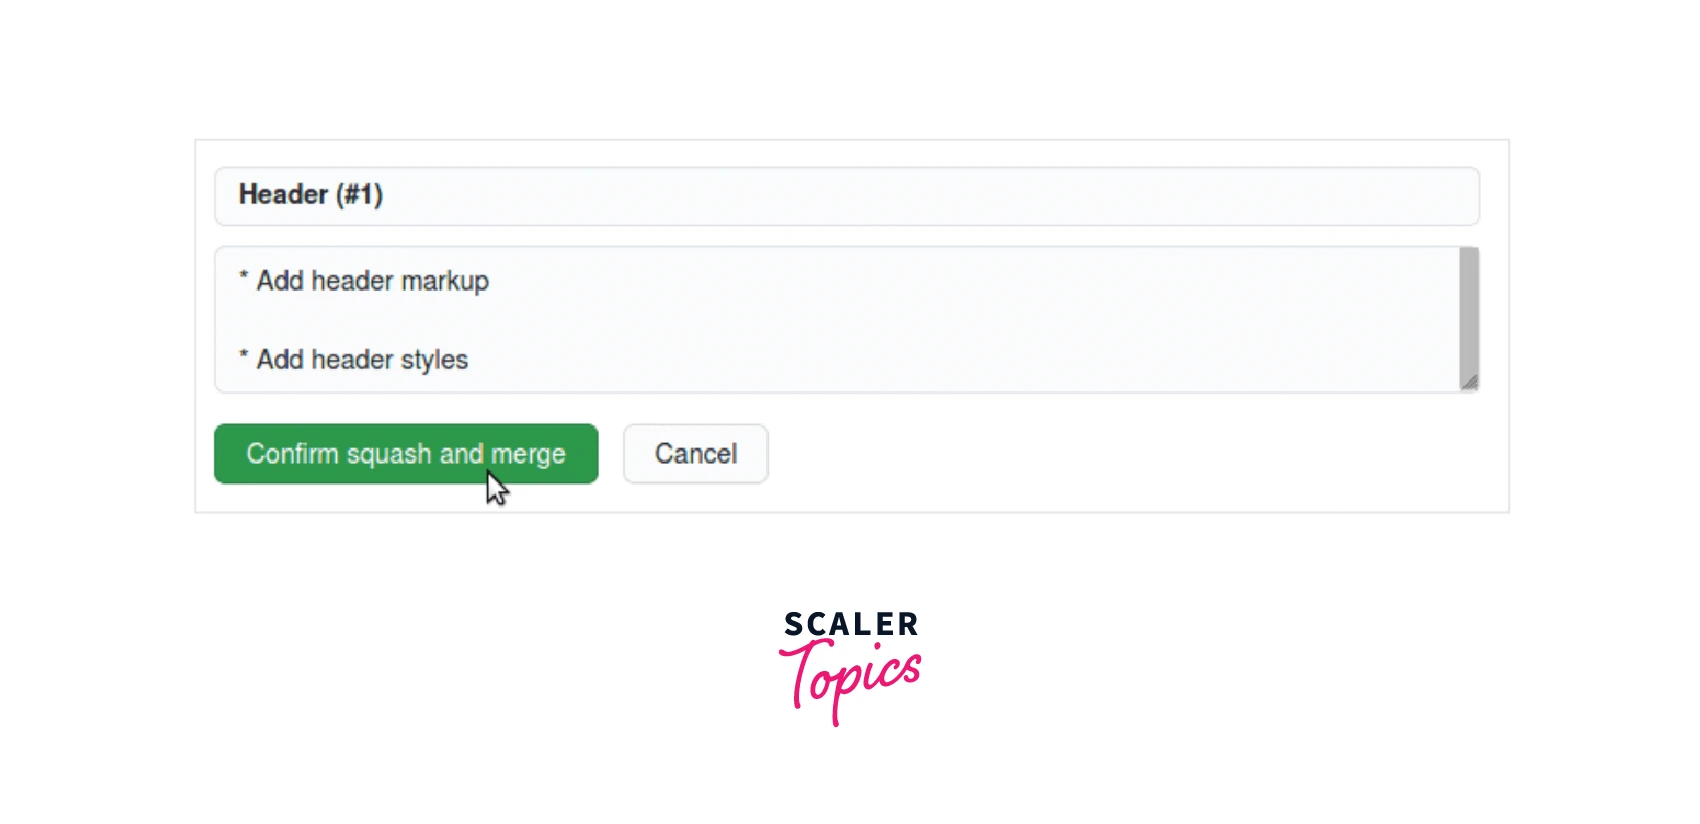
Complete Pull Requests with Squash Merge
You can directly select the "Confirm squash and merge" option from the UI to squash merge while finishing a pull request in a repository.
Squash Commits in a Merge Request
If your commits are allowed to be squashed as part of the merge process by selecting the merge request squash option then follow the below steps:
1. Go to the Merge Requests option and scroll down to the Merge Request Report section with the Merge button.
2. Squash commits checkbox should be checked, if not, then check it. If the squash options of a merge request are set to the Require option or a Disallowed option, then this check box will not appear.
3. Select the Change Commit Message button to change the merge commit message or a squash commit message (it will depend on the configuration of your project).
4. You can press the Merge button when you are finished with the configurations and you are ready to merge the request. You can also set the default squash options for merge requests, the process to do so is:
This is only allowed to the users with permissions to create or modify merge requests and they can apply the default squash options for merge requests. To do this:
1. Go to the merge request option.
2. Select the Edit option from there.
3. Pick or clear the Squash commits when a checkbox for merge requests is checked.
4. Select Save changes.
Configure Squash Options for a Project
To set the default squashing configuration for all the merge requests in your repository, you can perform the following steps:
1. Go to the top bar and select Projects from the Main Menu (Main Menu -> Projects).
2. From there, you can find your project.
3. Then, go to the left sidebar, and select Merge Requests from Settings (Settings -> Merge requests).
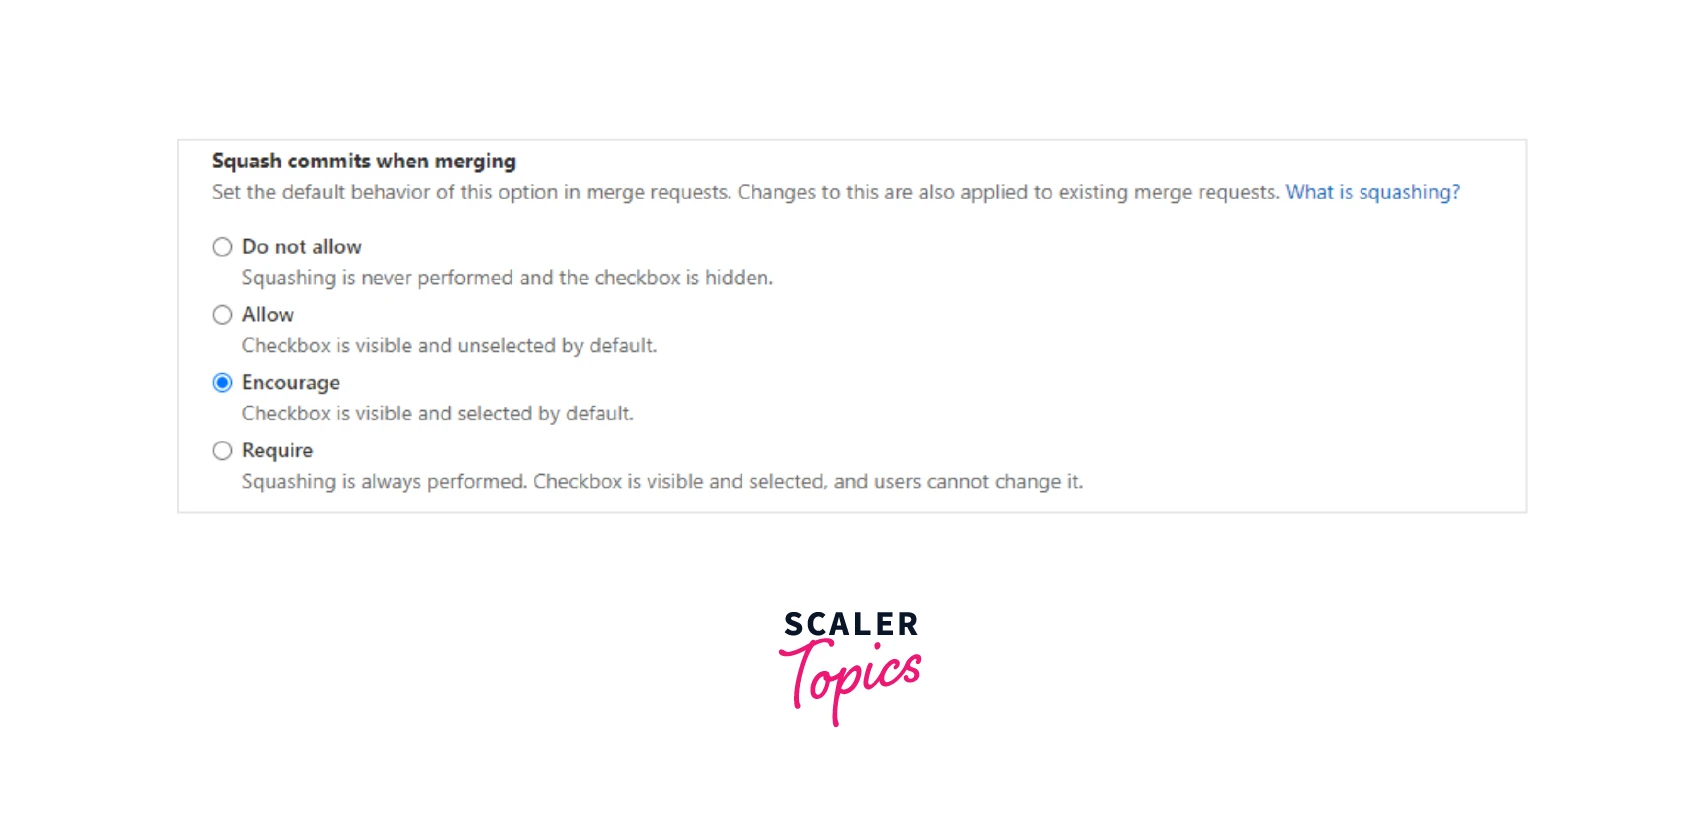
4. In the merge section go to squash commits and select the desired behavior:
- Do not allow: This option means that the squashing operation will not be performed and no option will be displayed.
- Allow: With this option, squashing is allowed, but it is disabled by default.
- Encourage: By this option, squashing is allowed and it is selected by default. However, this can be disabled anytime as per the requirement.
- Require: Here, squashing is always performed and the merge request will show the squash option, but the user will not be able to change it.
5. After doing all the changes, select Save changes.
Conclusion
- Git squashing is one of a feature in Git that allows developers to merge sequential commits into an integrated single commit, which is also known as a parent commit or a base commit.
- This helps developers to maintain a clean commit history in Git by replacing multiple small commits with a single parent commit.
- The Git merge command is used to combine the code changes of two different branches.
- The functionality of merging works by iterating over both the branches as a pointer and the pointer will stop when it will find a common base commit between two different branches.
- git merge --squash <source_branch_name> command will fetch all commits from the source branch and create one squash for all commits from the source branch to the destination branch.
- The main benefit of git merge squash is that you don't have those commits in your main branch. Instead, there is only one commit per pull request or a feature
- It is recommended to delete the source branch when merging squash commits as it prevents the confusion because the feature branch itself has no commits to merge with the default branch.
- The Do not allow option in the merge section means that the squashing operation will not be performed and no option will be displayed.
- The Allow option means that the squashing is allowed, but it is disabled by default.
- The Encourage option means that the squashing is allowed and it is selected by default. However, this can be disabled anytime as per the requirement.
- The Require option that squashing is always performed and the merge request will show the squash option, but the user will not be able to change it.
- You can directly select the "Confirm Squash and Merge" option from the UI to squash merge while finishing a pull request in a repository.
- The git merge squash command does not create a merge commit.
- The difference between squash merging and normal merging is that a squash merge command only gives you the final changes, while a normal merge command gives you code changes as well as the whole commit history of the feature branch.
- The users having the permission to create or modify merge requests can apply the default squash options for merge requests.