Git Setup
Overview
Git setup is one of the primary steps that we follow after installing git. To configure Git, we use the git config command which is one of the most powerful and basic commands used in Git Bash. We can use the git config command for configuring our username, email address, etc. The git config command is one of the most powerful and basic commands used in Git Bash. We can use the git config command for configuring our username and email address. The git config command is not only used to specify our user name and our email address but it can be used as a command to configure the configuration file so that we can customize how the git will work for us.
Pre-requisites
The prerequisites for learning the git setup command can be a basic understanding of Version Control Systems, Branching, and Git. Let us discuss them briefly before learning about the git setup command.
Git
Git is a version control system that tracks the changes in the code, documents, and other important information regarding a certain code base (or project), etc. Git is free and one of the most widely used version control systems. We can use Git through the command line as well as through its graphical user interface (GUI). The command line or terminal version of Git is known as Git Bash on the other hand the GUI version of Git is known as Git GUI.
Branching
A branch is an independent line of development that is used to add certain features and fix bugs without hampering the main project. So, we can develop new features in parallel and when the development is completed, we can add the back to the main project. By default, all the GitHub repository has the master branch which can be used for production.
So, a new branch is a copy of the master branch which is created for bug fixes and for the addition of new features. After the bug is fixed or new features are added, we can merge the branch to the master branch. The git branch command enables us to perform parallel development. The command can create, rename, list, and delete branches.
Transform Your Career
Choose from our industry-leading programs designed for career success
Modern Software and AI Engineering Program
Master full-stack development with AI integration

Modern Data Science and ML with specialisation in AI
Advanced data science techniques with AI specialization
Advanced AIML with Specialisation in Agentic AI
Deep dive into AIML with focus on Agentic systems
DevOps, Cloud & AI Platform Engineering
Build and manage AI-powered cloud infrastructure
AI Engineering Advanced Certification by IIT-Roorkee
Premier AI engineering certification from IIT-Roorkee
GitHub
GitHub is a cloud-based central repository that can be used to host our code for team collaboration. It is a hosting service that is used to manage the git repository in the central server. GitHub is a free (for certain limits) and easy-to-use platform that enables teammates to work together on projects. GitHub tracks the changes made in the project workflow and we can also revert back a certain state of the project (as GitHub saves the history of the project).
Introduction to Setting Up Git
To configure Git, we use the git config command which is one of the most powerful and basic commands used in Git Bash. We can use the git config command for configuring our username, email address, etc. The git config command is also used to configure the git's configuration file so that we can customize how the git will work for us. We can use the --global flag and --local flags with the git config command to apply the changes globally and to the local repository respectively.
So, to configure Git, we use the git config command. The git config command is one of the most powerful and basic commands used in Git Bash. We can use the git config command for configuring our username and email address. So for configuration, we can type the following command:
OR
In the above command, we need to specify our user name and our email address along with the git config command so that both can be used in our future git commits (a commit is a snapshot of the current version of the file).
Note: The above command, --global is a flag.
The git config command is not only used to specify our user name and our email address but it can be used as a command to configure the configuration file so that we can customize how the git will work for us. Now if we try to run just the git config command without any flag like --global, Git will show us all the usage of git config along with that it will show us the various command line options.

One of the important things to keep in mind regarding the git config command is that this command can be used to apply the configurations either locally to a specific Git repository or it can be used to configure the settings globally.
We can use the --global flag to apply the changes or the settings globally similarly we can use the --local flag flag to apply the changes to the local repository. Not only these, but we can also even set the configuration to a specific file using the flag -f filename.
In the git world, we have three configuration levels and file levels. Let us learn about them and their use cases.
Scaler Placement Report and Statistics
Scaler learners achieved 2.5x salary growth with average post-Scaler CTC reaching ₹23L.
1. --global
When we talk about the global-level execution of commands and settings, we mean the configuration related to the operating system user on which we have installed the Git application. To open the global level configuration file we can open the home directory of the operating system user and then do the changes accordingly. Let us now look at the commands for the same.
a. Windows:
b. macOS and LINUX distributions:
2. --local
When we talk about the local-level execution of commands and settings, we mean the configuration related to the current working git repository of the Git application. To open the local level configuration file we can open the .git directory which contains the local configuration details and then do the changes accordingly. Let us now look at the commands for the same.
a. Windows:
b. macOS and LINUX distributions:
3. --system
When we talk about the system-level execution of commands and settings, we mean the configuration related to all the working git repositories of the Git application as well as the configuration related to the operating system user on which we have installed the Git application.
To open the system-level configuration file we can go to the system root path which contains the system configuration details and then do the changes accordingly. Let us now look at the commands for the same.
a. Windows:
b. macOS and LINUX distributions:
Turn Learning into Career Growth
Steps for Git Setup
Before learning about the steps of git setup, let us first learn the various uses of the git configuration and git setup.
- We can set the username and email for the git application globally, locally, and system-wise using the git config command.
- We can update the username and email as well using the git config command.
- We can enable, disable, as well as change the editor for the git using the same git config command along with the -e flag.
- We can delete the previously added configuration using this command along with the --unset flag.
- We can also remove a whole section like the user section using the --remove flag with the git config command.
- We can rename a section using the --rename flag with the git config command.
- We can set alias names for numerous git commands using the git config command.
- We can change values as well as default settings (add new settings as well) using the git config command.
We can even use the git config command with GitHub. As we know we can work with a remote repository and can push or push data from GitHub. A repository that is hosted or stored on the remote server is known as a git remote repository. As we have compared a git repository with a file system similarly we can compare a git remote repository with the remote file system.
We have a remote server GitHub where we can host our local git repository. This will allow fellow developers to view our work. The other developers can also contribute to our projects as our git remote repository (public) is visible to them.
So for pulling, pushing, cloning, fetching, etc. we have commands on git as well which we can use to add and perform things manually.
One of the most basic and primary steps of using any application is to configure it. Now to start the development process with Git, we can do so in 3 steps:
- Installing the Git application on our local system.
- Configuring git with some important and necessary git settings using the git config command.
- Initializing a repository and start working on it.
Let us now learn each step one after the other.
Download and Install the Latest Version of Git.
The installation of Git is pretty simple.
- You need to visit the Git download page here.
- Click on the Git installer for your operating system and then the download will be started.
- Open the Downloads folder and click on the git package and install it like any other application.
We can use either the terminal of Git (i.e. Git Bash) or Git GUI as both of them are the same. Now, in the terminal version of Git, we need to learn the commands. On the other hand, if we use the GUI Git then we do not need to learn the command and we can simply click on buttons to perform the desired action(s).
Set Your Username in Git
We need to specify our user name and our email address along with the git config command so that both can be used in our future git commits (a commit is a snapshot of the current version of the file).
Command:
Set Your Commit Email Address in Git
As we have discussed in the previous subsection, we also need to specify the user's email address. The overall command for the same is:
Command:
Configure the Default Text Editor
Whenever we make commits in git, the default editor provided by git is vi. This vi editor can be difficult to use for beginners so we should change our preferred editor for convenience. We can enable, disable, as well as change the editor for the git using the same git config command along with the -e flag. we can opt for the nano editor as it is easy to use.
The overall command for configuring the default text editor in git is:
Your Default Branch Name
As we know that whenever we initialize an empty git repository, the default name of the working branch is the master branch. Now we can change the name of the master branch to something of our choice. Now, to do so, we can set the new desired value of the defaultBranch in the git config file. So, open the git config file and add the following value (in this code snippet, we are setting the default branch name as scalerTopics)
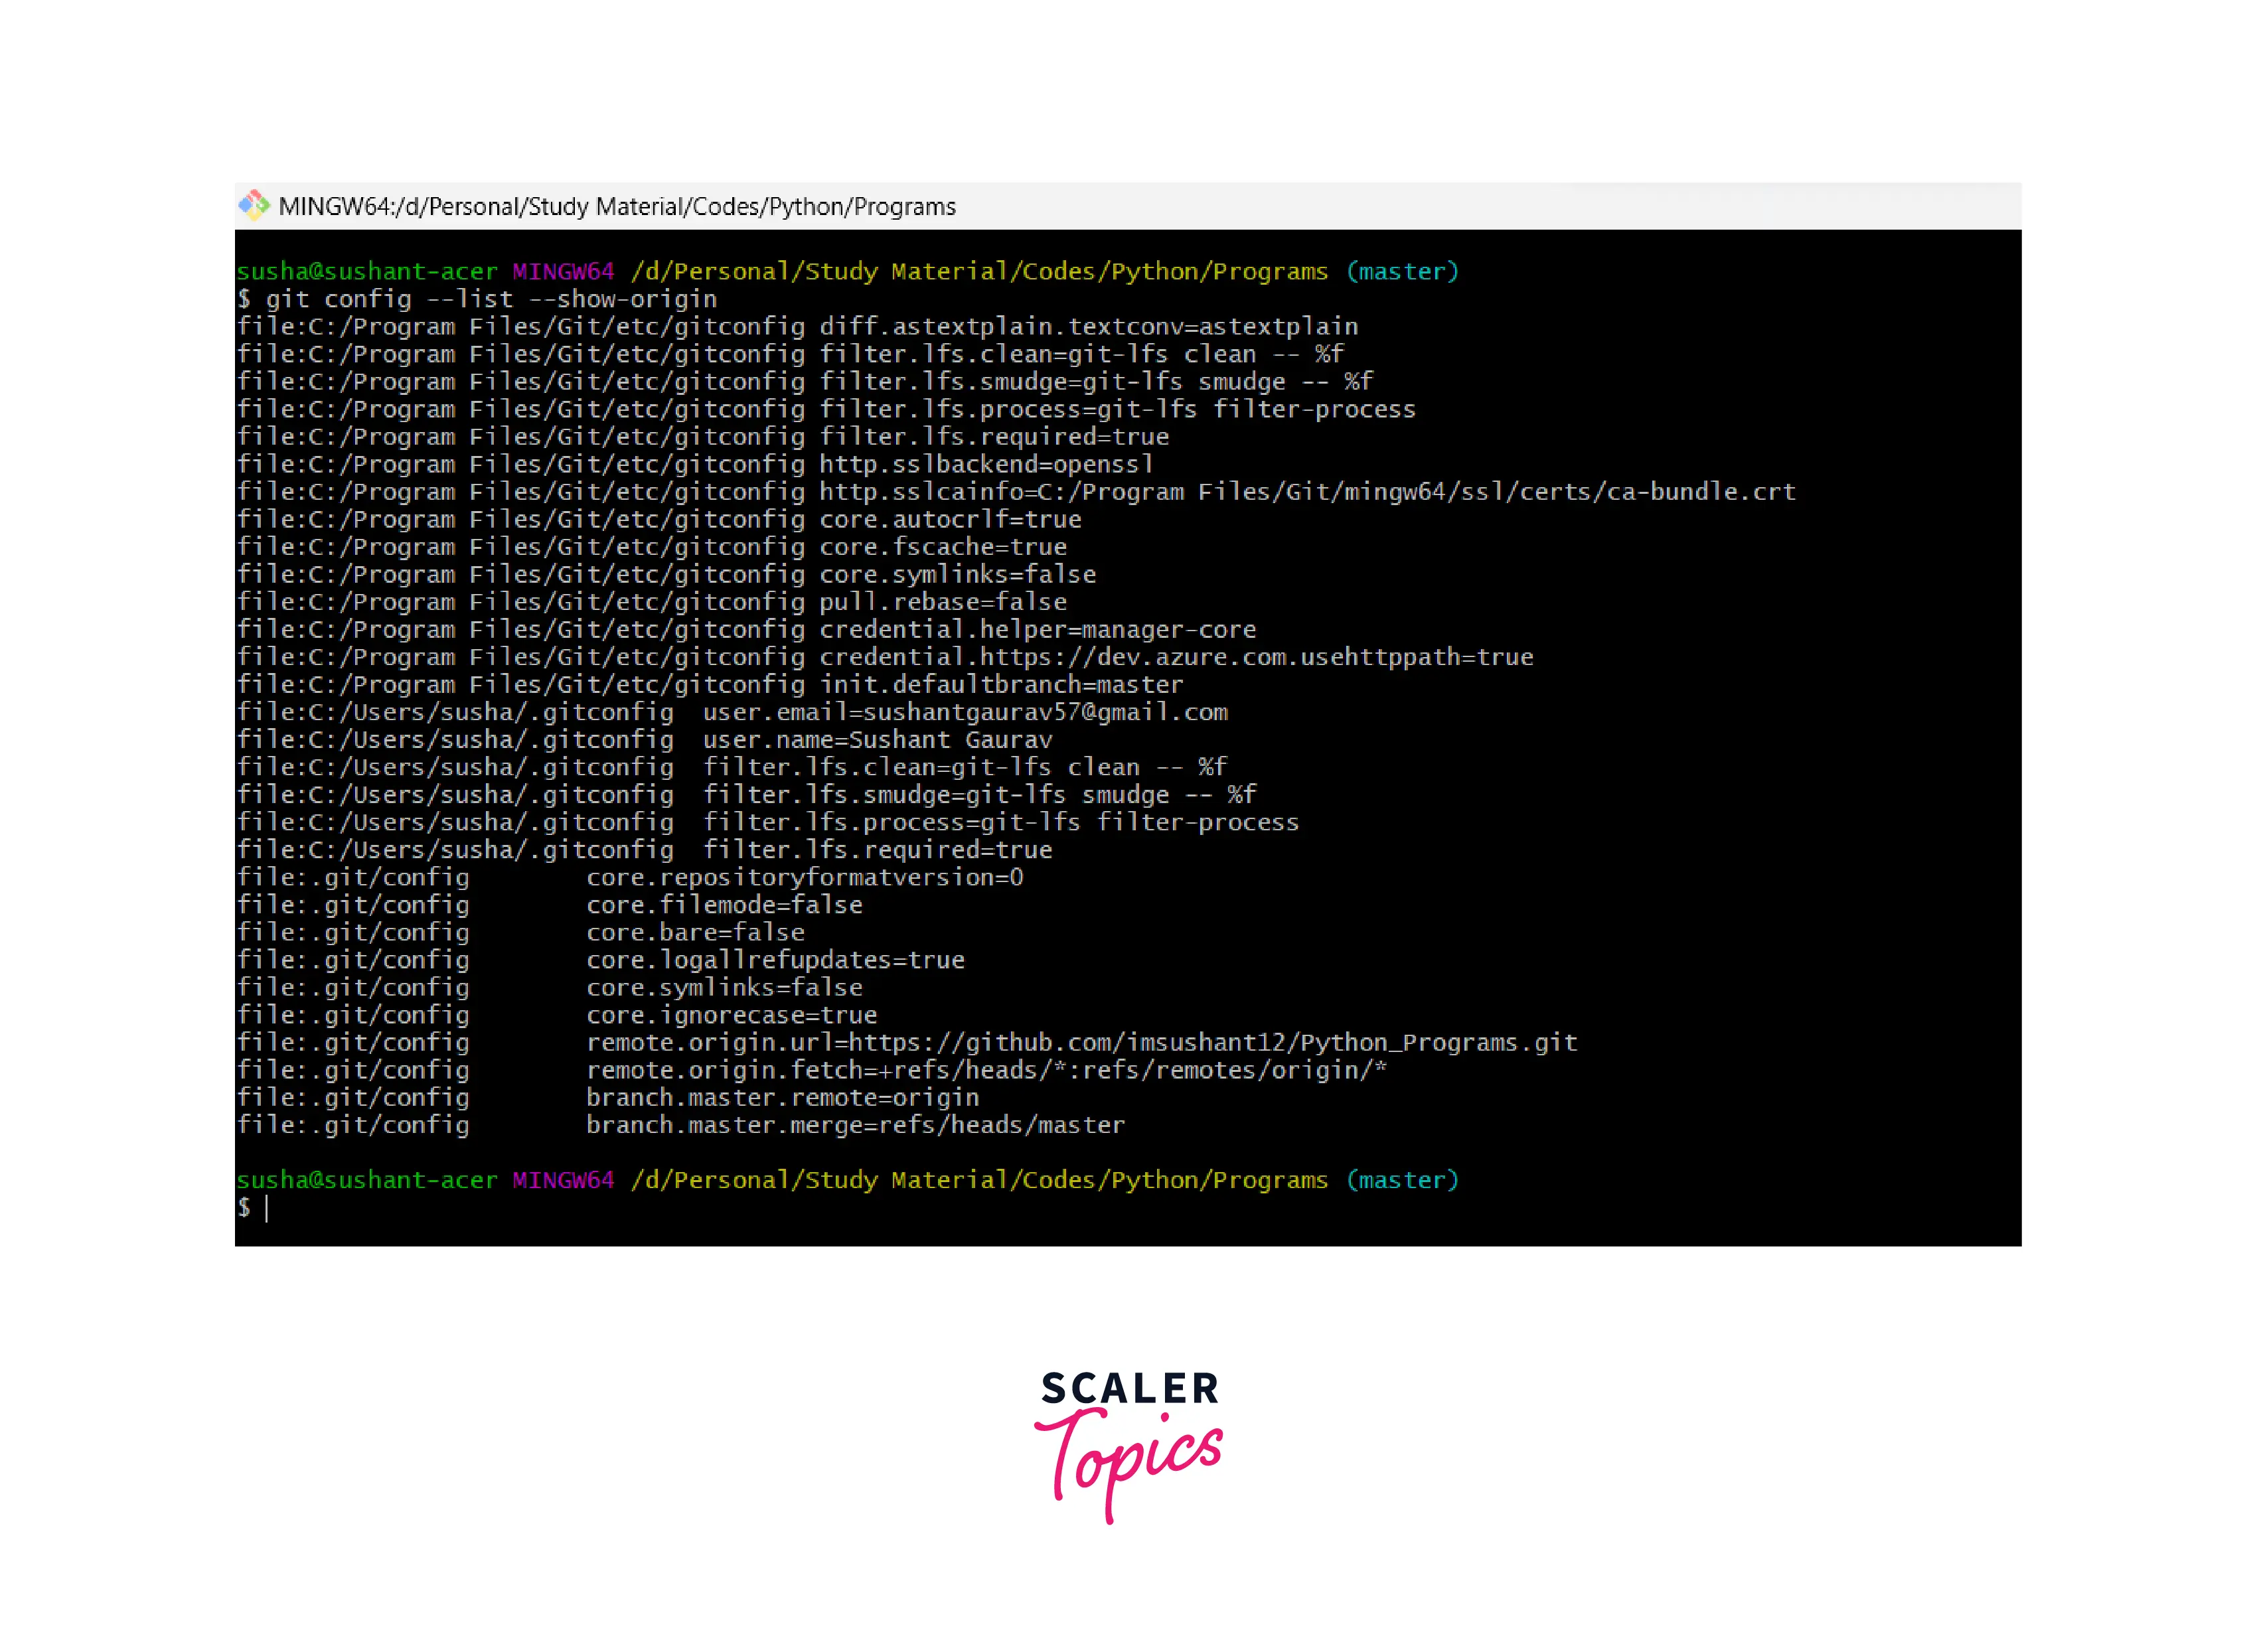
Checking Your Settings
Checking of git setting is pretty easy, all we need is a simple command:
Let us look at a sample output of the same command for more clarity.
Conclusion
- Git is a version control system that tracks the changes in the code, documents, and other important information regarding a certain code base, etc.
- Git setup is one of the primary steps that we follow after installing git. To configure Git, we use the git config command which is one of the most powerful and basic commands used in Git Bash. n
- The git config command is not only used to specify our user name and our email address but it can be used as a command to configure the configuration file so that we can customize how the git will work for us.
- We can use the git config command for configuring our username, email address, etc. The git config command is one of the most powerful and basic commands used in Git Bash. We can use the git config command for configuring our username and email address.
- Whenever we make commits in the git, the default editor provided by git is vi. This vi editor can be difficult to use for beginners so we should change our preferred editor for convenience
- Whenever we initialize an empty git repository, the default name of the working branch is the master branch. We can change the name of the master branch to something of our choice.
- We can even use the git config command with GitHub. As we know we can work with a remote repository and can push or push data from GitHub. A repository that is hosted or stored on the remote server is known as a git remote repository.
- To open the system-level configuration file we can go to the system root path which contains the system configuration details and then do the changes accordingly.
- To open the local level configuration file we can open the .git directory which contains the local configuration details and then do the changes accordingly.
- To open the global level configuration file we can open the home directory of the operating system user and then do the changes accordingly.