Stashing into a Branch in Git
Overview
Branching in Git is the core concept of the Git workflow. As we know, Git is a distributed version control system which allows multiple developers to work simultaneously on a single project in a distributed environment. Branching in Git helps developers to work in an isolated manner while maintaining stability. Each developer can work on any feature of the software by creating different branches, and in the end, all the branches can be merged to get the resultant software product.
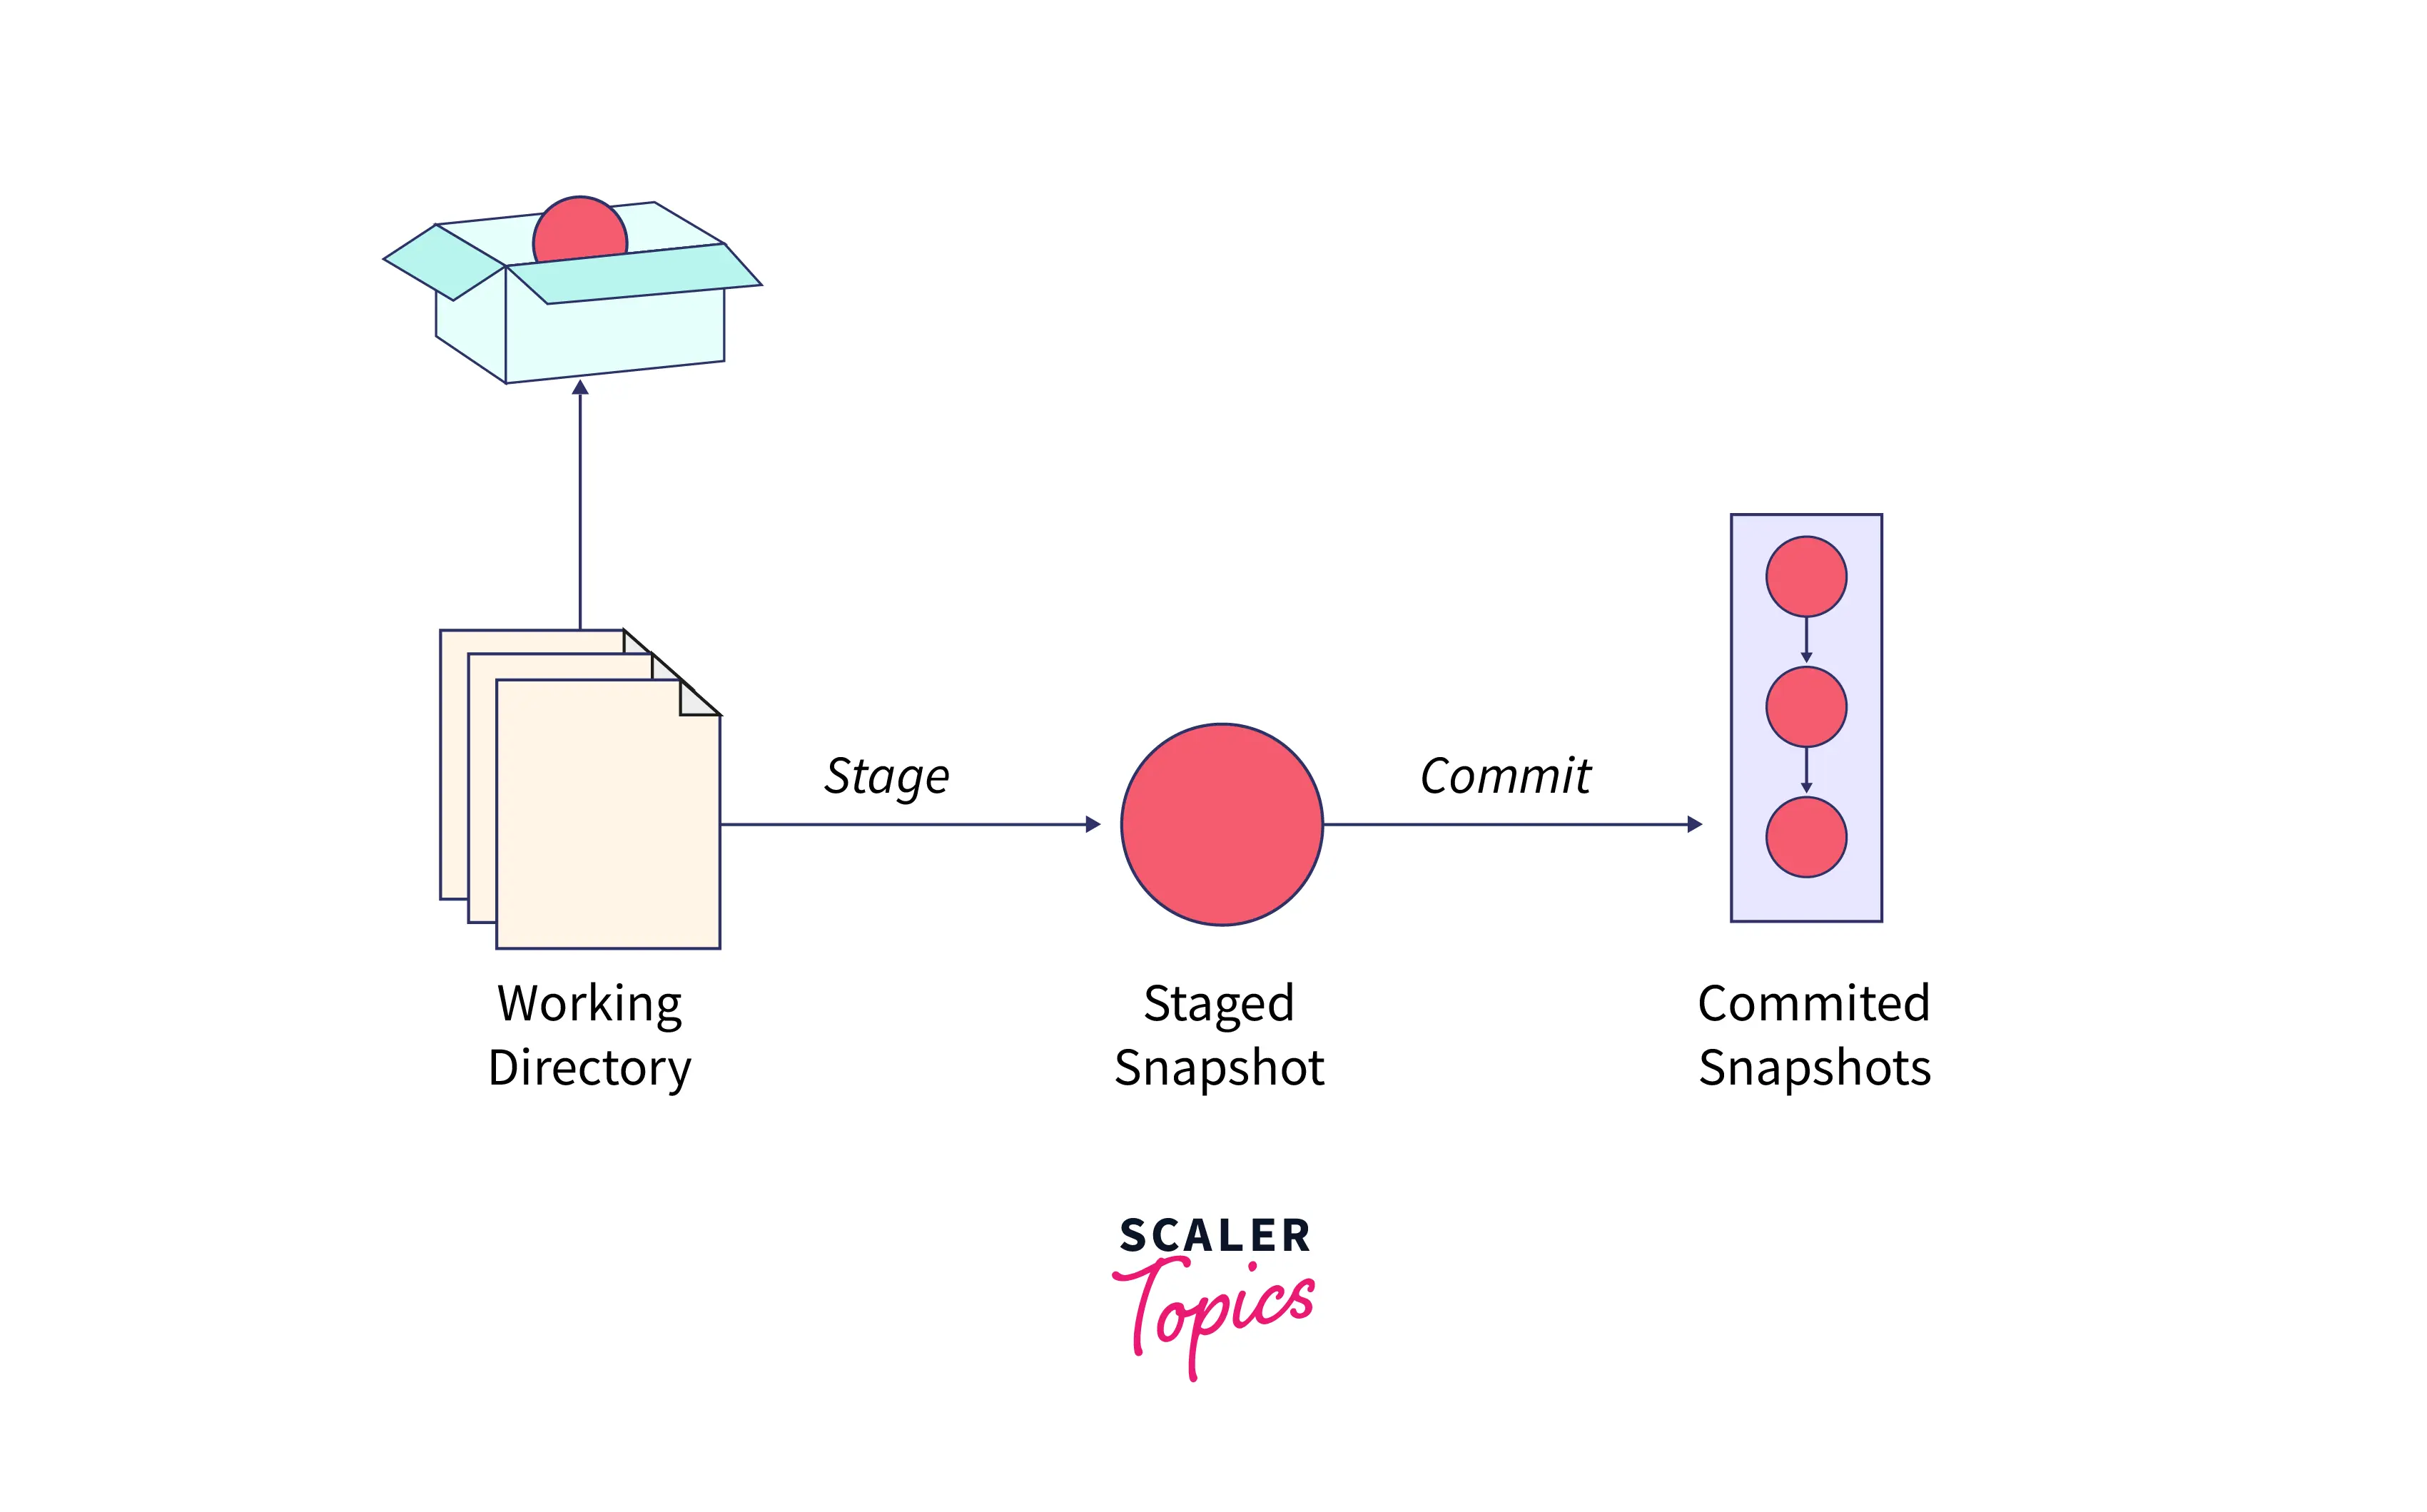
Stashing is the concept in git, which helps you to temporarily store or stash the staged or unstaged changes you have created on your current working directory so that in-between, you can go and work on something else without committing those changes, and then you can come back, restore and re-apply the stashed changes again.
In this article, we will see how stashing helps you in switching branches without committing the staged and unstaged changes in the current branch.
Transform Your Career
Choose from our industry-leading programs designed for career success
Modern Software and AI Engineering Program
Master full-stack development with AI integration

Modern Data Science and ML with specialisation in AI
Advanced data science techniques with AI specialization
Advanced AIML with Specialisation in Agentic AI
Deep dive into AIML with focus on Agentic systems
DevOps, Cloud & AI Platform Engineering
Build and manage AI-powered cloud infrastructure
AI Engineering Advanced Certification by IIT-Roorkee
Premier AI engineering certification from IIT-Roorkee
Introduction
Branching is a concept in git which allows us to diverge from the main branch and continue to work in an isolated manner without messing with the main branch. In Git, each branch is a version of any repository, or we can call it the independent line of development; any repository can have as many branches, each having a different version of the repository. Branching can be useful in many terms; firstly, we can work on any specific feature in an isolated manner without disturbing the work on the main branch; in this way, the development of bug fixes will also be facilitated, and there will be fewer errors as it’s easier to maintain a portion of your work rather than having large branches having all the code. Branching also helps in maintaining the stability of the code base.

To create a branch in git, we can use the command:
When you want to work on a new feature, you create a new branch diverging from the main branch using the command git branch new_branch_name.
If you want to display the total branches in a repository, then you can use the command:
The above command will show all the local branches in a repository, along with the * symbol marked in front of the name of the branch we are currently on.
To switch between different branches of the repository, we can use the command:
Here, we can provide the name of the branch on which we want to checkout.
Git stashing is the concept of temporarily storing or stashing the staged or unstaged changes you have created on your current working directory so that in between, you can go and work on something else without committing those changes, and then you can come back, restore, and re-apply them. It allows you to switch between branches without committing to the changes of the current branch. You can simply stash the changes, switch the branch, and then come and re-apply those changes in the previous branch whose uncommitted changes were stashed.
You can stash the changes using the command:
This git stash command will store the uncommitted changes (staged + unstaged changes) in a stack, save them for later use, and then re-applies them from your working directory.
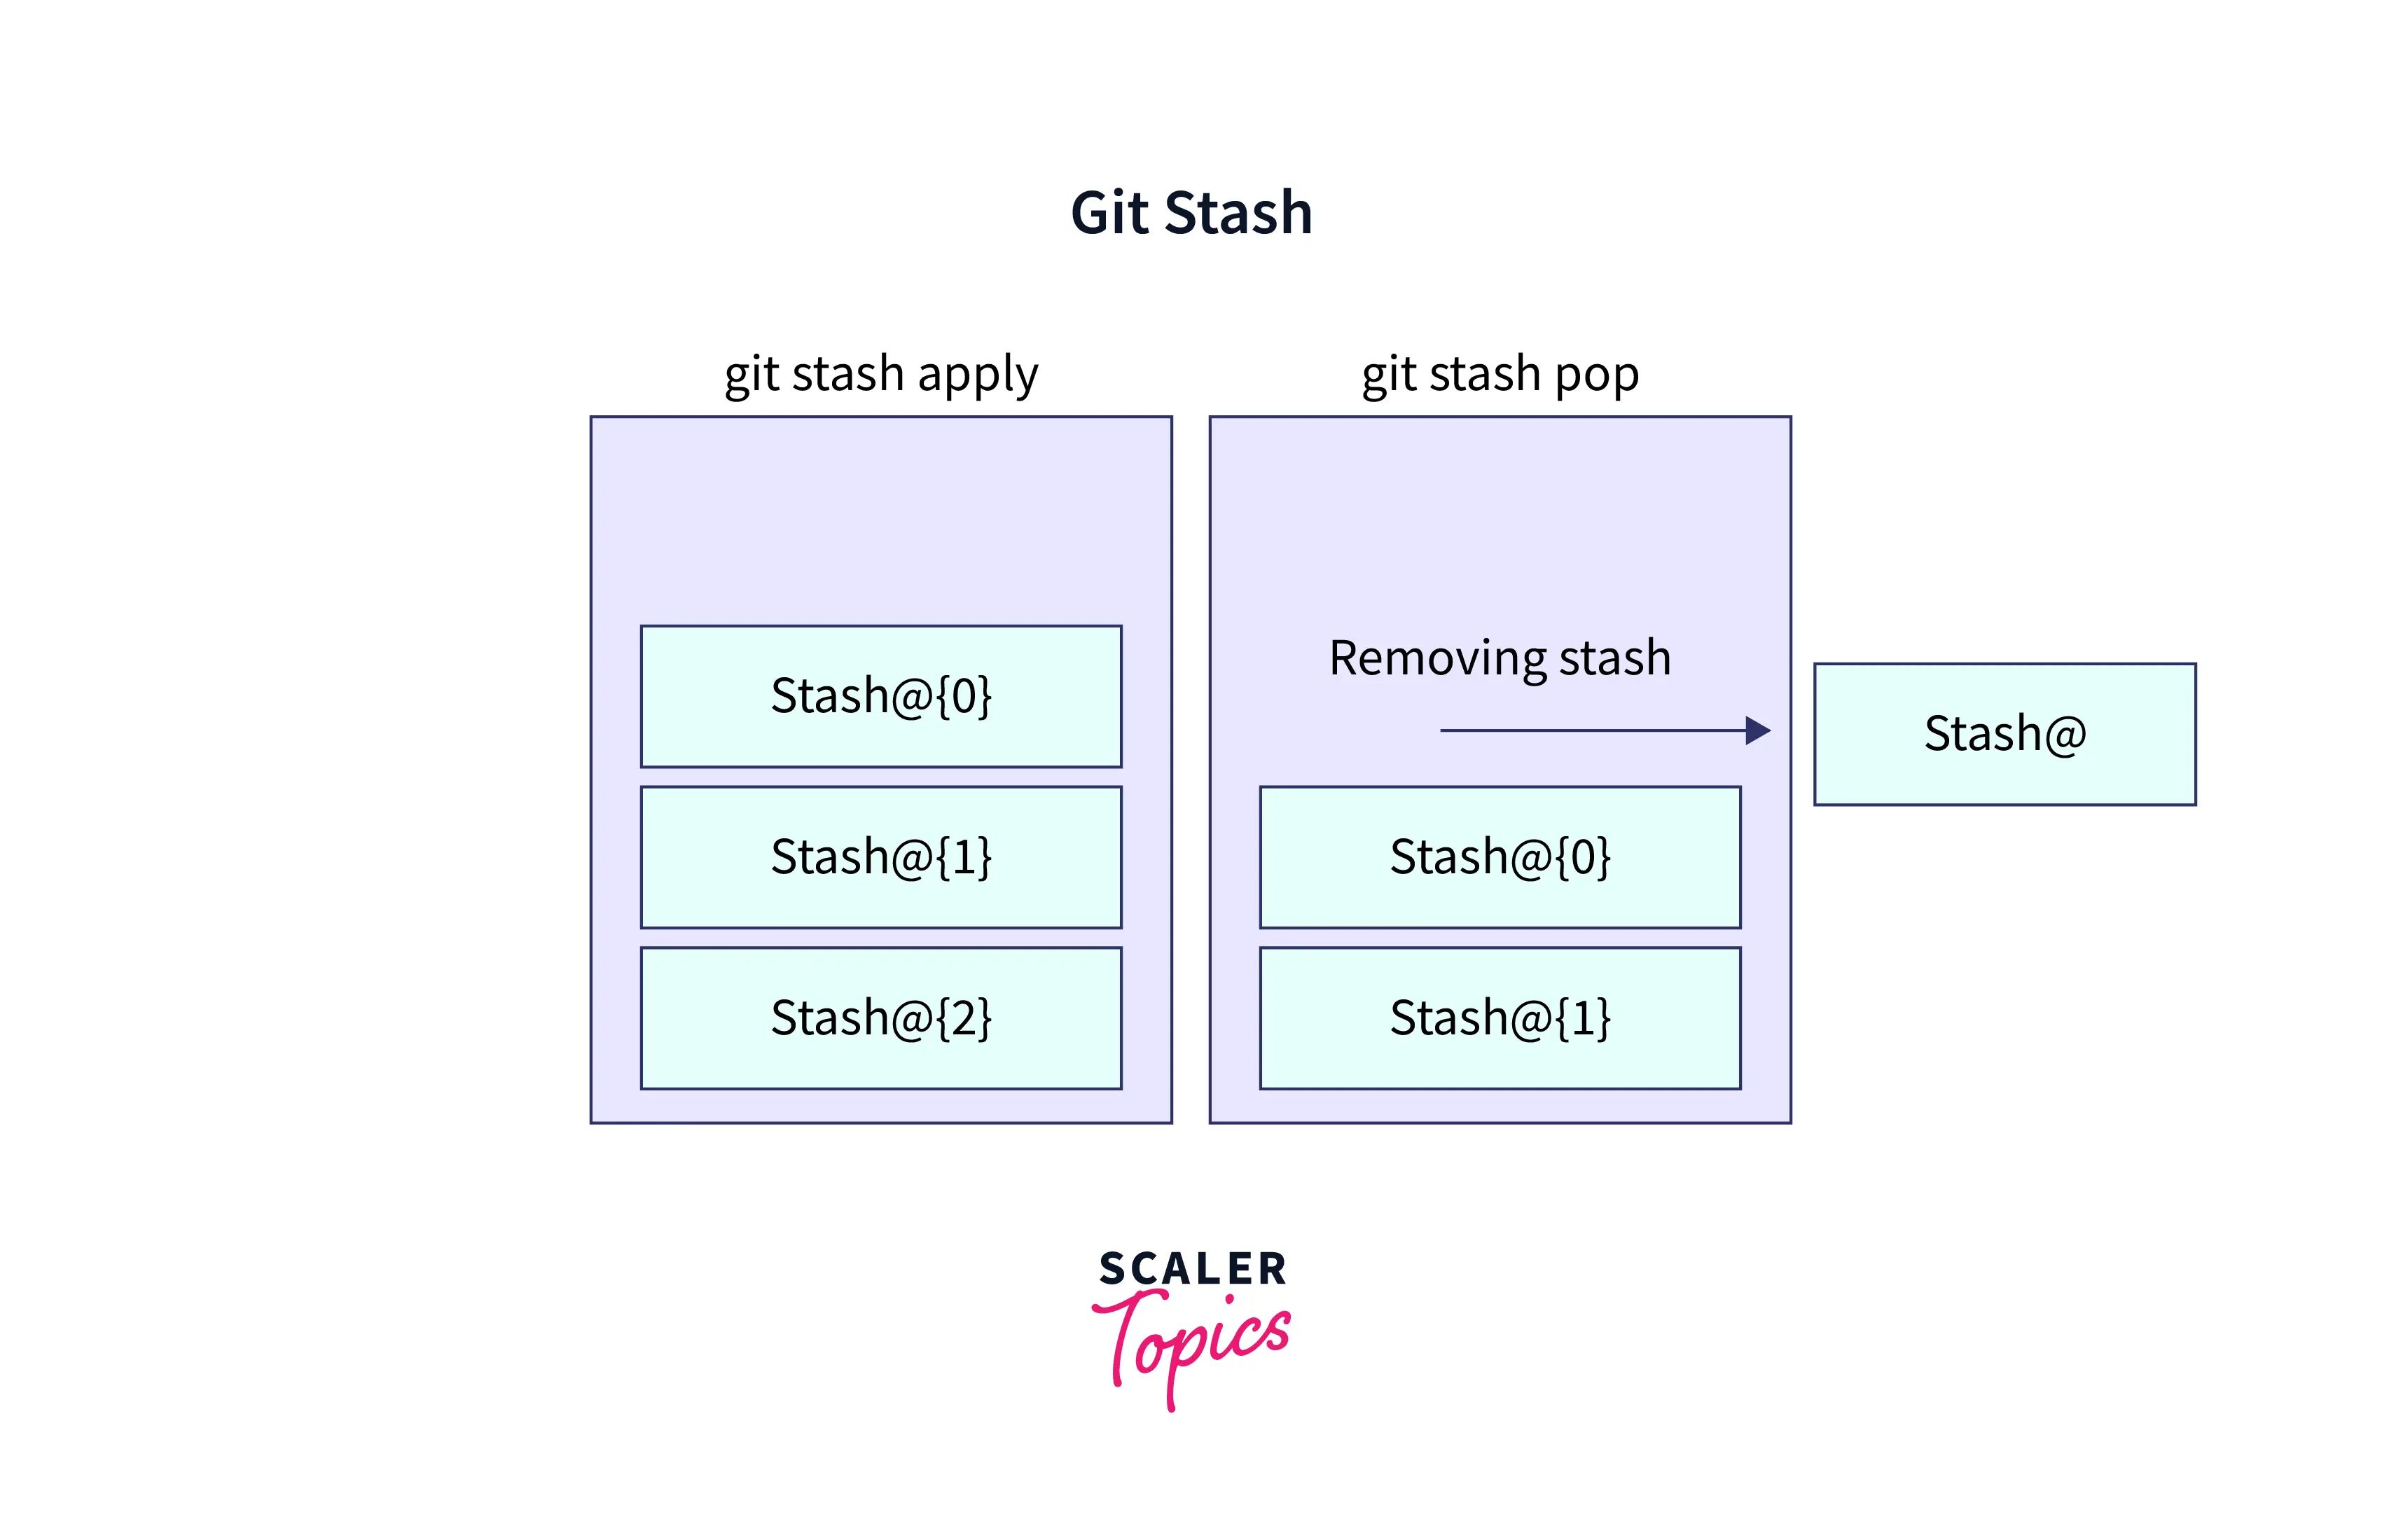
The Git stash pop command can be used to re-apply the previously stored changes to your working directory.
This pop will allow you to remove the changes from the stash and apply them to your current working directory, but if you want the changes to be there in the stash, along with re-applying them, then you can use the command git stash apply, instead of the git stash pop command.
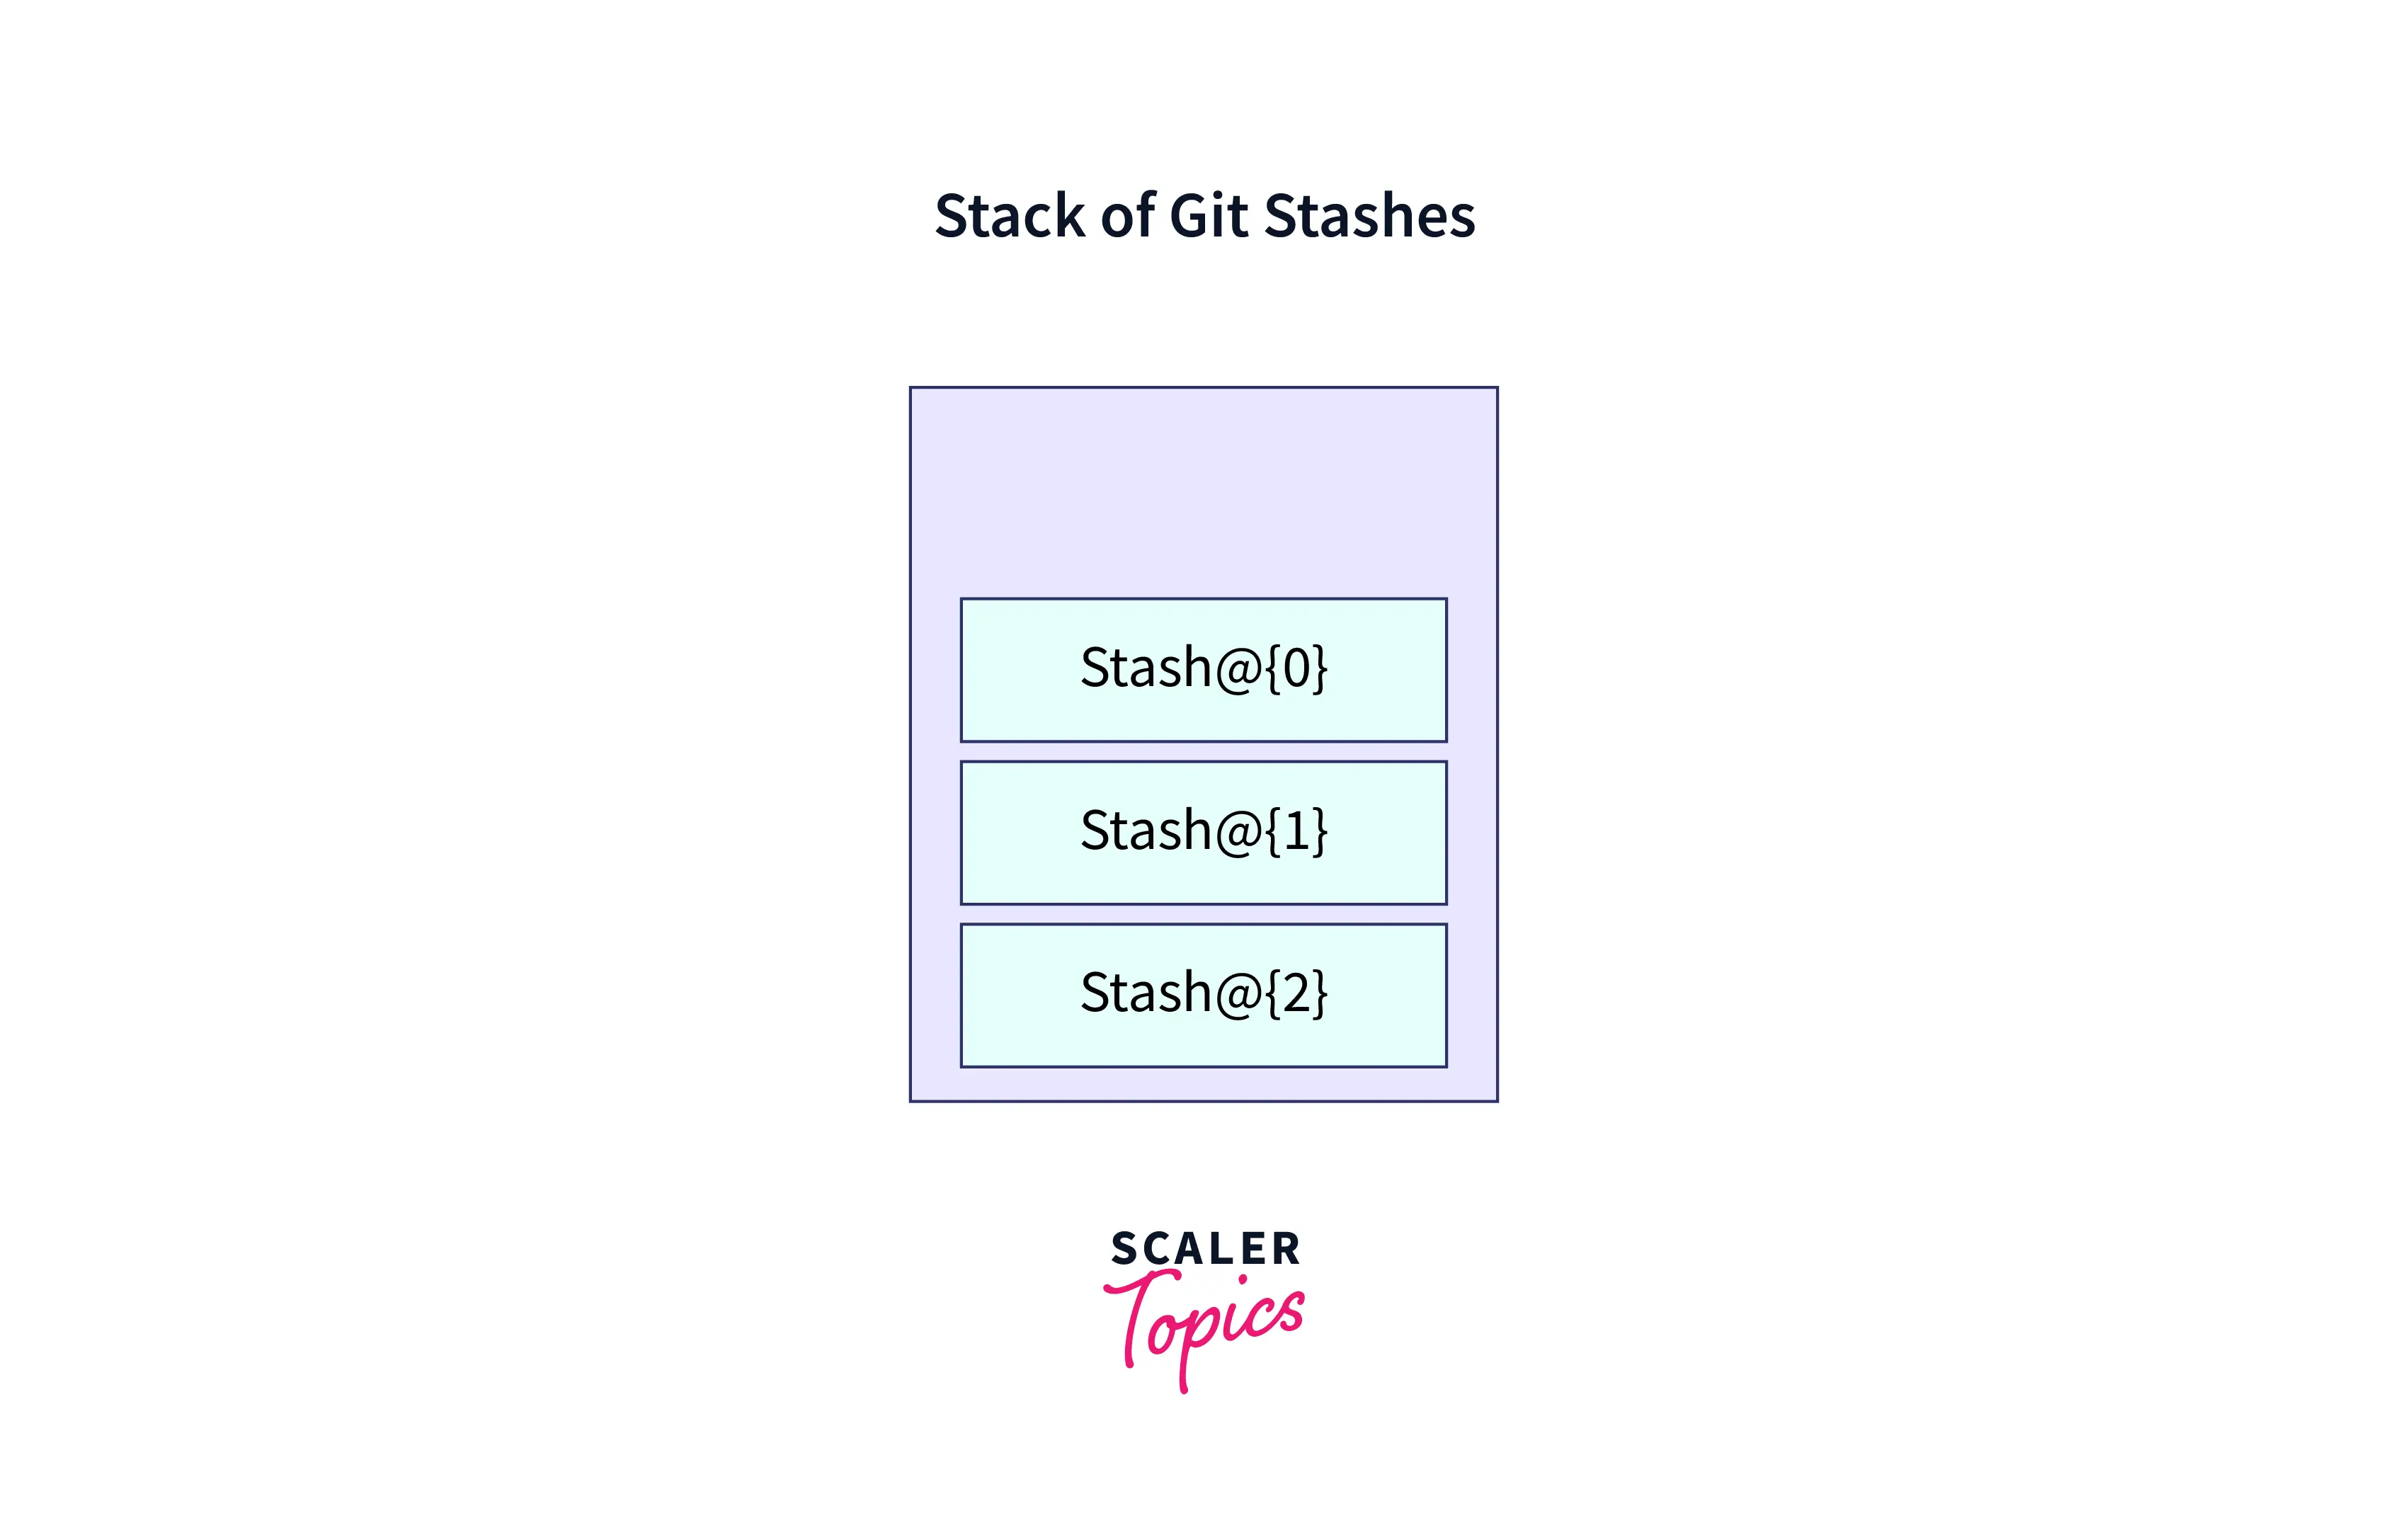
There is no limit on how many changes you can stash, so you can create multiple stashes according to your need. To view the list of stashes, you can use the command:
The output of the above command would be something like this:

Now, if you want to re-apply any particular stash and not just the latest one, then you can pick that revision and either use any of the commands:
or
You can also view the summary of the stashed changes by using the command:
Stashing Into a New Branch
Now let's understand the need for stashing while checking out into a new branch with the help of an example:
Suppose you are working on any feature, and you are doing the changes on the feature branch without messing with the main branch. Now, suddenly you have some urgent work to do on the main branch, and so you need to switch to the main branch. But it will not allow you to switch between the branches without committing the staged or unstaged changes. The reason for it stopping us from switching to a new branch without committing the changes in the current branch is the conflict that may arise at the destination branch (you may get the uncommitted changes of the current branch in the destination branch), or you may lose the changes you made in your current branch. Now, the option is to first commit the changes in the current branch and then switch to the new branch. But you don't want to commit particular changes and mess up your commit history. So, there comes the need for the concept of stashing, which allows you to store and save the changes in the current branch before switching to the new branch.
So, you can stash the uncommitted changes and move to the new branch. And then later on, you can re-apply the changes again after coming to the original branch.

As you can see from the above image, we have stashed the uncommitted changes of branch 1. Then, we can simply switch to branch 2 for some work, and then later on, we can come back to branch one and restore (re-apply) the stashed changes again.
There might also come the situation when you stash some work, and then leave it there for a while, and continue working and making changes on the branch from which you stashed the work; then you may face merging conflicts and problems in re-applying the work (stashed changes) to the current branch. Then, to fix this, you can create a new branch from the stash using the stashing into a new branch command. This will establish a new branch for you with the name of the branch you've chosen, look up the commit on which you stashed your work, re-apply your work there, and then remove the stash or stored changes after it has been successfully applied. In the upcoming sections, we will see the syntax of stashing into a new branch and some examples around this.
Turn Learning into Career Growth
Syntax of Stashing into a New Branch
To create a new branch from your stash, you can use the command:
The above command will create a new branch and check out the commit that you created your stash from. And then it will pop your stashed changes onto it.
Also, if you want to create a new branch from any particular stash and not the latest one, then you can mention the stash revision while creating a new branch using the command:
Example of Stashing into a New Branch
Let's understand the need for stashing into a new branch with the help of an example:
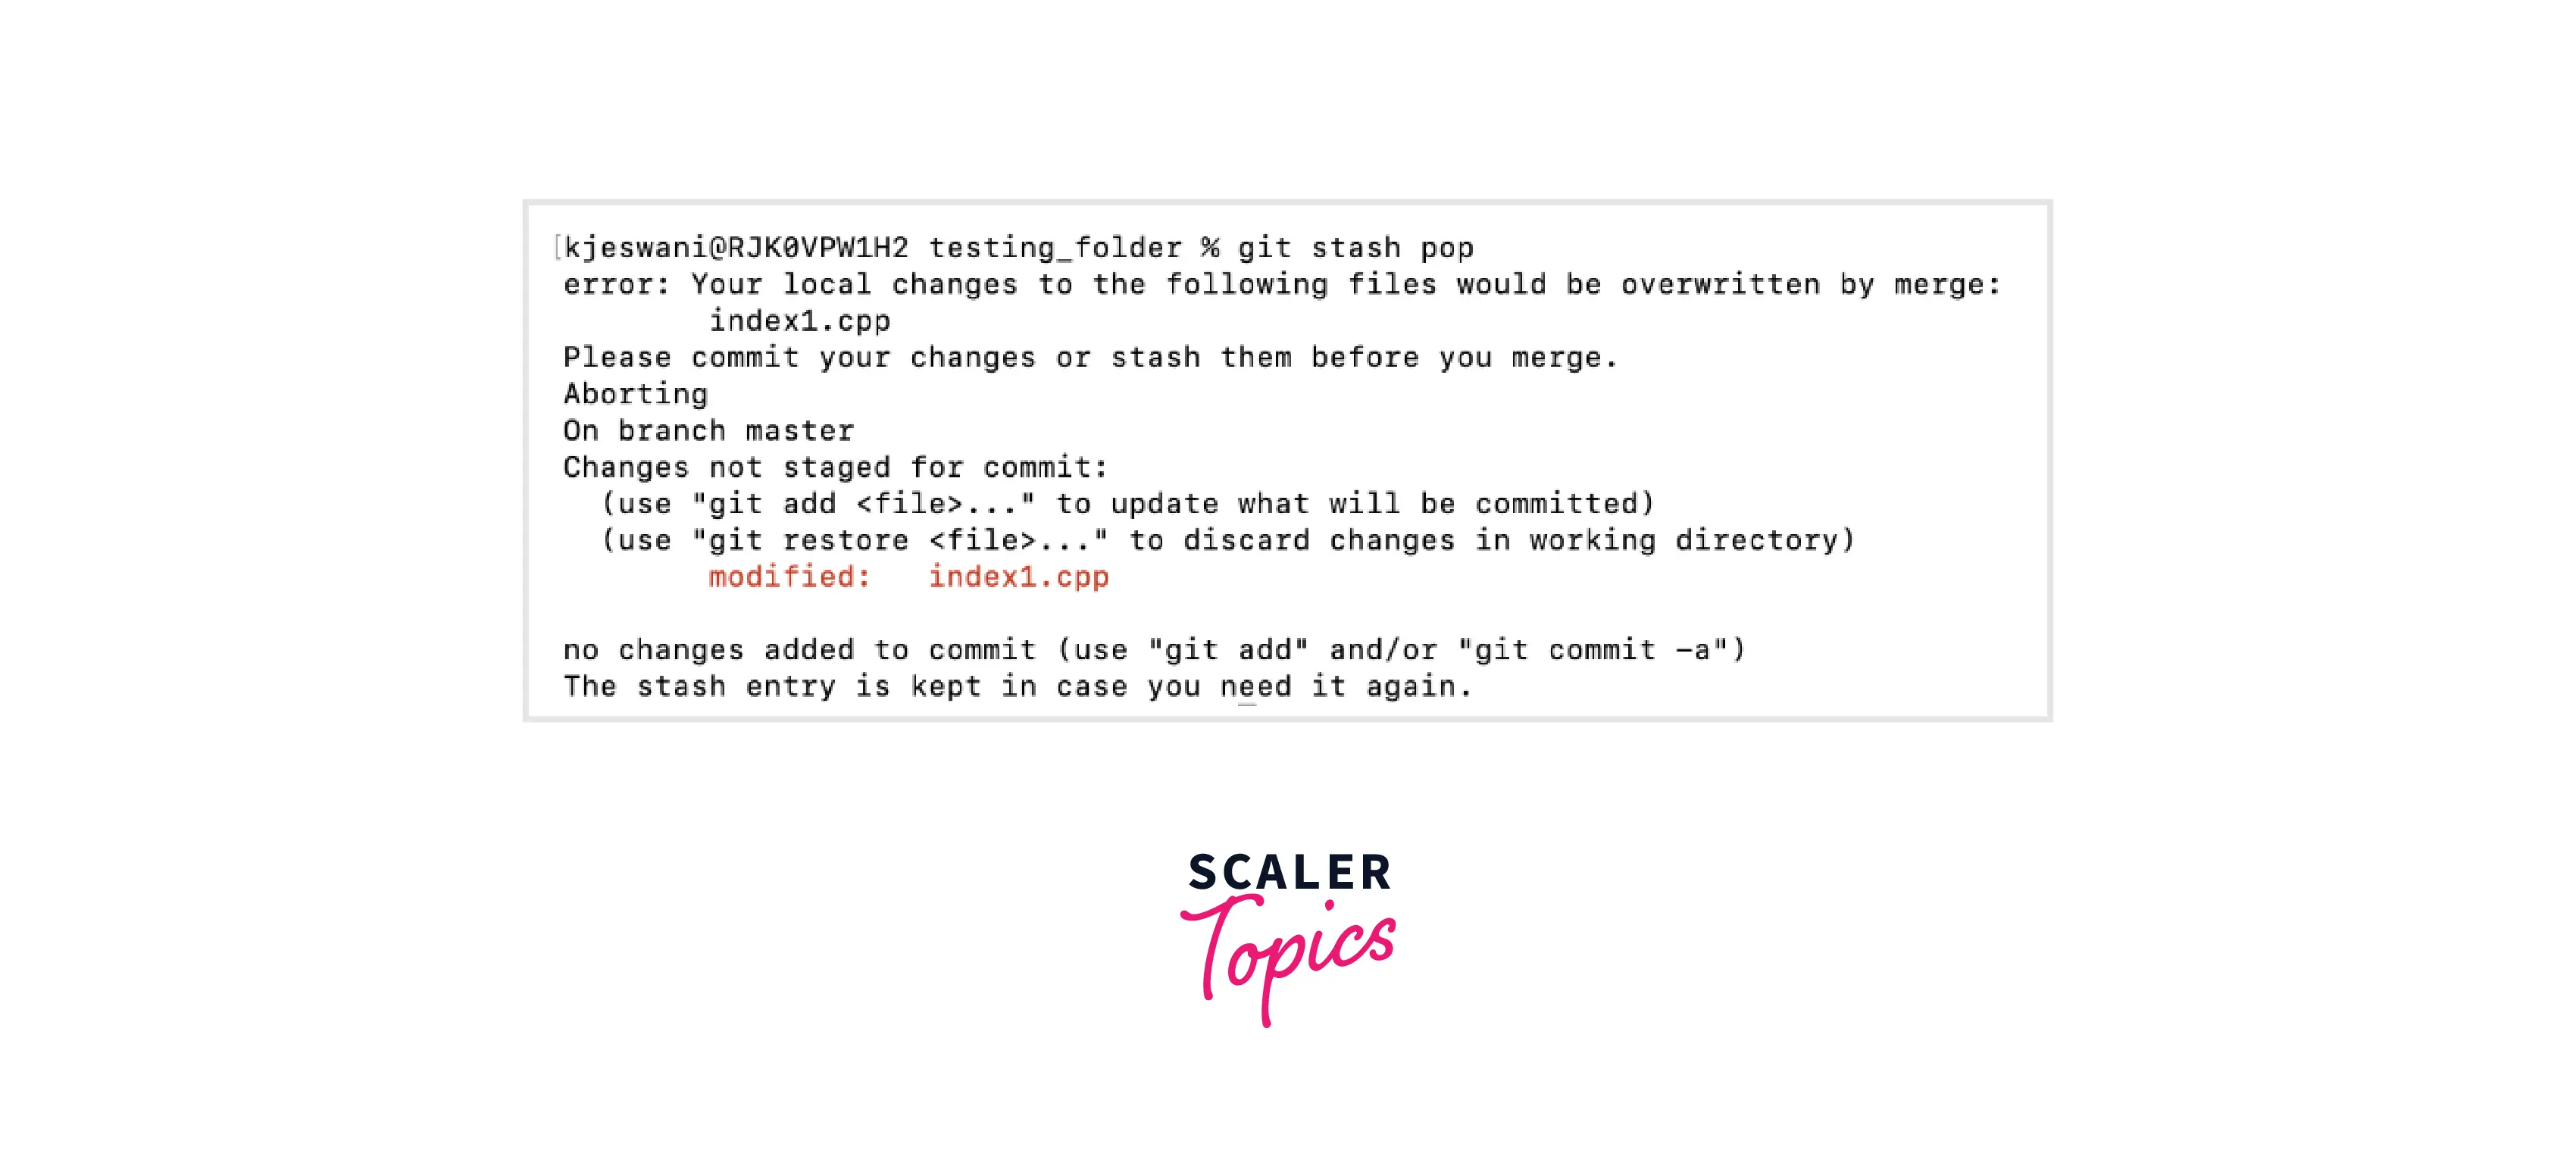
Suppose you are currently on a branch named master and have created a file index1.cpp and some other files; we have added the file to the staging area using the git add . command, but we don't want to commit the file at this point.
Now, due to some urgent work, we need to switch the different branches, but it will not allow you to switch the branch without committing the changes. So, we will stash the changes using the command git stash.

As we can see from the image, we have the modified index1.cpp file. And we have stashed the changes, which we can check using the git stash list command.
Now, let's say after some time, we again come to the branch master and make some edits again to the index1.cpp file. Now, while trying to re-apply the changes of the stash to the current branch, it will give merge conflicts as the current changes in the branch diverge from the stash causing the conflicts.
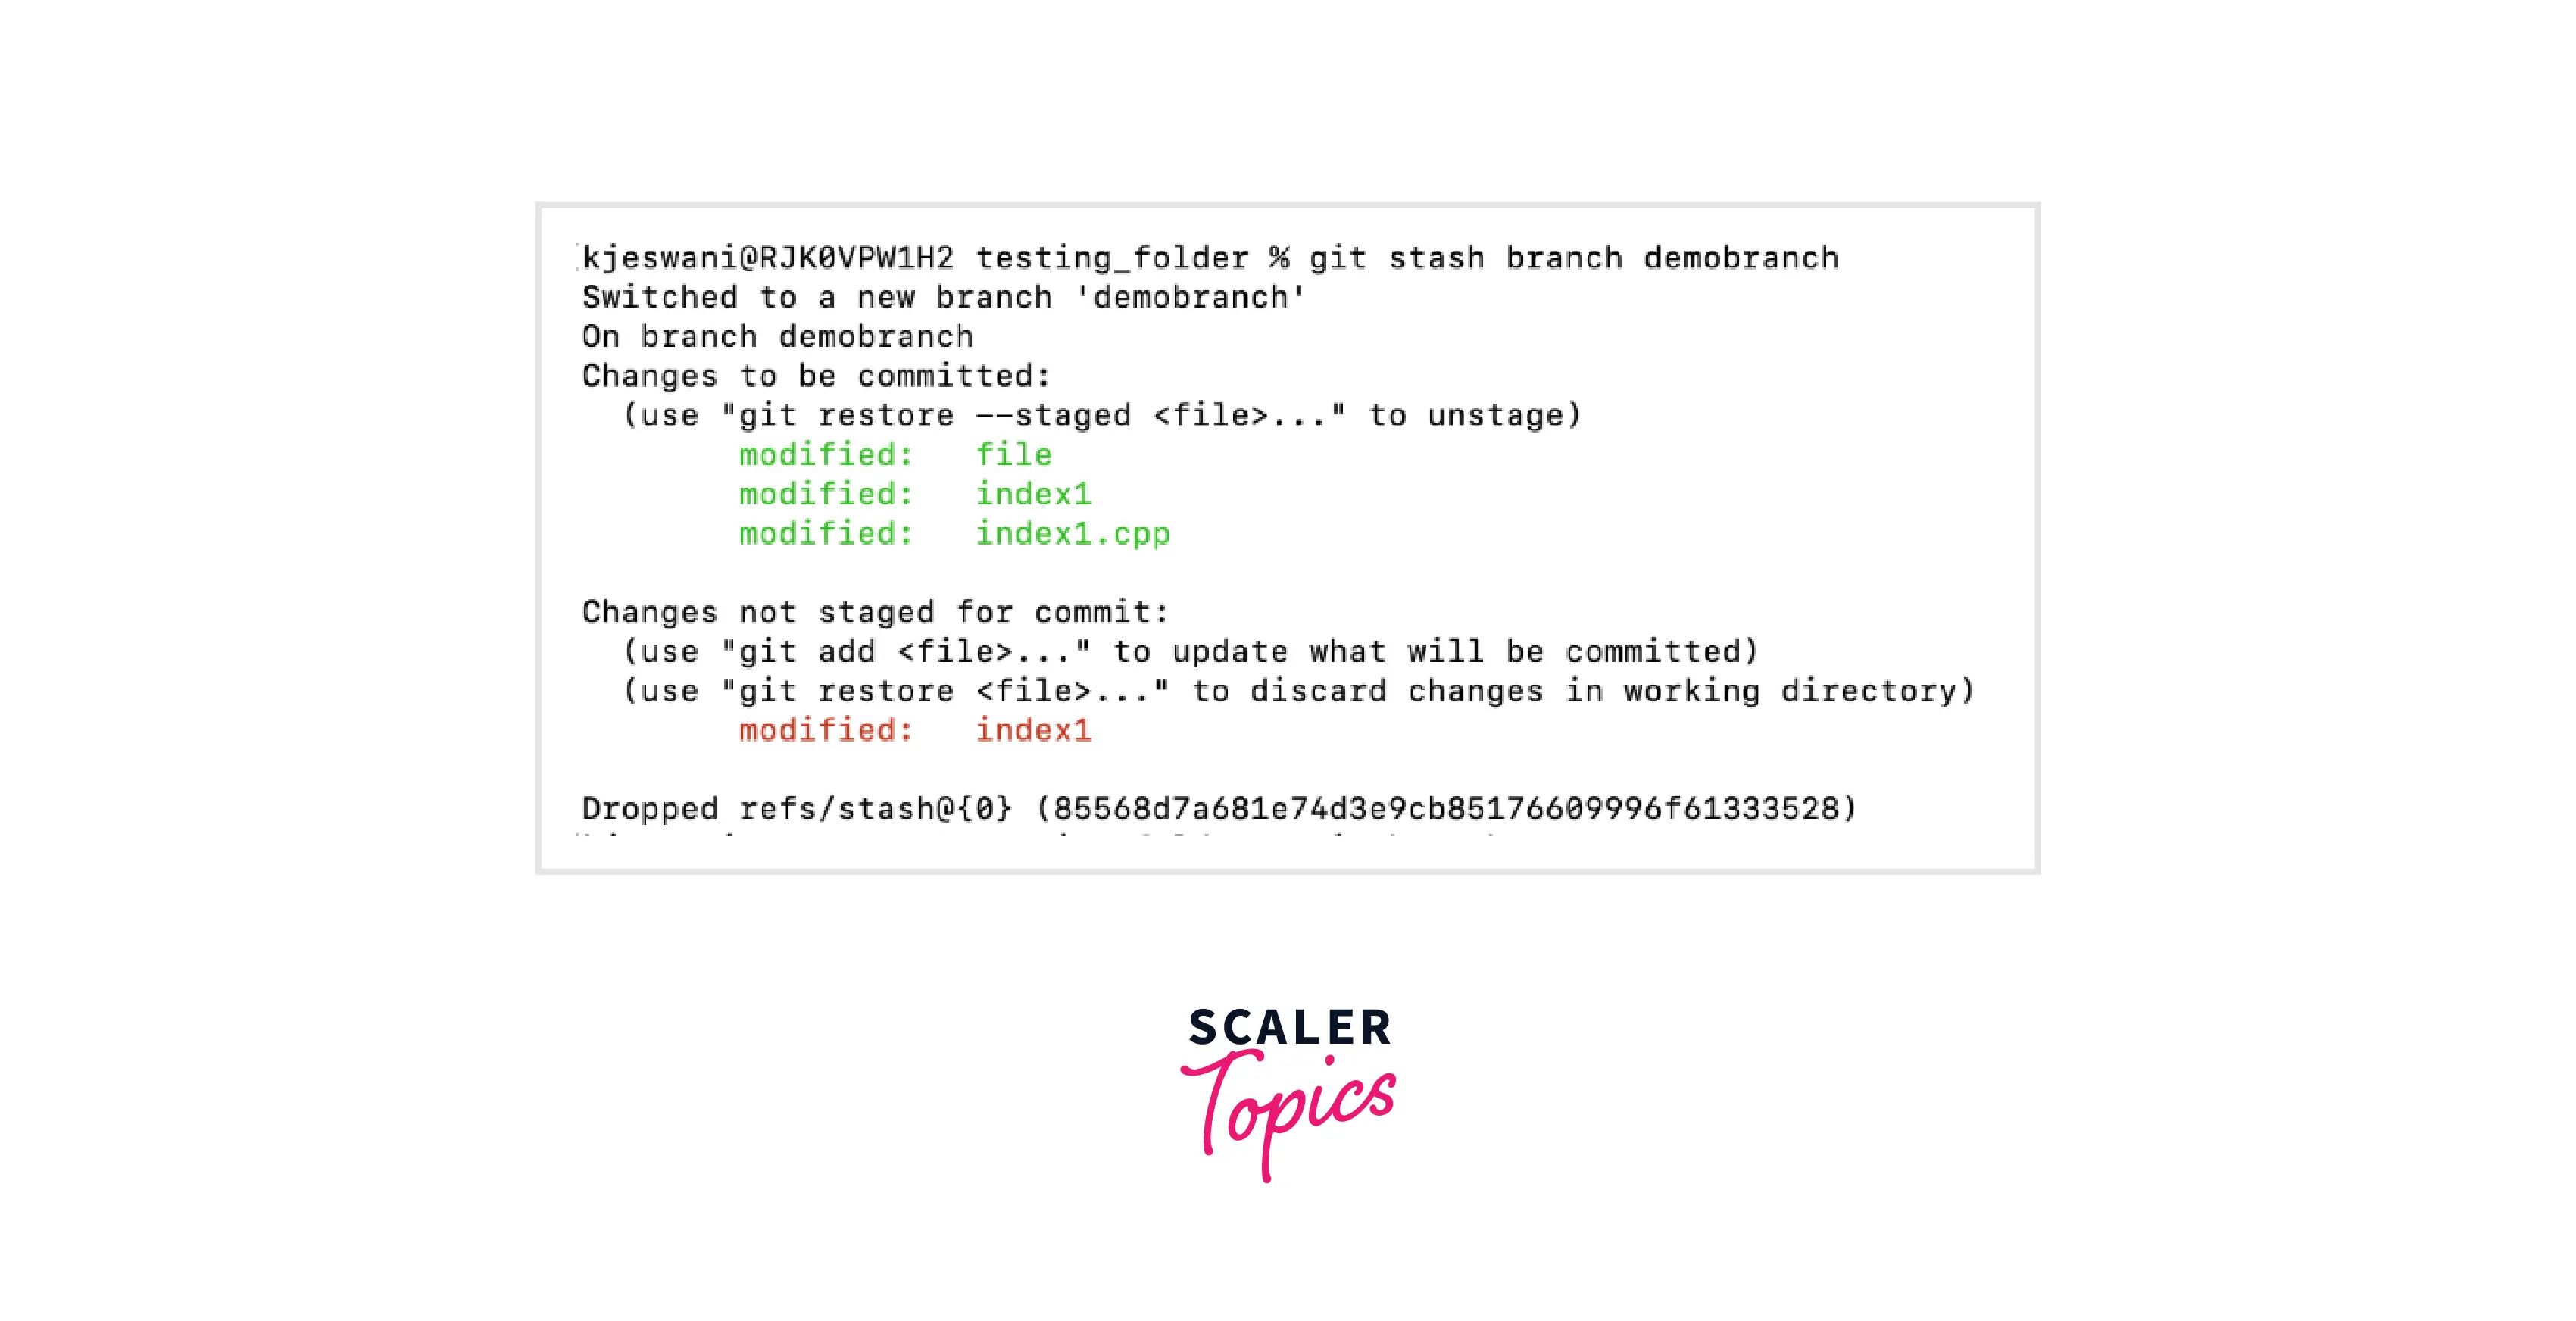
To resolve this issue, we can create a new branch, demobranch from the stash by using the command:
In our case, it is:
This will checkout to the commit that you created stash from and then pop your stashed changes onto it. And so, the conflict will be resolved, and the changes in the stash can be successfully applied.
This concept will help you to create a new branch and share all the stashed work on that.
Conclusion
- Branching in git allows a developer to work on an independent line of development. They can use branches to diverge from the main production branch so that they can easily work in an isolated and stable environment.
- Branching is mainly used when multiple developers are working on the same project, and each one of them is working on an independent feature of the software on their local branches, and then we can merge the changes of all the branches to get the complete software.
- Stashing is the concept in git, which helps you to temporarily store or stash the staged or unstaged changes you have created on your current working directory so that in-between, you can go and work on something else without committing those changes, and then you can come back, restore them and re-apply them.
- Git stashing will allow switching between branches without committing the changes of the current branch.
- git stash pop will allow you to remove the changes from the stash and apply them to your current working directory.
- git stash apply will keep the changes in the stash along with re-applying them to your current working directory.
- git stash show is used to view the summary of the stashed changes.
- git stash branch <branch_name> is used to create a new branch for you with the name of the branch of your choice, look up the commit on which you stashed your work, re-apply your work there, and then remove the stash or stored changes after successfully applying.
- git stash branch <branch_name> stash@{revision} is used to create a new branch from a particular stash revision.