Git Tag
Overview
A git tag is used to mark some point in the git history. The git tag is mainly used to mark the starting point in project development. So, if we are working on project development and we have created the first version of our project then we can mark the tag here (for example v1.1) and continue working on the development process. There are two types of tags i.e. Annotated tag and a Lightweight tag.
Pre-requisites
The prerequisites for learning the git tag command can be a basic understanding of Version Control Systems, Branching, and Git. Let us discuss them briefly before learning about the git tag command.
Transform Your Career
Choose from our industry-leading programs designed for career success
Modern Software and AI Engineering Program
Master full-stack development with AI integration

Modern Data Science and ML with specialisation in AI
Advanced data science techniques with AI specialization
Advanced AIML with Specialisation in Agentic AI
Deep dive into AIML with focus on Agentic systems
DevOps, Cloud & AI Platform Engineering
Build and manage AI-powered cloud infrastructure
AI Engineering Advanced Certification by IIT-Roorkee
Premier AI engineering certification from IIT-Roorkee
Version Control Systems
A version control system is a tool in software development that tracks the changes in the code, documents, and other important information regarding a certain code base (or project), etc. There are two types of Version Control systems namely - Centralized Version Control Systems (CVCS) and Distributed Version Control Systems (DVCS).
Git
Git is a version control system that tracks the changes in the code, documents, and other important information regarding a certain code base (or project), etc. Git is free and one of the most widely used version control systems. We can use Git through the command line as well as through its graphical user interface (GUI). The command line or terminal version of Git is known as Git Bash on the other hand the GUI version of Git is known as Git GUI. Git tracks the changes in a project and saves a certain state that is known as commit. A commit is a snapshot of the file's current version (s). So, we track these commits and can revert to a certain commit if we want.
Branching
A branch is an independent line of development that is used to add certain features and fix bugs without hampering the main project. So, we can develop new features in parallel and when the development is completed, we can add the back to the main project. By default, all the GitHub repository has the master branch which can be used for production.
So, a new branch is a copy of the master branch which is created for bug fixes and for the addition of new features. After the bug is fixed or new features are added, we can merge the branch to the master branch. The git branch command enables us to perform parallel development. The command can create, rename, list, and delete branches.
GitHub
GitHub is a cloud-based central repository that can be used to host our code for team collaboration. It is a hosting service that is used to manage the git repository in the central server. GitHub is a free (for certain limits) and easy-to-use platform that enables teammates to work together on projects. GitHub tracks the changes made in the project workflow and we can also revert ba a certain state of the project (as GitHub saves the history of the project). GitHub supports open-source development where several developers can collaborate and support each other in the development process.
Anyone can create an account on the GitHub platform to host their code, files, and documents. GitHub sells hosted private code repositories, and other collaborative business model plans to make money as an organization.


What is a Git Tag?
A git tag is used to mark some point in the git history. The git tag is mainly used to mark the starting point in project development. A git tag is some point in the git history. For example, if we are working on project development and we have created the first version of our project then we can mark the tag here (for example v1.1) and continue working on the development process. There are two types of tags i.e. Annotated tag and a Lightweight tag.
Refer to the image provided below for more clarity.
The annotated tags store extra details or the metadata of the tag such as the name of the developer, email id of the developer, and the date and time of tag creation. On the other hand, the lightweight tag is used in situations where we only want to store the necessary information about the tag but not the entire details.
Let us now learn about how we can create tags in the next section.
Git Create a Tag
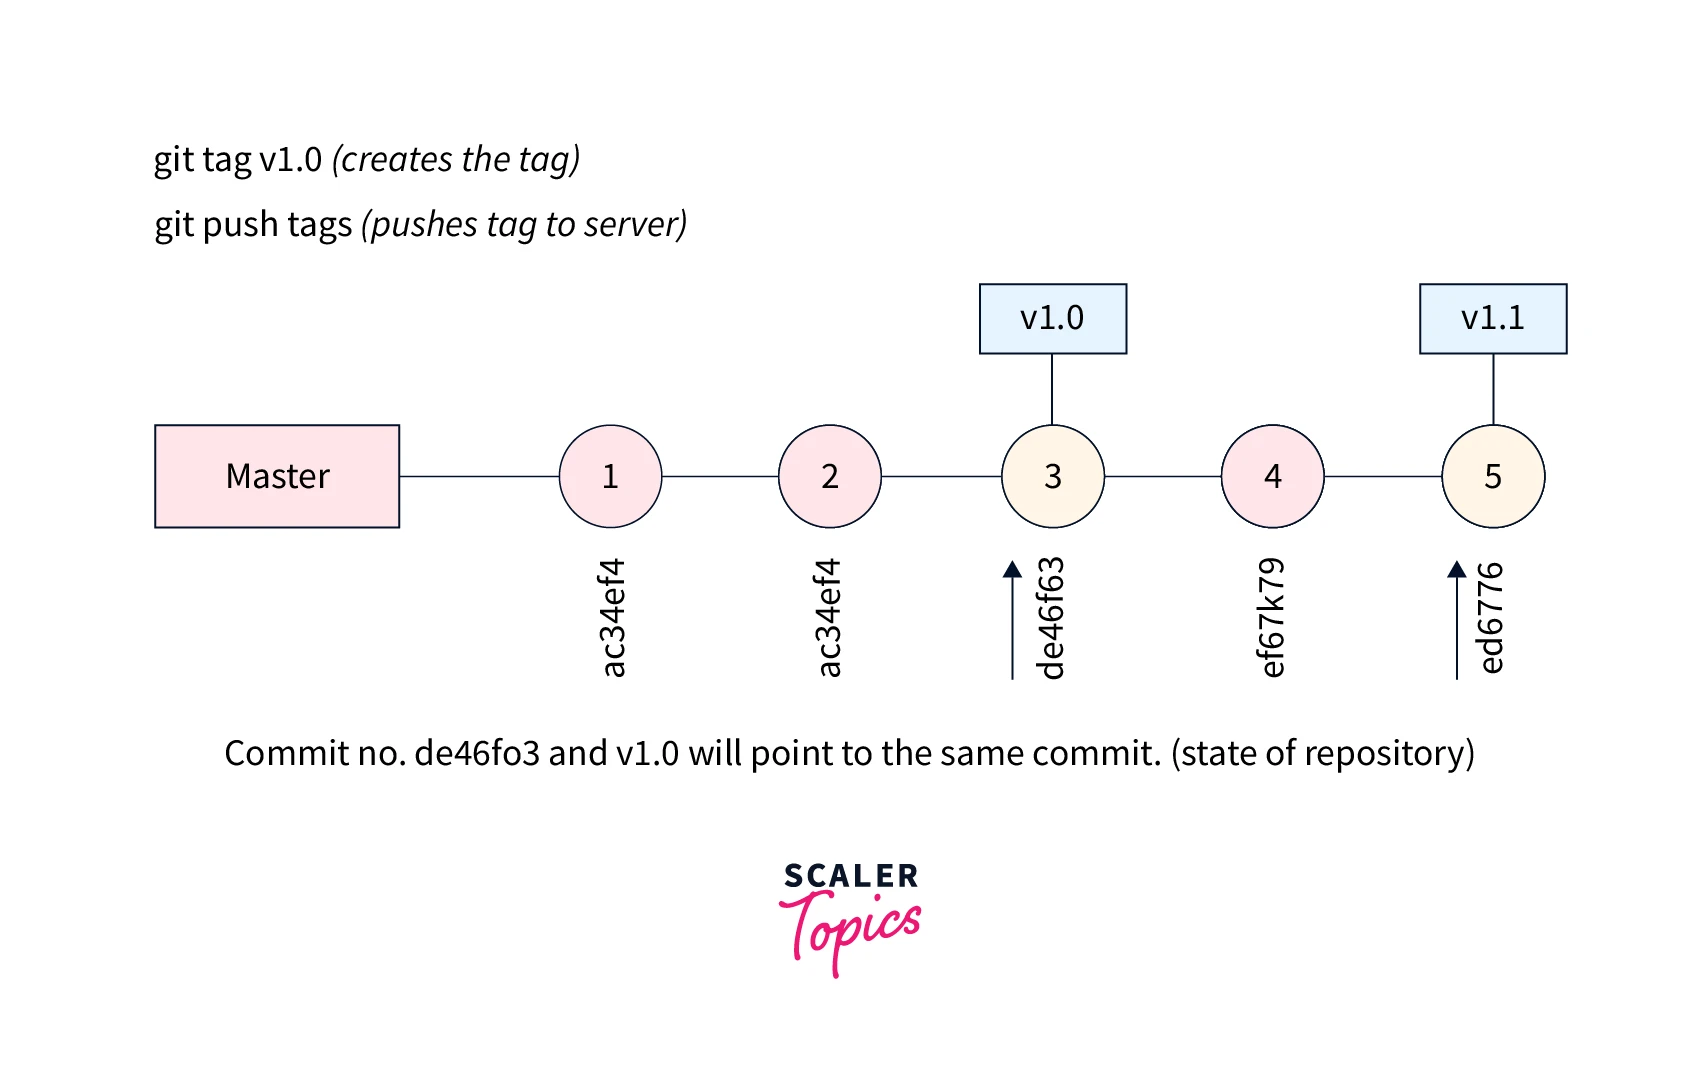
Now, to create a git tag, we first need to move to our desired branch using the git checkout branch-name command. After moving to our desired branch, we can create the tag by using the git tag command. We can provide any name to our tag such as v1.0 or v1.1 or any name we want. The overall command for the same is:
Some of the important points regarding the git tag are:
- Tags are similar to branches and once the tags are initiated, we do not change them.
- We can create numerous tags of a certain branch.
- There are two types of tags i.e. Annotated tag and Light-weighted tag, refer to the next section for more clarity.
- We should create a tag whenever we want to create a release or release point of our stable version of the code base.
- Git tag plays an important role in situations when we want to refer to the historical or previous versions of our project in the future.
Scaler Placement Report and Statistics
Scaler learners achieved 2.5x salary growth with average post-Scaler CTC reaching ₹23L.
View Tags
To view the tags of a branch, we three commands. We can use
- git tag
- git show, and
- git tag -l ".*" commands for the same. Let us learn about them one by one.
- git tag: This command is the most widely used command to list down all the tags that are available to the current working repository. The overall command is:
- git show <tag-name>: This command takes the name of the tag and returns the details of the tag such as the author's name, date of the tag creation, etc. In simpler terms, it shows us the description of the tag. The overall command for the same is:
- git tag -l: If we want to list down all the tags using a wild card. For example, if we want to list down all the tags starting with the name version we can use the version wild card for searching. This command can be very handy if there are several tags available for the branch and searching is necessary to filter out the needy tag. The overall command for the same is:
Here, the wild-card-pattern is the name to be searched and we are putting an astrict or start (*) after that to resemble the searching of the provided name.
In the above command, we are using the -l tag to list down all the tags.
Types of Git Tags
There are two types of git tags provided by Git:
- Annotated tag
- Lightweight tag
Let us learn about these tags in brief.
1. Annotated tag
The annotated tags store extra details or the metadata of the tag such as the name of the developer, email id of the developer, and the date and time of tag creation. The annotated tags are stored as a bundle of objects and these bundles are stored in the git database.
Whenever we are creating or saving the final version of the project, we can point to the final version of the project using the annotated tag. If we want to mark a temporary point in the development then we can use the lightweight tag (refer to the next sub-section for more details).
We provide the essential details that are needed in the public release of the project version using the annotated tags. We can even add the message related to the tag or the annotation of the project using the -m flag.
The overall command for the same is:
Turn Learning into Career Growth
2. Lightweight tag
There is another type of tag provided by Git i.e. lightweight tag which is used in situations where we only want to store the necessary information about the tag but not the entire details. Both the tags are used to mark a version of the project but the lightweight tag stores the necessary information and the annotated tag stores all the details of the tag.
The overall command for the same is:
Tagging Old Commits
We can revert to a certain point in history and can create a tag at our desired point. So to go back to a certain point, we can use the commit ID of the older commit along with the git tag command.
The overall command for the same is:
Push Tags
Before learning about pushing tags, let us first get a brief introduction to the push command used in git. As the name suggests, the git push command is used to push our local system repository (or any changes in the local system repository) to the remote repository. The Git push command takes two arguments. The first one is the repository and the other is the name of the branch to which we are pushing the changes. The commands- Git clone, Git fork, Git pull, and Git push- are used frequently when we are working on the repository hosted on GitHub.
So, if we want to push any tag to the remote directory we can push the tag using the git push command. The overall tag for the same is:
By pushing the tag, we are creating a release point at the tag in GitHub (at the remote repository).
Now, if we want to push all the tags of the local repository to the remote repository, we can use the command:
OR
The above command will create a release point at every tag point of the local repository.
Checking Out Tags
There is no such command for checking out a tag but we can use the git checkout branch command along with the tag name to check out the tag. So, this command will first create a branch with the same state of the working repository as it was in the original tag. Thus the overall command for the same is:
We can always use the git status and git log commands to get details of the previous commits.
Deleting a Tag
As we can delete the branches, and commits, we can similarly delete the tag(s). We can delete both the local repository tag as well as the remote repository tag. If we want to delete the local repository tag, we can use the command:
OR
Similarly, if we want to delete the remote repository tag, we can use the command:
OR
Conclusion
-
Git is a version control system that tracks the changes in the code, documents, and other important information regarding a certain code base (or project), etc.
-
A git tag is used to mark some point in the git history. The git tag is mainly used to mark the starting point in project development.
-
If we are working on project development and we have created the first version of our project then we can mark the tag here (for example v1.1) and continue working on the development process.
-
There are two types of tags i.e. Annotated tag and Light-weighted tag.
-
The annotated tags store extra details or the metadata of the tag such as the name of the developer, email id of the developer, and the date and time of tag creation.
-
We provide the essential details that are needed in the public release of the project version using the annotated tags. We can even add the message related to the tag or the annotation of the project using the -m flag.
-
The lightweight tag is used in situations where we only want to store the necessary information about the tag but not the entire details.
-
We should create a tag whenever we want to create a release or release point of our stable version of the code base.
-
Git tag plays an important role in situations when we want to refer to the historical or previous versions of our project in the future.
-
To view the tags of a branch, we three commands: use a.) git tag,
b.) git show,
c.) git tag -l ".*".
-
We can push the tags using the git push origin "tag-name"command and we can delete the tag using the git tag --delete "tag-name" command.