Using Github to Review a Pull Request and Selective Merging
Overview
GitHub is a cloud-based central repository that can be used to host our code for team collaboration. We request the project maintainer to merge our branch (containing changes) to the working remote repository by creating the pull request. If someone has made some merging requests on our remote repository, then we can review those requests and then merge them into our main branch using GitHub's Pull Request option. Git merge is one of the most widely used commands that is used to merge multiple commits (that may be stored in several branches) into a single branch.
Introduction
Before learning about pull requests and how to pull requests and selective merging work, let us first learn about Git and GitHub, as pull requests are interrelated with both of them.
Git is a version control system that tracks the changes in the code, documents, and other important information regarding a certain code base (or project), etc. Git is free and one of the most widely used version control systems. We can use Git through the command line as well as through its graphical user interface (GUI). The command line or terminal version of Git is known as Git Bash on the other hand, the GUI version of Git is known as Git GUI. Git tracks the changes in a project and saves a certain state that is known as commit. A commit is a snapshot of the file's current version (s). So, we track these commits and can revert to a certain commit if we want.
GitHub is a cloud-based central repository that can be used to host our code for team collaboration. It is a hosting service that is used to manage the git repository in the central server. GitHub is a free (for certain limits) and easy-to-use platform that enables teammates to work together on projects. GitHub tracks the changes made in the project workflow, and we can also revert ba a certain state of the project (as GitHub saves the history of the project). GitHub supports open-source development where several developers can collaborate and support each other in the development process.
Anyone can create an account on the GitHub platform to host their code, files, and documents. GitHub sells hosted private code repositories and other collaborative business model plans to make money as an organization.
Let us now learn about pull requests and selective merging in the next section.
Transform Your Career
Choose from our industry-leading programs designed for career success
Modern Software and AI Engineering Program
Master full-stack development with AI integration

Modern Data Science and ML with specialisation in AI
Advanced data science techniques with AI specialization
Advanced AIML with Specialisation in Agentic AI
Deep dive into AIML with focus on Agentic systems
DevOps, Cloud & AI Platform Engineering
Build and manage AI-powered cloud infrastructure
AI Engineering Advanced Certification by IIT-Roorkee
Premier AI engineering certification from IIT-Roorkee
Pull Requests
We request the project maintainer to merge our branch (containing changes) to the working remote repository by creating the pull request. Sounds complicated? It is very easy to let us learn some basics behind it so that we can easily get pull requests. Before pull requests, we encounter clones and forking.
If we want to clone some other developer's work (which is stored in the form of the central repository), then we can use the sample command that is git clone repository to copy the whole repository into our local system. Suppose we have developed a project and we have hosted the project on the remote repository (server), and the data on our local system got deleted due to some issue. Then we can easily clone our very own repository, and in this way, our data will always be stored in a safe place and will not be affected by any loss from the local system.
On the other hand, we use the Git fork command to fetch the changes from the remote repository to the cloned local repository. We used the Git fork command in the development process in cases such as bug fixing, feature adding, etc. We first fork the repository; then, we run the repository on our local system for testing. After the testing, we make changes such as bug fixing or any extra addition of features then we push our changes to the forked repository.
As we have discussed, Git clone and Git fork commands are used to cloning and fork the remote repository to our local system. Now, after cloning and forking, the Pull request command comes into the picture. We make Pull requests after changing the local repository. We ask the repository maintainer to merge our branch (containing changes) to the working remote repository by creating the pull request. The reviewer or the maintainer first checks our changes and then merges the branch into the main branch using the Merge command that we have discussed in the above section.
We have another command called the git push command. The Push command is used to push our local system repository (or any changes in the local system repository) to the remote repository. The Git push command takes two arguments. The first one is the repository, and the other is the name of the branch to which we are pushing the changes.
Let us now look at some of the differences between push and pull commands in git.
- The git push command asks the maintainers to update their branch by our commit; on the other hand, the git pull command gets our commit and updates our branch.
- The git pull command fetches the changes from the GitHub repository to our local repository and merges them. On the other hand, the git push command only sends our commits history from the local repository to GitHub (central repository).
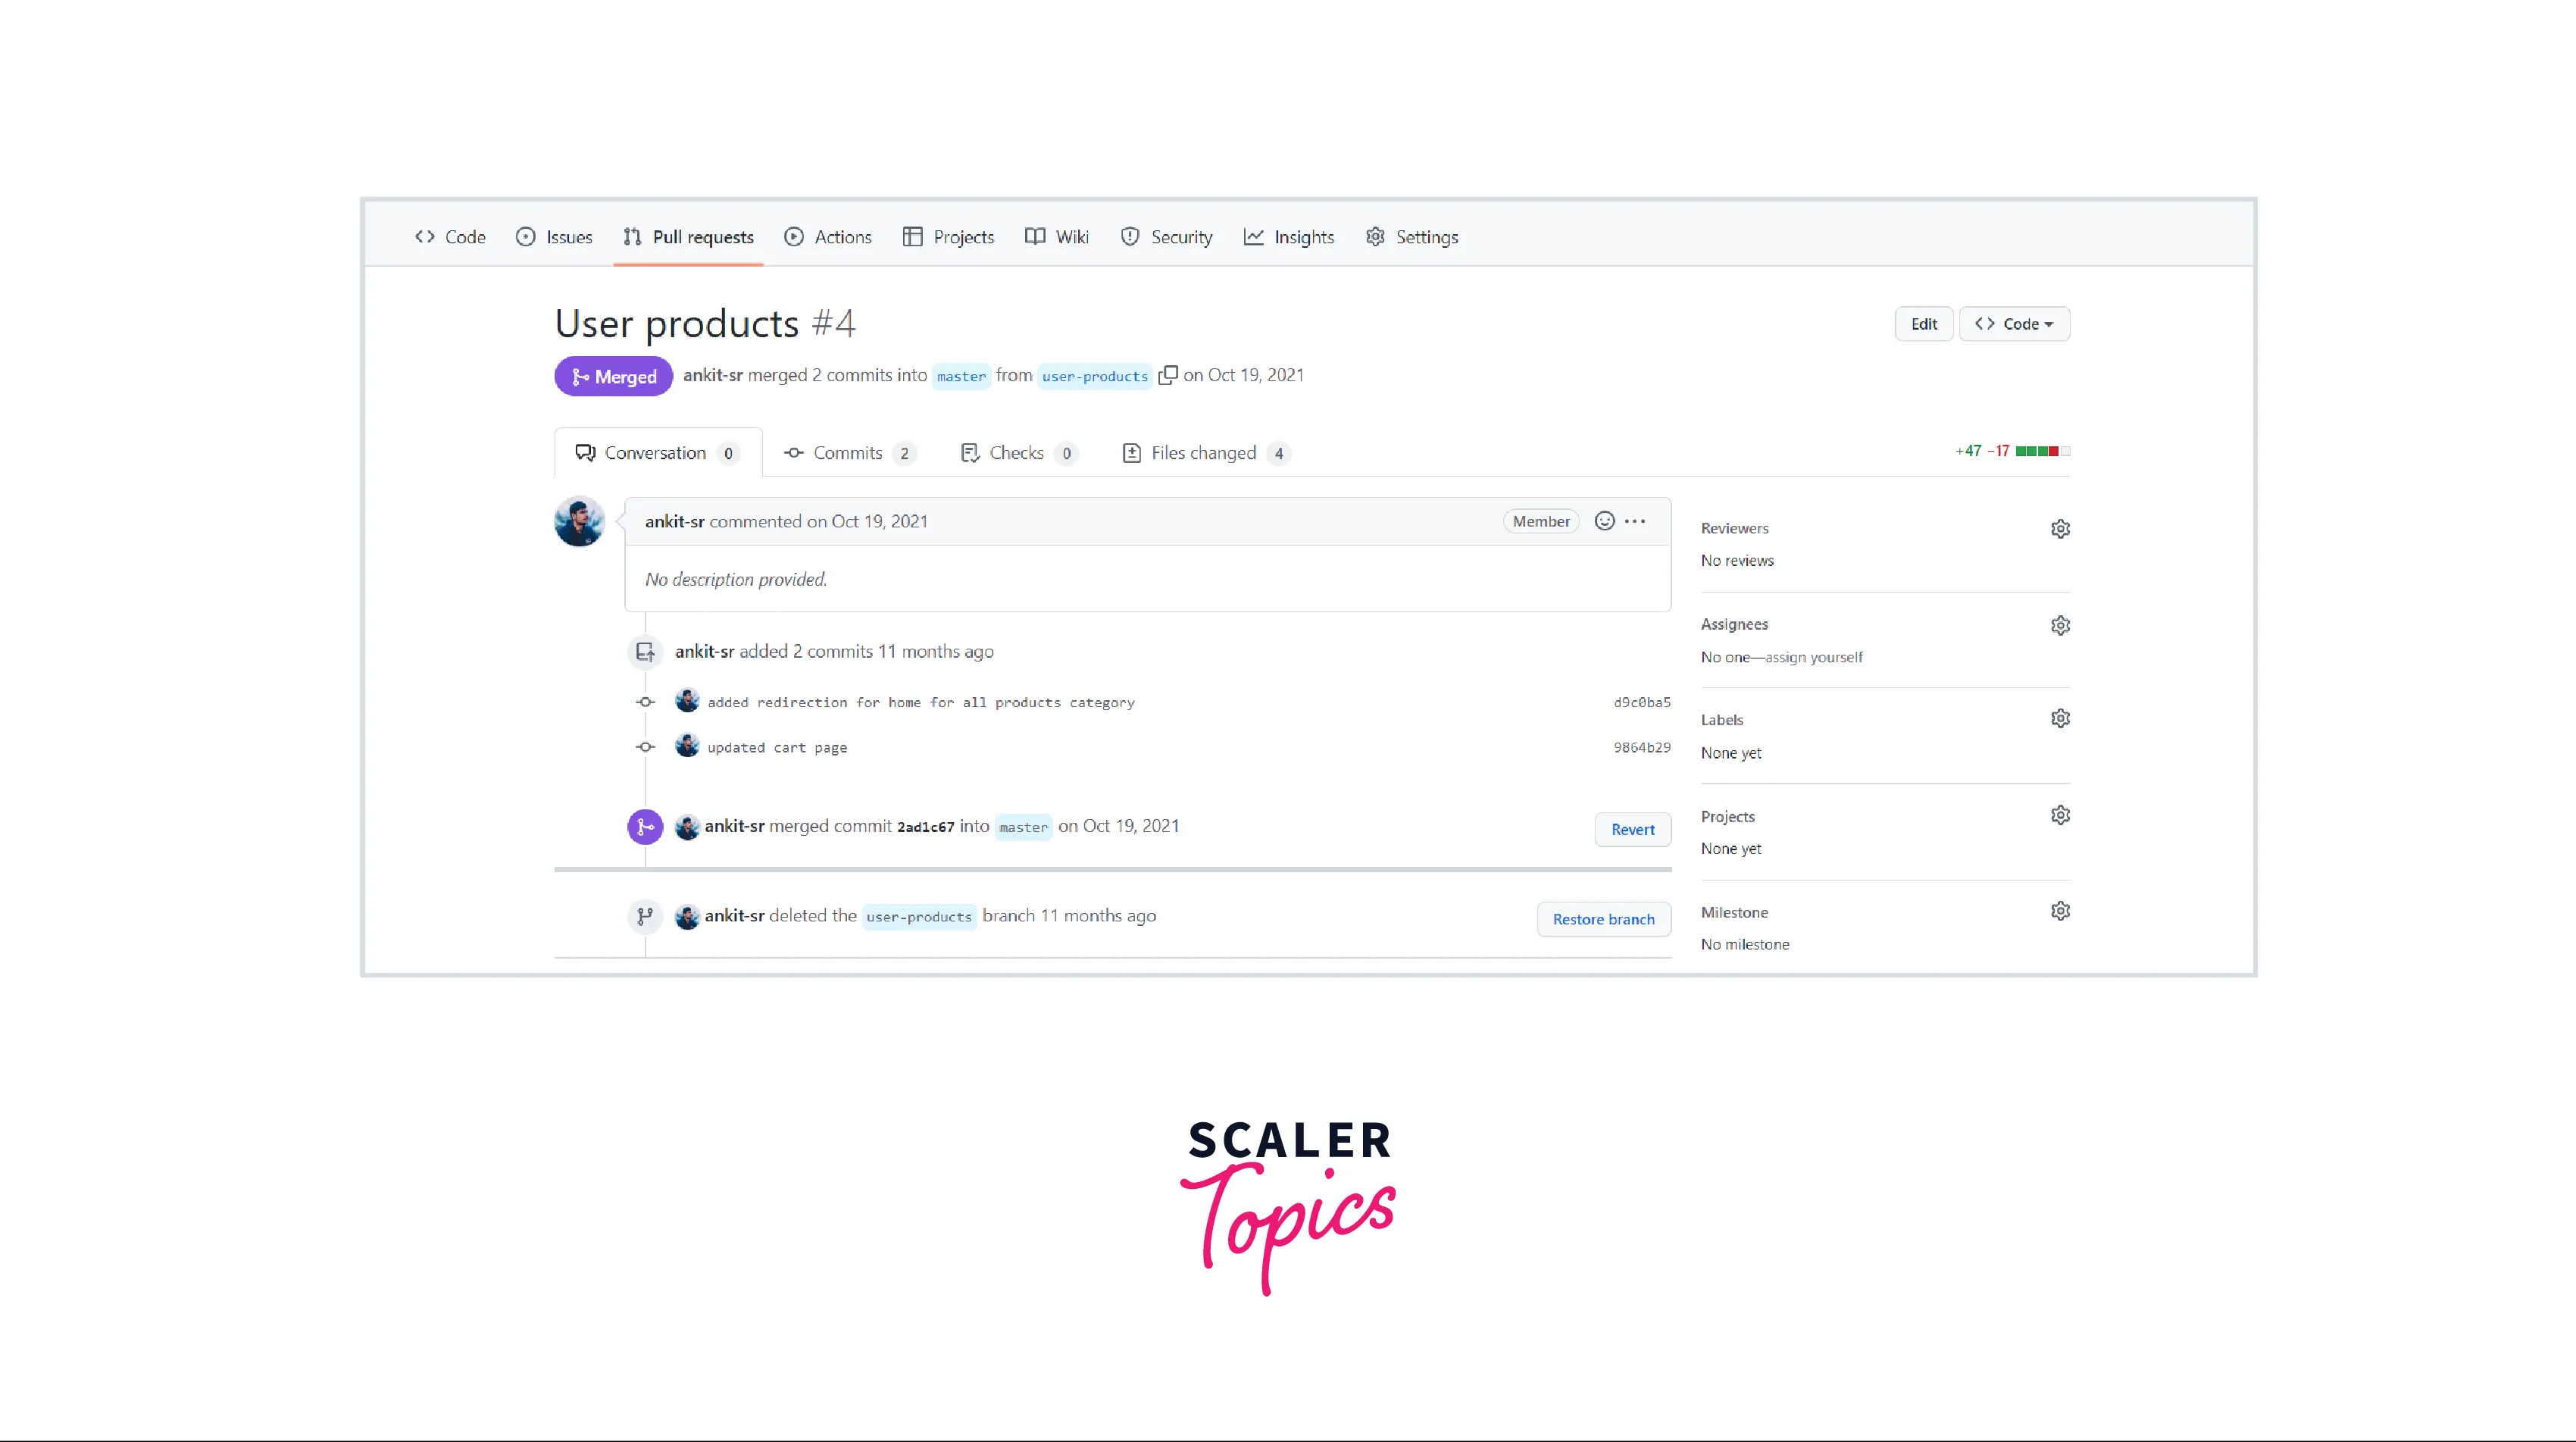
Refer to the image shown below how what a pull request section looks like on GitHub. If there is a pull request, then it will be shown on this tab.

Let us now learn how we review pull requests in a later section.
Reviewing a Pull Request
If someone has made some merging requests on our remote repository, then we can review those requests and then merge them into our main branch.
Let us learn how we can review the requests on the GitHub platform.
- We first need to open the Pull Requests present under our repository.
- We can now see a list of pull requests made on our main branch. Now, we can choose the pull request that we want to review.
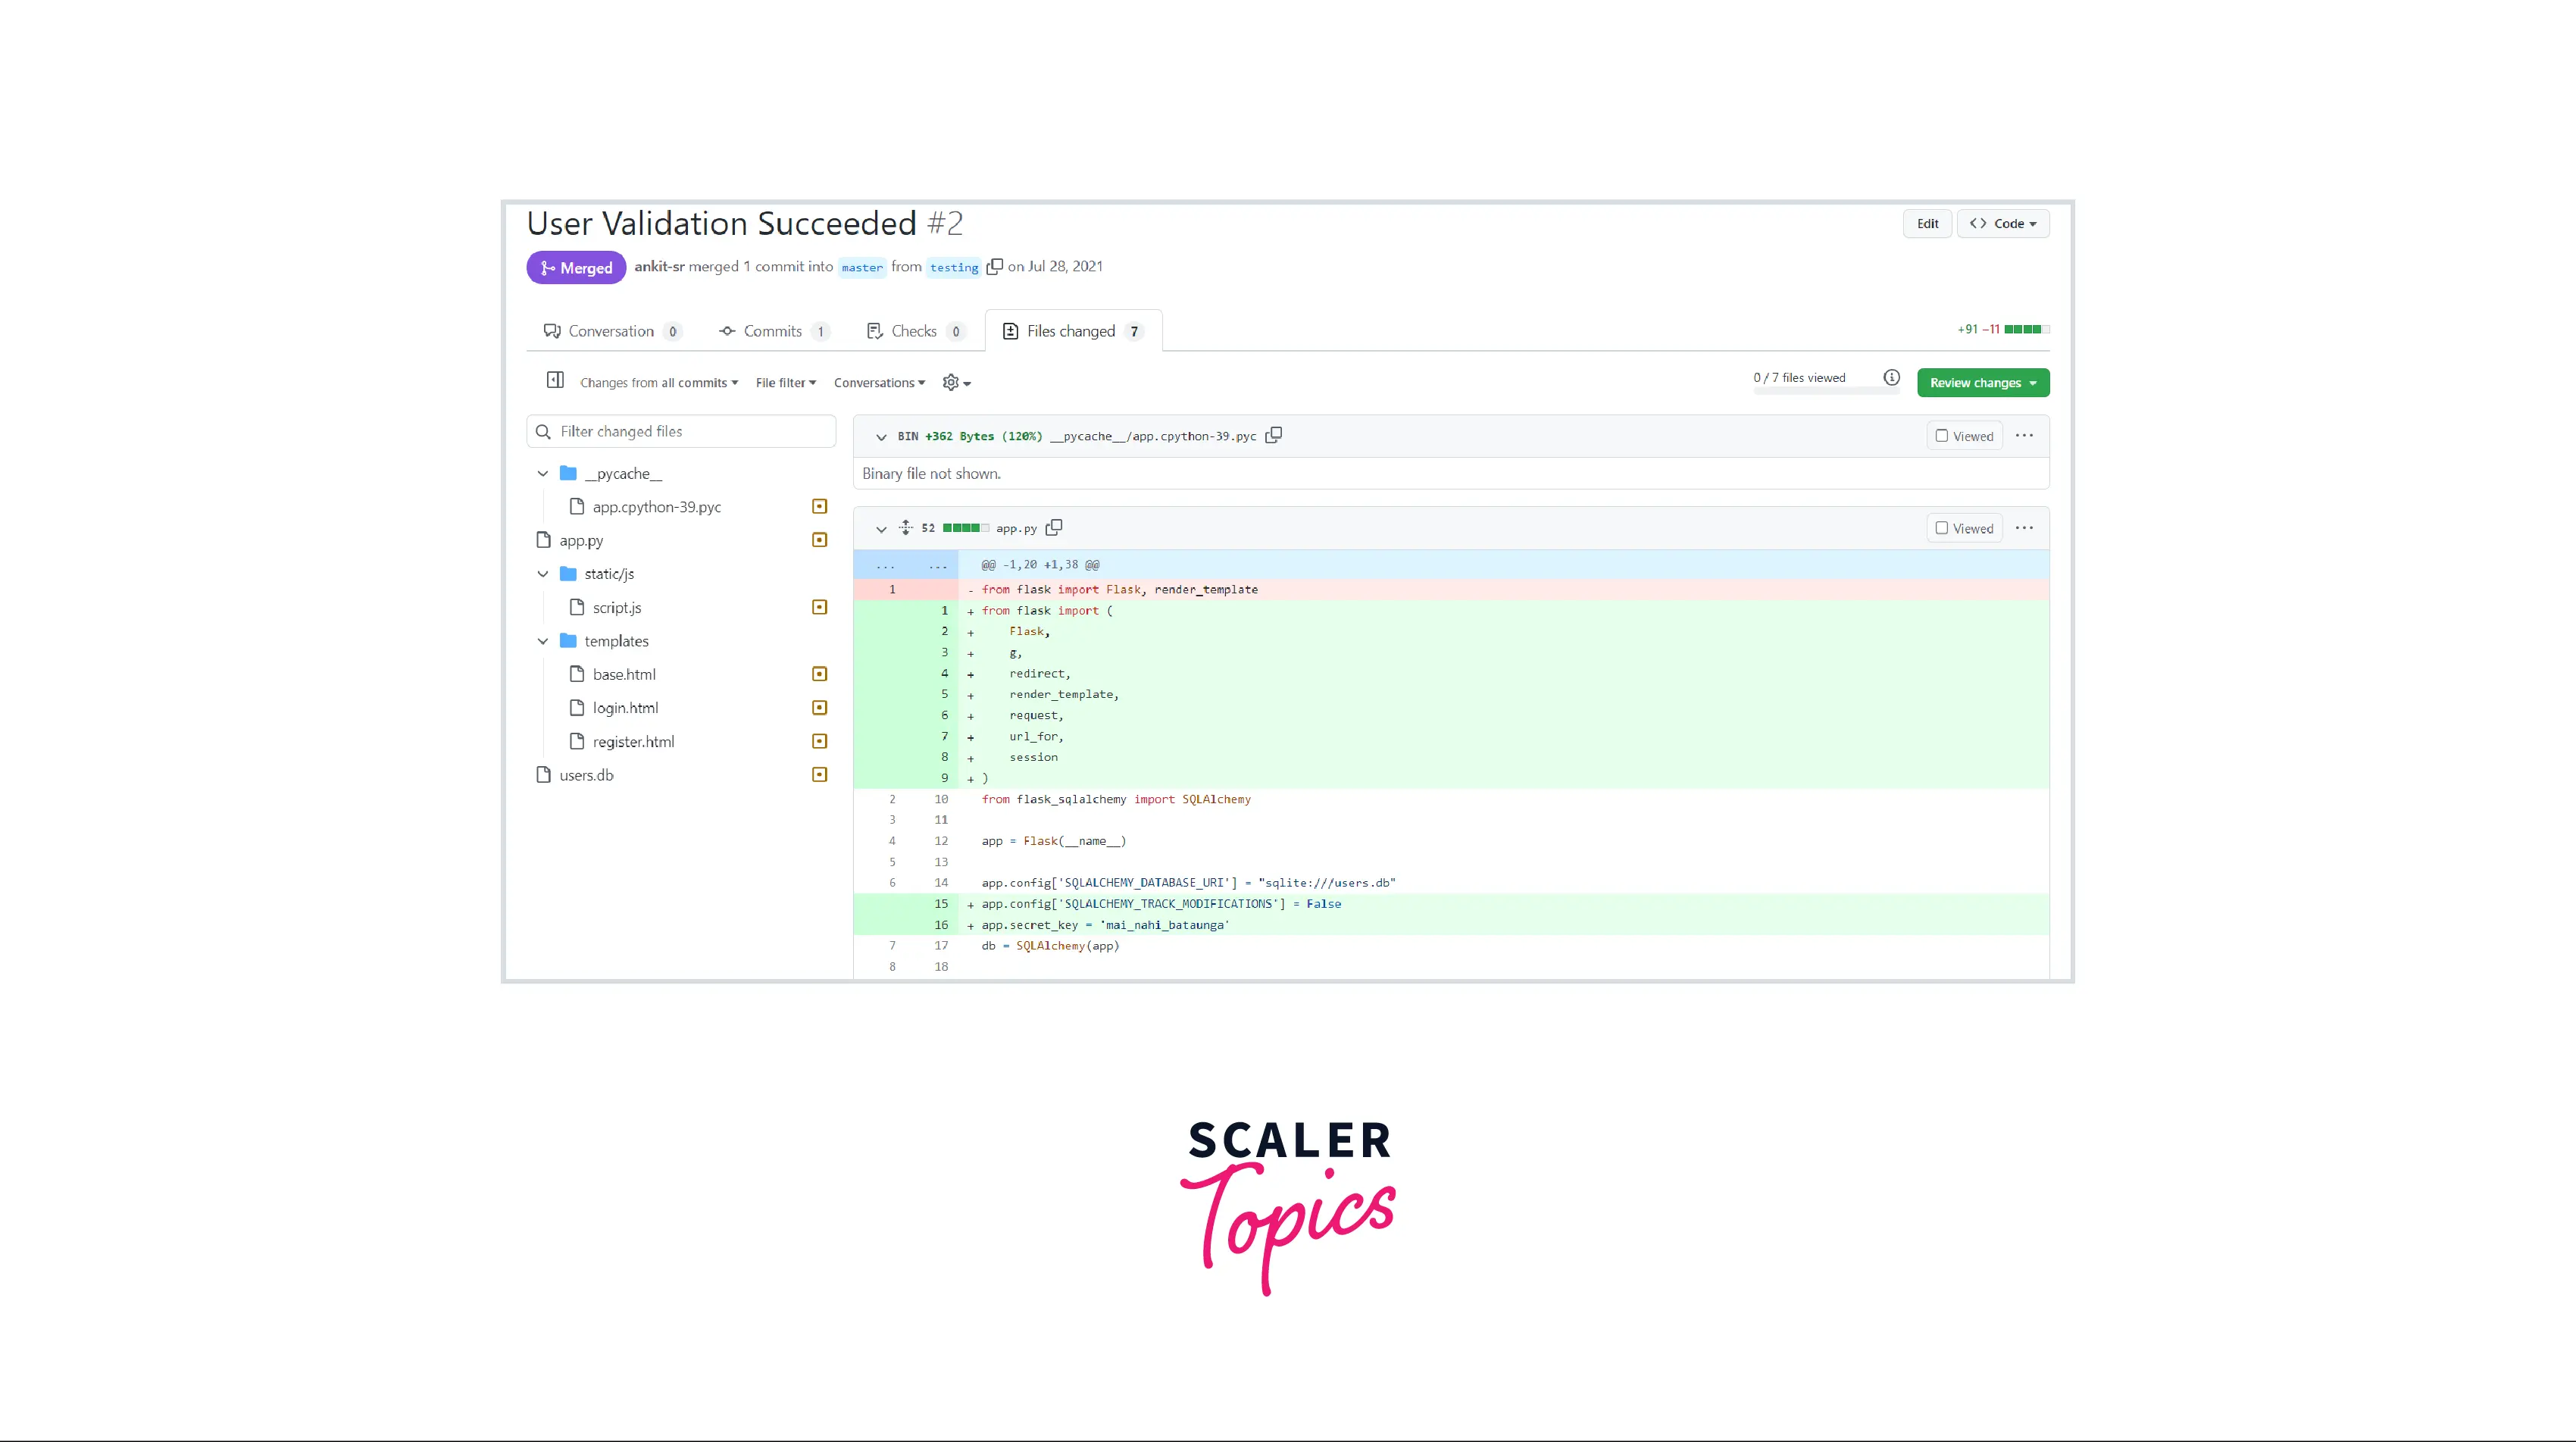
- On the pull request, we have a sub-section on the right half with the name Files changed we can click on that sub-section to see the files that have been changed by the developer.
- We can review the changed files or the pull request, and we can also add comments for the developer or ask for any certain changes if we want.
- After that, we can click on the Review changes button present above the changed code.
- Now, we can type a comment to summarize the feedback on the proposed changes.
- Finally we can Approve the proposed changes and click on the Submit review button.
Refer to the image provided below to see what a pull request looks like, along with the options that we get on the tab.
Options When Reviewing a Pull Request
Let us learn the various option that we see on the GitHub platform when we are reviewing the pull requests.
- Conversation Tab: It is used to add a comment at a certain line of code for the developer who made the pull request.
- Dismiss Review: We also have the option to dismiss the review of the proposed change is not optimal for merging.
- Files Changed: We have a sub-section where we can see the files that have been changed by the developer.
- Commits: We have another sub-section near the Files Changed sub-section, which contains all the commits made by the developer in the pull request.
- Write: Write tab can be used to add comments for the developers.
- Preview: We can preview our comments as well as the changes using the Preview button.
- Approve: The Approve button is used to approve the changes made by the developer and merge the pull request to our main branch.
Please check the image provided below for more clarity on these options.
Some Best Practices When Reviewing a Pull Request
Let us learn about some of the best practices that we should follow before making any pull request.
- We must not harm the correct code of the project.
- We must respect the time of the people. The person or the reviewer's time should be respected. Hence, we must not make silly pull requests.
- As a reviewer, we should provide correct and descriptive feedback to the developer so that he/she can learn and grow more.
- We must not be egoistic; we should review everyone's pull request with the same state of mind, whether the reviewer is our friend or a competitor.
- We must be crisp and precise about the changes that need to be improved in any pull request.
- We must be strict with codes; we should not merge temporary pull requests.
GitHub is a platform that connects several developers, and we must respect everyone for their time and effort.
Turn Learning into Career Growth
Git Merge
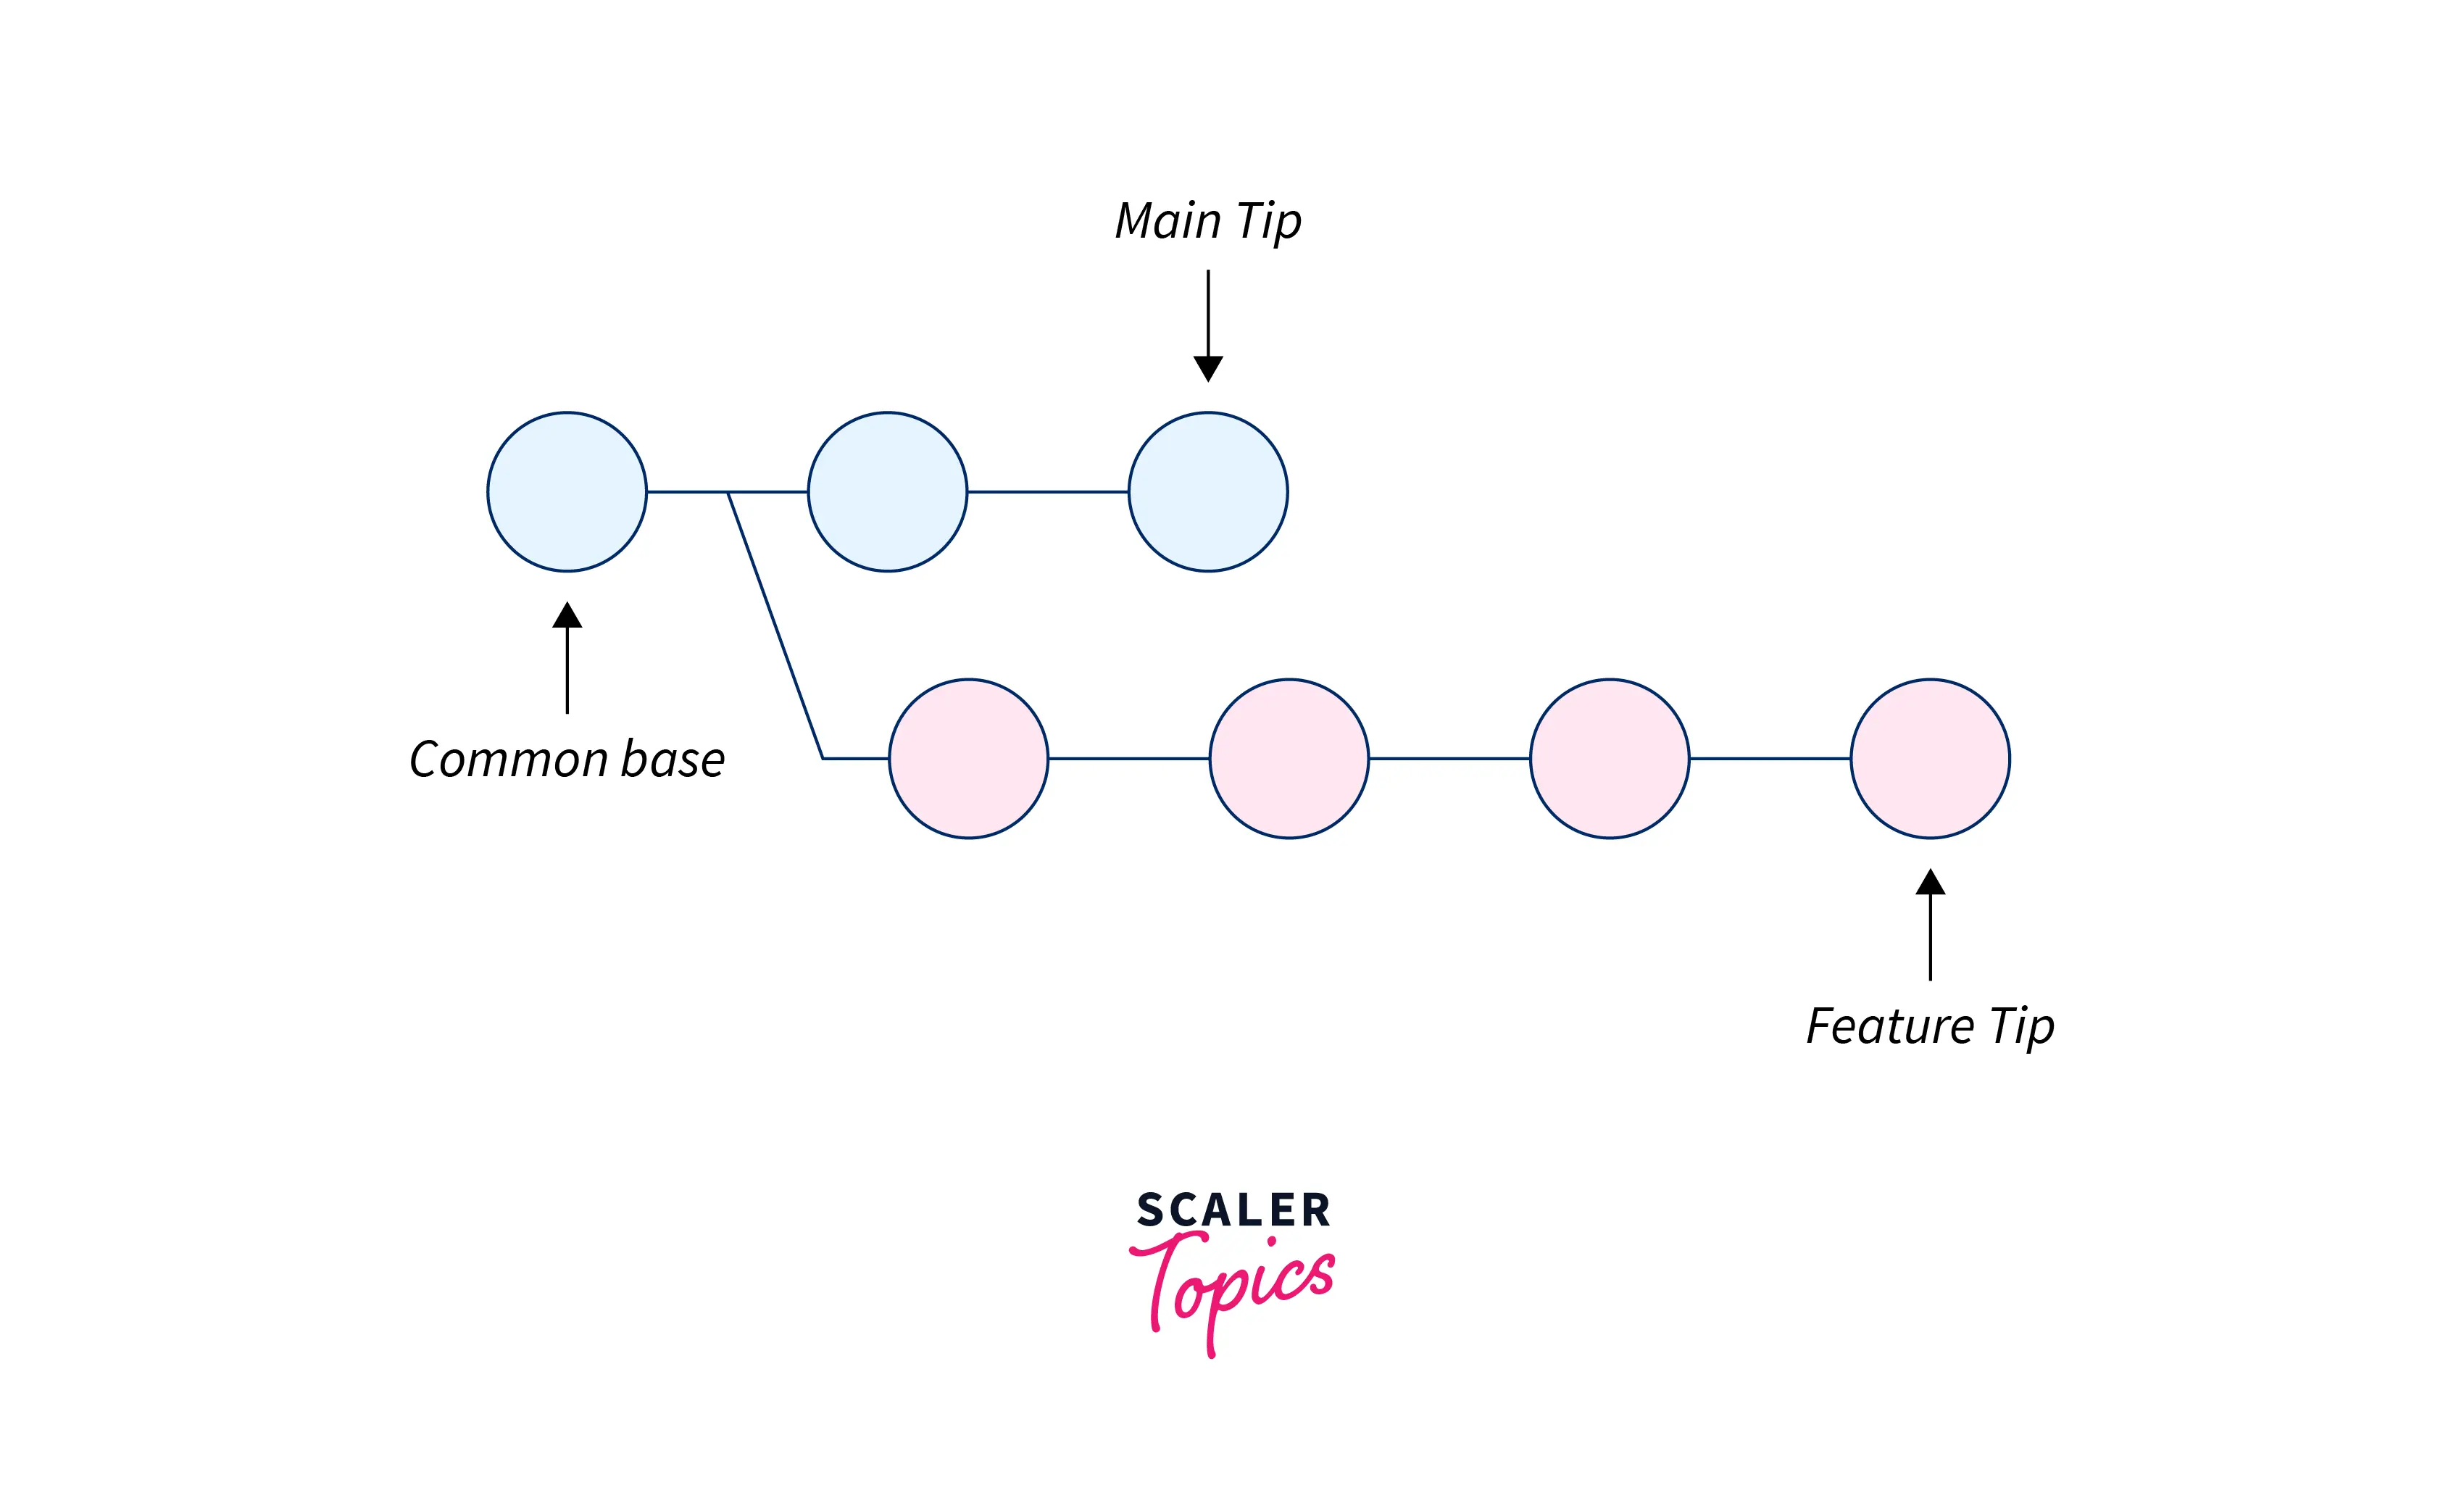
Git merge is one of the most widely used commands that is used to merge multiple commits (that may be stored in several branches) into a single branch. We perform branching for parallel development of new feature(s) and bug fixing. Once the bug is fixed or the new feature is added, we can merge these branches into a single branch.
Now, for merging several branches, the git associates a series of commits into a unified history. There are five types of merges in git; they are: Fast Forward, Recursive, Ours, Octopus, Resolve, and Subtree.
Let us now look at some of the features of the git merge command:
- Git merge command creates history in a graphical form so that the user can understand the commits and merge.
- We can use the git merge command on both private and public branches.
- The git merge command preserves the merging history.
- The git merge command shows us all the merge conflicts in a single place. Refer to the Merge Conflict section to learn about merger conflicts in merging.
- Git merge command merges two safe branches.
The git merge command is also considered an alternative to the git rebase command. Now the major difference between the git rebase and git merge is that when we perform git rebase, then the commits will be merged linearly; on the other hand, if we use the git merge command, then all the commits will be merged in a time altogether.
Refer to the image provided below for a better understanding.
Note: The git merge command is often used with the git checkout command and the git branch -d command. The git checkout command is used to select a certain branch. On the other hand, the git branch -d command is used to delete an obsolete branch.
Now to perform the merging, some preparation steps need to be followed. Let us discuss them briefly, getting into the essential commands of git merging.
-
Confirm the receiving branch We will first check whether the HEAD of the branch is pointing to the correct merging branch or not. The checking can be performed using the git status command that is used to check the status of the repository. If we need to change the branch, then we can use the git checkout command to move to a certain branch.
-
Fetch the latest remote commits Before merging, we need to first check if our receiving branch is up-to-date with the latest changes in the remote repository. For fetching the latest changes (to update the current branch), we can use the git fetch command. After fetching, we will use the git pull command to ensure that our master branch has the latest updates.
-
Merge After performing the above steps, we can now initiate the merging by using the git merge command.
The various commands that are used in git merging.
The basic git merging command:
1. The command to merge a certain commit of the active branch.
2. The command to merge a certain branch.
Git Cherry-pick
If we want to cherry-pick a change from one branch to the other branch, we use the cherry-pick command. We generally use the cherry-pick command to pick the changes to form the testing branch (beta-branch) to the master branch (master or main project). We can analyze the cherry-pick command as copying the old changes from one branch to the other branch.
Let us look at the syntax and various flags and subcommands associated with the git cherry-pick command.
Subcommands
- -e: - or -edit flag lets us edit the commit message before committing it.
- -x: -x flag is used to append a line to the original commit message during the recording of the commit.
- -n: -n or --no-commit is used to create a sequence of commits.
- -s: -s or --sign off is used to add a signed-off-by trailer at the end of our commit message.
- --ff: --ff is used to perform a fast-forward commit if the current head is the same as the parent head of the cherry-picked commit.
- --continue: continue subcommand is used to continue to ongoing operation present in the .git/sequencer. It is also used to continue the commit after the merge conflicts are resolved in a failed cherry-pick.
- --skip: As the name suggests, it is used to skip the current commit and then continue with the rest of the commit sequences.
- --abort: The abort command is used to cancel or abort the current operation and return to the pre-sequence state.
- --quit: the quit command is used to clear the sequence of commits after a failed to cherry-pick or revert event.
Scaler Placement Report and Statistics
Scaler learners achieved 2.5x salary growth with average post-Scaler CTC reaching ₹23L.
Selectively Merge Changes
Let us learn how we can perform selective git merging using the git cherry-pick command. For understanding selective git merging, let us understand the scenario in which we have a branch having some commits in the branch, and we need to pick a few commits to merge them into another branch. Suppose we have two branches, namely main and feature.
Suppose that we had some bugs in our project and we needed to fix them, so we fixed them and without committing those changes, we shifted our branch to the feature branch (without committing to the main branch). A normal merge cannot work here as it will break our project. In such scenarios, we first check the logs (using the git log command) to check all the commits performed in the history. After checking out the logs, we need to switch to the branch that contains the changes. Now for switching to that branch (here feature branch), we can use the git checkout <branch-name> command.
After checking out the feature branch, we need to identify the commits that we want to merge in our main branch. Let us assume that we have found two commits, namely edc8ae and cefb7bb that are not yet in the main branch. Now to merge these two commits in the main branch, we can use the git cherry-pick command and append the commit ids of both commits.
Before doing the git cherry-pick we must checkout the branch we want to merge to (main branch in our case). So after switching the main branch, we can execute the command-
After executing the above command, we can push our changes using the git push main command.
Other Options to Selectively Merge Files Such as Git Checkout and Git Squash
Apart from using selective merging, we have some other techniques of merging, such as git checkout and git squash. Let us learn about them in brief.
The git checkout is one of the most important commands used in git. It is used to switch between various versions of any target entity. The git checkout command mainly works with three distinct entities, i.e. files, commits, and branches. The git checkout command lets us switch between the branches. The git checkout command is usually used with the git branch command. It helps in easy switching and creating a branch if we combine both these commands. The combined command becomes git checkout -b <new-branch>. We can perform a lot of operations using the git checkout command. Some of the operations that can be performed using the git checkout command can be switching to a specific branch, creating a new branch, checking out a remote branch, and many more.
The git squash command helps us to combine two or more two commits into a single commit. It also allows us to specify a new commit message to the changes. The git squash command squashes two or more commits to the index of the working repository. For squashing, the command picks are the previously made commit, and the newly made commit. We can say that the git squash command is used to group all the changes before actually merging them.
In scenarios where we have multiple commits, we can use the git squash commands to squash them into a single commit.
Conclusion
- Git is a version control system that tracks the changes in the code, documents, and other important information regarding a certain code base, etc. GitHub is a cloud-based central repository that can be used to host our code for team collaboration.
- We request the project maintainer to merge our branch (containing changes) to the working remote repository by creating the pull request.
- Git merge is one of the most widely used commands that is used to merge multiple commits (that may be stored in several branches) into a single branch.
- If someone has made some merging requests on our remote repository, then we can review those requests and then merge them into our main branch using GitHub as well.
- Git merge is one of the most widely used commands that is used to merge multiple commits (that may be stored in several branches) into a single branch.
- The git merge command shows us all the merge conflicts in a single place. Refer to the Merge Conflict section to learn about merger conflicts in merging.
- We generally use the cherry-pick command to pick the changes to form the testing branch (beta-branch) to the master branch (master or main project).
- We can analyze the cherry-pick command as copying the old changes from one branch to the other branch
- The git checkout is used to switch between various versions of any target entity. The git checkout command mainly works with three distinct entities, i.e. files, commits, and branches.
- The git squash command helps us to combine two or more two commits into a single commit. It also allows us to specify a new commit message to the changes.
- In scenarios where we have multiple commits, we can use the git squash commands to squash them into a single commit.