HTML Cheat Sheet

Overview
HTML tags are similar to keywords which define how a web browser will structure and display the content. A web browser can tell the difference between HTML content and plain text by using HTML tags. HTML tags are divided into three sections, the opening tag, the content tag, and the closing tag. However, some HTML tags are not closed. An HTML document is scanned by a web browser from top to bottom and left to right. These tags are used to build HTML documents and display their features. Every HTML tag has a unique set of attributes. An HTML file must contain some important tags in order for a web browser to distinguish between plain text and HTML text. You can use as many tags as you need for your code. This HTML Cheat Sheet will provide you a good knowledge of HTML.
HTML Cheat Sheet
Setup for HTML
Text editors, sometimes known as code editors, are applications that developers use to write code. They can highlight and arrange your code to make it more readable and understandable.
You may have also read or heard of IDEs, often known as "integrated development editors." An IDE lets you edit, compile, and debug your code all in one application or interface. While the text editor is not called an IDE, it includes several IDE-like capabilities that make life easier for developers without requiring the extensive resources that an IDE generally requires. To setup for HTML you have to do the following things:
1) Choosing a text editor
There are many text editors available. For example, Visual Studio Code is one of the most popular text editors used among developers.
2) Installing Visual Studio code (VS code) The installation process for Computers running macOS, Windows, and Linux will be completely similar, also the use of Visual Studio Code will be the same across all of them.
- Go to the Visual Studio Code website to get the most recent version of Visual Studio Code.
- Your computer's operating system should be displayed, but if it isn't, click on the down arrow and select the option that matches your operating system from the drop-down menu, then click on the down arrow symbol beneath "Stable."
- Once the Visual Studio Code file has been downloaded, we must install it. Locate the Visual Studio Code file in your file manager, which is the tool that allows you to see your computer's files and directories.
- Make sure your Visual Studio Code application is saved in a location where you can quickly find it.
3) Make a development folder inside VS code
Using your file manager or the console, navigate to a folder. Make sure it is a folder that you will remember and visit frequently.
4) Open your development folder
Click the 'Explorer' icon on the left-hand menu, then click the 'Open Folder' option and navigate to your development folder. This will open the file manager.
5) Add file
Click on the name of your development folder in the Explorer window of Visual Studio Code. Four icons will display to the right of the folder name. Select the 'New File' option. Enter the name of the new file, followed by the file extension ( for example, .html, .css, .csv). It is important that you include the correct file extension so that applications like linters can read its contents. Press Enter when done.
6) View your file in the browser
Your file is now prepared to be viewed in a web browser. The next actions must be taken outside of Visual Studio Code.
Use your file manager or terminal to access the index.html file. Open or double-click index.html. Your default web browser should open the page.
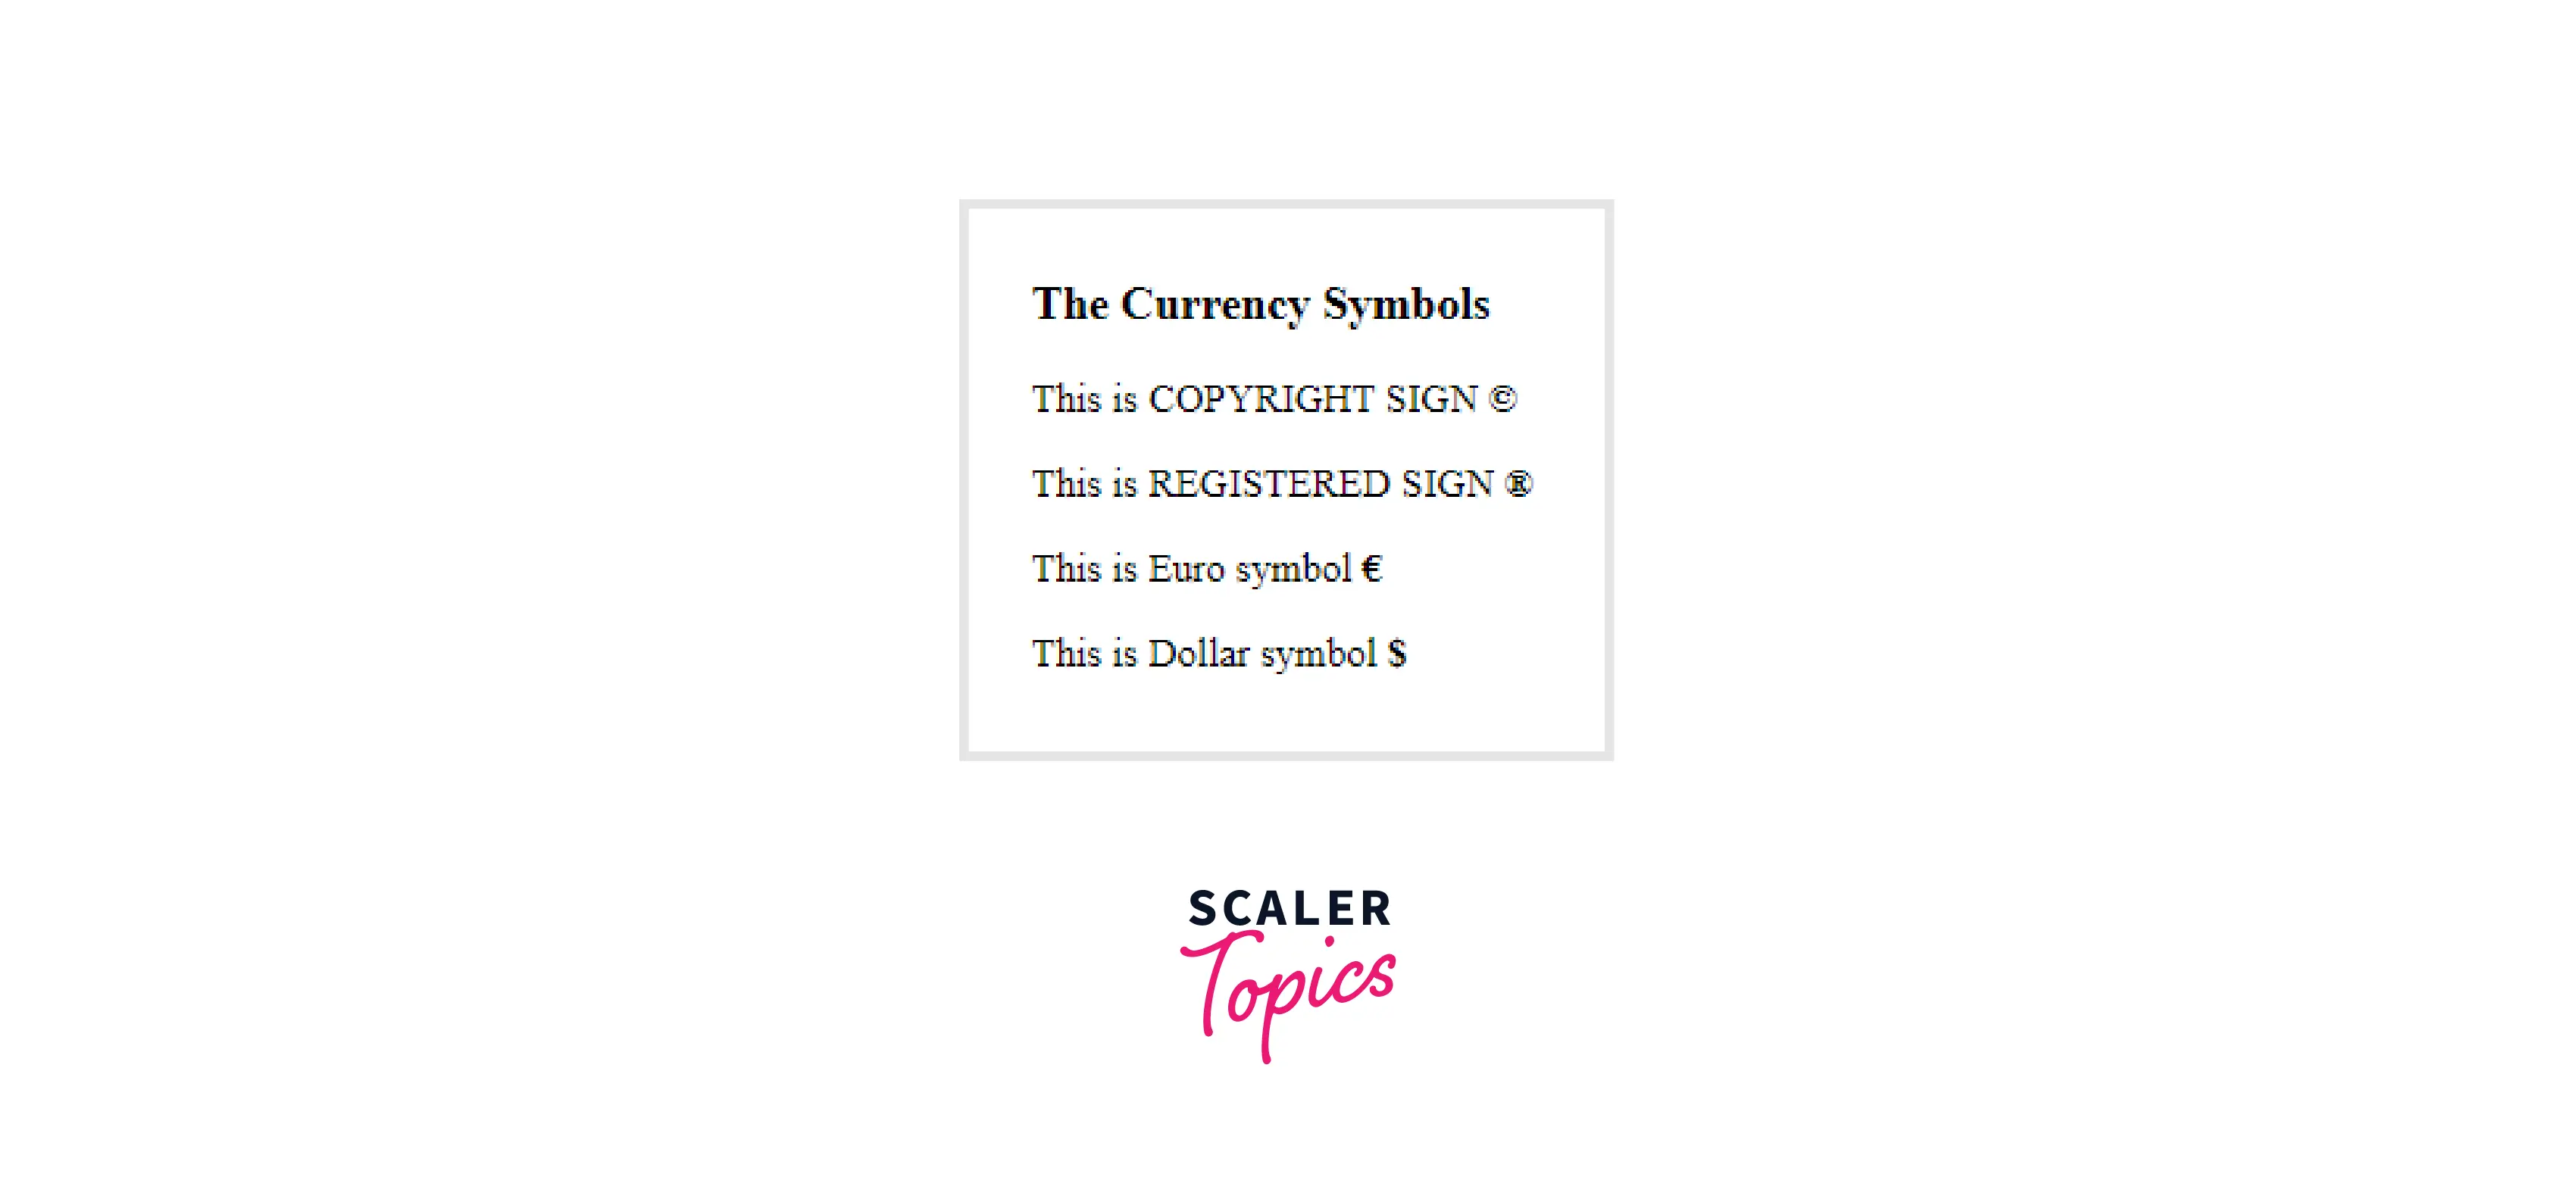
Characters and Symbols in HTML
HTML character references are small bits of HTML, also known as character entities or entity codes, that are used to show special HTML characters as well as characters that do not exist on your keyboard.
Many mathematical, technical, and currency symbols do not appear on a standard keyboard. To add such symbols to an HTML page, we have to use HTML entity names. If no entity name is available, you can use an entity number, decimal, or hexadecimal reference.
Example:
Output of the above code:
HTML DOM
The Document Object Model (DOM) is a programming interface for HTML and XML (Extensible Markup Language) documents. It specifies the logical structure of documents as well as how they are accessed and manipulated.
HTML is used to structure web pages, whereas Javascript is used to add functionality to web pages. When an HTML file is loaded into the browser, the javascript cannot directly interpret the HTML document. As a result, a relevant document is created (DOM). DOM is essentially a representation of the same HTML document in a new manner using objects.
Javascript readily interprets DOM, i.e. javascript cannot understand tags (<h1>H</h1>) in an HTML document but can understand object h1 in DOM. Javascript may now use several functions to access each of the objects (h1, p, etc.).
Transform Your Career
Choose from our industry-leading programs designed for career success
Modern Software and AI Engineering Program
Master full-stack development with AI integration

Modern Data Science and ML with specialisation in AI
Advanced data science techniques with AI specialization
Advanced AIML with Specialisation in Agentic AI
Deep dive into AIML with focus on Agentic systems
DevOps, Cloud & AI Platform Engineering
Build and manage AI-powered cloud infrastructure
AI Engineering Advanced Certification by IIT-Roorkee
Premier AI engineering certification from IIT-Roorkee
Block and Inline Elements
HTML (Hypertext Markup Language) elements were previously classified as either block-level or inline-level.
-
A block-level element always begins on a new line, and browsers provide space (a margin) before and after the element. It always takes up the full available width (stretches out to the left and right as far as it can). The block elements <p> and <div> are two of the most often used block-level element. The <p> element defines a paragraph while the <div> element establishes a divide or segment.
-
Inline elements are displayed in a single line. They do not force the text to a new line. An inline element takes up only as much width as it requires. An example of an inline element is an anchor (or link). You can put several links in a row to display them in a line.
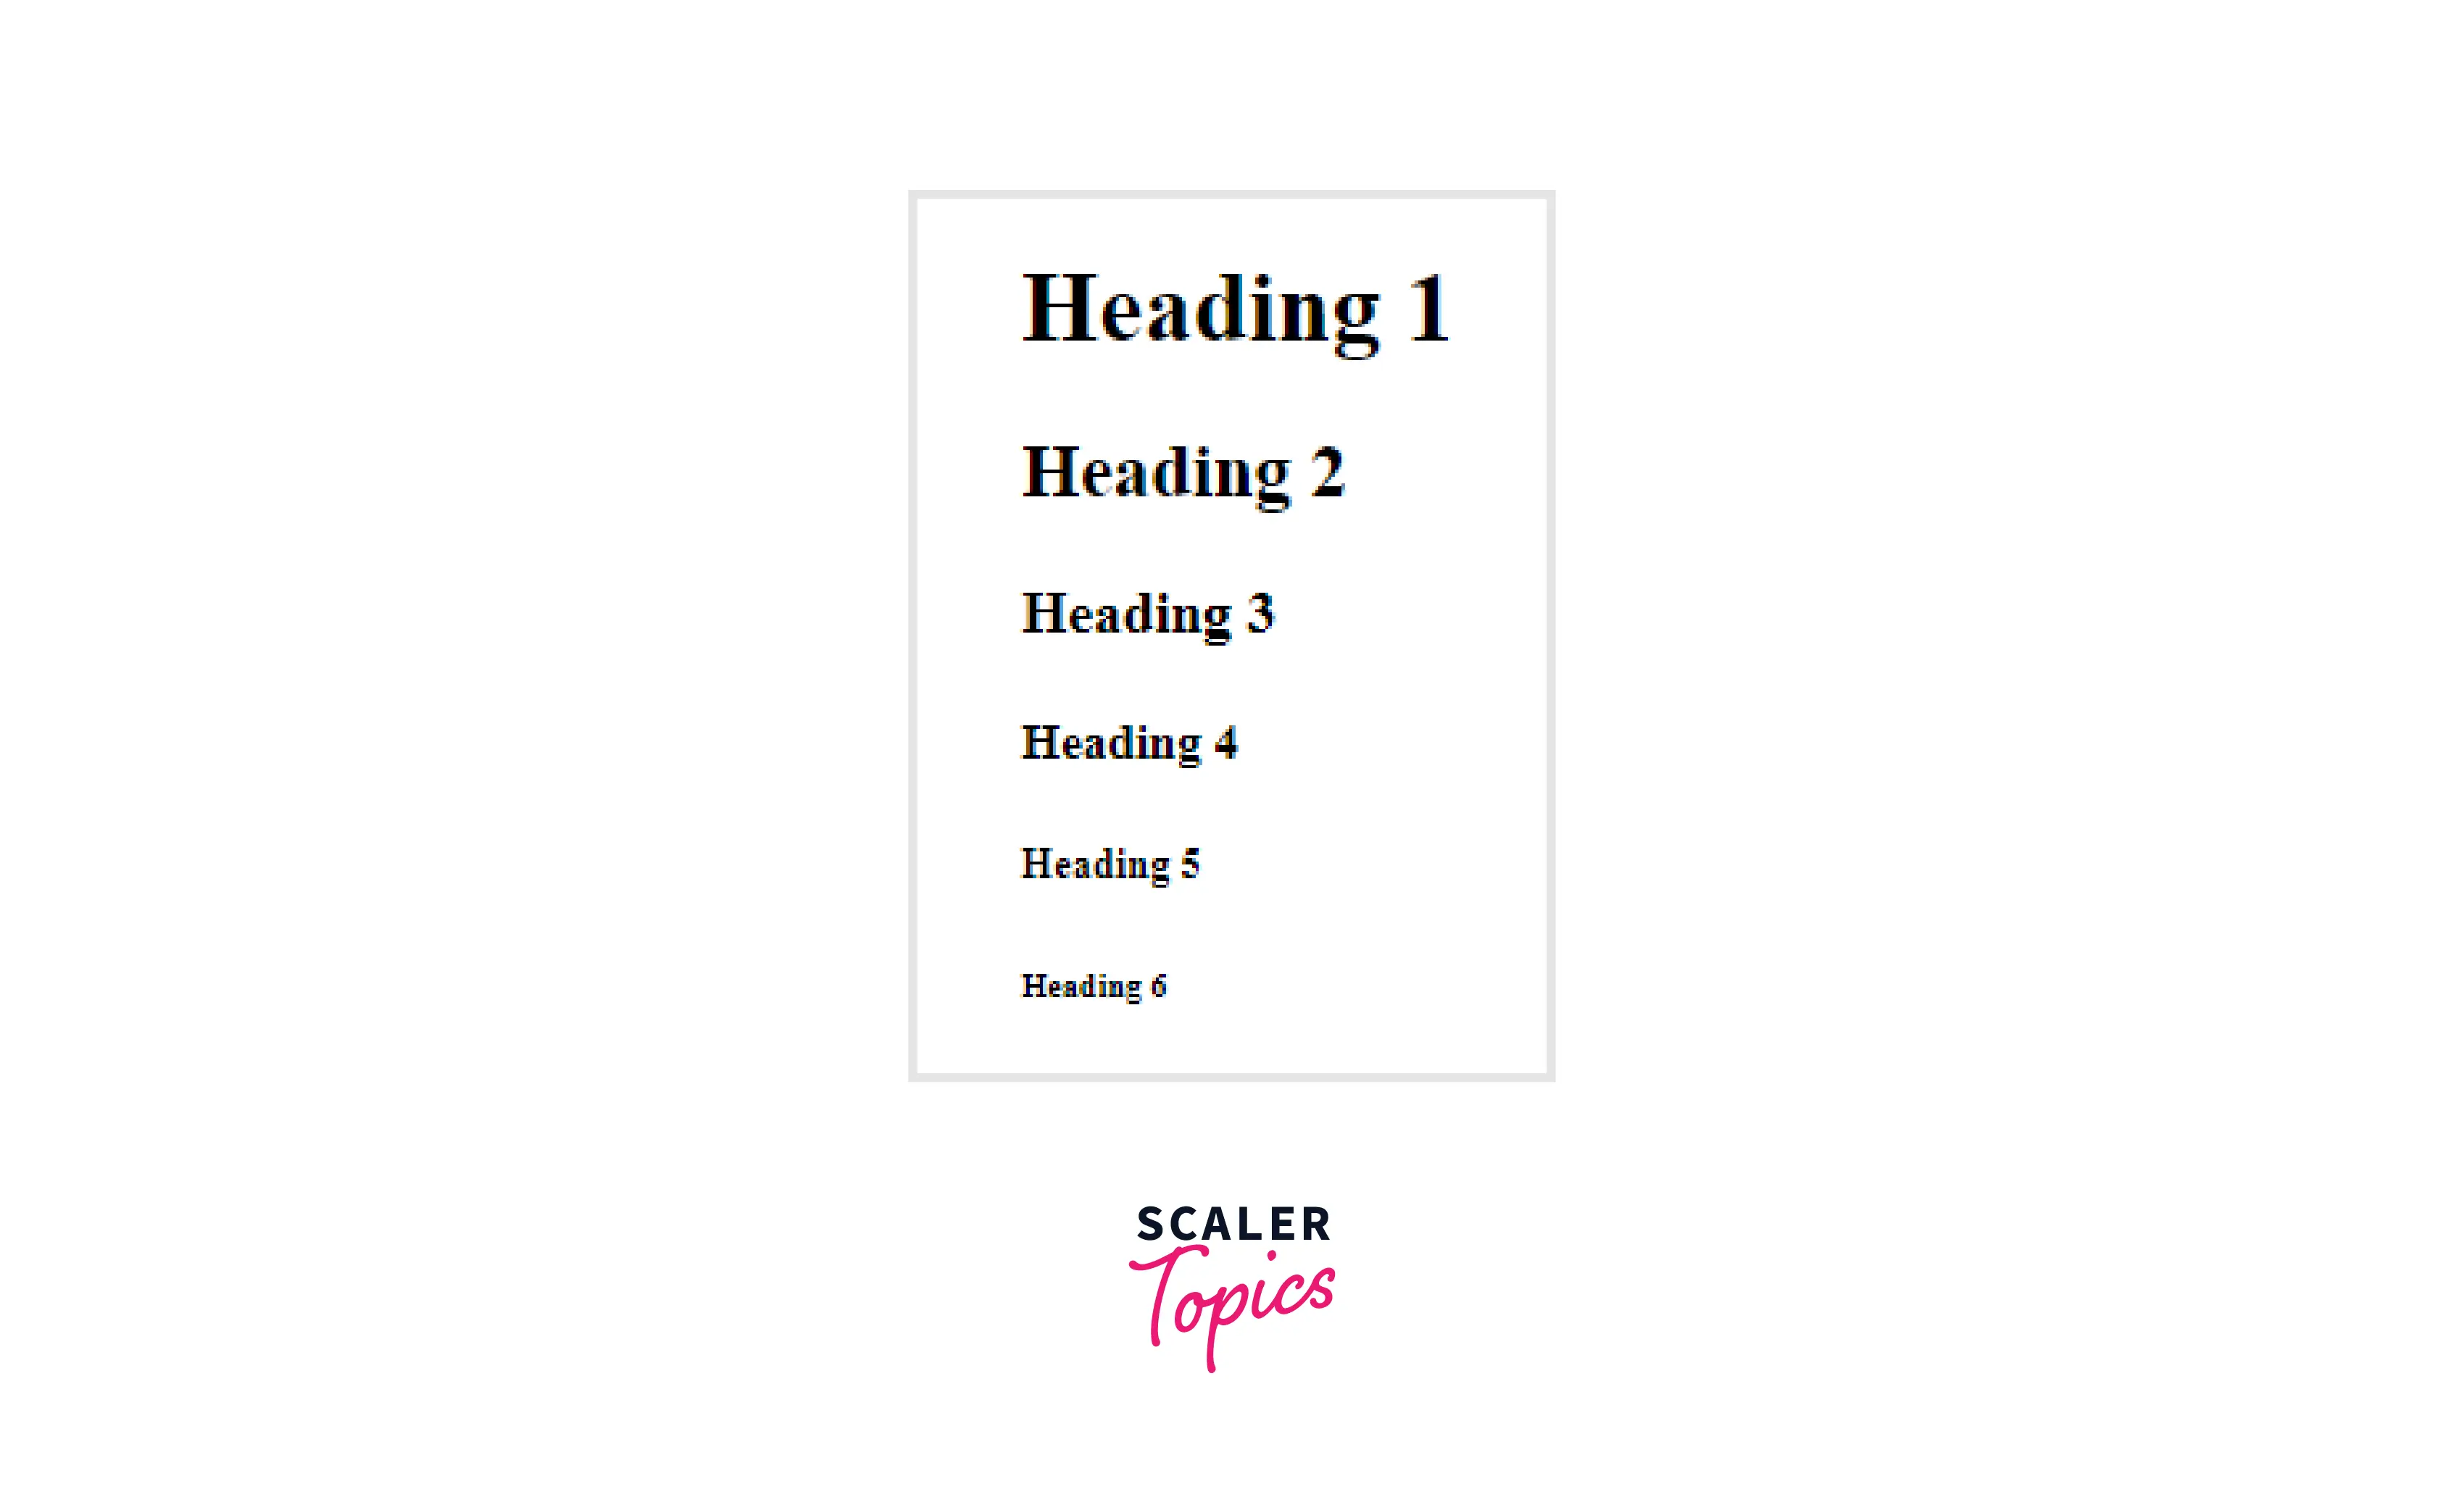
Heading Tags in HTML
Heading tags are HTML components that define the headings of a page. They set the heading <h1> and sub-headings <h2> to <h6> apart from the rest of the content. The relevance and position of a heading in the overall hierarchy of the heading structure are determined by the number from 1 to 6.
Example:
Output of the above code:
Container Tags in HTML
Container tags are often divided into three parts, i.e., the opening tag, the content (which will be displayed on the browser), and the closing tag. They can also include other tags in the content section. These opening and closing tags are used in pairs: start and end tags, often known as ON and OFF tags. If you fail to close the container tag, the browser will continue to use the effect of the opening tag until the conclusion of the page. Be cautious while working with container tags. The majority of tags in HTML are container tags.
| Tag | Description |
|---|---|
| <div> | The <div> tag is a block element. It represents a division or section in an HTML document. The <div> tag can contain any type of content. |
| <span> | The <span> tag is an inline element. It is used to highlight a section of a text or a section of a document. |
| <p> | The <p> tag represents a paragraph. HTML paragraphs can be any structurally related grouping of content, such as images or form fields. |
| <pre> | The <pre> tag represents pre-formatted content that should be displayed exactly as it is written in the HTML file. It preserves text spaces, line breaks, tabs, and other formatting characters that web browsers ignore. |
| <code> | The <code> tag represents the source codes. Its primary function is to display the code snippet on the web browser. |
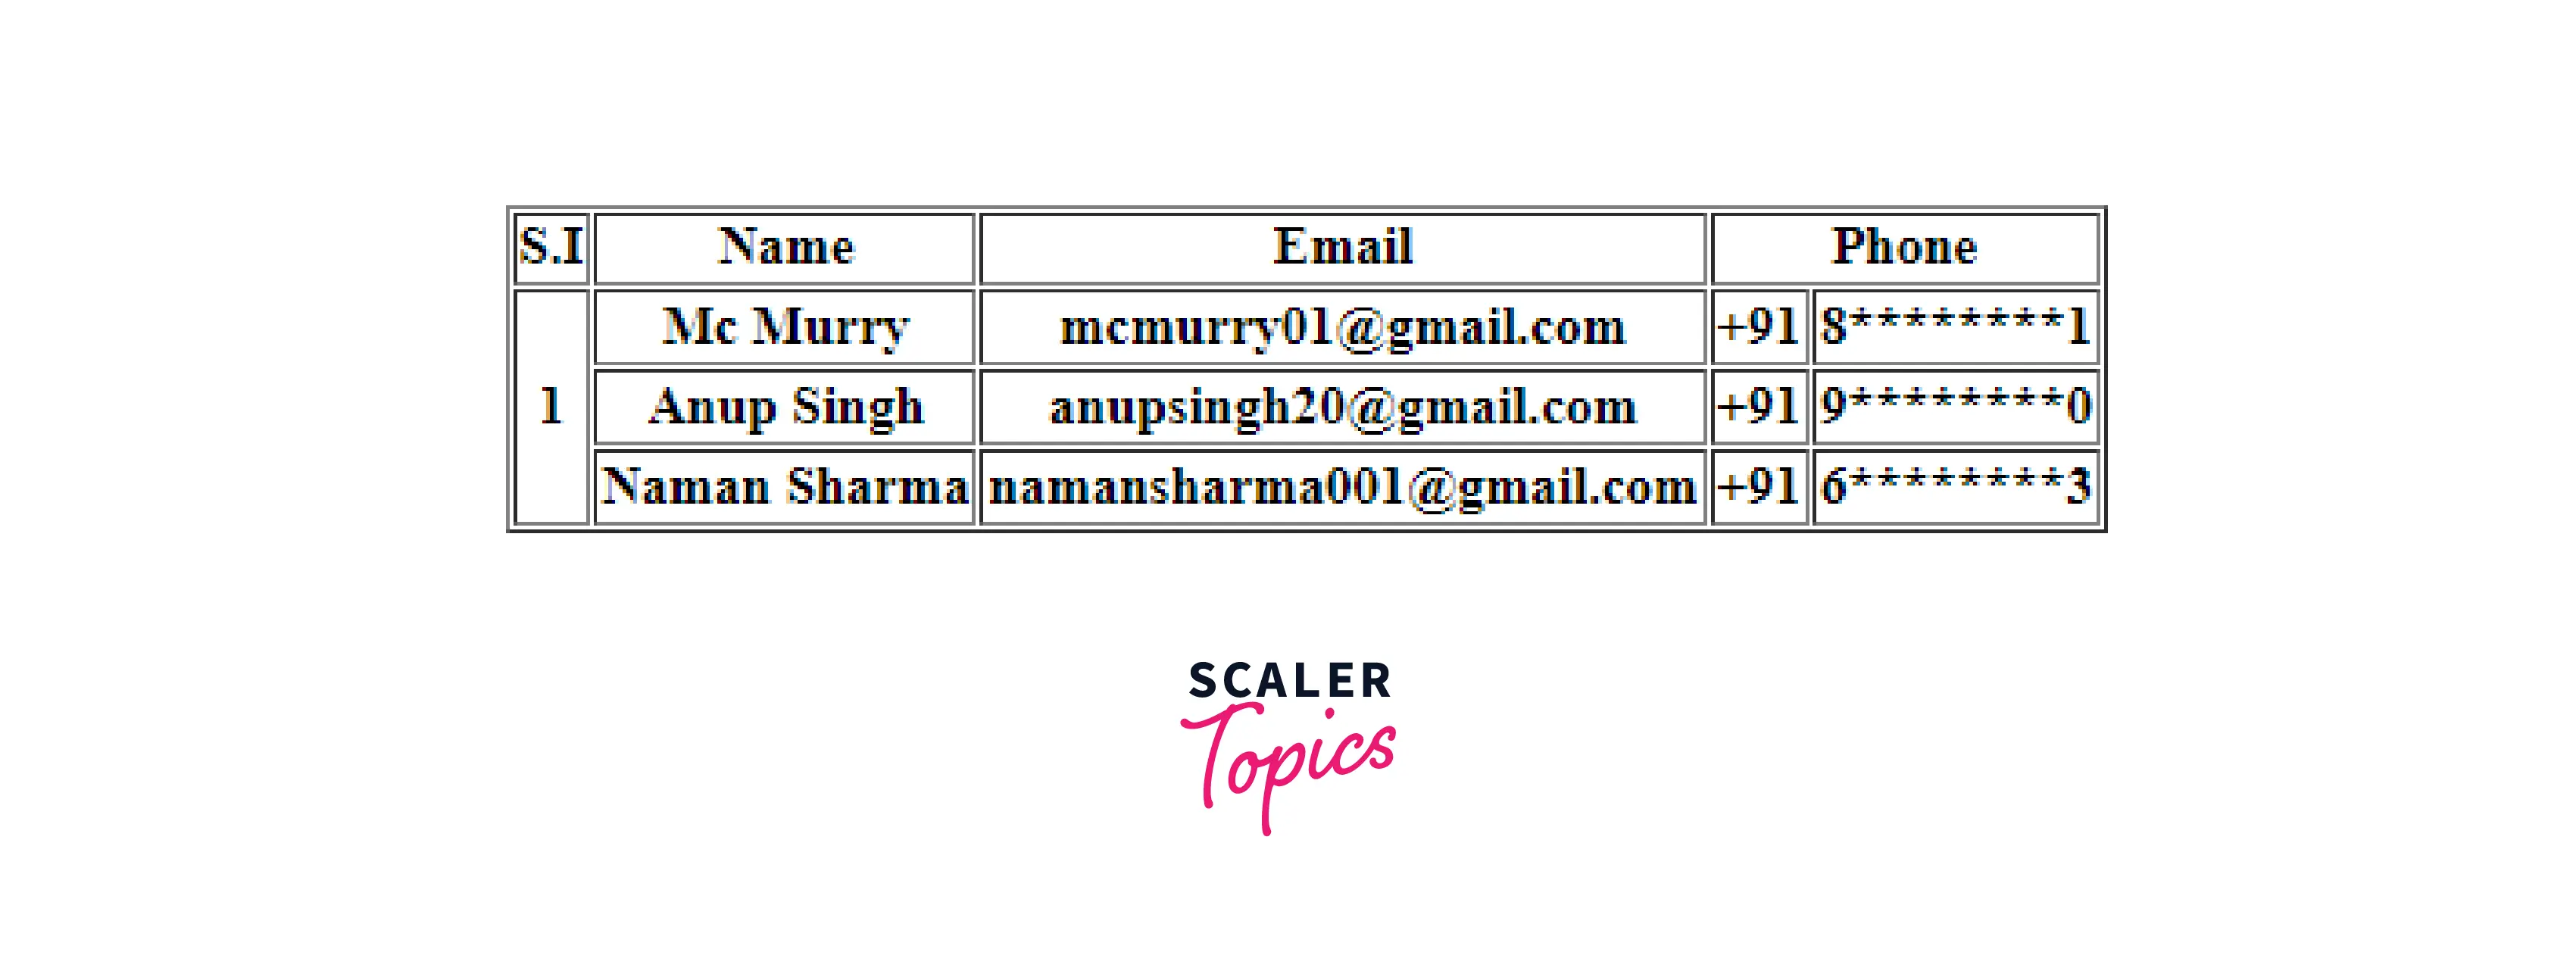
Table Tag in HTML
The HTML table tag displays data in a tabular format (row * column). A row can have many columns. Using the <table> element along with the <tr>, <td>, and <th> elements, we can make a table to display data in tabular form. Table rows are defined by the <tr> tag, table headers by the <th> tag, and table data by the <td> tags in each table. HTML tables are used to manage the page layout, such as the header section, navigation bar, body content, footer section, etc. However, it is advised that the div tag be used instead of the table to manage the page layout.
Example:
Output of the above code:
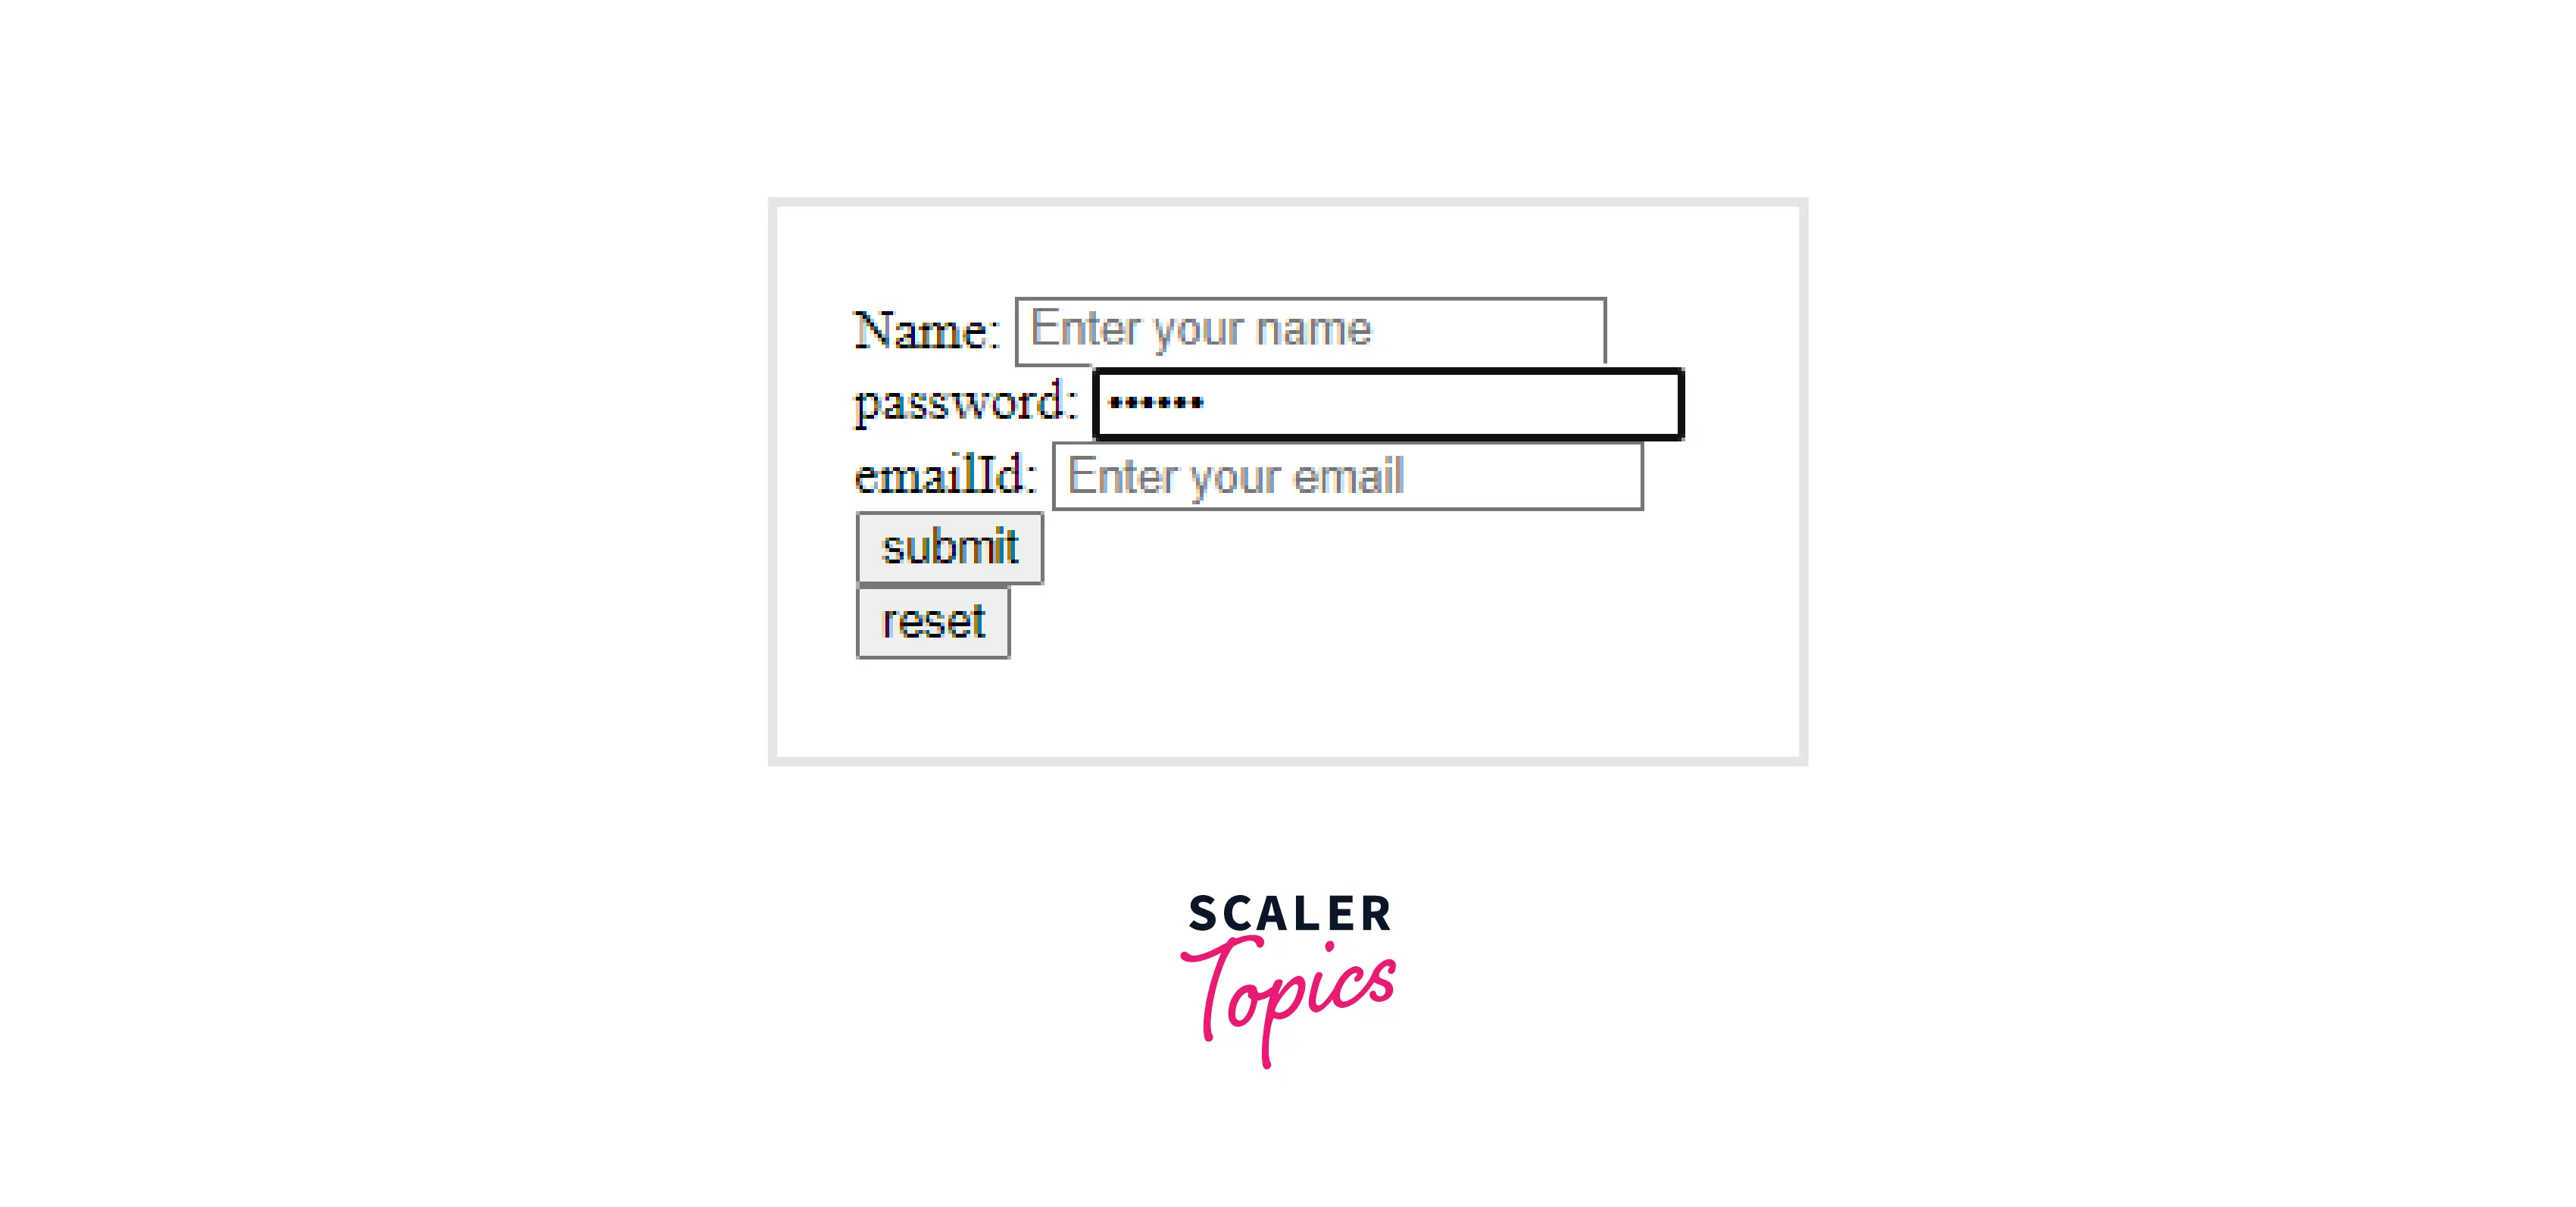
Form Tag in HTML
The <form> tag in HTML is used to create a user input form. A form may include textfields, checkboxes, radio buttons, and other elements. Forms are used to send user information to a certain URL. HTML forms are essential if you wish to collect information from site visitors. For example, if a user wants to buy something on the internet, he or she must fill out a form with information such as shipping address and credit/debit card details so that the item may be delivered to the specified address.
Example:
Output of the above code:
Turn Learning into Career Growth
HTML List Tags
Lists are used to arrange relevant pieces of information together so that they are clearly correlated with one another and easy to read. Lists are workhorse elements in modern web development, widely utilized for navigation as well as general content.
Lists are beneficial because they help in the creation of a well-structured, more accessible, and easy-to-maintain document. They are also useful since they provide specific elements to which CSS styles can be applied. Finally, semantically correct lists make it easier for people to read your website and make maintenance easier when your pages need to be updated.
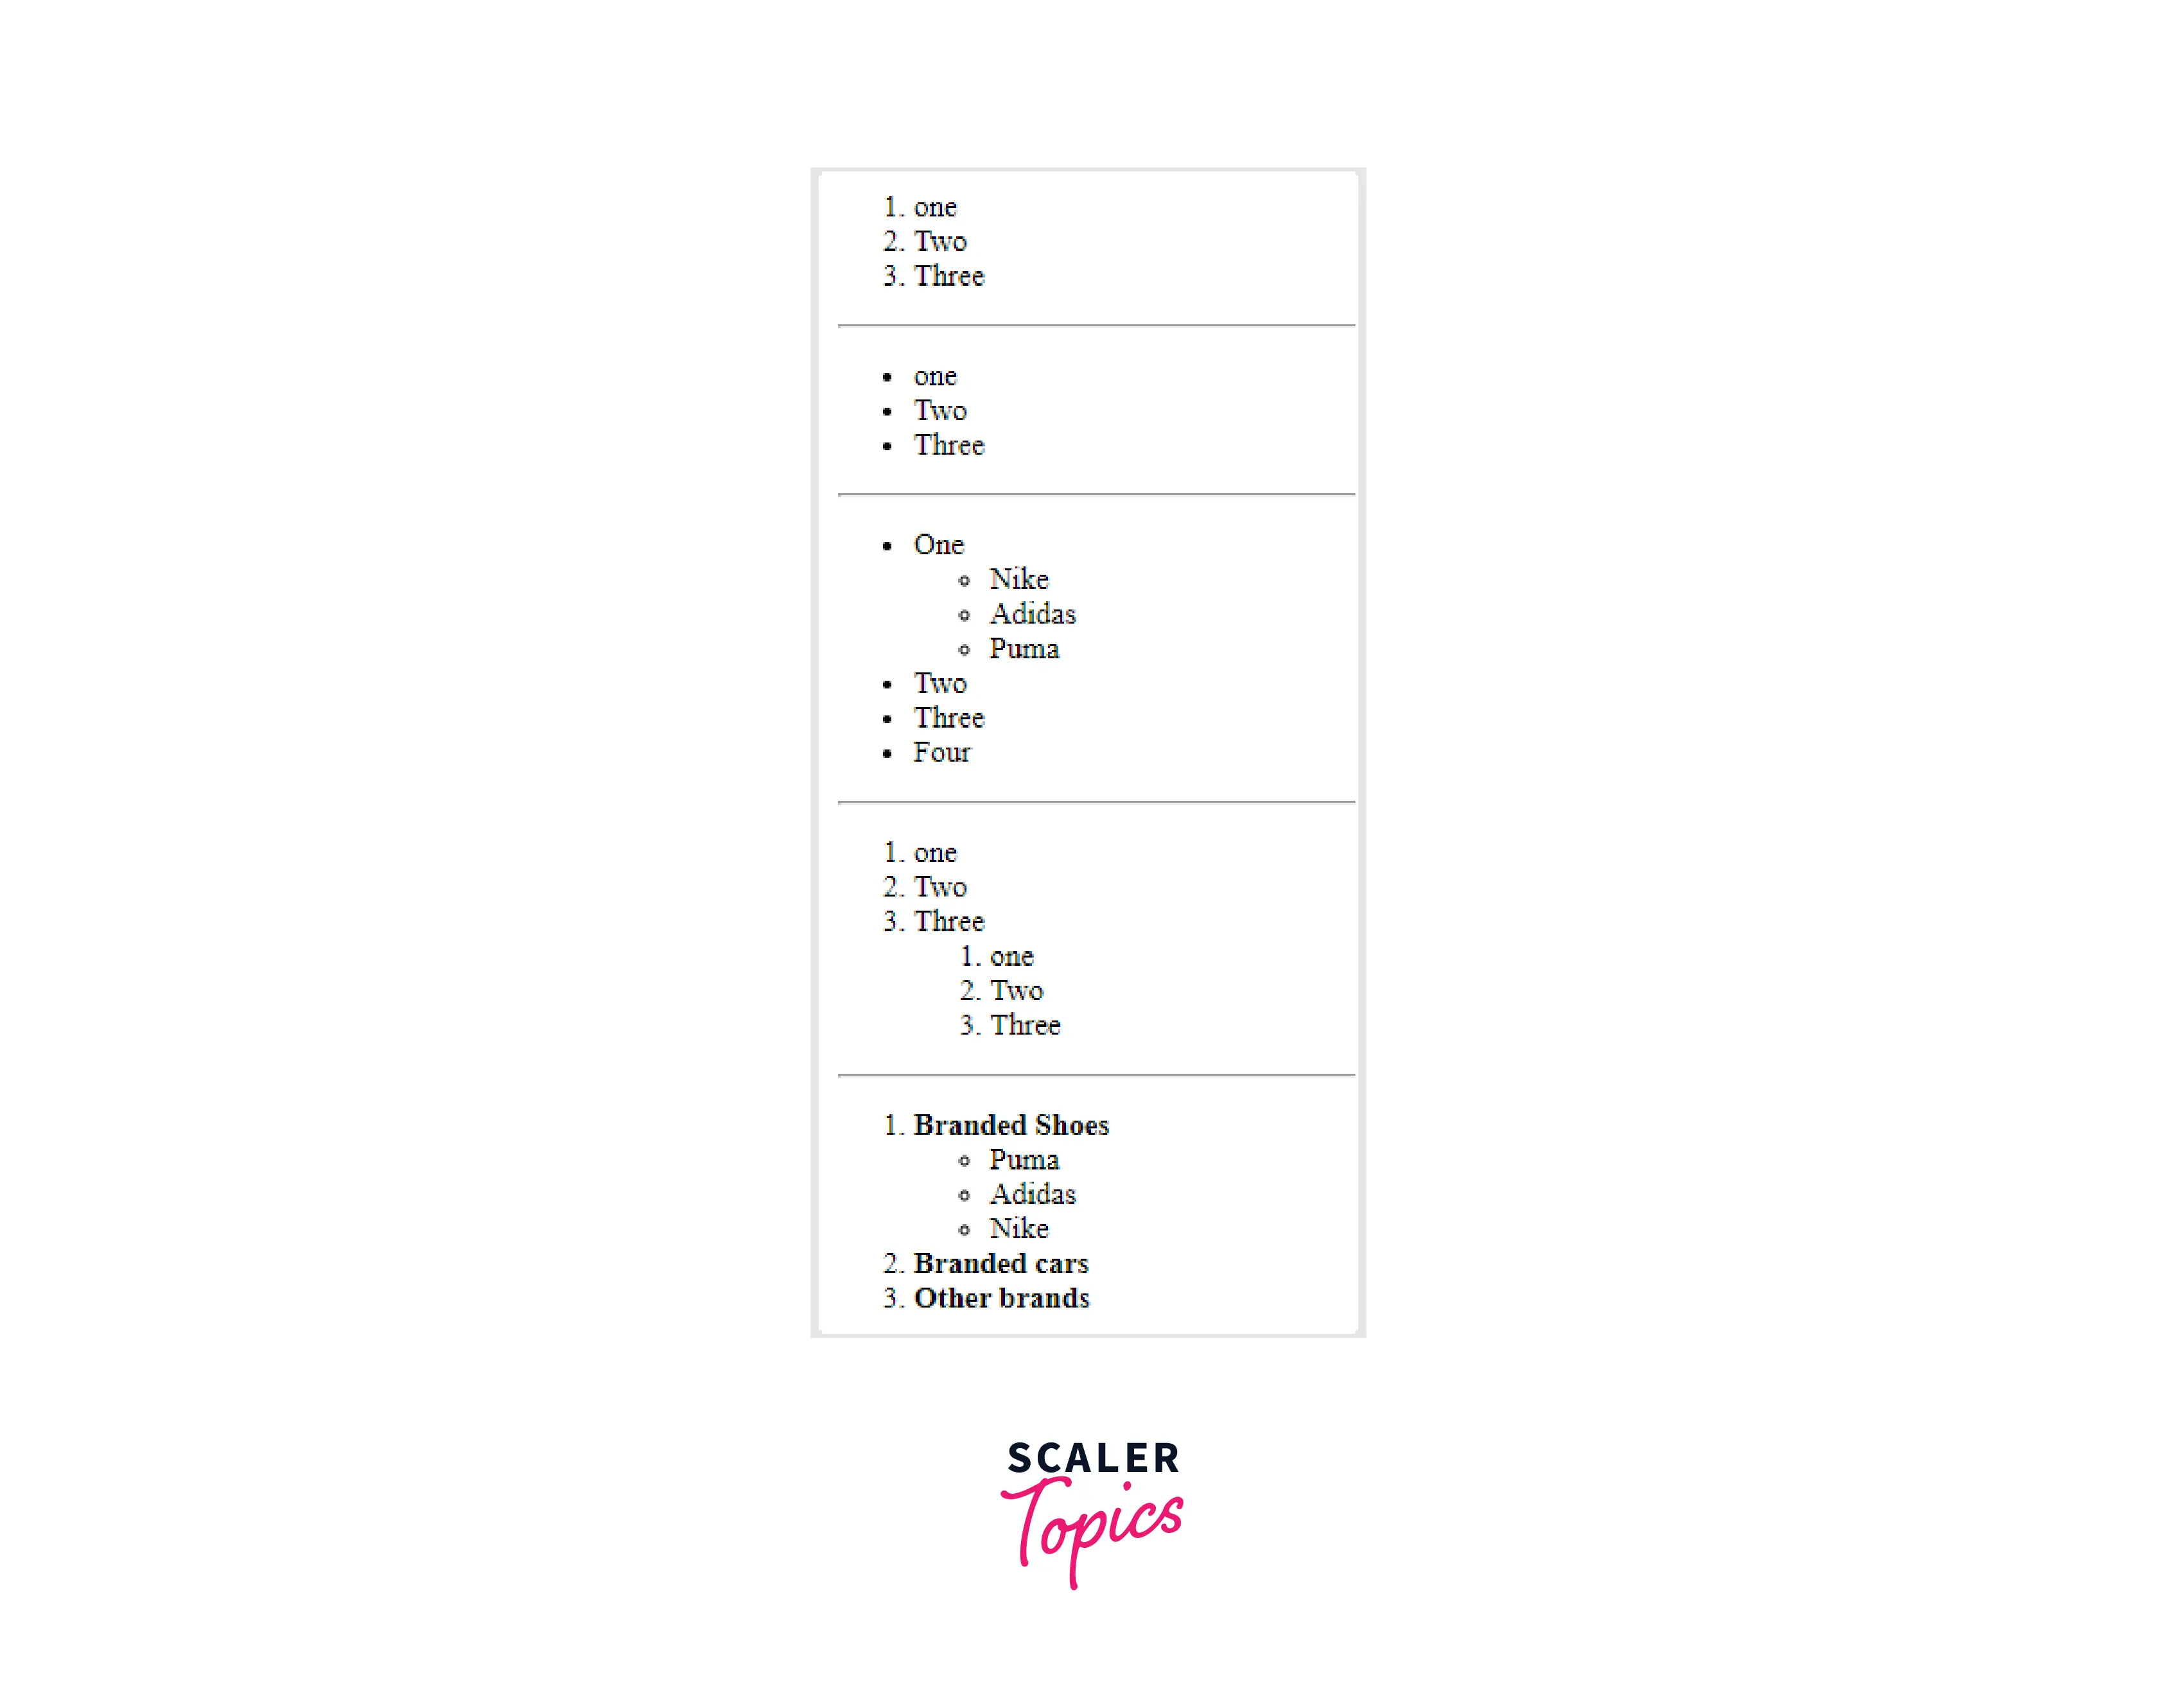
In HTML, there are three types of lists:
- Unordered list – a collection of related objects arranged in no particular order.
- description list — used to display name/value pairs such as terms and definitions
- ordered list — used to organize a set of related items in a specified order.
On a web page, each list type serves a specific purpose and has a distinct meaning.
Example:
Output of the above code:
HTML Sectioning Tags
Section tags in HTML define document sections such as chapters, headers, footers, and any other sections. Section tags divide information into sections and subsections. The section tag is used when two headers or footers, or any other component of a document, are required. The section tag was used to group the generic block of related content. The section tag has the advantage of being a semantic element, which specifies its meaning to both the browser and the developer.
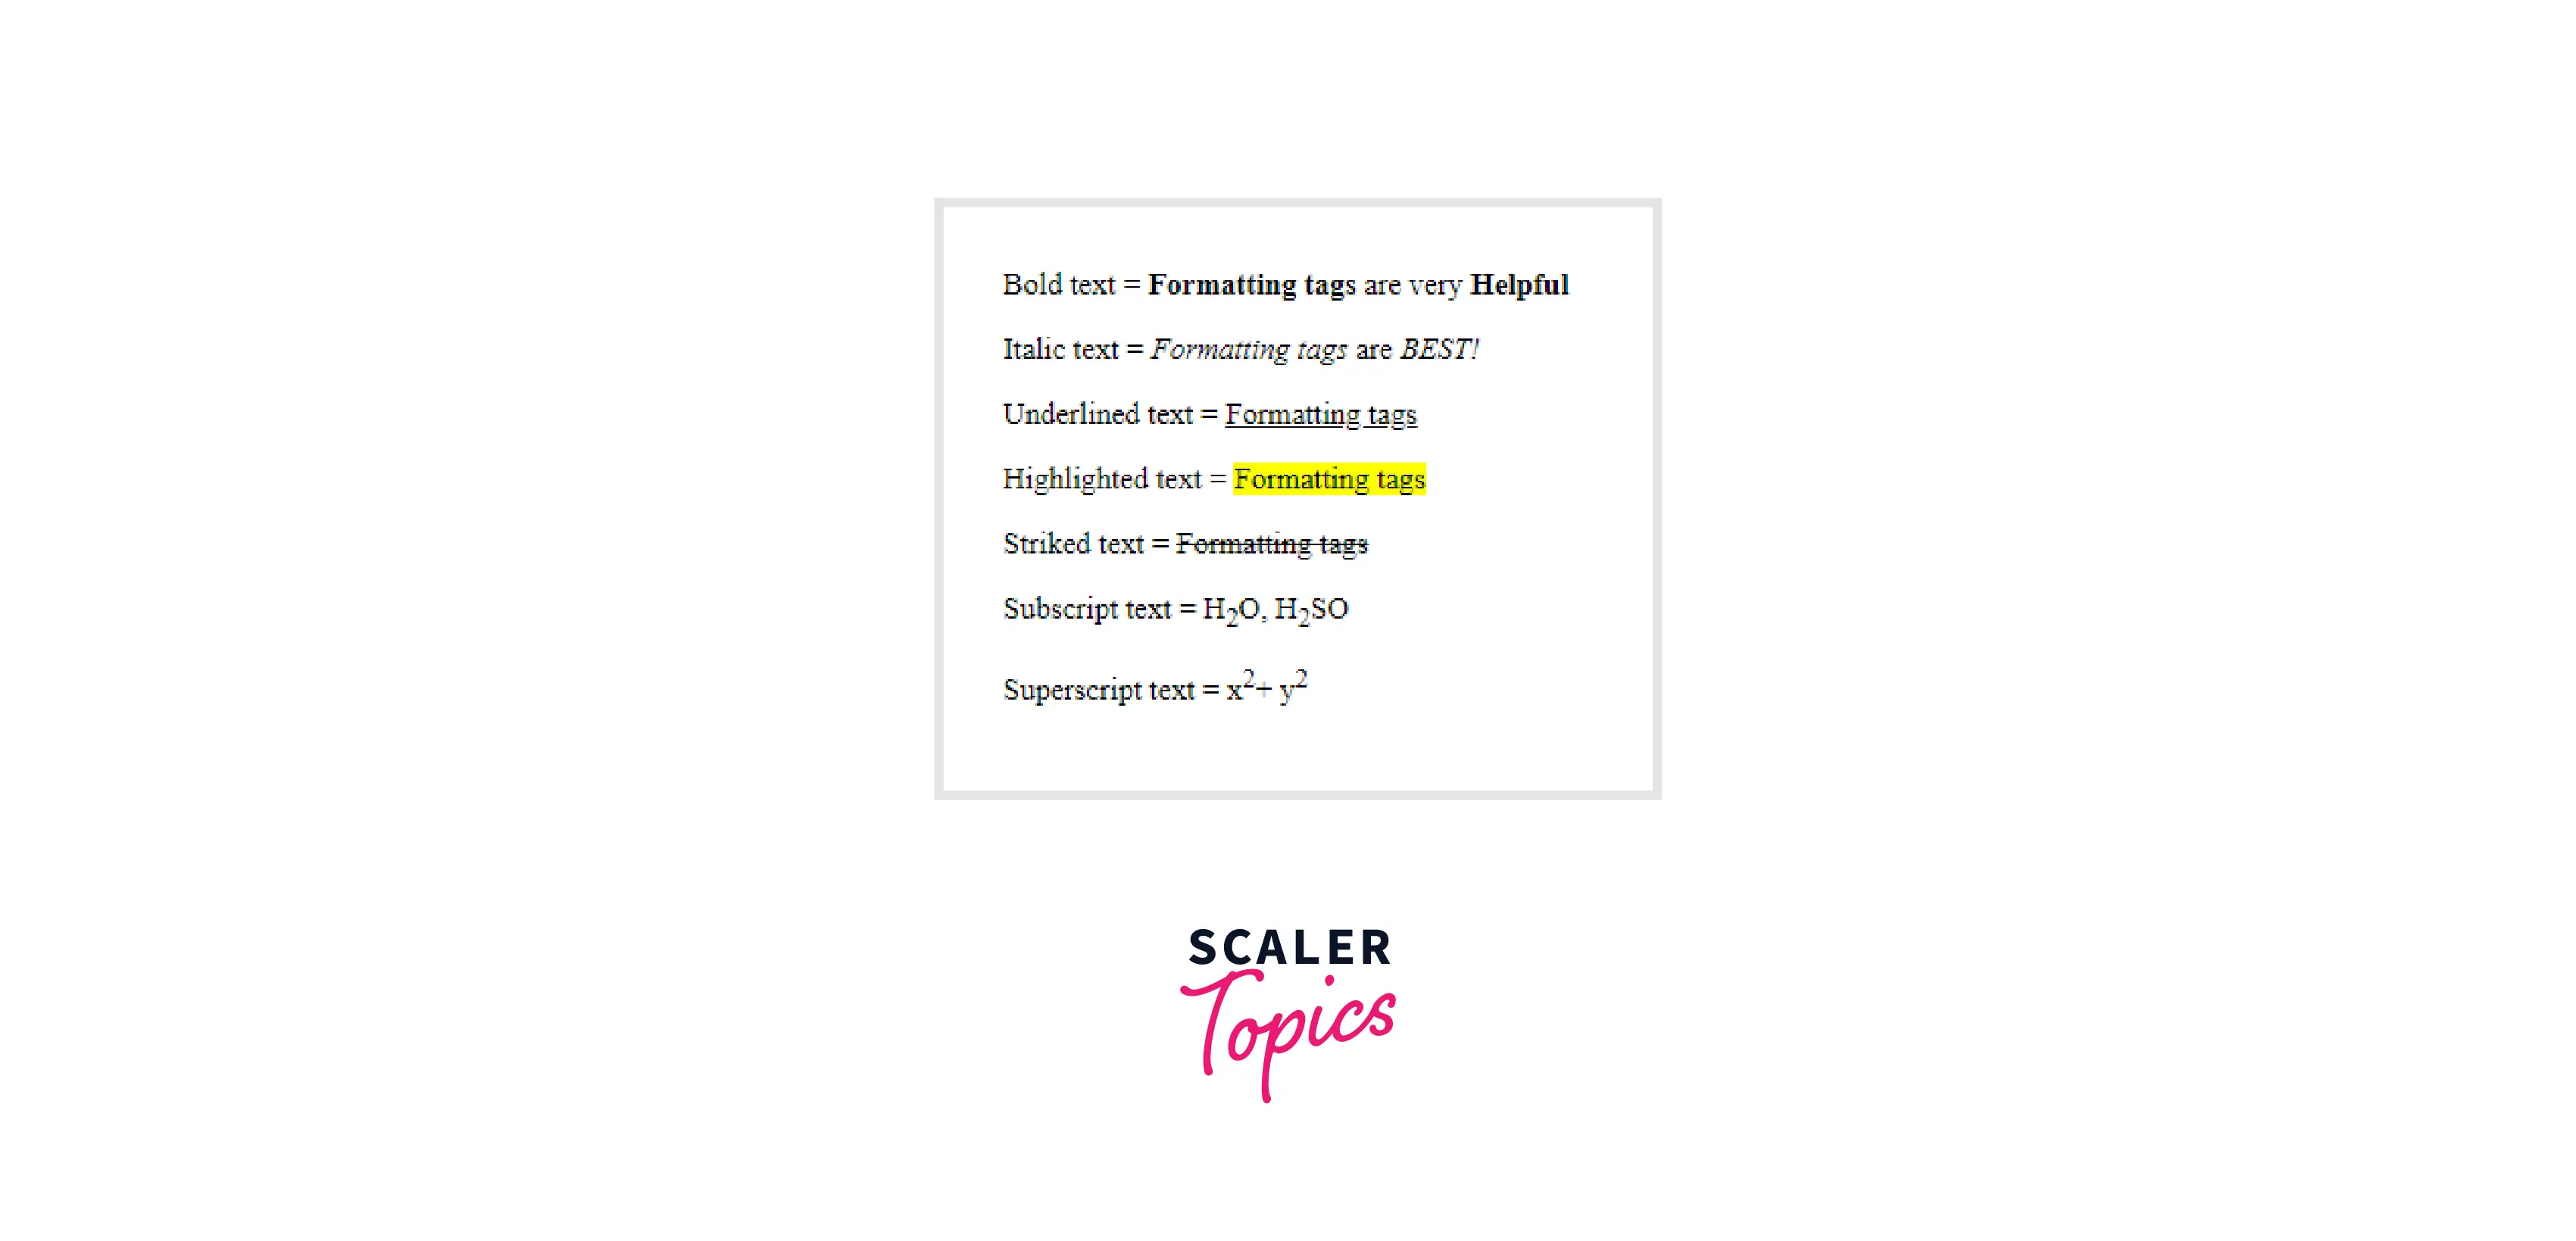
Text Formatting Tags
HTML Formatting is the process of formatting text to improve its appearance and feel. HTML allows us to format text without utilizing CSS. HTML has numerous formatting tags. Text can be bolded, italicized, or underlined with these tags.
In HTML, formatting tags are classified into two types:
- Physical tags: These tags are used to give the text a visual look.
- Logical tags: Logical tags are used to provide logical or semantic significance to the text.
There are about 14 options for how the text looks in HTML and XHTML.
| Tag | Description |
|---|---|
| <b> | This is a physical tag that is used to make bold the text written between it. |
| <strong> | This is a logical tag that informs the browser that the text is significant. |
| <i> | This is a physical tag that is used to make the text italic. |
| <em> | This is a logical tag that is used to display the content in italic. |
| <mark> | This tag is used to emphasize text. |
| <u> | This tag is used to underline the text that is written between it. |
| <tt> | This tag is used to make text appear in teletype. (HTML5 does not support this) |
| <strike> | This tag is used to create a strikethrough on a section of text. (HTML5 does not support this.) |
| <sup> | This tag displays the content slightly above the normal line. |
| <sub> | This tag displays the content slightly below the normal line. |
| <del> | This tag is used to indicate the deleted content. |
| <ins> | This tag is used to display the newly added material. |
| <big> | This tag is used to increase the font size by one standard unit. |
| <small> | This tag is used to decrease the font size by one unit relative to the base font size. |
Example:
Output of the above code:
Scaler Placement Report and Statistics
Scaler learners achieved 2.5x salary growth with average post-Scaler CTC reaching ₹23L.
Multimedia Tags
Multimedia is a form of communication that incorporates audio, visual, and graphical elements. Multimedia is important in web development because it decreases literacy barriers and makes a website more user-friendly. As a result, HTML includes various multimedia tags for embedding any multimedia content on a website.
Multimedia is a method of conveying data from one source to another. It could be anything from audio to video. We may use HTML to add audio, video, and other types of multimedia files to our web pages.
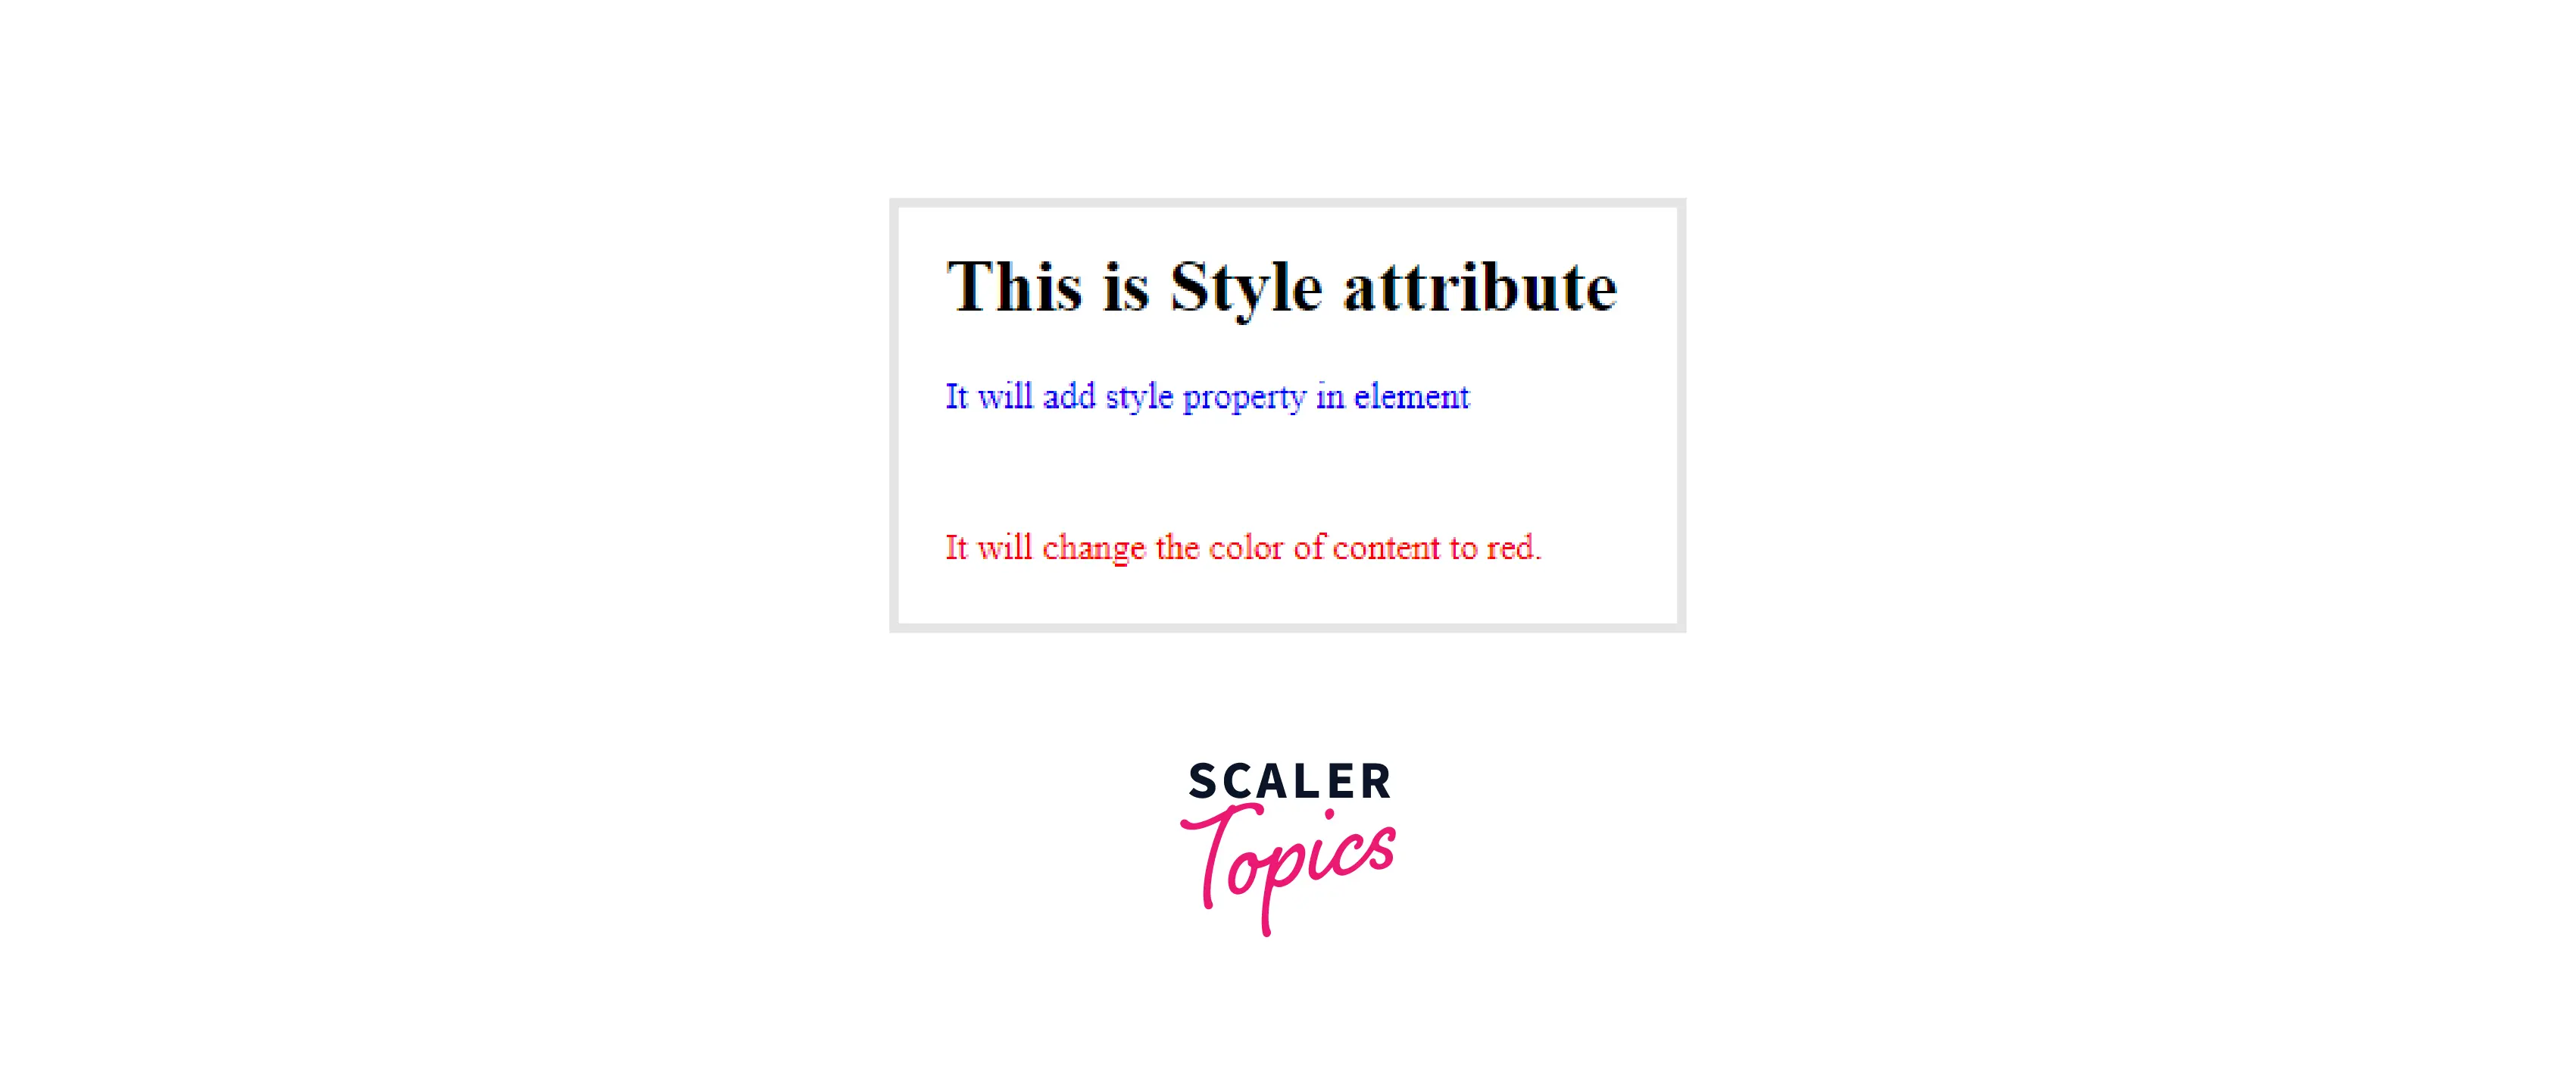
Attributes in HTML
- Attributes in HTML are special words that provide additional information about the elements.
- Each element or tag can have attributes that define its behavior.
- Attributes should always be used with the start tag.
- The Attribute should always be used with its name and value pair.
- The Attributes name and values are case sensitive, and the W3C recommends that they be written in lowercase only.
- Multiple attributes can be added to a single HTML element, but they must be separated by a space.
Example:
Output of the above code:
Classes, IDs, and Names
Classes: The class attribute for an element defines one or more classnames. The class attribute is typically used to point to a class in the style sheet. However, it can be used by JavaScript (through the HTML DOM) to alter HTML elements with a specific class.
Example:
IDs: The id attribute of an HTML element specifies a unique id. The id attribute value must be unique within the HTML document. The id attribute in a style sheet is used to point to a specific style declaration. JavaScript also uses it to access and manipulate the element with the specified id.
Example:
Names: The HTML name attribute is used to define a name for an element. The value of the name attribute serves as the element's identifier. Button, textarea, select, form, frame, iframe, img, a, input, object, map, param, and meta elements are all supported by the HTML name attribute.
Combining CSS and JS with HTML
When working with HTML, styles, and scripts on a large project, it is best to segregate files into multiple folders. All CSS files should be in one folder, and all JavaScript files should be in another. The same goes for HTML files.
- To link a CSS file to your HTML file, write the following script within the head tag of your HTML file.
or
- To link a Js file to your HTML, simply write the following script within or outside the body element; it doesn't matter.
or
Pre-processors in HTML
A preprocessor in HTML is a program that turns one input data form into another input data form. Haml and Sass are two of the most popular preprocessor languages for HTML and CSS.
Conclusion
- This HTML Cheet sheet has covered all the basic concepts of HTML. HTML tags are basic instructions that advise a web browser on how to format text. Tags can be used to format italics, line breaks, objects, bullet points, and other elements.
- Servers parse HTML code to understand and render content. To format content, you can use as many or as few tags as you want.
- HTML tags specify how an on-page element should be displayed. They begin with a < and end with a >, and they come before and after the element's content.
- HTML attributes, which appear within the HTML tag (e.g., html lang="en-US">), provide additional information about HTML elements.