How to include a JavaScript file in another JavaScript file?

Overview
We can include a JavaScript file in another JavaScript file using the native ES6 module system. This allows us to share code between different JavaScript files and achieve modularity in the code. There are other ways to include a JS file like Node JS require, jQuery's getScript function, and Fetch Loading.
In this article, we are going to go through each method in detail.
Transform Your Career
Choose from our industry-leading programs designed for career success
Modern Software and AI Engineering Program
Master full-stack development with AI integration

Modern Data Science and ML with specialisation in AI
Advanced data science techniques with AI specialization
Advanced AIML with Specialisation in Agentic AI
Deep dive into AIML with focus on Agentic systems
DevOps, Cloud & AI Platform Engineering
Build and manage AI-powered cloud infrastructure
AI Engineering Advanced Certification by IIT-Roorkee
Premier AI engineering certification from IIT-Roorkee
What are ES6 Modules?
In the early era of the web, the role of JavaScript was limited to form validation and providing a little bit of interactivity, so large scripts were not needed.
Today, JavaScript has become a primary language to develop web apps, including both backend and frontend. Thus the size of the JS programs has also grown exponentially, making it harder to manage code.
This motivated the use of module system, a way to divide the code into multiple files and directories but still make sure all the bits of code can access one another.
As the old versions of JavaScript have no native module system, many JavaScript libraries come with their own. For example - CommonJS and RequireJS.
JavaScript introduced a native module system in ES6 (ECMAScript 6 - the official name of JavaScript) called the ES6 Module.
An ES6 module is just a file containing JS code with two special characteristics:
- It is automatically in strict-mode: this prohibits the use of sloppy mistakes in the code, like using variables without defining.
- You can use the import or export keyword inside of it: providing a way to share the code with other files.
Let's discuss different ways to achieve modularity and learn how to import a JS file into a JS file.
Takeaway:
An ES6 module is a JS file that can export its code to share with other files and import and use code from other JS files.
Popular Ways to Include a JavaScript File in Another JavaScript File
In this section, we will learn about two popular ways of including a JS file in another JS file:
- Using ES6 modules.
- Using Node JS require function.
Using import/export | ES6 module
Let's start by using the ES6 way of importing and exporting. Create a file named utils.js and define the following function and constant inside it:
Notice that we used the export keyword before the function and variable to specify that these objects can be used by other files.
The Hello, ${name} is a template literal in JavaScript. It allows us to embed variables inside a string using the $ and {} syntax.
Now, create another file named main.js and write the following code in it:
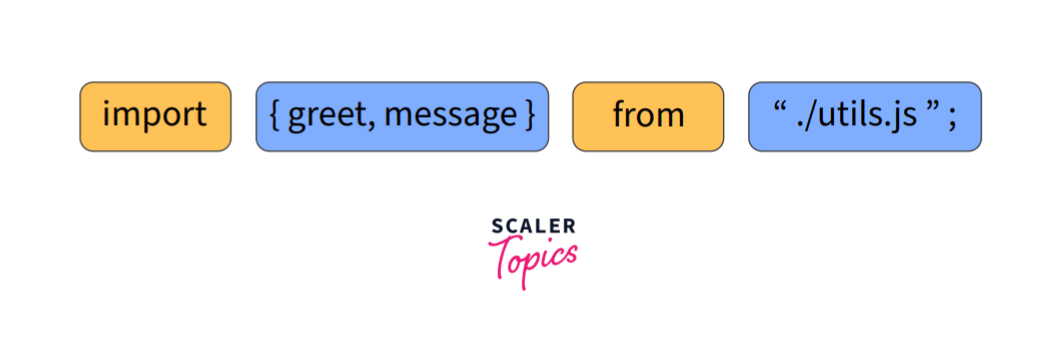
In the first line, we are importing greet and message from utils.js by specifying them inside of curly braces {}.
After this line, we can use the imported objects as they are defined in the same file.
Then, we console logged the output of both the objects.
ES6 syntax for importing: import {object1, object2, ...} from 'filename.js'
If you are going to use ES6 modules in a node js environment, remember to name your files with .mjs extension or set "type": "module" in the package.json file.
Using Default Exports
We can use the default keyword to export one object by default from a file. What does this mean? Let's see with an example. Make the greet function in utils.js a default export by adding default before it:
Now, you can import it in main.js like this:
It will work the same as before!
While performing default export, randomName is imported from greet.js. Since randomName is not in utils.js, the default export (greet() in this case) is exported as random_name.
Note 📝:
Let's discuss some important points related to ES6 modules that one should remember when using them:
-
We have to remove the curly braces when importing default exports.
For instance, if we have kept the braces in the randomName example above like this:It would have thrown an error saying no such export exists.
-
A file can contain multiple exports. However, we can only define a single default export in a file.
Thus the following JavaScript code is invalid ❌: -
We cannot use an alias name when importing a normal export.
Thus the following import is invalid ❌:We must use the same name when importing a normal export.
-
We can mix default and normal exports like this:
Notice, we used {} for named (normal) exports and put the default export without {}.
-
We can import an entire module's content using the *:
Then, you can access all the export using the module as a namespace:
-
You can export all the objects together at the end of the file Example:
-
You can rename exports and imports
- Example of renaming exports:
and in the import file:
- Example of renaming imports:
and in the export file:
This could help manage name conflicts between similar imports.
- Example of renaming exports:
Now, we will see how to run these ES6 modules inside a browser.


Using ECMAScript (ES6) modules in browsers
Most modern browsers like chrome, safari and firefox have support for running ES6 modules directly. Let's try running the modules created before in a browser.
In the previous section, we created two JS files with the following code:
- utils.js
- main.js
In the main.js file, we imported and used a function from utils.js using the import keyword.
Now, we want to run main.js using a browser by linking the main.js module to an HTML file.
Therefore, create an index.html file and include the main.js script as follows:
We need the type="module" attribute in the <script> element to declare this script as a module. The type="module" allows the use of import and export inside a JS file.
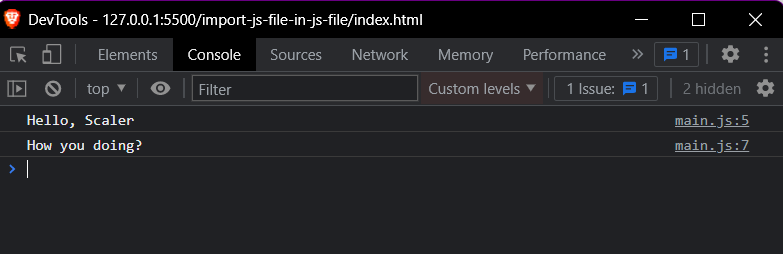
Open the HTML file in a browser using a local server and then open the console (press F12). You will see the following output:
You can't load the modules locally (that is with a file:// URL) inside your browsers due to JavaScript module security requirements.
Tip 💡:
If you are using VS Code, you can use the live server extension to host the HTML file.
Scaler Placement Report and Statistics
Scaler learners achieved 2.5x salary growth with average post-Scaler CTC reaching ₹23L.
Using Node.js require
The following section requires a basic understanding of Node JS Framework. You may skip this section if you are new to JavaScript.
Another popular way to import and export JS files is using the Node JS require function.
Node.js is an open-source, cross-platform, backend JavaScript runtime environment used to execute JavaScript code outside a web browser. It is used to create web servers.
You need to install Node JS to run the code given in this section.
Node JS has the module system even before the introduction of ES6 modules in JavaScript.
Let's rewrite the earlier greet example using require in Node JS. Create a new file utils.js with the following code:
The modules.exports object has all the exports from this file. Now, create the main.js file with the following code:
Notice the first line, we are using the require function by passing the name of the file we need to import.
The require function:
- Reads the file
- Executes the file
- And then returns the exports object.
We stored the returned object into the utils variable and used it to access the greet function and message.
Try running it with the node as follows:
And you will see the following output:
Notice, the Executing utils.js in the output, it is because the require function is executing the file before returning the exports object.
Takeaways:
- The ES6 module system and Node JS require are the most popular ways of including a JS file in another JS file.
- Modern browsers also support ES6 modules directly.
Dynamic Imports in Browsers
The following section requires an understanding of Promises and async/await in JavaScript. You may skip this section if you are new to JavaScript.
Dynamically importing modules allows us to load modules only when they are needed, rather than loading everything upfront.
We use the import as a function to achieve this. Let's look at an example:
Keep the utils.js function as before:
And add the following code to main.js to call the greet function only with a click of a button.
Explanation We called the import function with the path of the module as a parameter. The import function returns a promise (that's why we are using the async/await) which fulfils with an object containing all the exports.
We then access the greet function using the returned module object.
When we should use dynamic imports?
We should use dynamic imports only when necessary, for example if there is a low likelihood that you will need the code you are importing. This may help improve the performance if the imported file has many lines of code and is used rarely.
Takeaway: We can dynamically import a module as needed using the import function.
Ajax with Fetch Loading
The following section requires an understanding of Promises and async/await in JavaScript. You may skip this section if you are new to JavaScript.
Till now, we have seen two popular ways of including a JS file in another JS file. We also saw how to use the ES6 modules on-demand in the previous section.
Now, in the following sections, we will see some other possible ways on how to include a js file in a js file, starting with the fetch loading.
The fetch() function in JavaScript is used to make HTTP requests to the server and load the information on the web pages.
We can load and execute a JS file using the fetch API and eval function. Add a simple log statement in the utils.js file:
Now, add the following code in the main.js file:
Explanation
We are waiting for our HTML page to load and then fetching the utils file using fetch.
Then we are accessing the code of the JavaScript file using the text function and stored it in utilsText then passed it to the eval function.
The eval function evaluates JavaScript code represented as a string.
Evaluating the JavaScript code means it runs the code which was passed to the function in a string.
Warning Never use the eval function as it possesses security risks and it is far too easy for a bad actor to run arbitrary code when you use eval(). For example, if you use the eval on the server-side and a user used an infinite loop as their username, then it may crash the computer leading to server downtime.
Takeaway:
- We can use the combination of fetch and eval() to execute a JS file in another JS file.
Turn Learning into Career Growth
jQuery Loading
The following section requires a basic understanding of the jQuery Library. You may skip this section if you are new to JavaScript or you are unfamiliar with jQuery.
jQuery is a JavaScript library designed to simplify HTML DOM tree traversal and manipulation.
We can use its getScript function to load a JavaScript file and execute it.
To use jQuery add the following script tag in your HTML head element.
Now keep the utils.js as follow:
And add the following code to main.js:
Explanation The $ is an alias of the jQuery object, we use it to access different functions provided by jQuery. Here, we are passing the path of our JS file to the getScript function. The getScript function will execute the code of utils.js and return the data (text of utils.js) in a callback function. Inside the callback function, we are consoling the data of the file.
A callback function is a function passed into another function as an argument, which is then invoked inside the outer function to complete some kind of routine or action.
Here is the output for the above code:
Takeaway:
- jQuery provides the getScript function to load and execute a JS file in another JS file.
Dynamic Script Loading
We can avoid the use of jQuery's getScript function by injecting a script tag ourselves.
This is how you would do it in the main.js file:
Explanation
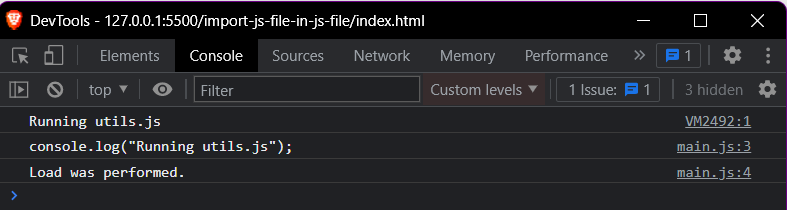
We created a script tag and set its source attribute to the path of the JavaScript file. Then we appended the script tag to the body element.
Check the console now and you will see the same output as before.
Concatenate Files
In the above example, we included a single JS file in the main.js, we can do the same with multiple files.
Create a file first.js with the following code:
Create another file second.js as follows:
Now, in the main.js you can include both files as follows:
It's the same code as before but now in a function. Making it easier to call it multiple times. You only need to include the main.js file in the HTML, the other two files will be included automatically.
Takeaway:
We can dynamically insert a script tag using DOM manipulation to load and execute a JS file without jQuery.
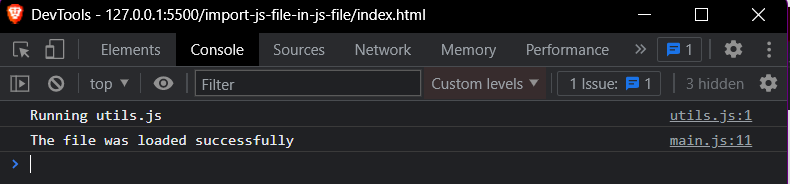
Detecting When the Script has Been Executed
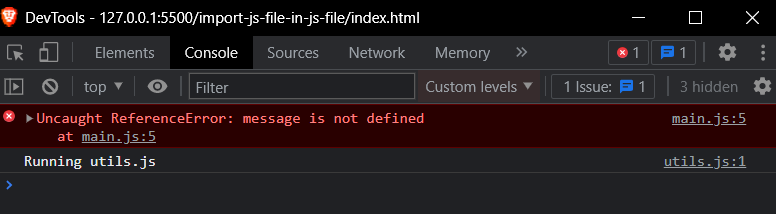
Now, there is a problem with the above solution (Dynamic script loading). If we try to access a variable from the imported file just after appending it to the HTML, we will run into an error because the browsers load JS files asynchronously (simultaneously) to improve performance.
For example, if this is the utils.js file:
And we are trying to access the message constant in main.js like this:
We will run into the following error:
To solve this, we must make sure that any code in main.js that uses the objects from utils.js is run after the file is loaded.
For this, we can use a callback function on the onload attribute of the script tag:
The key line here is: scriptTag.onload = callback;. The callback function is only called when the script is loaded.
Now, the output will be correct:
Takeaway:
Use the onload event of the script element to run some code only when the script is loaded.
Conclusion
- An ES6 module is a JavaScript file that can import and export code. It automatically uses the strict mode.
- The ES6 module system and Node JS require are the most popular ways of including a JS file in another JS file.
- Other methods for including a JS file in another JS file are:
- Fetch Loading: Using the fetch and eval functions.
- jQuery Loading: Using the getScript function.
- Dynamic Script Loading: Using DOM manipulation.(DOM refers to Document Object Model, DOM manipulation means changing the items on the HTML page).
- We can detect the successful execution of a script using the onload event of the script element.