How to Install Java in Linux?

Java is one of the most widely used programming languages. To execute code in any programming language, we need to set up required environments like code editors, interpreters, compilers, and IDEs. JDK (Java Development Kit)' is the complete environment required to run java codes on any system. IDE(Integrated development environment) like Eclipse and IntelliJ makes coding and developing complex projects easier with its user interfaces, automation tool, debugger, and many other features.
Introduction
Java, crafted by the ingenious mind of James Gosling at Sun Microsystems and unleashed upon the world in 1995, stands tall as a resilient and sophisticated programming language. Its versatility extends beyond mere code to encompass a comprehensive platform. In the realm of computing, a platform encompasses both the hardware and software environments where a program thrives. Java distinguishes itself with its robust runtime environment (JRE) and rich application programming interface (API), earning it the rightful title of a platform in its own right.
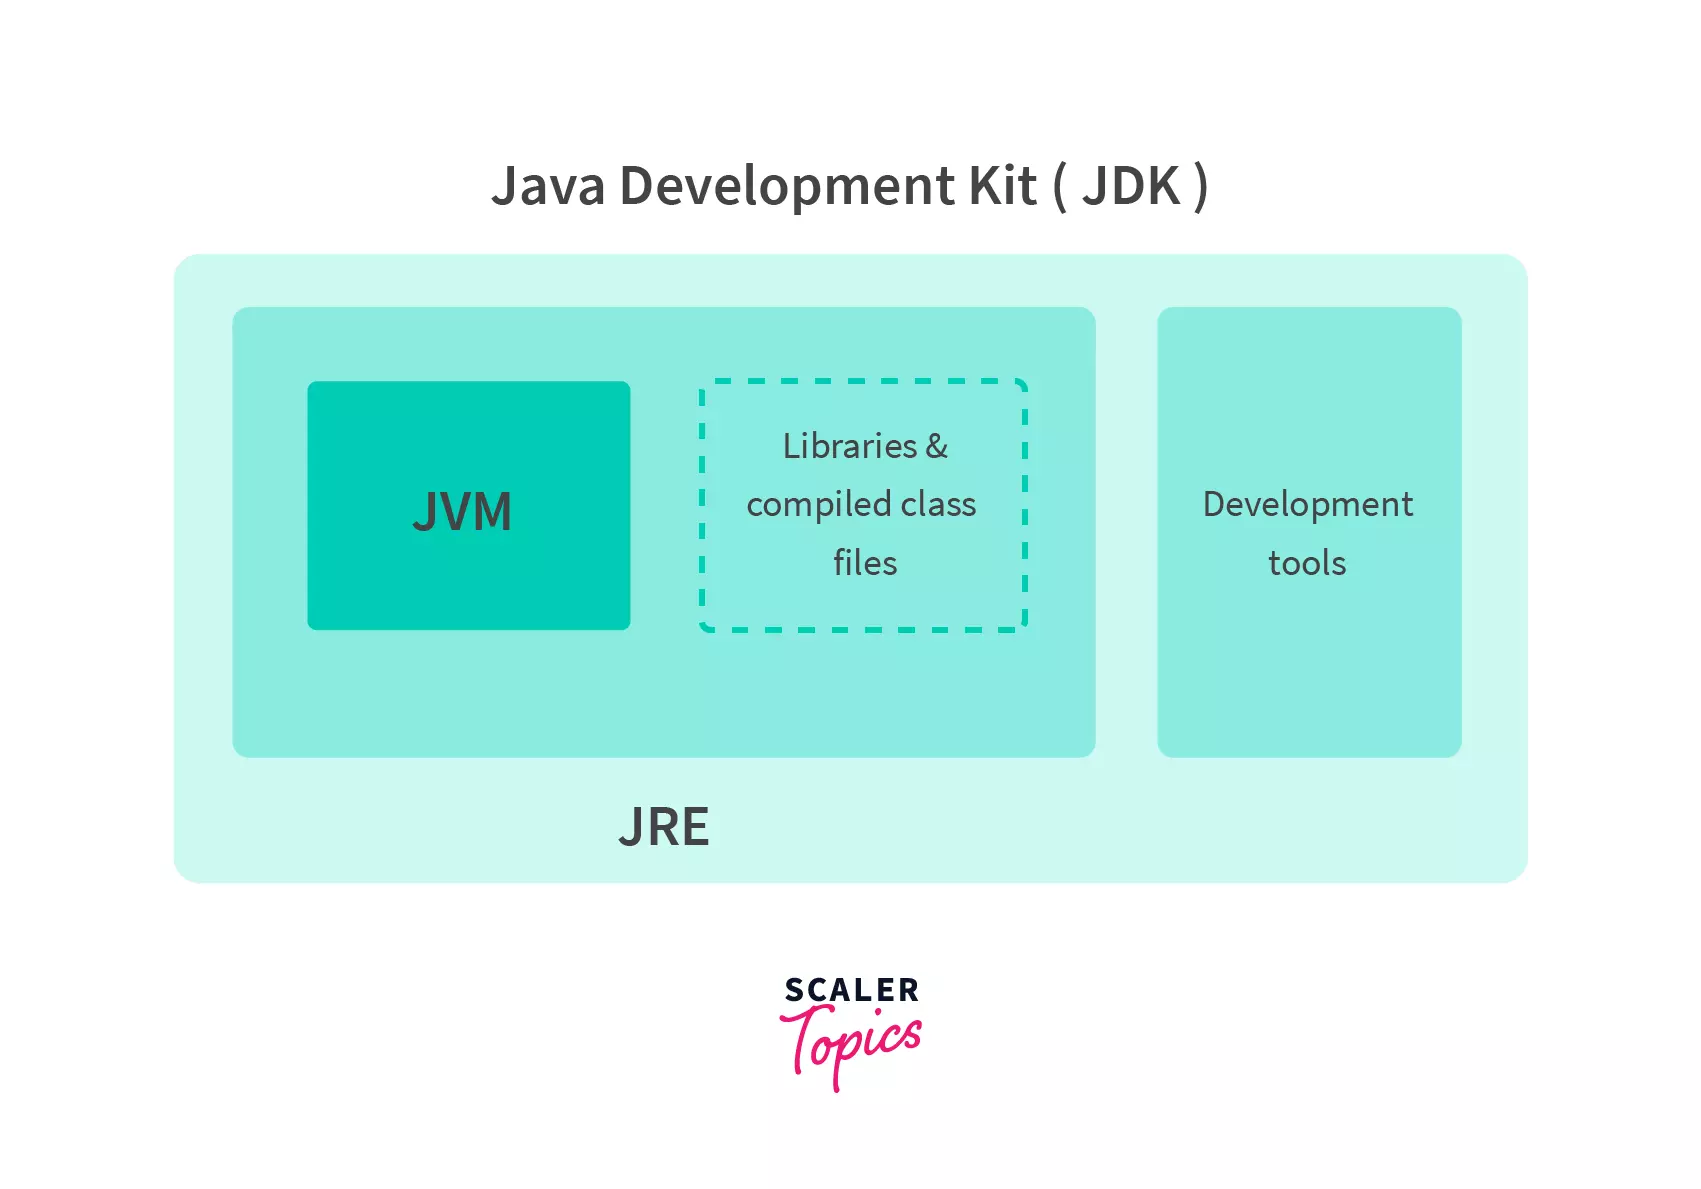
We need to install the Java Development Kit(JDK) to run any code and develop applications in Java. JDK contains tools required for development, and JRE(Java Runtime Environment), which contains all libraries, and JVM(Java Virtual Machine), which is required to execute the programs.
JDK can be installed on different operating systems, including Linux, Windows, and MacOS. Here, we will see detailed steps for installing JDK SE 16 on the Linux operating system.
Which One do I need: JVM, a JRE, or a JDK?
JVM, JRE, and JDK are different software bundles that are available for running java programs with different functionalities. To understand what we need to install JVM, JRE or JDK, let's understand these terms.
1. Java Runtime Environment(JRE)
- The Java Runtime Environment (JRE) is an open source software distribution that includes a Java class library, specific tools, and a JVM.
- It is the most common environment for devices running Java applications. JRE can be used when a user has to use Java applications but does not do development.
- Java source code is compiled and translated into Java **bytecode**. If you want to get output from this bytecode, you need JRE.
- It loads classes, checks memory access, and finds the system resources needed to run applications.
- JRE acts as a software layer over the operating system. It is a related component of the Java Development Kit(JDK) and a superset of JVM.
2. Java Virtual Machine (JVM)
- The JVM (Java Virtual Machine) functions as an "abstract machine," serving as a standardized runtime environment for executing Java bytecode.
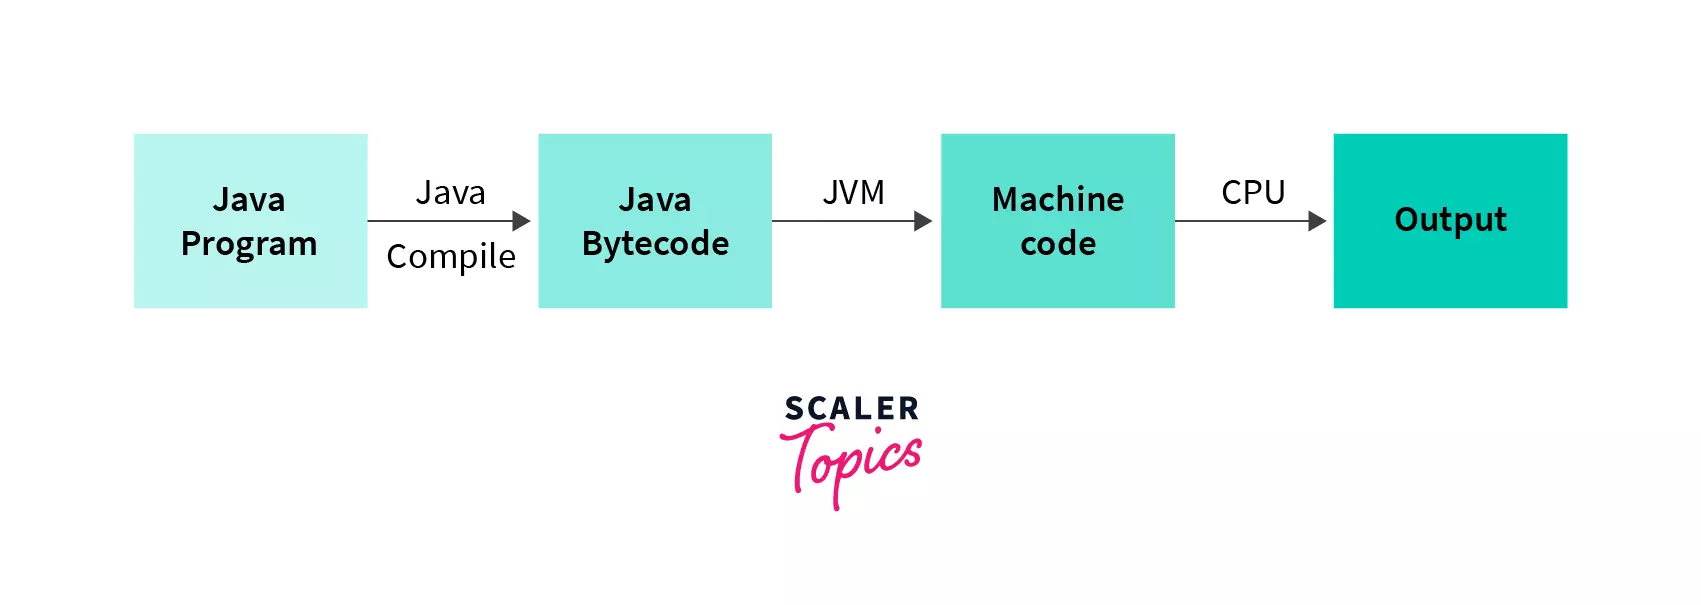
- When we run any Java program, the online Java compiler first compiles your Java code into bytecode. After compilation, JVM translates bytecode into machine code, i.e., machine-level instructions.
- Java earns its reputation as a "platform-independent" language due to its utilization of the Java Virtual Machine (JVM) for program execution, abstracting away the underlying hardware of the physical machine.
- Before running a Java program, users must compile it to convert the Java source code into bytecode. This process generates a .class file containing the compiled code ready for execution.
- After compilation, the compiler's byte code given in the .class file is converted into machine-level instructions by JVM, and output is given to the user.
Syntax to compile Java program:
Syntax to run Java program:
Here Java command activates JVM.
- Flow of program execution is done as follows:
3. Java Development Kit(JDK)
- JDK is required to develop applications in Java.
- JDK consists of development tools like compiler, debugger, and JRE.
- It contains JVM, JRE, and additional development tools like a compiler, interpreter, debugger, and many more things required for application development.
- JDK makes it easy for developers to develop applications.
Points to Remember while Downloading:
- If you're a user looking to run a Java application, you only need the JRE, which includes a JVM and libraries for running Java programs successfully.
- If you're a developer looking to program in Java and use any IDE for it, you need the JDK (which includes JRE libraries, which in turn includes a JVM).
From the above explanations, we know that JDK contains all the required components(JVM, JRE, compiler, and debugger) to execute a Java program. So, we will download and install JDK 16.
NOTE: Here, we will install default versions available in the Linux operating system repository. UbuntuOS in my case.
Difference between JRE vs OpenJDK vs Oracle JDK
JDK is a software development kit required to develop applications in Java. JDK consists of development tools like a compiler, debugger, etc. in addition to JRE. While installing JDK in Linux, two options are OpenJDK and Oracle JDK.
Both OpenJDK and Oracle JDK are Java development kits, and they contain all the software present in a JDK. However, there are some key differences between them.
Java Runtime Environment(JRE)
Java Runtime Environment (JRE) is an open-source software distribution with a Java class library, specific tools, and a JVM. It is the most common environment for devices running Java applications. JRE can be used when a user has to use Java applications but does not do development. JDK consists of JRE and JVM.
OpenJDK:
OpenJDK (Open Java Development Kit) is an open-source implementation of the Java Platform Standard Edition. It was launched by Sun Microsystems in 2006 and is free to use with the General Public License Version 2.
Oracle JDK:
The Java programming language was originally developed by Sun Microsystems, but it is now owned by Oracle. Oracle JDK is also owned by Oracle. In 2019, Oracle started charging for Java SE 8 licenses. Hence, Oracle JDK is chargeable.
OpenJDK Vs Oracle JDK
- The key difference between OpenJDK and Oracle JDK is the licensing process. OpenJDK is open-source Java with General Public License.
- Oracle JDK requires a paid license under the Oracle Binary Code License Agreement. However, there have been many other changes in support and cost.
- OpenJDK has the same code as OracleJDK, depending on your provider.
- Oracle JDK performance is better than OpenJDK, but that is changing. OpenJDK performance is constantly improving.
Note: Default JDK for Linux is OpenJDK, and we will install the same.*
How do you check if Java is already installed in Linux?
Step 1: To check if java is already installed in your Linux system, open the terminal and run the command java -version.
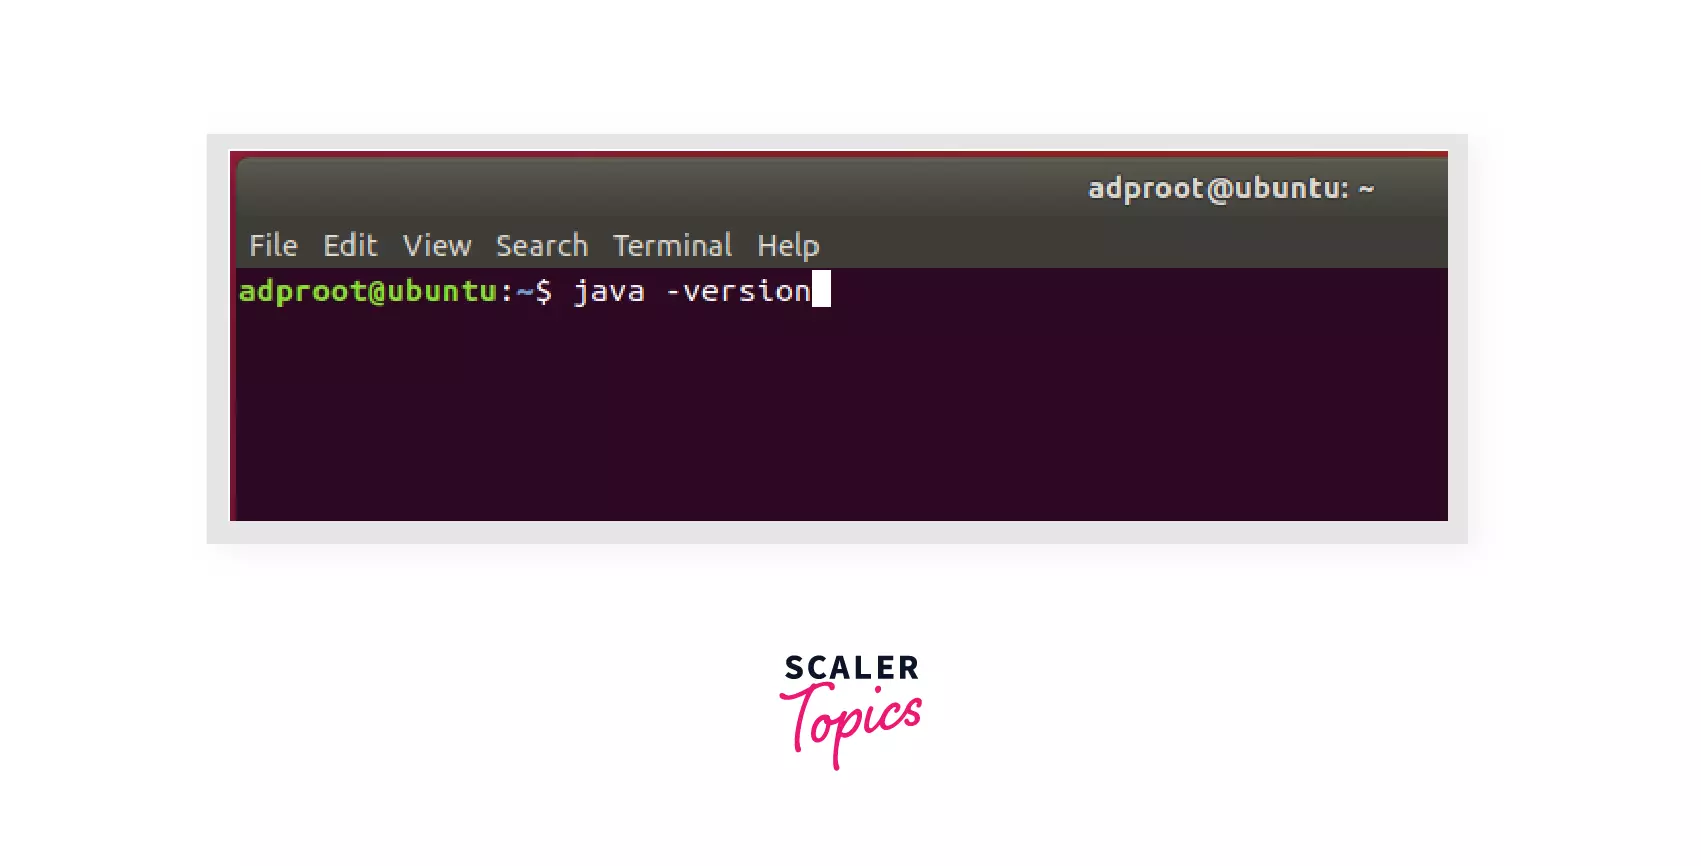
Step 2: It will show the installed version javaif it is already installed. Else it will show Java not found.
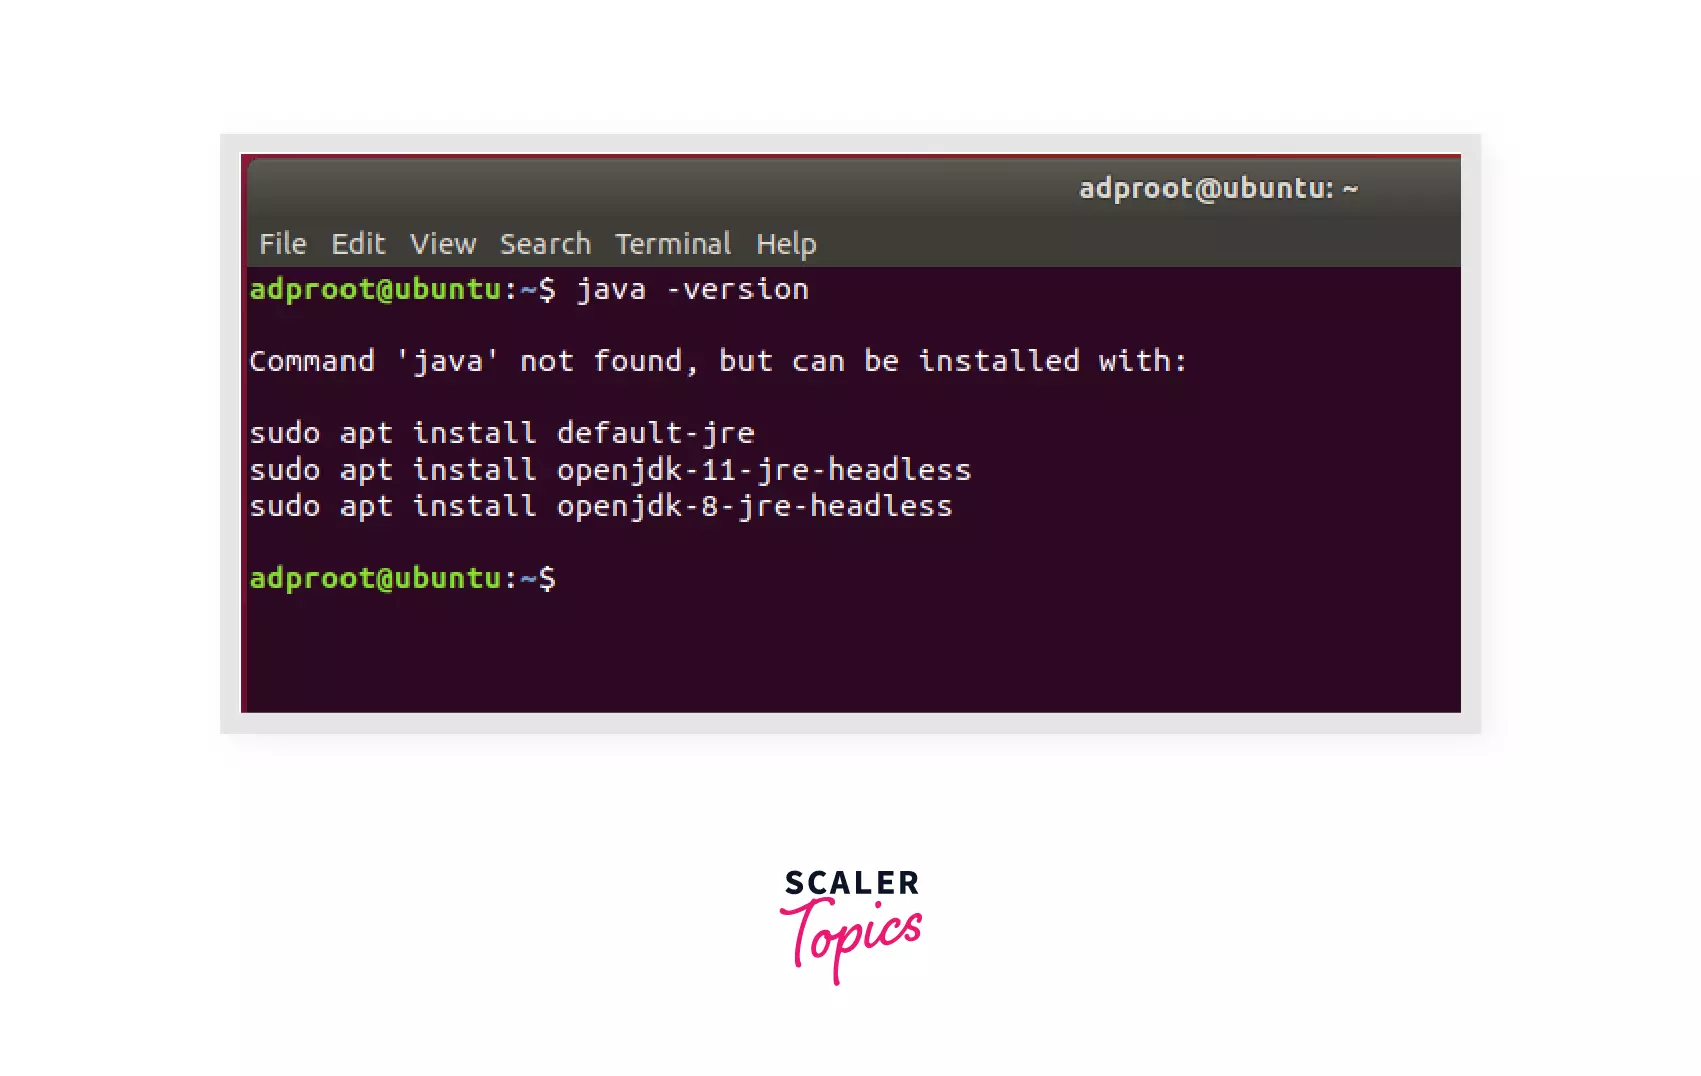 Here java is not installed on the Linux machine. So, let's install it.
How do you download and install Java in Linux?
Step 1:
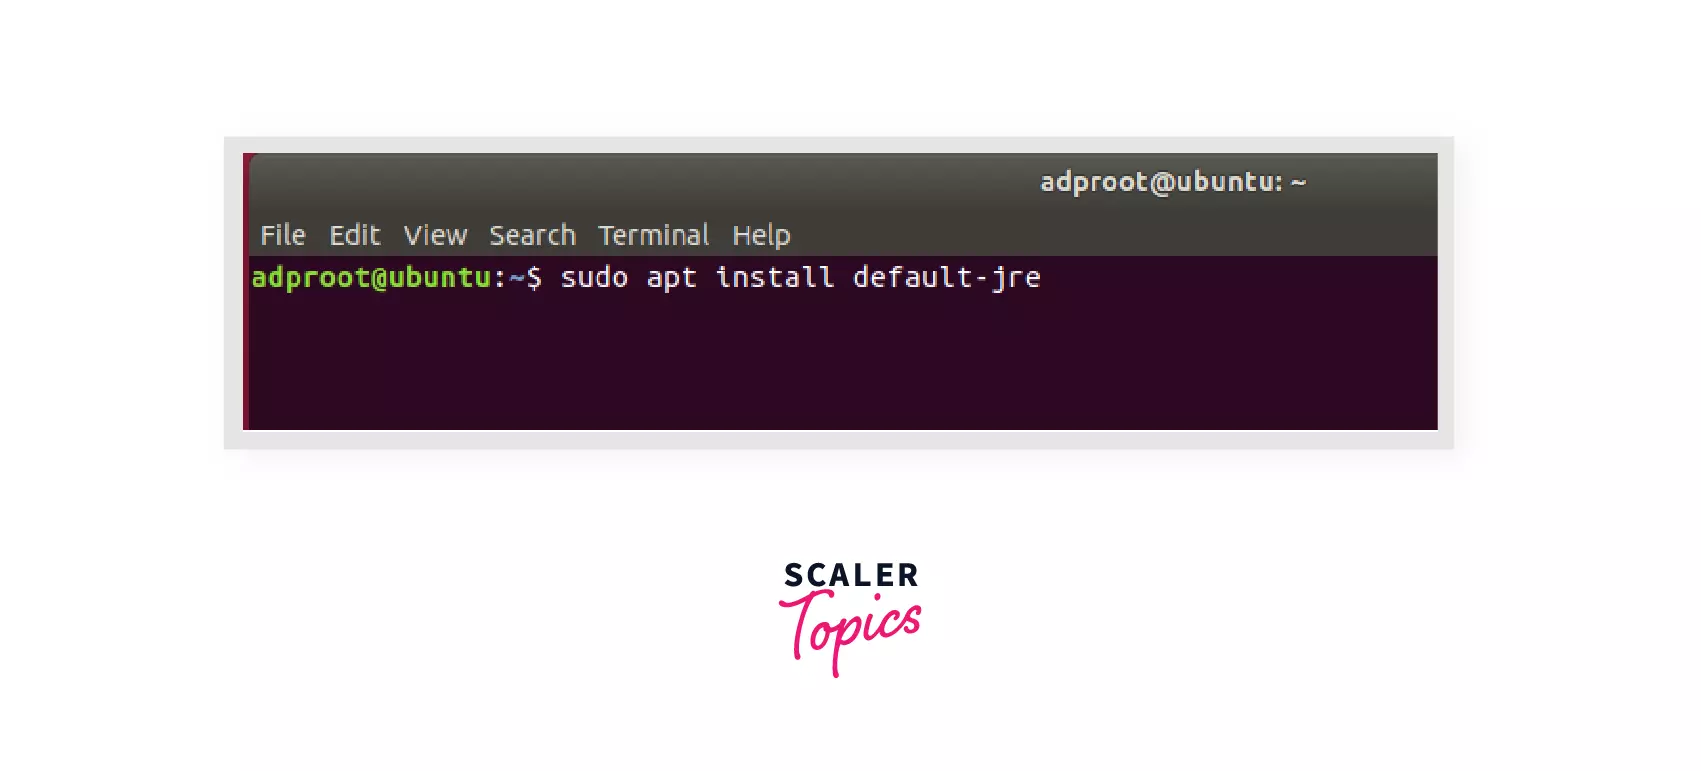
First, to install Java in Linux, let's install JRE from the Ubuntu repository. JRE will download Java, JVM, Java class library, and other tools present in JRE.
To install JRE, run the command sudo apt install default-jre. This will download and install the default version of JRE present in your Linux operating system's repository.
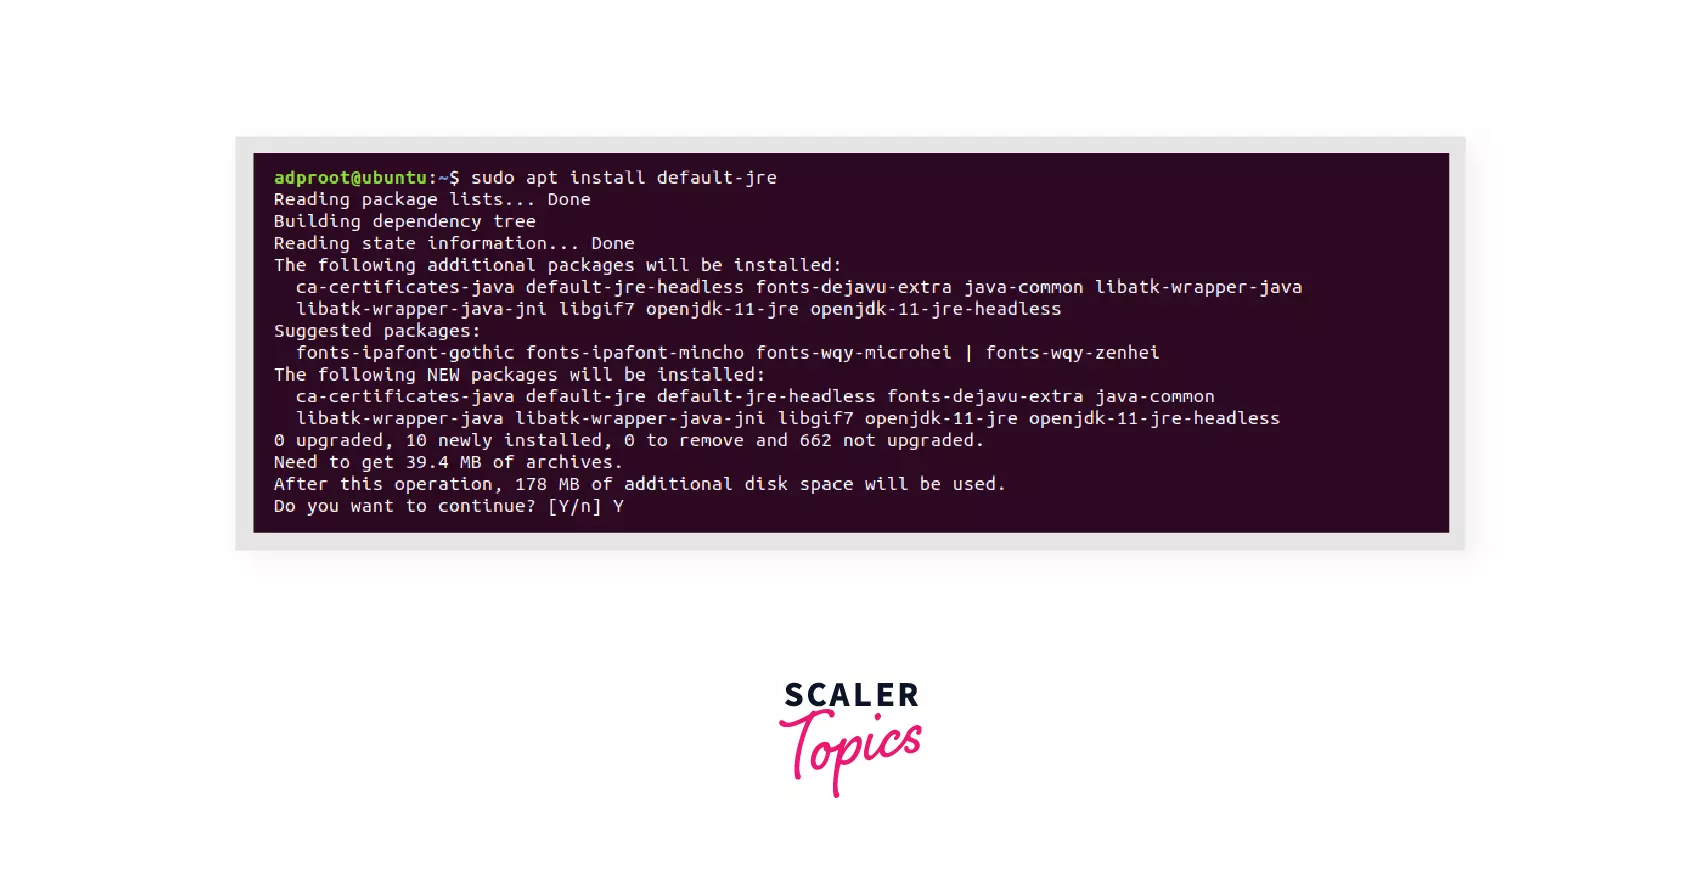
Step 2:
It will download some packages and ask for permission. Type Y for yes.
Step 3:
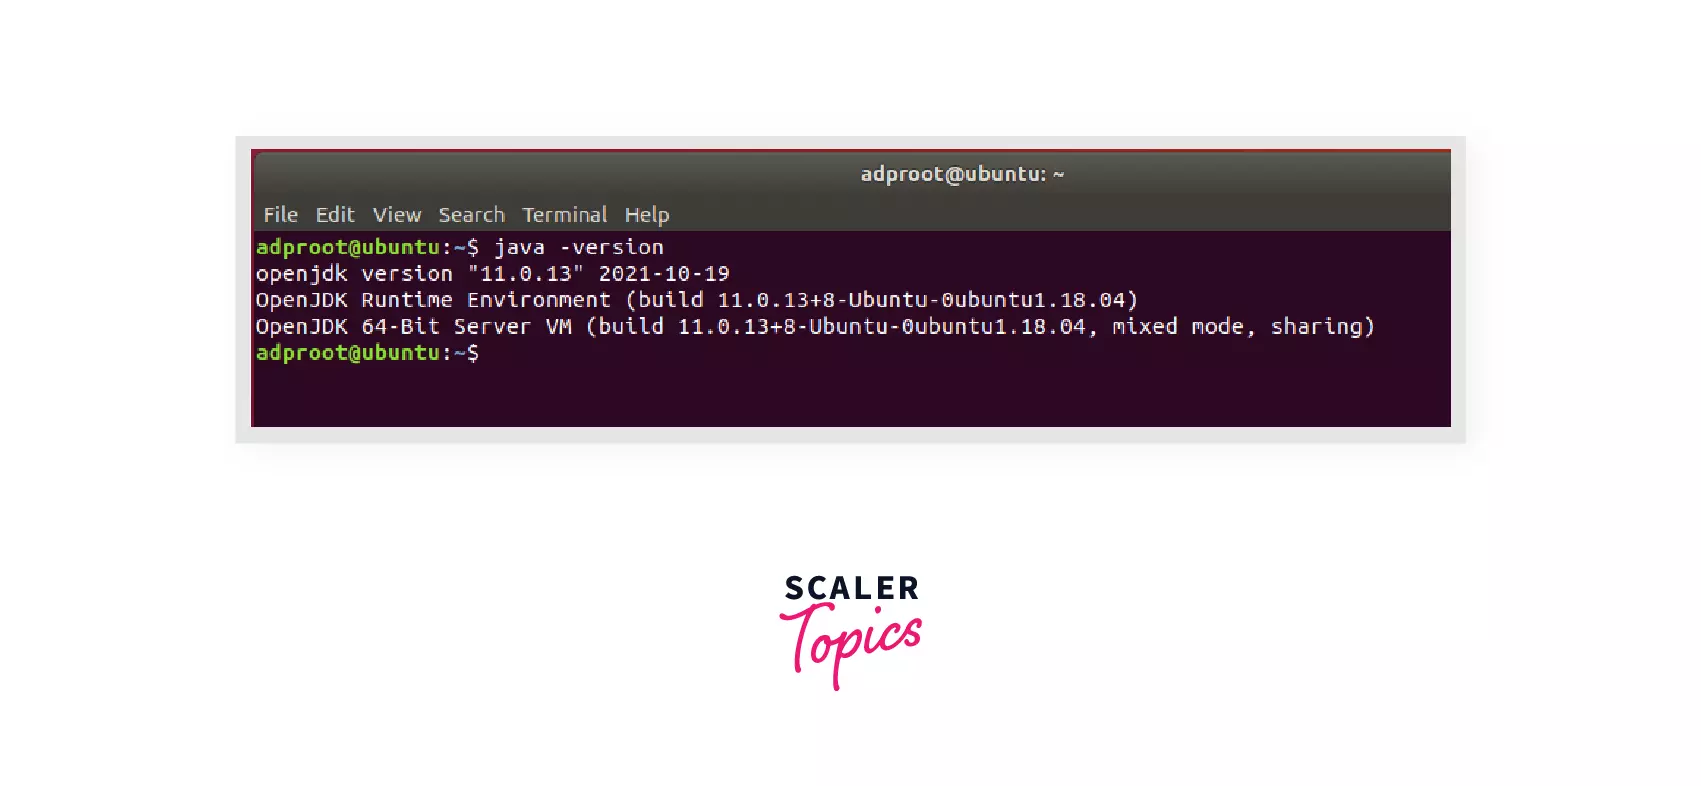
This will install Java and JRE in your machine. To verify again, check the version using the command java -version. It will give Java version installed.
How to Install JDK in Linux?
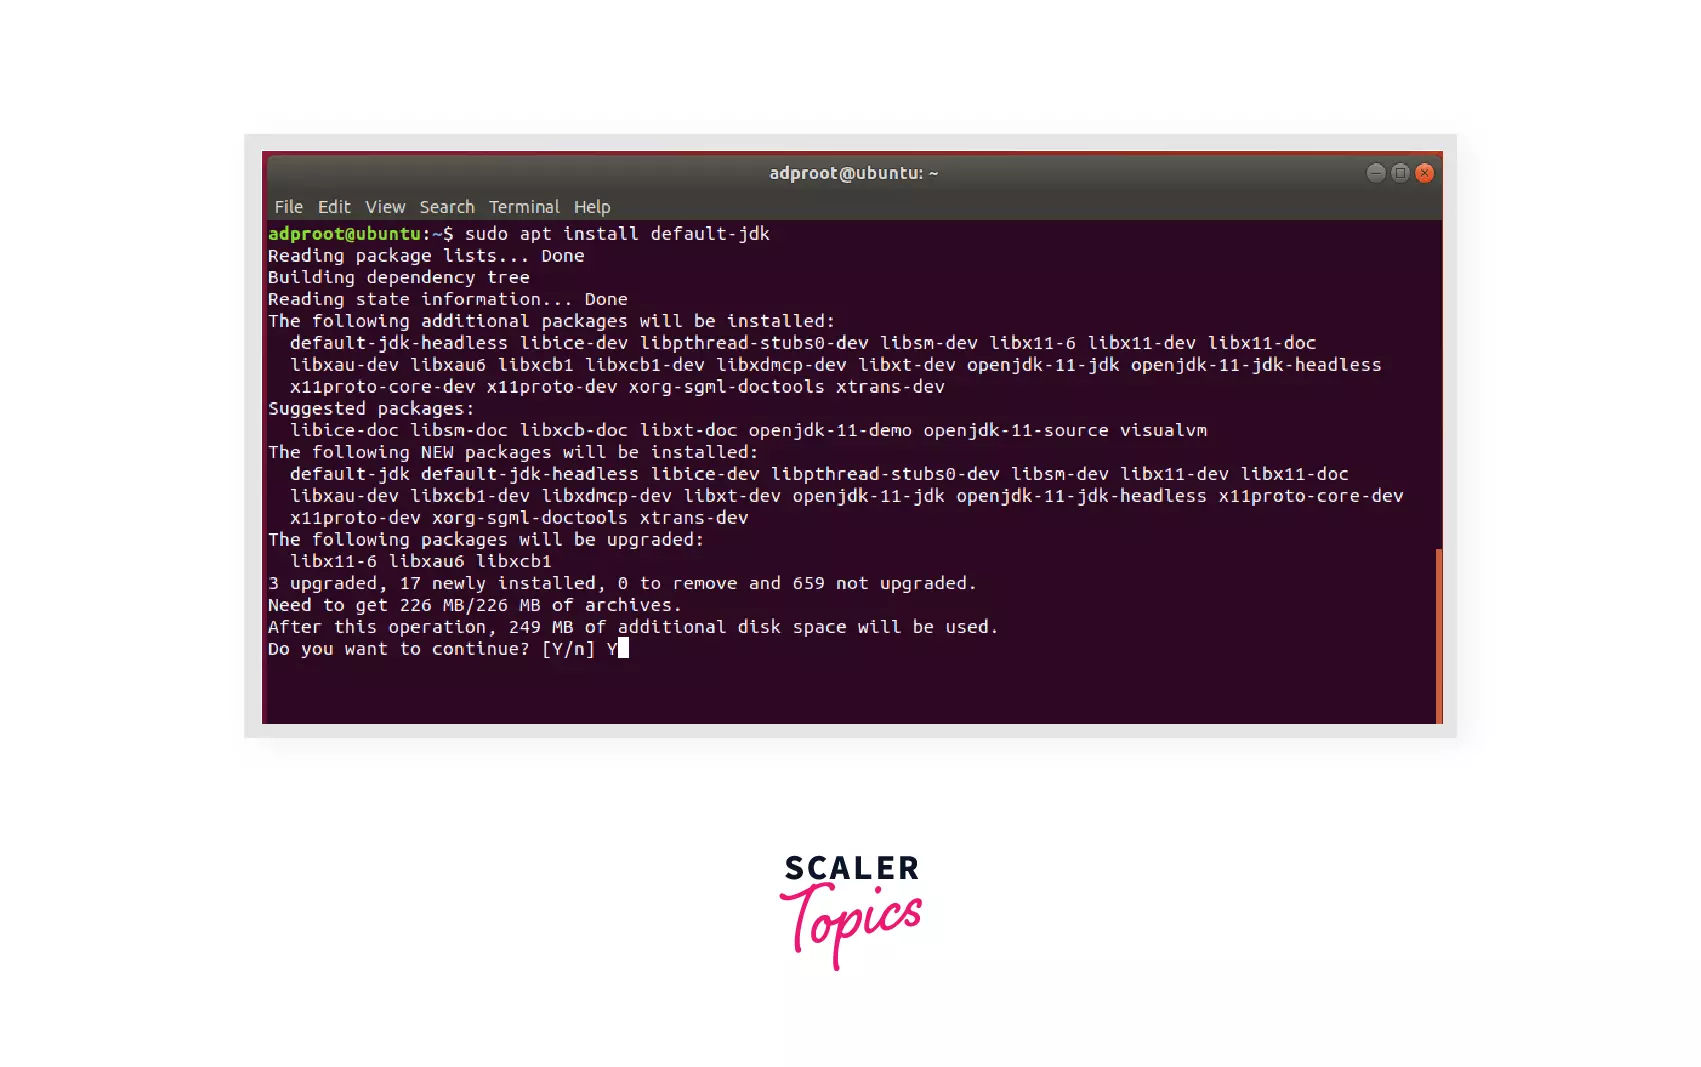
Step 1:
Now, let's install JDK in Linux using the command sudo apt install default-jdk. This will download and install the default version of JRE present in the repository of your Linux operating system.
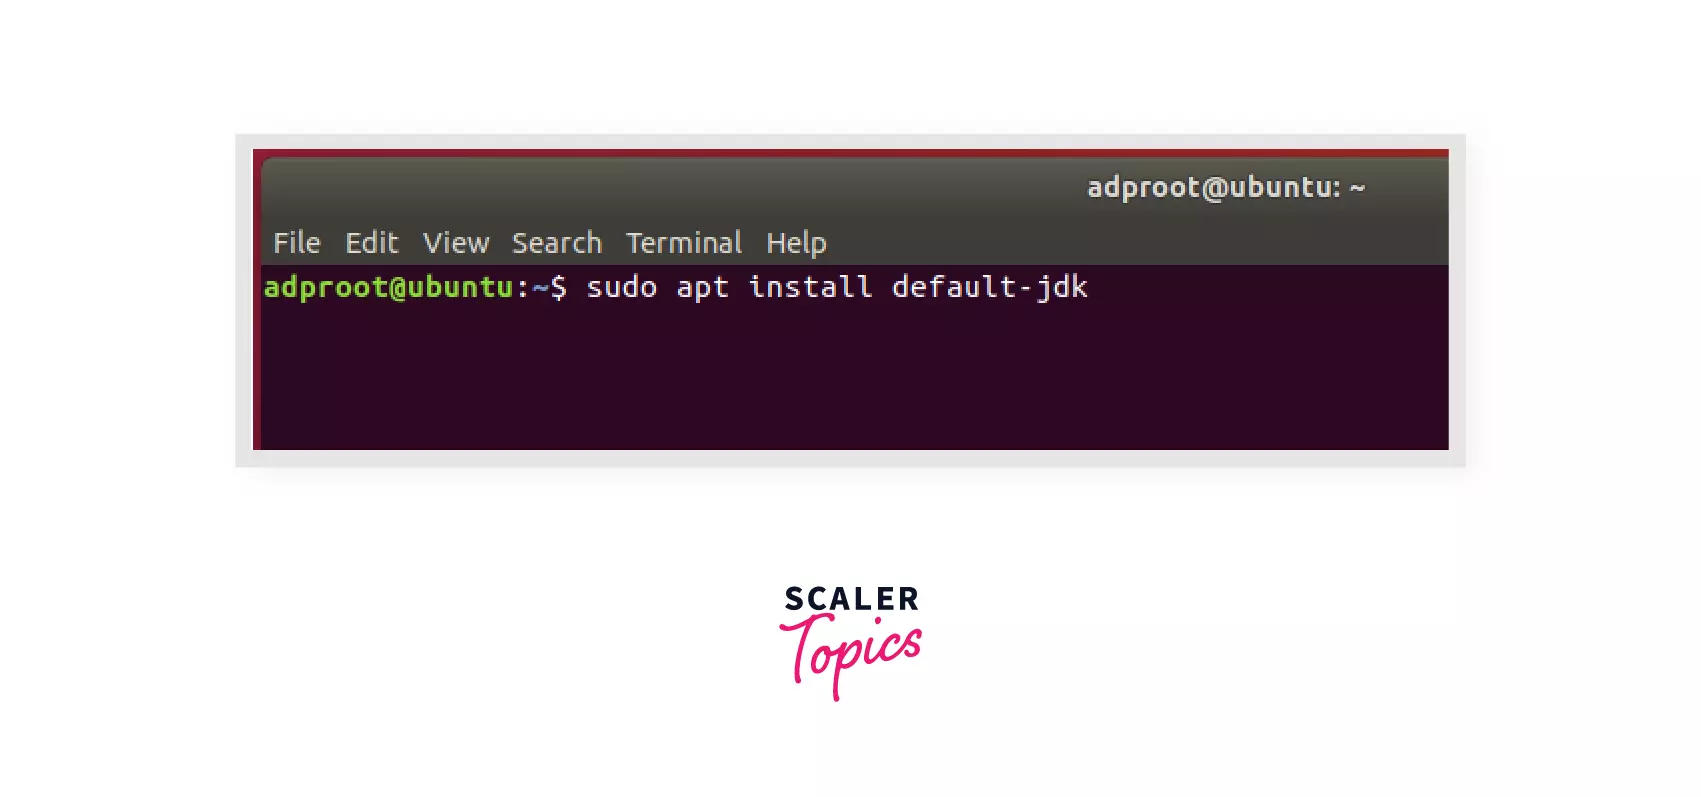
Note: This will install the default JDK i.e., OpenJDK.
Step 2:
It will download some packages and ask for permission. Type Y for yes.
Step 3:
This will install JDK on your machine. To verify again, check the version using the command javac -version.
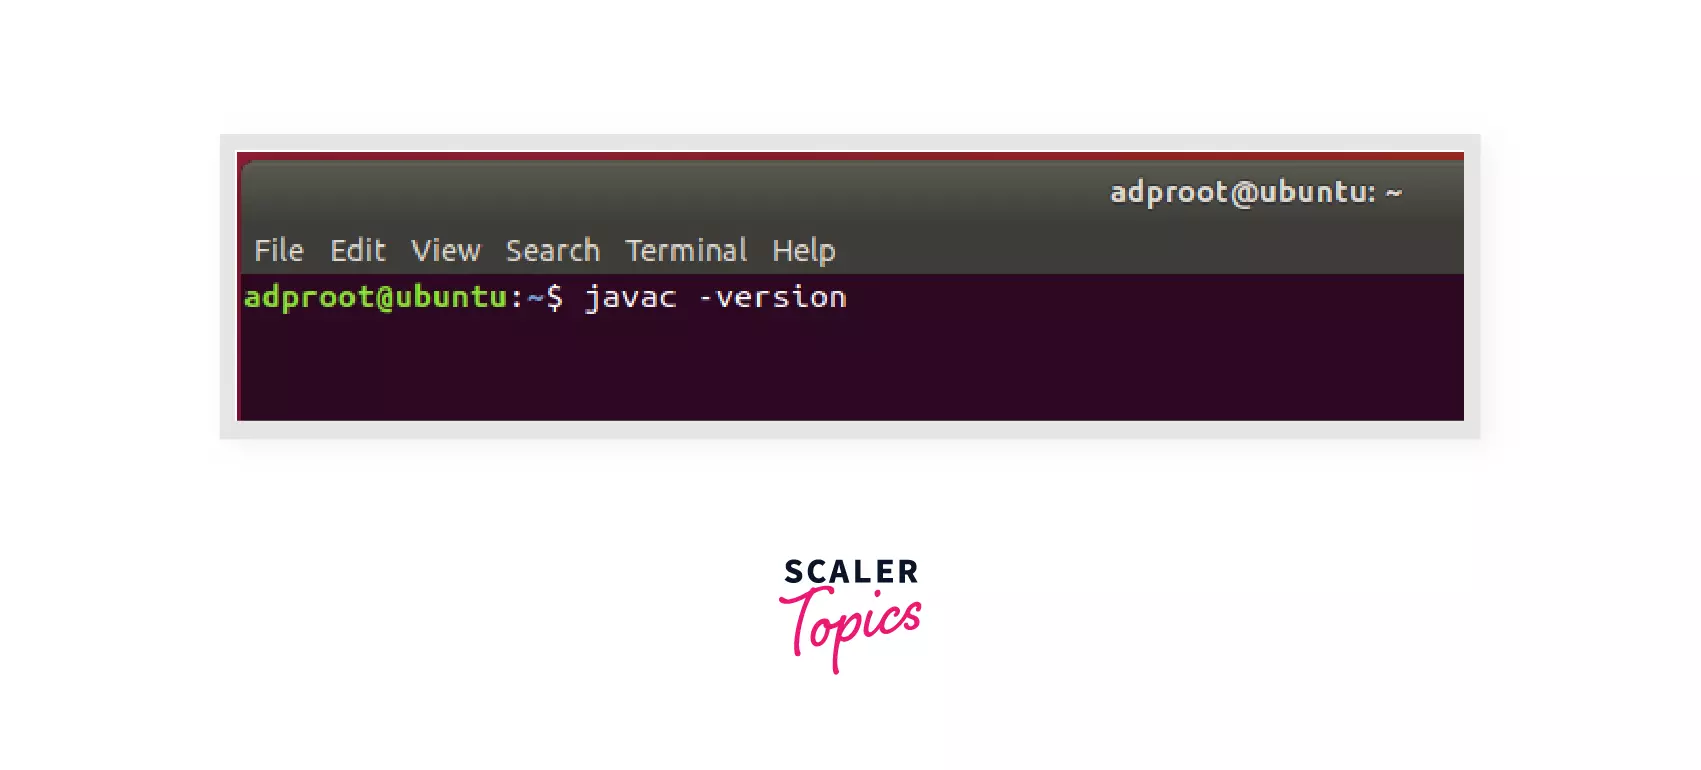
It will give Java compiler version installed. This will confirm the successful installation of JDK as the compiler is part of JDK.
Step 4:
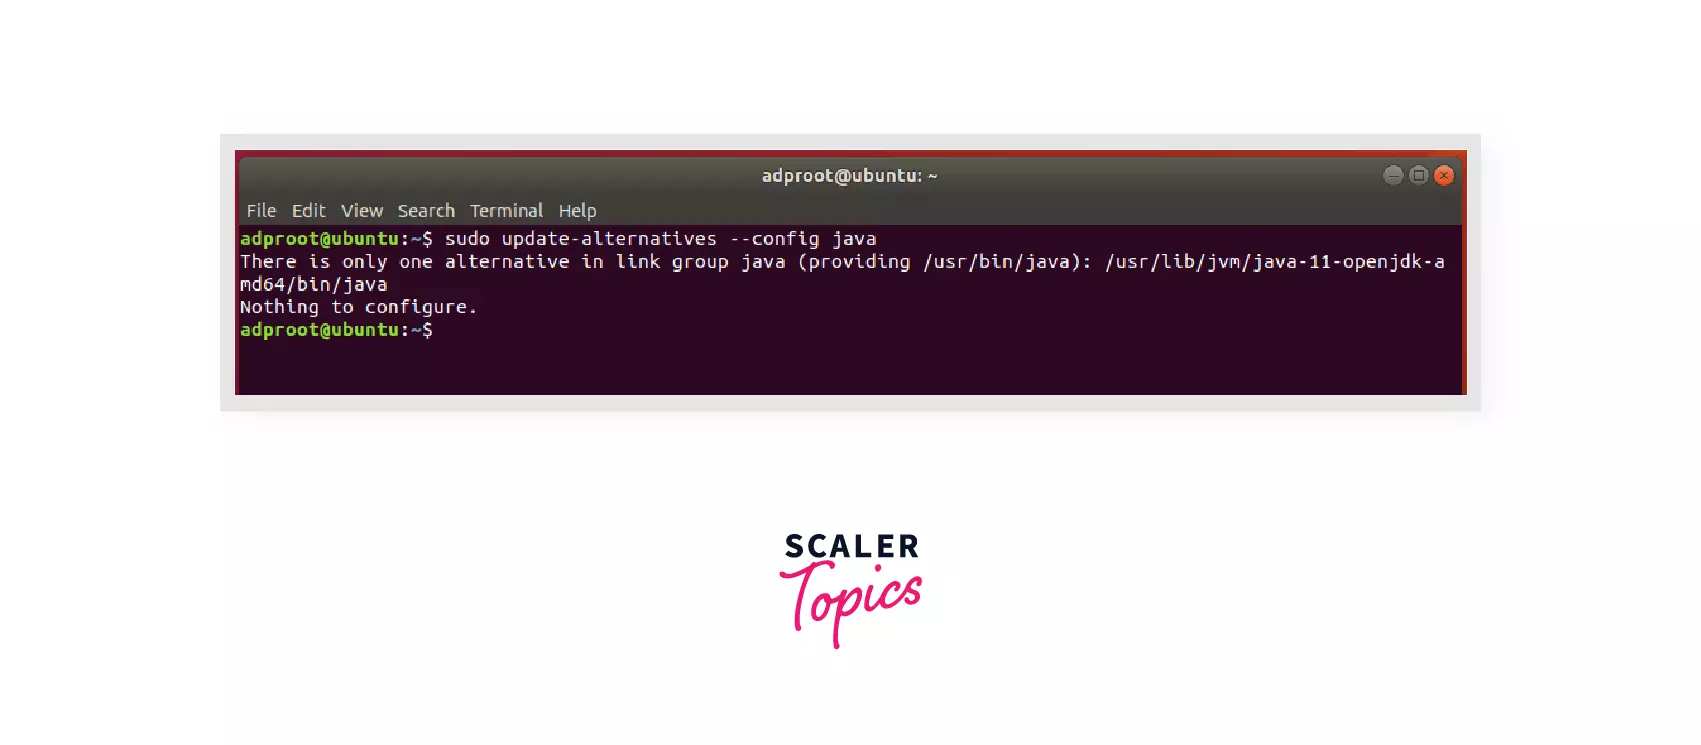
You can have multiple Java installations, such as the default JDK or Oracle JDK, on one server. To configure which version is the default for use, you can use the command update-alternatives. This command will configure and display all the Java installations available on the server so that you can choose one of them.
 As no other Java installation is available on the server, it will show that there is only one alternative.
Step 5:
- In Linux operating systems, many programs are written in Java and use the JAVA_HOME variable to determine the Java installation location.
- The JAVA_HOME environment variable points to the directory where the Java runtime environment (JRE) is installed on your computer.
- If the JAVA_HOME variable is not set properly, we can't run Java programs as OS cannot find the location where Java is installed on your machine.
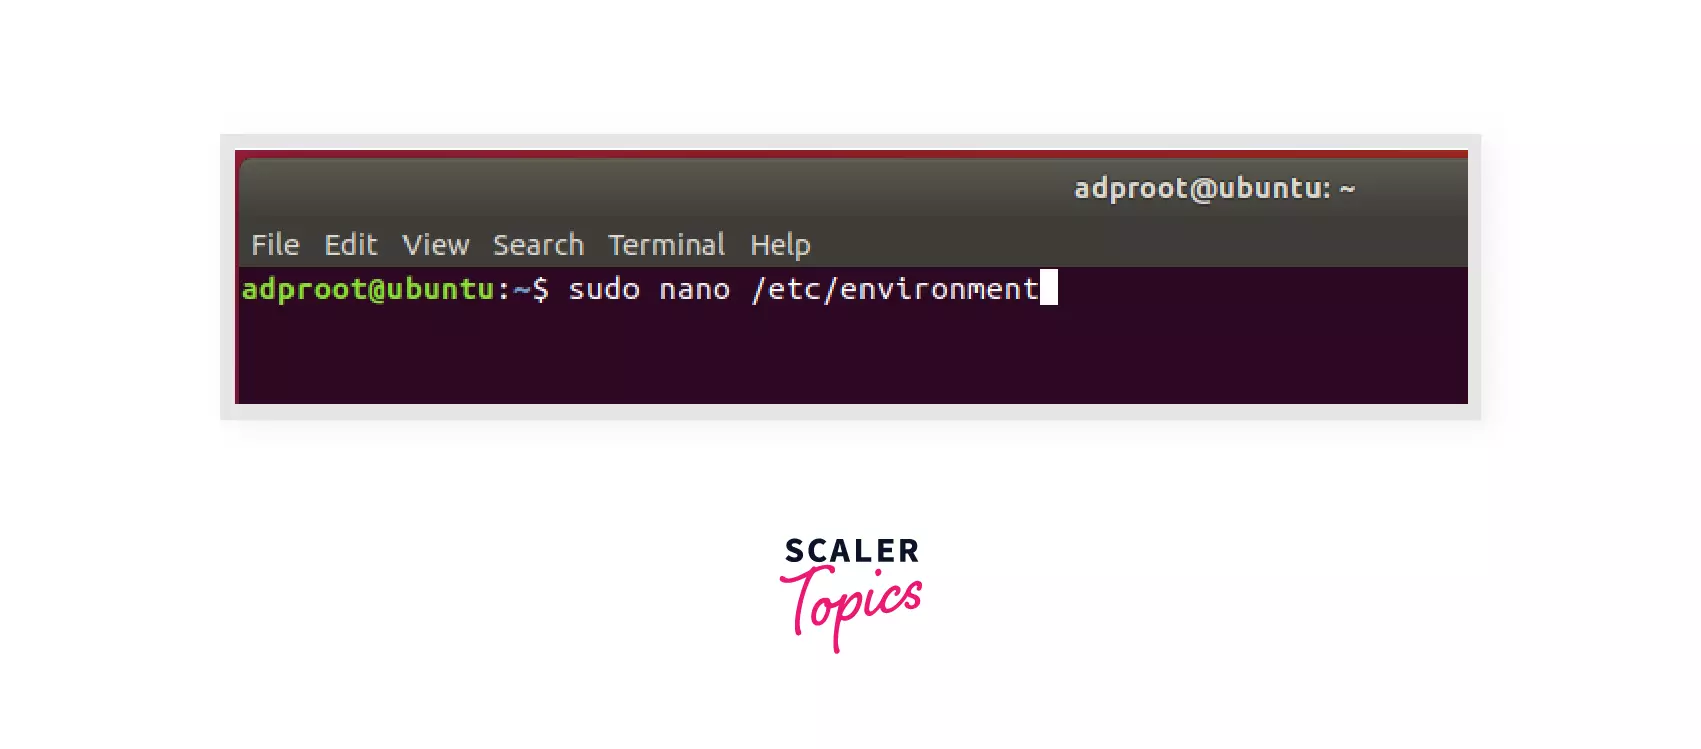
Let's set the environment variable JAVA_HOME. First, open environment variables file using nano editor in Linux.
Command: $ sudo nano /etc/environment
Step 6:
Generally, the default installation path for OpenJDK is'/usr/lib/jvm/java-11-openjdk-amd64/bin/java. Copy the path which gives the location of Java installation as above and set the variable JAVA_HOME` to the path as shown below.
 Save the changes and exit the editor using Crtl+X.
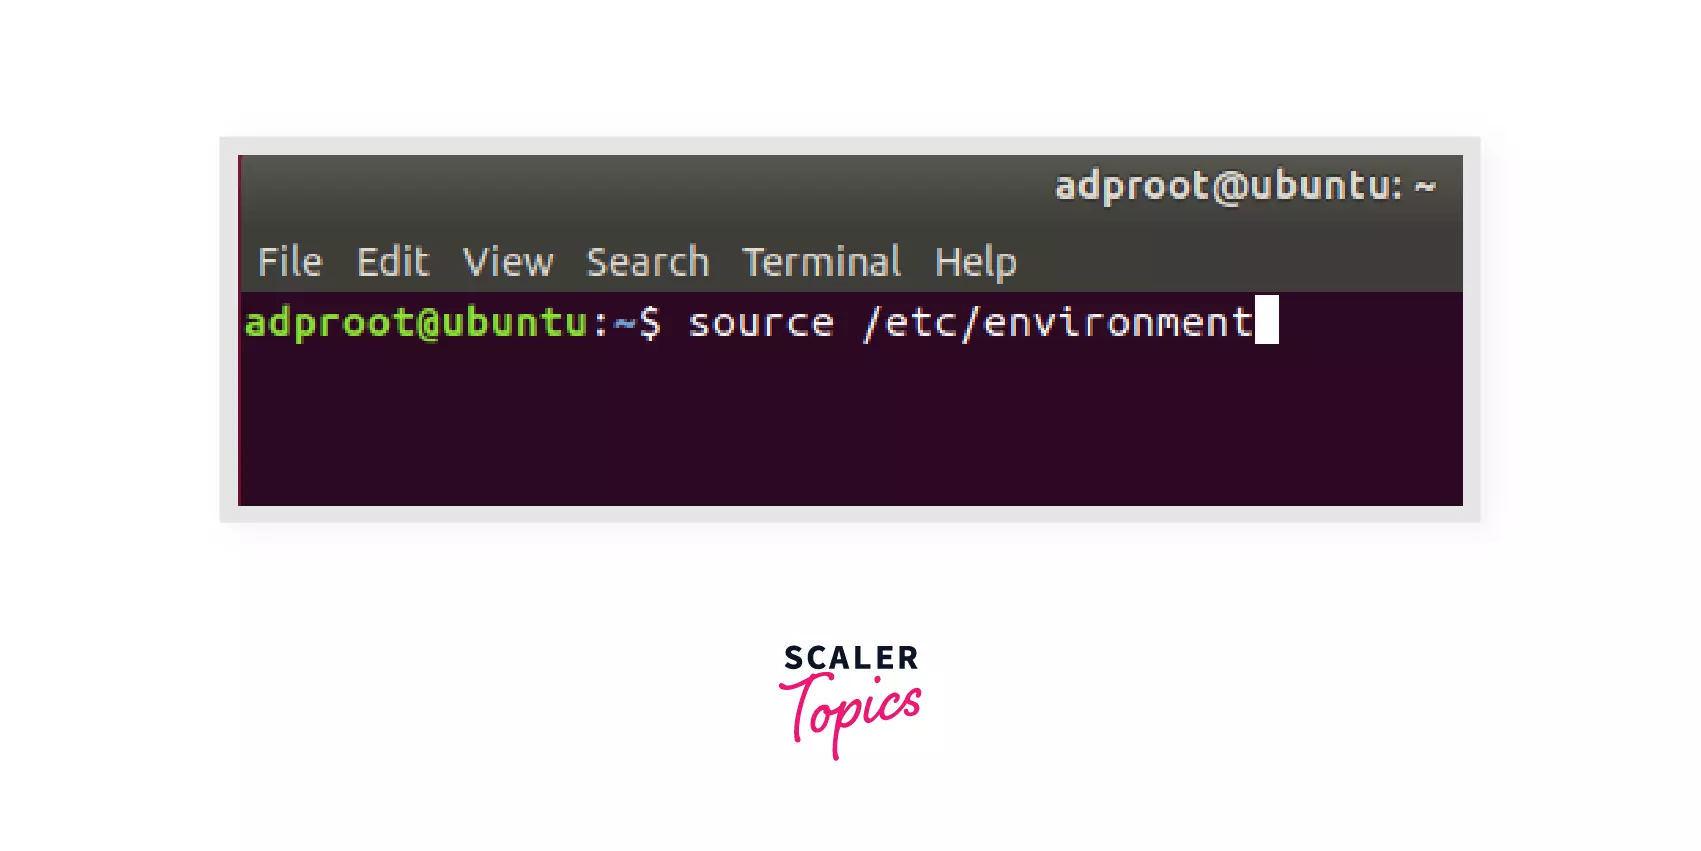
Step 7:
Now, the JAVA_HOME variable is set. To verify it check what's stored in the variable. Use source /etc/environment to go to the environment file.
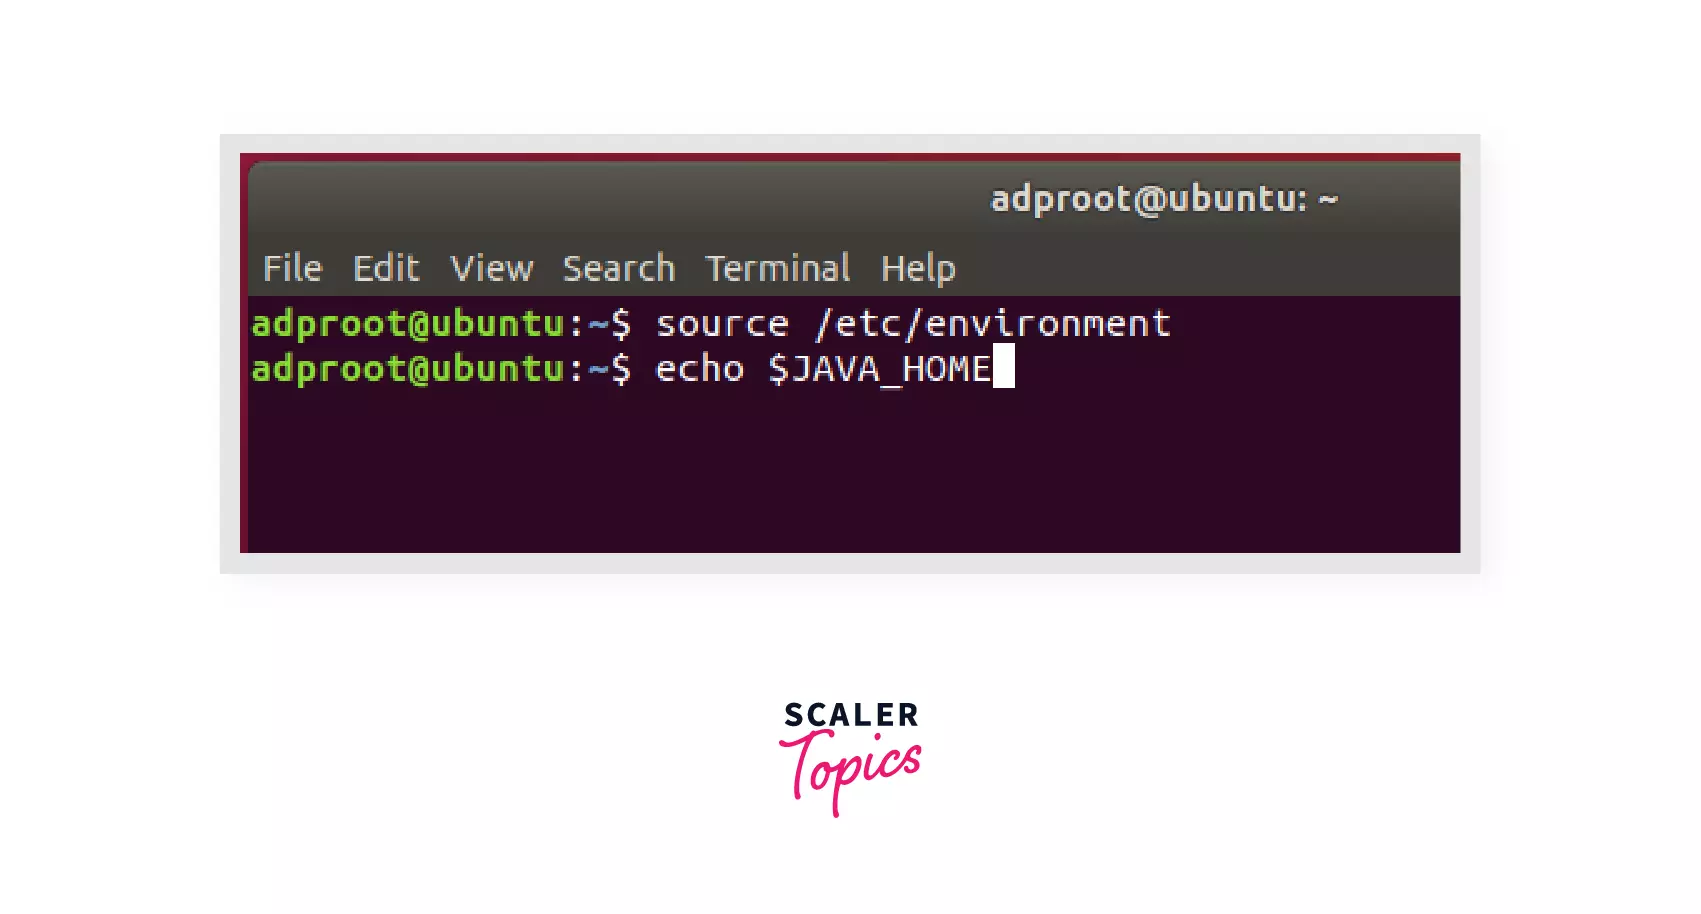
Step 8:
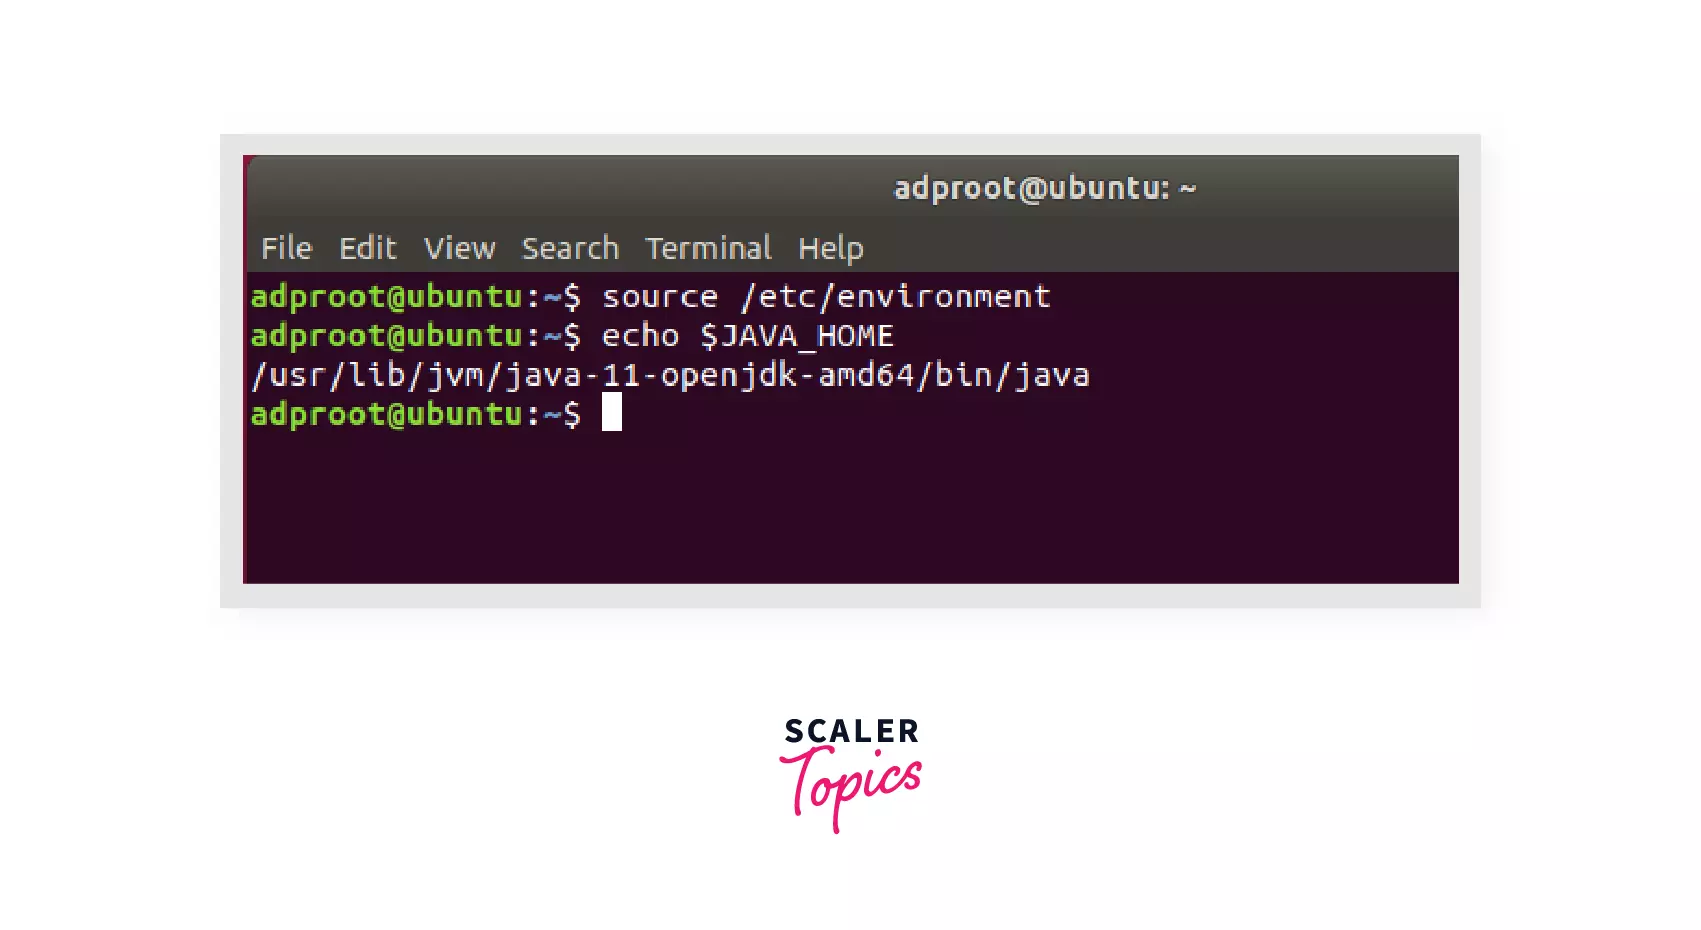
Check the path of JAVA_HOME variable using the command echo $JAVA_HOME. The echo command will print the path stored in the variable on the terminal.
It will show the path you just set as an output, which signifies that we have correctly set the environment variable.
/usr/lib/jvm/java-11-openjdk-amd64/bin/java
Your Linux machine is ready to develop and run Java applications.
Download and Install Java IDE on Linux.
- An integrated development environment(IDE) is a software suite that comprises basic tools like an editor, compiler, and debugger for developing applications.
- Java has various IDE's, but Eclipse IDE is mostly used and popular.
- Eclipse IDE is famous for its Java Integrated Development Environment, but it also has other IDEs like C/C++ IDE, JavaScript IDE, and PHP IDE. It can also be used for web development technologies and has all the necessary tools for application development and testing.
- One of the best perks of using Eclipse IDE is its user-friendly user interface(UI).
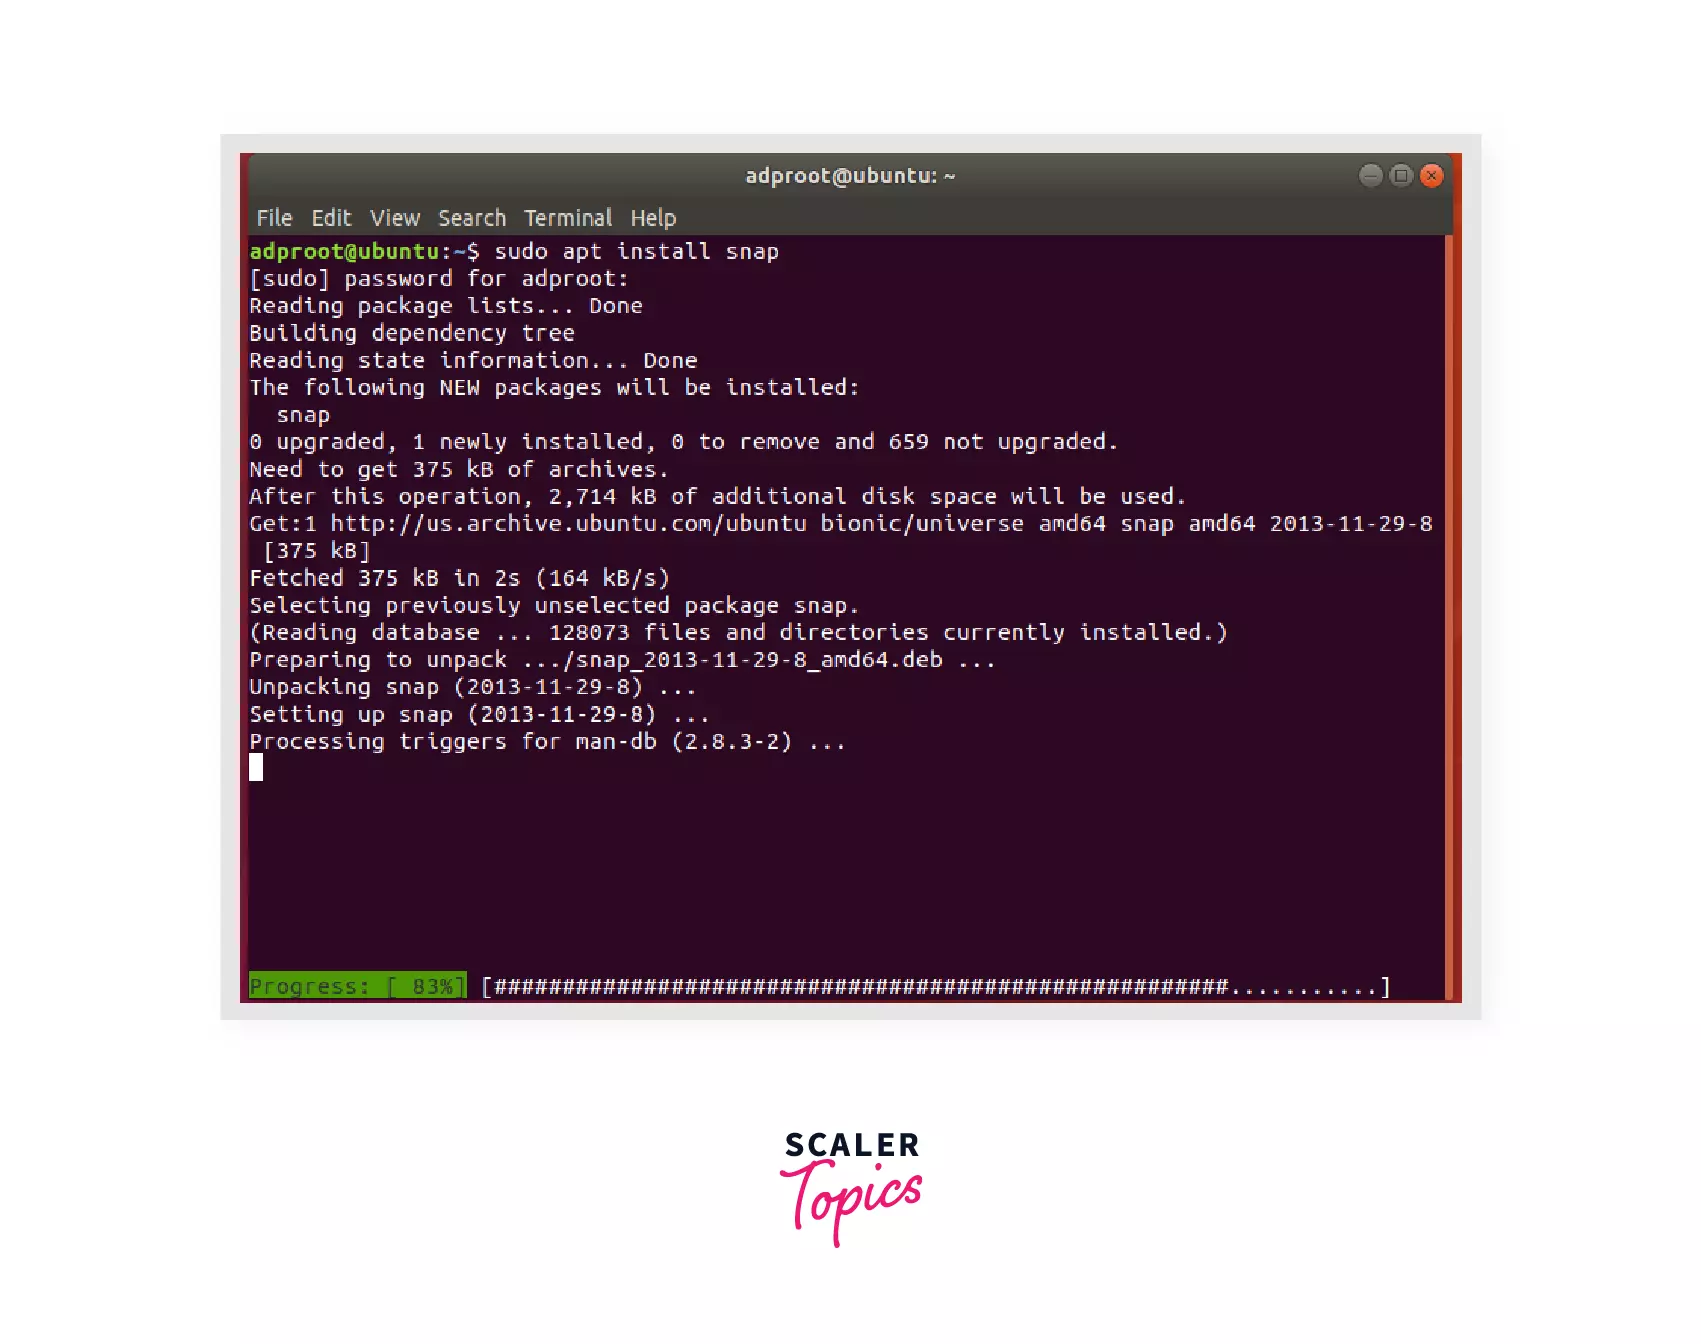
Here are the steps to install one of the famous IDE, Eclipse on the Linux Operating System : Step 1: Snap is an installer used to install eclipse IDE. Install snap using the command : sudo apt install snap.
Step 2: After installing a snap, install eclipse IDE using the command: sudo snap install --classic eclipse.
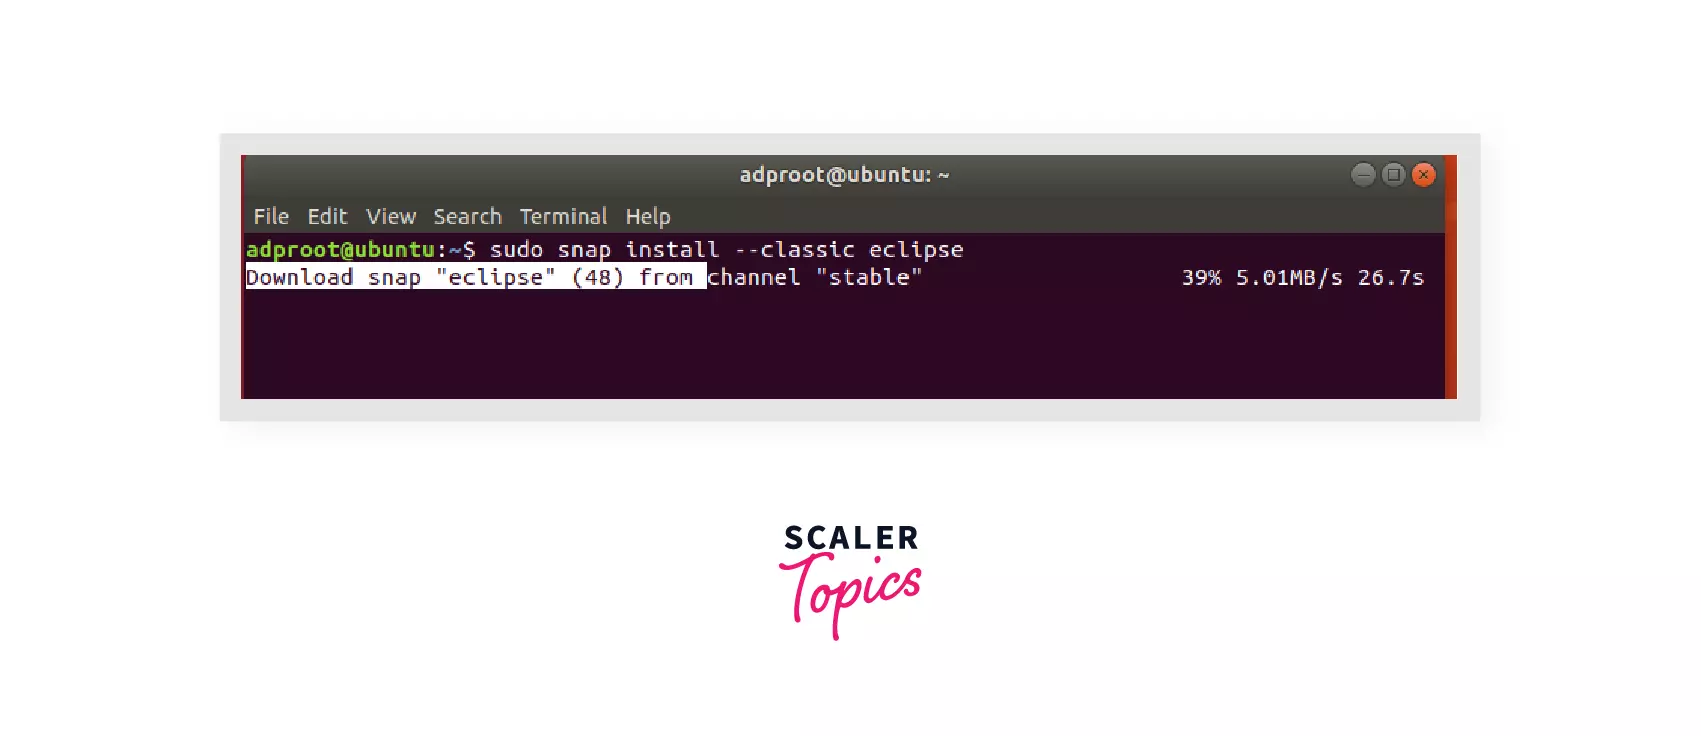 It will start downloading eclipse IDE.
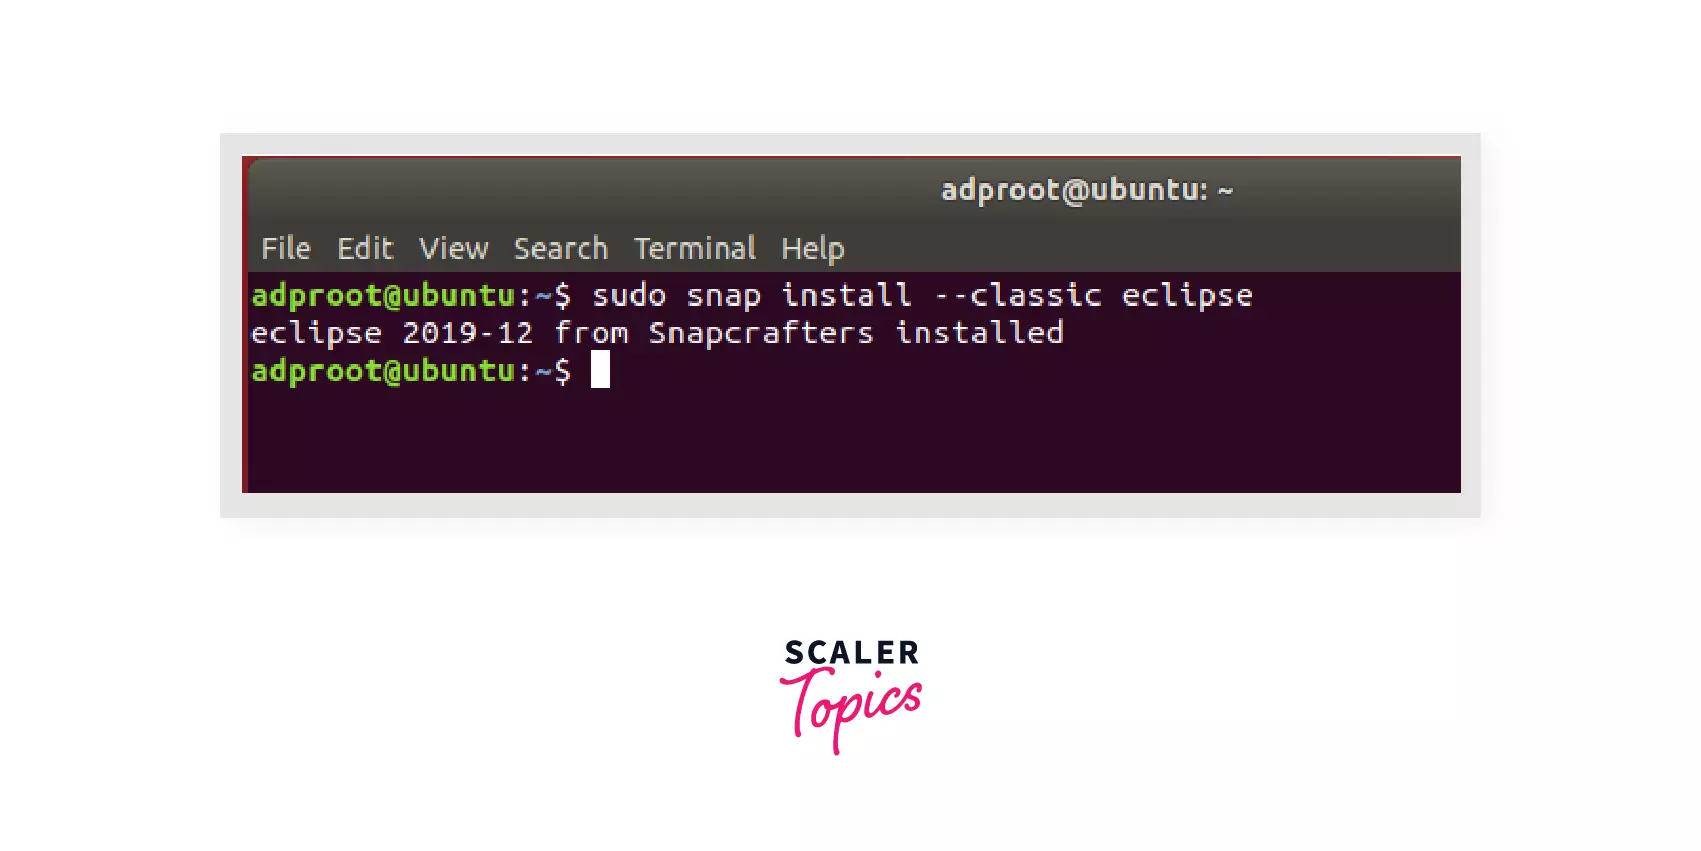
Step 3:
After successful installation, you will see the following message.
Step 4:
Search eclipse in the application search, and you will see the Eclipse IDE installed.

Write your first Java program on a Linux OS.
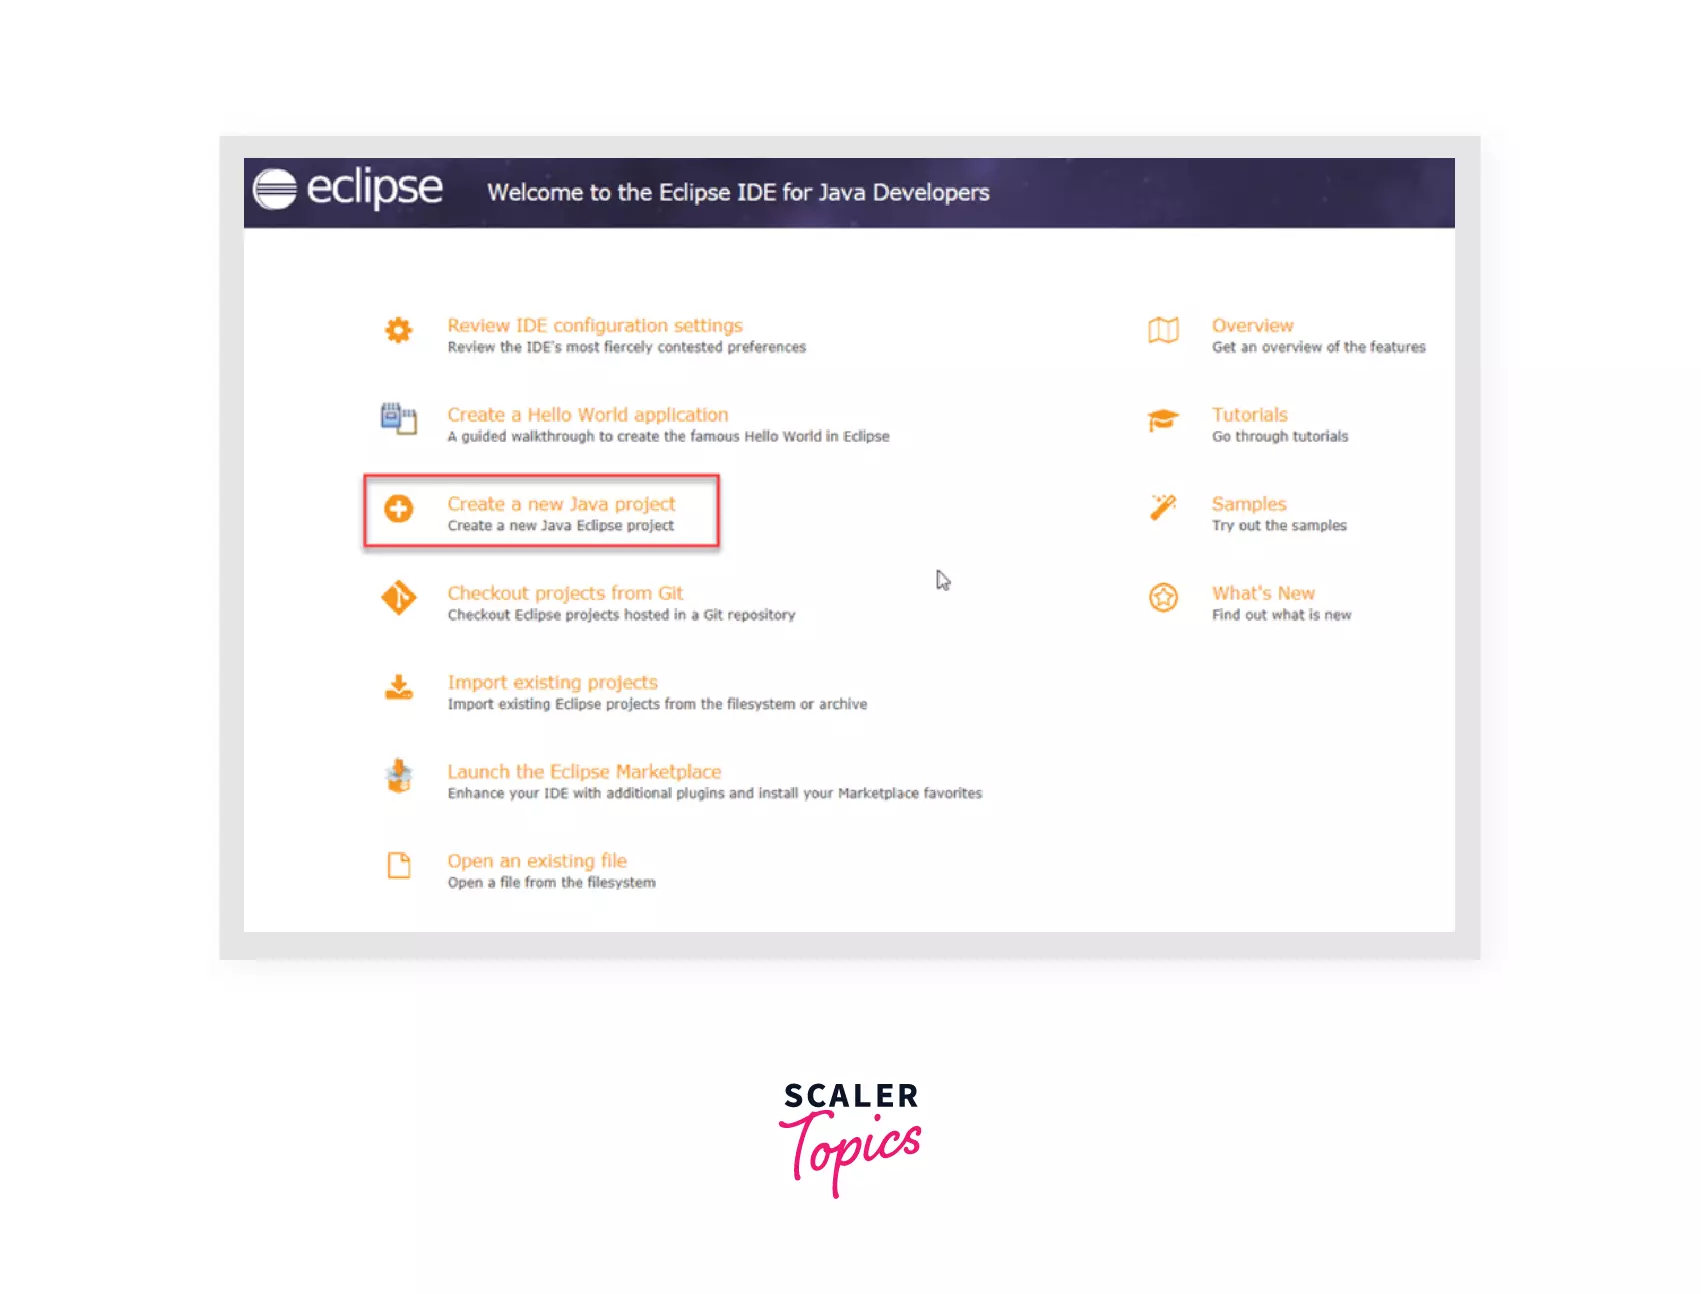
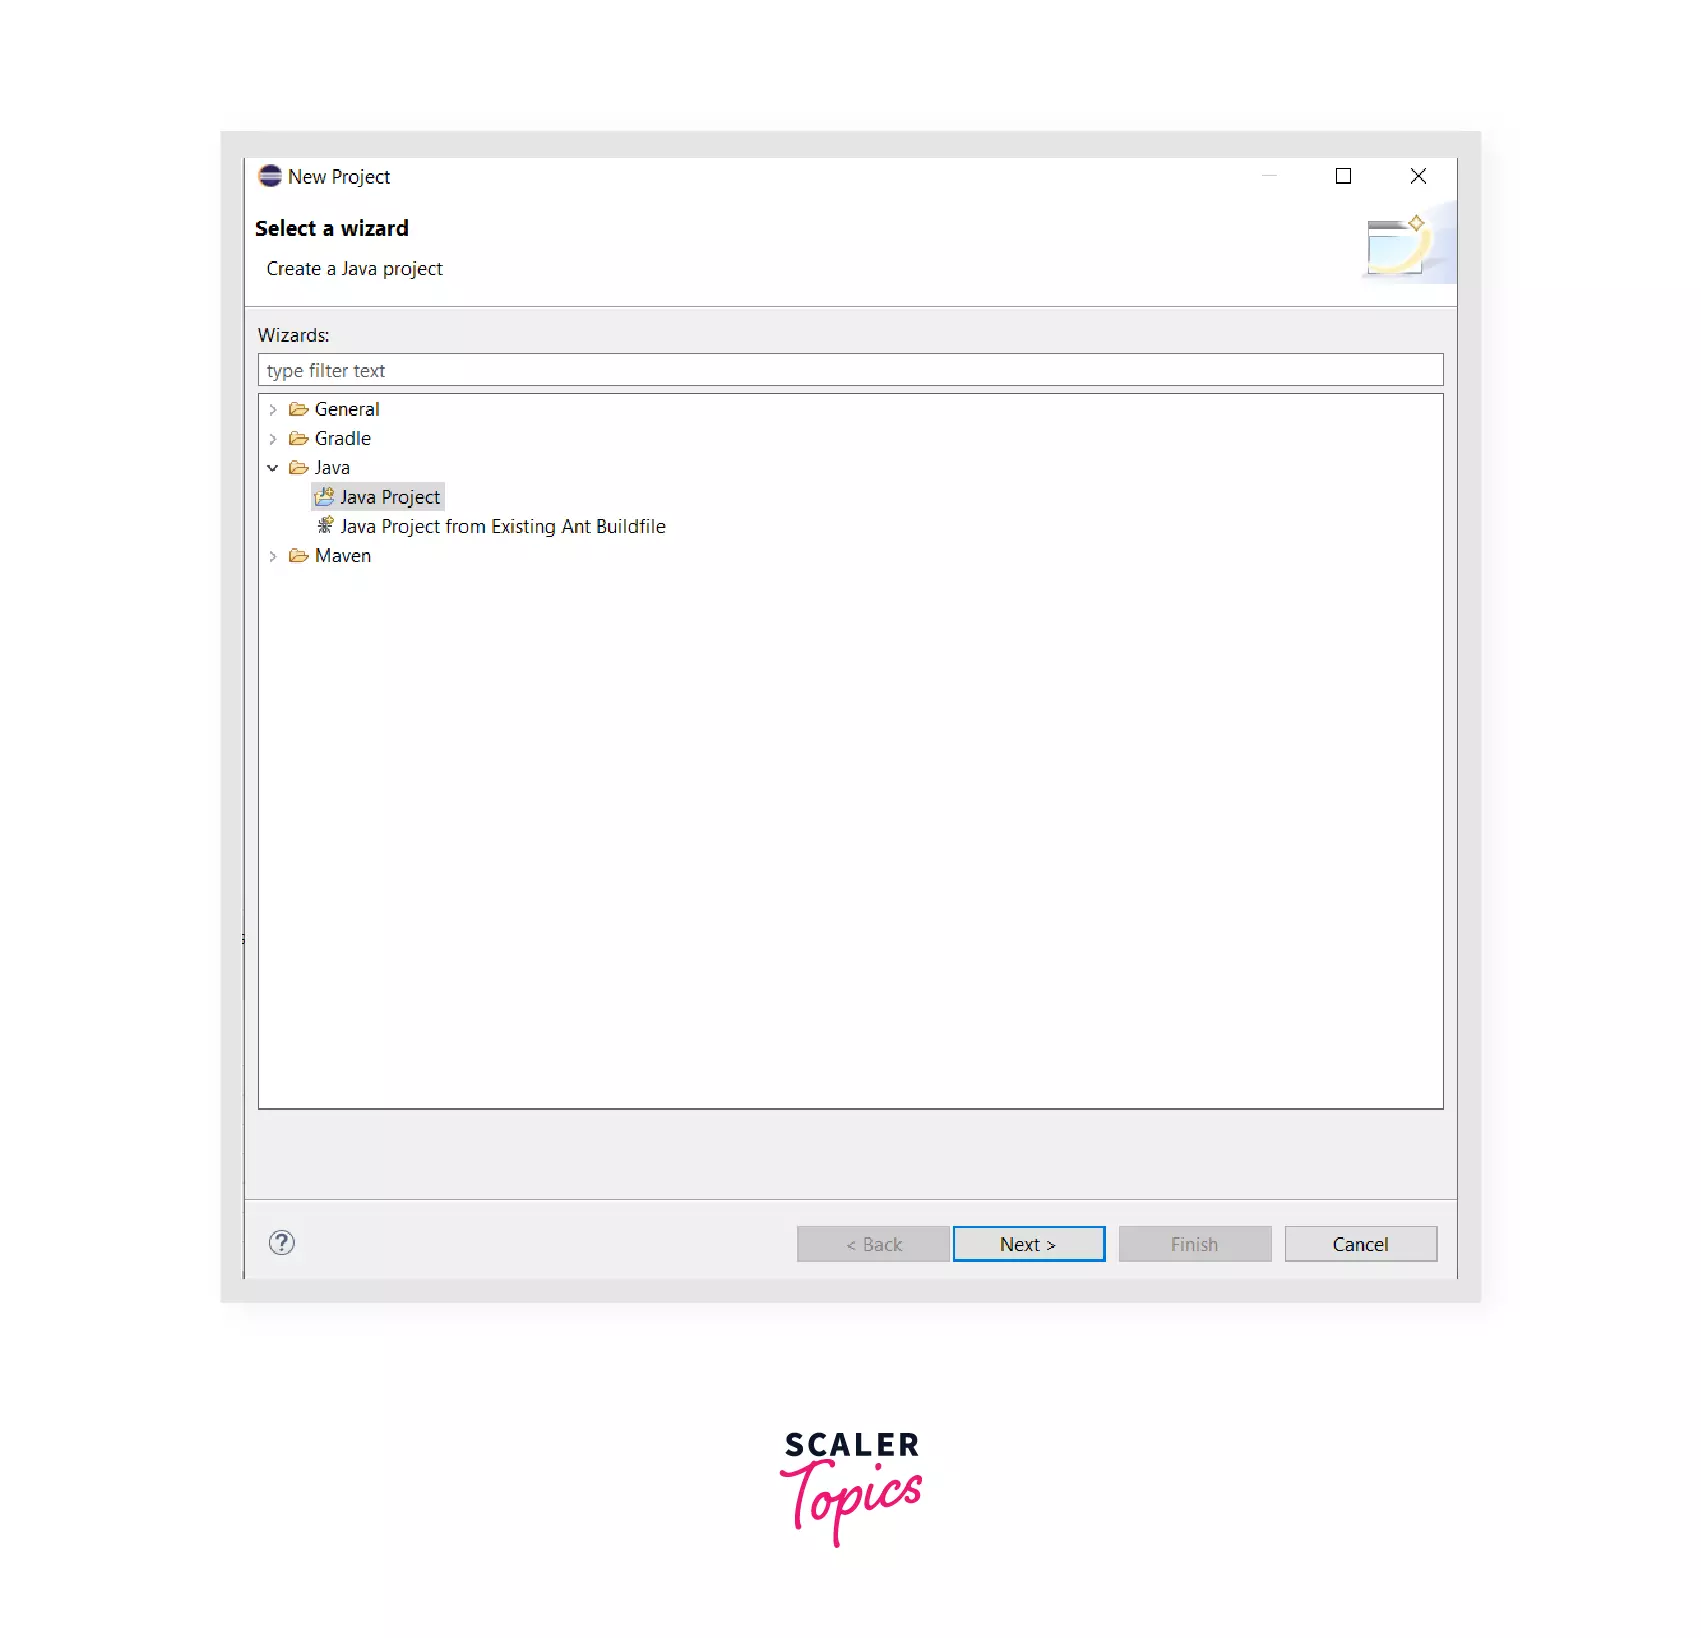
Let's write our first Java Program that prints Hello World!. Step 1: After launching the workspace, click on Create a new Java Project.
Step 2: Select Java Project and Click on Next.
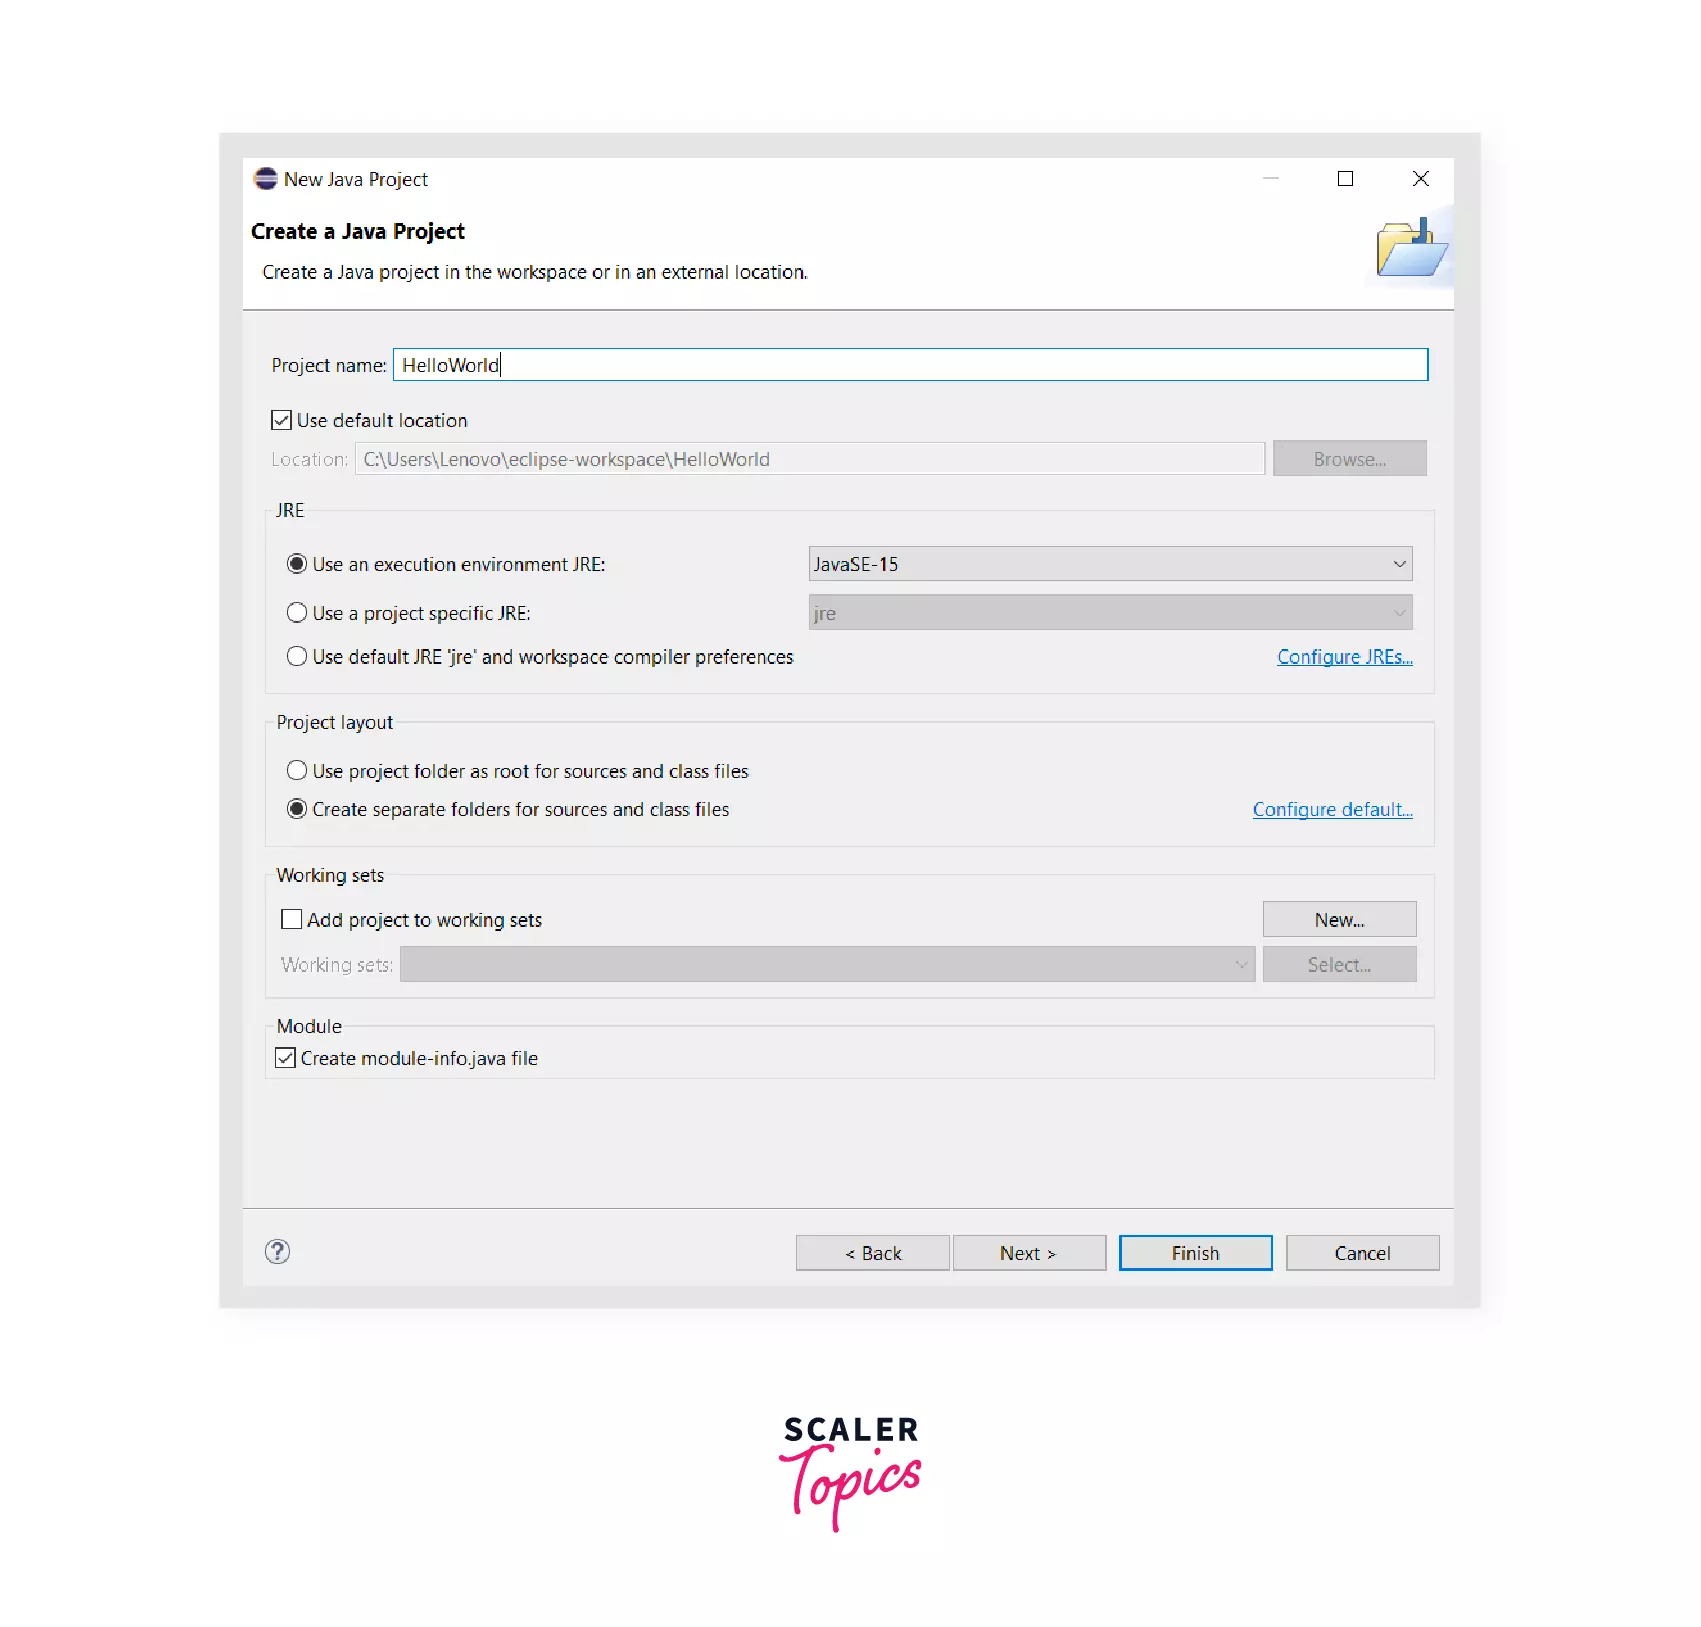
Step 3: Give name for your project in Project name and click on Finish. Here project name is HelloWorld.
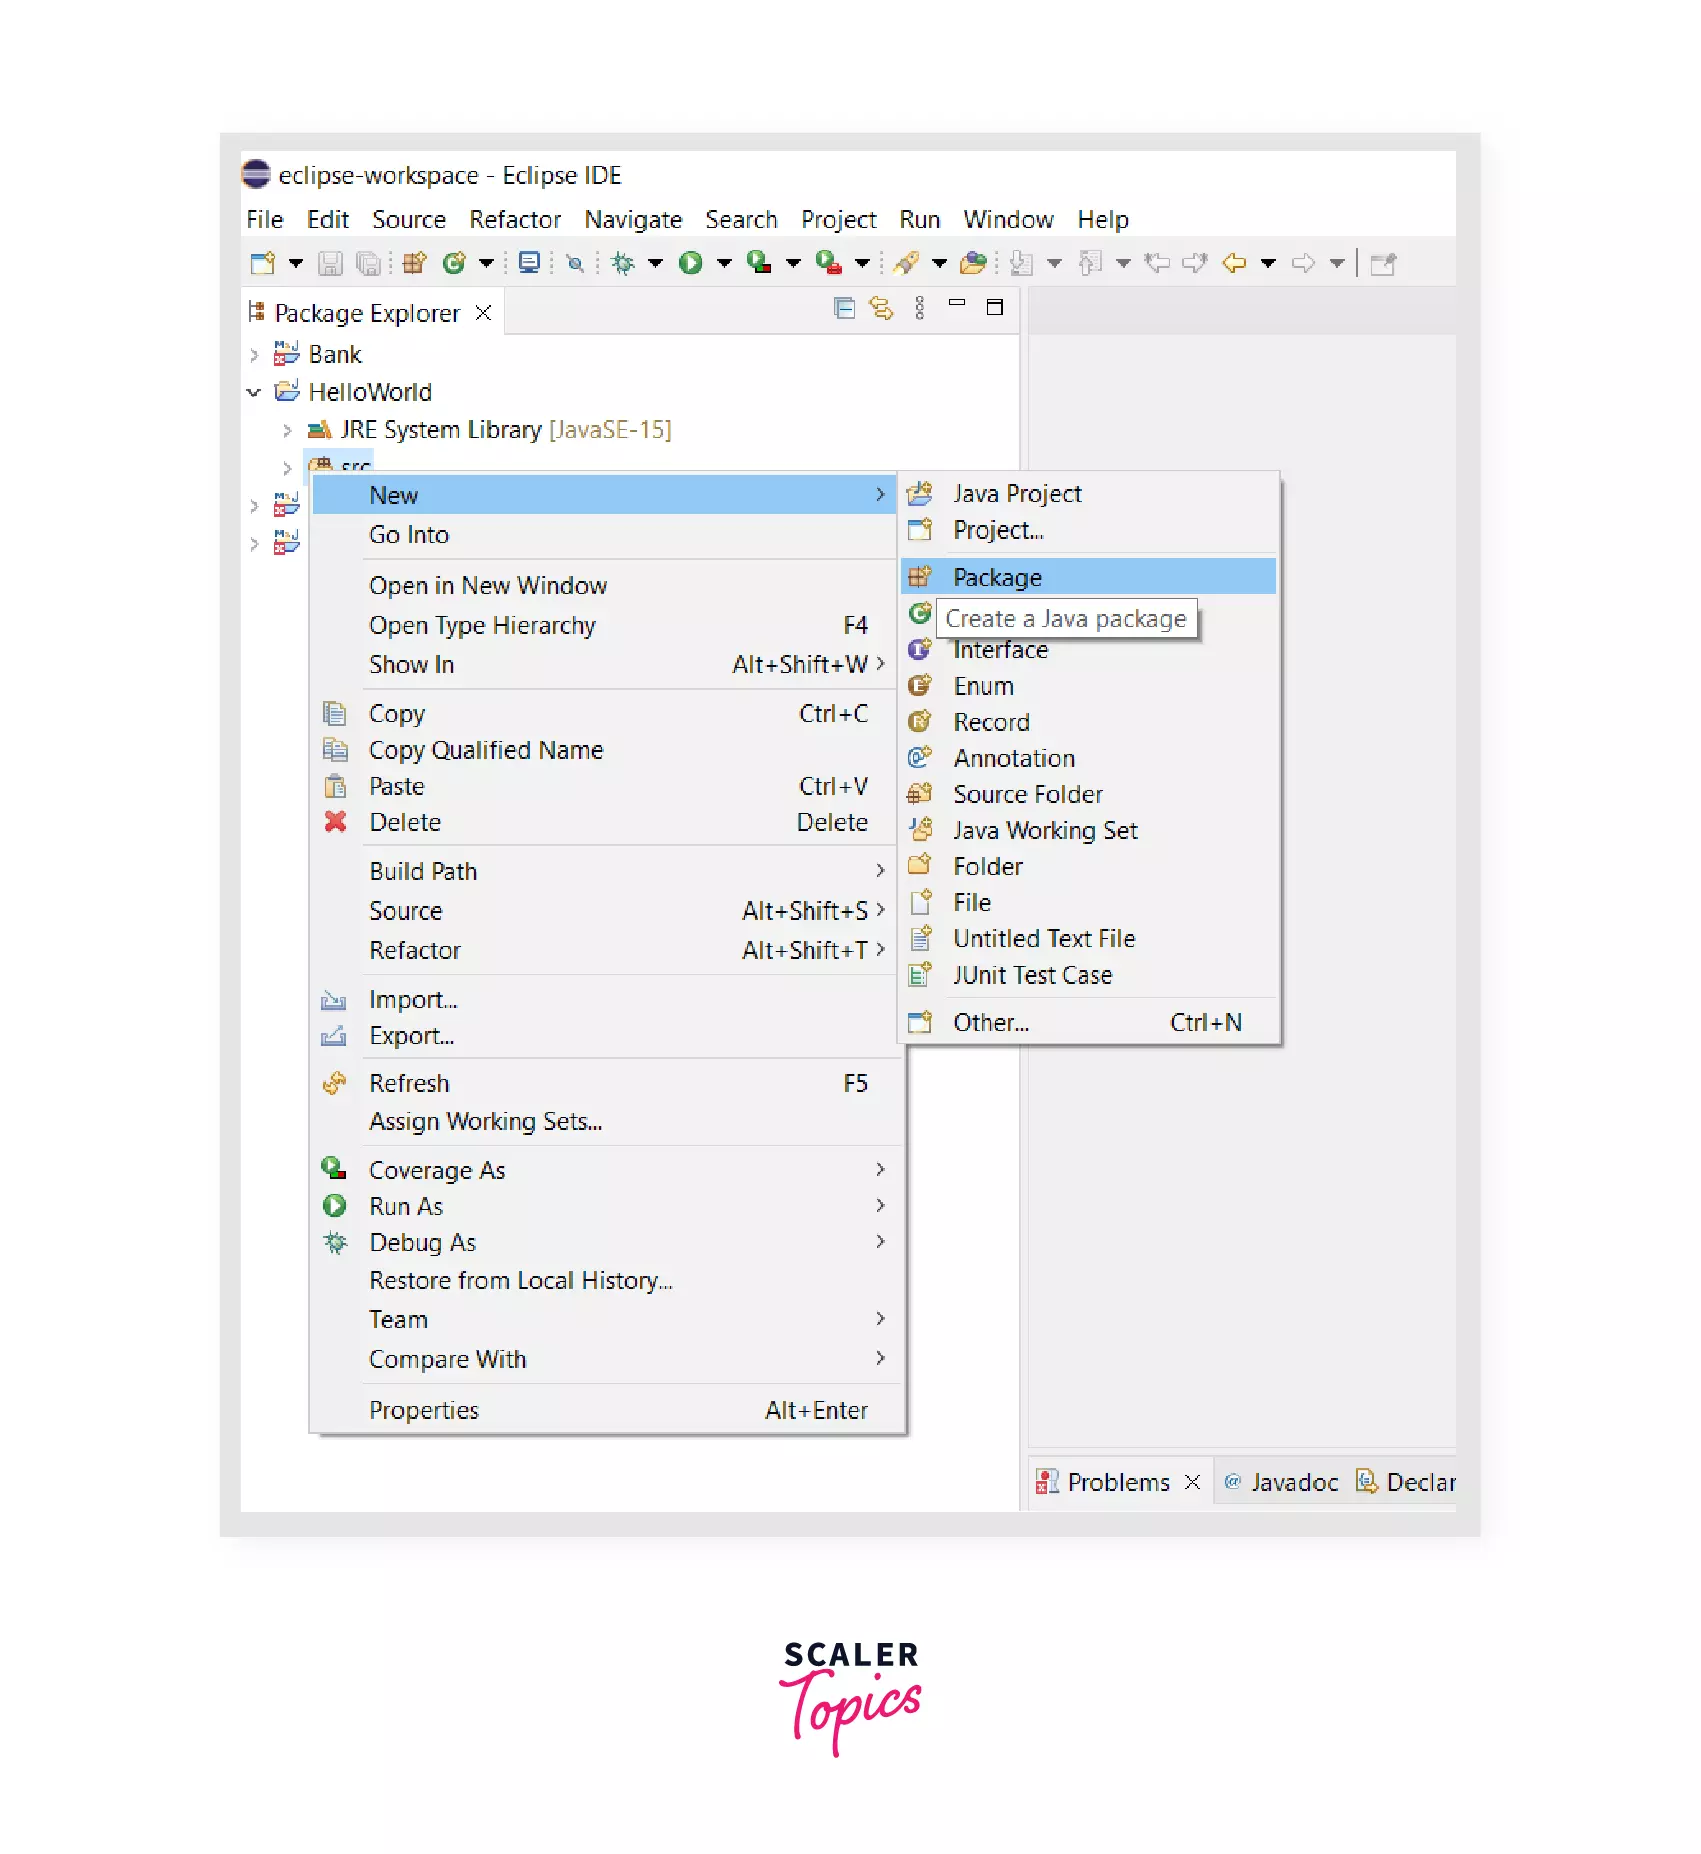
Step 4: You will find a folder named after your project name, i.e., HelloWorld, in the package explorer. Expand the folder and right-click on the src folder. Click on New and then on Package.
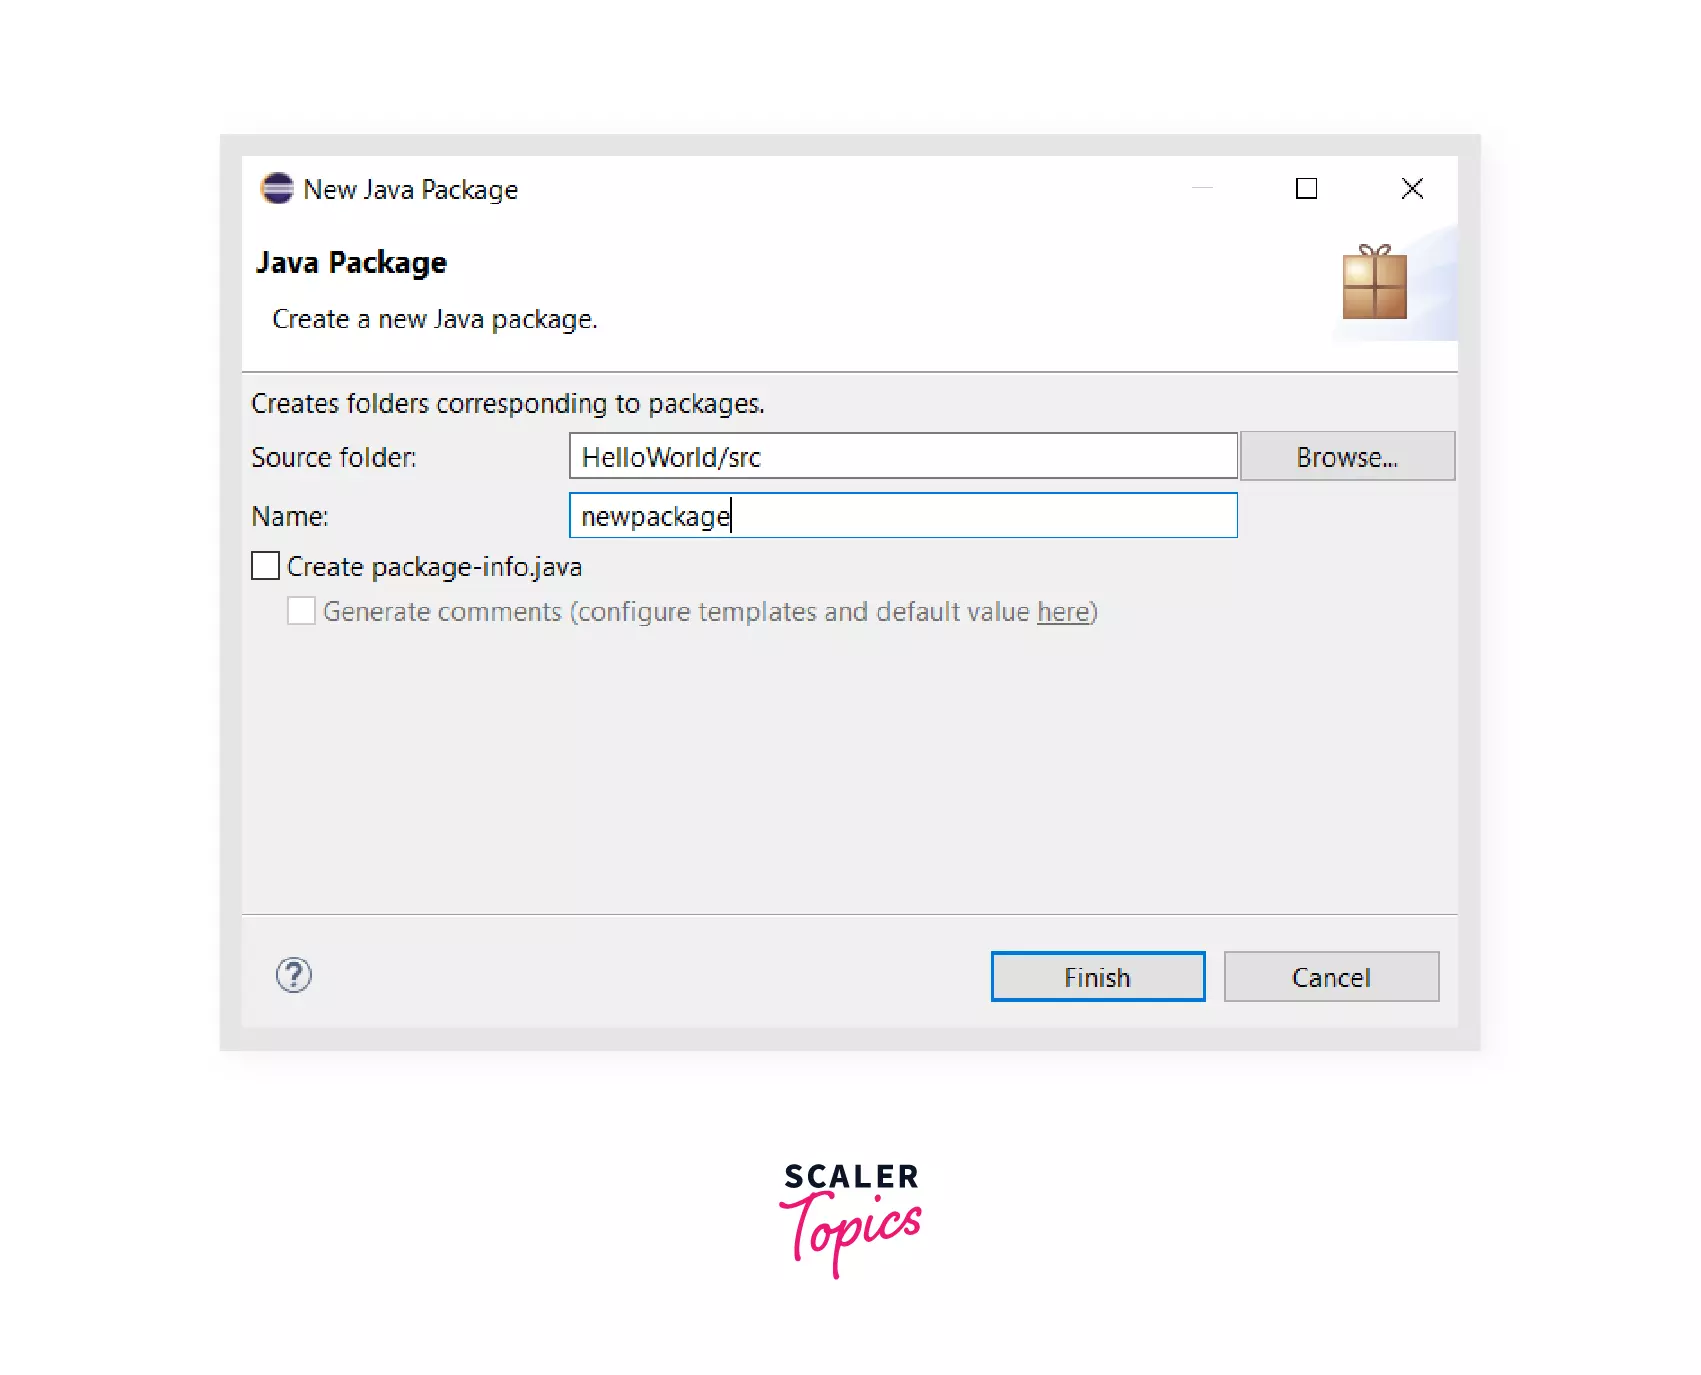
Create a package in src folder as follows:
Step 5: As an Object-Oriented Programming language, Java operates on the principles of classes and objects. Every Java program must contain at least one class to execute successfully. Create a new class in the package created above following the same steps.
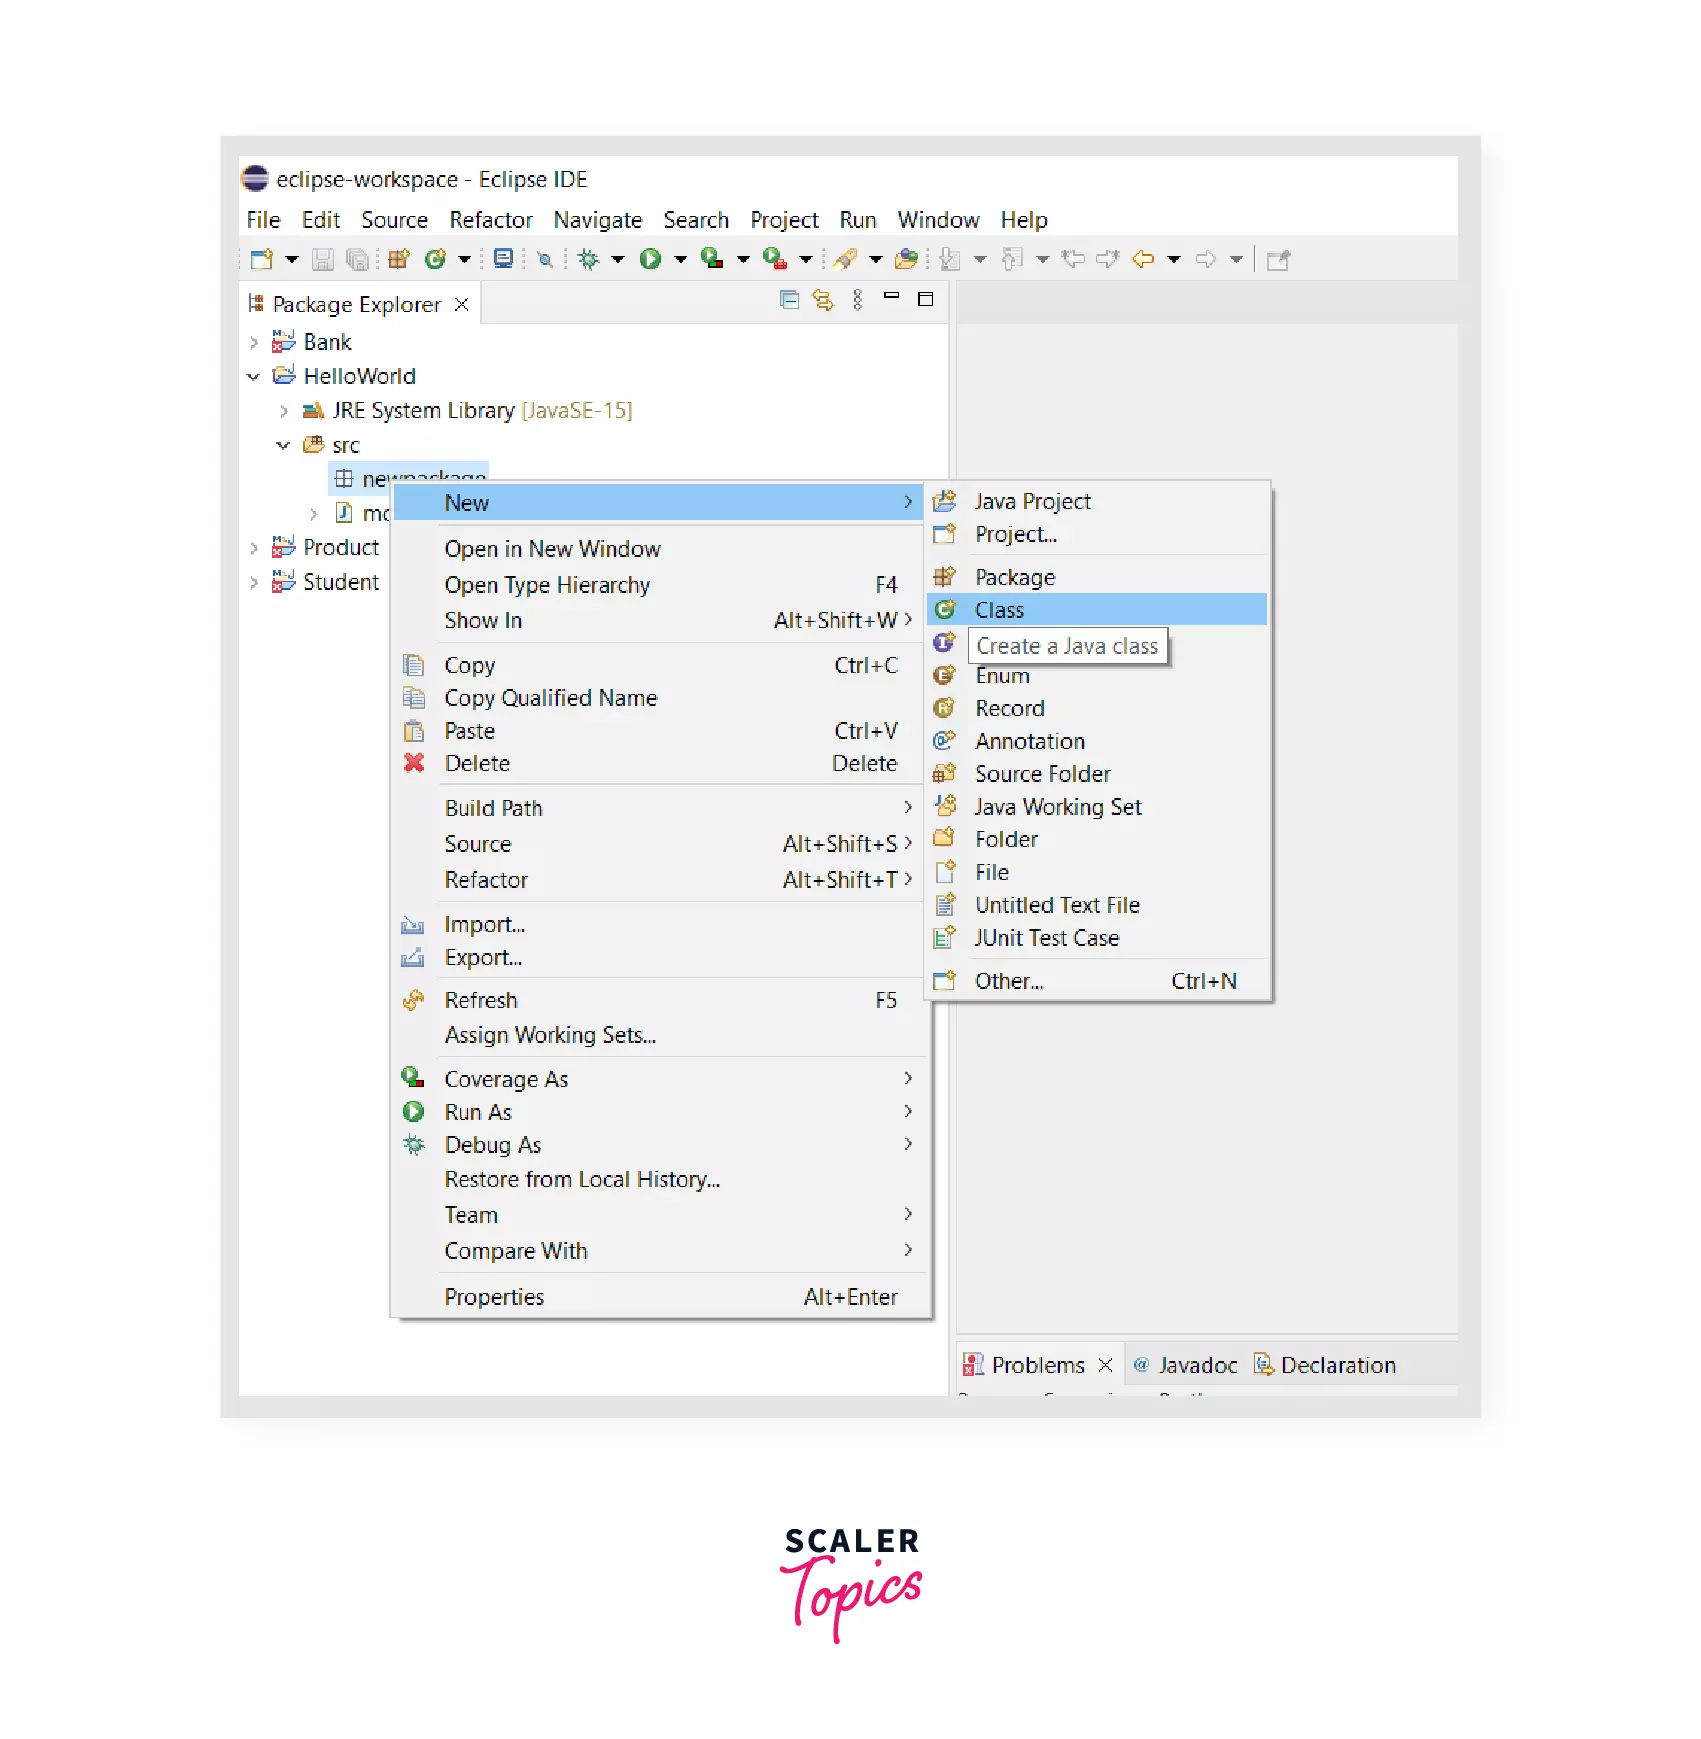
Create class as follows.

You can see the following window on eclipse. It has created all the classes and required methods. We have to write our executable statements using the main method.
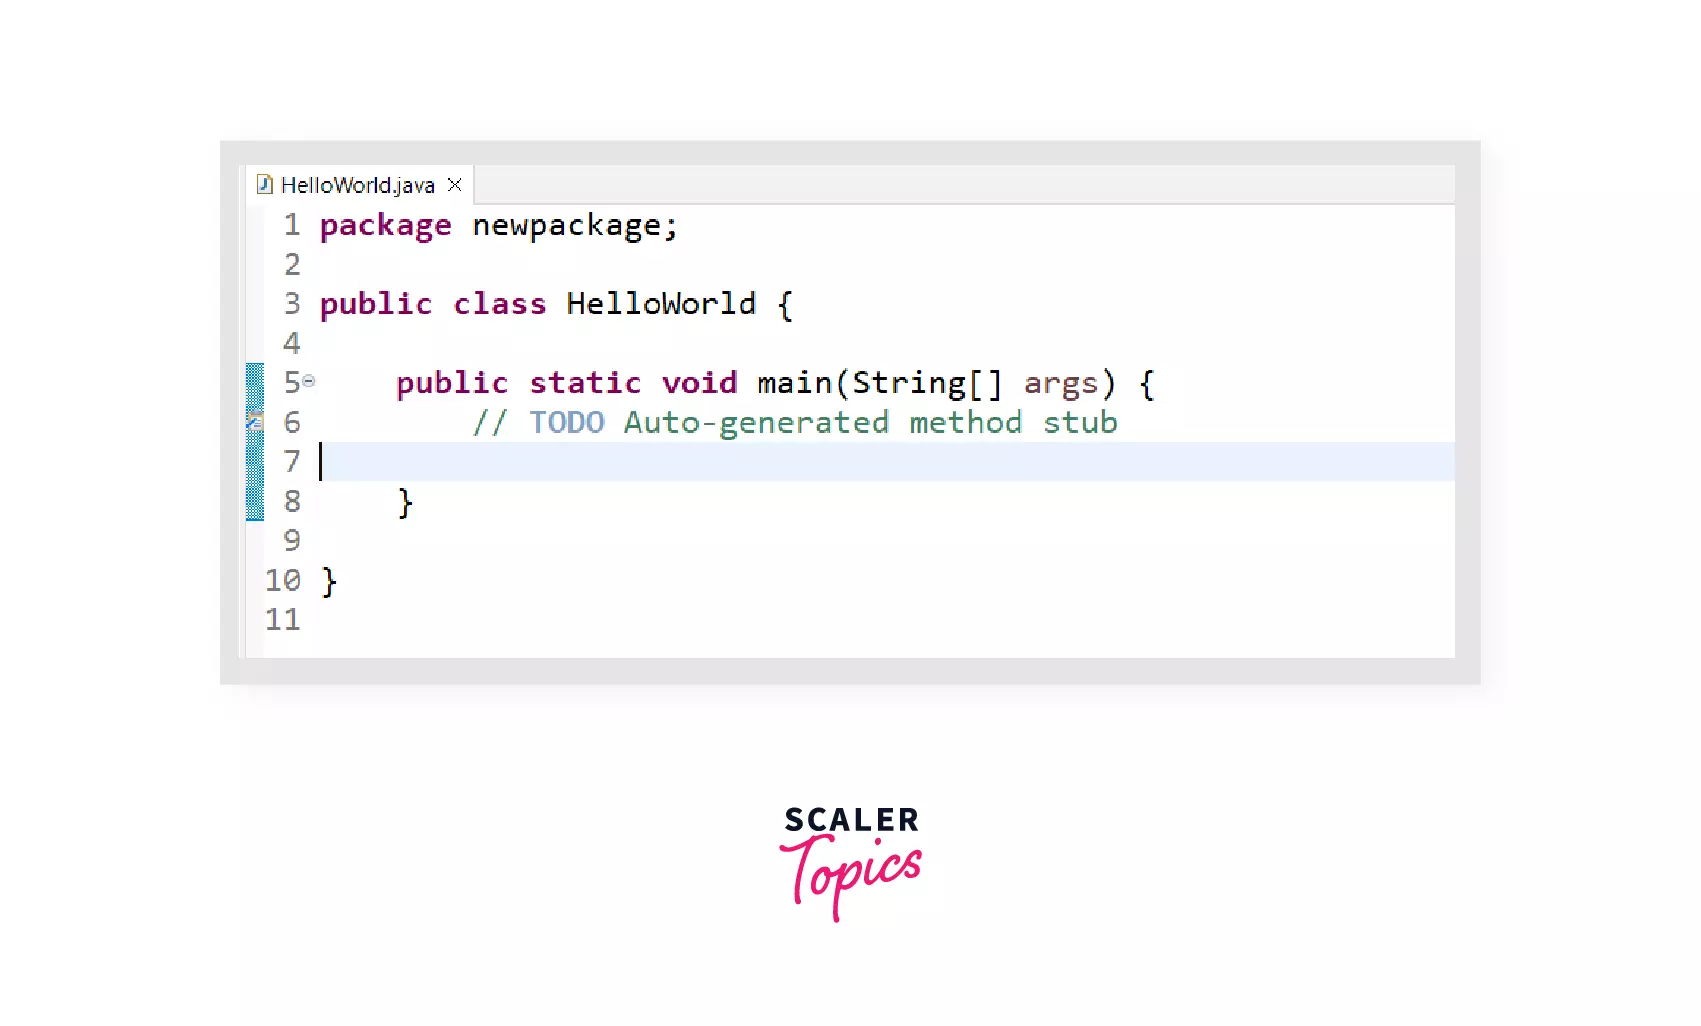
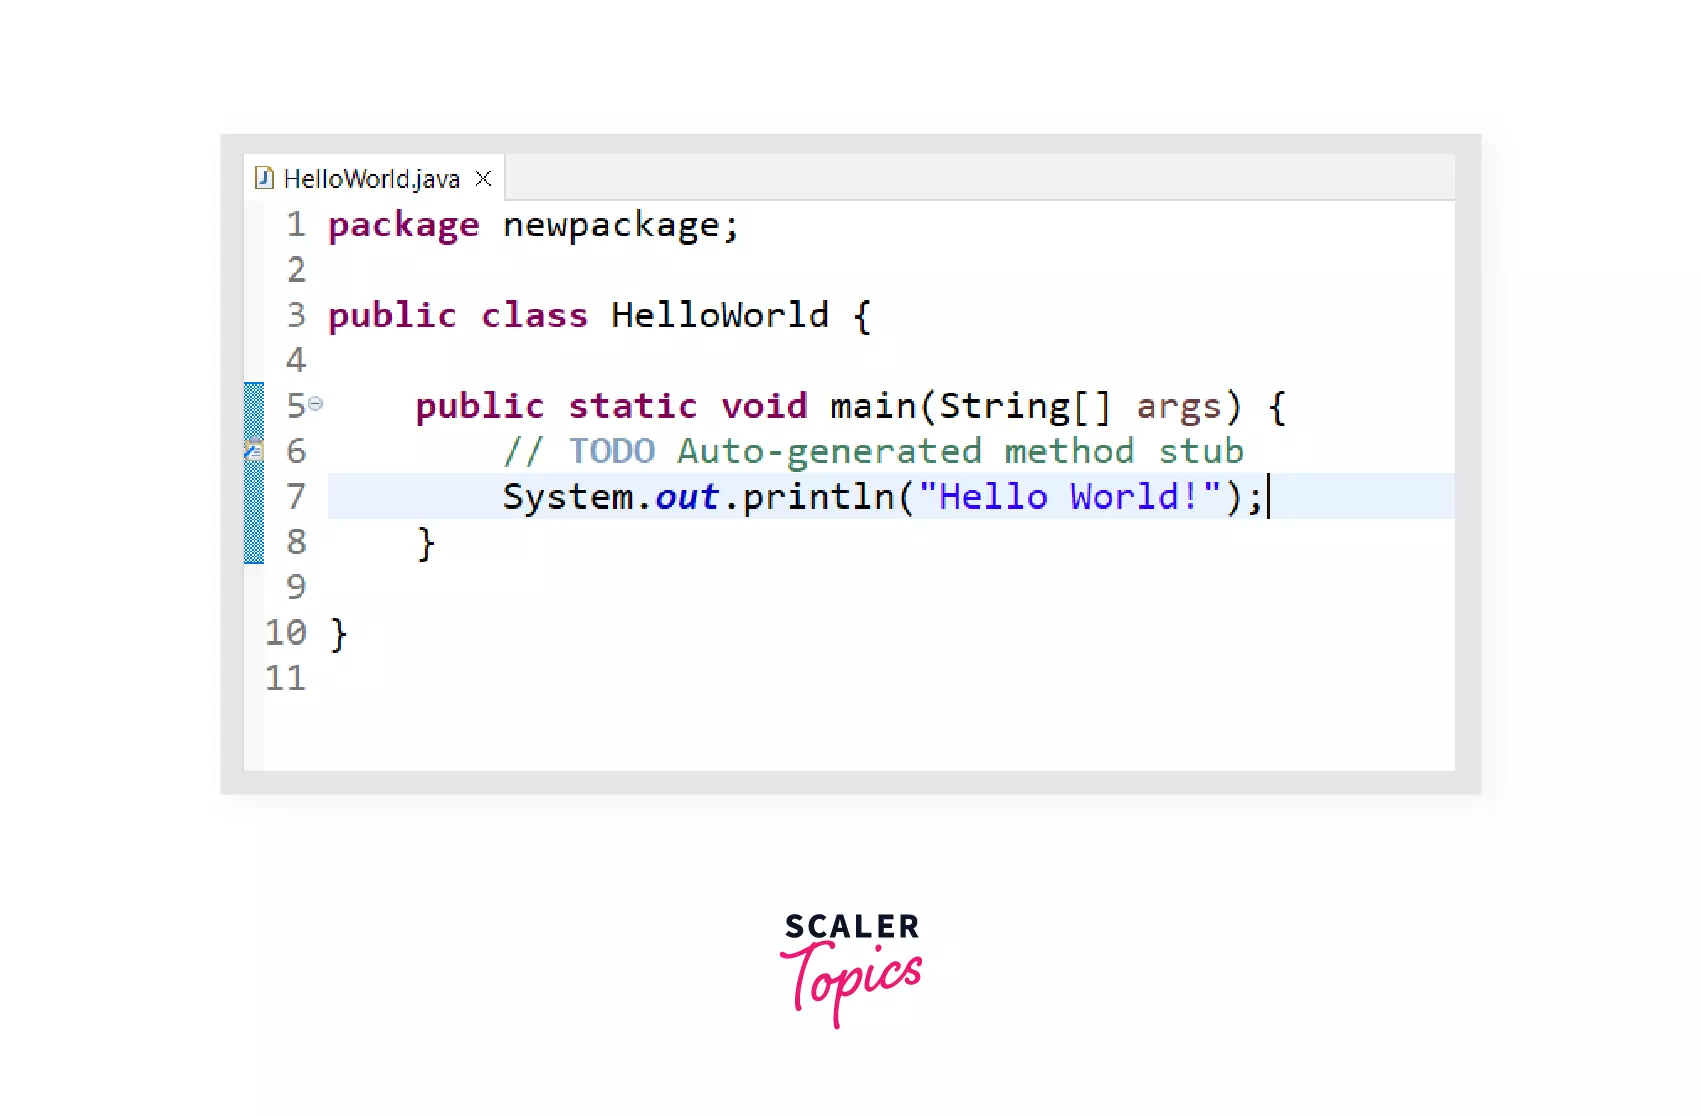
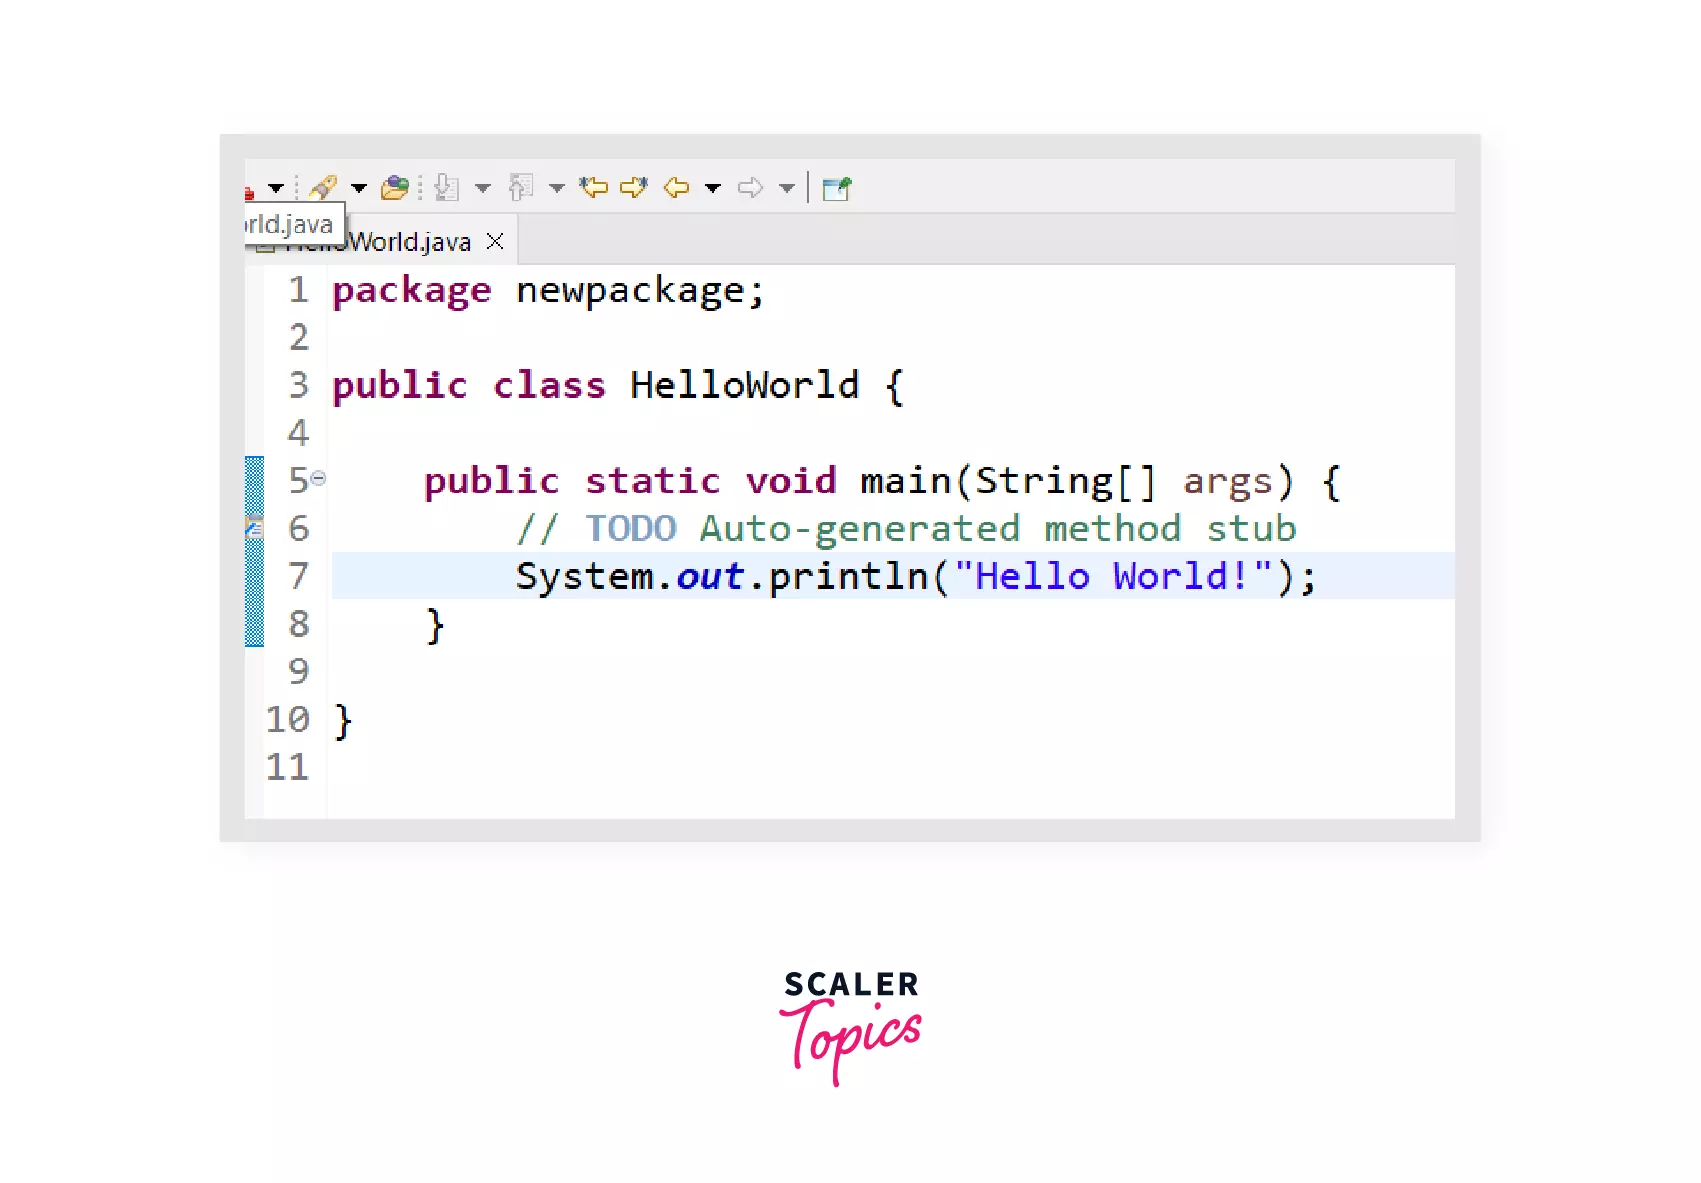
Step 6: Write output statement to print HelloWorld!.
Step 7: Run the code by clicking the Run icon in green color.
Here is the output of HelloWorld.java program:

Conclusion
- Java needs JDK, which is a superset of JRE and JVM to execute programs.
- javac command is used to compile java code, and java command is used to execute it.
- The java command activates JVM, responsible for executing Java programs.
- After successful installation, we must set environment variables to execute java commands.
- IDE consists of a smart editor and other applications that are helpful to developing and debugging Java applications easily.