Setting up JAVA_HOME and the IDE on MAC OS

Overview
An Integrated Development Environment (IDE) is a software that acts as a text editor, debugger, and compiler all in one. Java IDEs are the IDEs that are developed for making the process of building any java application much faster and easier.
JDK is full-featured Java Development Kit which includes development tools to provide an environment to develop Java applications and Java Runtime Environment to execute our programs. JAVA_HOME is an operating system environment variable which is used for setting the file system location where the JDK or JRE is installed.
Java 8, 11 and 17 are the current long-term support (LTS) versions.
Introduction
Java is one of the most popular and widely used programming languages. It has a very interesting history. Java was initially called by the name: OAK. However, in the wake of OAK technologies, the development team decided to rename it. The new options were Silk, Java, Dynamic, DNA, Jolt and Revolutionary.
Java was finally chosen because of its uniqueness. Java is the name of an island in Indonesia where the first coffee(named java) was produced. It was developed by James Gosling at Sun Microsystems Inc in the year 1991.
Java is class-based, object-oriented programming language and is platform-independent and can run on a variety of platforms, such as Windows, MAC OS, Linux, etc. Java can be used to develop mobile apps, web apps, games and much more.
Setting up Java Home and IDE are essential to run and develop java programs. IDEs are basically used for writing code in a much more efficient manner. Java IDEs are developed for making the process of building any java application much faster and easier. JAVA_HOME is used for setting up the environment variable which points to the location where JDK or JRE is installed.
Let's walk through the process of downloading and setting up Java environment on MAC.
Which one do I need: JVM or a JRE or a JDK?
First let's understand each term and what does it stand for:
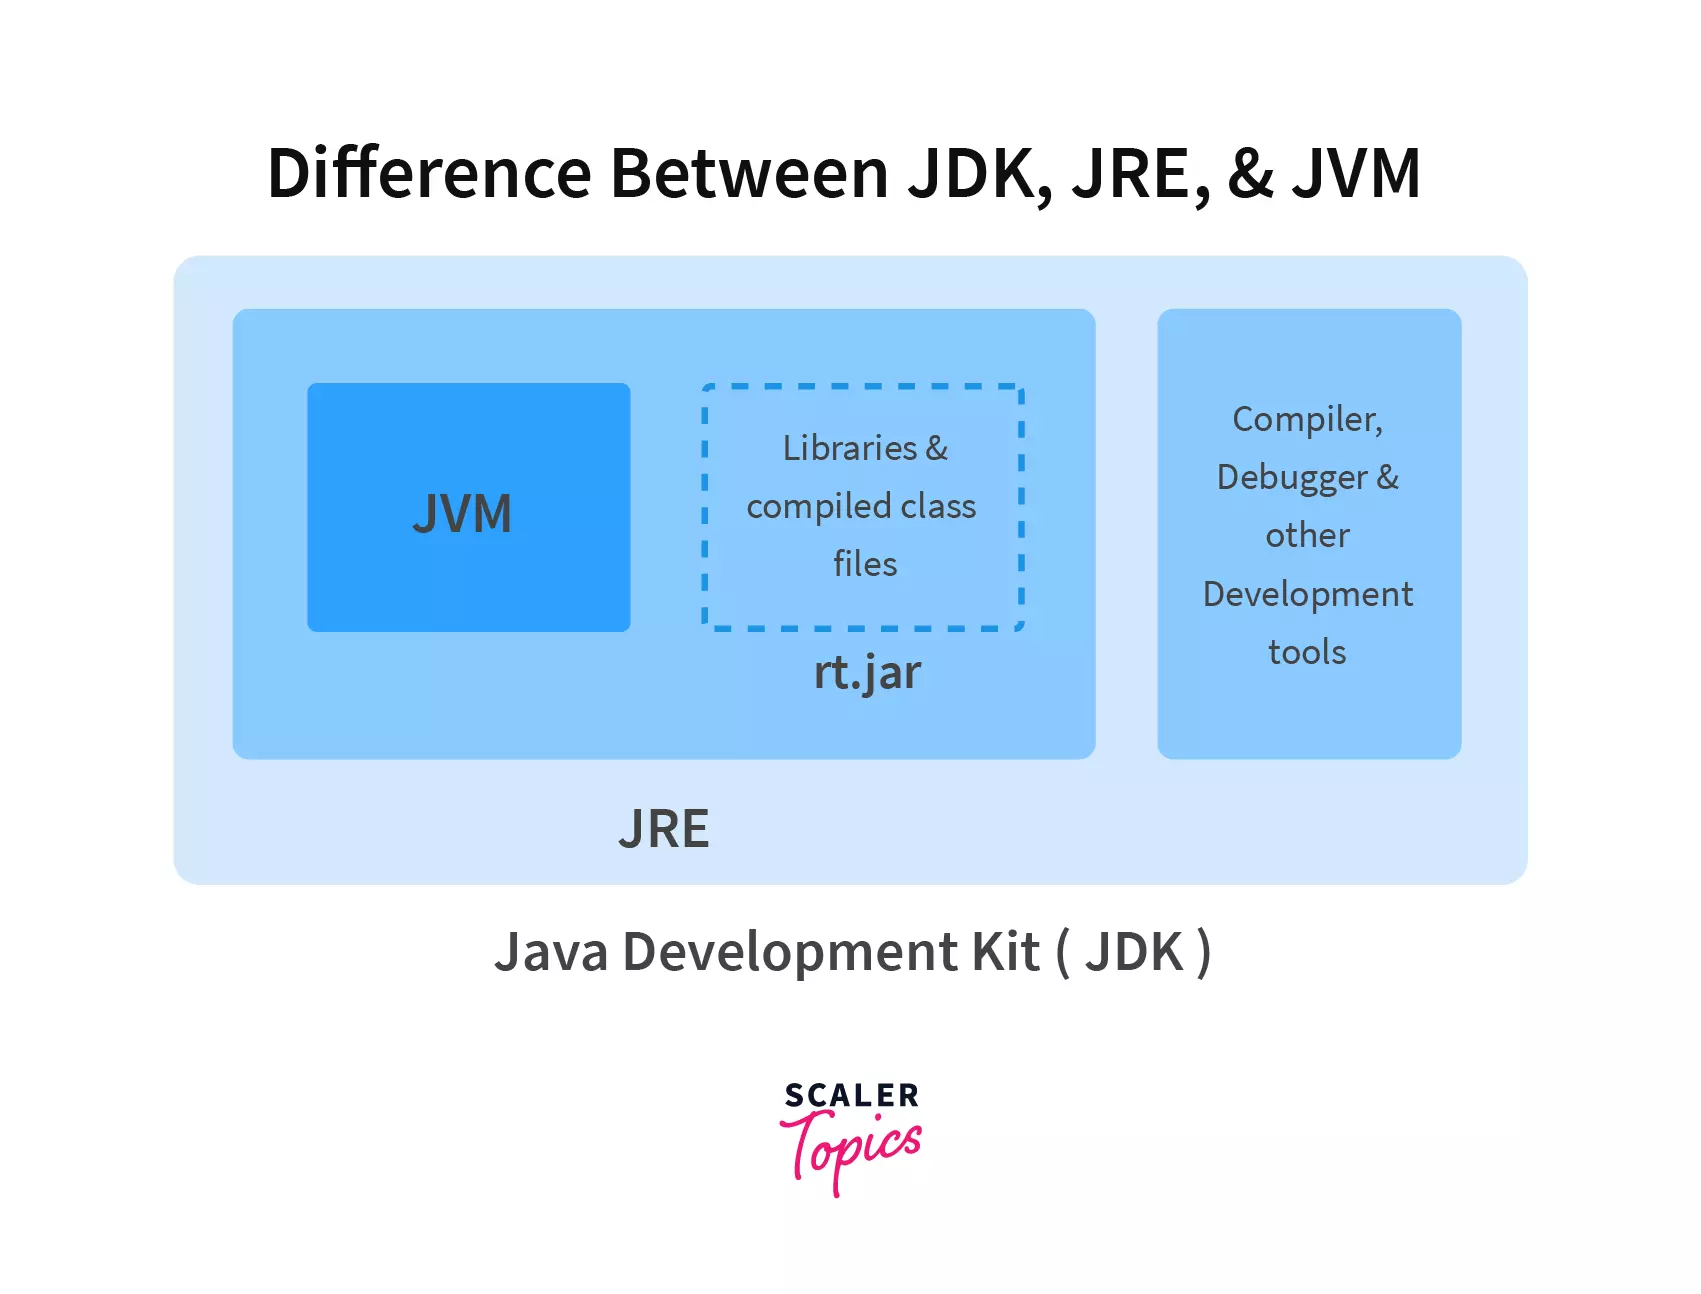
- JVM: JVM stands for Java Virtual Machine. As we know, Java codes are first compiled into bytecodes. The compilation is performed using JAVAC compiler. It takes java code as input and converts it into bytecode. In the running phase, JVM then converts the bytecode into machine code. JVM is the one that actually calls the main method present in a java code. JVM loads the code, verifies and executes the code.
So, the function of JVM is to convert bytecodes into machine code. It is an essential component of both JDK and JRE. It is also platform-dependent and performs many functions, including memory management and security.
-
JDK: JDK stands for Java Development Kit. It is the whole package entailing compiler, Java Runtime Environment (JRE), java docs, debuggers etc. It contains development tools to provide an environment to develop java programs and JRE to execute java programs. It is thus essential to develop and run a java program on our computer.
-
JRE: JRE stands for Java Runtime Environment. It is included in the Java development kit. JRE allows us to run java programs on our computers using Java bytecodes. It comprises browser, JVM, applet supports, and plugins. It has class libraries and other resources which are needed to run a Java program. It combines the Java code created using JDK with the necessary libraries to run it on a JVM. Java Runtime Environment is what enables a Java program to run in any operating system without modification.
So, we can deduce that JDK is the key to running and compiling our program. It is a full-featured development kit that includes development tools to provide an environment to develop Java programs and Java Runtime Environment to execute our program. So, JDK entails JRE(consisting of JVM + Libraries)and development tools. JRE only helps to run the code but developement tools like debugger, compiler, JavaDoc etc. aids in building application.
Transform Your Career
Choose from our industry-leading programs designed for career success
Modern Software and AI Engineering Program
Master full-stack development with AI integration

Modern Data Science and ML with specialisation in AI
Advanced data science techniques with AI specialization
Advanced AIML with Specialisation in Agentic AI
Deep dive into AIML with focus on Agentic systems
DevOps, Cloud & AI Platform Engineering
Build and manage AI-powered cloud infrastructure
AI Engineering Advanced Certification by IIT-Roorkee
Premier AI engineering certification from IIT-Roorkee
How to Download Java for Mac?
Let's set up our own Java development environment:
We'll be downloading Oracle JDK 17. JDK 17 is the latest long-term support release for the Java SE platform.
There are two ways to do it:
1) Downloading it from the Oracle website.
2) Using terminal via homebrew
Note:
If you want to install Oracle Java 7 or later version on Mac OS then your mac must be Intel-based Mac running Mac OS X 10.7.3 (Lion) or later and you need to have administrative privileges.
Scaler Placement Report and Statistics
Scaler learners achieved 2.5x salary growth with average post-Scaler CTC reaching ₹23L.
Downloading JDK 17 from the Oracle website
This method includes downloading java from Oracle's official site. The following steps will guide as on how to install and run java on mac.
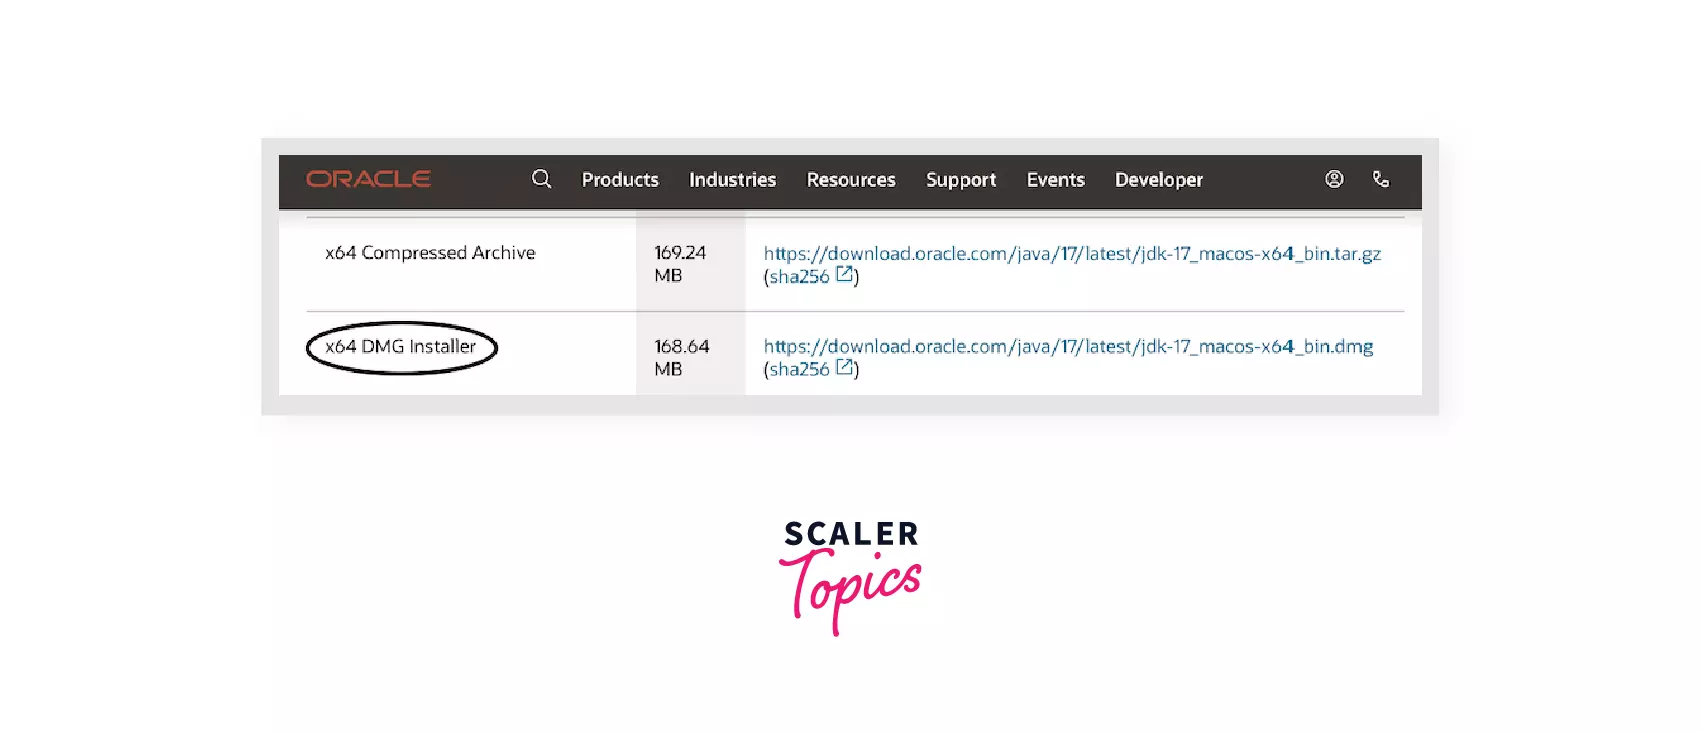
- The first step is to install the JDK 17 from Oracle's official website by downloading x64 DMG Installer by clicking on this link.
Note:
It is advised to download the Apple Disk Image file i.e. DMG file instead of the compressed version in MAC OS.
- The second step is to open the above DMG file by double-clicking on the downloaded JDK package. It will initiate the process of installing Oracle 17 JDK. It will first install the DMG disk and an installer as shown in the pic that will appear on the screen. Then we'll have to look through the updated License Agreement of Oracle JDK.
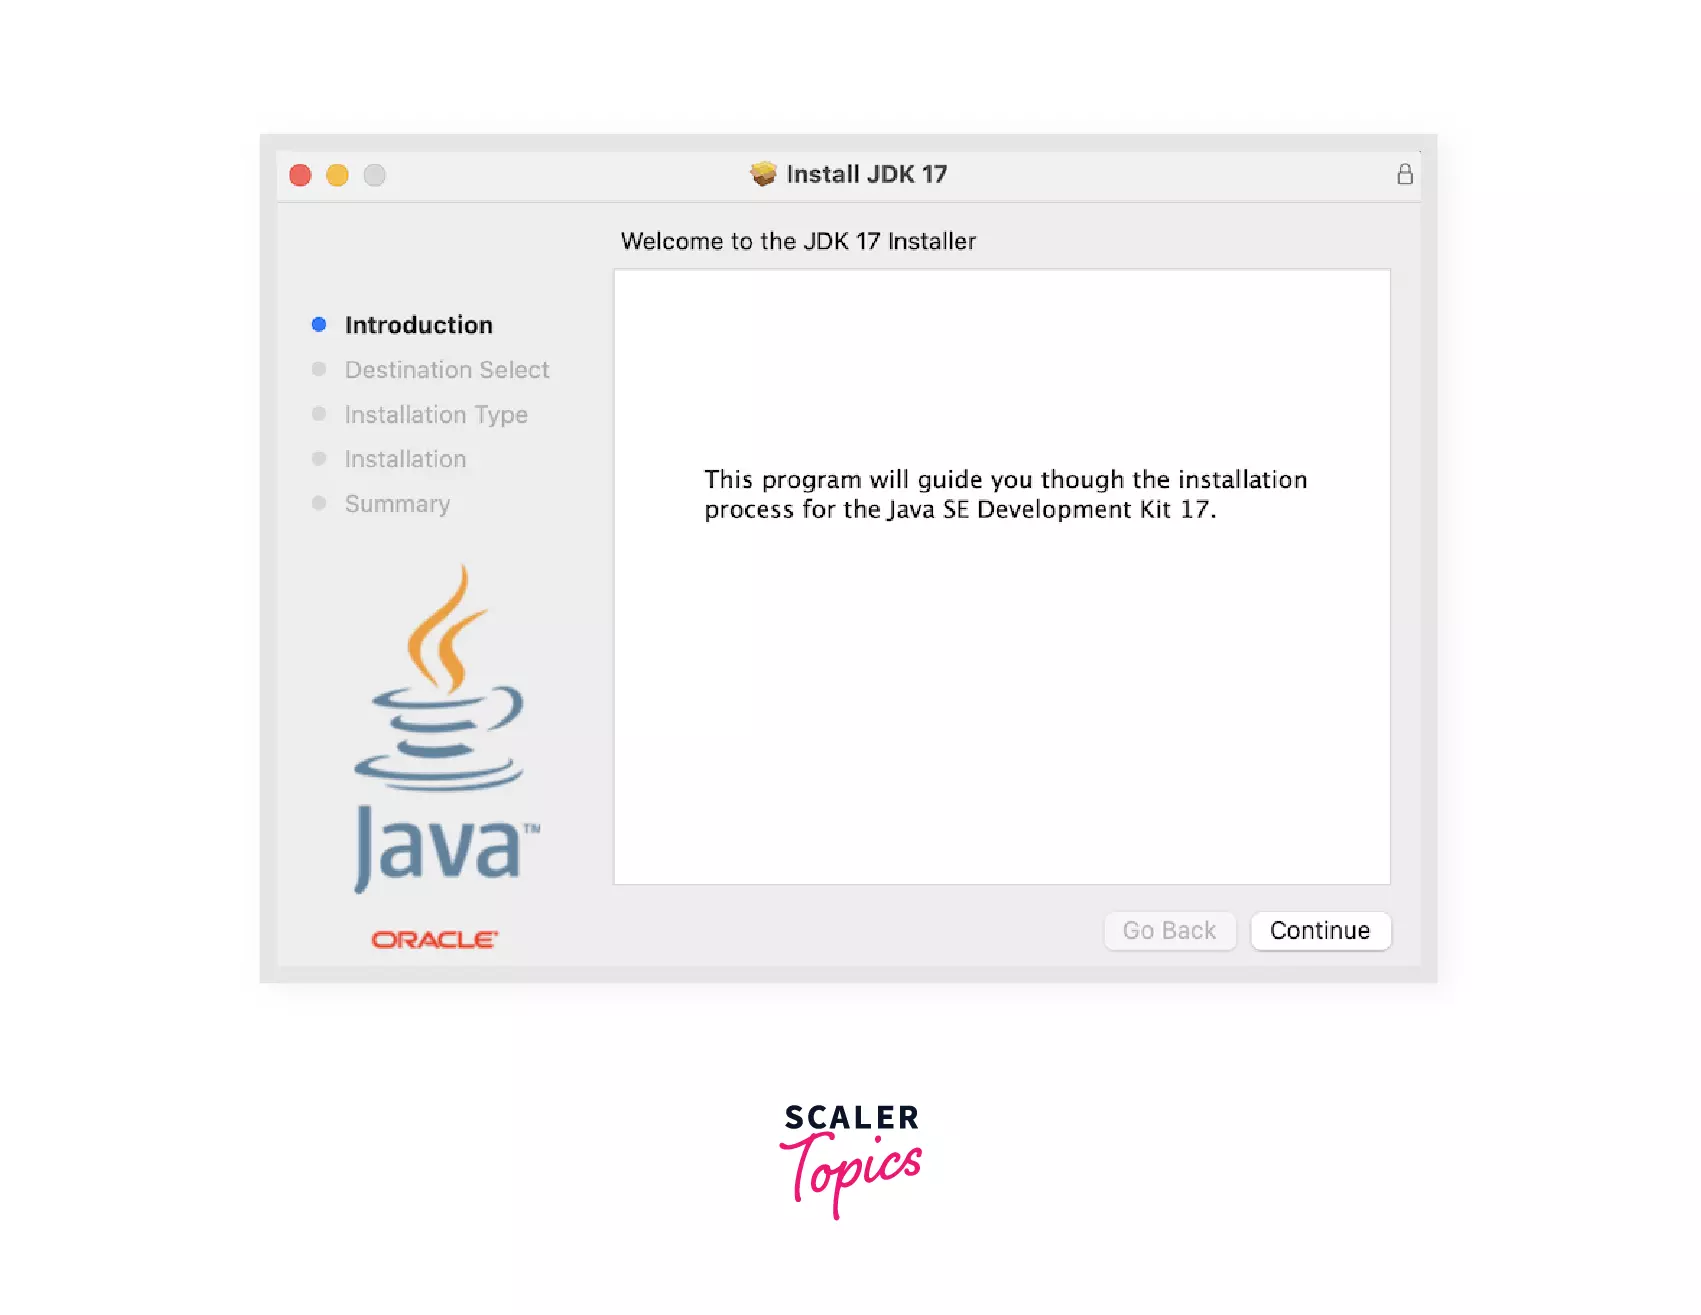
- The third step is to click on the continue button, then select the destination where we want to install the package, click on install and enter your password to authorize the installation of java 17.
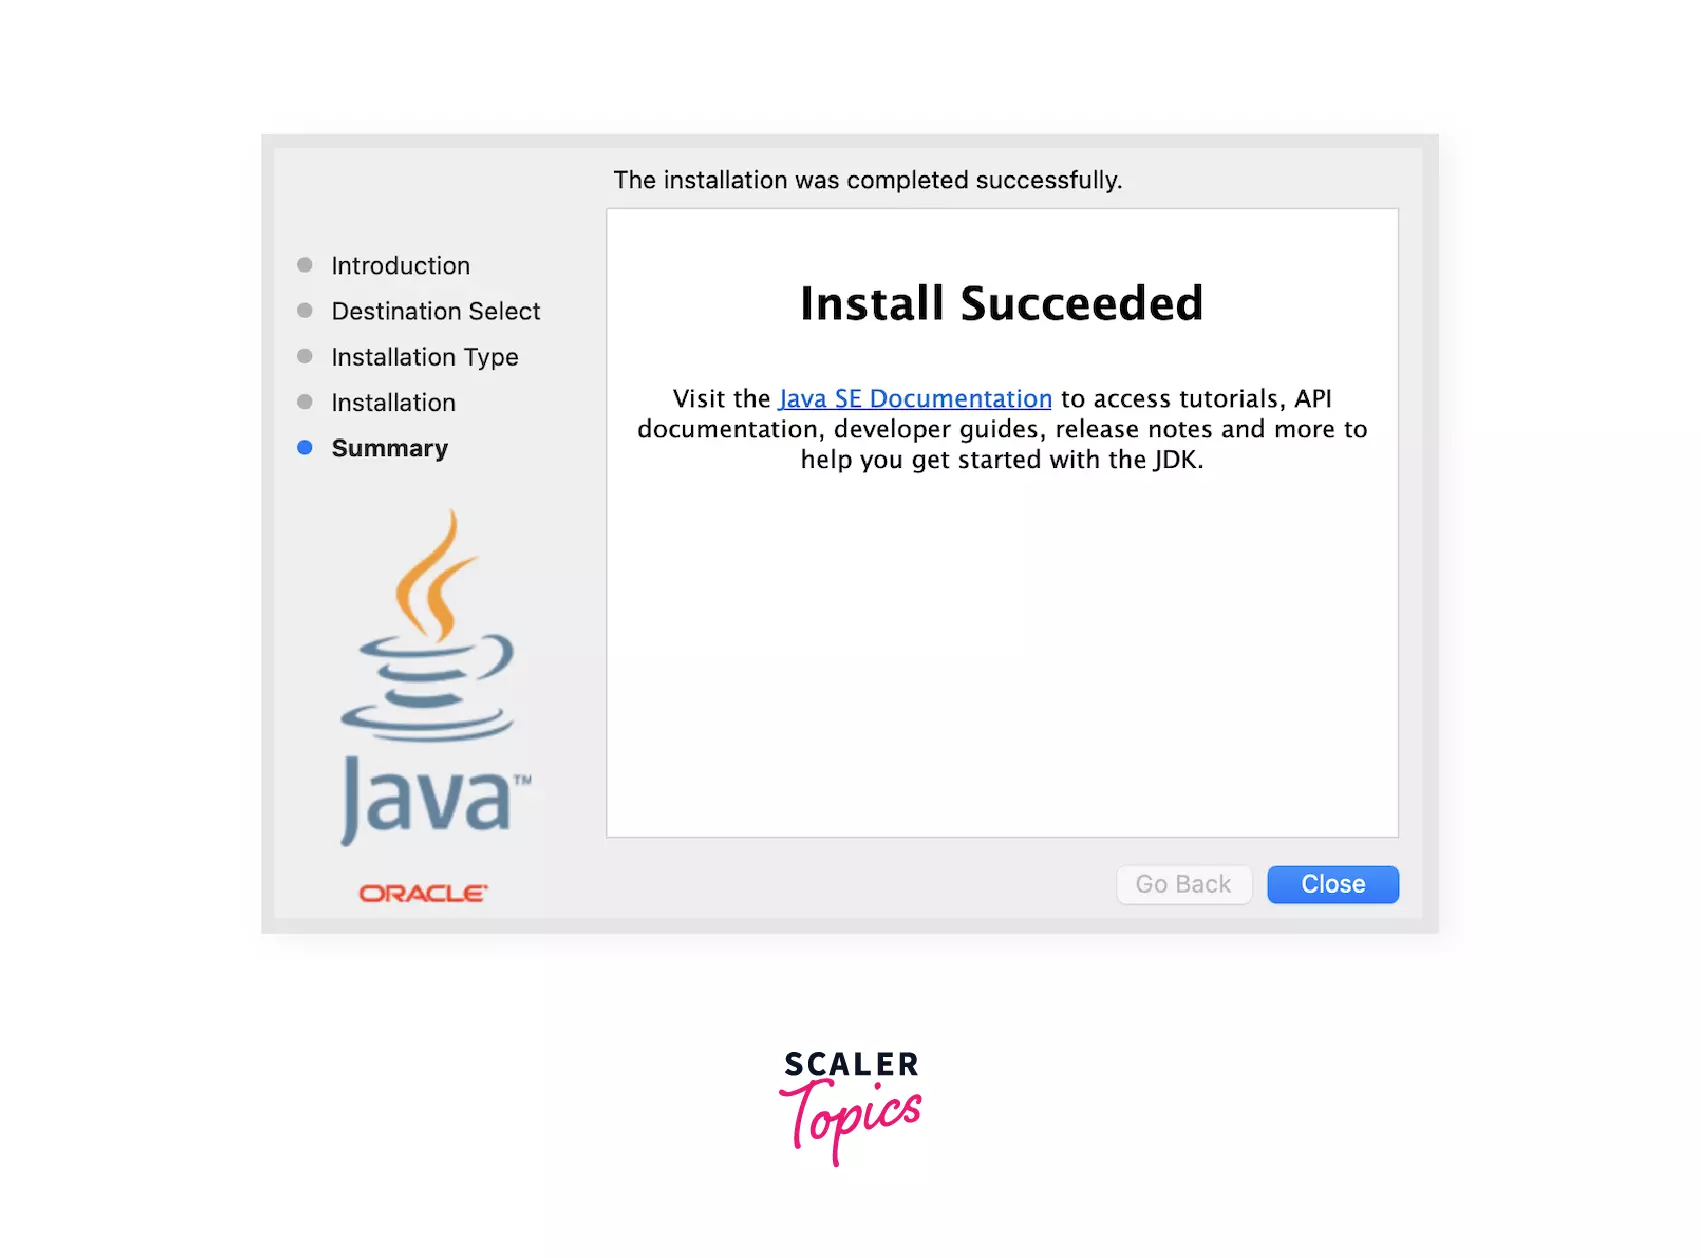
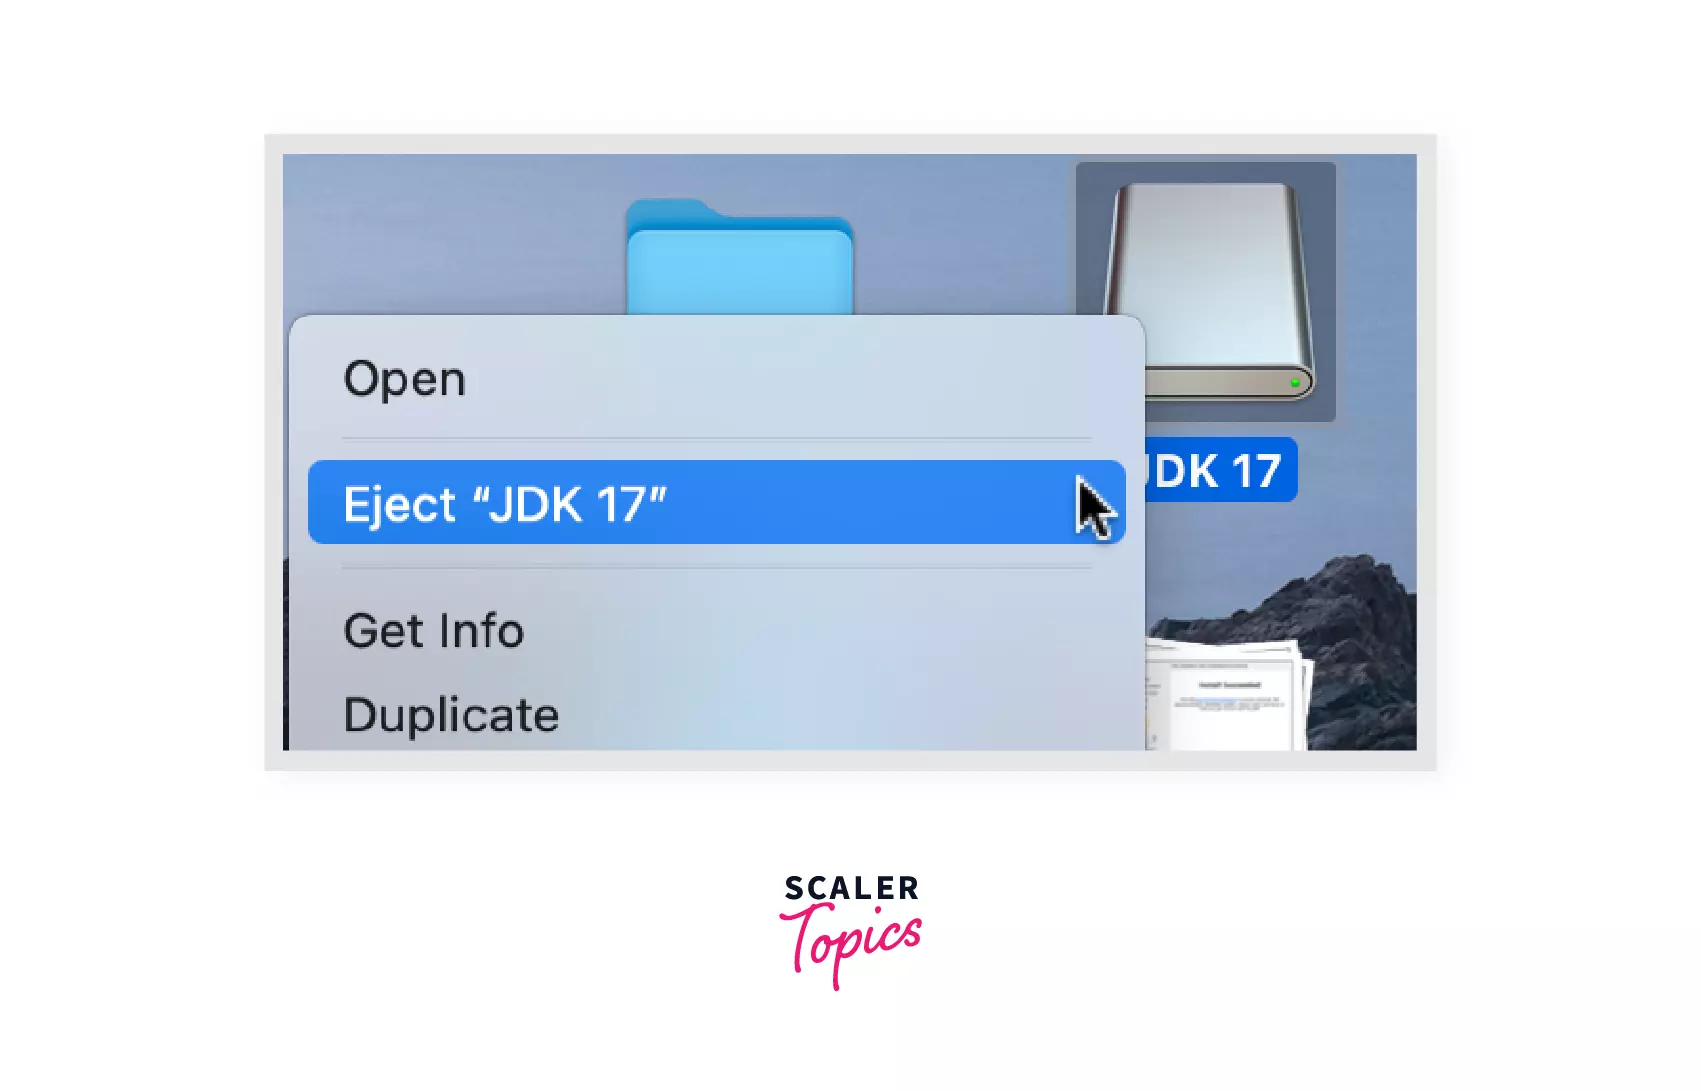
- The fourth step involves unmounting the installation file(the DMG image) by right-clicking it.
- Install Succeeded. We just installed Oracle JDK 17 on MAC OS with just four simple steps. To confirm our installation, we can open the terminal and type: java -version
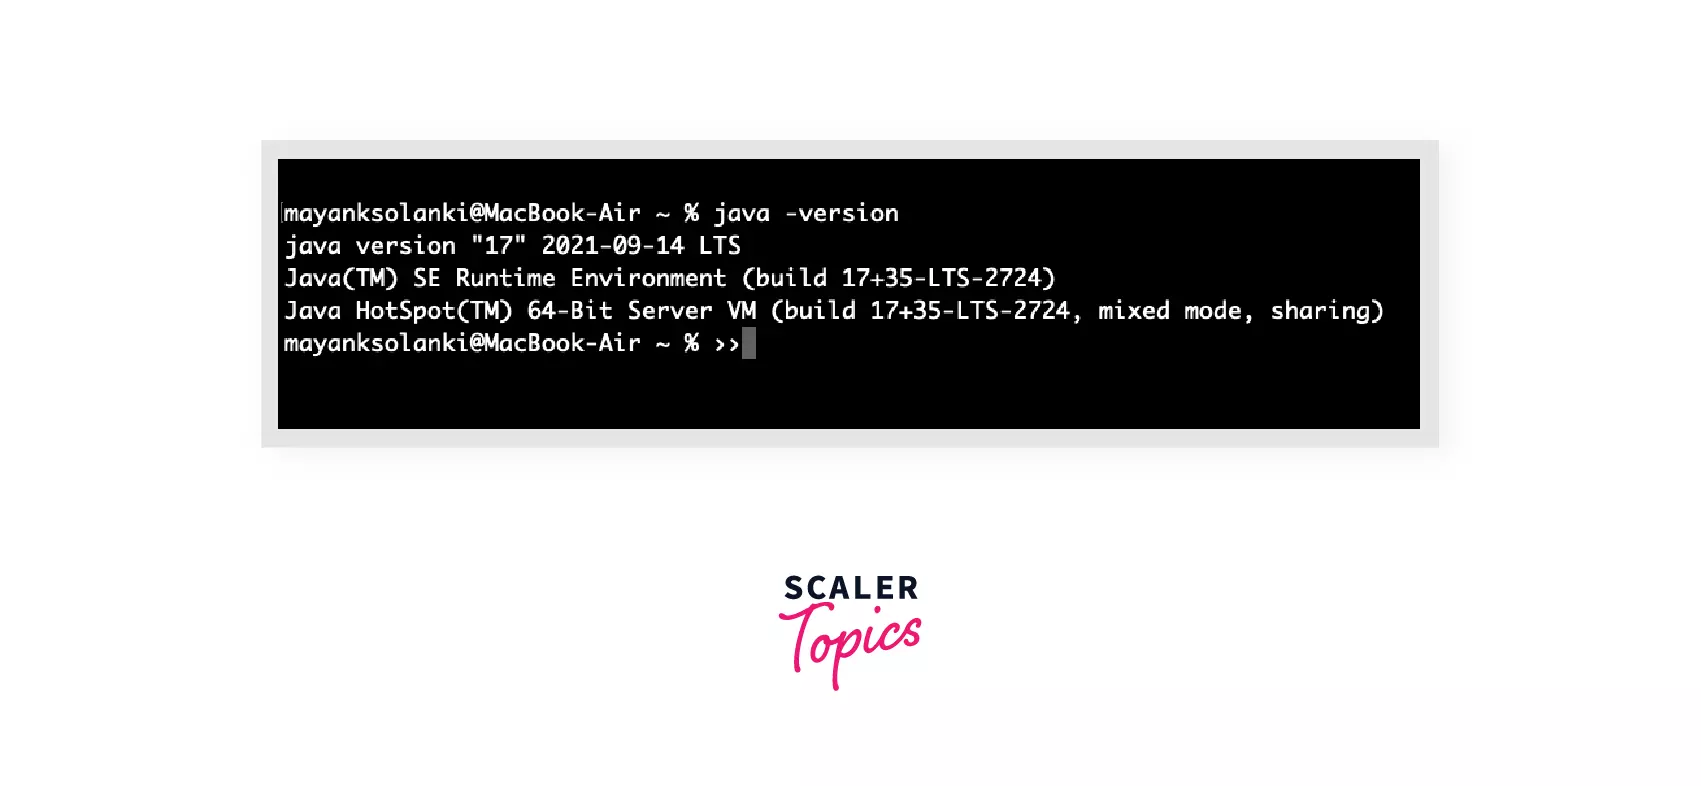
It will show the downloaded version of JDK.
Using terminal via homebrew
Homebrew is the package manager for MAC which makes installing software easy! The prerequisite of installing java using a terminal is to have homebrew already installed on your device. Introduction to Homebrew will guide as to how to install homebrew. So, now since we have everything the first and only step will be to open a terminal and write the below code
The brew command will install JDK. In a few minutes, the following message will be seen on the screen.
Voila! Java is successfully installed. To check for the version installed we can write:
It will confirm the version of JDK installed and thereafter we can easily start writing some java code on our system.
How to install OpenJDK on macOS?
There are two ways to install OpenJDK on macOS:
- Installing OpenJDK from a Brew repository.
- Installing OpenJDK from a binary.
Let's see both methods to install JDK on macOS.
Turn Learning into Career Growth
Installing OpenJDK from a Brew repository
We can install the most recent stable feature release version of OpenJDK. It always contains the latest JDK GA version.
Installing OpenJDK from a binary
- Step 1: Open the terminal and download OpenJDK 14 binary using the below command
- Step 2: Now we can extract the downloaded binary file by navigating to the current directory in terminal and executing the below code
- Step 3: We can add java to our PATH using:
Verify the downloaded version using $ java -version.
How to set/change the Path of Java on macOS?
The path is the most important environment variable of the Java environment which is used to locate the JDK packages that are used to convert the java source code into the machine-readable binary format. Tools like javac and java can be used by setting the path.
Thus, setting up the path of Java is an extremely important task that must be done properly for the smooth functioning of Java on MAC.
Following are the steps that must be followed if a need arises to change the Java path on MAC:
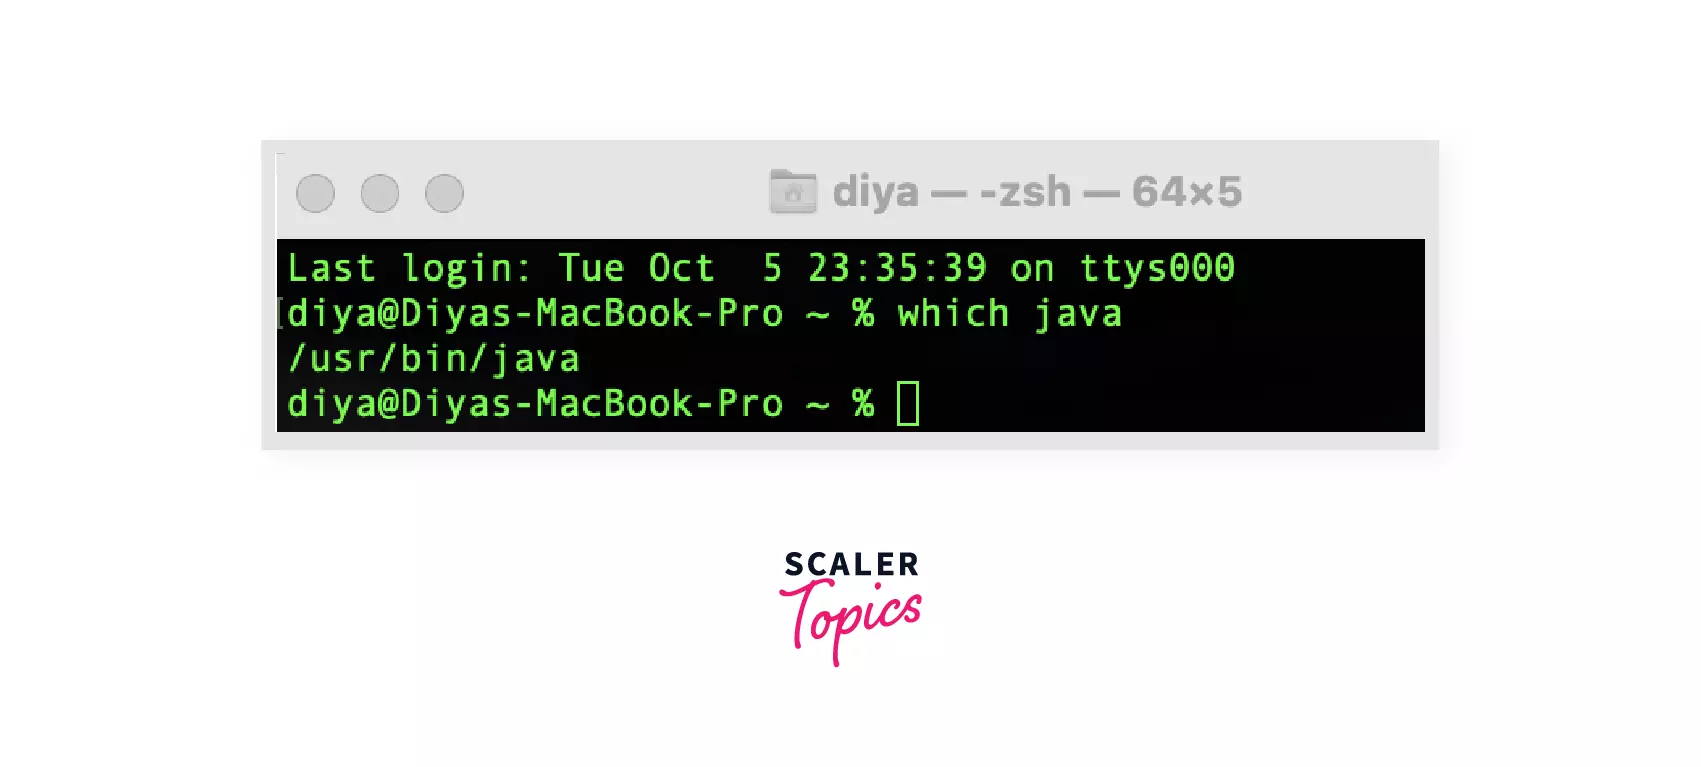
Step 1: First and foremost open the terminal window and type which java. It confirms if we have JDK. It will output /usr/bin/java if JDK is found.
Note:
JAVA_HOME is the full path of directory that has bin as its subdirectory and bin contains java.
For Mac OSX: Library/Java/Home
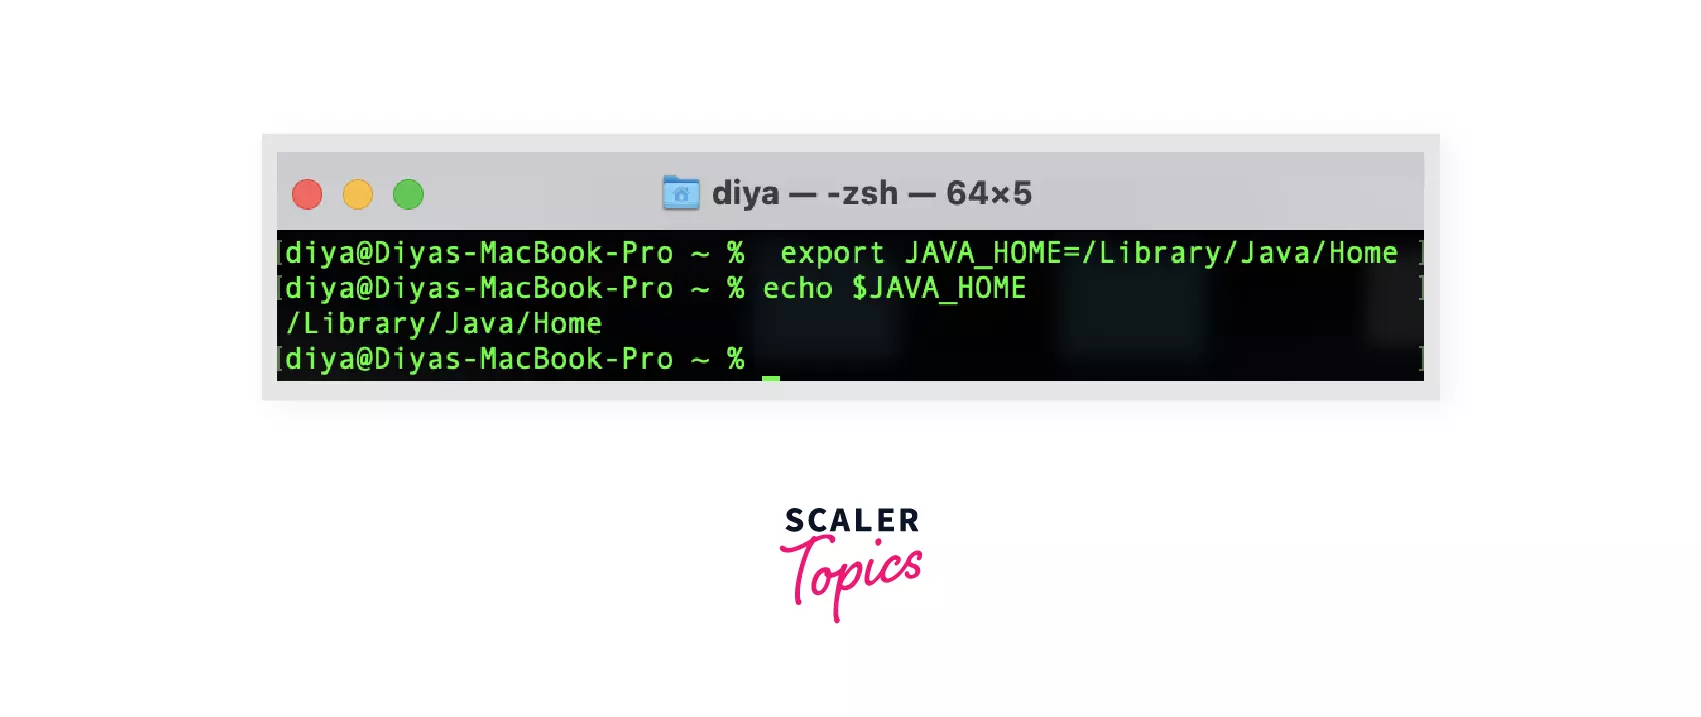
Step 2: The next step is to set JAVA_HOME using the below command. Enter the path of the JAVA_HOME that has bin as its subdirectory which in turn contains java. The JAVA_HOME environment variable points to the file system location where the JDK or JRE was installed in your system. You can specify the path according to the location where Java is installed in your system.
For MAC OSX it is: /Library/Java/Home
Step 3: The following command will confirm the path
Step 4: We are ready to run our application.
Note: This procedure only sets the JAVA_HOME for this session. If we want it to last then we'll have to add the command to our ~/.zshenv or ~/.zshrc file as on macOS 10.15 Catalina, and later as shown below.
Step 5: Open terminal and write the below code
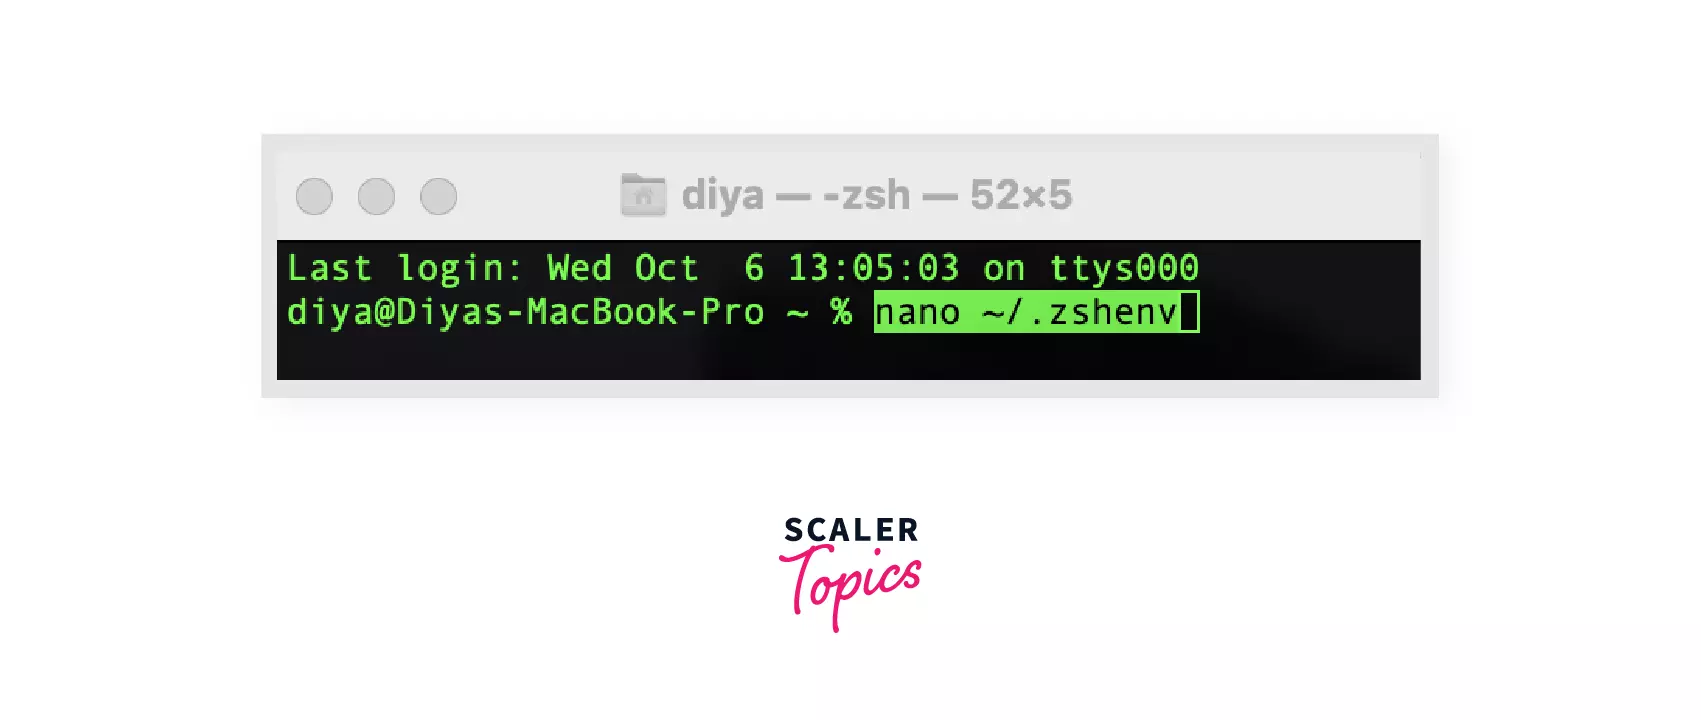
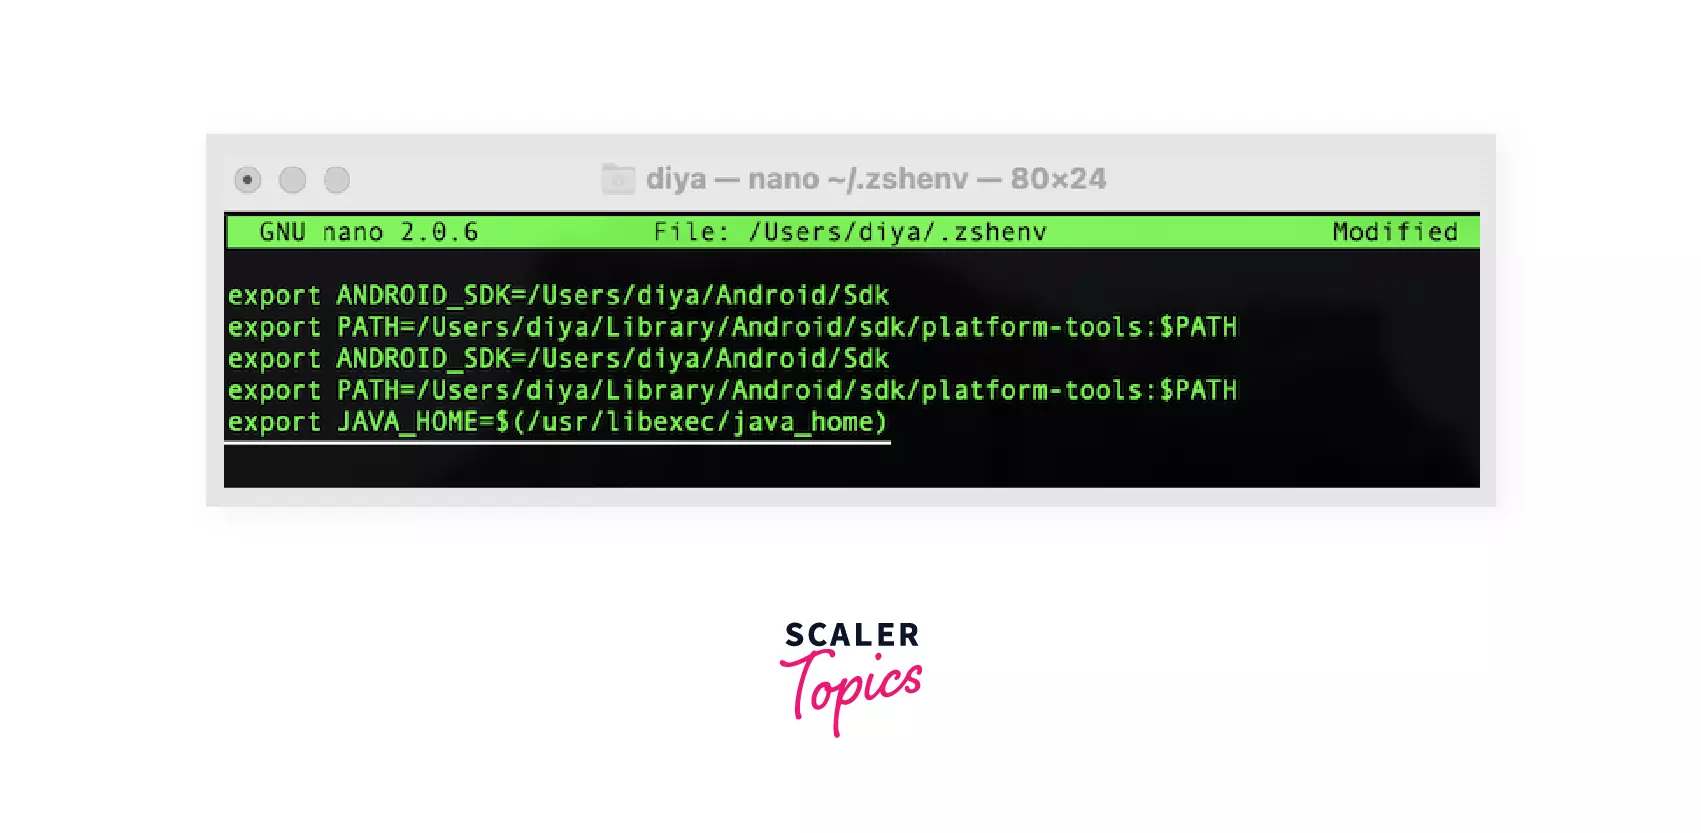
Step 6: Adding this to the end of the ~/.zshenv file. This steps helps in adding the java path to the zsh environment which is the default shell in MAC OS. We can save and exit nano.
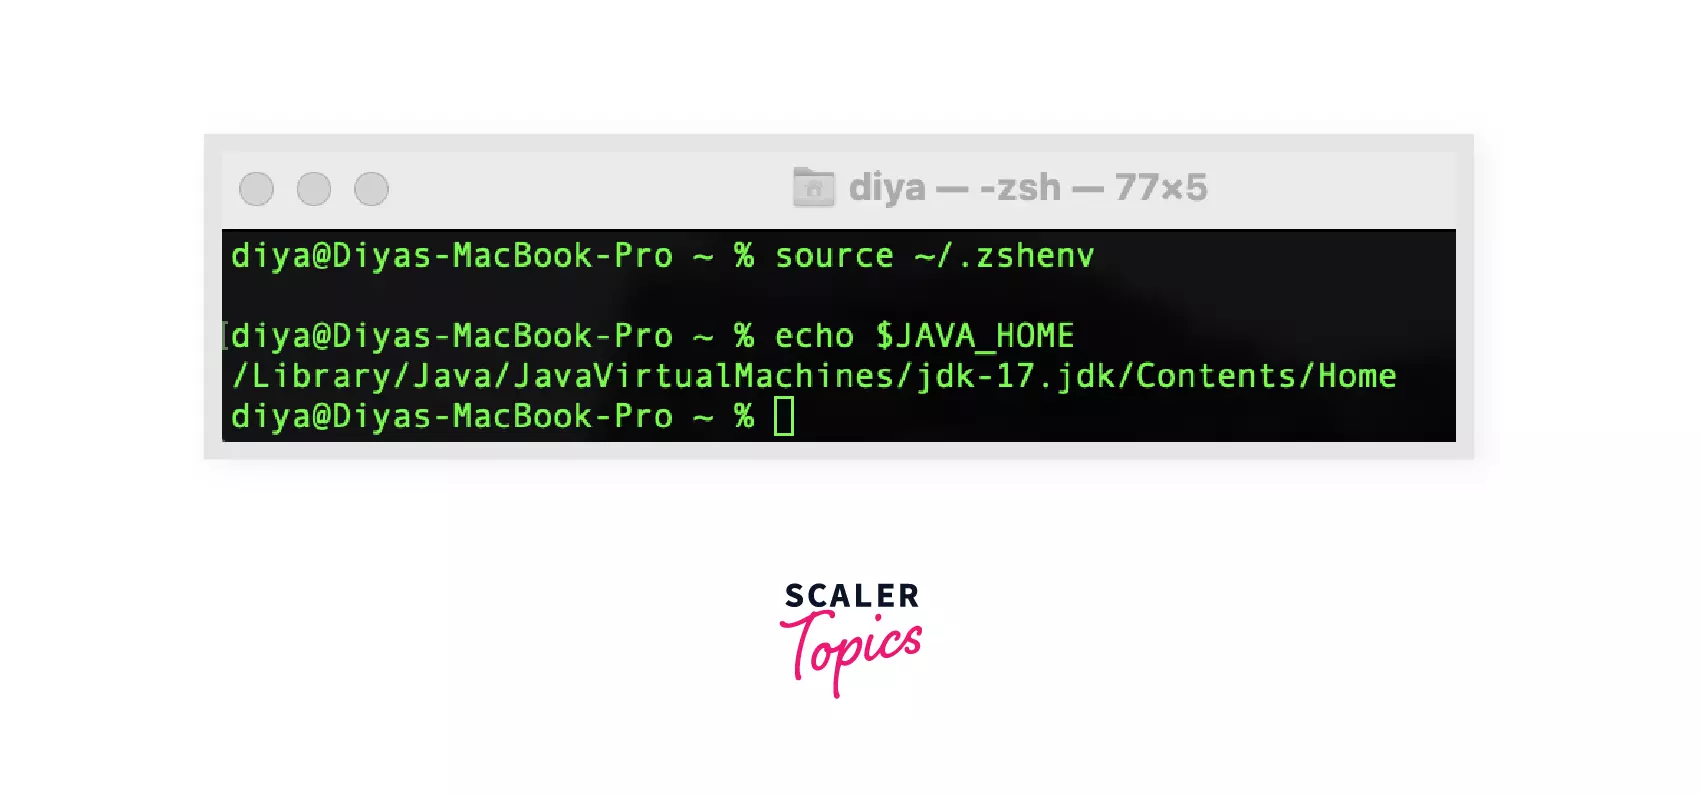
Step 7: Source the file and test using echo $JAVA_HOME
If the following output comes up, then we can be assured that we have successfully set up JAVA_HOME environment variable.
Scaler Placement Report and Statistics
Scaler learners achieved 2.5x salary growth with average post-Scaler CTC reaching ₹23L.
Installing the IDE (Intellij, Eclipse etc)
You must be wondering what is an IDE and why do we need it in the first place?
IDE stands for Integrated Development Environment. It provides various functionalities like smart code completion, text highlighting feature, various build automation tools, a debugger and many more. Java IDE is a software application that enables users to write and debug Java programs more easily.
You need to have JDK downloaded and installed in your computer before downloading IDE. There are many available IDEs for Java like Intellij, Eclipse, NetBeans etc. Eclipse is an open-source software widely preferred by Java developers.
Steps to download Eclipse:
- Download and install JDK(it is a pre-requisite essential step)
- Go to the eclipse website and choose a compatible version of IDE depending on your macOS specifications.
- Open the downloaded file extension and follow the standard software installation process.
- Choose package as per developer language needs.
- A new window will be relaunched and if not relaunch eclipse.
- Go to the new project and create classes inside which java programs are good to go.
First Java program on a Mac
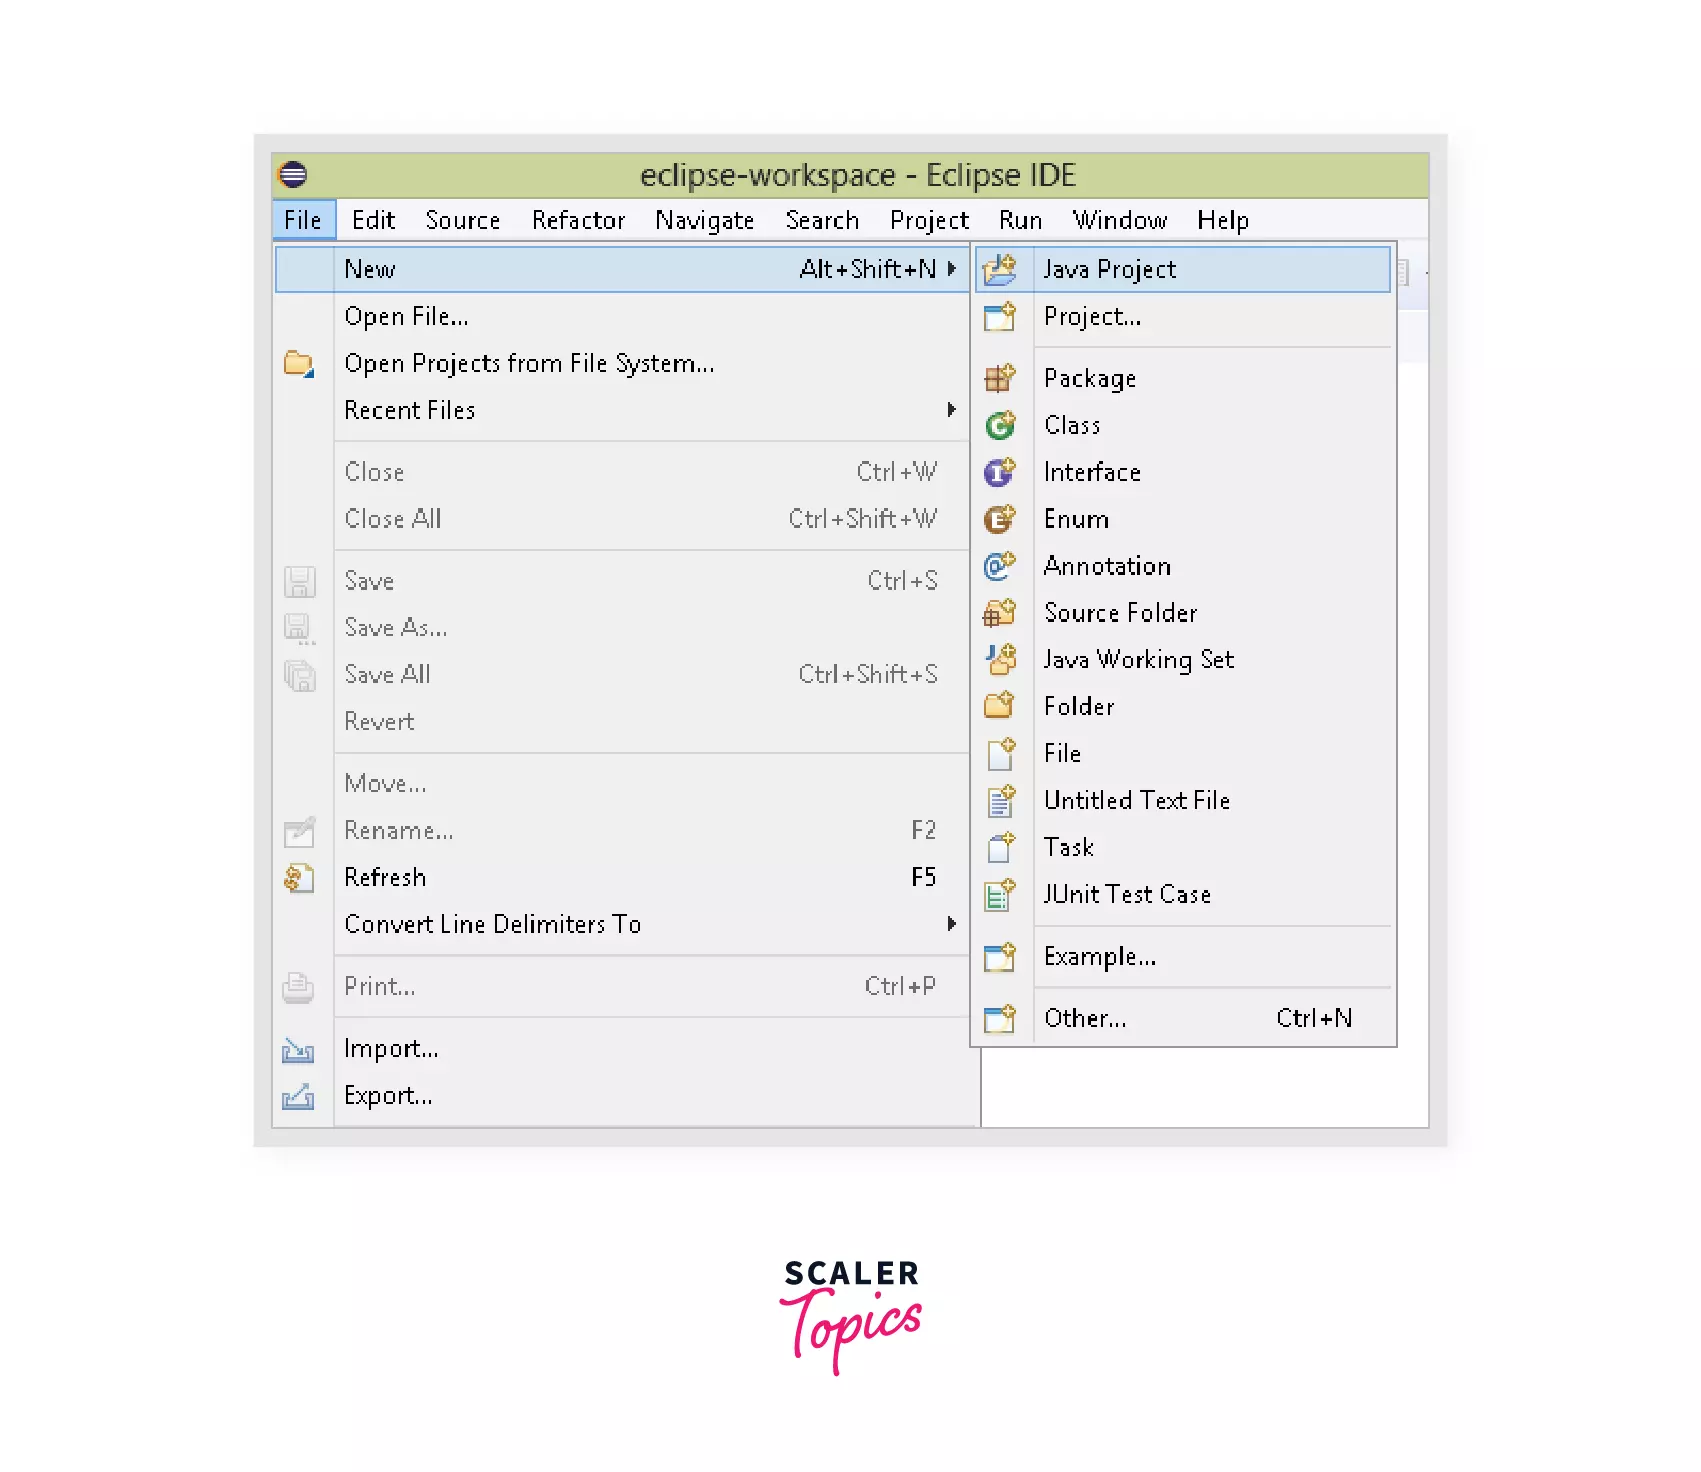
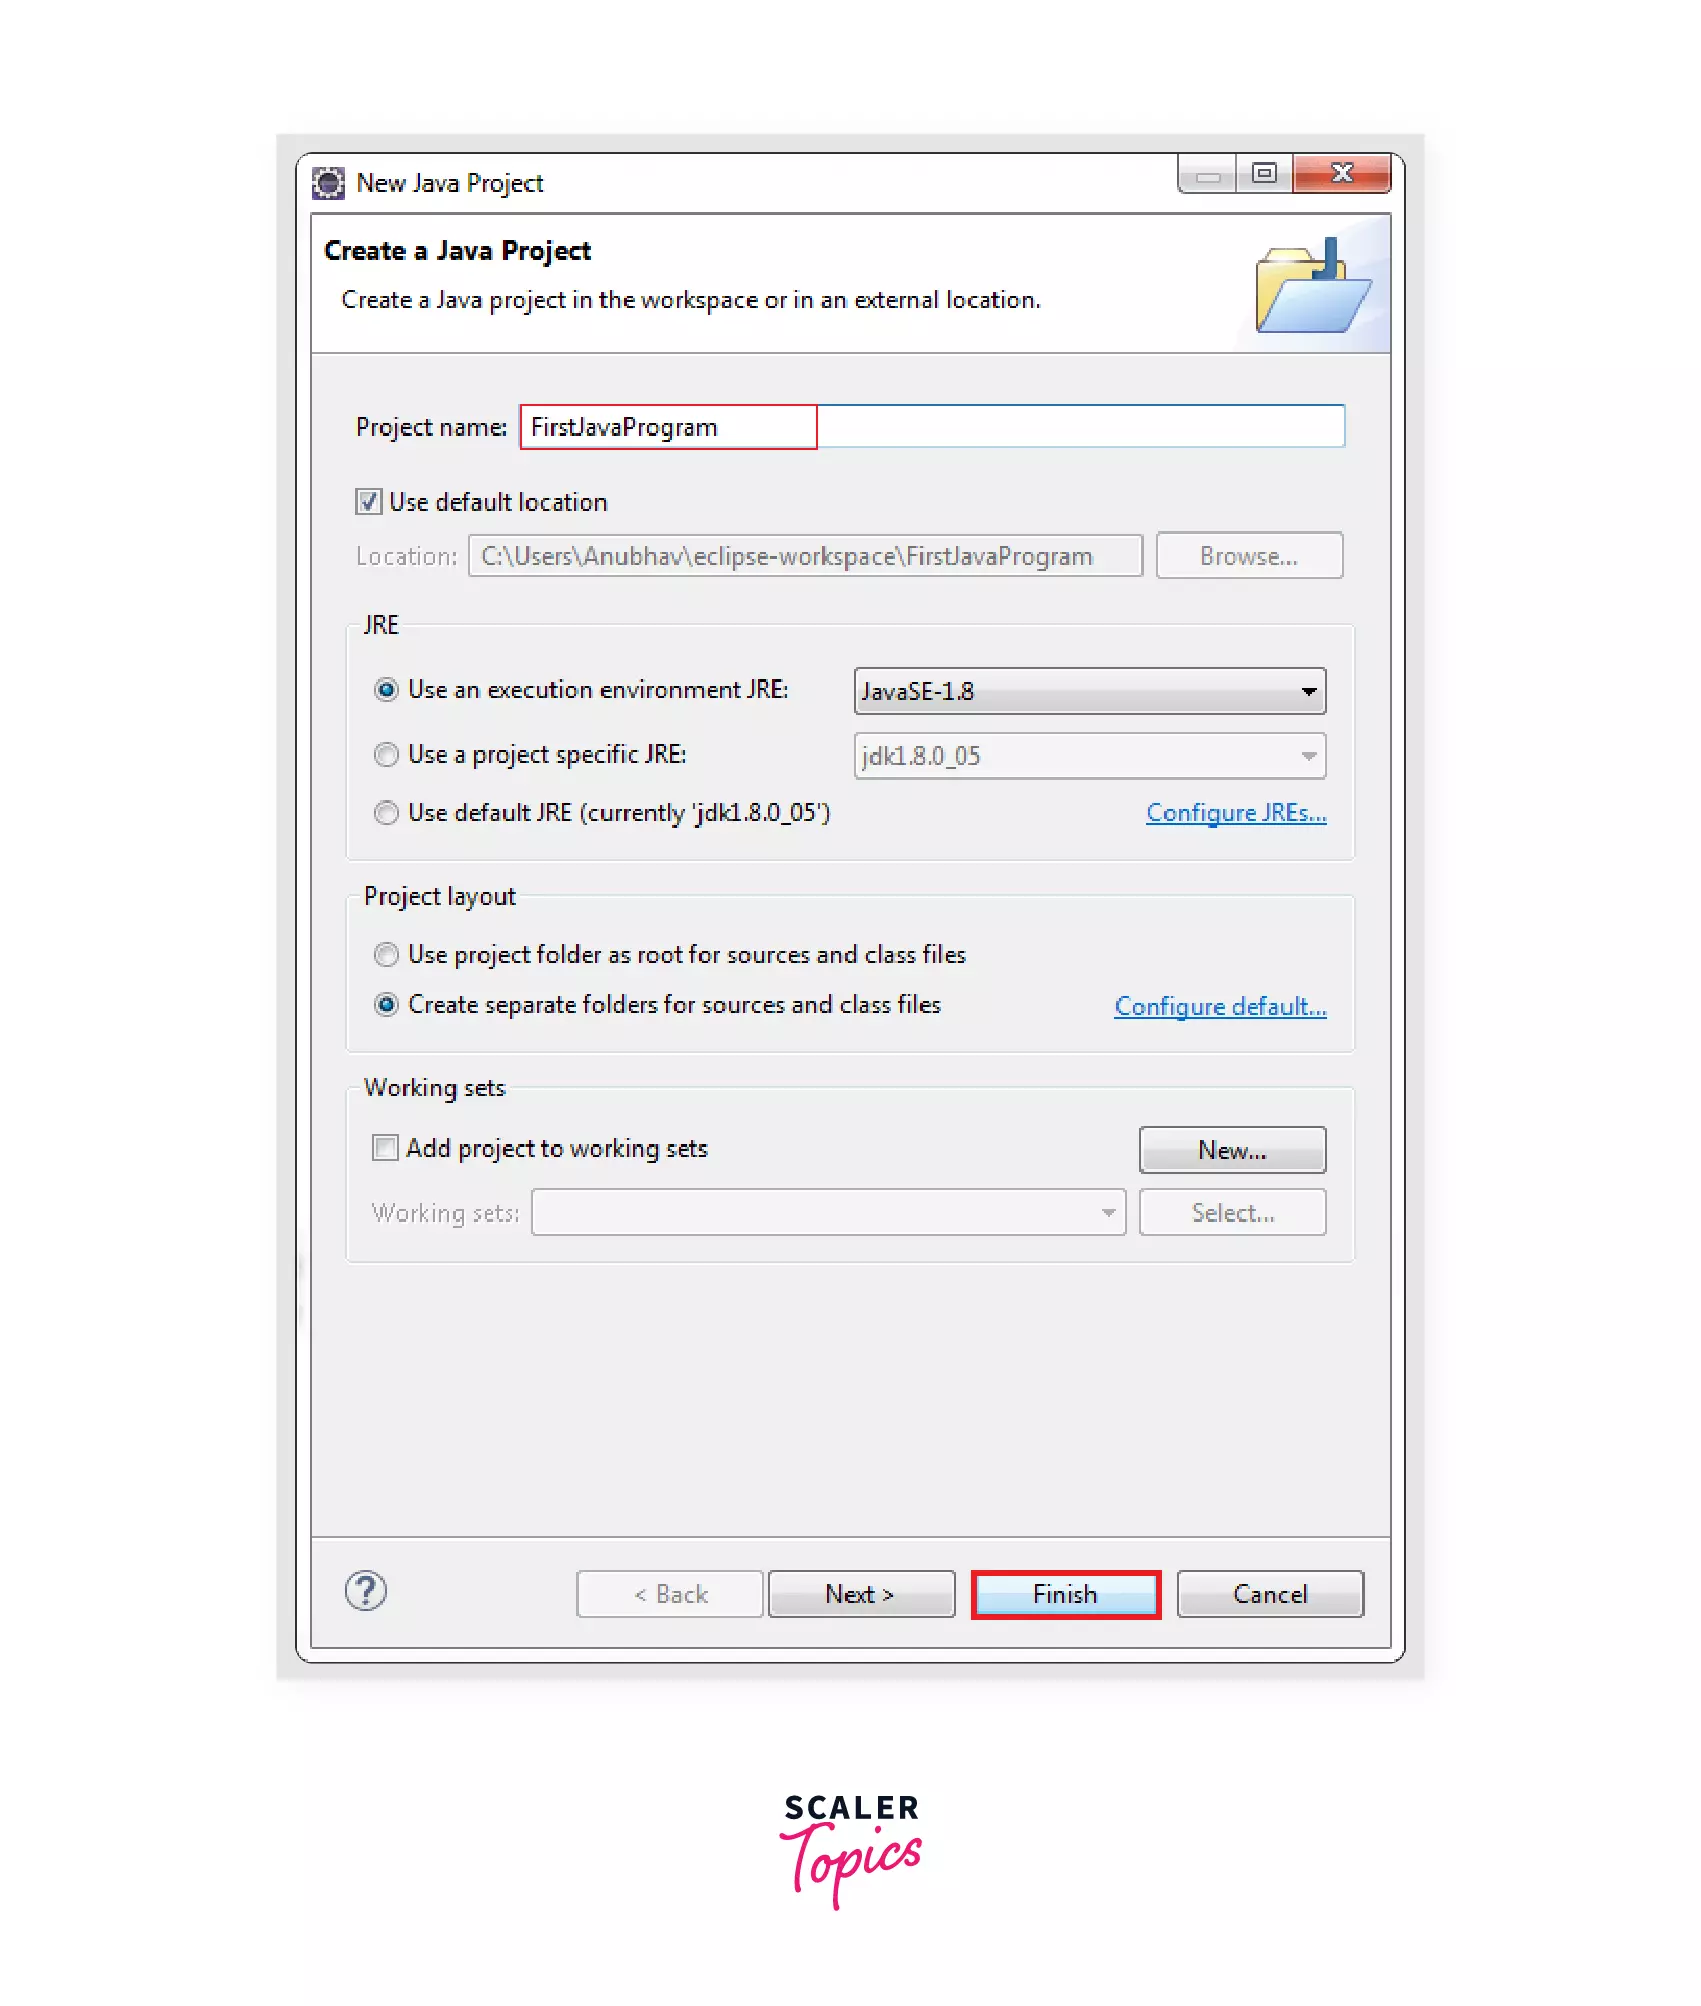
- We can write a java program in Eclipse by creating a new project by clicking on File > New > Project.
- Then select java project and give your project a name.
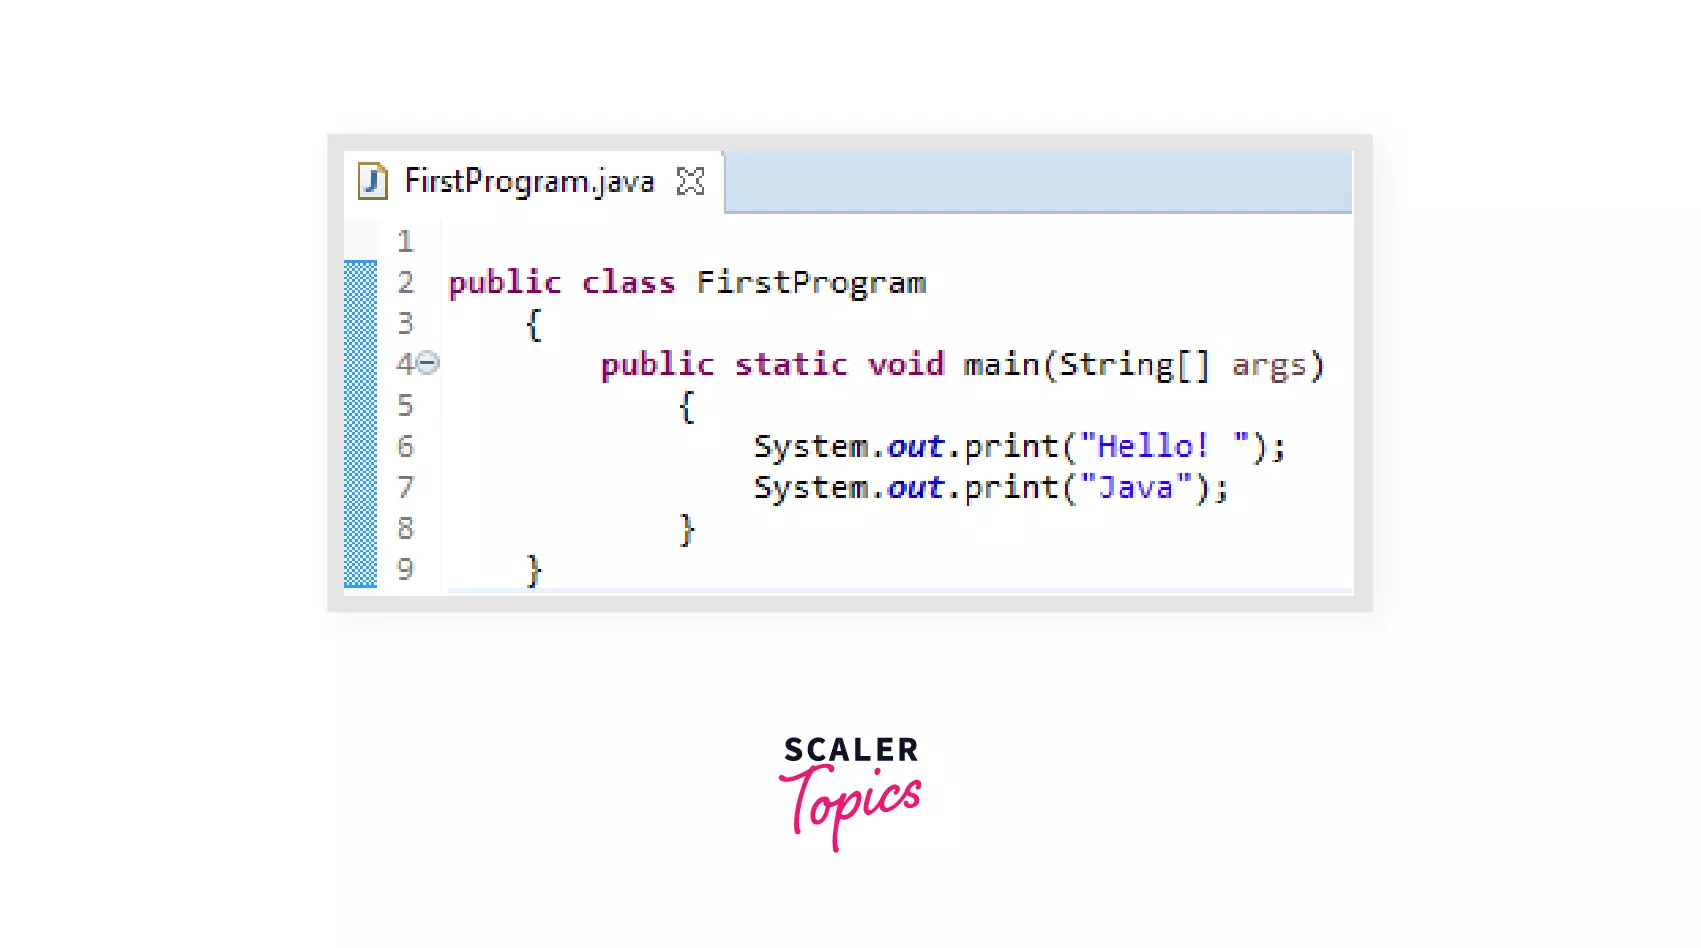
- After that create a new package and select New > Class for a new Java class. The New Java Class dialog appears, type the name of the class and generate main() method and start writing your code in the main section.
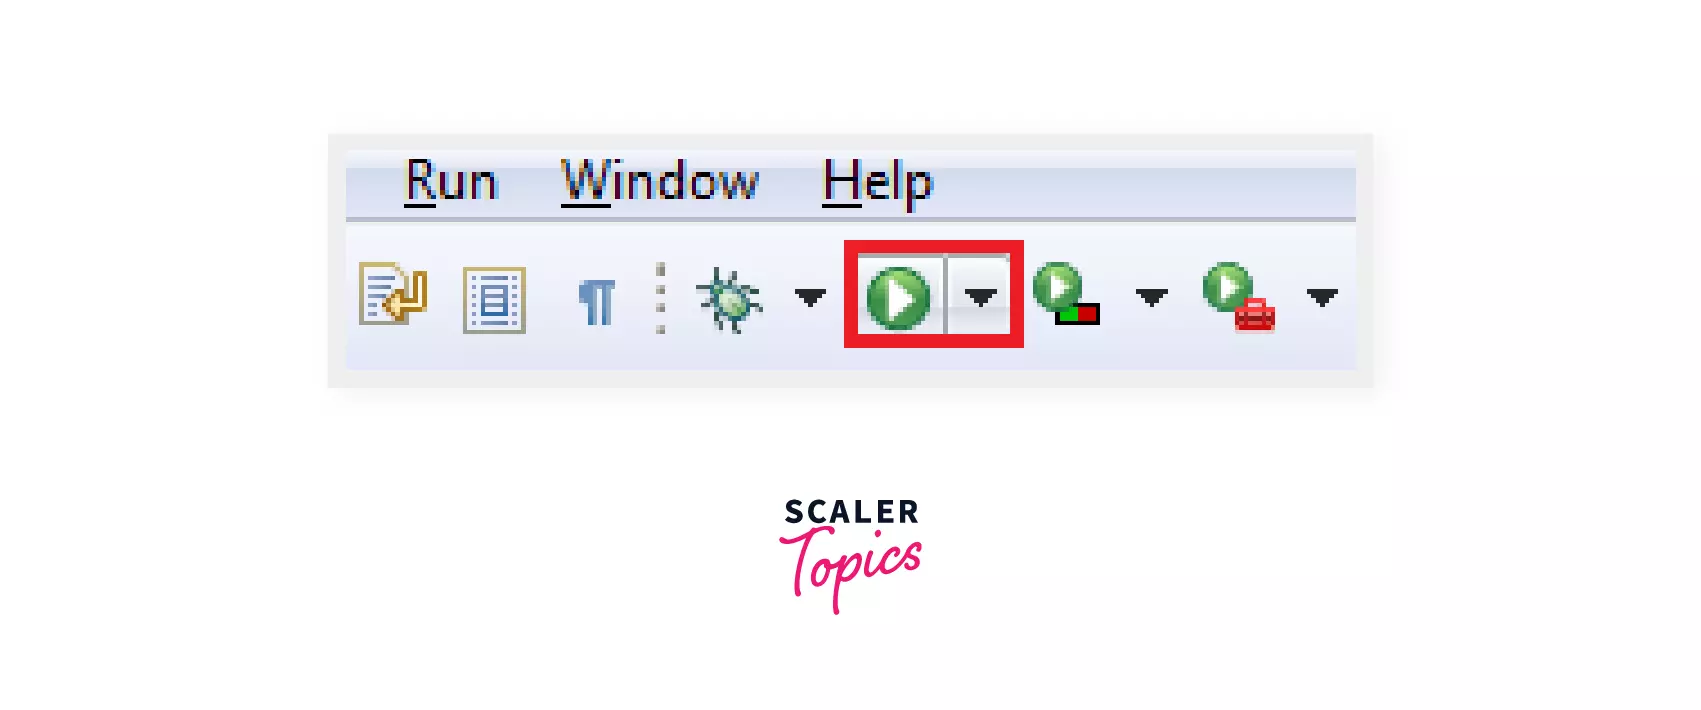
- Click on the Run menu and select Run or click on Run button. The code will compile and run successfully.
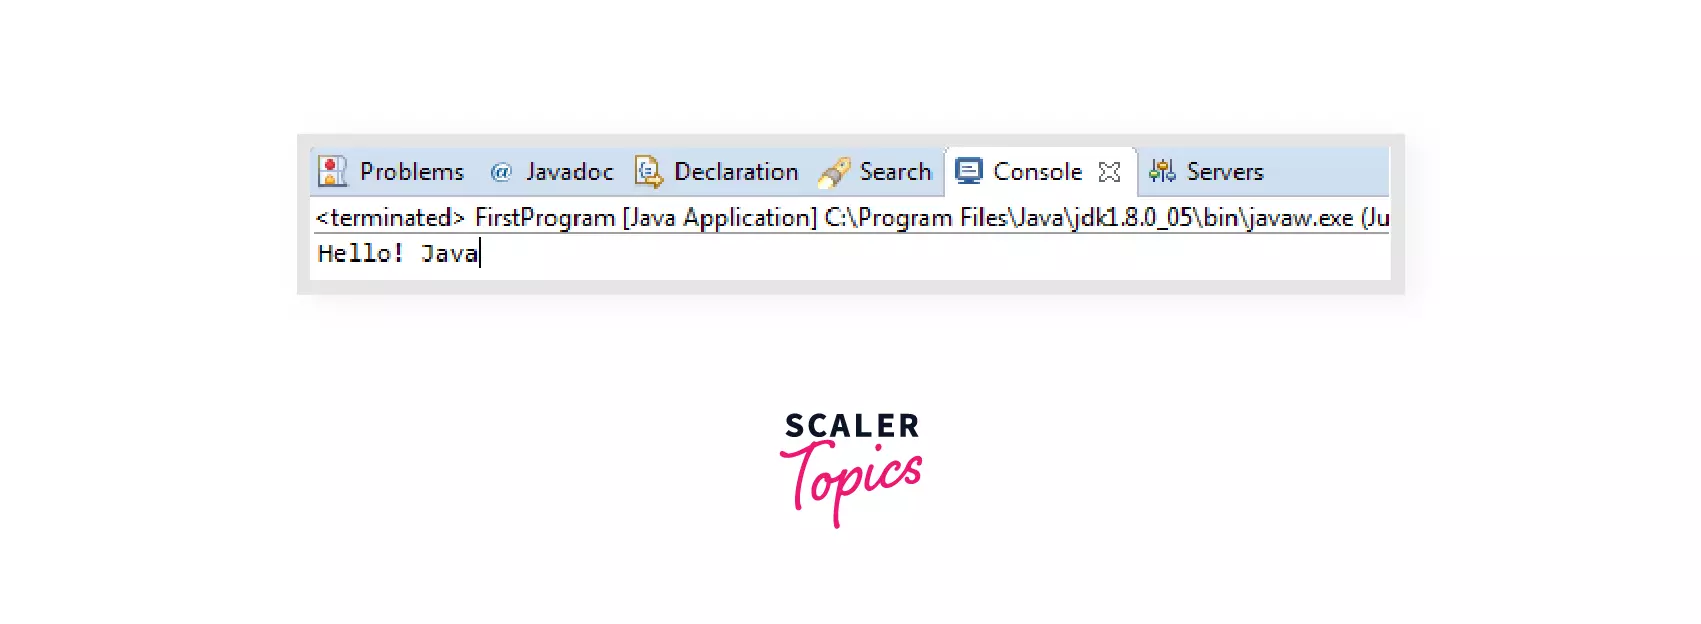
- Output will appear in the console window.
Conclusion
- Java is a high-level, class-based object-oriented programming and platform-independent language.
- Java codes are first compiled into byte code which then can run on any operating system using the platform dependent Java Virtual Machine.
- JRE allows us to run java programs on our computers however, we cannot compile a Java source code using JRE. It just provides an environment to run Java programs.
- The primary purpose of JVM is to convert the bytecodes into machine codes. It is an essential component of both JDK and JRE.
- JDK is needed to create, compile and run a java program on our computer.
- We can install Oracle's JDK in Mac OS by either downloading the DMG file from the official website of Oracle or through the terminal.
- There are two ways to install JDK on macOS:
- Installing OpenJDK from a Brew repository.
- Installing OpenJDK from a binary.