How to Change the Default Jenkins Port?
Overview
Jenkins is a powerful and widely used open-source automation server that allows developers to automate various tasks in the software development lifecycle.
In this blog post, we will explore one fundamental aspect of the Jenkins default port and delve into the significance of this port number in Jenkins installations.
Introduction to Jenkins' Default Port
Jenkins is an open-source automation tool used for Continuous Integration and Continuous Deployment of software using build pipelines. Jenkins is a web-based user interface that makes it easy to manage and configure automated running pipelines and jobs.
Jenkins' default port is 8080, which means that when Jenkins is installed and started, we can access the Jenkins web interface by navigating to:
Change "your_server_ip_or_domain" to your Jenkins server's IP address or domain name. If Jenkins is running locally, use http://localhost:8080 to access the interface.
It's important to note that if Jenkins' default port 8080 is already in use by another application on your server, Jenkins may not start correctly. In such cases, you can change the Jenkins default port by modifying the Jenkins configuration file. The configuration file is located in the Jenkins home directory, and the setting you need to change is HTTP_PORT However, this process may vary depending on your operating system and how Jenkin's installed.
How to Change the Jenkins Default Port?
You need to modify the Jenkins configuration file to change the Jenkins default port on which Jenkins runs. Depending on how Jenkins is installed and the operating system you are running, the procedure for changing the Jenkins port could be different. The general procedures for changing the default port are as follows:
1. Stop Jenkins:
Make sure Jenkins is shut down before making any configuration changes. Jenkins can be stopped using the proper command for your operating system if it is running as a service:
For example, on Linux using systemd:
2. Locate the Jenkins Configuration File:
The Jenkins configuration file is typically named jenkins.xml on Windows and jenkins.conf on Linux. Depending on the installation method, you can find the configuration file in different locations:
- Debian/Ubuntu: /etc/default/jenkins
- Red Hat/CentOS: /etc/sysconfig/jenkins
- Windows: C:\Program Files (x86)\Jenkins\jenkins.xml
3. Edit the Configuration File:
Edit the Jenkins configuration file in an editor that has administrative rights (you may accomplish this on Linux by typing "sudo"). Find the line that defines the variable 'HTTP_PORT', which determines the port Jenkins will use. It should resemble the following:
4. Change the Port Number:
Modify the HTTP_PORT value to the desired port number. For example, if you want Jenkins to run on port 9090, change the line to:
5. Save and Close the File:
After making the changes, save the configuration file and close the text editor.
6. Start Jenkins:
Now that you've changed the port, you can start Jenkins again using the appropriate command: On Linux with systemd:
On Windows, start Jenkins using the Jenkins service from the "Services" application.
7. Access Jenkins on the New Port:
After starting Jenkins with the new configuration, you can access the Jenkins web interface using the updated port. For example, if you changed the port to 9090, you can access Jenkins at:
Remember to configure any firewalls or security groups to allow traffic on the new port and ensure that other services are not using the chosen port to avoid conflicts.
How to Change the Default Jenkins Port on AWS?
To change Jenkins's default port on AWS, we will login into the AWS console and SSH into the system where Jenkins is installed. Your console would look something like this:

Stop the existing Jenkins server running using the following command:
You will be in the root directory of the system. We will require to edit Jenkinsfile where all default configs are stored. Use the following command:

Once done, use vim to change the fileHTTP_PORT=8080 to the port we want to open. For example, we will be opening our Jenkins port on 8081.
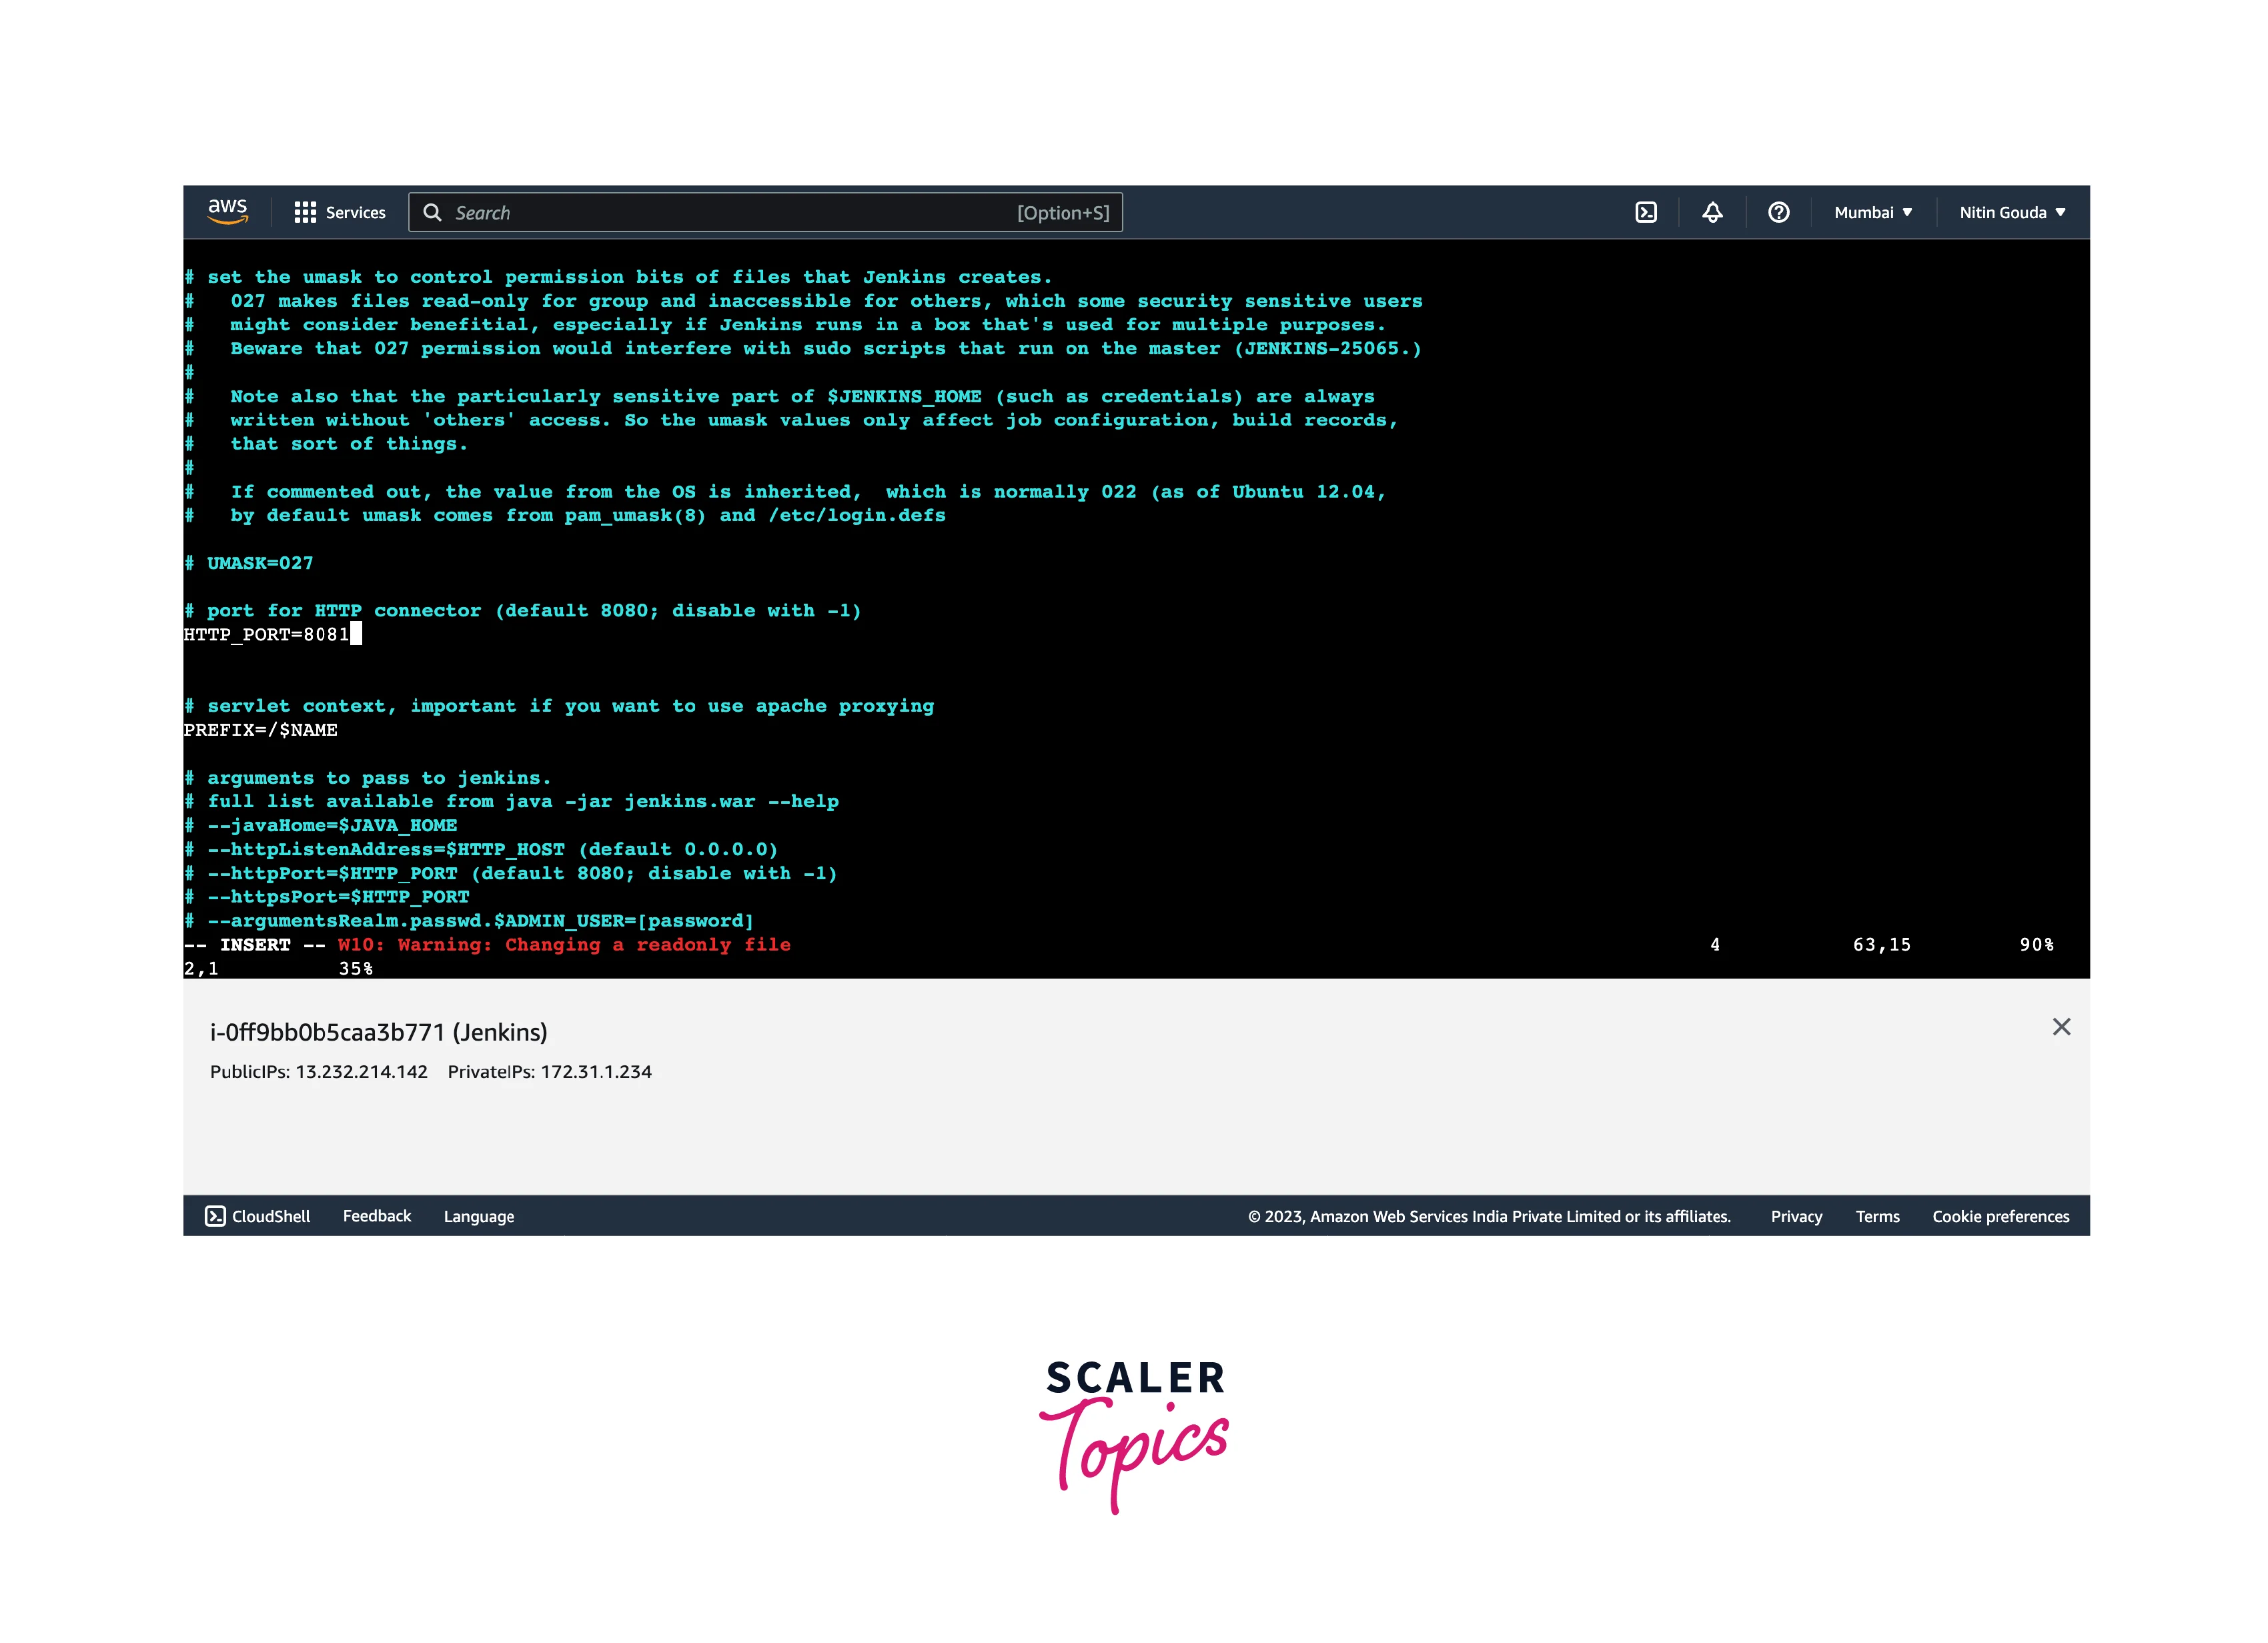
Once done, save and exit and restart the Jenkins server.
Using command:
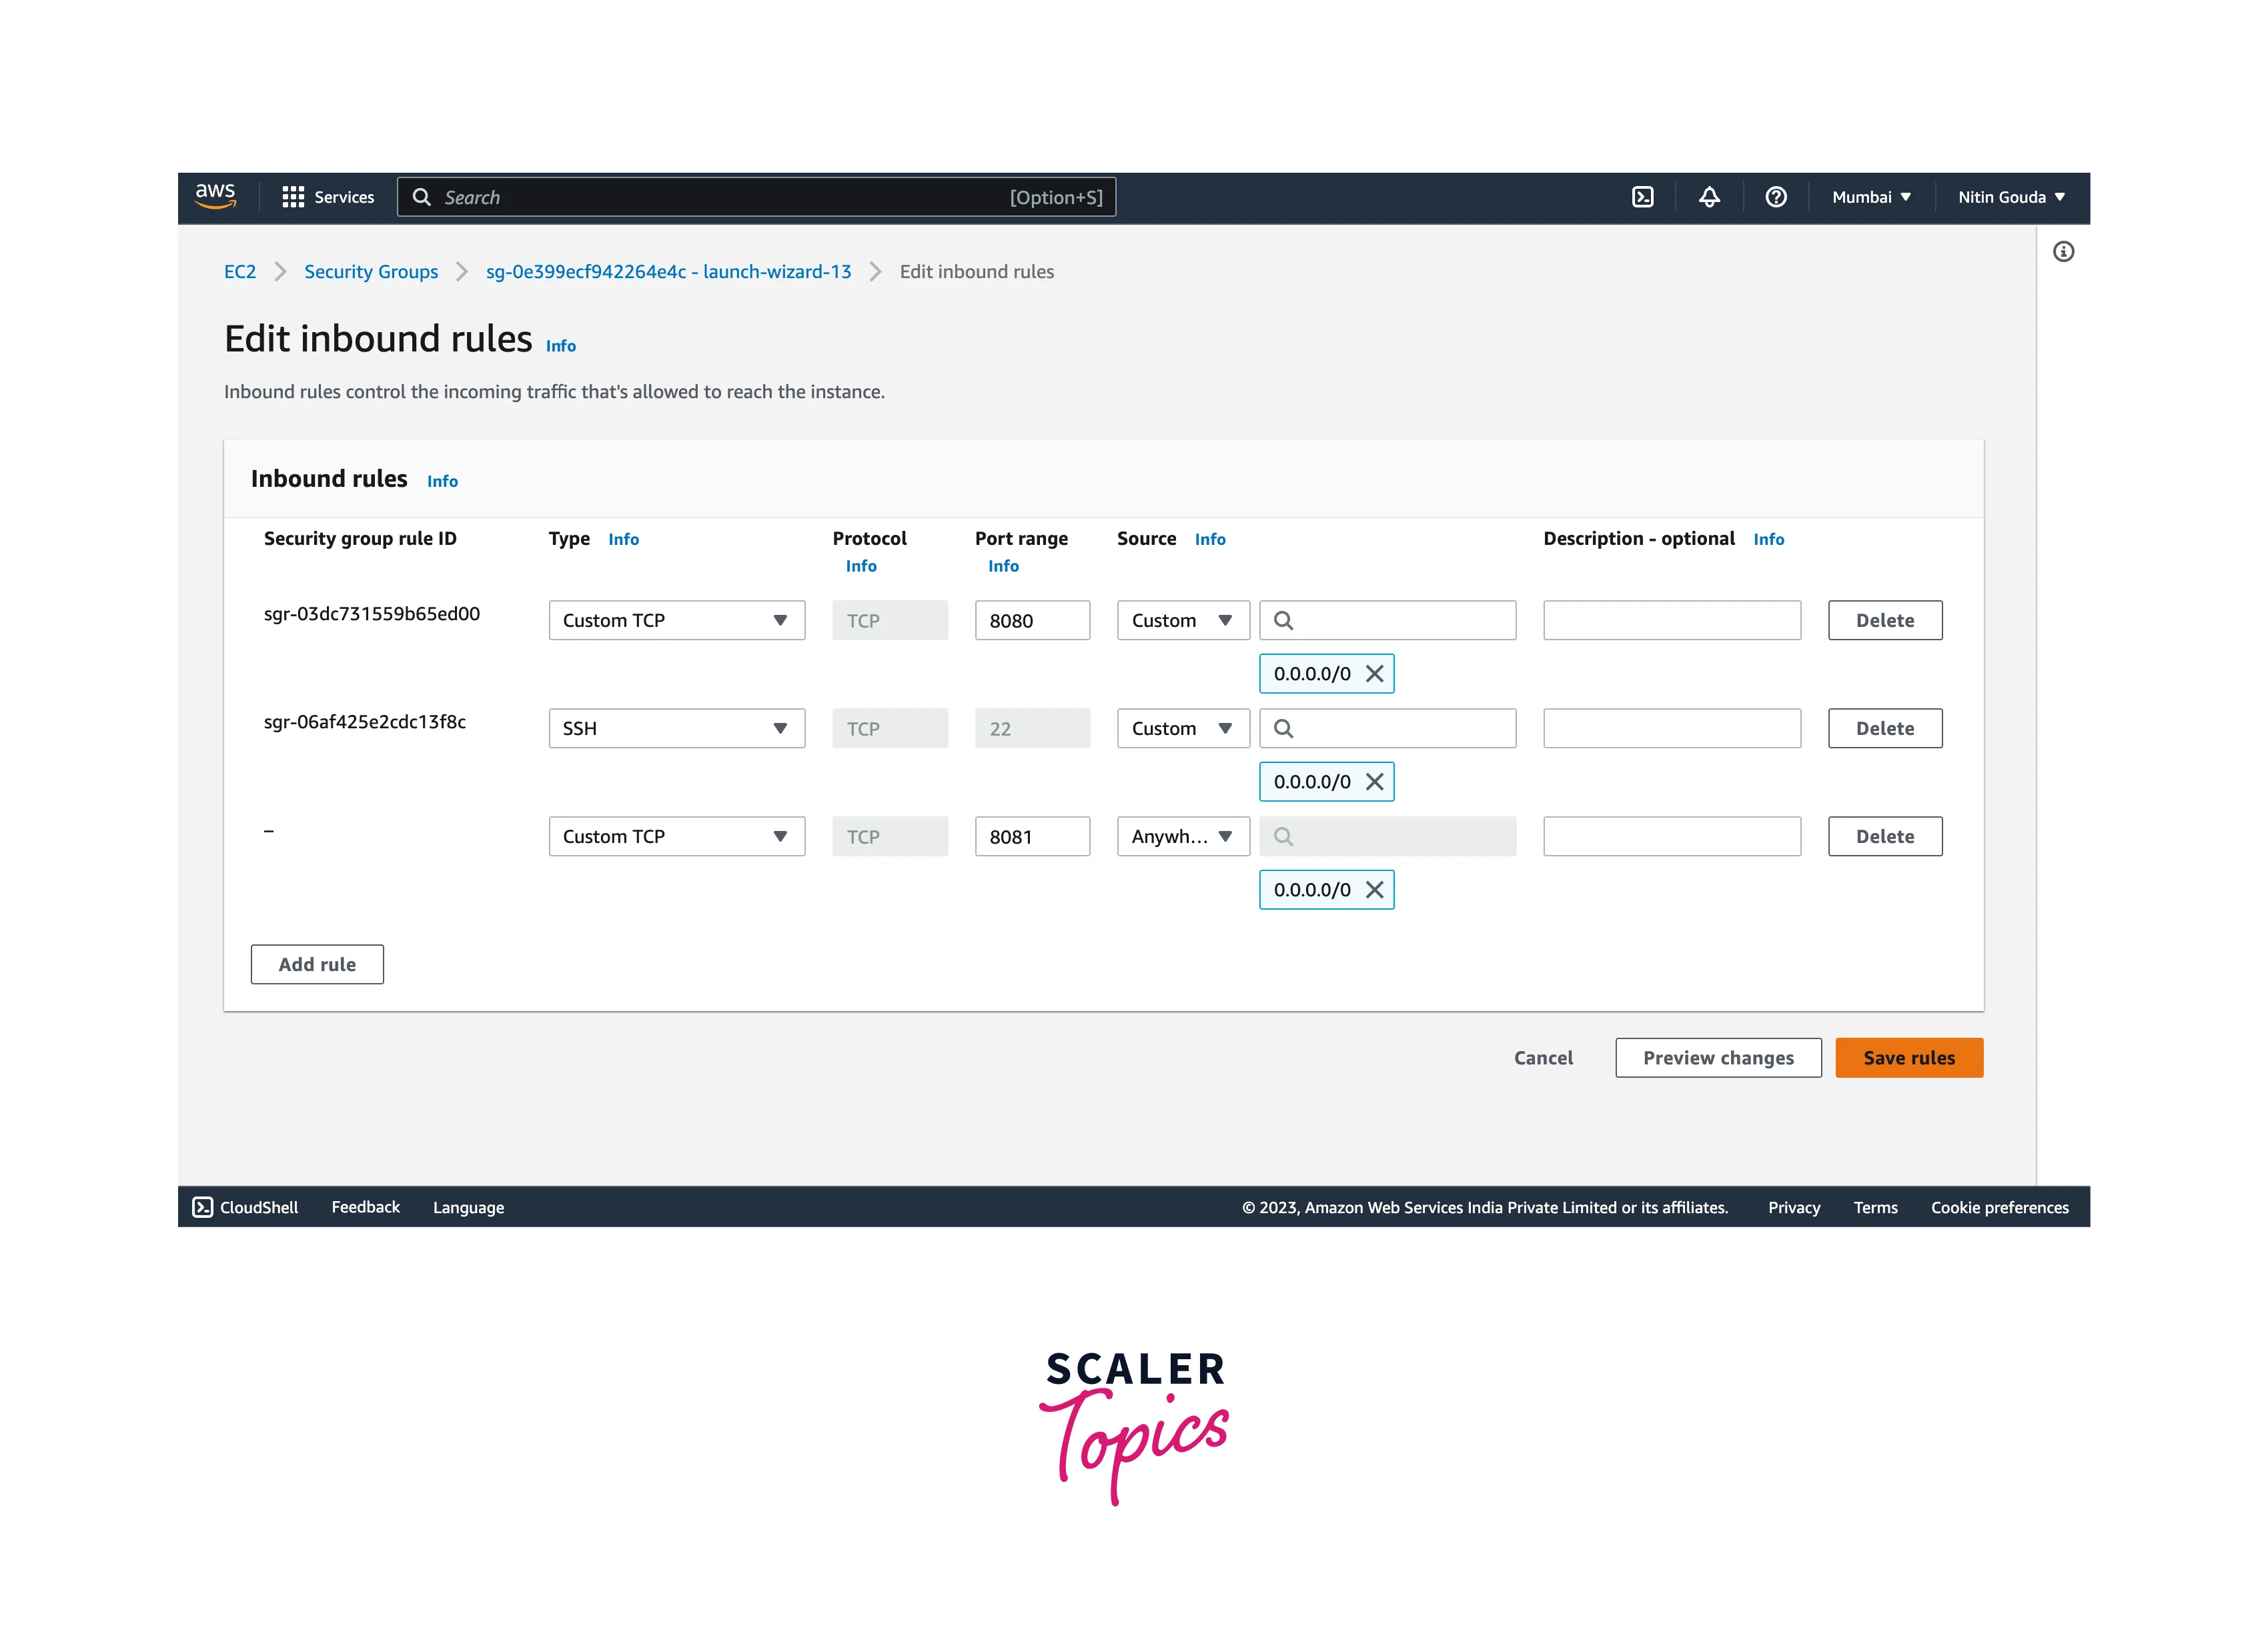
After that, while accessing the Jenkins server change the security groups to the port you will be using and add it to the security groups.
Once done, you can access the Jenkins Server using the new port assigned.
How to Change Port for Jenkins in Windows?
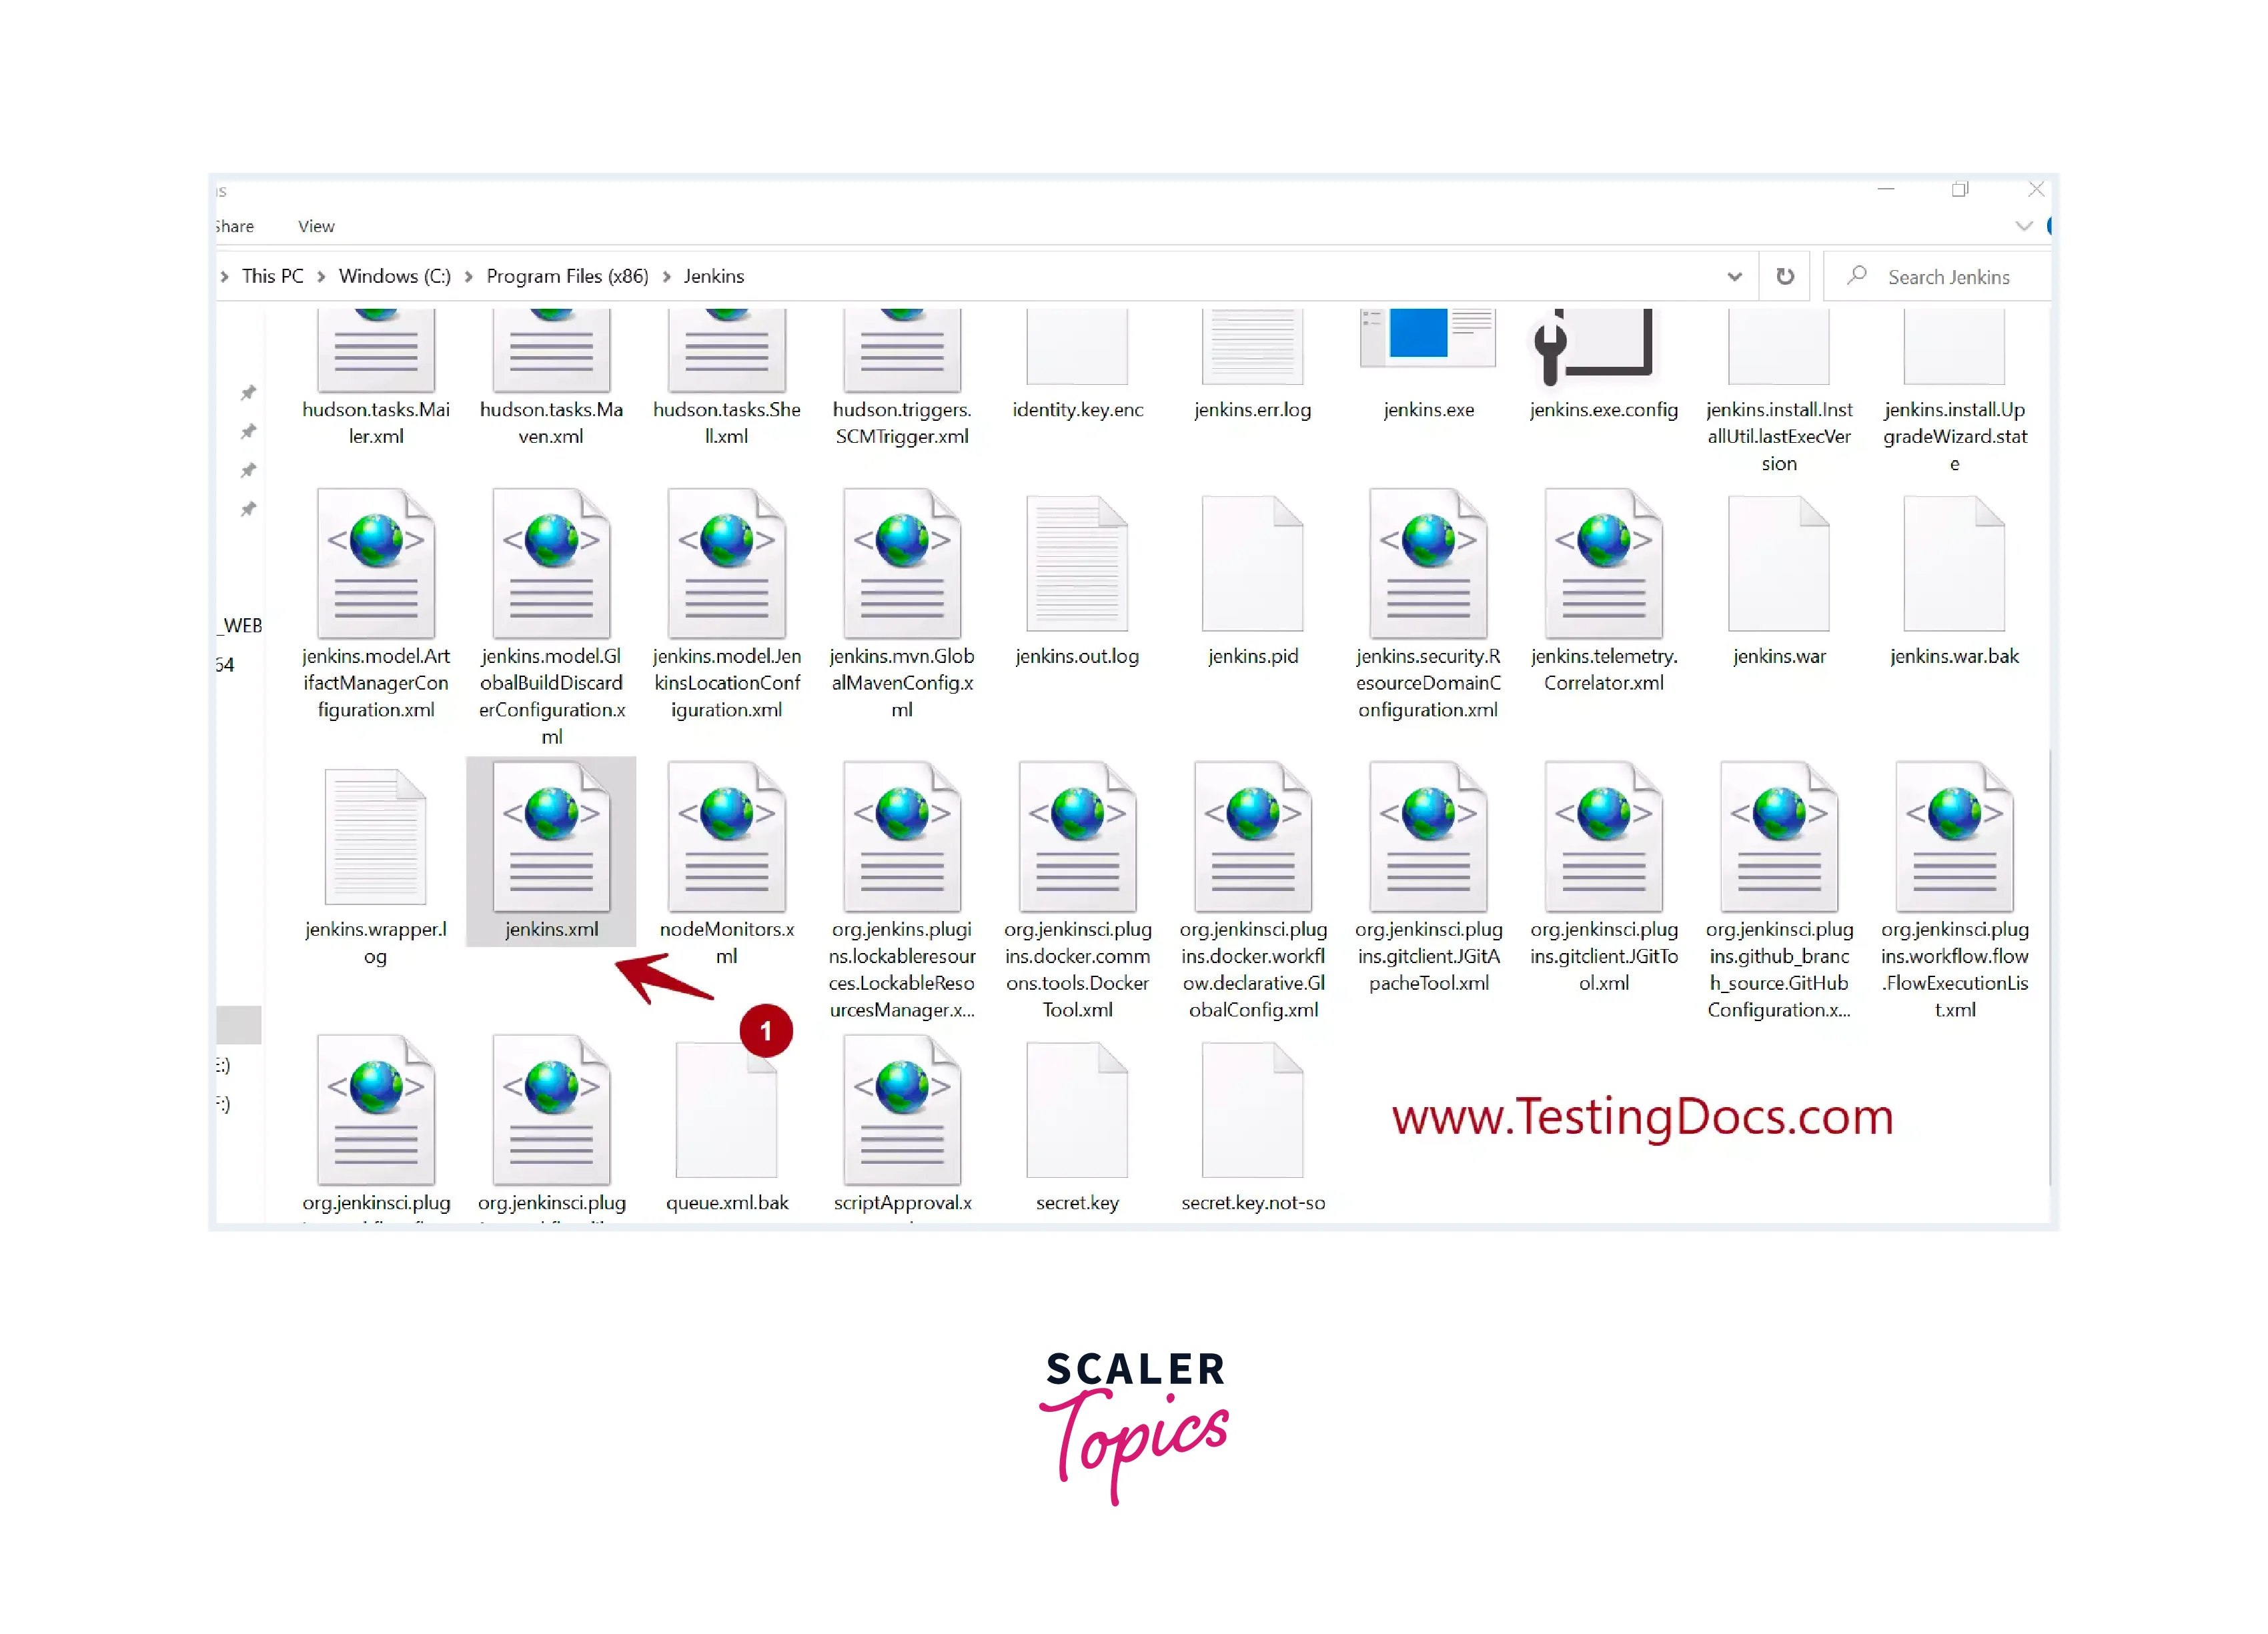
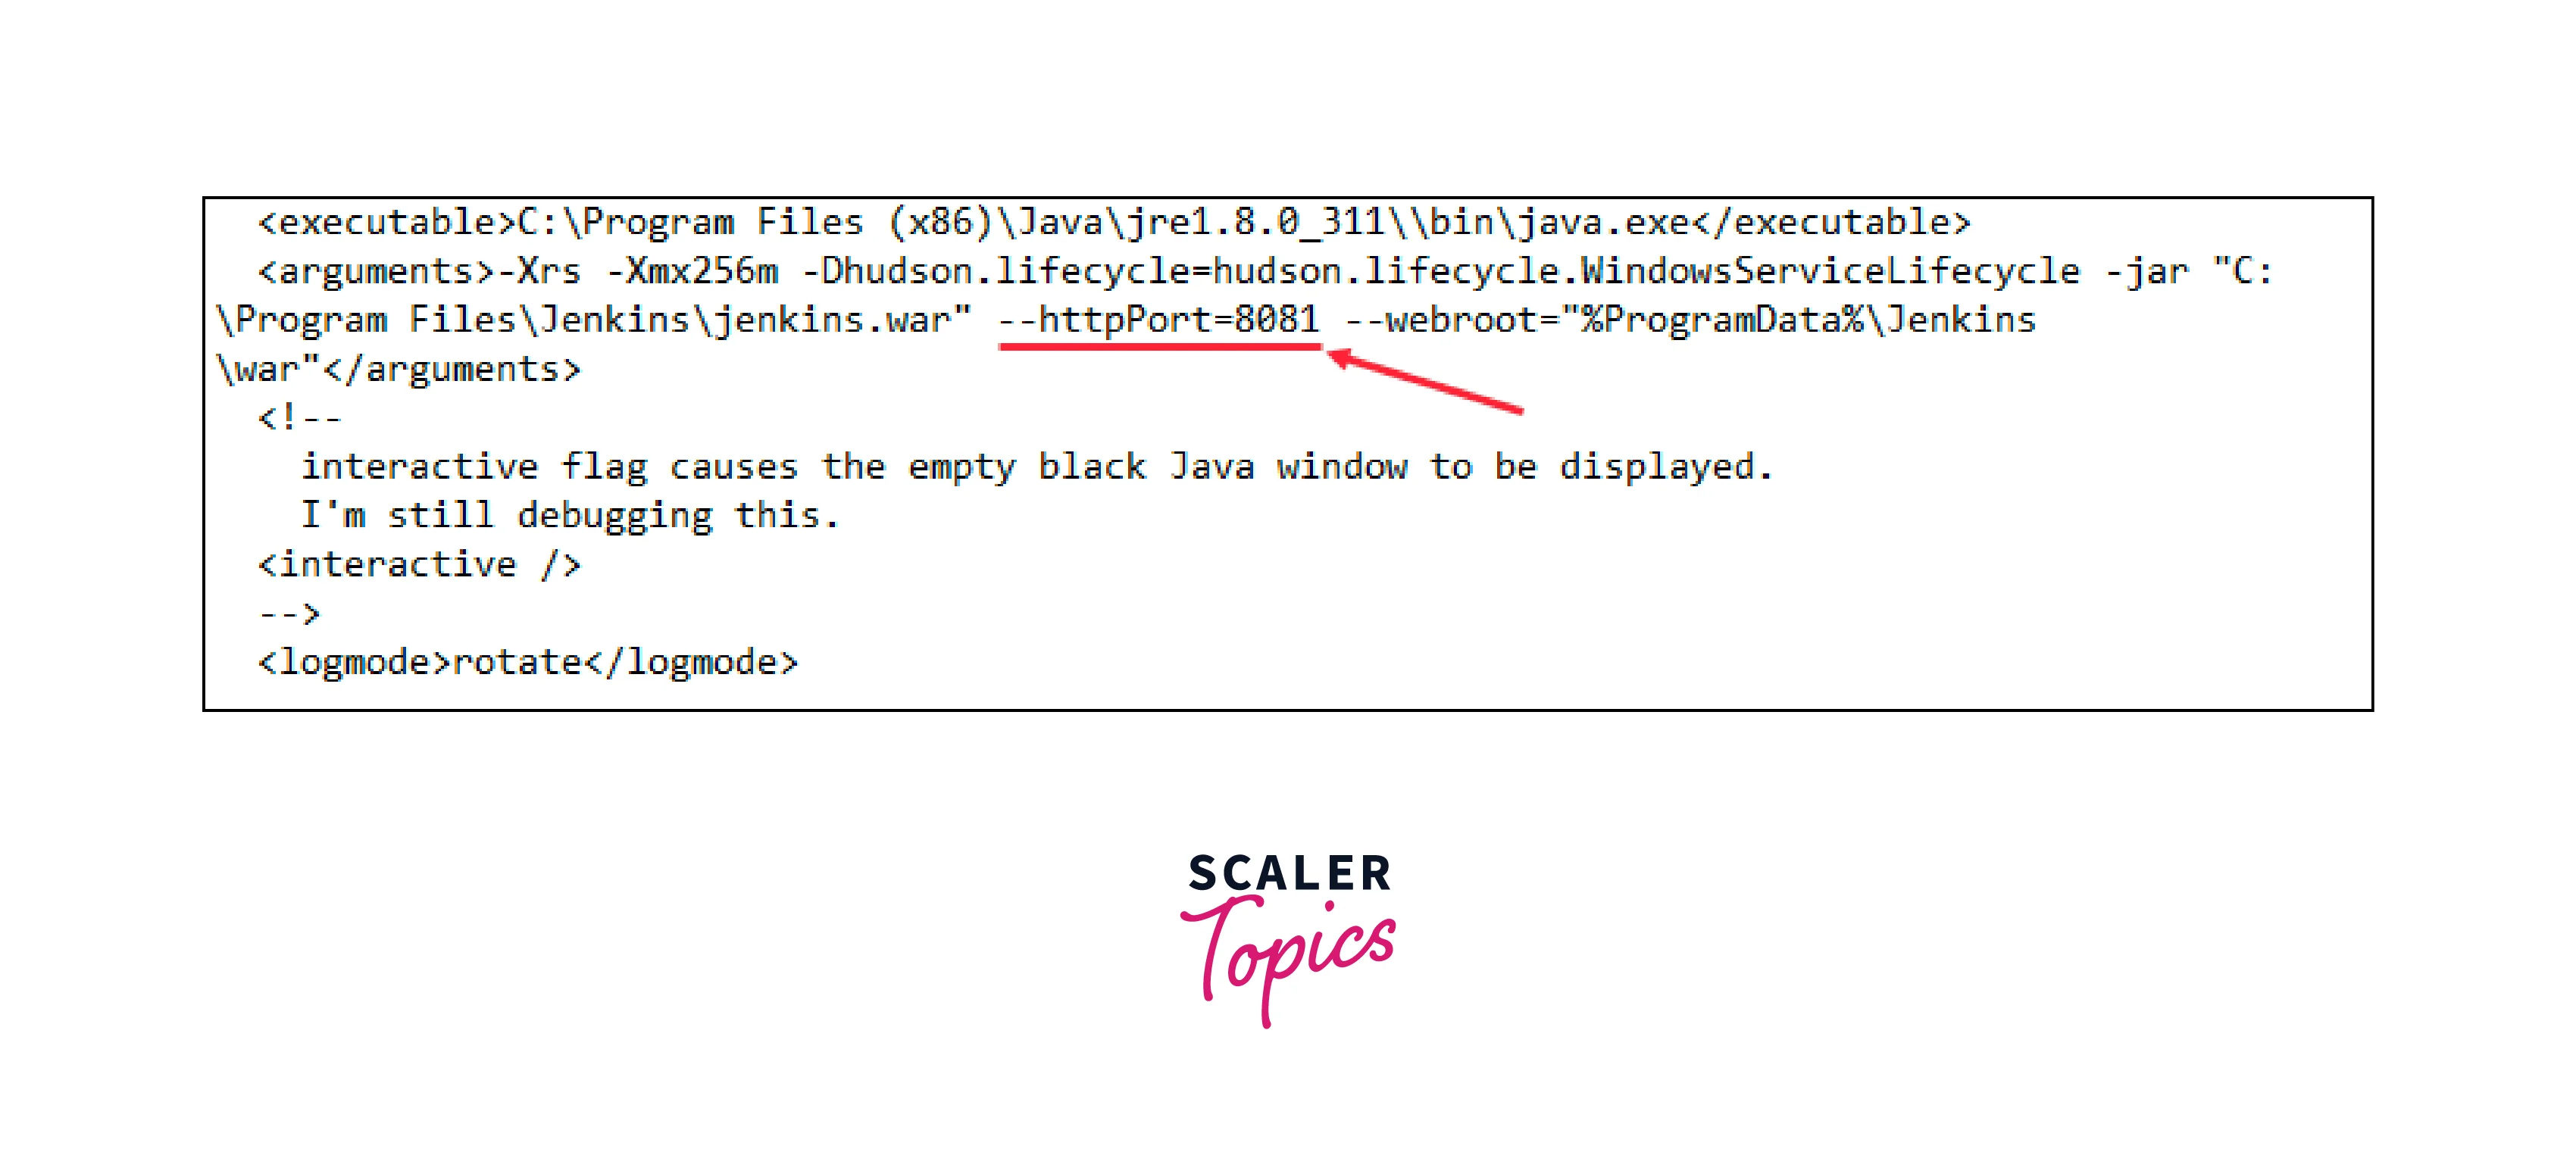
If you have Jenkins installed on Windows to change the default jenkins port, we will have to edit the 'jenkins.xml' configuration file. Which is located in Jenkins install folder (the default path is C:\Program Files\Jenkins\jenkins.xml)
Open the file in VSCode or Notepad modify the --httpPort=8080 and change the number to the port you want to set.
Once everything is finished and configured, you must restart the Jenkins server. To do this, click OK after typing "services.msc" in the run menu after pressing "Windows + R."
To discover the Jenkins service, scroll down. To restart the service, perform right-click and choose Restart.

Once restarted, Jenkins will be available on port 8081 or the port you set on.
How to Change Port for Jenkins in MacOS?
On MacOS, since Jenkins was installed using "brew" we will have to make changes in the jenkins-lts file
Locate the file 'homebrew.mxcl.jenkins-lts.plist' and change the '--httpPort=8081'.

Once done, use the following command to stop and restart Jenkins to open at the port assigned recently.
Now we can access our Jenkins through port 8081

Conclusion
- Jenkins default port is set to 8080, and you can access the Jenkins web interface using http://your_server_ip_or_domain:8080.
- Changing the Jenkins default port can be necessary if port 8080 is already in use or to align with your organization's port configuration.
- To change the Jenkins default port, modify the Jenkins configuration file (jenkins.xml on Windows, jenkins.conf on Linux) and update the HTTP_PORT variable.
- On Linux, you can use sudo systemctl stop Jenkins to stop Jenkins, make the changes, and restart it with sudo systemctl start jenkins.
- On Windows, locate the jenkins.xml file in the Jenkins installation folder, modify the --httpPort parameter, and restart the Jenkins service from the "Services" application.
- On macOS with Jenkins installed via "Homebrew" modify the --httpPort parameter in the homebrew.mxcl.jenkins-lts.plist file and restart Jenkins using brew services stop jenkins-lts and brew services start jenkins-lts.
- Remember to update security groups and firewalls to allow traffic on the new port and ensure no port conflicts occurs.