How to Create JenkinsFile?
Overview
Jenkins is a powerful and OpenSource CI Software in which Jenkinsfile is a way to manage and build pipelines. It allows developers to codify their CI processes, providing version control, automation, and easier collaboration. In this blog, we explore and learn more about Jenkinsfile. Additionally, we explore advanced features like the post, triggers, parameters, and environment blocks. By the end, readers will grasp the value of Jenkinsfile in optimizing CI processes and enabling faster, higher-quality software delivery.
What is a Jenkinsfile?
A Jenkinsfile is a text-based script that defines the entire CI/CD (Continuous Integration/Continuous Deployment) pipeline in Jenkins. It provides a declarative or scripted approach to define and control the stages, actions, and conditions of a software delivery process.
Teams can have the full pipeline as code thanks to the Jenkinsfile, which is often stored in the version control system together with the source code, encouraging transparency, reproducibility, and collaboration. Developers can declare dependencies, handle triggers, and configure various components of the CI/CD process in a flexible and automated way by utilising a Jenkinsfile to define the build, test, and deployment phases, among other things.
Jenkinsfile additionally provides a wide range of advantages that greatly improve CI/CD processes. By offering a version-controlled and simply accessible script that specifies the complete pipeline, it first and foremost enhances traceability. Teams can log changes, examine configurations, and replicate builds thanks to this, which encourages accountability and openness.
Last but not least, Jenkinsfile supports scalability by offering a customizable and automated pipeline management system. Teams can quickly grow their pipelines with Jenkinsile by implementing parallel execution, adding or altering stages, and integrating with other tools and services. This enables organisations to effectively manage growing workloads and adjust to shifting requirements.
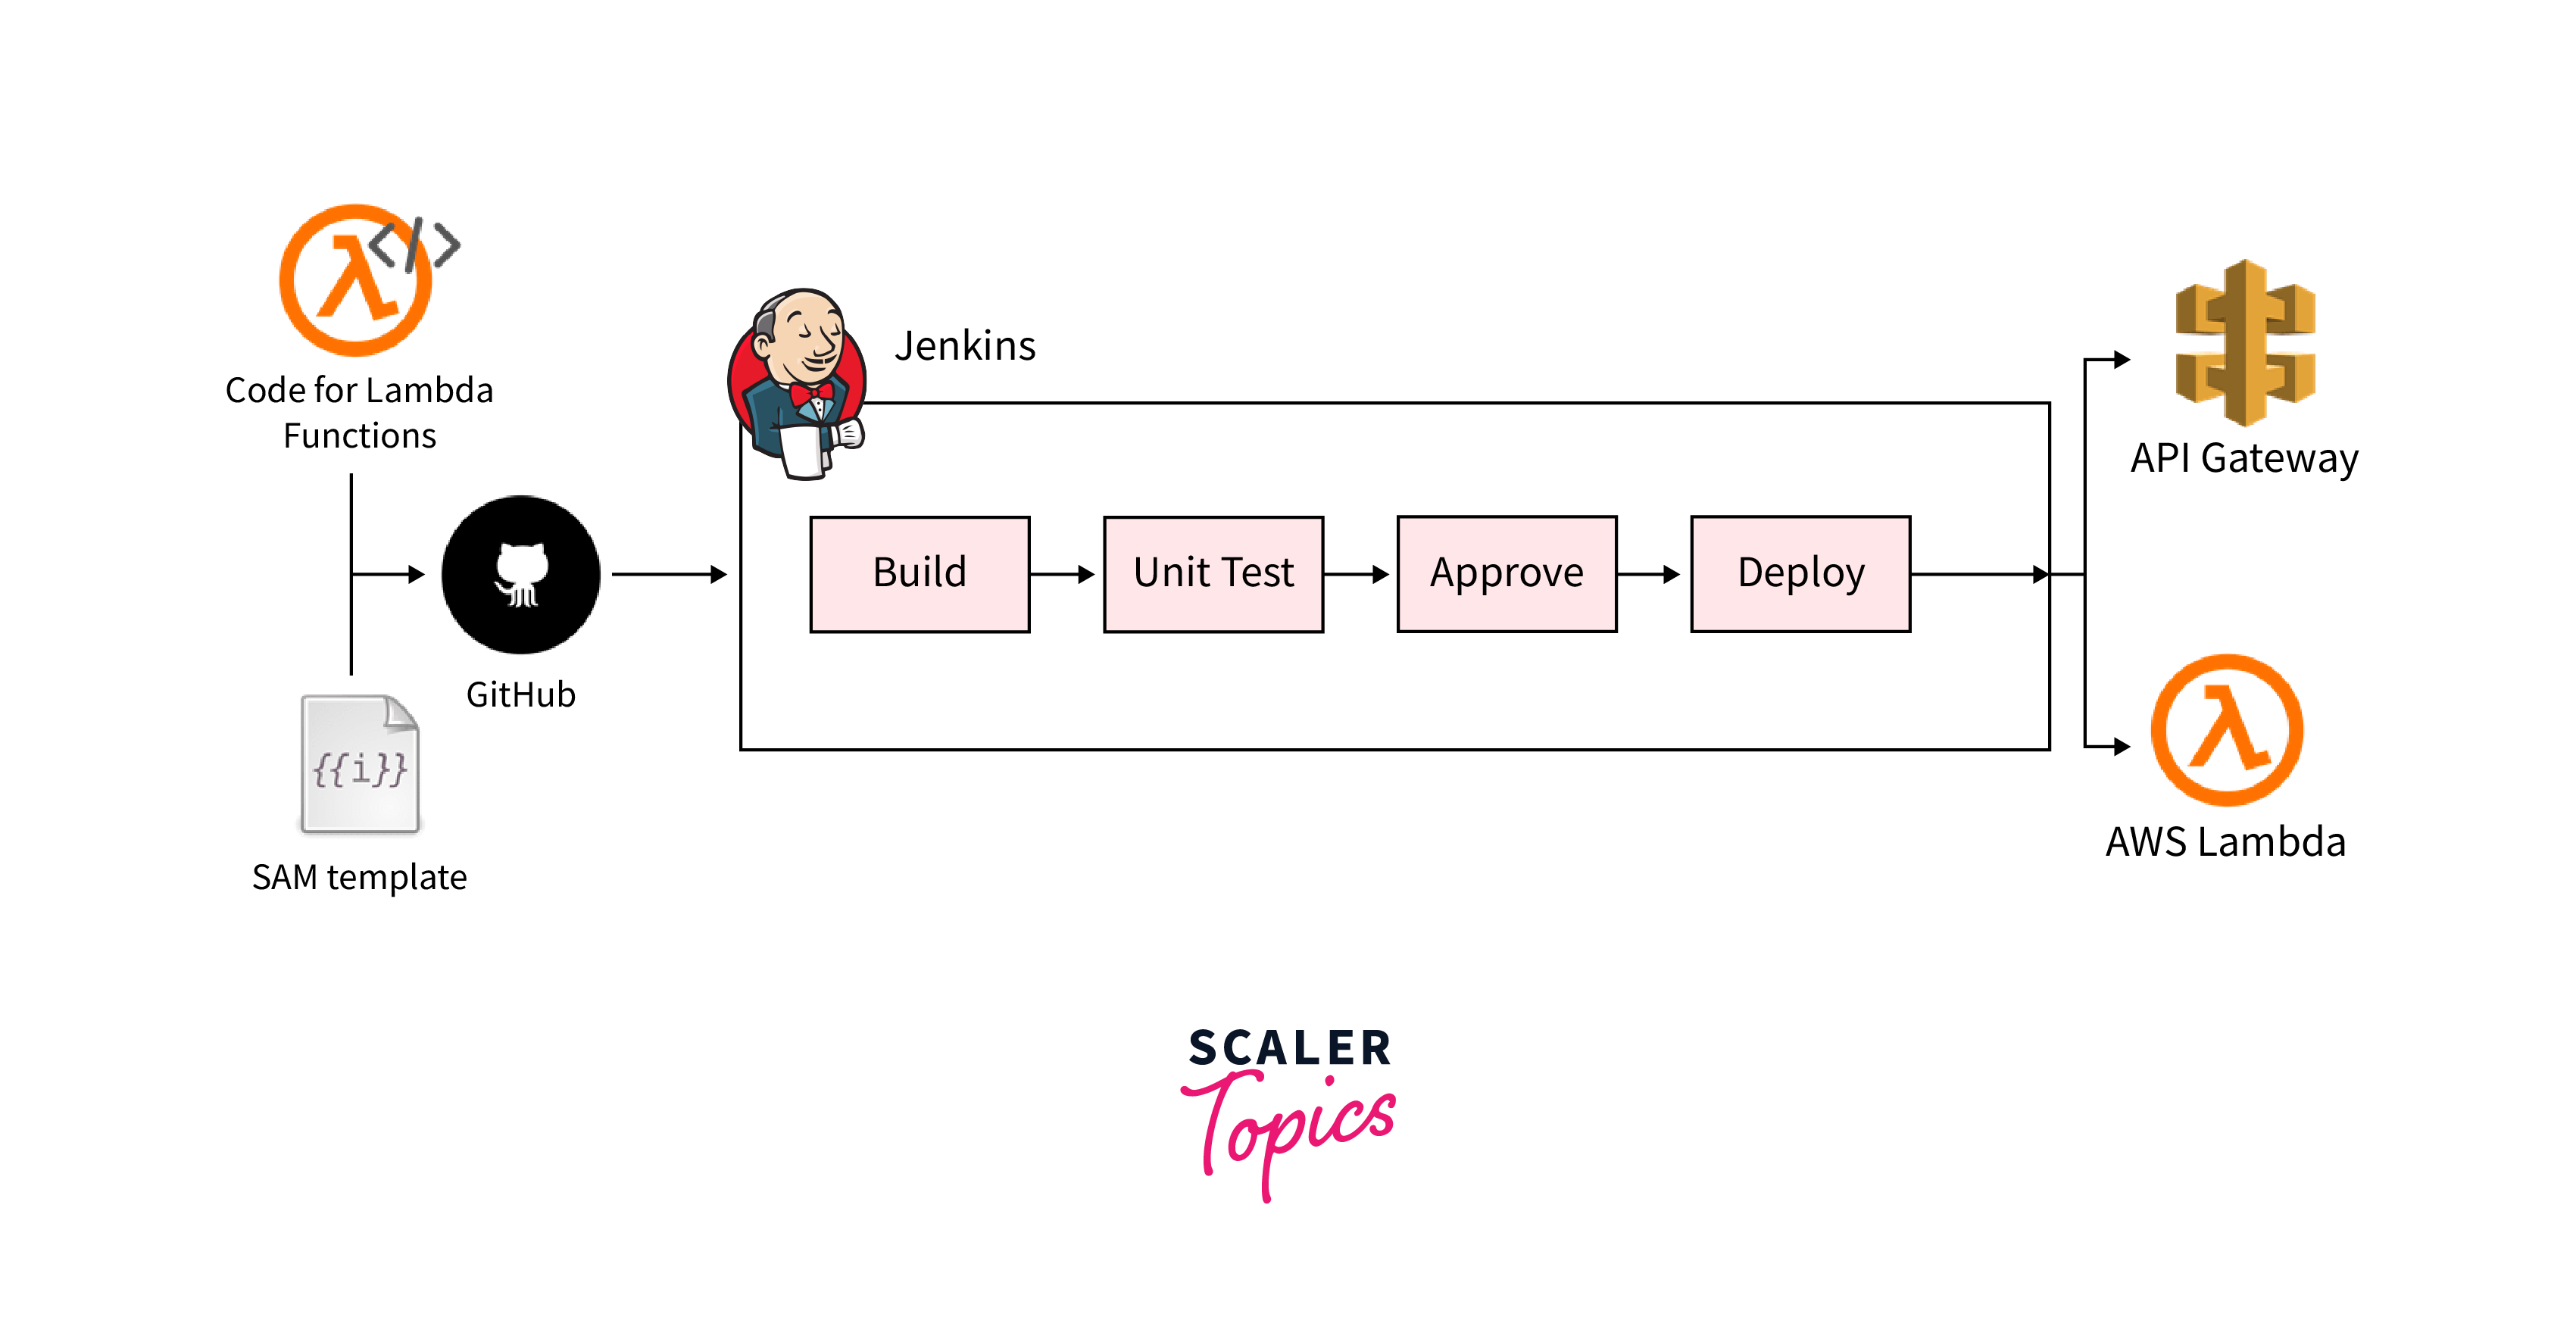
Here's an overview of how it would look in a production based pipeline.
Using a Jenkinsfile
A Jenkinsfile is a powerful tool used in Jenkins to define and control Continuous Integration/Continuous Deployment (CI/CD) pipelines. By leveraging a Jenkinsfile, developers can describe the entire software delivery process as code, ensuring consistency and reproducibility. In a Jenkinsfile, developers can define various stages, such as build, test, and deploy, along with the specific actions and configurations for each stage. They can specify dependencies, execute custom scripts, integrate with version control systems, and trigger pipeline runs based on events or schedules.
One of the key benefits of using a Jenkinsfile is its ability to be version controlled alongside the source code. This allows teams to track changes, review and collaborate on pipeline configurations, and rollback to previous versions if needed. With Jenkinsfile, teams can automate the entire CI/CD process, eliminating manual intervention and reducing human error. The declarative syntax of Jenkinsfile simplifies pipeline configuration and makes it more readable and maintainable.
Furthermore, Jenkinsfile supports advanced features like parallel execution, conditional steps, and post-build actions. It also allows for environment variable configuration, enabling fine-grained control over pipeline behavior. Overall, using a Jenkinsfile empowers teams to establish efficient and consistent CI/CD pipelines. It promotes collaboration, version control, and automation, ultimately leading to faster software delivery and improved code quality.
Creating a Jenkinsfile
In a Jenkinsfile, the Build stage is where you define the actions needed to build your code, including compiling, resolving dependencies, and creating artifacts. The Test stage involves running tests to ensure code quality and functionality, such as unit tests and integration tests.
Finally, the Deploy stage handles deploying your application to the desired environment, including packaging artifacts, configuring deployment targets, and executing deployment scripts. Each stage can be customized with commands, scripts, and configurations specific to your project. By defining these stages in a Jenkinsfile, you establish an automated CI/CD pipeline, enabling efficient and reliable software delivery.
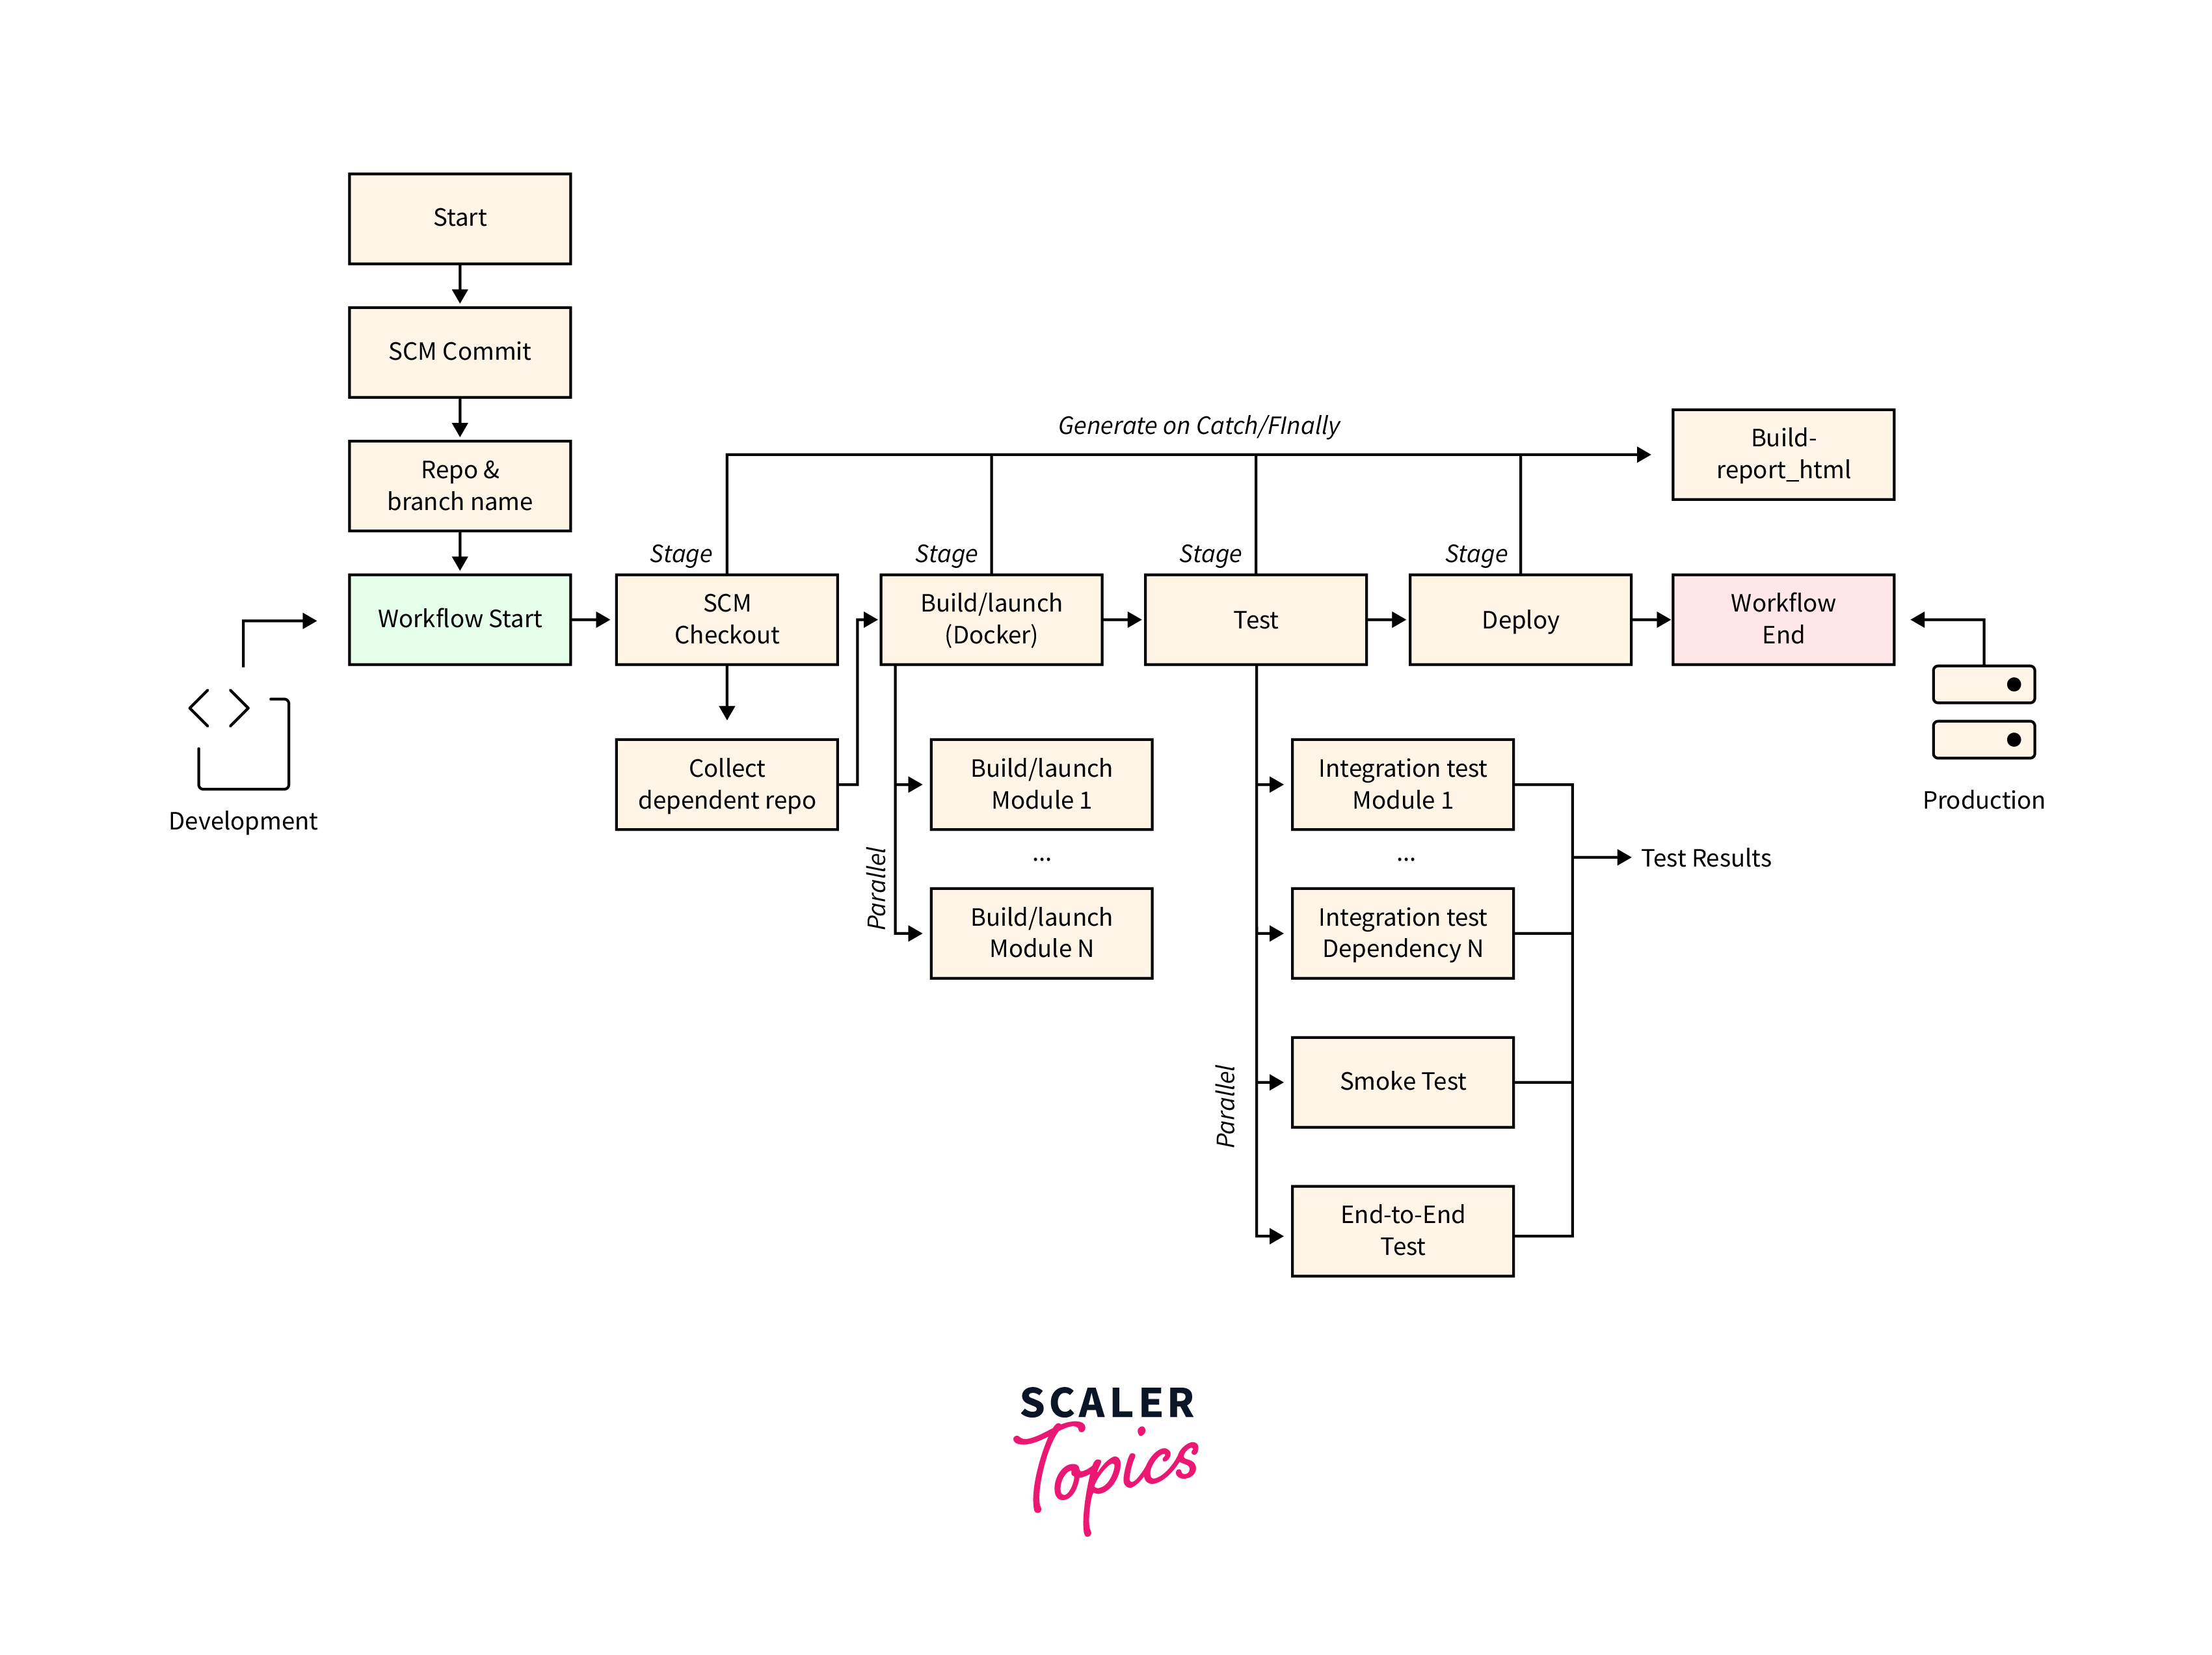
Here we have divided our works into different stages that needs to be triggered to take carry out the tasks mentioned. As per the requirements of the organization the Jenkinsfile will change.
Here's an overview of some steps that could be added in all the Stages as per requirements:
-
Build Stage:
In the Build stage, you'll specify the actions required to build your code. This typically involves compiling the source code, resolving dependencies, and creating any necessary artifacts or binaries. You can use build tools like Maven or Gradle to automate this process. Specify the necessary commands or scripts to execute the build in this stage. Here's an example for build codeIn this example, the stage('Build') block defines the build stage. Within the steps block, the following actions are performed:
- cleanWs():
Cleans the Jenkins workspace to ensure a fresh build environment. - checkout scm:
Checks out the source code from the version control system specified in the Jenkins configuration. - sh 'mvn clean package':
Executes the Maven build command to clean and package the code. You can replace this command with the appropriate build tool command for your project. - archiveArtifacts artifacts:
'target/*.jar'
We can modify the code as require to be used in the organization or build requirements such as using the appropriate build tool and specifying the correct file patterns for archiving the build artifacts.
- cleanWs():
-
Test Stage:
The Test stage is where you'll run various tests to ensure the quality and functionality of your code. This can include unit tests, integration tests, or any other types of tests that are relevant to your application. Use testing frameworks and tools appropriate for your programming language or technology stack. Configure the commands or scripts to execute the tests and generate test reports in this stage.In this example, the stage('Test') block defines the test stage. Within the steps block, the following actions are performed:
- sh 'echo "Setting up test environment..."':
This step sets up the test environment. You can customize this step based on your specific testing requirements, such as starting a test database or configuring test dependencies. - sh 'mvn test':
This command runs the unit tests using Maven. Replace this command with the appropriate test command for your project, depending on the testing framework or tool you are using. - sh 'mvn integration-test':
This command runs the integration tests using Maven. Modify this command based on your project's integration test setup. - junit 'target/surefire-reports/*.xml':
This step generates test reports using the JUnit plugin. It specifies the path pattern for the XML test result files generated by the unit tests. Adjust the file path pattern to match your project's test result file location.
- sh 'echo "Setting up test environment..."':
-
Deploy Stage:
The Deploy stage is responsible for deploying your application to the desired environment. This can involve packaging the build artifacts, configuring deployment targets (e.g., servers, containers), and executing deployment scripts. You may utilize infrastructure-as-code tools like Ansible or Docker to automate the deployment process. Specify the necessary commands or scripts to deploy your application in this stage.In the Deploy stage, the Jenkinsfile deploys the application to the desired environment. The provided examples demonstrate deploying to a remote server via SSH and deploying to a container orchestration platform like Kubernetes. You need to replace these examples with the actual commands or scripts required to deploy your application.
The post section defines actions to be taken based on the result of the pipeline, which include sending notifications or triggering downstream jobs based on the success or failure of the deployment. We will need to configure it as per our requirements and avoid using passwords or hard coding tokens in the file for best practices.
Working with Your Jenkinsfile
The following sections provide details about handling: specific Pipeline syntax in Jenkinsfile and features and functionality of Pipeline syntax which are essential in building an application or Pipeline project.
Certainly! Here's an explanation of specific Pipeline syntax in Jenkinsfile and some essential features and functionality of Pipeline syntax:
- Stages and Steps:
In a Jenkinsfile, you define your pipeline as a series of stages, and each stage contains one or more steps. Stages represent distinct phases of your pipeline, such as build, test, deploy, etc. Steps define the individual actions or tasks to be executed within each stage. Steps can include shell commands, script execution, or calls to various Jenkins plugins or external tools. - Agent:
The agent directive is used to allocate a specific type of executor or Jenkins agent for running the pipeline. The agent can be specified as any to allow the pipeline to run on any available agent, or you can specify a specific label or agent type (e.g., docker, kubernetes, aws, etc.) based on your project requirements. - Environment Variables:
You can define environment variables specific to your pipeline using the environment directive. These variables can be accessed and used within your pipeline stages and steps. Environment variables are useful for passing parameters, credentials, or configuring specific behavior for different stages of the pipeline. - Checkout:
The checkout step is used to fetch the source code from a version control system (e.g., Git, SVN) into the Jenkins workspace. This step ensures that the latest code is available for building, testing, and deploying in subsequent stages. - Shell Steps:
Shell steps allow you to execute shell commands within your pipeline. You can use the sh step to run commands like compiling code, running tests, executing deployment scripts, or performing any other necessary tasks in your pipeline. - Notifications:
Pipeline syntax allows you to send notifications or trigger actions based on the success or failure of specific stages or the overall pipeline. You can use steps like echo to print custom messages, emailext to send email notifications, or slackSend to send notifications to Slack channels. Additionally, you can use the post section to define actions to be performed based on the pipeline's result, such as sending notifications, triggering downstream jobs, or performing cleanup tasks. - Conditional Statements:
Pipeline syntax supports conditional statements like if, else, and when to control the flow of execution based on certain conditions. You can use these statements to perform different actions or skip stages based on the outcome of previous steps or environment variables. - Error Handling:
Pipeline syntax allows you to handle errors or failures gracefully. You can use try-catch blocks to catch and handle specific exceptions or failures within your pipeline. Additionally, the catchError step can be used to catch any error or failure that occurs during the execution of a specific block of steps and take appropriate actions. - Artifacts and Archiving:
Pipeline syntax supports archiving and storing artifacts generated during the build or test stages. You can use the archiveArtifacts step to specify file patterns or directories to be archived. These artifacts can be later accessed for deployment, publishing, or as a build artifact for downstream jobs.
These are some of the key features and functionality of Pipeline syntax in a Jenkinsfile. By leveraging these capabilities, you can create flexible, robust, and customizable pipelines for building and deploying your applications or projects.
Post Block in Jenkinsfile
The post block in Jenkinsfile allows you to define actions to be performed after the execution of the entire pipeline or specific stages. It helps to handle the outcome of the pipeline, whether it succeeds or fails. Post Block consists of various sub-blocks that define actions based on different conditions. The three important sub-blocks are always, success, and failure. Let's explore each of them:
- always:
The always block is executed regardless of the result of the pipeline or any specific stage. It ensures that the specified actions are always performed, whether the pipeline succeeds, fails, or encounters any other outcome. It can be used for cleanup tasks, finalizing resources, or executing any necessary actions that should occur regardless of the pipeline's result.
- success:
The success block is executed only if the entire pipeline, including all stages, completes successfully without any failures or errors. It allows you to define specific actions that should occur when the pipeline succeeds.
- failure:
The failure block is executed if any stage in the pipeline fails or encounters an error. It allows you to define actions that should occur when the pipeline fails. This block is useful for performing actions such as sending notifications, creating failure reports, or triggering additional actions to handle the failure.
It's important to note that the always block is executed regardless of the pipeline result, whereas the success block is only executed if the entire pipeline succeeds, and the failure block is only executed if any stage in the pipeline fails. Also by utilizing the post block and its sub-blocks, you can define specific actions to be performed after the pipeline execution, handling different scenarios based on the pipeline's success or failure.
Triggers Block in Jenkinsfile
The triggers block in a Jenkinsfile allows you to define events or conditions that trigger the execution of your pipeline. Triggers specify when the pipeline should run, whether it's on a specific schedule, a code commit, or other events.
The triggers block is typically used at the top level of the Jenkinsfile and can include one or more trigger configurations. Here are some commonly used triggers:
- Schedule Trigger:
The cron trigger allows you to schedule the pipeline to run on a specific schedule using cron syntax. It defines a cron-like expression to specify the time and frequency of pipeline execution. For example, to run the pipeline every day at 8:00 AM, you can use:
- SCM Trigger:
The pollSCM trigger periodically checks the configured version control system (VCS) for changes and starts the pipeline if any changes are detected. This trigger is useful when you want to run the pipeline whenever there are new commits or changes in the VCS repository. For example:
The H/15 * * * * cron expression represents polling the SCM every 15 minutes.
- GitHub Trigger:
The githubPush trigger allows the pipeline to start when changes are pushed to the associated GitHub repository. This trigger is particularly useful when you want to trigger a build whenever a developer pushes code changes. For example:
- GitLab Trigger:
The gitlab trigger starts the pipeline when specific events occur in a GitLab repository. You can configure the trigger to respond to events such as push events, merge requests, or pipeline events. Here's an example that triggers the pipeline on every push event:
- Parameters Trigger:
The parameters trigger allows you to define parameters that can be passed to the pipeline when manually triggering its execution. Parameters provide a way to customize the behavior or inputs of your pipeline, such as specifying a specific version to deploy or selecting a target environment. For example:
This configuration allows users to provide a deploy version and select the target environment when triggering the pipeline manually.
You can combine multiple triggers within the triggers block based on your project's requirements. Each trigger can define its own conditions, schedules, or event listeners to control when the pipeline should execute.
By utilizing the triggers block and its available triggers, you can configure your pipeline to automatically start based on specified events or schedules, or allow manual triggering with customizable parameters.
Parameters Block in Jenkinsfile
The parameters block in a Jenkinsfile allows you to define parameters that can be passed to your pipeline when manually triggering its execution. Parameters provide a way to customize the behavior or inputs of your pipeline, such as specifying a specific version to deploy or selecting a target environment.
The parameters block is typically used at the top level of the Jenkinsfile and can include one or more parameter configurations. Here are some commonly used parameter types:
- String Parameter:
The stringParam allows the user to input a text value. It can be used to capture information such as a version number, a file path, or any other text-based input. Here's an example:
In this example, the VERSION parameter is defined with a default value of '1.0'. The user can override this value when manually triggering the pipeline.
- Choice Parameter:
The choiceParam allows the user to select a value from a predefined list of choices. It is useful when you want to limit the input options for a parameter. Here's an example:
In this example, the ENVIRONMENT parameter is defined with a set of choices: 'dev', 'qa', and 'prod'. The user can select one of these options when manually triggering the pipeline.
- Boolean Parameter:
The booleanParam provides a checkbox option for the user to select or deselect. It is useful when you need a parameter that represents a true/false or on/off option. Here's an example:
In this example, the CLEAN_BUILD parameter is defined as a boolean parameter with a default value of true. The user can choose whether to perform a clean build or not when manually triggering the pipeline.
- Password Parameter:
The passwordParam hides the entered value as a password, which is useful when sensitive information needs to be passed as a parameter. Here's an example:
In this example, the DB_PASSWORD parameter is defined as a password parameter. The entered value will be hidden from the user when manually triggering the pipeline.
- File Parameter:
The fileParam allows the user to upload a file as a parameter. It is useful when you need to pass a file to the pipeline, such as a configuration file or a test data file. Here's an example:
In this example, the CONFIG_FILE parameter allows the user to upload a file when manually triggering the pipeline.
You can combine multiple parameter configurations within the parameters block based on your project's requirements. Each parameter configuration includes the name, type, default value (if applicable), and description.
By utilizing the parameters block and its available parameter types, you can create customized pipelines that allow users to provide inputs and configure the pipeline execution based on their specific needs.
Environment Block in Jenkinsfile
The environment block in a Jenkinsfile allows you to define environment variables that will be available to all stages and steps within the pipeline. These variables can be used to configure specific behavior, store credentials, or pass information between stages.
The environment block is typically used at the top level of the Jenkinsfile and can include one or more environment variable assignments. Here's an example:
In this example, the environment block defines two environment variables: MY_VARIABLE and ANOTHER_VARIABLE. These variables can be accessed and used throughout the pipeline.
You can also reference existing environment variables in the environment block or use credentials stored in the Jenkins credential store. Here are a couple of examples:
- Referencing Existing Environment Variables:
In this example, the value of MY_VARIABLE is set to the value of an existing environment variable called EXISTING_VARIABLE.
- Using Credentials:
In this example, the value of DATABASE_PASSWORD is set to the value stored in the Jenkins credential store with the ID 'my-credentials-id'. This allows you to securely retrieve and use sensitive information like passwords or API keys within your pipeline.
Environment variables defined within the environment block can be accessed in subsequent stages or steps using their names. For example:
In this example, the value of MY_VARIABLE is echoed within the My Stage stage.
You can define multiple environment variable assignments within the environment block, as needed. These variables will be available throughout the pipeline's execution.
By utilizing the environment block and its environment variable assignments, you can configure and use variables that affect the behavior and configuration of your pipeline.
Conclusion
- Jenkinsfile is a powerful tool in Jenkins that allows developers to define and manage their CI/CD pipelines as code.
- By using a Jenkinsfile, teams can achieve version control, automation, and collaboration in their CI processes.
- Jenkinsfile is a text-based script that defines the entire CI/CD pipeline in Jenkins.
- It allows developers to define build, test, and deployment steps, specify dependencies, and configure aspects of the CI/CD process.
- Advanced features like post, triggers, parameters, and environment blocks enhance the functionality of Jenkinsfile.
- The post block defines actions to be performed after the pipeline execution based on its result.
- The triggers block specifies events or conditions that trigger the pipeline's execution.
- The parameters block allows customization of pipeline behavior by defining parameters that can be passed when manually triggering the pipeline.
- Overall, Jenkinsfile provides a flexible, reproducible, and automated approach to CI/CD pipeline management, leading to faster and higher-quality software delivery.