MongoDB on Heroku
Overview
This article will cover the process of deploying MongoDB on Heroku, but before we delve into the details, let's take a brief look at what this topic involves.
Deploying MongoDB on Heroku involves setting up a cloud-based MongoDB database instance that can be accessed and manipulated via a web interface or API. Heroku is a popular Platform as a Service (PaaS) that offers a convenient way to deploy and manage web applications in the cloud. The process of deploying MongoDB on Heroku is simple and can be completed with minimal steps. Using Heroku, the management of your MongoDB instance in the cloud becomes effortless, and you can benefit from various features such as automatic scaling, logging, and monitoring.
So let us now begin with the main agenda of the article, Deploying MongoDB on Heroku.
What is Heroku?
Heroku is a cloud-based platform that allows developers to build, deploy, and manage applications easily. It provides a fully managed, scalable, and secure infrastructure for running web applications, without requiring developers to manage the underlying servers or infrastructure.
Developers can use Heroku to deploy web applications written in various programming languages, such as Ruby, Python, Node.js, Java, PHP, and more. Heroku also supports a wide range of third-party add-ons, such as databases, caching, and logging, which can be easily integrated into applications.
Heroku's core functionality is based on a containerization technology called dynos. Dynos are lightweight, isolated environments that can run a single process or application instance. Heroku allows developers to easily scale their application by adding or removing dynos as needed, without having to worry about infrastructure management.
Heroku also provides various tools and services to help developers manage their applications, such as the Heroku Command Line Interface (CLI), which allows developers to deploy and manage their applications from a command line interface, and the Heroku Dashboard, which provides a web-based interface for managing applications.
Overall, Heroku is a popular platform for developers who want a simple and scalable way to deploy and manage web applications.
Deploy MongoDB on Heroku
Configuring a MongoDB database on the Heroku platform, which is a cloud-based platform for building, deploying, and managing web applications, is referred to as deploying MongoDB on Heroku. Developers can use various tools and services provided by Heroku to deploy, run, and scale their applications, including MongoDB databases. This process requires the creation of a new MongoDB instance or connection to an existing one, along with the configuration of access controls and necessary settings. Once the MongoDB database is set up on Heroku, it can be used by applications deployed on the platform.
Pre-requisites
This guide requires that you possess prior knowledge and experience using MongoDB to develop applications. You should also be well-versed in deploying Heroku applications and have the Heroku CLI installed. Additionally, you must have a basic understanding of Git and have it installed on your system. It is important to ensure that all of these requirements are met before proceeding with the tutorial.
Setting Up Atlas Cluster
Here are five steps to set up your Atlas cluster:
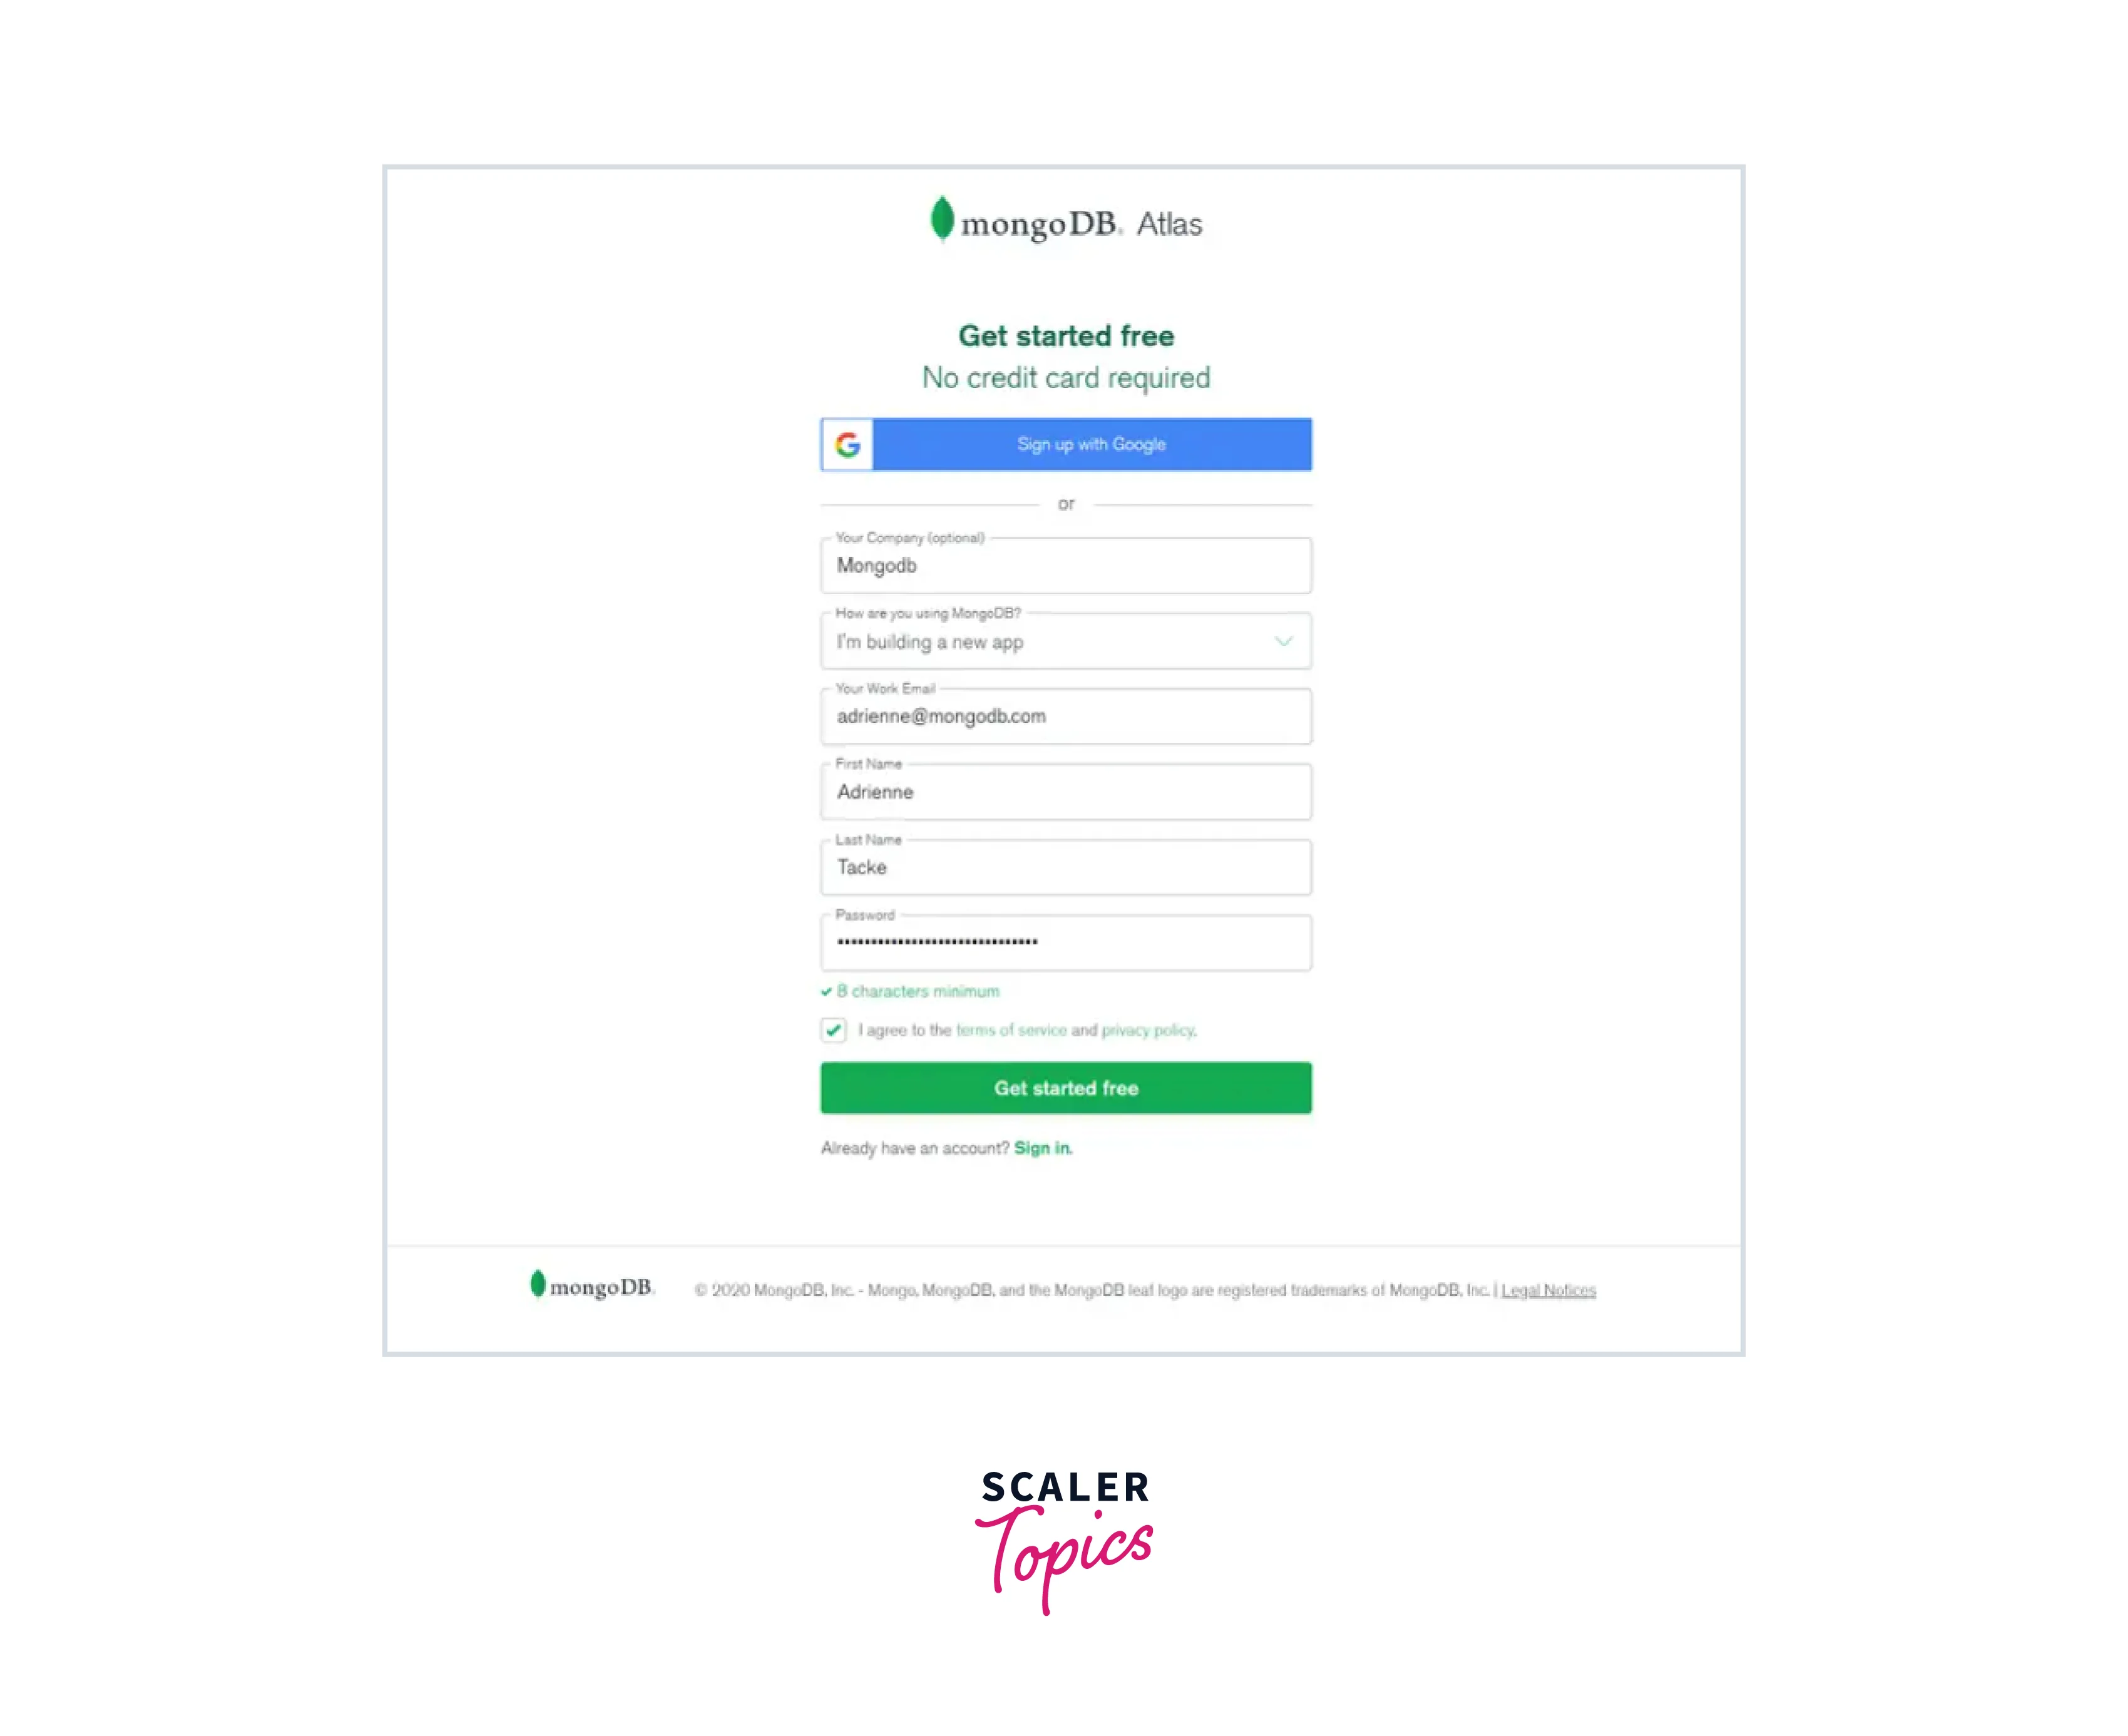
Step 1: Create an Atlas account:
Firstly you will create your account on MongoDB Atlas, for that navigate to the MongoDB Atlas and follow the prompts to provide your details such as your name, email address, and password.
Step 2: Build a new cluster:
After creating your account, you can start creating your new MongoDB Atlas cluster. Choose the "Build a New Cluster" option and then select your preferred cloud service provider, region, and other relevant details.
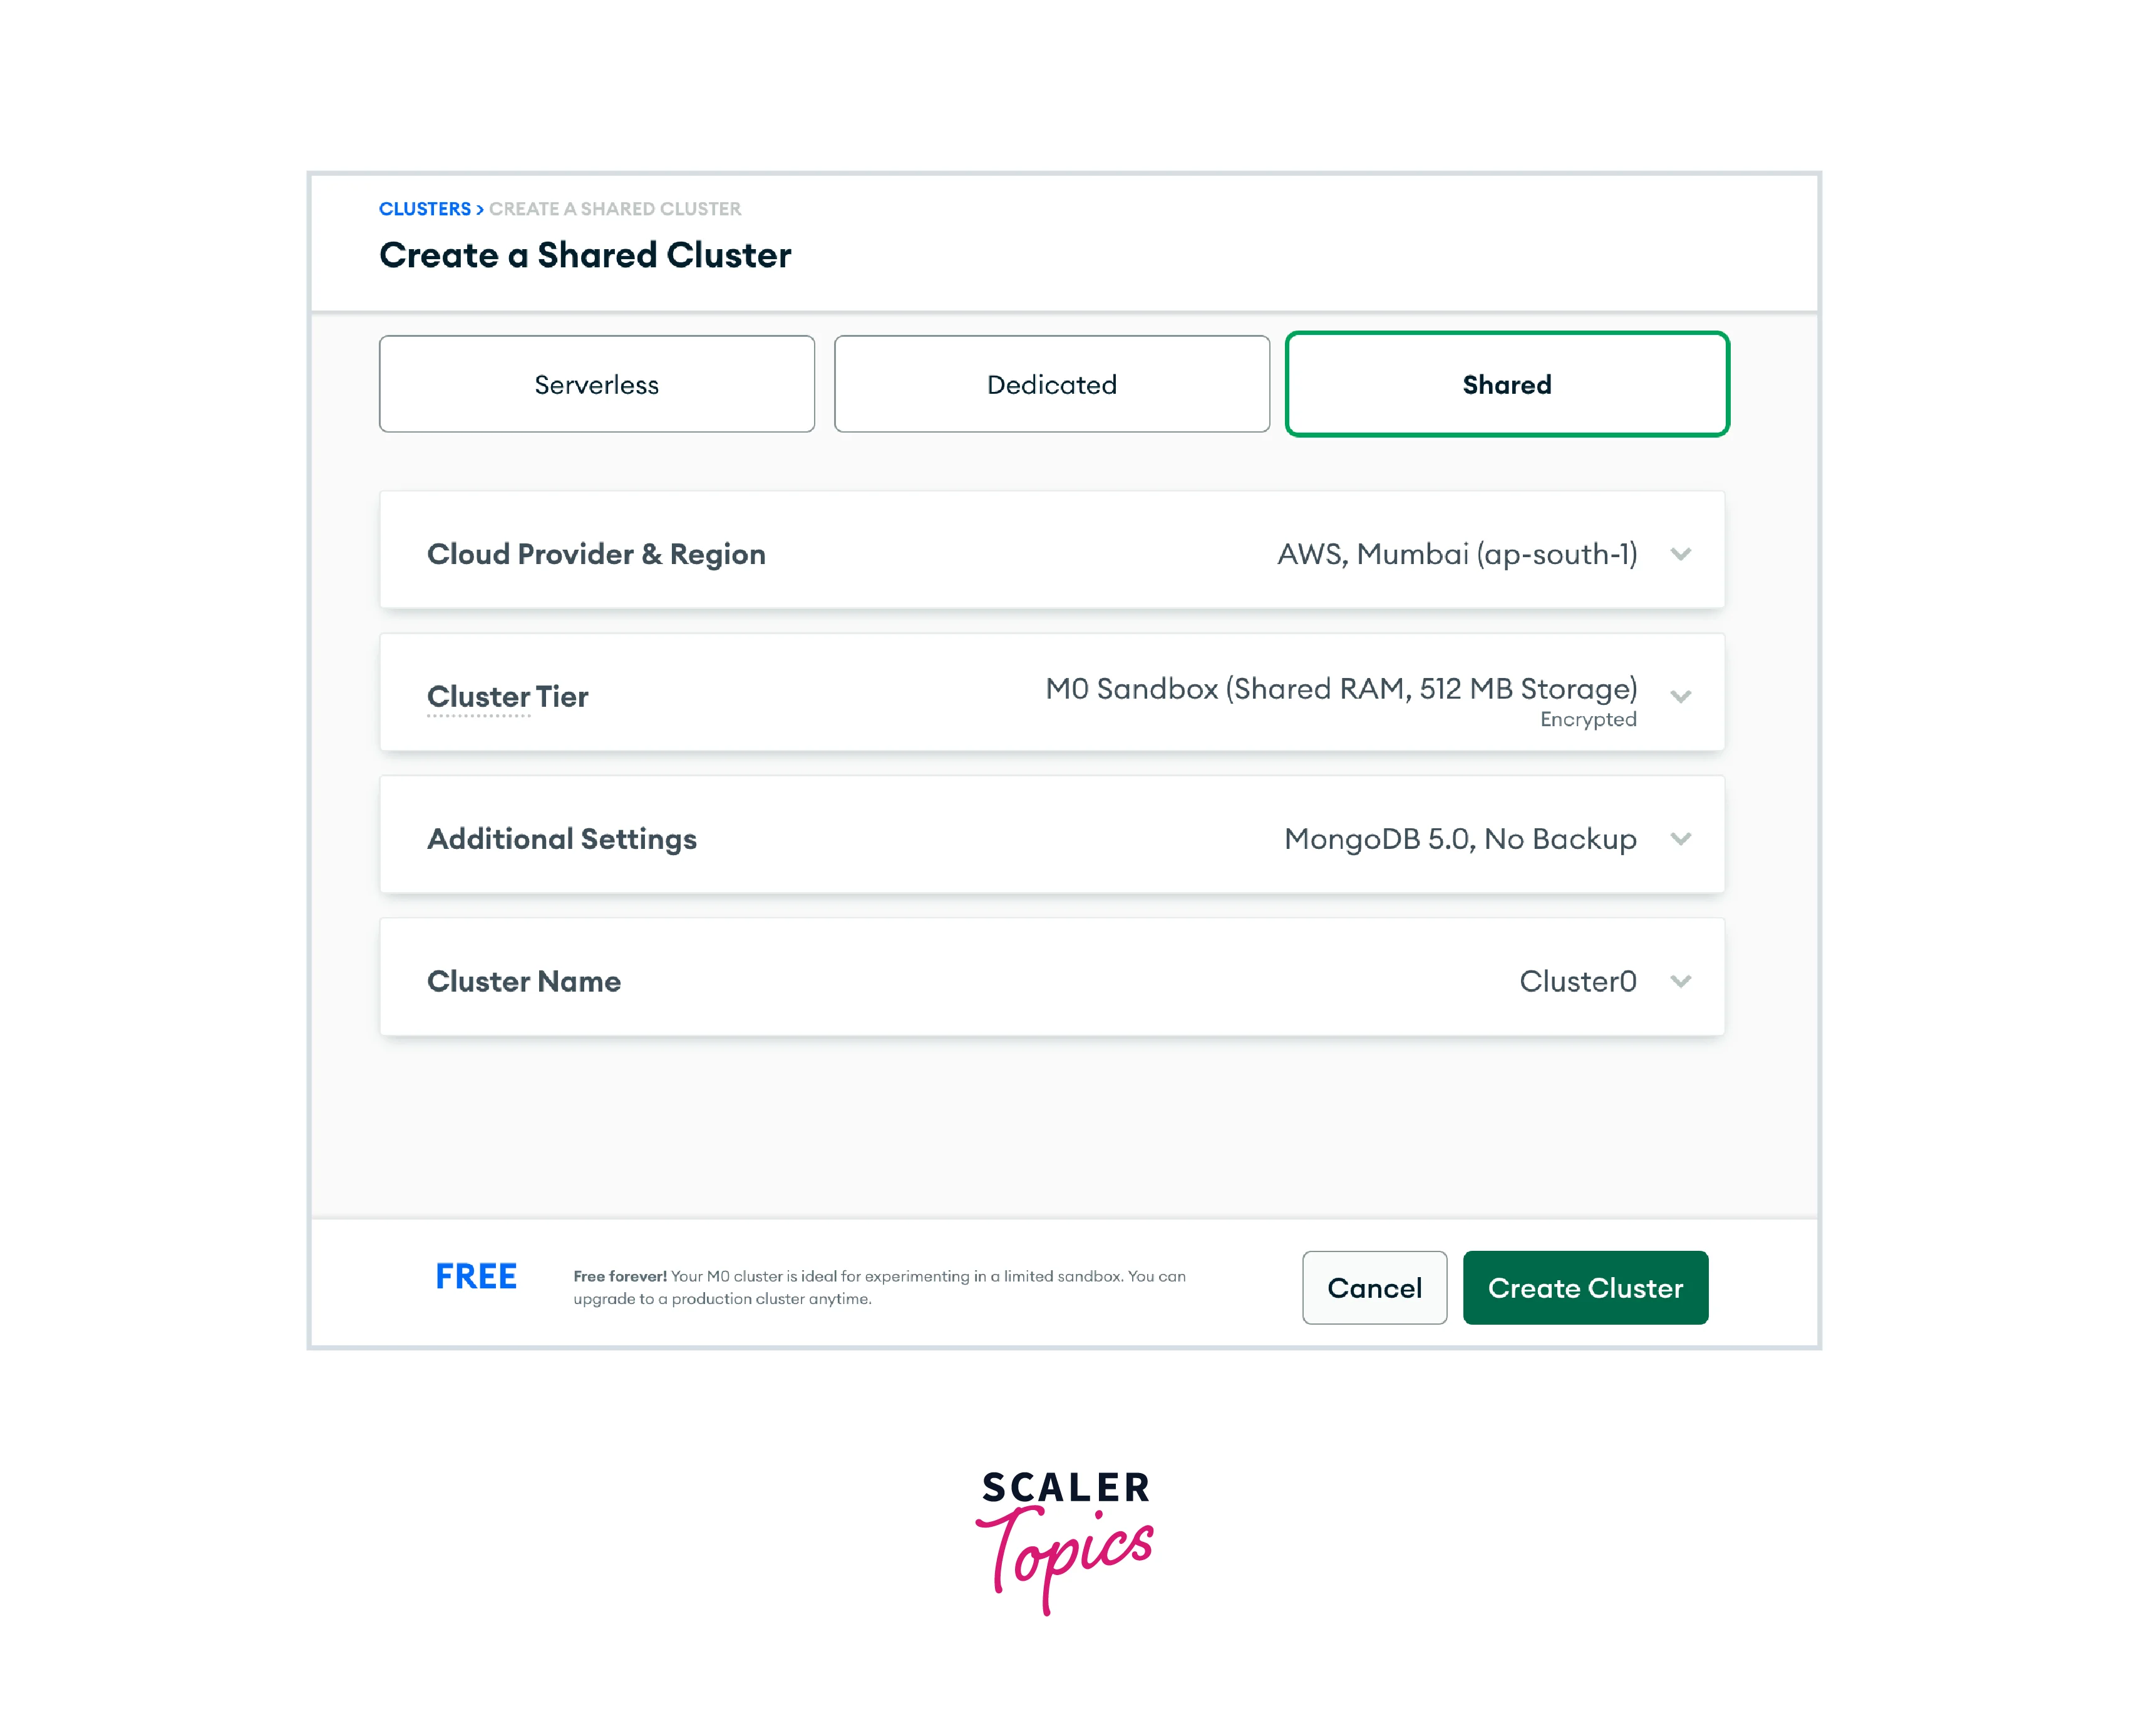
Step 3: Choose your cluster settings:
Now let us configure your cluster settings, in which you can configure different properties of your cluster such as its name, the number and type of nodes, and any additional features you would like to enable. Let us look at those in detail:
-
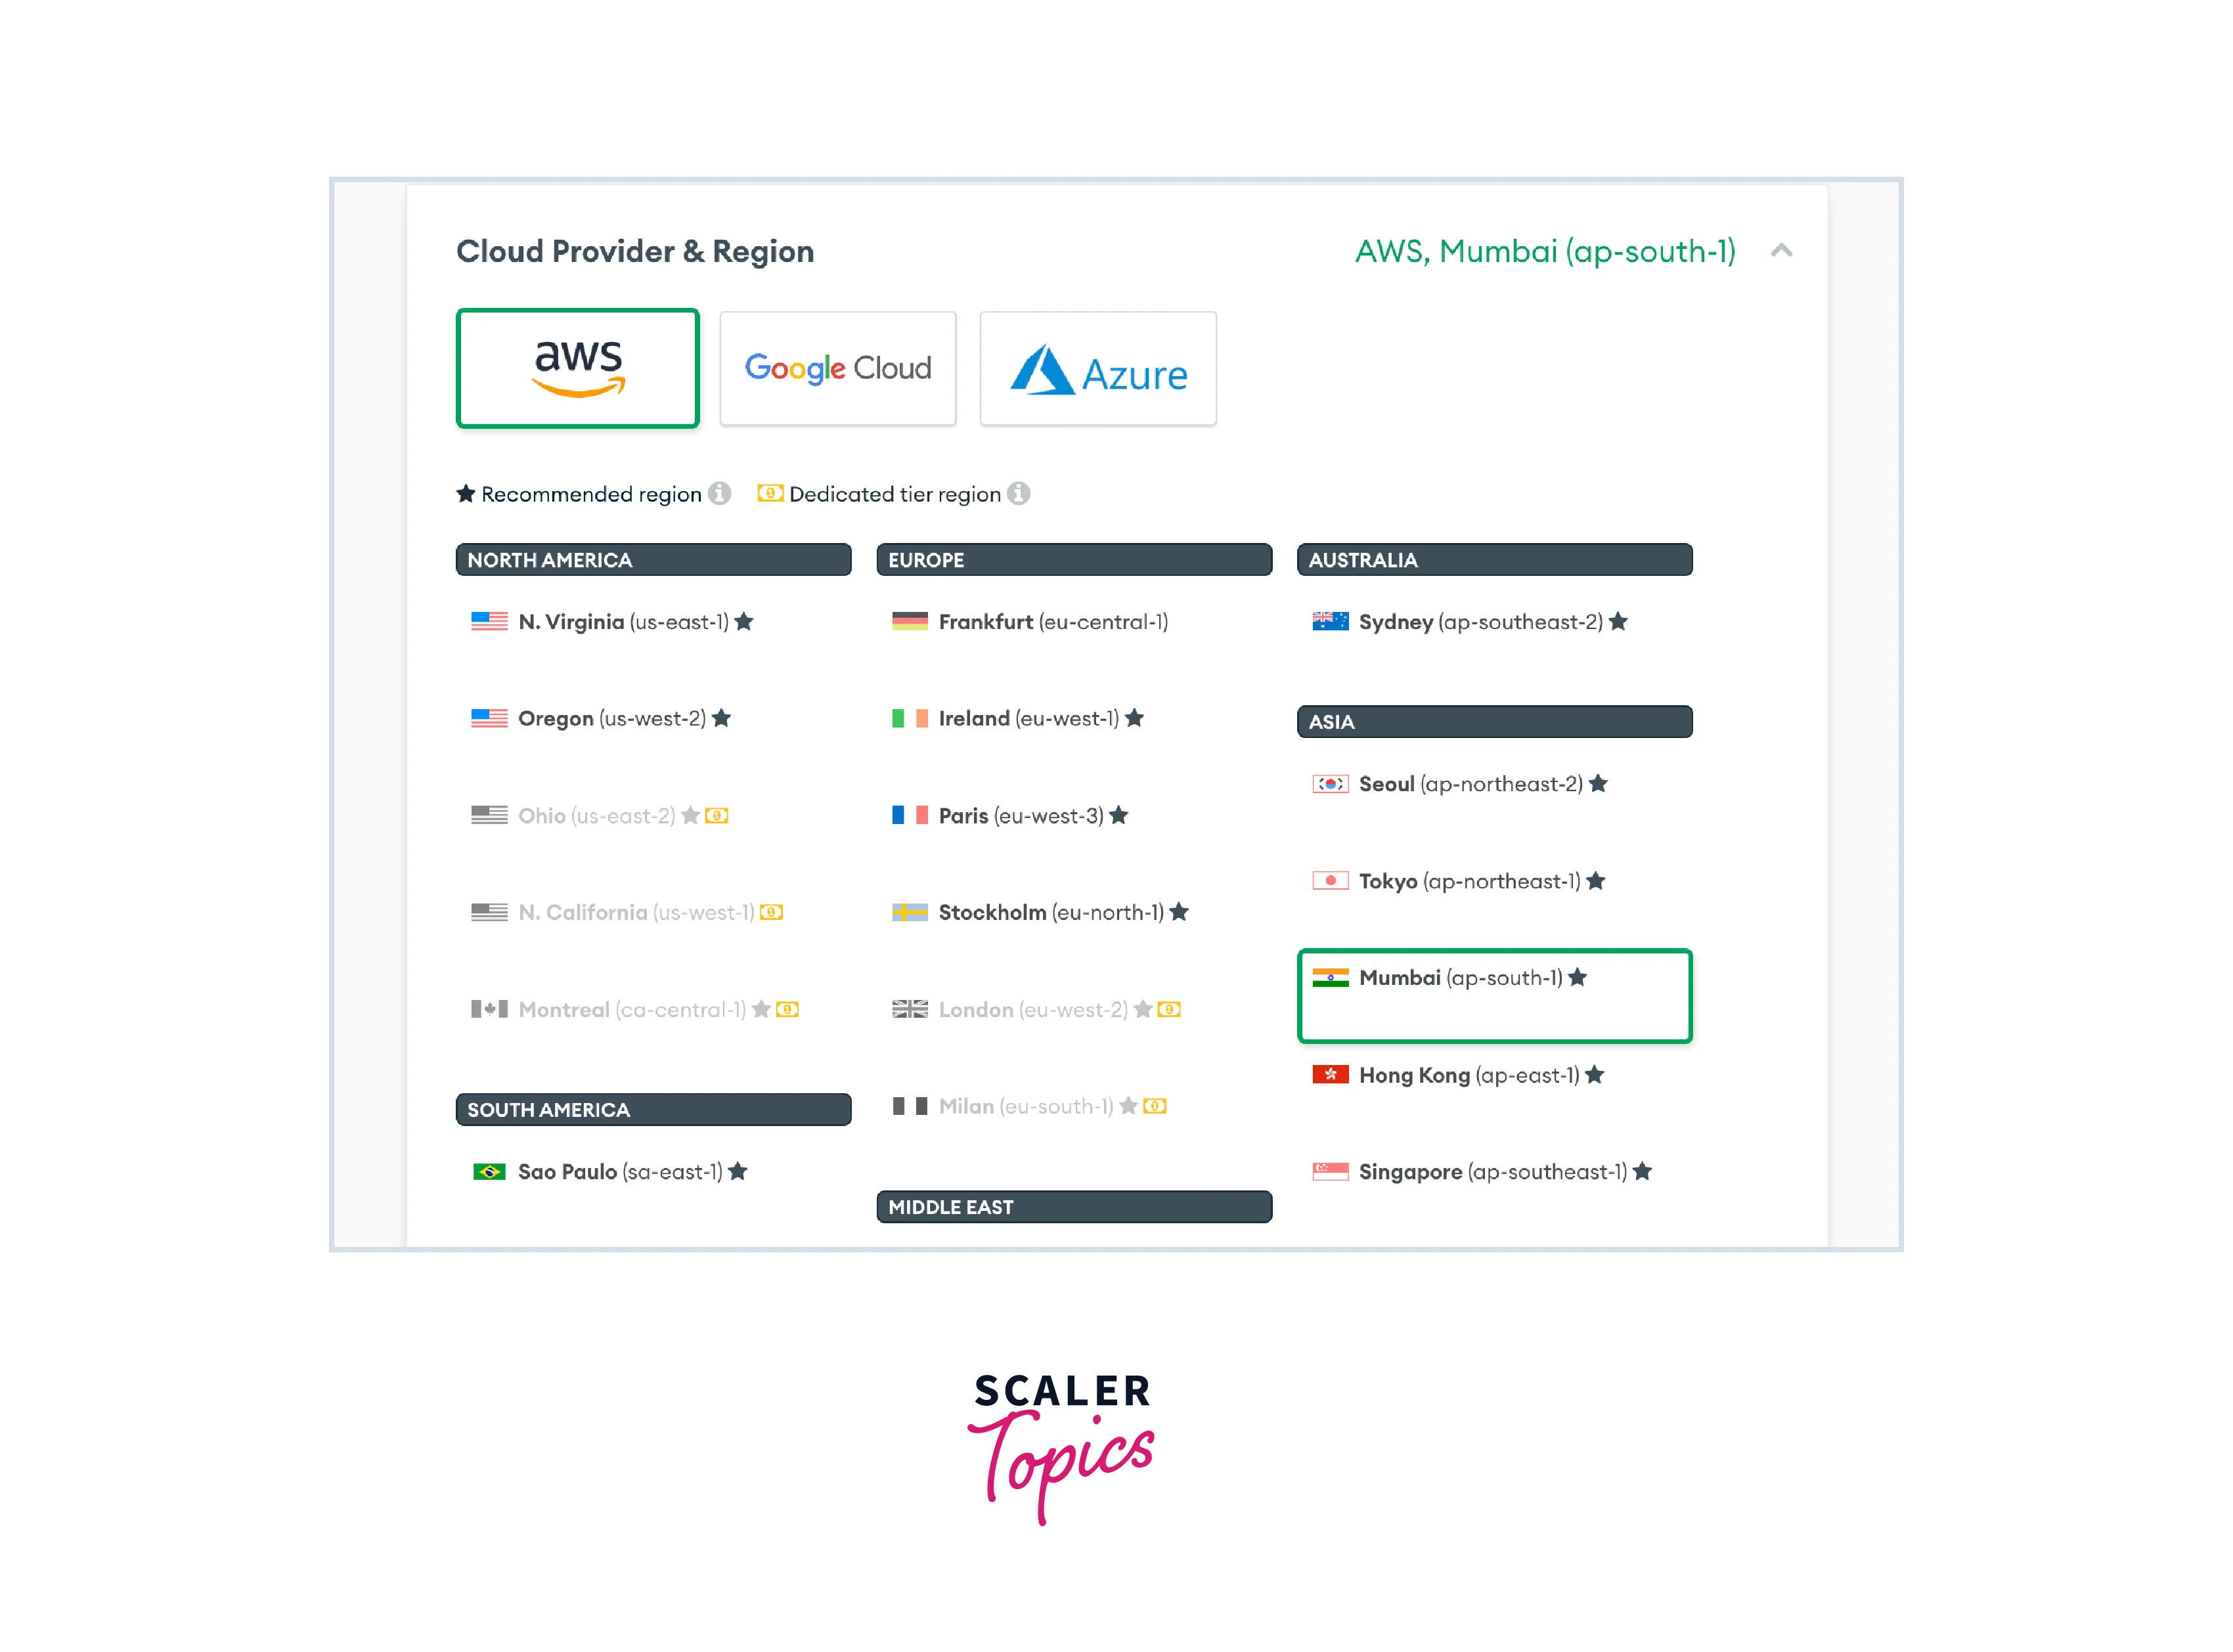
Cloud provider and region: Select the region where you want your cluster to be deployed, ensuring that you choose the region which is near your application, preferably the region where you have built your application, to reduce delay. In this tutorial, we will choose the AWS / Mumbai (ap-south-1) region as the cloud service, since Heroku deploys its server there.
-
Cluster tier: You will see the available cluster tiers for the shared clusters option. A comparison of RAM, storage, vCPU, and base price between the tiers is available to assist you in selecting the appropriate tier. For this tutorial, leave the default M0 Sandbox tier selected.

-
Additional settings: You could have access to certain more choices based on the tier you select. The MongoDB version you want to use for deployment and, for M2 clusters and higher, backup choices, are included here. Choose MongoDB 5.0 as the most recent version for this lesson.

-
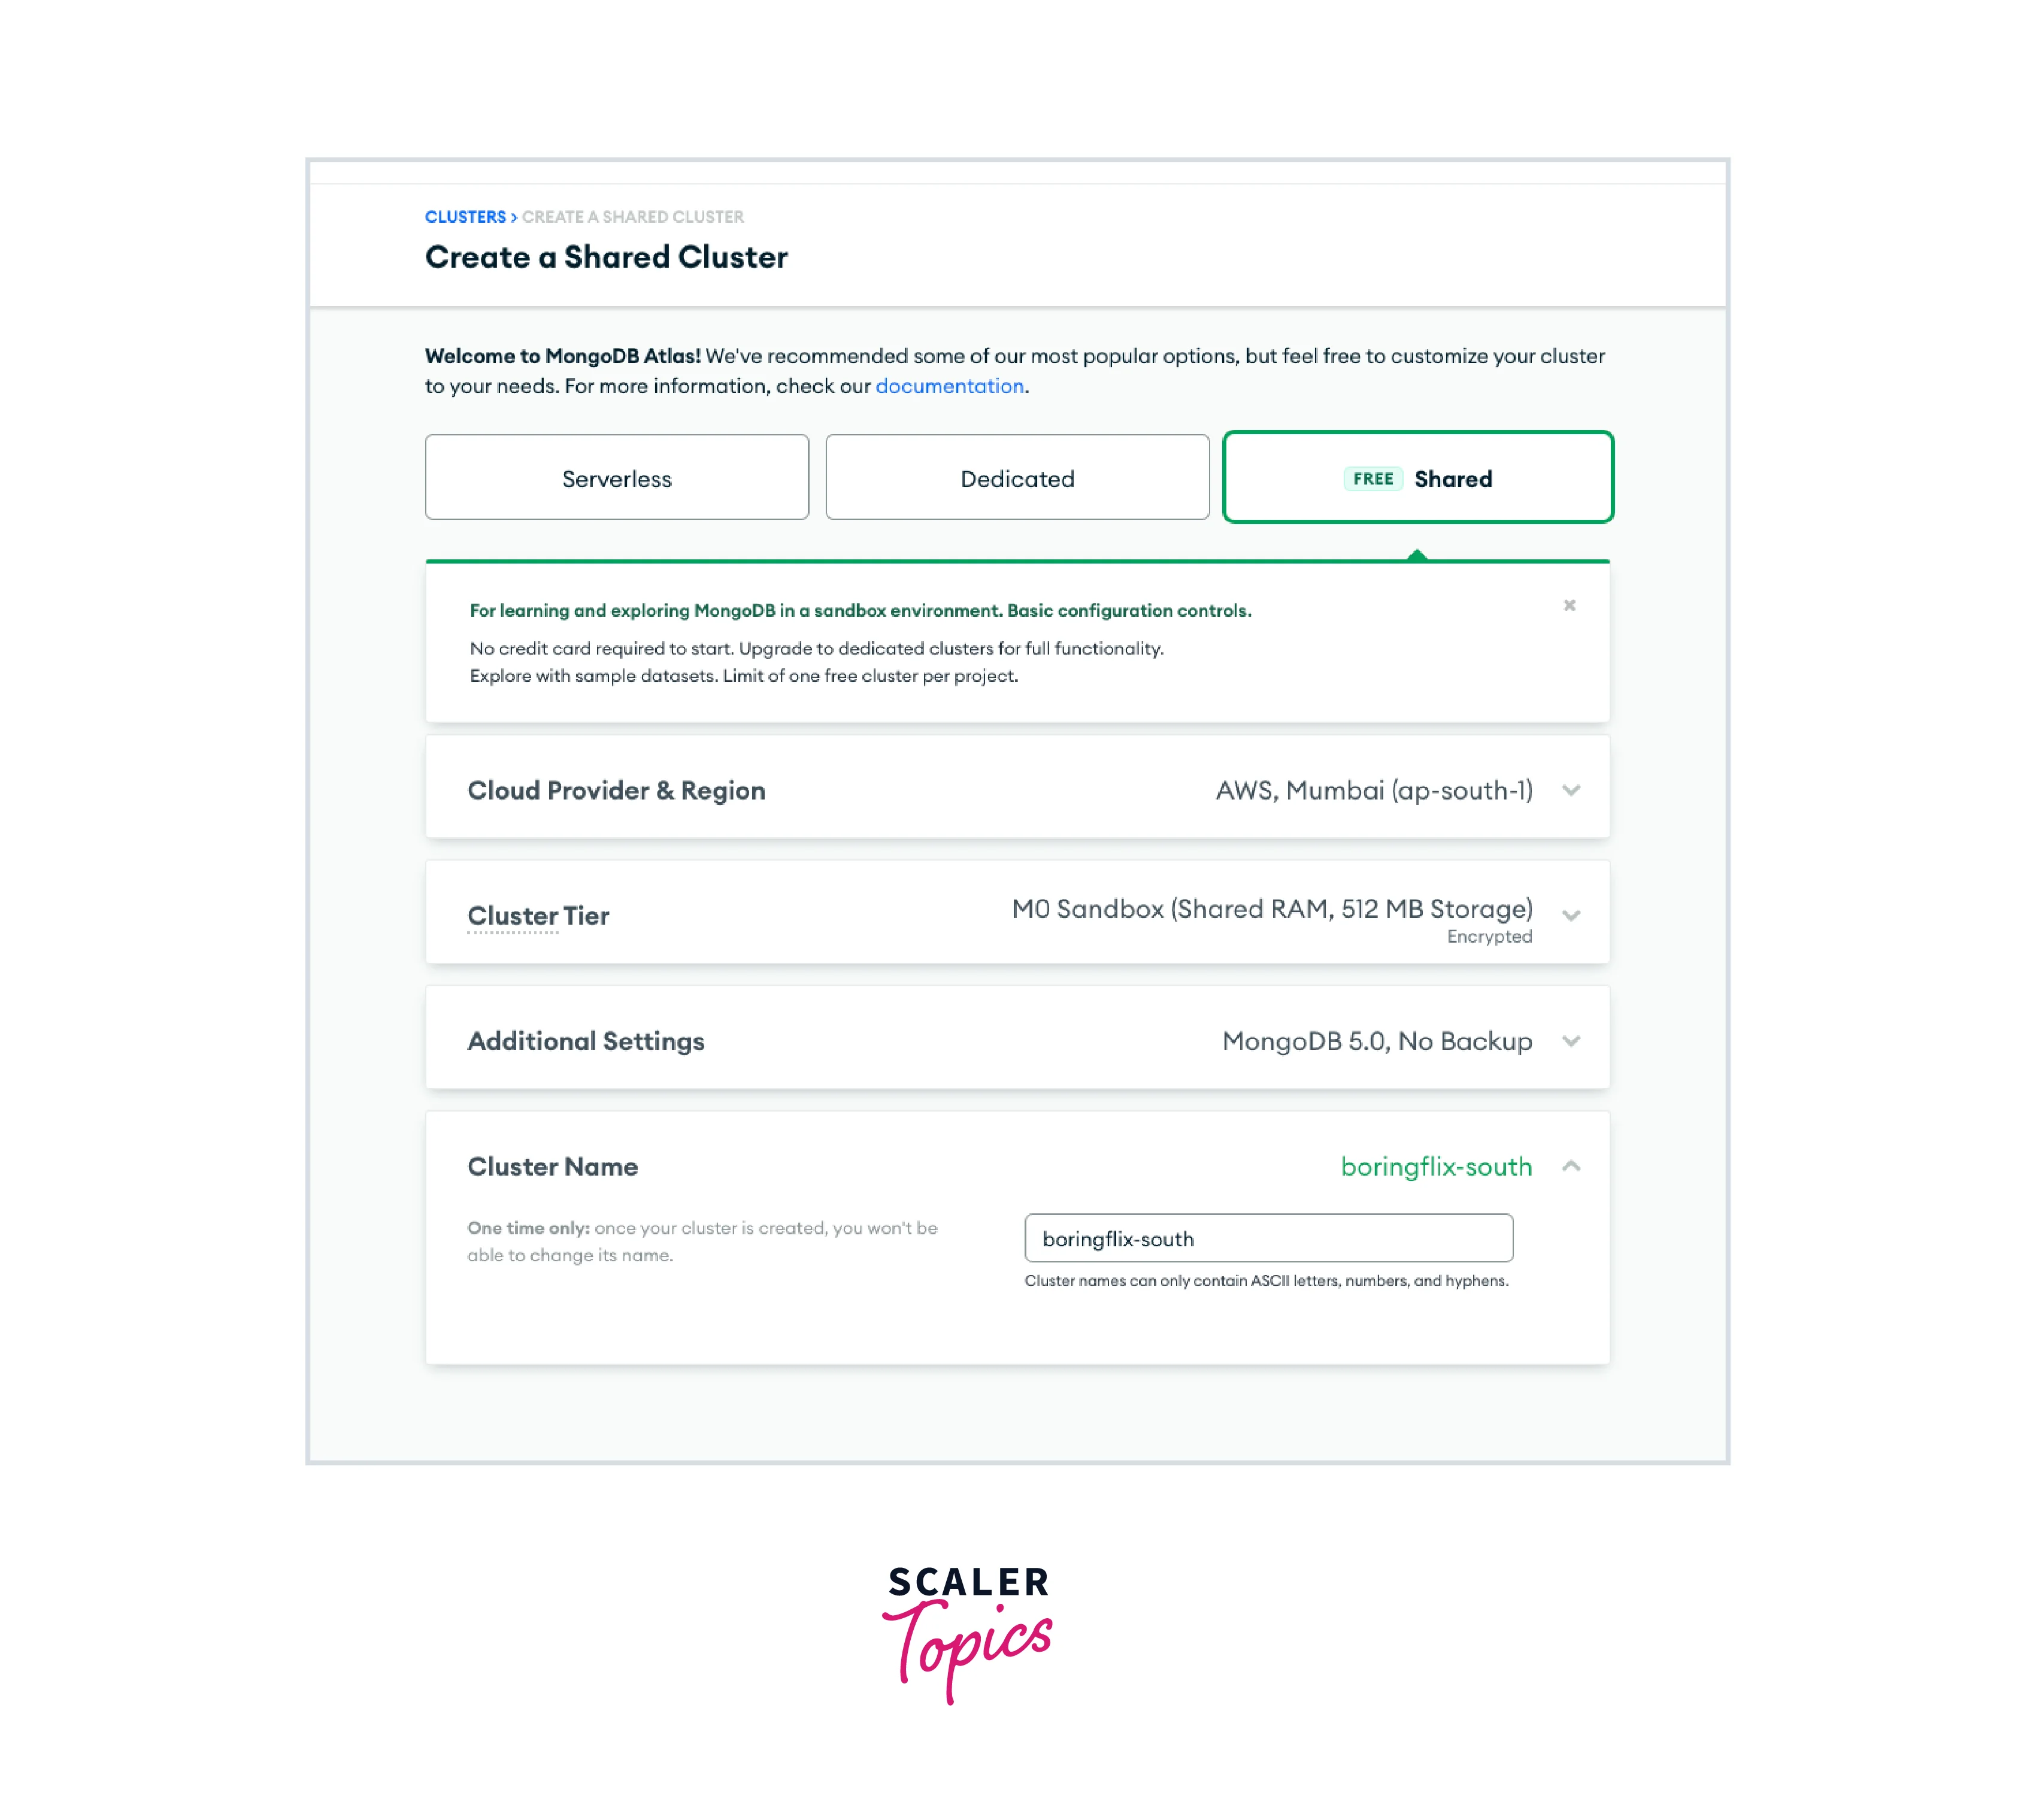
Cluster name: Finally, give a name to your cluster, make sure that you cannot change it once you created the cluster. In this tutorial, the name of our cluster will be boringflix-south to help identify the region and project it supports.

-
Before clicking the Create Cluster button, review your options one last time to ensure accuracy.
Step 4: Create a user for your database in your cluster:
To access your cluster in MongoDB Atlas, you need to create a user for your database with the following steps:
- Go to the Database Access section in the left side nav bar under the Security option.
- Click Create a new Database User.
- Select the authentication method as Password and give a username and password for the user.
- You can also choose to generate a strong password automatically in Atlas, which is highly recommended for security reasons.
- Once you have created the database user, you can use its credentials to connect to your MongoDB Atlas cluster.
Step 5: To access your cluster, grant authorized IP addresses:
To grant authorized IP addresses access to your cluster in MongoDB Atlas, follow these steps:
- Navigate to the "Network Access" section in the left-hand navigation bar.
- Click on the "Add IP Address" button.
- By selecting "Add IP Address" you can add a single IP address, or by selecting "Add IP Address Range" you can add a range of IP addresses.
- In the given field(s), input the IP address or a range of IP addresses that you want to authorize access to.
- You can also add a description for this IP address (optional).
- Click on the "Confirm" button to save the changes.
- By following these steps, you have now been granted access to the specified IP addresses in your MongoDB Atlas cluster.
Well done! You have successfully set up your Atlas cluster!
Using config vars for Configuring Heroku to Point to MongoDB Atlas Cluster
The setup process for Atlas-backed Heroku applications is not only quick but also exciting. However, the following section is even more thrilling. Setting up such an application is straightforward - you only need to create a config var at the application level that stores the connection string for your cluster. Once you've set it up, you can securely access the config var within your application.
Step 1: Log into the Heroku CLI
Executing the above command will launch the Heroku login page in your web browser. If you're already logged in, you can simply click on the "Log in" button. Alternatively, you can use the -i flag to log in via the command line.
Step 2: Clone The Demo App
To proceed with this tutorial, you need to clone the demo Node application that uses MongoDB Atlas and is an app you want to deploy to Heroku. Once you've cloned it, navigate to its directory.
Step 3: Create the Heroku app
The app's name is boringflix.
Getting Atlas Cluster Connection String
To proceed with this tutorial, you will require a demo Node application that utilizes MongoDB Atlas and is ready to deploy to Heroku. Once you have the application, navigate back to your Atlas cluster dashboard to obtain your connection string. Click on the Connect button and select the Connect your application option. You will find the connection string that is needed to connect to your cluster. Copy and paste it into an editor as we need to modify it before setting it to a Heroku config variable. The username of the previously created database user is conveniently included by Atlas. To make the connection string valid, substitute <password> with your database user's password and <dbname> with sample_mflix, the sample dataset our demo application will use. After you have modified the connection string, proceed to configure the Heroku application to utilize it.
Note: If you do not have access to your database user's password, you can generate a new one and use it in your connection string. However, make sure to update it if you generate a new one in the future. You can quickly access the generated password by navigating to the Database Access section and clicking "Edit" on the corresponding database user. Then, select "Edit Password" and use the "Autogenerate Secure Password" feature to generate a new password.
Set a MONGODB_URI config var
After forming the connection string, the next step is to save it in a Heroku config variable. To do this, set the connection string to a config var called MONGODB_URI using the command:
Keep in mind two things while executing this command:
- The command should be written in a single line.
- As our connection string contains special characters, it needs to be enclosed within quotes.
With this step, your Atlas cluster's connection string is now securely stored as a Heroku config variable. This ensures that you can access it without compromising its security once your application is deployed on Heroku.
Alternative Way:
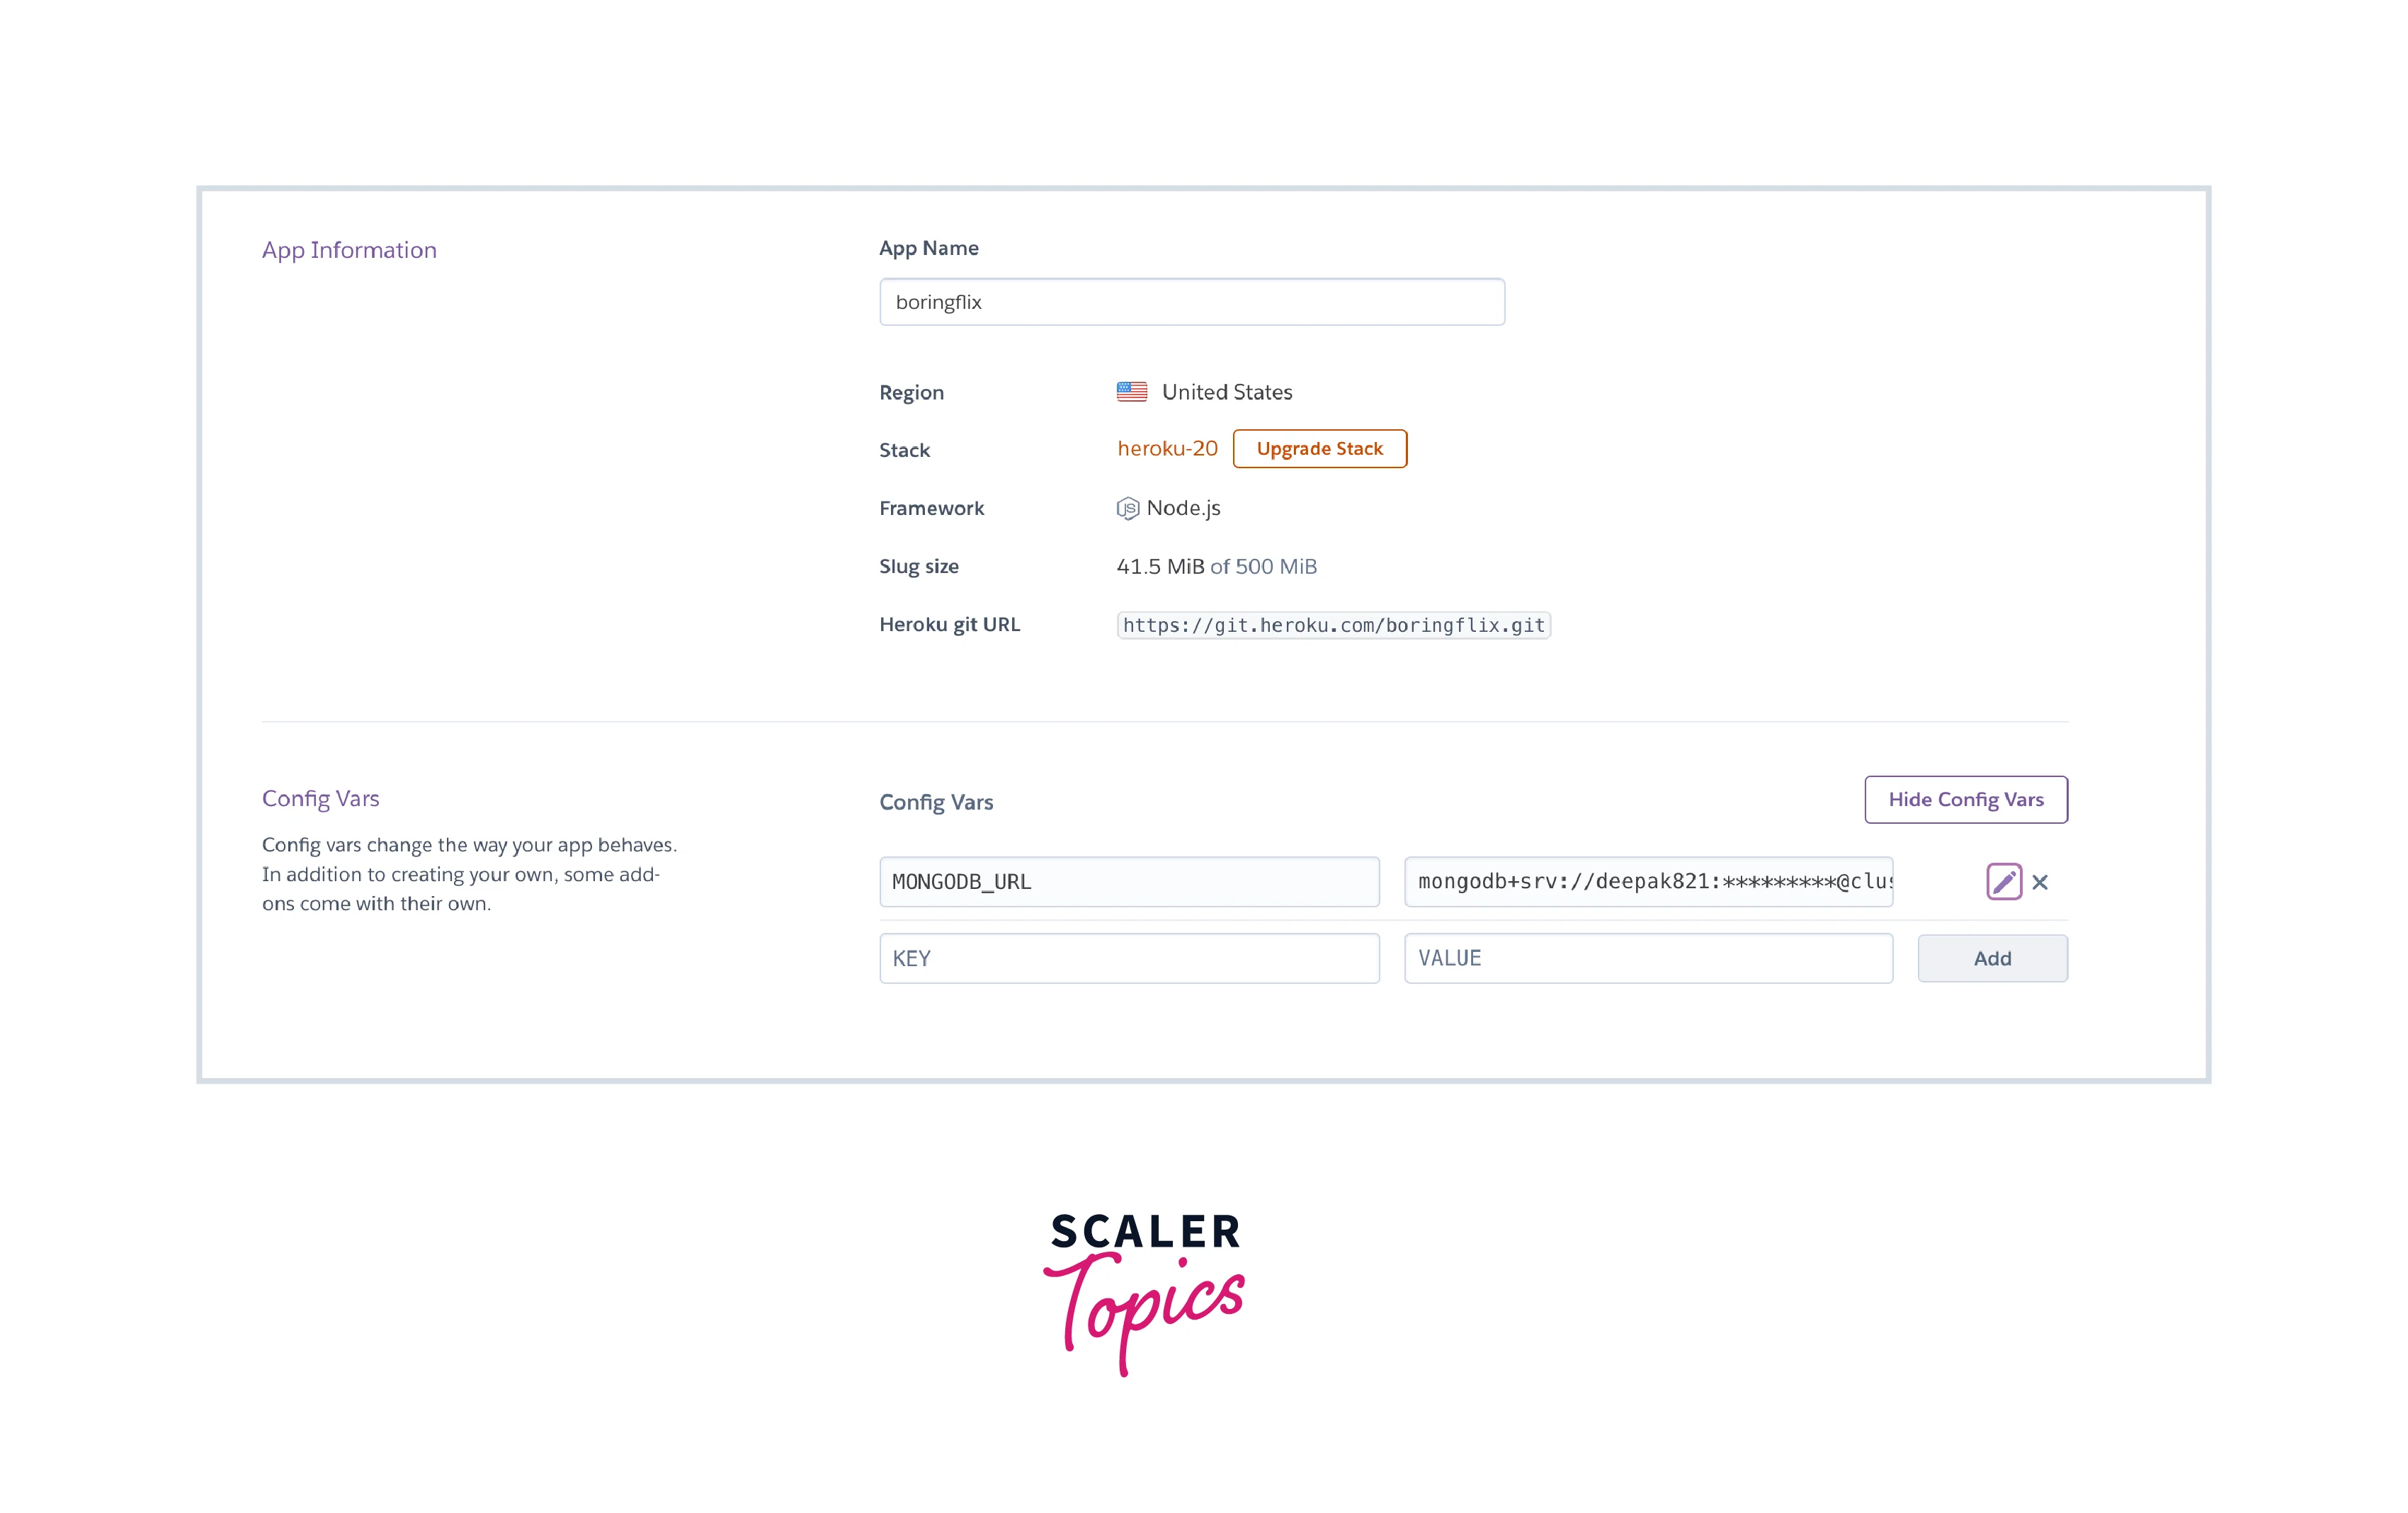
Another way to add the MONGODB_URI config variable is through the "Settings" tab in the Heroku Dashboard. Follow these steps:
- Go to the Heroku Dashboard and select your app (in this case, boringflix).
- Click on the Settings tab.
- In the Config Vars section, click the Reveal Config Vars button.
- You'll see a table with two columns. In the first column, add MONGODB_URI. In the second column, add the connection string, without quotes. For example: mongodb+srv://yourUsername:yourPassword@yourClusterName.n9z04.mongodb.net/sample_mflix?retryWrites=true&w=majority
- Click the Add button to save your new config var.
- That's it! Your Atlas cluster's connection string is now stored as a Heroku config variable and you can access it securely in your application code using process.env.MONGODB_URI.
Connecting the app to MongoDB Atlas Cluster Using Heroku config var Values
The hard-coded Atlas cluster connection string in our demo application needs to be refactored to use the Heroku config variable we created earlier. These config vars are accessible to the application's code as environment variables. The way to access these variables may differ depending on the language of the application. For example, in Java, you would use System.getenv('key') calls, while in Ruby, you use ENV['key'] calls. Since our application is written in Node.js, we can access the Atlas cluster via the process.env property provided by Node.js. To do this, we need to modify the URI constant in the server.js file to:
Great! Now that we have added our Atlas cluster connection string as a Heroku config var, our application will be able to securely access it once it is deployed. Let's save the modified file and commit the changes:
And then, let's deploy the code to Heroku using the following command:
Once we have deployed the web app, let us now check if the web app's instance is live or not using the following command:
If we see the message Scaling dynos... done, now running web at 1
Finally, you can visit the web app using the command:
If everything works perfectly, you will get this output:
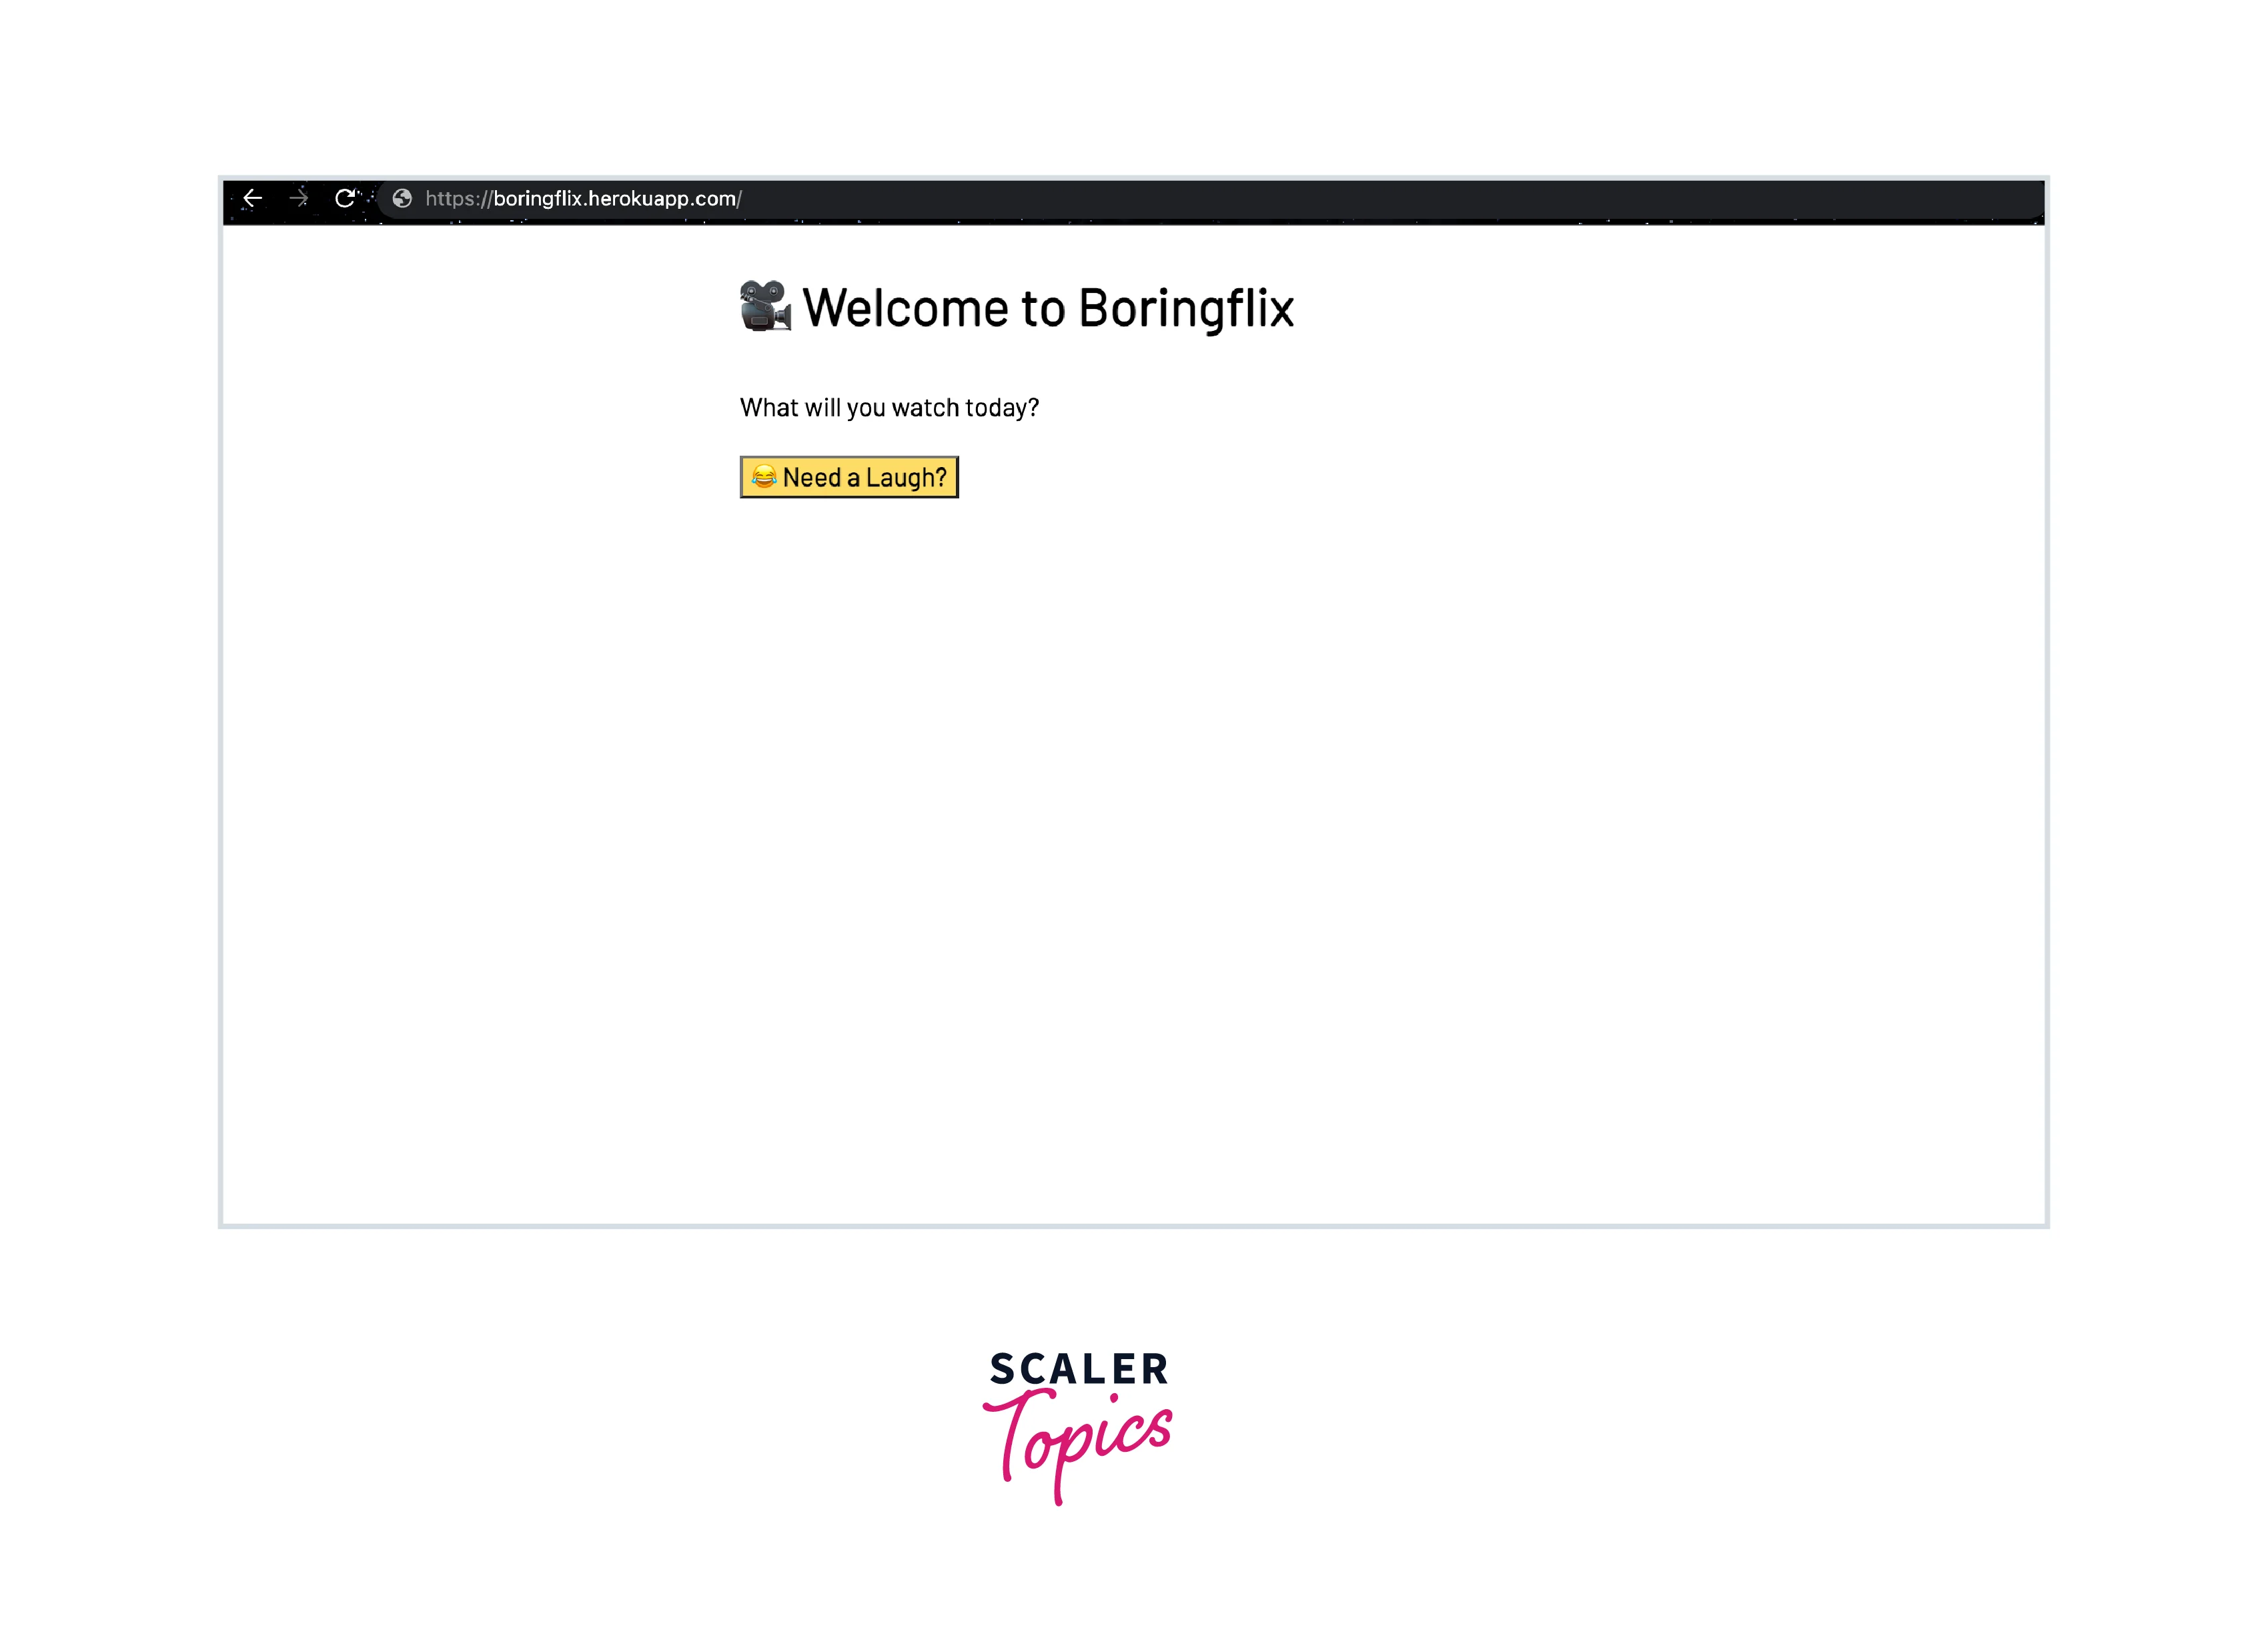
When the Need a Laugh? button is clicked, you will get any random comedy movie. The movie is directly coming from the MongoDB Atlas cluster from the sample_mflix collection.
Configuring Heroku IP Addresses in MongoDB Atlas
Congratulations on successfully setting up your cluster and deploying your app on Heroku! However, it's important to restrict access to your cluster only to your application for security purposes. There are a couple of ways to achieve this on Heroku.
To limit access in your Atlas, an approach is to leverage an add-on that supplies a fixed outbound IP address for your application. Some add-ons that deliver this service can be found in the following list:
Use of Heroku Private Spaces, which enables you to utilize static outgoing IPs for your space, is an additional choice. While it is more costly, this choice does not need an additional add-on.
While few articles and documents suggest using the IP ranges which is published by Heroku or AWS to provide access to IPs originating in your Heroku Dynos located in those regions or AWS region, this is not suggested as these ranges change over time. Therefore, we recommend using the methods mentioned above.
The moment you have obtained the IP address(es) for your application, you can use them to set up your firewall in Atlas. To do so, go to your Atlas cluster, delete any existing IP ranges, and add the new IP address(es) to your allowed list.
Advantages of Deploying MongoDB on Heroku
Deploying MongoDB on Heroku offers several advantages, including:
- Easy setup and management: Heroku makes it easy to set up and manage a MongoDB instance without having to worry about infrastructure or server administration. This means you can focus on developing your application and not on managing the database.
- Scalability: Heroku allows you to easily scale your MongoDB deployment as your application grows. You can easily upgrade to larger database instances or add read replicas to handle increasing read traffic.
- High availability: Heroku offers high availability for your MongoDB deployment, with automatic failover and built-in backups to ensure data is always available.
- Security: Heroku provides a secure platform for your MongoDB deployment, with features like encrypted data at rest and in transit, network security, and access controls.
- Integration with other Heroku services: If you are already using other Heroku services, such as Heroku Postgres or Heroku Redis, integrating MongoDB into your application is easy and seamless.
Overall, deploying MongoDB on Heroku can save you time and effort, while providing a reliable and secure platform for your database needs.
FAQs
Here are some frequently asked questions about deploying MongoDB on Heroku:
Q. What is the cost of deploying MongoDB on Heroku?
A. The cost of deploying MongoDB on Heroku depends on the size and configuration of the database instance you choose. Heroku offers several options with varying levels of performance and storage capacity, and you are only charged for what you use.
Q. Can I use a third-party MongoDB add-on with Heroku?
A. Yes, Heroku allows you to use third-party MongoDB add-ons to deploy and manage your database instance. Some popular add-ons include mLab, MongoDB Atlas, and Compose for MongoDB.
Q. Can I use the free tier of MongoDB on Heroku?
A. Yes, Heroku offers a free tier for MongoDB that includes a shared database instance with limited storage capacity. This option is suitable for small-scale applications or testing and development purposes.
Q. How do I connect to my MongoDB instance on Heroku?
A. To connect to your MongoDB instance on Heroku, you will need to use the connection string provided by Heroku. You can then use this connection string in your application code or a MongoDB client to connect to your database instance.
Q. How do I secure my MongoDB instance on Heroku?
A. To secure your MongoDB instance on Heroku, you can use features such as network security, encrypted data at rest and in transit, access controls, and backups. Heroku also provides recommendations for securing your MongoDB instance in its documentation.
Conclusion
In this article, we learned about Deploying MongoDB on Heroku. Let us recap the points we discussed throughout the article:
- Heroku is a cloud-based platform that allows developers to build, deploy, and manage applications easily. It provides a fully managed, scalable, and secure infrastructure for running web applications, without requiring developers to manage the underlying servers or infrastructure.
- Deploying MongoDB on Heroku involves setting up a cloud-based MongoDB database instance that can be accessed and manipulated via a web interface or API.
- The five steps to set up your Atlas cluster are: Create an Atlas account then Build a new cluster then Choose your cluster settings then Create a database user for your cluster then Grant authorized IP addresses to access to your cluster.
- Then we learned how we can deploy a demo project on Heroku which is connected with the MongoDB Atlas cluster.