Building HTTP Server using HTTP API - 2
Overview
Whenever you do an action in a browser, you are sending a request to some other computer on the internet, which response by sending you the webpage. That device you're communicating with over the internet is a web server. A web server takes HTTP requests from clients such as your browser and responds with an HTTP response such as an HTML page or JSON from an API. Node.js enables developers to use JavaScript to create back-end code, despite the fact that it was previously used to produce front-end code in browsers. The HTTP API makes it simple to start up an HTTP server in Node.js.
Transform Your Career
Choose from our industry-leading programs designed for career success
Modern Software and AI Engineering Program
Master full-stack development with AI integration

Modern Data Science and ML with specialisation in AI
Advanced data science techniques with AI specialization
Advanced AIML with Specialisation in Agentic AI
Deep dive into AIML with focus on Agentic systems
DevOps, Cloud & AI Platform Engineering
Build and manage AI-powered cloud infrastructure
AI Engineering Advanced Certification by IIT-Roorkee
Premier AI engineering certification from IIT-Roorkee
Summary of Building HTTP Server using HTTP API - 1
HTTP stands for Hypertext Transfer Protocol, and it is an application layer protocol that is predominantly used with the WWW(World Wide Web) in the client-server architecture, where a web browser is a client interacting with the web server that is hosting the website. An HTTP server waits for incoming client requests and responds to each one by returning desired information, including the delivery of the requested web page, or by returning an HTTP error message.
If necessary, the client obtains the server's IP address from a nameserver. The client then seeks up and establishes a transport layer connection to the server; in the case of HTTP, this is accomplished via TCP/IP. The client then transmits data to the server across that connection, which is adequate for obtaining a response from the server in the following phase. That broadcast is commonly referred to as a request.
The http module is a core module in Node.js that has the required functions for creating the server. The following code can be used to create a simple web server with the help of the http module. Write the code in a file server.js.
In the above code, first, the server object is created using the createServer() function of the http module. The server object accepts all the requests and passes them to the requestListener() function. The server is then attached to the port and host using the server.listen() function. The listen() function takes the port, host and the callback function as arguments. The callback function is called when the server begins to listen.
You can run the code by running the following command :
In the console, you will see this output :
Now open http://localhost:8000/ in a browser and you will see the output Output and Welcome User !!
In the above example, a simple text was returned in the response. You can serve various types of data. Text formats like JSON, CSV, XML, and HTML can be easily returned. Other than these non-text data such as PDFs, compressed files, audio, and video can be returned by web servers.
For returning the text formats like JSON, CSV and HTML you need to set the following two things in Node.js :
- Set the suitable value for the Content-Type header in your HTTP responses.
- Check that res.end() receives the data in the correct format.
Hence the changes are mainly in the requestListener() function.
You can also set up routes using the HTTP API. Most websites and APIs we use have multiple endpoints through which we can access various resources. Here is a small example :
As shown above, the requestListener has a switch statement that sends the response on the basis of the path of the endpoint specified in the URL.
Listening and Handling Connections
The server.listen() is a built-in application programming interface of the Socket class that is within the tls module that is used to start the server and listen for encrypted connections. It is used to accept connections on the specified port and host. If the hostname is not specified, the server will accept connections to any IPv4 address (INADDR ANY). A port value of zero generates a random port.
Syntax:
Parameters: This method takes the following arguments as parameters.
- host: It is the IP address we want to listen to.
- port: The port number on which the server will listen.
- Return Value: This method returns a callback function.
Here is an example of the server.listen(). To run the code on your system you need to generate a pair of public and private keys. You can generate them using online tools or using openssl commands.
In the above code snippet, a server has been created using the createServer() method, and the listen() method is used to specify the host and the port number. A TLS client is created. AS TLS relies on public key infrastructure (PKI) to enable secure communication between a client and a server, hence the use of a public certificate and a private key is done. The client gets a session key from the server. You will receive the output similar to the following : I'm listening at 127.0.0.1, on port 8000
Received: Session key : 93
Turn Learning into Career Growth
HTTP Request Parsing
The extra details you want to send to the server are kept in the request body. Because it specifies the information one intends to send, the body is crucial. The request body can be used to hold user data, such as a user's username and password when they attempt to log into our system.
Node.js utilizes streams to read data because it reads data in chunks. We can use the requested data after the node has finished reading it for our purposes. The request body of a POST or PUT request could be significant to your application. It takes a little more work to get the body data than it does to retrieve the request headers. The ReadableStream interface is implemented by the request object that is delivered to a handler. Like any other stream, this one can be listened to or piped to another location. By paying attention to the stream's data and end events, we can take the data directly out of the stream.
So you can create an array first in which you can store all the chunks of the request body. For this, you need to create a .on handler for the data to get every chunk.
The incoming http request has a data event bound to it. Data will continue to stream from this event and be pushed to the requestBody variable.
Combine all the request body chunks appended in the array.
When the receiving of data is finished, we will transform it to a string with the use of the end event.
The request parameters are returned to us as key-value pairs. To save or make use of the values, we must divide it. We can split the string to get the value.
Write the following code in a file server.js :
In the above code snippet, first, the http module has been imported. The PORT is set as 8000.
Then the createServer() method is used to create a server. The incoming request’s URL is checked. If the URL is / then an HTML file is served to contain a form. In the form, the user can enter his name and submit it. Submitting the form creates a POST request to the /name endpoint. .on() listeners for data are used to get the body chunks. .on() for the end event concatenates all the chunks and forms a string. The string is broken and the name of the user is stored in the username variable. For any other endpoint HTML with a hello is sent.
Writing an Application That Can Use the Server
Now, as you have seen how to create an HTTP server and how to parse the body of an HTTP request, let us now create a simple application using an HTTP server. We will create a simple application in which one can create simple posts.
The first step is to create an HTTP server. So create a file server.js. Create the server by calling the createServer() function on the HTTP module after requiring it. The server object that these function returns allows us to select the port on which the server should listen for requests using a method called listen.
The requestListener() function that manages requests and responses is the only argument required by the createServer function. With the help of this callback function, we can use the asynchronous event-driven architecture in Node to process requests as they come in and continue running other code while we wait for a request without blocking.
With the code shown above, an HTTP server will be created that will be listening on port 8000 and will have a response defined for all incoming requests. The request URL value is stored in the req object's url property, therefore a request made to http://localhost:8000 would have the value / in it. An HTTP status code and headers for a response are defined by the writeHead method on the response object. We then include some HTML in the response before concluding it with res.end().
We have created a simple server till now. Now we need to create an html file that we will send as a response. The HTML file will contain the form through which users will provide the data for the post. So create a file index.html and write the following code in it.
The HTML file contains a form with two fields: a name and a postData field. Now we need to modify the server.js file to serve the index.html file. So now make the changes in the server.js file as in the following code :
The above code will serve the currently selected directory's index.html file. The __dirname is an environment variable that gives the absolute path of the currently executing file.
In the above example res.end() is used to send the response data. Alternatively, you could use the same result by first using res.send(data) or res.write(data), then res.end(). The .send() method, which has the syntax .send([body]), sends the HTTP response, and the body parameter accepts one of the following values: a Buffer object, a String, an object, or an array. The response process will be ended by the .end() method.
The HTML page shown above will be returned as the response when you send a request to the / route on the HTTP server we built. Every path accessed on the server will return the same result because we haven't set up any routing.
The application we are creating will have two endpoints only: one / for serving the form page and one /post for POST requests where form data will be handled. So now create a file handlers.js where we will be keeping the logic for both endpoints. Write the following code in the handlers.js file.
Example:
In the above code snippet, we have two functions one having the logic for the home page and one having the logic for the post endpoint. The home method uses the same implementation as in displaying the response to read a file's contents and serve them. The post function is an endpoint that shows the form submission from the home page on /post after receiving a POST request from the form submission. The action attribute of the form element equals /post, which indicates that when the form is submitted then the page gets forwarded to http://localhost:8000/post.
In the post method the .on() listener for the data event is used to form a string of request body. This string is similar to the query string of a URL. The query string used to represent the form data is delivered to the server as the post body when a form is submitted.
We can utilize URLSearchParams now that the URLSearchParams interface is available. To extract the values from the query string, the .get() is used. In the end, an object with the name and data is sent as a response.
Now you need to make changes in the server.js file to introduce the routing of requests to the correct handler. The primary responsibility of the router is to "route" requests to a specified handler, who subsequently sends a response. So make the changes in the server.js file as n the below code :
In the above code, the two handlers have been imported. A requestListener function is created. All the code related to routing is written in the requestListener function. A switch statement has been used. For the / path the home() function has been called. Similarly for /post, the post() function has been called. For all the other cases a message has been returned.
The requestListener function is passed in the createServer() function. Now the App is functional. Use the below command to run the server :
You will get the following output in the terminal :
Now open http://localhost:8000/ in any browser. You must see the following screen:

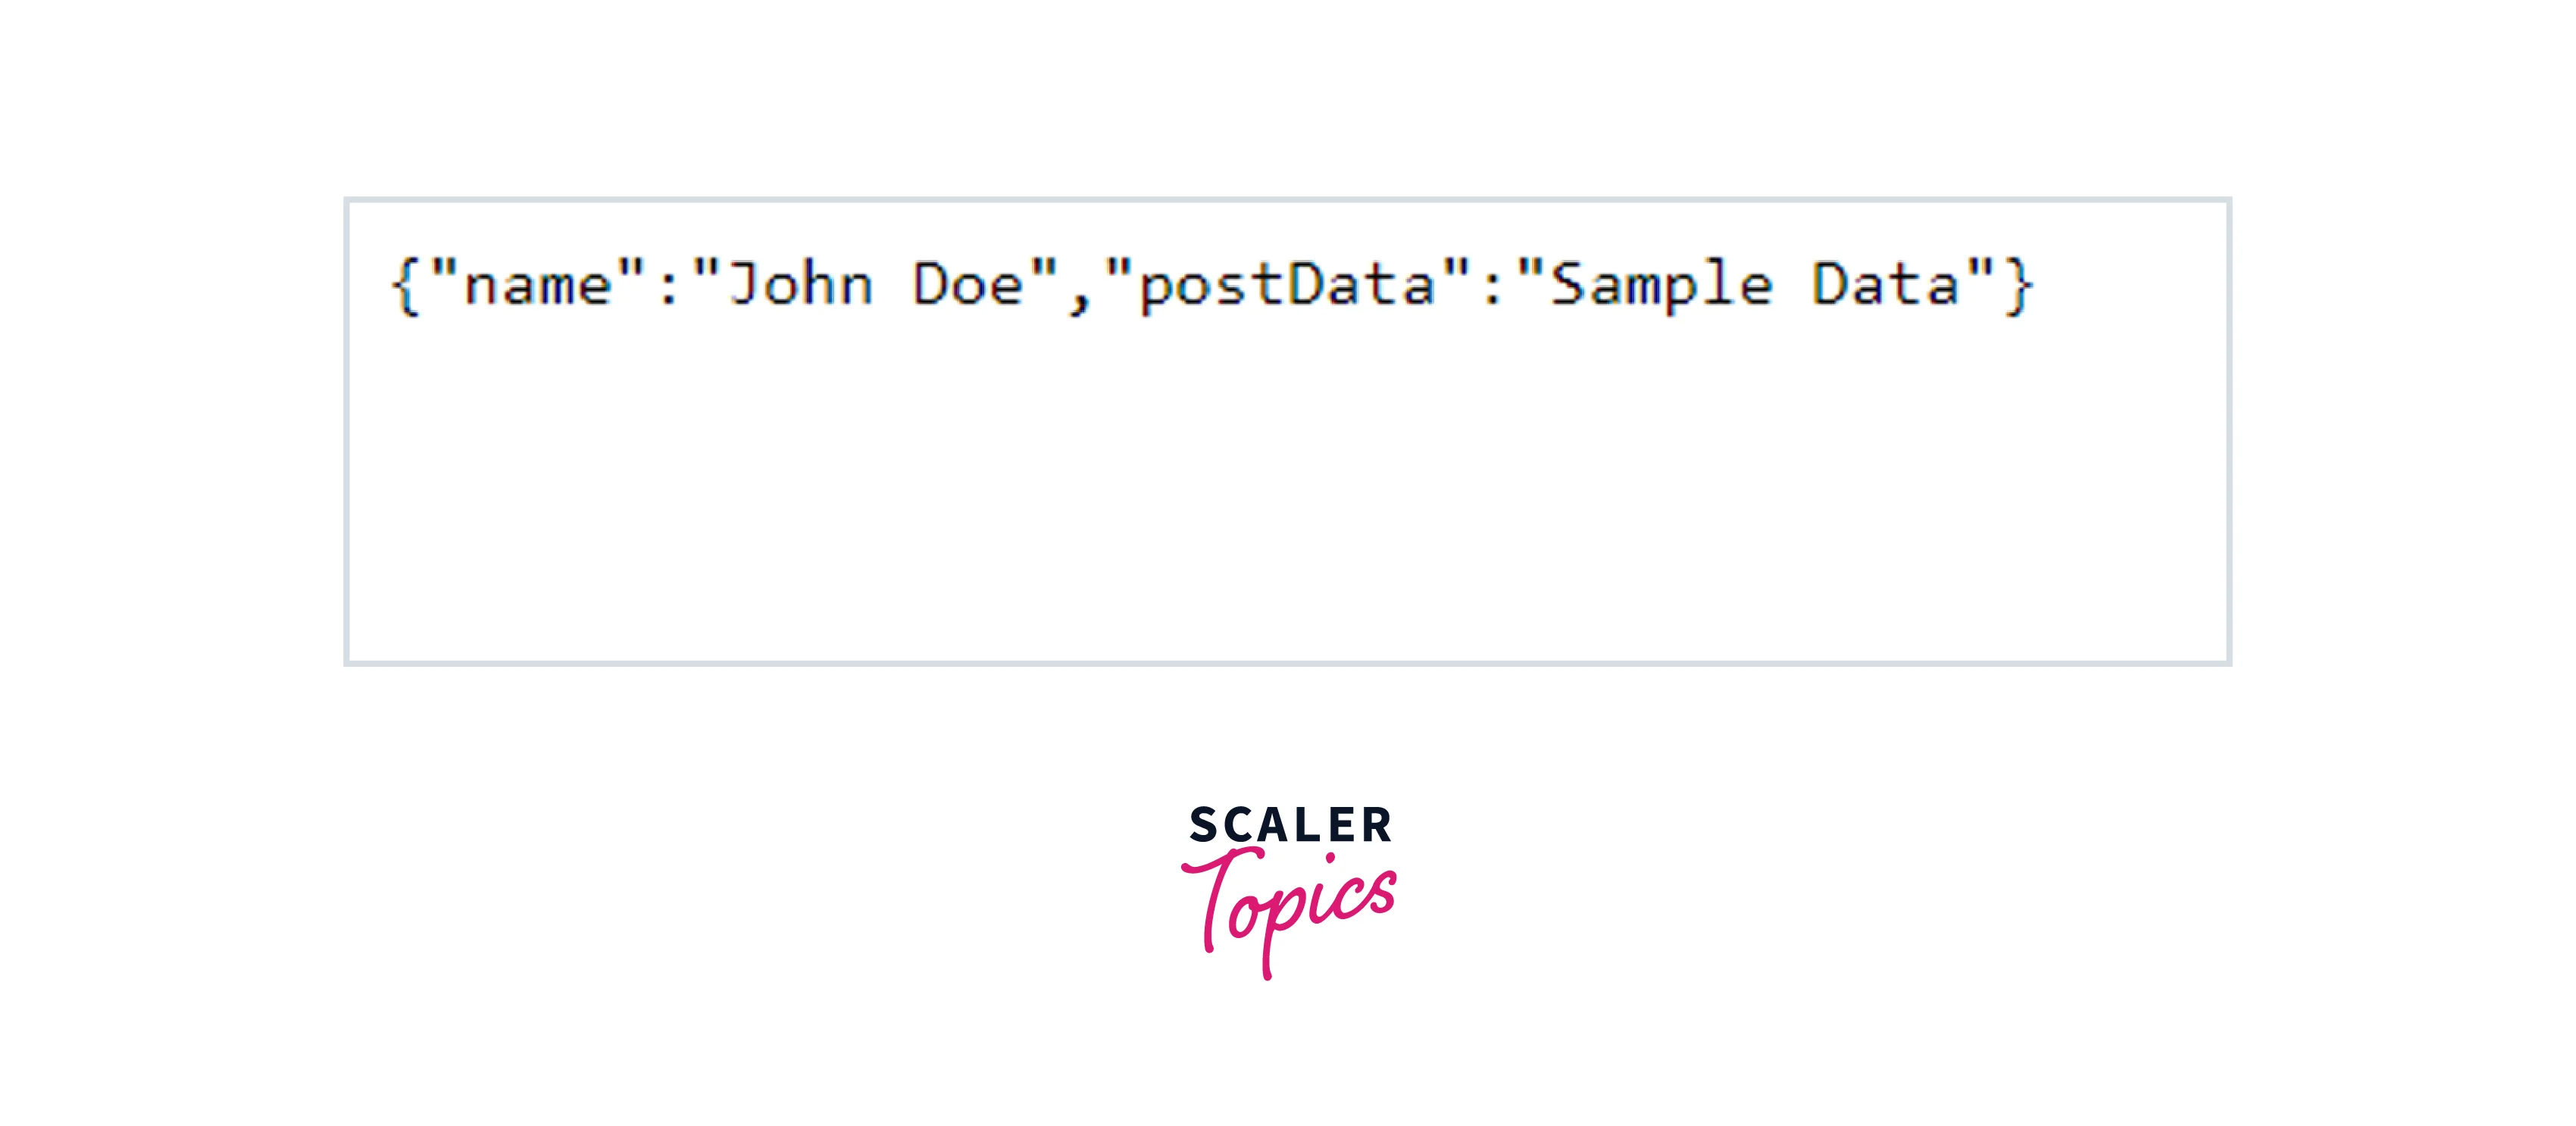
Enter some data and press submit. Now the url will change to http://localhost:8000/post and you will see the following output :
Also in the terminal, the following logs will appear :
Hence our application is functional and the use of an HTTP server is being made.
Conclusion
- An HTTP server is a computer program or a software component of another program that acts as a server in a client server.
- A HTTP server’s primary duty is to store, process, and distribute web pages to clients.
- A HTTP server’s primary duty is to store, process, and distribute web pages to clients.
- The server.listen() is a built-in application programming interface of the Socket class.
- To run server.listen() application on your system you need to generate a pair of public and private keys.
- The __dirname is an environment variable that gives the absolute path of the currently executing file.
- Node.js utilizes streams to read data because it reads data in chunks. We can use the requested data after the node has finished reading it for our purposes.
- The request body can be used to hold useful data, such as a user's username and password when they attempt to log into our system.