CORS in Nodejs
Overview
CORS or Cross-Origin Resource Sharing in Node.js is a mechanism by which a front-end client can make requests for resources to an external back-end server. The single-origin policy does not allow cross-origin requests and CORS headers are required to bypass this feature. Through this article, we will learn how to set up an ExpressJS back-end server and send a cross-origin request to it through a front-end.
Pre-requisites
- A Basic understanding of RESTful APIs
- A Basic understanding of ExpressJS
- Understanding of the Client-Server Model along with Requests and Responses
- A Basic understanding of middleware
What is CORS?
CORS is an acronym for Cross-Origin Resource Sharing. As we know, all web applications have a front end & a back end and they communicate with each other via API's. In most cases, both the front end and the back end are hosted on the same origin. CORS in node.js helps to get resources from external servers. To better understand this, let's review the following analogy.
Consider our application to be a restaurant. The origin is the address of our restaurant. The front end is the dining area and the back end is the kitchen. Both the dining area and the kitchen are at the same address. This enables them to exchange food and service, or in our case, resources. Now, there could be a case where the guests are feeling sick and they request medicine which needs to be fetched from another address outside of the restaurant. In technical terms, the front end requesting to a back end outside of its origin. Thus, this mechanism where a front-end sends a request to a different back-end for some additional service or resource is known as Cross-Origin Resource Sharing.
Usually, the front end of an application is only able to make API calls to the back end in its origin. This is known as the Same-Origin Policy and is quite important from a security standpoint. All requests made from the front end of a different origin or to a back end of a different origin will be blocked by the browser. CORS allows us to bypass this policy in case of scenarios where accessing third-party resources becomes necessary.
Note :
Under the Same-origin policy, browsers can make the requests but the responses will be blocked.
Transform Your Career
Choose from our industry-leading programs designed for career success
Modern Software and AI Engineering Program
Master full-stack development with AI integration

Modern Data Science and ML with specialisation in AI
Advanced data science techniques with AI specialization
Advanced AIML with Specialisation in Agentic AI
Deep dive into AIML with focus on Agentic systems
DevOps, Cloud & AI Platform Engineering
Build and manage AI-powered cloud infrastructure
AI Engineering Advanced Certification by IIT-Roorkee
Premier AI engineering certification from IIT-Roorkee
How CORS Works?
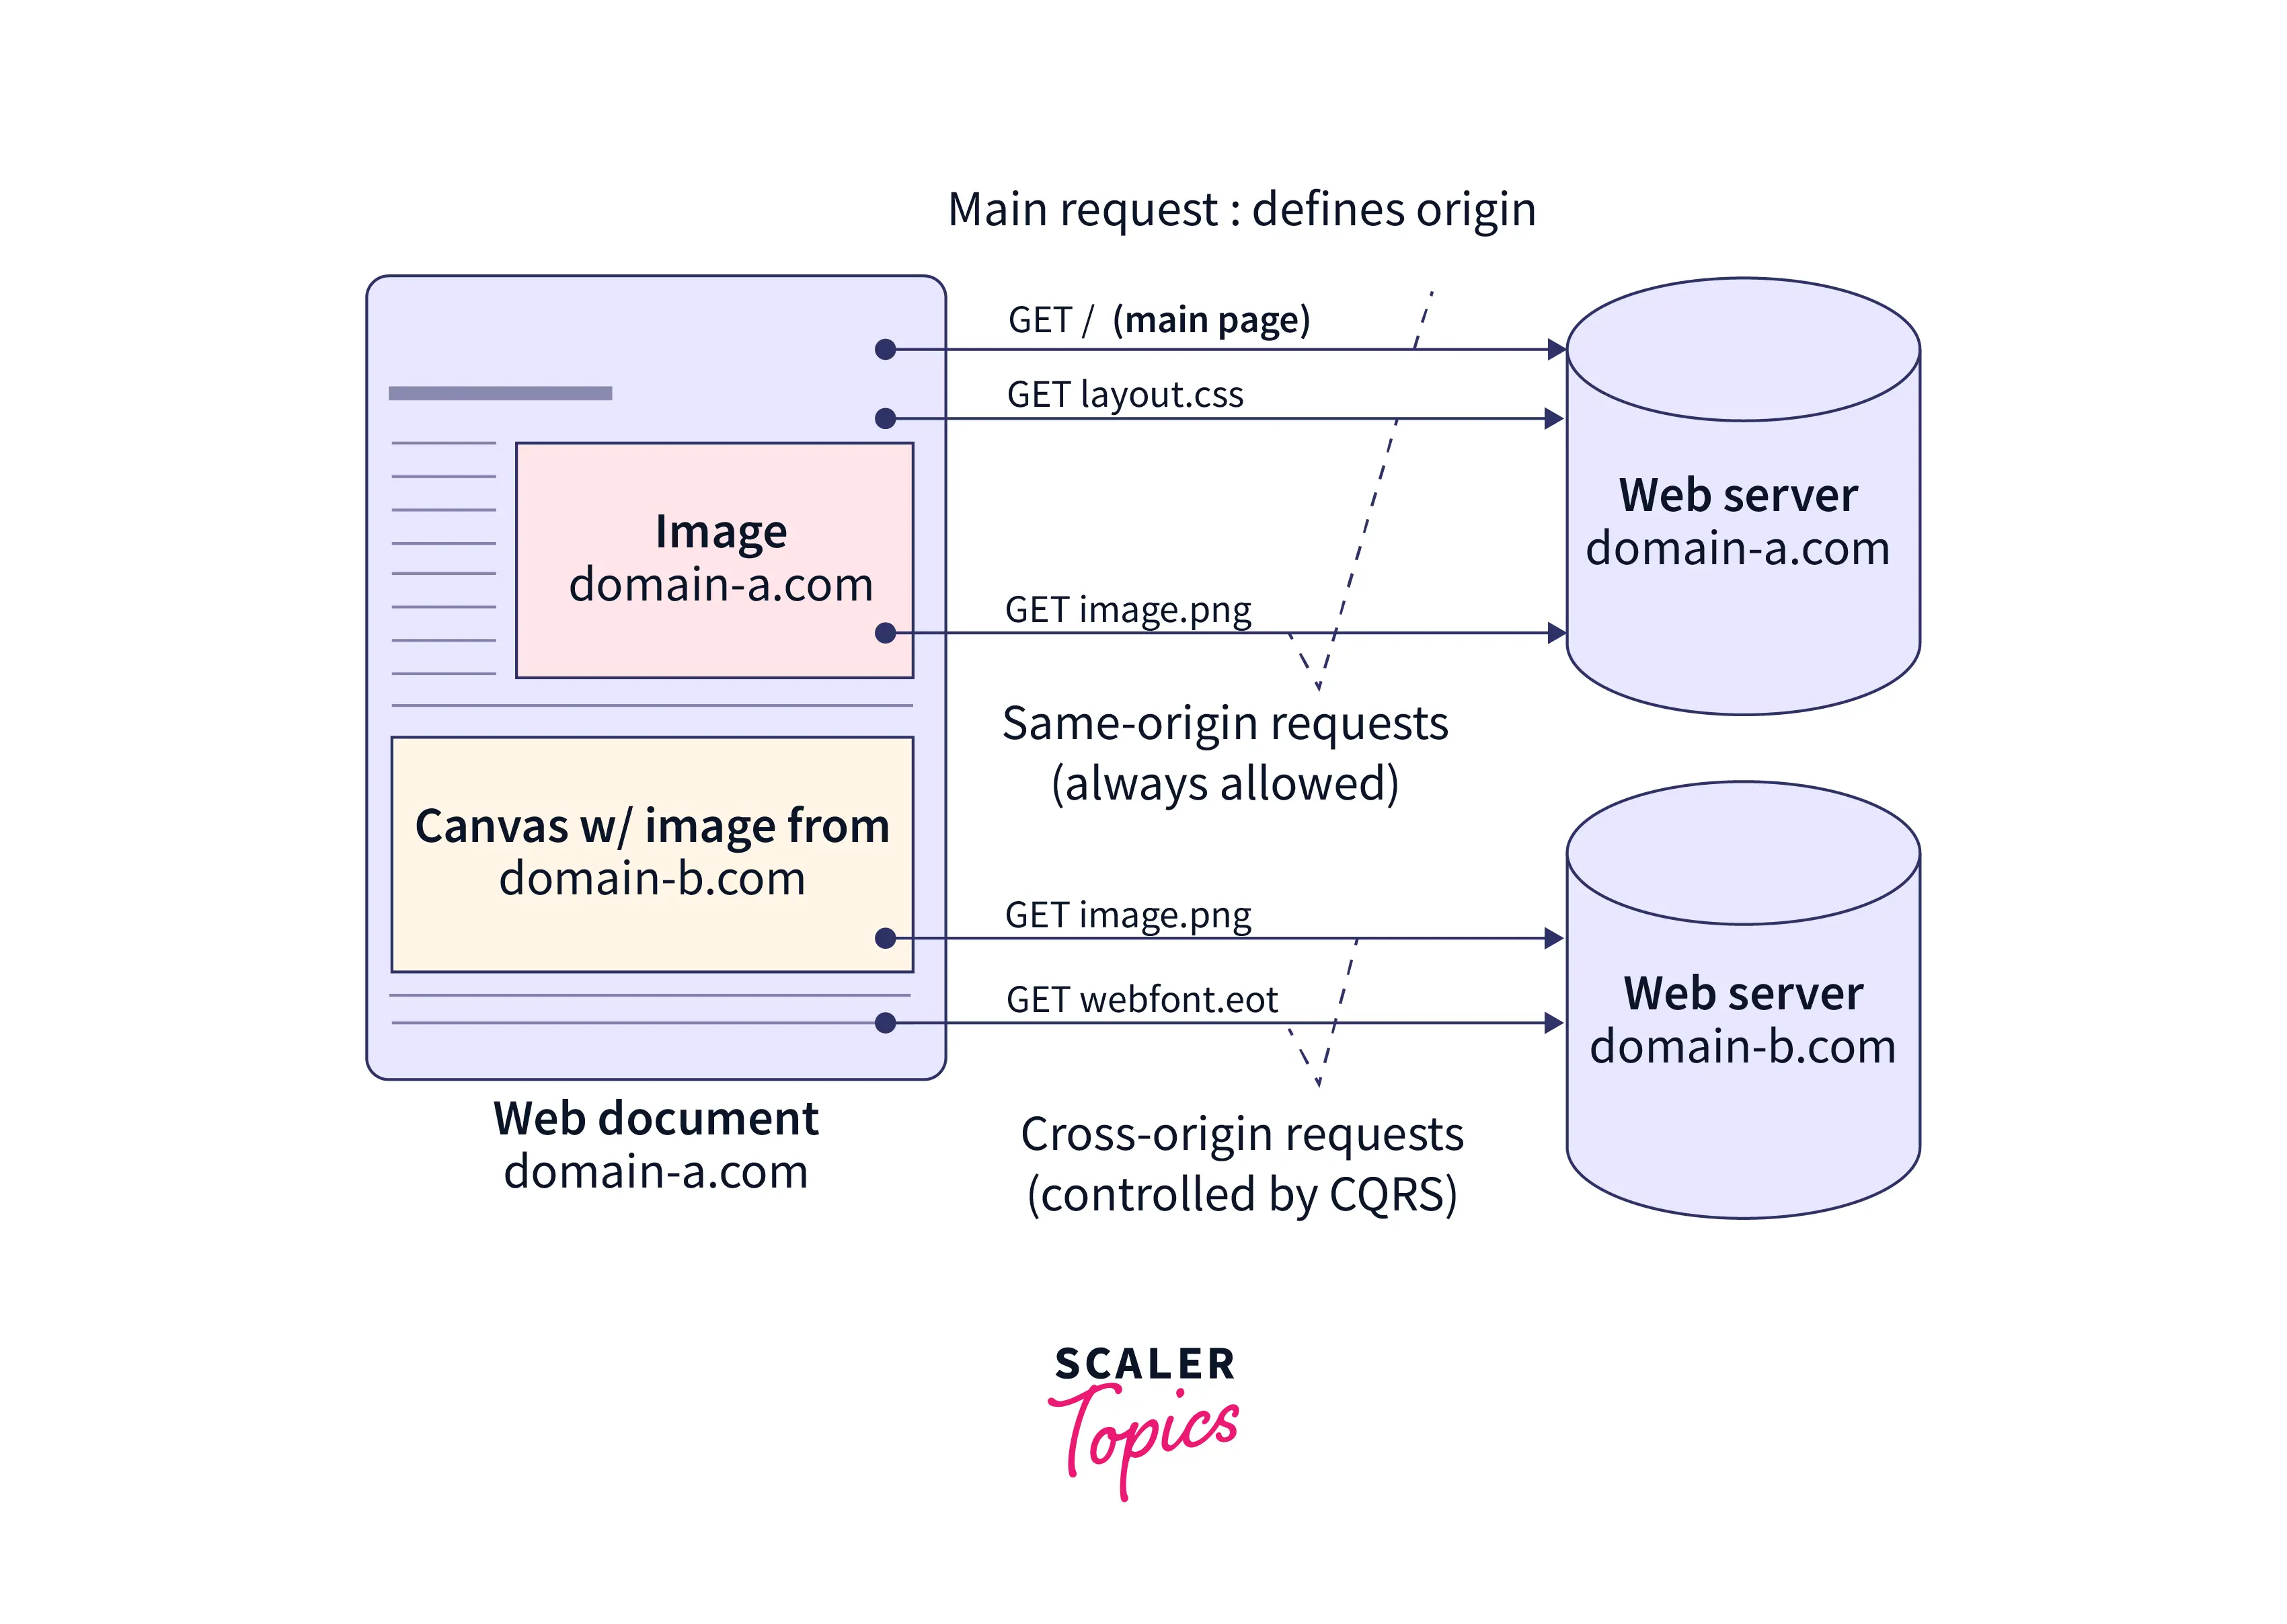
As we have discussed, the browser implements a same-origin policy that allows resources to be fetched from its origin(URL) and blocks resources from an external URL. This can be changed through Cors in node.js. When the browser makes a request, an Origin header can be specified in the request message. If the request goes to a server on the same origin then the request is allowed by the browser and it is not blocked. However, if the request is made to a server outside the origin, then it is known as a Cross-origin request. When sending the response, the server will add the Access-Control-Allow-Origin header to the response. This header's value should match the origin header's value in the request. If this is a match, then the request is allowed. If it does not match then the browser will block the response data. Here the user will get the infamous CORS error in their browser console.
Before delving deeper into Cors in Node.js, let us first understand the Origin. As we discussed earlier, a change in origin will block all requests unless we have implemented CORS. So what is considered a change in origin?
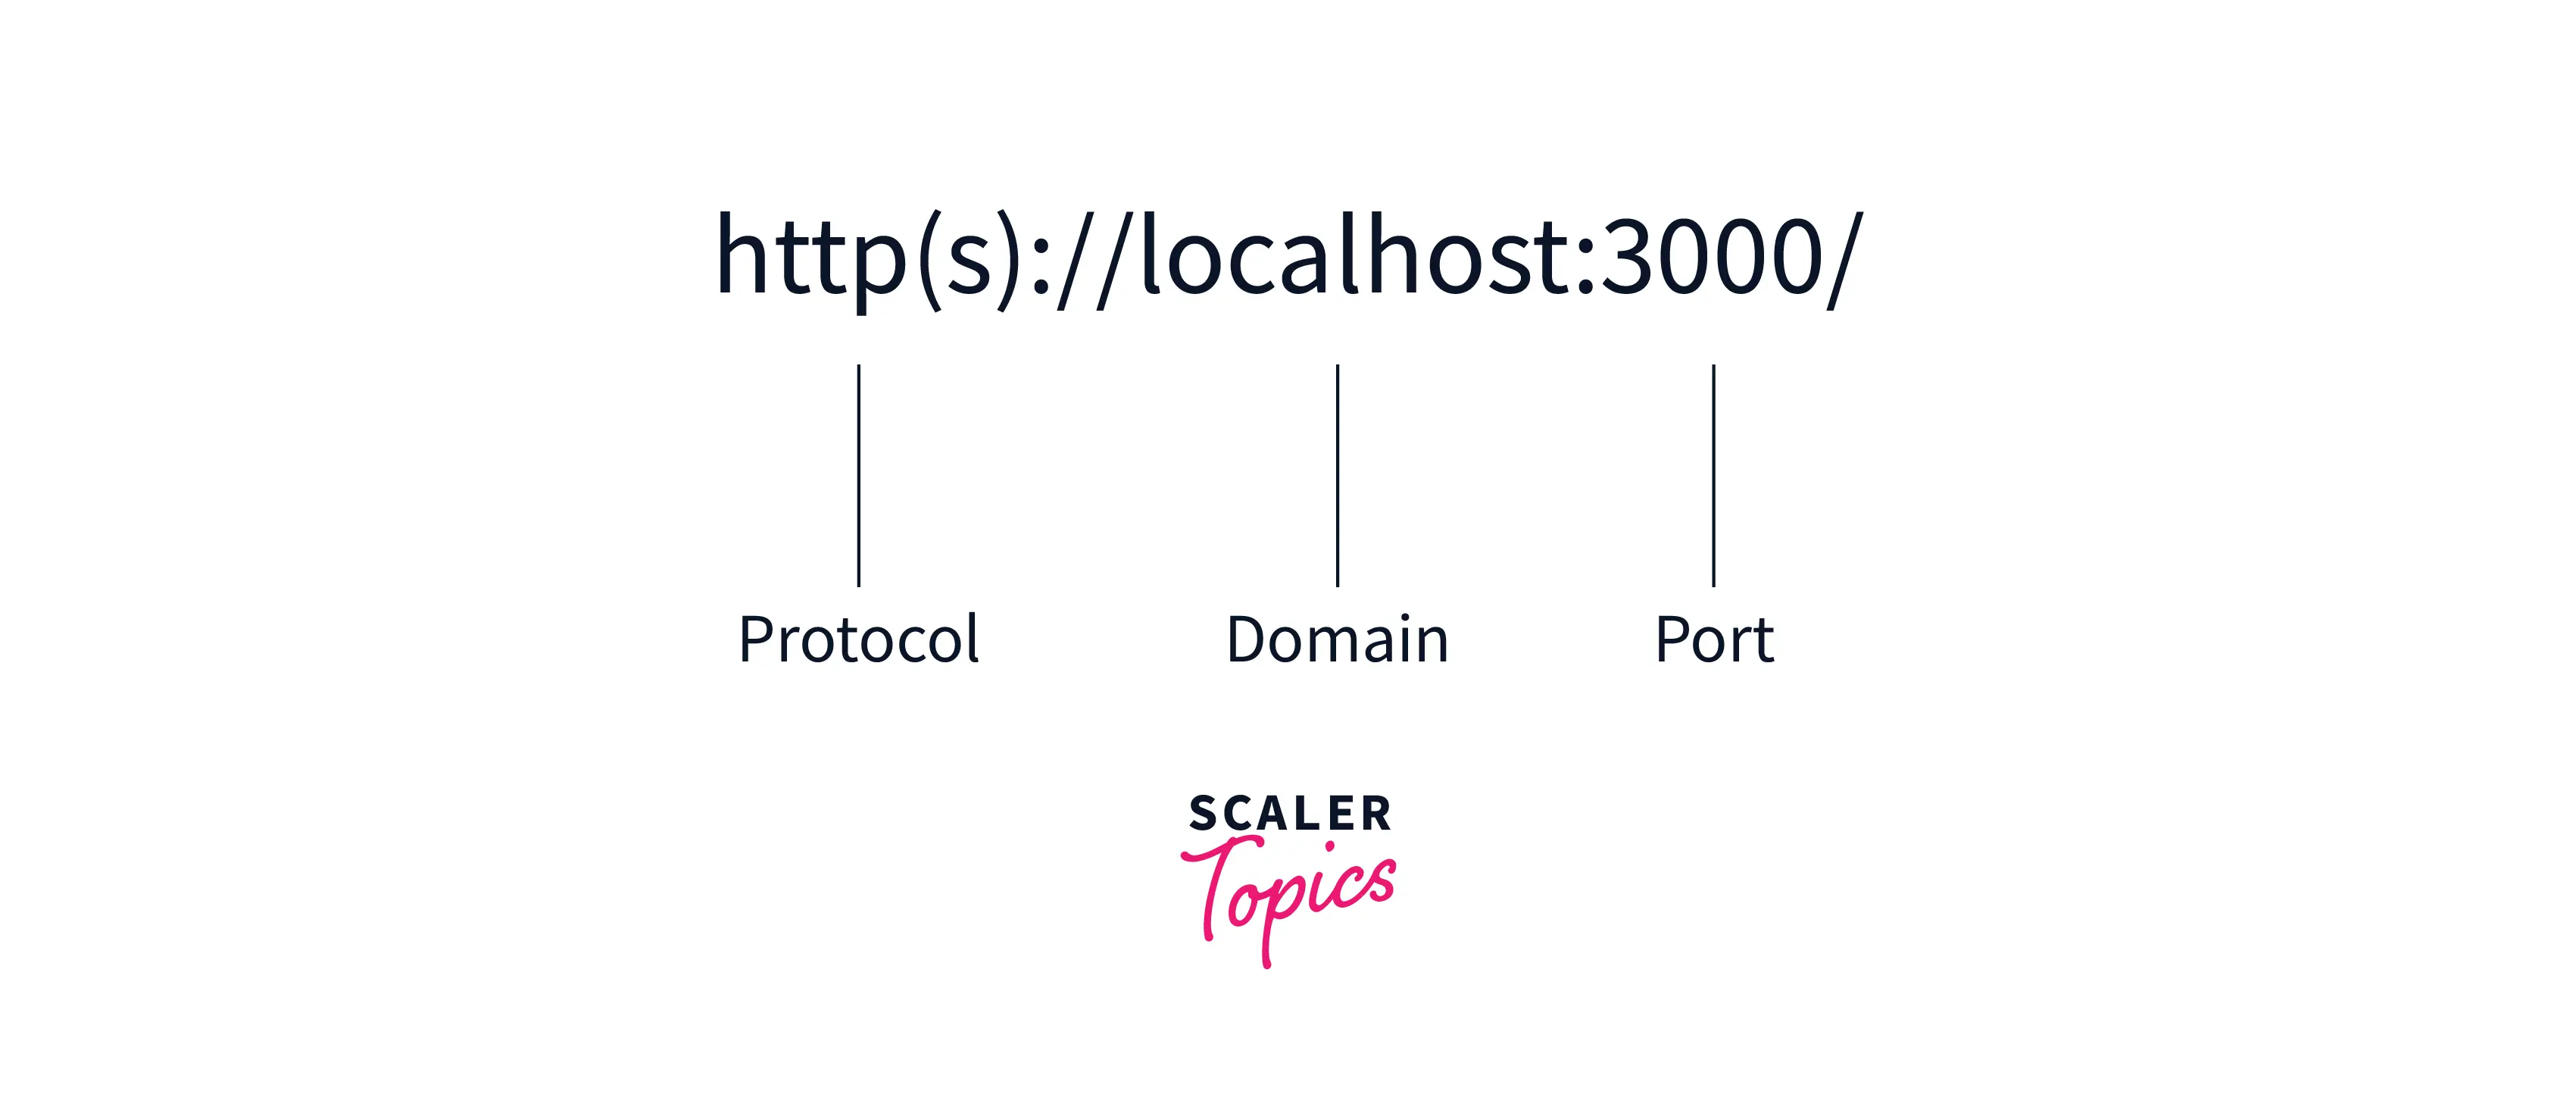
The origin is a request header that identifies the URL of the clienthood that made the request. It has three parts :
- A scheme eg. HTTP, HTTPS
- A domain eg. localhost, www.corsinnodejs.com
- A port eg. 8080, 8888
If we combine the three, it looks something like this :
Any change in the above three parts would result in a different origin URL and could result in a cors error. HTTP is not the same as HTTPS. www.corsinnodejs.com is not the same as www.corsinnodejs.co.in. We need to ensure a match in the request and response origins or configure CORS in node js so that the resources are not blocked.
Now let's get to the headers. In the simplest terms, headers are used to send additional information with a request or response. This information is required by the browser or the server for various functions. A request header provides extra information about the request. A response header provides extra information about the response.
- Origin : This header indicates the URL of the request and response.
- Access-Control-Allow-Origin : This header indicates the URL which can be used to make cross-origin requests.
Let's look at an example of a youtube clone application to further understand cors in Node.js.
Here is the general request to the server. We are trying to make a GET request to fetch 50 new videos.
Following are the request headers. We should notice that it has the scheme, origin, path, key, etc.
Following are the response headers. We should notice that it has Access-control-allow-origin, methods, content-type, etc. This means that the URL mentioned in the "access-control-allow-origin" header is allowed by the browser. The `*` indicates that all client origins are allowed.
Thus, we saw that the request had a header with the origin URL. The response had the header with the access-control-allow-origin URL (or * in this case which allows all origin URLs). The front-end client sent a request to the back-end and since the back-end allowed all origin URLs, the request was allowed by the browser, and the data was fetched to the client. The status code 200 proves that the request was served without error.
In the next section, we will build a simple app from scratch and see what happens when we try to access an external back-end without the CORS headers.
Scaler Placement Report and Statistics
Scaler learners achieved 2.5x salary growth with average post-Scaler CTC reaching ₹23L.
A Basic CORS Demonstration in Node.JS ( Example of Error and Resolution )
We have already seen successful fetching of cross-origin resources when CORS is enabled. Now let's see what happens when CORS is not enabled for a cross-origin request. We will make a simple application to demonstrate cors in node.js.
-
Step - 1 :
Make sure node.js and npm are installed in your system. To check, fire up the terminal and run the following commands :If node.js is not installed, then we should visit the Node.JS website for downloading and installation.
-
Step - 2 :
We will now make our project structure. We make a new directory using the commandWe move into this new directory with the command
We initialize a new npm project with the command
We can enter the desired values in the terminal.
Now we will use npm to install ExpressJS which will be used to implement our server. We run the following command :
We will also install an IDE extension to run our HTML page on a server. Front-end clients are hosted on servers as well and we can just use an IDE extension to emulate this process. We have used VSCode as our IDE and we will be using Live Server as the extension.
-
Step - 3 :
Let us write our server. We will use the ExpressJS package to create our server and the app would listen to some pornumberser. We would make a path '/data' which would return JSON data on a "GET" request. Here is the snippet : -
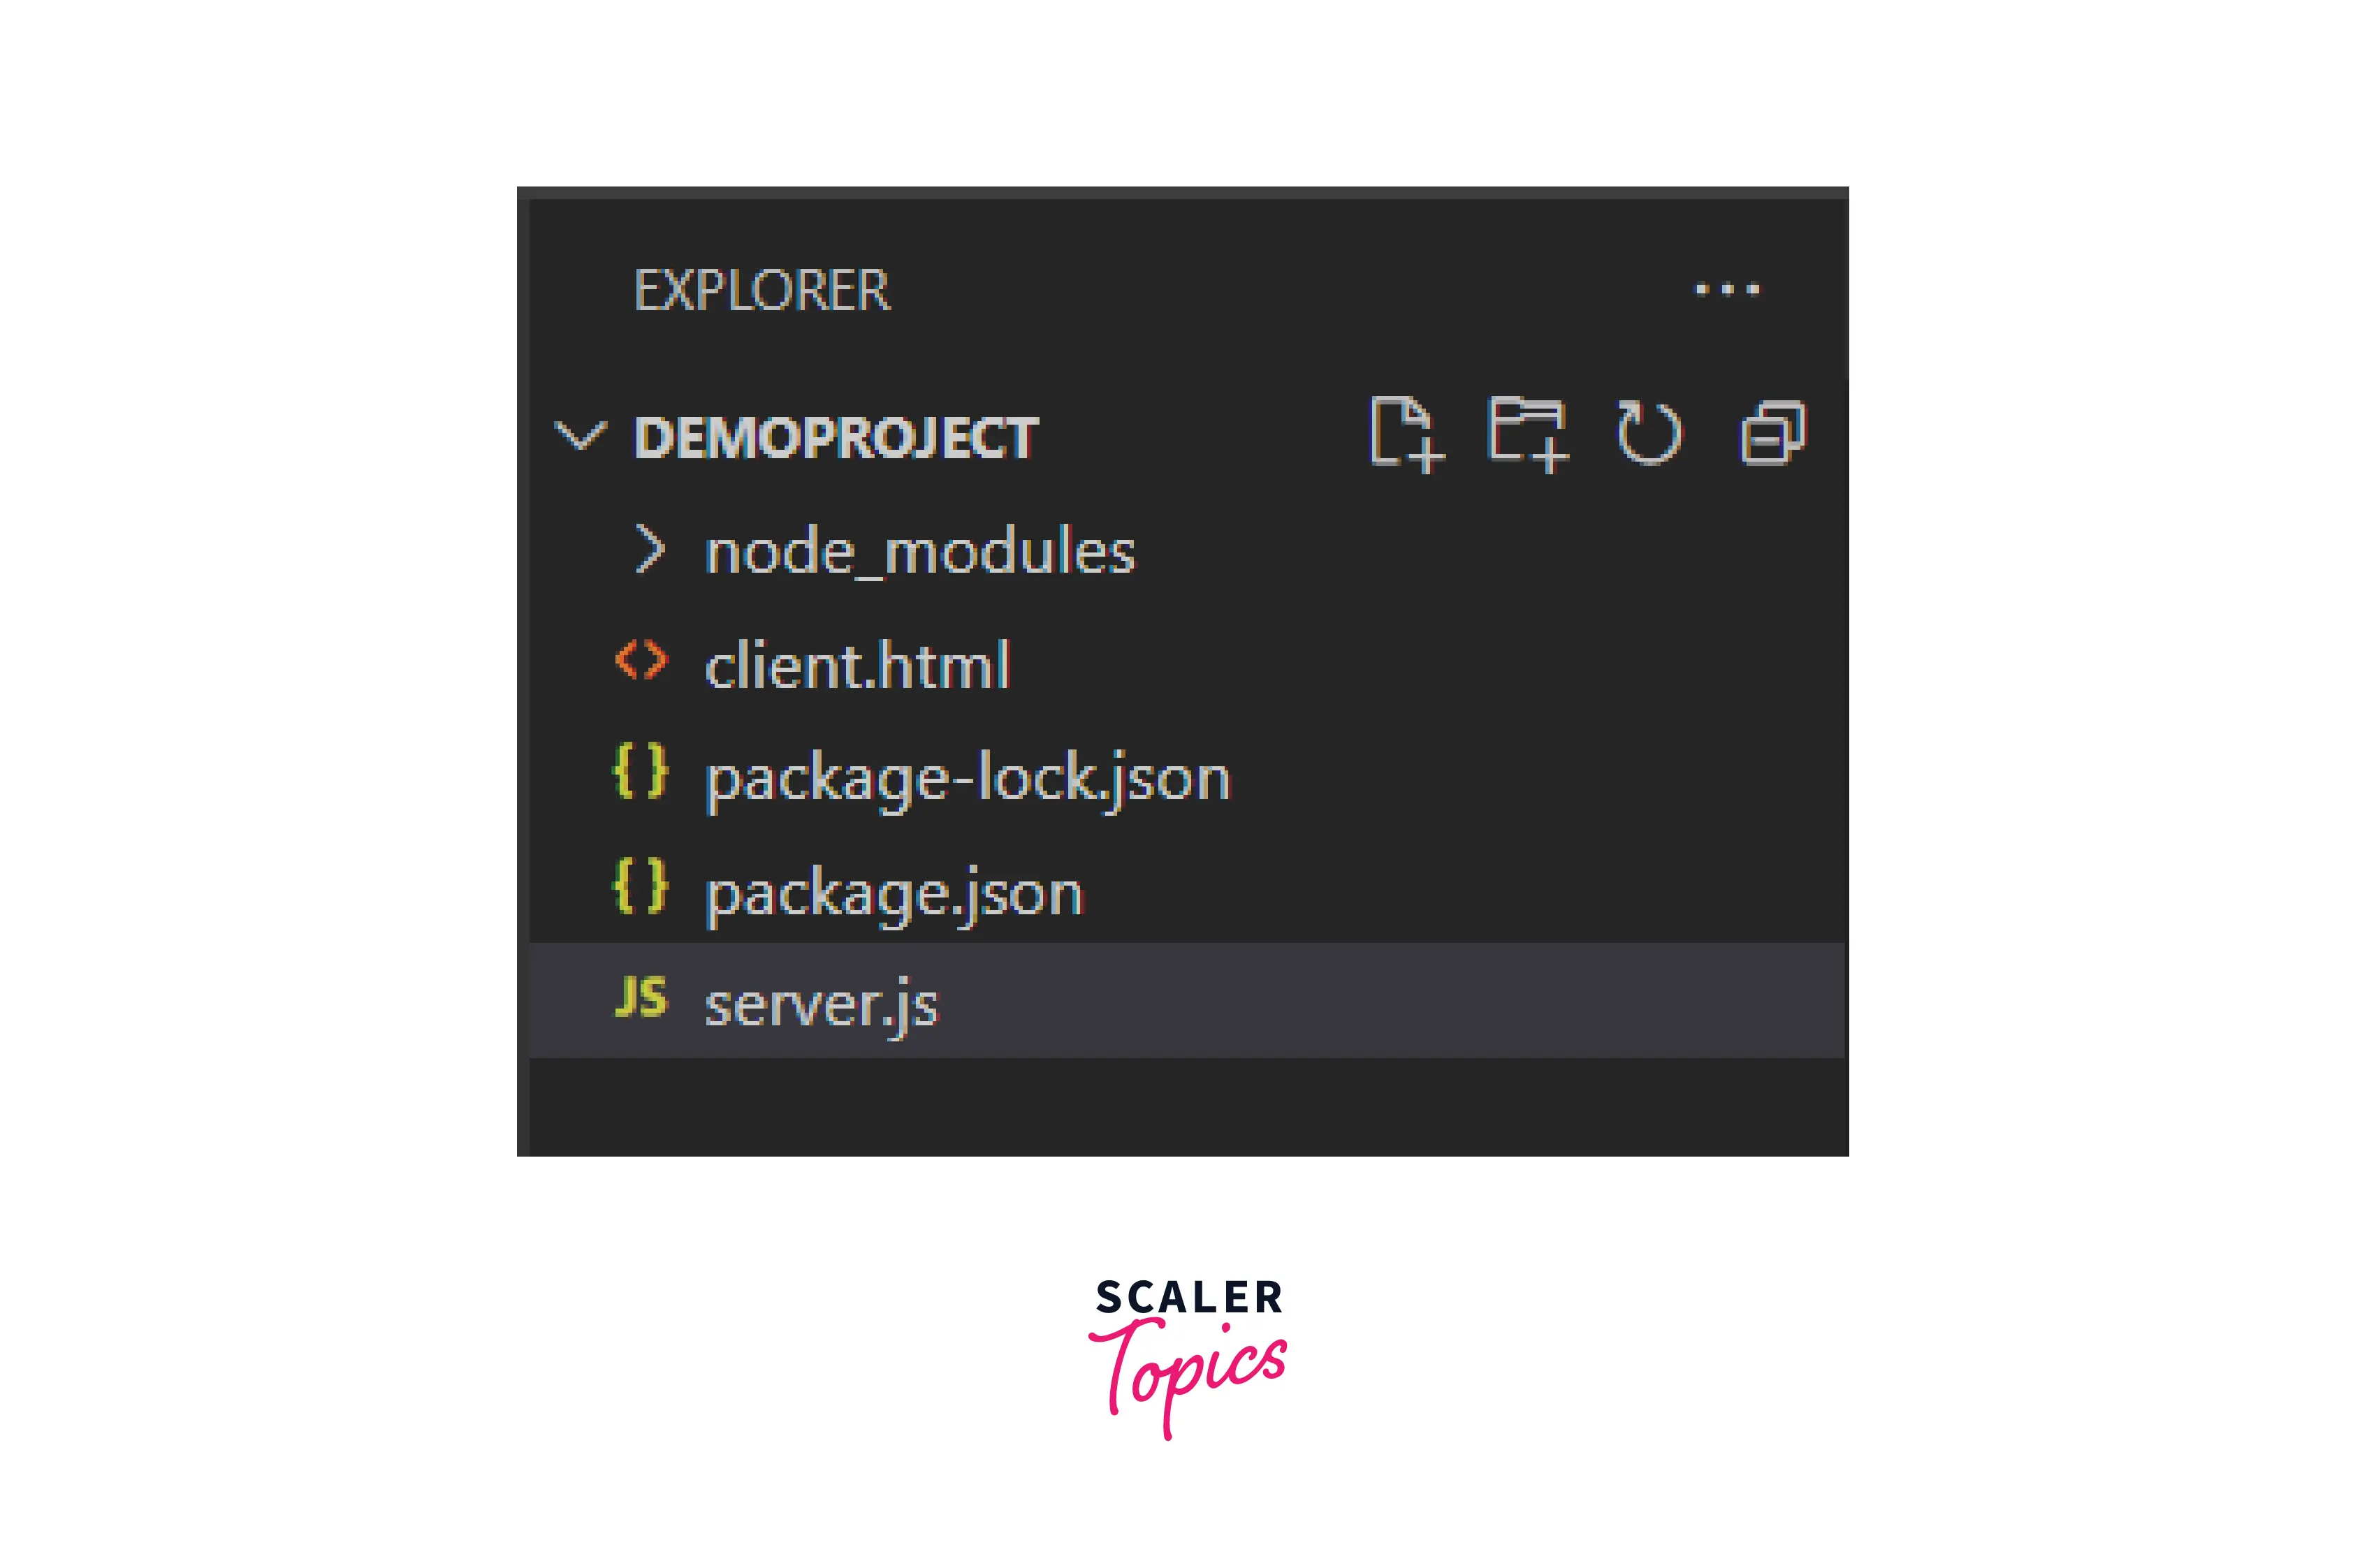
Step - 4 :
Now let us write our front-end page. It is a simple HTML Page with a JavaScript script to make a fetch request to our back-end server. Here's the snippet :This is how our folder structure looks :
-
Step - 5 :
Now we will run both our front-enserverr and our back-end server.For the Back-end, open up the server directory in the terminal and run the following command :
In our case it would be :
This would start our backend server.

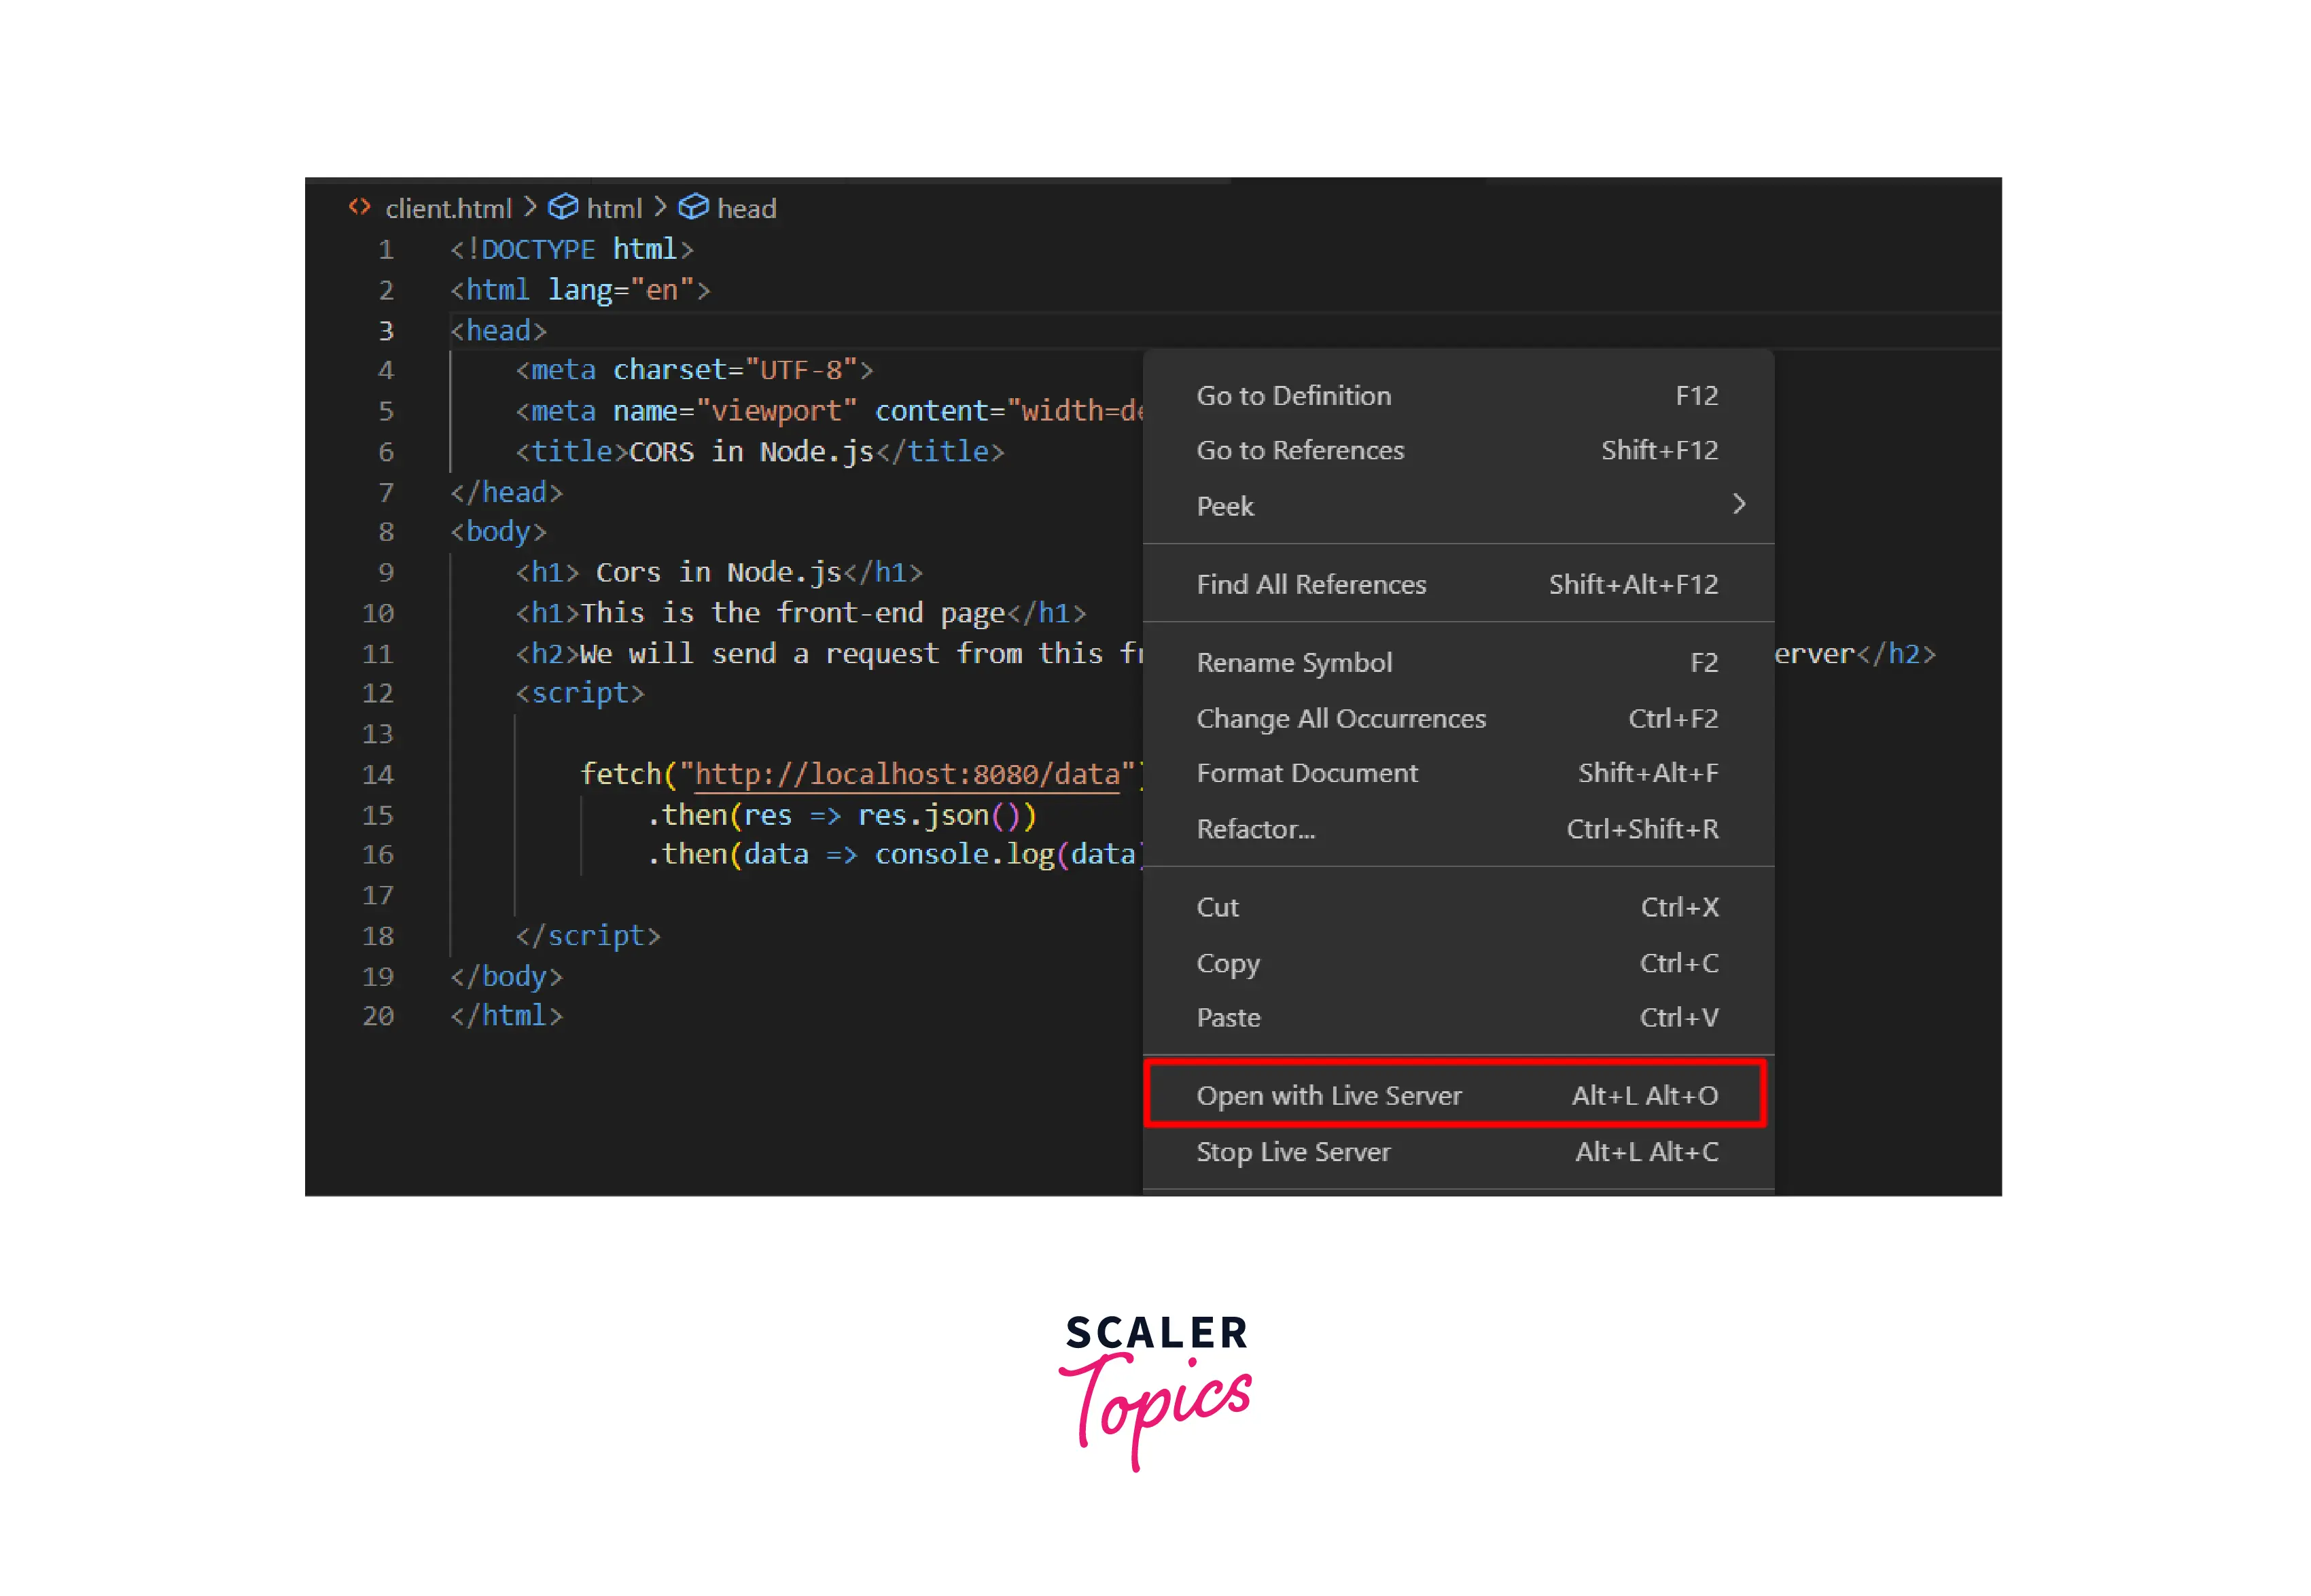
For the Front-End, go to the HTML page, right-click, and select Open with Live Server.
-
Step - 6 :
Now, Visit the HTML page in the browser and open the console. We can right-click on the browser window and select Inspect. Then we move to the Console panel. Here we would see the CORS error.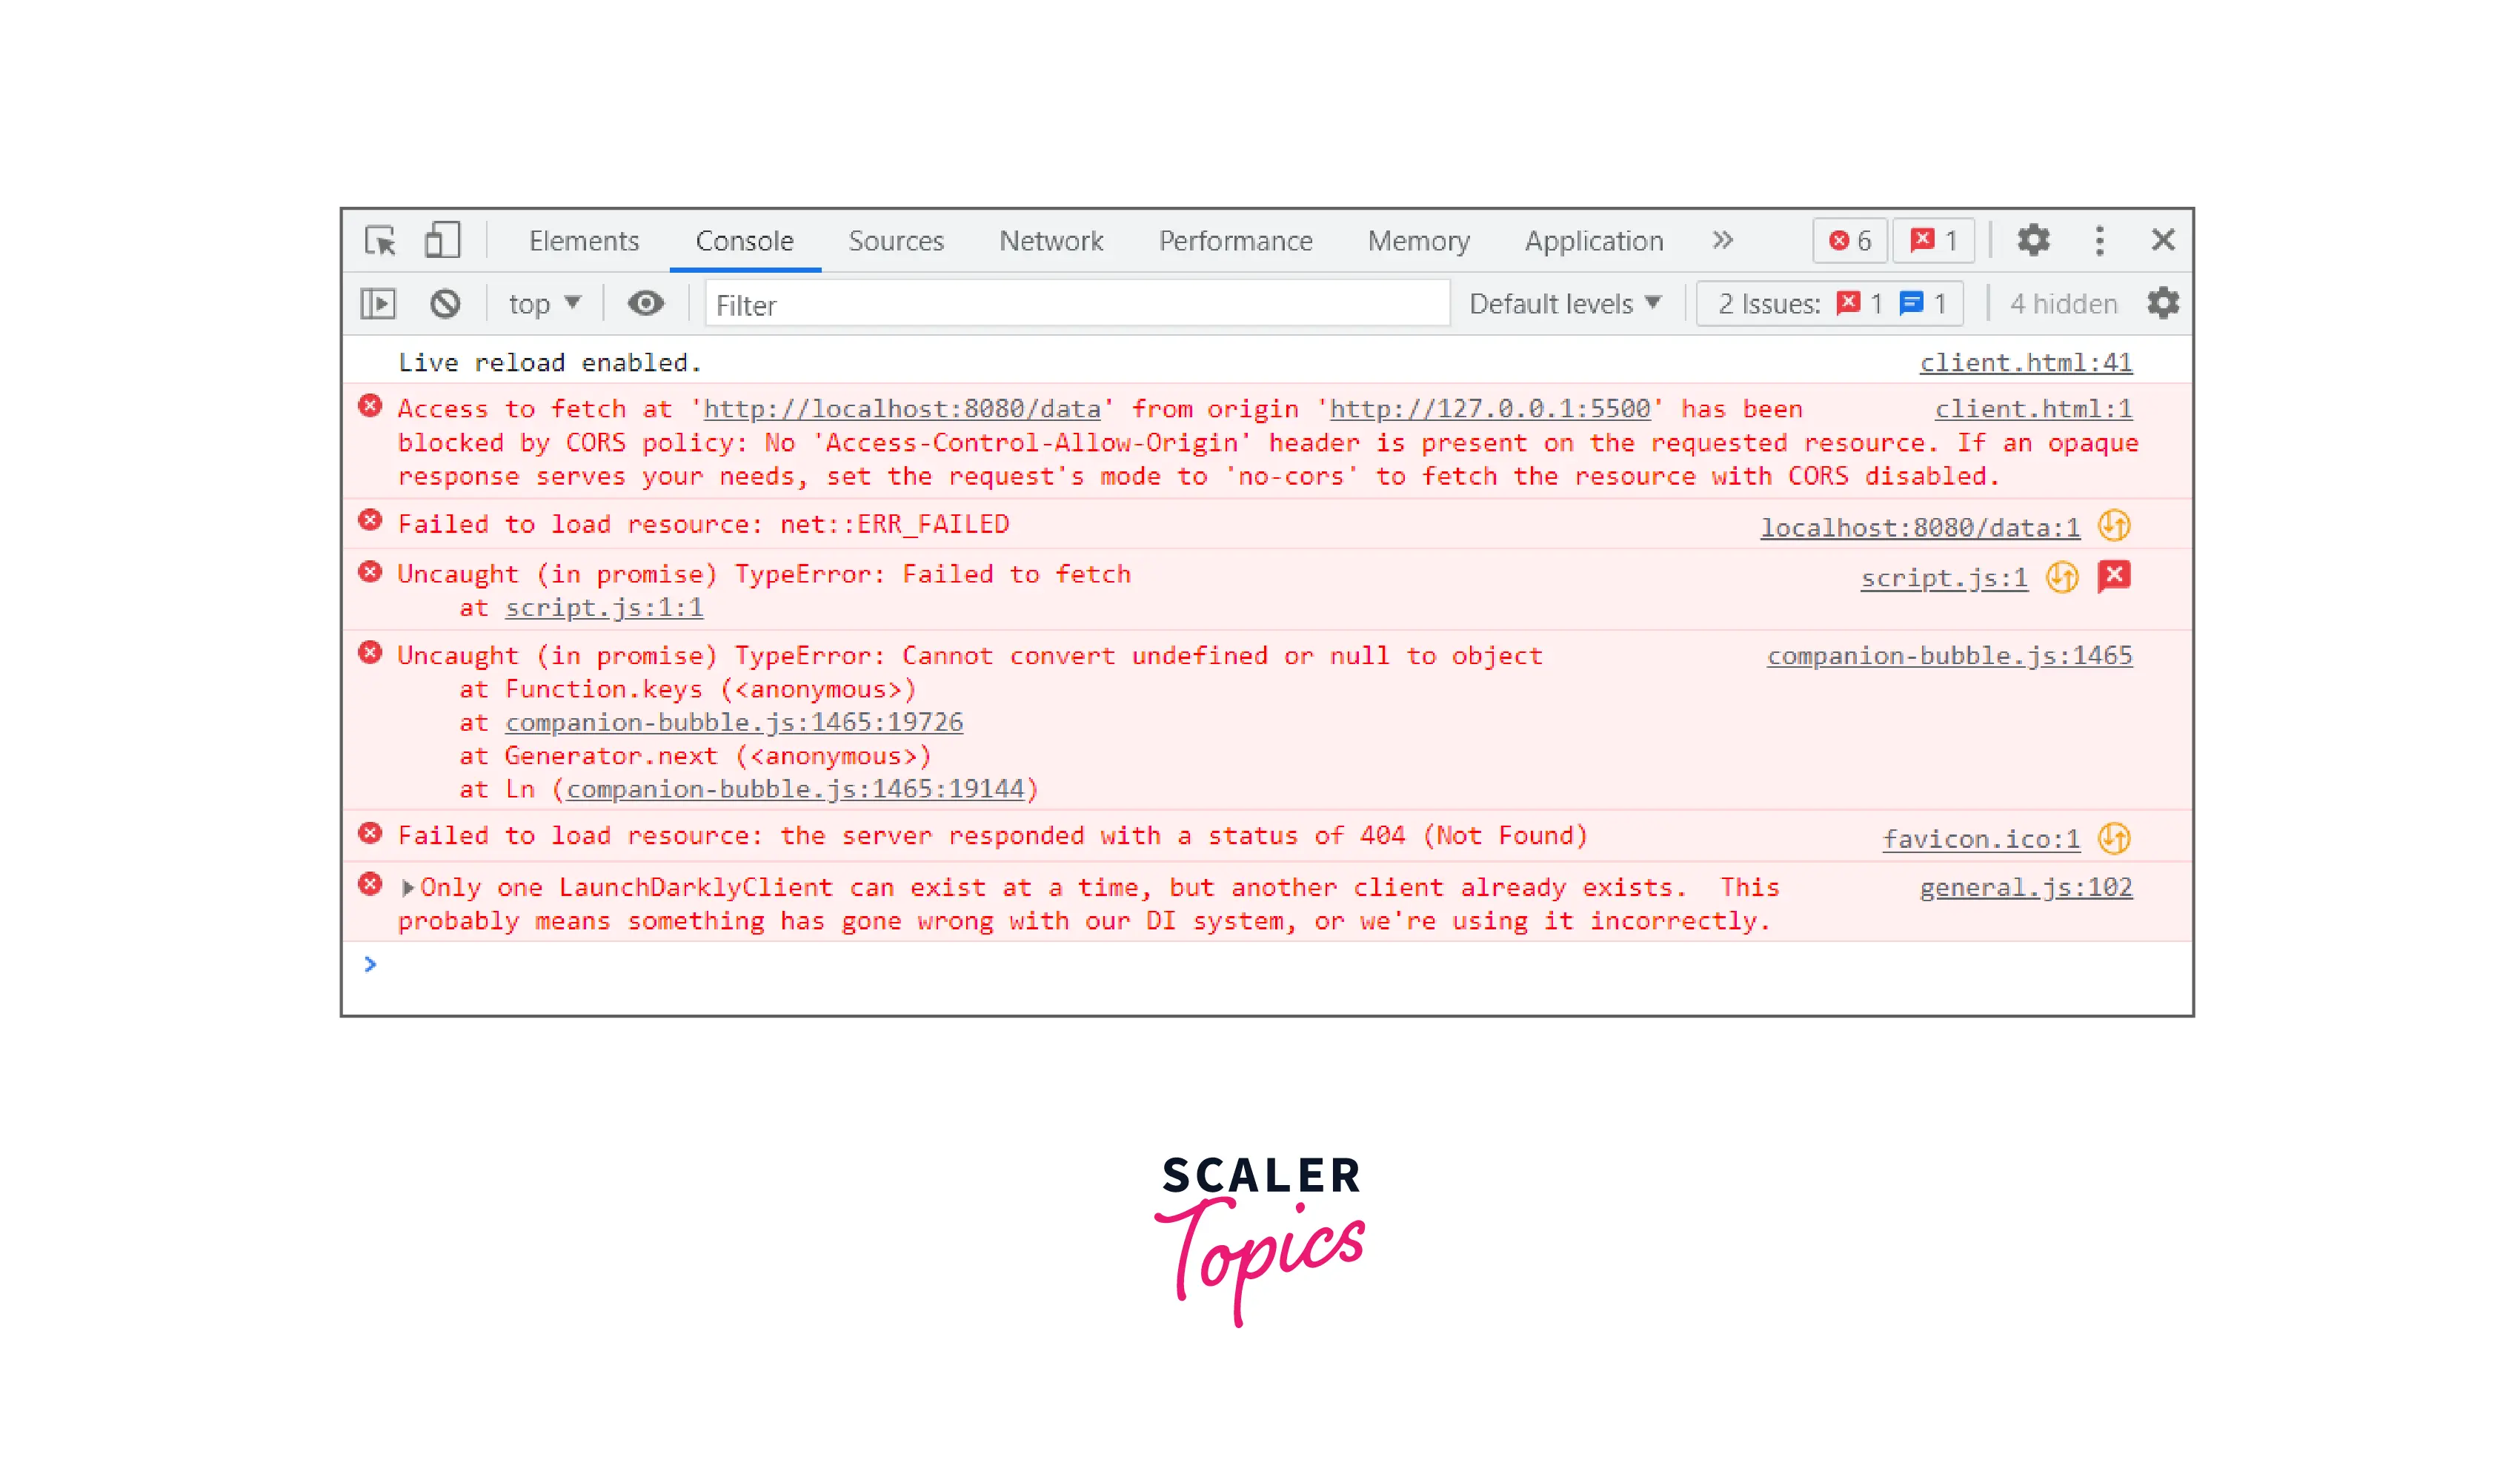
As mentioned in the error statement, the origin of the front-end and back-end are different and thus, the request was blocked by the browser. This led to the browser throwing the CORS error.
Now, we will use CORS to resolve this error. We will use the CORS package from NPM. Use the following command to install cors in node.js :
-
Step - 7 :
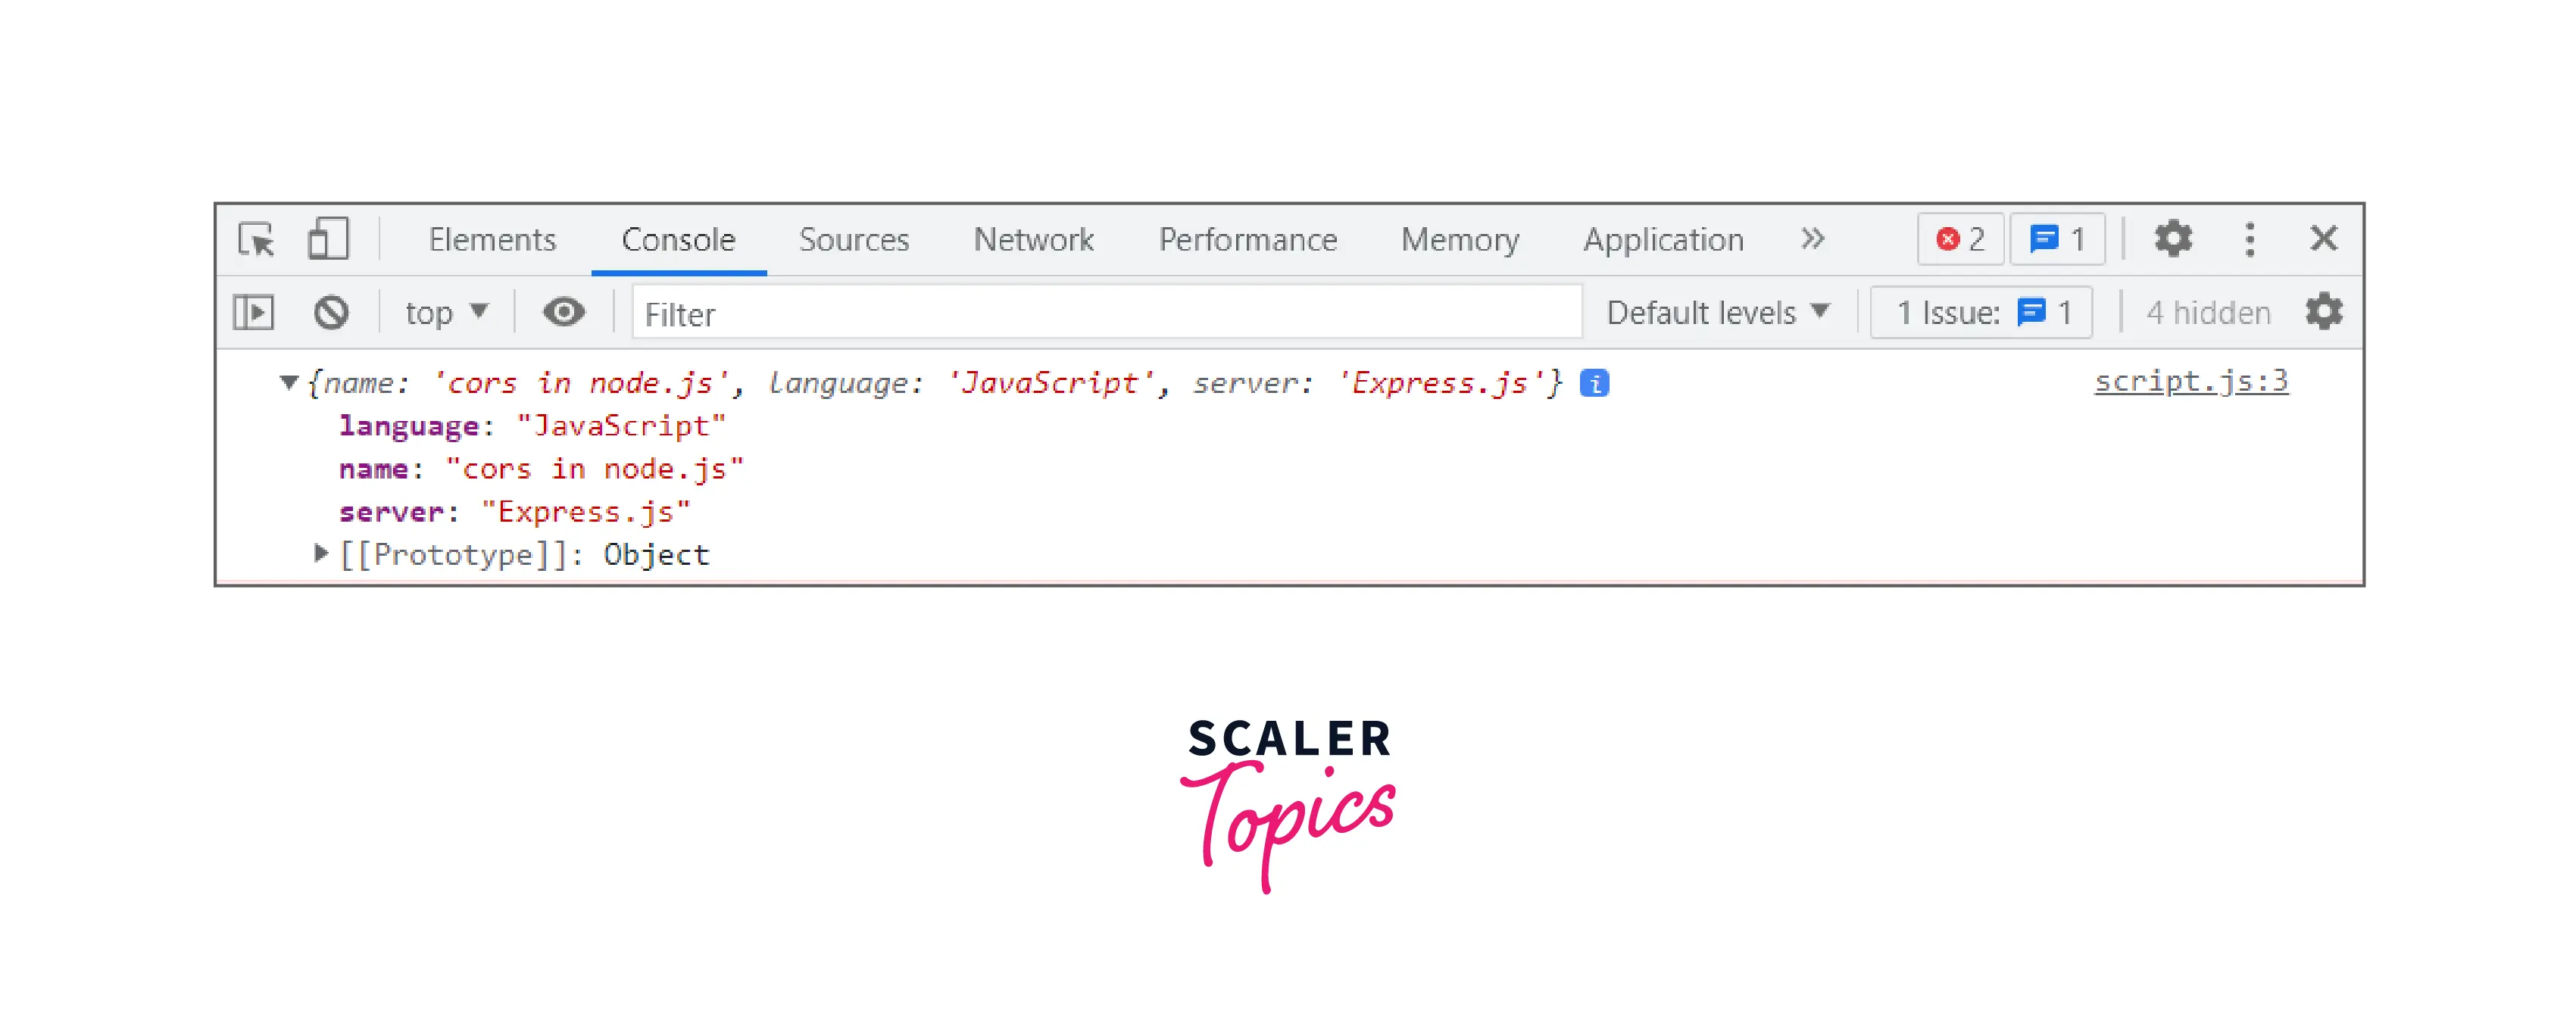
Now we use middleware with the client's origin URL in our server. We make an object with a key as origin and the value as the URL and pass it in the middleware. Here is the snippet :Here we can see that we have included the client-side origin URL in the middleware. This URL can also be found in the error message from earlier. Now we will try to run both our front-end and back-end servers again. Checking the console, we finally have the desired data. Thus, we have successfully fetched a cross-origin resource using cors in node.js.
JavaScript Maestro Seeking Full-Stack Mastery? Enroll in Our Full-Stack Developer Course and Uncover the Symphony of Front and Back-End Development.
Enable All CORS Requests
In the snippet above, we used the cors middleware for a specific origin. This will only enable cross-origin resource sharing from that particular URL and not any other. If we wish to enable all CORS requests in node.js, then we can modify our middleware to the following :
This statement must be written before our routes.
Turn Learning into Career Growth
Enable CORS for a Single Route
The above implementation use app.use() for middleware which enables the middleware for all routes. If we wish to use CORS in node.js for a particular route, then we can modify our route to the following :
As we can see, we have added the cors for only one of the two routes in the above snippet.
Scaler Placement Report and Statistics
Scaler learners achieved 2.5x salary growth with average post-Scaler CTC reaching ₹23L.
Configure CORS with Options
As we have seen earlier, the cors() function accepts an object with the origin. We can explicitly declare this object with properties other than origin as well. Here's an example :
Here we have passed in the origin URL as well as the request methods. Only the methods mentioned will be allowed. In this case, if the client makes a patch or a delete request, then it will fail. If they make a get or put request then it will be allowed.
Configuring Dynamic CORS Origins Using a Function
We can also try to configure the origin dynamically. There are multiple ways to achieve this based on our requirements. In the following snippet, we have implemented an asynchronous origin URL fetch from a database.
Here we get our origin from a database based on the request headers. This origin then gets assigned to our Origin in the options object.
Loading List of Allowed Origins from a Data Source
We can also get the list of allowed origins from the server. Here is the snipper for that :
This loads the allowed origins from the database(db object). An error is displayed if no origins are found or there is no access.
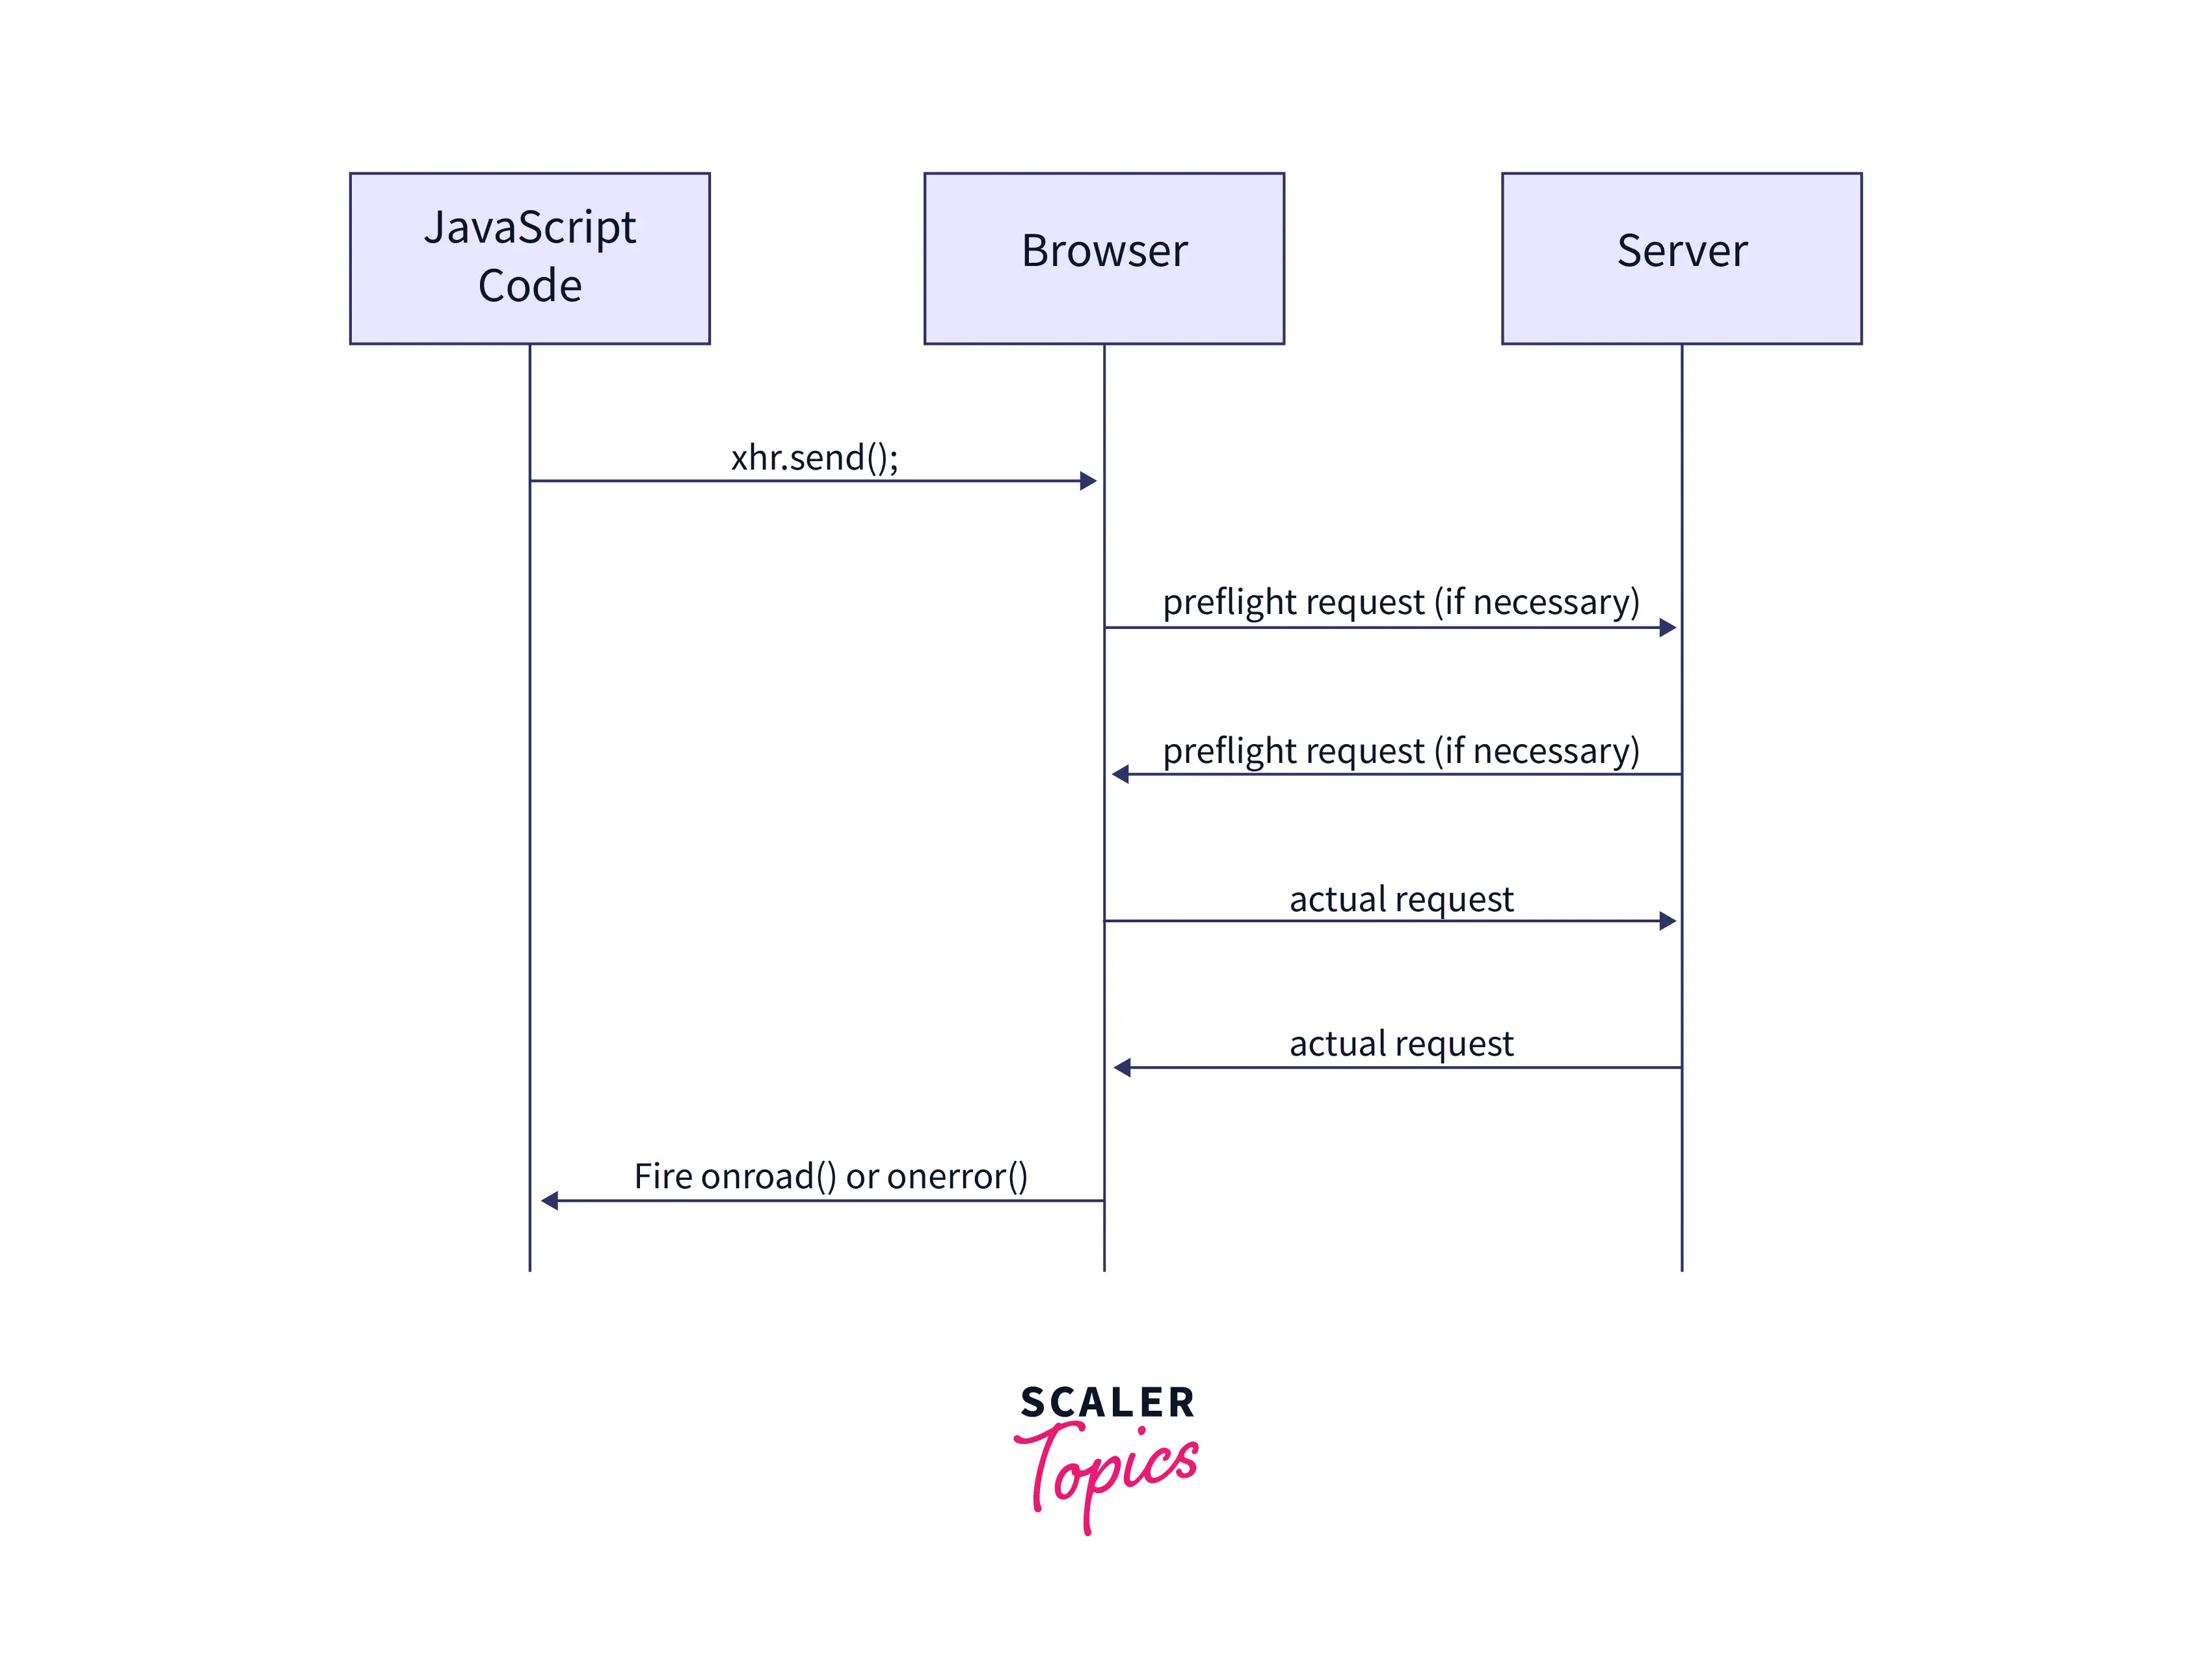
Pre-flight Requests
Every request must have a few mandatory properties like the request methods or the content type. Sometimes, this data is missing from the request headers. In these situations, the browser makes a pre-flight request to the back-end server with the available data to confirm if the back-end will serve the requests or not. Think of this pre-flight request as a check to see if future requests will get a response or not. At first, this seems to be an inefficient approach but this response can be cached for a certain time. To use a pre-flight request, we can use the following snippet :
Node.js is the backbone of modern web applications. Enroll in our Free Node.js course and learn to create efficient, real-time applications.
Conclusion
- CORS in node.js stands for Cross-Origin Resource Sharing. It is a mechanism by which resources are shared across different servers.
- Single-origin policy is important for safety however, blocks external requests. We need CORS to bypass this feature.
- An origin is a URL where the front-end or the back-end server is hosted.
- We can set up a back-end server using ExpressJS. We can then use CORS as middleware.
- A fetch request on an external origin will be not allowed unless CORS headers are present.
- There are multiple ways to implement the CORS headers and CORS requests as per our needs.
- Pre-flight requests are made to confirm if these request headers will fetch a response or not.