JWT Authentication with Node.js
Overview
There are several ways to transfer information from one party to another. It is very important that the information shared has not been meddled with by any third party. JWT is one of how the validity of the data transferred can be checked. Features like statelessness, lightweight, and popularity of JSON make JWT the most compatible and easy to use.
Pre-Requisites
- Node js should be installed locally on your system. You can download Node from their official website.
- A package manager like npm (Node package manager), which is typically installed with Node js installation.
- Basic understanding of the HTTP headers and the JSON format.
- Basic knowledge of Node.js and Express.js
Scaler Placement Report and Statistics
Scaler learners achieved 2.5x salary growth with average post-Scaler CTC reaching ₹23L.
What is JSON Web Token (JWT)?
JSON web token, based on the open standard (RFC 7519), is a JSON-based method for transferring data over the network. It is a compact and self-contained method where the data is digitally signed using a private key or public key pair provided by an Identity provider. This allows the integrity and authenticity of the data to be verified by the parties involved in the transfer.
JWT is signed and encoded but not encrypted, as its purpose is not to hide the data but to ensure its authenticity. JWT is a stateless and token-based authentication mechanism. JWT is client-side based. Hence, the server is not required to store session information in a database.
There are two types of JWTs:
- JSON Web Signature (JWS) - Used to make data integrity protected. Anyone with the token can see the data but not modify it, as signature verification will fail.
- JSON Web Encryption (JWE) - Used to encrypt the data as well as make it integrity protected. A secret key is also required to view the data along with the token.
What are Authentication and Authorization?
Authentication and authorization are two crucial security processes that determine the security of the system when combined. Authentication verifies the identity of users, while authorization determines their access rights.
Authentication : Authentication is the process in which the identity of the user is verified with the help of some credentials. If valid credentials are entered by the user, then only the process of Authorization will come into the picture. Hence, in authentication, it is verified that someone or something is what they claim to be. For example, we have our government-issued identity cards to verify our identity.
Authorization : After the user has been authenticated, it is checked if the user has the right to access a certain resource. If the user has been allowed to view the resource, the user can be considered authorized. Hence Authorization is a process that determines the access to protected resources for a certain user. For example, only the owner of a house has its full rights.
Transform Your Career
Choose from our industry-leading programs designed for career success
Modern Software and AI Engineering Program
Master full-stack development with AI integration

Modern Data Science and ML with specialisation in AI
Advanced data science techniques with AI specialization
Advanced AIML with Specialisation in Agentic AI
Deep dive into AIML with focus on Agentic systems
DevOps, Cloud & AI Platform Engineering
Build and manage AI-powered cloud infrastructure
AI Engineering Advanced Certification by IIT-Roorkee
Premier AI engineering certification from IIT-Roorkee
Why Do Applications Use JSON Web Tokens for Authentication?
There are several reasons why applications use JWT for authentication :
- JWT is less voluble when compared to other alternatives like XML. Hence after encoding, the size is smaller, and it is more compact. This makes JWT a better option to be passed in HTML or HTTP environments.
- In the context of security, the HMAC algorithm is used to sign JWT symmetrically. A pair of public/private keys can also be used to sign JWT. Signing XML is a complex process when it is done, but some security holes arise in this process.
- JWT is also quite suitable for implementing authorization at a large scale. Processing of JWT can be done on any platform with ease.
- JSON parsers are quite standard in most programming languages. XML does not have a mapping between documents and objects naturally. Hence it is very convenient to use JWT.
Note: HMAC is a type of key hash authentication code involving a hash function and a secret key. It takes a message, a secret key, and a hash function.
Advantages of Node.js Authentication With JWT
There are several advantages of implementing authentication with JWT in Node.js :
- The primary advantage of JWT is that it provides the scalability of large-scale stateless applications. JWT is also becoming popular among big companies like Google, Twitch, Amazon Cognito user pool, etc. Hence its usage will keep growing in the future.
- Simple verification can be easily implemented.
- An authentication service can be easily implemented or outsourced.
- It is more trustworthy than cookies and sessions because it can be validated.
The JWT Format
Structure of JWT
The JWT token has three parts separated by a period(.) . An abstract representation of JWT will look like this:
header.payload.signature
All three parts are individually base64url encoded. Here is a sample jwt token,
eyJhbGciOiJIUzI1NiIsInR5cCI6IkpXVCJ9.eyJzdWIiOiIxMjM0NTY3ODAwIiwiaWF0IjoxNTE2MjM5MDIxLCJuYW1lIjoiSm9obkRvZSJ9.gmWlFJ4Qvv05QbJ0htA96ZVqvK3PLq1U0xDgFIlJ1pQ
Let’s take a look at the three parts of JWT in detail:
Part One - The Header The first part of the JWT token is the header. It is known as JOSE (Javascript Object Signing and Encryption). The header contains various claims that in general define how the rest of the JWT is to be parsed. They describe if the JWT is signed or encrypted and which algorithm has been used for signing the JWT.
For example, in our sample JWT token, the header part is : eyJhbGciOiJIUzI1NiIsInR5cCI6IkpXVCJ9
It is the base64url encoded form of the following JSON :
In the above JSON object, the alg specifies the cryptographic algorithm used to sign the JWT. In our case the algorithm used is HS256. The typ specifies the type of media in JWT. The typ parameter is mainly used in cases where JWT is mixed with other objects carrying the JOSE header. By default the typ is JWT.
According to the type of JWT various other claims can be included in the header object. Here is a list of the claims that can be used in authorization headers:
| Claims | Description |
|---|---|
| typ | Token type |
| alg | Algorithm |
| cty | Content type |
| jku | JWK Set URL |
| kid | Key ID |
| jwk | JSON Web Key |
| x5u | X.509 URL |
| x5c | X.509 Certificate Chain |
| x5t | X.509 Certificate SHA-1 Thumbprint |
| x5t#S256 | X.509 Certificate SHA-256 Thumbprint |
| crit | Critical |
We can add user-defined claims also in the header though this is of limited use.
Part Two - The Payload The second part of the JWT is the payload. It contains the actual data that has all the information to be passed. Certain standard claims may be added, but they are not mandatory. The claims are of three types - public, private and registered.
- Registered Claim Names — They are a set of predefined names that have already specified meanings. They are not mandatory but are recommended to provide some useful and interoperable information.
- Public Claim Names — They can be defined by anyone using JWT, but to avoid a collision, these names should be either registered in IANA “JSON Web Token Claims” registry or should be a collision-resistant name (highly unlikely to collide).
- Private Claim Names — They can be anything as agreed by the communicating parties. Unlike public names, they are prone to collision.
Here is a list of registered claim names. This means that they have a prespecified meaning.
| Claims | Description |
|---|---|
| iss | Issuer |
| sub | Subject |
| aud | Audience |
| exp | Expiration Time |
| nbf | Not Before |
In the sample token, the payload part is: eyJzdWIiOiIxMjM0NTY3ODAwIiwiaWF0IjoxNTE2MjM5MDIxLCJuYW1lIjoiSm9obkRvZSJ9
It is the bse64url encoded version of:
The payload has one public claim (name) and two registered claims ( sub and iat ). Sensitive information should never be included in payload data because anyone can view the data by easily base64 decoding it.
The claim names must be kept short as jwt is meant to provide a small footprint.
Part Three - The Signature The third and last part of the JWT is the signature. It is also base64url encoded. The combination of the encoded header, encoded payload along with the secret is signed using an algorithm. The result is then again encoded to form the signature. The signature is used to check if the header or payload has not been modified and if the sender is appropriate.
Hence the calculation of signature can be represented as:
header = {...}
payload = {...}
encodedString = base64UrlEncode(header) + "." + base64UrlEncode(payload);
signature = base64UrlEncode(HMACSHA256(encodedString, 'secret'));
Note: HMAC is a type of key hash authentication code involving a hash function and a secret key. It takes a message, a secret key and a hash function.
The secret key is mixed with the message, and the hash of the combination is calculated using the cryptographic hash function. We can represent HMACSHA256 as follows.
HMACSHA256 = SHA256(message + secret)
The above formula is just a representation. In reality, the HMACSHA256 is more complex but based on this idea.
In our sample token, the base64url encoded version of the header and payload are eyJhbGciOiJIUzI1NiIsInR5cCI6IkpXVCJ9 and eyJzdWIiOiIxMjM0NTY3ODAwIiwiaWF0IjoxNTE2MjM5MDIxLCJuYW1lIjoiSm9obkRvZSJ9 respectively.
Now to calculate the signature, the combination of the encoded header and the encoded payload separated with a period is passed into the HMACSHA256 function along with a secret key. Then the hash is encoded to form the signature.
We are taking the secret key as samplesecret. Hence the hash is calculated as follows:
hash = HMACSHA256('eyJhbGciOiJIUzI1NiIsInR5cCI6IkpXVCJ9.eyJzdWIiOiIxMjM0NTY3ODAwIiwiaWF0IjoxNTE2MjM5MDIxLCJuYW1lIjoiSm9obkRvZSJ9', ‘samplesecret’)
Now the hash is encoded as follows and we get the signature: signature = base64UrlEncode(hash)
Now summing it all up,
Our header is
payload is
and signature is
The final token will be calculated as follows : jwtToken = base64UrlEncode(header) + "." + base64UrlEncode(payload) + "." + base64UrlEncode(signature)
Hence in our case, the token becomes: eyJhbGciOiJIUzI1NiIsInR5cCI6IkpXVCJ9.eyJzdWIiOiIxMjM0NTY3ODAwIiwiaWF0IjoxNTE2MjM5MDIxLCJuYW1lIjoiSm9obkRvZSJ9.gmWlFJ4Qvv05QbJ0htA96ZVqvK3PLq1U0xDgFIlJ1pQ
How Do JSON Web Tokens Work?
In the process of authentication, when the user provides legitimate credentials, A JWT token is returned. Since the tokens act as credentials, security issues must be taken into consideration, and they must be prevented. The tokens should have an expiry time, and they should not have any sensitive data.
When the user wants to access a protected route, the JWT must be sent by the user agent in the Authorization header following the Bearer schema as shown below :
Authorization: Bearer <token>
This can act as a stateless authorization mechanism. The protected routes of the server will validate the JWT in the authorization header. If the JWT is present and valid, users will get access to the protected resource. Data in JWT can also help in reducing the need to query the database.
If JWT is being sent as an HTTP header, in that case, we must take care of the size of the token. Some servers don't accept headers of more than 8KB. If the token is sent in the Authorization header, Cross-Origin Resource Sharing (CORS) won't be an issue as it doesn't use cookies.
The following diagram shows the entire process of obtaining and using JWT.
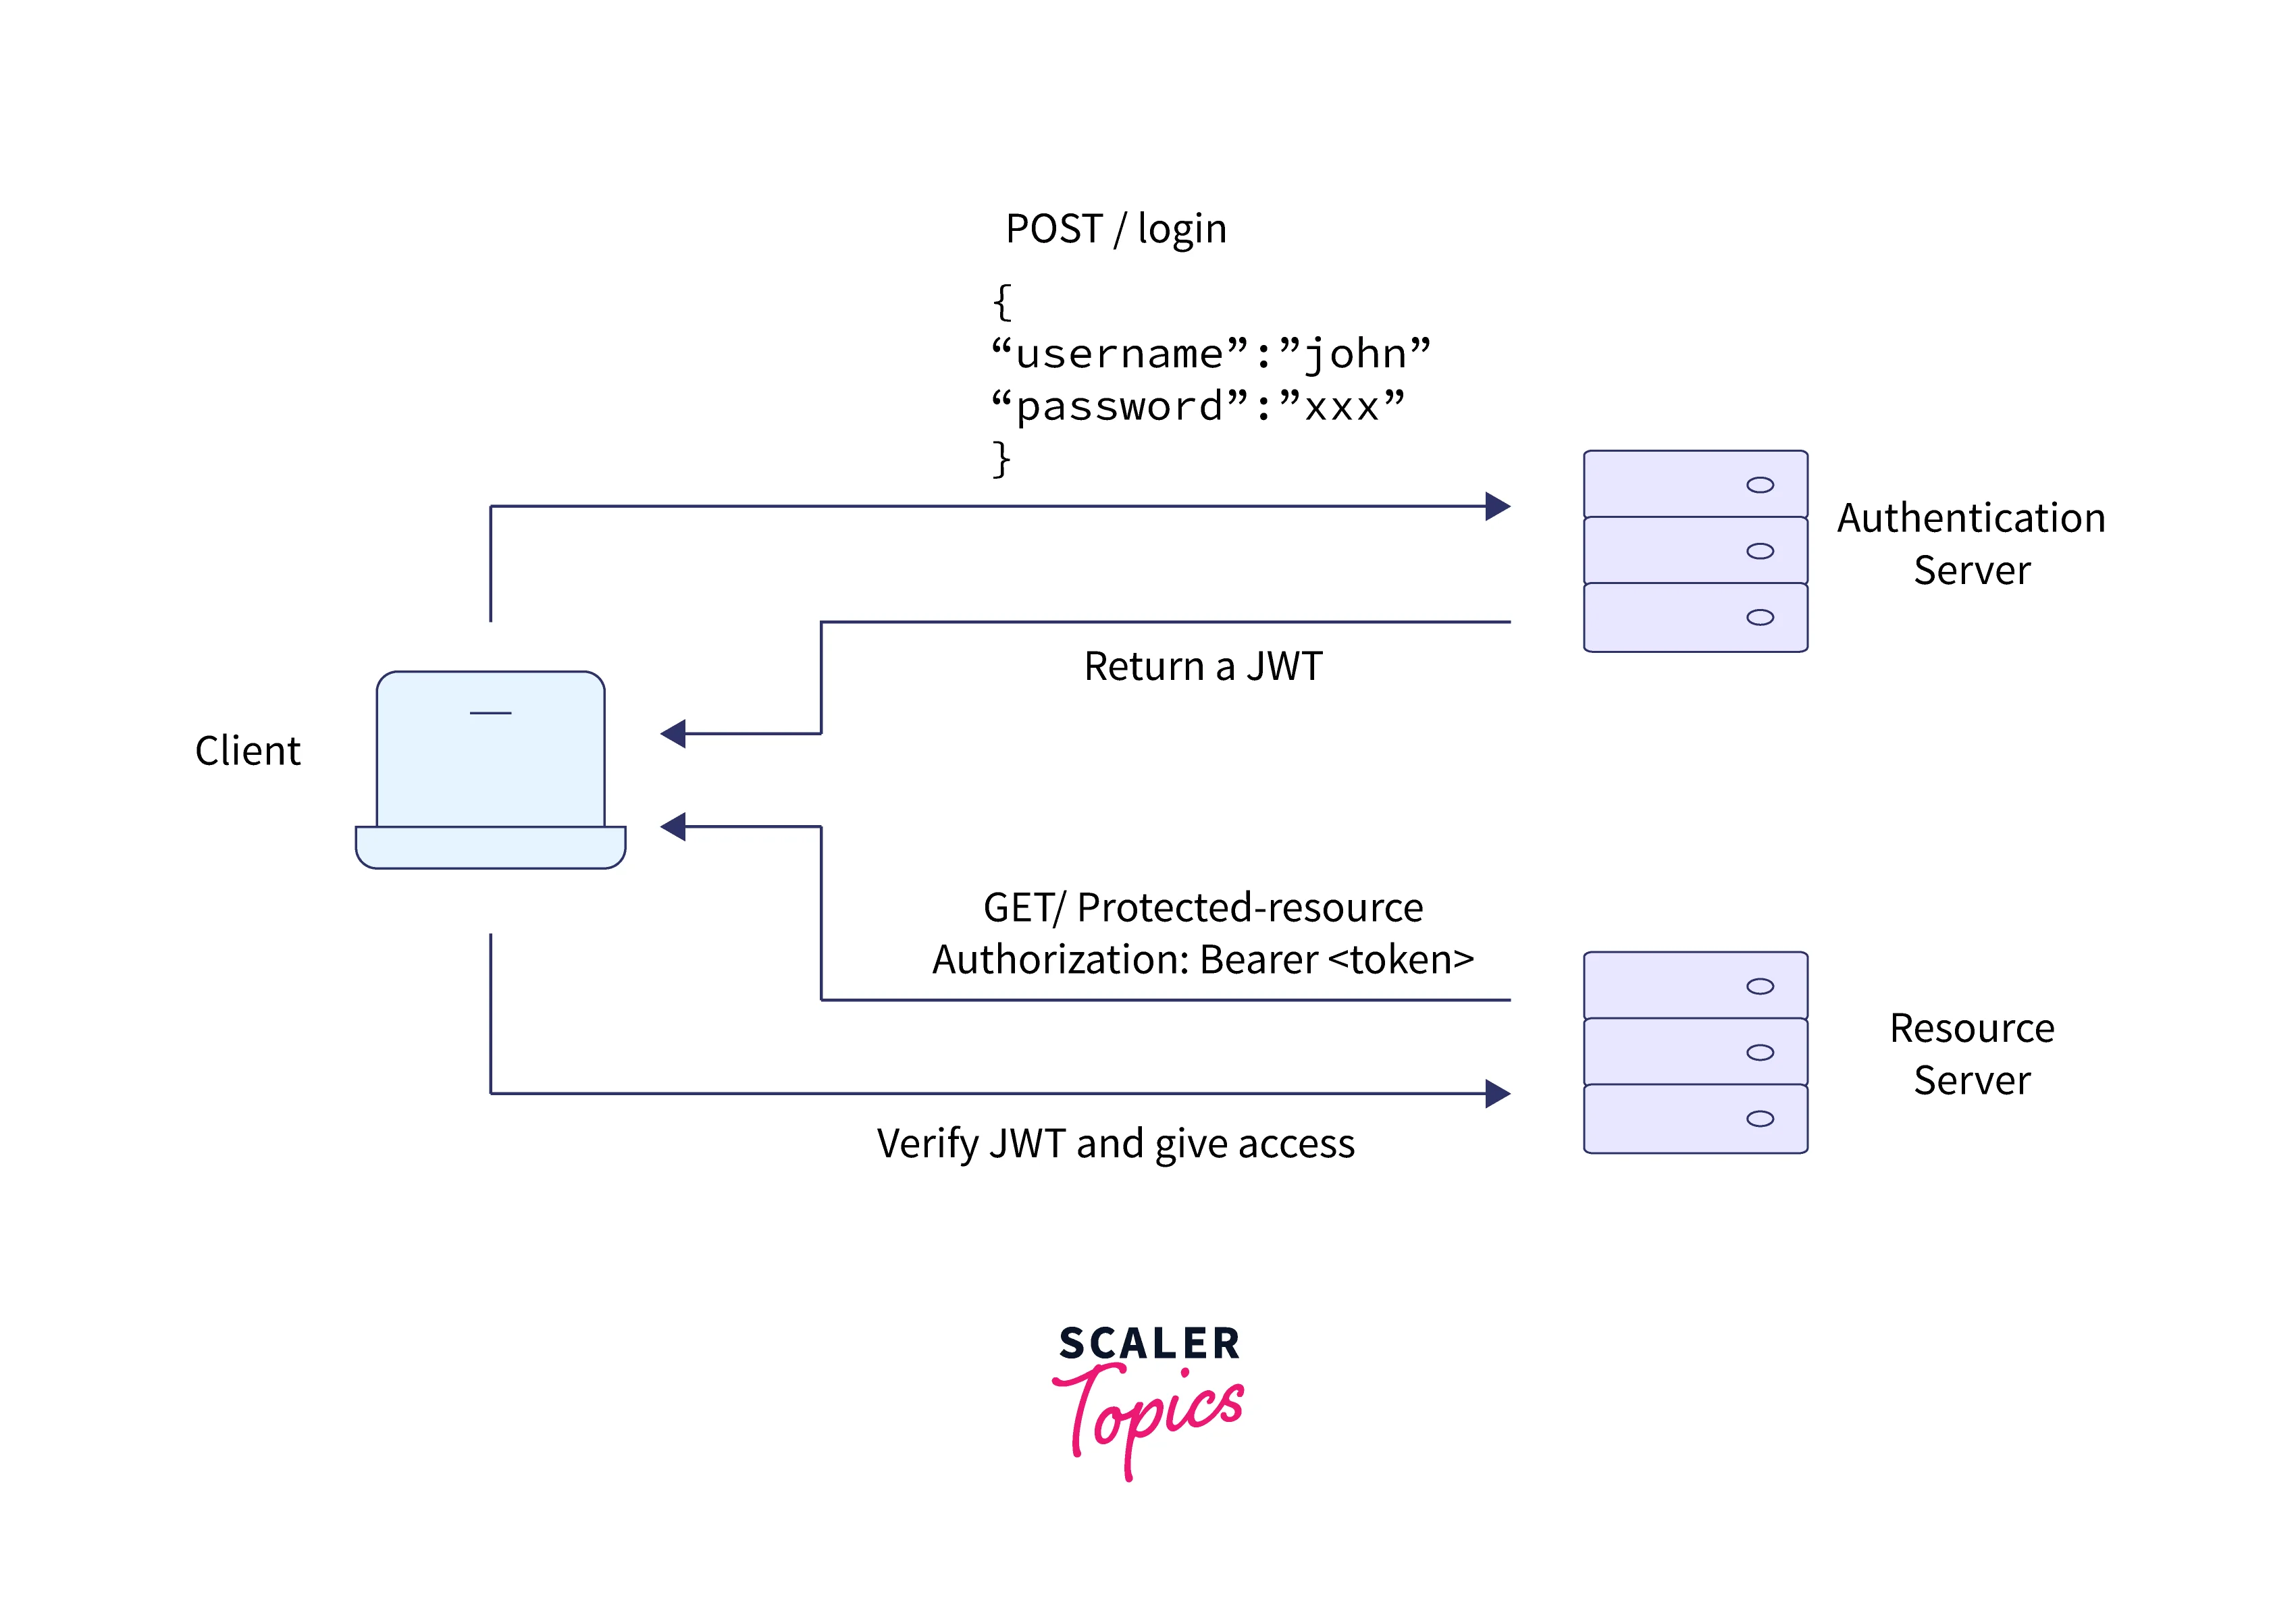
1. The user sends credentials for the authentication process. 2. On successful authentication, the server returns a token. 3. The token is used by the application to access some protected resource.
Turn Learning into Career Growth
Verifying a JWT
We have discussed how the signature of the JWT token is created. The combination of the encoded header and the encoded payload is used with a secret key to generate a hash using the hashing algorithm. This hash is again encoded to form a signature.
When the JWT token is received by the receiving party, if the token follows the format of JWT, then the header and payload can be easily extracted. The data is base64url encoded; hence it can be decoded easily.
The header contains the algorithm used and other details for the signing of JWT. Hence the signature is generated based on the information in the header part of the JWT. If the signature generated is the same as the third part of the JWT ( that is, the signature sent in JWT ), then the JWT is valid. This way, the JWT verification can be easily done.
Implementing JWT Authentication in Node.js
Let's have a look at how we can implement authorization using JWT in Node.js.
Before that, if you don't have Node.js installed on your system, download the latest version of the Node.js installer from the official website.
Step 1: Creating the HTTP Server
Create a project directory and initiate a node project using the below command:
Install the dependencies that will be required with the below command :
Now create the index.js file with the following code :
The above code makes use of express to create an HTTP server on port 3000. We have added a get endpoint on the home URL that returns the message Welcome to this API server. The express.json() middleware is used to parse the body of the requests in JSON format.
Step 2: Handling User Sign In
Now let us add the functionality of user login. We will take data from requests sent by the user. We are extracting the id, username and email from the body of the request.
In the above code, we are creating a user object that has the details sent by the user. Using the sign function of the jwt module we are generating the token by passing the secret key. The token generated is sent in the response.
Step 3: Handling Post-Authentication Routes
Now we will add the endpoints that will provide the functionality of verifying the tokens sent by the user and authorizing them to access protected resources.
In the above code, the concept of middleware has been used. A middleware is a function that has access to the request and response objects. The request and response first pass through the middleware function verifyToken and then. In this function, the token is extracted from the Authorization header and then passes it to the next function in the request object.
Then JWT verified with the secret key provided. If the verification is successful, then the resource is granted.
Step 4: Renewing Your Token
For renewal of the token, the following functionality is used:
- The JWT is issued with a short expiry time.
- The expiry date of the token is checked by the application, and if the token has expired, it is refreshed, or a new token is sent by the server.
- The server gets a refresh request, and if the auth flag is set for the user, then a new token is issued.
- Repeat.
Hence the server keeps monitoring the token and extends its expiry time from time to time so that the token gets renewed and does not expire frequently.
Conclusion
- JSON web token is a JSON based method for transferring data over the network.
- JWT is a stateless and token-based authentication mechanism used on the client side.
- JWT types are Json Web Signature and Json Web Encryption.
- Authentication verifies the identity of users, while authorization determines their access rights.
- JWT can be used in large-scale stateless applications, it is compact and more secure than cookies and sessions.
- Structure of JWT has three parts - Header, Payload, and Signature.
- Header has information about how to parse the token, the payload has actual data, and the signature is used in the verification of the token.