Panorama with OpenCV
Overview
In this article, we will see how to perform Panorama stitching using Python and OpenCV. Panorama is used in several fields such as Wide-Angle Photography, AR/VR, Survailance, etc. Panorama stitching will bring a larger view of an environment and makes it easier to extract information from a single image. For performing this task we will need Python and OpenCV.
What are We Building?
We are going to create a visually immersive merging of two images, which will make it look like a single one. Panorama stitching is the process of bringing two images which represent the same locality together to form a single stretched image. OpenCV provides various algorithms to perform image stitching, allowing users to merge images into a single panorama.
Pre-requisites
- OpenCV provides a robust and versatile toolkit for creating panoramic images, often referred to as image stitching.
- This powerful functionality enables professionals to seamlessly merge multiple images into a single, cohesive panorama.
- In this article, we will delve into the process of building high-quality OpenCV panoramas, exploring the key steps involved and highlighting the advantages of utilizing this renowned computer vision library.
When utilizing OpenCV panorama stitching, we are building a comprehensive solution that combines multiple overlapping images into a single, visually captivating panoramic image.
This involves leveraging the extensive functionality provided by OpenCV to perform tasks such as image acquisition, preprocessing, feature detection and matching, image transformation, image blending, and panorama construction.
How Are We Going to Build This?
There are several Computer vision techniques involved in OpenCV panorama, these include,
- Keypoint detection :
Identifying distinctive points or regions in an image that can be used as reference for further analysis or matching. - Descriptor detection :
Assigning numerical descriptors to keypoints, encoding their local appearance or texture information. - Feature matching :
Establishing correspondences between keypoints in different images to find matching points or regions. - Homographic estimation :
Estimating the homography matrix that represents the geometric transformation between two images, allowing for proper alignment and registration. - Perspective warping :
Applying the homography transformation to warp one image to align with another, ensuring seamless blending and creating a visually consistent panorama.
We'll see the above steps in detail below. These steps are essential to create a OpenCV Panorama.
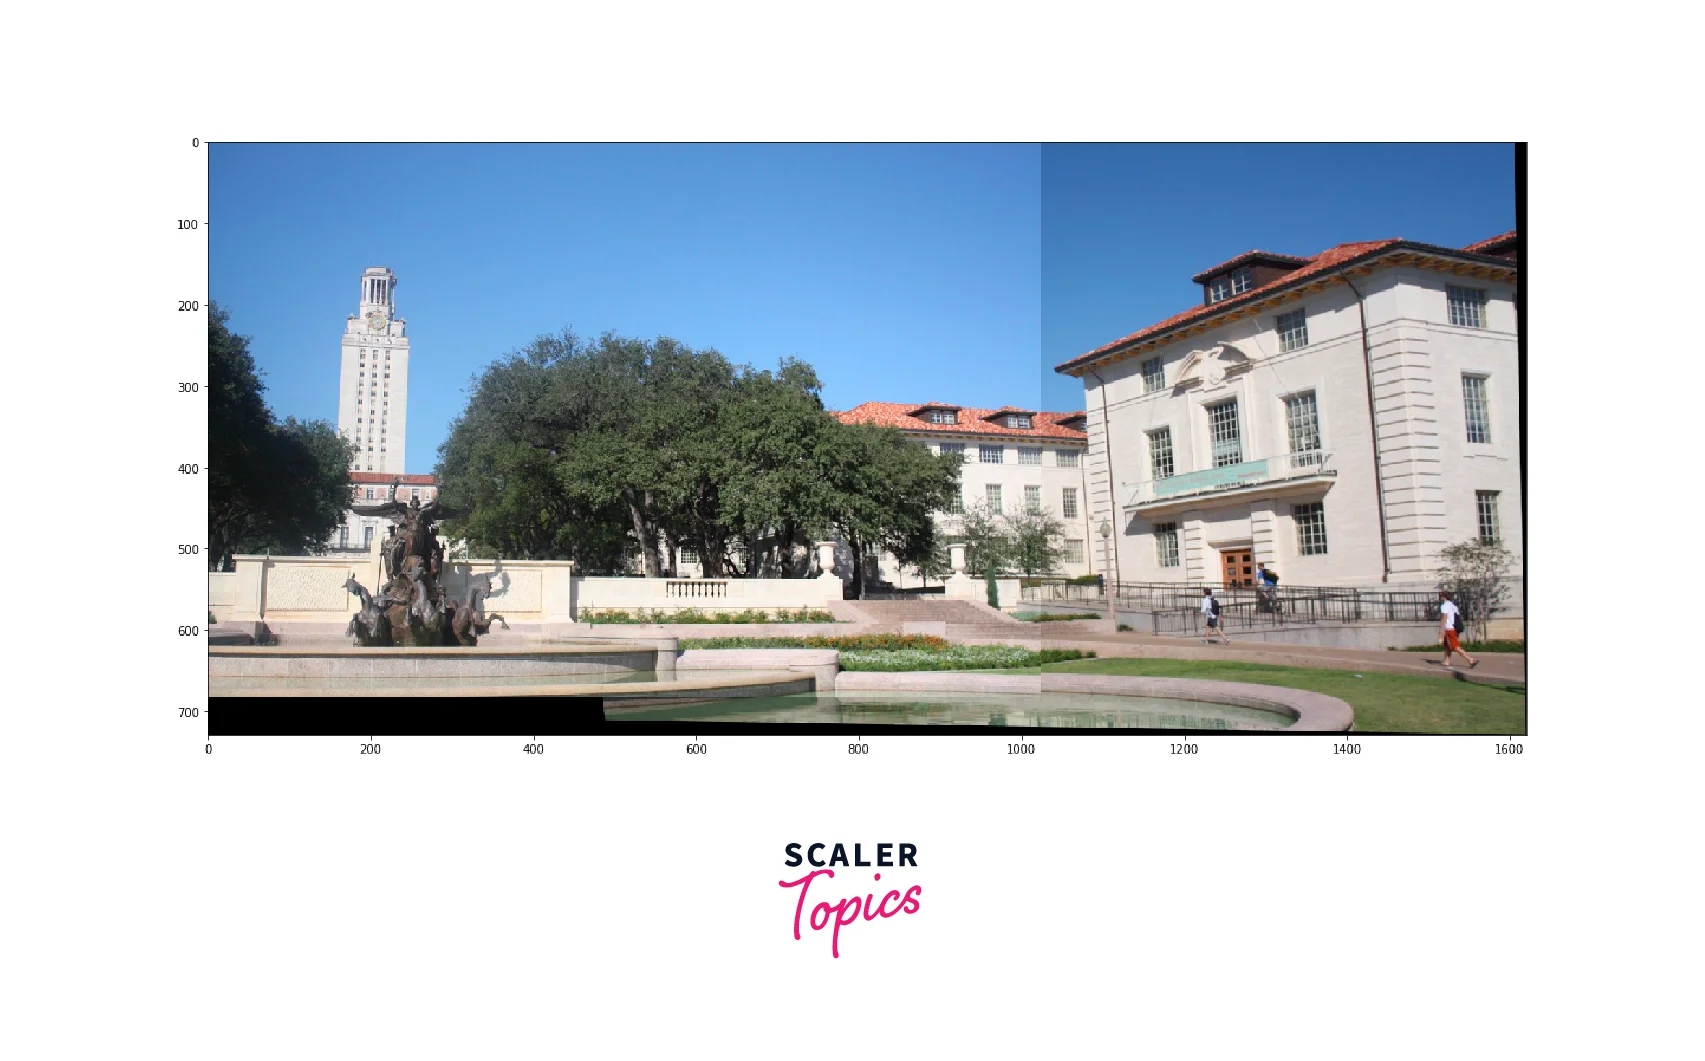
Final Output
After performing the above mentioned tasks, we'll get the following image as the output.
Output
Requirements
Performing Image Stitching using OpenCV Panorama. The following are required.
- OpenCV Library :
Install and set up the OpenCV library which contains the functions required for the Image Stitching tasks, which includes Keypoint Detection, Descriptor Extraction, Feature Matching , Homographic Estimation and Perspective Warping. - Input Images :
Get the input images which you want to stitch to create an OpenCV panorama. These images should cover the desired field of view for accurate alignment. - Visualization Libraries :
Python visualization libraries like Matplotlib and imageio are used for visualizing the outputs.
Implementation of OpenCV Panorama using OpenCV and Python
Now we'll see the implementation of OpenCV Panorama using OpenCV and Python. We will see step by step process of OpenCV panorama stitching for better understanding.
Step 1: Imports
First, we'll start with importing the required libraries for performing OpenCV panorma.
The statement cv2.ocl.setUseOpenCL(False) disables the use of OpenCL for image processing operations in OpenCV panorama, ensuring execution on the CPU.
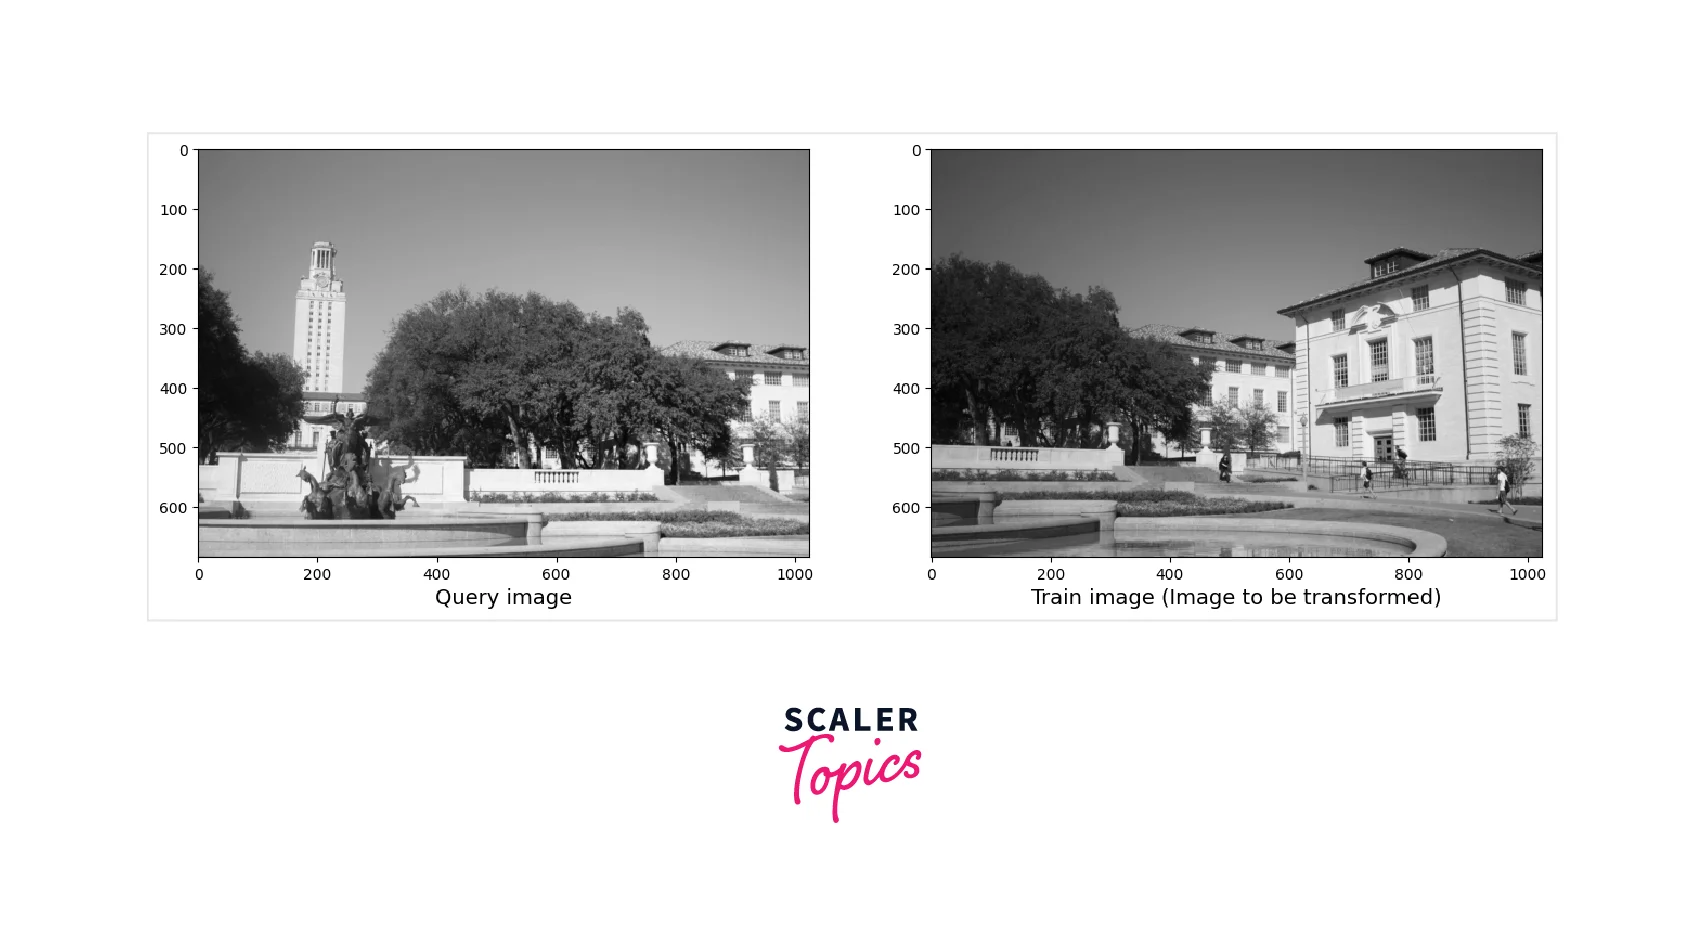
Step 2: Importing the Images
Now, we'll import the images. The images are converted into an array using the imread() function.
Step 3: Data Preprocessing
For preprocessing the data, we are going to convert the images into greyscale. For conversion of images to greyscale we are going to use the cvtColor() function
After conversion of Images into greyscale, the following output will be produced.
Output:
Step 4: Stitch the images using OpenCV
Step 4.1: Keypoint Detection
A Keypoint is used to identify key regions of an object that are used as base to match images. There are several algorithms to detect keypoints such as the SIFT, SURF, ORB, FAST, etc. Traditional corner detection algorithms like Harris Corners wouldn't work here as those algorithms use a fixed kernel size to detect the regions of interest of the images. This may seem like a useful method unless we scale an image. When we scale an image the kernel may become too small or too big. So keypoint detection algorithms use Difference of Gaussians(DoD) method. The DoD method takes the difference of the scaled versions of the same image and extracts the features among them.
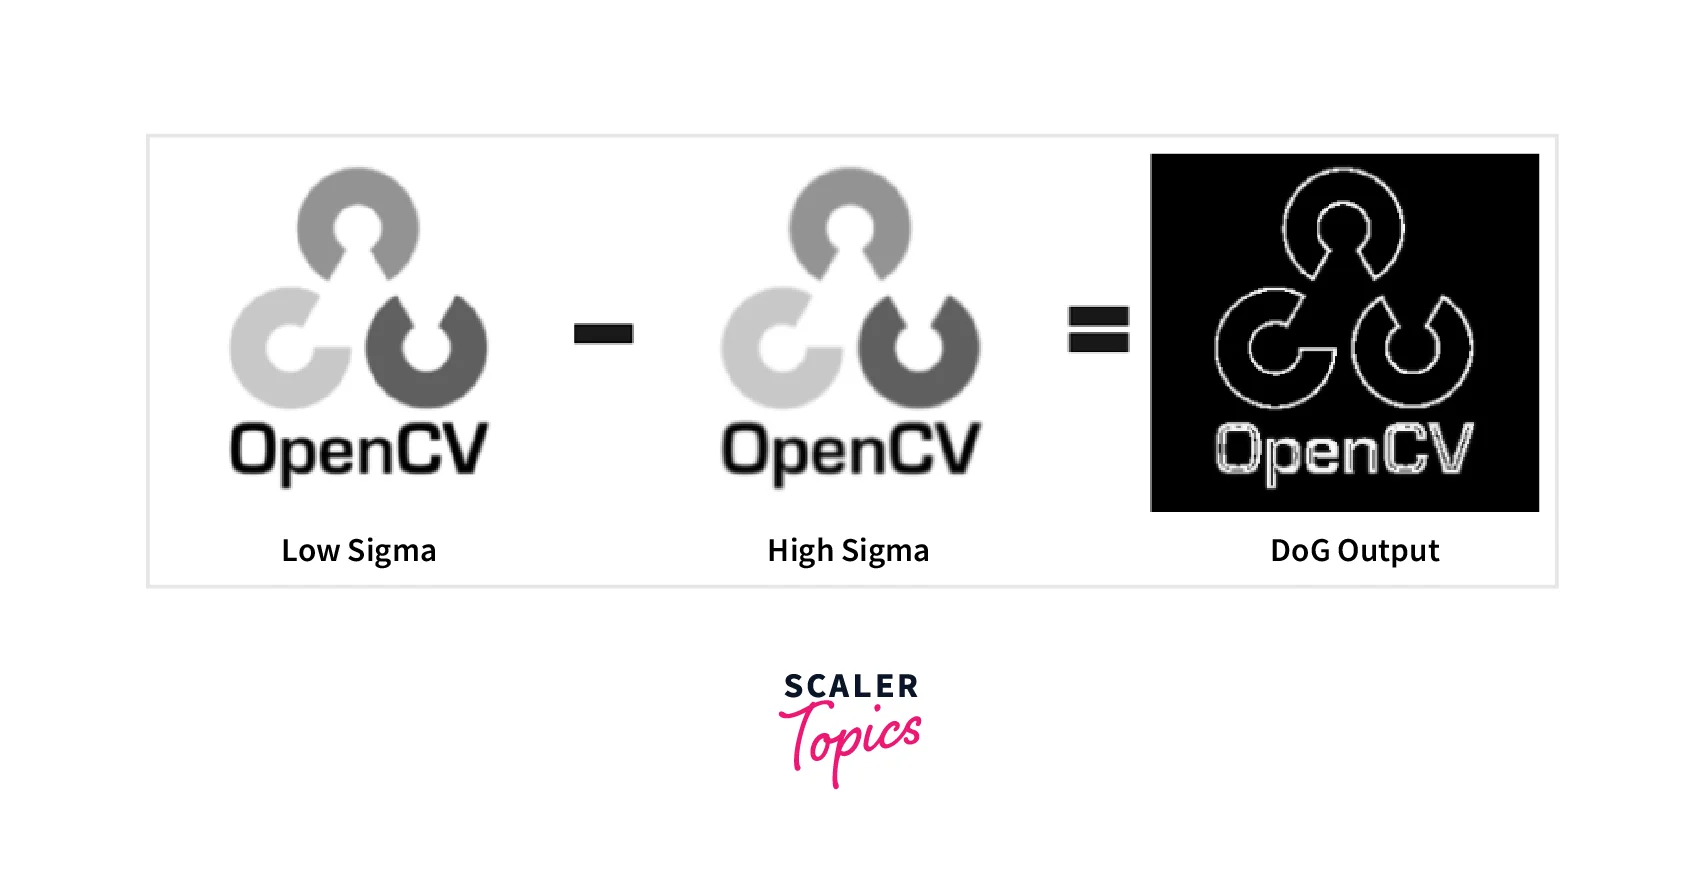
The low sigma and high sigma are the scaled versions of the image where low sigma is scaled by a smaller number and high sigma is scaled by a larger number.
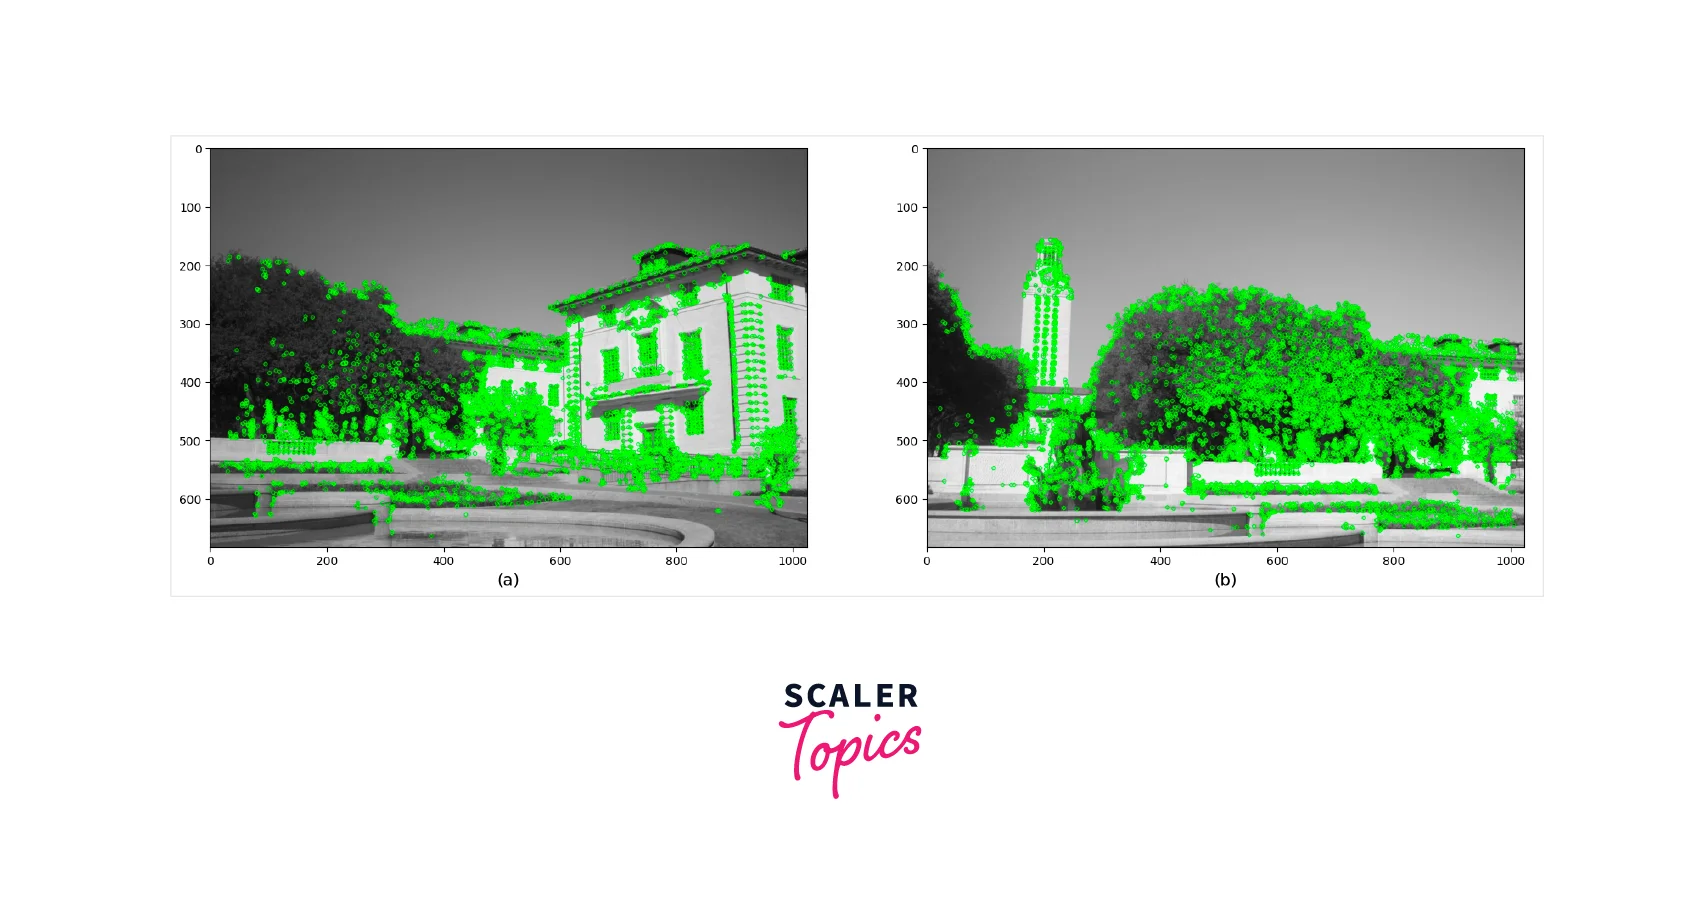
First, we must load two images: a query image and a training image. The next step is to extract key points and descriptors from both images using the detectAndCompute() function in OpenCV. To use this function, we need to have an instance of a keypoint detector and descriptor object, such as ORB, SIFT, or SURF. It's important to note that we must convert the images to grayscale before passing them to detectAndCompute().
We'll use detectAndCompute on both train and query image to find all the keypoints. Now we'll use feature extractor upon those images. For SIFT, it returns a 128-dimensional feature vector. For SURF, it returns a 64-dimensional vector. This is the result of extracted features after detectAndCompute() using sift, orb and brisk detector.
Sift algorithm

Orb Algorithm

Brisk algorithm
Now we have the features we will now see how to match the features.
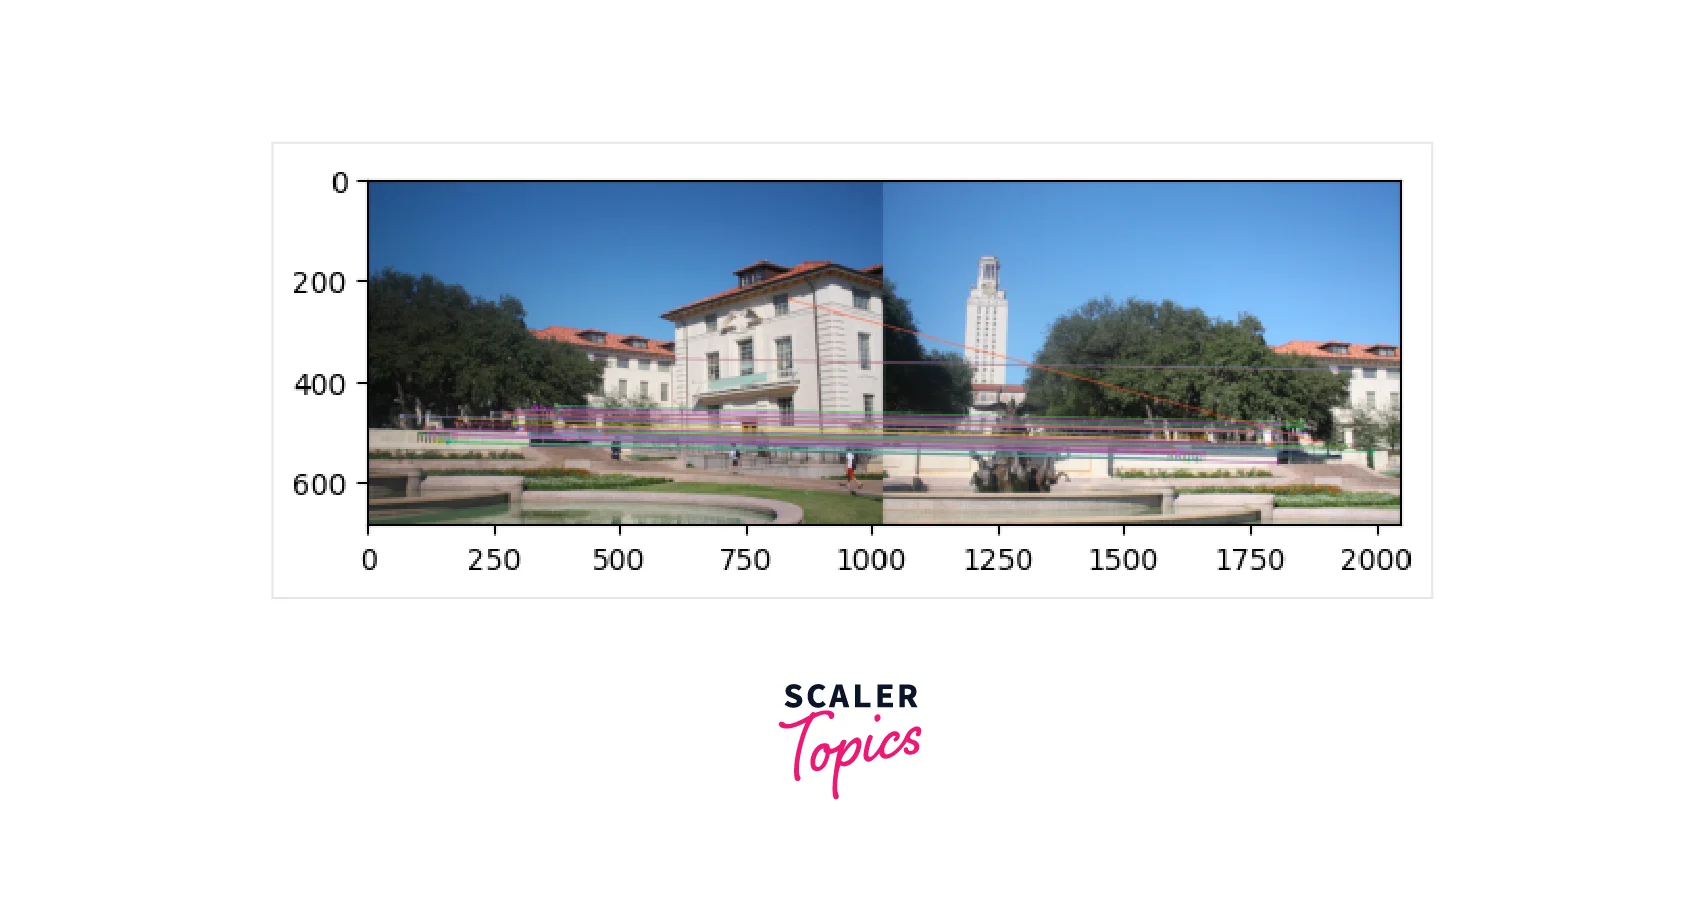
Step 4.2: Feature Matching
To match features, we have to compare two sets of features and match the pairs which show more similarity, a feature matcher exactly does this job. Feature extractor uses two methods.
- Brute Force Matcher
- K-Nearest Neighbours
Brute Force Matcher
A Brute Force Matcher, as the name suggests uses brute force approach to match pairs. Every feature from feature set A is compared against all features from set B. The Euclidean distance is computed between the two points. Thus for every feature set in A, it returns the closest feature from set B. OpenCV recommends using Euclidean distance for SIFT and SURF algorithms. For other algorithms like ORB, Hamming distance is preferred.
A Brute Force Matcher has two parameters first is the distance metric and the other is the crosscheck boolean parameter.
K-Nearest Neighbours
Brute Force Algorithm is best when we have a single match for features. However, if we have more than one match KNN's are used. However, the value of k needs to be predefined by the user. KNN provides a larger set of candidate features. However, we need to ensure the robustness of those pairs.
To ensure the pairs generated by the KNN can be joined, Radio Test method is used. In the Radio test, we iterate over each and every pair generated by the KNN and perform a distance test, if the distance between the features is within a certain ratio, we will keep it. Note that the ratio should be predefined by the user.
Brute Force Matcher
KNN Matcher Output
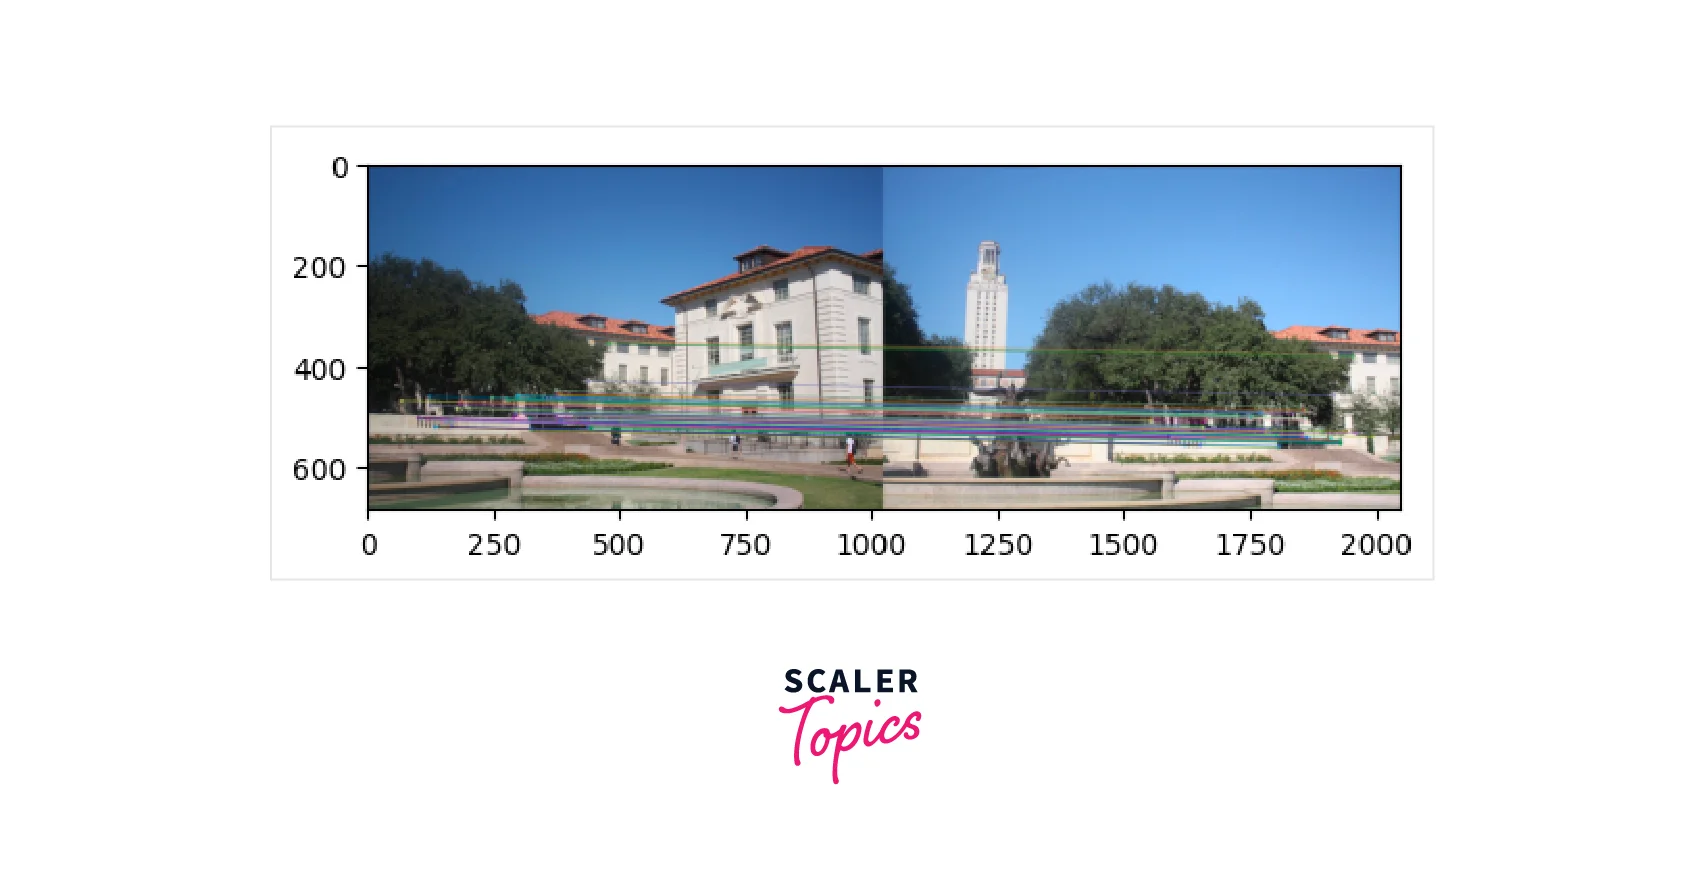
Step 4.3: Homography Estimation
RANSAC is an iterative algorithm used to fit linear models and is designed to be robust to outliers. Unlike other linear regression models that use least-squares estimation to fit the best model to the data, RANSAC is less sensitive to outliers, making it more effective when the number of outliers is significant.
The approach of RANSAC is to estimate parameters using only a subset of inliers in the data. A comparison between Linear Regression and RANSAC reveals that Linear Regression is highly influenced by the outliers since it attempts to reduce the average error by minimizing the overall distance from all data points to the model itself, including outliers.
On the other hand, RANSAC only fits the model on the subset of points identified as the inliers, making it more effective in handling outliers. This characteristic makes RANSAC ideal for estimating the Homography matrix, which is very sensitive to the quality of data passed to it.
Therefore, RANSAC's ability to filter out points that do not belong to the data distribution and identify inliers is crucial for our use case of estimating the Homography matrix.
Now we'll see how the RANSAC algorithm works on our image.
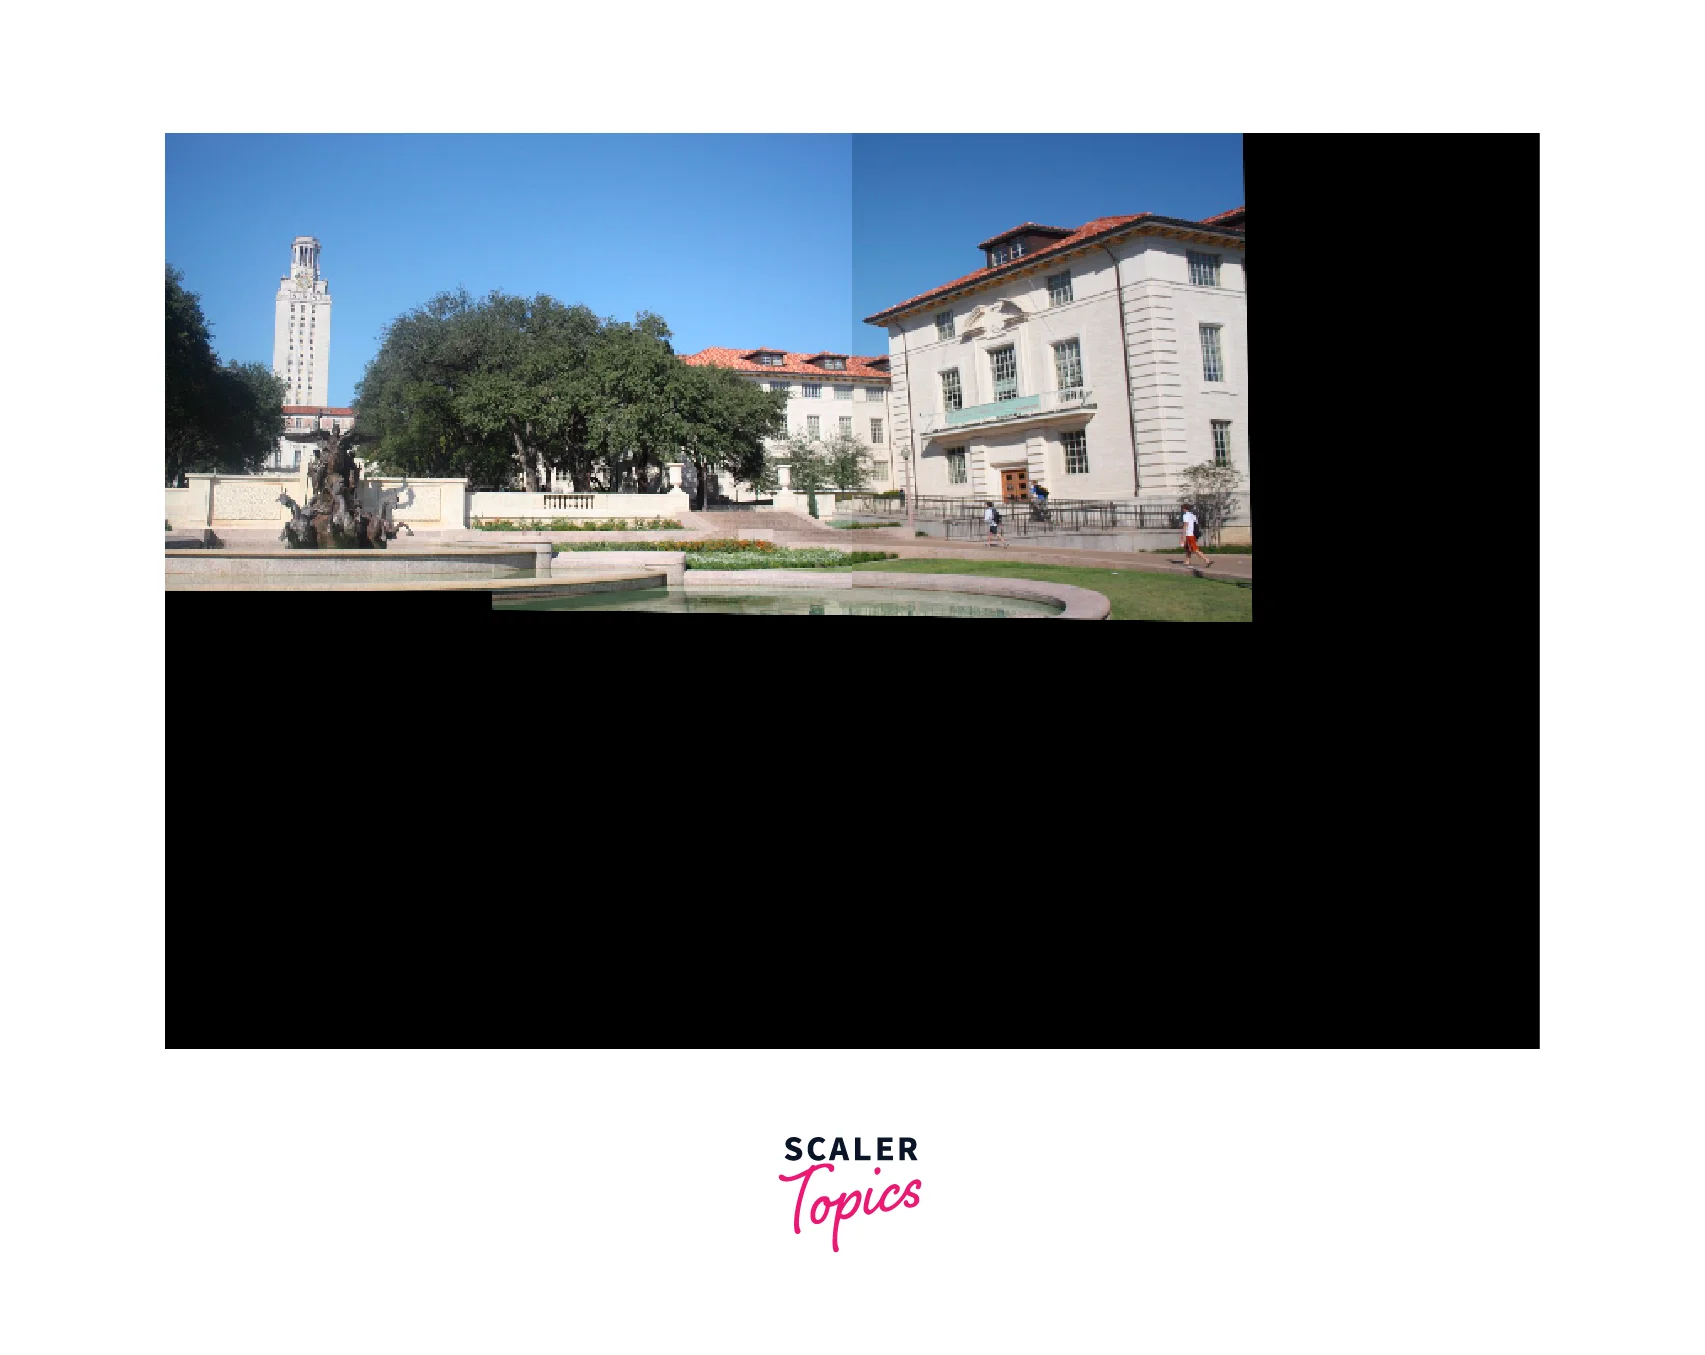
After estimating homography, we need to warp one of the images to a common plane, for that we are going to transform the perspective of the images, so that the two image merge as one:
Output

Conclusion
The panorama image obtained from the image stitching process using OpenCV has some noticeable imperfections such as issues with lighting and visible edges at the boundaries of the images. These artifacts can be addressed through post-processing techniques like histogram matching, which can help to normalize the intensities and create a more natural-looking result. Here are some applications of OpenCV panorama.
- Wide-Angle Photography:
OpenCV Panorama can be used to create a wide-angle photograph by stitching multiple images together. This technique is particularly useful in landscape photography where capturing the entire landscape in a single photograph is not possible. - Virtual Tours:
OpenCV Panorama can be used to create virtual tours of a location or a property. By stitching together multiple images of different rooms or areas, a virtual tour can be created that allows viewers to explore the location from different angles. - Surveillance:
OpenCV Panorama can be used in surveillance applications to create a wider view of a scene. By stitching together multiple camera feeds, a panoramic view can be created that provides a more comprehensive view of the scene. - Augmented Reality:
OpenCV Panorama can be used in augmented reality applications to create a wider field of view. By stitching together multiple images captured by a smartphone camera, for example, a wider view can be created that allows for more immersive augmented reality experiences.