How to Create a Custom PyTorch Dataset ?
Overview
This article is a hands-on tutorial for creating a PyTorch custom dataset class using the base class. We walk through the steps involved in a data pipeline and implement each of them in our PyTorch custom dataset class using different methods.
Introduction
-
PyTorch is one of the most popular deep learning libraries offering low-level components to build and train deep neural networks.
-
Pre-processing and efficiently loading the data is the first and crucial step while training neural networks. To this end, PyTorch provides massive support for loading custom user datasets containing data in almost any form.
-
There exist many functions to load custom datasets of various kinds in the TorchVision, TorchText, TorchAudio, and TorchRec domain packages.
-
However, these functions might not be enough many times and for such cases PyTorch allows us to build our custom dataset class.
Let us move on to first understand the base class torch.utils.data.Dataset after which we will learn to customize it to our liking to implement a custom PyTorch dataset class.
Scaler Placement Report and Statistics
Scaler learners achieved 2.5x salary growth with average post-Scaler CTC reaching ₹23L.
The Dataset Class
PyTorch provides two data primitives viz torch.utils.data.DataLoader and torch.utils.data.Dataset that allow us to use the datasets pre-loaded in PyTorch as well create a pipeline using our custom datasets.
The Dataset class is abstract and is primarily concerned with storing the data samples and their corresponding labels.
The basic structure of the class torch.utils.data.Dataset is as shown below : source
As is evident, __getitem__ is an abstract method and should be implemented in any class that inherits from this base class.
Next, we will look into the methods of the Dataset class in detail while understanding the major components of a data pipeline, we will consequently look at which method deals with the component.
The Data Pipeline
From acquiring the data from its source (database, files on the system, etc.) to get it into a form that is ready to be fed into our deep learning models for training them, there are three major steps or components involved that we discuss below :
Accessing
The very step in a data pipeline is defining the means to get access to the data from wherever it is stored.
For example:
it could consist of writing code to access a CSV file containing names of images with their corresponding labels.
In this step, only the names of the image files shall be read and not the actual images.
Note:
that one could choose to either read the actual data files (like actual images) or just define the "means" (variables etc.) to access the data in this step. The latter is called lazy loading of data and is recommended due to performance reasons. Sometimes, lazy loading of data is the only option when the whole of the dataset cannot fit into the memory at once.
The __init__() method of our custom dataset class generally deals with this step.
Transform Your Career
Choose from our industry-leading programs designed for career success
Modern Software and AI Engineering Program
Master full-stack development with AI integration

Modern Data Science and ML with specialisation in AI
Advanced data science techniques with AI specialization
Advanced AIML with Specialisation in Agentic AI
Deep dive into AIML with focus on Agentic systems
DevOps, Cloud & AI Platform Engineering
Build and manage AI-powered cloud infrastructure
AI Engineering Advanced Certification by IIT-Roorkee
Premier AI engineering certification from IIT-Roorkee
Pre-processing
Raw data coming straight from the source is rarely in a form that is ready to be fed into the model training pipeline. Preprocessing hence forms an important step of the data preparation pipeline wherein raw data contents are transformed or cleaned and made available for the model to ingest for training.
While the preprocessing steps could be "defined" in the init() method, they are applied after the actual data is read later in the pipeline.
Scaler Placement Report and Statistics
Scaler learners achieved 2.5x salary growth with average post-Scaler CTC reaching ₹23L.
Reading Data
Finally, comes the part where the actual data samples are read, preprocessed and returned in a form that does not require any further processing before getting fed into the deep learning model for training.
This is like the climax step and is implemented in the getitem method of our PyTorch custom dataset class.
Also, important note that the method getitem is implemented via subclasses only and has no implementation in the base class (essentially, it is an abstract method).
Next, we will compile all these steps together and define a skeleton structure for a PyTorch custom dataset class.
The Dataset Subclass
Any PyTorch custom Dataset class should have a basic structure that looks like the following :
The first point to note is that any custom dataset class should inherit from PyTorch's primitive Dataset class, that is torch.utils.data.Dataset.
-
As already discussed, the init method deals with accessing the data files, and getitem is where the data is read at particular indexes, preprocessed, and returned in the form of PyTorch tensors : tensors are the core data structure PyTorch works with and hence are what's required by the models for training.
-
An additional method that could be implemented in the custom Dataset class is called len which simply returns the length of the dataset.
-
While len is not strictly an abstract method, it is recommended that every subclass of the Dataset class implements this. The reason why that is so is that this method is expected to return the size of the dataset by many implementations of the class torch.utils.data.Sampler (this is used in the DataLoader class) and the default options of the classtorch.utils.data.DataLoader.
Let us now get hands-on and implement our own PyTorch custom dataset class.
Creating the Custom Dataset
Dataset Used & Other Requirements
For our example, we will be using the Landmark dataset available for download here.
This dataset is a subset of the Google Landmark Data v2 which contains images annotated with labels representing human-made and natural landmarks.
This subset contains landmarks from around the globe belonging to one of the total 50 classes.
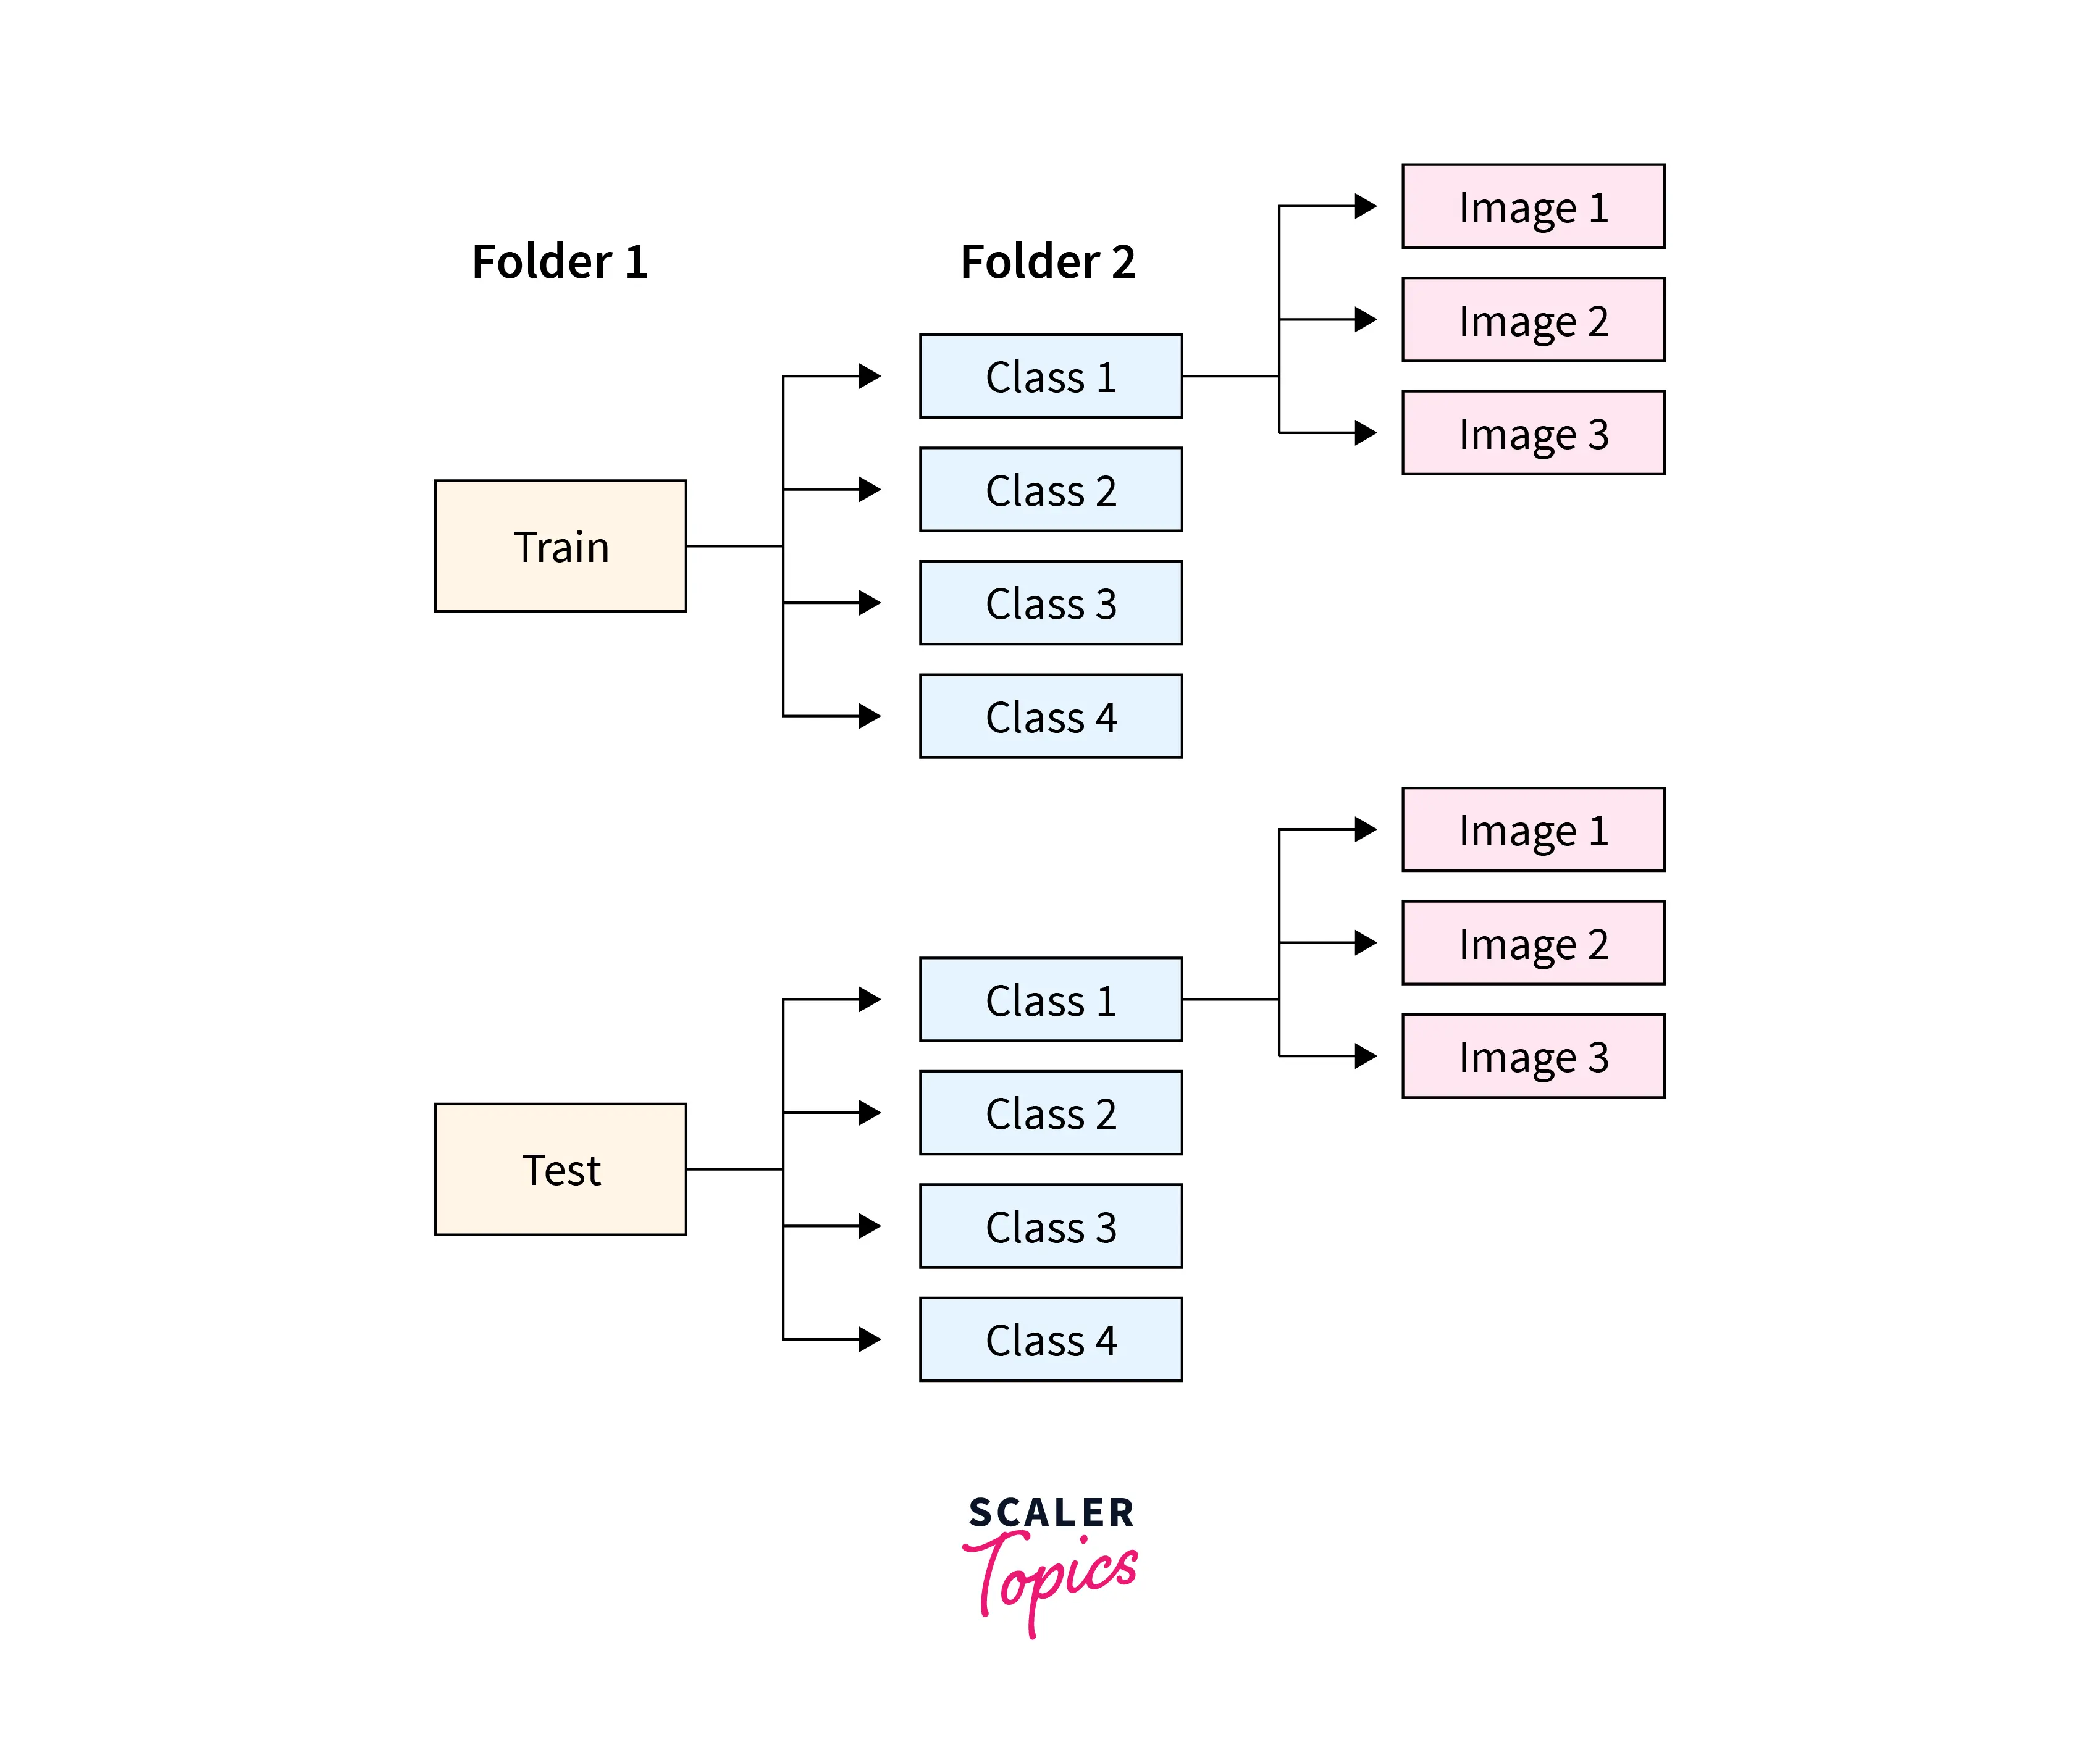
The folder structure for the project shall be as follows :
-
The root folders are the Train/ Test folders containing separate folders for 50 classes, with example images inside them.
-
A custom dataset class provides us with the flexibility to load data present in any form. For example - it'll be as easy to process a similar structure where all the image files are within one single folder, with the corresponding classes specified via image names themselves like dog_01.jpg and so on.
-
For our project, we shall also be using the Albumentations library leveraging it for image augmentations. The library has a wide range of options available for image augmentations. We will learn how to incorporate it into the custom dataset pipeline.
To install the library, use the following command:
Turn Learning into Career Growth
Import Libraries
Next up, let us import all the necessary dependencies required to build the project using the following snippet :
Define Transforms
We will now define different image transformations for the training and test set using albumentation.
The transformations on the train data are the most general ones like cropping the image, rotating the image, and transformations dealing with image characteristics like color, saturation, and brightness.
An important transformation to note here is ToTensorV2() that converts the data to PyTorch tensors which is what's expected later by the model in the training pipeline.
Create Train, Test, and Validation Sets
To define the train, test, and validation divisions separately, we will now create lists containing image paths separately for all three divisions.
Output:
Create index_to_class & class_to_index Libraries
Computers understand numbers and not text.
However, our different classes are names rather than numbers.
So, we now want to create a mapping between the class names and numerical indices to index each name.
Particularly, we are going to define two dictionaries, one for each mapping - class names to indices and indices to class names, like so :
The Dataset Class
Taking all these components together, we will now create a PyTorch custom dataset class and implement the three methods we studied above.
-
In the init method which is called as soon as an instance of this class is created, the variables image_paths and transform get initialized.
These respectively store the paths to the image files (the lists we created earlier) and the transformations we looked at in the data preprocessing section.
-
getitem is the method where we read the actual image file at a particular index idx, extract the label of the image from the file path, apply the transformations on the image and return both the image and label.
-
Now, we will instantiate our custom dataset class to create instances for all the three divisions of our data viz the train, validation, and the test division, like so :
Note:
that as we define the valid_dataset instance for our validation data, we use the transformations defined for test data to preprocess it, and not the train transformations.
It should be clear why that's so - as the validation data is essentially used to test the model for selection between any two choices during training. for eg. choosing the hyperparameters etc.
Accessing the New Data
We could now extract a particular sample from the dataset by indexing the instance corresponding to the division we want to extract from, like so :
Output:
This direct indexing of dataset instances for extracting particular samples is an application of dunder methods, getitem is a dunder method.
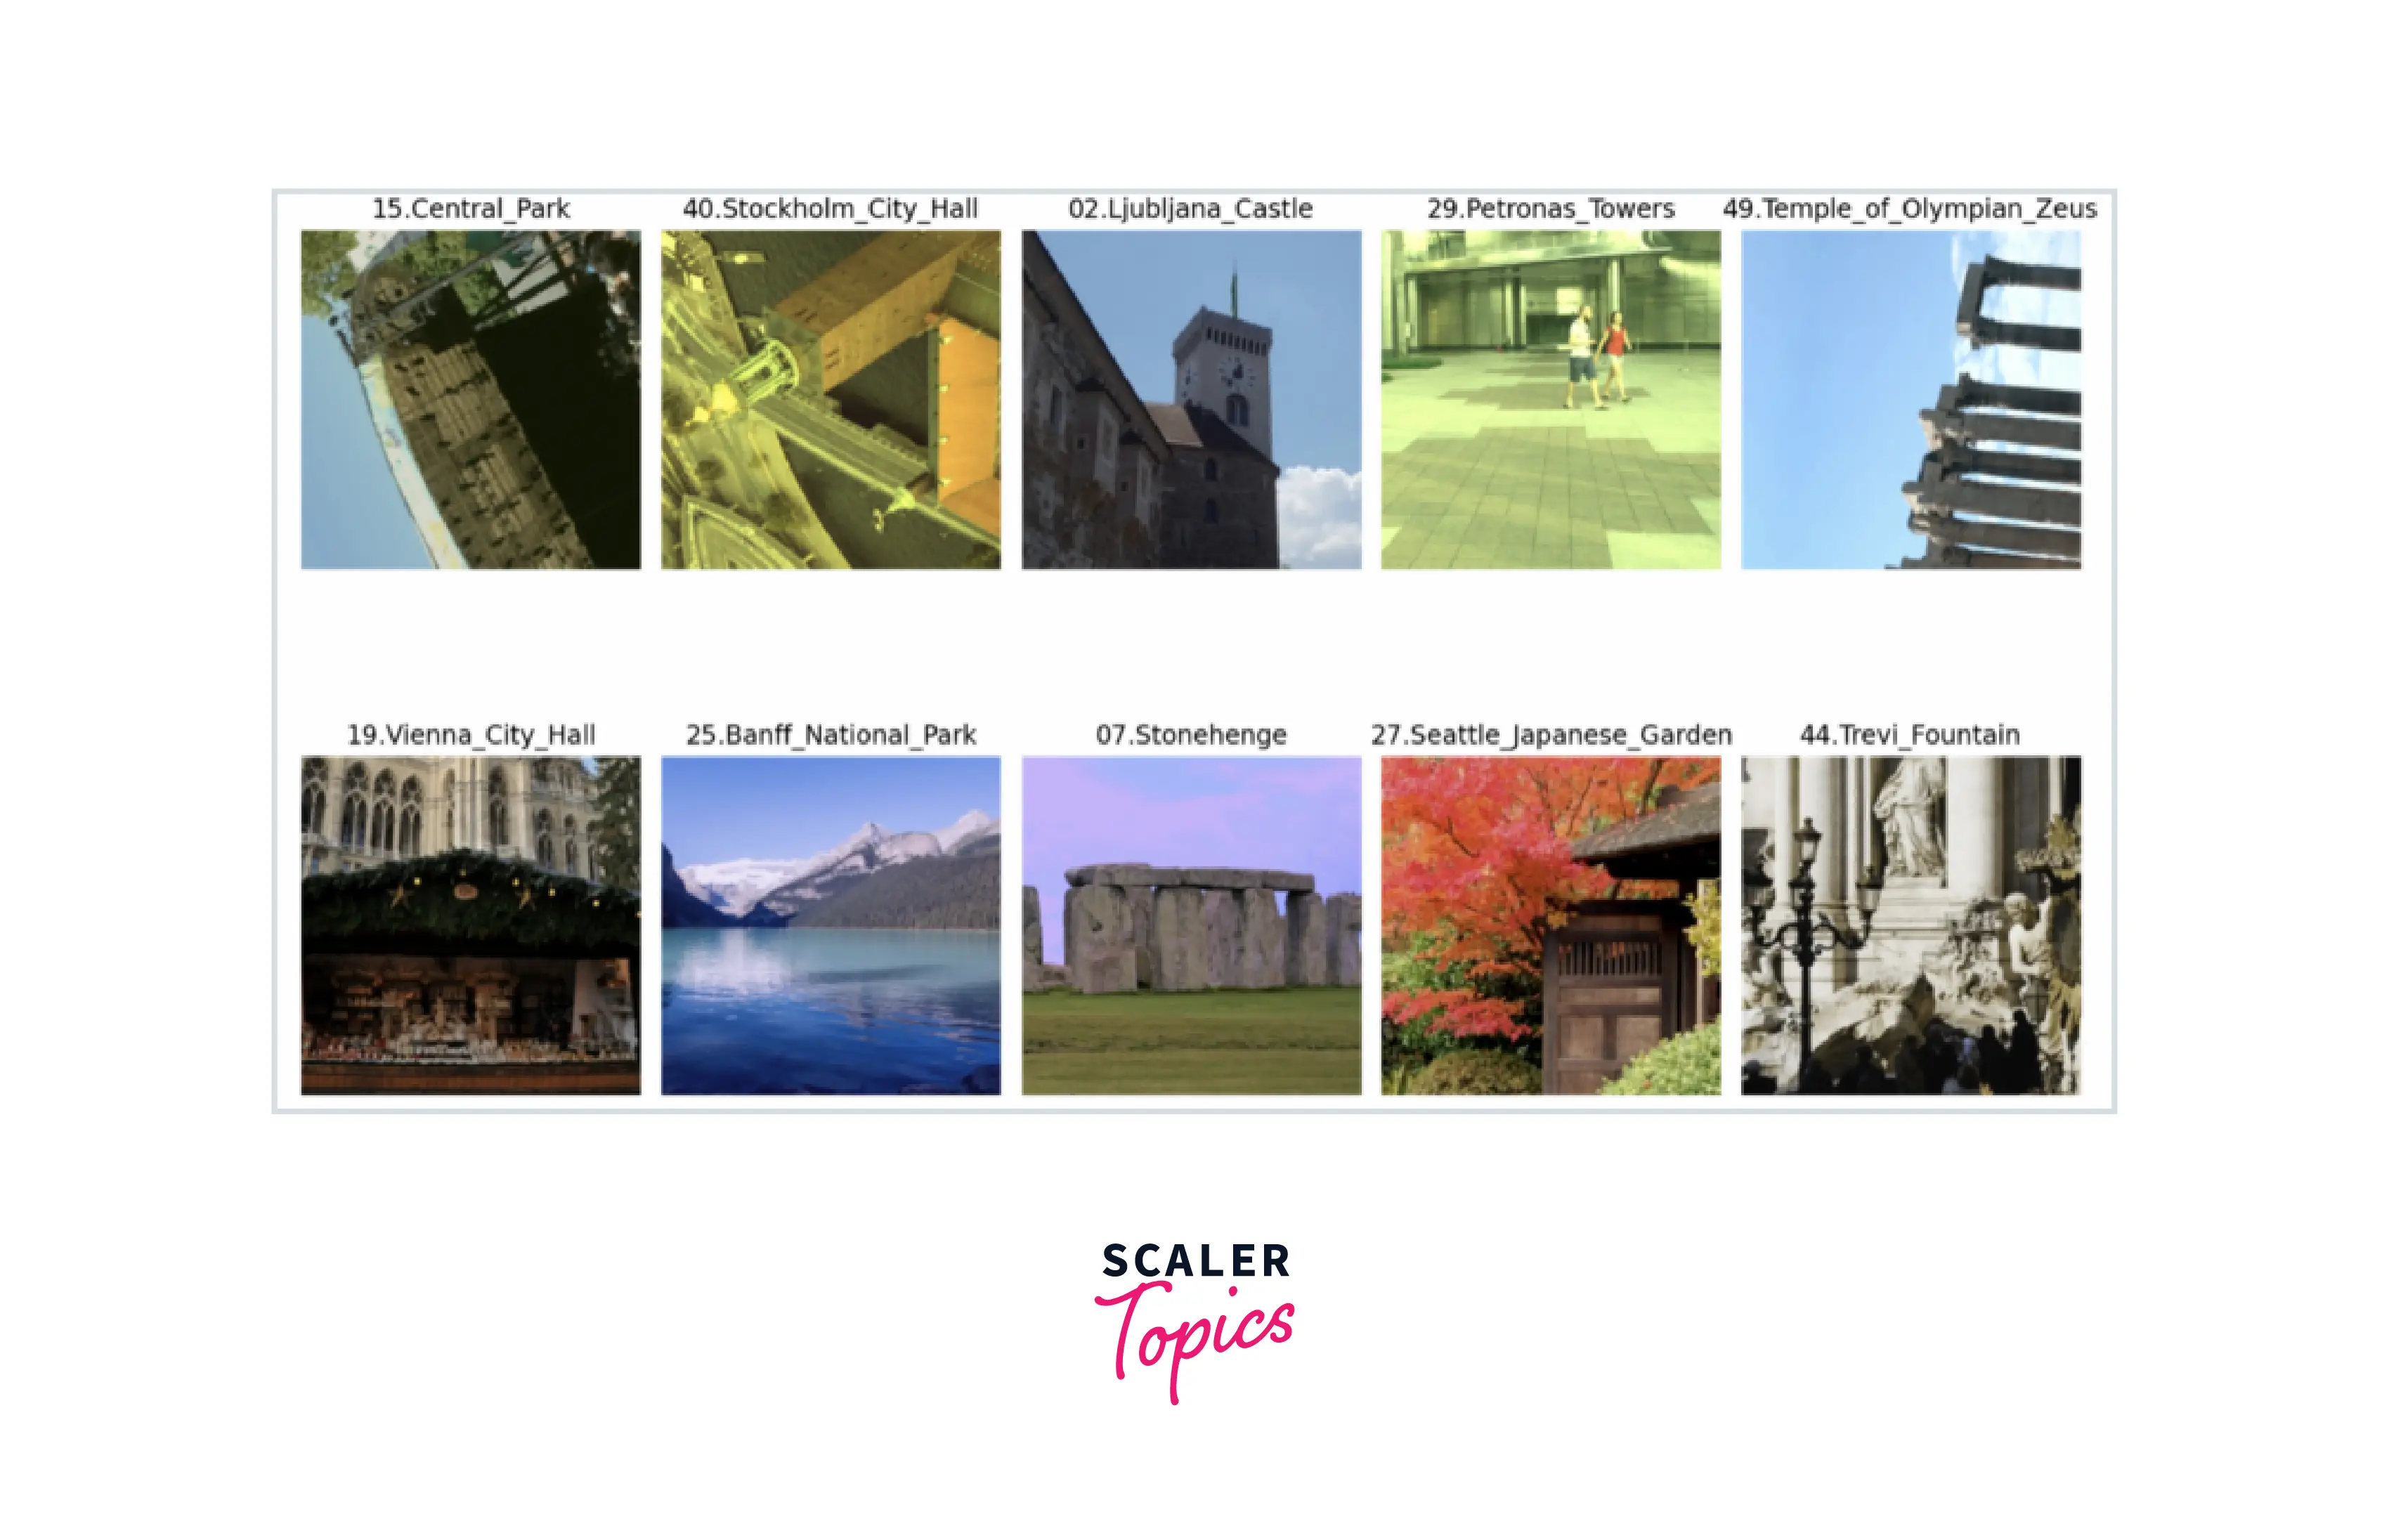
Visualization of the Data
Let us now visualize some of the data samples. We will define a helper function for it, like so :
Output:
Creating the Data Loader
-
As mentioned earlier, PyTorch provides another data primitive called torch.utils.data.DataLoader that deals with making the process of feeding data into the model for training much more efficient.
-
We do not want data loading to be a bottleneck in the model training pipeline.
That to say if the data processing and loading both happen in the main process in which the model trains, the model (that potentially sits on the GPU) shall have to wait till the time the next batch of data is made available for the model to use, this way the GPUs get stalled.
-
Ideally, we would want the next batches of data to be available as soon as the previous batch is done processing by the model.
-
DataLoader helps us achieve just that by creating multiple sub-processes in parallel to the main process. The sub-processes deal with loading batches of data in parallel so that the batches of data can be made readily available for the model to use and the model doesn't have to wait.
We could create the dataloader instance by passing the corresponding dataset instance in torch.utils.data.DataLoader, like so :
We can now wrap the dataloader instance in enumerate and access the batches of data, like so :
Output:
That was all about how a PyTorch custom dataset class can be coupled with the dataloader class to facilitate efficient and fast processing of data.
Conclusion
In this article, we learned about the PyTorch custom dataset class. In particular:
- We briefly understood the importance of the Dataset class in Pytorch.
- We then walked through the three major steps involved in any data pipeline - data accessing, data pre-processing and reading the data.
- Then we understood how a PyTorch custom dataset class can be created using the base class while implementing the above three steps in the custom class using different methods.
- Then we worked through a fully hands-on code example where we built our PyTorch custom dataset class to define the data pipeline for the Landmark dataset.
- Finally, we understood the need for the DataLoader class which is another primitive provided by PyTorch for efficient data loading while also implementing the same for our dataset.