How to Split a Torch Dataset?
Overview
The following article is a hands-on tutorial explaining how to split a PyTorch dataset into two or more divisions to train, evaluate, and test deep neural networks.
Transform Your Career
Choose from our industry-leading programs designed for career success
Modern Software and AI Engineering Program
Master full-stack development with AI integration

Modern Data Science and ML with specialisation in AI
Advanced data science techniques with AI specialization
Advanced AIML with Specialisation in Agentic AI
Deep dive into AIML with focus on Agentic systems
DevOps, Cloud & AI Platform Engineering
Build and manage AI-powered cloud infrastructure
AI Engineering Advanced Certification by IIT-Roorkee
Premier AI engineering certification from IIT-Roorkee
Introduction
Building deep neural models isn't just about training the networks but also about simultaneously and continuously evaluating them to get an assessment of their generalizability. To this end, we usually have three different divisions of our dataset: the training, validation, and testing.
Let us first understand the cruciality of having three separate splits for our model-building pipeline.
Why Split a Dataset?
An obvious question to ponder upon before proceeding with learning to split a dataset is "Why is the splitting of a dataset to get separate non-overlapping divisions important in the first place?"
This question itself contains keywords like "separate" and "non-overlapping" that are crucial to consider.
- While model training is a significant step in any machine learning pipeline, our goal behind it is to train the models in a way such that they are capable enough to predict accurately on data that was unseen during training, rather than getting the best possible accuracy during the training time.
- To be able to evaluate our models continuously as they train, we need a dataset that is different from what the models see during the training time.
- The concrete meaning of evaluating could be manifold and involves tasks like choosing the hyperparameters, and keeping a check on the overfitting (which happens when the performance on unseen data is way worse than what it is on the data the model trains on), so on and so forth.
- Such a dataset is termed as validation dataset, and ideally, it needs to be completely non-overlapping with the training set. Otherwise, we are at risk of overestimating the model performance.
- While the validation dataset is mainly concerned with keeping a check on the training procedure, there is another crucial division we would want to have, which is called the testing division.
- This is the one that could be seen as a simulation of what the model is going to face in production. The utmost care must be taken to ensure no leak from the testing set into the validation or training set. A test set is used to get an unbiased estimate of the model's real-world performance.
An interesting question that pops up is why can't we take the performance measure on the validation set as an estimate of the production performance. The answer is simple and pretty intuitive - as the validation set is used multiple times to evaluate or adjust the training procedure during model training, it introduces a bias.
The model can be adapted to the validation set, so the performance estimate from the validation set would, in most cases, overestimate the number we are looking for.
That sums up the need for three separate datasets to build machine-learning models.
While having three separate divisions is only sometimes possible, one could end up with just the training and validation set. In that case, cross-validation is one technique that could help us get a better estimate of the model performance in the absence of a test set. But it has its caveats since it requires us to train the model multiple times, which requires a lot of computing power.
Let us now look at how to split a PyTorch dataset.
Using random_split()
We will be using the raw images dataset from kaggle available here. First, let us import all the dependencies and set up the set and the root directory from the dataset like so:
we will unzip the files to be able to use them like so:
Now, using torchvision.transoforms, let us define some standard image transformations. Specifically, we will resize each image to size 224 * 224 and convert them to PyTorch tensors, like so:
Using the ImageFolder API, we will now define the dataset instance that we will be using to demonstrate the splitting of datasets.
We will now use the .class_to_idx method that returns the class-mapping label in the dataset to build a dictionary defining the reverse of it - that is, the index to class mapping, like so:
Now let us define a helper function to visualise the class distribution in a dataset object.
The function get_class_distribution first creates an initial dictionary with all the class counts as 0.
Then it iterates over the dataset instance, thus getting access to the inputs and labels and leverages the idx_to_class dictionary we created above to update the class counts in our initial dictionary, which it finally returns.
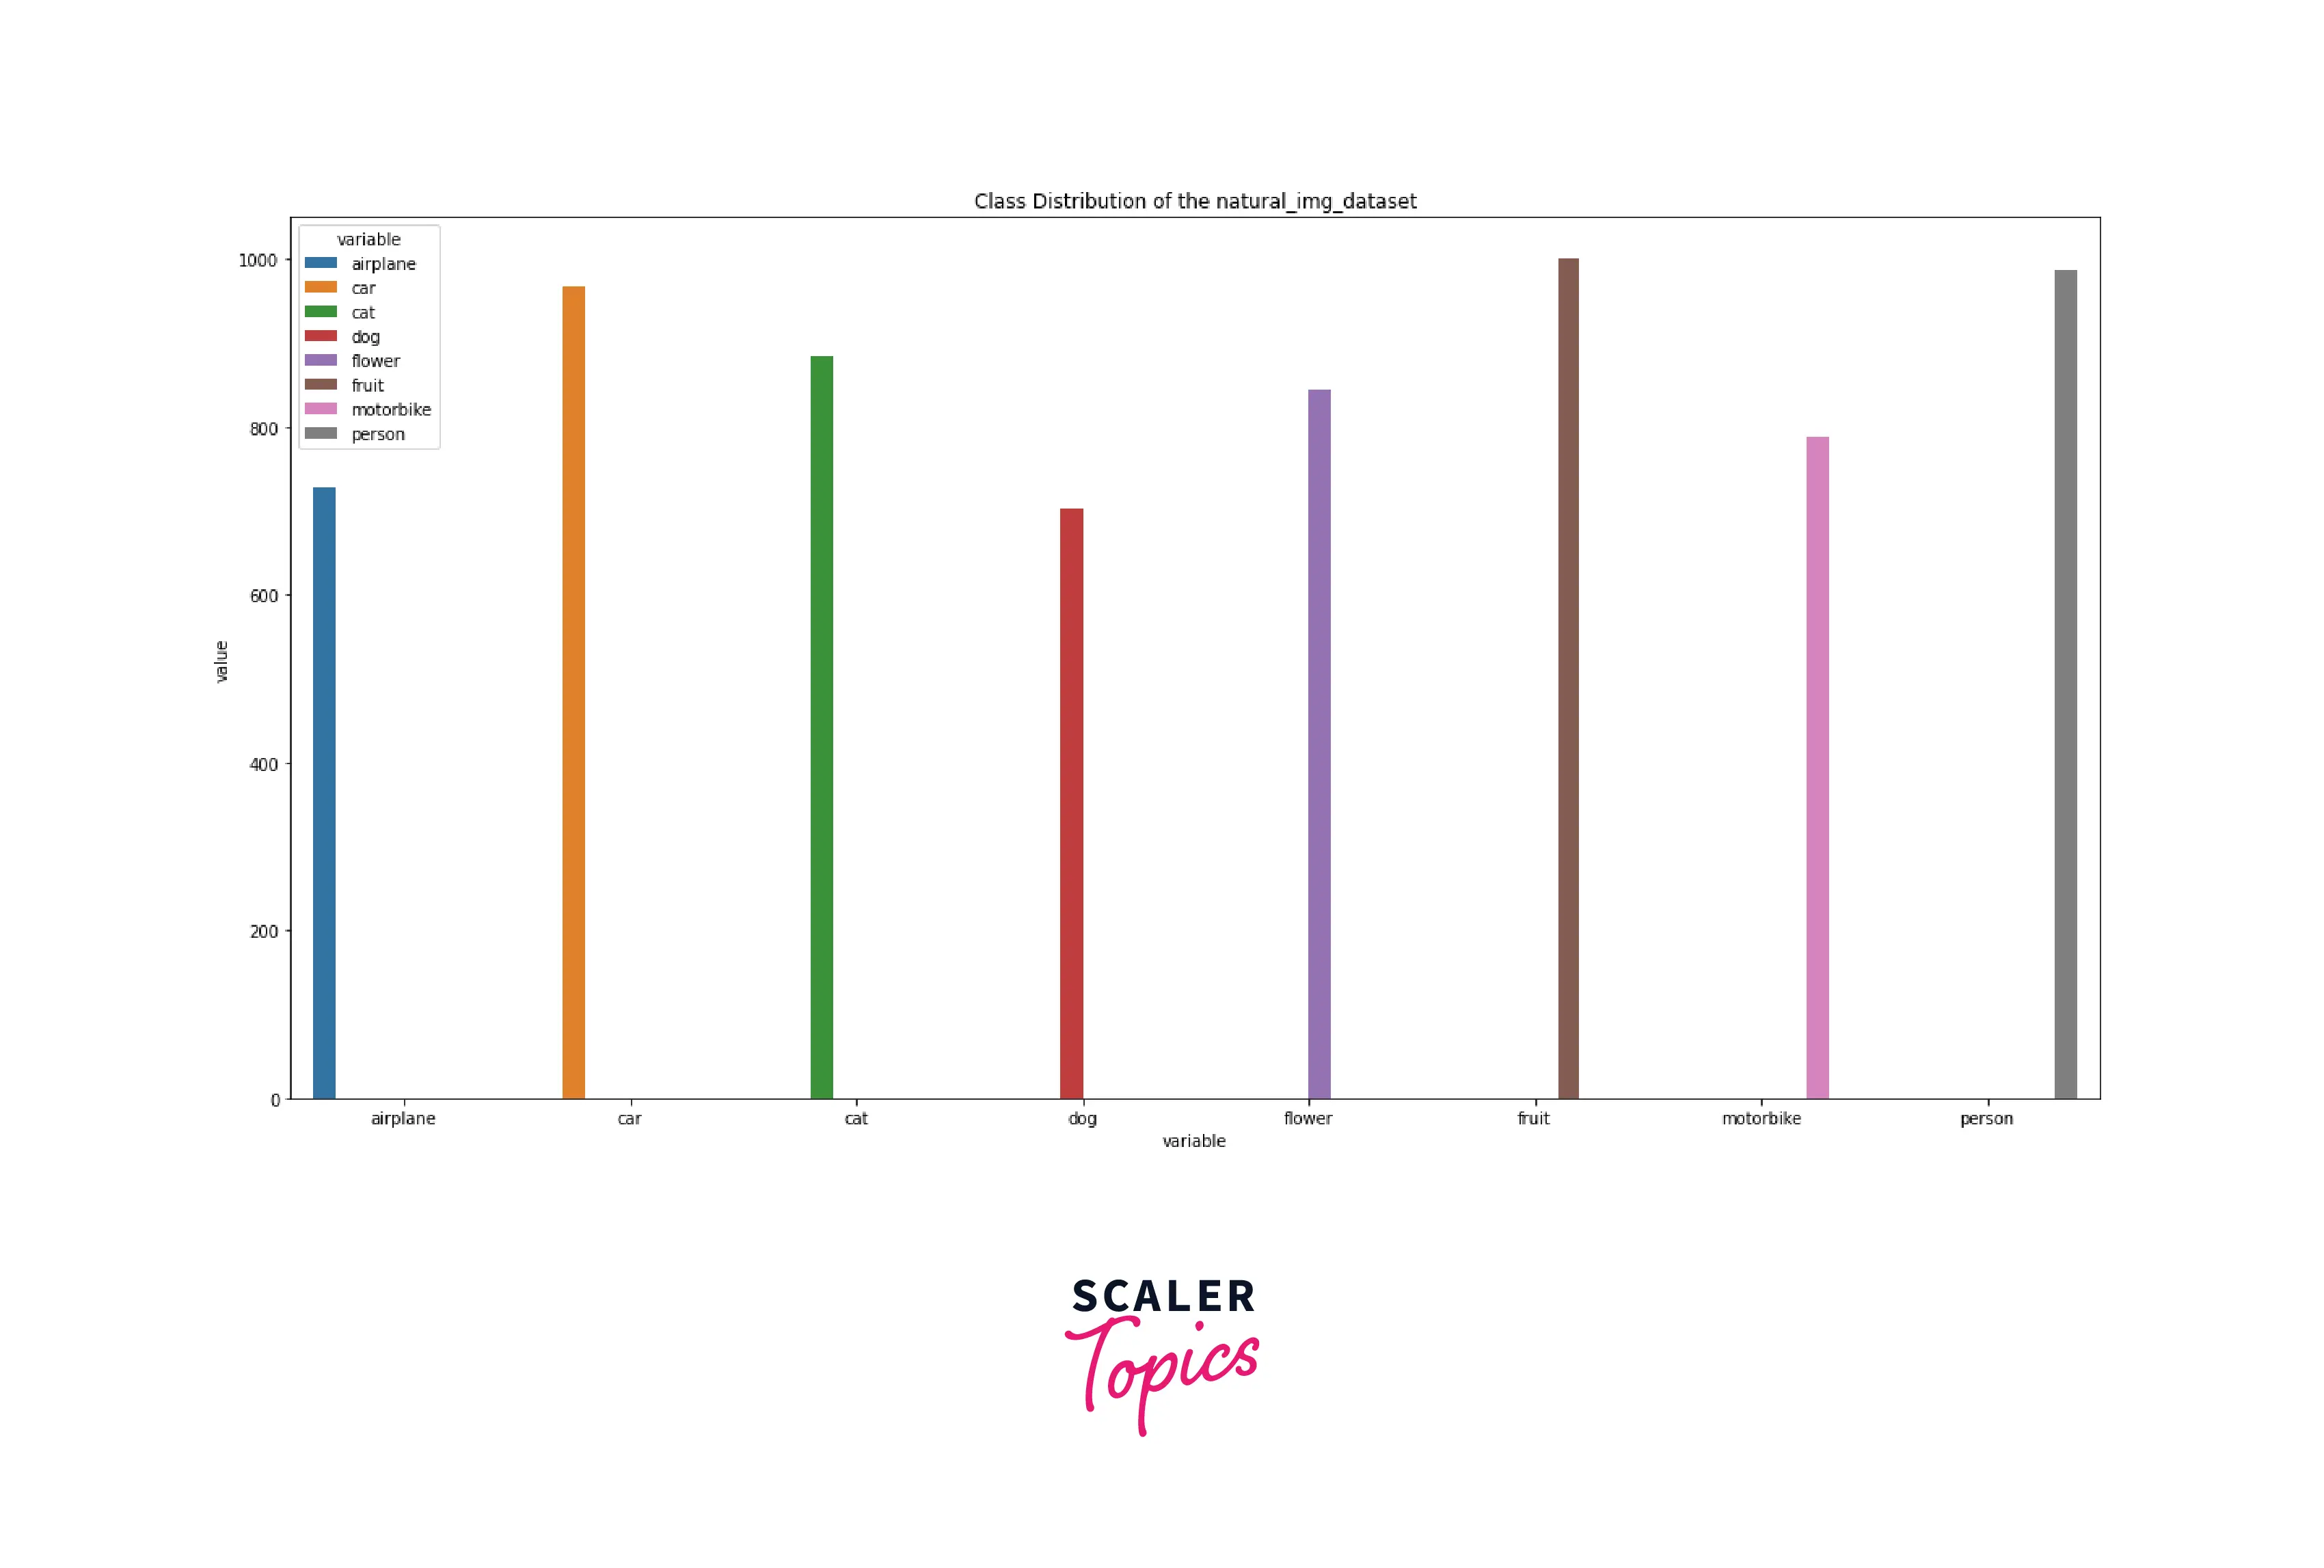
Now, to visualize the class counts returned as a dictionary, we use the Seaborn library. We first convert this dictionary into pandas dataframe and then melt it post which we use the function sns.barplot() to visualize our plot, like so:
This gives us a plot for the distribution of classes in our initial dataset instance, like so:
Let us now use the random_split method from PyTorch to split our initial dataset instance into three different sets, as we discussed above, like so:
The random_split(dataset, lengths) method can be invoked directly on the dataset instance. It expects two input arguments: The first is the dataset instance we intend to split, and The second is a tuple of lengths.
The size of this tuple determines the number of splits created. Further, The numbers represent the sizes of the corresponding datasets after the split is done.
In our original instance, we split 6899 images into three divisions: training, validation, and the test dataset with sizes 5000, 1000, and 899, respectively.
We can now use the dataloader class to create the corresponding data loaders for the three sets, like so:
Let us again look at the distribution of classes in each of the three datasets, like so:
gives -
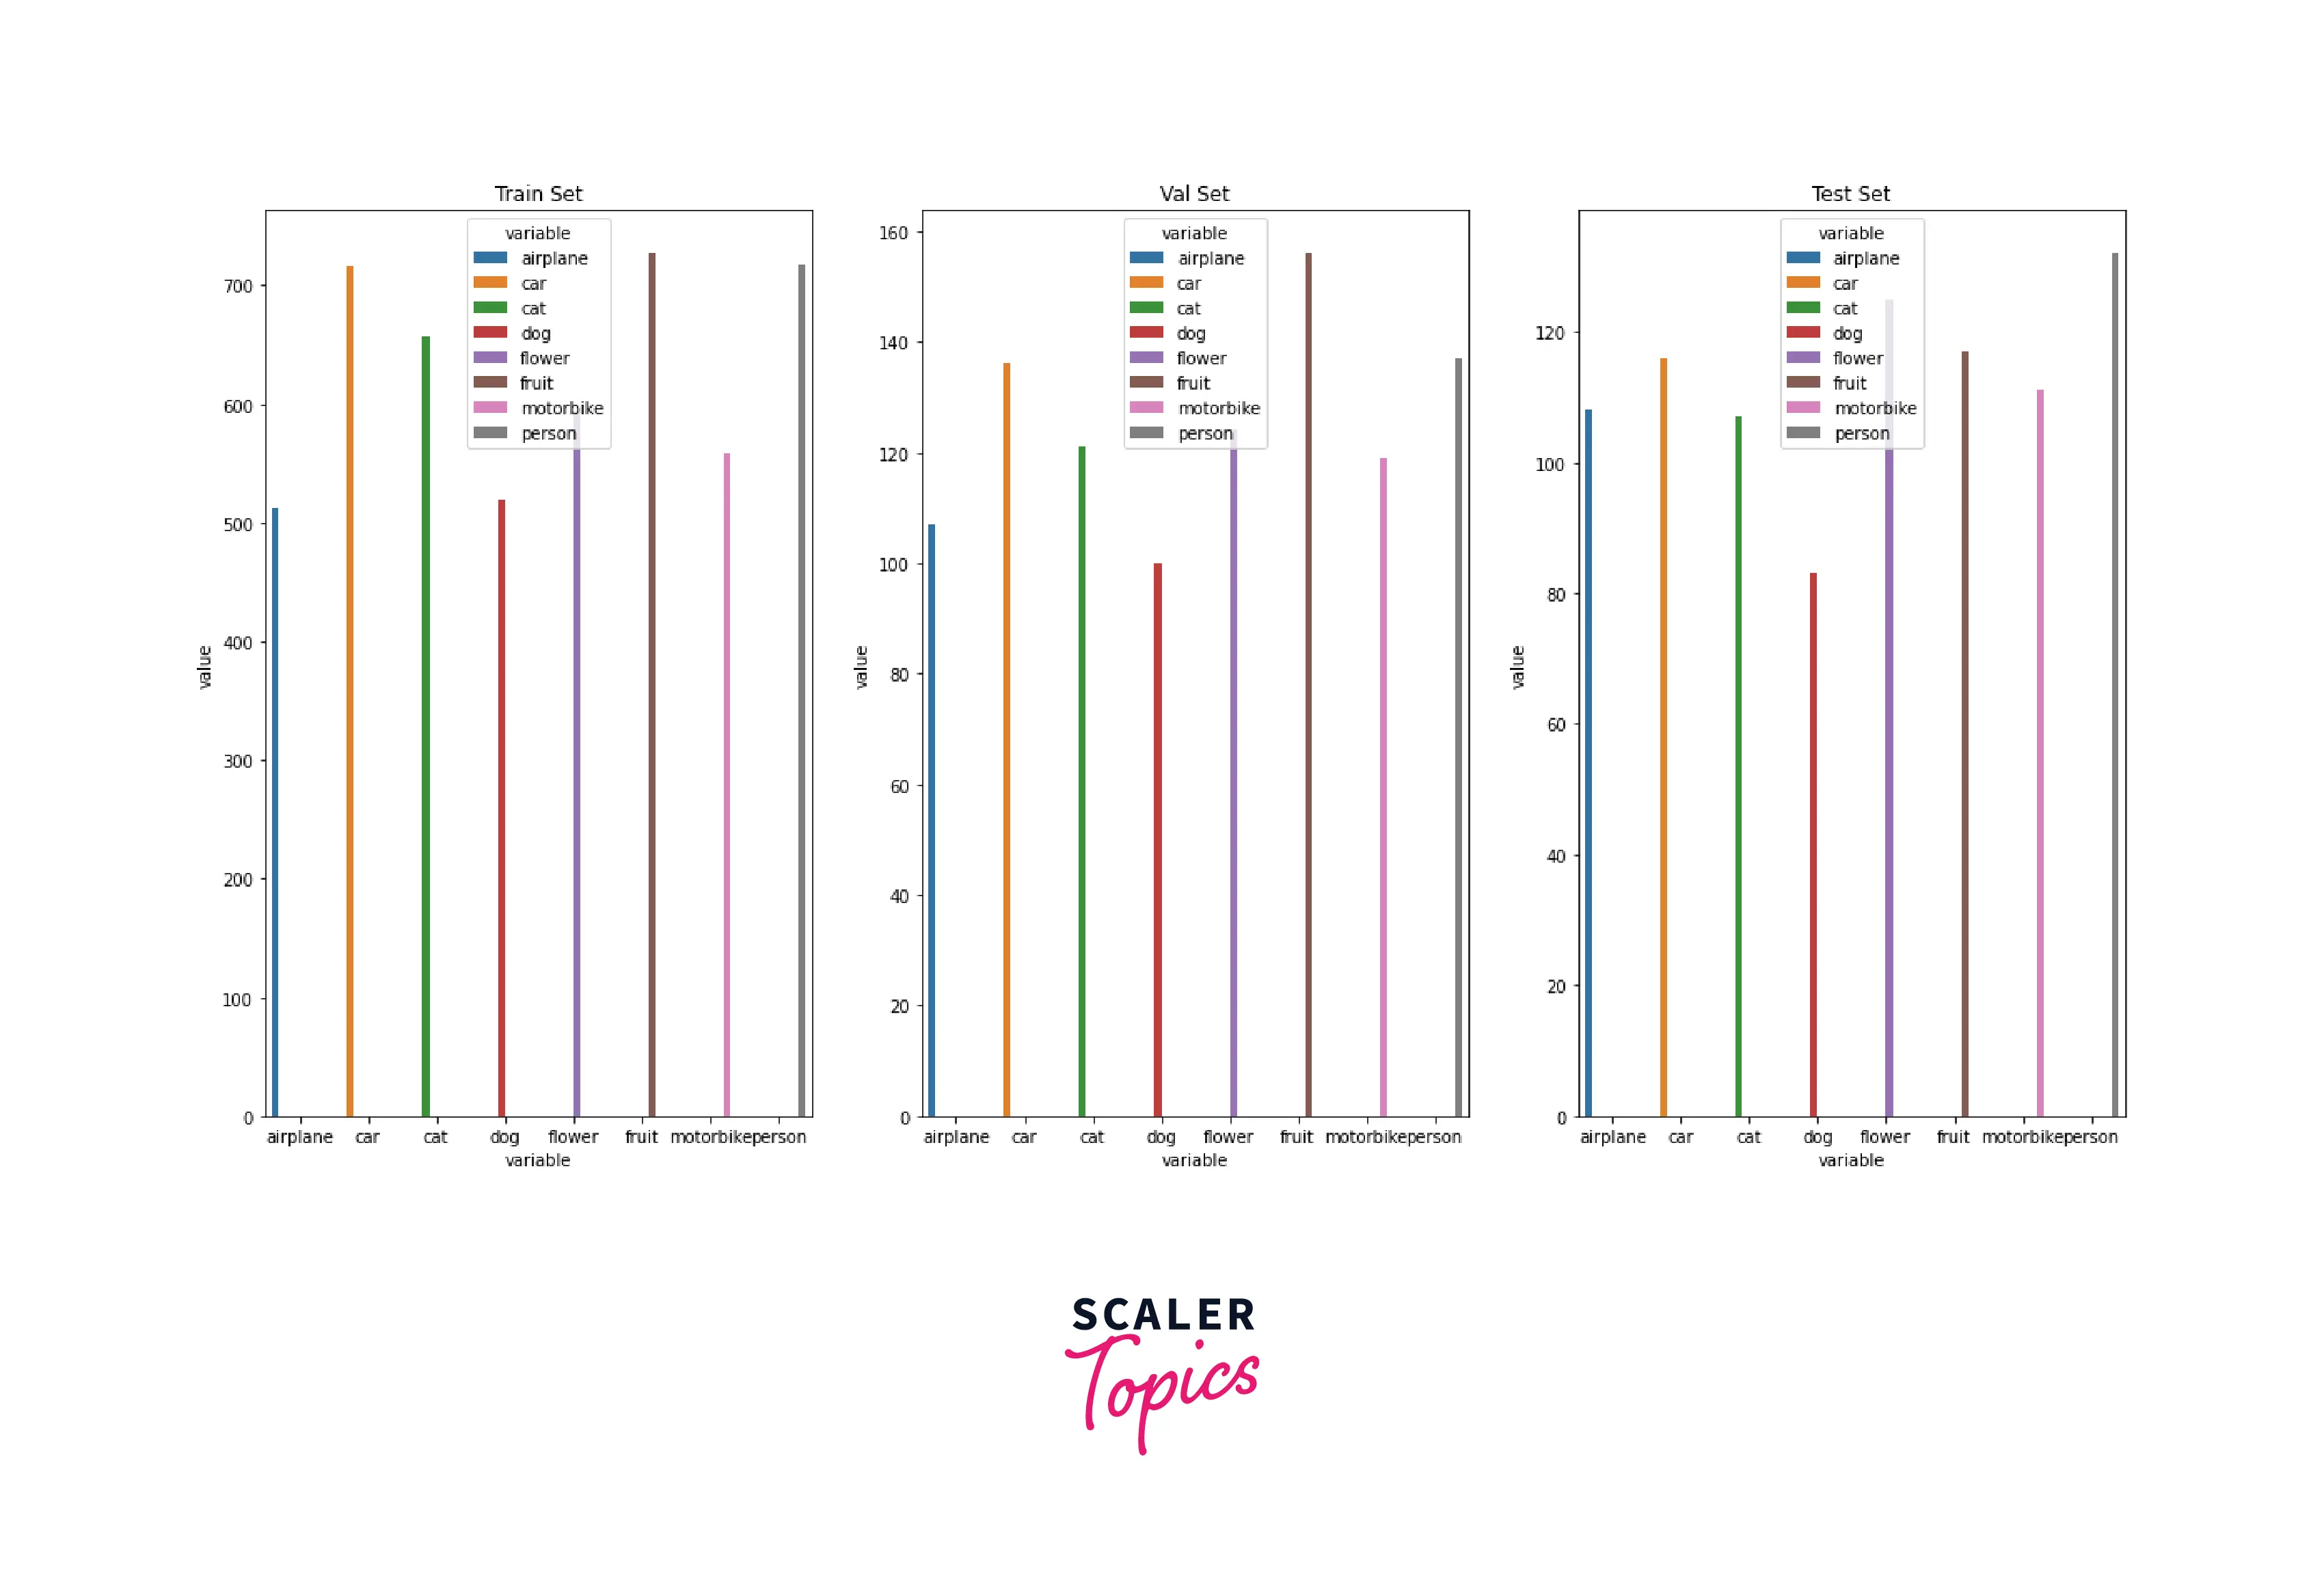
Perfect! We will now move to try some advanced samplers that do more than just split randomly.
Turn Learning into Career Growth
Using SubsetRandomSampler
The subset random sampler randomly samples elements from a given indices list without replacement. The index is a sequence of indices, and the generator is an instance of type torch.Generator.
The major steps involved in splitting a dataset using this sampler are as follows:
- Create a sequence of indices.
- Shuffle this sequence of indices.
- Split the indices based on the train-val-test percentage.
- Create Samplers as instances of SubsetRandomSampler.
We will now implement these steps for our raw image dataset.
Create a list of indices starting from 0 to the length of the dataset, and shuffle the indices using numpy like so:
We will now create split indices using a suitable train-val-test percentage, like so:
Now, using the split indices, we slice our list of indices to obtain separate indices for the train, validation, and test set, like so:
Using these separate list of indices, we will now create the sampler instances using SubsetRandomSampler and use these samplers as arguments to the dataloader class to create the corresponding dataloader instances, like so:
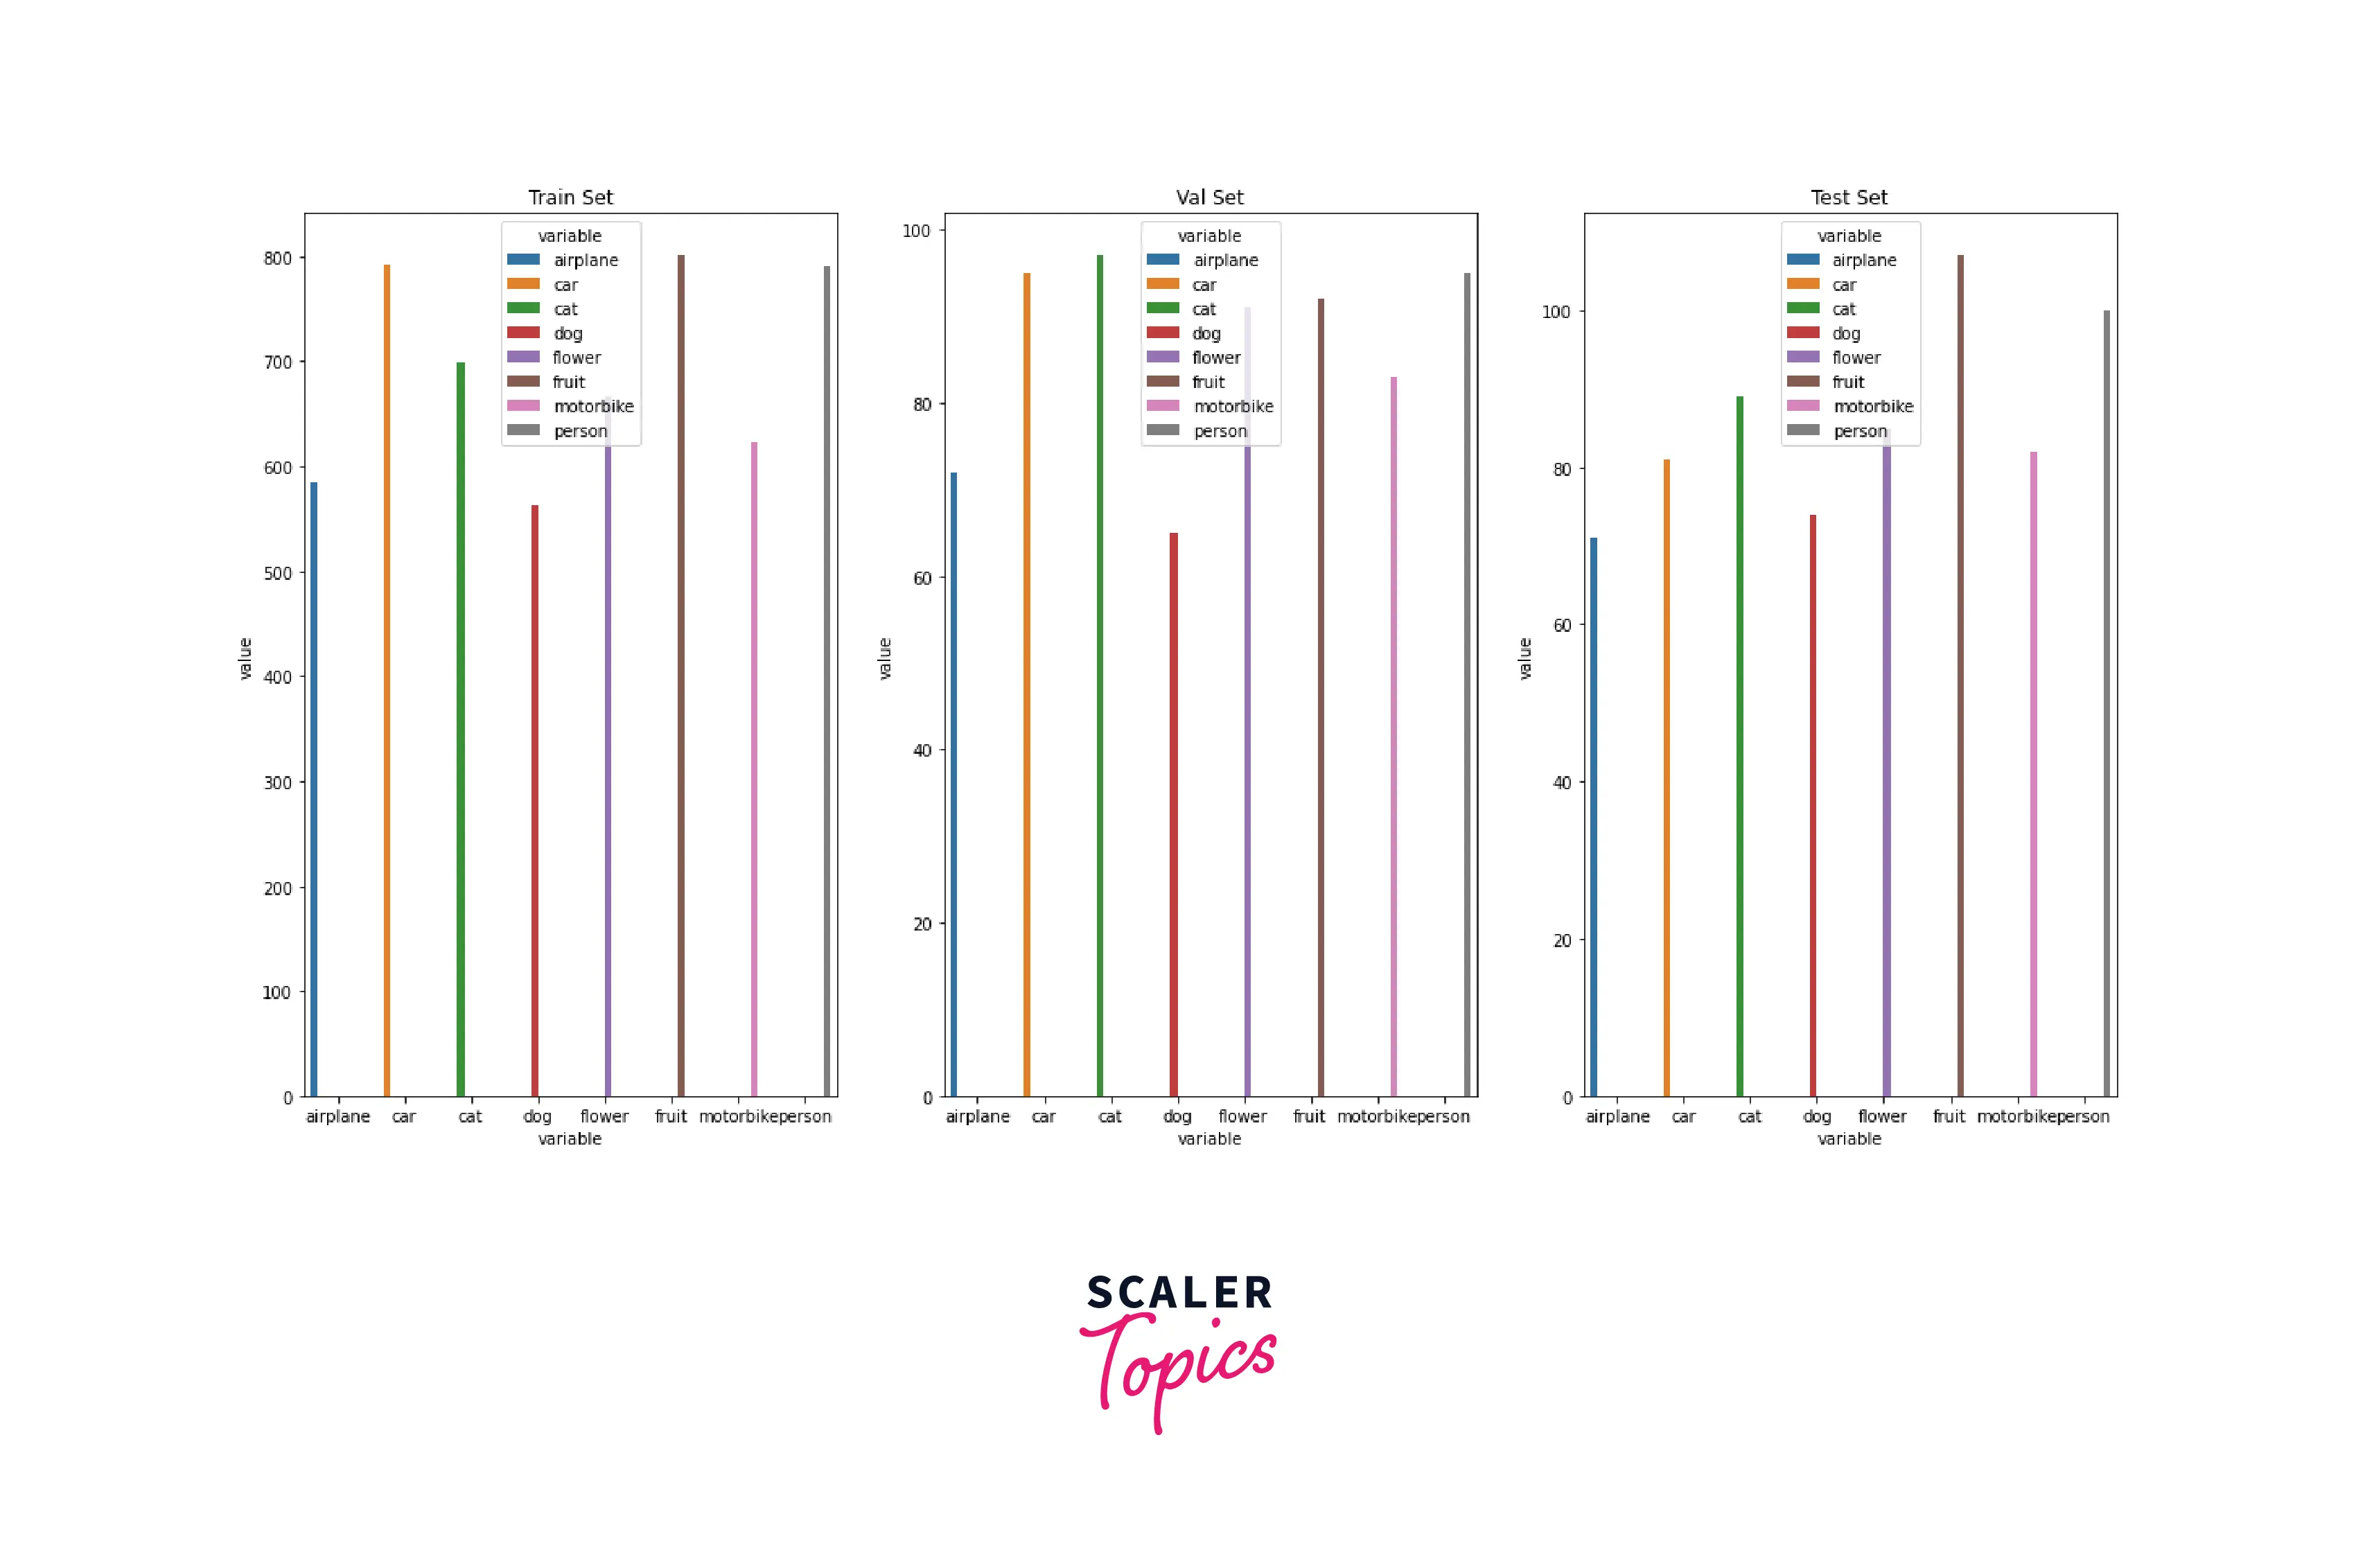
Now, let us plot the class distribution in the various data loaders. We will create a helper function that uses a dataloader object to create a dictionary, keeping count of the class distribution of different classes. And finally, we will use sns plots to visualize, like so:
Using WeightedRandomSampler
A weighted random sampler can ensure that each division of the original dataset contains samples in the different classes in equal proportions.
It Samples elements from with given probabilities (weights).
The arguments are as follows:
- weights – a sequence of weights (not necessarily summing up to one)
- num_samples (int) – the number of samples to draw
- replacement (bool) – If True, samples are drawn with replacement. If not, they are drawn without replacement, which means that when a sample index is drawn for a row, it cannot be drawn again for that row.
- generator (Generator) – torch.Generator instance used in sampling.
A simple recipe to follow to create a WeightedRandomSampler for any dataset is as follows -
- Get all the target classes as a sequence.
- Get the class weights per class. Class weights are calculated as the reciprocal of the number of data points per class.
- Obtain the corresponding weight for each sample in the dataset.
Let us create a WeightedRandomSampler by implementing this for our dataset.
We will obtain the sequence of targets like so:
Then, we calculate the class counts and weights by taking the reciprocal of the class counts.
We now assign the corresponding weights to all the targets in the targets tensor.
Finally, we use these weights to create an instance of the WeightedRandomSampler which can then be passed to the DataLoader as a sampler argument to create the dataloader instance, like so:
That was about how to split a PyTorch dataset to create three separate divisions to train and correctly evaluate our machine learning models.
Ready to dive deep into the world of deep learning with PyTorch? Join our Free PyTorch for Deep Learning Certification course and embark on your AI journey.
Conclusion
In the following article, we learned about splitting a PyTorch dataset in an efficient and easy manner. In particular,
- We first understood the motivation behind having three separate datasets for model-building while also showing where each appears in the modeling pipeline.
- We walked through the different ways that can be used to split a PyTorch dataset - specifically, we looked at random_split, WeightedRandomSampler, and SubsetRandomSampler.
- Then, we took a dataset from Kaggle and implemented the above three techniques step by step while also visualizing the class distribution in the created divisions.