PyTorch Linear and PyTorch Embedding Layers
Overview
Deep neural networks are a term given to a wide variety of machine learning modeling architectures that contain many layers of potentially different types and are capable of learning representative features from the data rather than requiring hand-created features to learn the relationship between the input and the output data. The different layer in deep neural architectures allows the networks to learn features and hence explore patterns from the data that are then generalized to real-world data to build AI-powered applications.
To this end, this article talks about the foundational layers that form the backbone of most deep neural architecture to learn complex real-world non-linear relationships present in the input data while also implementing a working example of each in PyTorch like PyTorch linear layers and PyTorch embedding layer.
Pre-requisites
To get the best out of this article, the reader should be familiar with basic linear algebra concepts like :
- Working knowledge of matrix and matrix operations like matrix multiplications, vectors, and so on
- Basic linear transformations.
- Working knowledge of Python is assumed.
Transform Your Career
Choose from our industry-leading programs designed for career success
Modern Software and AI Engineering Program
Master full-stack development with AI integration

Modern Data Science and ML with specialisation in AI
Advanced data science techniques with AI specialization
Advanced AIML with Specialisation in Agentic AI
Deep dive into AIML with focus on Agentic systems
DevOps, Cloud & AI Platform Engineering
Build and manage AI-powered cloud infrastructure
AI Engineering Advanced Certification by IIT-Roorkee
Premier AI engineering certification from IIT-Roorkee
Introduction to PyTorch Linear Layer
The most basic of all layers used in deep neural networks is the linear layer that takes in an input vector of any dimensionality and transforms it into another vector of potentially different dimensionality.
The layer does this by making use of a weight matrix and optional bias term and brings about a linear transformation of the form :
Where x is the input vector and W is the weight matrix multiplied by it, b is an optional bias term that is added to the result of this matrix multiplication to yield the linearly transformed vector y, and hence the name linear layer.
Diagrammatically, the linear layer can be represented as the following :
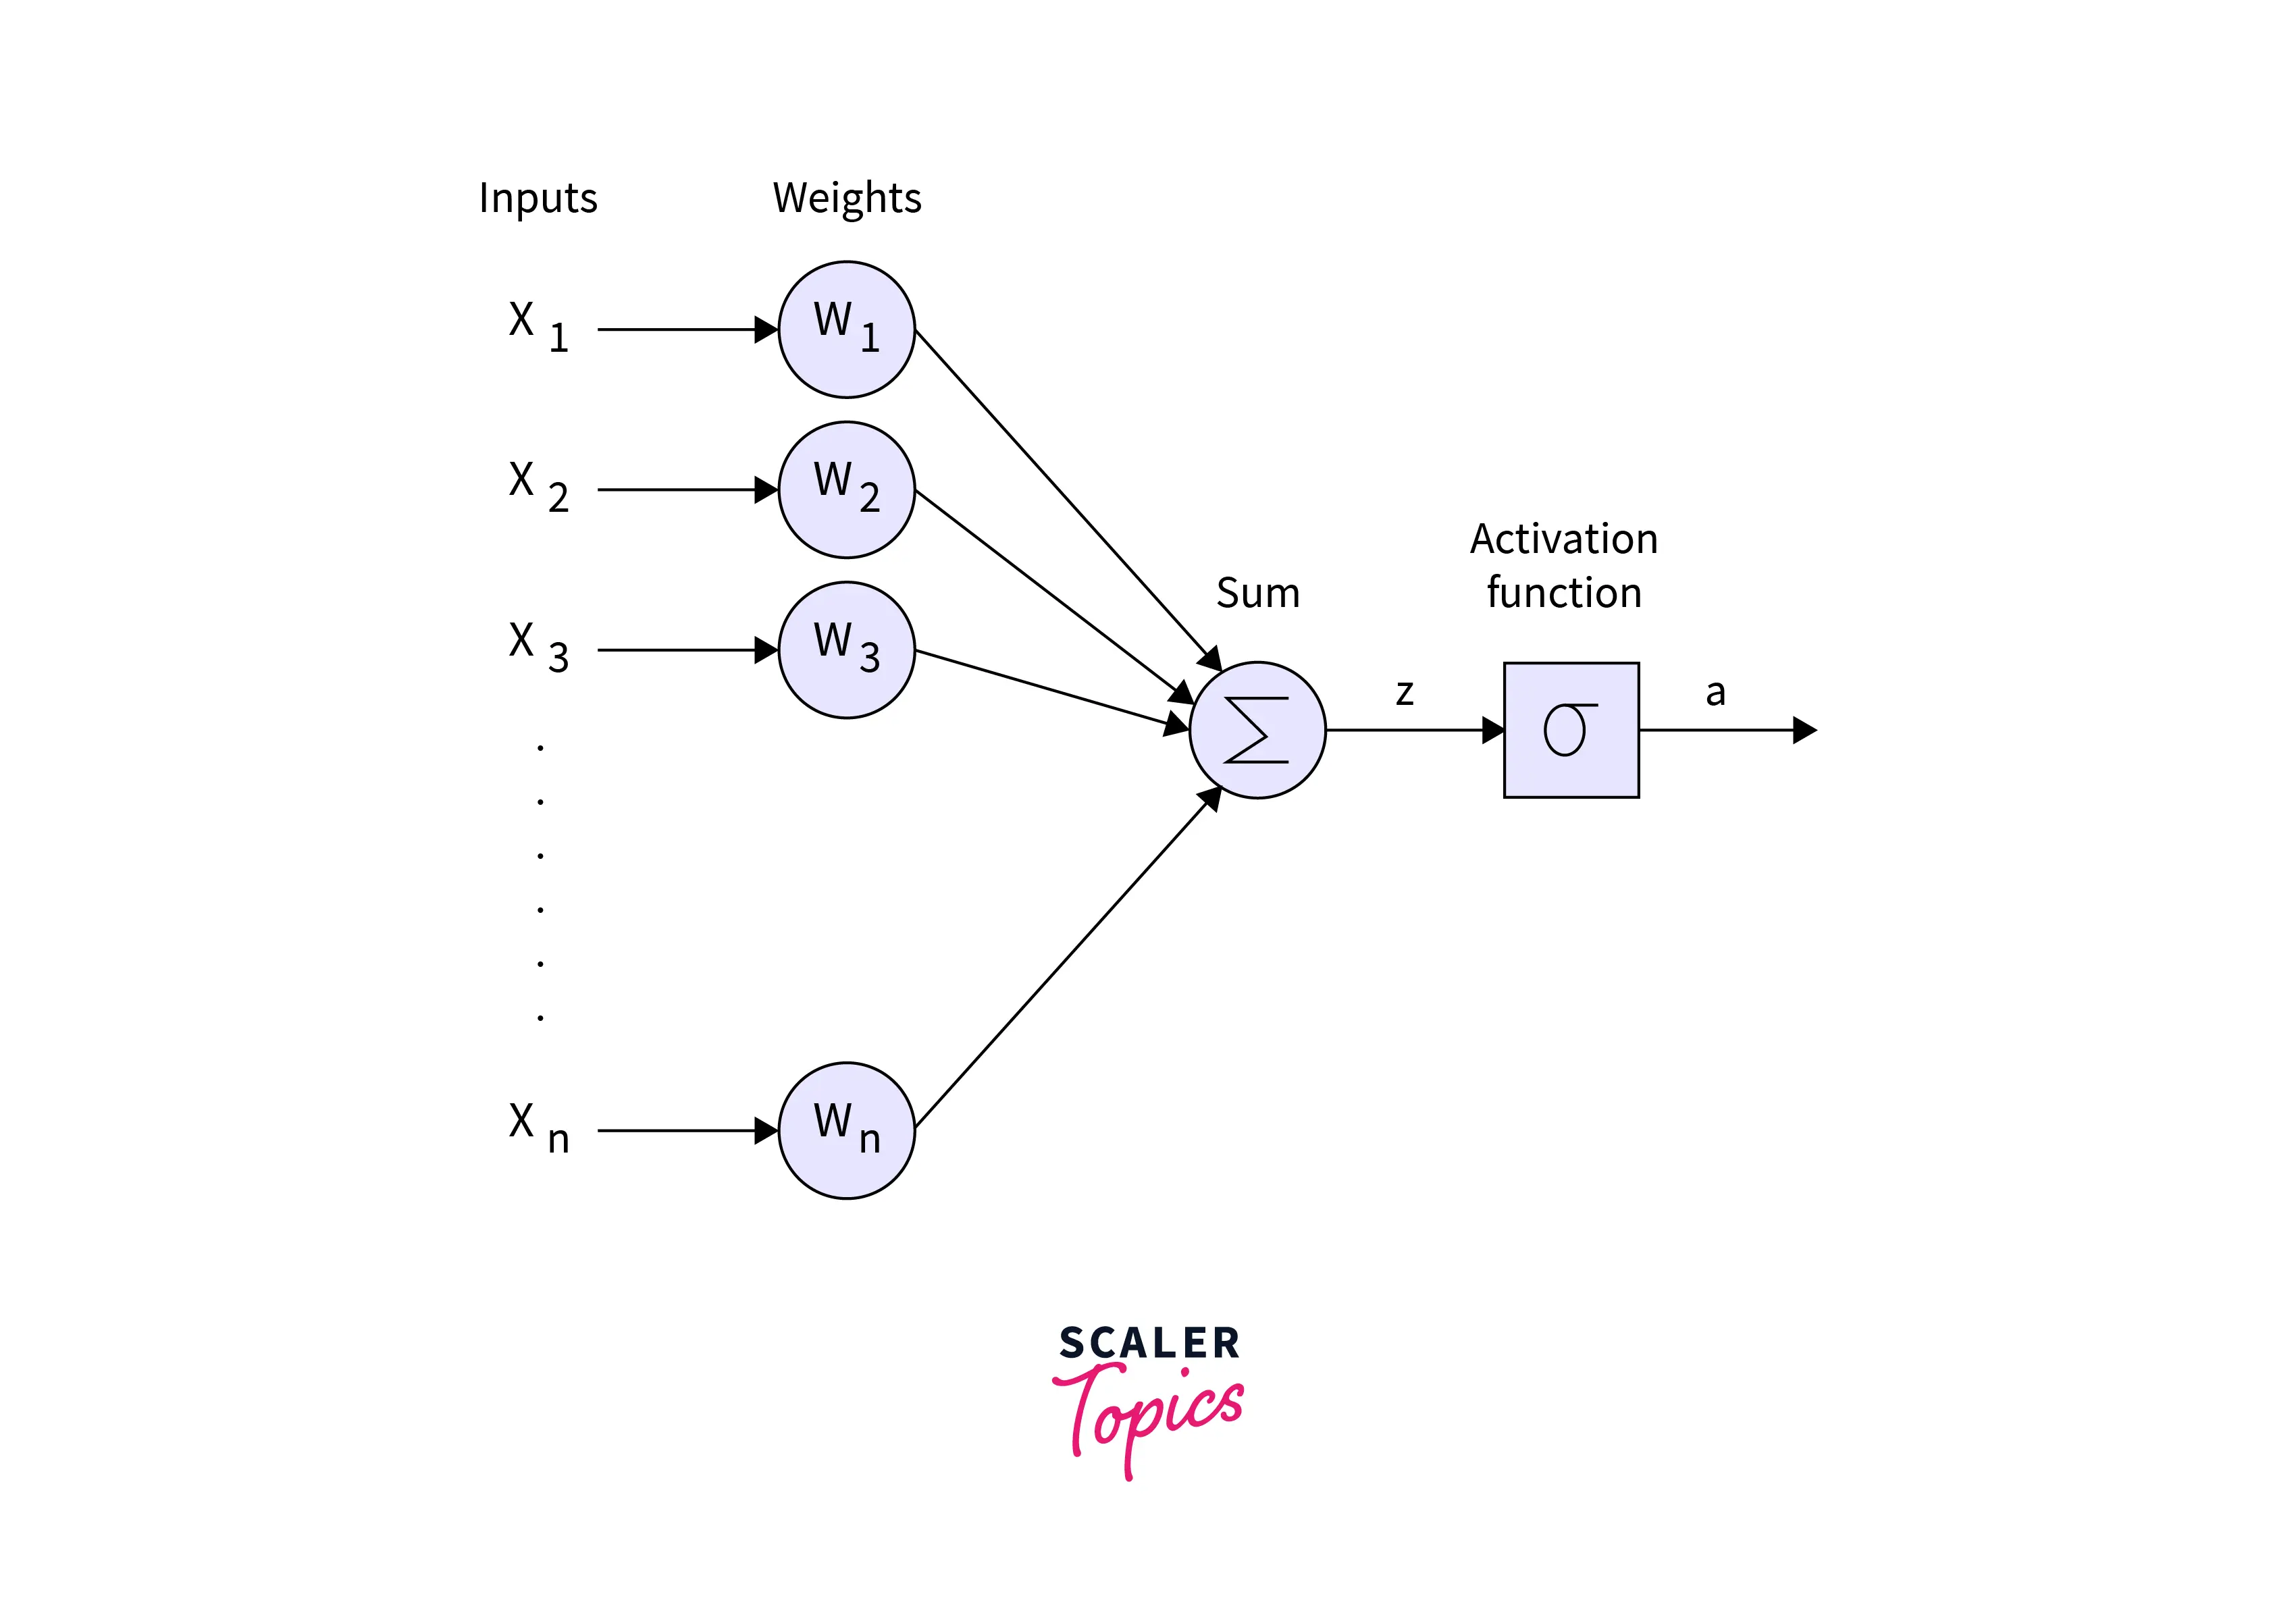
The linear layer is also called the fully connected layer or the dense layer, as each node (also known as a neuron) applies a linear transformation to the input vector through a weights matrix.
As a result, all possible connection layer-to-layer connections are present; hence, every input of the input vector influences every output of the output vector.
Note that in the above figure, although the output is represented as a sone node, it only means that the output vector can be of any dimensionality, the same or different from the dimensionality of the input vector.
Also, using the linear layer to construct deep neural networks is needed more than using the layer to transform the input vector. We need to add some form of activation to the vector by adding an activation layer.
This is needed to introduce non-linearity in the network structure to enable to network to learn non-linear relationships. But for this, the network shall transform into one big linear transformation, and it will not be possible to model non-linear relationships with such a network.
How to Create a PyTorch Linear Layer?
Let us learn how PyTorch supports creating a linear layer to build our deep neural network architecture. The linear layer is contained in the torch.nn module, and has the syntax as follows :
Where some of the parameters are as defined below :
- in_features (int) :
the size of each input sample (the input vector) - out_features (int) :
the size of each output sample (the input vector) - bias (bool) :
the optional bias term. If set to' False', the layer will not learn an additive bias. Default: True
It is important to note the shapes supported by PyTorch for the input and output tensors when working with a linear layer - until now. This is because we have been talking about the linear layer and the linear transformation in general in terms of vectors as inputs and inputs. In linear algebra, vectors are considered column vectors (dimensionality ). Still, in the real world, the data can be in multi-dimensional forms, and hence PyTorch supports input tensors of any dimensionality as input to the linear layer.
specifically, the input tensor can take the shape () where * can be any number of dimensions including none and
Such an input tensor, when passed through the linear, later produces an output tensor of a shape () such that all but the last dimension are the same shapes as the input tensor and
The linear layer can be accessed in PyTorch in the following way :
Output:
We can also access the weights and bias terms of the linear layer fc_layer like so :
Output:
As we can see, both of them are parameter tensors requiring gradient (that is, having their attributes requires_grad=True)
Let us now demonstrate how these parameters can be made to learn or change themselves according to some expected model output, like so :
After backpropagating the loss, we can change the parameters according to their gradient attribute like so :
Output:
As we can see, the weight parameter's value is now changed.
We can make a similar change for the bias term like so :
Output:
That was about the PyTorch linear layer. We will now learn about another important type of layer used as a building block for many large deep neural model architectures, called the embedding layer.
What is PyTorch Embedding?
Embedding layers are another very common type of layer used in deep neural modeling. Embedding layers act as a lookup table to extract embedding vectors corresponding to any entity, like indices, words, characters, etc.
The most common use of an embedding layer is in natural language processing where (dense) embeddings corresponding to words can be trained to get vector representations of words to be able to use them for modeling text data, rather than big and sparse one-hot encoded computationally inefficient vectors.
Besides word embeddings in natural language processing, the embedding layer finds use cases in recommender systems, collaborative filtering, temporal modeling, etc.
Hence, embeddings are just vector representations, and an embedding layer is simply a medium for mapping identities to their corresponding vectors (embeddings).
There are two dimensions to take care of with an embedding layer :
- The unique number of entities, viz. indices, words, etc. that are to be embedded into vector representations, and
- The fixed dimension of each embedding, that is, the length of each embedding vector
Let us now look into how embedding layers in PyTorch work.
How Does PyTorch Embedding Work?
The syntax of the Embedding layer class looks like this :
Where some parameters are defined below :
- num_embeddings (int):
specifies the size of the dictionary of embeddings, that is, the unique number of entities that need to be mapped to embedding vectors. - embedding_dim (int) :
the size of each embedding vector. - padding_idx (int, optional) :
If specified, the entries at padding_idx do not contribute to the gradient. Therefore, the embedding vector at padding_idx is not updated during training, i.e., it remains as a fixed “pad”. For a newly constructed Embedding, the embedding vector at padding_idx will default to all zeros but can be updated to another value to be used as the padding vector.
For a full list of parameters, refer to the docs.
The learnable weights of the embedded g layer are hence of shape (num_embeddings, embedding_dim) and are initialized from .
Turn Learning into Career Growth
Example of PyTorch Embedding
The input to the embedding layer in PyTorch should be an IntTensor or a LongTensor of arbitrary shape containing the indices to extract, and the Output is then of the shape , where is the input shape and .
Let us now create an embedding layer in PyTorch :
Output :
Notice that we created an embedding layer that will act as a lookup table for indices in the range 0-4. Any index out of this range does not have a corresponding embedding and hence shall produce an error, like so :
Gives an error Output:
Let us now see an example with padding_idx by setting the index to 3, like so :
Output:
In the example above, we also demonstrated how the embedding corresponding to padding_idx could be changed. Similar to how it's done in the linear layer, we will need to change the no_grad context manager to avoid errors.
We can also instantiate an embedding layer from a pre-trained embedding weight using the class method from_pretrained has the following syntax :
Where the parameters are defined as :
- embeddings (Tensor) :
specifies the FloatTensor containing weights for the Embedding. The first dimension is being passed to Embedding as num_embeddings, second as embedding_dim. - freeze (bool, optional):
If True, the tensor is not updated in the learning process. Equivalent to embedding.weight.requires_grad = False. Default: True. - padding_idx (int, optional) :
If specified, the entries at padding_idx do not contribute to the gradient. Therefore, the embedding vector at padding_idx is not updated during training, i.e., it remains a fixed “pad”.
An example demonstrating the creation of an embedding instance from pre-trained weights is as follows :
Output:
What is PyTorch nn.sequential?
Finally, we will look at another API provided by PyTorch that is very useful for storing layers in succession and hence define a model architecture in PyTorch.
The sequential container can be used to chain different Modules (or layers) that will then get added to it in the order they are passed in the constructor while instantiating an nn.Sequential object.
Each module is registered as a submodule under the sequential module, which means the whole sequential container can be treated as a single module. The benefit of treating the whole container as a single module is that it gets applied to each of the modules it stores when performing a transformation on the Sequential object.
It also accepts an OrderedDict of modules. The forward() method of Sequential agrees with any input and forwards it to the first module it contains. Then it “chains” the outputs to inputs sequentially for each of the subsequent modules and finally returns the Output of the last module.
Scaler Placement Report and Statistics
Scaler learners achieved 2.5x salary growth with average post-Scaler CTC reaching ₹23L.
How to Use PyTorch nn.sequential?
In PyTorch, we can use the sequential container in either of the following two ways :
Ready to master deep learning? Our PyTorch for Deep Learning Free Course is your key to success in AI and machine learning.
Conclusion
With this, we are done understanding and implementing the foundational neural network layers that form the building block of modern deep neural architectures.
Let us recap in points what we studied in this article :
- Firstly, we understood the concept of a linear layer as a linear transformation for mapping data in input vectors to output vectors.
- Then, we implemented a fully connected layer (linear layer) in Pytorch using the nn.Linear API while also looking at how a linear transformation's weight and bias parameters can be accessed and updated using a few lines of PyTorch code.
- We then explored what an embedding layer in deep learning modeling is and understood the use cases where such a layer might be useful.
- After this, we demonstrated how embedding layers could be used in PyTorch to create essentially a lookup table for entities to map them into dense embedded vectors.
- Lastly, we walked through the nn.Sequential container provided by PyTorch and understood the importance of it while also implementing it in code in two different ways.