Resnet in PyTorch
Overview
ResNets are considered a breakthrough in Computer Vision as they work to solve the performance challenges faced by deep neural networks with many layers.
As complex deep learning tasks on image data require us to build very deep networks with many layers, ResNets allow us to do just that without falling into the practical problems faced by very deep nets. In this article, we learn to use PyTorch ResNet and a PyTorch ResNet example to demonstrate how ResNets can build deep neural network-based systems for image data.
Prerequisites
To follow along with the following article,
- A basic understanding of what Convolutional Neural Networks are is required.
- To code along, Google colab with GPU support is sufficient.
- To ensure faster training, changing the runtime type to GPU in the Google colab notebook is recommended.
Introduction
To learn generalizable patterns from image data, external networks do not qualify as they underfit the data and cannot extract any meaningful features.
To overcome this, we build deep neural networks with many layers so that the different layers can identify low-level and high-level features from the images. Thus, the model as a whole will be able to learn better.
However, it is practically experimented with and then concluded that very deep networks suffer from a common yet tricky problem called "the problem of vanishing gradients.” It is said to have occurred when during the calculation of gradients of the loss function concerning the parameters of the layers, the gradients of the initial layers become extremely small to the extent that they disappear, causing virtually no updates in the parameter values.
In other words, the initial part of the network fails to learn and, thus, needs to perform better on real-world data.
To overcome the problem of vanishing gradients with very deep neural nets, ResNet is introduced. Finally, we will look at what ResNet is next.
Transform Your Career
Choose from our industry-leading programs designed for career success
Modern Software and AI Engineering Program
Master full-stack development with AI integration

Modern Data Science and ML with specialisation in AI
Advanced data science techniques with AI specialization
Advanced AIML with Specialisation in Agentic AI
Deep dive into AIML with focus on Agentic systems
DevOps, Cloud & AI Platform Engineering
Build and manage AI-powered cloud infrastructure
AI Engineering Advanced Certification by IIT-Roorkee
Premier AI engineering certification from IIT-Roorkee
What are ResNets?
ResNet worked through the practical difficulties large deep neural nets face and introduced tricks that allow us to build larger ones without succumbing to the vanishing gradients problem.
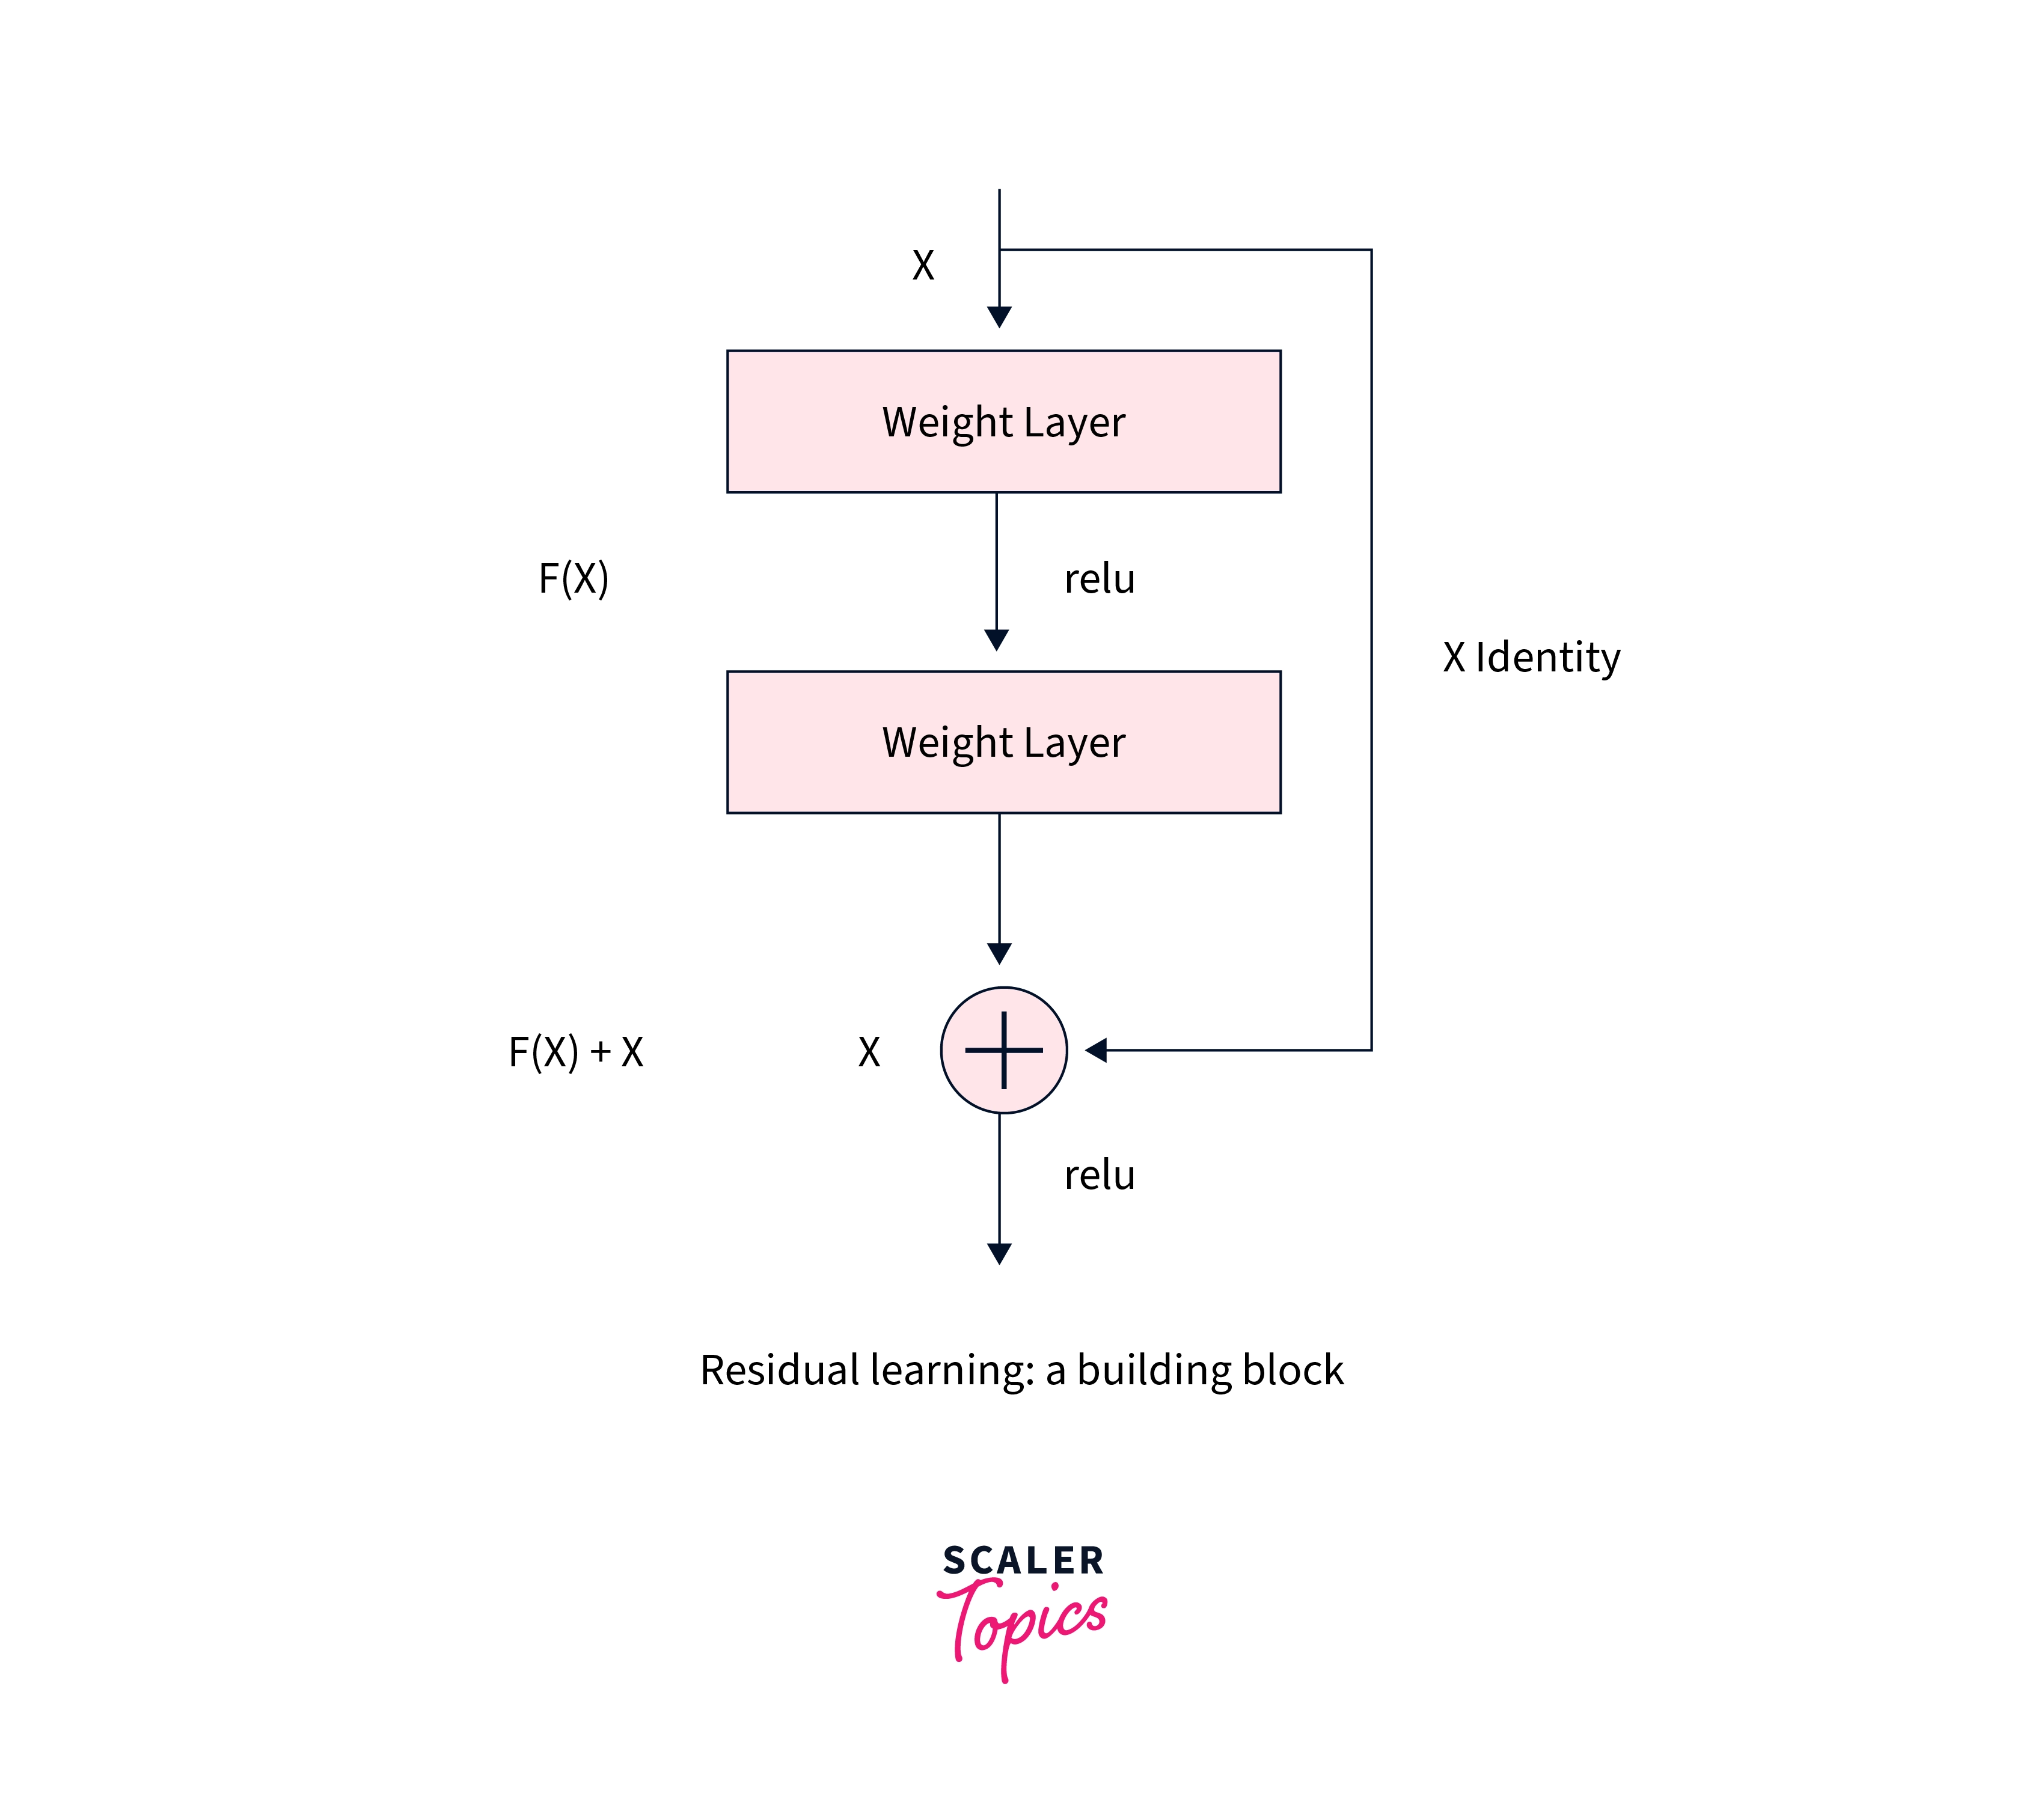
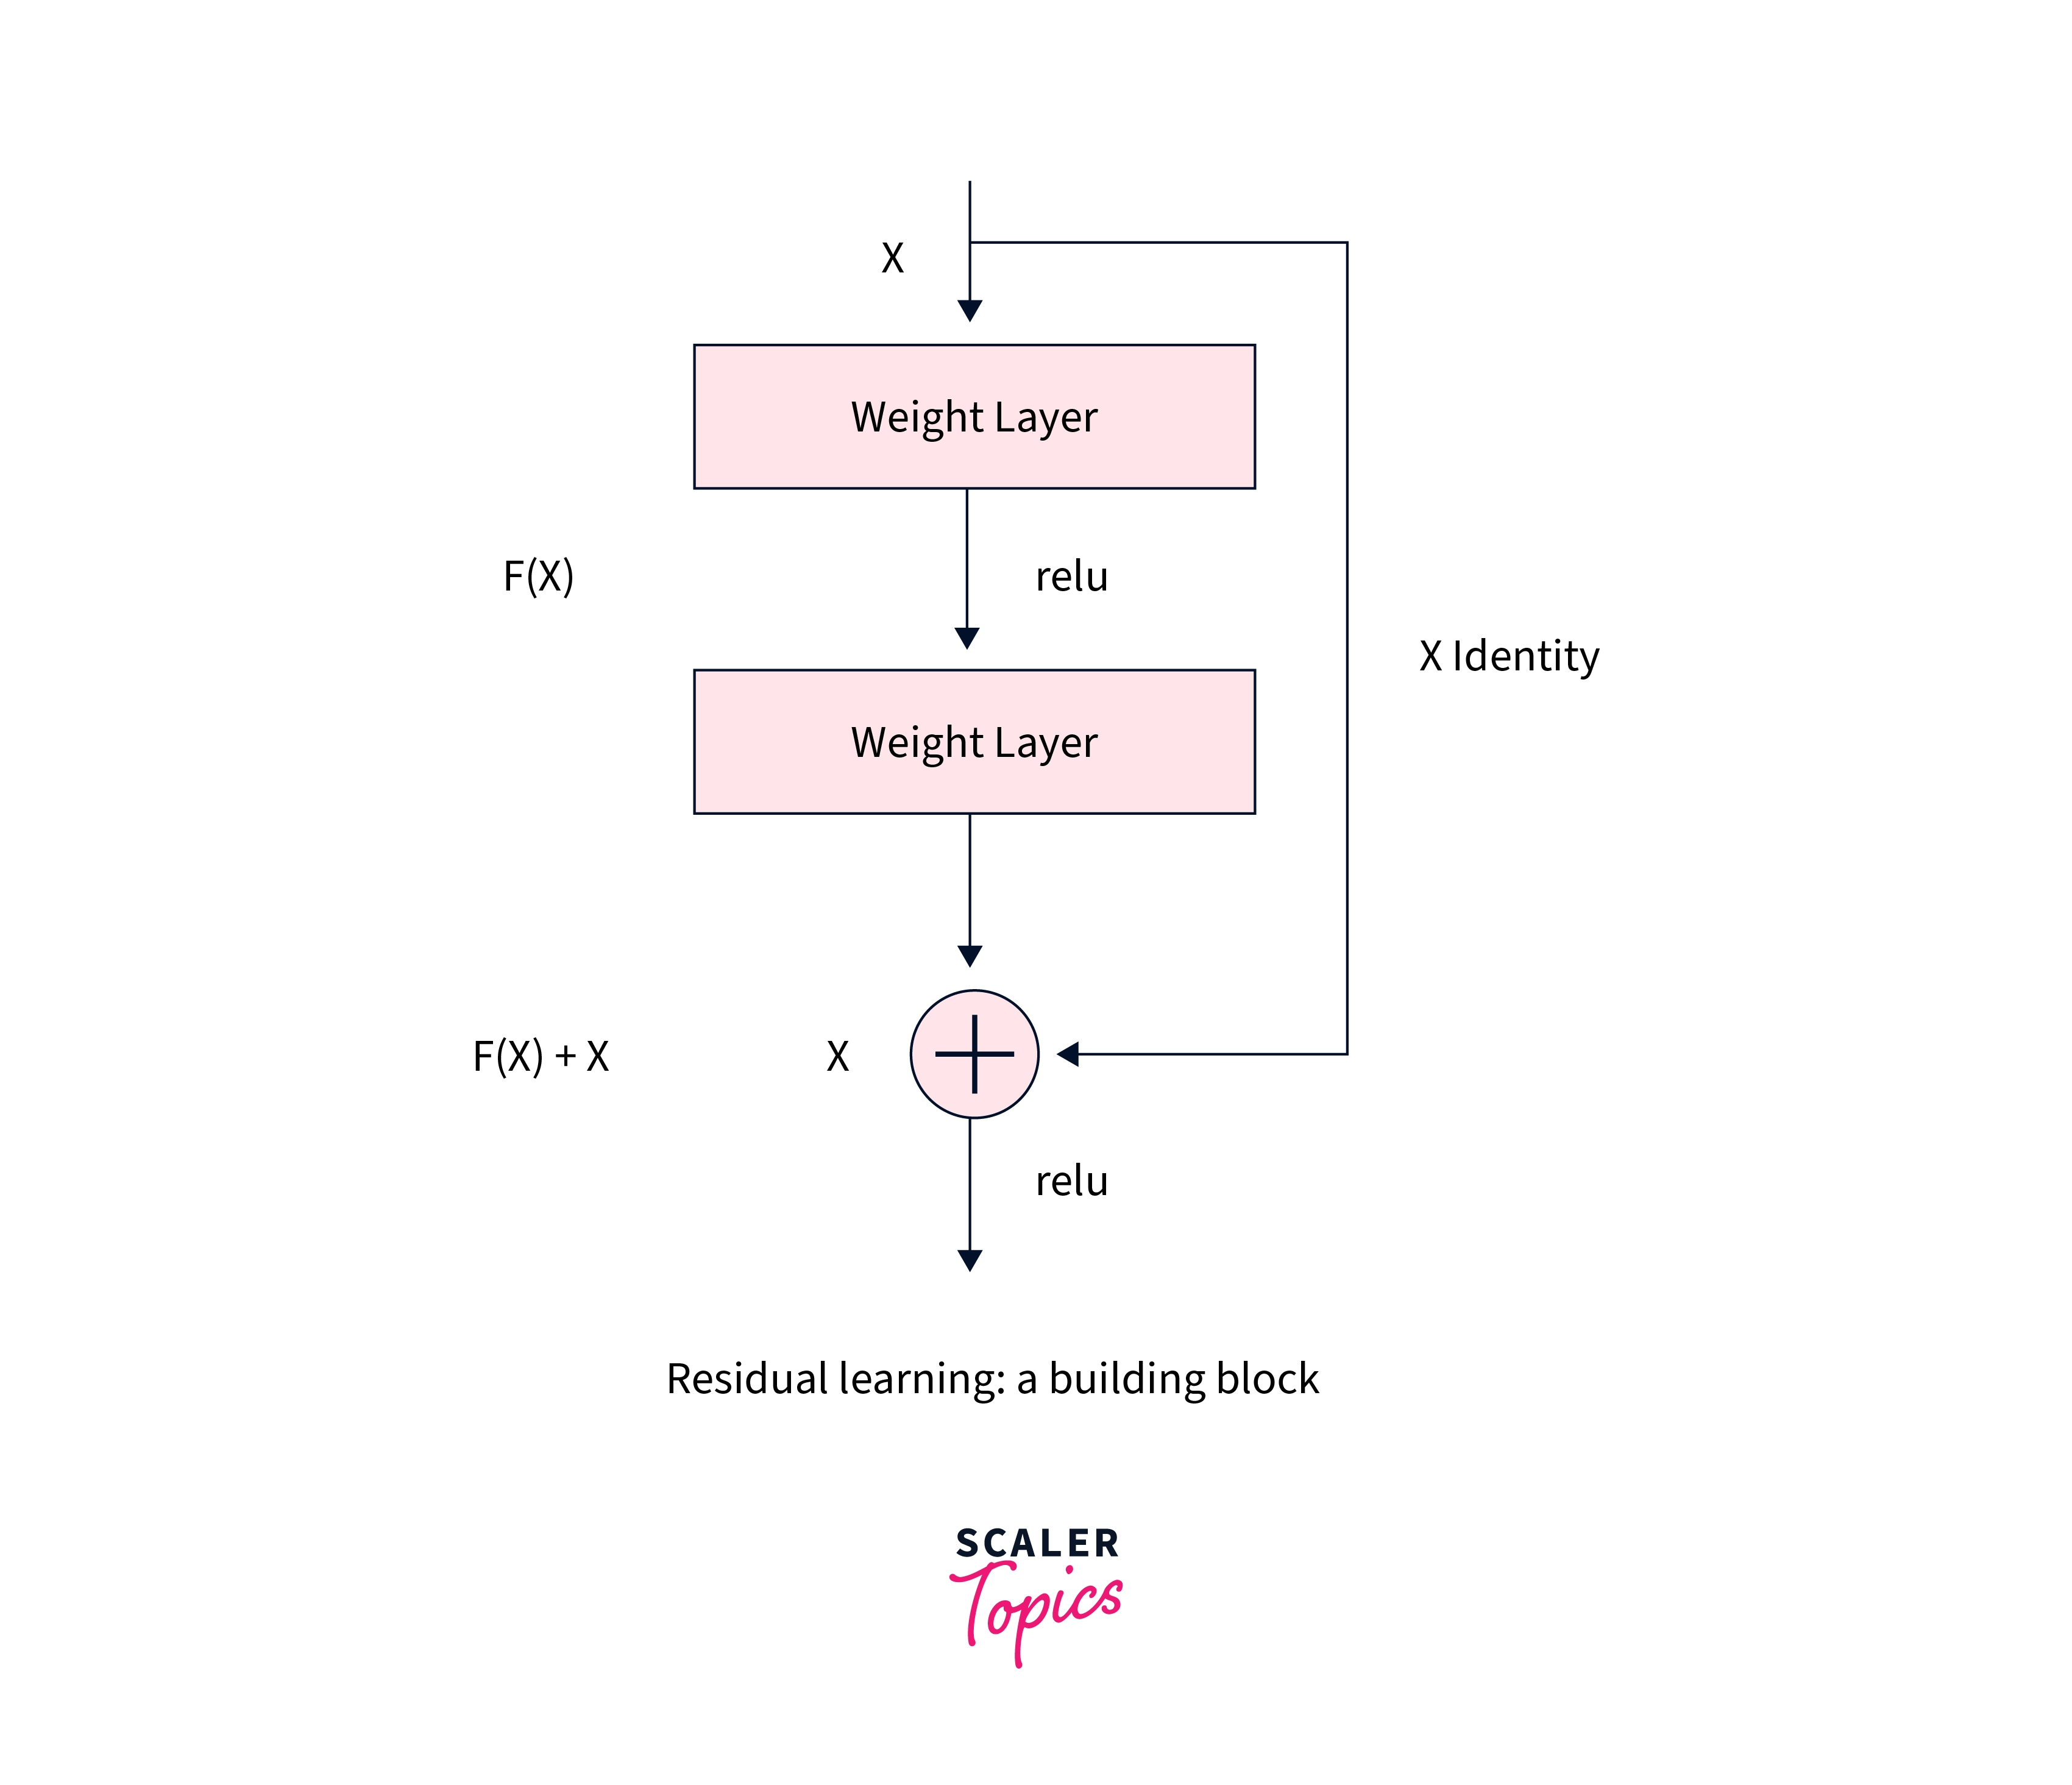
The essence of ResNets lies in what is called skip connections or shortcuts. ResNets hence have residual blocks as their major building block that use skip connections to add intermediate inputs (or another form of them) to the output of a group of convolution blocks.
The simplest residual block can hence be shown as -
When compared to the general neural networks without skip connections, we can see how residual blocks, in addition to the main flow of the data through the network, contain skip connections between the layers, like so -
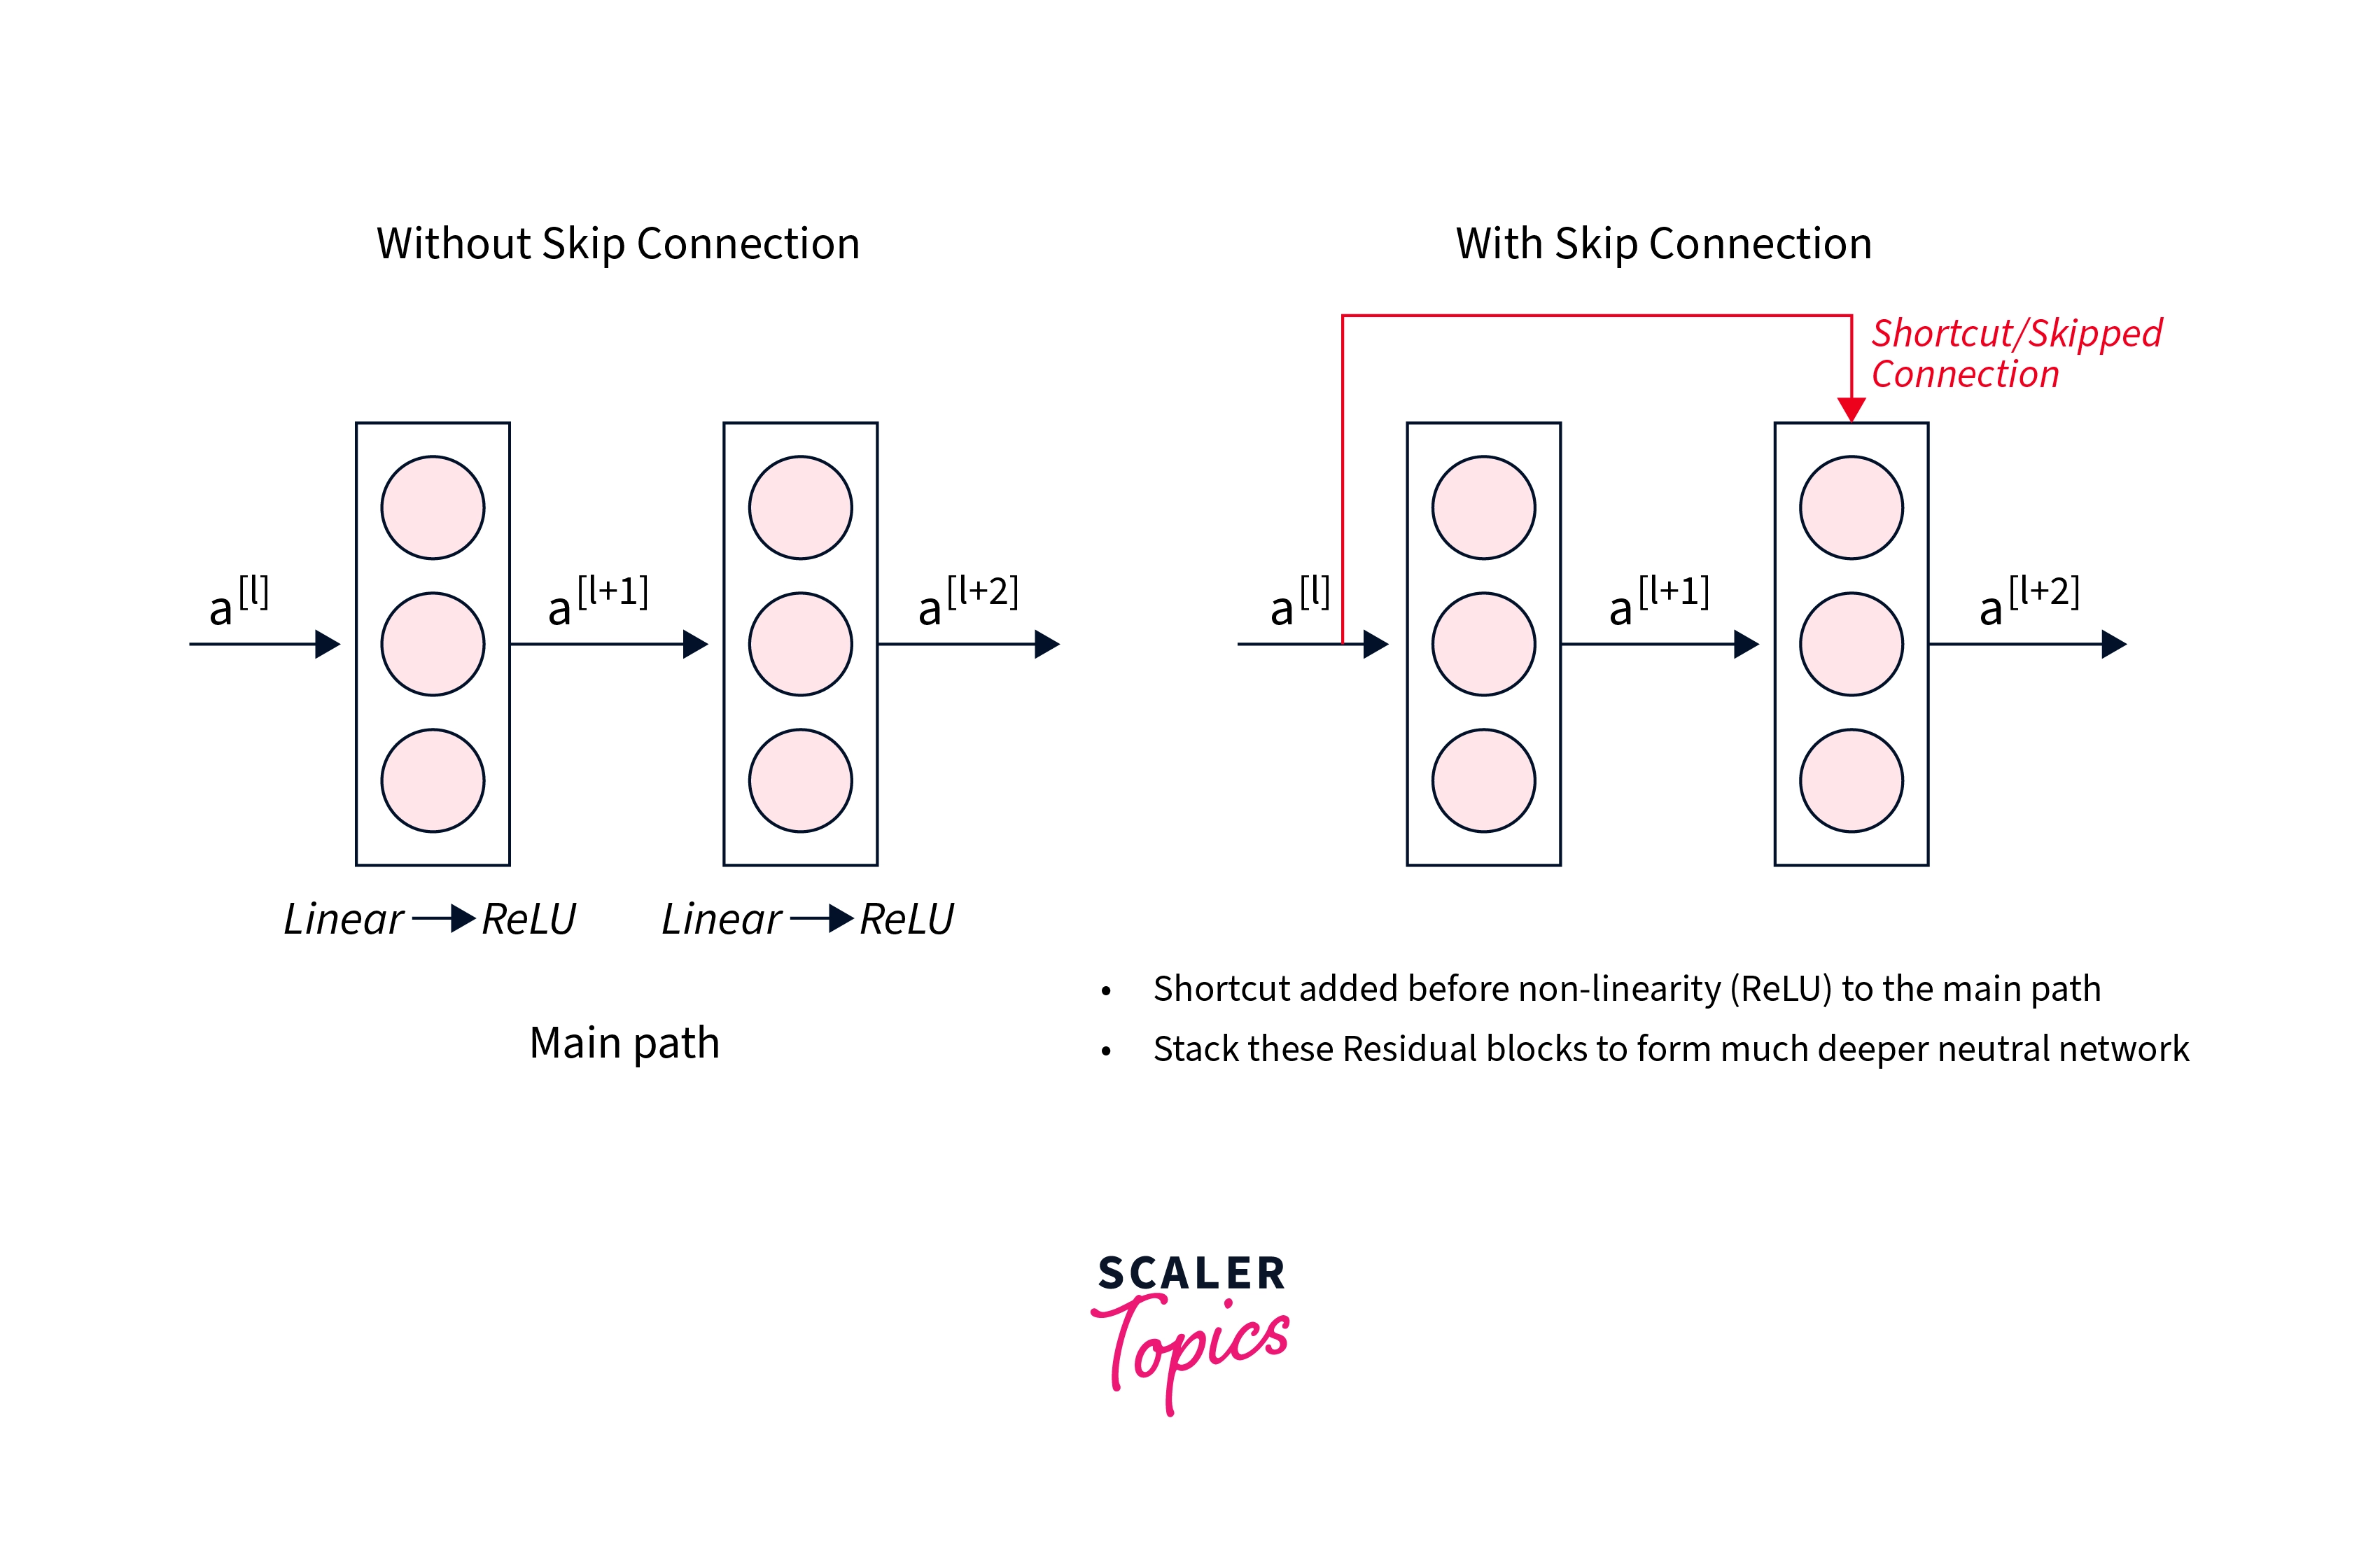
These skip connections enable the gradients to keep flowing without reducing to very small quantities and eventually vanishing during their path.
This way, as many as up to 3 layers can be skipped at a time, making it easy for the network to learn during the training process.
We will now look at moving on to learn about PyTorch ResNet with a full-fledged PyTorch ResNet example in code.
ResNet Blocks:
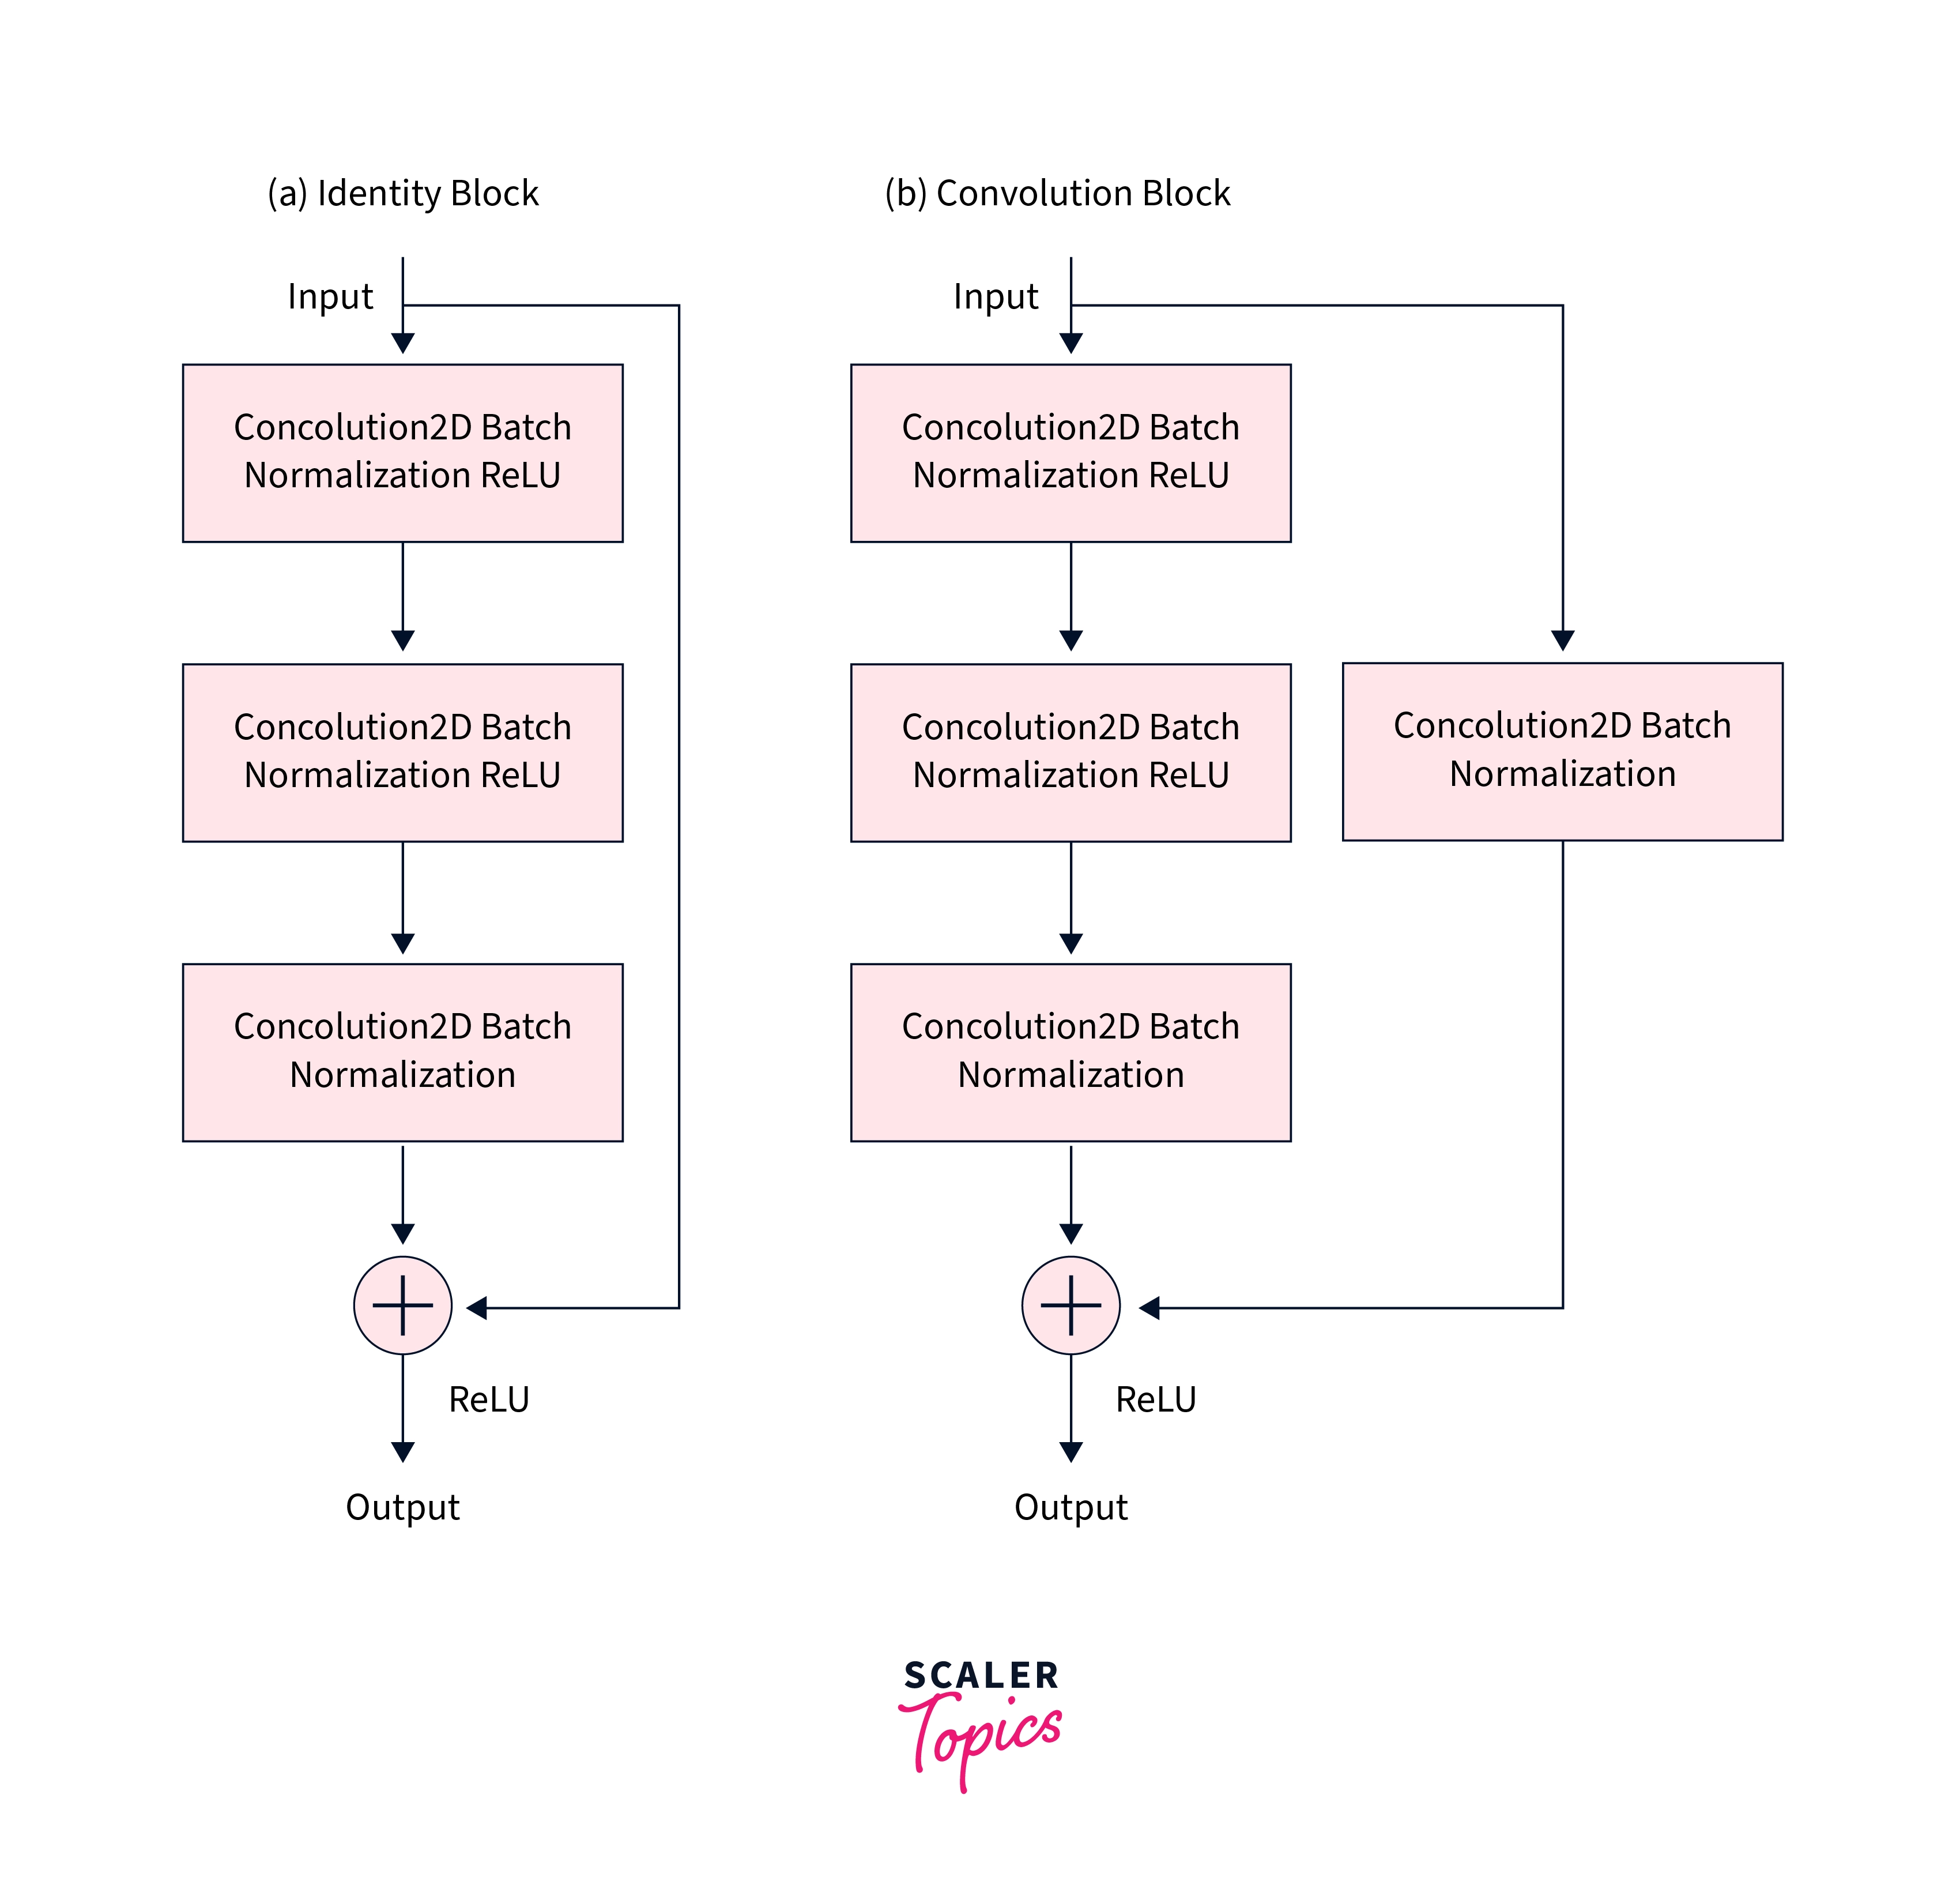
The architecture of ResNet can be composed of two main types of building blocks depending on whether the input to the block and the output coming out of the blocks differ in their dimensions or not.
- Identity Block: This can be used when the input and output activations have the same dimensionality.
- Convolution Block: When the input and output activation dimensions differ in dimensionality.
, For example,, to reduce the activation dimensions (HxW) by a factor of 5, we can use a 1x1 convolution with a stride equal to 5.
How Does PyTorch Support ResNet?
PyTorch provides easy access to ResNet using the torchvision.models API. From here, we have two paths to pursue -
-
We could either download the pre-trained model provided by Pytorch that is trained on the ImageNet dataset and modify its last layer according to our task. (this could further be fine-tuned on a custom dataset)
-
We could utilize PyTroch's architecture by setting the pre-trained version to False, and thus randomly initialize its weights to train it from scratch using our data.
The latter is a computationally expensive process, while the former is an example of an important machine learning concept called transfer learning.
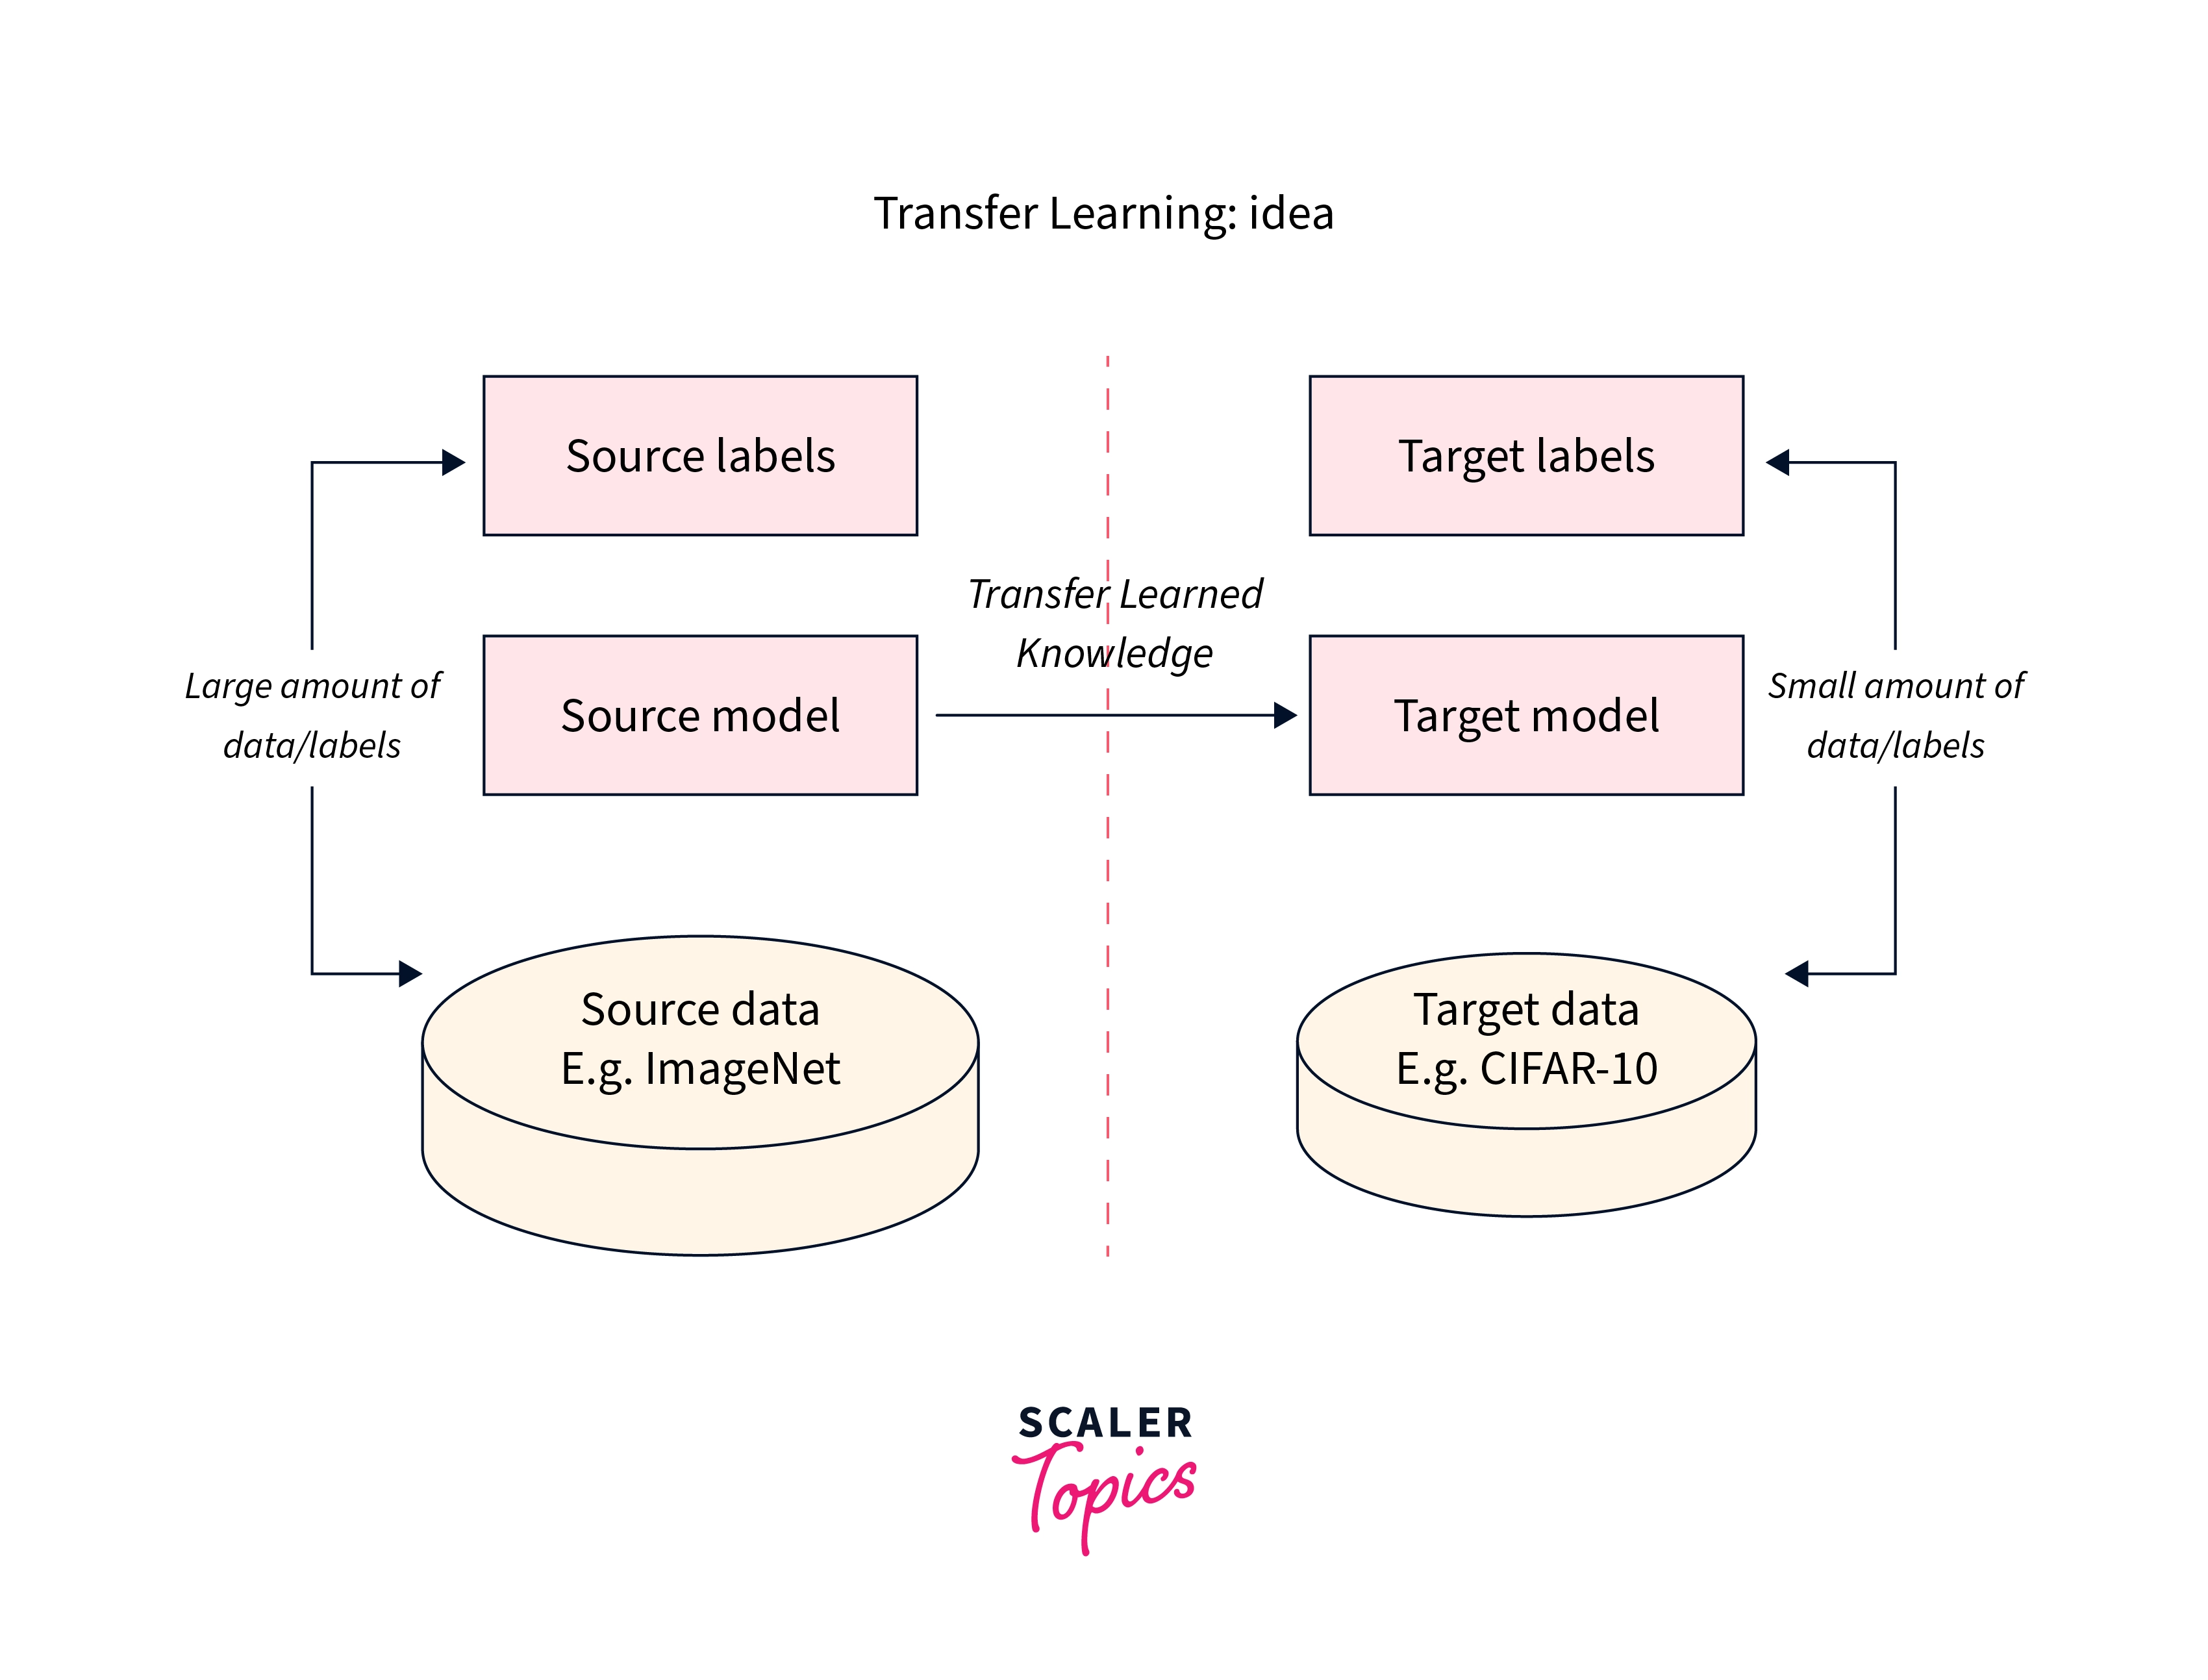
In the first one, we transfer the knowledge from pre-trained weights into our current network implementation.
We will now demonstrate a working PyTorch resNet example of the first method and build a neural network classifier based on the ResNet architecture.
Implementation of ResNet in PyTorch
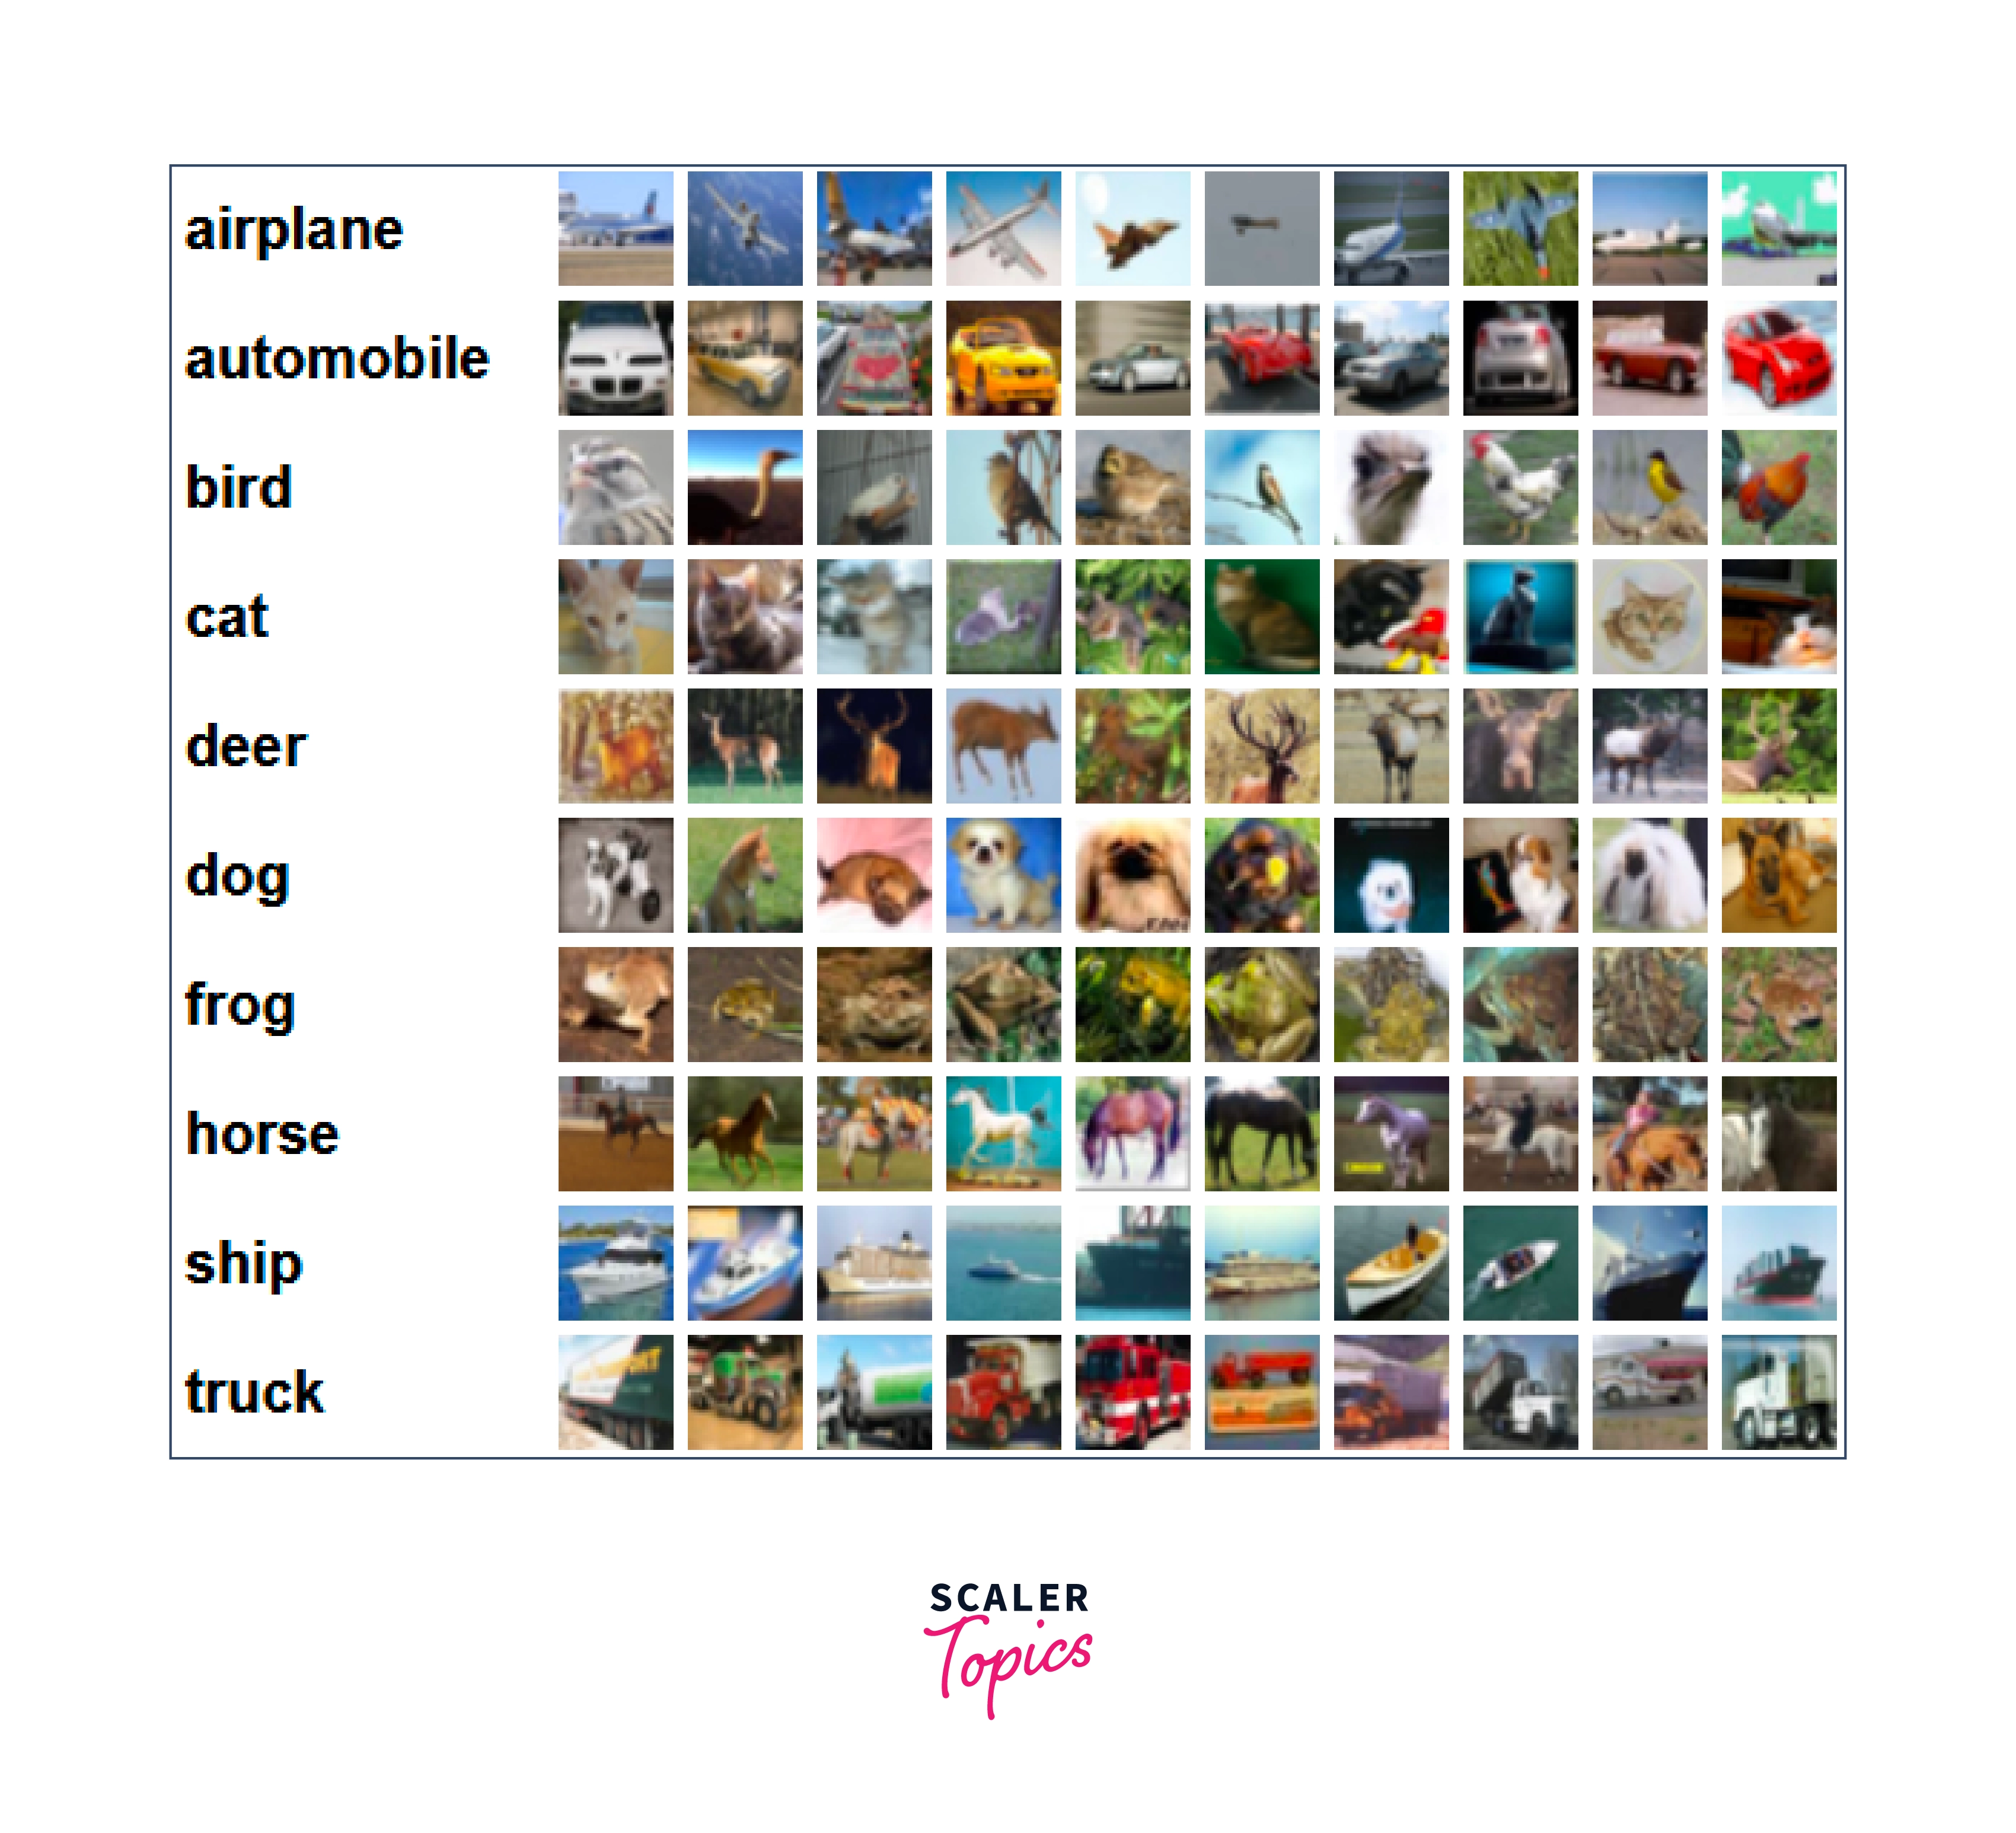
In this PyTorch ResNet example, we will use the CIFAR-10 dataset easily available in PyTorch using the torchvision module.
The CIFAR-10 dataset is a labeled dataset comprising a total of 60000 images, each of dimensions 32x32 with 3 color channels. Each image belongs to one of the 10 classes, and there are 6000 images per class, with a total of 50000 images in the training set and 10000 images in the test set.
The following are the 10 classes in the dataset, along with some examples from each category.
Turn Learning into Career Growth
Importing the Libraries
Let us import all the necessary dependencies required to build our classifier model while also specifying the available hardware device to train the model on -
Downloading the Data and Creating the DataLoaders
We will now use torch-vision.datasets to download the training and testing division of the CIFAR-10 dataset, like so -
As can be seen, we have also defined some data transformations to be applied to the images before they are fed into the model. Different transformations are required for different reasons. For example, normalizing makes the process of mathematical optimization faster, causing the model to learn quickly and efficiently. We also convert the images to PyTorch tensors, as that is the type expected by all PyTorch models and operations.
Scaler Placement Report and Statistics
Scaler learners achieved 2.5x salary growth with average post-Scaler CTC reaching ₹23L.
Downloading the Model
We will now download the ResNet 18 model from torch-vision.models and put it on the correct device. The model architecture is also shown below for reference -

Output:
As we print the model layers, we can see that by default, the last linear layer is a classifier head for 1000 classes (ImageNet, for which the model is trained, contains 1000 classes). We will need to modify this number to be able to fine-tune the model for our dataset.
CIFAR-10 contains a total of 10 classes, so we will need to modify the last fully connected (fc) layer accordingly such that it has 10 nodes in its output layer corresponding to the 10 classes. This just amounts to a single line of code where we access the fc layer and redefine it using standard PyTorch modules, like so -
Output:
The last fully connected (fc) layer is now successfully modified according to our dataset and has the output layer consisting of 10 nodes (which is equal to the number of classes in the CIFAR-10 dataset).
Model Training
We will now train (fine-tune) our model on the CIFAR-10 dataset. Alongside this, we also keep track of the accuracy of the trained model on the test data.
Note that in the following code, all the model parameters from all the layers are getting updated, as we have yet to freeze any part of the model architecture. That said, this code may take a while to run even when trained on a hardware accelerator device like GPU, or TPU.
Also, we have defined (rather than experimenting with) certain hyperparameters like the batch size, the learning rate, the optimization algorithm used, and so on. These play a crucial role in determining how efficiently and fastly the network converges to a solution. There is, thus, a lot of scope for experimentation with these.
Output:
With this, we are done training our model for 10 epochs.
Other ways of fine-tuning the model involve freezing all the layers of the network but for the last linear layer that will then get fine-tuned, like so -
Output:
Freezing most of the network and fine-tuning the last fully connected layer is a common approach taken in transfer learning. This approach is significantly faster than fine-tuning the whole network and can give comparable results.
That was all about using PyTorch ResNet. We will now learn how to create a ResNet architecture in PyTorch.
ResNet From Scratch in PyTorch
To define a ResNet from scratch, we will first define a custom class for its building block, the ResidualBlock, that can be used throughout to define the network architecture.
A residual block, as shown below, consists of an optional skip connection and the forward call; it is applied directly to the input, x, and not to the output, out.
In code-
Using the Residual Block, we just defined, we will build the ResNet architecture with three blocks containing 3, 3, 6, and 3 layers, respectively. To define the three blocks, we will create a helper function called _make_layer to add the layers along with the Residual Block.
We will also add the average pooling and the final linear layer (the fully connected layer), like so:
That was all about how to code a PyTorch ResNet from scratch by defining its building block and then a custom model class for the main architecture. Note that both the custom model classes inherit from PyTorch's base module torch.nn.Module. This is particularly important as we want to be able to inherit the functionality provided by the base class to leverage it later, like defining and using the optimizer instance, accessing particular layers, and so on.
Conclusion
We will now conclude what we studied in this article -
- Firstly, we got an introduction where we understood one of the practical challenges faced while training deep neural networks called the vanishing gradients problem.
- After this, we looked closely at how ResNet is architecturally constructed to overcome this challenge. We also looked at the two different designs for its building block called the residual block.
- Then, we look at PyTorch ResNet and understand various ways in which PyTorch ResNet can be used -
-
- by transferring the pre-trained weights while configuring the last fully connected layer and,
-
- by randomly initializing the whole network and training it again.
-
- Finally, we also learned how to implement ResNet from scratch in PyTorch by first defining a class for the residual block and then a custom ResNet model class utilizing the residual block with an average pooling layer and a fully connected layer.