How To Set Up A React Project With Create React App?
Overview
React JS is a JS (javascript) library created by Facebook in 2013. It is used for the fast development of user interfaces for web applications. Building a react project from scratch can be very time-consuming and cumbersome as you will spend a lot of time in setting up the project rather than working on the main logic of the app. Making use of toolchain like create-react-app can help us initialize the project quickly and efficiently.
Transform Your Career
Choose from our industry-leading programs designed for career success
Modern Software and AI Engineering Program
Master full-stack development with AI integration

Modern Data Science and ML with specialisation in AI
Advanced data science techniques with AI specialization
Advanced AIML with Specialisation in Agentic AI
Deep dive into AIML with focus on Agentic systems
DevOps, Cloud & AI Platform Engineering
Build and manage AI-powered cloud infrastructure
AI Engineering Advanced Certification by IIT-Roorkee
Premier AI engineering certification from IIT-Roorkee
Introduction
React is one of the most well-known libraries used for the creation of client-side applications. React was developed by Facebook. React has become so popular because of its features like the creation of fast reusable components and the use of JSX, an easy-to-understand syntax extension that allows writing HTML like syntax in javascript.
Creating a React project from scratch happened to be a multistep process that required setting up a code transpiler to convert modern javascript and (JSX) to browser-readable code, setting up a build system and a base directory structure. Nowadays, there are different toolchains available to set up the react app.
One of those is create-react-app, which includes all the necessary javascript packages that are required to run a react project (like webpack or Babel), and other packages like code transpiling, testing, basic linting, and build systems. Create-react-app also includes a server that features hot reloading that monitors the changes in the components and reflects them on your page without restarting the server.
Finally, create-react-app will also create a structure for your directories and components, so you start coding logic without worrying about anything else. Hence you will not have to take the pain of having to configure a build system like Webpack or setting up a transpiler like Babel to transpile your code so that it is readable by the browser. You can directly start writing the front-end logic with very less preparation.
::: section{.main}
Requirements
To follow this article, you will need the following tools :
- Node js should be installed locally on your system. You can download Node from their official website. create-react-app requires a Node version least greater than 10.X, you can check the version of node using command node -v.
- A package manager like npm (Node package manager), which is typically installed with Node js installation. NPM version should be at least greater than 5.X, you can check the version of npm using command npm -v.
- Basic understanding of javascript functions, variables and syntax along with knowledge of HTML and CSS.
- Any good code editor like visual studio code, which can manage your project directory and files.
:::
How to Install Create React App?
Now, you will create a new app in react using the node package manager (npm) using a script. All the files will be copied in a new directory, and the dev-dependencies will be installed by the script. NPM is already included in the Node js installation package. npx is a tool included in NPM that runs all the executable packages. npx allows us to make use of the create-react-app package, without having to install or download it beforehand. Hence it means you do not have to download any files for your react project manually, and everything will be taken care of by the Create react app toolchain and npx.
The installation will be done by the executable package installation and create the react app in the directory that you select. Firstly the project directory will be formed, which will be called my-react-app in this tutorial. This directory will be created by the executable package. The command npm install will also be run by the script to install any supplementary dependencies.
Using npx also guarantees that we are using the latest version of create-react-app to create our project. Run the following command in your terminal.
This command will start the build process that will download all the basic files and configure everything with a number of dependencies. The build of create-react-app command takes at least 2 to 3 minutes or even more to complete.
Note : Brand new git repo is created if you will use the create-react-app command to start your project. You can start adding your new changes and then committing those changes using commands git add . and then git commit -m "commit message".
When the build script is finished, you will see a message like this :
Create React App also allows you to use some templates to use for specific types of React projects.
For example, suppose we want to create a React project that uses the tool TypeScript. We could use a template without any need to install TypeScript manually.
We can use the following command to create a react app that uses typescript :
Turn Learning into Career Growth
Reviewing the Project Structure
After your project is set up in a new directory you can move into that directory using the command :
You are now inside your react project directory. At this point, you have the project all set up with the dependencies. Now let us take a look inside the project directory. You can open the project in any text editor, or you can run the following command in your terminal to list out all the files in the my-react-app directory.
The -a flag guarantees that the output also includes hidden files.
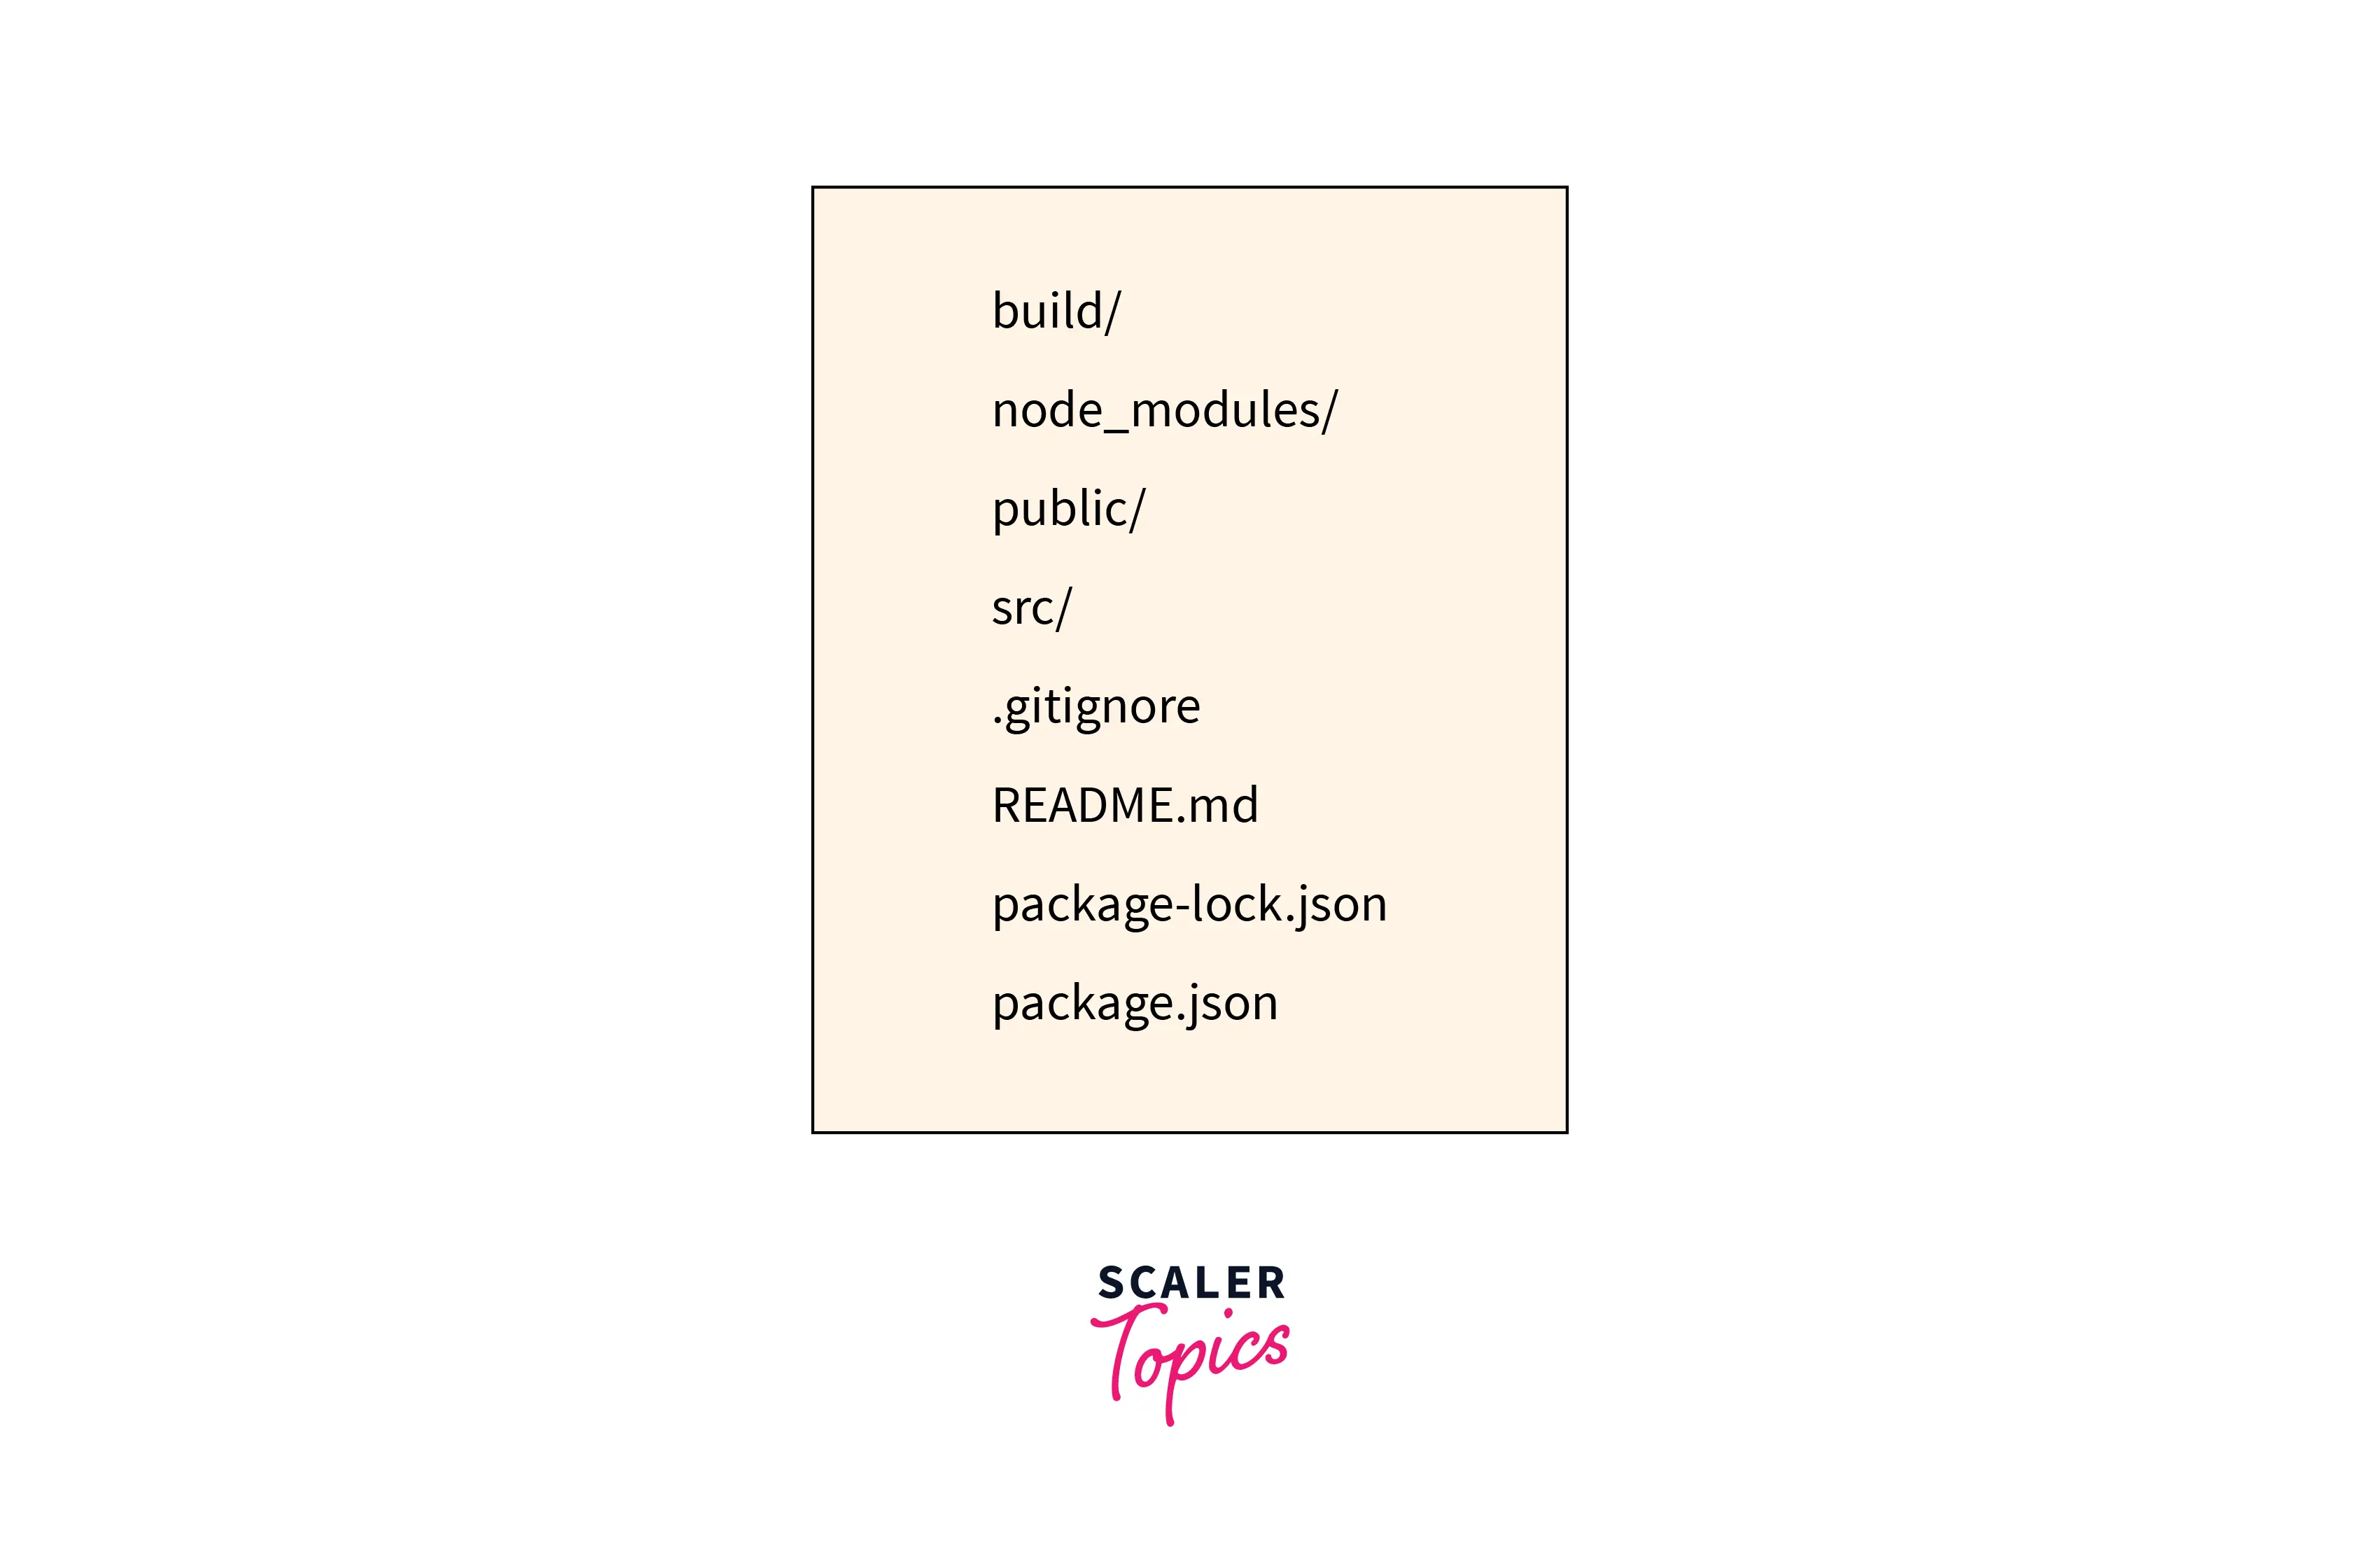
By using any of the above method, your project structure will be something like this :

Let us understand what these files means and contains:
-
README.md : It is a markdown file that has a large number of helpful tips, information and links about the create-react-app that may help you while learning to use the Create React App. It contains a summary of all the commands, like the command to start the react app locally on your system. The information about the start, test, build and eject scripts. For now, it is recommended not to edit the README.md file. As the project advances, you can replace the information in this file with more details about your project.
-
node_modules : This folder includes all the external javascript packages and file packages that are downloaded from npm and are used by your react project. This is rarely opened or changed.
-
.gitignore : The .gitignore is a file that includes some files and directories (environment variables file, or config file and node_modules folder) that your source control - git will not be tracked. The ignored terms include directories that are very large (node_modules) folders or API secrets that you do not need in source control.
-
public : This is a folder/ directory that includes all the static assets. It contains some basic HTML, JSON, images, svgs and fonts for our react app. These are the roots of your folder.
-
src : This is a folder/ directory that includes our react javascript source code of your project. It is where all the react component and pages related code will live and is what we will mainly work on to build our app.
-
package.json : This file contains the meta-data of our react project, along with it manages our app dependencies. It means all the packages present in the node_modules folder for your project, the title of the project, and version number, plus, most important, the scripts that we need to run and build our react app.
If you look at the scripts object, you will find four scripts. Let us look at these scripts in their order of importance. To run these scripts, you need to type npm run "script_name". In a few special cases, we can even omit run from the above command.
- The build Script : To run build script , use the command given below.
This script tells you that your create-react-app is compiling all the project code into a usable bundle. After running this script, the folder structure will look like the one below.
Also, in the .gitignore file, you will see that the build directory is mentioned, hence it is not monitored by git. This is because the build directory contains an optimized and minified version of the other files. You will use this script at the time of deployment.
* **The test Script :** To run build script , use the command given below.
This script allows you to omit the run keyword from the above command. A test runner called Jest will be started by the script. The project files are scanned by the test runner for the .test.js or .spec.js extension and then runs those files.
Jest runner also continues running the test suit in your terminal. It detects any changes in the source code and re-runs the test again. You can also limit the test you run by using the different keyboard options. For example - type o : so that test will only run the file that has been changed. This can save a lot of time as the project advances.
* **The eject Script :** To run build script , use the command given below.
This script copies your create-react-app project configuration and dependencies, giving you full authority over the react code but disbanding your react project from the Create React App integrated toolchain. You can only run this script once this script is executed, it cannot be undone, and in future, you won't receive any updates from the toolchain of Create React App.
The value of create-react-app is that you do not need to spend a significant amount of time in the configuration of the react project. create-react-app handles all those configurations, but the downside of this is that you lose your ability to customize the project. So eject command helps you to take control of the project.
* **The run Script :** To run build script , use the command given below.
This script is used to start a local server in your syste. We will see more about this script in the next section.
Note : README.md and .gitignore files are used by the npm package manager. When you ran the npx command, the basic project structure was created, but also some additional dependencies were installed. When these dependencies were getting installed package-lock.json file was created.
This file is used by npm to ensure that the packages match the identical version. So that if anyone else installs this project, you can ensure they will have the exact dependency version.
How to Run your React Project?
Now we will see how to start a local server in your system and run the react project in your browser. You can start the server using another npm script. Like the npm test script, this script also allows you to omit the run keyword.
When you run this script, the project code will be executed, and a local server will start, along with a watcher that will listen for code changes in your project. Also, the project will open in the browser.
To run the project, move into the project directory. Now use the npm run command. This script will continue running the local server as long as you want it to.
Output in terminal :
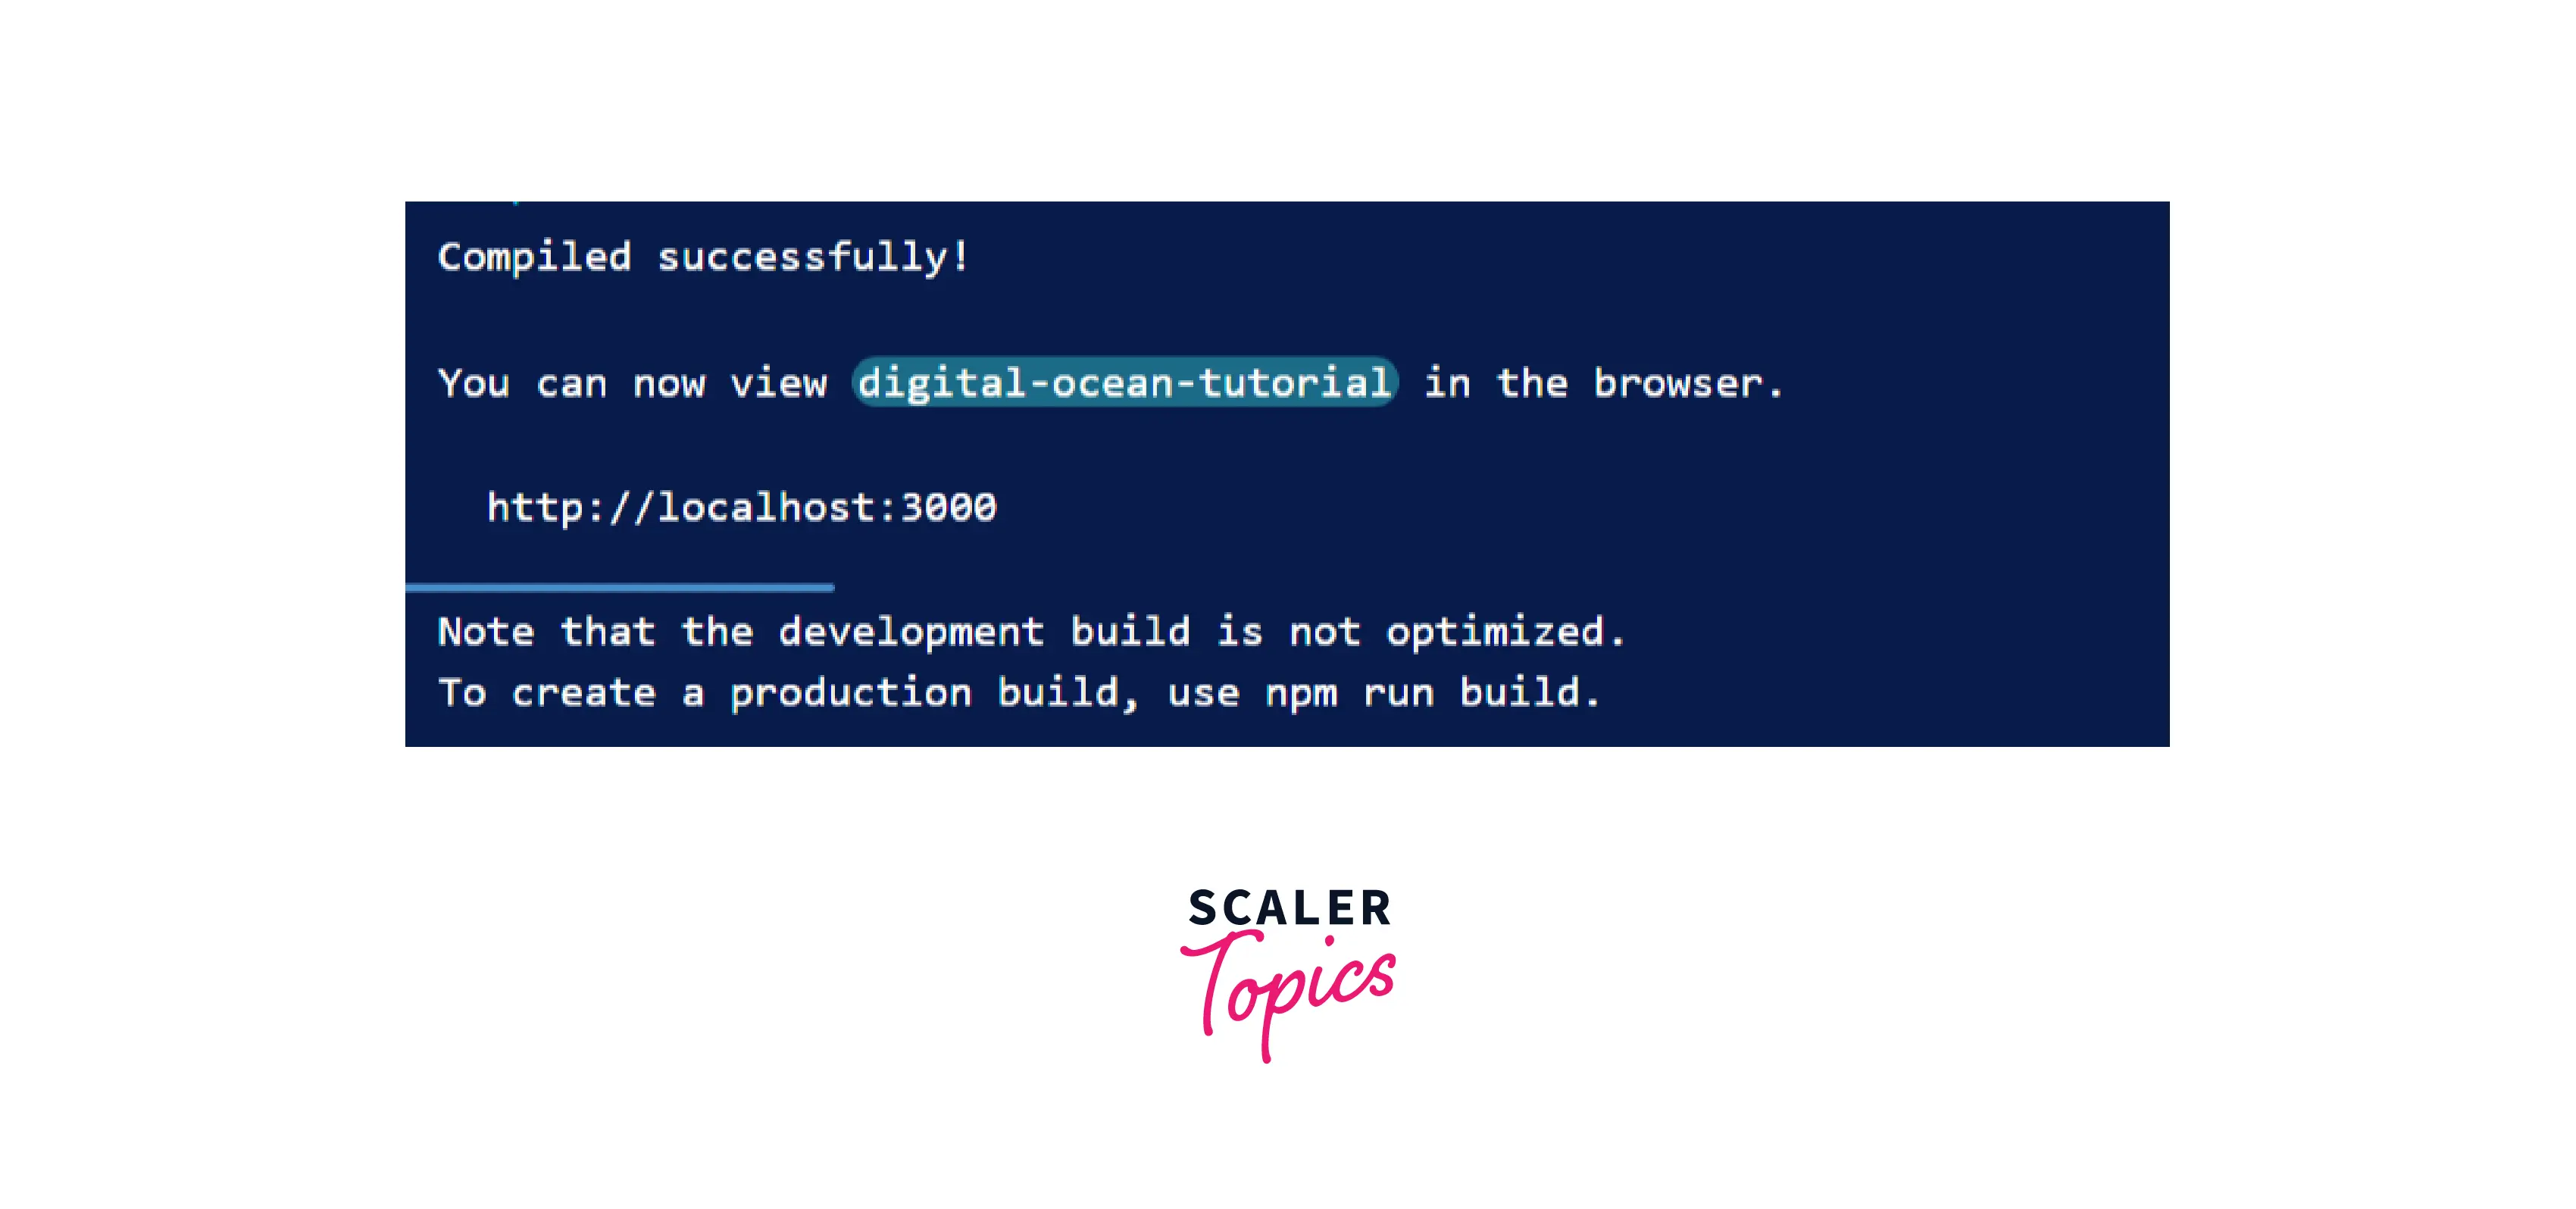
If you are running the script locally in the termianl, it will open the react project in your browser and shift the focus from the terminal to that browser window. If that doesnot happens you can visit http://localhost:3000/ to see the website in action. If something else is running on port 3000, create-react-app will detect the next available port and run the server on it.

The local server will remain active as long as the script is running. To stop the script, use CTRL+C or ⌘-+c in the terminal window or tab that is running your script.
How to Change the App's MetaData?
If you go inside the public directory in your react project, you will see these files :
- favicon.ico
- logo192.png
- manifest.png
- index.html
- logo512.png
- robots.txt
Favicon and logo files are the icon that the user will see in the browser or on their phones. You can replace these according to the needs of your project.
The manifest.json file is a structured set of metadata that contains information that describes your project. It also contains the lists of icons that will be used for different size options.
The robots.txt file contains data for web crawlers. It tells the web crawlers which pages they are allowed or not allowed to index. You need not change its content unless there is a clear reason to do so. For instance, if you want to give users a URL with special content but do not want it to be indexed by search engines. This can be added to robots.txt file.
The root file of the react project is index.html. This file is the one that the server will read and your browser will display. Now, if you open this file in your text editor, you will see the meta tags.
There is no content in the body tag of index.html. That's because React builds the whole HTML structure and injects it with JavaScript. But react has to know where to insert the elements; hence we have a root element in the body.
Now, if you make changes to any of the above meta tags or html, it will be reflected in the whole react app.You can also add CDN's or different scripts. For example if you want to modify the title of the app. You can just edit it (in place of React' in the above code) and it will be reflected everywhere.
Conclusion
- create-react-app includes all the javascript packages needed to run a react project (like webpack), including code transpiling, testing, basic linting, and build systems.
- create-react-app also includes a server with hot reloading that monitors the changes in the files.
- We create a new react app using the command given below. npx create-react-app my-react-app
- Create react app also initialize a new local git repository.
- Create react app creates project structure that includes directories like README.md, public, src, .gitignore, package.json and node_modules.
- README.md and .gitignore files are used by the node package manager so that packages match the exact version.
- package.json contains scripts to build, run, eject and test the react app.
- The root file of the project is index.html as it is the one that the server will read and your browser will display.
- The robots.txt file contains data for web crawlers to specify crawlers which pages they are allowed or not allowed to index.
- The manifest.json file is a structured set of metadata that contains information that describes your project.