React Google Login
Overview
For client developers, building apps with authentication can be a tedious process. Because the server has to handle the authentication and maintain the code. You have to manage multiple mechanism. You can also add a server configuration(Basic, OAuth, etc.) to authenticate with the server. To get user data from Google using Google Sign In, and how to sign in, register, or link existing users. To achieve this, also install and configure the React Google Login lib.
What is OAuth?
OAuth is an open standard authorization protocol or framework that describes how independent servers and services can securely grant authenticated access to assets without actually sharing the original and associated single sign-on credentials. Work in authentication parlance, this is called secure delegated authentication with a third-party user agent.
OAuth 2.0, shot for open Authorization, is a standard developed to allow websites or applications to access resources hosted by other web apps on behalf of users. In 2012 he superseded OAuth 1.0, which is now the de facto standard for online authentication.
How to Use OAuth?
Basic steps
- Obtain OAuth 2.0 credentials from Google API Console
- Obtain an access token from the Google Authorization Server
- Examine scopes of access granted by the user
- Send the access token to an API
- Refresh the access token, if necessary
Transform Your Career
Choose from our industry-leading programs designed for career success
Modern Software and AI Engineering Program
Master full-stack development with AI integration

Modern Data Science and ML with specialisation in AI
Advanced data science techniques with AI specialization
Advanced AIML with Specialisation in Agentic AI
Deep dive into AIML with focus on Agentic systems
DevOps, Cloud & AI Platform Engineering
Build and manage AI-powered cloud infrastructure
AI Engineering Advanced Certification by IIT-Roorkee
Premier AI engineering certification from IIT-Roorkee
Adding Google Login in your React App
Steps
To add React Google Login you'll need to create an application in the Google Developer Console. Provide a clientId that identifies the application details. Follow the steps below to get your client ID.
- Go to the Credentials page.(If this is your first time, create a project and follow these steps)
- Click Create Credentials
- OAuth Client ID.
- Choice the type of web application.
- Name your OAuth 2.0 client
- Click Create Make sure you provide your domain and redirect URL. To identify the origination domain for which Google can provide authentication.
You can also add a local development root. You have now completed authentication setup in the Google Developer Console.
In your CRA install React Google Login package
Login.js Make sure to import googleLogin from the React Google Login library. The file will look like:
Logout.js In the Logout.js file we will be using GoogleLogout from the React Google Login library.
The code will look like:
App.js
Now run the application and you will see the profileObj in the console after login.
Congratulations, you successfully uesd React Google Login in your application.
However, after one hour the Tokenld expires and is not used to access data or authenticate users through React Google Login. Therefore, we need to generate a new Tokenld. To make it work, we need to add some cases to our login component.
Login.js
refreshTokenSetup function will take care of handling new tokenIds.
This function checks the timestamp 'expires_in' or a custom time(before the token expires) and calls 'reloadAuthResponse'. This is a library-provided utility function that processes a 'refresh_token' to get a new 'tokenId'.
Yes, you have successfully added React Google Login to your application. Now you have access to the user's name, its URL in the photo, her email address, Google ID, etc.
Packages Required for React Google Login
Installation To install React Google Login in your react application, run the following command:
How to use
Custom Google Button
Staying Logged in
Login Hook
Logout Hook
Turn Learning into Career Growth
Props
Login Props
| params | value | default value |
|---|---|---|
| clientId | string | REQUIRED |
| jsSrc | string | https://apis.google.com/js/api.js |
| hostedDomain | string | - |
| scope | string | profile email |
| responseType | string | permission |
| accessType | string | online |
| onSuccess | function | REQUIRED |
| onFailure | function | REQUIRED |
| onScriptLoadFailure | function | - |
| onRequest | function | - |
| onAutoLoadFinished | function | - |
| buttonText | string | Login with Google |
| className | string | - |
| style | object | - |
| disabledStyle | object | - |
| loginHint | string | - |
| prompt | string | - |
| tag | string | button |
| type | string | button |
| autoLoad | boolean | false |
| fetchBasicProfile | boolean | true |
| disabled | boolean | false |
| discoveryDocs | - | https://developers.google.com/discovery/v1/using |
| uxMode | string | popup |
Logout Props
| params | value | default value |
|---|---|---|
| clientId | string | REQUIRED |
| jsSrc | string | https://apis.google.com/js/api.js |
| hostedDomain | string | - |
| scope | string | profile email |
| accessType | string | online |
| onLogoutSucess | function | REQUIRED |
| onFailure | function | REQUIRED |
| onScriptLoadFailure | function | - |
| buttonText | string | Logout of Google |
| className | string | - |
| disabledStyle | object | - |
| loginHint | string | - |
| tag | string | button |
| type | string | button |
| fetchBasicProfile | boolean | true |
| disabled | boolean | false |
| discoveryDocs | - | https://developers.google.com/discovery/v1/using |
| uxMode | string | popup |
| theme | string | light |
| icon | boolean | true |
| redirectUri | string | - |
| isSingnedIn | boolean | false |
| render | function | - |
Callbacks
onSuccess callback
If the response type is not code, the callback will return a GoogleAuth object.
If the response type is code, the callback returns an authorization code. You can use this to get a refresh token from the server.
When using the hostsDomain parameter, be sure to validate the id_token (JSON Web Token) returned by Google on your backend server.
- In the responseGoogle(response) {...} callback function, you should get the default JWT at response.tokenld or res.getAutResponse().id_token.
- Send this token to your server(preferalbly as an authorization header)
- Use a common JWT library such as jwt-simple or send a GET request to https://www.googleapis.com/oauth2/v3 to decrypt the id_token on the server./tokeninfo?id_token=YOUR_TOKEN_HERE
- The returned decoded token should have the same hd key as the hosted domain you want to restrict.
Logout
Use the GoogleLogout button present int the React Google Login library to log the user out of Google.
onSuccess callback(w/offline false)
The onSuccess callback returns a GoogleUser object that gives access to all GoogleUsers
| property name | value | definition |
|---|---|---|
| googleld | string | Google User ID |
| tokenld | string | Token Id |
| accessToken | string | Access Token |
| tokenObj | object | Token details object |
| profileObj | object | Profile details object |
onSuccess callback(w/offline true)
| poperty name | value | definition |
|---|---|---|
| code | object | offline token |
onFailure callback
When an initialization or login attempt fails then we called onFailure callback.
| Property name | value | definition |
|---|---|---|
| error | string | Error code |
| details | string | Detailed error description |
Other error constent:
- Wrong_response_type
- unknown_error
- immediate_failed (error_subtype: no_user_bound)
- idpiframe_initialization_failed (where cookies are blocked this error will come like incognito in simple word cookies are not enabled in current environment)
- popup_closed_by_user
- access_denied
Google Client ID Aquisition for the project
A client ID is a unique identifier associated with an application that supports OAuth 2.0 authentication of clients and servers.
To get a Client ID from google, go to the Google Cloud Console and create a new project. In this article, I named the project Google Sign In, but you can name it whatever you want.
After creating the project, go into the project and you will see a dashboard like this: Your current project name should be displayed next to the Google Cloud Logo in the upper left corner of the dashboard page.
Now let's see how to configure the consent screen before the credentials.
React Google Login Consent screen
A consent screen, as the name suggests, is a consent page that asks the user to sign up via an external or third-party library. This step warns the user that they are leaving the app's root page to access the party page.
Simply put, when using OAuth 2.0 fir her for authorization, the app asks the user to authorize one or more access scopes for her from her Google account. The scope of access includes any information or activity that the app is permitted to access or is permitted to do under the user's account.
The Google sign-in consent screen that your app presents to users can include a short description of your project, its policies, and the scope of access requested.
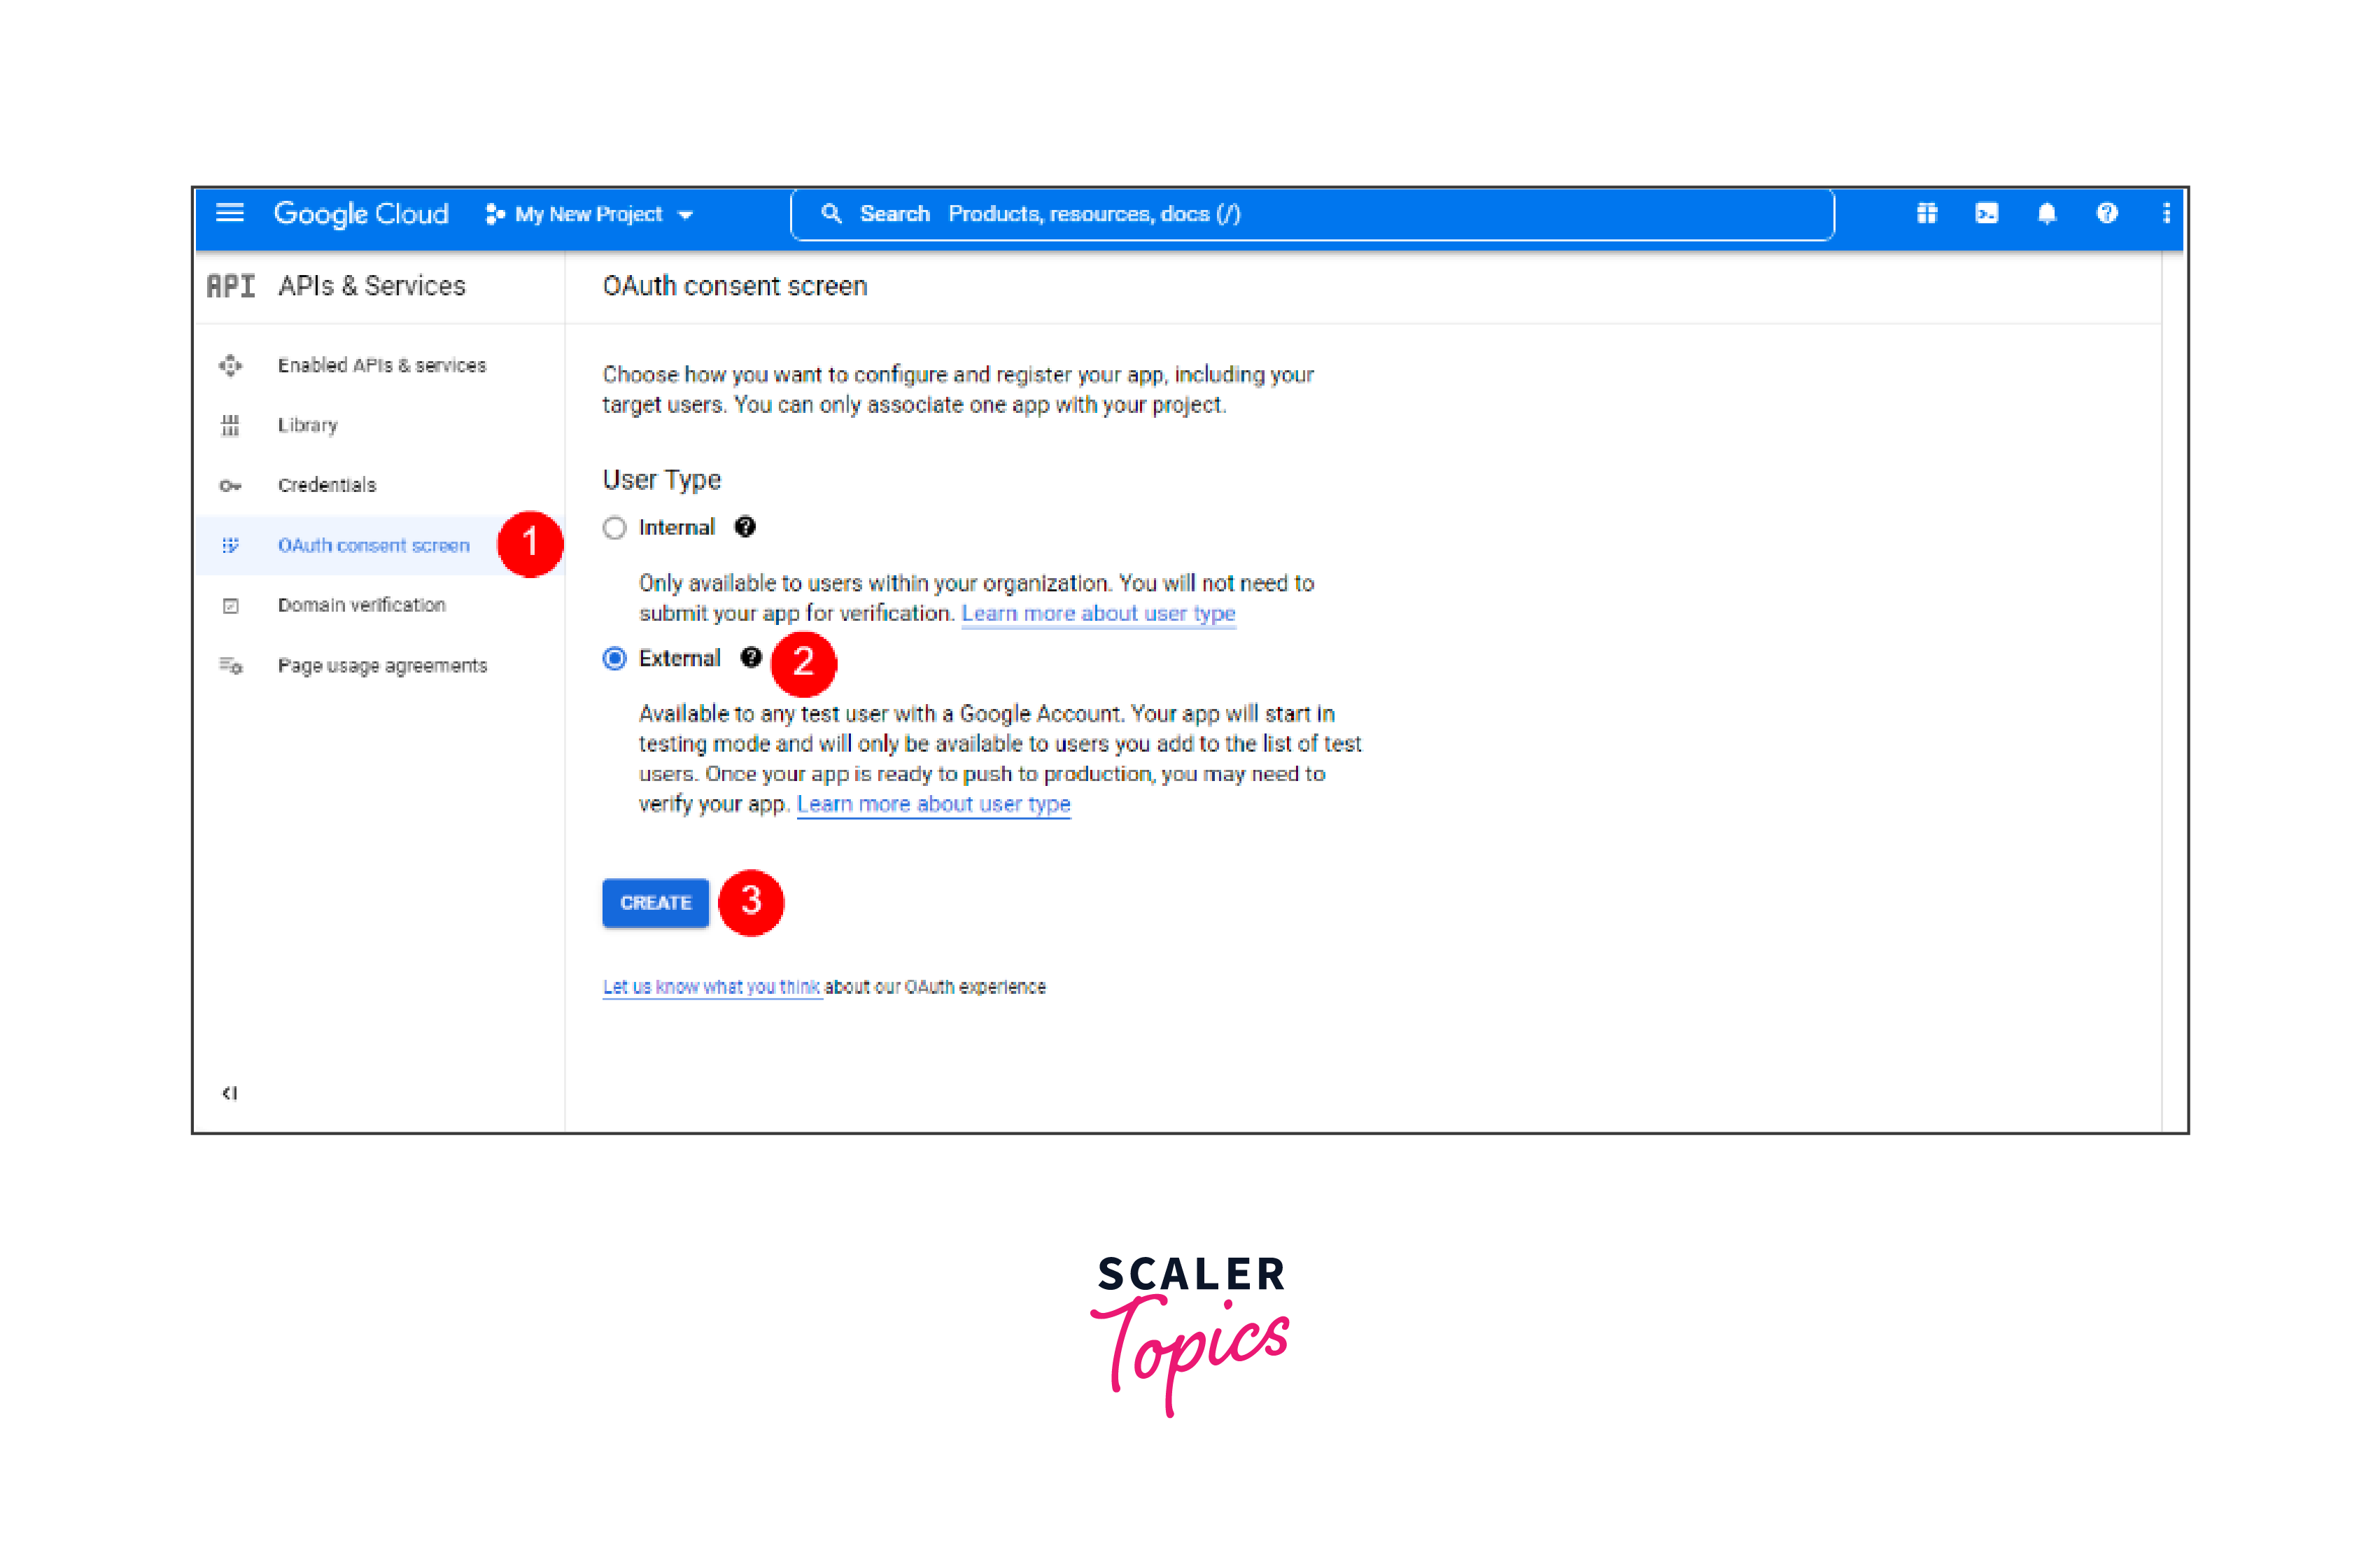
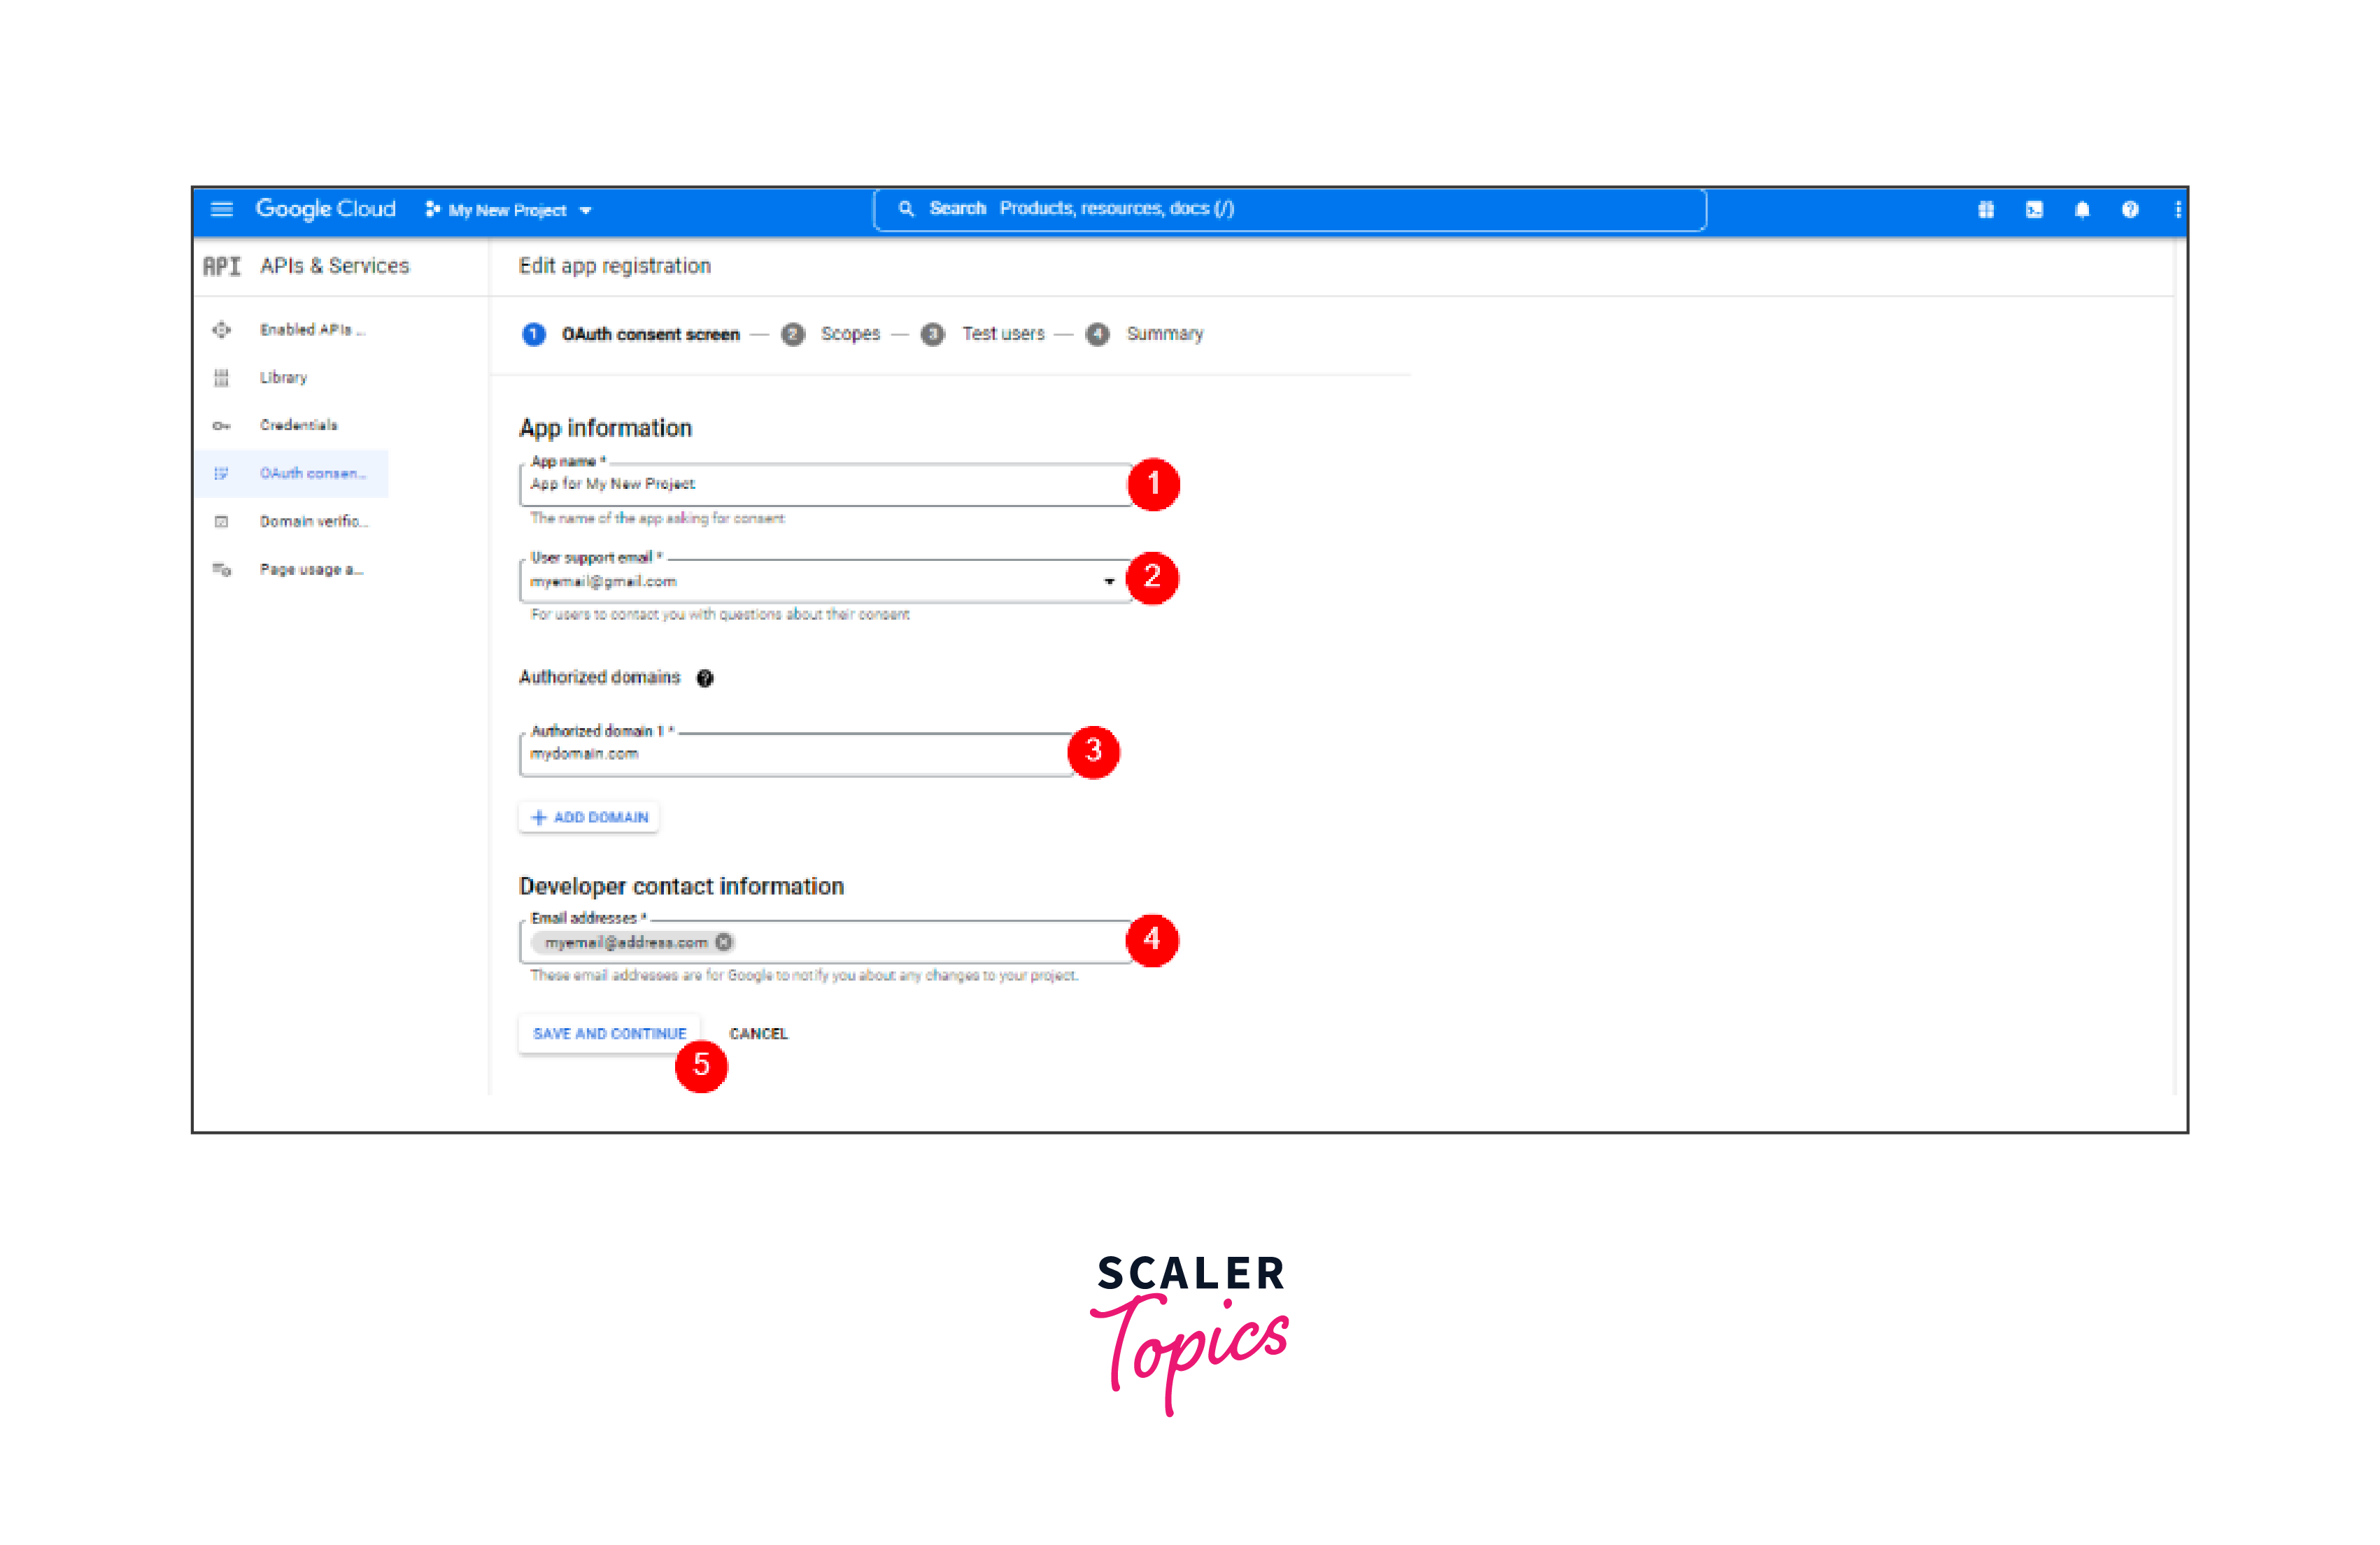
To configure the Google consent page for your React app, go to the OAuth Consent Screen tab in the left menu of the Google Cloud Console.
On this tab, select External. This is really the only option you have unless you are using an organization or application that has been varified by Google. Click the Create button to create your consent screen.
Then, on the same tab, select the application's name and email address to receive notifications of changes to the the project. Other requirements and options can be left blank for now. If you have the details ready, you can add them at this step as needed.
You can also skip the rest of the registration section for now. Simply scroll down each section and click save and continue to return to the dashboard when done.
How to Create a Web Client ID?
Steps
- Go to Google Developers Console. Sign in if you have a Google account, otherwise create an account.
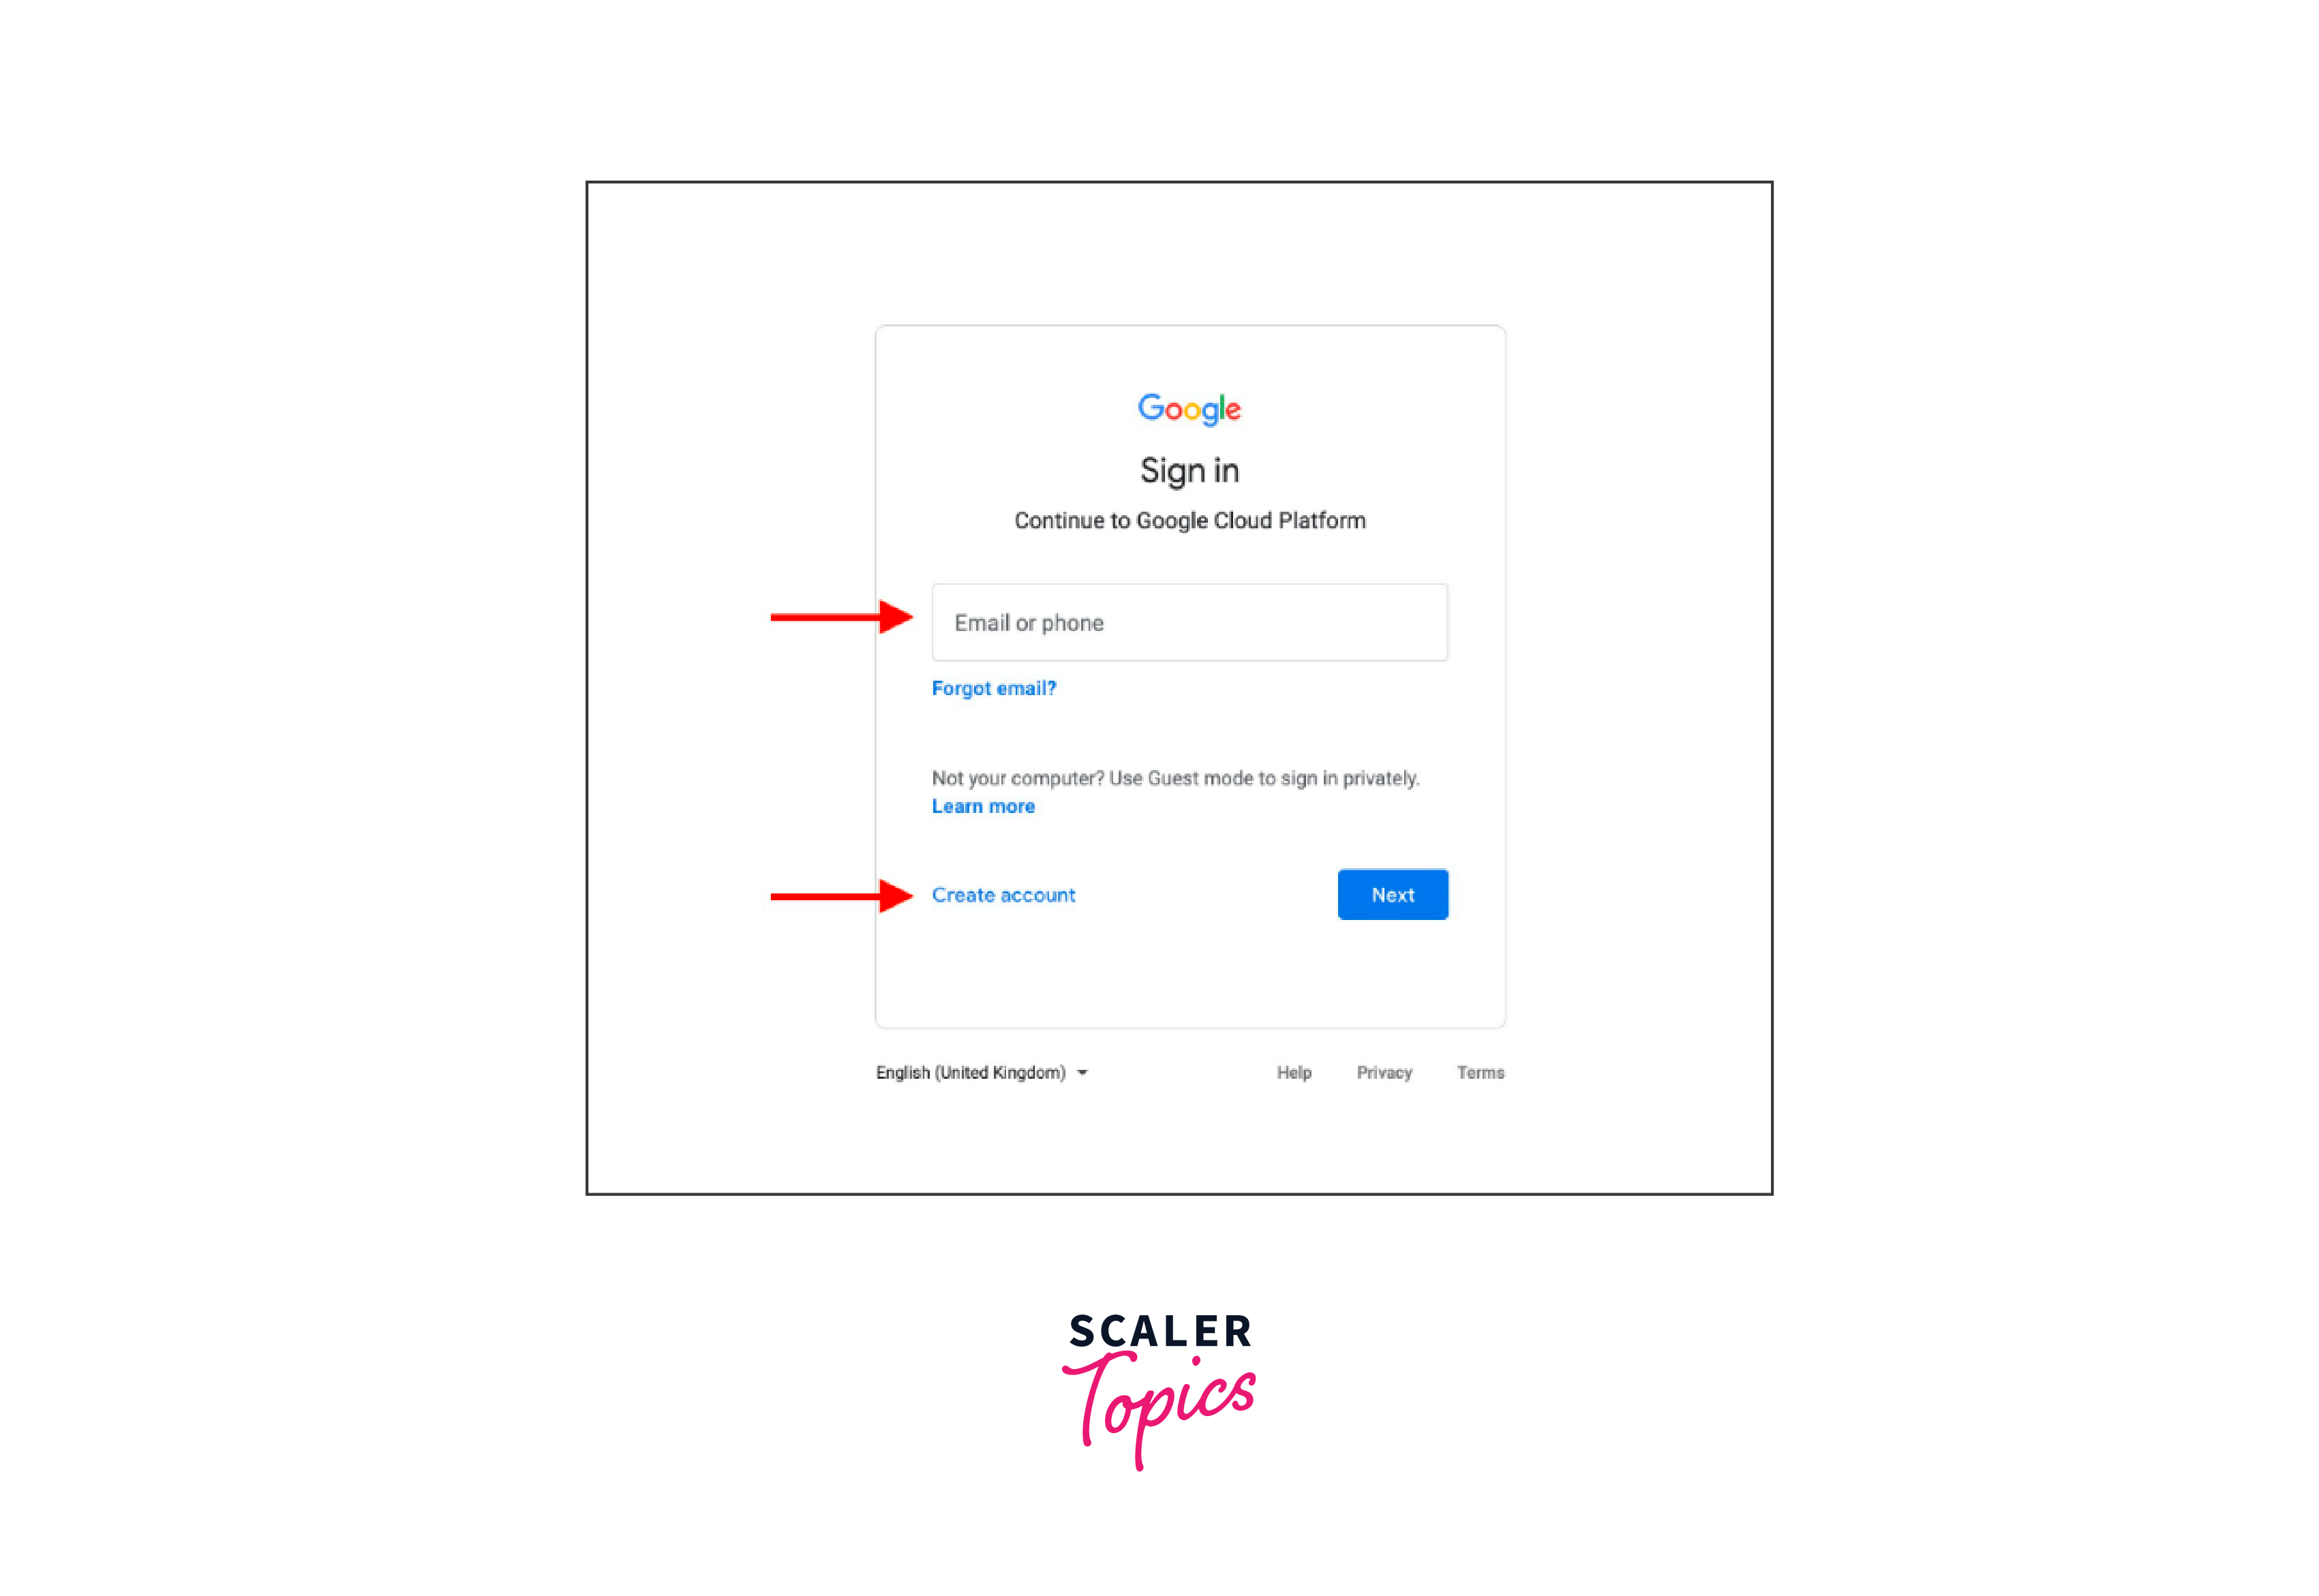
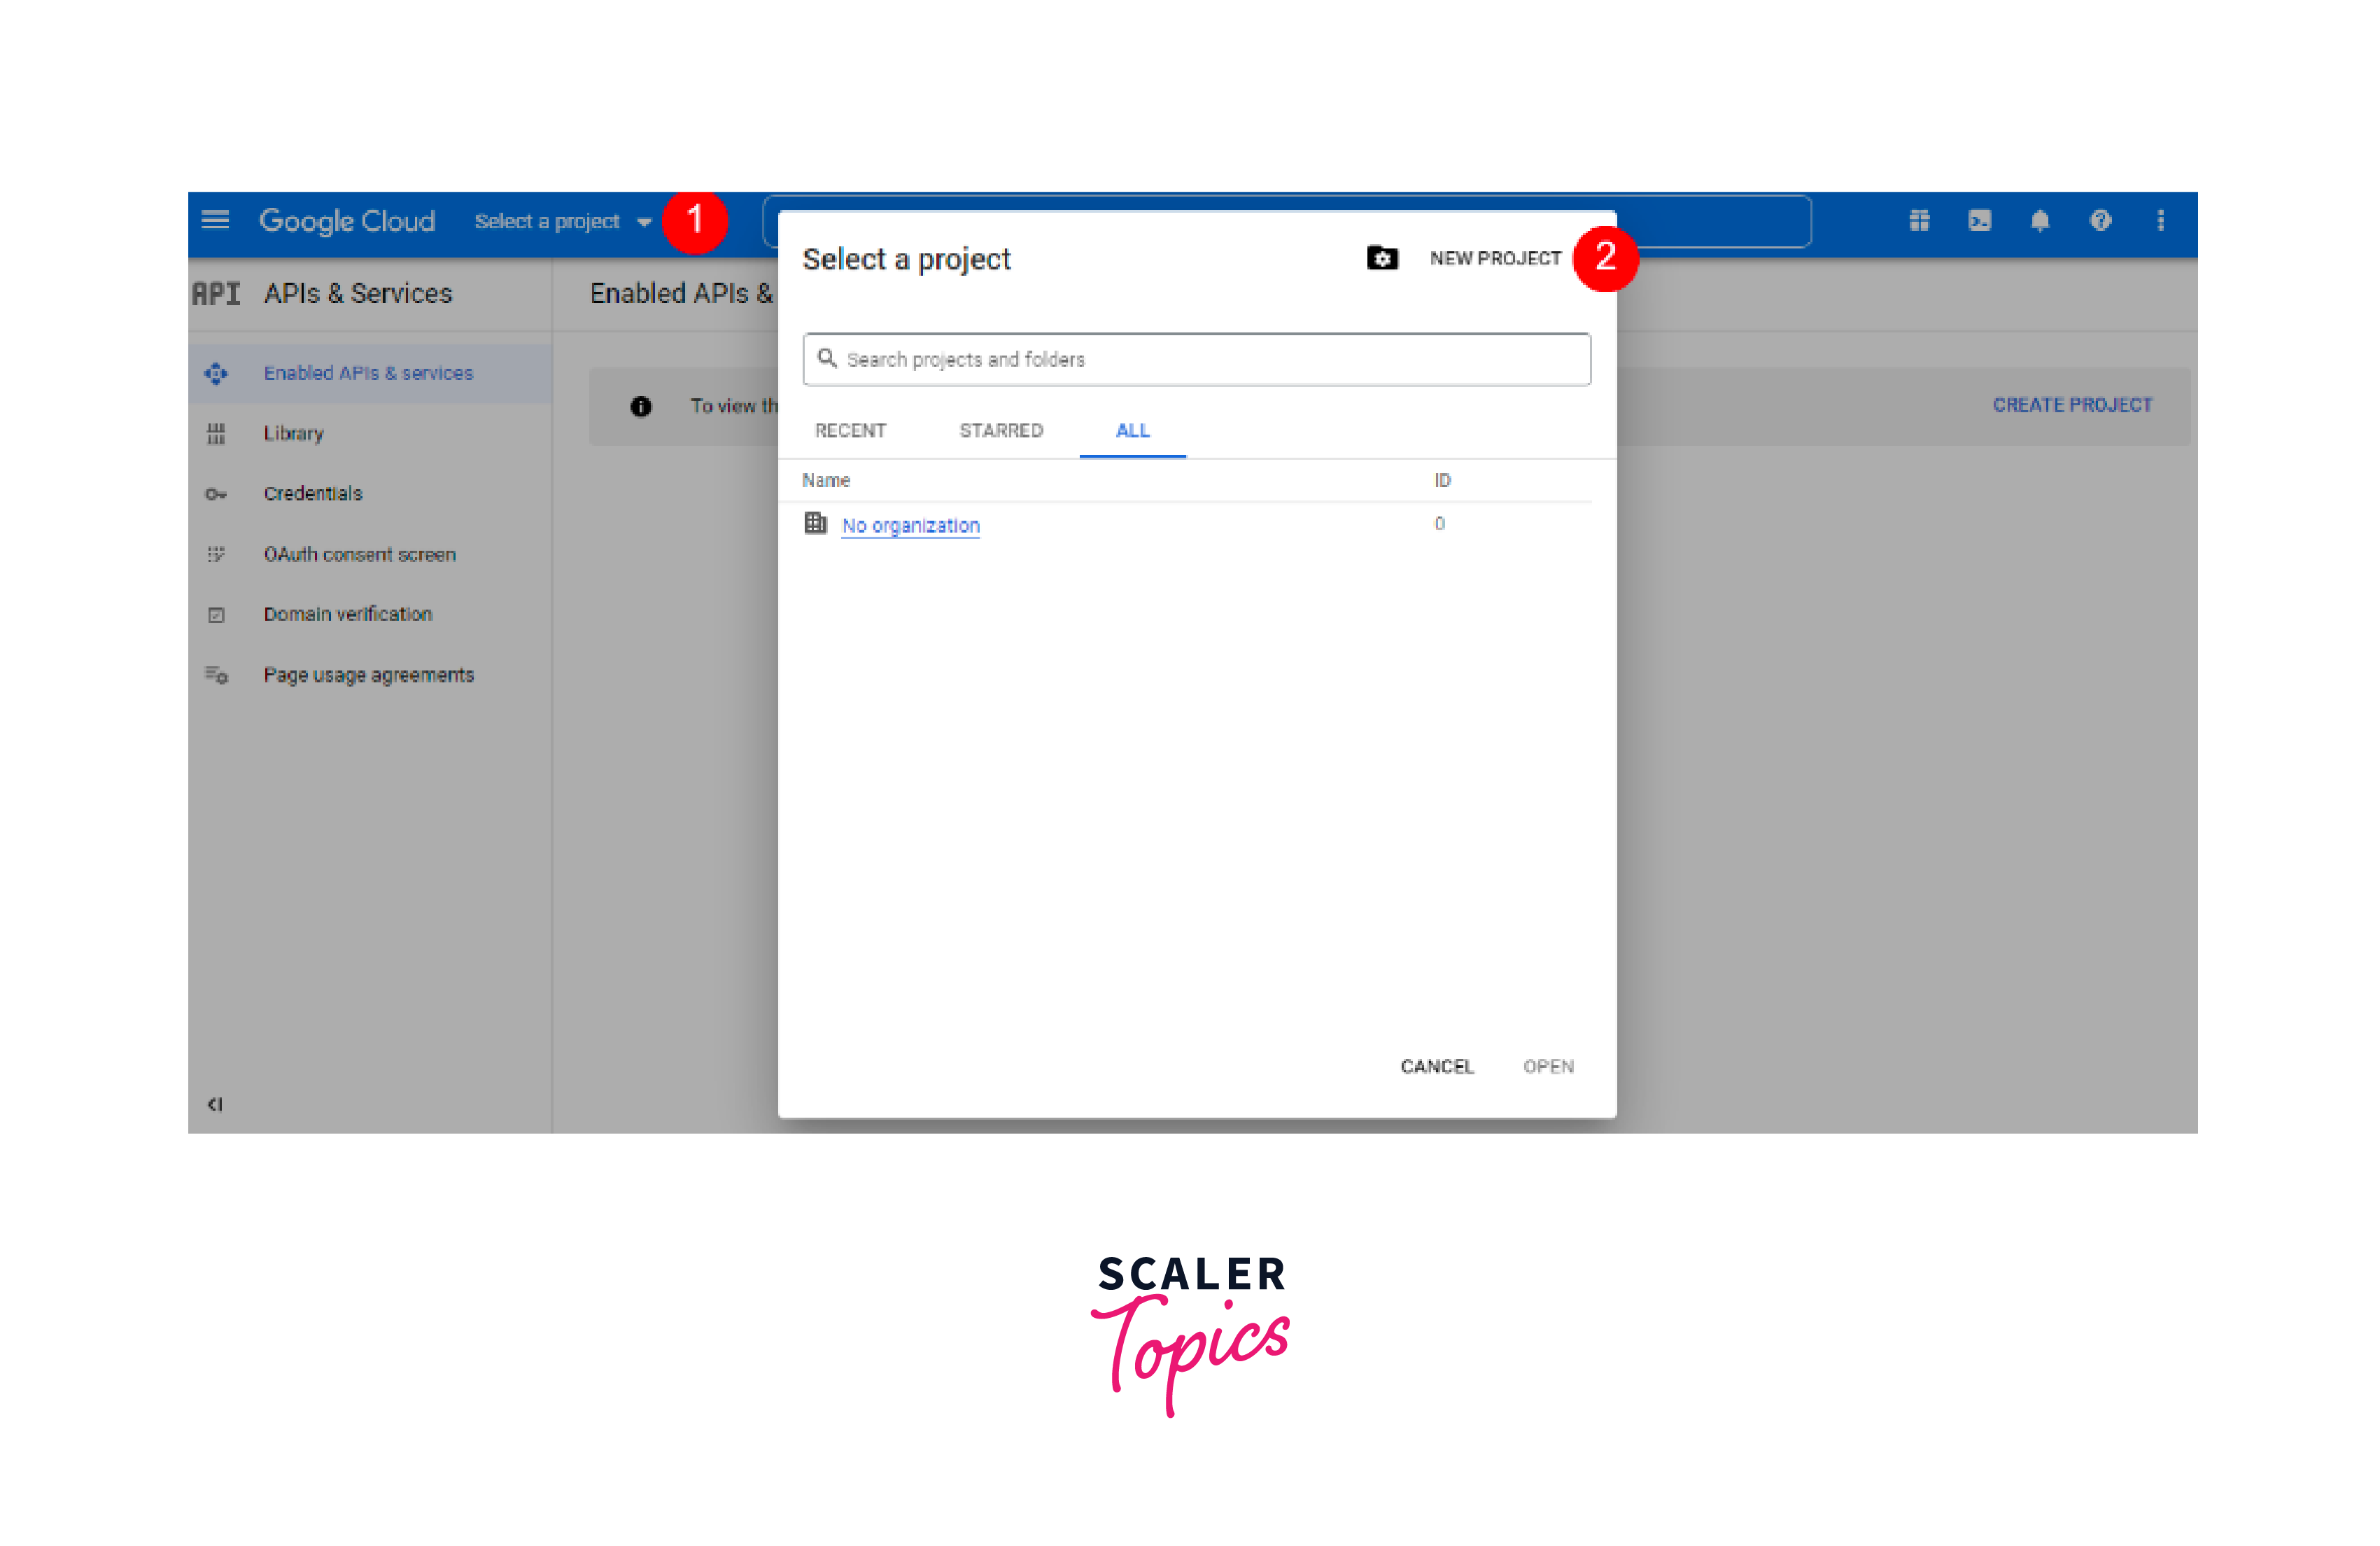
- Click Select project -> New project -> Create button
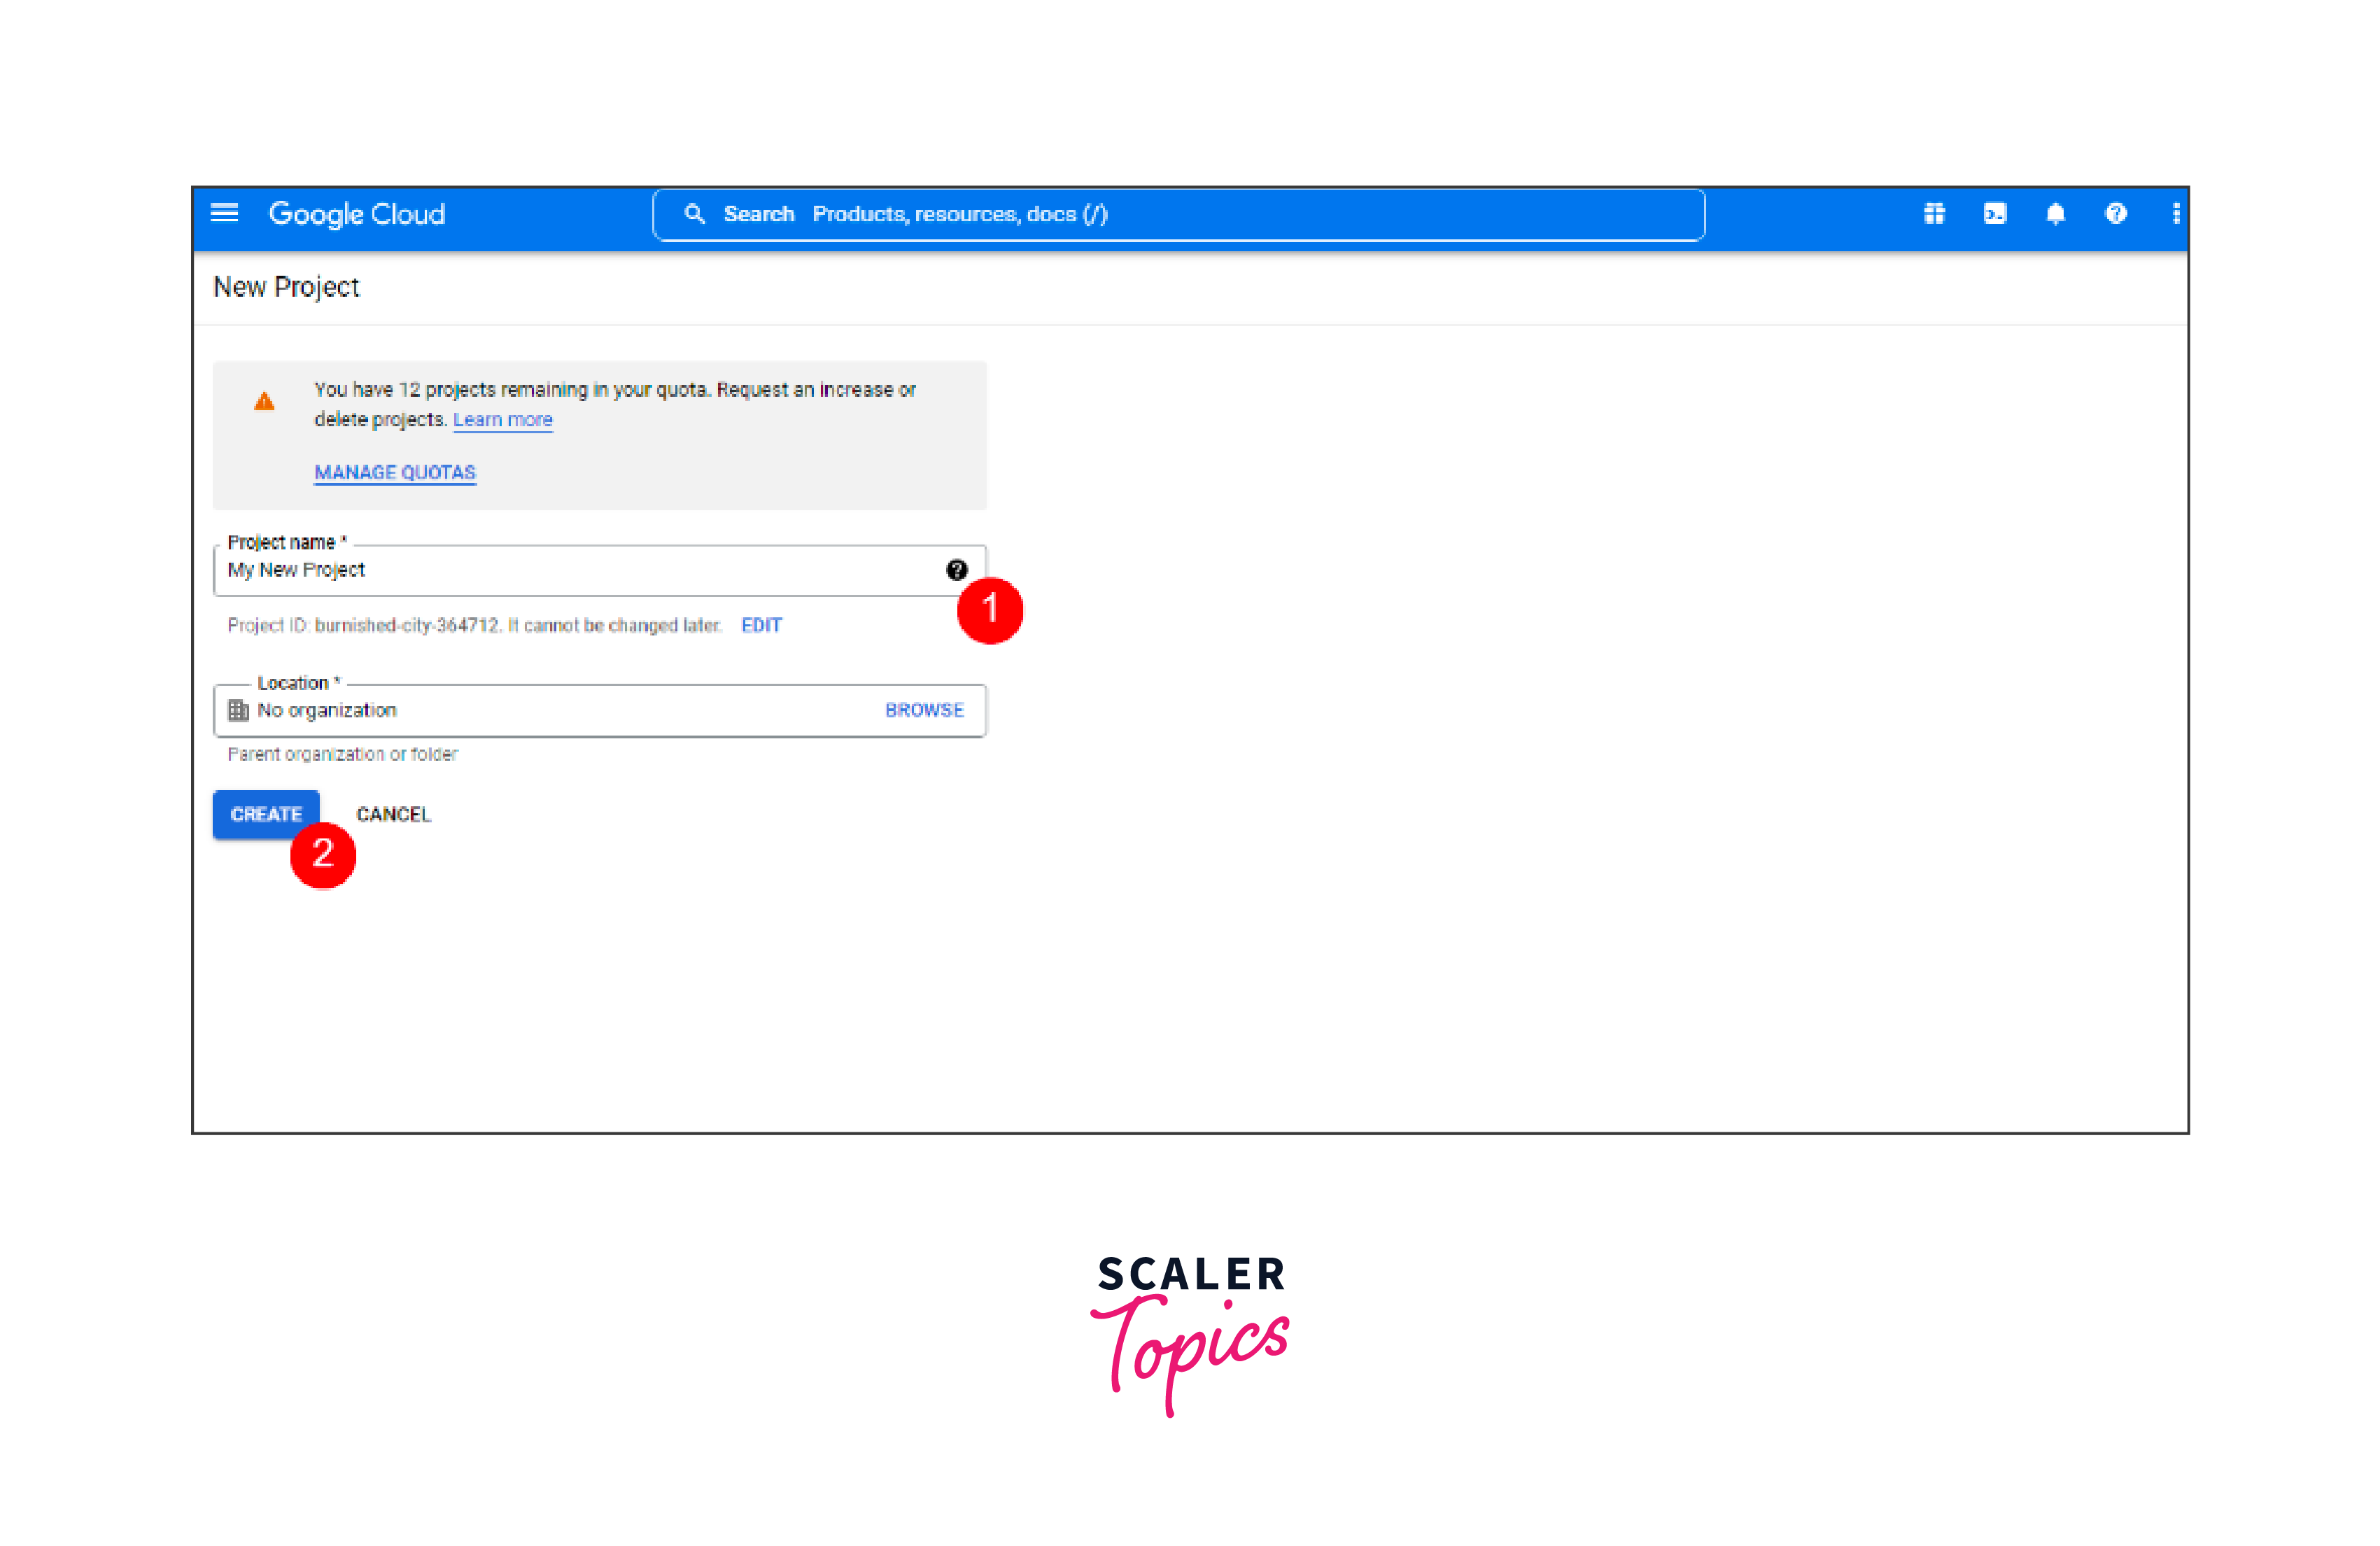
- Enter a project name and click the Create button
- In the left menu, click OAuth Consent Screen, select a User Type, and click the Create button
- Click the Add Application Name -> Support Email -> Accepted Domains -> Developer Consent Information -> Save and Continue button
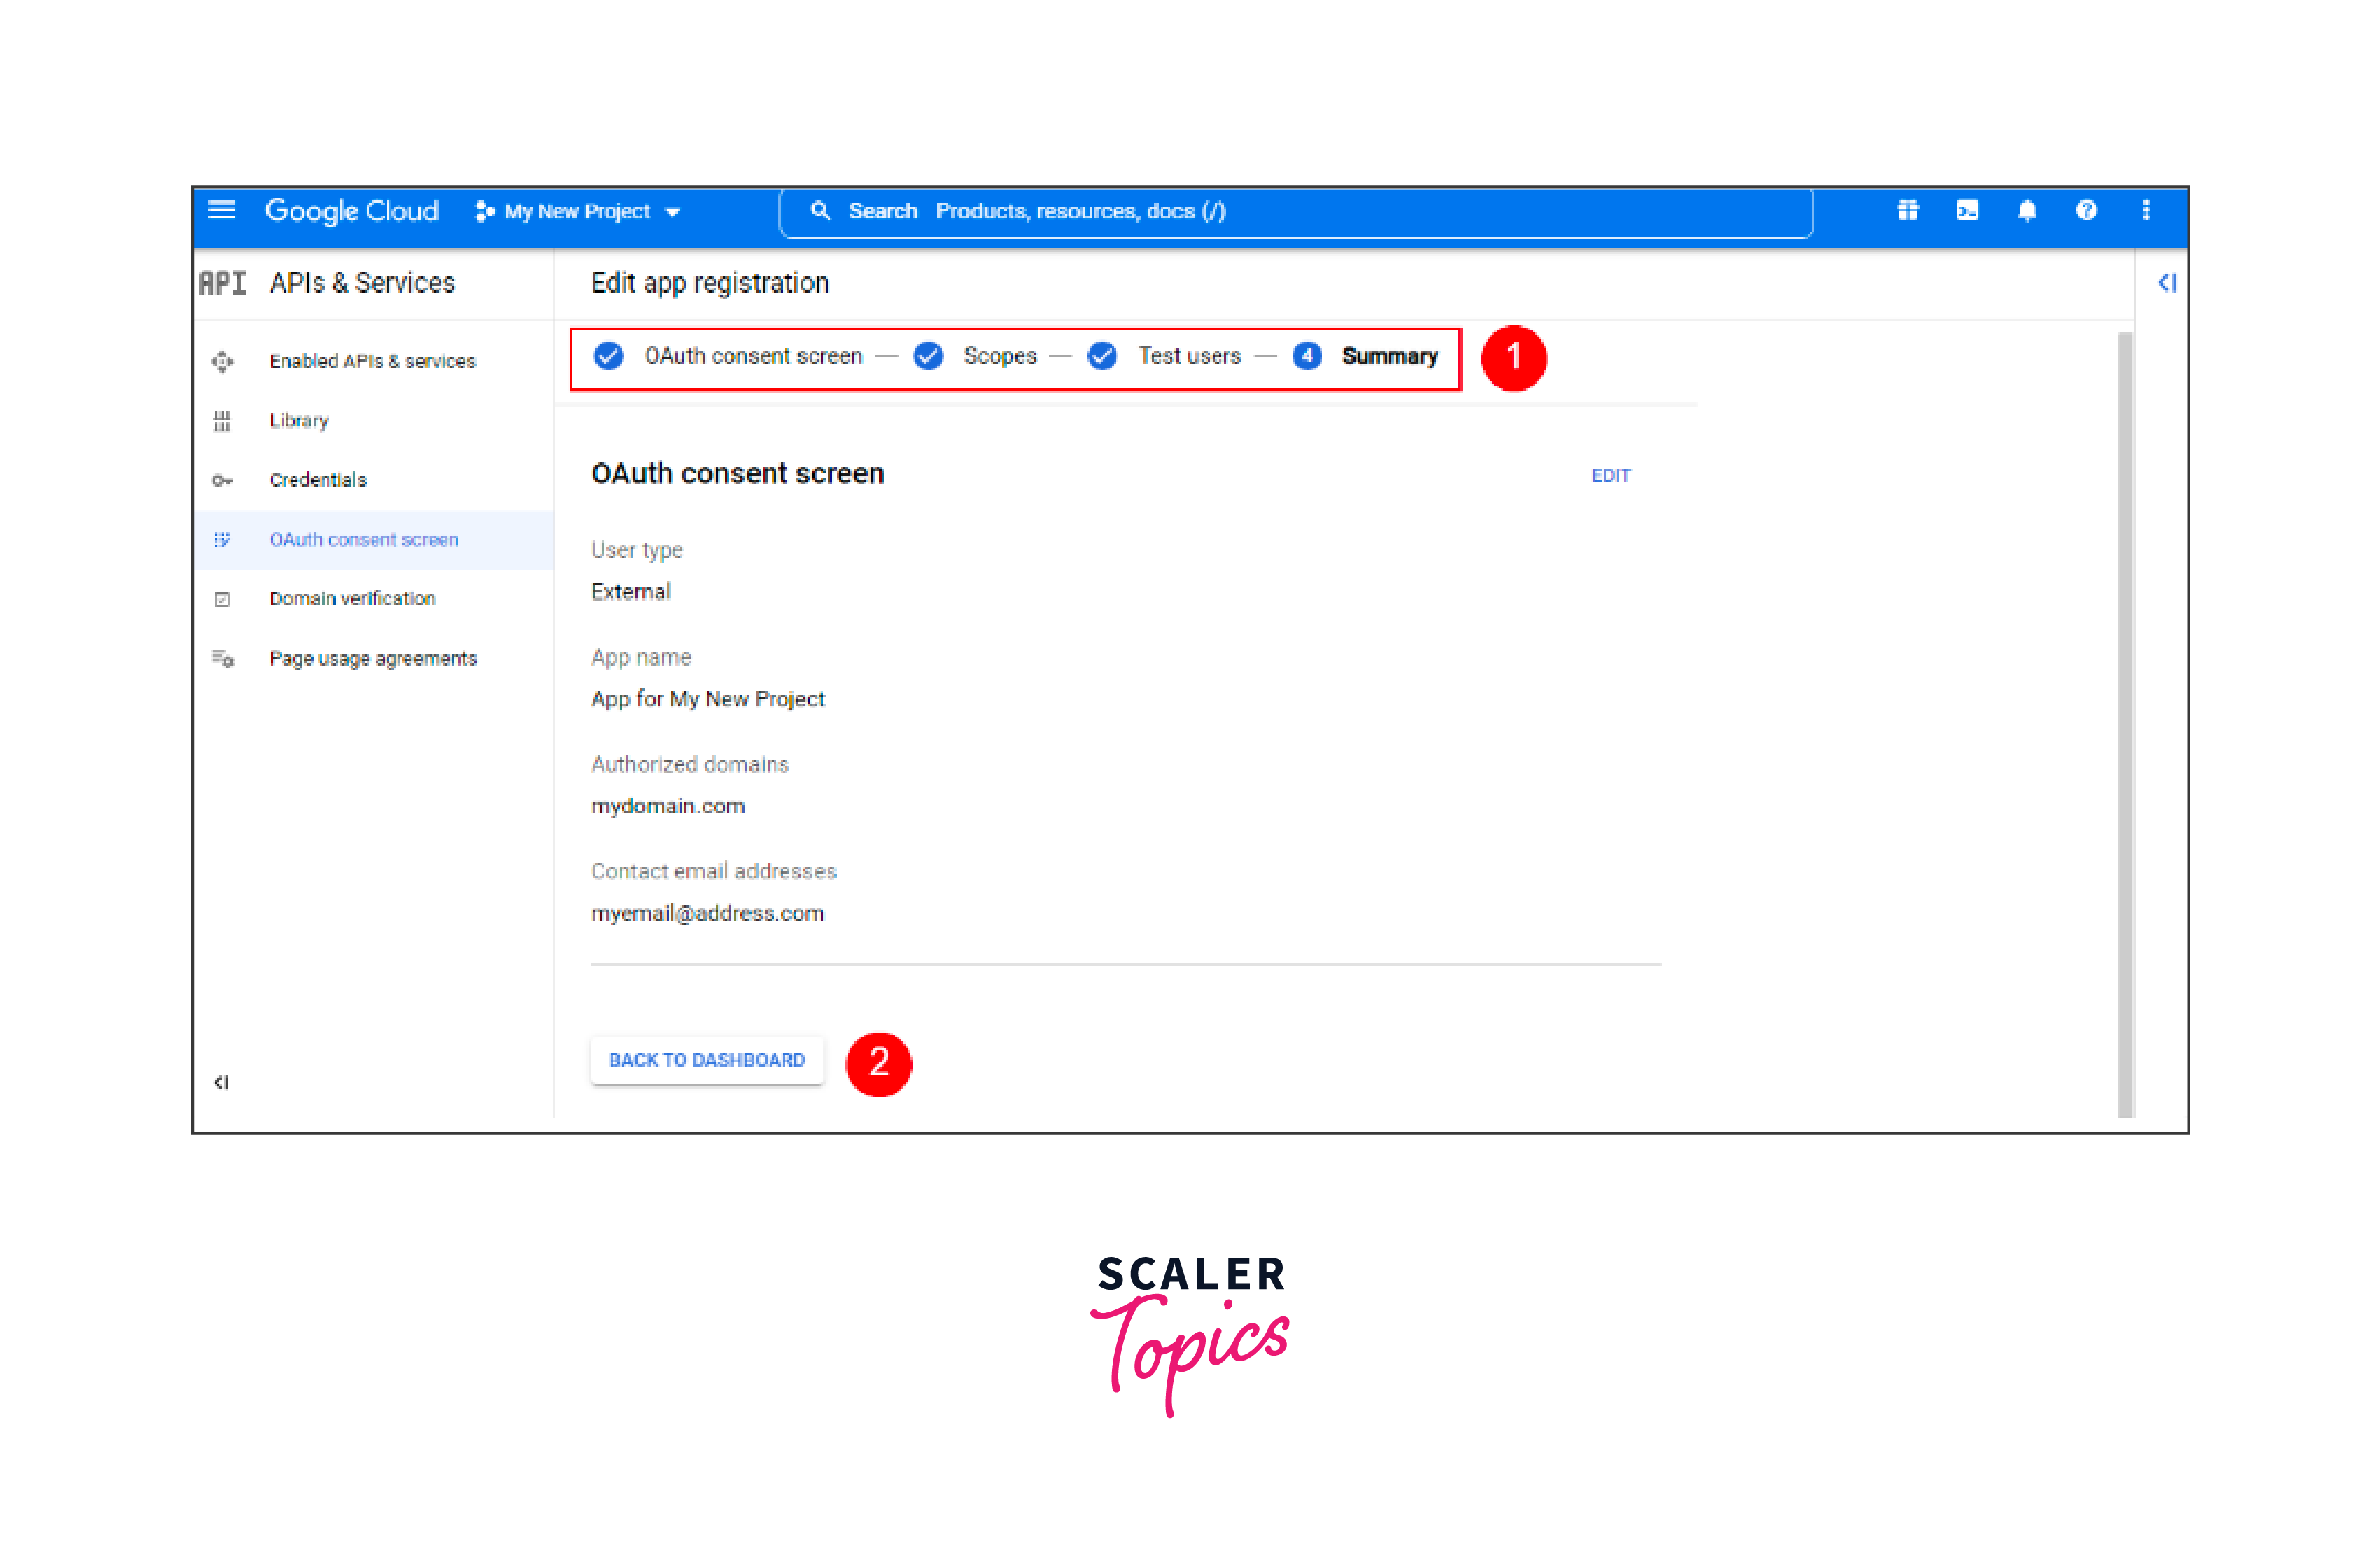
- Complete all four steps on the OAuth Consent Screen and click the Return to Dashboard button
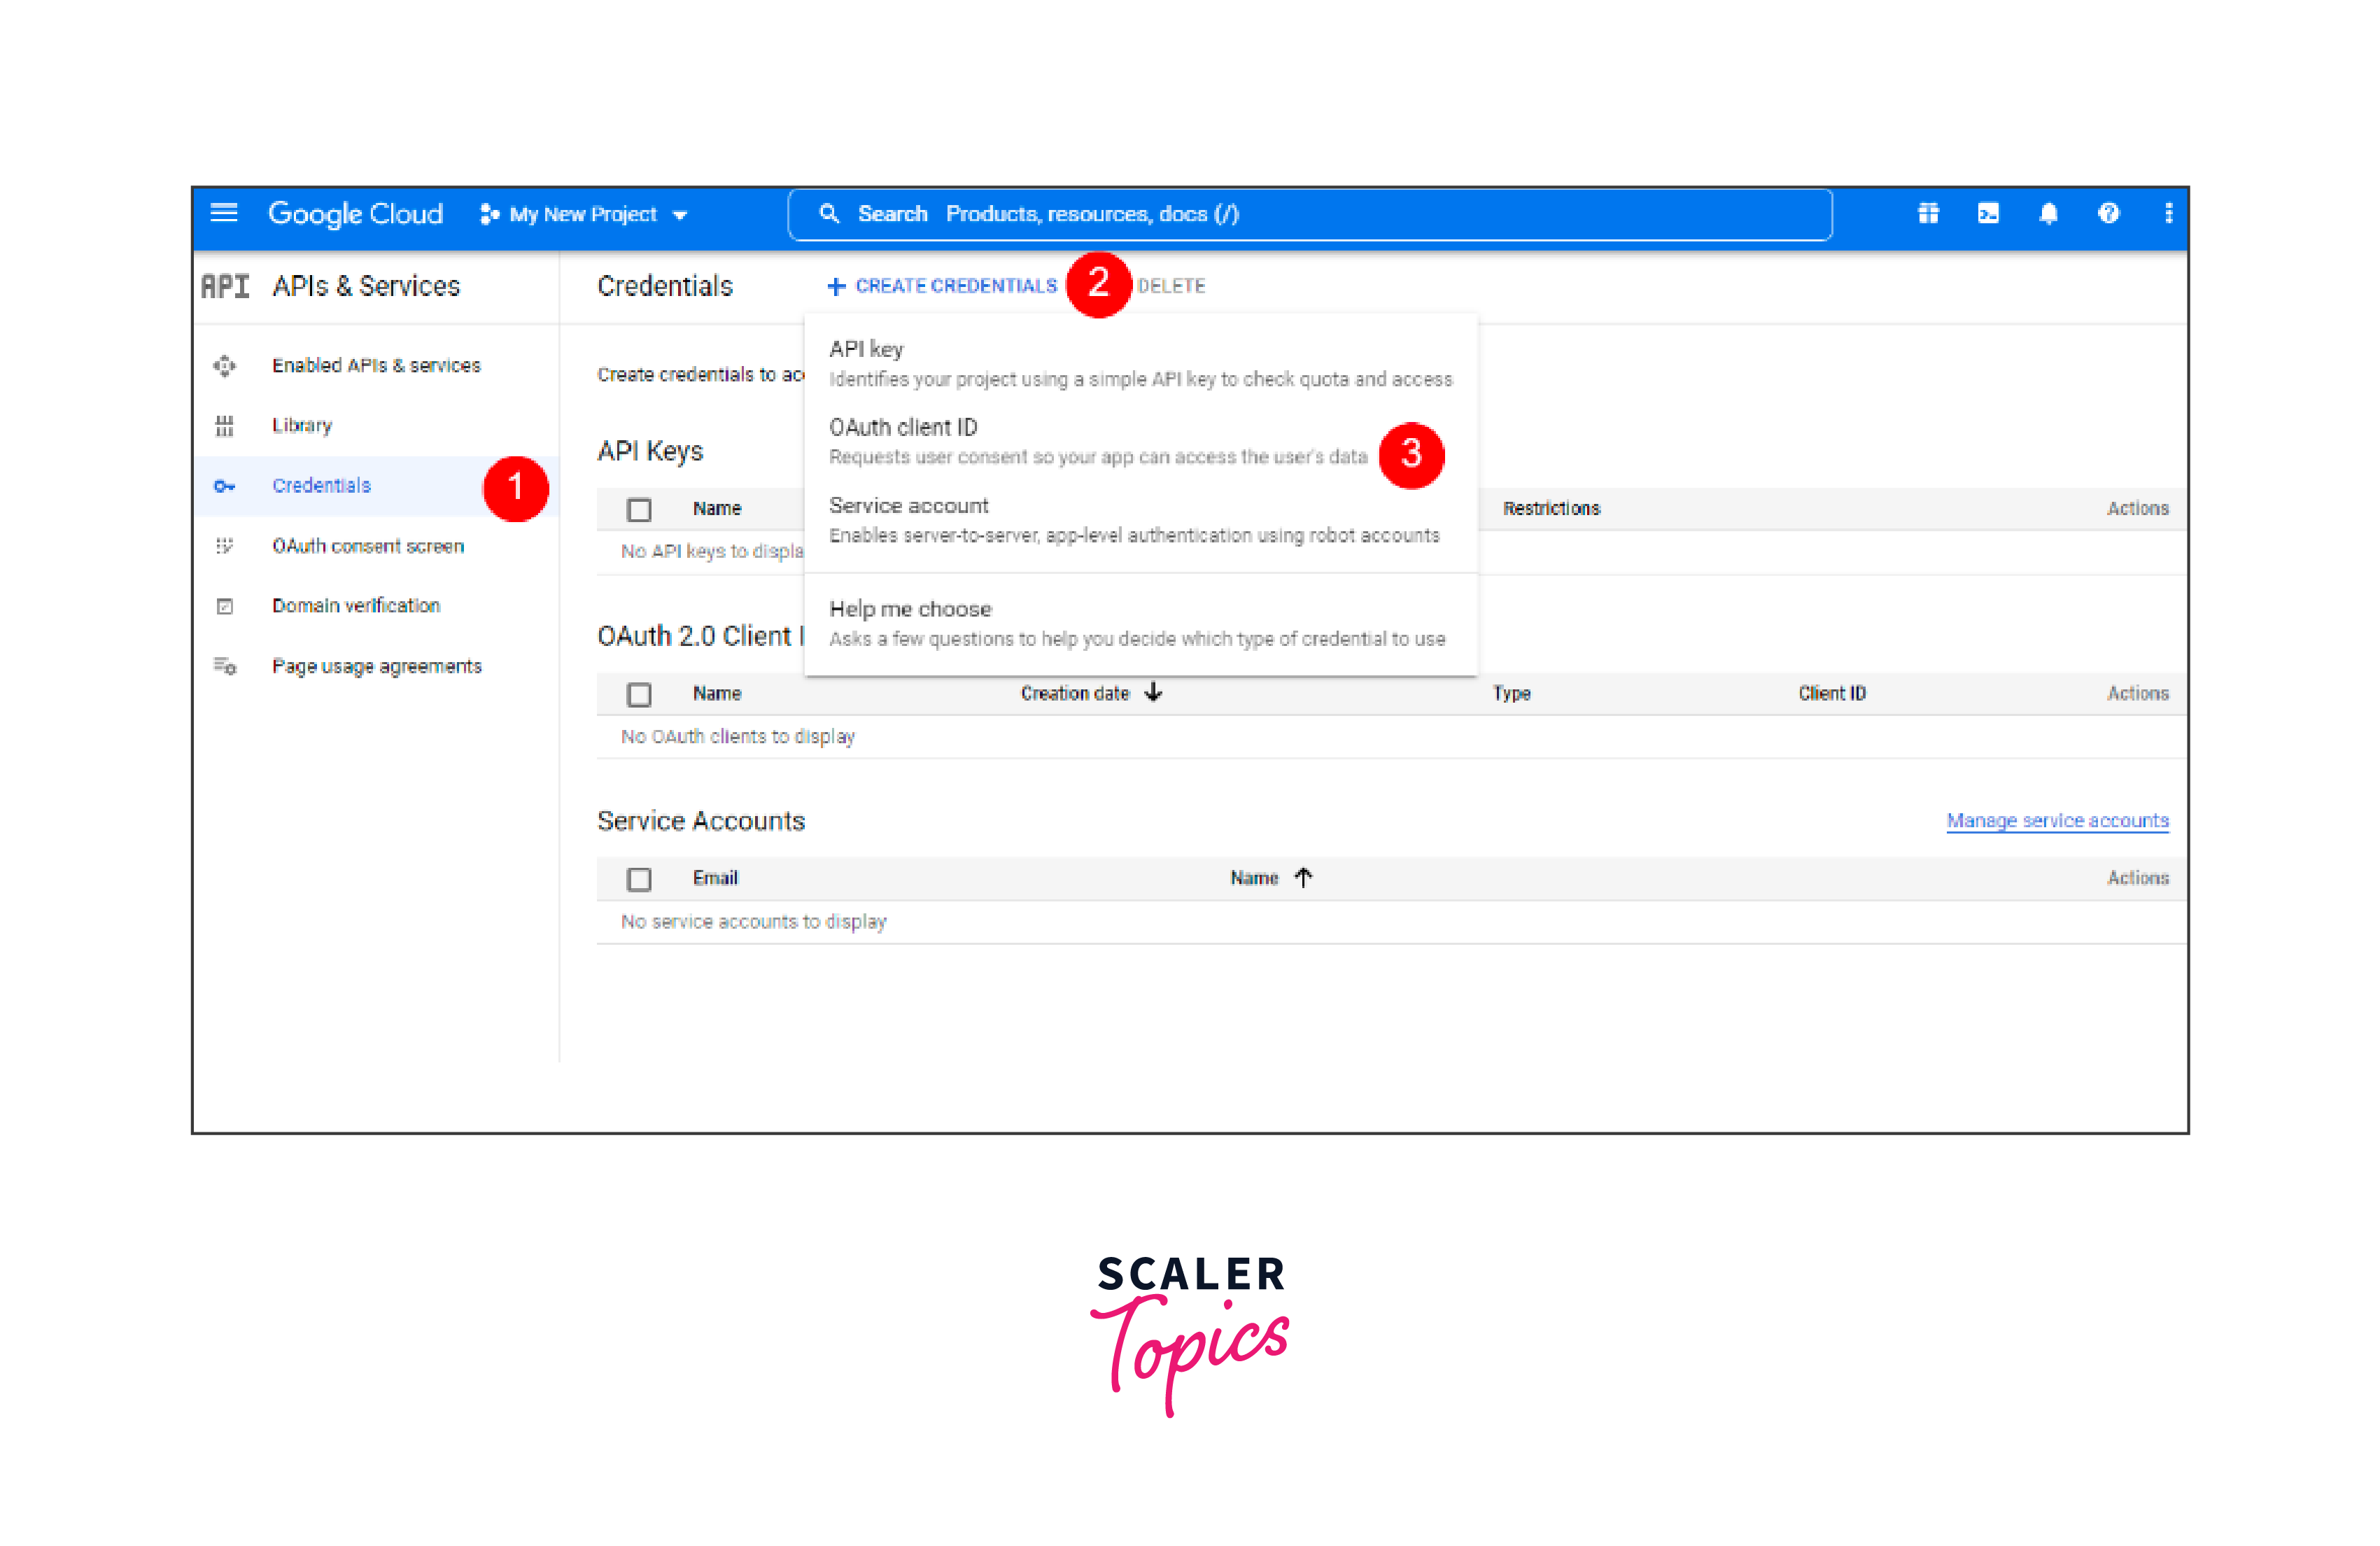
- Go to Credentials, click Create Credential, and select OAuth Client ID from the dropdown list
- Open the Application type drop-down list, select Web application, and enter the name of your OAuth 2.0 client
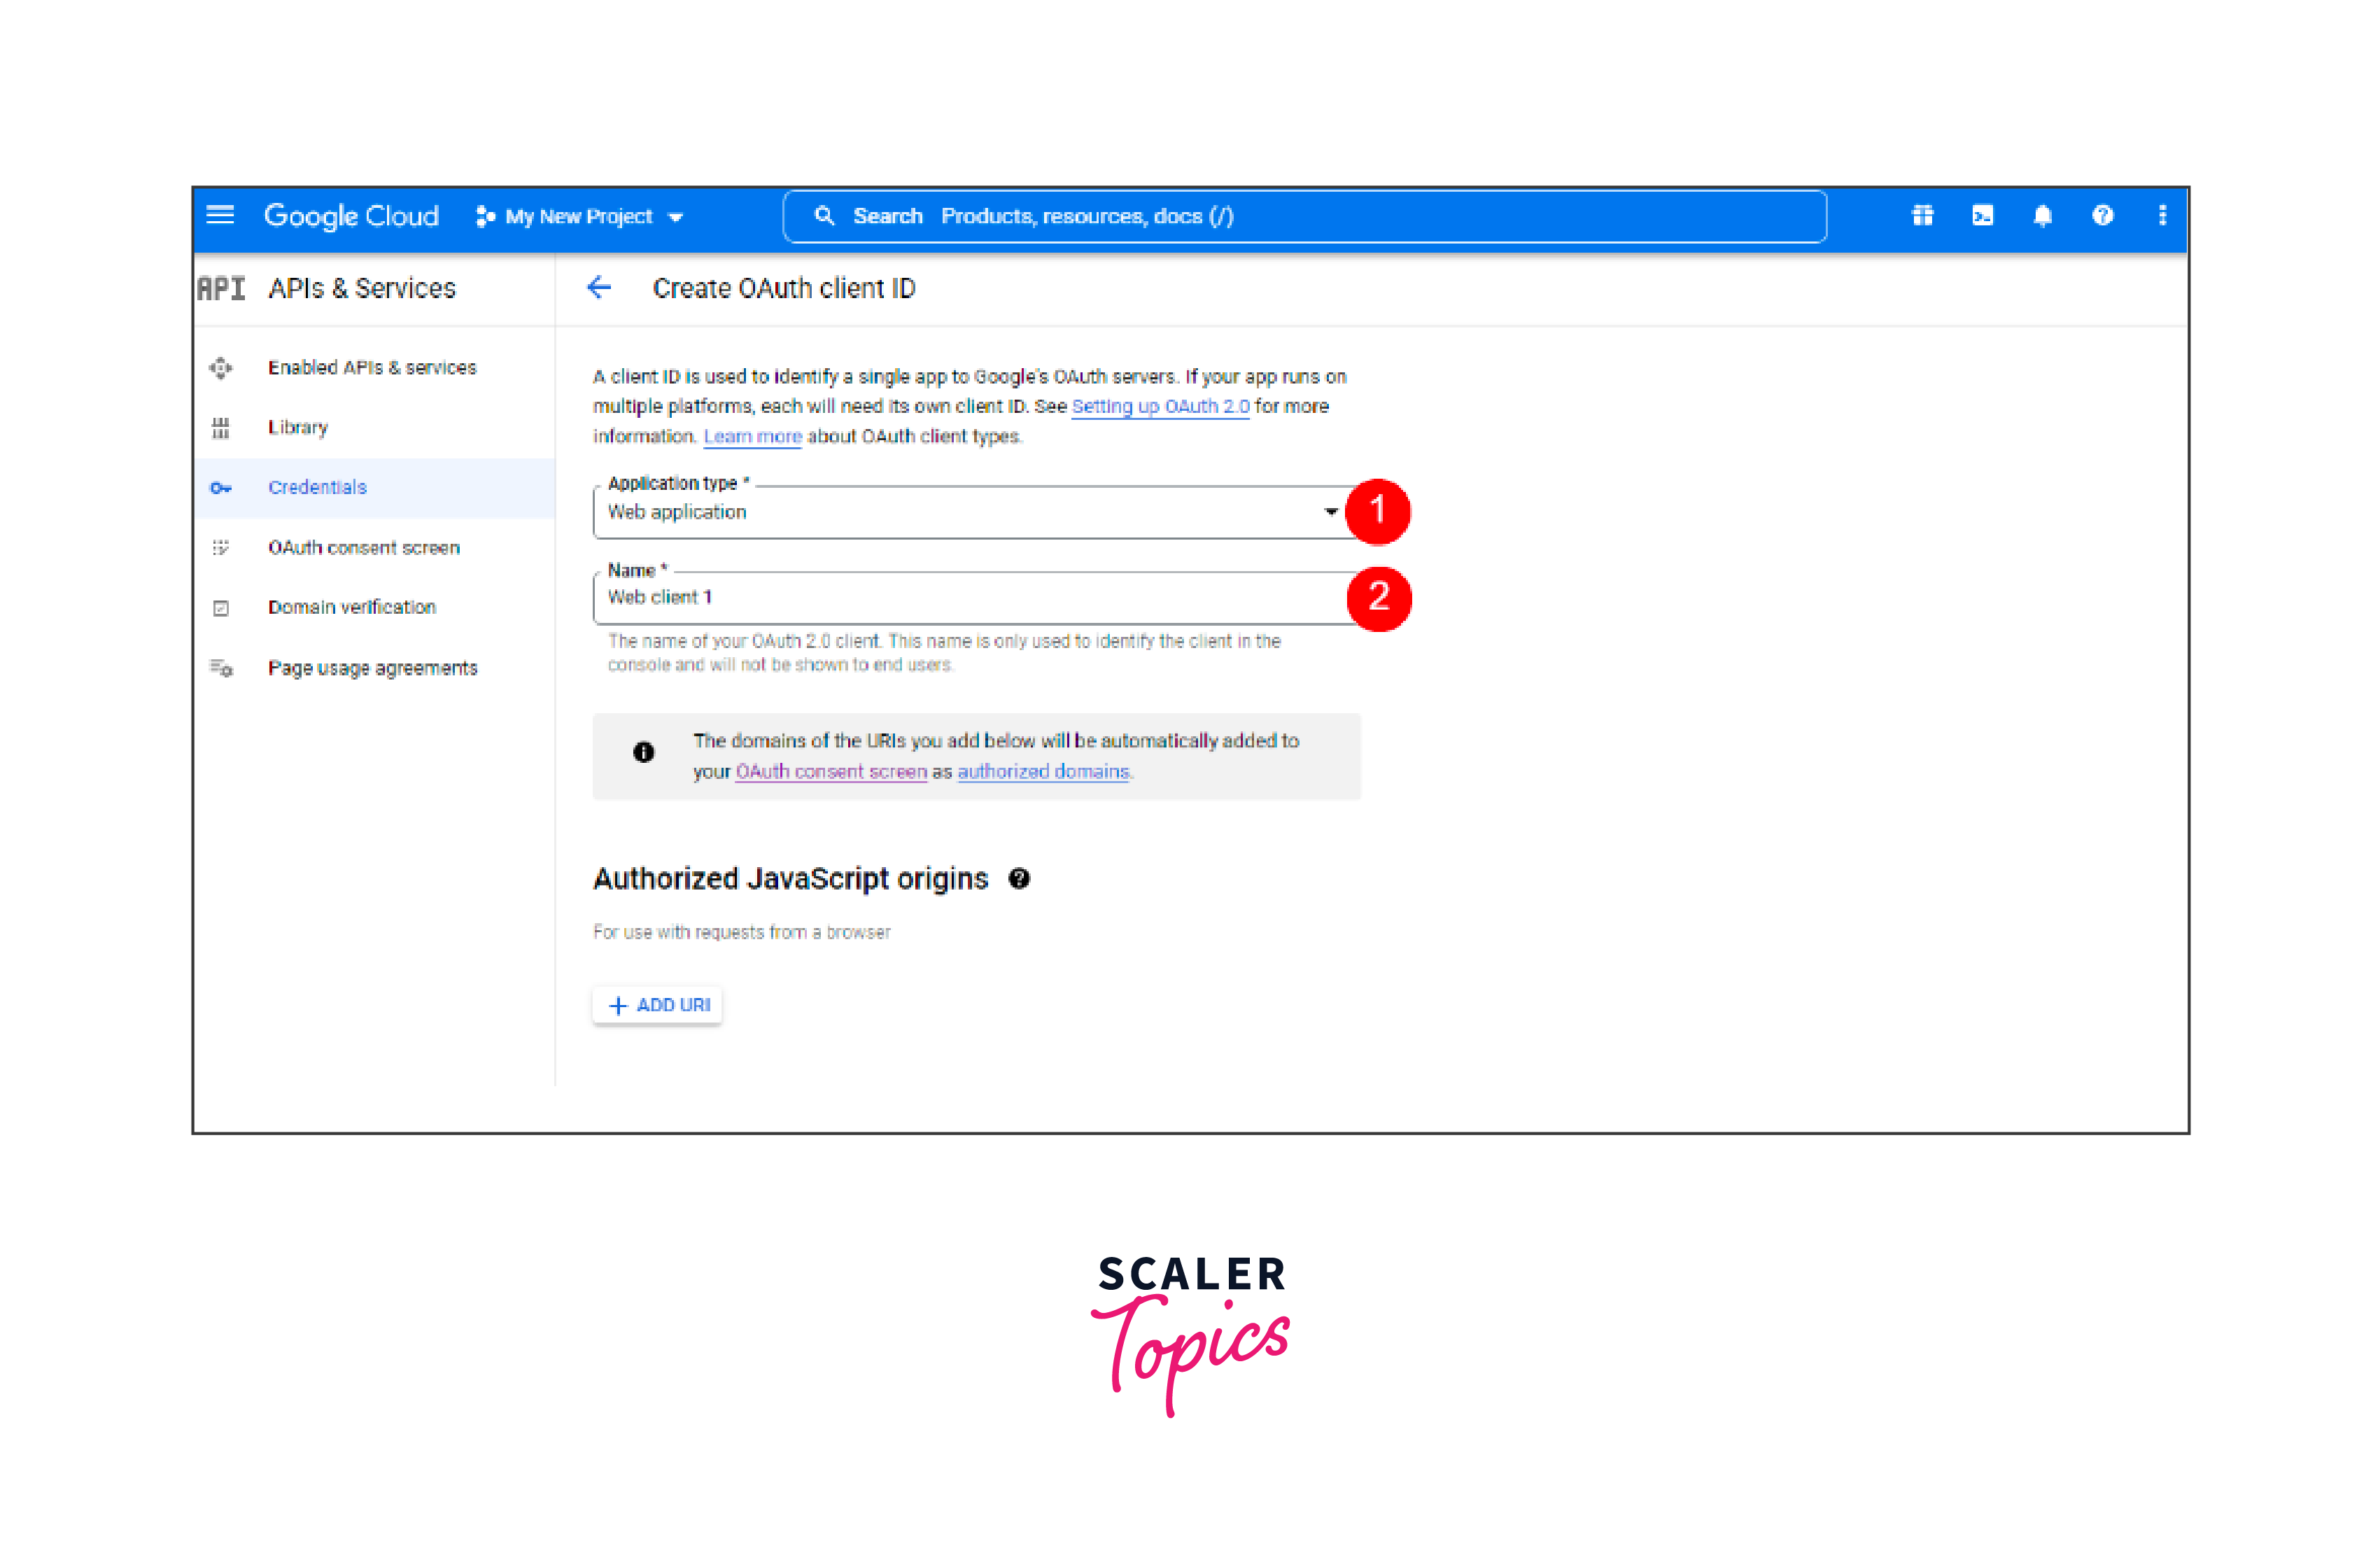
- Enter the URL of your website in Authorized JavaScript Origins -> In Authorized Redirect URIs, enter the URLs of pages where users will be redirected after being authenticated with Google -> Click the Create button
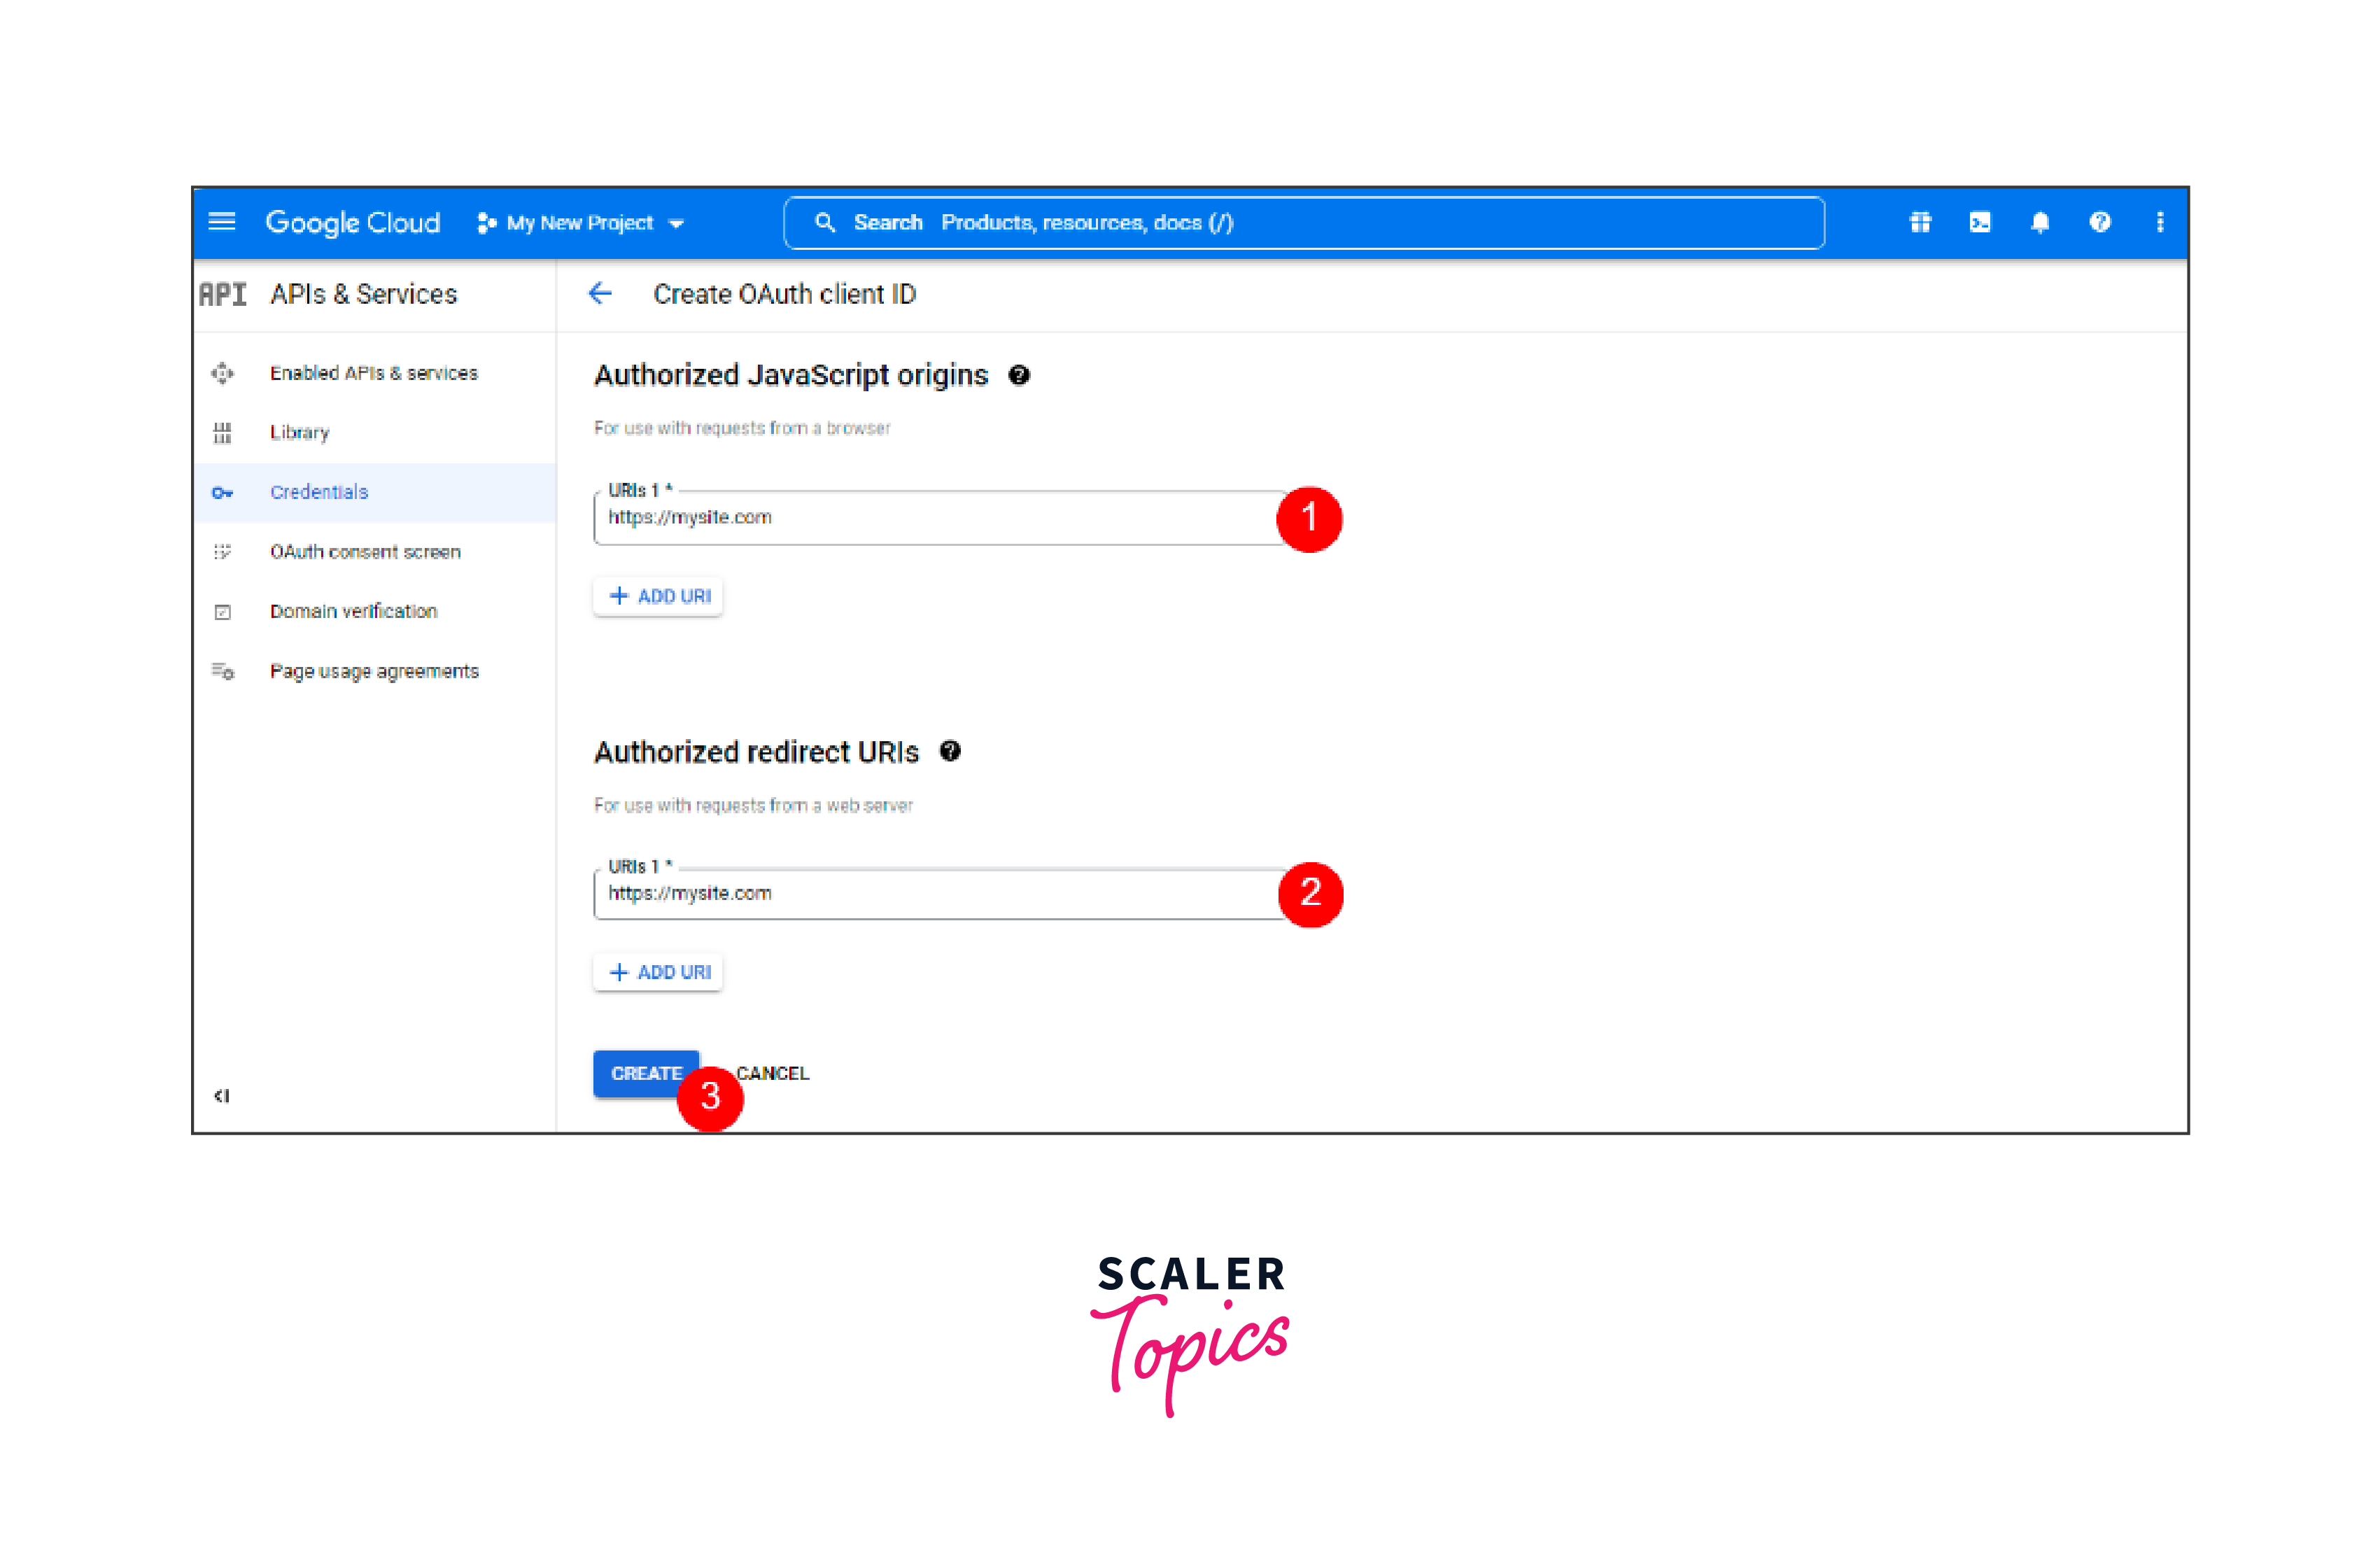
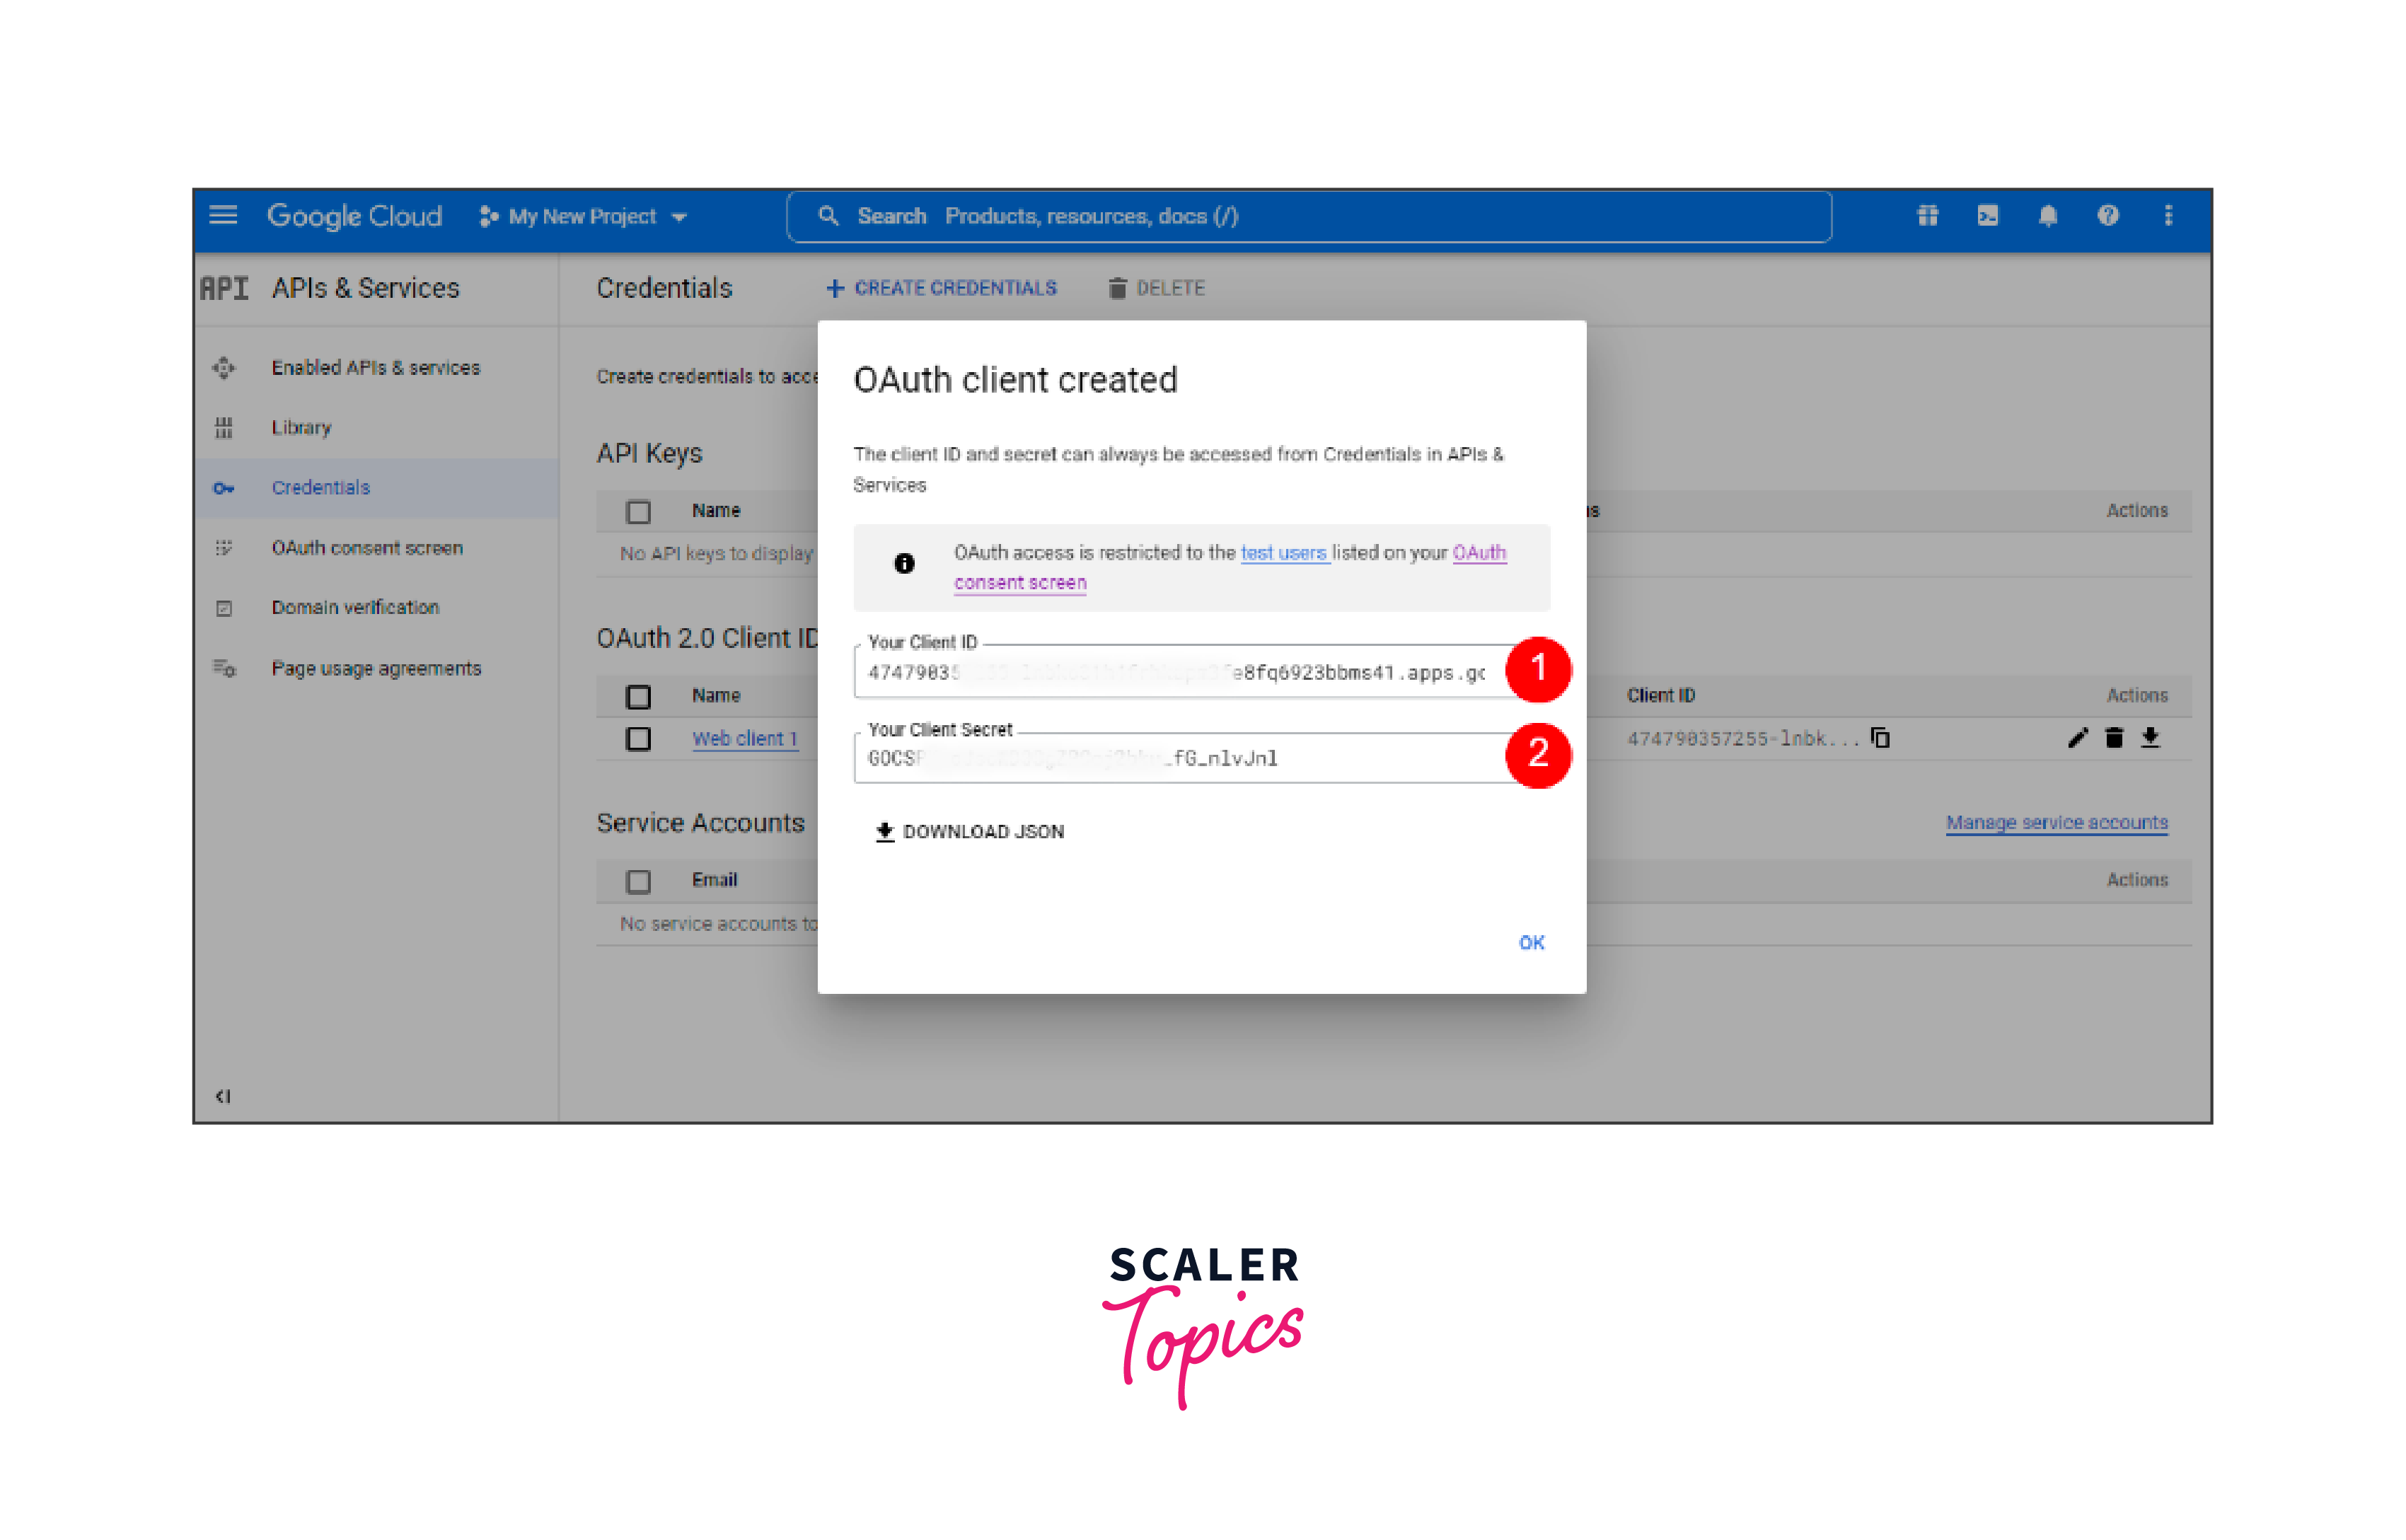
- Once this is done, an OAuth client will be created. Copy the Client ID
Final Integration with React Google Login
Create a new React app by passing command
Install NPM package
Google.js
Import GoogleLogin from @react-oauth/google and add inside render. When the user logs in, onSuccess will return the response as a jwt token and onError will capture the error.
App.js
Explanation:
Import the GoogleOAuthProvider tag from @react-oauth/google and the Google tag from the Google.js file you created earlier. Make sure it is exported by default.
Add GoogleOAuthProvider to the return value and add the mesurment ID as the clientId from Google Analytics/Property/Stream. Add the Google tag as a child inside the vendor tag.
Open a terminal with the appropriate project path and run npm start. Here I created a simple Google Button> Click>> Leave your Gmail account and password so you can get the response in the console.
Conclusion
- At the end, you have learned how to login and signup on React using Google Sign-in with React Google Login.
- Google sign-in is an important feature that should be integrated into your application to save time and improve user experience. Another justification for adding this feature is that it is quick and easy to implement and use.
- I hope you are familier with React Google login implemented by NPM library React OAuth and a short guide.
- React Google login is easy to use, and user don't have to remember any passwords. You can Login directly with your Mail Account.
- I hope I covered everything you need to know about React Google login using Google.