Routing in React Apps with React Router
Overview
React is a JavaScript library that is used to create user interfaces. With the aid of React Router, we can also extend it to create multi-page apps. This is a third-party library that allows us to route our React apps. Routing is a critical component of the emerging single page application (SPA), defining what should appear when a user accesses a certain page in the application. When a user clicks an element (link, button, icon, picture, etc.) or enters a URL inside the application, routing allows them to travel between different pages of the application.
Introduction
Routing is the technique or process of directing a user to various pages based on their activity or request. Routers in React assist in the creation and navigation of the many URLs that comprise your web application. They enable your user to navigate between your app's components while retaining user state, and they can give unique URLs for these components to make them more shared. You may improve the user experience of your app by simplifying site navigation using routers.
ReactJS Router is mostly used to create Single Page Web Applications. React Router is used in the application to define multiple routes. When a user inputs a certain URL into the browser, if the URL path is the same as any route in the router file, the user is routed to that route.
The React Router Package is a standard library system developed on top of React that is used to build routing in React applications. The library is built with simple components to allow you to create a declarative routing system for your web application. Declarative routing allows you to construct clear and readable routes, making it easier to maintain your application architecture. It populates the browser's synchronous URL with data that will be shown on the web page. It preserves the application's conventional structure and functionality and is mostly used for designing single-page web apps.
React Router is essential for displaying different views in a single page application. Multiple views in React apps are not possible without React Router. Most social media websites, such as Facebook and Instagram, employ React Router to show multiple views.
Transform Your Career
Choose from our industry-leading programs designed for career success
Modern Software and AI Engineering Program
Master full-stack development with AI integration

Modern Data Science and ML with specialisation in AI
Advanced data science techniques with AI specialization
Advanced AIML with Specialisation in Agentic AI
Deep dive into AIML with focus on Agentic systems
DevOps, Cloud & AI Platform Engineering
Build and manage AI-powered cloud infrastructure
AI Engineering Advanced Certification by IIT-Roorkee
Premier AI engineering certification from IIT-Roorkee
Pre-Requisites
To follow this article, you will need the following tools :
- Node js should be installed locally on your system. You can download Node from their official website.
- A package manager like yarn or npm (Node package manager), which is typically installed with Node js installation.
- Basic understanding of javascript functions, variables and syntax.
- Any good code editor like visual studio code, which can manage your project directory and files.
Setting up the Project
To follow along and learn about how to implement routing in react with the help of react router, you will have to first set up a react project. In the react project, you will set up react routing.
If you have node.js installed in your system, you can install create-react-app easily with the following command: If you are using npm, then,
If you are using yarn then,
Now to create a react app with the name react-routing using create-react-app run the below command :
The above command will take some time to execute and then a directory of the name React-routing will be created.
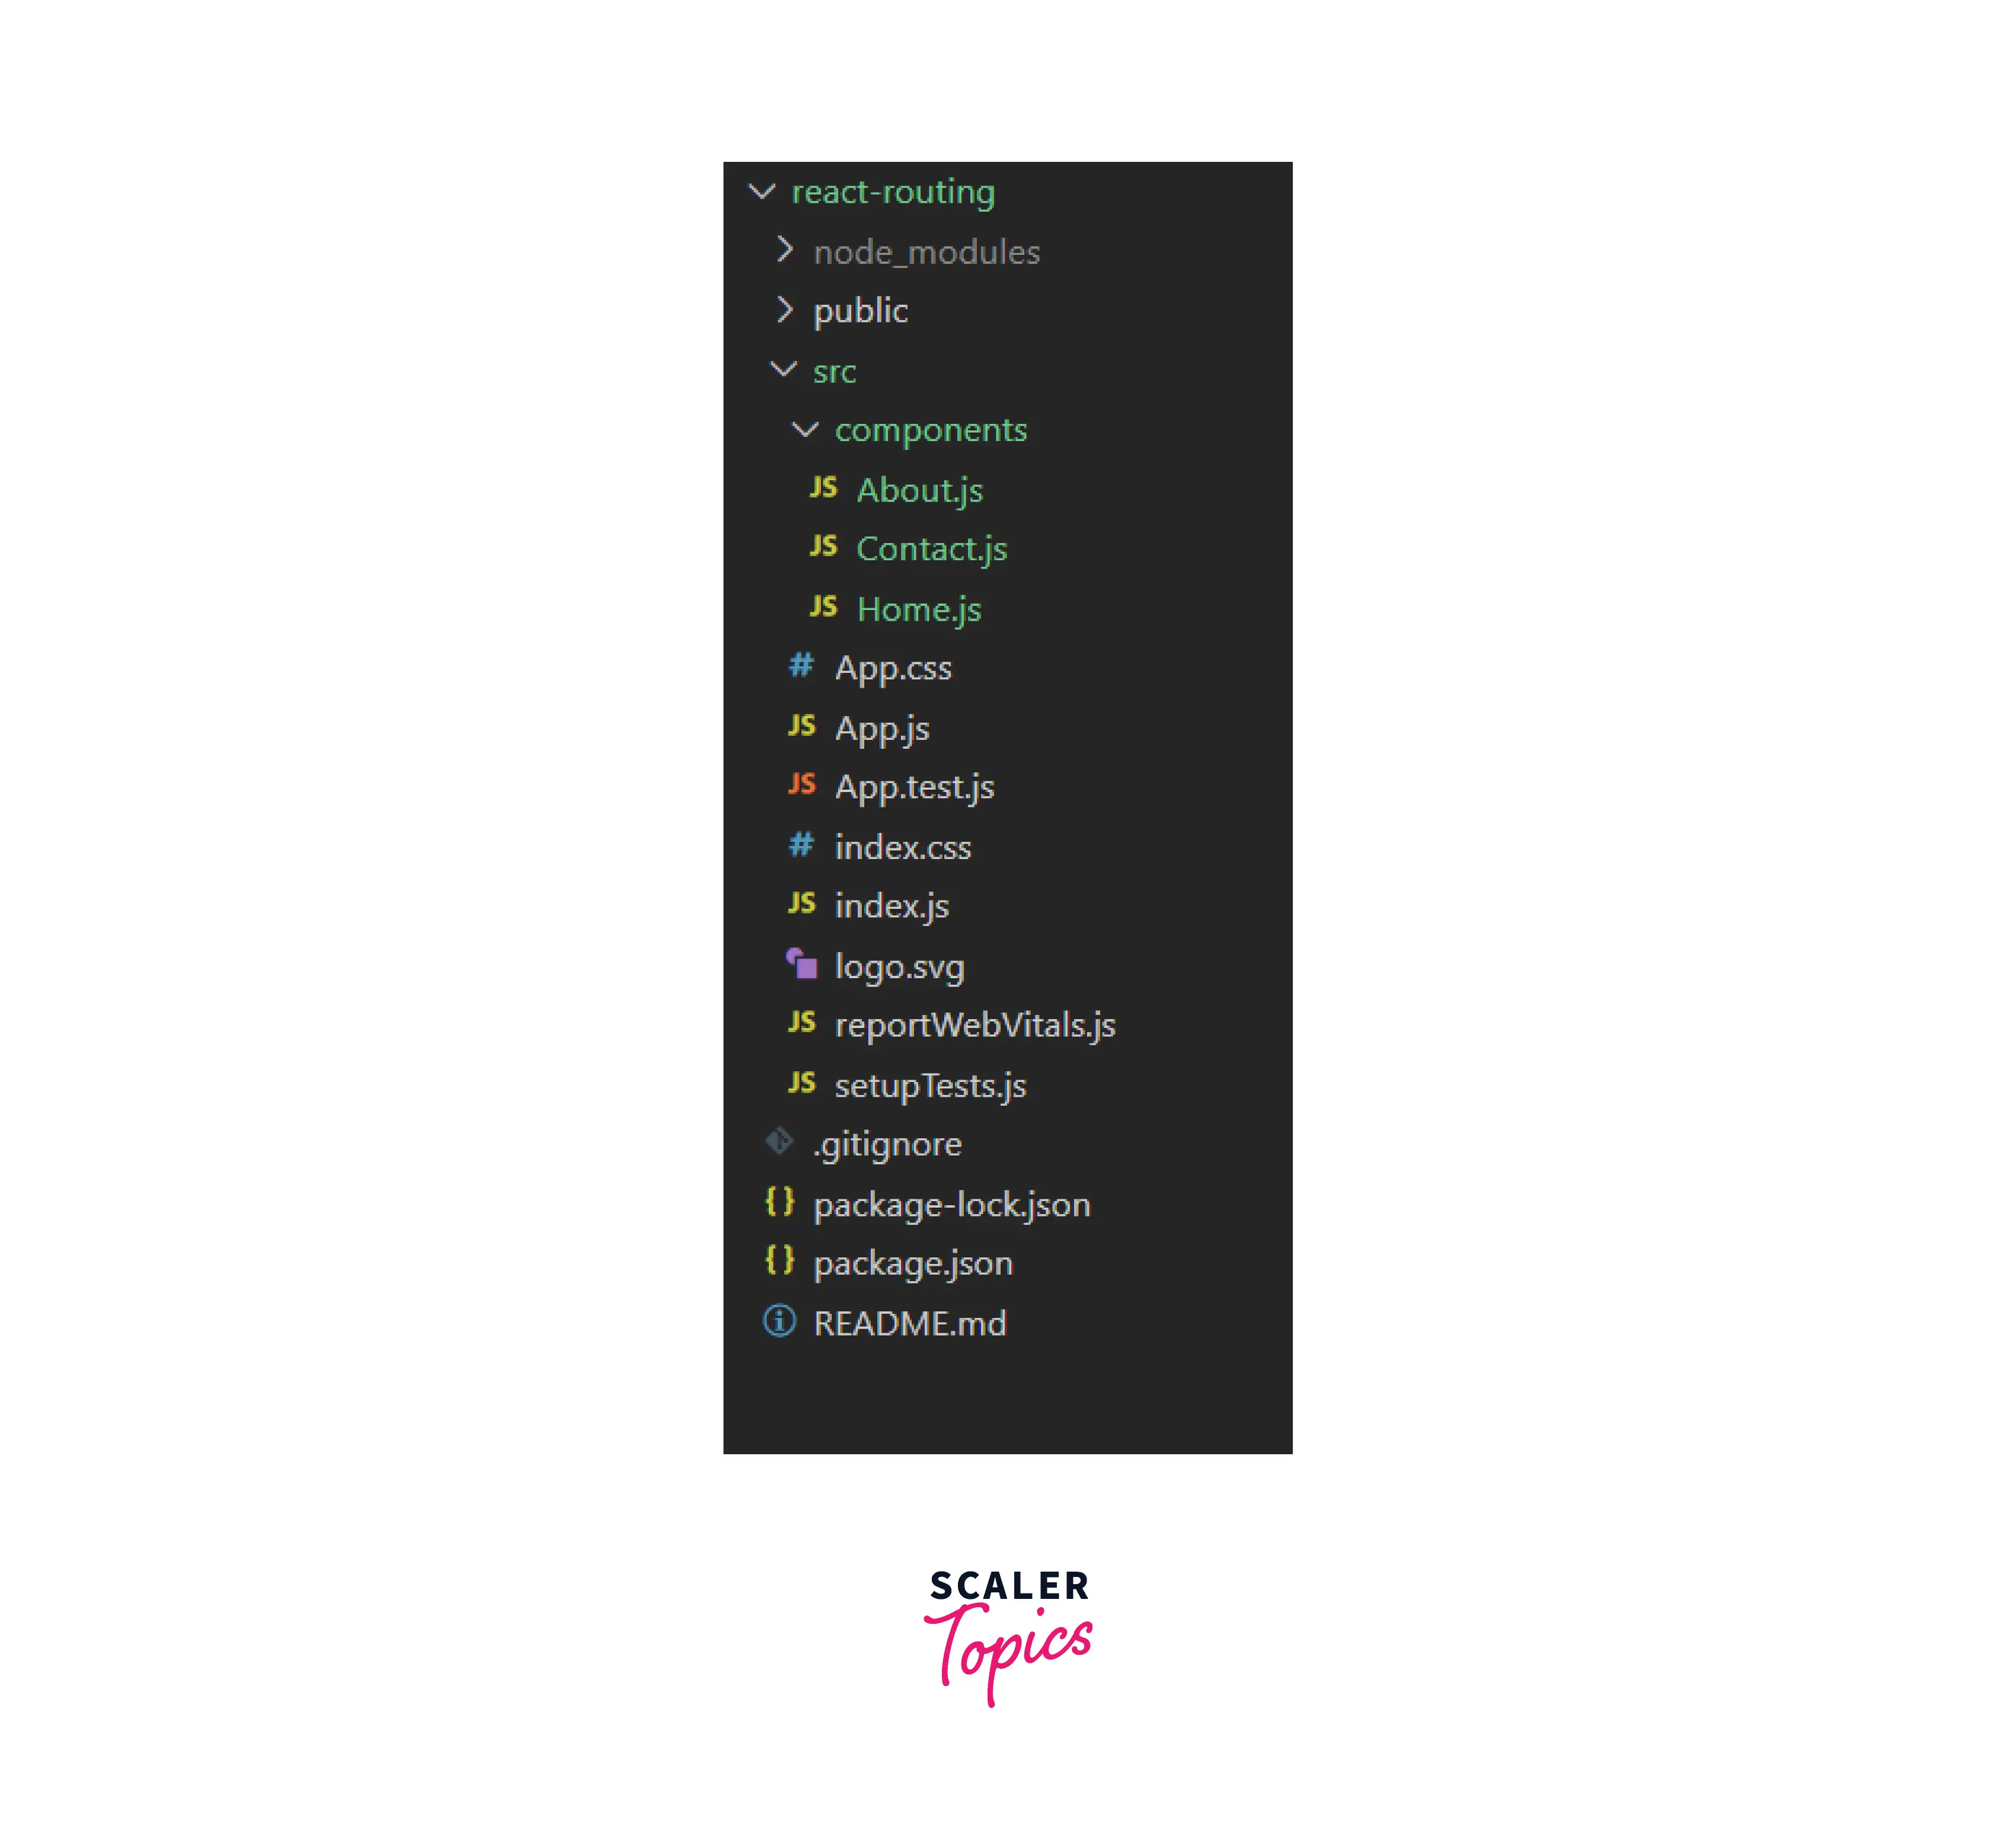
Now create a components directory in the src directory in your main project directory. Create the following files in it with the shown code.
Home.js file for the home page of the application with the following code :
About.js file for the about page of the application with the following code :
Contact.js file for the contact page of the application with the following code :
In all the above components we have created a functional component that returns a div containing the name of the page. You can also add other content to these pages but right now we have kept the components simple to show the use of routers in react.
Now your project directory will have the following structure :
Now on running the app with the help of npm start you will see the default application code’s output on localhost:3000.
Now you will make changes in the App.js file and use react routing to show the components that you just created.
Installing React Router
There are three different packages for routing in React. These are :
- react-router : It gives the React Router apps with the core routing methods and components.
- react-router-native : It is used in building apps for android and ios.
- react-router-dom : Web designing utilities are contained by it.
react-router cannot be directly used in your application. To utilise react routing, you must first install the react-router-dom components in your application. The command below is used to install react-router dom.
If you are using yarn then,
Turn Learning into Career Growth
Components in React Router
There are two types of router components :
-
BrowserRouter : It allows the handling of a dynamic URL. The HTML5 history API (pushState, replaceState and the popstate event) is used to synchronise the API with the URL.
The browser router takes the following four attributes :
-
basename: string The fixed or base URL for all locations. If your app is served from a sub directory on your server, set this to that directory. A properly constructed basename should begin with a slash and end without any slash.
-
getUserConfirmation: func A function that is used to confirm navigation. Defaults to using window.confirm.
-
forceRefresh: bool If true, the router will perform complete page refreshes while navigating between pages. You might use this to mimic the behaviour of a standard server-rendered app, with full page refreshes between page navigation.
-
keyLength: number The length of location.key. Its default value is 6.
-
HashRouter : It allows the handling of the static request. A <Router> that makes use of the hash portion of the URL (i.e. window.location.hash) to synchronise the URL with the UI of the application.
The hashrouter takes the following three attributes :
-
basename: string The fixed or base URL for all locations. If your app is served from a sub directory on your server, set this to that directory. A properly constructed basename should begin with a slash and end without any slash.
-
getUserConfirmation: func A function that is used to confirm navigation. Defaults to using window.confirm.
-
hashType: string The encoding type that is used for window.location.hash. The available values are :
- slash - Creates hashes like #/ and #/user/profile
- noslash - Creates hashes like # and #user/profile
- hashbang - Creates crawlable ajax (which is currently deprecated by Google) hashes like #!/ and #!/user/profile defaults to slash.
The hashrouter is no longer used as it is only for static routing. When we have large production-ready apps that serve backends, we should employ BrowserRouter.
Adding Routes
Now, after installing the react-router-dom you can now add a router in the react app.
We will be making use of the browserRouter. Now the browser router must wrap all the components of the application. To wrap all elements, you can either make it the parent element in the App.js file or simply use App.js inside the BrowserRouter in the index.js file.
In the index.js file, make the following changes :
In the above code, the BrowserRouter has been imported as Router. The App has been wrapped in the Router to facilitate the routing of the whole application.
Now to finally start adding Routes in your application, open the App.js file and import Routes and Route from react-router-dom.
Have a look at what these terms mean :
-
Routes - When the location changes, Routes searches through all of its child routes for the best match and renders that branch of the UI. Nesting of Route components may be done to show nested UI, which also corresponds to nested URL paths. Parent routes render their child routes on the basis of these nested routes.
-
Route - A single route is created with the help of Route. It takes in two attributes :
- Path - It is used to specify the path of the URL for which the current element must be shown. You can call this pathname whatever you want. Also, the first pathname is a backslash (/) is always used first. When the app loads for the first time, any component with a backslash in its pathname gets displayed first. This means that to make the Home component to be present in our application first we need to use the backslash path with it.
- element - This specifies what component must be rendered for a specific route.
Now to use these in your application, first import all the components that you had created in the components directory. So now your code in App.js file must look like the following :
We have removed all the default code from the app component.
Now you need to define the routes and attach the respective components.
The / path is attached to the Home component hence it will show up first. The /about url path will give the About page and the /contact url path will give the Contact component.
This way you have defined the routes in your application.
Basic Routing
Now you have defined the routes. It is time for you to connect these components to each other. The react-router-dom components <Link> and <NavLink> are used to navigate throughout the react application. While navigating, we often employ anchor tags for this reason.
Anchor tags cause the page to refresh and re-render all of its components. In contrast, <Link> and <NavLink> will only re-render updated components that match the Route's URL route without reloading. It allows Single-Page Applications to route more quickly.
"Link" Component Props :
- to : String or object which specifies the pathname.
- replace : Replaces the pathname in the history stack with new.
- innerRef : Passes ref to the element rendered by the component.
"NavLink" Component Props :
- className : Specifies the CSS class name you want to apply to the element when active.
- isActive : Returns boolean value whether the link is active or not.
- style : To apply inline CSS.
- end : Match the pathname precisely with the URL.
- to, replace, innerRef same as the Link Component.
A special kind of <Link> is <NavLink> that has the information about itself being active or not. It is also used to apply styling to the Link.
Now try to add the Link component in the home page. We will add the links in the Home component so that all the pages can be visited from the home page.
In above code two links have been created to the about and contact page.
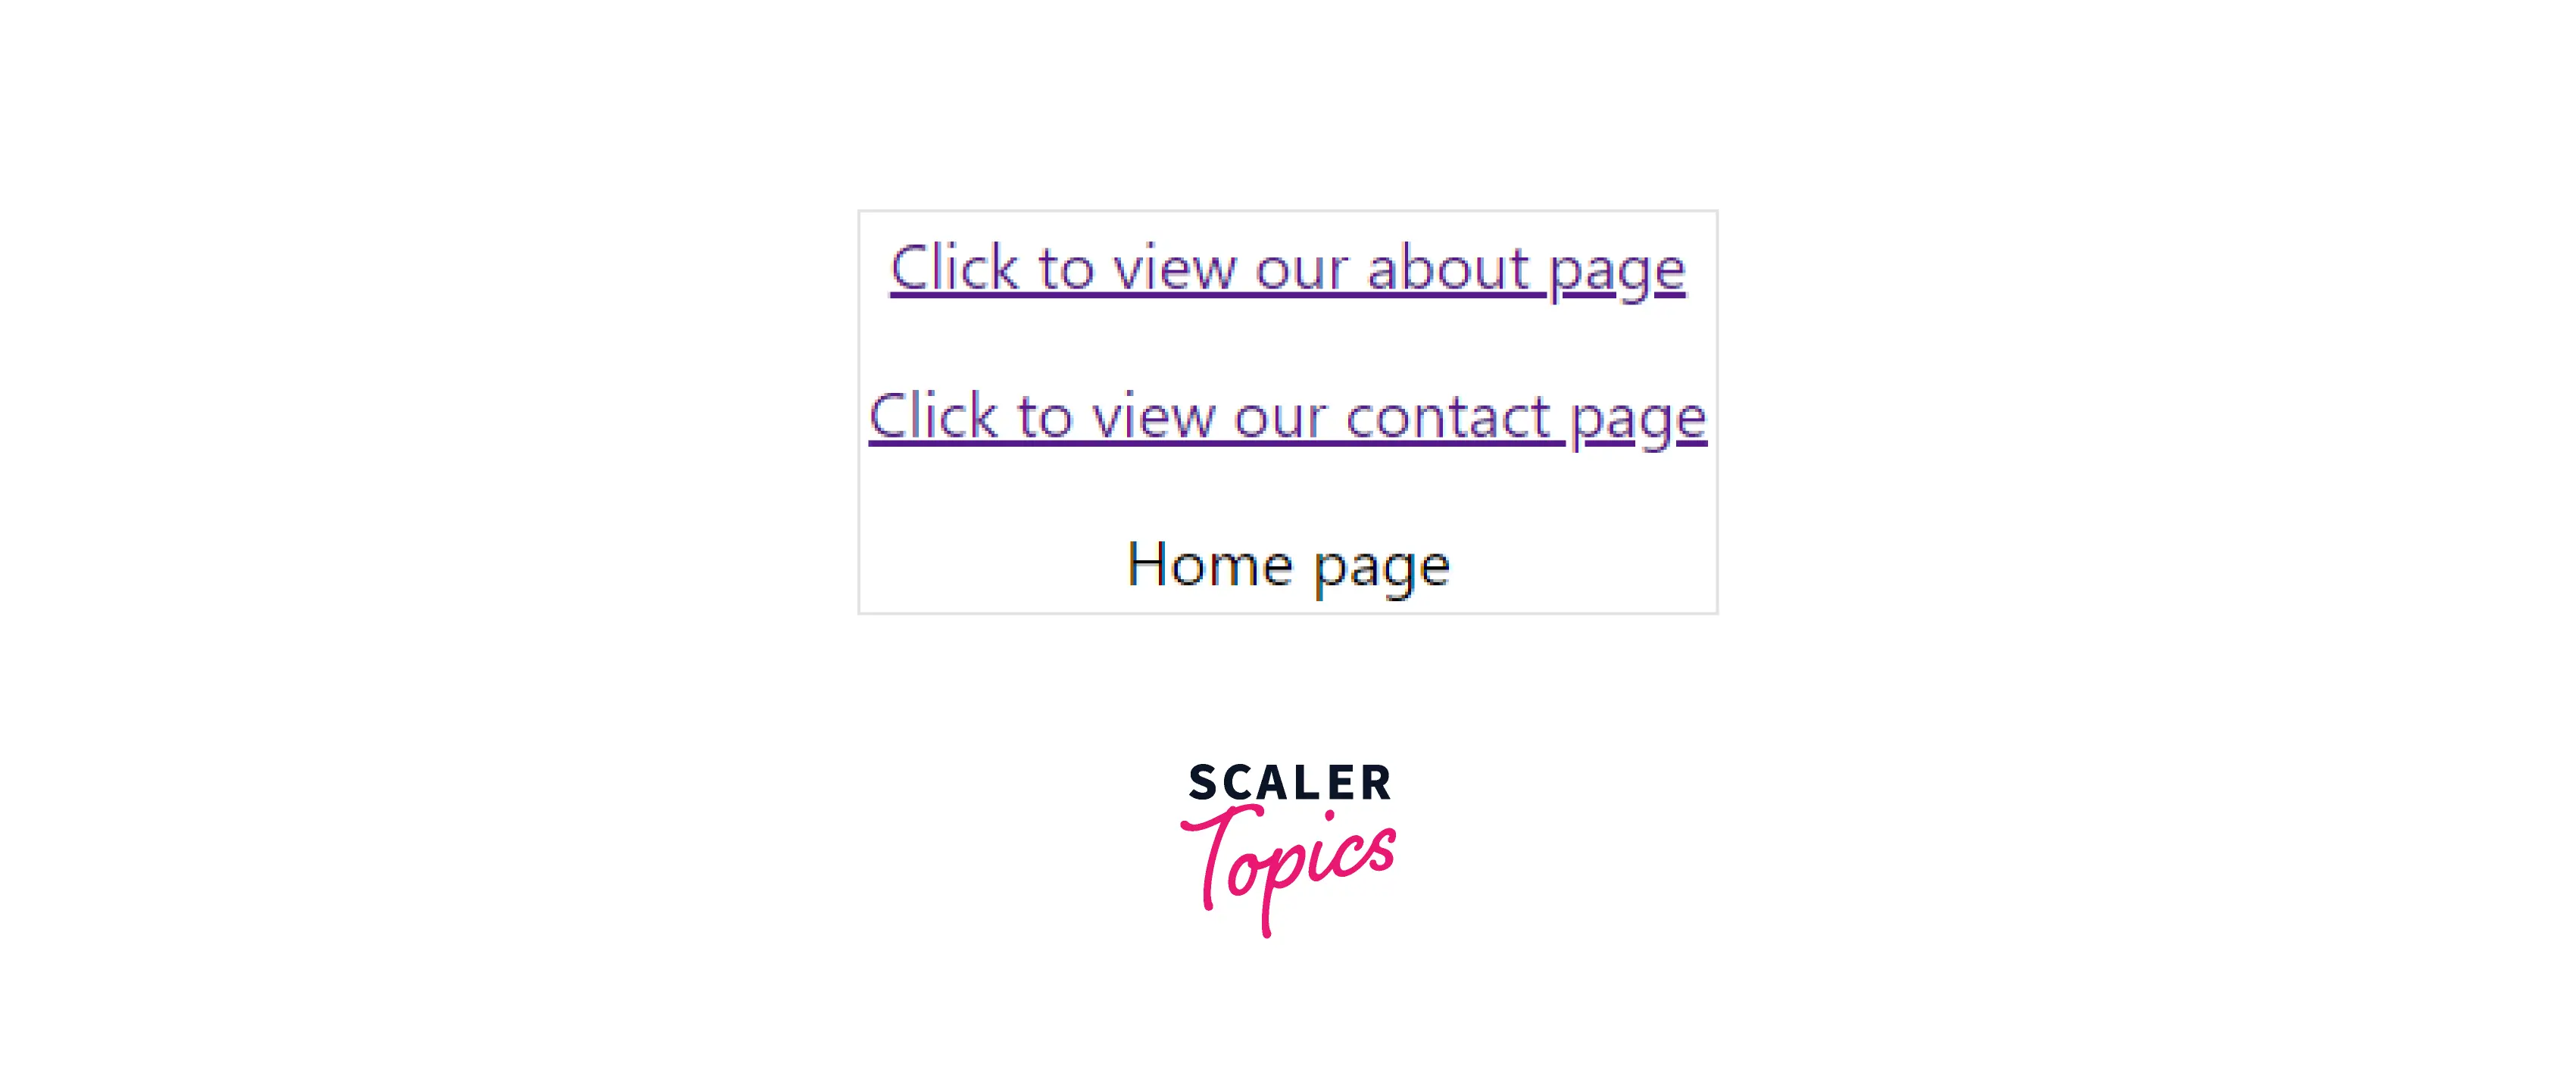
Now if you click the about page link: The url will become http://localhost:3000/about
And If you click the contact page link: The url will become http://localhost:3000/contact
Nesting Routes
Routes might expand and get more complicated. Nested routes are used by React Router to provide more specific routing information within child components.
Now to understand the nesting of routes, create a user route and a user component. We will create two components: user profile and user account. These two will be nested in the user route.
So create two new components with the name UserProfile and UserAccount.
User Profile
User Account
Now you need to define a User component in which you will be doing nested routing. So create a new component User with the following code :
In the above code, under the Routes, two routes have been defined, one for the /profile and one for the /account . The UserProfile and UserAccount components have been imported. The /profile is attached to the UserProfile component, and the /account is attached to the UserAccount component.
Now you need to route from the main app to the User component. Then only the User component and its nested routes will work. So add the route for the User component in the App.js file as shown:
You must have noticed that the path for the user component is different from the rest of the routes. The path user/* means that for any path starting with user/, the User component will be rendered. In other words, if you type /user/random or /user/lorem or anything like this, the User component will be rendered.
Now we wanted the /user/profile path to give us the UserProfile component and the /user/account path to give us the UserAccount component. So if the user enters /user/profile, the User component will be rendered, and in the user component, the routing for the rest of the path, that is /profile will be done and the UserProfile component will be rendered. The same will be the case for the /user/account path, the UserAccount component will be rendered.
Now the final task left is to add links for the UserProfile and UserAccount components. So add the two links in the Home.js file as shown:
Now on running the app you will be getting the following output: For http://localhost:3000/

On clicking the user profile link :
The url will become http://localhost:3000/user/profile

On clicking the user account link: The url will become **http://localhost:3000/user/account**

Hence you have successfully implemented nested routes.
Conclusion
- Routers in React assist in the creation and navigation of the many URLs that comprise your web application.
- Routers enable your user to navigate between your app's components while retaining the user state.
- React Router is essential for displaying different views in a single-page application.
- There are three different packages for routing in React namely react-router,react-router-native, react-router-dom.
- There are two types of router components namely <BrowserRouter> and <HashRouter>.
- Anchor tags cause the page to refresh and re-render all of its components. In contrast <Link> and <NavLink> will only re-render updated components.
- Nested routes are used by React Router to provide more specific routing information within child components.