Redux DevTools
Overview
The redux is an open-source Javascript library that lets us manage and centralize the state of an application, specifically a react application. However, with such great functionalities, it also introduces specific terms like store, actions, reducers, middlewares, etc. which are often considered as complex for beginners. To make this easy, we have a tool called Redux devtools, which lets us visualize all these concepts in an easy to understand manner.
Introduction to Redux DevTools
While working with Redux, many times we feel stuck and are not able to understand what and how to proceed further from a point; this may be due to the involvement of lots of new terminologies apart from the core react working, like the store, actions, middlewares, reducers etc. And that's where Redux DevTools proves to be helpful.
By using redux devtools as an extension in our application, we can make it easy to visualize all these concepts in an easy-to-understand manner. This basically provides us with a debugging platform for our redux-based react apps. It allows us to debug and perform live editing in our react application. Some of its features as per the official documentation are listed below -
- It lets us inspect every state and action payload.
- It lets us go back in time by canceling actions.
- If we change the reducer code, each staged action will be re-evaluated.
- With the presistState() store enhancer, we can persist debug sessions across page reloads and many other functionalities.
Scaler Placement Report and Statistics
Scaler learners achieved 2.5x salary growth with average post-Scaler CTC reaching ₹23L.
Environment Setup Methods
Workflow
Let's now set up our environment to get an understanding of how it works. Here we will first add the redux devtools chrome extension into our chrome browser, then we will install the devtool dependencies for it into our react application, and then we will be ready to visualize the created stores and actions in our browser window using the redux devtool console.
Transform Your Career
Choose from our industry-leading programs designed for career success
Modern Software and AI Engineering Program
Master full-stack development with AI integration

Modern Data Science and ML with specialisation in AI
Advanced data science techniques with AI specialization
Advanced AIML with Specialisation in Agentic AI
Deep dive into AIML with focus on Agentic systems
DevOps, Cloud & AI Platform Engineering
Build and manage AI-powered cloud infrastructure
AI Engineering Advanced Certification by IIT-Roorkee
Premier AI engineering certification from IIT-Roorkee
Adding Extension
Download the redux devtools extension from the web store of your preferred browser, here is the link for Google Chrome, Mozilla Firefox, and Microsoft Edge, and then install it by simply adding it to your browser.

After the addition, it should appear in your browser's extension list.
Installing DevTools Dependencies
Now let's proceed further by installing the devtool dependencies into our application; we can install it by simply executing some commands.
And to use it in our redux store, we need to:
We can also specify extension options here using the following:
Let's now understand this with the help of an example.
Redux DevTools Console Break-down
Let's now understand what the redux console in the browser is trying to tell us. First, if the extension is successfully installed, then there will be a screen like this upon clicking on the extension.
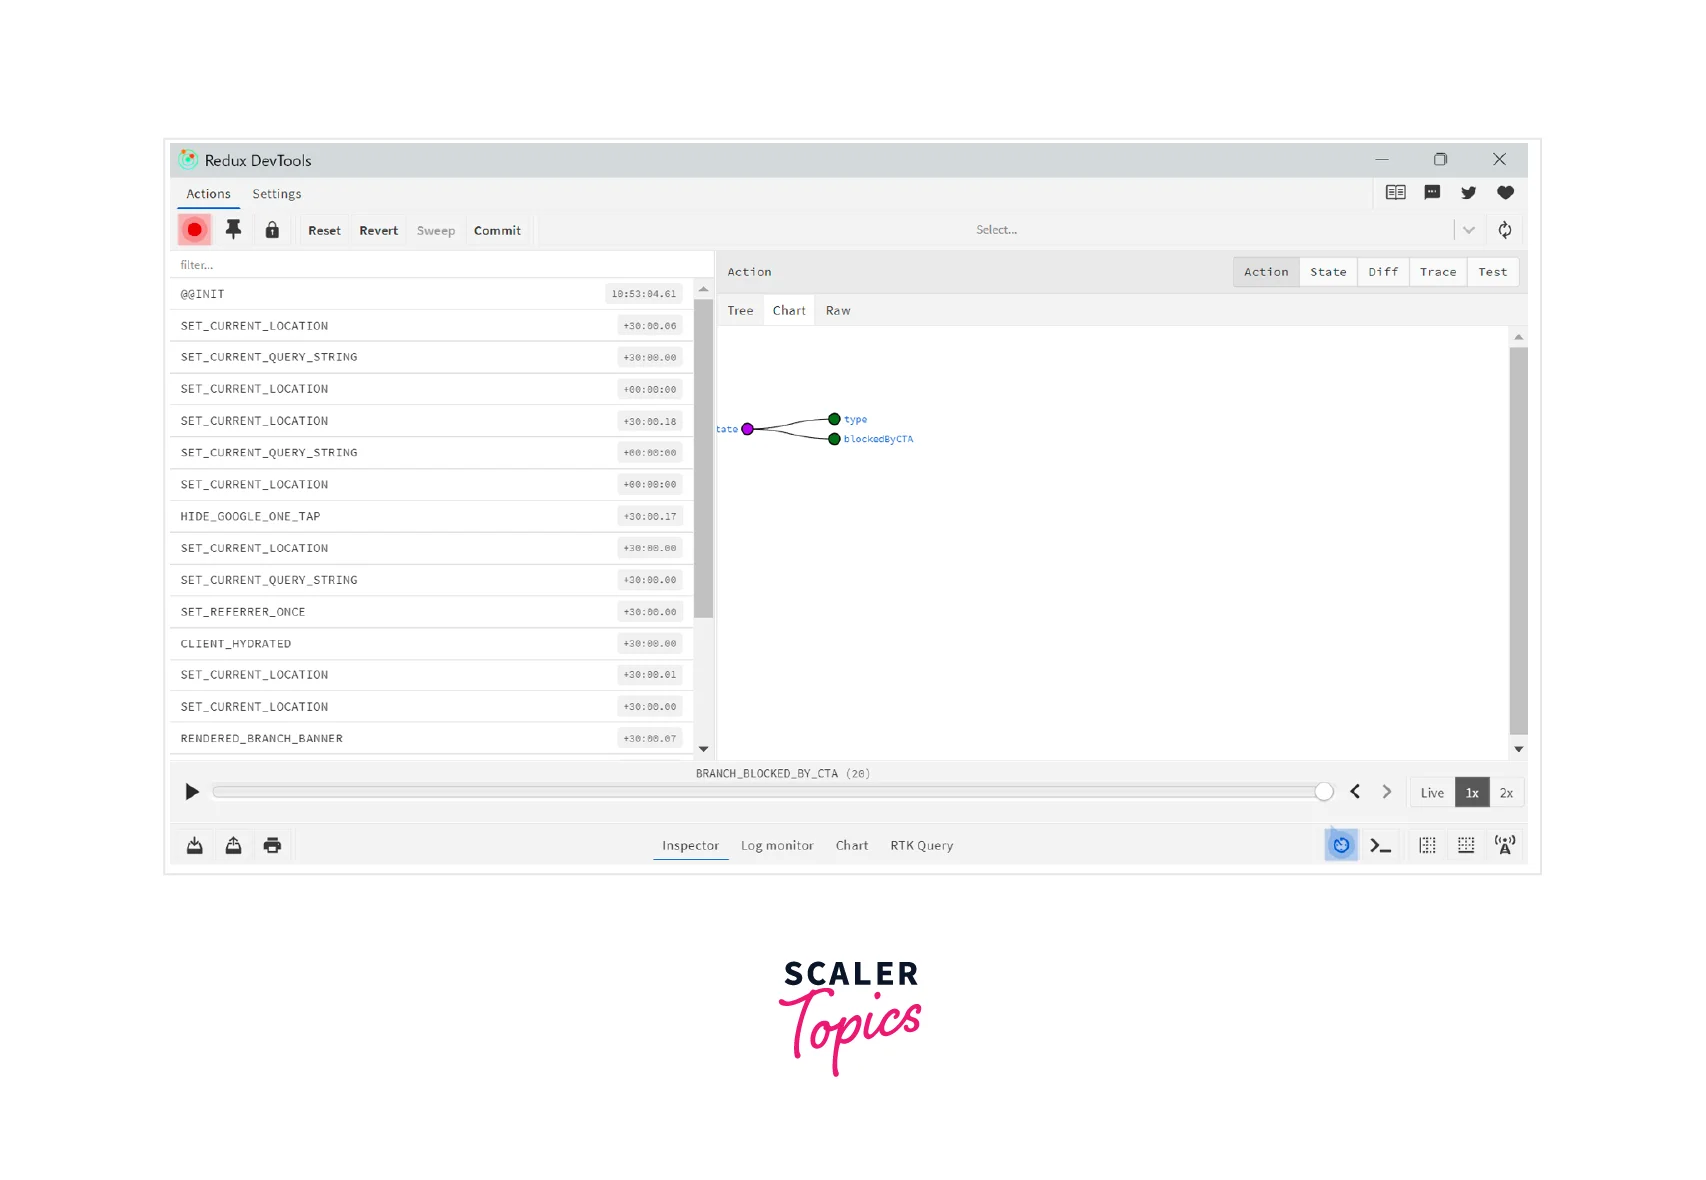
- Left side console tools - The left-hand column shows us the real-time actions that get fired in our react application.
- Right side console tools - On the right-hand side, we have multiple sub-menus to choose from
- Action - Clicking on it will show us the individual action type and any data it carries to the reducers. It has furthermore two three views - Tree view (summarizes the data into single lines), Chart view (shows the store tree, including all the reducers and their corresponding data branches), and Raw view (shows the action creator in a coded form).
- Diff - Shows only what that specific action changed in the state tree.
- State - Shows the entire state tree at the time of the action, which we have selected on the left-hand side of the console.
- Bottom side console tools - On the bottom side, we have tools like
- Inspector - Most used and default mode shows all the tools mentioned above.
- Log Monitor - Shows entire states and actions, compared to the Inspector mode, where it only shows the differences.
- Char - Shows the state in a tree-like structure.
Extension Options
In our redux store, i.e., here
We can pass an optional option parameter to the composeWithDevTools() method, which can be from any of the following options.
- name - It is a string value, which will be shown on the monitor page, its default value is document.title. If it is not specified, and there is also no title in our document, then it will consist of tabId and instanceId.
- actionCreators - It can be either an array or an object; they are basically the action creator functions that are to be available in the Dispatcher.
- latency - If more than one action is getting dispatched in the indicated time interval, all new actions will be collected and will be sent at once; when set to 0, all actions will be sent instantly, its default value is 500ms.
- maxAge - It is a Number whose value should be greater than 1; it is the amount of maximum allowed actions to be stored in the history tree. Once themaxAge limit is reached, the oldest actions from the history tree will be removed; its default value is 50.
- trace - It can be either a boolean or a function; if set to true, this will include a trace for every dispatched action, making it easy for us to see it in the trace tab.
- traceLimit - It is a number; it is the number of maximum trace frames to be stored, and its default value is 10.
- shouldRecordChange - It is a boolean; if made false, it will not record any changes until we click the Start Recording button; the default value is true.
- pauseActionType - It is a string value, which, if specified, then whenever the Pause Recoding button will be clicked, it will add this action type, else will commit when paused, and the default value is @@PAUSED.
- shouldStartLocked - It is a boolean value, which, if specified as true, will not allow any non-monitor actions to be dispatched till clicking on Unlock changes button.
- shouldCatchErrors - It is a boolean value, which, if specified true, and whenever there is some exception in the reducer, the monitor will show the error message and will not dispatch subsequent actions.
Extension Methods
We also have some methods for the redux devtools extension that we have installed, which we can use in our program as per the need.
- connect() - The connect() method accepts an object from the options we discussed above and returns another object which contains the following methods.
- subscribe(listener) - It adds a change listener, it will be called anytime an action is dispatched from the monitor. It returns a function to unsubscribe the current listener.
- unsubscribe() - Unsubscribes all listeners.
- send(action, state) - Sends a new action and state manually, to be shown in the monitor; if the action is passed as null, then we suppose we sent liftedState.
- init(state) - Sends the initial state to the monitor.
- error(message) - Sends the error message to be shown in the extension's monitor.
- disconnect() - It removes extension listeners and disconnects the extension's background script connection. Along with this, we can just use the unsubscribe() method from the above connect() method to achieve the same functionality.
- send(action, state, [options, instanceId]) - Sends a new action and state manually to be shown in the monitor. It is advised to use the send() method of the connect() method we discussed above to do this task, but we can use it directly also if we want to hook into an already created instance.
- listen(onMessage, instanceId) - listens for messages dispatched for a specific instanceId. However, it is advised to use the subscribe() method inside the connect() method to achieve this functionality.
- open(position) - Opens the extension window; this should depend on whether you want to open the extension window automatically. It accepts a position string value, which can be either of left, right, or bottom, its default value is left.
- notifyErrors(onError) - When called, the extension will listen for uncaught exceptions on the page. Optionally, we can provide a function to be called when an exception occurs. It accepts a parameter onError, which is the function we want to call when there is an exception.
Turn Learning into Career Growth
Remote Monitoring
Through @redux-devtools/cli, we can remotely connect to any remote application. So let's see how we can do that.
1. Connecting to the Websocket Server
The client driver provides us with a way to connect to the server via WebSockets. Here we are using socketCluster for real-time communication, which provides a fast and scalable web-socket layer. We need to include one of its clients in our application to communicate with the RemotedevServer. By default, the WebSocket server is running on ws://localhost:8000/socketcluster/.
2. Disconnecting and Reconnecting
The socketCluster handles the reconnecting for us, but still, if we want to know when the connection was established or when it failed to connect, we can do it this way,
3. Authorizing and Subscribing to Channel of Events
Till now, we are not providing any authorizing mechanism. To do that, all we need to do is to emit a login event, and we will get a channelName that we should subscribe to and can watch for messages and events.
4. Sending the Action and State to the Monitor
We can use log or log-noid channels to send our data to the monitor; the log-noid will also add the socket id to the to-be-sent message from the server side; it is helpful when the message was sent before the connection was established.
5. Listening to Monitor Events
When a monitor action is emitted, we get an event on the subscribed function.
Conclusion
- Redux devtools is a development time package that provides us with an easy way to work with our redux-based react applications.
- To accompany it, we also have a browser extension to increase and manifold its functionalities.
- It basically eases our working by letting us visualize how a redux application works under the hood.
- i.e. how the stores work, how actions are fired, how middlewares are used etc.
- We can simply add the redux-devtools extension in our preferred browser and can work with it; along with it, we might need to install the required package into our application as well.
- In our redux store, we can specify various different options in the composeWithDevTools() method to enhance our work.
- We also have several extension methods like connect(), disconnect(), listen() etc. which we can use in our application.
- We can also perform remote monitoring of applications using the redux devtools.