Integrating Redux with React
Overview
React is one of the most popular front-end frameworks in today’s industry. Be it a big industry like Netflix, Facebook, or small start-ups everyone uses React. And Redux in React is the go-to for every developer when it comes to state management in React. The bigger the application the more beneficial it is to use Redux. Reducers in Redux are the main component that handles state management efficiently.
Getting Started with Redux in React
Let’s take a look at what Redux in React is.
Redux is a State Management tool used for JavaScript applications. This is a very well-known tool for managing states using a centralized store known as Redux Store. This can be easily used with React apps.
These three main tenets form the foundation of Redux:
- A single state object known as the state or state tree houses all of the app's data.
- States in Redux is read-only. Only sending an action to the store will modify it.
- A function that accepts the current state and the desired action must be written in order to explain state changes. A newly updated state, not a tweaked version of the current state, must be returned by the function. Reducers are the term for these operations.
Installation
Let’s take a look at how the installation of Redux in React is done. First, we will take a look at how it is done in a completely new React project, then we shall see how it is done in an existing React project.
Creating a new React project and installing Redux in React
-
First, we need to create a new React project using the following line of code:
-
Then enter the folder using cd as follows:
-
Then install redux and react-redux as follows:
Note: If there is any error installing the two together then install them one by one as follows:
Once, the installation of redux is complete, then go for the installation of react-redux
We are now good to get started with a brand new project which supports Redux in React!
Installing Redux in an existing React project
You might have guessed it. If the React app is already created then we can simply get into the project folder and install redux using step 3 as above! Simple, right?
Why Use Redux in React?
State management in React could be easily done with props as you might know. The technique is known as prop drilling. Let’s take a simple example first.
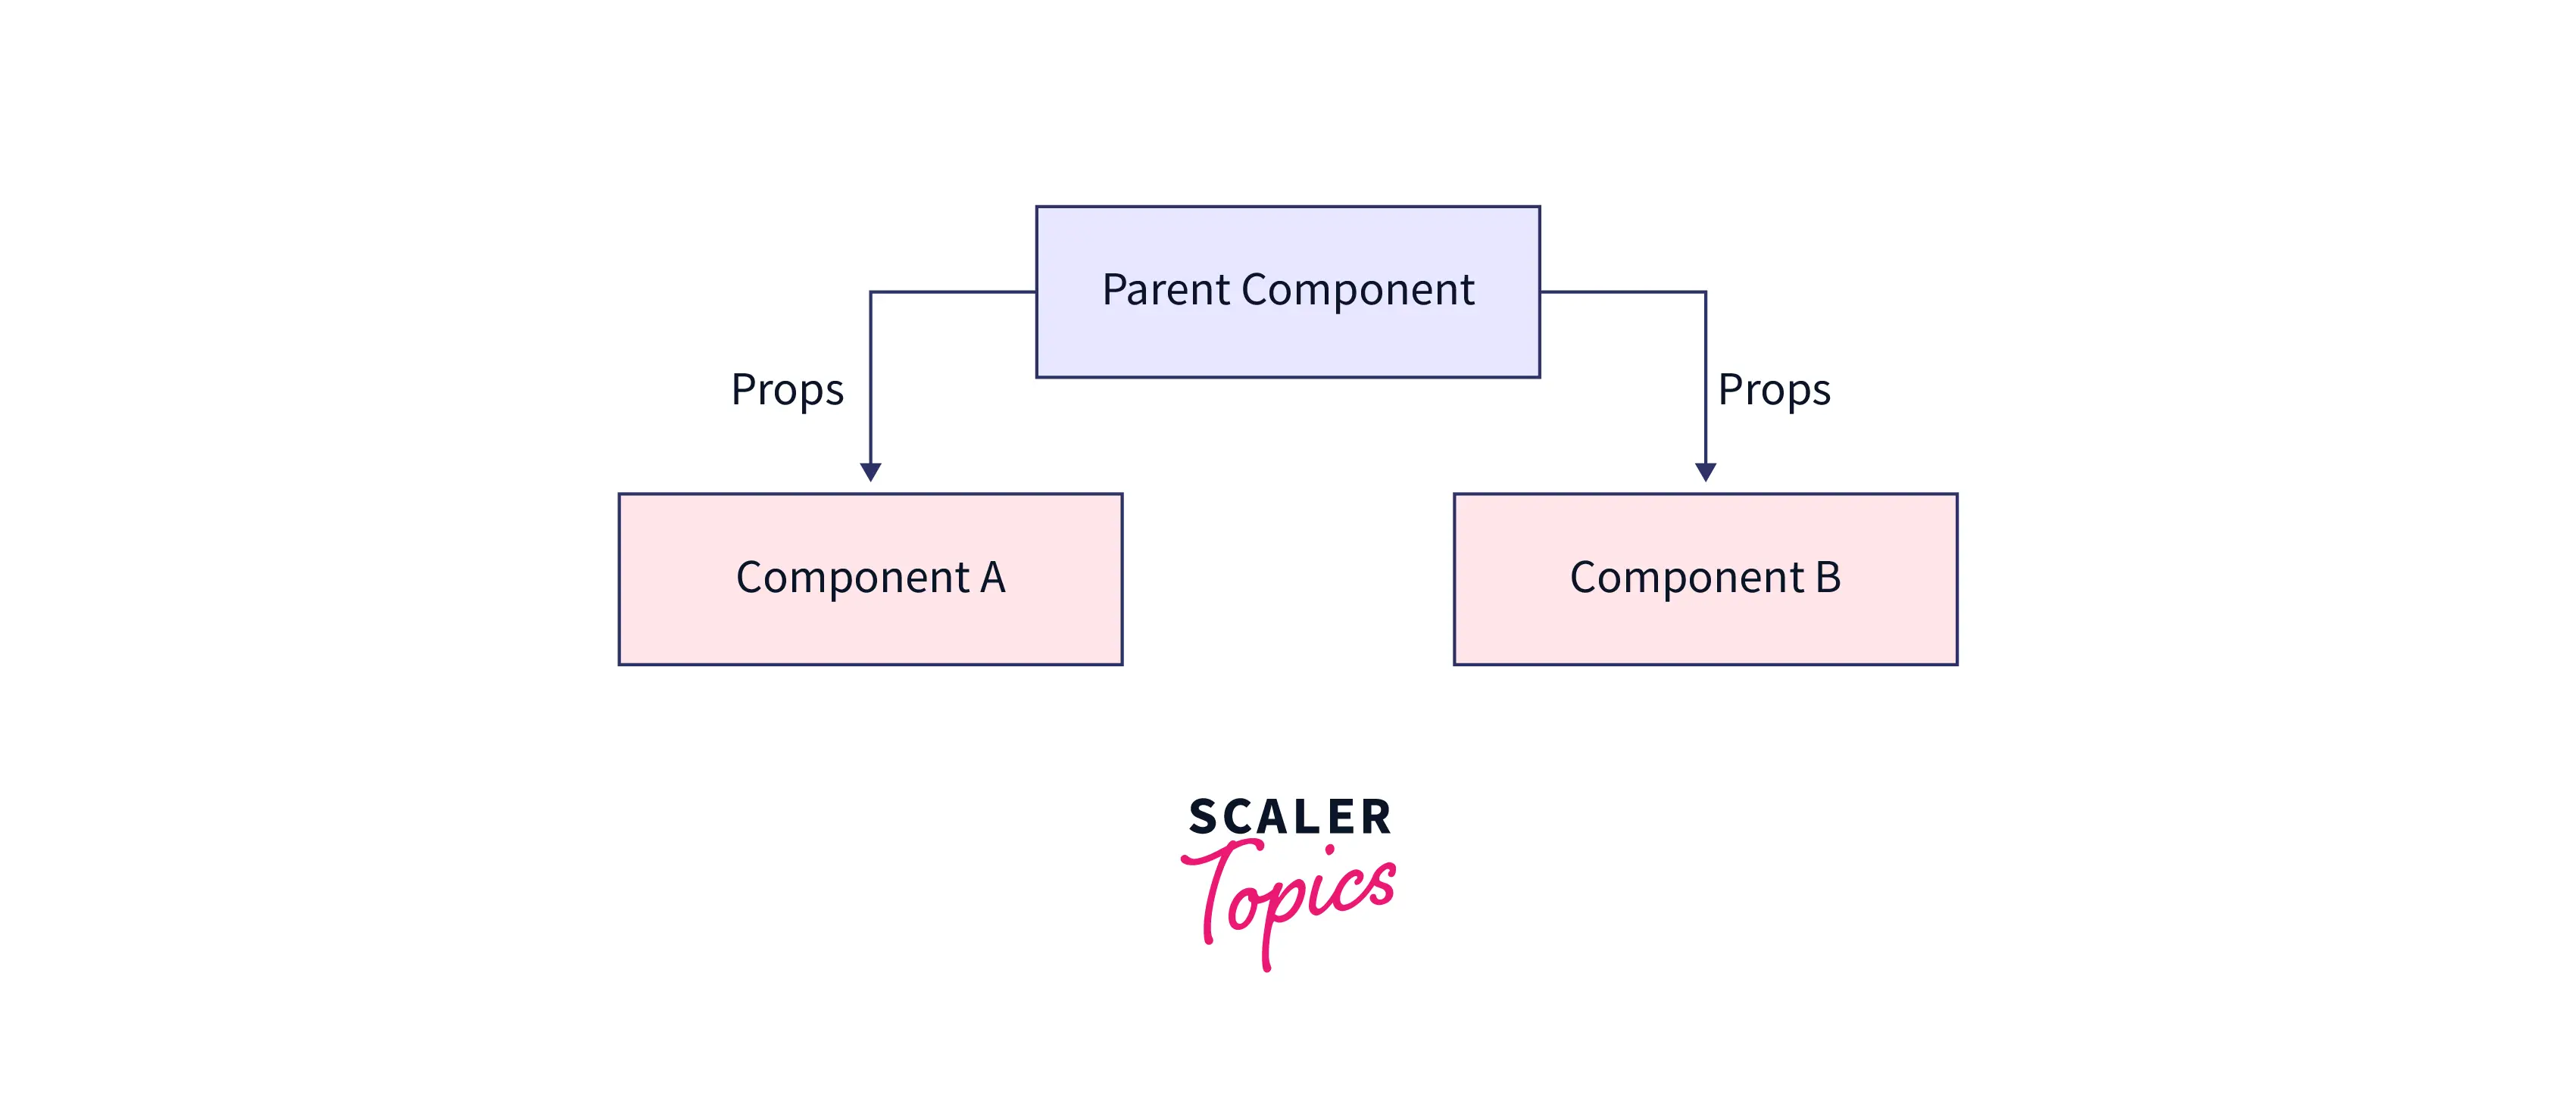
A good illustration of React's unidirectional data flow is this. Through read-only characteristics known as "props," the parent component in this illustration gives the child components a snapshot of its current state. The data given down from the "Parent Component" is shared by "Component A" and "Component B." The next instance demonstrates where the problems start.
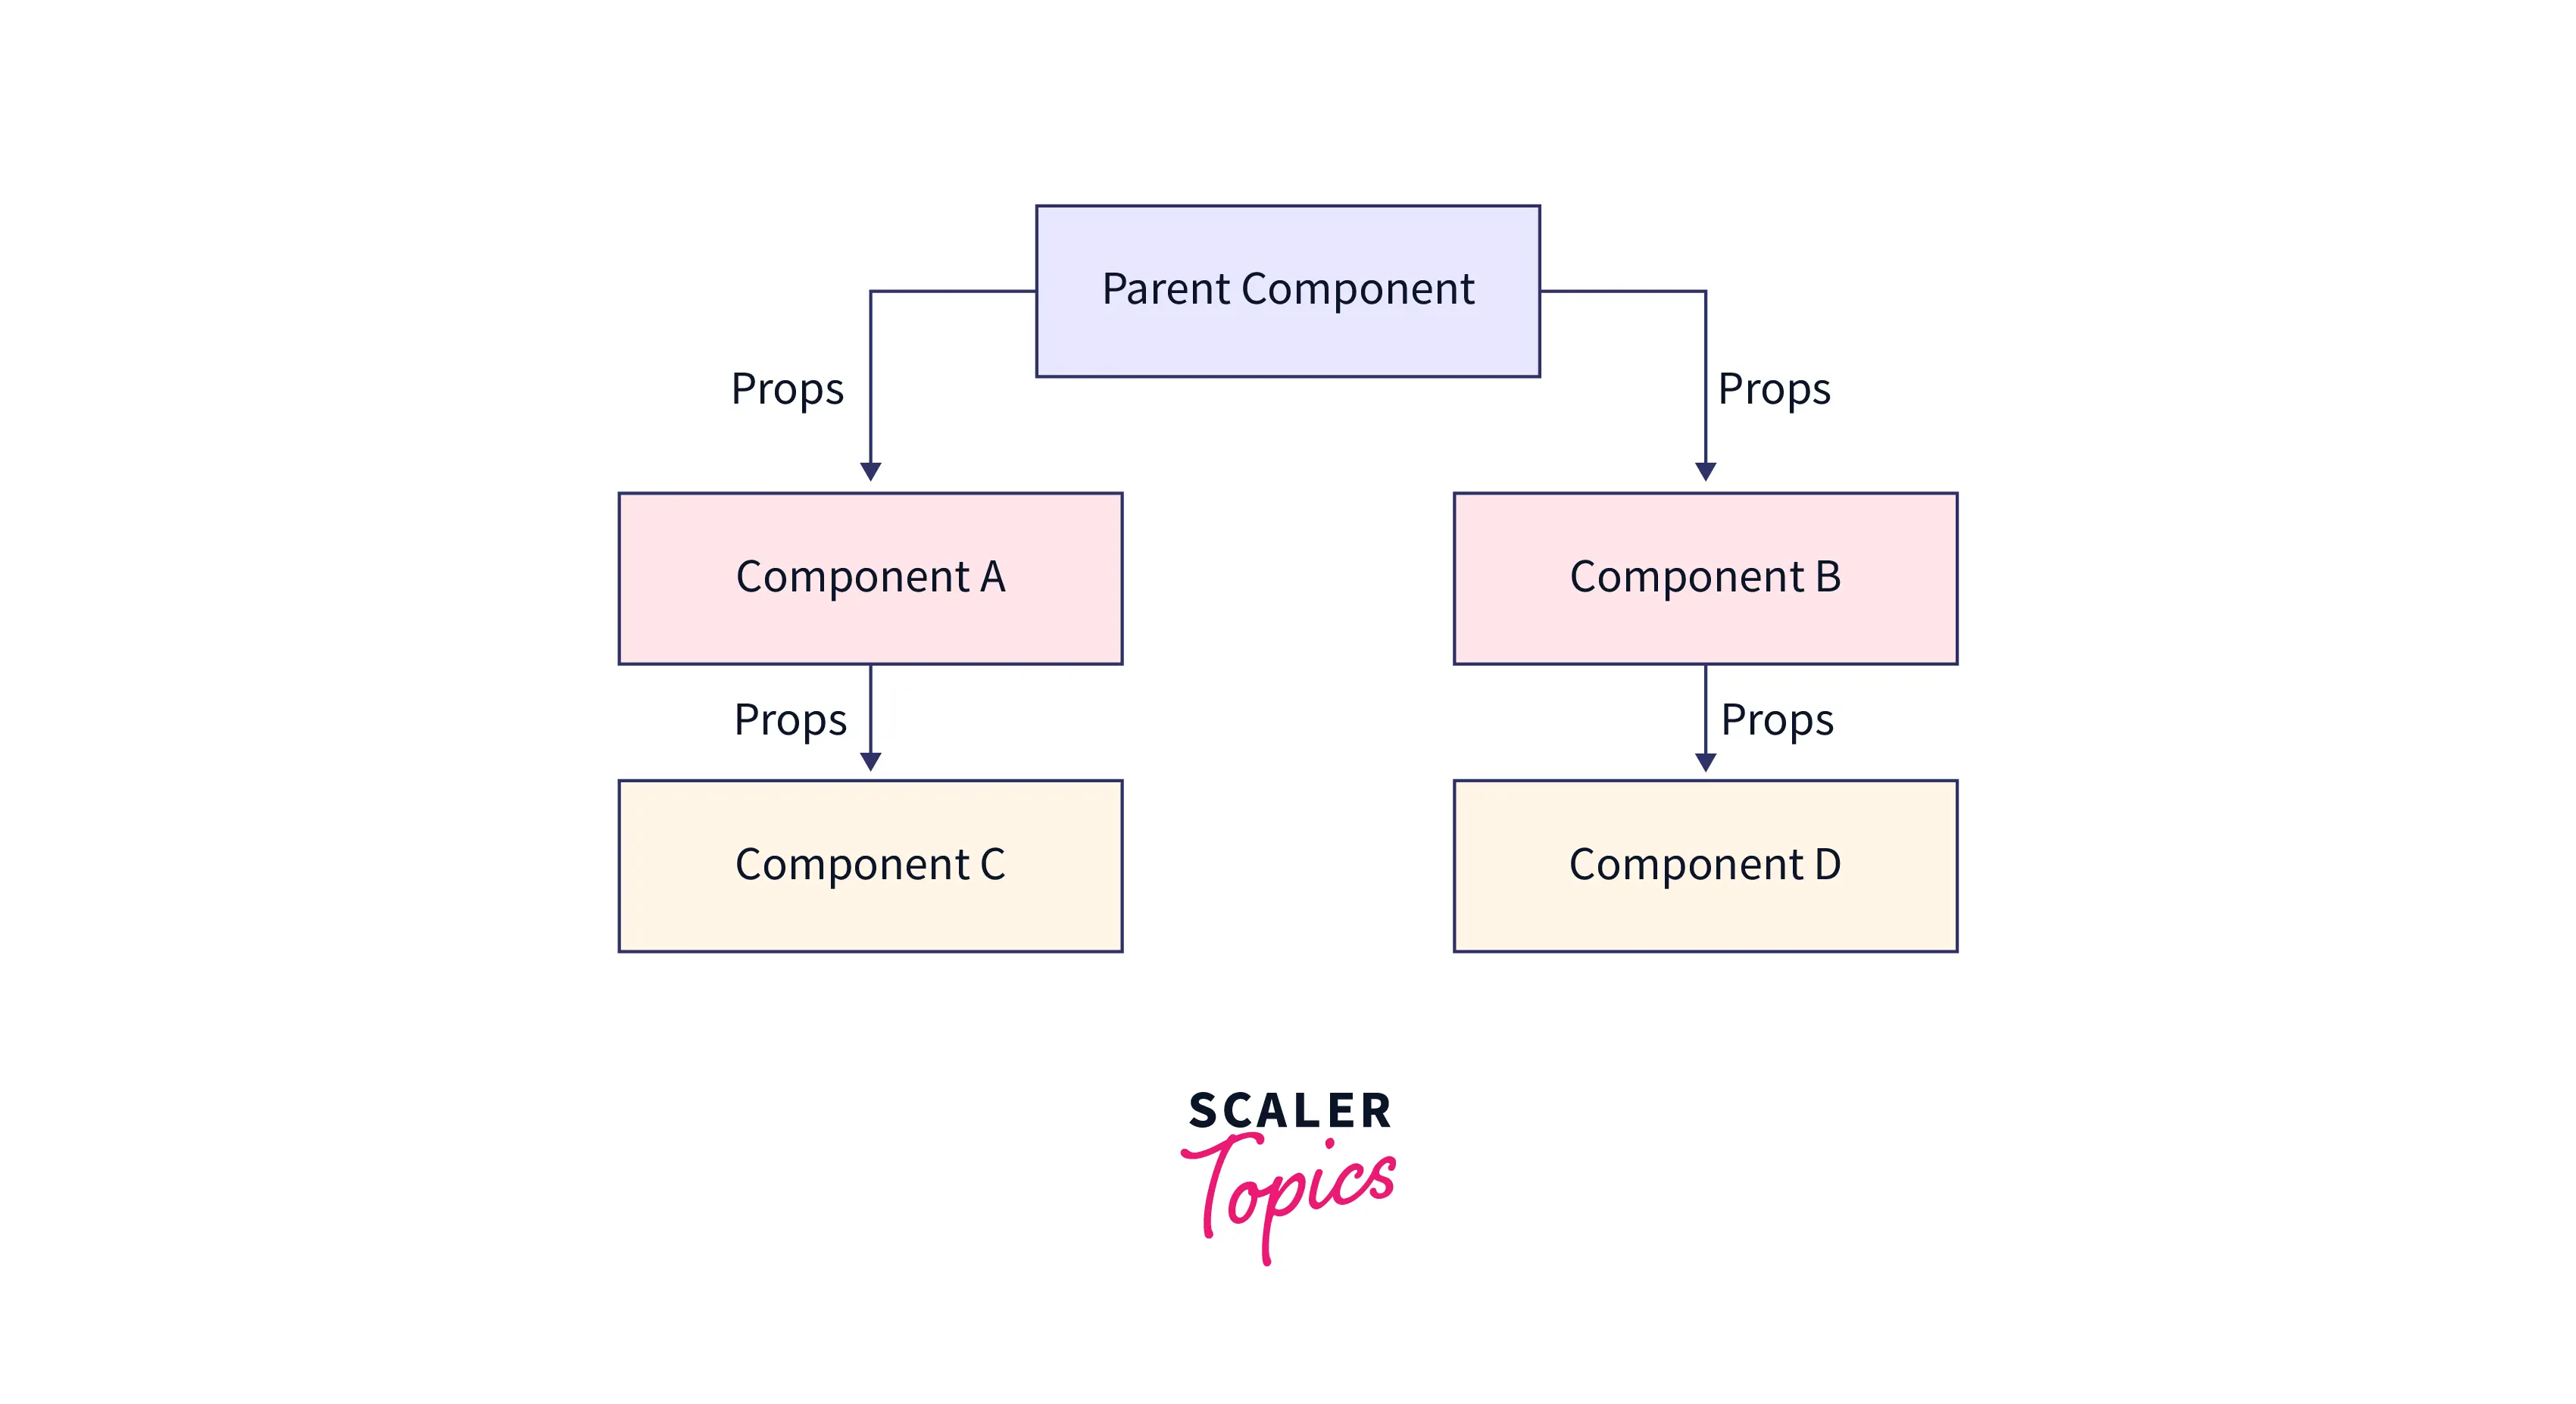
What direction is this moving in? Not even necessarily huge projects using React frequently experience this. If Component C and Component D require the same data, you must send it from Parent Component, which is also their closest common ancestor. The data passes through several tiers of intermediary parts before arriving at some of them, which might not even require the data.
This method of data transmission can cause a lot of problems. You are unable to freely move any component in this structure since every component is currently closely connected. The performance of your app may also be impacted because every state modification necessitates a re-rendering of all child components. It is time-consuming and frequently frustrating to have to rewrite the code of numerous components to set up the data flow from top to bottom of the tree if two components need the same data.
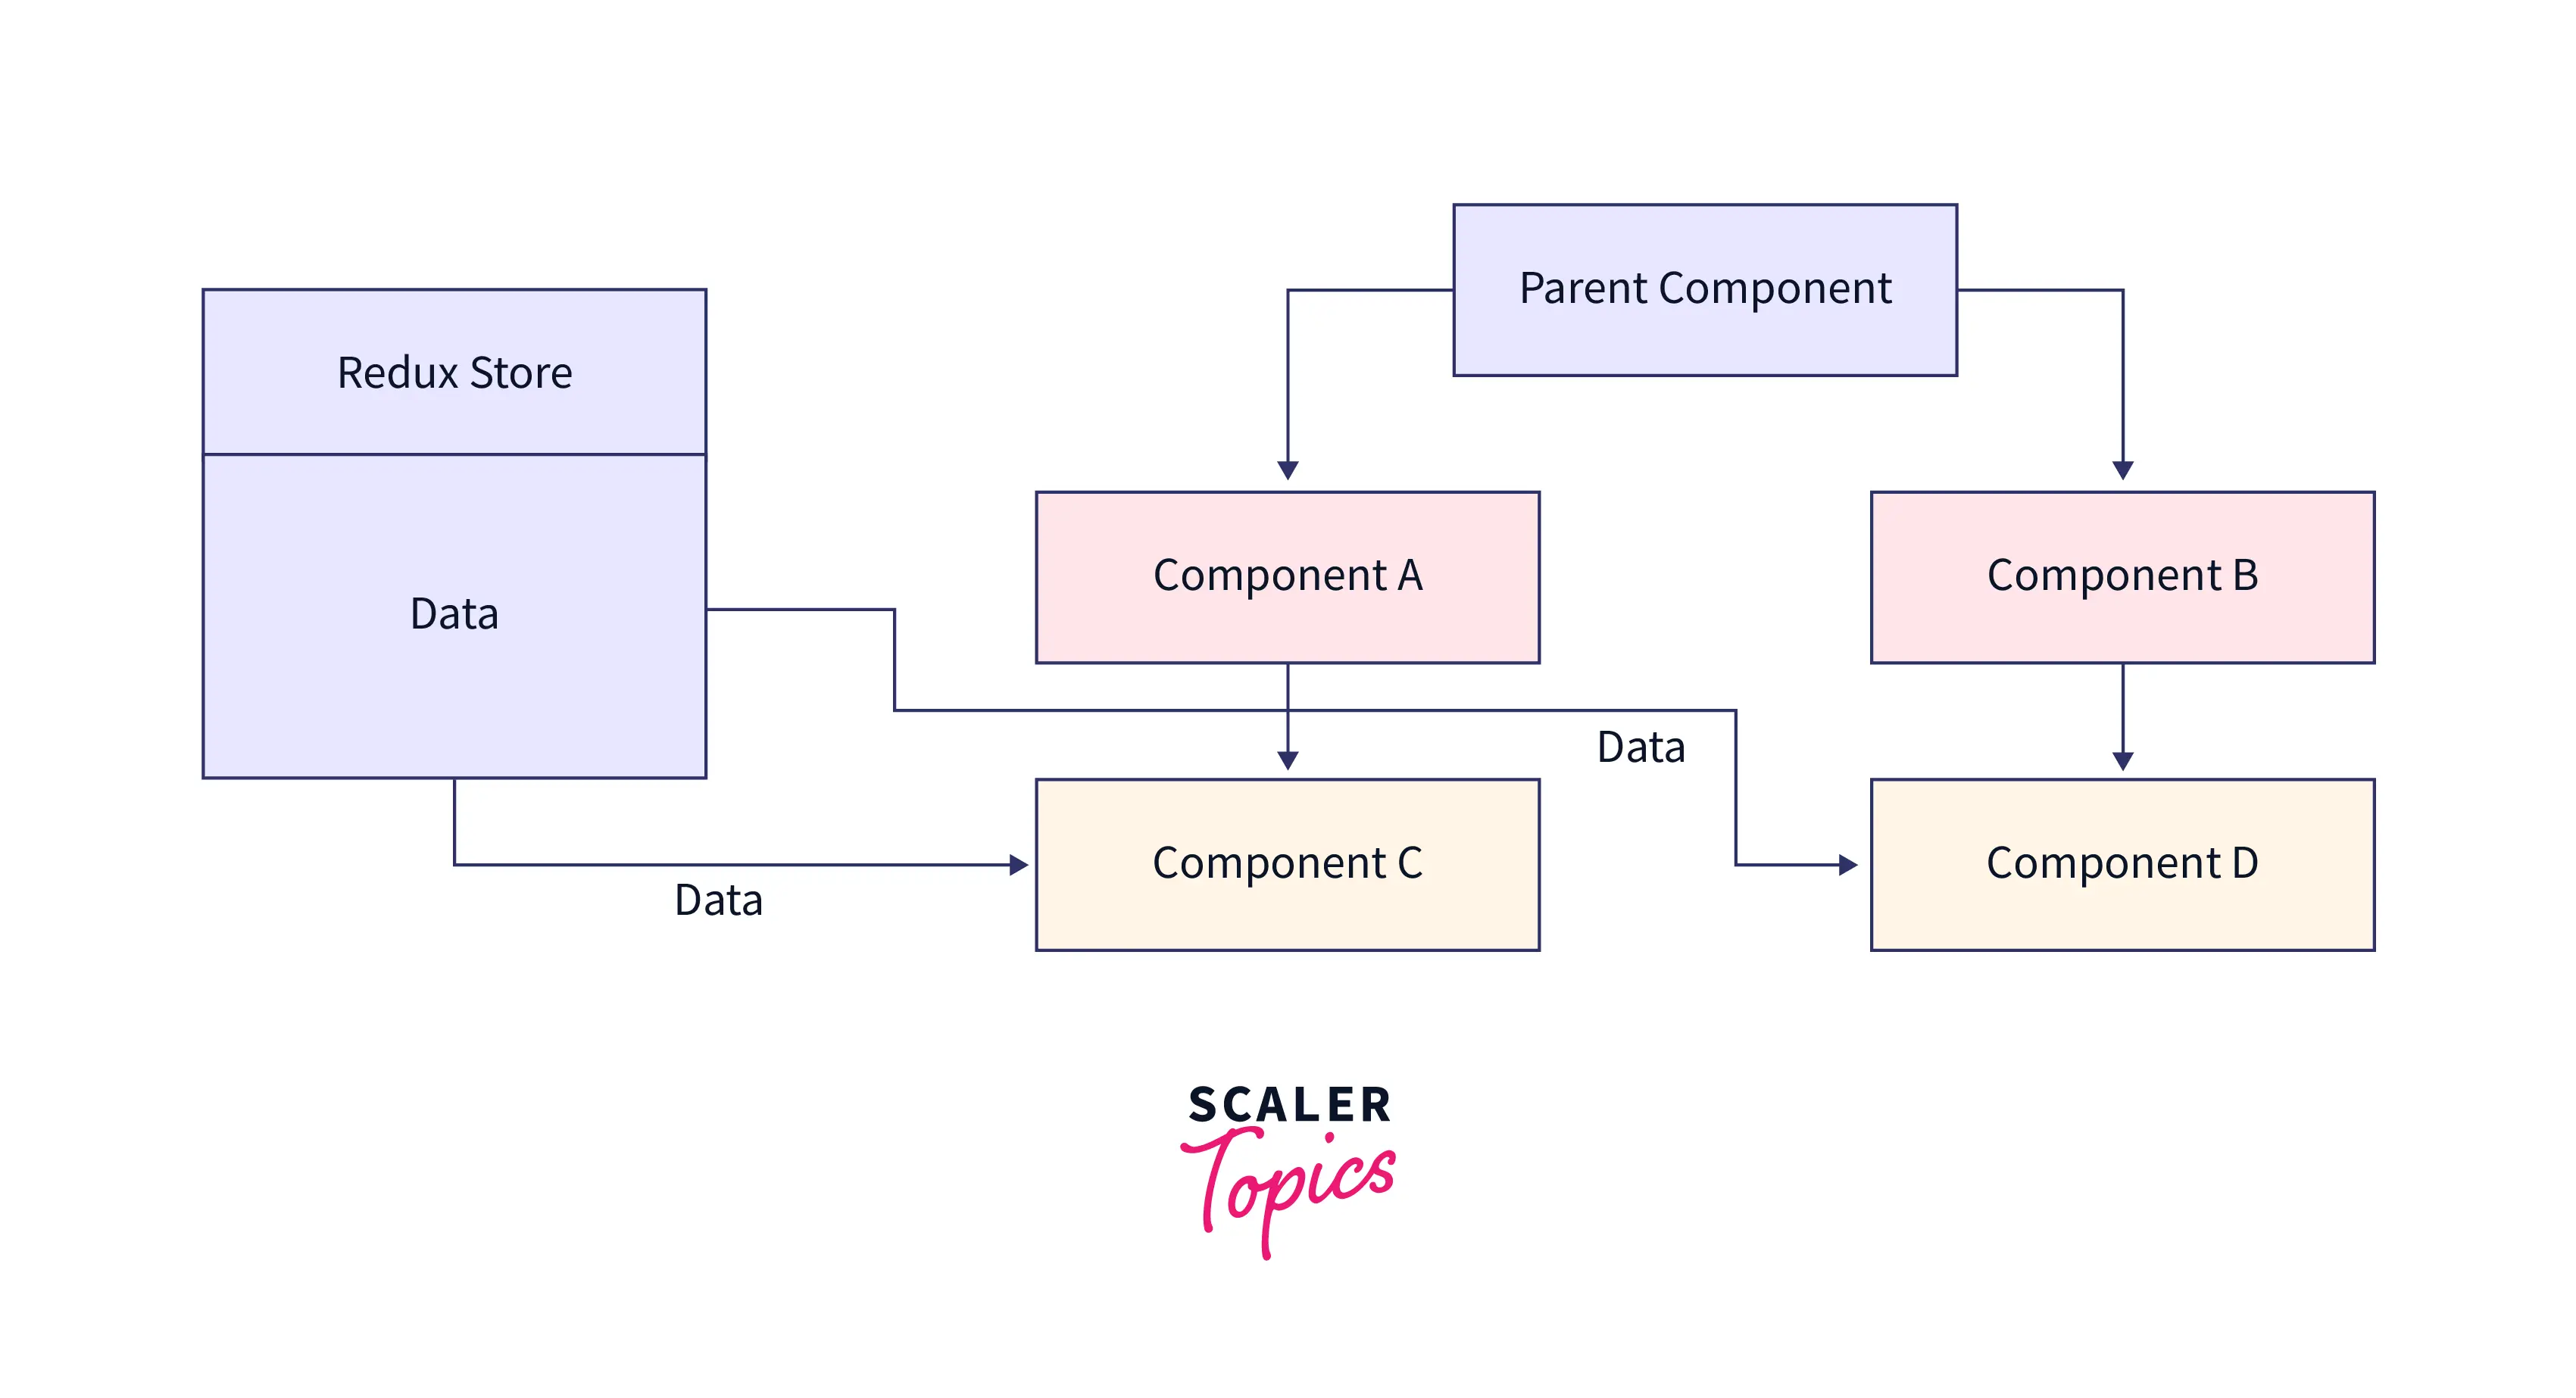
Here Redux comes into play. For JavaScript applications, Redux is a predictable state container. You may use it to create applications that function consistently, work in client, server, and native contexts, and are simple to test. Redux uses a single Store global object to control an application's state.
- Redux is a tool for managing states.
- Any JavaScript framework or library can utilize Redux.
- Redux saves the application's state, and its components may access it through a state store.
Redux Architecture
MVC, which stands for Model, View, and Controller, is now one of the most well-liked and often-used design patterns. In MVC, the application model is built using the raw data. The logic takes the raw input and transforms it into functions that manage the application's state. The Redux architecture conforms to the flowchart below based on the mechanism.
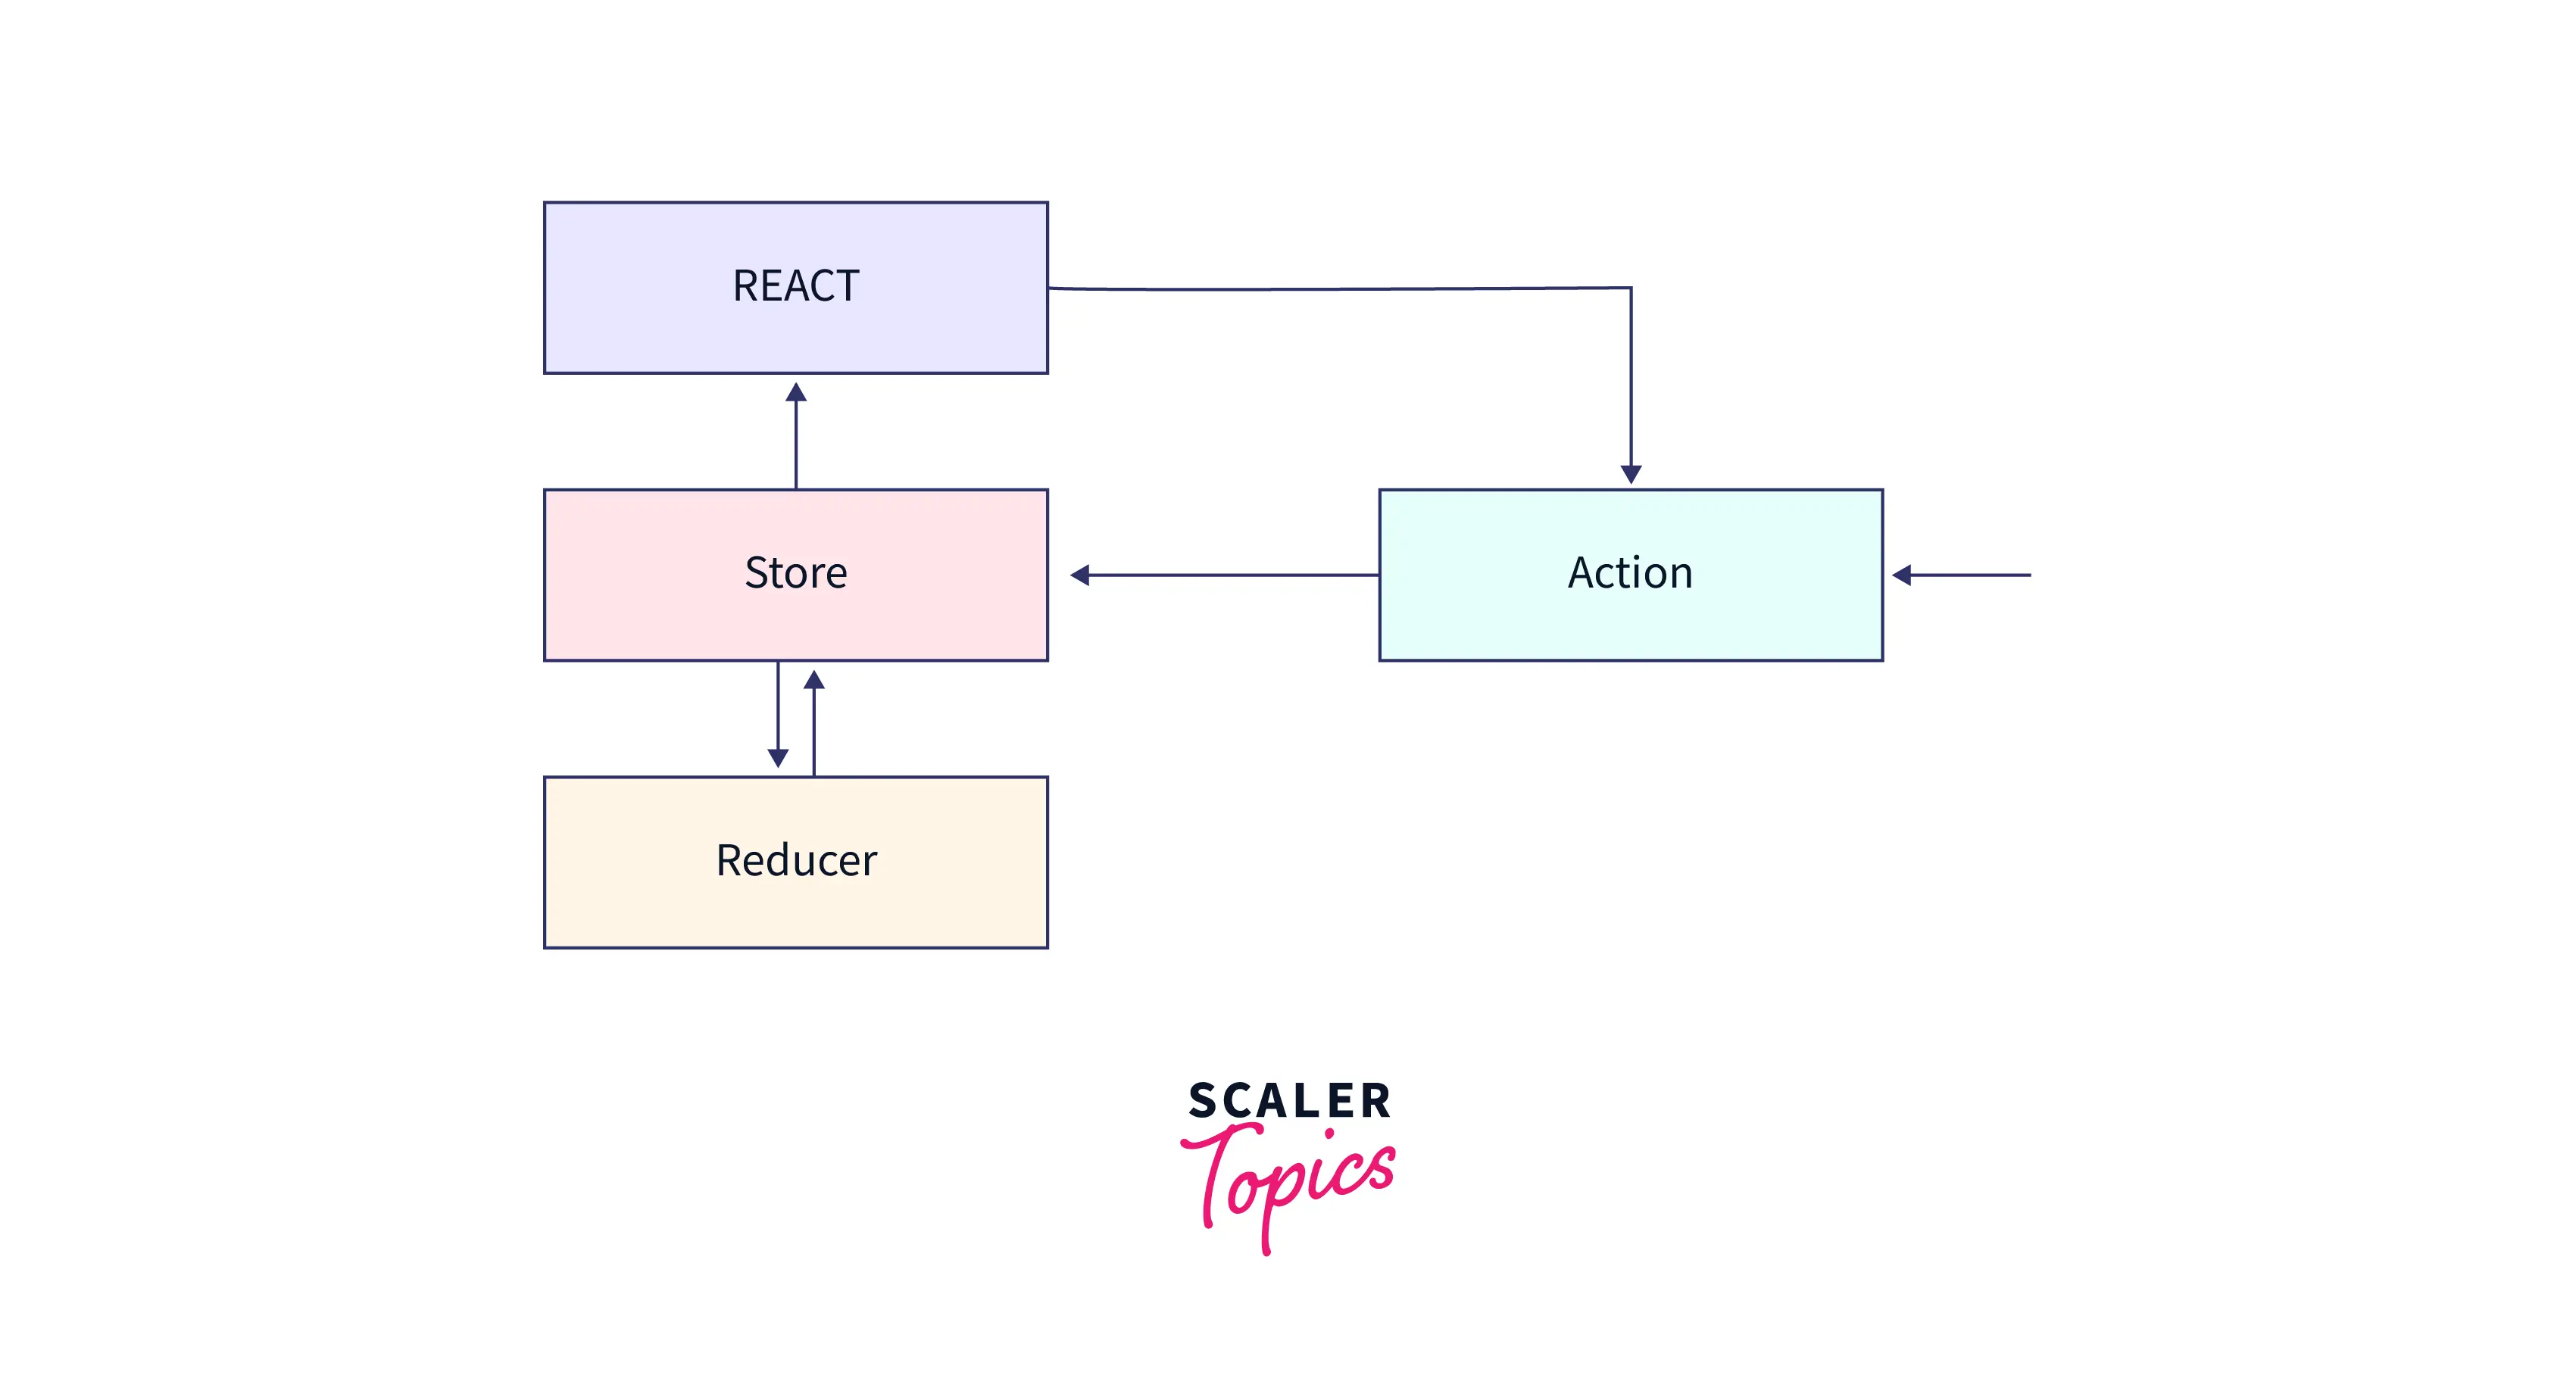
The flutter architecture is virtually identical to redux, and both are derived from it. Redux, a library, functions as a state container and aids in controlling an application's data flow. All React components may subscribe to Redux's store, which is one of the two biggest enhancements it provides. The modifications to the state of your application will be determined by a reducer inside that store.
Creating a New ReactJS Based Project and Adding Redux to it
In this example, we will make a simple Counter, where we will have a value that we can increase or decrease using buttons.
Installations
First things first, let’s create a new React Project using the create-react-app command. After that is done we will enter the directory and install React Redux as follows.
npm install redux react-redux
You will require these three items to use Redux:
-
Actions: These objects should have two properties: one indicating the sort of action to be taken, and the other specifying the changes that should be made to the app state.
-
Reducers: These are the functions that put the actions' behavior into practice. Based on the description of the action and the description of the state change, they alter the app's state.
-
Store: There is just one store, and it connects the actions and reducers, holding and altering the state for the entire program.
Transform Your Career
Choose from our industry-leading programs designed for career success
Modern Software and AI Engineering Program
Master full-stack development with AI integration

Modern Data Science and ML with specialisation in AI
Advanced data science techniques with AI specialization
Advanced AIML with Specialisation in Agentic AI
Deep dive into AIML with focus on Agentic systems
DevOps, Cloud & AI Platform Engineering
Build and manage AI-powered cloud infrastructure
AI Engineering Advanced Certification by IIT-Roorkee
Premier AI engineering certification from IIT-Roorkee
Project Structure
Let’s arrange the Project Structure properly so that it is easy to maintain. Inside the src, we will add two new folders:
- components folder
- store folder
Inside components we will have all our components for the application.
Inside store we will have three files:
- action-types.js: this will contain all the possible types of actions that can take place in our application.
- action-creators.js: we’ll define our action creators. As you may remember, actions are plain JavaScript objects that describe what happens in our application.
- reducers.js: we define our app’s initial state and our reducer.
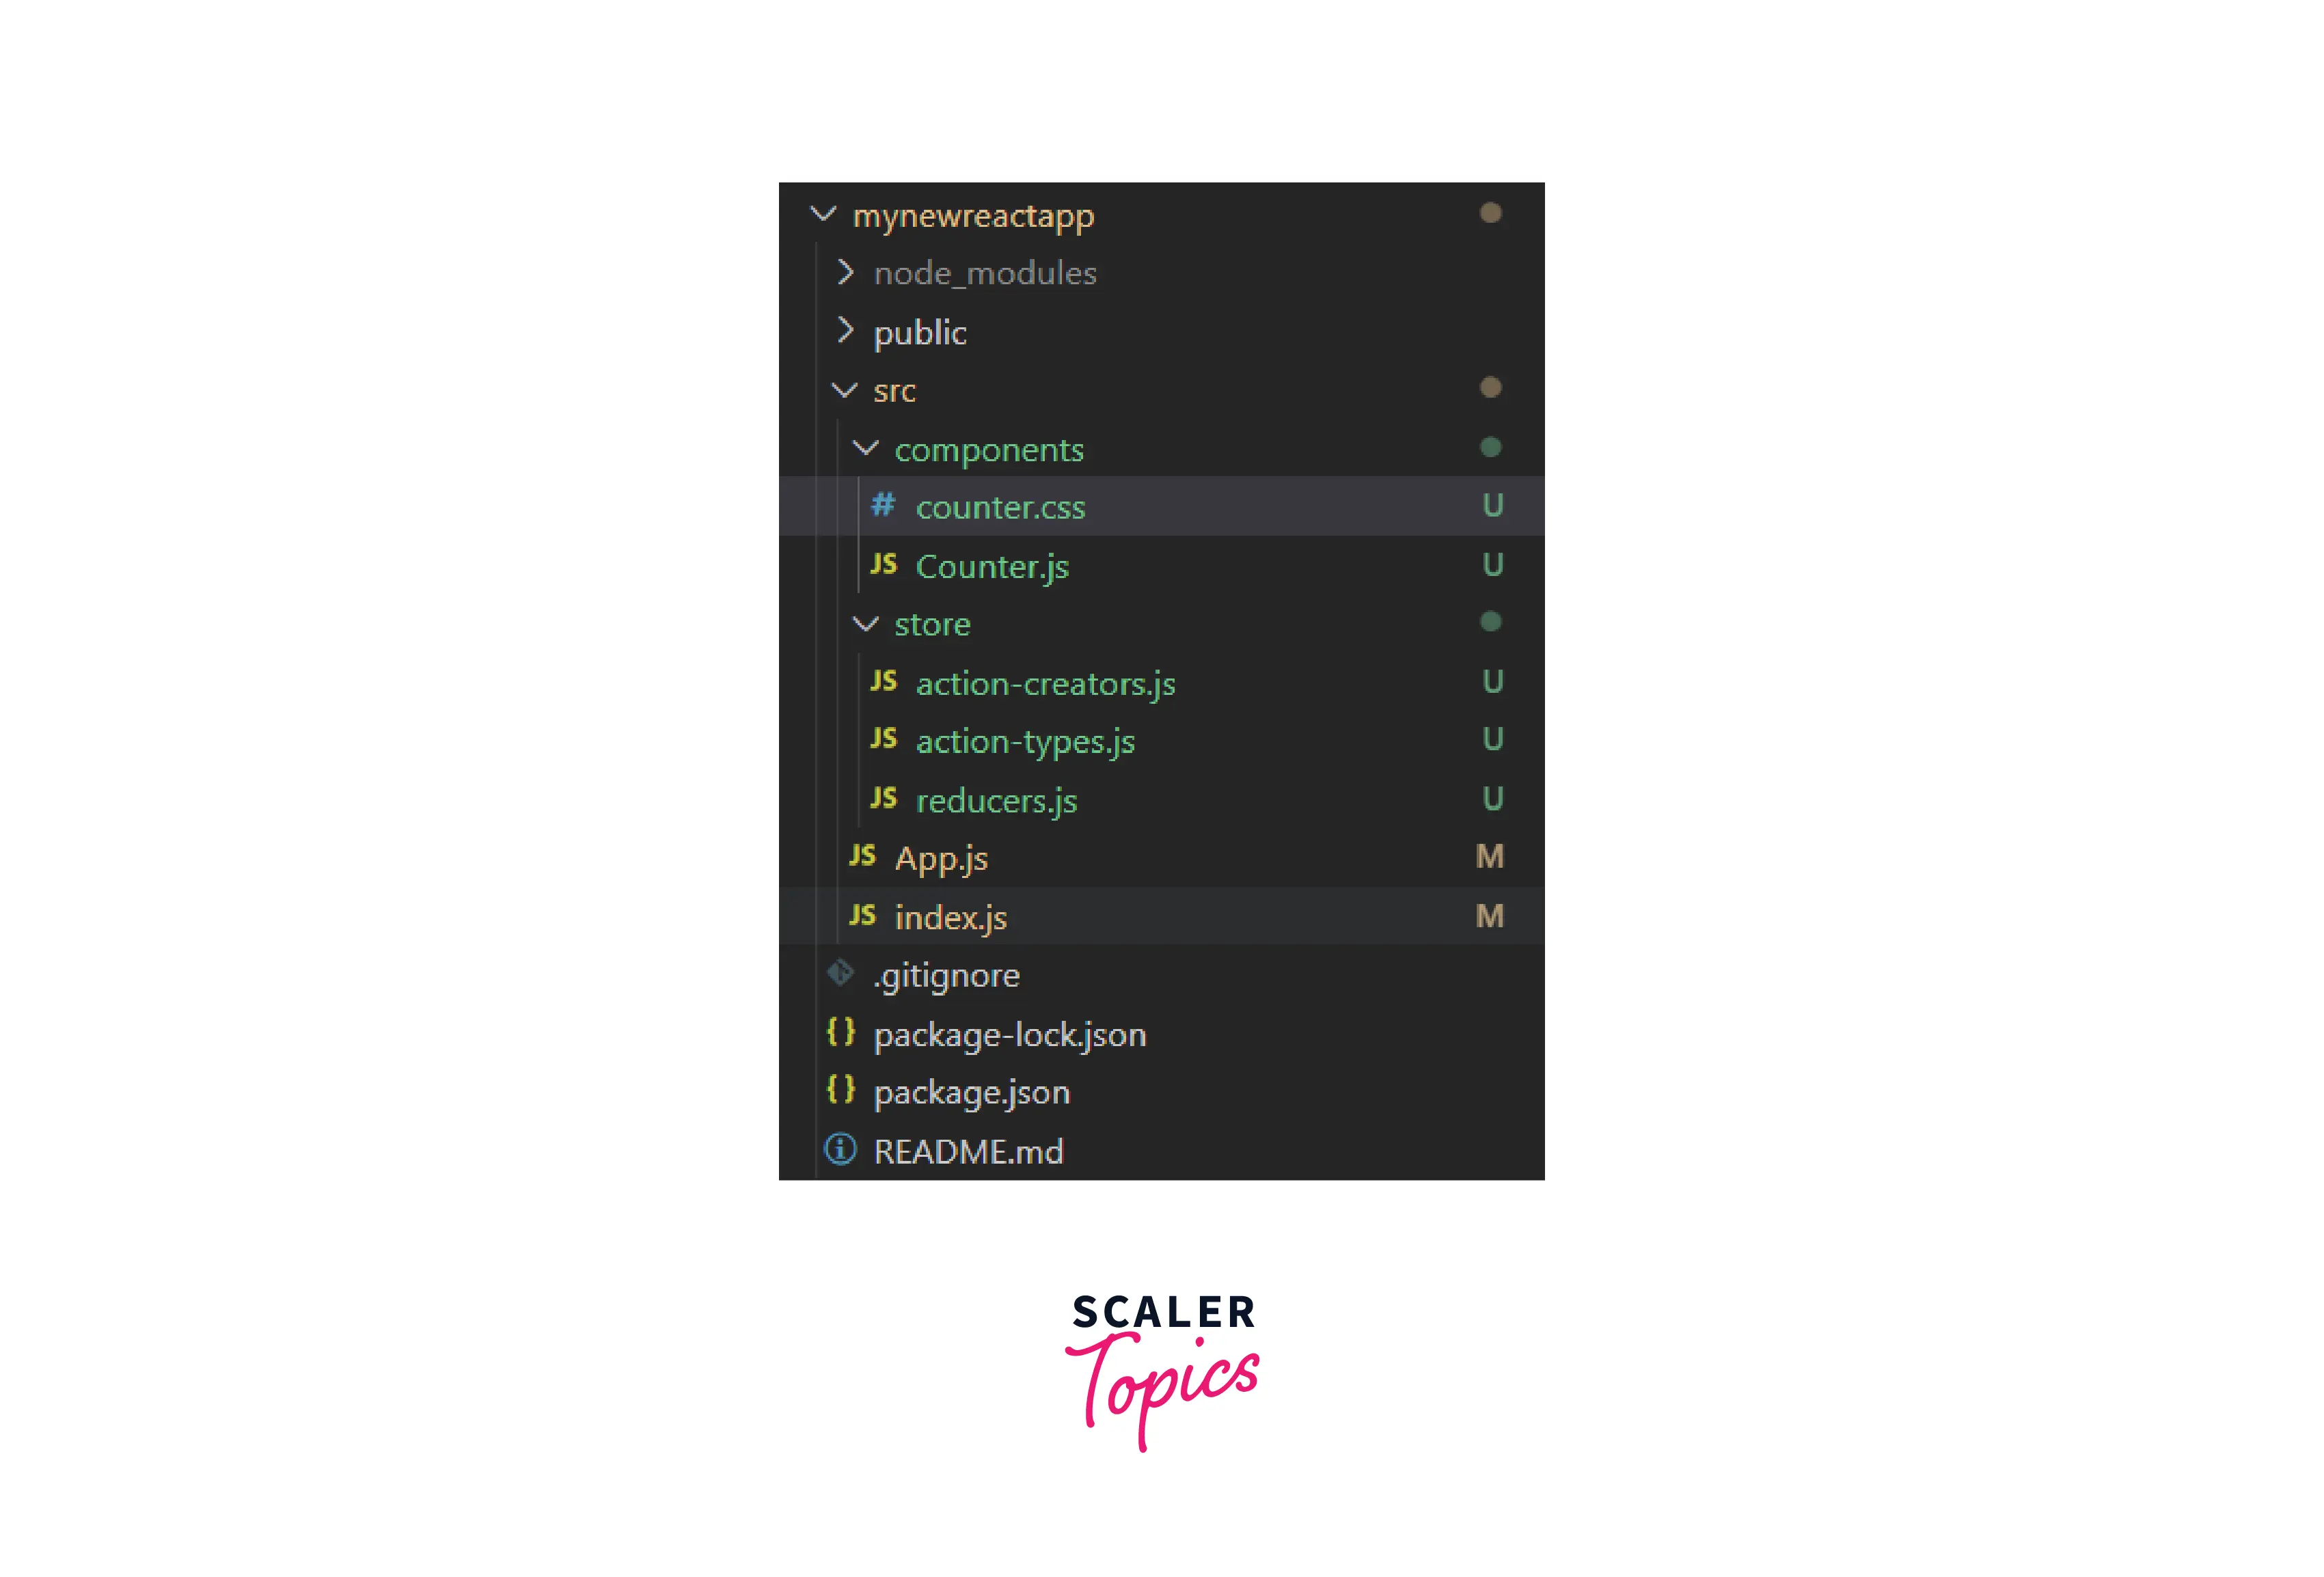
This is how things will look inside the project directory once we are done setting it up.
Now, let’s get started with some codes! Time to get your hands dirty!
Action
action-types.js:
First, let’s define the actions that can occur in action-types.js. In our case, we will have only two, increase and decrease.
action-creator.js:
Now, let’s define our action creators.
As you can see, these functions are typical ones that produce objects (actions) having a type attribute. Depending on the action types in our reducers, we'll take different actions. Only the type attribute is required and is sufficient for our example, but actions would contain extra data in more complex applications.
Reducers
We will be defining our reducers along with our app’s initial state here.
Every time an action is sent in a Redux application, redux calls each reducer, sending the current state as the first parameter and the most recent action as the second parameter. One reducer will be used in our straightforward app. Here, we take three alternative actions based on the type of action:
- Bring back a new state with a higher counter value.
- New state with a lower counter value returned
- Restore the previous state.
Simple, yes? Observe that the only language used thus far in these files is JavaScript; neither Redux nor React-Redux have been imported.
Building the Counter Component
Let us now build the counter component in the counter.js file.
Presentational component CounterComponent calls handleIncrement or handleDecrement on button clicks and displays the current counter.
The function mapStateToProps accepts the parameter state. We get "state.counter" using ES6 destructuring, and the object we provide translates the required piece of state to the properties of the component.
Our action creators are mapped to the props of the component using an object called mapDispatchToProps.
Next, we send our CounterComponent and the linked component to connect, which produces a new function that will accept both of them. Observe how to connect handles access to the store for us behind the scenes so that our component doesn't have direct access to it.
Connecting Redux and React
Now is the moment to merge Redux with React. Go to src/index.js and add the following code to its existing content:
Our app's entrance point is this. There are some adjustments we're making. By providing our reducer to the createStore method, we can create our store. The App component is then enclosed in a Provider component, making the store accessible to our React app.
And of course, you are free to use your own creativity in the counter.css file to stylize your Counter app using Redux in React.
Final Output
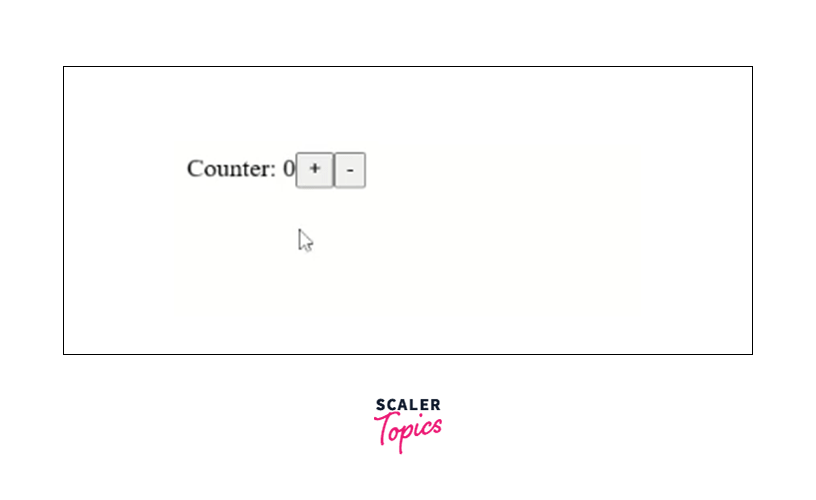
That's it, we have learned how to use Redux in React using this simple Counter application as an example. Let's now jump into something very real.
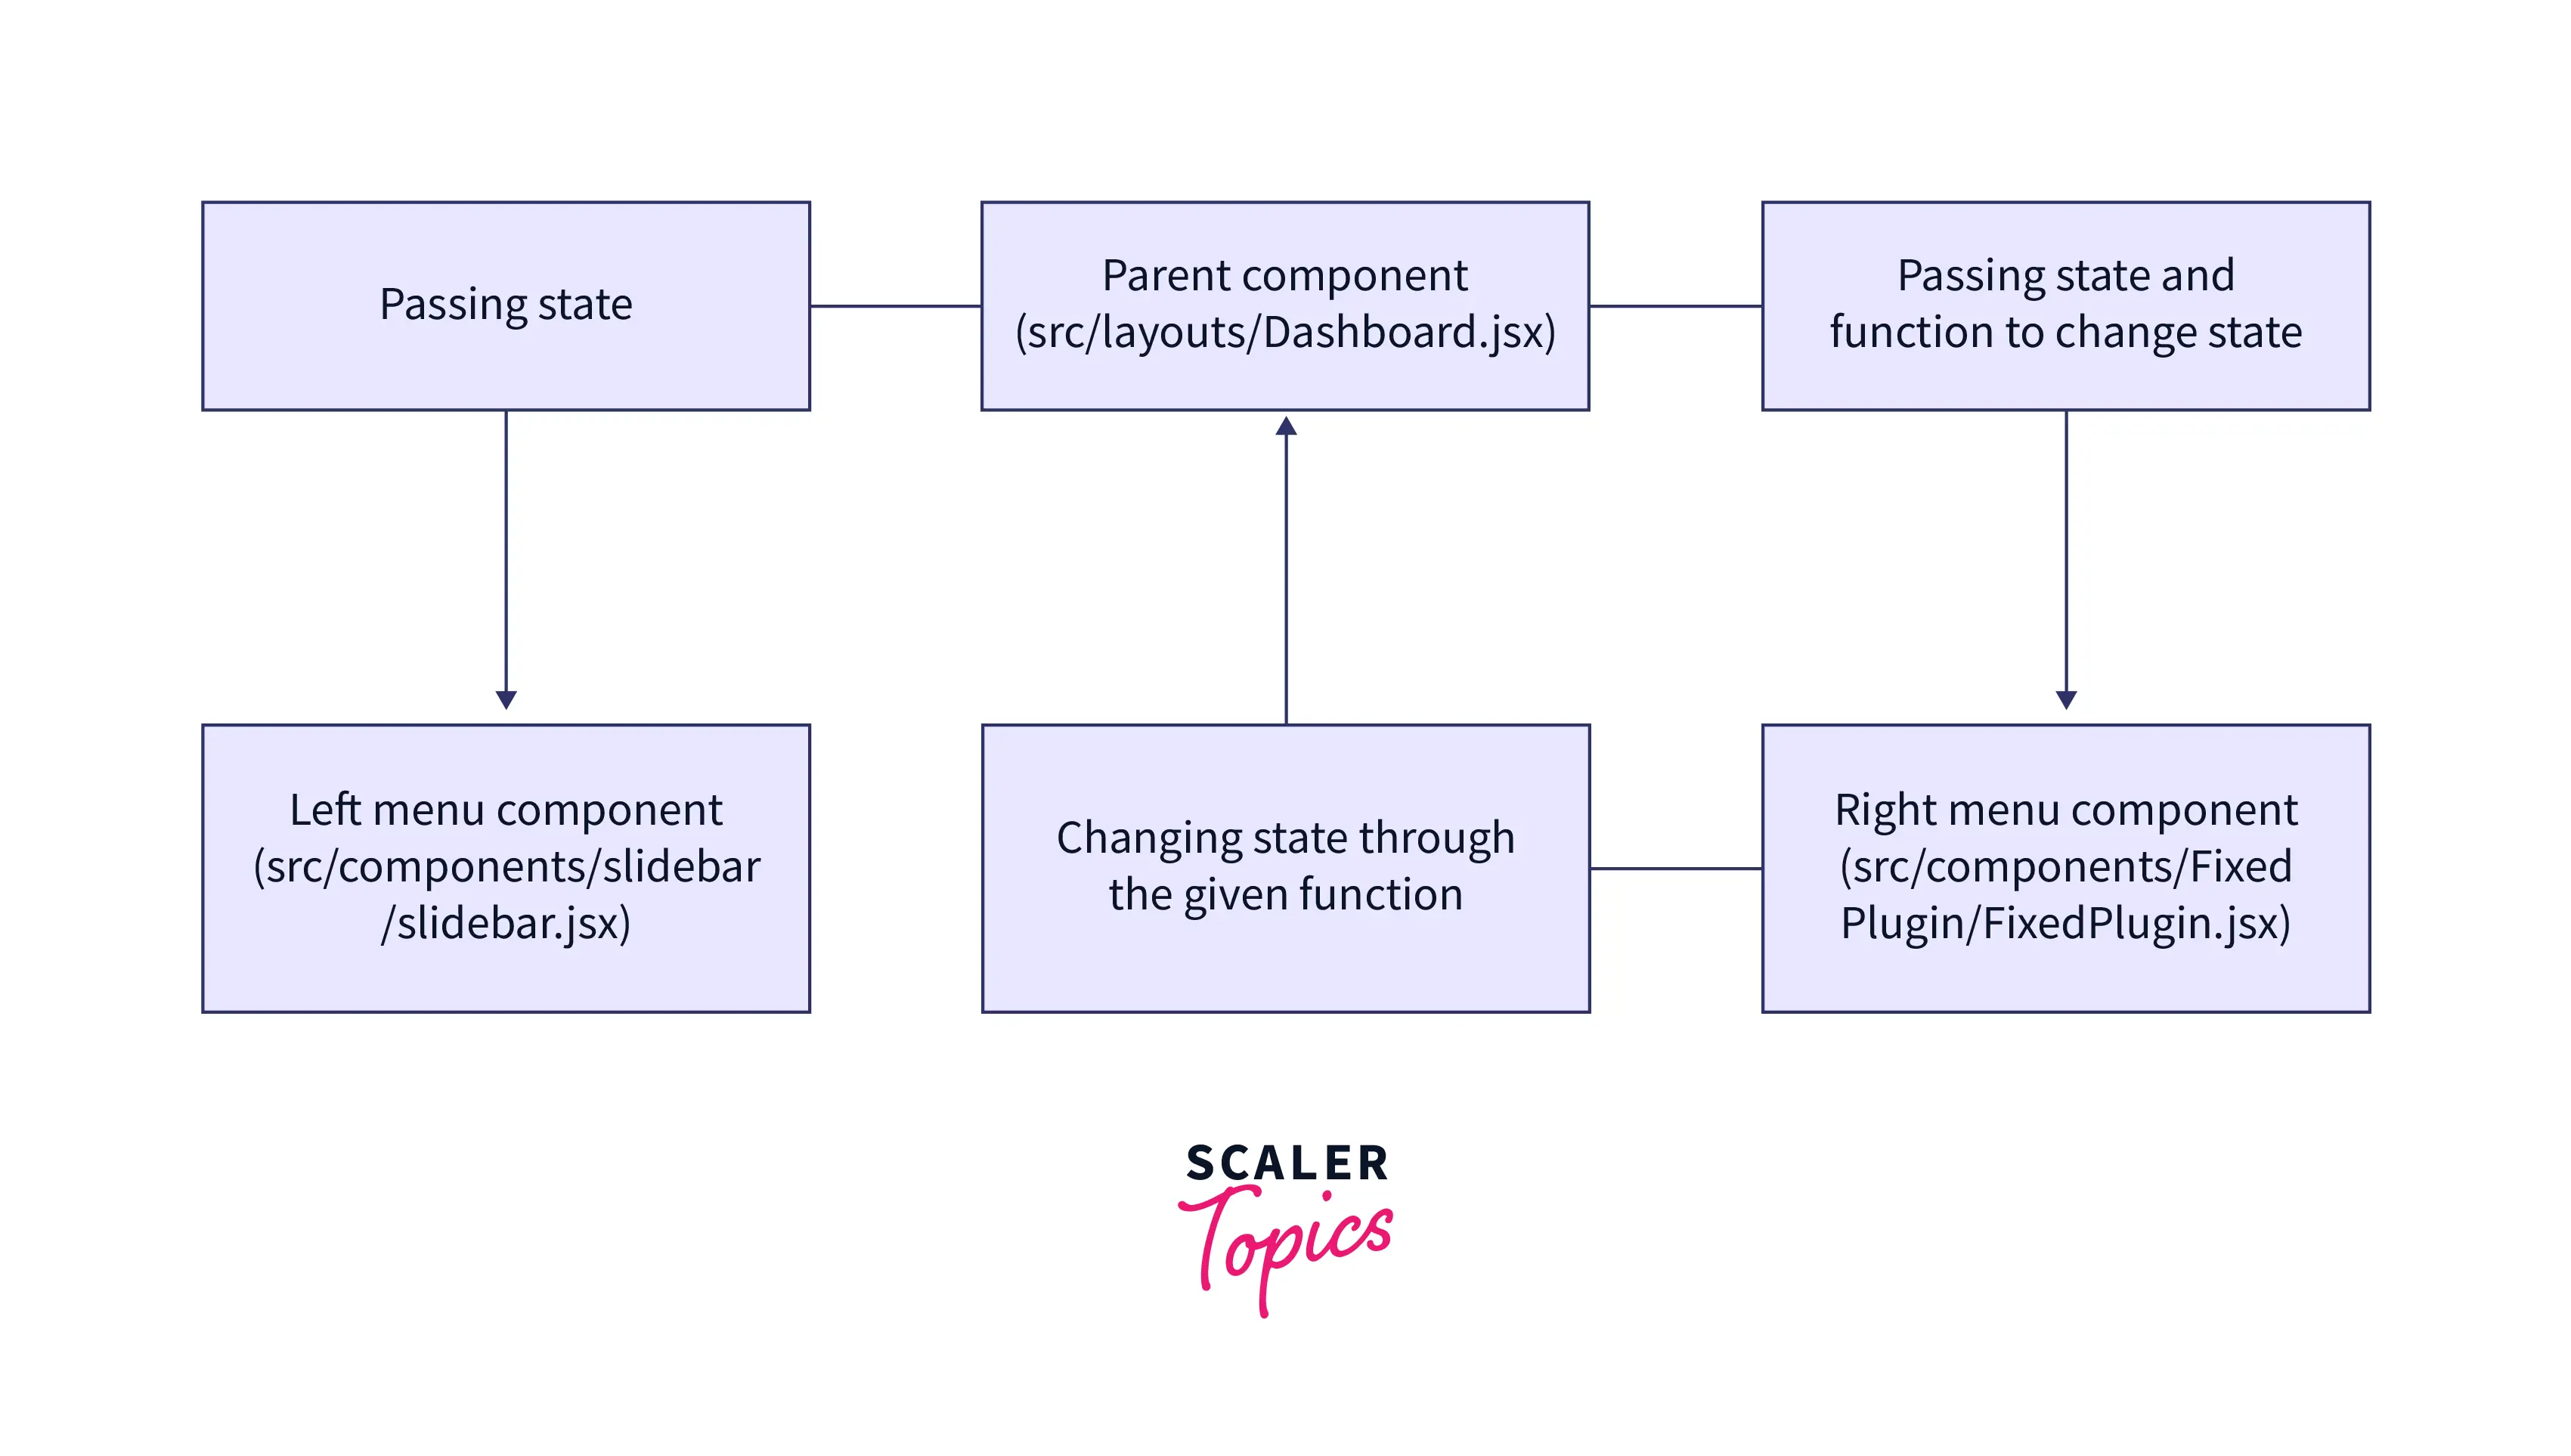
A Real-Life example with Paper Dashboard React

We will be utilizing the right menu to alter the colors of the left menu, as you can see in the gif image above. To accomplish this, component states are used, and the state is sent from a parent component to two menus and a few methods to modify the state.
Let us take this product and replace the component states with Redux in React.
Cloning the Existing Git Repository
We will start by cloning this git repository using the following command:
Scaler Placement Report and Statistics
Scaler learners achieved 2.5x salary growth with average post-Scaler CTC reaching ₹23L.
Installation
Let us cd into the project directory and install the Redux as we have done in the previous example.
Let's get started with the coding part. We will be making a few additions and a few changes to the existing code.
Turn Learning into Career Growth
Actions
We then need to create the actions. We need 7 actions, or 2 actions creators because the right menu has 2 colors that set the backdrop of the left menu and 5 colors that modify the color of the links. We have chosen the latter option because it requires a little less code to produce.
Let’s create the action folder inside src, then inside the action folder, we create two more files for the two different actions:
- setBgAction.js
- setColorAction.js
Let’s create each of the two actions now:
setBgAction.js
setColorAction.js
Reducers
Now, as we did in the first example, we need reducers here as well.
Let’s create a folder named reducers inside src and create a file rootReducer.js inside it.
Let’s code the rootReducer.js now.
Scaler Placement Report and Statistics
Scaler learners achieved 2.5x salary growth with average post-Scaler CTC reaching ₹23L.
Store
Let’s create the store.js as well now inside src.
Changes to index.js
As all of you know, this is the starting point of our app. So to add Redux to the existing file we need to make the necessary imports first.
Once importing new packages are done, we will have to make some changes to the render function as well. The changed render function should look like this:
Once these are done our index.js is ready! Let’s take a look at the entire index.js file.
Dashboard.jsx
The src/layouts/Dashboard/Dashboard.jsx file has to be modified right now. Both the state and the functions that alter the state must be deleted. So feel free to REMOVE the following code fragments:
Between lines 16 and 22 [The constructor]:
Between lines 41 and 46 [The state functions]:
Lines 53 and 54 [The sidebar bgColor and activeColor props]:
Between lines 59 and 62 [FixedPlugin props]:
Let’s take a look at the remaining code in Dashboard.jsx after all the removals.
Connecting Sidebar and FixedPligin Components to Store
Sidebar.jsx
We need to import connect from react-redux.
Change the export to:
FixedPlugin.jsx
And this is what the export should now be:
The following changes will occur:
- You must replace any instances of handleBgClick with setBgAction.
- You must replace any instances of handleActiveClick with setColorAction.
As a result, the FixedPlugin component should now appear as follows:
We're done, so you may start the project and check that everything functions as intended:

Multiple Reducers
There can be as many reducers as there are actions and vice versa. The only need is that you combine them; we'll learn how to achieve this further down.
Reducers
Create two new reducers for our application, one for the setBgAction and one for the setColorAction:
bgReducer.js:
colorReducer.js:
Code Explanation
You must include a default state for each of your reducers that will be merged when dealing with combined reducers. In our situation, we've selected an empty object, state = {};
Following this, our rootReducer will merge these two:
Code Explanation
Therefore, we indicate that the colorReducer should be referenced by the app state's activeState prop, and the bgReducer should be referred to by the app state's bgState prop.
States
Since, we have two different reducers now, instead of one. So, the way we represent our states will also change.
This is what it used to look like:
It will now look like this:
Redux Store
We now need to alter our store because we modified our reducers and merged them into simply one reducer likewise.
store.js:
Changes To Existing Components
We now need to update the props within the Sidebar and FixedPlugin components to the new state object because we altered the state's appearance.
Sidebar.jsx (src/components/Sidebar):
amend line 36 from
To
FixedPlugin.jsx:
Now, we need to alter all occurrences of this.props.bgColor to this.props.bgState.bgColor. And all those of this.props.activeColor to this.props.activeState.activeColor.
Therefore, the new code should look something like this:
Code Explanation
We have combined the two bgReducer and colorReducer into one rootReducer. This makes our life simpler by allowing us to write multiple reducer logic separately, so it is easier to debug and also combine them into a single rootReducer for better usability.
Conclusion
Now that we have been through everything about Redux in React, let us take a quick summary of everything we have seen so far.
- Redux is a State Management tool used for JavaScript applications. This is a very well-known tool for managing states using a centralized store known as Redux Store. This can be easily used with React apps.
- Reasons for using Redux:
- Avoid prop drilling thereby increasing the efficiency.
- Works in client, server, and native contexts.
- Simple to test.
- Redux Architecture is based on three main components. The React Components subscribe to the Redux Store, whenever there is any Action the Reducer is triggered, and the states in the Redux Store are updated.
- We can write multiple reducers for multiple actions in Redux. This makes it more of a logical coding approach and we can combine them into a single reducer using the combineReducers function from redux.