Realm for React Native
Overview
In the world of mobile app development, Efficient data management plays a crucial role in delivering seamless user experiences. One such powerful tool that has gained significant traction among developers is Realm. Designed specifically for mobile platforms, Realm offers a lightweight and flexible database solution for applications built using React Native. In this blog post, we will delve into the world of Realm, discussing its features, advantages over other databases, structure schemes, and how to set it up for React Native projects.
What is Meant by Realm?
Realm, at its core, is an embedded database engine that can be directly integrated into mobile applications. Unlike traditional databases that rely on the client-server model, Realm React native operates directly on the device, providing faster data access and minimizing the need for network requests. It offers a cross-platform API, allowing developers to write data-related logic once and deploy it across multiple platforms seamlessly.
Features:
- Real-time Data Sync:
One of the standout features of Realm is its ability to synchronize data in real time. This means that any changes made to the database are immediately reflected across all connected devices, ensuring consistent and up-to-date information. - Offline Capabilities:
Realm allows for seamless offline functionality by persisting data locally on the device. This empowers applications to continue functioning even without an active internet connection, ensuring a smooth user experience. - Lightweight and Performant:
Realm's lightweight architecture enables it to perform exceptionally well on resource-constrained mobile devices. It is designed to deliver fast and efficient data access, making it ideal for mobile applications that require real-time updates. - Easy-to-Use API:
The Realm API provides a straightforward and intuitive interface for developers. It abstracts away complex SQL queries, allowing developers to interact with the database using object-oriented paradigms. This reduces the learning curve and accelerates development.
Difference Between Realm and Other Databases
When comparing Realm react native with traditional databases like SQLite or MongoDB, several key distinctions become apparent:
- Performance:
Realm outperforms traditional databases in terms of read and write operations, thanks to its direct device-level integration. It eliminates the need for network requests, resulting in faster data access and reduced latency. - Simplicity:
Realm's API is designed to be developer-friendly and intuitive, leveraging object-oriented paradigms. In contrast, traditional databases often require complex SQL queries or intricate data mapping processes. - Real-time Synchronization:
Realm's built-in real-time synchronization sets it apart from many other databases. The ability to seamlessly propagate changes across devices makes it an excellent choice for applications that require collaborative features or data consistency across multiple users.
Structure Schemes of Realm
Realm react native adopts a schemaless approach, which means that, unlike traditional databases, it doesn't enforce strict structure schemes. Instead, Realm allows developers to define object models using classes or schemas. This flexible approach enables developers to quickly adapt and iterate on their data models as their application evolves.
How to Set Up Realm for React Native?
Setting up Realm react native involves a few straightforward steps:
- Install the Realm package:
Using npm or yarn, install the Realm package by running the command: - Link the package:
For React Native versions below 0.60, link the package manually using the react-native link realm. For React Native 0.60 and above, the linking is automatic. - Configure Gradle files:
If you're developing for Android, make sure to configure the Gradle files to include the Realm dependencies. - Begin using Realm:
Import the Realm module into your React Native project, create a Realm instance, and start interacting with the database. Realm's API documentation provides detailed guidance on performing CRUD operations and handling data synchronization.
Using Realm React Native
In this blog post, we will delve into the usage of Realm in a React Native application. There are multiple approaches you can consider when integrating Realm, and we will focus on the third approach for our discussion.
Instead of starting from scratch or creating a standard TypeScript-templated project and adding Realm to it, we will explore a ready-made Realm-TypeScript template provided by the Realm React native team on their GitHub. This template serves as a solid foundation, and we can customize it further to add the desired functionality to our React Native app.
Type the following command to start:
You also have the option to provide a custom name for your project. For this demonstration, let's name it reactrealmdemo.
After creating the project with the chosen name, you can test it by launching Metro or any other development client from the project folder. Then, simply run the project to see it in action.
The Realm-React Native project template is intended to add and remove items from a to-do list. Realm React native is used for persistence, while Realm React Hooks are used for React integration. It also enables synchronization, allowing users to log in and sync their to-do lists across numerous devices.
When you open the project to check its files, particularly package.json, you will notice the packages that have been installed automatically for you.
The template program comprises various important files and comes in two versions: one that syncs data and one that does not. The following files are critical:
- Task.ts under models: defines the schema through an object model with a class named Task
- TaskItem.tsx
- AppWrapperSync.tsx under app
- AppSync.tsx
- AddTaskForm.tsx: contains the code to create and add new tasks via a form
- TaskList.tsx: displays a list of tasks
- TaskManager.tsx under components
I expanded on this template example to develop an application that allowed me to do CRUD operations on a list of movies, such as adding, viewing, updating, and deleting them. I also wanted to use React Native Navigation to navigate between displays.
Let's get this project started:
Following that, we'll create a Movie object model in Movie.ts:
Our index.ts model is defined as follows:
A React Context is created using the createRealmContext() function.
the object for a specific Realm reacts native in a realm.Configuration. The Context object has built-in Hooks and a wrapper component that grants access to the Hooks to its child components so they may interact with the realm and a context provider.
The RealmProvider component is included in the Context object that was returned from createRealmContext(), as can be seen, if you look at the parent component of the template application, AppWrapperNonSync.tsx.
Here is a screenshot of our AppWrapperNonSync.tsx file:
Through the built-in Hooks, the RealmProvider grants access to the specified Realm react native to your main component and its children. useObject(), useQuery(), and useRealm().
React Native Navigation Addition
TaskManager.ts, which is called in AppNonSync.ts, contains the code in the template app for actually writing to the realm and retrieving/deleting from it.
But after messing around with the coding, I took a different course of action. Several requirements for navigation and gesture handling were added after I created the Movie object model.
To save the navigation screen names for my project's use of React Native Navigation with Realm, I generated a RootStackParams.ts file.
Here is a screenshot of my RootStackParams.ts file:
My main component is enclosed by RealmProvider> tags so that all child components may utilize Realm's built-in Hooks. I called them in my App.tsx, the project's entry point. The lines in our App.tsx file that are highlighted in bold below are:
Add Operations in Realm
I set up the UI in HomeScreen to move us to various screens when we carry out CRUD activities.
I repurposed part of the code from the template application's AddTaskForm.tsx and TaskManager.tsx files in AddMovieScreen.tsx below to build a single screen that would carry out the add operation.
I've added code to display a form that users may fill up with movie information in this file. To access the Realm react native object that is presently open, we utilize the built-in useRealm() Hook. After that, the function handleAddMovie(), which is wrapped behind a callback, receives the data from the form fields.
Writing Data from Other Forms to Realm
Using realm.write(), the form's data is sent to the realm. Realm's write operation lets you create, alter, and destroy Realm React native objects by passing a callback function to a Realm React native instance function. This implies that performing realm.write() is required even to erase data from a realm.
I launched the app for the HomeScreen after testing my project on a real device (as it was quicker than an Android emulator).
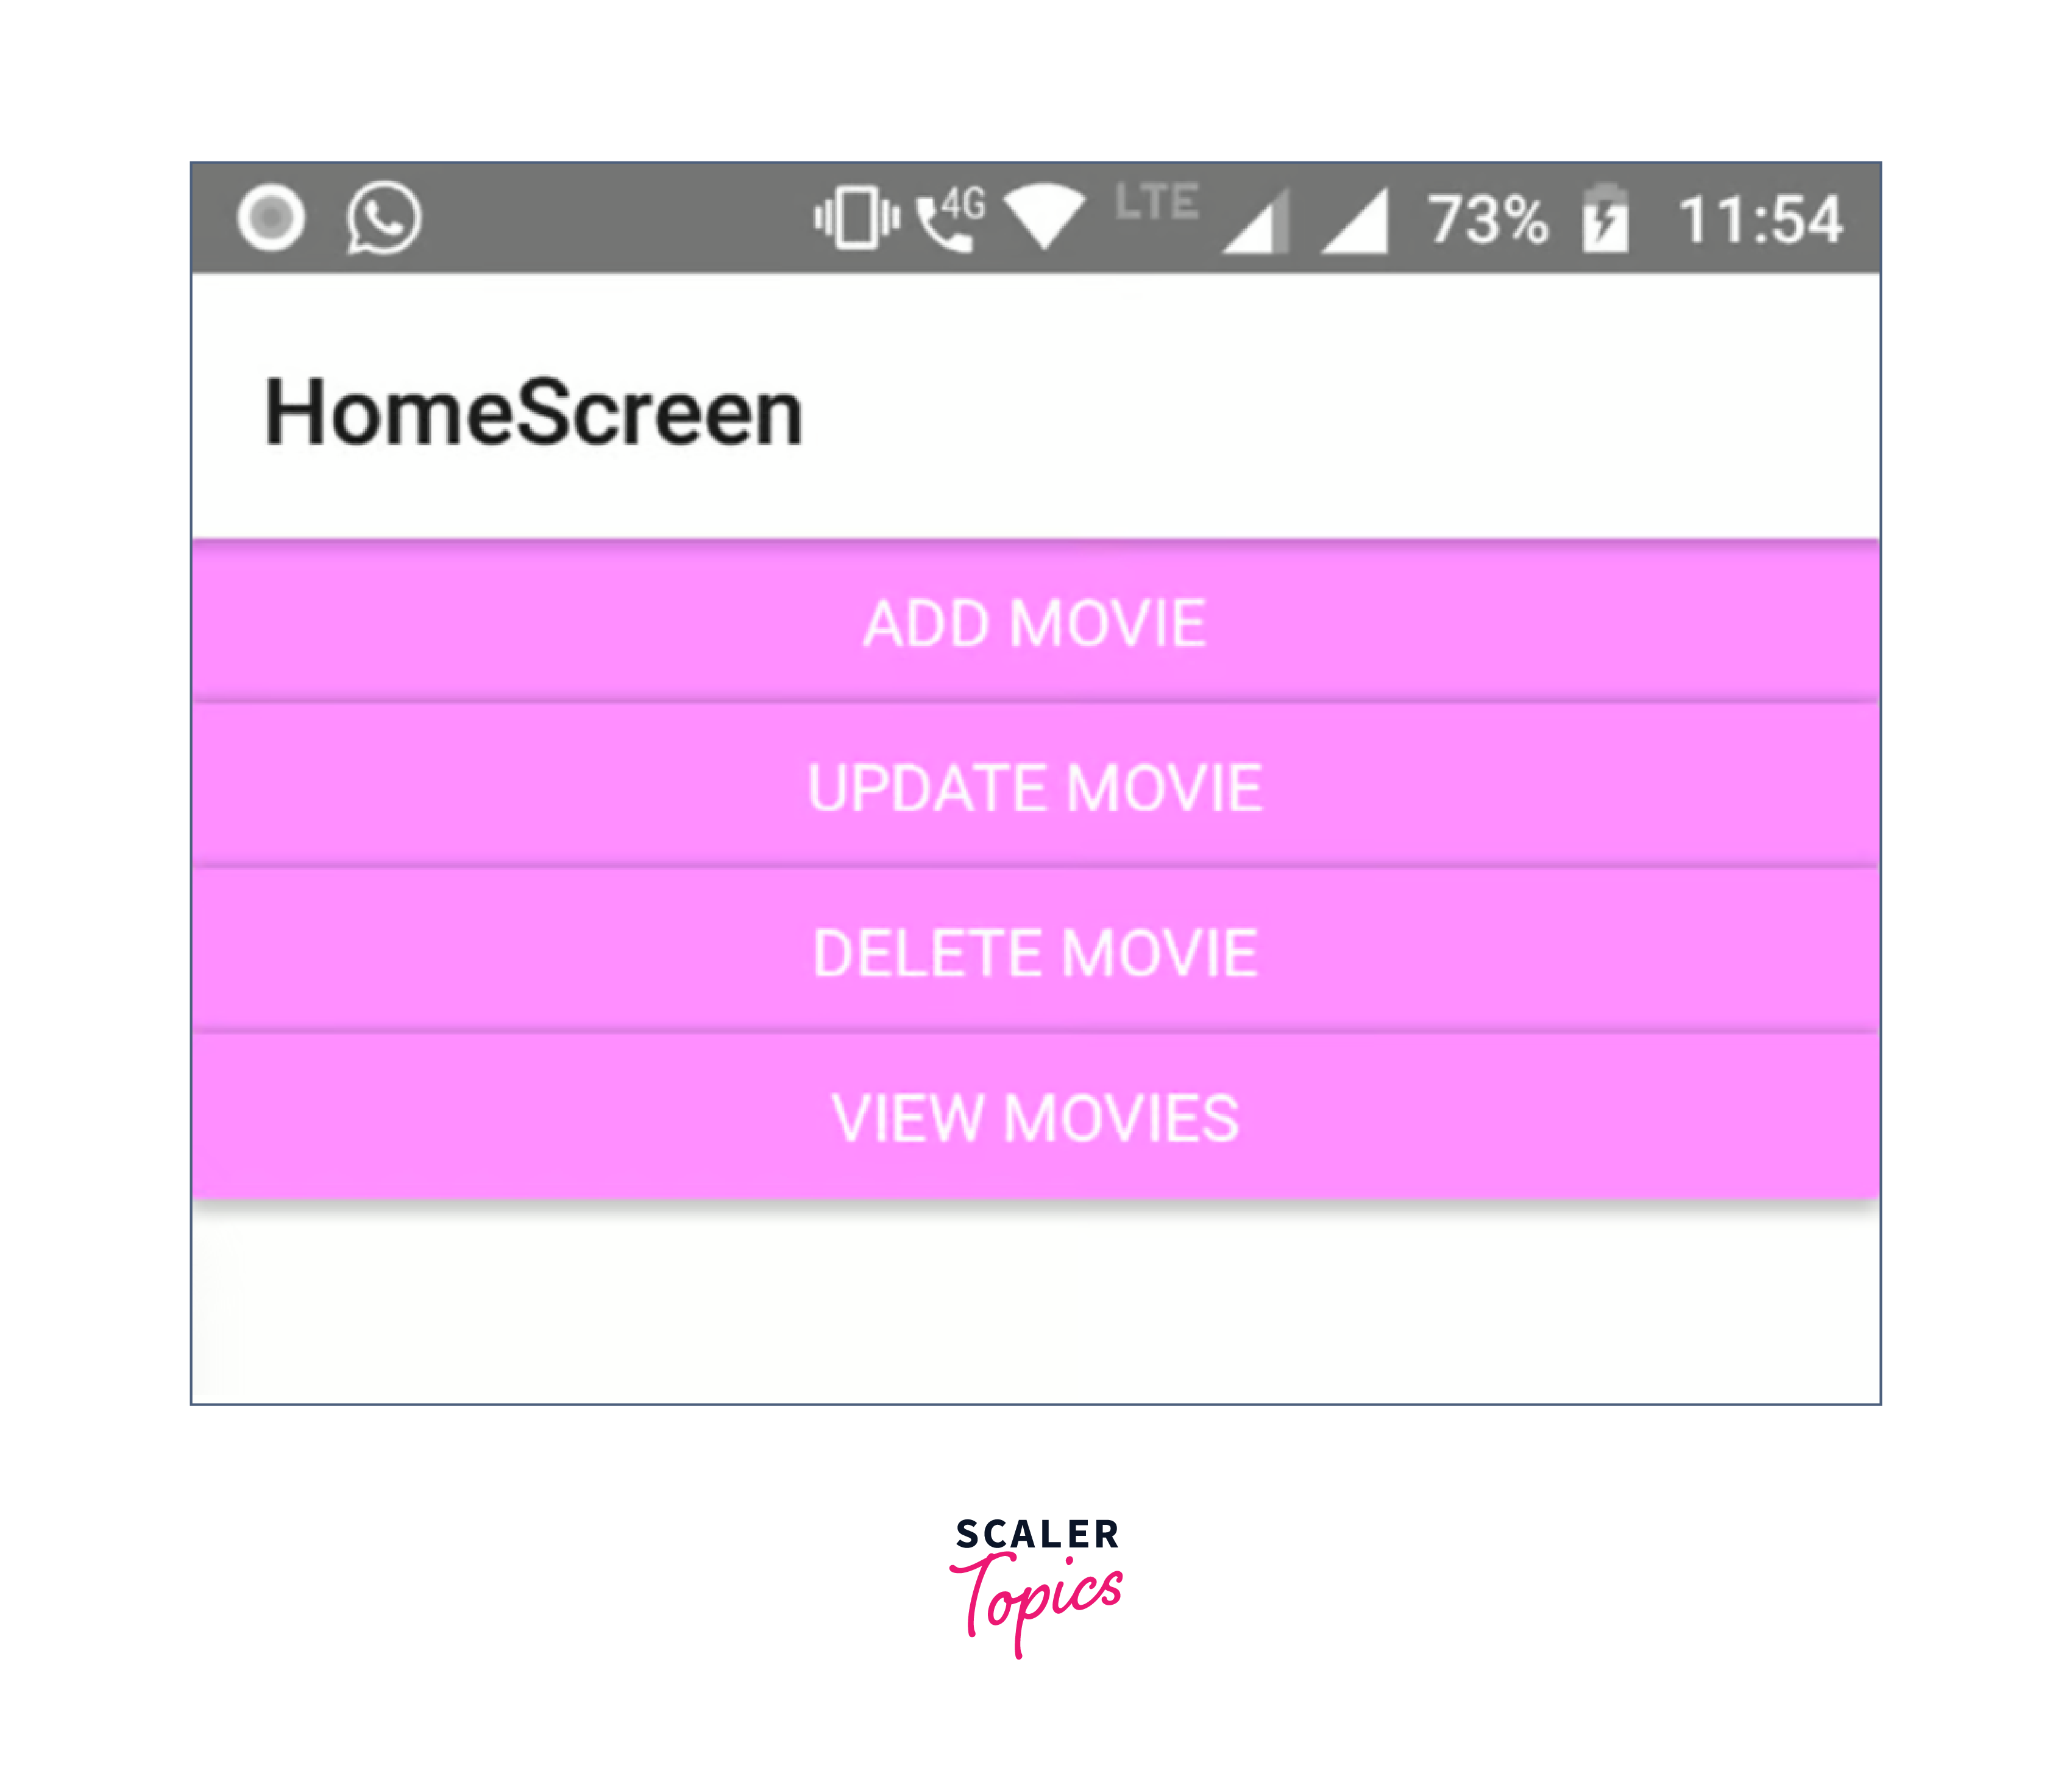
When I select Add Movie, I see the following screen:

Similarly, I added code to DeleteMovieScreen.tsx to carry out delete activities in the realm.
Look at the lines above that are bold. Within a realm.write() is the statement realm.delete(). An ordered list of current movies with a delete button and trash can icon next to each title will be the screen's output.

The exact record for the chosen movie title will be removed from the realm when you press the Delete button.
How to Display List from the Realm?
I created code in ViewMovieScreen.tsx to show a list of films from the realm. Using the built-in useQuery() Hook, a group of Realm objects of a specific kind will be returned. Either the Object Schema class or the model name supplied as a string can be used to call it. The useQuery() Hook keeps track of any changes to collection objects and re-renders the component if the query results change.
The result is a list of movie specifics organised by year of release.

You must migrate the schema or upgrade the schema version if you make changes to the schema after the app has been used and data has already been stored in the database. This is possible in the index.ts file, as demonstrated here:
The title or type of a property might be changed as an example of a schema modification use case. The simplest solution to keep running the app in such a situation is to increase the schema version. If you don't, the application won't launch and will raise a migration error.
Realm Studio to Add Update Functionality
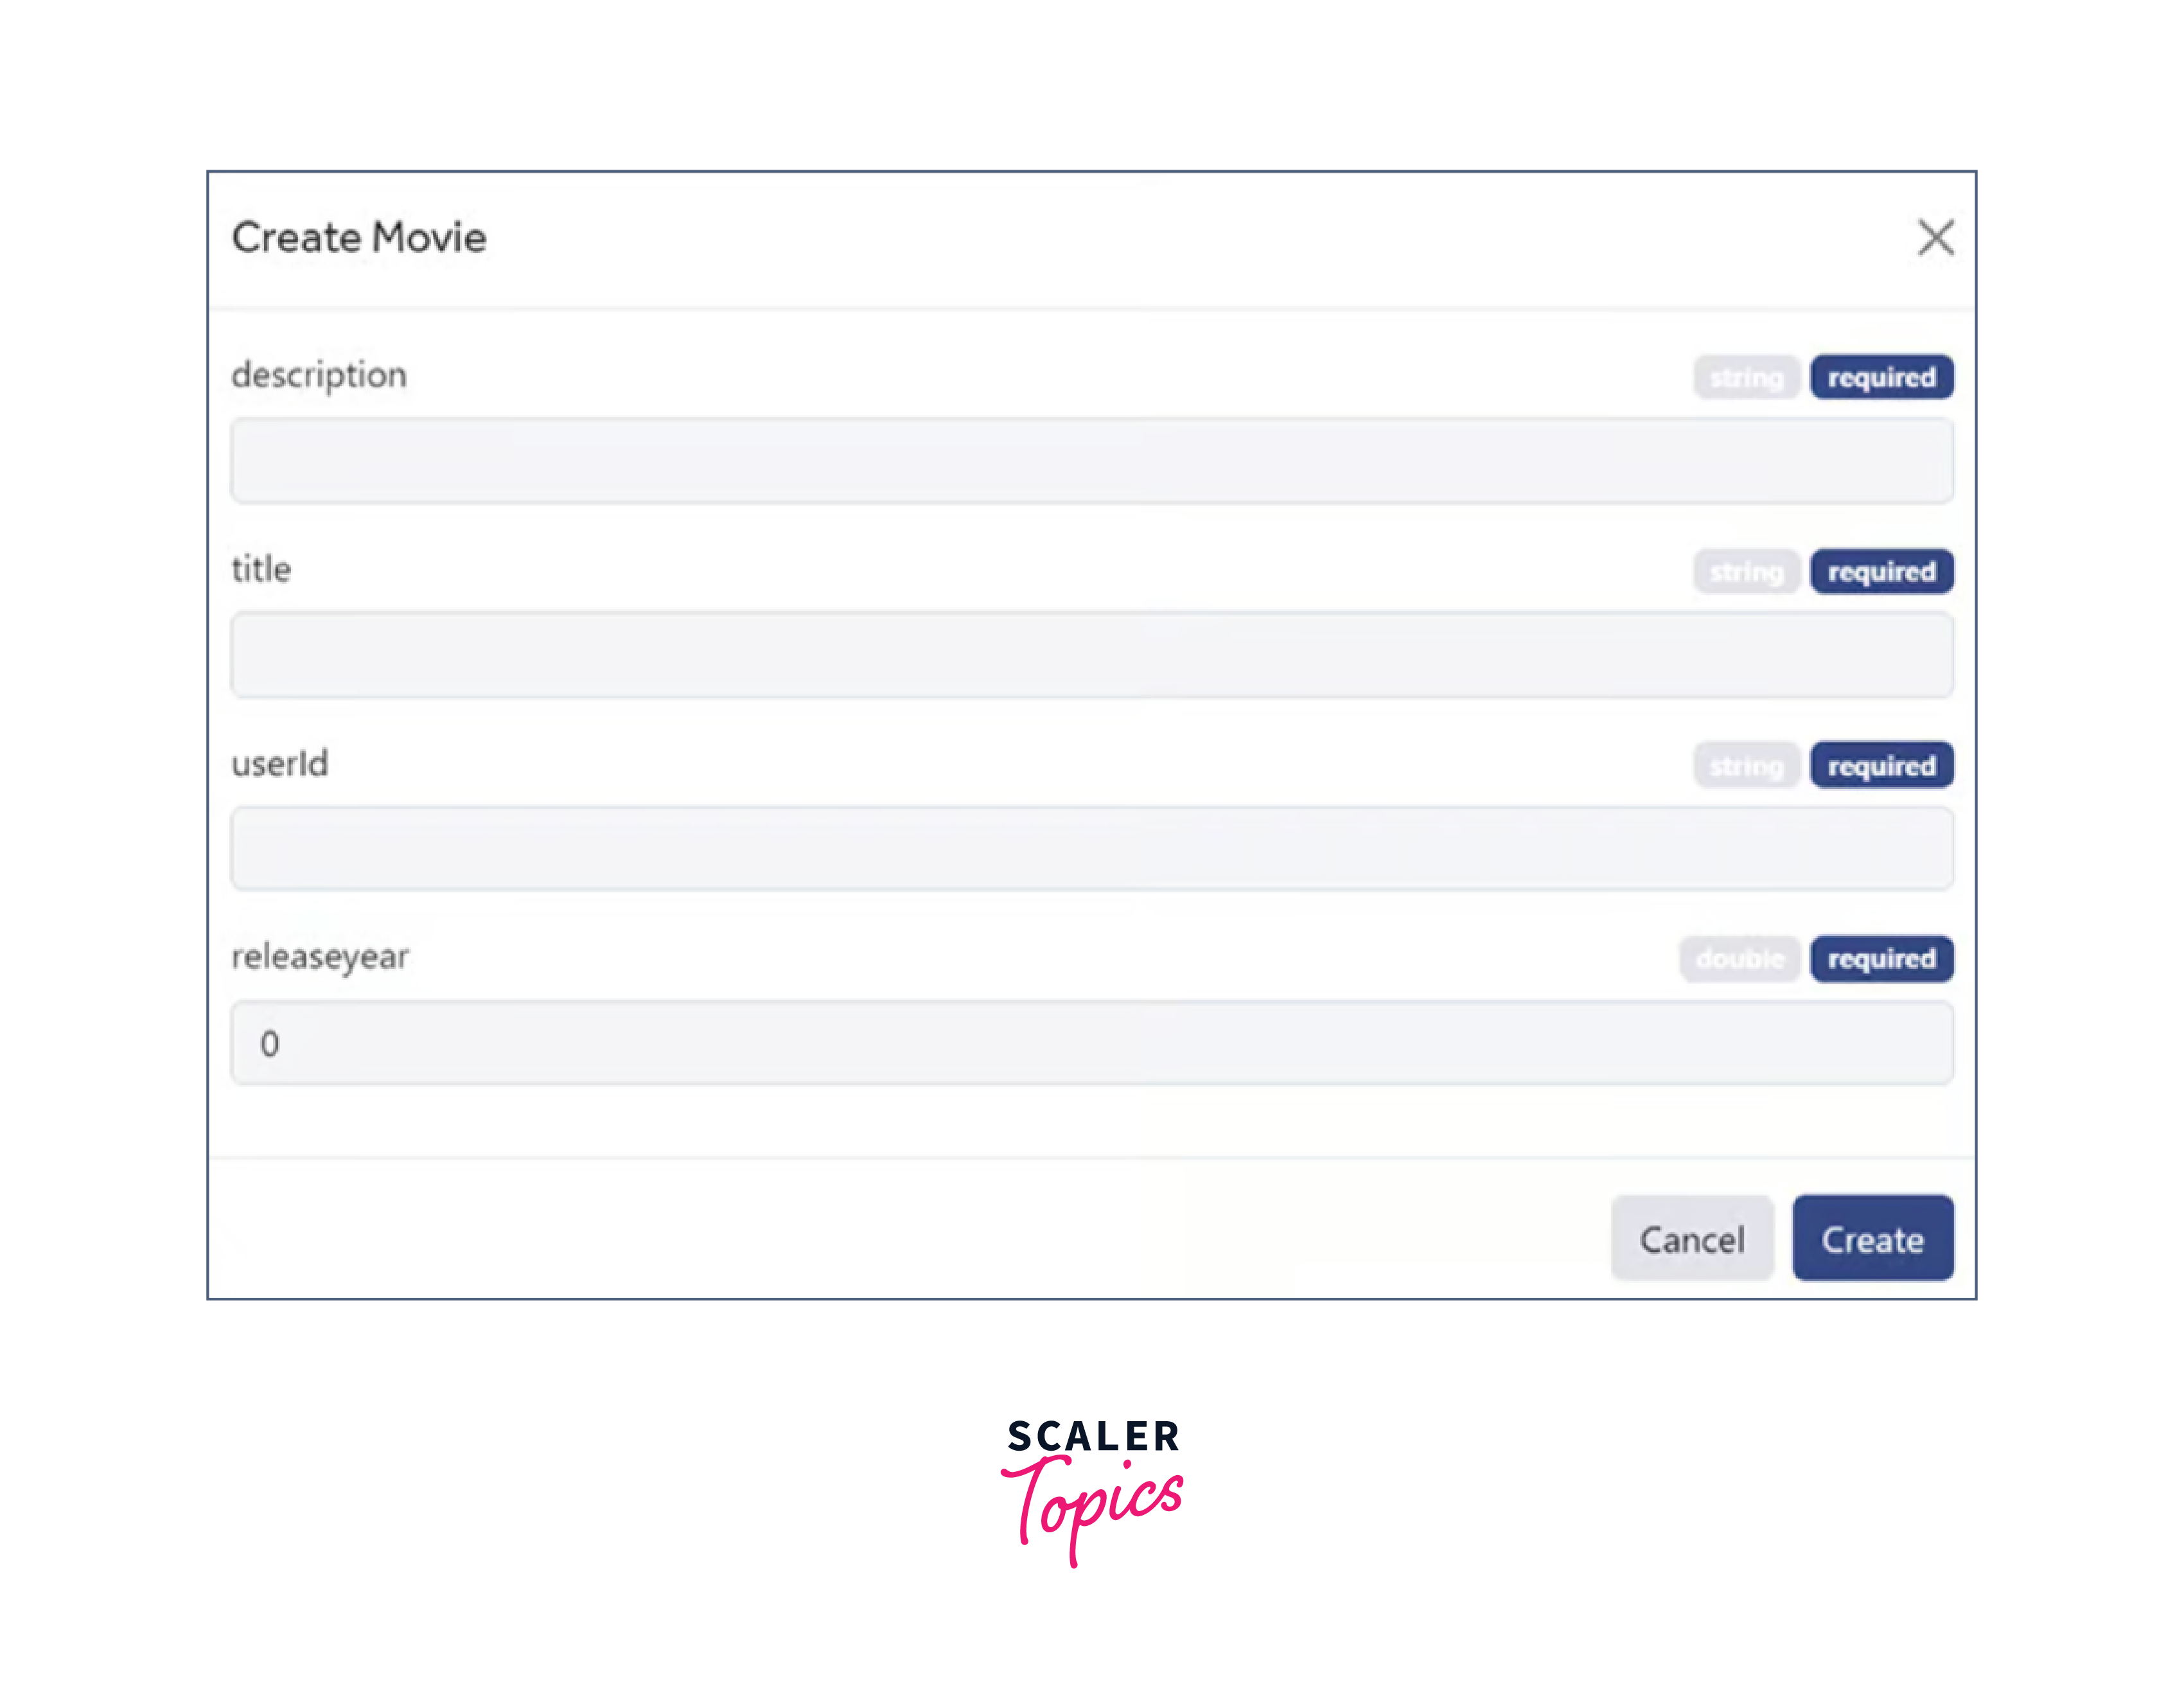
I made the unconventional choice to approach the CRUD Update operation. I utilized MongoDB's Realm Studio v 13.0 to make managing my Realm database instead of building a screen like the View, Delete, and Add screens we constructed to control realm data. With a GUI-based tool, opening existing worlds and adding to and changing the data within them is much simpler.

Importing and Exporting
Let's first identify our Realm file and then complete the Update operation using Realm Studio. Using the code below, you can get the Realm file's local directory on your simulator or device:
For instance, the path in the present project would be:
The Device File Explorer tool in Android Studio may then be used to open this file, but only while the app is active. No matter the IDE you used to modify your project files, make sure Android Studio is set up as a framework for the project. For instance, I edited my project files in VS Code, therefore I was requested to set up the framework when I launched the development environment for the first time in Android Studio.
Scroll downwards until you find your realm file in the Device File Explorer once you've completed that step and it has opened.

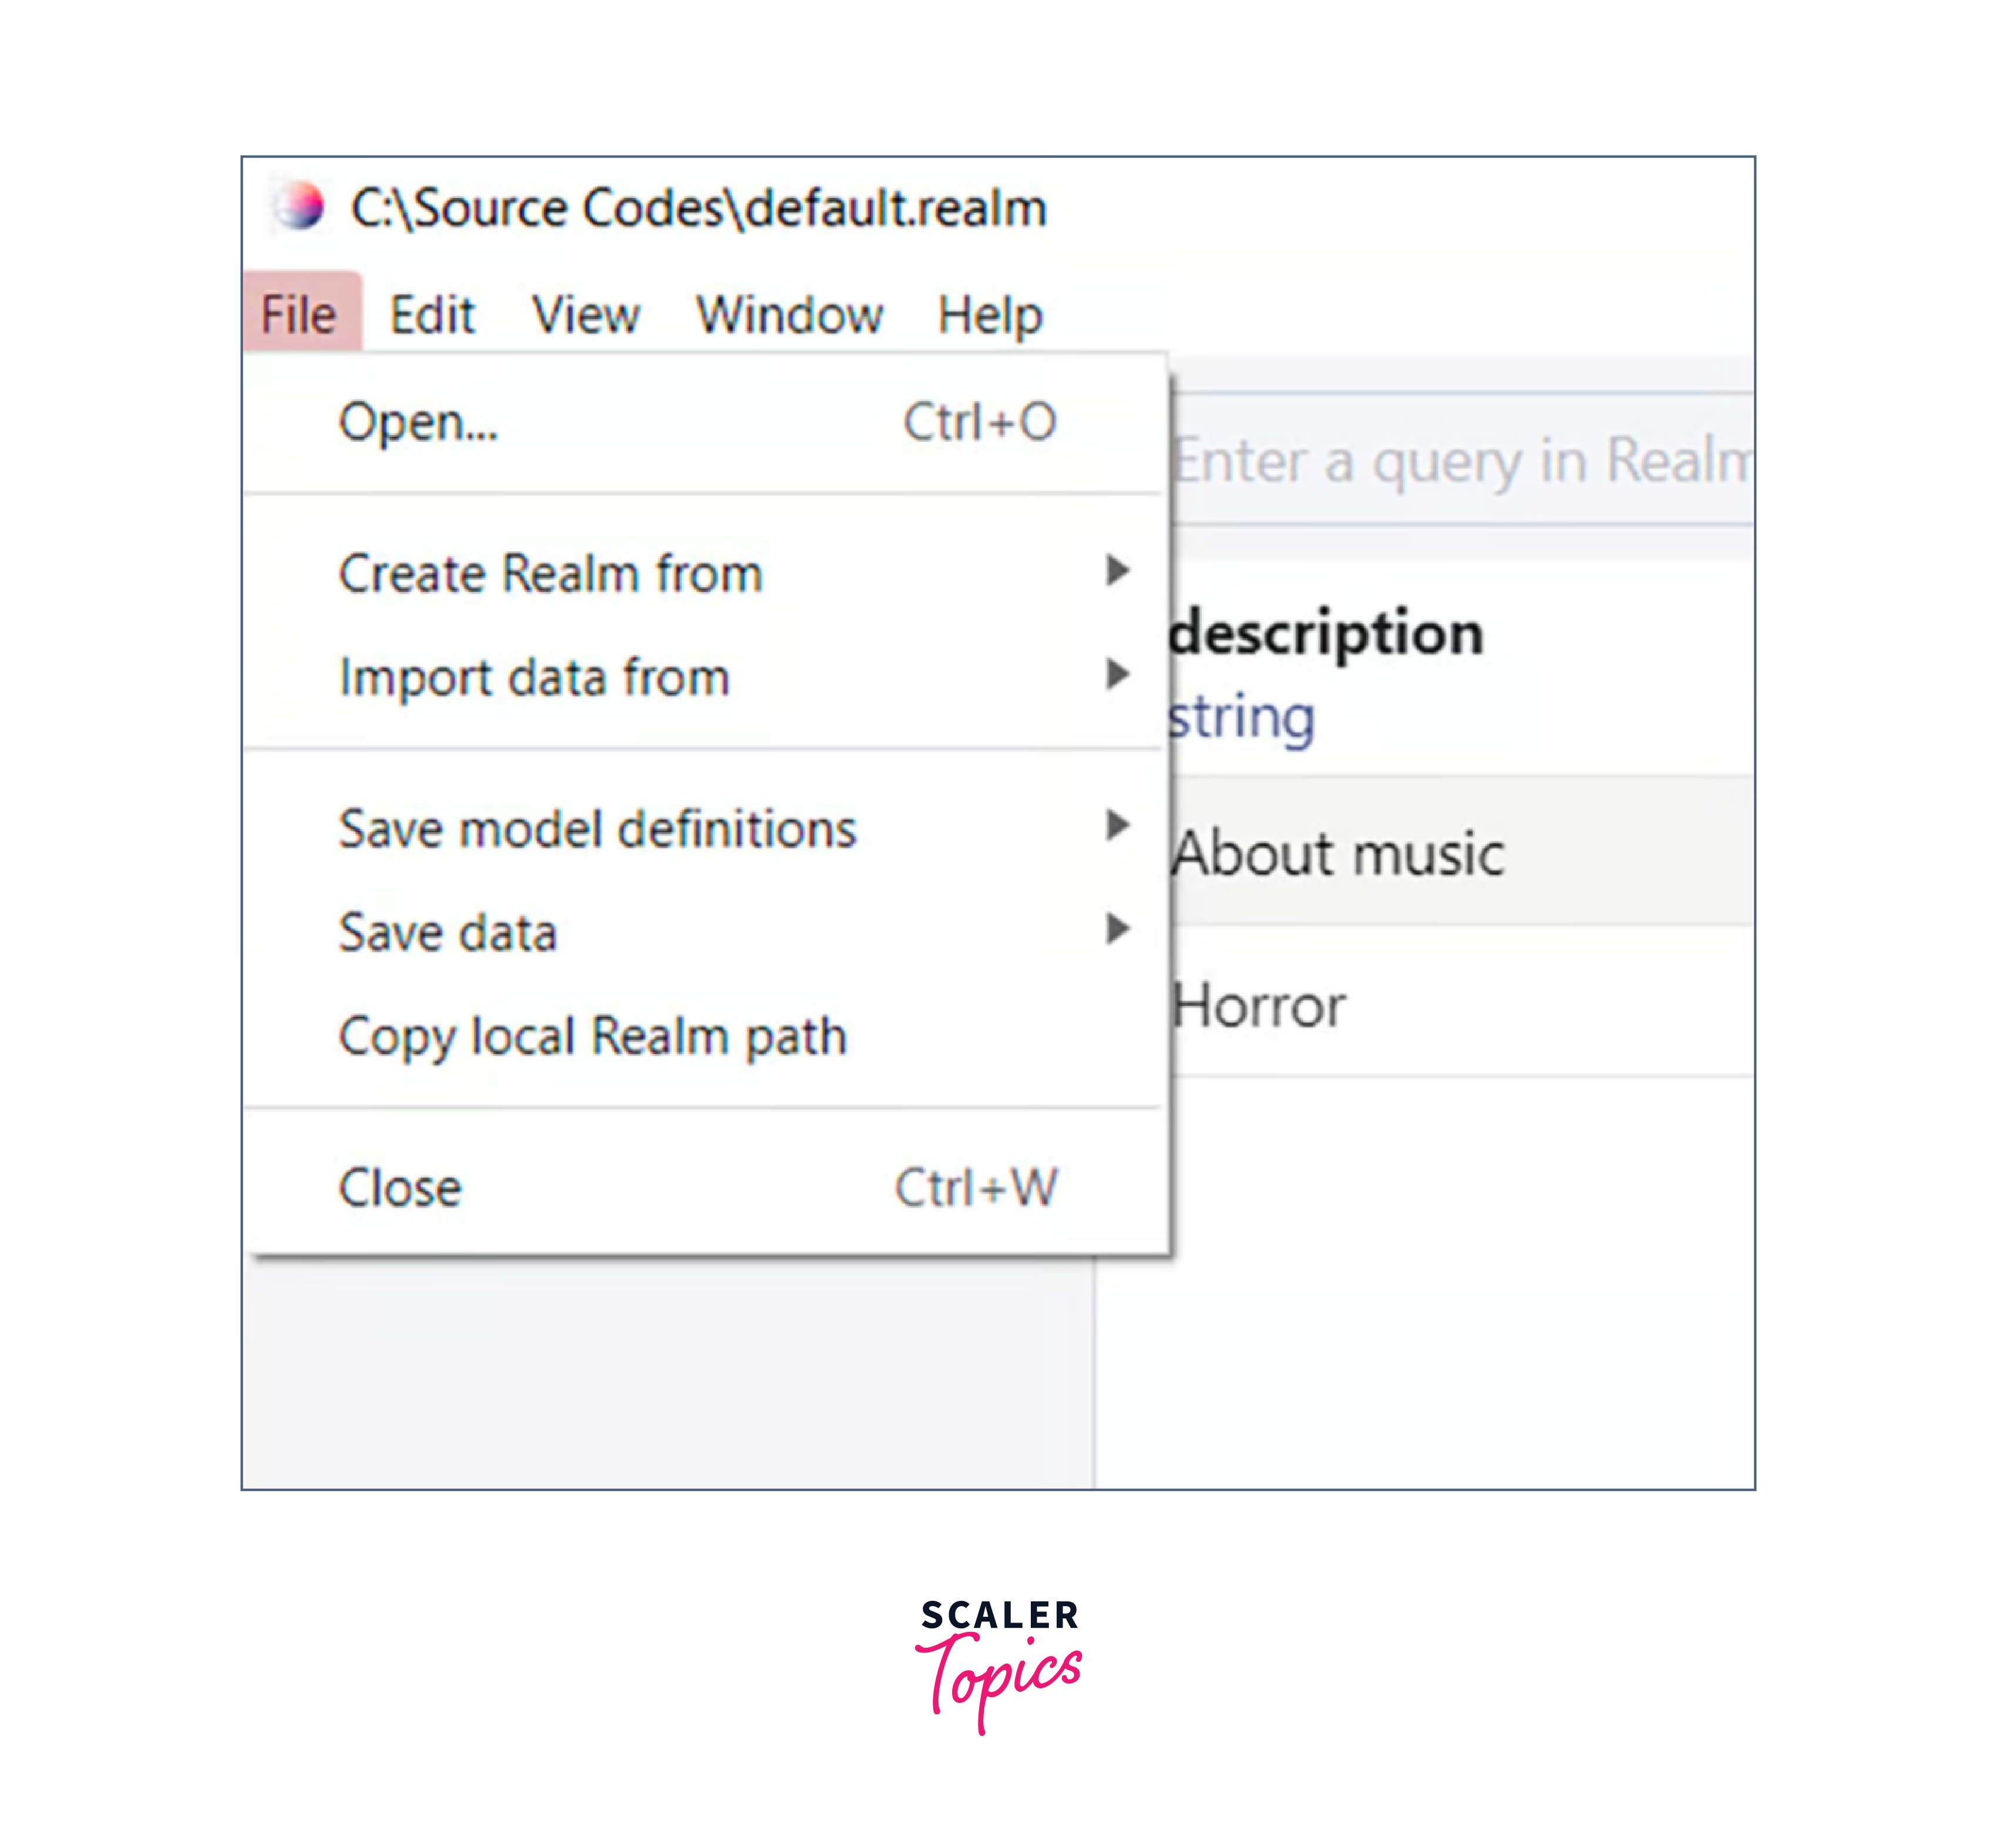
To save the realm file to your hard drive, just right-click default.realm and select Save As. Realm Studio may be used to open, examine, and modify the file when this is finished.
Open the main screen of Realm Studio and select Open Realm file. Choose the directory in which you just stored the file.
Here is the default.realm file I kept in the Source Codes folder on C. The GUI tool is currently showing our movie data. I can edit any property (column) by clicking on it.
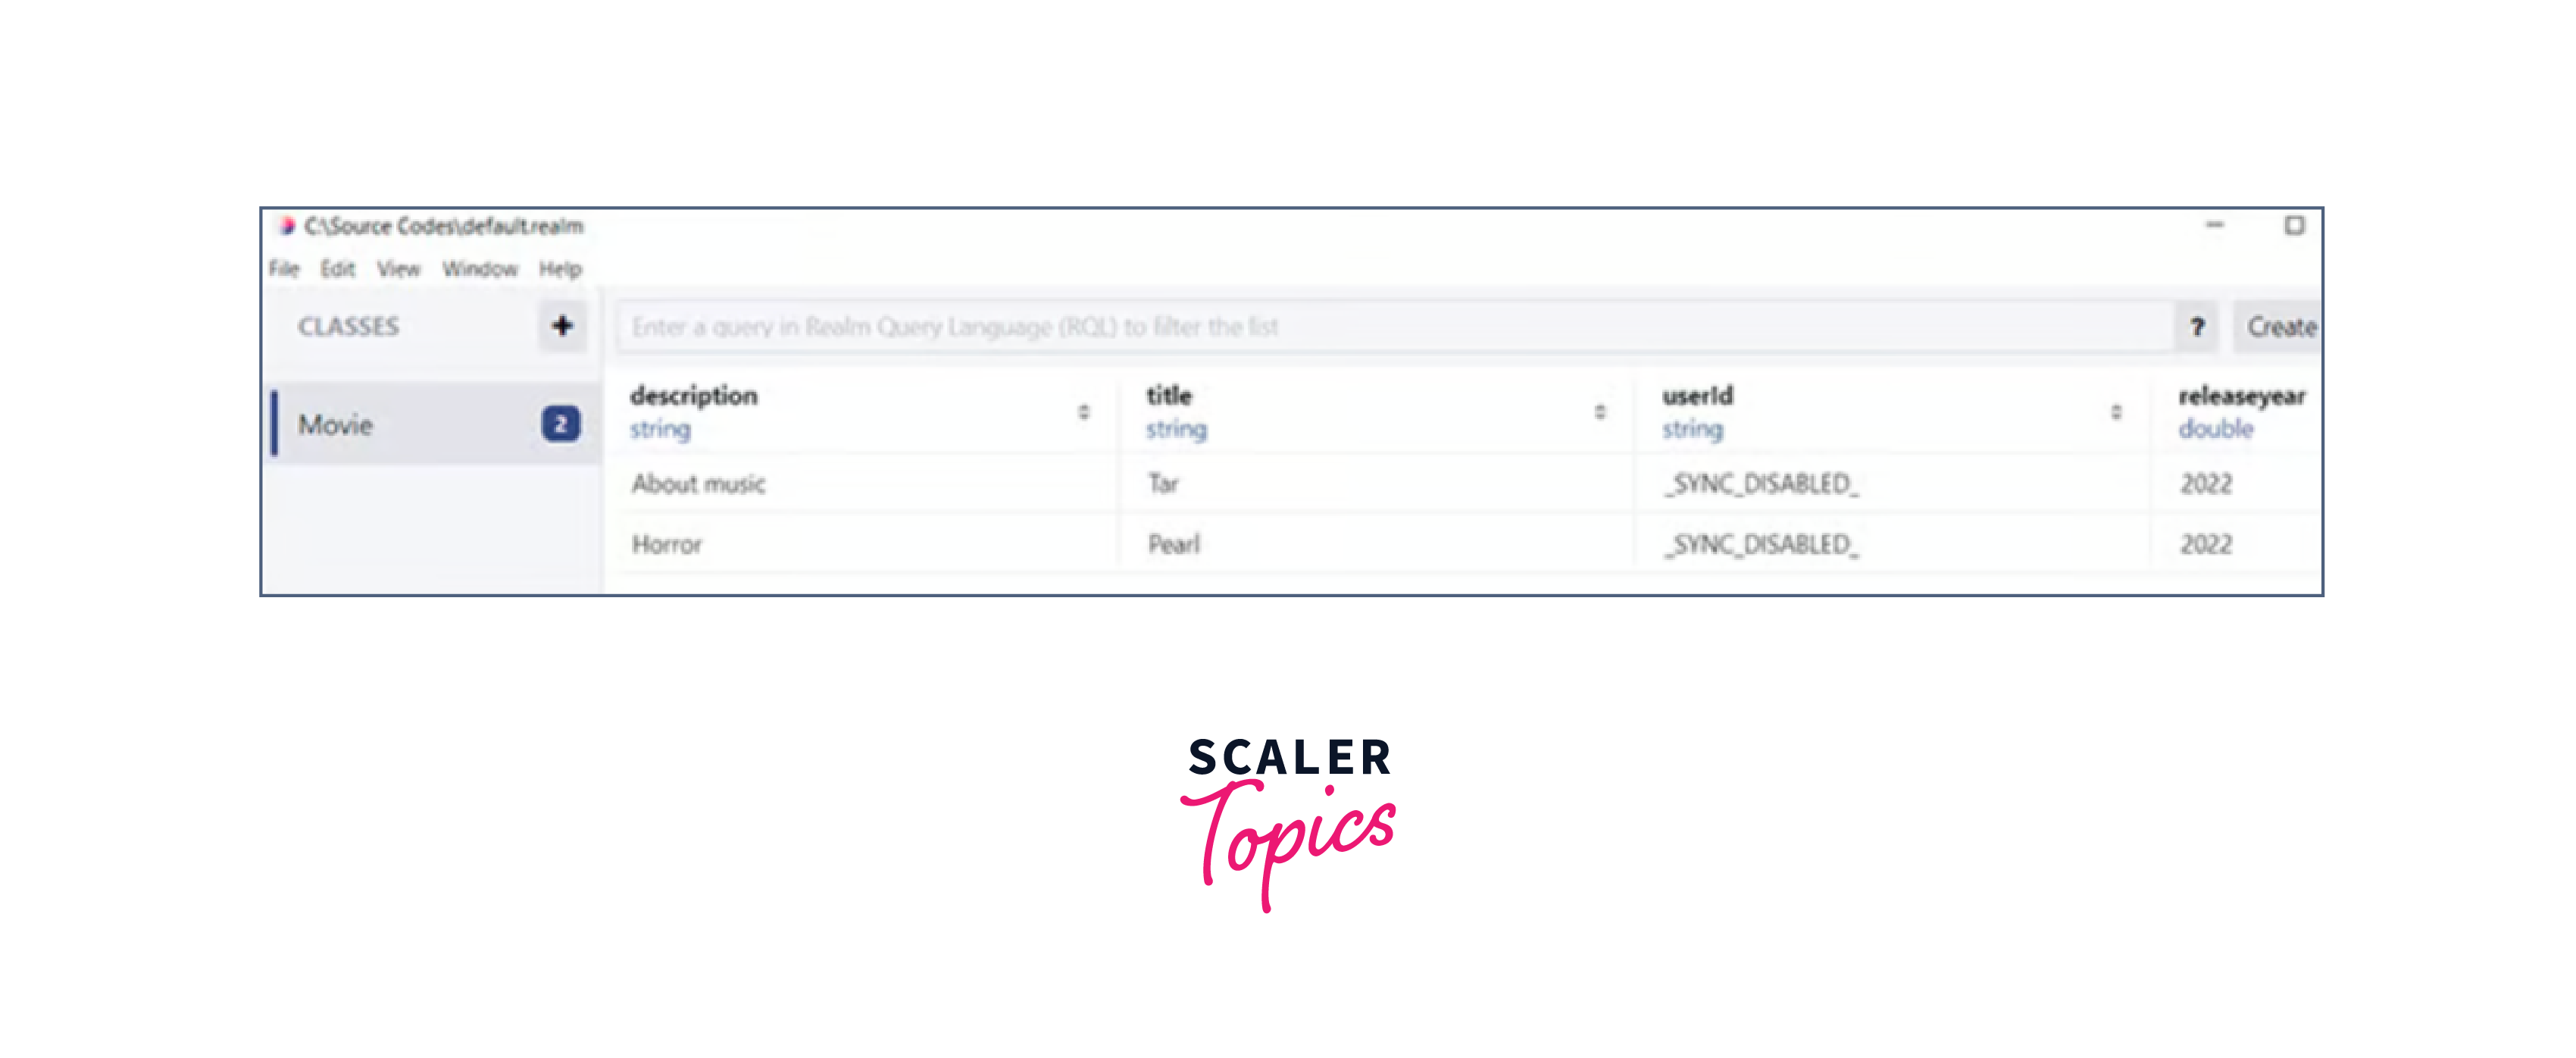
I can even add fresh properties, remove old entries, etc.
The original realm file is not affected by any modifications we make here, unless we replace that file with an updated one, as this data is now present on the local disc and not on the emulator or the device where the project was operating.
Realm.Configuration may also be used to override the default values for the realm's location and name when it is initially formed.
Importing and Exporting
You may also import and export Realm React native data using Realm Studio. You may export current realm data to a CSV or import data from any CSV.
Additionally, you may reuse your model definitions in other apps by saving them in certain formats.
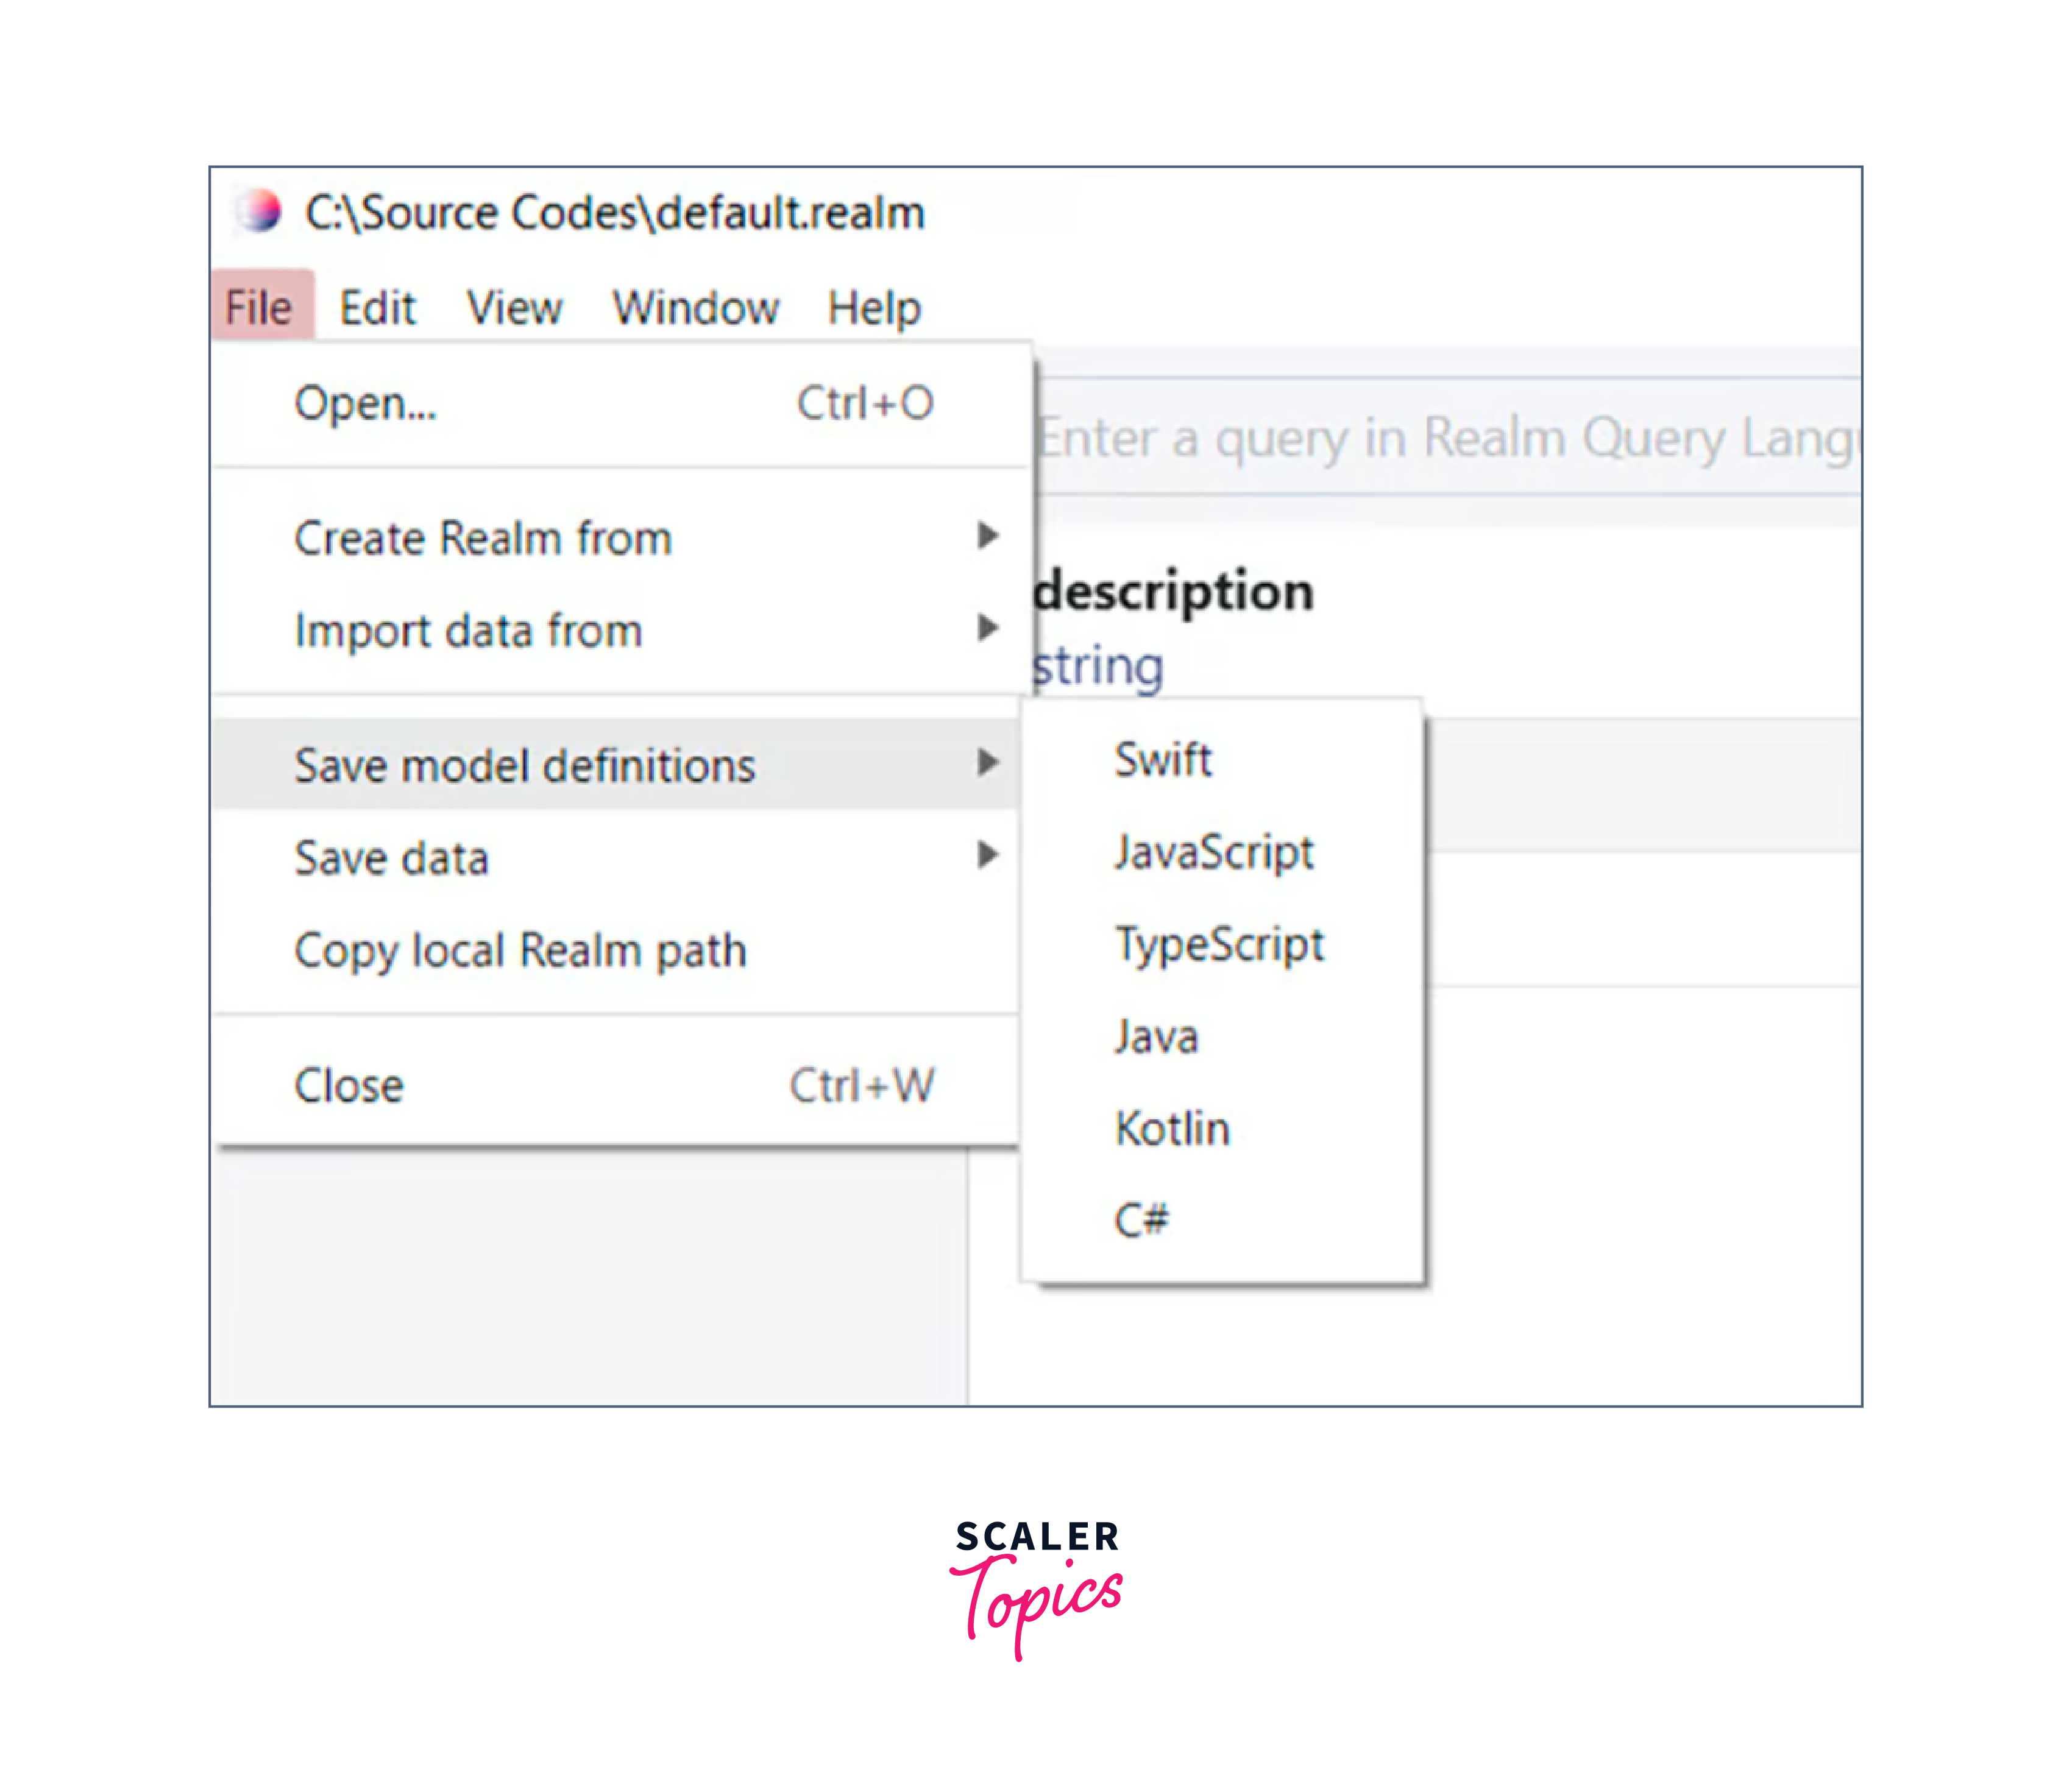
You can save data in a local realm file or JSON format.
FAQs
What is Realm for React Native?
Realm for React Native is an open-source database solution designed specifically for mobile applications built with React Native. It provides a lightweight and efficient alternative to traditional databases, offering real-time data synchronization, offline capabilities, and a user-friendly API.
How does Realm for React Native Differ from Other Databases?
Realm stands out from other databases due to its direct integration within the mobile device, eliminating the need for network requests and providing faster data access. It offers real-time data synchronization, which enables immediate updates across connected devices. Additionally, Realm's API is designed to be intuitive and easy to use, leveraging object-oriented paradigms and reducing the complexity often associated with traditional databases.
Conclusion
- Realm, at its core, is an embedded database engine that can be directly integrated into mobile applications.
- Realm React Native provides a lightweight and efficient database solution.
- Features are Real-time Data Sync, Offline Capabilities, Lightweight and Performant, Easy-to-Use API.
- Realm React native adopts a schemaless approach, which means that, unlike traditional databases, it doesn't enforce strict structure schemes.
- Realm reacts native supports both iOS and Android platforms, making it suitable for developing cross-platform React Native applications.
- Realm React native supports real-time data synchronization, enabling multiple devices or users to collaborate and share data seamlessly.
- Realm React native is capable of handling large datasets and scaling as your application grows.