TestNG in Selenium
Overview
TestNG in Selenium is a powerful testing framework that provides advanced features and functionalities for test automation. It offers comprehensive test management, parallel test execution, configuration flexibility, and reporting capabilities. With TestNG, testers can easily organize and execute their Selenium tests, handle test dependencies, perform data-driven testing, and generate detailed test reports, making it a popular choice for robust and scalable test automation projects.
What is TestNG?
TestNG is a Java-based testing framework for Selenium that provides a wide range of features and functionalities to enhance test automation. It offers advanced capabilities such as parallel test execution, configuration flexibility, comprehensive test management, and detailed reporting.
TestNG allows testers to organize and execute their Selenium tests efficiently, handle test dependencies, perform data-driven testing, and generate comprehensive test reports. With its robust features, TestNG is widely used for scalable and efficient test automation in the Selenium ecosystem.
TestNG in Selenium
TestNG is a powerful testing framework widely used in Selenium for Java-based test automation. It provides numerous features and functionalities that enhance the testing process and make it more efficient and manageable.
- Test organization through annotations such as @Test, @BeforeMethod, and @AfterMethod.
- Flexible test configuration with prioritization, grouping, and dependency management options.
- Support for data-driven testing by parameterizing test methods and providing test data from external sources.
- Parallel test execution for faster feedback and improved test efficiency.
- Advanced assertions, including soft assertions for comprehensive test results.
- Extensive reporting capabilities with customizable HTML reports.
- TestNG listeners for implementing custom functionality during test execution.
- Integration with build tools and CI/CD pipelines for seamless automation workflows.
- Enhanced test management features like grouping, enabling/disabling tests, and controlling test execution order.
- Compatibility with Selenium WebDriver for robust and scalable test automation.
Why Use TestNG with Selenium?
TestNG is widely used in Selenium for several reasons:
- Advanced Test Configuration: TestNG provides flexible and extensive test configuration options. Test methods can be easily annotated with attributes like priority, dependencies, time-outs, and invocation counts. This allows testers to customize and control their test cases' behavior easily.
- Test Grouping and Prioritization: TestNG enables logical grouping of test methods using user-defined groups. This makes it convenient to execute specific tests based on requirements, such as smoke tests, regression tests, or specific feature tests. TestNG also allows the prioritization of test methods, ensuring critical tests are executed first.
- Parallel Test Execution: TestNG offers built-in support for parallel test execution, allowing tests to run concurrently across multiple threads or processes. This significantly reduces the test execution time, leading to faster feedback and increased test efficiency.
- Data-Driven Testing: TestNG simplifies data-driven testing using external data sources like Excel sheets, CSV files, or databases. Test methods can be parameterized, and TestNG can automatically execute the same test with different test data sets, eliminating the need for duplicating test code.
- Powerful Assertions and Reporting: TestNG provides a rich set of assertion methods to validate expected results. It offers detailed test reports with information about test status, execution time, failures, and stack traces. These reports aid in identifying and debugging test failures quickly, facilitating effective troubleshooting.
- Integration with Build Tools and CI/CD Pipelines: TestNG integrates seamlessly with build tools like Maven and Gradle, enabling easy test management and execution as part of the build process. It also integrates well with continuous integration/continuous delivery (CI/CD) pipelines, allowing automated test execution and reporting.
- Extensibility and Customization: TestNG offers an extensive set of APIs and interfaces, allowing testers to extend and customize its behavior according to specific needs. TestNG supports the creation of custom annotations, listeners, and plugins, making it highly adaptable to different testing scenarios.
Advantages of TestNG over JUnit
TestNG and JUnit are both popular testing frameworks in the Java ecosystem, but TestNG offers several advantages over JUnit. Here are some advantages of TestNG over JUnit:
- Flexible Test Configuration: TestNG provides more flexible and comprehensive test configuration options than JUnit. It offers various annotations and attributes to control test execution, including parallel execution, grouping, prioritization, and dependency management. This allows testers to customize and fine-tune test behavior according to specific requirements.
- Data-Driven Testing: TestNG has built-in support for data-driven testing, allowing testers to parameterize test methods and provide test data from external sources such as Excel files, CSV files, or databases. This simplifies the execution of the same test with multiple sets of input data, making tests more versatile and reducing code duplication.
- Parallel Test Execution: TestNG offers native support for parallel test execution, allowing tests to run concurrently across multiple threads or processes. This can significantly reduce test execution time and provide faster feedback, especially in projects with many tests. JUnit, on the other hand, lacks built-in parallel execution capabilities.
- Advanced Assertions: TestNG provides a rich set of built-in assertions, including soft assertions, which allow the execution of all assertions even if some fail. This helps gather more comprehensive test results and diagnose multiple failures at once. JUnit, by default, stops execution upon encountering the first failed assertion.
- Test Configuration Flexibility: TestNG allows testers to define configuration methods such as @BeforeTest, @BeforeSuite, etc., at different levels of the test hierarchy. This gives greater control over the setup and teardown phases of tests. JUnit primarily offers @Before and @After annotations at the class level, limiting the flexibility of configuring test environments.
- Advanced Test Reporting: TestNG provides detailed and customizable HTML test reports, including information about test execution status, logs, and screenshots. These reports facilitate better test results analysis and help identify and debug issues. On the other hand, JUnit generates simpler and less detailed reports by default.
- TestNG Listeners: TestNG supports the use of listeners, which are custom classes that can be used to add functionality to the testing process. Listeners in TestNG provide hooks for various events during test execution, such as test start, test failure, or test completion. This enables testers to implement custom logging, reporting, or other test-related activities.
TestNG Installation and Set Up
To install and set up TestNG, you need to follow these steps:
Step 1: Install TestNG
There are a few different ways to install TestNG. You can use a build tool like Maven or Gradle or manually download the TestNG JAR file and add it to your project.
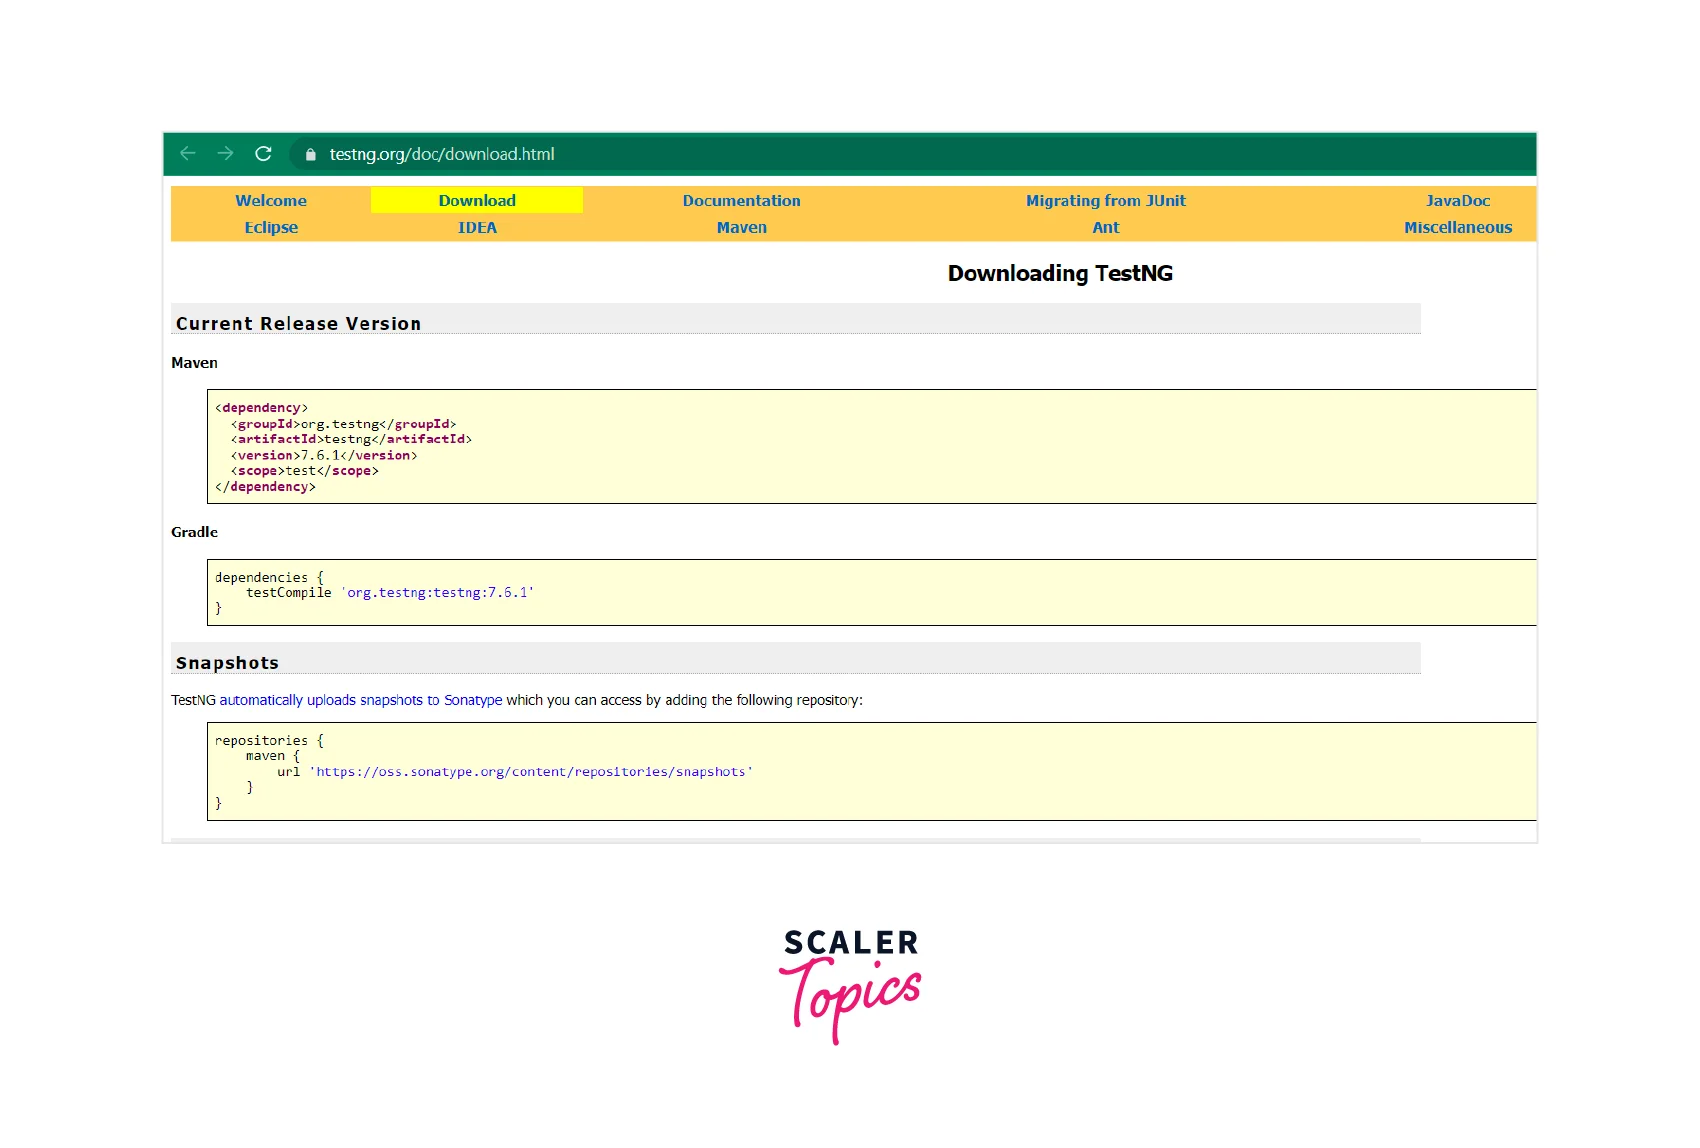
Option 1: Installing with Maven
If you're using Maven, you can add the TestNG dependency to your project's pom.xml file. Open the pom.xml file and add the following lines inside the <dependencies> section:
Save the pom.xml file, and Maven will automatically download and include the TestNG JAR file in your project.
Option 2: Installing manually
If you prefer to install TestNG manually, you can download the TestNG JAR file from the TestNG website.
Once you have the JAR file, you can add it to your project in the following ways:
-
Add it to your project's classpath: You can place the TestNG JAR file in your project's lib folder or any other folder included in the classpath. Depending on your development environment, you may need to configure the classpath settings to include the TestNG JAR file.

-
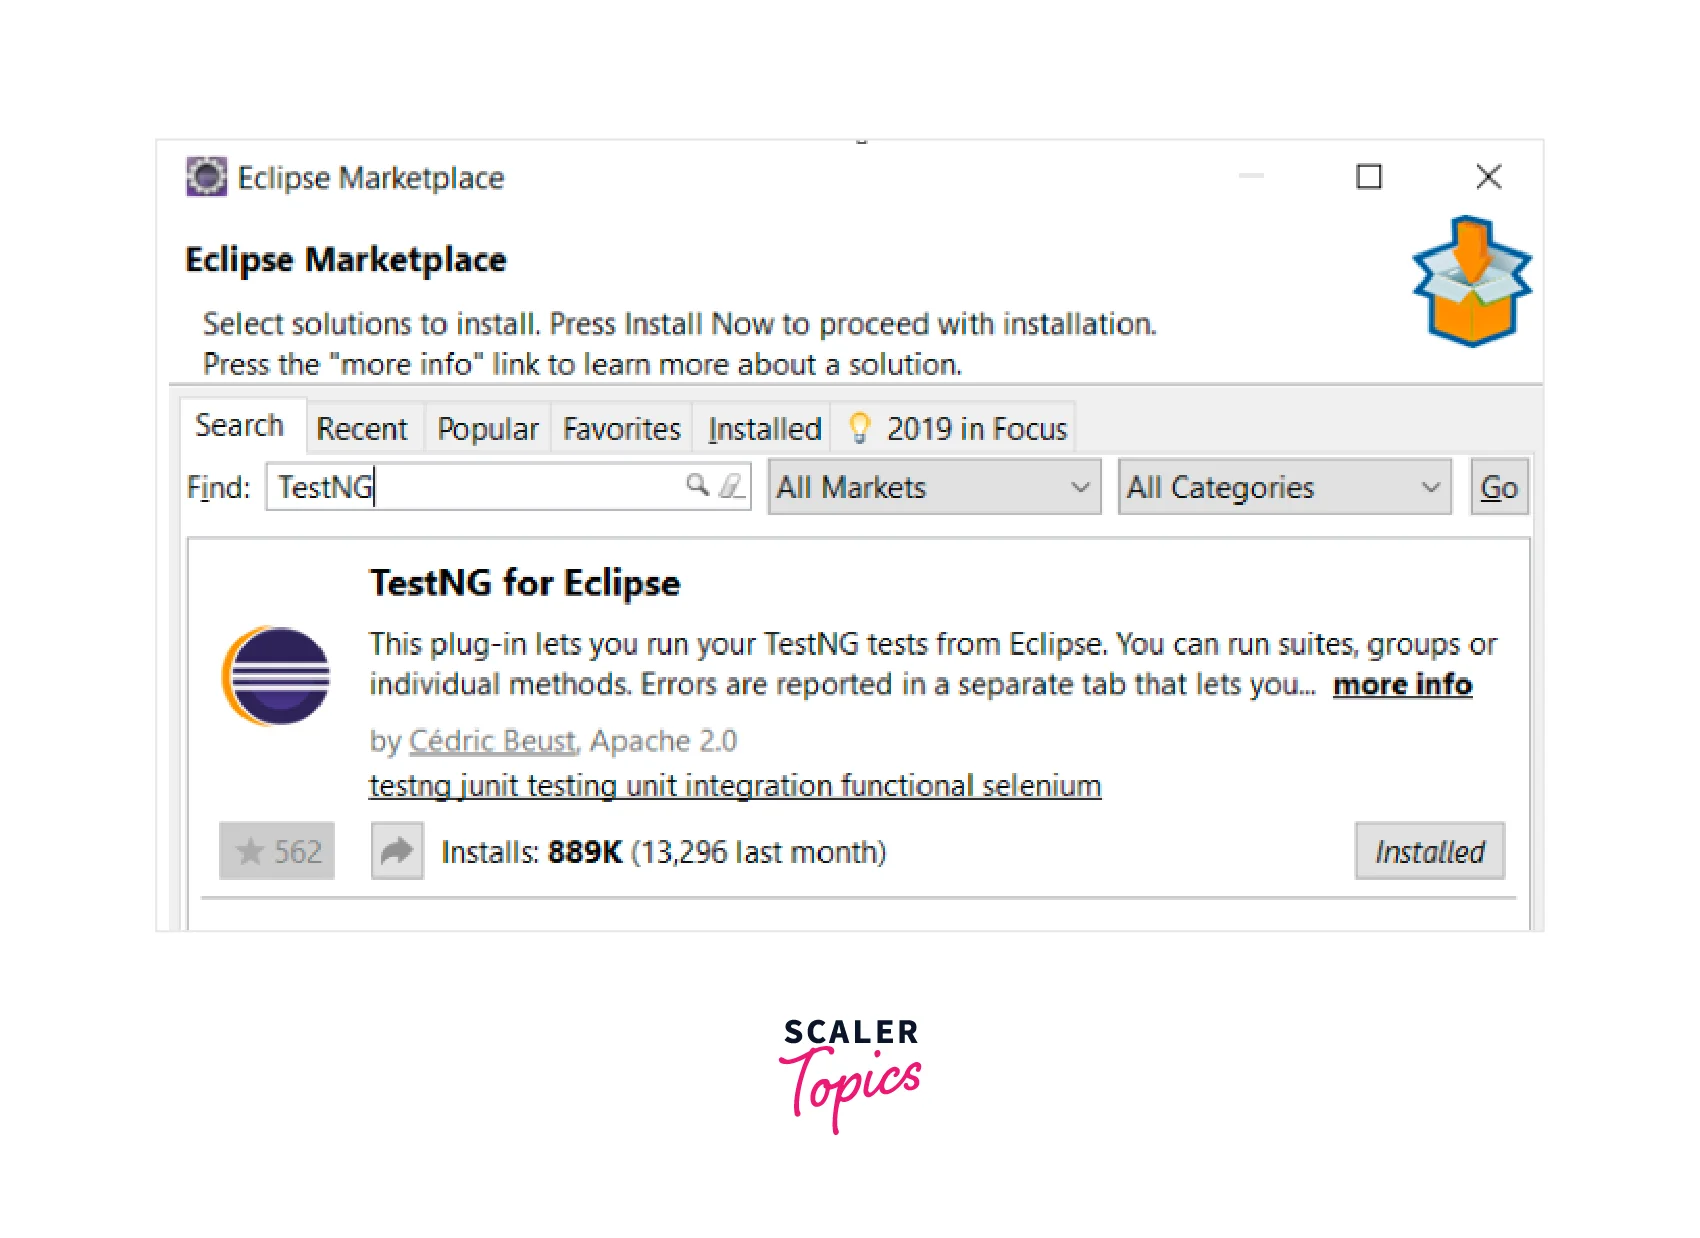
Add it to your IDE: Most modern IDEs allow you to add external JAR files to your project directly from the IDE. Refer to your IDE's documentation to learn how to add external JAR files.
Step 2: Set up TestNG in Your Project
Once TestNG is installed, you need to set up your project to use TestNG for testing. Here are the steps:
- Create a new Java class for your test cases, or open an existing Java class that you want to convert into a TestNG test class.
- Add the TestNG annotations to your test class. TestNG uses annotations to mark methods as test methods, set up configurations, and define test dependencies. Here are a few commonly used annotations:
-
@Test: Marks a method as a test method.
-
@BeforeSuite, @AfterSuite: Run once before or after all tests in the suite.
-
@BeforeTest, @AfterTest: Run before or after all tests in a specific <test> tag in the XML suite file.
-
@BeforeClass, @AfterClass: Run before or after all tests in the same class.
-
@BeforeMethod, @AfterMethod: Run before or after each test method.
A detailed explanation of annotations is covered below.
- Save the changes to your test class.
Step 3: Run Your TestNG Tests
You can run your tests once you've set up your project with TestNG. There are different ways to run TestNG tests depending on your development environment. Here are a few common methods:
- Run tests from the command line:
- If you're using Maven, you can run TestNG tests from the command line by executing the following command in your project's root directory:mvn test
- If you're using Gradle, you can run TestNG tests with the following command: gradle test
- Run tests from your IDE: Most popular IDEs have built-in support for TestNG. You can usually right-click on your test class or test suite and select an option like "Run as TestNG test" or "Run all tests."
TestNG Annotations
TestNG provides several annotations that you can use to control the execution and behavior of your test methods. Let's take a look at some commonly used TestNG annotations:
-
@Test: This annotation marks a test method. TestNG will execute methods annotated with @Test as part of the test suite.
-
@BeforeSuite and @AfterSuite: These annotations mark methods that should be run before and after all tests in the suite, respectively. Typically, you use these annotations for setup and teardown tasks common to the entire suite.
-
@BeforeTest and @AfterTest: Similar to @BeforeSuite and @AfterSuite, these annotations mark methods that should be run before and after all tests within a specific <test> tag in the XML suite file.
-
@BeforeClass and @AfterClass: These annotations mark methods that should be run before and after all tests within the same test class. They are useful for setup and teardown tasks specific to the test class.
-
@BeforeMethod and @AfterMethod: These annotations mark methods that should be run before and after each test method execution. They are commonly used for setup and teardown tasks specific to each test.
-
@DataProvider: This annotation marks a method that provides data for test methods. TestNG can invoke this method to retrieve test data, which is then passed to test methods using the dataProvider attribute.
-
@Parameters: This annotation is used to specify parameters for a test method. You can define parameters in the testng.xml file or as method parameters in a separate data provider method.
-
@Test(dependsOnMethods = {...}): This annotation allows you to define dependencies between test methods. The specified test method(s) will be executed before the current test method.
-
@Test(enabled = false): This annotation disables a test method. The method will be skipped during test execution.
-
@Test(timeOut = ...): This annotation specifies the maximum time a test method should execute. If the test method exceeds the specified timeout value, it will be marked as a failure.
-
@BeforeGroups: This annotation is used to mark a method that should be executed before a specific group of test methods. The group of test methods is defined using the groups attribute in the @Test annotation. The method annotated with @BeforeGroups will run before any test method that belongs to the specified group.
-
@AfterGroups: This annotation is used to mark a method that should be executed after a specific group of test methods. The group of test methods is defined using the groups attribute in the @Test annotation. The method annotated with @AfterGroups will run after all the test methods that belong to the specified group have been executed.
-
@Listeners: This annotation is used to specify one or more listener classes for a test class or a test suite. Listeners are used to customize the behavior of TestNG and perform actions at various stages of the test execution, such as before/after test methods, before/after test classes, before/after test suites, etc. By using the @Listeners annotation, you can add listener classes to your test classes or test suites.
-
@Parameters: This annotation is used to specify parameters for a test method or a configuration method. It allows you to pass parameters to your test methods or configuration methods from an external source like an XML file or a data provider.
-
@Factory: The @Factory annotation is used in TestNG to define a factory method that creates instances of test classes dynamically. It allows you to generate multiple instances of a test class based on different criteria or inputs.
Creating a New TestNG Test File
To create a new TestNG test file in Eclipse, you can follow these steps:
-
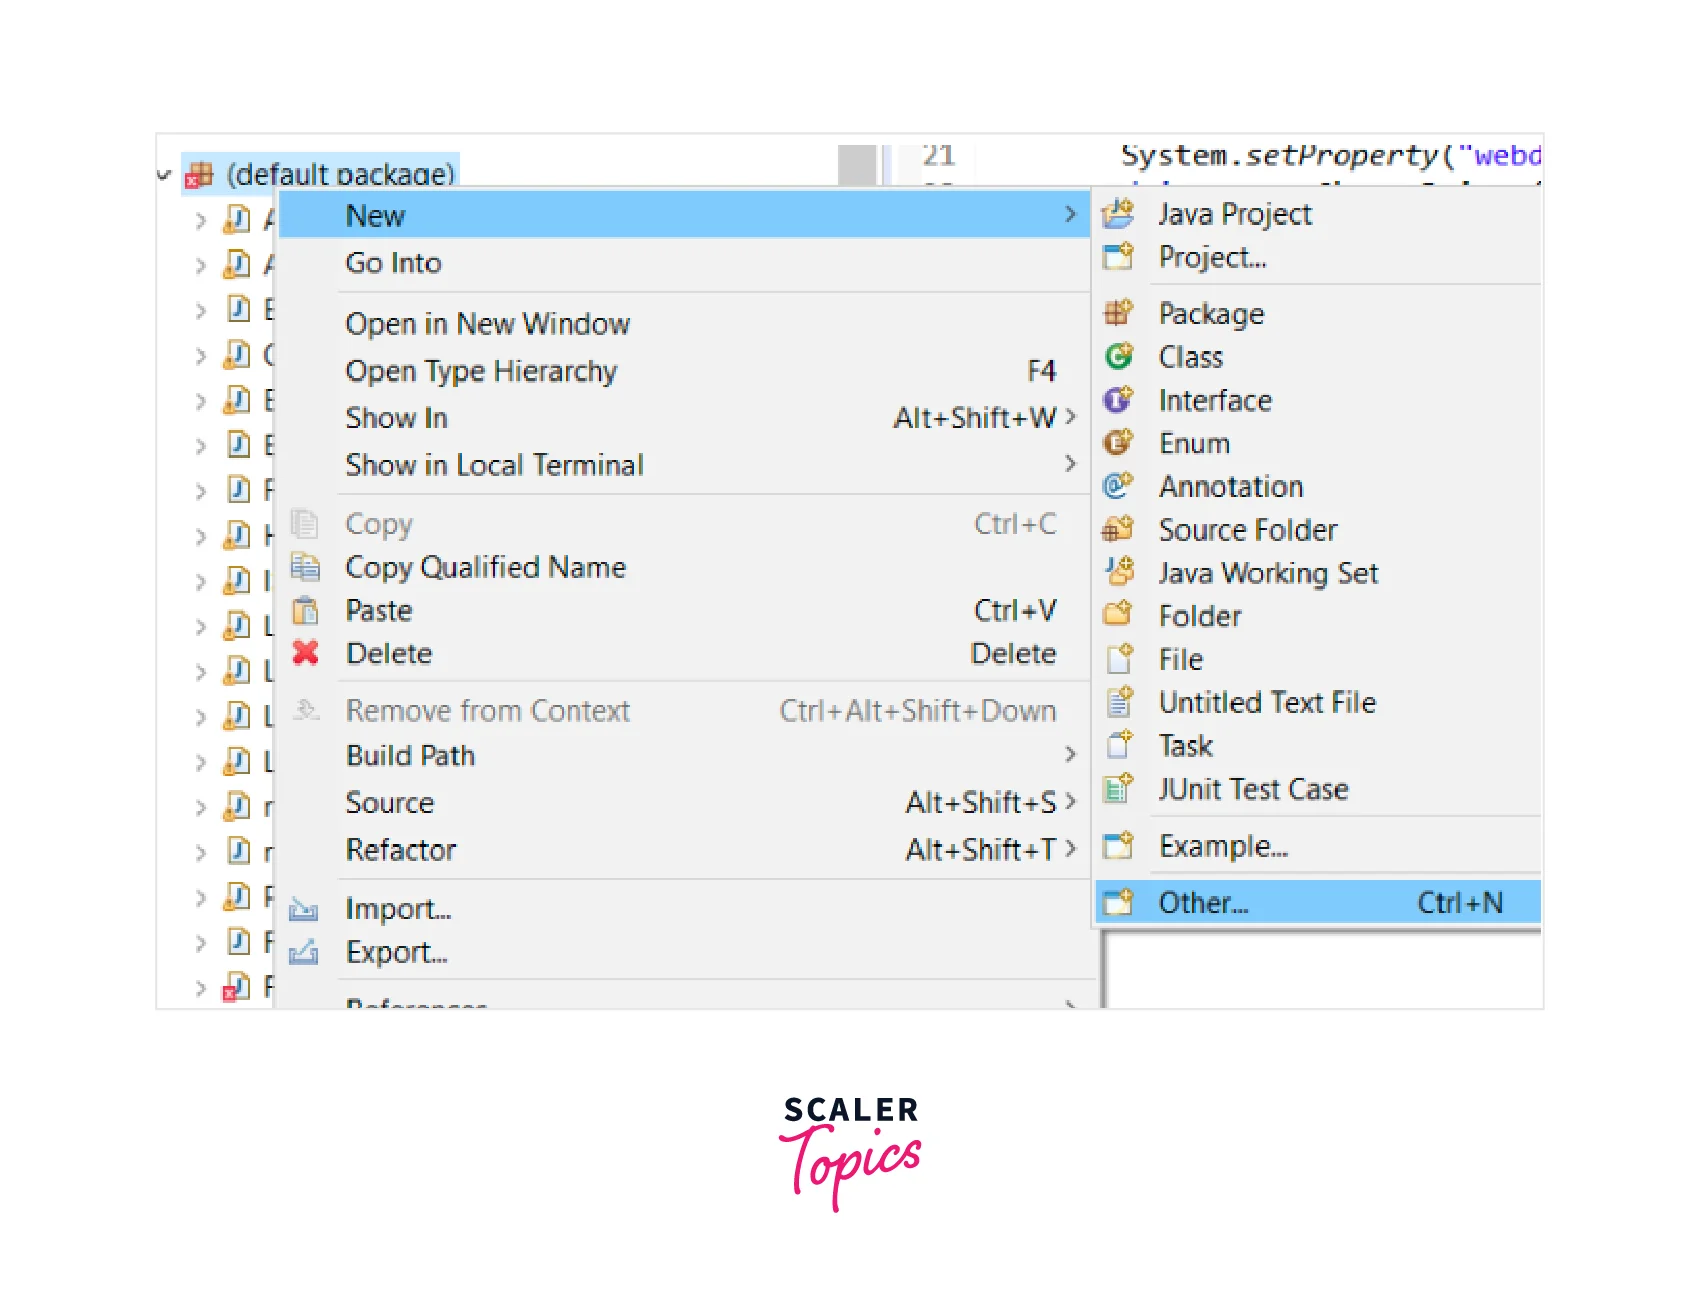
Open Eclipse IDE. Right-click on the package or directory where you want to create the test file.
-
Go to New from the context menu and click Other.
-
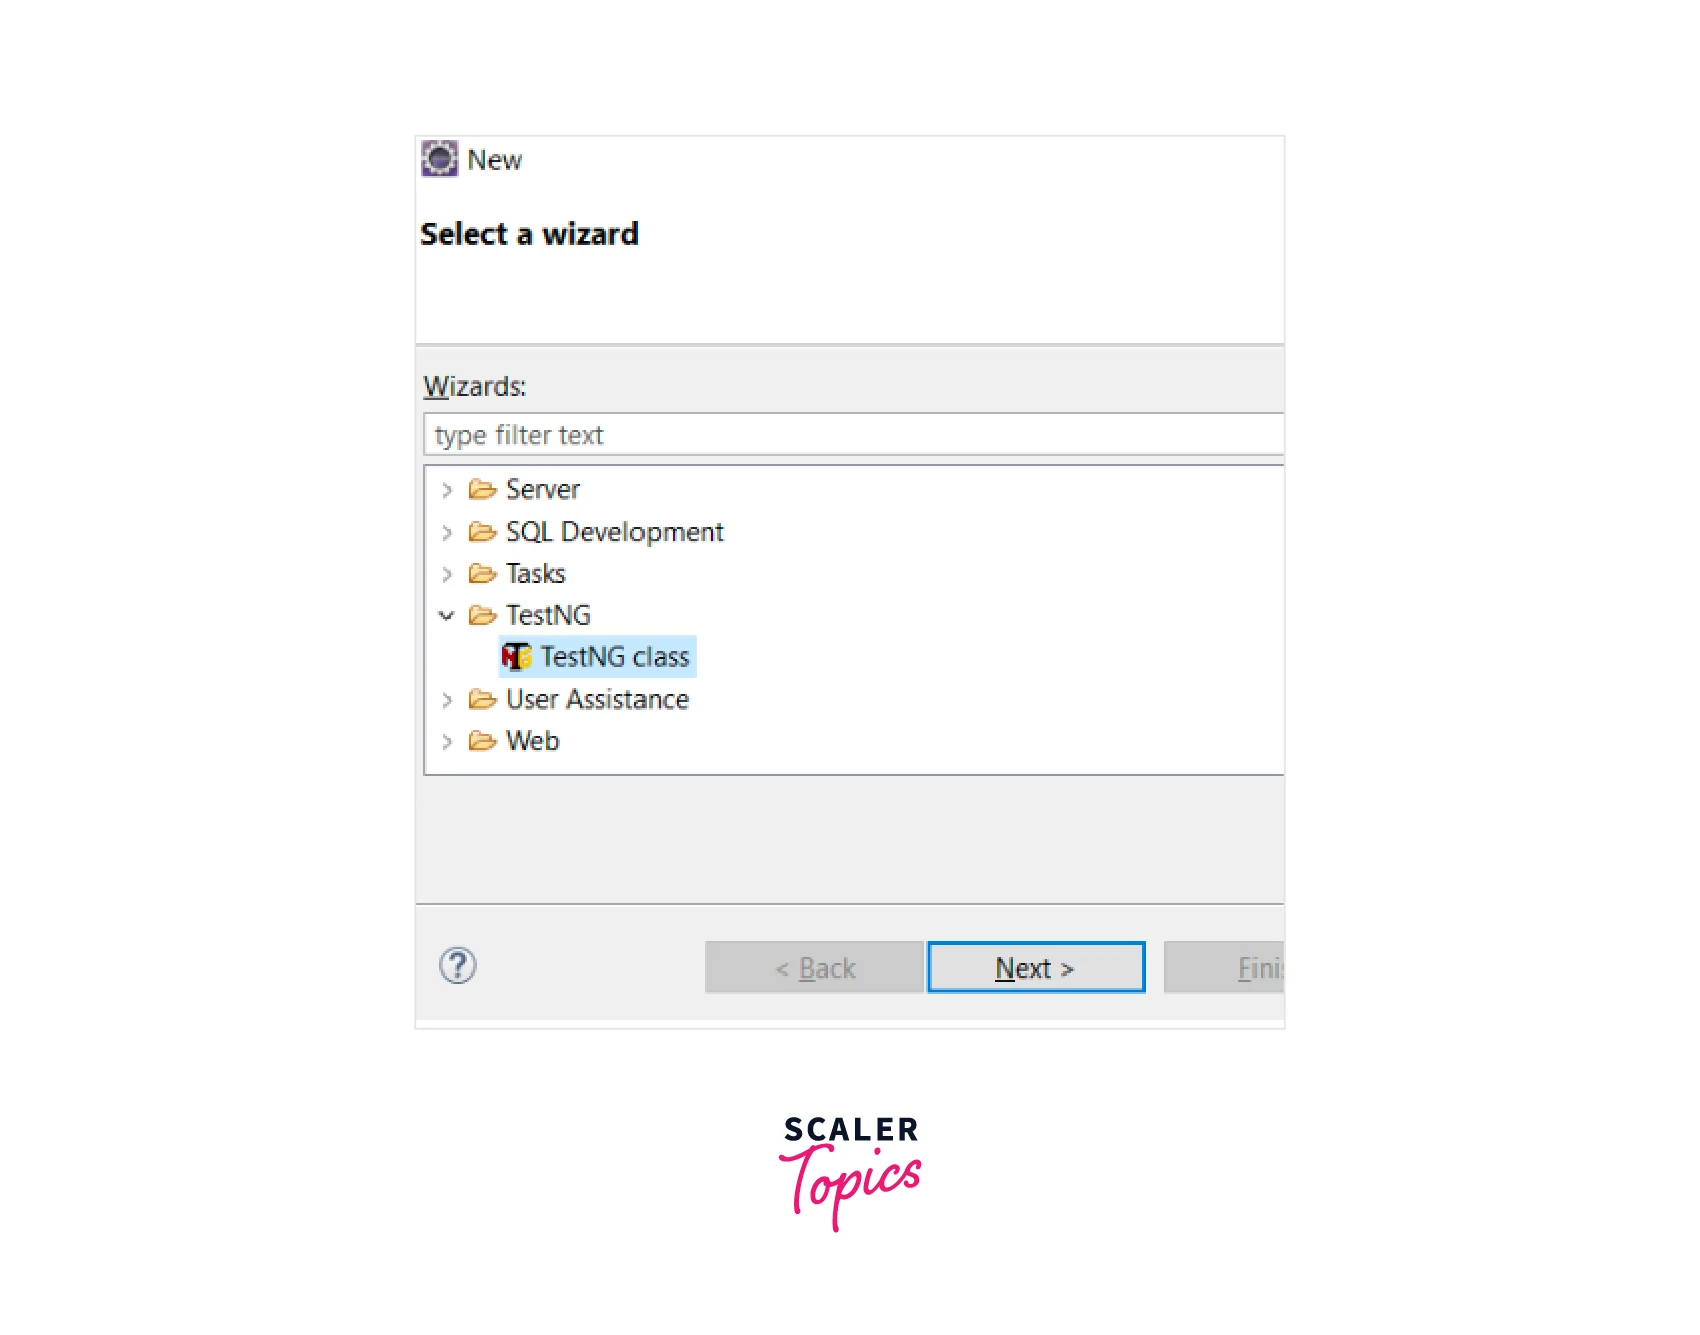
Expand the 'TestNG' folder in the New dialog and select TestNG Class. Then click on the Next button.
-
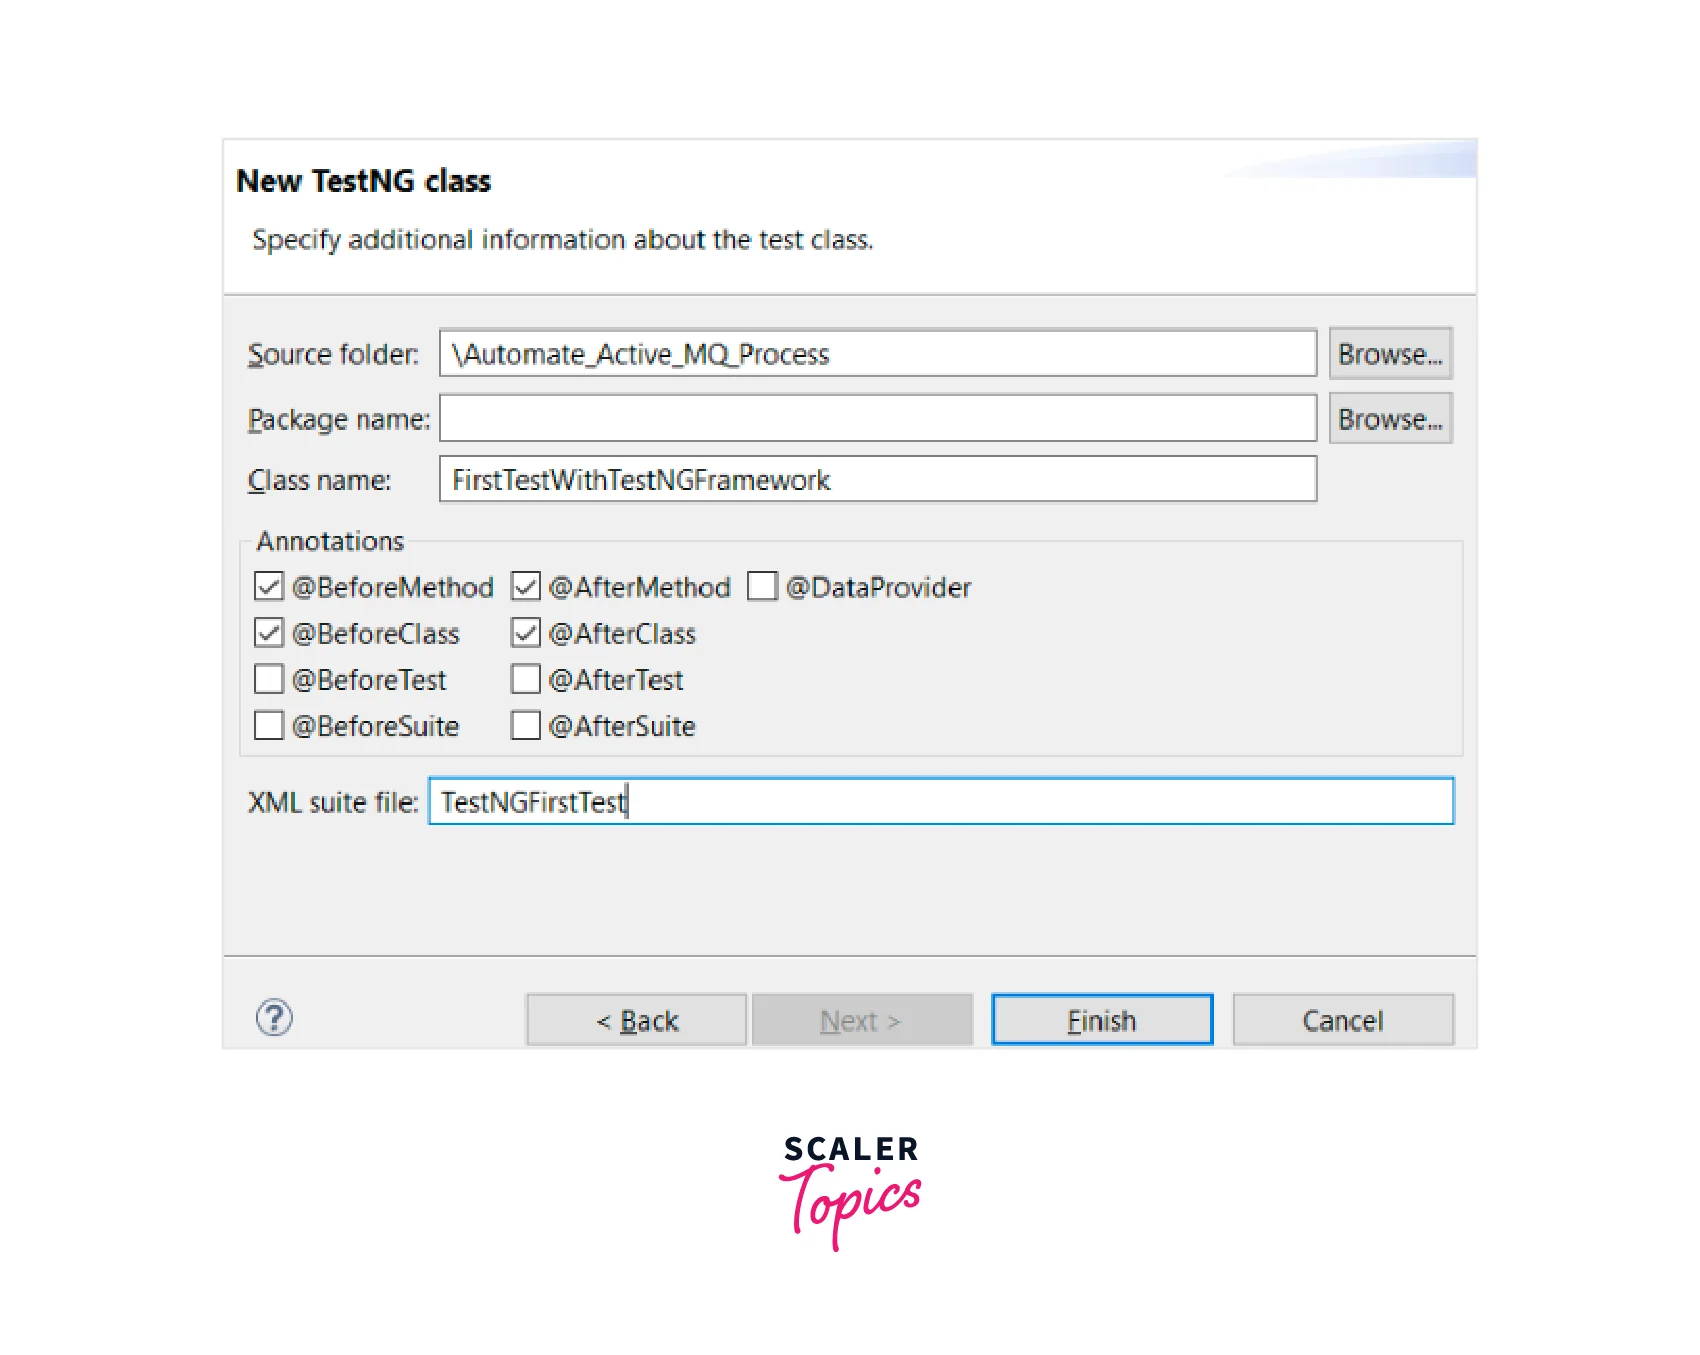
In the New TestNG Class dialog, provide the following information:
-
Name: Enter a name for your test class.
-
Package: Choose the package where you want to create the test class.
-
Class under test: Select the class that you want to test. Click on the Finish button.
-
Eclipse will generate the TestNG test file with the default template. You will see the test class open in the editor.
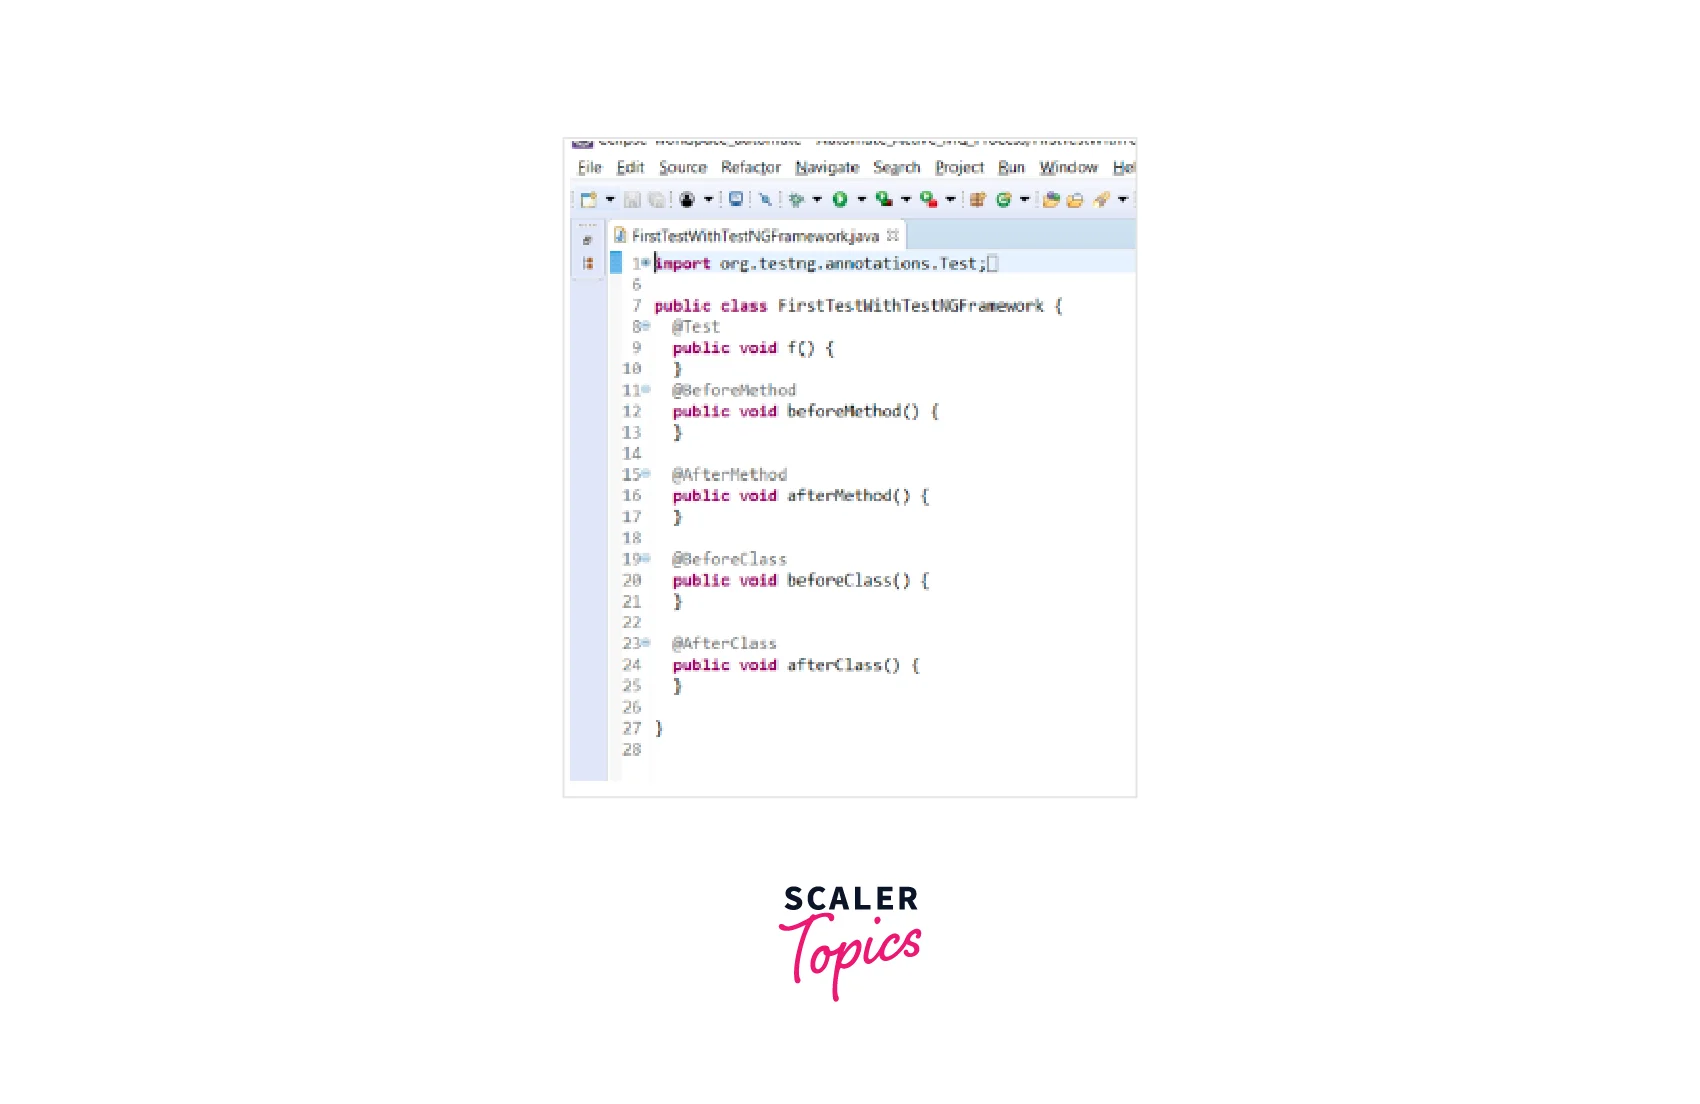
Inside the generated test class, you can start writing your test methods using the TestNG annotations such as @Test, @BeforeMethod, @AfterMethod, etc.
-
Save the file after writing your test methods.
You have now successfully created a new TestNG test file in Eclipse. You can continue adding test methods, configuring test parameters, and running the tests using TestNG's features and Eclipse's test runners.
What is Parameterization in TestNG?
Parameterization in TestNG refers to the ability to provide different sets of input data to a test method or test class. It allows you to execute the same test logic with multiple data values, enabling you to test various scenarios and ensure the robustness of your test cases.
TestNG provides several ways to achieve parameterization:
- TestNG XML Parameters: You can pass parameters to test methods or test classes using the <parameter> tag in the TestNG XML configuration file. This approach is useful when running the same test with different inputs without modifying the test code.
- Data Providers: TestNG supports the use of data providers, which are methods that provide data to test methods. A data provider method is annotated with @DataProvider and returns a two-dimensional object array or an iterator object. Test methods can then be annotated with @Test(dataProvider = "dataProviderMethodName") to receive the data from the data provider.
- Data-driven Testing: TestNG allows you to perform data-driven testing by combining the @DataProvider annotation with other annotations such as @Test, @Parameters, or @Factory. This approach enables you to define multiple sets of test data and execute the test methods for each data set separately.
- External Data Sources: TestNG can integrate with external data sources such as Excel spreadsheets, CSV files, databases, or JSON/XML files. You can create custom data providers that read data from these sources and provide it to the test methods.
An example of using an external data source (CSV file) as a data provider in TestNG:
Code Explanation
The entire code can be broken down for better understanding:
- The import statements import the necessary classes for TestNG, file I/O, and data providers.
- The TestClass class is defined, which contains the test method and the data provider method.
- The testMethod is annotated with @Test and specifies dataProvider = "csvDataProvider". This means that the test method will be executed multiple times, each time with data provided by the method named csvDataProvider.
- The provideData method is annotated with @DataProvider(name = "csvDataProvider"). This method is responsible for reading data from a CSV file and returning it as a 2D array of objects.
- In the provideData method, a CSV file path is specified, along with a line variable, a delimiter (in this case, a comma), and a data array to store the extracted data.
- The code then opens the CSV file using a BufferedReader and counts the total number of lines in the file to determine the size of the data array.
- The data array is initialized with the appropriate size to hold the data.
- The BufferedReader is closed and reopened to reset the reader position.
- The code then iterates over each line of the CSV file, splitting it into individual values using the specified delimiter. The values are then assigned to the respective indices of the data array.
- After reading all the data from the CSV file, the data array is returned.
Conclusion
- TestNG is a Java-based testing framework for Selenium that enhances test automation.
- It provides advanced features like parallel test execution, flexible test configuration, and comprehensive test management.
- Custom data providers can be created to read data from external sources and provide it to test methods.
- TestNG offers powerful assertions, parallel test execution, and extensive reporting capabilities.
- It integrates well with build tools and CI/CD pipelines, allowing seamless automation workflows.
- TestNG provides flexibility, extensibility, and customization options through annotations and listeners.
- TestNG offers advantages over JUnit, including more flexible test configuration, data-driven testing support, and parallel execution capabilities.
- TestNG annotations like @Test, @BeforeSuite, @AfterMethod, etc., allow controlling test execution and defining test setup and teardown tasks.
- TestNG supports parameterization, allowing the same test logic to be executed with different data values.
- Parameterization can be achieved using TestNG XML parameters or data providers.
- TestNG XML parameters allow passing values to test methods or classes directly from the TestNG XML configuration file.
- Data providers in TestNG are methods annotated with @DataProvider that provide test data to test methods.
- Data-driven testing is supported in TestNG by combining data providers with other annotations.
- TestNG can integrate with external data sources such as Excel spreadsheets, CSV files, databases, or JSON/XML files.