What is WPS in Wi-Fi?
Overview
WPS stands for WiFi Protected Setup and is a network security standard whose aim is to make connections between wireless devices and a router in a fast and easy way. The Wi-Fi Protected Setup or WPS was originally known as Wi-Fi Simple Config. The WPS was built by Cisco in the year 2006. It was introduced to allow home users (who have little knowledge about networks and wireless security) to set up Wi-Fi Protected Access and also to help them add new wireless devices to an existing network. The WPS also allows the users to block unauthorized users of WiFi and give easy access to the authorized users by just clicking the WPS button present on the home router.
What is WPS?
WPS stands for Wifi Protected Setup and is a network security standard whose aim is to make connections between wireless devices and a router in a fast and easy way. It is widely used to create secure wireless home networks. We can use WPS to add devices to WiFi networks without entering long passwords. The WPS does not handle the connection of Wifi but it handles the data sending between the client device(s) and the router.
The WPS is a password-protected wireless network that supports the WPA (Wifi Protected Access Personal) or WPA2 (Wifi Protected Access2 Personal) security protocols. It is quite secure as it does not work with wireless networks that support dis-favored Wired Equivalent Privacy (WEP) security as it can be easily hacked by hackers (even with simple basic skills).
Now for making the connection between wireless devices and a router, we must know the name of the network i.e. SSID (Service Set Identifier) and the password of the wireless network (which is also known as the WPA-PSK key). So, our device first needs to select the network that we want to connect to and then enter its password.
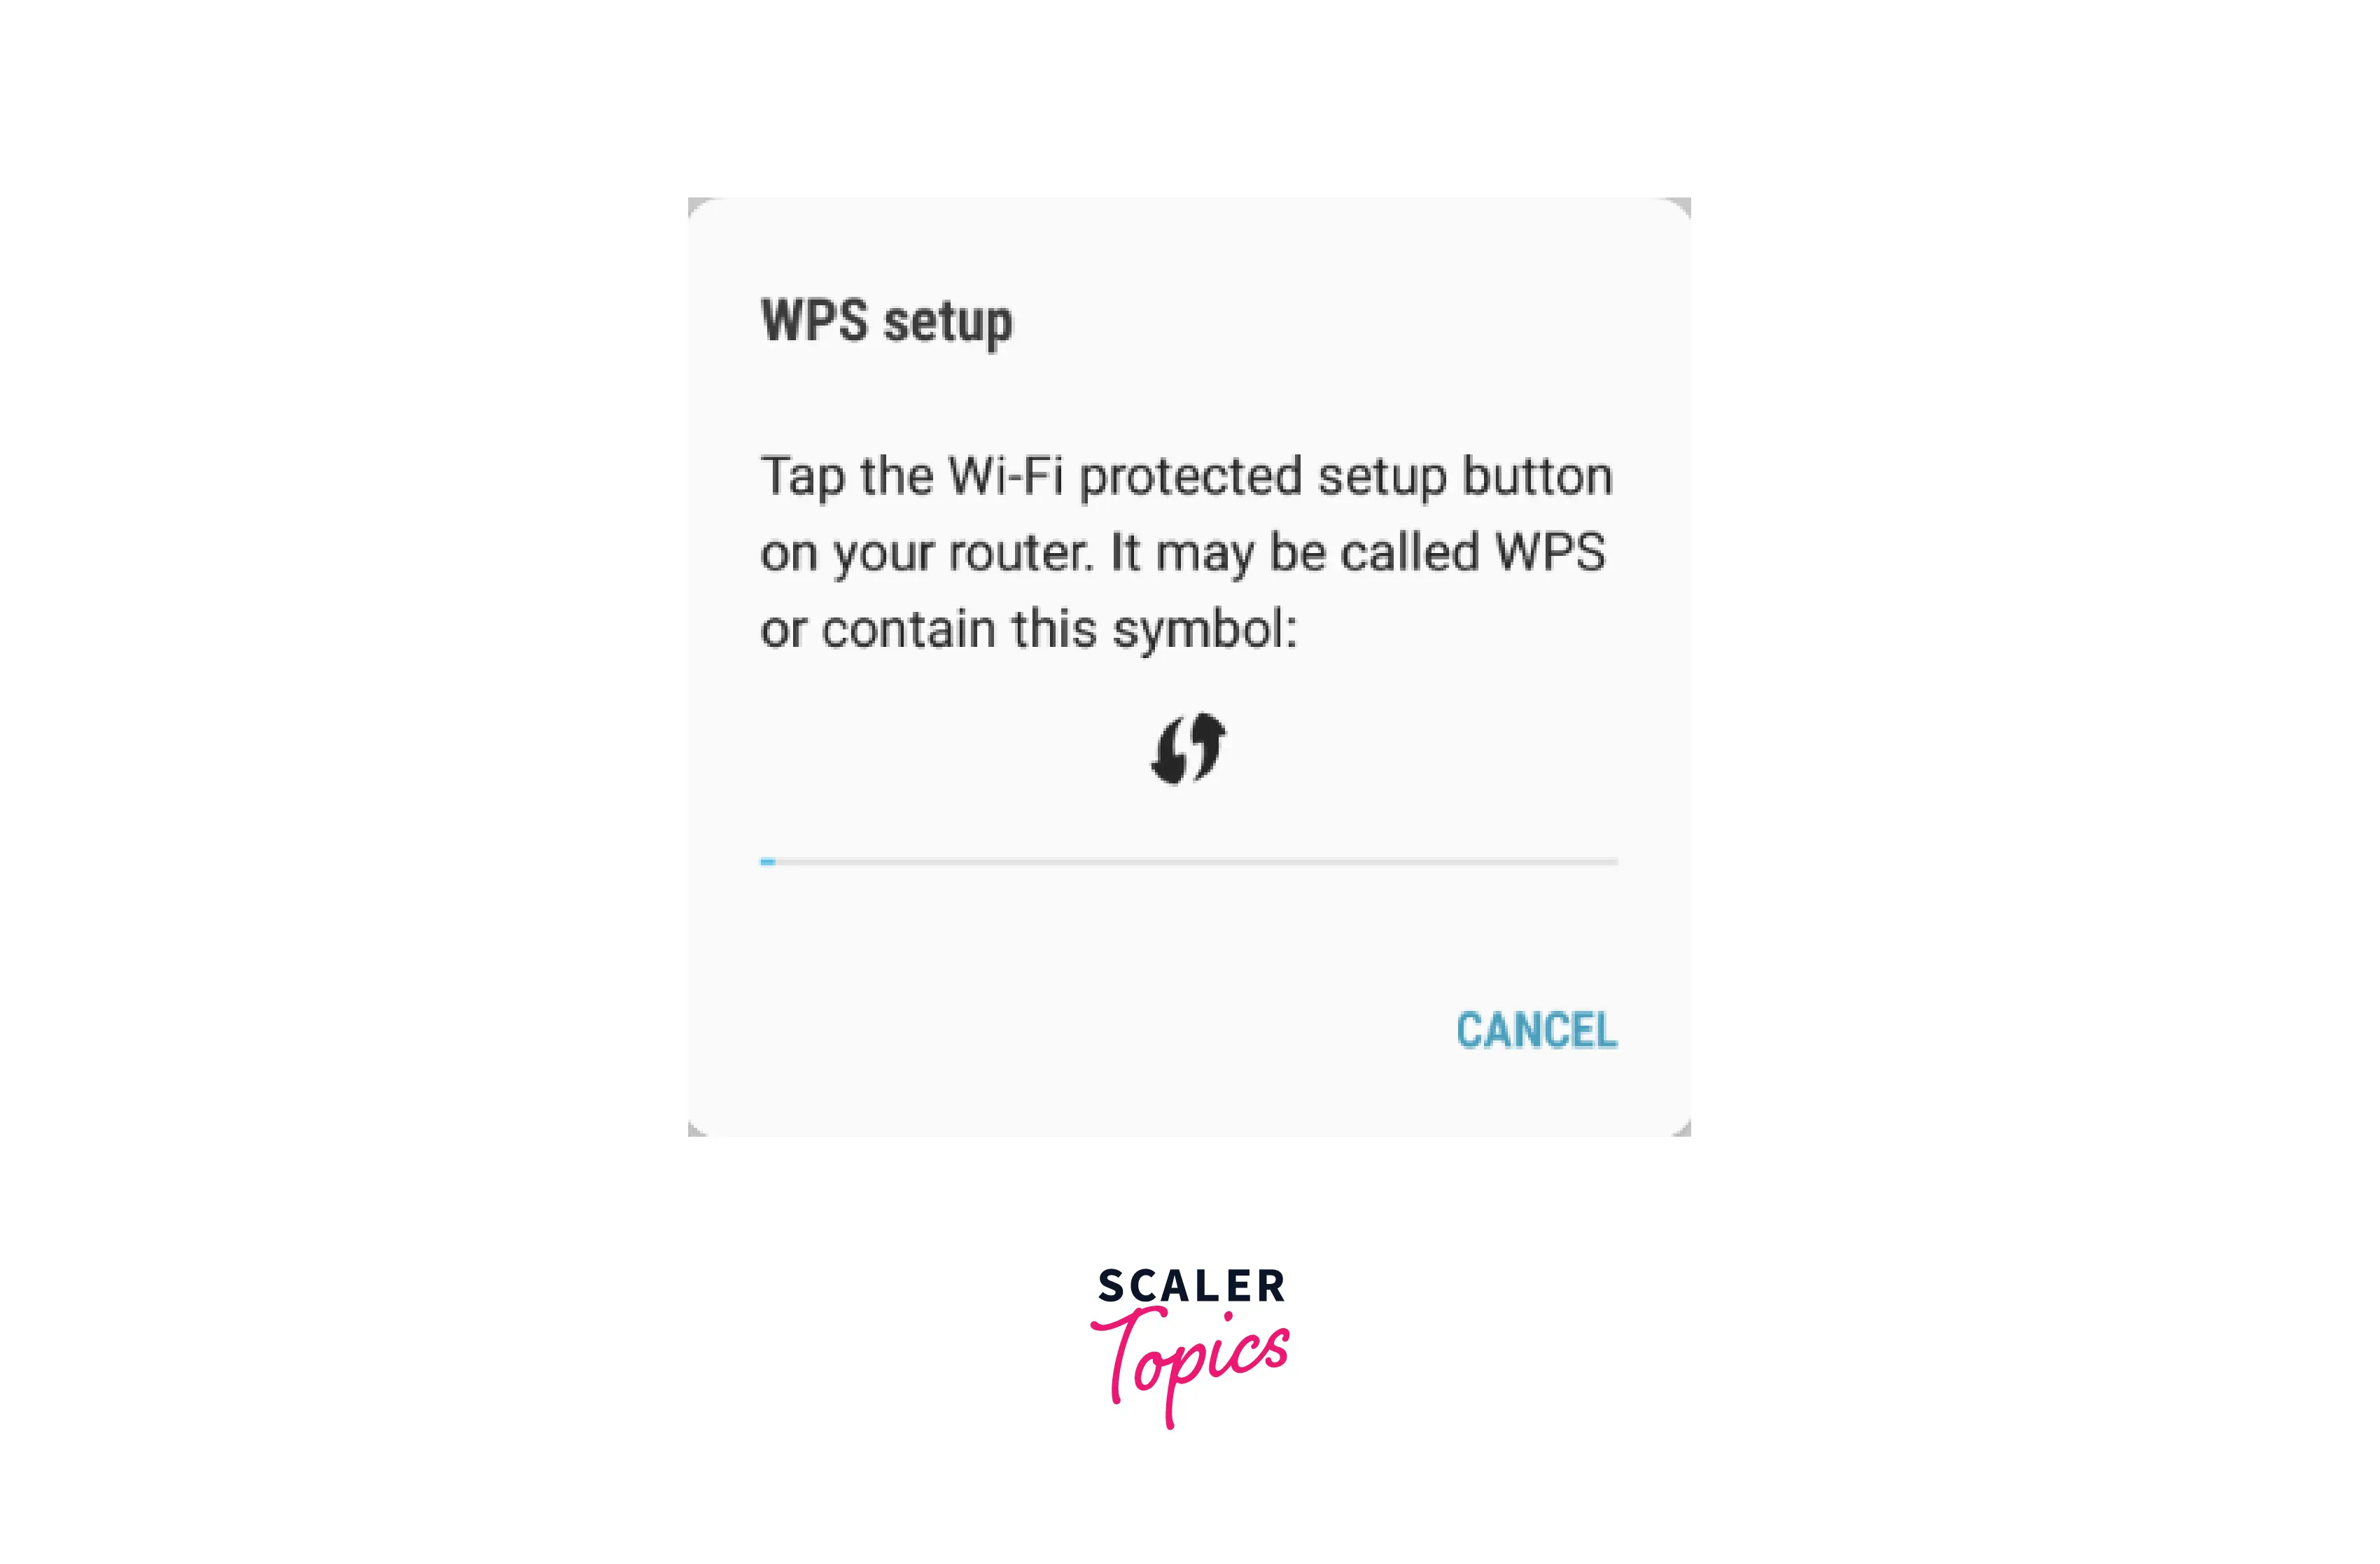
Refer to the image provided below to see what a Wi-Fi WPS setup looks like on a smartphone.
The Wi-Fi Protected Setup or WPS was originally known as Wi-Fi Simple Config. The WPS was built by Cisco in the year 2006. It was introduced to allow home users (who have little knowledge about networks and wireless security) to set up Wi-Fi Protected Access and also to help them add new wireless devices to an existing network. The WPS also allows the users to block unauthorized users of WiFi and give easy access to the authorized users by just clicking the WPS button present on the home router.
After learning about What is WPS in Wifi, let us learn about What can a WPS do?
What Can WPS Do?
The main aim of the WPS is to simplify the connection procedure. The WPS allows us to connect to the network. Now for connecting to the network, we have two options the first one being the push button and the other one using a PIN. Push buttons can be found in some devices but it is not mandatory on the other hand, push buttons are mandatorily found in all Wifi Setup devices.
So, far we have discussed the WPS and its major usage, let us discuss how the WPS connections can be performed in the next section.
How Does WPS Work?
The WPS can work in four ways. Let us discuss them briefly.
- For connecting with new devices, we first need to discover new devices by clicking the WPS button present on the router. After that, we can select the network that we want to connect to. Now, the device will automatically get connected to the wireless network without even entering the network password.
- Various wireless devices like range extenders, or wireless printers have their own WPS button. So to connect these wireless devices to the network, we need to press the WPS button on both the devices (router and wireless device like printer). In such cases, the WPS automatically sends the password of the network to the other device and the device remembers the password for further connection.
- Another method of connection can be using the eight-digit WPS pin code. The WPS present on the router comes with an automatically generated PIN code (which cannot be configured by the users).
Note: The connection PIN can be found on the WPS configuration page of our router. If we enter the correct PIN, then the device gets authenticated and connected to the wireless network.
- Now some devices do not come with a WPS button. If the device does not contain a WPS button but supports WPS, it can generate a client PIN. So, we can enter this generated PIN in our router's configuration panel so that the router can use this configuration to add other devices to our network.
Technical Architecture
We have learned about What is WPS in Wifi, let us now discuss the architecture of the WPS. The WPS protocol defines the three types of network devices, they are:
-
Registrar: The registrar is a device that may be integrated into wireless AP (Access Point) and has the authority to revoke as well as issue to a network. It can also be provided as a separate device (not integrated with an AP).
-
Enrollee: An enrollee is a device that wants to join the wireless network. It is also termed a client device.
-
AP: AP stands for access point which is a proxy acting between the registrar and the client device (enrollee).
Modes of WPS
There are four methods by which we can connect a device using WPS, let us discuss them.
Transform Your Career
Choose from our industry-leading programs designed for career success
Modern Software and AI Engineering Program
Master full-stack development with AI integration

Modern Data Science and ML with specialisation in AI
Advanced data science techniques with AI specialization
Advanced AIML with Specialisation in Agentic AI
Deep dive into AIML with focus on Agentic systems
DevOps, Cloud & AI Platform Engineering
Build and manage AI-powered cloud infrastructure
AI Engineering Advanced Certification by IIT-Roorkee
Premier AI engineering certification from IIT-Roorkee
1. PIN Method
The first method of connecting a new device is using a connection PIN that can be found on the sticker. So, we use this connection PIN and type this connection PIN on the access point of the network. On the other hand, we can also enter the PIN generated by the access point on the new device(s) to connect them. This is one of the most basic methods and hence it is supported by every device. So, every keypad or smart device (like smartphones) supports the PIN mode of network connection.
2. Push Button Method
The second method of connecting a new device involves a button that needs to be pressed by the user for the connection. Now, this button can be a physical button present on the client's wireless device or it can be a virtual button that can be found on the access point. In many devices whenever we turn on the connection mode, the connection gets established automatically within a few minutes. As we have discussed previously the PIN method is mandatory for every keypad and smart device, this push method is compulsory for the access point but it is optional in connecting devices.
Scaler Placement Report and Statistics
Scaler learners achieved 2.5x salary growth with average post-Scaler CTC reaching ₹23L.
3. Near-field Communication Method
The third method of connecting a new device involves bringing the connecting devices (client devices) near the access point to allow near-field communication between the devices. In this mode, NFC (Near Field Communication) and RFID (Radio Frequency Identification) tags are also used. Unlike the previous two methods, this connection method is optional.
4. USB Method
The fourth method of connecting a new device involves a USB flash drive. In this method, the user uses the USB flash drive as a medium of communication to transfer the data between the device and the access point of the network. Unlike the first two methods, this connection method is also optional.
WPS Password Security Requirements
The Wi-Fi Protected Setup is only available in wireless networks that require a password before establishing a connection. The WPS connection is encrypted with security protocols such as WPA/WPA2 or WPA3. The WPS does not support the WEP security hence the WPS does not work with the networks that support WEP (Wired Equivalent Privacy) security as WEP is now deprecated and can easily be hacked by any hacker with some basic skill set.
Where is the WPS Button on a Mesh Wi-Fi System?
Some devices do not have the physical WPS button, for example, devices from ASUS and TP-Link, and they are usually termed mesh WiFi systems. So, in mesh WiFi systems we need to turn on the WPS via their firmware only.
Many of the mesh Wi-Fi systems have a hidden WPS button present in the bottom part of the device. For example, Linksys Velop. Refer to the image provided below.
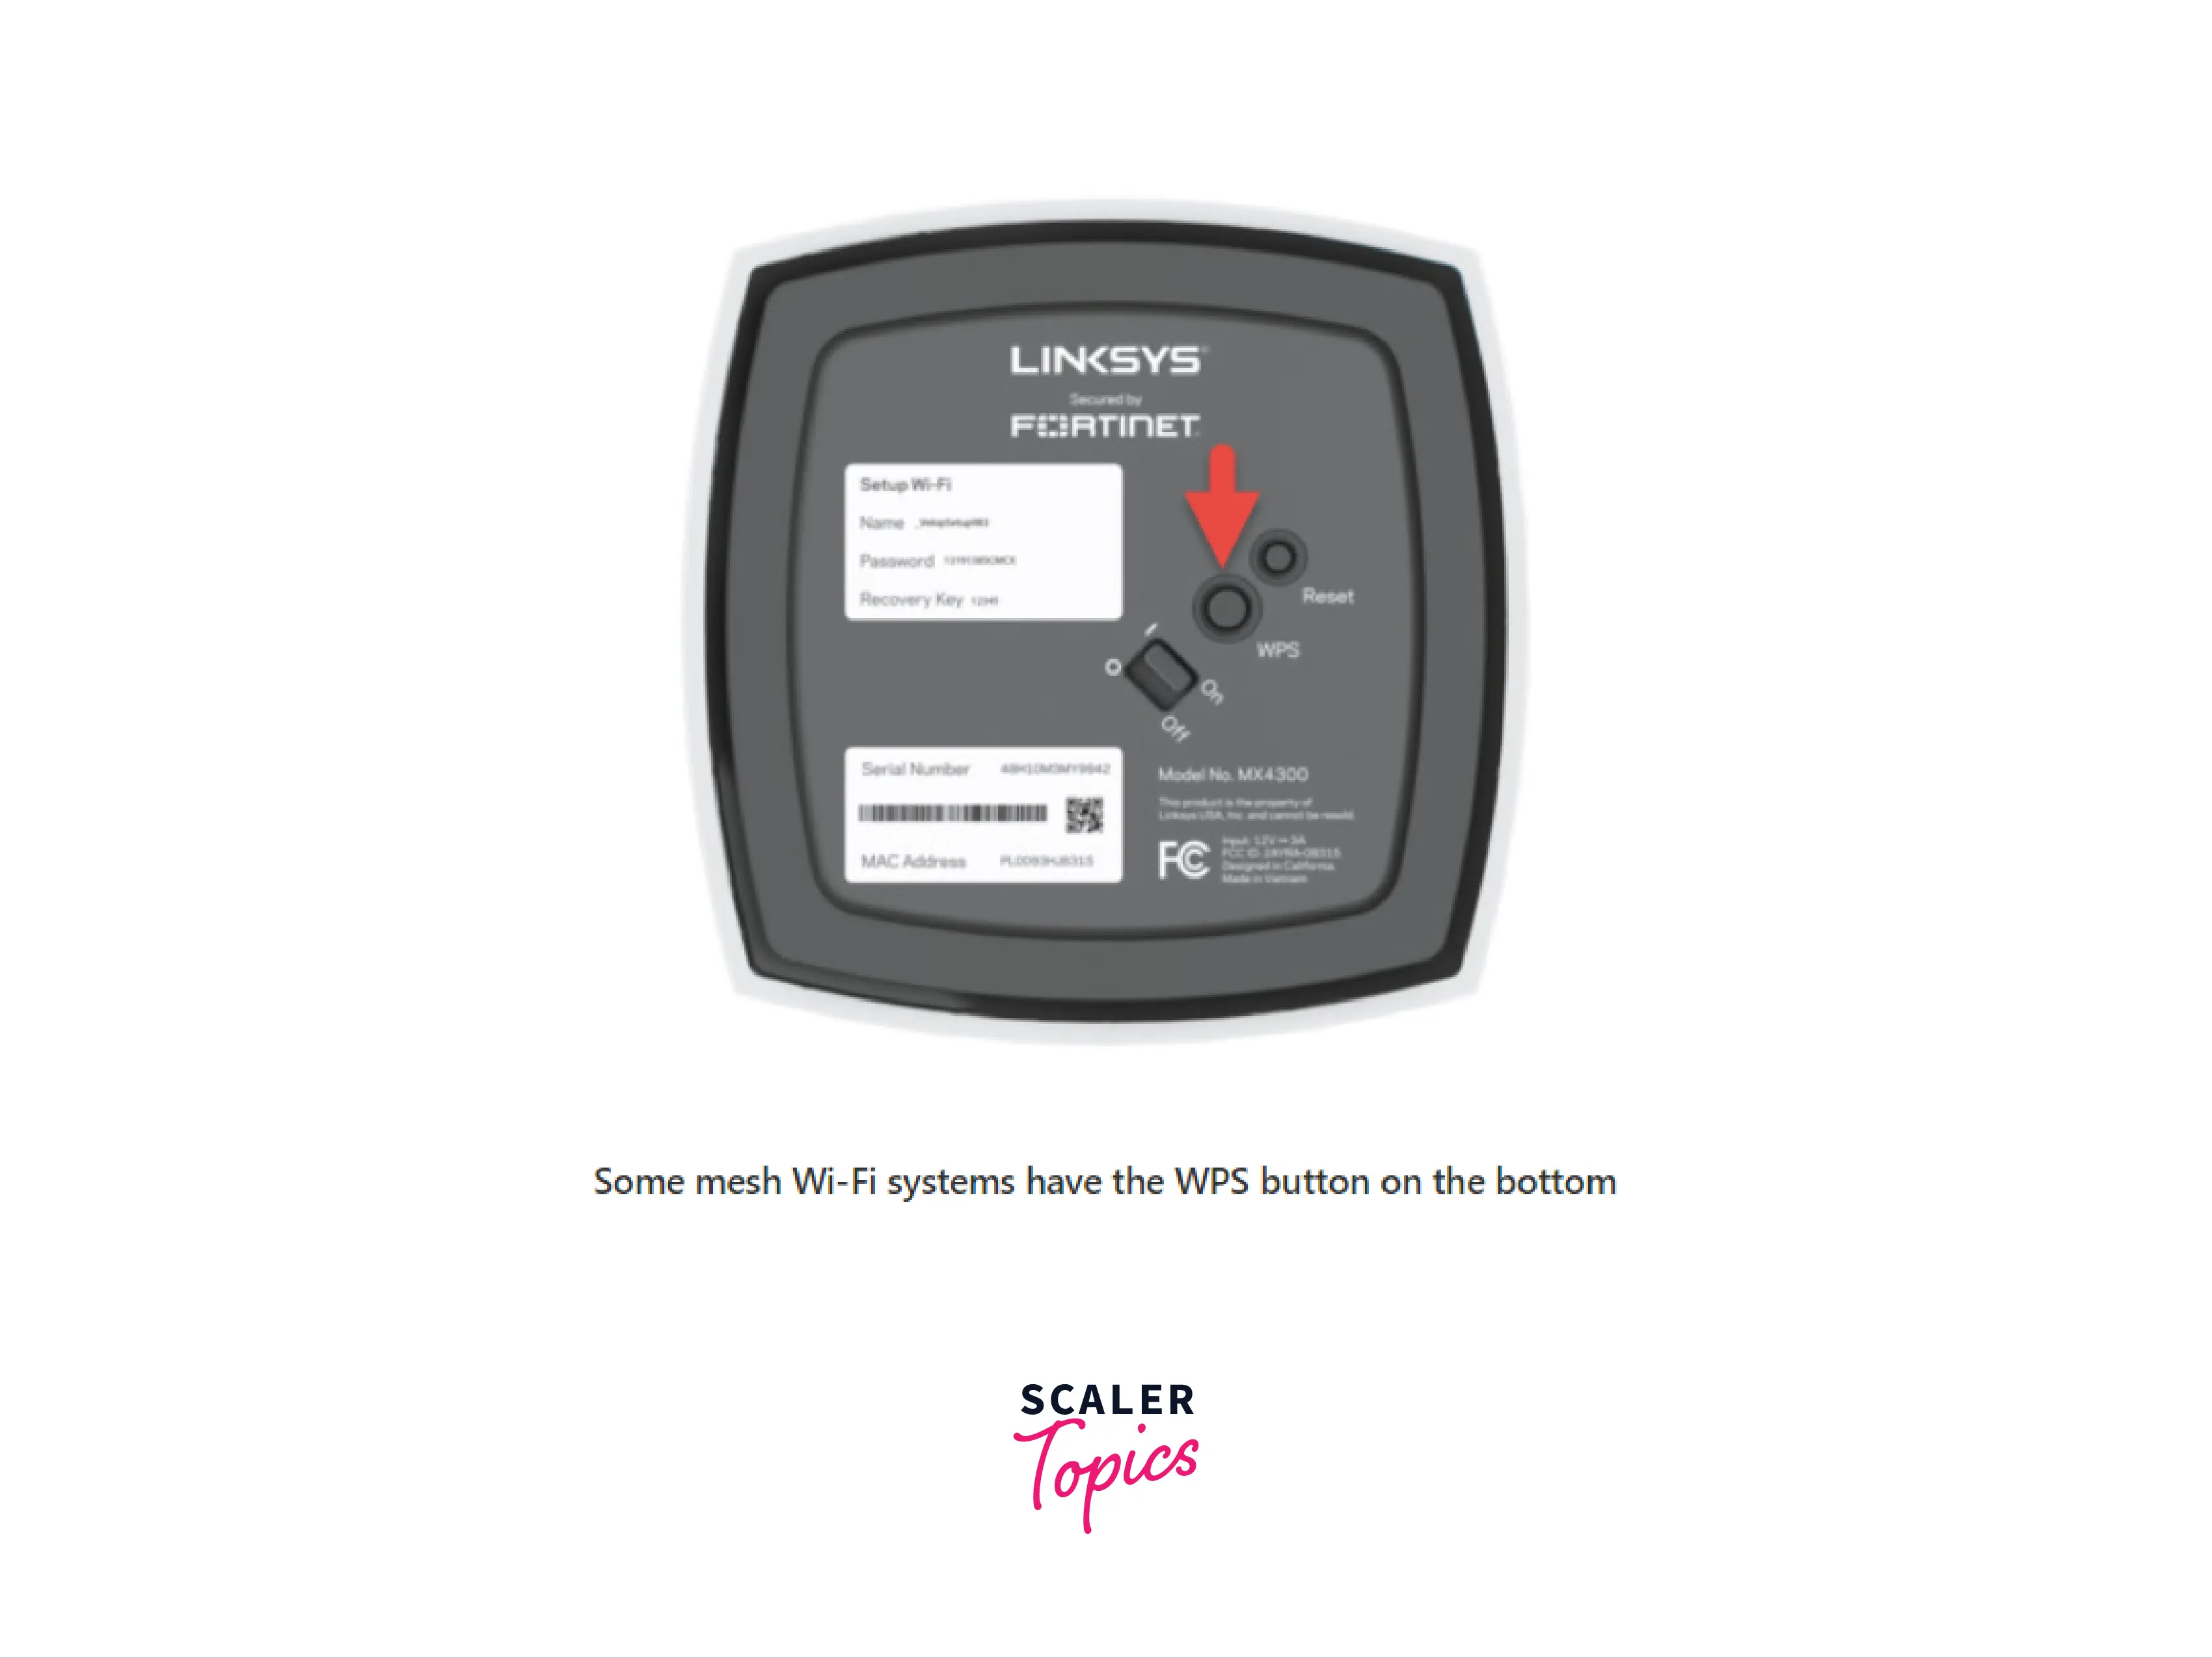
Note: Some of the mesh Wifi systems can have the WPS button for example the D-Link M15 AX1500, includes a WPS button.
Turn Learning into Career Growth
Where is the WPS Button on a Router?
The WPS button is generally found on the back portion of a router. So, if we want to connect to the network via the WPS button, we need to locate it on our router. Refer to the image provided below
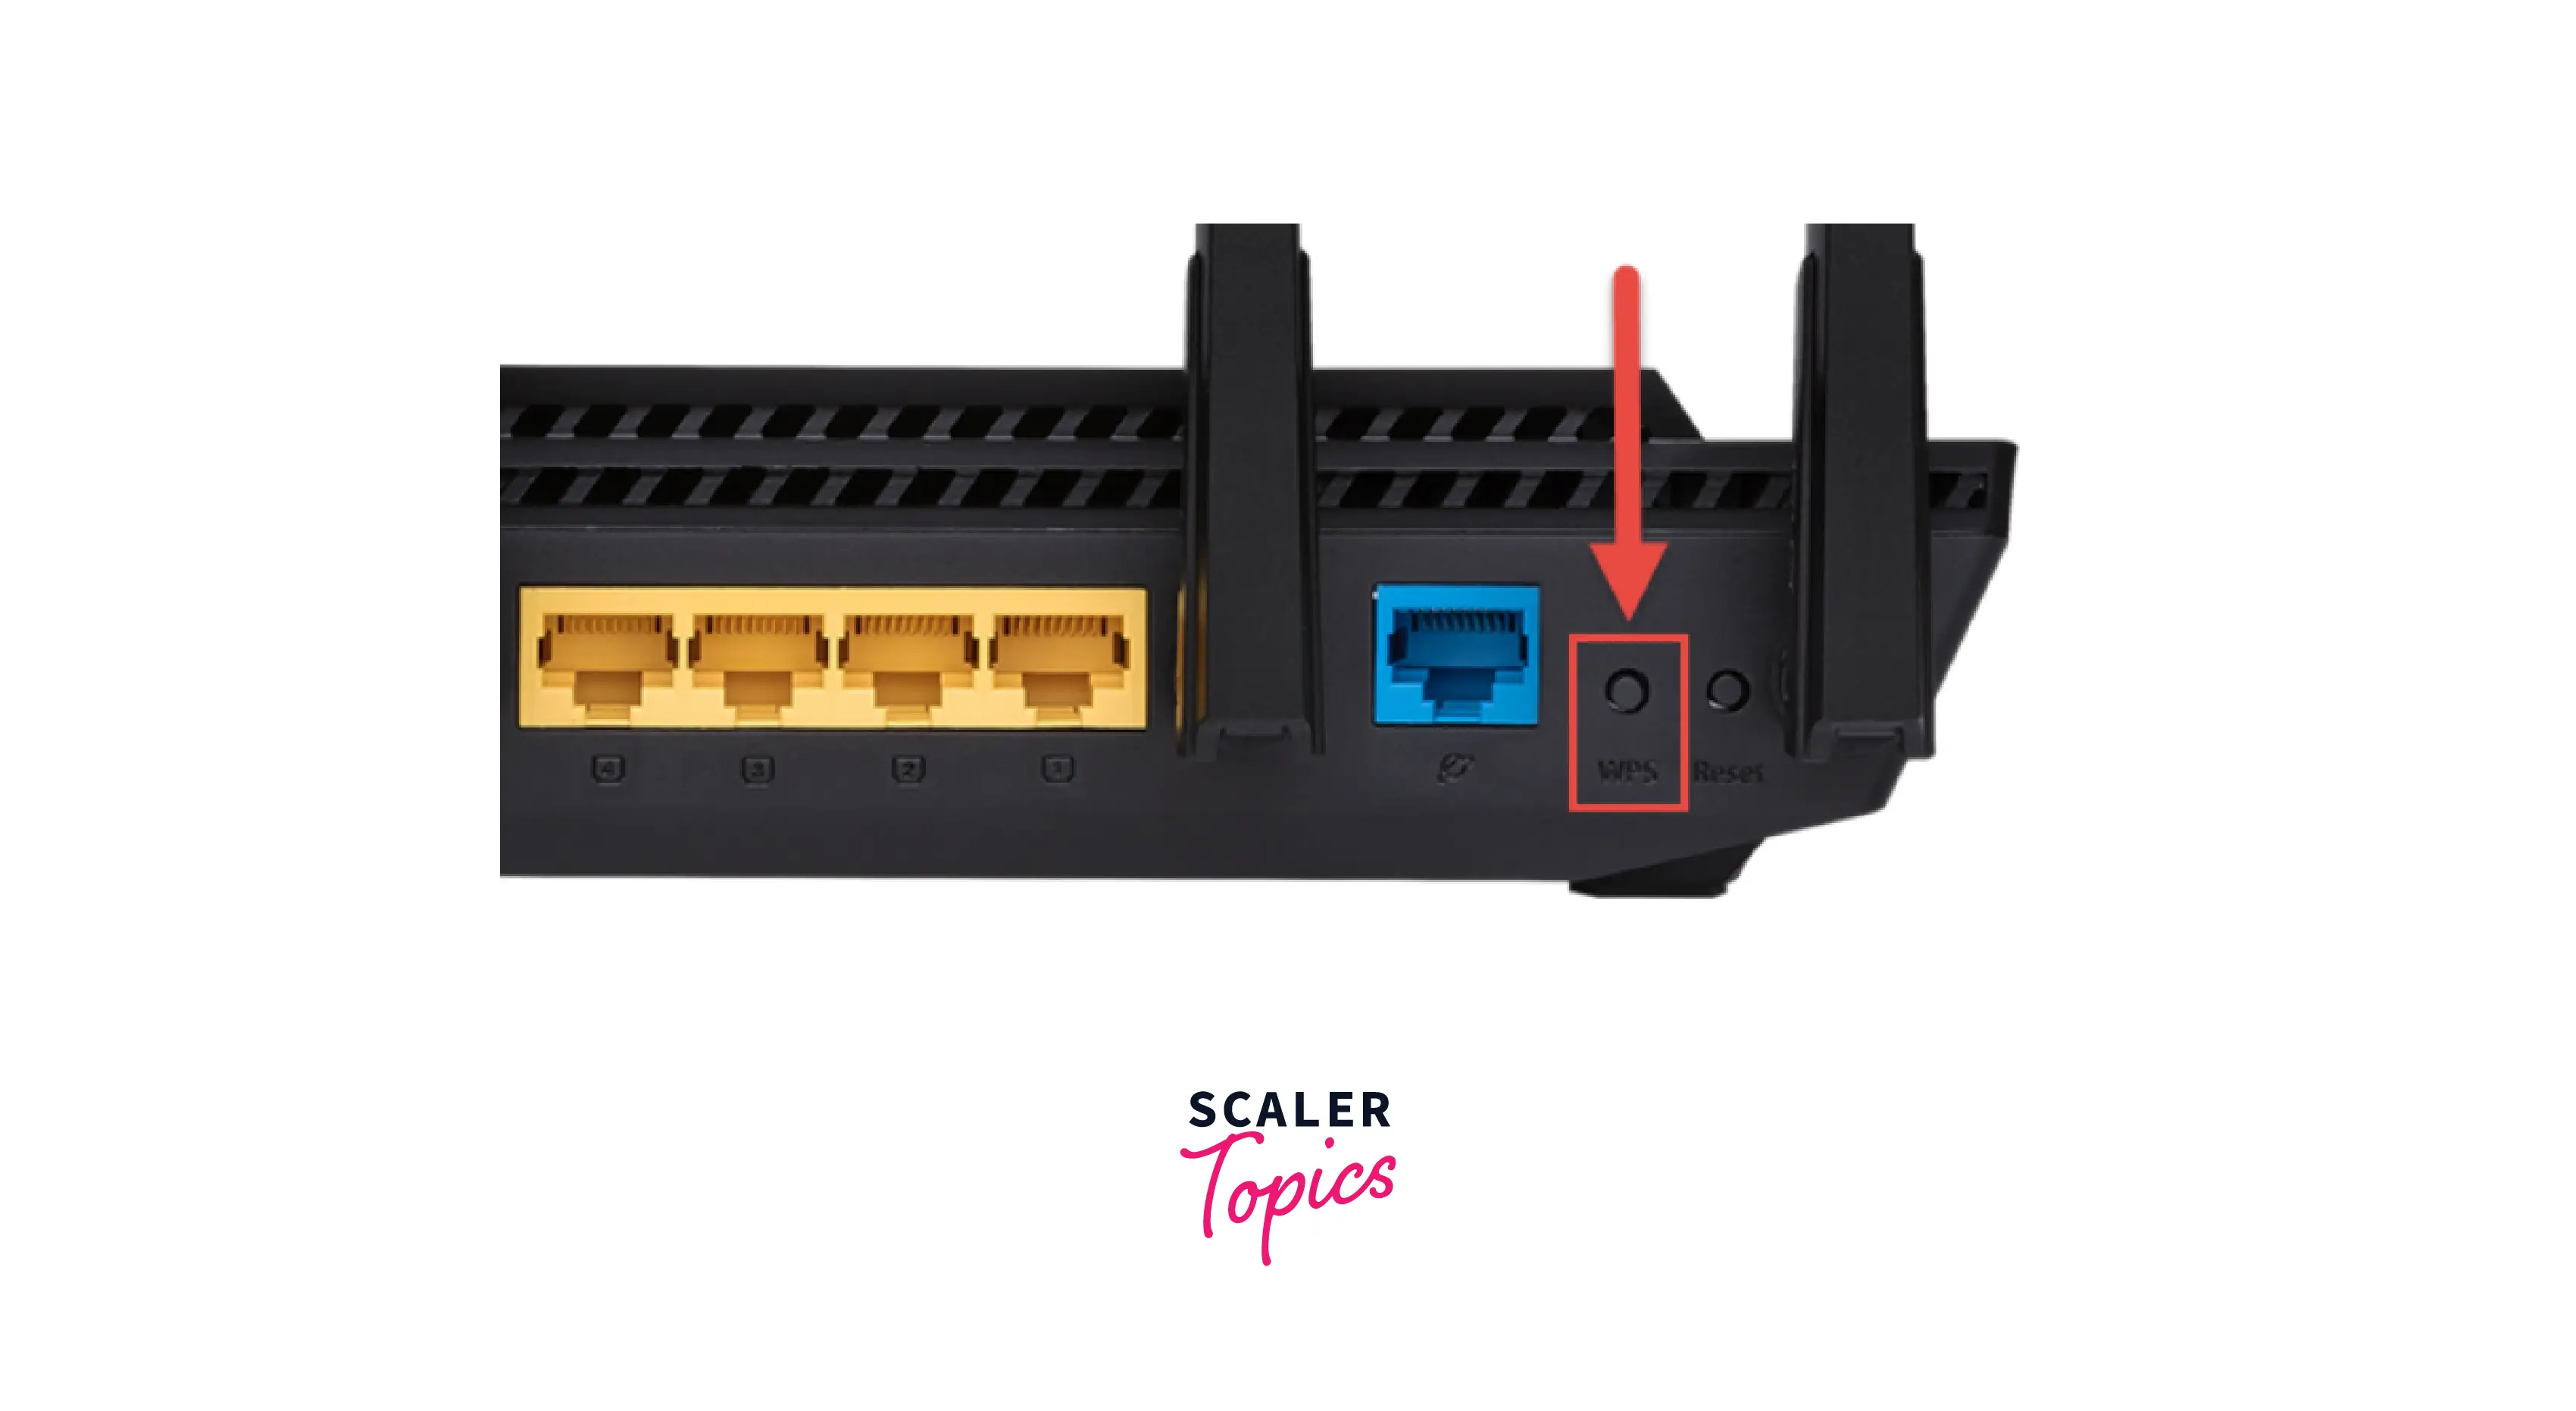
Now, various routers have different locations of the WPS button.
- ASUS RT-AX58U and D-Link routers: back of the router.
- Linksys routers: back of the router in blue colour.
- TP-Link routers: back of the router has two functions. If we press it for 1 second, the WPS gets activated but if we press it for a longer period, it acts as a Wifi switch (i.e. Wifi can be turned OFF/ON).
How to Use WPS to Connect Any Internet-Capable Device to Wi-Fi?
To connect any internet-capable device to the WiFI, we need to check whether our device and the router are WPS compatible or not.
For the router, we can check whether the router has the WPS button or not. For the internet-capable device, we need to go into the Network menu and verify if the WPS option is present on the device or not.
Now, let us look at the steps involved in setting up a WPS push-button connection.
- Press the HOME button using the remote of our device.
- Goto Settings.
- Goto Network settings.
- Select Network Set up or Setup Network Connections.
- We can select the Wireless, Wireless LAN, or Wi-Fi option.
- After that we need to select the WPS Push button option.
- Finally, we can start searching so that our device can search for the WPS connection.
- We need to press the WPS button on the router and then our device will detect it and then it will take a few minutes to connect to the network.
- Once the connection is established, we can press OK from our device.
How to Disable WPS on Wi-Fi Router?
As we know the configurations of various WiFi routers are different so we will discuss the overall procedure to disable the WPS button present on our WiFi router.
How to Disable the WPS Button in PIN Mode WPS?
The PIN mode WPS is always on, hence they are prone to risks. A router may allow us to disable the WPS or disable the PIN mode.
How to Disable the WPS Button in Button Mode WPS?
The button method is quite simple and safe, we only need to press the button present on the router to activate it. The WPS will automatically get disabled after a few minutes (get automatically disabled after a few minutes).
What Will Happen after Disabling WPS on Wi-Fi Router?
So far we have learned what is WPS in WIFI. Let us now see what will happen if we disable the WPS button present on the Wi-Fi router.
Now, WPS is not the only way to connect to the Wifi. The WPS was designed to ease the work of connection so security was not the main concern and point of developing it. The WPS eases our work as we do not need to enter the passcode or passphrase to connect to the network, we can directly connect to the Wi-Fi. Now, security is a major concern in the case of WPS (as we have discussed earlier in the previous sections), so we generally disable our WPS.
So, if we turn off the WPS option then we need to provide the passcode for connection to the network.
Advantages and Disadvantages of WPS
As we have discussed a WPS is used for making connections between wireless devices and a router in a fast and easy way. Let us now learn the advantages and disadvantages of WPS.
Scaler Placement Report and Statistics
Scaler learners achieved 2.5x salary growth with average post-Scaler CTC reaching ₹23L.
Advantages of WPS
- A WPS can automatically configure the SSID and the WPA security key for the devices that support the WPS network connections.
- If we use a WPS then we need not enter a long hexadecimal code sequence (or paraphrase) for the connection.
- It is a secure method of connection as WPA generates keys randomly so no one can figure it out. Hence, it increases security.
- In case of using the name of the network i.e. SSID to connect to the WPS-enabled network devices, we must know the SSID security key and password (or passphrase).
- For securely exchanging the information, network credentials, and other data, EAP or Extensible Authentication Protocol is used.
Disadvantages of WPS
- If we use the eight-digit WPS PIN code to connect to the wireless network, then the connection speed becomes slower as we need to type the PIN, and typing is just slow.
- The addition of a non-WPS client device is very difficult as the WPS generates long sequences of hexadecimal characters for connection.
- We cannot use a WPS for devices that do not use an access point for communication. So the devices that communicate with each other directly do not use a WPS.
- If the devices present on the Wi-Fi are not WPS certified (or not WPS-compatible) then we cannot use the WPS.
- Apple Inc, products like a Mac, an iPhone, or an iPad, do not support WPS. Hence, we cannot connect Apple products to the network using WPS.
- Since, WPS can be found on the router, anyone who can easily reach the router can access the connection using WPS.
Conclusion
- WPS stands for Wifi Protected Setup and is a network security standard whose aim is to make connections between wireless devices and a router in a fast and easy way.
- We can use WPS to add devices to Wi-Fi networks without entering long passwords.
- The Wi-Fi Protected Setup is only available in wireless networks that require a password before establishing a connection.
- The WPS does not handle the connection of Wifi but it handles the data sending between the client device(s) and the router.
- The Wi-Fi Protected Setup or WPS was originally known as Wi-Fi Simple Config. The WPS was built by Cisco in the year 2006.
- The main aim of the WPS is to simplify the connection procedure.
- For connecting to the network, we have two options the first one being a push button and the other one using a PIN.
- If we turn off the WPS option then we need to provide the passcode for connection to the network.
- A WPS can automatically configure the SSID and the WPA security key for the devices that support the WPS network connections.
- If we use the eight-digit WPS PIN code to connect to the wireless network, then the connection speed becomes slower as we need to type the PIN, and typing is just slow.
- The addition of a non-WPS client device is very difficult as the WPS generates long sequences of hexadecimal characters for connection.
- In case of using the name of the network i.e. SSID to connect to the WPS-enabled network devices, we must know the SSID security key and password (or passphrase).
- Since, WPS can be found on the router, anyone who can easily reach the router can access the connection using WPS.