Amazon Connect
Overview
Amazon Connect is a cloud-based contact center provided for use by Amazon Web Services. You can quickly build and deploy your contact center model using Amazon Connect. It is easy to use, and your model will be ready with the simple drag-and-drop method. It serves as an omnichannel by providing both voice and chat services. Amazon Connect is highly scalable. The contact centers can be increased or decreased as per need.
What is Amazon Connect?
Almost every firm needs to have a contact center to provide support to its customers. The traditional way of setting up a contact center faces numerous challenges:
- Long wait times lead to customer dissatisfaction.
- The budget for setting up and managing a contact center is high.
- Most of the time, technical issues need to be resolved.
 The above challenges are handled well using the AWS-based service Amazon Connect.
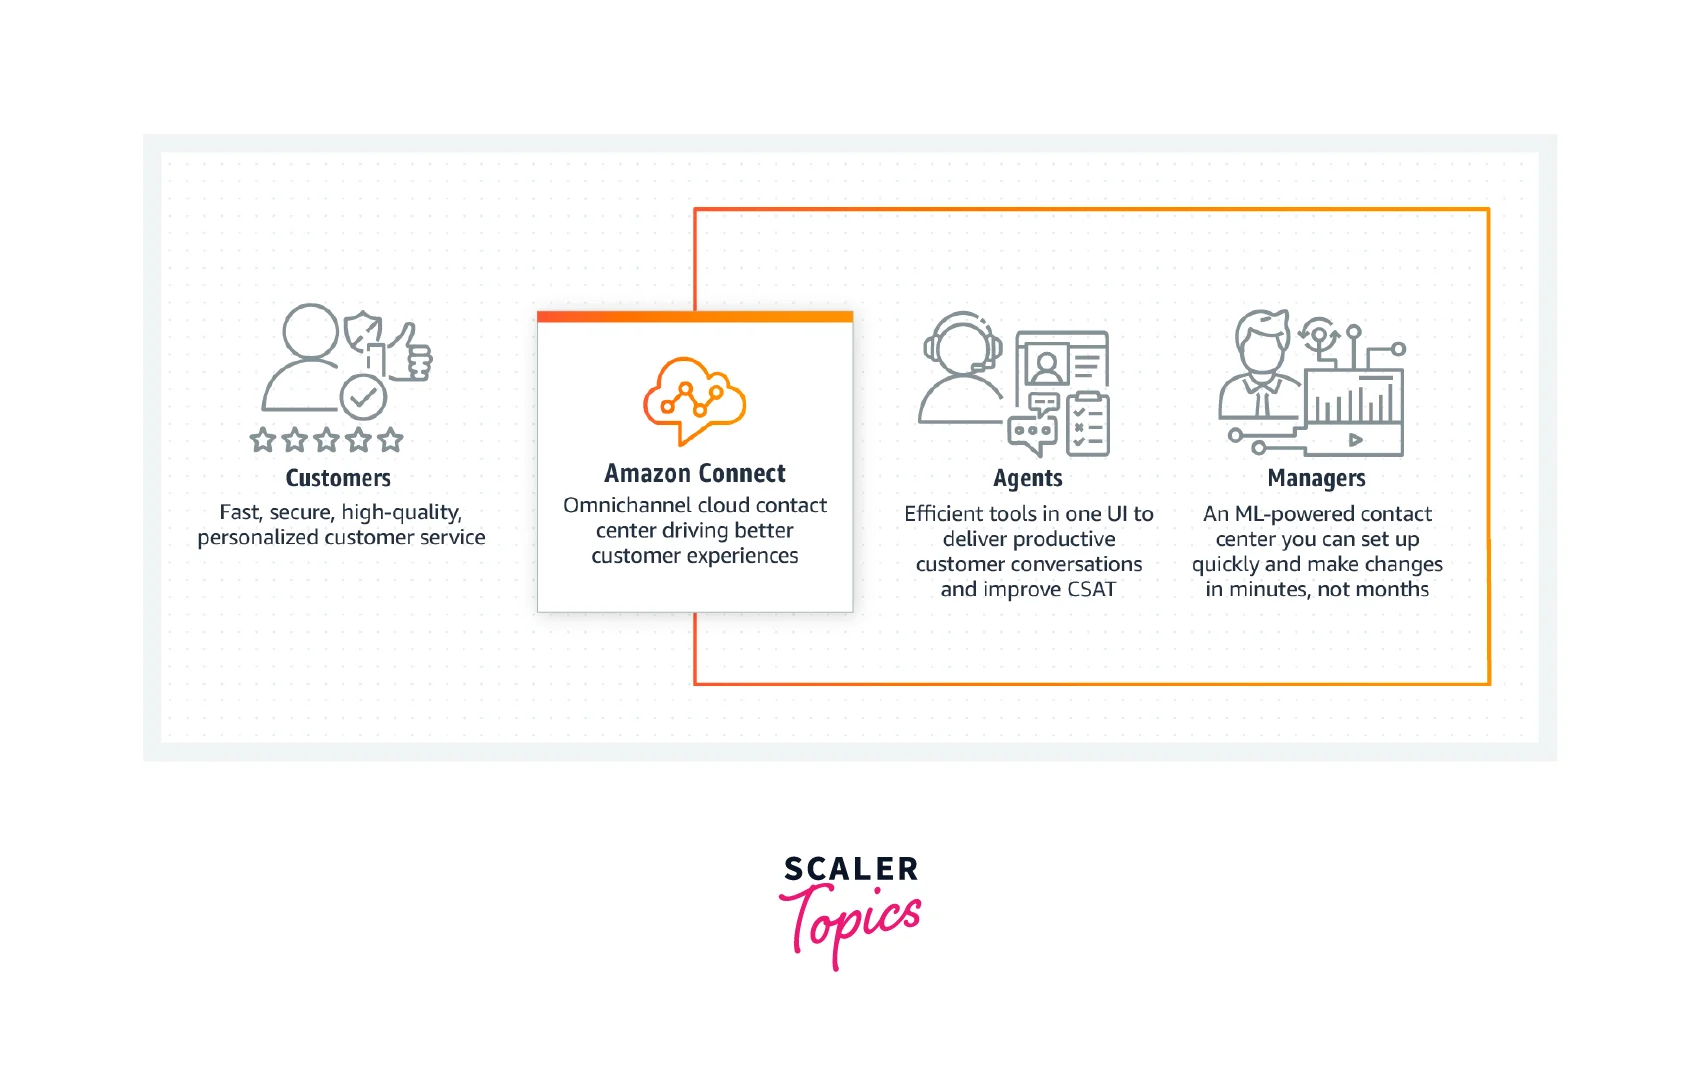
Amazon Connect is a cloud service that helps us set up a contact center with just a few clicks. It is highly scalable, and the number of agents can be increased or decreased anytime per the situation's demand. It provides the facility for customer service representatives to interact with the customers similarly using the on-premises contact center setup.
![]()
Business firms, small or big, use Amazon Connect to provide telephony services to their customers.
Scaler Placement Report and Statistics
Scaler learners achieved 2.5x salary growth with average post-Scaler CTC reaching ₹23L.
How does It Work?
We know about Amazon Connect. Now let's understand the working of Amazon Connect. Amazon Connect creates a virtual contact center with the help of an Amazon Connect instance to manage its features, like telephony options, data storage, and its directory.

Amazon Connect instance helps us to set up the best customer service by providing different methods to build it. All these services are on the cloud. We have to first claim a number for our service center. Then We have to set up the routing profiles by creating queues for the customers with different issues. We can also add working hours for the support services. After that, We can build the Contact flow for the customers for customer interaction. These contact flows are available for voice and chat channels. We can also add a chatbot for our customer experience using Amazon Lex. This is a well-labeled diagram of how Amazon Connect works.
We will learn How to start with Amazon Connect, Later in this Article.
Concepts
Let's understand some concepts involved in setting up AWS Connect:
-
Telephony:
Amazon Connect provides multiple options for making and receiving calls. It manages the infrastructure for maintaining the telephony services.
-
Chat:
Amazon Connect also provides chat support facilities. Customers can chat with the contact center representatives or agents using any device. It provides options for resuming a chat conversation or continuing the conversation with some other device.
-
Tasks:
Amazon Connect Tasks are used to organize the flow, set priorities, assign calls, and track issues. These tasks can be automated using other AWS tools and services.
-
Routing profiles:
A routing profile is like a template of rules used to determine what contacts an agent will receive. It is also used to determine the routing priority. Each agent is assigned a Routing Profile. Multiple agents can use a Routing profile.
-
Queues: standard and agent:
The customer calls are aligned in the standard queue first and then routed to an agent. The agent queue gets updated automatically when a new agent is added to the contact center.
-
Queues: priority and delay:
Priority and Delay are important features of Amazon Connect. They help in load balancing the traffic coming to the contact center by dividing them among the agents' groups based on priority.
-
Queue-based routing:
This is used in cases where a particular agent is responsible or has the knowledge required for solving an issue. It is also known as skill-based routing.
-
Channels and concurrency:
An agent is responsible for handling tasks, calls, and chats. But if an agent attends a particular call, he will not be assigned any other job, chat, or call until he finishes the previous call. Now we can have another scenario where an agent accepts a chat, and 10 more chats can be routed to him, but no tasks and calls.
-
Flows:
Flow is responsible for determining customer experience from the start to the end of the contact support provided.
Features
Amazon Connect provides us with a lot of features. Let's learn more about these features of Amazon Connect.
Omnichannel Cloud Contact Center
Amazon Connect is an omnichannel cloud contact center. It helps to communicate via different channels like voice, SMS, and email to reduce customer effort and provide consistent, seamless cross-channel experiences across both live and automated interactions.
Agent Experience
Amazon Connects the features to the agents in one easy-to-use experience. It helps agents to save time and increase their productivity. It provides the softphone call-like feature, Contacts Control Panel (CCP), which allows the agent to manage task management, customer information, and workforce schedules in a single UI.
Amazon Connect Wisdom
Amazon Connect Wisdom is the feature of Amazon Connect, which uses Machine Learning (ML) to minimize the time agents spend looking for solutions. It uses ML analytics in Contact Lens to detect customers' issues and recommend the solution to resolve the issue. This feature is beneficial to the agents in resolving the query of the customers.
Task management
Amazon Connect helps maintain high customer satisfaction by resolving their queries and demands. It makes it easier to manage agent tasks, including some work after the call, so the following client issues are addressed promptly. So, Task management is also one of the best features of Amazon Connect.
Integration and Automation
Amazon Connect integrates with different services and technology partners who provide automation. For example, we can easily add the chatbot Amazon Lex to it. Amazon Connect is used by different services like Salesforce Service Cloud Voice. Integration and automation are better features of Amazon Connect.
Transform Your Career
Choose from our industry-leading programs designed for career success
Modern Software and AI Engineering Program
Master full-stack development with AI integration

Modern Data Science and ML with specialisation in AI
Advanced data science techniques with AI specialization
Advanced AIML with Specialisation in Agentic AI
Deep dive into AIML with focus on Agentic systems
DevOps, Cloud & AI Platform Engineering
Build and manage AI-powered cloud infrastructure
AI Engineering Advanced Certification by IIT-Roorkee
Premier AI engineering certification from IIT-Roorkee
Amazon Connect Use Cases
Some of the use cases of Amazon Connect are:
1. Unify the Agent Experience
Amazon Connect provides agents with various tools. They can utilize these tools to deliver personalized and meaningful solutions. As a result of this, the Customer Satisfaction rate increases.
Studies show that the presence of additional tools has increased the rate of First Contact Resolution (FCR).
Scaler Placement Report and Statistics
Scaler learners achieved 2.5x salary growth with average post-Scaler CTC reaching ₹23L.
2. Improve Productivity
Amazon Connect provides tools for team collaboration. The agent desktop provides features to track a customer journey, conversation history, and context data. All of these enhance productivity.
Agents can look into the past interactions of a particular customer with the support team and use the analysis to figure out his needs. In addition, integration with AI applications also provides the ability to predict any future issue.
3. Improve Customer Loyalty
Features like chatbot provide the customers with self-service options. This helps in increasing both productivity and customer loyalty. The customer can figure out a solution to small issues themselves. Meanwhile, the agents can spend their time on more complex issues.
4. Simplify Team Management
As discussed before, AWS Connect provides team collaboration tools. It also includes integration capabilities with AI-based applications, which can be used to generate analysis reports of customer calls.
The team supervisors can track agents and teams, similar to how agents can follow the customer journey.
5. Seamless Integrations
The contact centers can be further customized with seamless integrations with Content Resource Management like Salesforce, Microsoft Dynamics, etc. All information can be accessed using a single screen without switching screens. Amazon Connect promotes transparency.
Getting Started with Amazon Connect
Let's go and learn how to use Amazon Connect with the demo.
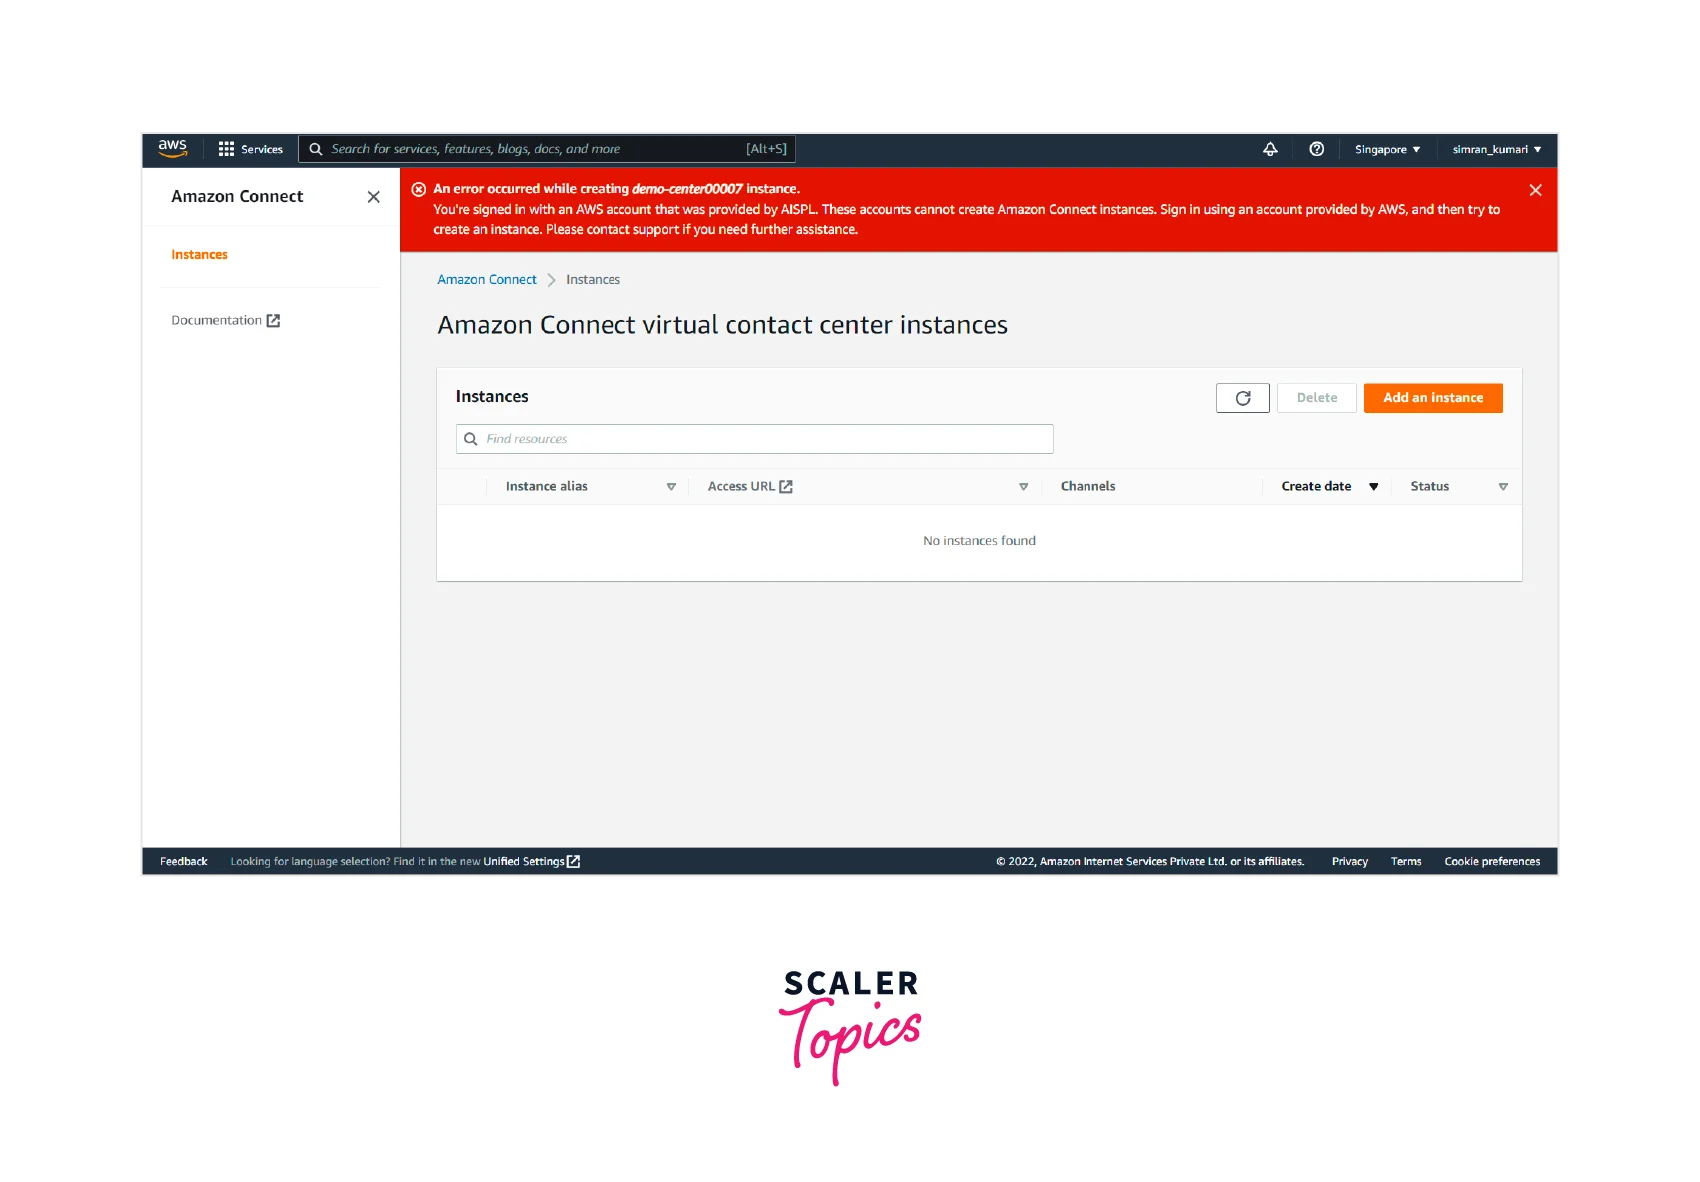
You will get the following message if you open the Amazon Connect page.
After this, even if you try to change the region and work with Amazon Connect Instance, you will get the following error message.
If you are from India, you must have an AISPL account. AISPL account does not support Amazon Connect Services. You need to create an AWS account. The main difference between the two accounts is that the AWS account is administered under Amazon Web Services, Inc. In contrast, the AISPL account is administered under Amazon Internet Services Private Limited.
Creating an AWS Account
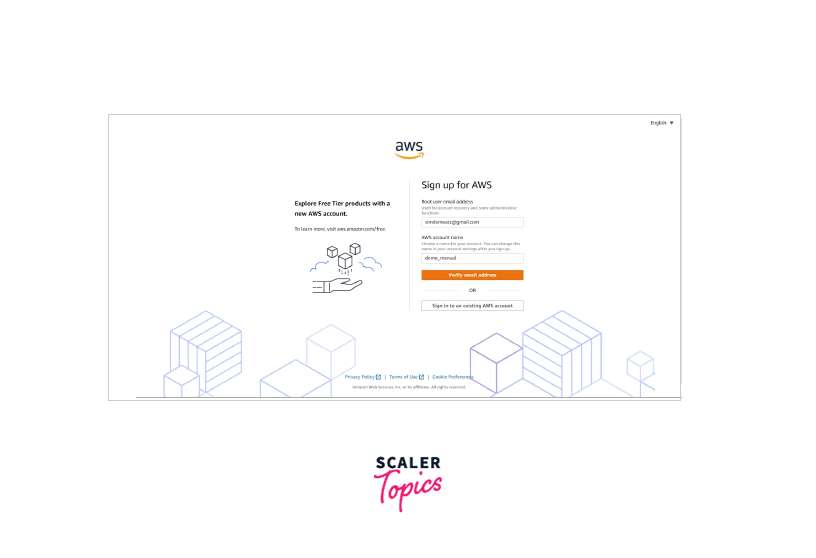
Let's first create an AWS-administered account.
-
Move to the signup page, and fill in details like email id and account name.
-
Verify your email id by entering the verification code
-
You will be redirected to another page. Fill in the details here. You need to give your original phone number as the verification code is sent to it. For address, you can search for any random remote address on the internet and use it.
-
Fill in the billing details
-
Fill in other details on the next page to confirm your identity.
-
Verify your phone number and log in to the AWS Management Console.
Create an Amazon Connect Instance
Follow the given steps to create an Amazon Connect Instance.
-
Open the AWS Management Console and search for Amazon Connect in the search bar.
-
The web page for amazon connect appears as shown below. Click on the Create Instance button.
-
You will be redirected to another page that asks for some details. This is the set identity page. It provides you with three different options. You can start with the first one, Store users in Amazon Connect. Provide an access URL and click on next.
-
Next, the Add administrator page comes up. You can add an administrator account with the details or use the no administrator option.
-
Here, we are opting for no administrator. Then, click on next.
-
Next, we are taken to the Set Telephony page. Make sure both the checkboxes are marked, and click on the Next button.
-
Next, we have the Data Storage page. Leave the default options and click Next.
-
Review the options you choose and click on the Create Instance button.
-
It will take a few seconds to launch the instance with the message as shown below:
-
The Amazon Connect instance gets created finally with a success message.

Set up Your Phone Number
After creating the AWS connection to the instance, you need to set up the phone number using the following steps:
-
From the Amazon connect instance page, click on the Get started shown in the last image. We will see a new tab to help us set a phone number(claim a phone number). Click on the Let's go button.
-
Next, permit to use the microphone. Click on Allow.
-
Now, we have to claim a phone number from the listed country. It demands a valid address from that country to claim the number of other countries.
-
It is suggested that you select the country where you created the AWS account. Pick a number from the dropdown menu and click on Next.
-
On the next page is to make a call on that number and show a softphone called CCP (Contact Control Panel).
-
Now, use your mobile phone to call on that number to verify. The call started with some default set voice call, and after pressing 1 for three times, your call will appear on the CCP. Click on the green tick to accept it.
-
After accepting the call, you can talk with your mobile phone. It also shows some menu on the CCP to hold, mute the call and forward it to the next quick contacts.
-
After a few seconds, end the call. On the CCP, we will see some after-call work. It is the period in which any calls are not transferred to this number until the close contact has been clicked. In this, after call work, some work has to be done by the agent. So next, click on clear contact and click on the Continue button.
-
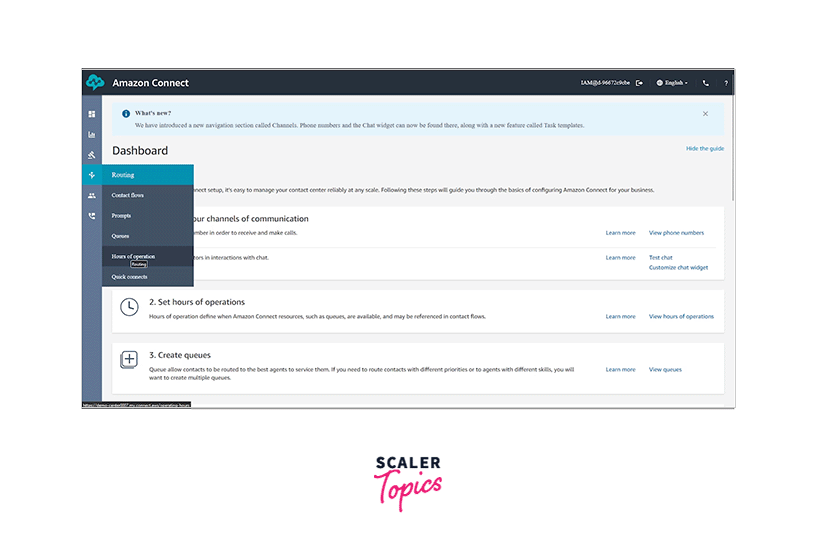
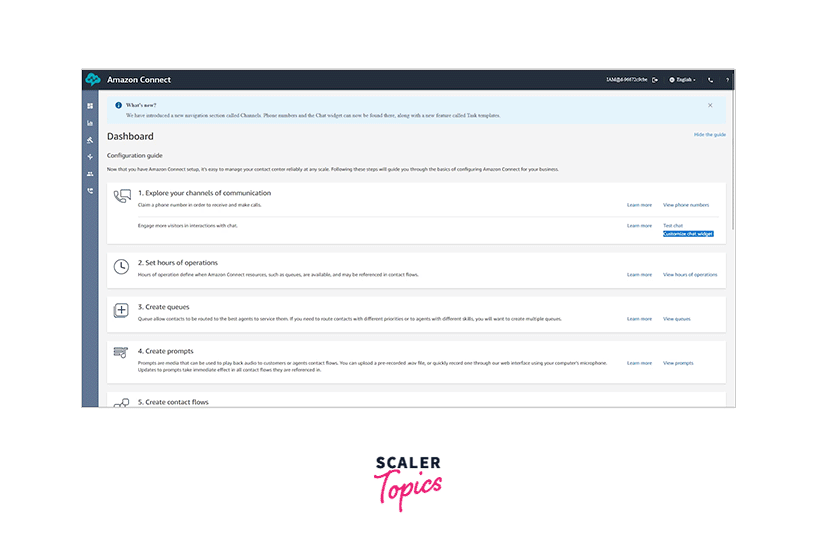
So, we successfully claim a number. Now, we will be on the dashboard screen of Amazon connect.

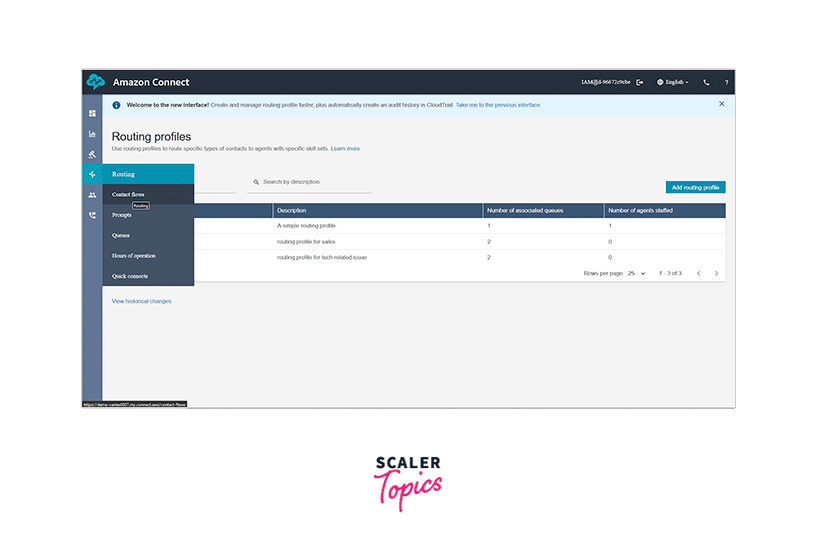
Set up the Routing Profiles
In this section, we are going to set hours of operation, create queues, and routing profiles using the following steps:
-
We are on the dashboard page. Click on Hours of operation from the Routing menu.
-
Here, a Basic Hours is already created by default, which always opens for operation (24x7). Click on Add new hours.
-
Fill in the name and description for the hours of operation. Next, fill in the time zone and set the time according to the day. Click on Save.
-
We created the office time as Hours of operation. Next, we have to create the queue. From the Routing menu, click on Queue.
-
Here, a Basic Queue is already created by default. We create here two queues, one for sales and one for a technical issue. Click on Add queue.
-
Fill in the Queue name and description. Choose the hours of operation and scroll down.
-
Fill in the caller_id name and select the number. We can also have features for outbound whisper flow and quick connect to redirect the call. We will leave those fields for this demo and click on Save.
-
Similarly, once again, click on the Add queue button and fill in the queue name and description. Choose the hours of operation and scroll down.
-
Again, fill in the caller_id name, select the number, and click on Save.
-
We have successfully created the sales and tech queue.
-
Now, click on Routing profiles from the Users menu.
-
Here, a Basic Routing profile is already created by default. Click on Add routing profile.
-
Fill in the name and description of the routing profile and set the channel as voice.
-
Now, add the queue to the routing profile with the priority and set the default outbound queue. Click on Save.
-
Similarly, once again, click on the Add routing profile button, fill in the name and description of the routing profile, and set the channel as voice.
-
Add the queue to the routing profile with the priority and set the default outbound queue. Click on Save.
-
We created the Routing profile for both the queue successfully.
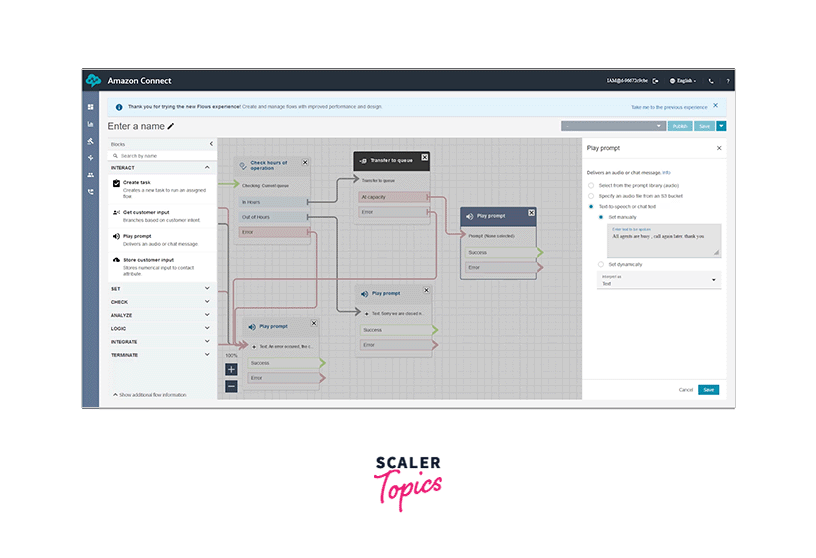
Create Amazon Connect Flows
In this section, we are going to create Amazon Connect Flows using the following steps:
-
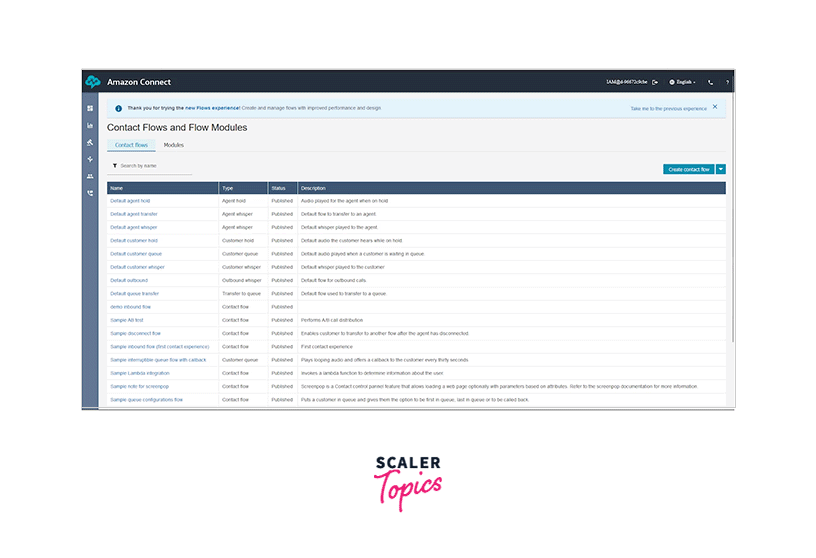
Click on Contact flows from the Routing menu.
-
Here, different flows are already created by default. We can also create different types of flow. Next, Click on Create contact flow.
-
We will land on the contact flow edit page.
-
Drag and drop a Play prompt from the interact menu and click on it to open its setting. Select Text to speech or chat text and write the introductory lines. Click on Save.
-
Next, drag and drop a Get customer input from the interact menu and click on it to open its setting. Select Text to speech or chat text and write the option you want to give. We have to option DTMF and Amazon Lex to get the input, and we will choose DTMF for now. Click on Add a condition and fill it with the option. Click on Save.
-
Now, drag and drop Set working queue from the set menu, click on it, and select the sales queue.
-
Again, drag and drop Set working queue from the set menu, click on it, and select the tech queue.
-
Now, drag and drop the Check hours of operation from the check menu and connect to the flow.
-
Next, from the Terminate menu, drag and drop the Transfer to queue and connect with the flow.
-
Now, we add the error lines from each flow to a Play prompt and click on it to add some instructions. Click on Save.
-
Add another Play prompt to the get customer input if the user provides the wrong input and connect it with the Get customer input.
-
Add a Play prompt to the Check hours of operation to provide a better experience to the customer.
-
If the Transfer to queue is at full capacity, it should tell to call back later. So, add another Play prompt for this and connect to the flow.
-
At last, drag and drop the Disconnect from the terminate menu to end the call. Connect all the left flow to it.
-
Edit the name of the flow and click on Save. Click on Publish. It will reconfirm to publish it and click again.
-
Our contact flow is published and appears on the contact flow page.
-
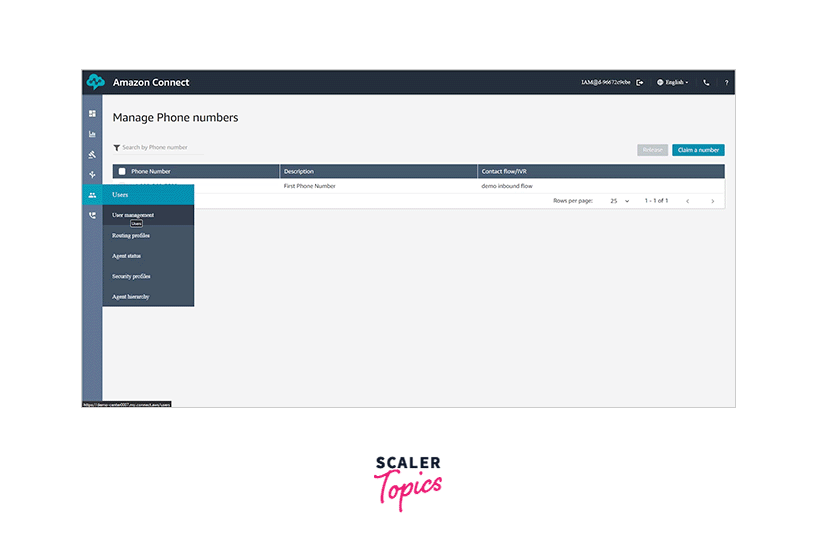
We have to attach this contact flow to the claimed number. So, from the Channels menu, click on Phone numbers.
-
Click on the Phone number to open its details.
-
On this page, change the contact flow/IVR to the contact flow created earlier. Click on Save. Our constant flow is created and set successfully; we can test it by dialing the number.
Turn Learning into Career Growth
Add Users to Amazon Connect
In this section, we are going to create users/agents for Amazon Connect using the following steps:
- From the user's menu, click on User management.
- Here, we see an admin user, which we created earlier at the time of creation. Here we will add two agents. Click on Add new users.
- Fill in the user details and choose the security profile as an agent. Choose the routing profile as sales and choose the softphone. Click on Save.
- Similarly, add another user. Click on Add new users.
- Fill in the user details and choose the security profile as the agent. Choose the routing profile as tech and choose the softphone. Click on Save.
- We successfully created two users for sales and tech.
Set up Your Customer's Chat Experience
In this section, we learn to set up a chat widget for our website using the following steps:
- Go to the dashboard and click on Customize chat widget.
- Here, we can customize the Chat widget window to our satisfaction.
- We have to select a contact flow to the chat widget and click on Next.
- On the next screen, we have to add the URL of our website and check for security. Then click on Next.
- After that, a script is generated, and we have to add that script to our source code to add the chat widget.
- Here is an example of how it looks when a chat widget is added to the website.
Set up Recording Behaviour
In this section, we set the recording behavior to our contact flow using the following steps:
- Go to the contact flow page and click on the flow which we have created.
- from the menu, drag and drop the Set recording and analytics behavior to the flow. Select call recording and choose agent or customer as per the need. Click on Save.
- Click on Save and Publish. Our recording behavior is set up successfully.
Add Amazon Lex bot to Amazon Connect
In this section, we create an Amazon Lex bot and then attach it to Amazon Connect using the following steps:
-
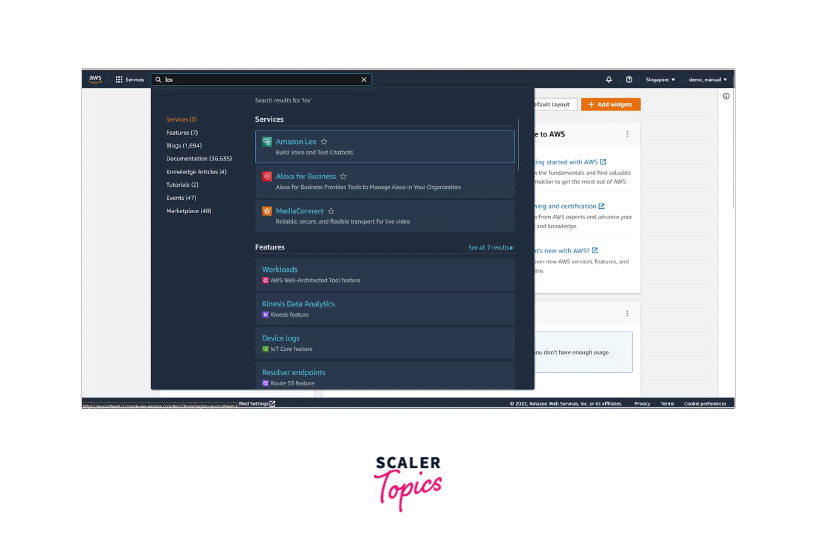
Go to the AWS console and search for Amazon Lex. Click on Amazon Lex.
-
Click on the Create bot button on the next screen.
-
We have to select the creation method. I select the start with an example option for this demo. It will create a bot with the example shown.
-
Fill in the Bot name and choose IAM permissions to create a new one. Select yes in the Children's online privacy protection act. Click on Next.
-
Next, leave all the values in default and click on Done.
-
Our Amazon Lex bot is created successfully. Next, click on Build.
-
The build is successfully done. Click on Test.
-
A chatbot screen is open as Test draft version. We may interact with this bot.
-
Now go to the Amazon Connect instance page and click on the instance alias we created earlier.
-
Click on the Contact flows from the left side menu.
-
Add the bot name and alias in the Amazon Lex option. Click on Save.
-
Go to Amazon connect and open the contact flow. Open the earlier created flow.
-
Click on Get customer input and select the Amazon Lex option instead of DTMF. Select the Lex bot, fill in the details, and click on Save. Click on save and publish the contact flow. So we successfully added the Amazon Lex bot to Amazon connect.
Contact Flows in Amazon Connect
Contact flows are used to track customer journeys from beginning to end. There are nine different types of contact flows. Each contact flow is designed with certain blocks to serve a specific purpose. You can choose a flow that serves your purpose.
-
Inbound contact flow:
This is the default contact flow. It works with voice, chats, and task services.
-
Customer queue flow:
This flow is used to take care of customer experiences when they are in the queue, i.e. before interacting with any agent. This flow also works for all three functionalities, voice, chat, and task.
-
Customer hold flow:
This flow is used to take care of customer experiences when they are on hold. This flow works only with voice. Here, one or more audio is played on a loop while the call is on hold.
-
Customer whisper flow:
This contact flow is supported only for voice and chats. It customizes the customer's experiences immediately before joining the agent conversation.
-
Outbound whisper flow:
This flow is used to work on customer experiences before joining the conversation with the agent. This flow works only with voice and chat services. It can be used for enabling call recordings before the call is connected.
-
Agent hold flow:
This is similar to customer hold flow, except that this flow is used to manage agent experiences when they are on hold during a conversation with a customer. Similar to customer hold flow, this flow also works only with voice.
-
Agent whisper flow:
This is similar to customer whisper flow, except that this flow is used to manage agent experiences immediately before joining the customer conversation. This flow is supported only for voice and chats like customer hold flow.
-
Transfer to agent flow:
This flow is used to work on customer experiences while they are being transferred from one agent to another. This flow works for all three services voice, chat, and tasks.
-
Transfer to queue flow:
This flow is used to work on agent experiences while being transferred from one queue to another.
Software, Hardware Support
The agents of the cloud contact center use the Contact control panel, and this panel is a workspace that the browser can access.
Amazon Connect supports the following browsers:
| Browser | Version |
|---|---|
| Google Chrome | Latest three versions |
| Mozilla Firefox | Latest three versions |
| Mozilla Firefox ESR | Versions are supported till Firefox end life date |
| Microsoft Edge | Unsupported |
| Edge Chromium | Unsupported |
Languages
The different components of AWS Connect provide different language supports:
1. Chat
The chat section of Amazon Connect allows you to converse using any language of your choice. It provides full support for Unicode.
2. Contact Control Panel
The latest version of the Contact Control Panel provides support for the following languages:
- Chinese
- English
- French
- German
- Italian
- Japanese
- Korean
- Portuguese
- Spanish
3. Amazon Connect Admin Console
The admin console also provides support for the same languages as supported by the Contact Control panel. The included languages are Chinese, English, French, German, Italian, Japanese, Korean, Portuguese, and Spanish.
Amazon Connect Pricing
Free-tier
Under the free tier, you can get started with Amazon Connet for free. The following comes under the free-tier plan:
- The free tier remains for 12 months after signup.
- Under this, you can use the Amazon Connect service for 90 minutes monthly for free.
- You get a DID(direct inward dial) number for the country where you specified the Amazon Connect region.
- Free tier also includes 30 minutes of free inbound calls per month and 30 minutes of free outbound calls per month if the calling number location and AWS region for Amazon Connect service are the same.
- You can also use chat facilities, with a limit of 500 messages per month, and tasks with a limit of 100 tasks a month.
Standard Pricing
The following pricing structure is followed under standard pricing:
- $0.018 is charged per minute for inbound voice usage, and the same is followed for outbound voice usage.
- $0.004 per message is charged for using the chat facility.
- $0.04 per task is charged for charge usage.
- $0.0025 is charged per profile monthly for storing profiles.
- No charges are made for storing profiles generated by Amazon Connect automatically.
Benefits of Amazon Connect
Let's explore the benefits of using Amazon Connect.
- It allows us to start quickly, as no hardware installation is required. If you want it now, you can get it with just a few clicks.
- Amazon Connect provides a pocket-friendly approach. You can start with a price as low as zero. Under the free tier, you can use AWS connect services free with some limits.
- Amazon Connect is highly scalable. A more virtual infrastructure can be added anytime.
- It provides many valuable tools and easy integration with other AWS services.
- In-built analytics tools give a better insight into the customer and agent experiences.
- AWS Connect saves time and cost by automating most steps.
- The inbuilt chatbots save the time and manpower involved in building a chatbox from scratch.
Companies Using Amazon Connect
Amazon Connect is used in various sectors, from education to financial services, healthcare, energy, retail, technology, travel, hospitality, etc. Several companies use Amazon Connect to boost their contact center or customer care activities. Some of the top companies using AWS Connect are:
-
Intuit: Intuit is a service-based company that provides financial management solutions. It uses Amazon Connect along with Salesforce to provide better customer experiences through the agents.

-
American Prep Academy: American Prep Academy is an educational institution. During the Covid-19 outbreak, they were preparing to launch a remote learning platform to ensure the safety of the students. They used Amazon Connect to provide IT support to the remote learning platform.

-
Adobe: Adobe is leading the market in providing optimized content to its customers. It used Amazon Connect to provide transformative chat and call experiences to its customers. They utilized Amazon Connect to transfer the call, which was redirected to the agents.

Apart from the ones discussed above, several other companies also make use of AWS Connect to provide better customer services, like Seimens, LegalZoom, DXC, Vodafone NZ, SUBWAY, and many more.
Conclusion
- Amazon Connect lets you set up your contact center on the cloud.
- It provides the best features at a comparatively low cost.
- AWS Connect is highly scalable. It can be increased anytime with an increase in users or agents without needing to install new infrastructure devices.
- Amazon Connect provides transparency in the dashboard to get insights into customer experiences.
- You can easily get started with Amazon connect by clicking a few buttons under the free tier.
- The security, availability, and reliability provided by AWS Connect make it the best tool to set up data centers on the cloud.