Guide to Creating and Activating AWS Account
AWS offers a range of cloud services for seamless work, but creating an AWS Account is essential before diving in. Think of an AWS account as a container for your resources, where you can create, manage, and access them alongside administrative and billing capabilities.
For optimal scalability and cost tracking, using multiple AWS accounts is advisable. This approach establishes clear billing boundaries, fosters flexibility for individuals and teams, enhances security by segregating resources, and allows users to adapt to evolving business processes.
Starting with AWS begins by creating and activating your AWS account, a crucial first step. The following article will explore setting up your AWS account and delve into essential concepts. Familiarize yourself with AWS account management, security best practices, available services, and resources.
How to Create and Activate a New AWS Account?
When getting started with AWS Account, AWS offers its new users 12 months of Free Tier account to make them comfortable with AWS service by giving them free hands-on experience with all of its AWS cloud services. AWS captures information from its user's AWS account and allows this 12 months free trial period to let users access free services such as S3, Dynamo DB, or EC2 within some limitations.
To access your hands-on experience with the AWS Account, let us get started creating your first AWS Account by following the below steps:
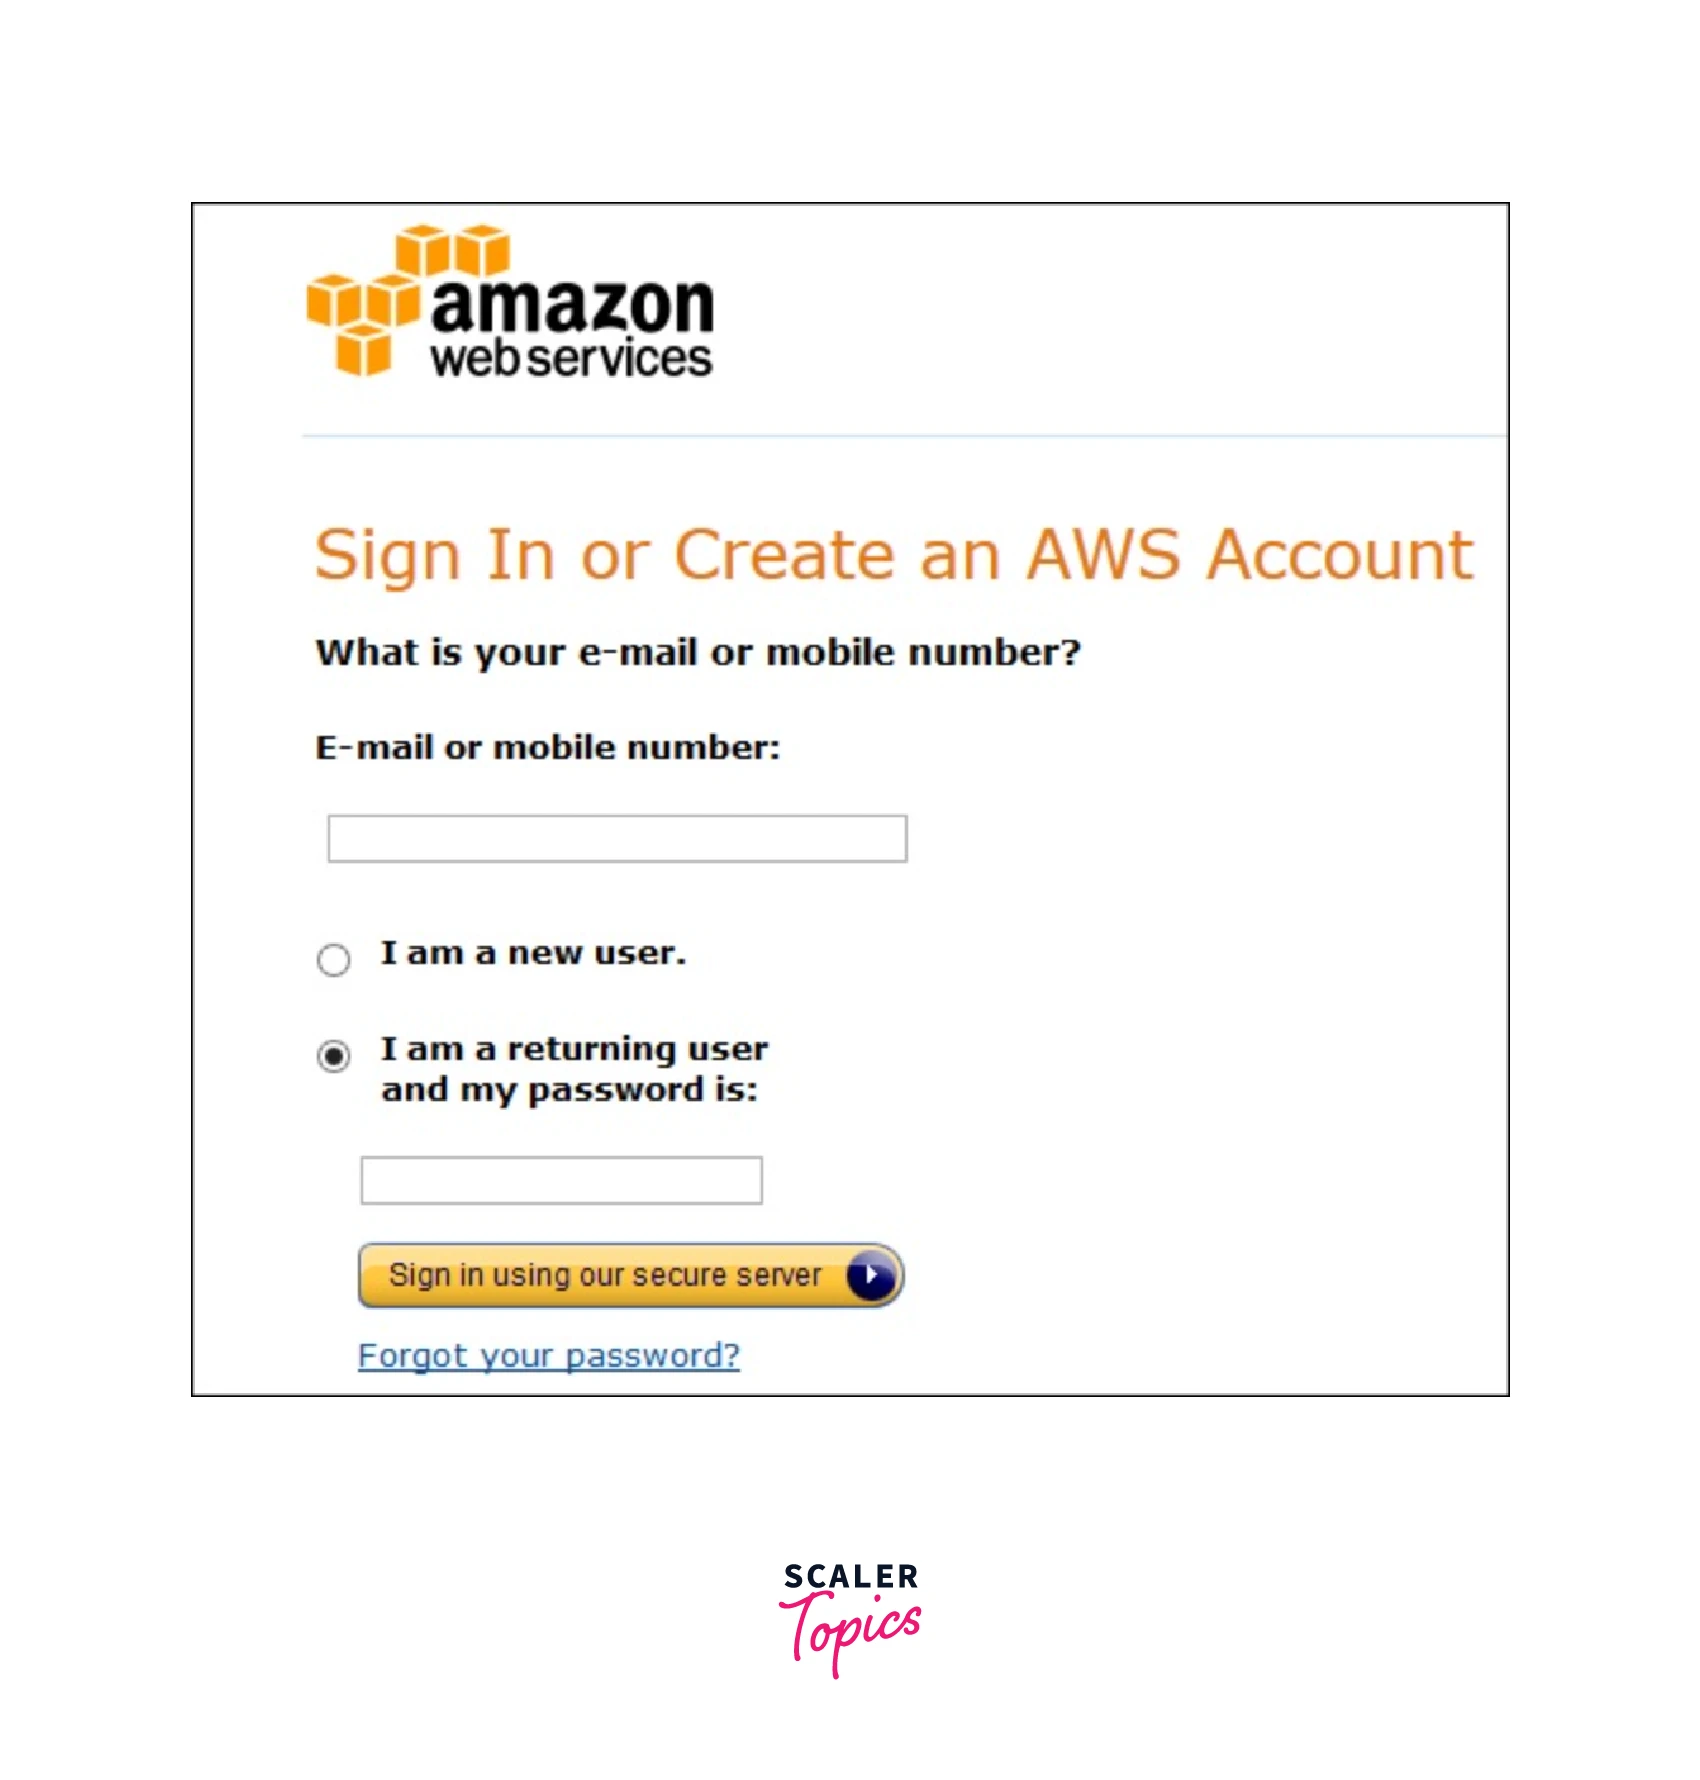
Step 1 − Open the link on your web browser and sign-up for a new account by entering the required details as shown below. You can directly log in using the existing AWS password if you already have an AWS account.
Step 2 − Once you entered the details (as shown below), you can go ahead and sign-up for the required AWS services. Make sure to correctly enter the AWS account details specifically your email address. You shall not be able to access your AWS account if you mistakenly entered the incorrect email address. AWS uses the details that you filled in at the time of billing, invoice generation, and recognizing the AWS account.
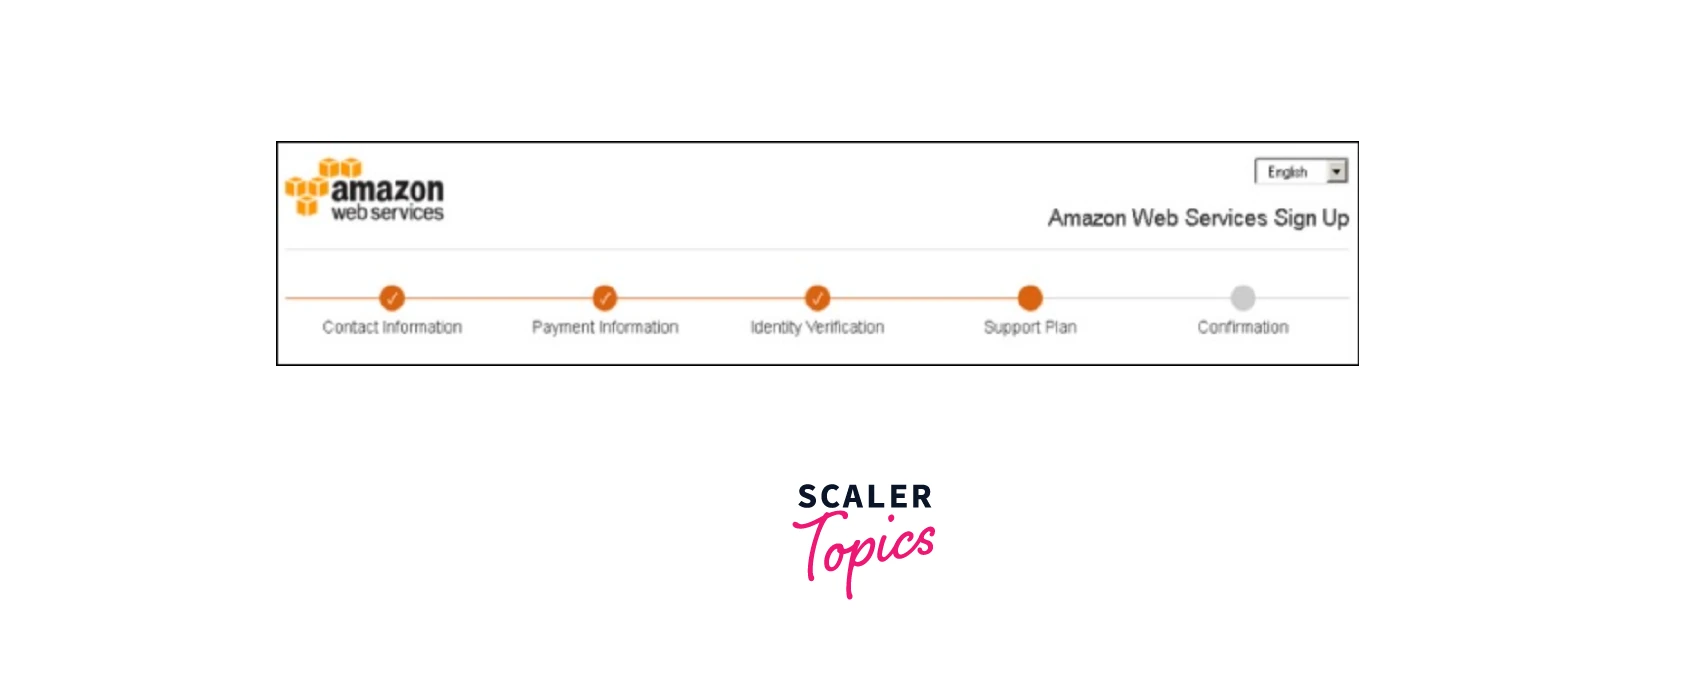
Step 3 − Carefully Read and understand the terms of the AWS Customer Agreement. And then go ahead to agree to the AWS Customer Agreement. Select the Create Account option and Continue as seen below.

Step 4 − You shall be directed to the Payment Information page where you need to add valid information for your payment method, and then select the Verify and Add button. To avail of the AWS services, you are required to enter the correct payment information. Don't panic you get charged a minimal amount of transactions against your card. AWS does so to validate that it is valid. This charge might also vary according to the region.
Step 5 − For identity verification, you need to verify your phone number by selecting the accurate country or region code from the list. Once you enter a phone number AWS shall call back in the next few minutes to validate the provided contact number. Now, you need to enter the code displayed in the CAPTCHA, and then click on the submit button along with the PIN you receive on the validation phone call back from Amazon.
Step 5 − Continue to the next page where you will have to Select a Support Plan. Subscribe to one of the available AWS Support plans from Basic, Developer, Business, or Enterprise. Here, The Basic AWS Support plan is not charged anything but offers limited resources which is a good option if you are just getting started with AWS.
Step 6 − VOila! you have created your AWS Account as seen below. Now the last step is the confirmation email from AWS. But Is your AWS account activated??
For validating the Activation for your New AWS Account, you need to wait until the AWS account is activated:
- Once you choose the Support plan, you will be directed to a confirmation page indicating that the AWS Account is getting activated. Often, The AWS Accounts are activated within a few minutes, but sometime this duration might get stretched up to 24 hours.
- Even though the activation of your AWS account might get delayed, you still can sign in during that time. You will observe that a Complete Sign-Up button shall appear on The AWS home page even though you completed all the steps.
- You shall receive a confirmation email, which indicates that your AWS Account is fully activated and you get complete access to all AWS services. Don't forget to check your spam folder too.
Bravo! You have successfully created and activated your AWS Account.
How to Use an AWS Account?
Well, we just learned how to create an AWS account. You might be wondering how can we access the AWS Account and start using the AWS Account:
For Using an AWS Account you need to follow below steps:
- Start by creating an AWS account.
- Sign-up for the various AWS services.
- Then, move ahead with securing your AWS account by creating the password and then accessing the AWS account credentials.
- Lastly, you can Activate the AWS services from the credits section.
AWS Account Identifiers
While working on various AWS resources you will trace back to your AWS Account frequently for certain checks or so. And for this navigation, AWS offers the AWS Account identifier which helps the user navigate to its accounts (if the user has multiple accounts in its AWS organizations).
To search for an AWS Account using the AWS Account identifier AWS allows two unique IDs for each of its AWS accounts. These unique identifiers are:
- An AWS account ID * Canonical user ID
Let us learn about each of them in detail.
Transform Your Career
Choose from our industry-leading programs designed for career success
Modern Software and AI Engineering Program
Master full-stack development with AI integration

Modern Data Science and ML with specialisation in AI
Advanced data science techniques with AI specialization
Advanced AIML with Specialisation in Agentic AI
Deep dive into AIML with focus on Agentic systems
DevOps, Cloud & AI Platform Engineering
Build and manage AI-powered cloud infrastructure
AI Engineering Advanced Certification by IIT-Roorkee
Premier AI engineering certification from IIT-Roorkee
AWS account ID
The AWS account ID is defined as a 12-digit number that helps the users to distinguish and uniquely identify their AWS account from others. This ID can be something like '987654321123'. The Amazon Resource Names (widely popular as ARNs) are where many AWS resources incorporated their AWS account ID. With the AWS Account ID, a user can easily acknowledge the AWS resources in its AWS account from the other AWS Account. AWS gives you the flexibility to sign in to the AWS Management Console, either via the AWS account ID or the AWS account alias if and only if you are an IAM user.
Canonical user ID
The Canonical user ID is defined as a long alpha-numeric AWS Account identifier which is a bewildering form of the AWS account ID. This ID can be something like '9283hsrfstgd0b9hteg5d96acd47ef2be'. We generally use this Canonical user ID to recognize an AWS account when we grant permission for cross-account access to S3 buckets or S3 objects. Either an IAM user or the root user of the AWS account is allowed the ability to retrieve the Canonical user ID for accessing their S3 bucket by specifying the Canonical user ID in the S3 bucket policy.
Account Alias
AWS offers to allow the usage of AWS Account alias to its users for their respective AWS accounts. In scenarios where you need the URL for your sign-in pages to reside in your organization's name (or any other friendly AWS account identifier) instead of your AWS account ID, AWS offers this possibility by allowing the user of the AWS account to create an AWS account alias. Also, The AWS account can only have one AWS Account alias and when new AWS Account alias is created, the new AWS Account alias overwrites the previous AWS Account alias in addition to this the previous alias URL stops working.
The default format for your sign-in page URL looks something like the below:
https://Your_Account_ID.signin.aws.amazon.com/console/
Once you have an AWS account alias for the AWS account ID, the format for your sign-in page URL will start to look something like the below:
https://Your_Account_Alias.signin.aws.amazon.com/console/
Here, the original URL remains active(where the AWS account ID resides) and is often normally used even after you created your AWS account alias.
The account alias must be unique across all Amazon Web Services products.
Note: For bookmarking the AWS account sign-in page in the web browser, you should always manually type the sign-in URL in the bookmark entry and avoid using the"bookmark this page" feature of your web browser.
Create/Delete your Account Alias
Now we will learn how to create, edit as well as delete the AWS account alias via the IAM API, the AWS Management Console, or the command line interface(CLI).
Turn Learning into Career Growth
Using the AWS Management Console
For Creating, editing, or deleting the AWS account aliases from the AWS Management Console follow the below steps:
Step 1: Log in to the AWS Management Console and open the IAM console via the link https://console.aws.amazon.com/iam/ .
Step 2: Select Dashboard from the navigation pane. Here, you shall find the AWS Account section. Search for Account Alias, and select the Create button. You will see an Edit. option, if one was an account alias, was already created.
Step 3: Type in the name for your AWS Account alias and Save your changes.
Step 4: You can also remove the AWS Account alias by selecting the Delete option next to the Account Alias and then choosing Delete. Once deleted, The sign-in URL shall revert to using the AWS account ID.
Using the AWS API
For Creating, deleting, or listing the AWS account aliases follow the below steps:
Run the commands:
aws iam create-account-alias for creating an AWS Account alias for your AWS Management Console sign-in page URL.
aws iam delete-account-alias for deleting an AWS account ID alias
aws iam list-account-aliases to display your AWS account ID alias.
Using the CLI
For Creating, deleting, or listing the AWS account aliases follow the below steps:
Call operation - CreateAccountAlias for creating an AWS Account alias for your AWS Management Console sign-in page URL.
Call opertion - DeleteAccountAlias for deleting an AWS Account alias
Call operation - ListAccountAliases for displaying an AWS Account alias
Multi-Factor Authentication (MFA)
Talking about the security practices for the AWS Account, AWS offers a Multi-Factor Authentication service to its users.
Multi-Factor Authentication (widely known as MFA) is defined as the additional level of security to the AWS Account by authenticating the users accessing the AWS account with a unique authentication code to be entered. This Multi-Factor Authentication code is sent to the approved authentication device or via an SMS text message if and only if the user is trying to access or login to the AWS account/websites or services. Once the correct MFA code is given, only then the user can successfully access the AWS services.
The Requirement for setting up the MFA for your AWS account to follow best security practices is to enable the MFA to your AWS Account. While using the MFA services, the user will have to either register a device (which can be hardware or virtual also) with the AWS root account or the IAM user of the AWS Account. Once registered, every MFA device linked with the user should always be unique. This regulates security at its best as no user will be allowed to enter and authenticate their AWS Account via the MFA code sent on another user's device.
AWS Identity & Access Management (IAM)
The AWS Identity & Access Management (IAM) in AWS Account is defined as the user entity where the user of the AWS account has the control to grant limited access to users, groups, or accounts to the AWS Service or resources. The IAM is created in the AWS that represents users of that AWS account having the ability to share limited access. Therefore, it is recommended to not use the root AWS account in daily activities.
This allows the root AWS account to prevent any restricted access to invade the information in or about AWS services or resources. In the AWS Account, a user of the account can create multiple users for that AWS account and control the access permissions to specific AWS resources as per needs.
How to Close an AWS Account?
When one of the members from your organization, no longer has access to AWS service or AWS resources, then it's good practice to make sure that no one access any service from his/her AWS account, and can arise charges after using the AWS services. It's recommended to close the AWS account either by the AWS Organizations console or the AWS Billing Console.
Note: Always cross-check that data or applications( that you might need) are backed up before closing the AWS Account. When the AWS account is closed, no AWS activity can be performed. AWS only allows the root user of that account to sign in to either contact AWS Support or view the past bills incurred.
Now we will learn how you can close any member's AWS accounts that were a part of your organization by signing into the organization's management AWS account.
Step 1: Back up the required applications and data.
Step 2: Login to the AWS Organizations console. Then sign in as an IAM user, where you need to either assume an IAM role or log in as the root Aws account user in the organization’s management AWS account. Signing in as a root Aws account user is not recommended though.
Step 3: Now you can search and select the name of the member AWS account which we want to close from the AWS accounts page. This can be done either by navigating Organisations Unit hierarchy or checking the information of the member AWS Account from a flat list of AWS accounts.
Step 4: At the top, you might find the 'Close' button, that you need to select present next to the AWS account name.
Step 5: Now head towards selecting every check box. This will acknowledge all the required AWS account closure statements are done.
Step 6: Then you need to enter the member AWS account ID and select the Close Account option.
Step 7: Once the AWS account is closed, you shall notice that immediately you are not able to access the AWS services or resources. To reopen the AWS account, only a root user can contact AWS Support within the limited Post-Closure Period.
For closing any member's AWS accounts that were a part of your organization AWS CLI or AWS SDK is given below:
For AWS CLI-
AWS CLI: use 'close-account' API
For AWS SDK- AWS SDKs: use 'CloseAccount' API
Conclusion
-
An AWS account is defined as a container to sustain your AWS resources where you can create, align and manage the AWS resources of your AWS account in addition to administrative capabilities for accessing and billing.
-
The AWS Identity & Access Management (IAM) in AWS Account is defined as the user entity where the user of the AWS account has the control to grant limited access to users, groups, or accounts to the AWS Service or resources.
-
Multi-Factor Authentication is defined as the additional level of security to the AWS Account by authenticating the users accessing the AWS account with a unique authentication code to be entered.
-
Always cross-check that data or applications( that you might need) are backed up before closing the AWS Account. When the AWS account is closed, no AWS activity can be performed. AWS only allows the root user of that account to sign in either to contact AWS Support or view the past bills incurred.