AWS Application Discovery Service
Overview
Enterprise clients planning migration projects can benefit from the data collected about on-premises data centers by the AWS Application Discovery Service.
Planning for data center migration may entail thousands of workloads with close ties to one another. Early in the transfer process, data about server usage and dependency mapping are essential. Additionally, the AWS Application Discovery Service gathers and displays server configuration, usage, and behavior data.
What is ADS (Application Discovery Service)?
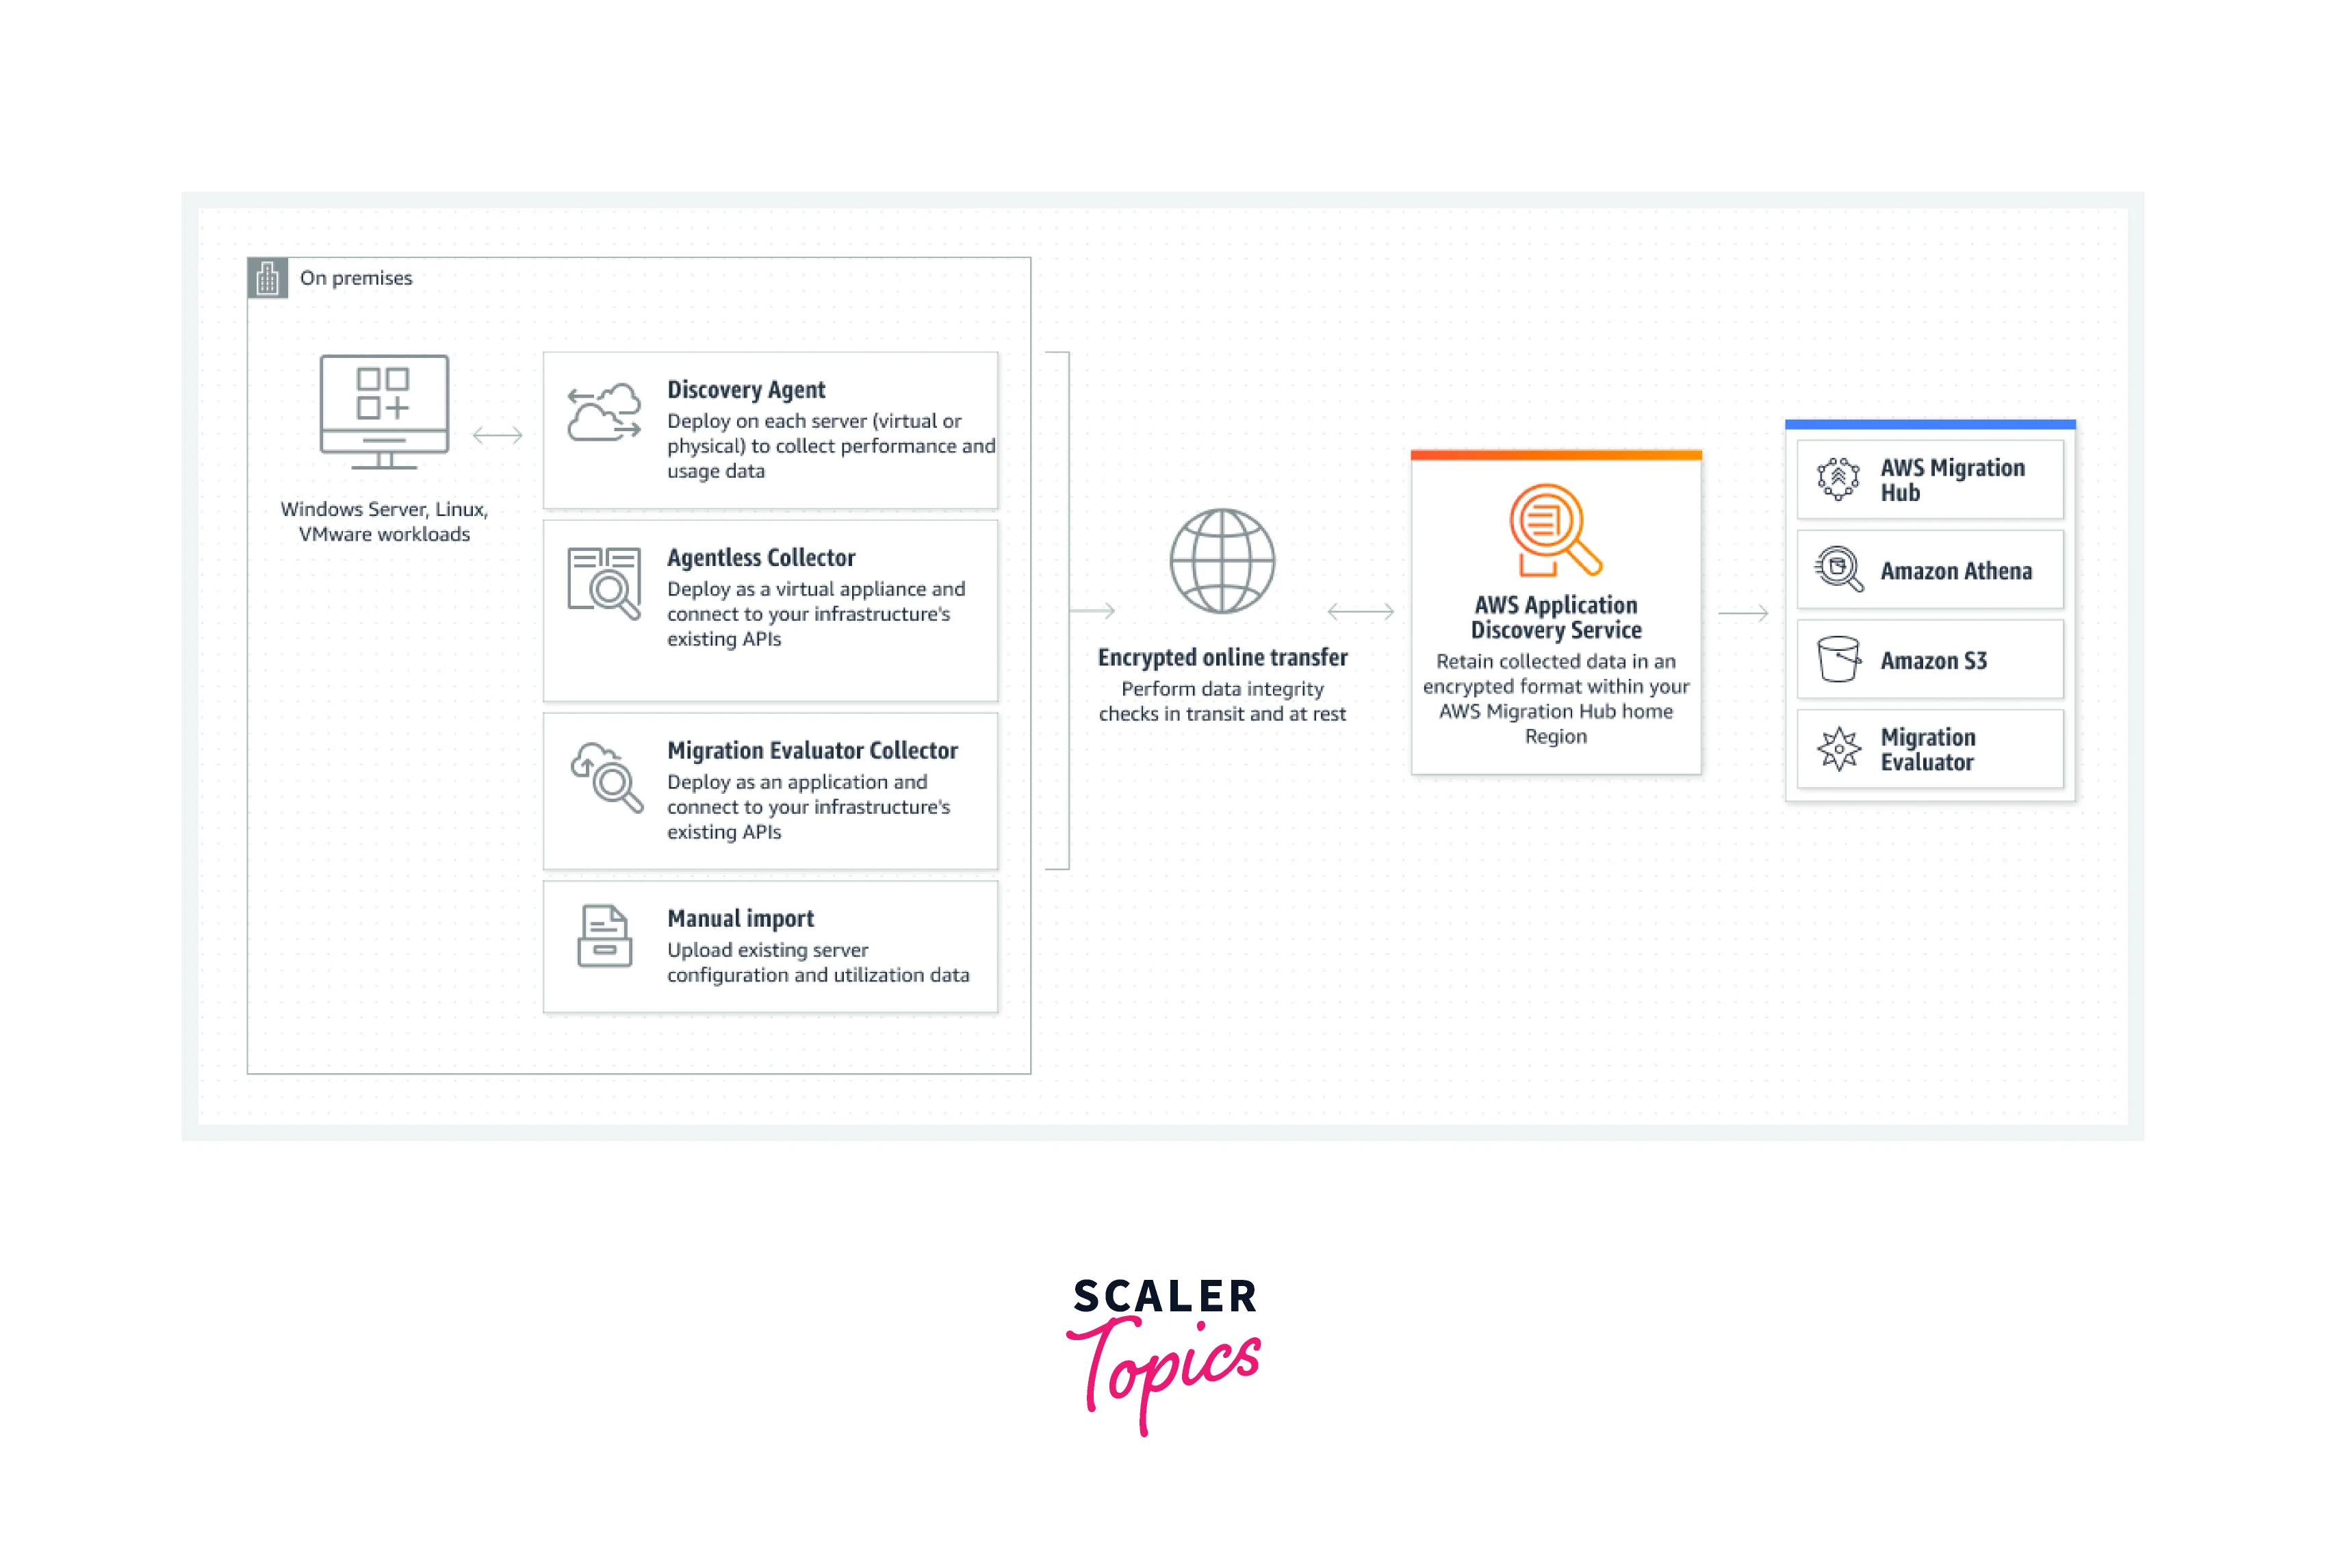
To help you plan your transition to the AWS cloud, the AWS Application Discovery Service gathers use and configuration information from your on-premises servers. The Application Discovery Service and AWS Migration Hub are linked, which makes migration tracking easier by compiling all of your migration status data into a single console. You can explore the detected servers, classify them into applications, and then track the migration status of each application from the Migration Hub console in your home region.
Using Application Discovery Service, there are two ways to find and gather information about your on-premises servers:
- Agentless Discovery:
To execute agentless discovery, the VMware vCenter can be used to install the AWS Agentless Discovery Connector (OVA file). After being established, the Discovery Connector locates hosts and virtual machines (VMs) connected to vCenter. The server's disc resource allocations, hostnames, IP addresses, MAC addresses, and other static configuration information are all gathered by the Discovery Connector. Additionally, it gathers information on VM usage and computes average and peak utilization for factors like CPU, RAM, and disc I/O. - Agent-Based Discovery:
You can execute agent-based discovery by installing the AWS Application Discovery Agent on your virtual machines and physical servers. Operating systems for Windows and Linux are supported by the agent installer. Inbound and outgoing network connections, running processes, static configuration data, and comprehensive time-series system performance information are all collected.
How Does Application Discovery Service Work?
Along with file-based import, Application Discovery Service includes on-premises tooling that is both agent- and agentless-based. Customers who use agentless discovery put the tooling on centralized servers, which then use open APIs in the on-premises environment to find resources and track usage. Using this method, one install may watch over numerous servers. The collection tooling is installed on every server (physical or virtual) in the on-premises system for customers who require higher-resolution data, including details on active processes.
Transform Your Career
Choose from our industry-leading programs designed for career success
Modern Software and AI Engineering Program
Master full-stack development with AI integration

Modern Data Science and ML with specialisation in AI
Advanced data science techniques with AI specialization
Advanced AIML with Specialisation in Agentic AI
Deep dive into AIML with focus on Agentic systems
DevOps, Cloud & AI Platform Engineering
Build and manage AI-powered cloud infrastructure
AI Engineering Advanced Certification by IIT-Roorkee
Premier AI engineering certification from IIT-Roorkee
Features
The functionalities offered by AWS Application Discovery Service are as follows:
- Learn About On-Premises Infrastructure:
The AWS Application Discovery Service gathers information about the CPU, network, memory, and disc resource allocation and utilization for servers, along with hostnames, IP addresses, and MAC addresses. You can use this knowledge to scale AWS resources during migration. - Identify Server Dependencies:
Agents for AWS Application Discovery Service keep track of all incoming and outgoing network traffic on each server. Then, using this information, server dependencies can be inferred. - Evaluation of Server Performance:
To gather performance data about apps and processes, AWS Application Discovery Service monitors host CPU, memory, disc consumption, and disc and network performance (e.g., latency and throughput). You can establish a performance baseline to compare after moving to AWS using this data. - Exploring Data Using Amazon Athena:
Using the information acquired from your on-premises servers and pre-defined queries, you can use Amazon Athena to study the time-series system performance for each server, the kinds of processes operating on them, and the network interconnections between different servers.
What are the Use Cases of Application Discovery Service?
-
Discover On-Premises Server Inventory:
Collect server hostnames, IP and MAC addresses, and important information about resource allocation during inventory discovery to hasten migration.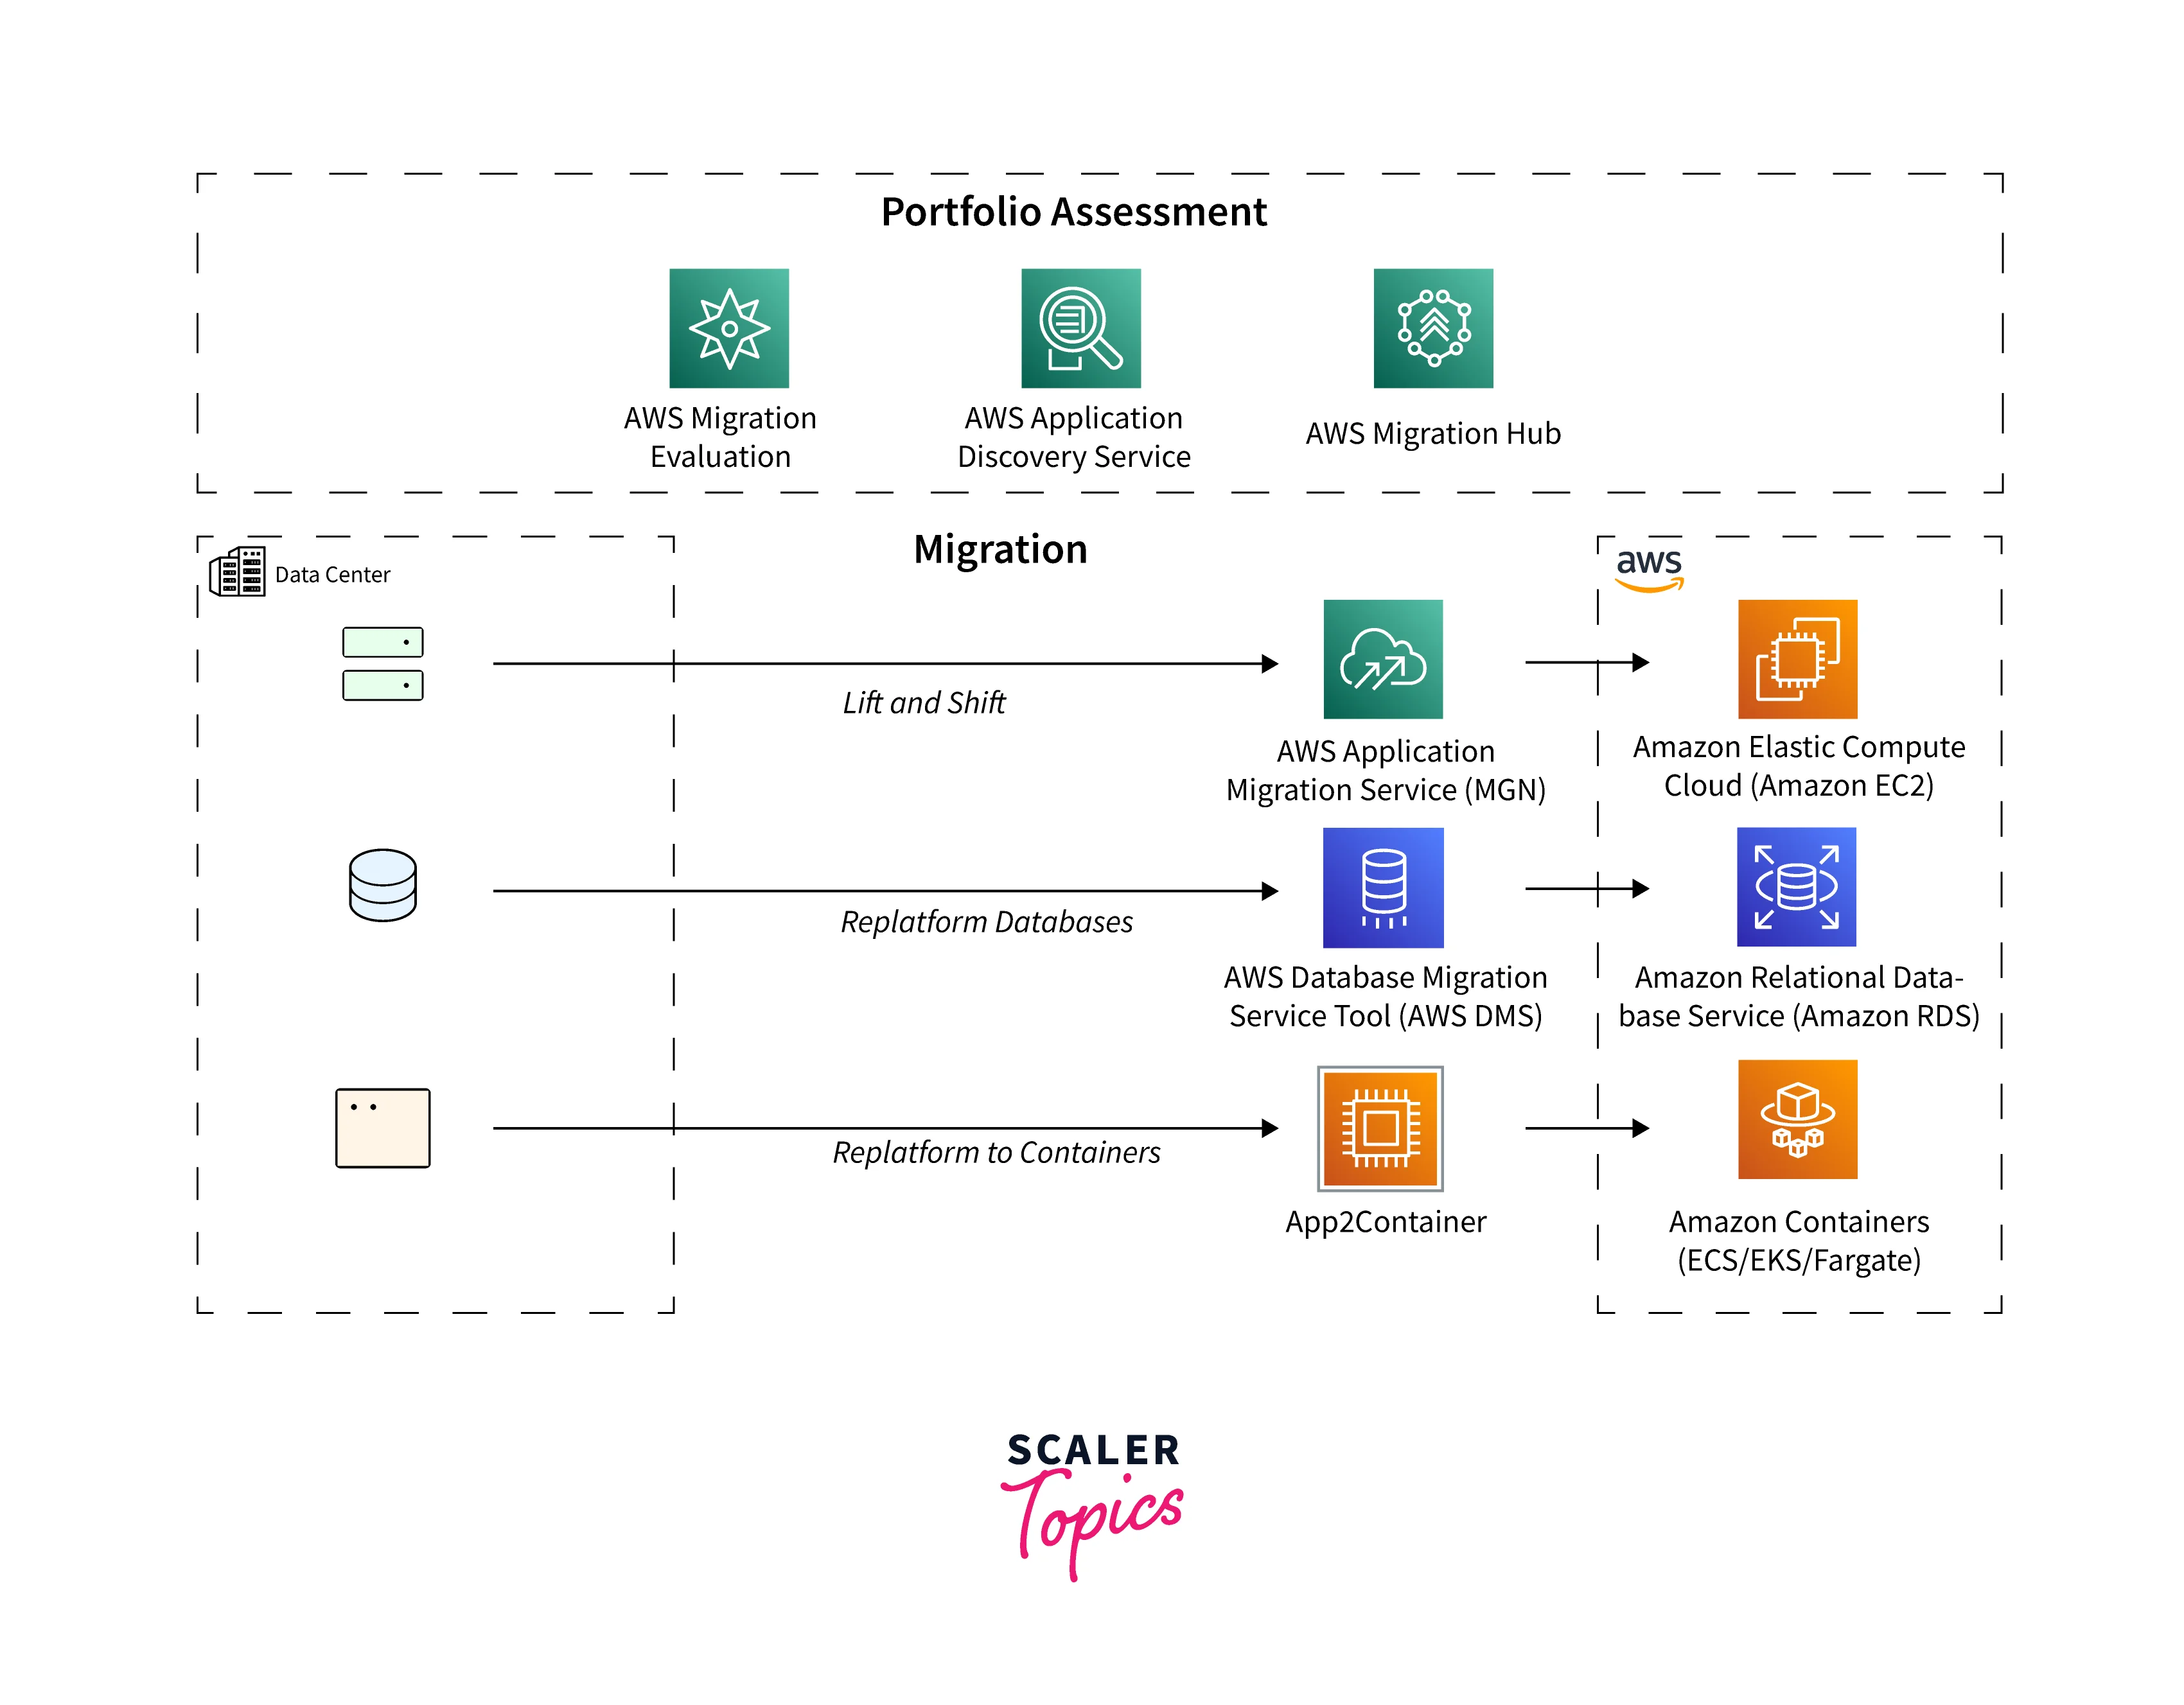
-
Map Network Communication Patterns:
Investigate the links between apps and servers to find unidentified servers, better comprehend dependencies, and create move groups. -
Mobilize for Migration:
Obtain usage information to create appropriately sized Amazon Elastic Compute Cloud (EC2) instances and make migration plans in the Migration Hub.
Pricing
You may plan your migrations and find out about your on-premises servers for free with the AWS Application Discovery Service.
You only pay for the AWS resources that are used to store your on-premises data, such as Amazon S3, Amazon Athena, or Amazon Kinesis Firehose. There are no minimum payments or up-front commitments, you simply pay for what you use as you use it.
You can check more about pricing in the given link.
Setting Up of Application Discovery Service
Sign Up for Amazon Web Services
To Sign Up for an AWS Account:
- Open the billing/signup page at link
- Follow the internet directions:
Receiving a call and entering a verification code on the phone keypad are both steps in the sign-up process. A root user for your AWS account is created when you sign up. All AWS services and resources in the account are accessible to the root user.
Create IAM Users
You receive a single sign-on identity with full access to all of the AWS services and resources in the account when you create an AWS account. The AWS account root user is the name of this persona. You can access all of the AWS resources in your account by logging in to the AWS Management Console with the email address and password you used to create the account.
Creating an IAM Administrative User
To Make an Administrator User:
- In your AWS account, create an administrator user.
Creating an IAM Non-Administrative User
To Make a Non-Administrator IAM User:
- Go to the IAM console in the AWS Management Console.
- While carrying out the IAM User Guide's instructions:
- Choose Programmatic access on the step where you must choose the type of access. Even though it's not advised, you should only choose AWS Management Console access if you intend to log in to the AWS console using the same IAM user credentials.
- Select the option to Attach current policies to the user directly on the Set Permissions screen. Then, from the list of policies, pick a managed IAM policy for Application Discovery Service.
- When you reach the phase where you can view the user's access keys (access key IDs and secret access keys), follow the instructions in the Important note about storing the user's new access key ID and secret access key in a safe location.


Sign In to the Migration Hub Console and Choose a Home Region
To Choose the Home Region:
- Open the Migration Hub console by going to link and logging in with your AWS account.
- Pick Settings and then a home Region from the Migration Hub console navigation pane.
- Your home Region contains the migration monitoring, planning, and discovery data from your Migration Hub.
Discovery Agent
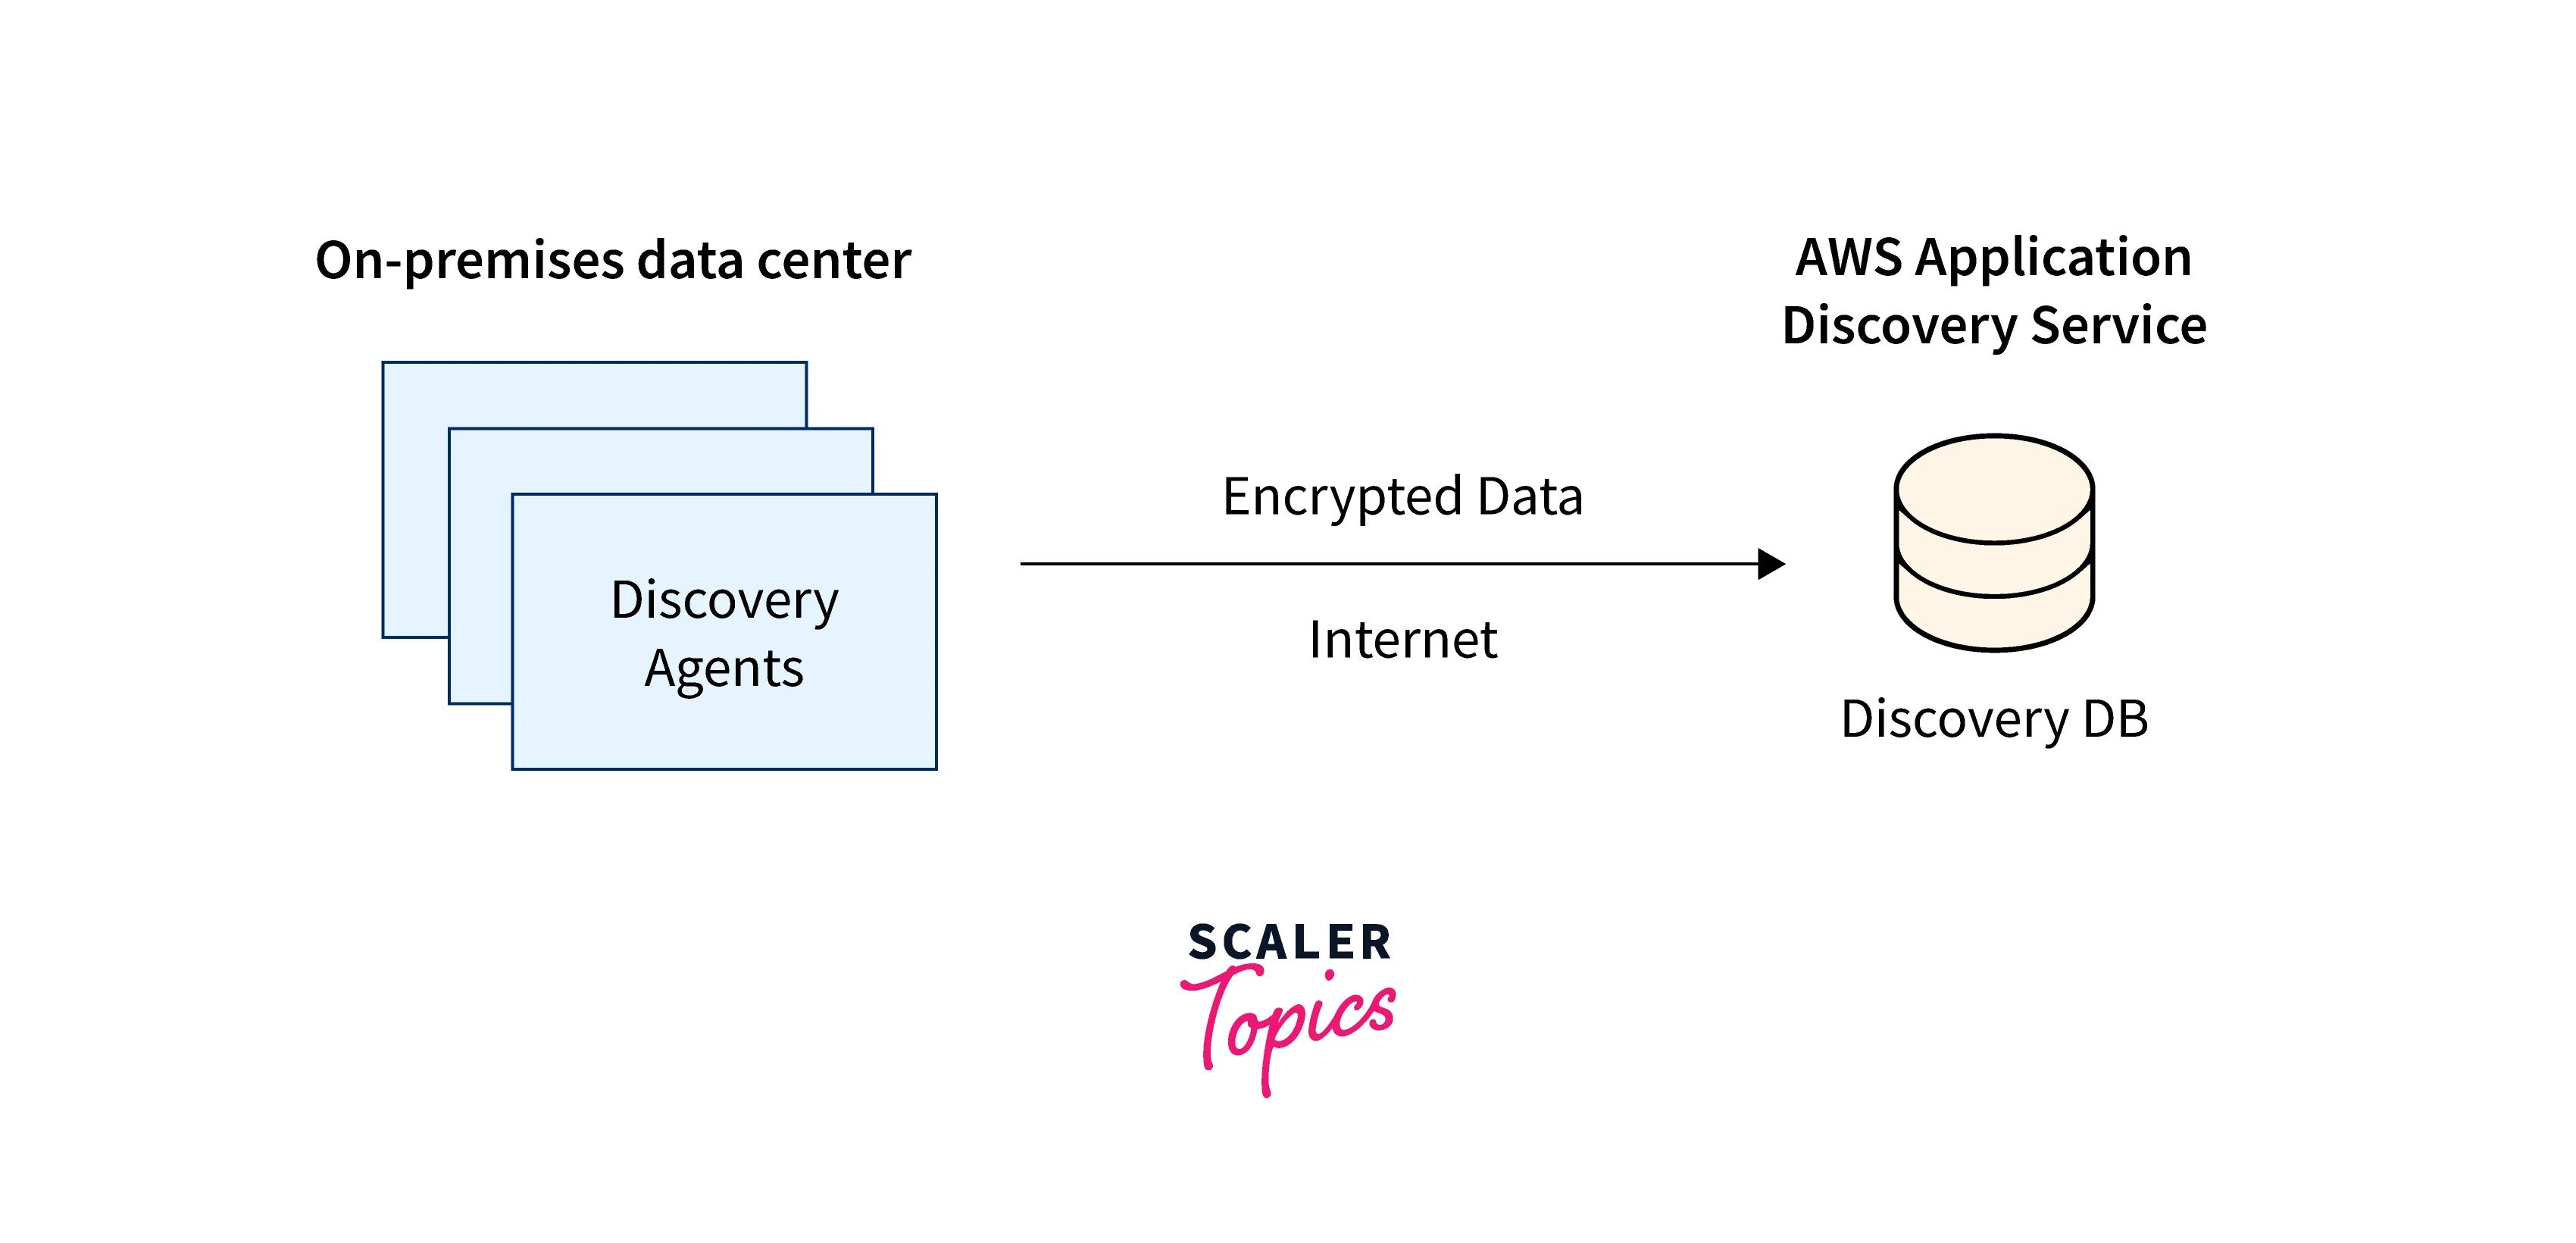
On on-premises servers and virtual machines (VMs) intended for discovery and migration, you install the AWS Application Discovery Agent (Discovery Agent) software. Agents record information about running processes, system configuration, performance, and network connections between systems. You can install agents on virtual machines, real on-premises servers, Amazon EC2 instances, and the majority of Linux and Windows operating systems.
The Discovery Agent operates locally and necessitates root access. The Discovery Agent registers with Application Discovery Service and establishes a secure connection with your home region when it is first launched.
- For instance, it registers arsenal-discovery.eu-central-1.amazonaws.com with Application Discovery Service if that area is your home region, eu-central-1.
- Alternately, you can use your region in place of all others besides us-west-2.
- It registers arsenal.us-west-2.amazonaws.com with Application Discovery Service if us-west-2 is your home region.
Scaler Placement Report and Statistics
Scaler learners achieved 2.5x salary growth with average post-Scaler CTC reaching ₹23L.
How It Works?
The agent begins gathering data for the host or virtual machine it is running on after registering. Every 15 minutes, the agent pings the Application Discovery Service to get configuration data.
System specs, times series usage or performance data, network connections, and process data are among the data that have been gathered. You may map your IT assets and their network relationships using this data. You may estimate the cost of maintaining these servers on AWS and make migration plans using all of these data points.
The Application Discovery Service receives data safely from the Discovery Agents via Transport Layer Security (TLS) encryption. When new versions are released, agents are set up to upgrade automatically. If desired, you can modify this configuration option.
Install Discovery Agent on Linux
To Install AWS Application Discovery Agent in Your Data Center:
-
Create a new directory on your Linux-based server or virtual machine to house the components of your agent.
-
Change to the new directory and use the console or the command line to download the installation script.
- To download via the command line, use the following command. curl -o ./aws-discovery-agent.tar.gz https://s3-us-west-2.amazonaws.com/aws-discovery-agent.us-west-2/linux/latest/aws-discovery-agent.tar.gz
- Do the following to download from the Migration Hub console:
- Go to the Discovery Tools page after opening the console.
- Pick Linux from the list of options after selecting Download agent in the Discovery Agent box. Your download starts right away.
- Use the following three commands to check the installation package's cryptographic signature:
-
- Extract from the tarball as shown following.
-
You must adjust your firewall settings if outbound connections from your network are prohibited. Agents require TCP port 443 access to the arsenal. They don't need the opening of any inbound ports. For instance, you would use https://arsenal-discovery.eu-central-1.amazonaws.com if your region is eu-central-1:443
Install Discovery Agent on Windows
- Check this link to learn more about installing Discovery Agent on Windows.
Agentless Collector
Service for Application Discovery An on-premises program called Agentless Collector (Agentless Collector) uses agentless techniques to gather data about your on-premises environment, including server profile data (such as OS, CPU count, and RAM size) and server utilization metrics. Using an Open Virtualization Archive (OVA) file, you deploy the Agentless Collector as a virtual machine (VM) in your VMware vCenter Server environment.
Thanks to Agentless Collector's modular architecture, multiple agentless collection techniques may be used. One-module collection from VMware VMs is now supported by Agentless Collector. The collection of network connections, data from various virtualization platforms, and operating system-level data will all be supported by subsequent modules.
Getting Started with Agentless Collector
Step - 1:
Create an IAM User for Agentless Collector
To Create a Non-Administrator IAM User to Use With Agentless Collector:
Navigate to the IAM console in AWS Management Console using the AWS account you used to create the home Region.
Follow the directions in the IAM User Guide for creating a user with the console to create a non-administrator IAM user.
While carrying out the IAM User Guide's instructions:
- Choose Programmatic access on the step where you must choose the type of access.
- Select the option to Attach current policies to the user directly on the Set Permissions screen. Then, from the list of policies, pick the AWSApplicationDiscoveryAgentlessCollectorAccess managed IAM policy.
Step - 2:
Download The Agentless Collector
To Download The Collector OVA File and Verify its Checksum:
- As a VMware administrator, log into vCenter and select the directory from which you wish to download the Agentless Collector OVA file.
- Download either the MD5 or SHA256 to receive the file containing the checksum value, depending on which hashing algorithm you use in your system environment. Verify the ApplicationDiscoveryServiceAgentlessCollector file you downloaded in the previous step using the downloaded value.
- Run the appropriate MD5 or SHA256 command for your version of Linux to check that the ApplicationDiscoveryServiceAgentlessCollector.ova file's cryptographic signature matches the value in the corresponding MD5 or SHA256 file that you downloaded.
Step - 3:
Deploy Agentless Collector
To Deploy Agentless Collector:
- Log in as a VMware administrator to vCenter.
- To install the OVA file, use one of the approaches below:
- Employ the UI:
Select Deploy OVF Template from the File menu after choosing the collector OVA file you obtained in the previous section. Then, to complete, adhere to the wizard's directions. - Employ the Command Line:
Use the VMware Open Virtualization Format Tool to install the collector OVA file from the command line after downloading it (ovftool). Pick a release from the OVF Tool Documentation page to start the download for ovftool.The replaceable values in the example are described as follows:
- The name is the name you want to give your virtual machine running an agentless collector.
- In your vCenter, the datastore is known as the data store.
- The collector OVA file that was downloaded is known as the OVA file.
- Your vCenter login information is the username and password.
- Your vCenter's URL is represented by the vcenterurl.
- Your VMware ESXi host can be reached using the vi route.
- The following is an illustration of how to install the collector OVA file using the ovftool command line tool.
- Employ the UI:
- In your vCenter, find the deployed Agentless Collector. Right-click the virtual machine and select Power, Power On.
- The collector's IP address appears in vCenter after a short while. You connect to the collector using this IP address.
Step - 4:
Access the Agentless Collector Console
To Reach The Agentless Collector Console:
- The IP address of the collector from Step - 3: Deploy Agentless Collector is the ip address, so open a web browser and type https://ip address>/ into the address bar.
- When you first access Agentless Collector, select Get Started. You will then be prompted to log in.
Turn Learning into Career Growth
Data Collected by Agentless Collector
You configure your servers' inventory, profile, and usage data gathering using the Application Discovery Service Agentless Collector (Agentless Collector) module.
Data gathering from VMware VMs is now supported by Agentless Collector. Future modules will support operating system-level collection as well as collection from various virtualization platforms.
- Unless otherwise noted, the data collection is done in measurements of kilobytes (KB).
- The Migration Hub console reports equivalent data in megabytes (MB).
- Only the.csv files generated by the export function of the Application Discovery Service API contain data fields with an asterisk (*).
- The polling period is divided into halves that last about 60 minutes.
- Currently, data fields with a double asterisk ( ** ) yield a null value.
| Data Field | Description |
|---|---|
| applicationConfigurationId* | ID of the migration application the VM is grouped under |
| avgCpuUsagePct | Average percentage of CPU usage over polling period |
| avgDiskBytesReadPerSecond | Average number of bytes read from disk over polling period |
| avgDiskBytesWrittenPerSecond | Average number of bytes written to disk over polling period |
| avgDiskReadOpsPerSecond** | Average number of read I/O operations per second null |
| avgDiskWriteOpsPerSecond** | Average number of write I/O operations per second |
| avgFreeRAM | Average free RAM expressed in MB |
| avgNetworkBytesReadPerSecond | Average amount of throughput of bytes read per second |
| avgNetworkBytesWrittenPerSecond | Average amount of throughput of bytes written per second |
| configId | ID assigned by Application Discovery Service to the discovered VM |
| configType | Type of resource discovered |
| connectorId | ID of the virtual appliance |
| cpuType | vCPU for a VM, an actual model for a host |
| datacenterId | ID of the vCenter |
| hostId* | ID of the VM host |
| hostName | Name of the host running the virtualization software |
| hypervisor | Type of hypervisor |
| id | ID of server |
| lastModifiedTimeStamp* | Latest date and time of data collection before data export |
| macAddress | MAC address of the VM |
| manufacturer | Maker of the virtualization software |
| maxCpuUsagePct | Max. percentage of CPU usage during polling period |
| maxDiskBytesReadPerSecond | Max. number of bytes read from disk over polling period |
| maxDiskBytesWrittenPerSecond | Max. number of bytes written to disk over polling period |
| maxDiskReadOpsPerSecond** | Max. number of read I/O operations per second |
| maxDiskWriteOpsPerSecond** | Max. number of write I/O operations per second |
| maxNetworkBytesReadPerSecond | Max. amount of throughput of bytes read per second |
| maxNetworkBytesWrittenPerSecond | Max. amount of throughput of bytes written per second |
| memoryReservation* | Limit to avoid over-commitment of memory on VM |
| moRefId | Unique vCenter Managed Object Reference ID |
| name* | Name of VM or network (user-specified) |
| numCores | Number of independent processing units within CPU |
| numCpus | Number of central processing units on VM |
| numDisks** | Number of disks on VM |
| numNetworkCards** | Number of network cards on VM |
| osName | Operating system name on VM |
| osVersion | Operating system version on VM |
| portGroupId* | ID of the group of member ports of VLAN |
| portGroupName* | Name of a group of member ports of VLAN |
| powerState* | Status of power |
| serverId | Application Discovery Service assigned ID to the discovered VM |
| smBiosId* | ID/version of the system management BIOS |
| state* | Status of the virtual appliance |
| toolsStatus | Operational state of VMware tools |
| totalDiskSize | Total capacity of disk expressed in MB |
| totalRAM | Total amount of RAM available on VM in MB |
| type | Type of host |
| vCenterId | Unique ID number of a VM |
| vCenterName* | Name of the vCenter host |
| virtualSwitchName* | Name of the virtual switch |
| vmFolderPath | Directory path of VM files |
| vmName | Name of the virtual machine |
Using the Agentless Collector Console
The Agentless Collector Dashboard:
You may view the collector's status and select a data collection technique as detailed in the following sections on the Application Discovery Service Agentless Collector (Agentless Collector) dashboard page.
- Collector Status:
You can learn more about the collector's status by checking Collector Status. The version, migration hub home region, collector name, and state of collector's connection to AWS. You might need to change the setup parameters for Agentless Collector if you're experiencing AWS connectivity problems. - Data Collection:
You can select a data collecting technique under Data collection. Service for Application Discovery Data gathering from VMware VMs is now supported by Agentless Collector (Agentless Collector).
Migration Hub Import
Without using the Application Discovery Service Agentless Collector (Agentless Collector) or AWS Application Discovery Agent (Discovery Agent), you can import information about your on-premises environment directly into AWS Migration Hub (Migration Hub), allowing you to perform migration assessment and planning using the imported data. You can track the migration status of your devices by grouping them as applications.
To Launch an Import Inquiry:
- Download the CSV import template in a specifically structured format.
- Fill it with the data from your current on-premises server.
- Utilize the Migration Hub GUI, AWS CLI, or one of the AWS SDKs to upload it to Migration Hub.
Handling Errors:
There is a link provided to download the compressed CSV files of the error log and unsuccessful records files. After fixing the issues, use these files to submit your import request again.
View, Export & Explore Data
System performance information based on average and peak utilization is provided by both Application Discovery Service Agentless Collector (Agentless Collector) and AWS Discovery Agent (Discovery Agent). You can run a high-level total cost of ownership (TCO) calculation using the system performance data that was gathered. The more specific information that discovery agents gather includes time series data for system performance data, inbound and outgoing network connections, and server operations. With the aid of this information, you may identify the network relationships between servers and classify the servers that are associated as applications for migration planning.
View Collected Data Using the Migration Hub Console
Once the data collection process has begun for the Application Discovery Service Agentless Collector (Agentless Collector) and AWS Discovery Agent (Discovery Agent), you may use the console to view the information that has been gathered about your servers and virtual machines (VMs). Approximately 15 minutes after data collection begins, data start to emerge in the console. By executing API requests with the AWS CLI, you may export the collected data and see it in CSV format.
To View Collected Data About Discovered Servers:
- Select Servers from the console's navigation pane. The servers list includes the newly found servers.
- Select the server name link in the Server info column to view the details made up of the collected data. By doing this, a screen with detailed information about the system, performance metrics, and other topics is displayed.
Export Collected Data
You can export the information gathered by the Application Discovery Service Agentless Collector (Agentless Collector) and AWS Application Discovery Agent (Discovery Agent) about your servers and virtual machines (VMs) once the data collection process has begun. Depending on the discovery tool you used to gather data, you can export this data either by interacting with the console or by making API requests through the AWS CLI.
Export Agent Collected Data Using The Console
To Export Collected Data About A Discovered Server:
- Pick Servers in the navigation pane.
- Select the link for the server you wish to export data for from the Server info column.
- Select Export server details from the Exports section at the bottom of the screen.
- Enter the Start date and Time for the Export server details.
- Select Export to begin the job. Click the refresh symbol in the Exports section to change the status from In-progress, which it is by default.
- The .zip file can be downloaded and saved after the export procedure is finished.
- Saved file must be unzipped. The export data is contained in a group of.csv file.
- Microsoft Excel can be used to review the output server data by opening the .csv files.
- A JSON file containing information about the export task and its outcomes can be found among the files.
Enabling Data Exploration in Amazon Athena
When you select Start data collection or toggle the option labeled Data exploration in Amazon Athena on the Data Collectors page of the Migration Hub console, Continuous Export is implicitly enabled, enabling data exploration in Amazon Athena.
To Enable Data Exploration in Amazon Athena from The Console:
- Select Data Collectors from the navigation pane.
- Select the Agents tab.
- Select Start data collection, or if data collection is already enabled, select Data exploration in Amazon Athena.
- Click the box indicating that you agree to the related expenses in the dialogue box that was created in the previous step, then select Continue or Enable.
Conclusion
- We learned about the AWS Application Discovery Service in this article. The AWS Application Discovery Service collects information on server characteristics, and performance, as well as specifics on active tasks and network connections.
- The cloud-based AWS Application Discovery Service protects data. Security of the infrastructure that underpins AWS Cloud services is the responsibility of AWS.
- To help you plan your transition to the AWS cloud, the AWS Application Discovery Service gathers use and configuration information from your on-premises servers.
- The AWS Application Discovery Service offers both agent-less delivery and agent-based delivery as its two service types.
- In the end, we discovered that using AWS Application Discovery Service is completely free.