Distributions
Overview
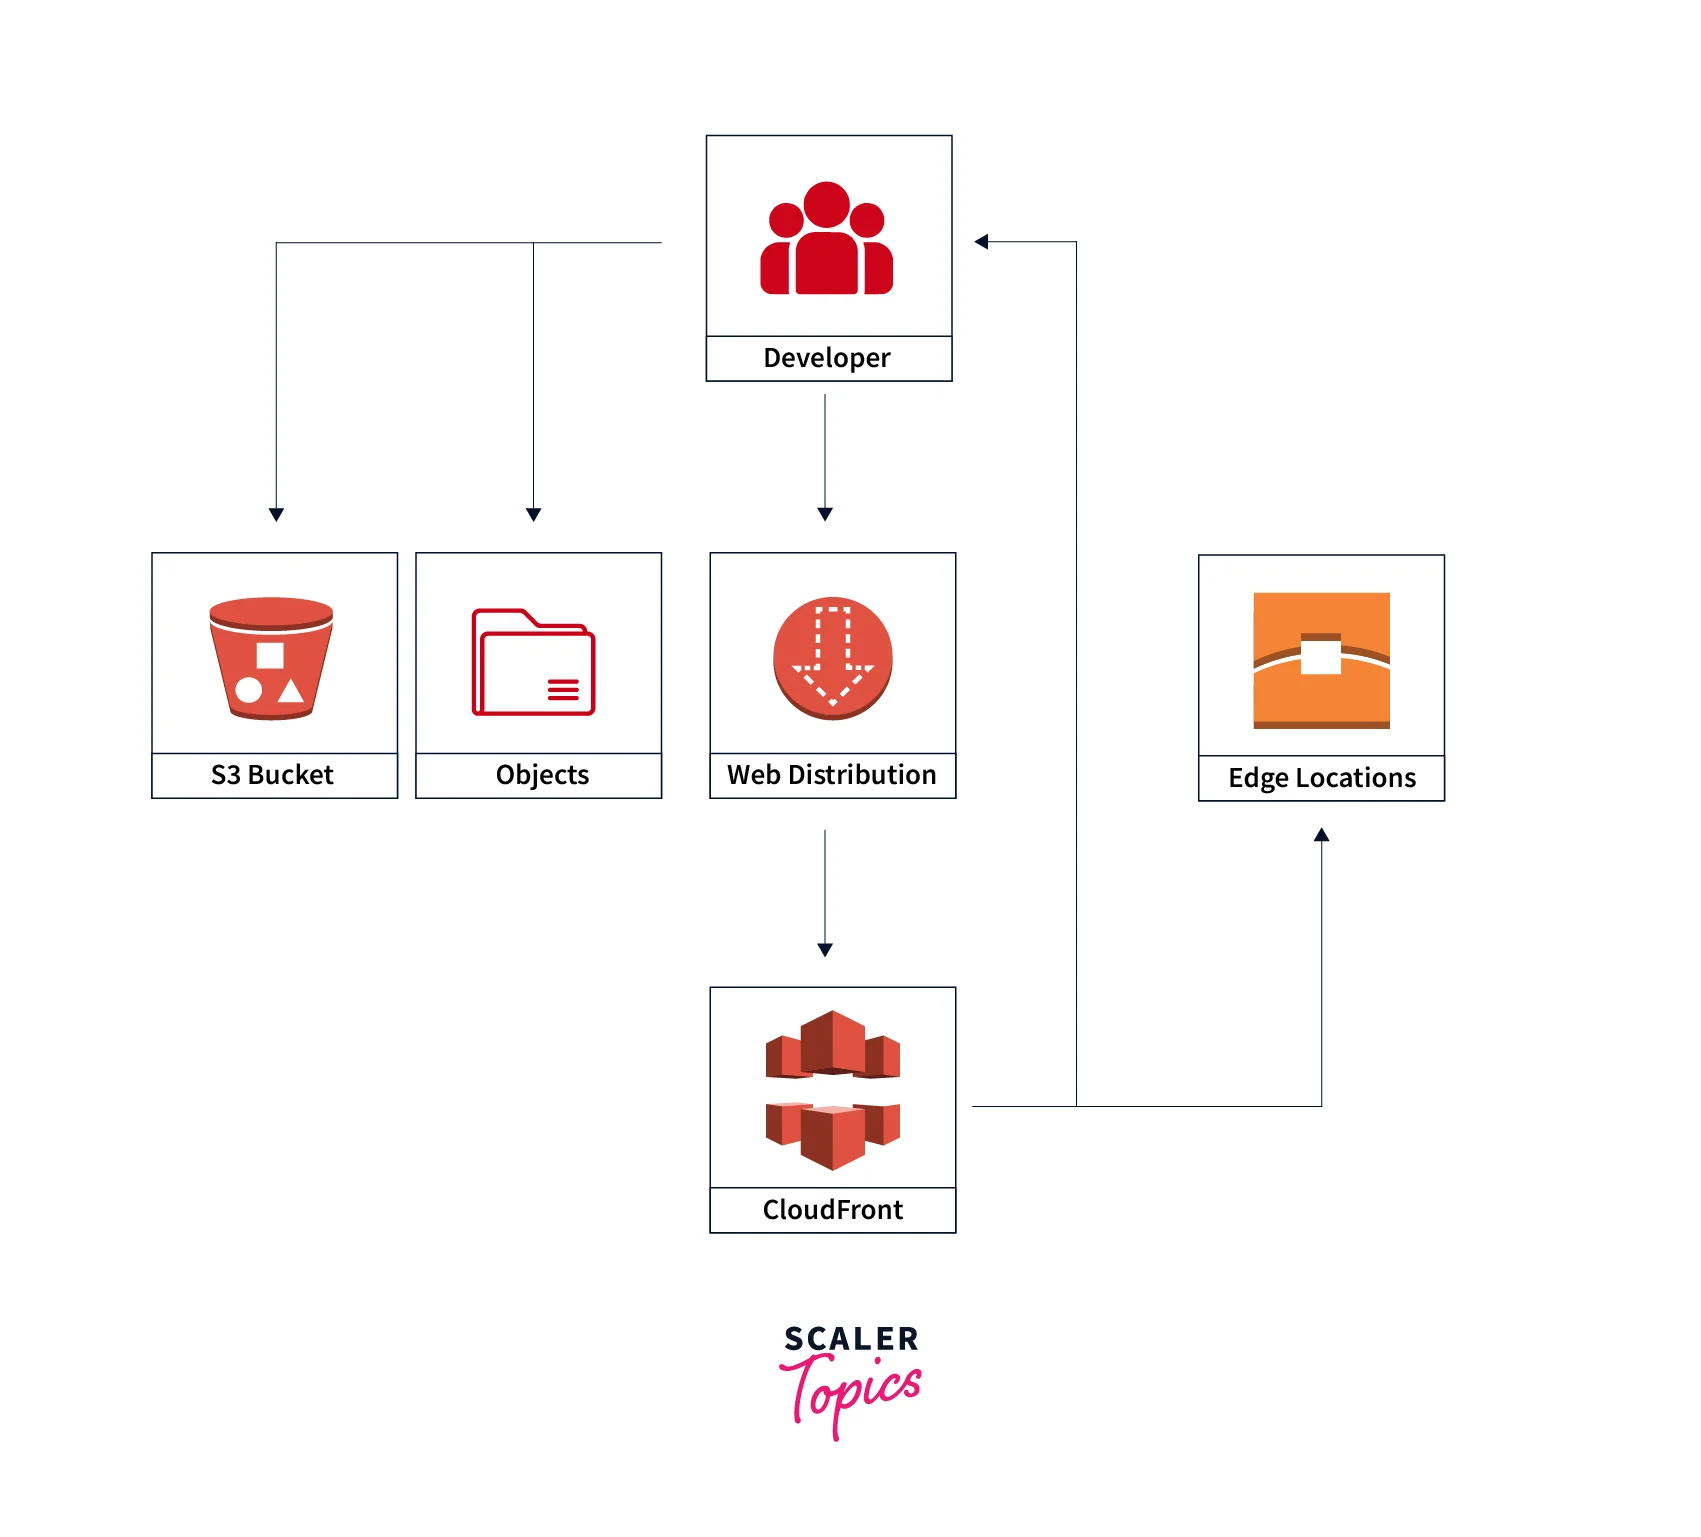
Distributions in AWS serve as a reference to the actual content you are hosting in CloudFront, whether it is in an AWS instance or a custom origin. When a request comes in for content that isn't already in the cache, CloudFront has to know where to acquire it from, thus the origin must be mentioned in the Distribution.
Overview of Distributions
Distributions is the instantiation of CloudFront. It acts as a pointer to the original content that you are hosting either in an AWS or custom origin. You build a distribution in AWS and pick the configuration options you desire when using CloudFront to deliver your content. For instance:
- Origin Request Settings: Whether you want CloudFront to deliver requests containing HTTP headers, cookies, or search strings to your origin.
- Origin of the Content: The HTTP server, Elastic Load Balancer, Amazon S3 bucket, or any other location from which CloudFront obtains the files it needs to distribute. For a single distribution, you can choose from up to 25 different origins.
- Security: Whether you want CloudFront to make HTTPS the minimum requirement for users to view your content.
- Logs: Whether you want CloudFront to produce regular logs or logs that reflect viewer activity in real-time.
The following content can be served via Distributions over HTTP or HTTPS:
- Use HTTP or HTTPS to download static and dynamic content, such as .html, .css, .js, and picture files.
- Video on demand in a variety of formats, including Microsoft Smooth Streaming and Apple HTTP Live Streaming (HLS).
- A real-time live event, such as a meeting or conference. You can use an AWS CloudFormation stack to automatically construct the distribution for live broadcasting.
Actions You Can Use With Distributions
The activities you can perform with CloudFront to interact with Distributions are included in the following table.
| Action | CloudFront API |
|---|---|
| Create a distribution | CreateDistribution |
| List your distributions | ListDistributions |
| Get all information about a distribution | GetDistribution |
| Get the distribution configuration | GetDistributionConfig |
| Update a distribution | UpdateDistribution |
| Delete a distribution | DeleteDistribution |
Transform Your Career
Choose from our industry-leading programs designed for career success
Modern Software and AI Engineering Program
Master full-stack development with AI integration

Modern Data Science and ML with specialisation in AI
Advanced data science techniques with AI specialization
Advanced AIML with Specialisation in Agentic AI
Deep dive into AIML with focus on Agentic systems
DevOps, Cloud & AI Platform Engineering
Build and manage AI-powered cloud infrastructure
AI Engineering Advanced Certification by IIT-Roorkee
Premier AI engineering certification from IIT-Roorkee
Required Fields for Creating and Updating Distributions
There are more needed fields when updating a distribution using the UpdateDistribution CloudFront API action than when creating a distribution using CreateDistribution. Follow these instructions to update a distribution:
- To obtain the most recent configuration for the distribution you want to update, use GetDistribution.
- You should update the fields in the distribution settings. Additionally, modify the ETag field's name to IfMatch without altering the field's value.
- By giving the whole distribution configuration, including the fields you edited and those you didn't, use UpdateDistribution to update the distribution.
The fields needed to create and update a distribution are listed in the tables below.
DistributionConfig
| Members | Required in CreateDistribution API Call | Required in UpdateDistribution API Call |
|---|---|---|
| CallerReference | Yes | Yes |
| Aliases | - | Yes |
| DefaultRootObject | - | Yes |
| Origins | Yes | Yes |
| OriginGroups | - | - |
| DefaultCacheBehavior | Yes | Yes |
| CacheBehaviors | - | Yes |
| CustomErrorResponses | - | Yes |
| Comment | Yes | |
| Logging | - | Yes |
| PriceClass | - | Yes |
| Enabled | Yes | Yes |
| ViewerCertificate | - | Yes |
| Restrictions | - | Yes |
| WebACLId | - | Yes |
| HttpVersion | - | Yes |
| IsIPV6Enabled | - | - |
Creating, Updating, and Deleting Distributions
A distribution can be created, updated, or deleted by following the instructions in the following sections.
Steps for Creating a Distribution
For Creation of a Distribution in AWS
- Step 1: Make a few Amazon S3 buckets or set up HTTP servers to serve as your origin servers. The place where you keep the initial copy of your content is known as the origin. The files that CloudFront distributes at edge locations are obtained from the origin when CloudFront receives a request for them. Your origin servers might be any setup of HTTP servers and Amazon S3 buckets.
- Step 2: Upload your content to your origin servers. Make the objects publicly readable if you don't want to use CloudFront-signed URLs to limit access to your content.
- Step 3: Create your distribution in CloudFront.
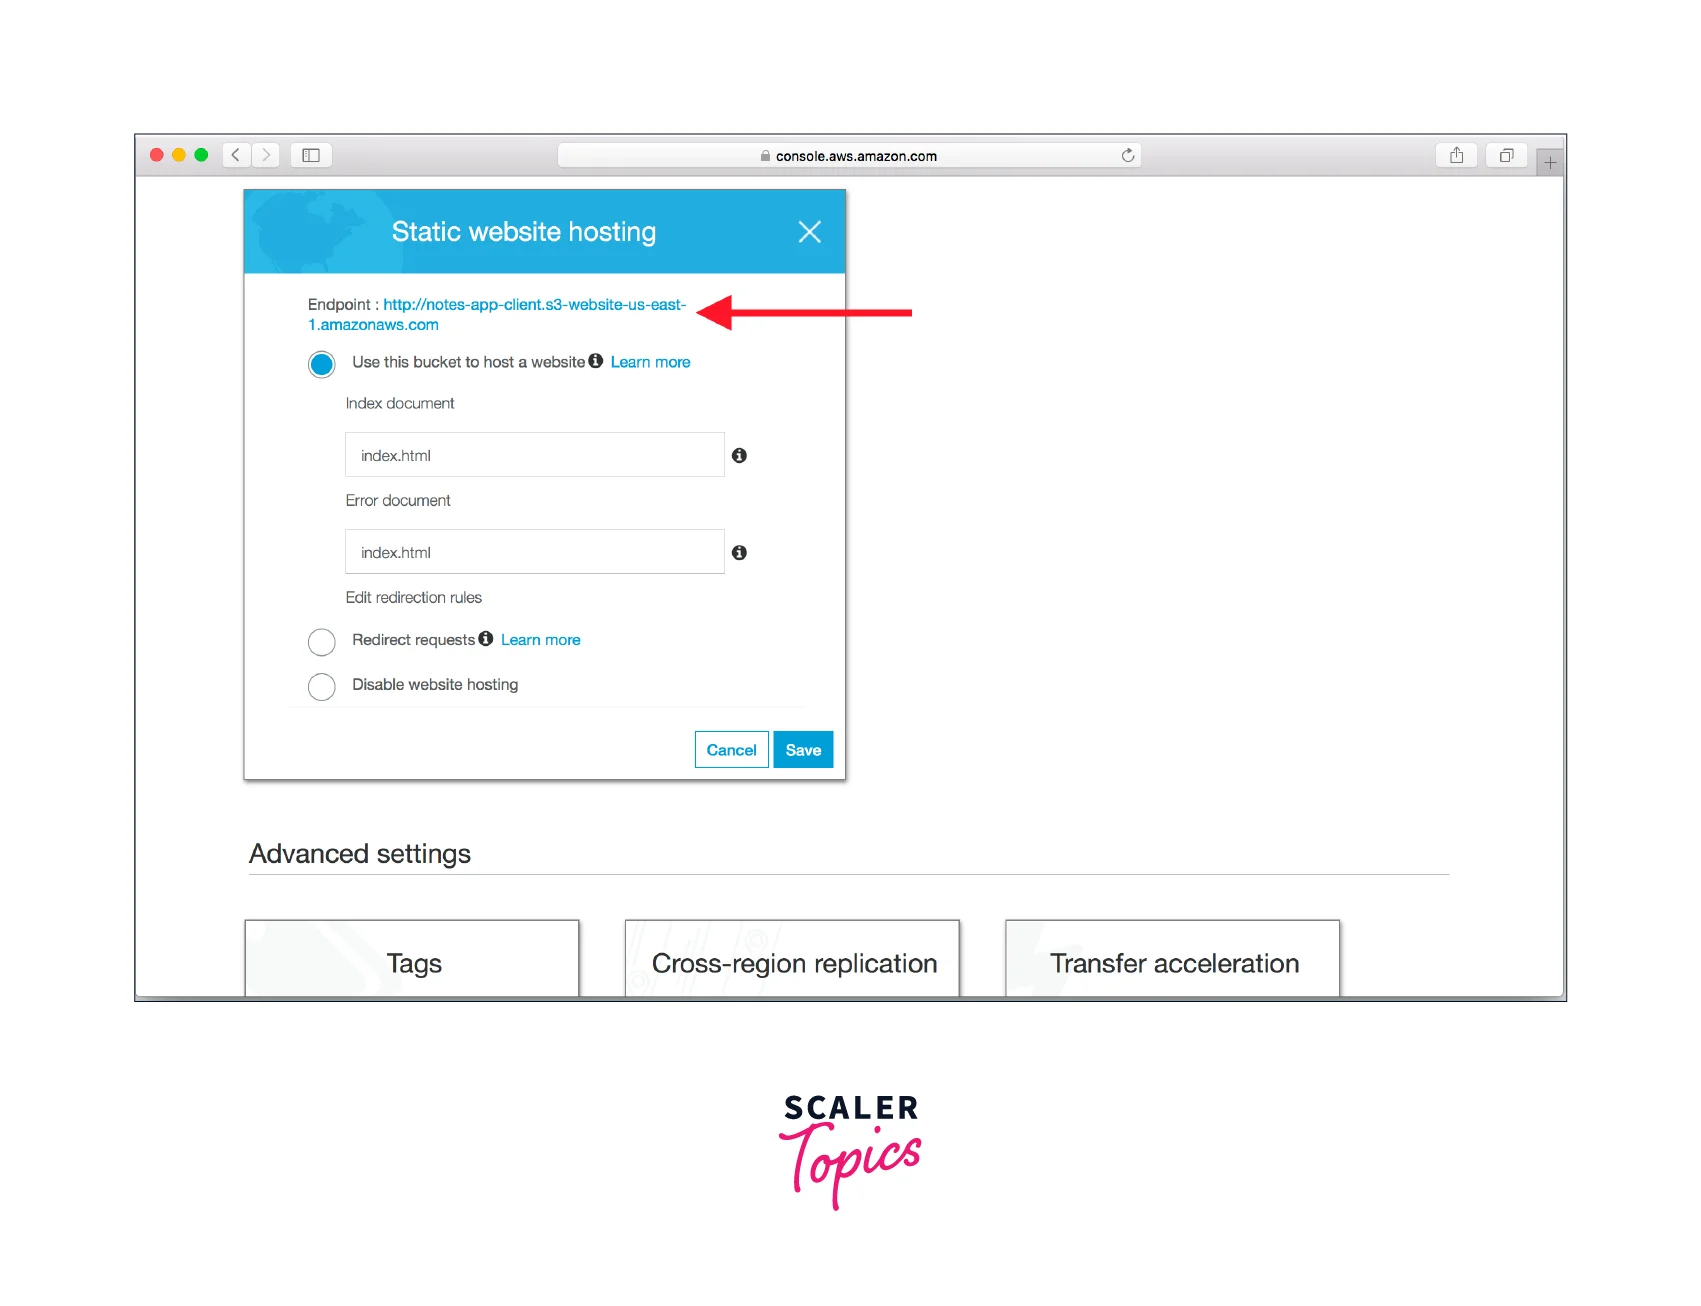
- Step 4: Utilizing the domain name that CloudFront returned after you create your distribution in Step 3, develop your website or application to access your content. For instance, the URL for the file image.jpg in an Amazon S3 bucket or the root directory on an HTTP server will be https://d12345axbew7.cloudfront.net/image.jpg if CloudFront returns d12345axbew7.cloudfront.net as the domain name for your distribution.
Creating a Distribution
A distribution can be created or updated programmatically or through the CloudFront console. This section is about utilizing the console to interact with Distributions.
Create a CloudFront Web Distribution (Console)
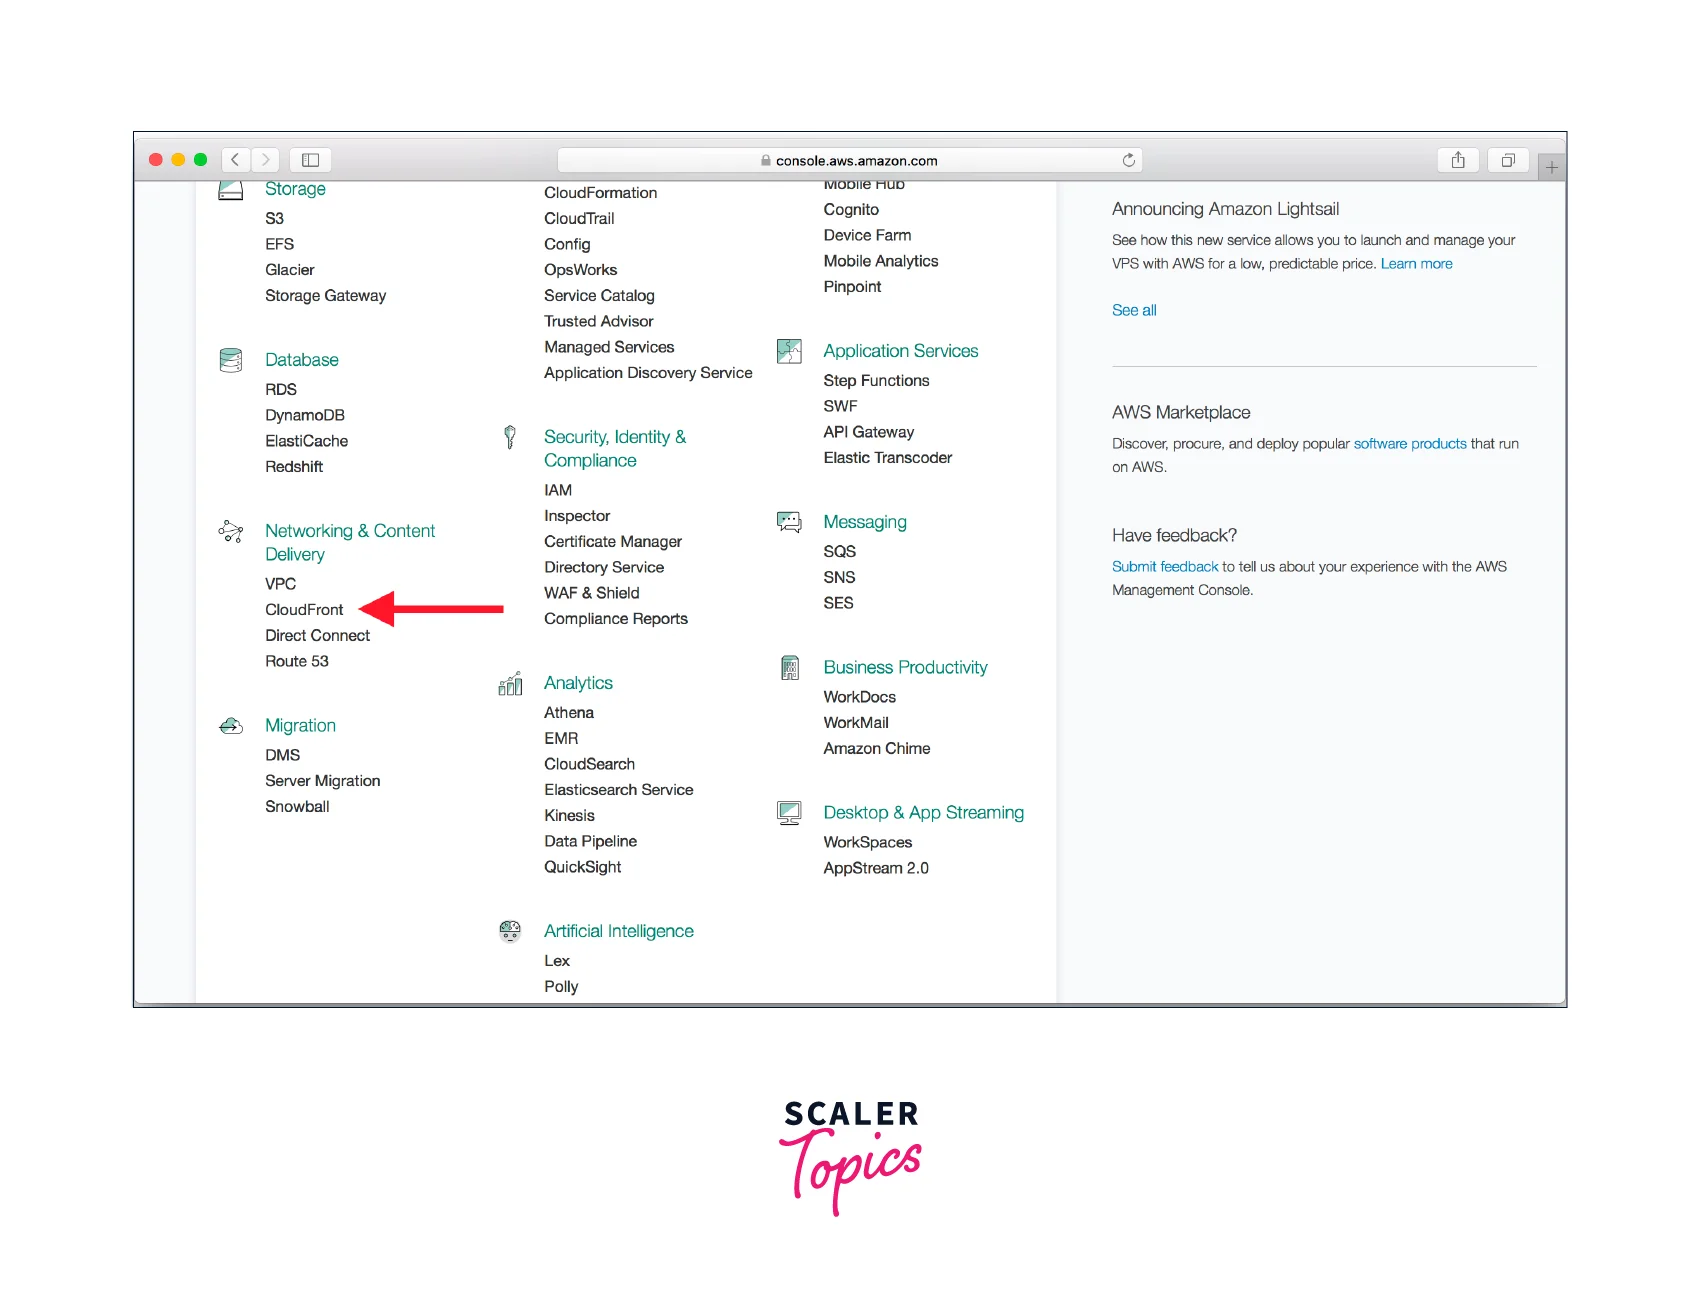
- Step 1: Open the CloudFront console by logging into the AWS Management Console at this link.
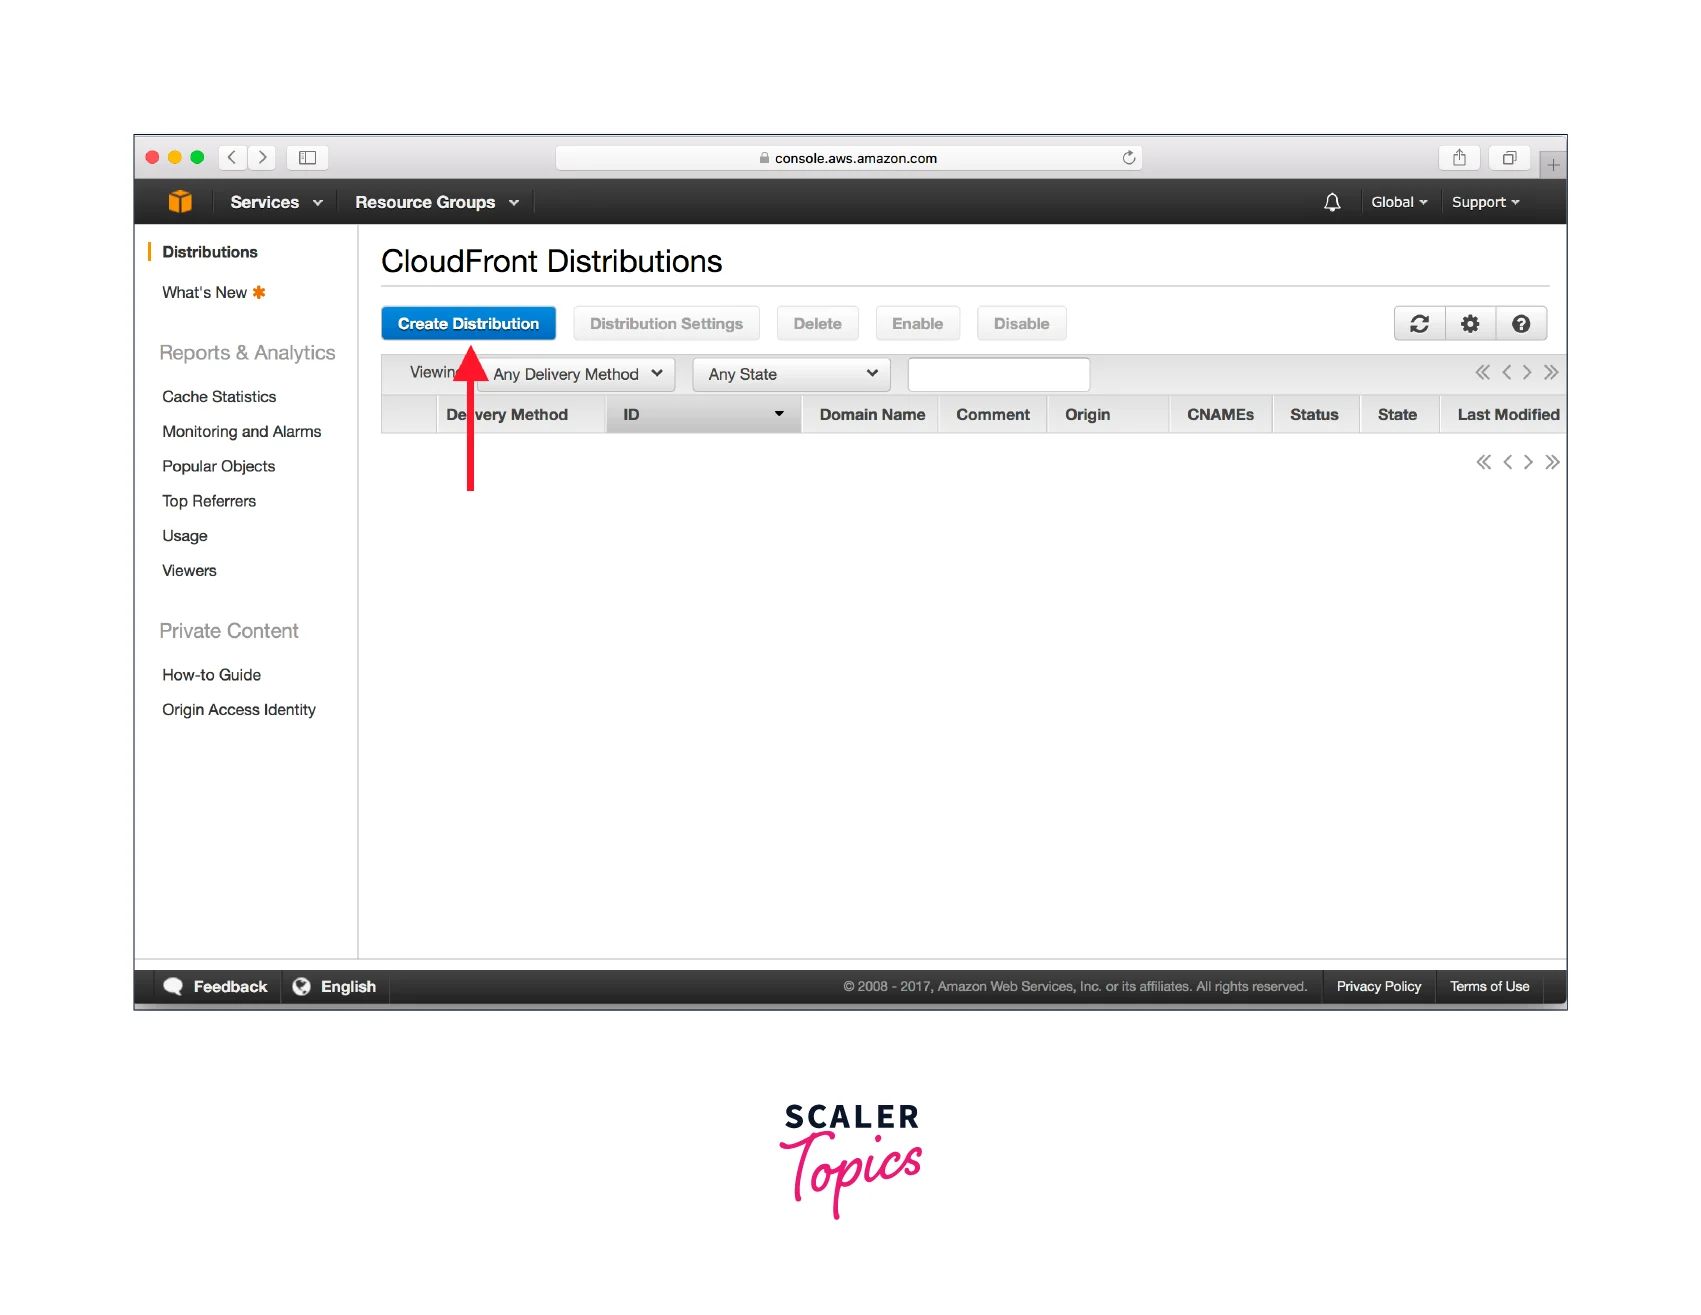
- Step 2: Select Create Distribution.
- Step 3: Select Get Started from the Web section on the Create Distribution Wizard's first page.
- Step 4: Set the distribution options. See the Values that you supply when creating or updating a distribution for more details.
- Step 5: Save changes.
- Step 6: Your distribution's Status column will read Deployed once CloudFront has created it, changing the value from InProgress. After the status changes to Deployed, the distribution if you decided to activate it, will be prepared to handle requests. Your distribution's domain name is displayed in the list of distributions under the distribution's name.
- Step 7: Using your new CloudFront URL or CNAME, make sure you can access your content after your distribution is published.


Values that You Specify
When you use the CloudFront console to create a new distribution or update an existing distribution, you specify the following values
The following values are entered while creating a new distribution or making changes to an existing distribution using the CloudFront console.
- Origin Settings: The origins — the places where you keep the original versions of your online content — are specified when you establish or edit a distribution using the CloudFront dashboard.
- Origin Domain: The DNS name of the HTTP server or Amazon S3 bucket that CloudFront should use to obtain objects for this origin.
- Origin Path: Enter the directory path, starting with a slash (/), to tell CloudFront where to look for your content in your origin. The directory path is added by CloudFront to the value of the Origin Domain.
- Name: A string that uniquely identifies this origin in this distribution. If you create cache behaviors in addition to the default cache behavior, you use the name that you specify here to identify the origin that you want CloudFront to route a request to when the request matches the path pattern for that cache behavior.
- Add Custom Header: Specify the header name and value if you want CloudFront to add the specified headers each time it sends a request to your origin.
- Enable Origin Shield: To activate CloudFront Origin Shield, select Yes.
- Connection Attempts: The number of times CloudFront tries to connect to the source. As for the number of tries, you can choose between 1, 2, or 3. If you don't specify a number, the default is 3.
- Connection Timeout: The length of time CloudFront waits before attempting to connect to the origin. One to ten seconds can be chosen as the number of seconds (inclusive). If you don't specify a timeout, the default is 10 seconds.
- HTTP Port: The HTTP port on which the specific origin listens. Among the acceptable options are ports 80, 442, and 1025 to 64535. Port 80 is the default selection.
- HTTP Response Code: The HTTP status code and customized error page that CloudFront should return to the viewer.
- Geographic Restrictions: You can set up your CloudFront distribution using an Allow list or a Block list if you need to restrict access to your content for users in particular nations. The setting of geographic limits is free of charge.
Values that are Displayed
When you create a new distribution or update an existing distribution, CloudFront displays the following information in the CloudFront console
The following data is shown by CloudFront in the CloudFront console whenever you establish a new distribution or update an existing distribution.
- Distribution ID: With the CloudFront API, you may use the distribution ID to identify the distribution when acting on a distribution. The distribution ID of a distribution cannot be altered.
- Distribution Status: InProgress denotes that the distribution is still being built or updated and that edge servers have not yet received all of the changes. Deployed, on the other hand, denotes the creation or updation of the distribution and the complete propagation of the modifications throughout the CloudFront system.
- Last Modified: The distribution's most recent modification time and date in ISO 8601 format.
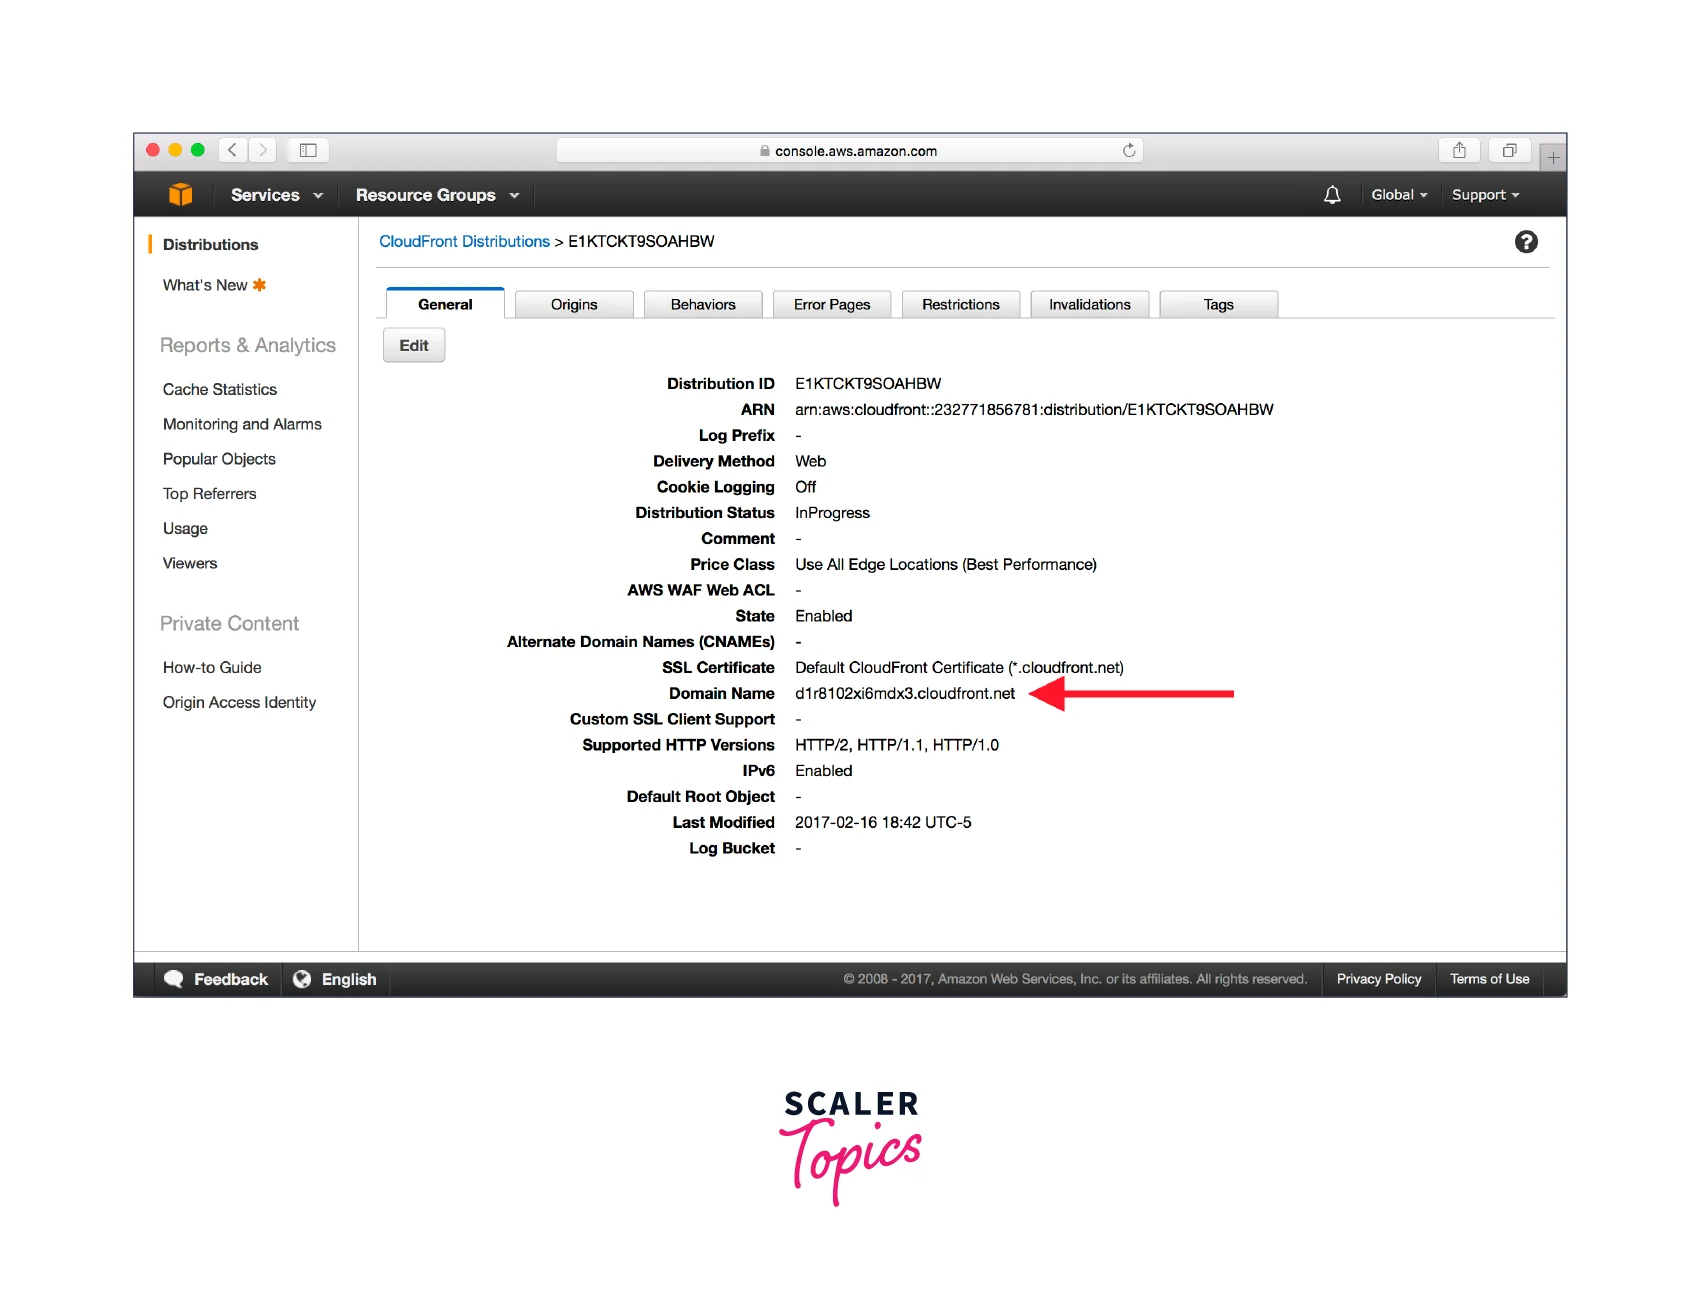
- Domain Name: In the URLs of your objects, you utilize the distribution's domain name. The CloudFront distribution domain name cannot be changed.
Testing a Distribution
Once you've made your distribution, CloudFront is aware of the location of your origin server and you are aware of the domain name connected to the distribution. The CloudFront domain name can be used to generate links to your objects, and CloudFront will provide the items to your website or application.
To Establish Linkages Between Items in a Web Distribution
- Step 1: Replace domain-name with the domain name of your distribution and object-name with the name of your item when pasting the below HTML code into a new file. If your object is located in a folder on your origin server, the URL must additionally contain the name of the folder.
- Step 2: The HTML code should be saved in a file with the extension .html.
- Step 3: To make sure that you can see your object, open your webpage in a browser.
Scaler Placement Report and Statistics
Scaler learners achieved 2.5x salary growth with average post-Scaler CTC reaching ₹23L.
Updating a Distribution
You can check a distribution's settings and make changes through the CloudFront console, where you can also see the CloudFront distributions connected to your AWS account. Be mindful that until the distribution has reached the AWS edge locations, any settings changes you make won't take effect.
For a CloudFront Distribution Update
- Step 1: Open the CloudFront console by logging into the AWS Management Console at this link.
- Step 2: Choose a distribution's ID. The distributions list contains every distribution connected to the AWS account you used to access the CloudFront dashboard.
- Step 3: Select the Distribution Settings tab to make changes to a distribution's settings.
- Step 4: Select Edit to adjust the default settings. Otherwise, select Origins or Behaviors as the tab for the settings you want to change.
- Step 5: After making the changes, select Yes, Edit to save them.
- Step 6: You should take the following actions to remove an origin from your distribution:
- Make sure you have transferred any default cache behaviors linked to the origin to another origin after selecting Behaviors.
- Select Origins, then pick the origin.
- Select Delete.
Tagging a Distribution
Your AWS resources can be categorized and identified using tags, which are words or phrases. Each resource can have one or more tags added to it, and each tag has a defined key and value. For instance, domain may be the key, and xyz.com could be the value. Your resources can be searched for and filtered based on the tags you enter.
Two scenarios when using tags in CloudFront can be helpful as follows:
- Use tags to keep track of billing data for various categories. AWS creates a cost allocation report as a comma-separated value (CSV) file containing your consumption and expenses aggregated by your active tags when you apply and activate tags. To categorize your expenditures across several services, you can apply tags that stand in for business categories (like cost centers, application names, or owners).
- Apply tags to CloudFront distributions to enforce tag-based permissions.
To Add, Modify, or Remove Tags For a Distribution
- Step 1: Open the CloudFront console by logging into the AWS Management Console at this link.
- Step 2: Select the distribution ID that needs to be updated.
- Step 3: Select the Tags tab.
- Step 4: Select Manage tags.
- Step 5: The below mentioned actions are available on the Manage tags page:
- Type a key and, if desired, a tag value to add a tag. To add more tags, select the Add new tag option.
- Change a tag's key, value, or both to update it. A tag's value can be removed, but the key must remain.
- Select the Remove button next to a tag to remove it.
- Step 6: Select Save changes.
Deleting a Distribution
A distribution can be deleted using the CloudFront console or the CloudFront API if you decide to stop utilizing it.
Be careful that you must first disable a distribution to delete it, and updating a distribution requires authorization.
For CloudFront Distribution Deletion
- Step 1: Open the CloudFront console by logging into the AWS Management Console at this link.
- Step 2: Locate the distribution you want to remove in the CloudFront console's right pane.
- Step 3: Skip to Step 8 if the State's value is Disabled.
- Step 4: If the distribution is Enabled and its status is Deployed, proceed to Step 6 to disable it before deleting it.
- Step 5: Wait until Status switches to Deployed if State is Enabled and Status is InProgress. The distribution will have to be disabled before being deleted, so go to Step 6.
- Step 6: To stop the distribution, select Disable, and to confirm, select Yes, Disable. Next, select Close.
- Step 7: Disabled appears in the State's value right away. Wait until the Status's value changes to Deployed.
- Step 8: Select the distribution you want to remove by checking the appropriate box.
- Step 9: To confirm, select Yes, Delete after selecting Delete. Next, select Close.
Using CloudFront Continuous Deployment to Safely Test CDN Configuration Changes
You may securely publish updates to your content delivery network (CDN) configuration with Amazon CloudFront continuous deployment by testing them beforehand with a sample of your production traffic. To test that the new CDN configuration functions are as planned, you can transmit some traffic from actual (production) viewers to it using a staging distribution and a continuous deployment policy. When you're ready, you can activate the new setup to deliver all traffic through the primary distribution after continuously monitoring its performance.
The advantages of adopting CloudFront continuous deployment are depicted in the following diagram. It saves you from having to use simulated traffic to test CDN setup modifications. With continuous deployment, you can test the modifications on a portion of the production traffic and then, when you're ready, promote them to the main distribution.

Process of Continuous Deployment Using CloudFront (Console)
- Select the distribution you want to utilize as the primary distribution in the CloudFront console. Currently, production traffic is served through the primary distribution.
- Make a staging distribution using the primary distribution. In the console, this launches a multi-step wizard.
- The staging distribution's configuration should be updated.
- The traffic configuration, which controls how CloudFront delivers traffic to the staging distribution, must be specified. You have a choice between the two traffic setups listed below:
- Weight-Based: The requested percentage of requests is sent to the staging distribution by CloudFront. Testing with live traffic can be done with this configuration.
- Header-Based: Requests with a certain header in the HTTP request are sent by CloudFront to the staging distribution (you specify the header and its value). For local testing, this arrangement is helpful.
- The staging distribution can now be watched to see if the configuration changes work as planned. While keeping an eye on the stage distribution, you can:
- To keep testing configuration changes, update the staging distribution's configuration once more.
- Increase or decrease the amount of traffic going to the staging distribution by updating the continuous deployment policy (traffic configuration).
- When you are comfortable with the staging distribution's performance, you can promote it to the primary distribution, which duplicates the staging distribution's configuration to the primary distribution. The continuous deployment policy is disabled and all traffic is routed to the primary distribution when you upgrade from a staging distribution to a primary distribution.
Monitoring a Staging Distribution
The metrics, logs, and reports that CloudFront offers for all distributions can be used to track the performance of a staging distribution. For instance:
- In the CloudFront panel, you may view the standard CloudFront distribution metrics (including total requests and error rate) and turn on extra metrics (like cache hit rate and error rate per status code) for an additional fee. Additionally, alarms based on these parameters are possible.
- The following two fields are included in standard logs to assist you in determining the primary distribution to which the request was initially received before CloudFront forwarded it to the staging distribution: primary-distribution-name and primary-distribution-id.
- In the CloudFront console, you may see and download reports, including the cache statistics report.
Turn Learning into Career Growth
Using Various Origins With CloudFront Distributions
You designate the origin for CloudFront to send requests for the files when you build a distribution. With CloudFront, you can use a variety of origin types. You could, for instance, use an AWS Lambda function URL, or an Amazon S3 bucket.
- Utilizing an Application Load Balancer: An application load balancer can be used to distribute traffic to instances that are hosted on one or more Amazon EC2 instances if your origin is one or more HTTP servers (web servers).
- Utilizing a Lambda Function URL: The URL of an AWS Lambda function is an exclusive HTTPS endpoint. You can create a serverless web application solely within AWS Lambda by using a Lambda function URL. Without requiring an API Gateway or Application Load Balancer integration, you can call the Lambda web application directly from the function URL.
- Utilizing Amazon EC2: An HTTP server, such as a web server, is a custom origin. The HTTP server may be a hosted HTTP server on your network or an Amazon EC2 instance. When you utilize your own HTTP server as a custom origin, you must provide CloudFront with the DNS name of the server, its HTTP and HTTPS ports, as well as the protocol you want it to use when fetching items.
- Utilizing CloudFront Origin Groups: If you wish to arrange origin failover for circumstances when you want high availability, you can define an origin group for your CloudFront origin. When the primary origin sends a certain HTTP failure response status code, CloudFront will immediately switch to the other origin you choose using origin failover.
- Utilizing a MediaStore Container: You can establish an Amazon S3 bucket that is set up as a MediaStore container to stream content using CloudFront, or you can use MediaPackage to construct a channel and endpoints. After that, you set up a distribution in CloudFront so that the video may be streamed.
- Utilizing a Standard Amazon S3 Bucket: If you use Amazon S3 as the origin for your distribution, you must put the items in an Amazon S3 bucket that CloudFront will deliver. You could make use of the AWS S3 console or API to upload objects to S3. As with any other typical Amazon S3 bucket, you may set up a hierarchy in your bucket to store the objects.
Using Custom URLs by Adding Alternate Domain Names (CNAMEs)
Using your domain name (such as www.test.com) in place of the domain name that CloudFront provides to your distribution is possible via CloudFront's alternate domain name, commonly known as a CNAME.
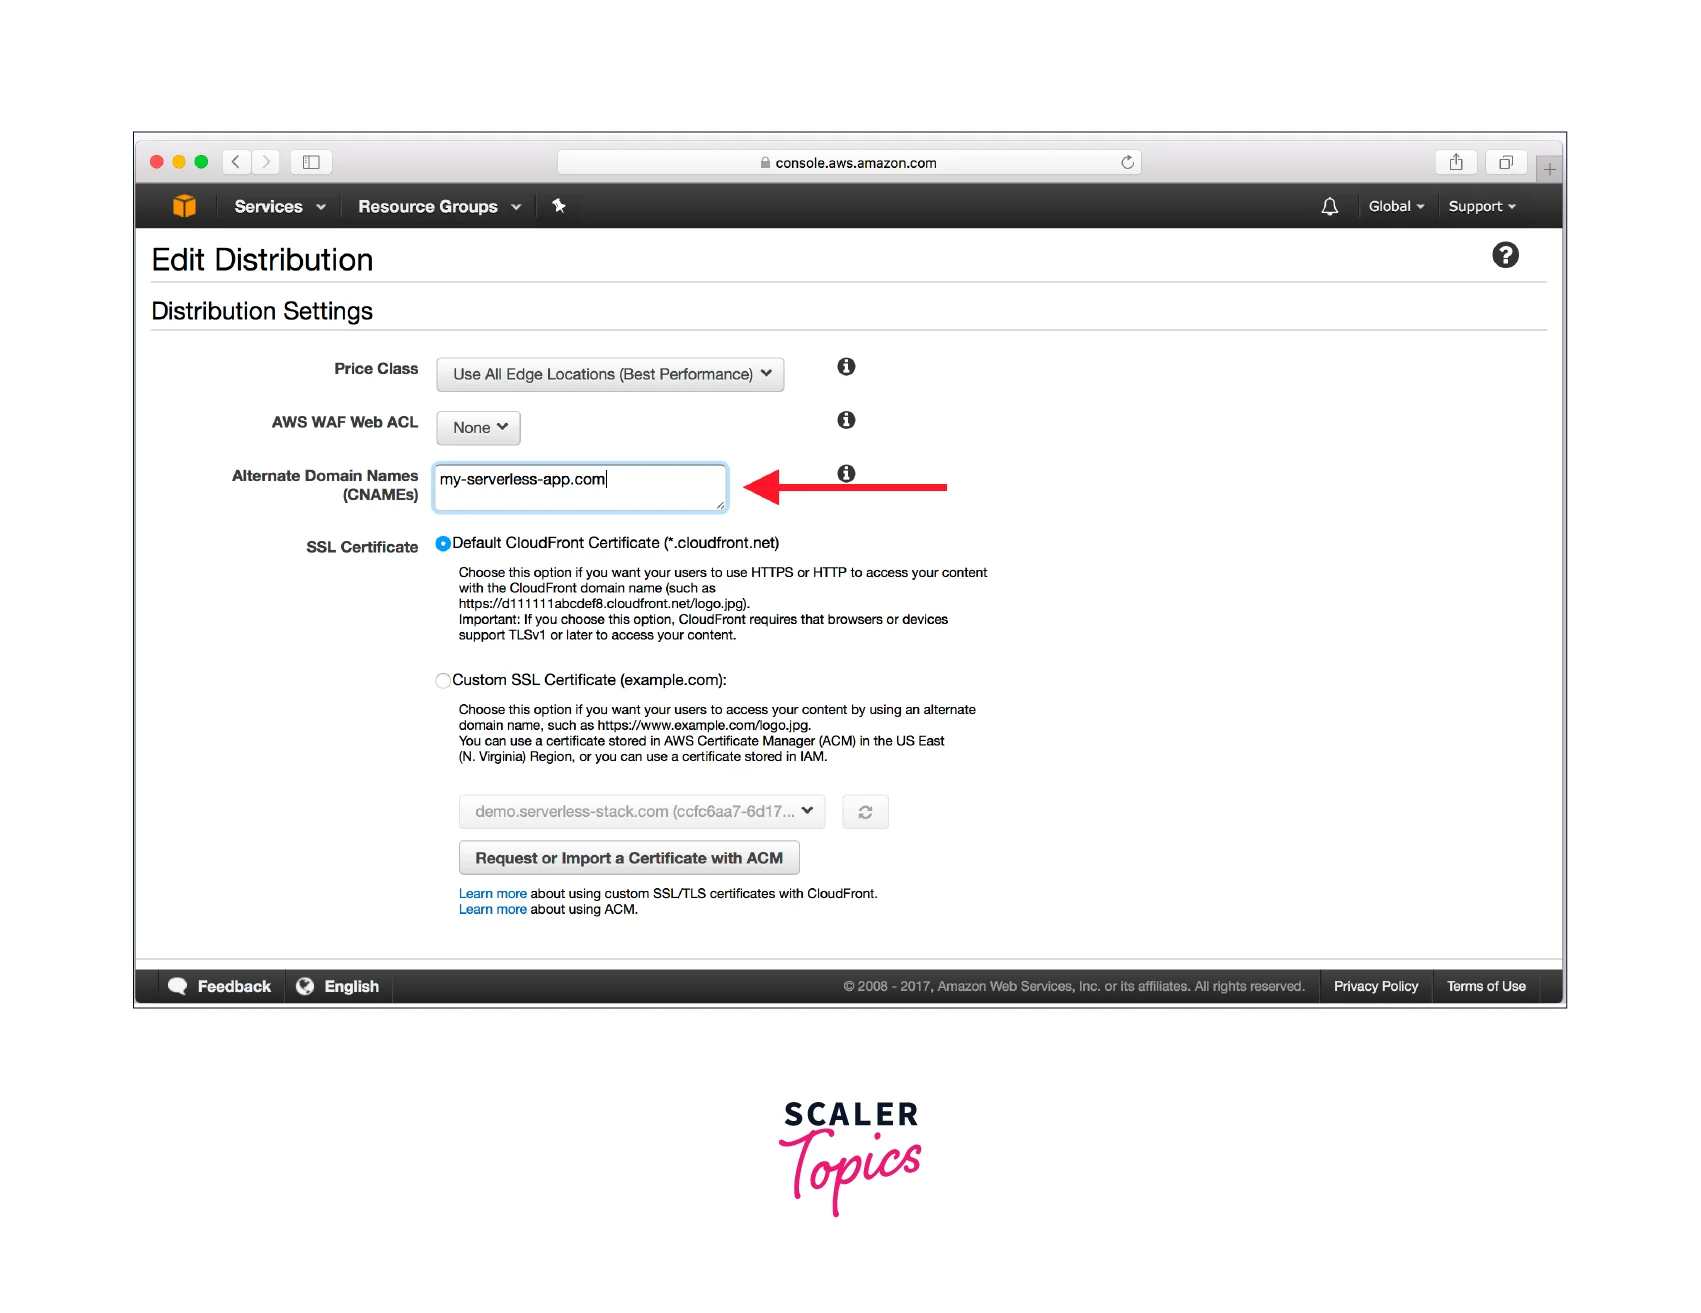
When you create a distribution, CloudFront generates a domain name for it, such as d123456axvtf8.cloudfront.net.
You can add an alternative domain name to your distribution if you wish to use your domain name instead of cloudfront.net, such as www.test.com.
- The Addition of a Backup Domain Name: Instead of utilizing the CloudFront domain name in your links, you can use your domain name by following the instructions in this link on how to add an alternative domain name to your distribution using the CloudFront dashboard.
- Changing a Distribution for a Different Domain Name: A CNAMEAlreadyExists error is displayed when attempting to add a different domain name to a distribution when the alternative domain name is already in use on another distribution. This issue, for instance, appears when you try to add www.test.com to a distribution but it is already linked to another distribution. For instructions on moving a domain name to a different distribution, click this link.
- Deleting an Alternate Domain Name: Follow the instructions in this link to alter both the DNS configuration and the CloudFront distribution if you wish to discontinue routing traffic for a domain or subdomain to that distribution. You must update your DNS settings and delete the alternate domain names from the distribution. In the future, if you want to link the domain name with another CloudFront distribution, this helps avoid problems. If a domain name is already connected to one distribution, it cannot be set up with a different distribution.
- Making Use of Wildcards in Alternative Domain Names: Instead of adding subdomains one at a time, you can use the * wildcard at the start of a domain name for adding alternate domain names. You can utilize any domain name that ends in test.com in your URLs, for instance, www.test.com, city-name.test.com, and so on, by using an alternate domain name of *.test.com. Irrespective of the domain name, the route to the item is the same.
- Conditions for Using Alternate Domain Names: The following conditions must be met when adding an alternative domain name, like www.test.com, to a CloudFront distribution:
- CNAMEs, or alternate domain names, must all be lowercase.
- A trusted, active SSL/TLS certificate covering the alternate domain name must be attached to your distribution to add an alternate domain name (CNAME) to a CloudFront distribution.
- To direct DNS requests for the new alternate domain names to your CloudFront distribution, you should set up CNAME records when you add the new alternate domain names.
- You must carry out some additional configuration if you want readers to use HTTPS with an alternate domain name.
- Limitations on the Use of Alternate Domain Names: The following limitations on utilizing alternate domain names should be noted:
- If an identical alternate domain name already exists in another distribution, even one that is owned by your AWS account, you cannot add it to a CloudFront distribution.
- The maximum number of alternate domain names is limited by a quota.
- Domain fronting that occurs across many AWS accounts is protected by CloudFront. Domain fronting is the act of a non-standard client issuing an HTTPS request for an unrelated name in one AWS account while establishing a TLS/SSL connection to a domain name in another AWS account.
Using WebSockets with CloudFront Distributions
WebSocket, a TCP-based protocol, is supported by Amazon CloudFront and is helpful when long-lasting bidirectional connections among clients and servers are required. Real-time applications frequently need a persistent connection. WebSockets can be used in a variety of situations, such as online chat platforms and online workplaces, for collaboration. For full-duplex communication, data can flow in both ways across a WebSocket connection.
CloudFront universally supports WebSocket connections without the need for extra configuration. All CloudFront distributions provide built-in WebSocket protocol assistance, provided that both the client and the server can use it.
Working of the WebSocket Protocol
- You can bypass some of the overhead and increased latency of HTTP by using the independent, TCP-based WebSocket protocol.
- The client sends a conventional HTTP request that changes the protocol using HTTP's upgrade semantics to create a WebSocket connection.
- The handshake can then be finished by the server. Since the WebSocket connection is still active, either the client or the server can deliver data frames to one another without repeatedly opening new connections.
- The WebSocket protocol by default utilizes port 80 for ordinary WebSocket connections and port 443 for TLS/SSL connections.
Requirements of WebSocket
RFC 6455 mandates the following standard forms for WebSocket requests.
Sample Request from the Client Side:
Sample Response from the Server Side:
Client applications are required to re-establish communication with the server whenever the WebSocket connection is broken by the client, the server, or a network outage.
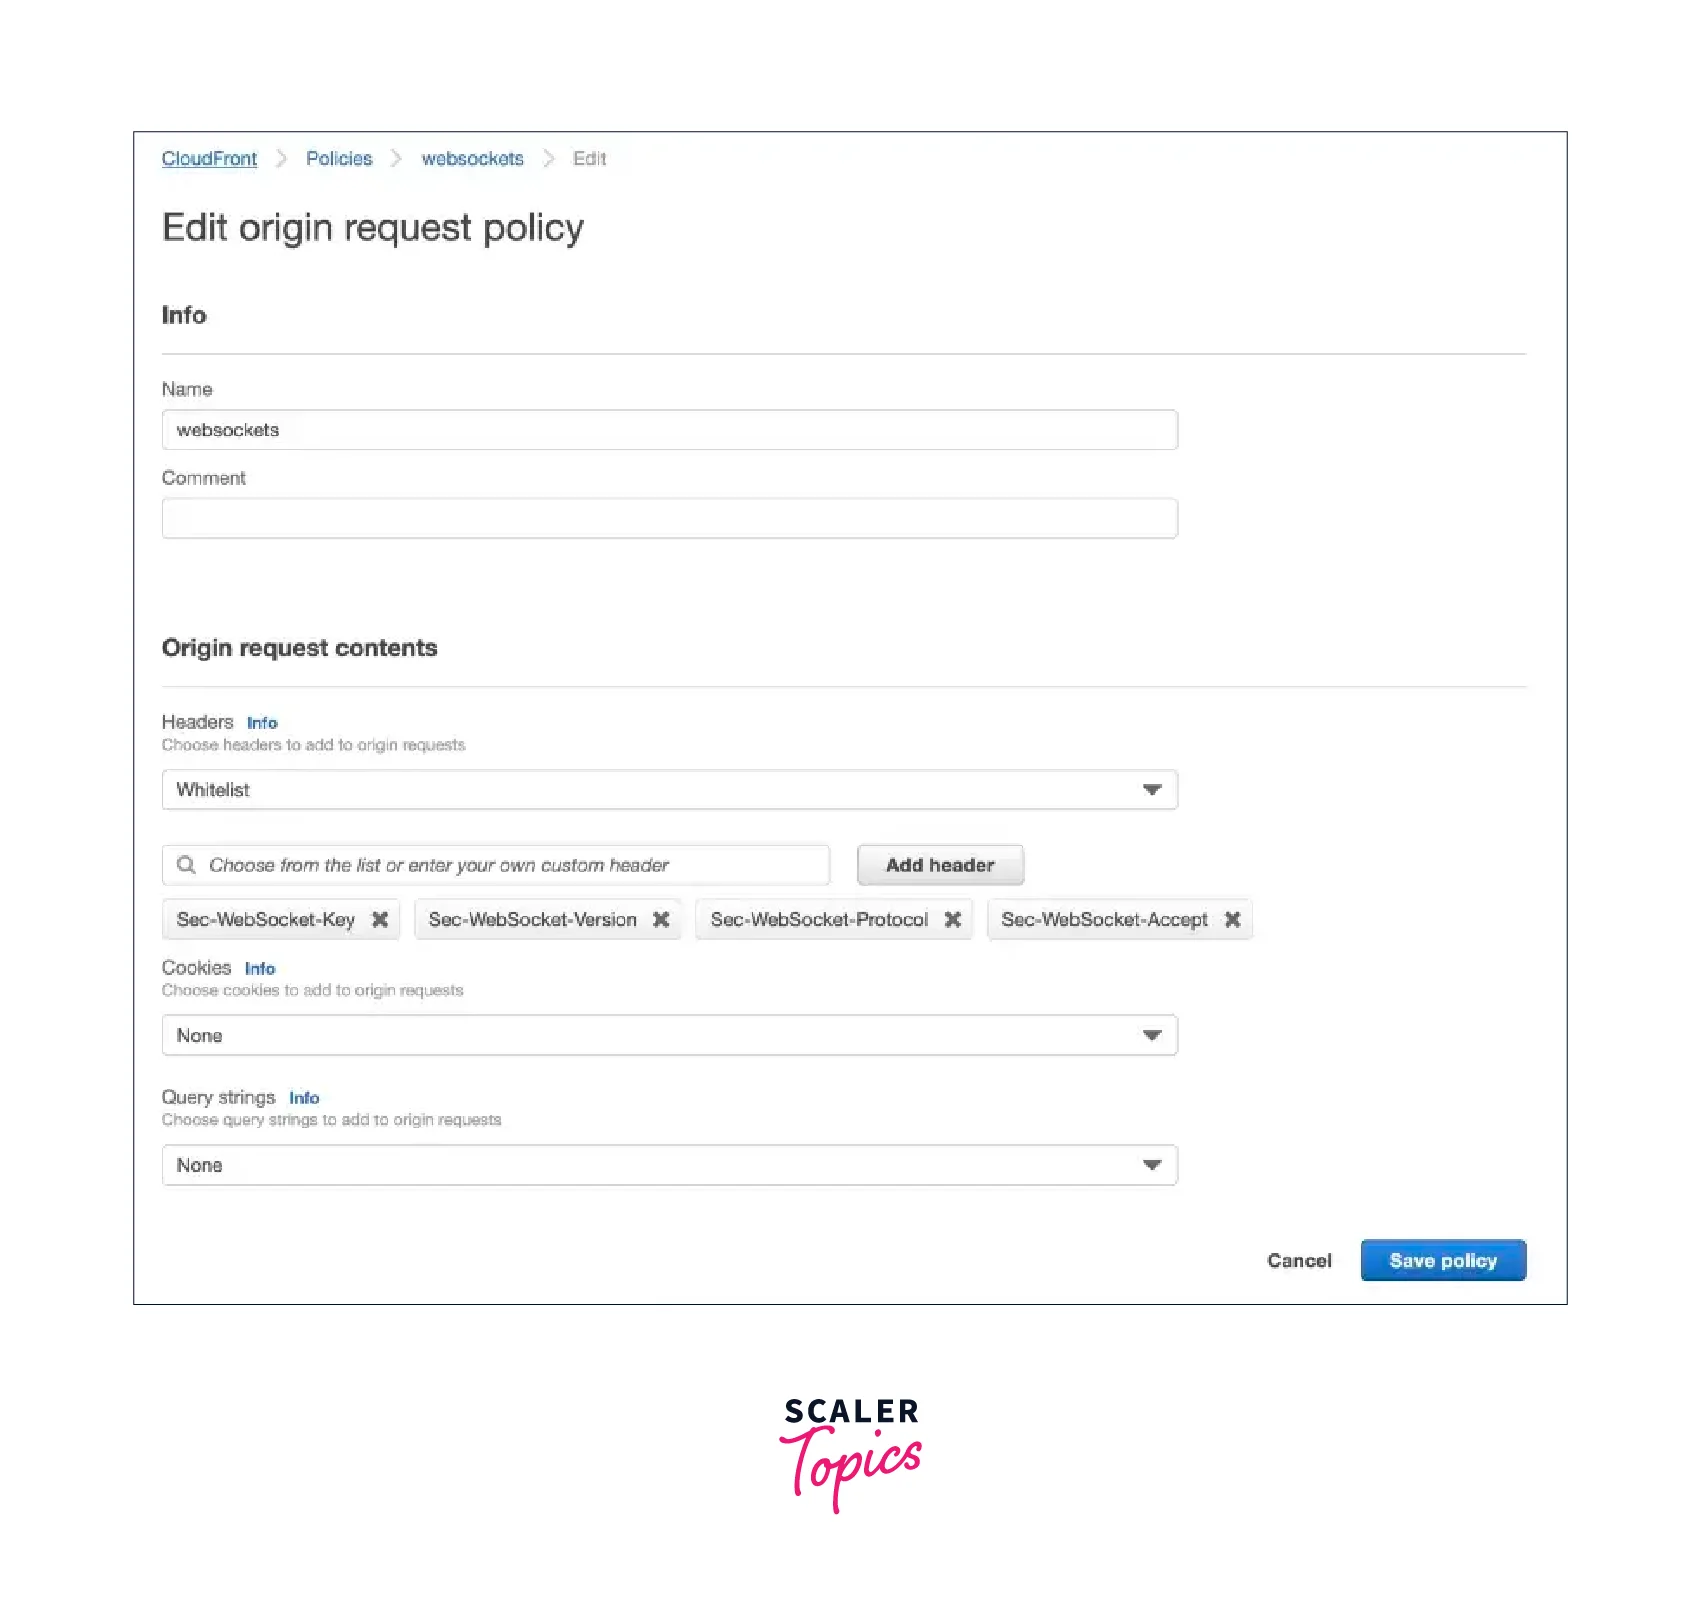
Suggested Settings
We advise that you add the following headers to an origin request policy to prevent unanticipated compression-related problems when utilizing WebSockets:
- Sec-WebSocket-Key
- Sec-WebSocket-Version
- Sec-WebSocket-Protocol
- Sec-WebSocket-Accept
- Sec-WebSocket-Extensions
Conclusion
- A distribution in AWS informs CloudFront of the location from which you want the content to be delivered as well as the specifics of how to monitor and control content delivery.
- Once you’ve made your distribution, CloudFront is aware of the location of your origin server and you are aware of the domain name connected to the distribution. The CloudFront domain name can be used to generate links to your objects, and CloudFront will provide the items to your website or application.
- The activities you can perform with CloudFront to interact with distributions include CreateDistribution, GetDistribution, UpdateDistribution, etc.
- With the CloudFront API, you may use the distribution ID to identify the distribution to utilize when acting on a distribution. InProgress denotes that the distribution is still being built or updated and that edge servers have not yet received all of the changes. Deployed, on the other hand, denotes the creation or updation of the distribution.
- You can check a distribution’s settings and make changes through the CloudFront console, where you can also see the CloudFront distributions connected to your AWS account.
- Your AWS resources can be categorized and identified using tags. Each resource can have one or more tags added to it, and each tag has a defined key and value.
- You may securely publish updates to your content delivery network (CDN) configuration with Amazon CloudFront continuous deployment by testing them beforehand with a sample of your production traffic.