AWS Resource Access Manager
Overview
The AWS Resource Access Manager(RAM) is one of the several ways AWS shares our resources. Simply said, you may share AWS resources created in one AWS account with other AWS accounts using the Resource Access Manager service. They may be accounts from your business, Organizational Units(OUs), or even accounts from other parties.
Provisioning and controlling resources to subordinate accounts inside the organization is always a challenge when using a multi-account strategy to create infrastructure. Among others, provisioning resources, maintaining them up to date, and effectively decommissioning them are very efficiently managed by AWS RAM.
What is AWS Resource Access Manager and How Does it Work?
You can quickly and securely share AWS resources with any other AWS account or with other members of your AWS Organization by using AWS Resource Access Manager (RAM). If you have multiple AWS accounts, you can use AWS RAM to create a resource once and make it available to the other accounts. You have the option of sharing resources with all other AWS Organizations accounts in the organization or just those accounts that are a part of one or more specified organizational units (OUs). You can share with specific AWS accounts by account ID regardless of whether they belong to an organization.
RAM eliminates the need to duplicate resources in several accounts, minimizing the operational burden of maintaining those resources across all of your accounts.
You can provide access to a resource to another account by sharing it with that account. The shared resource is covered by all of the account's policies and permissions.
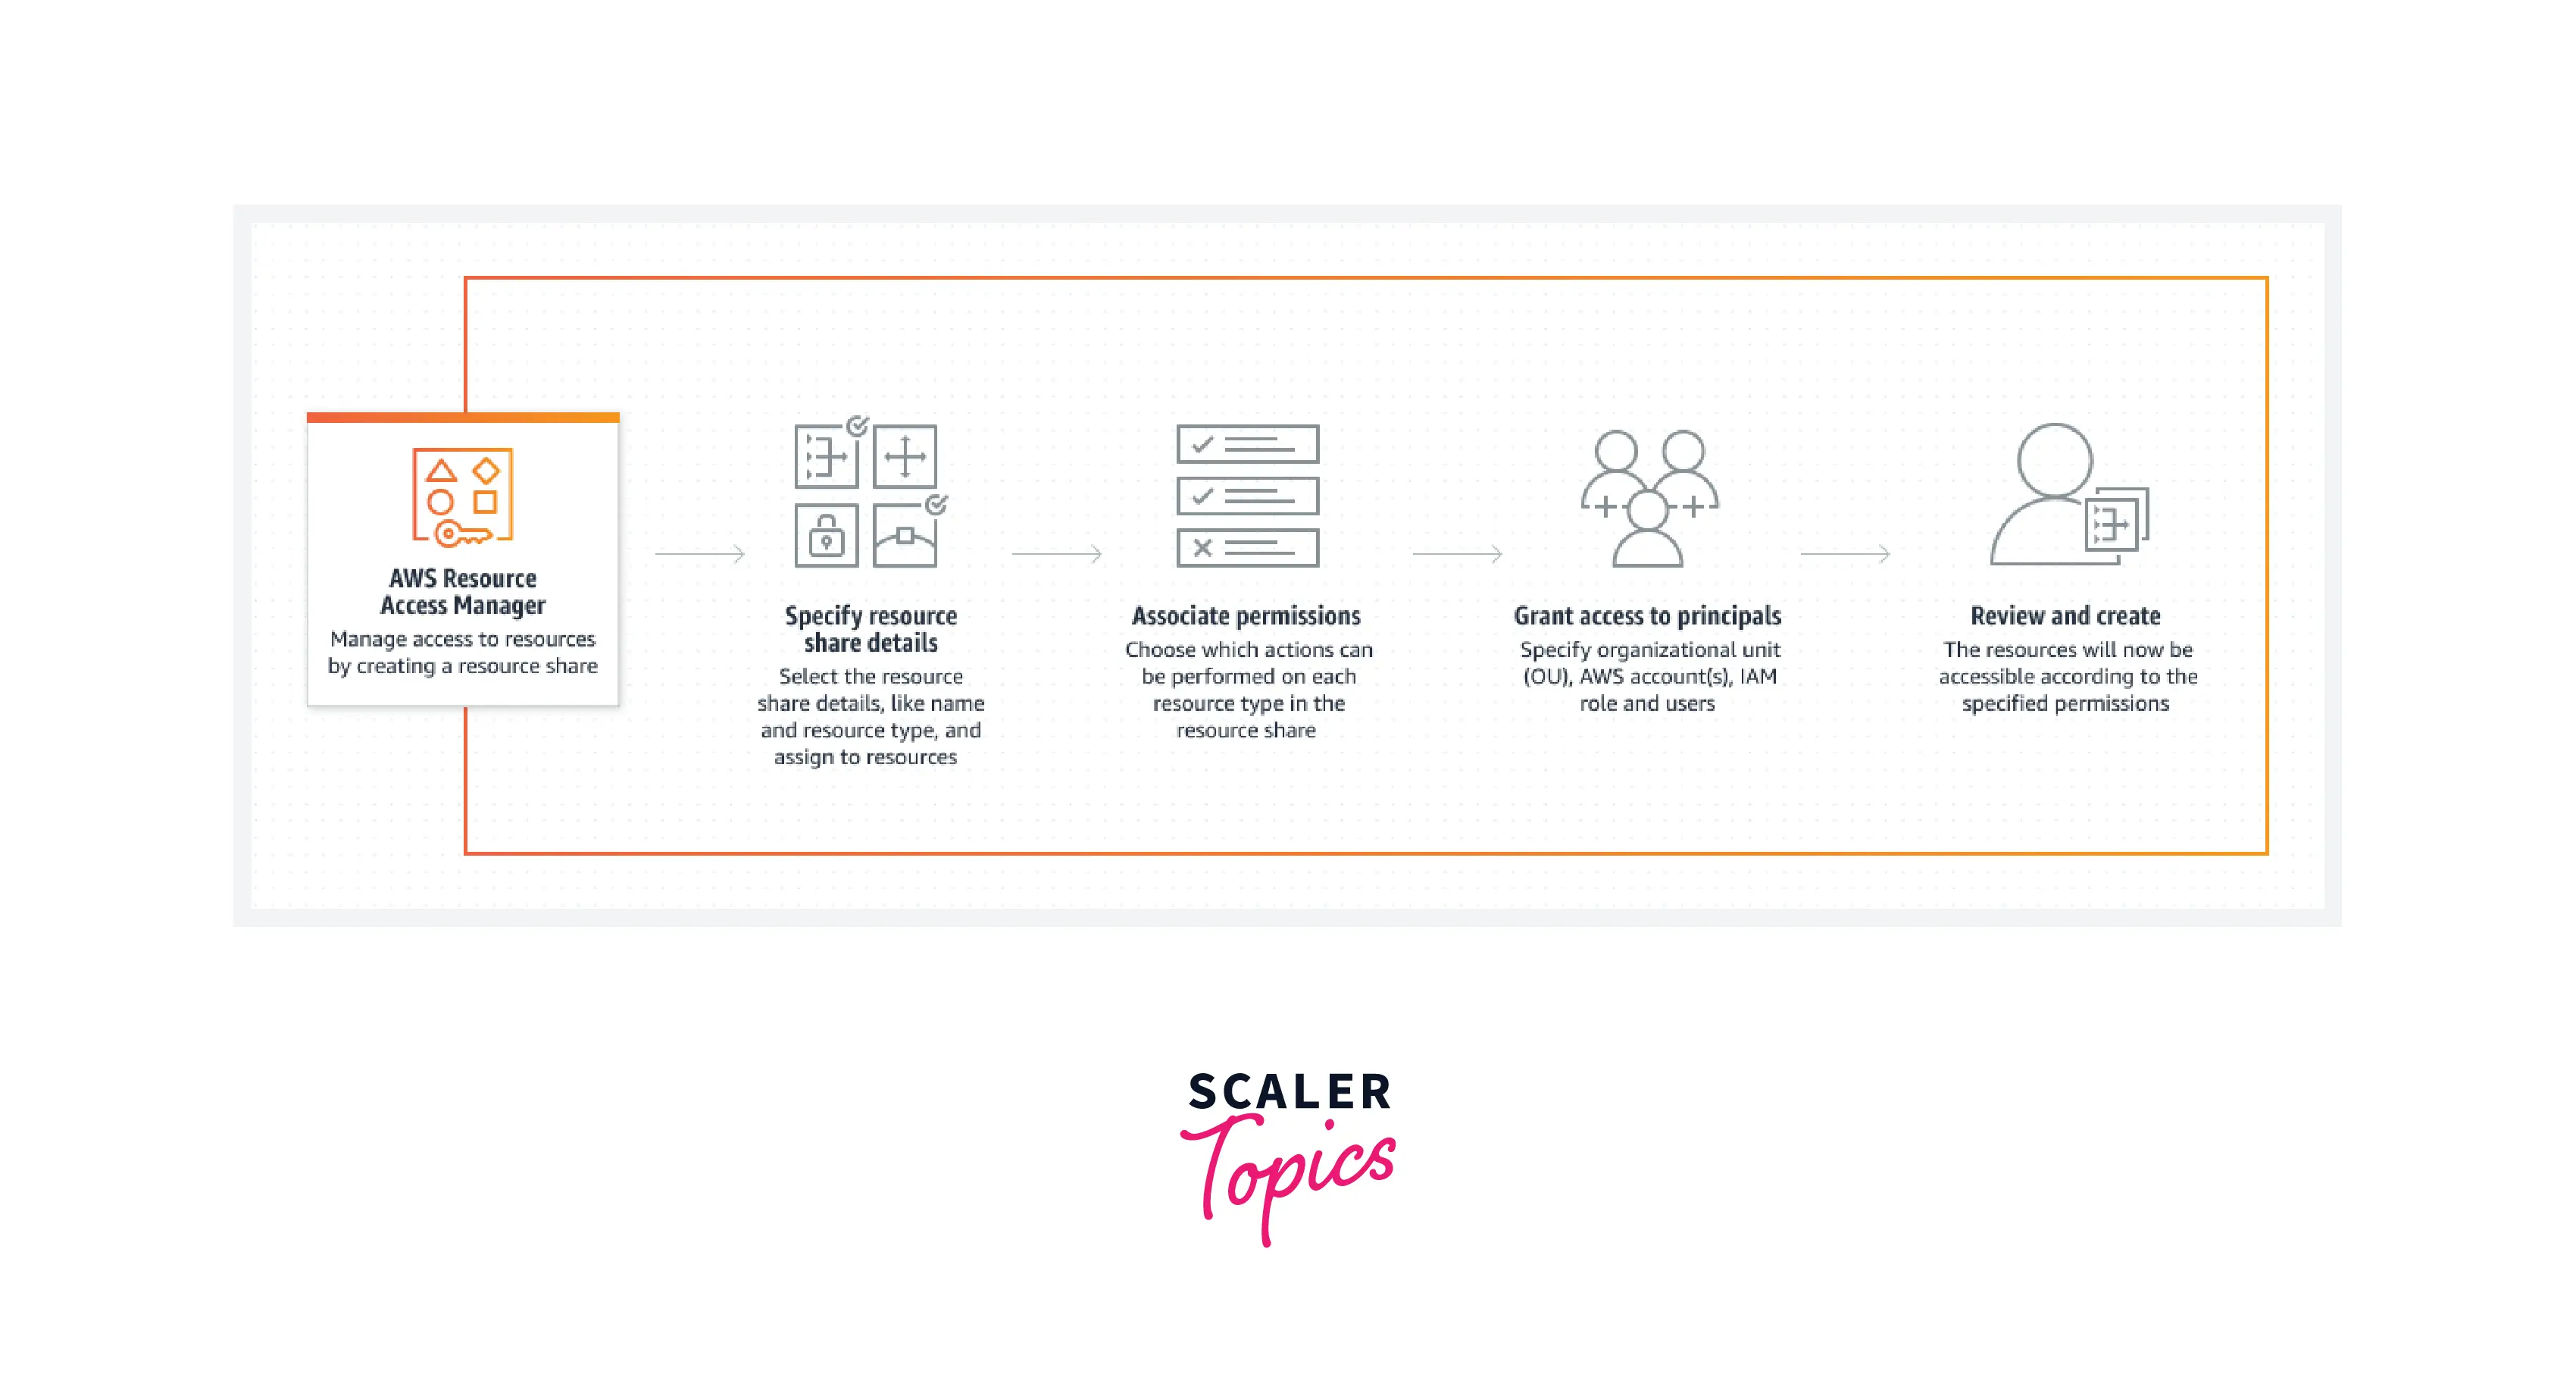
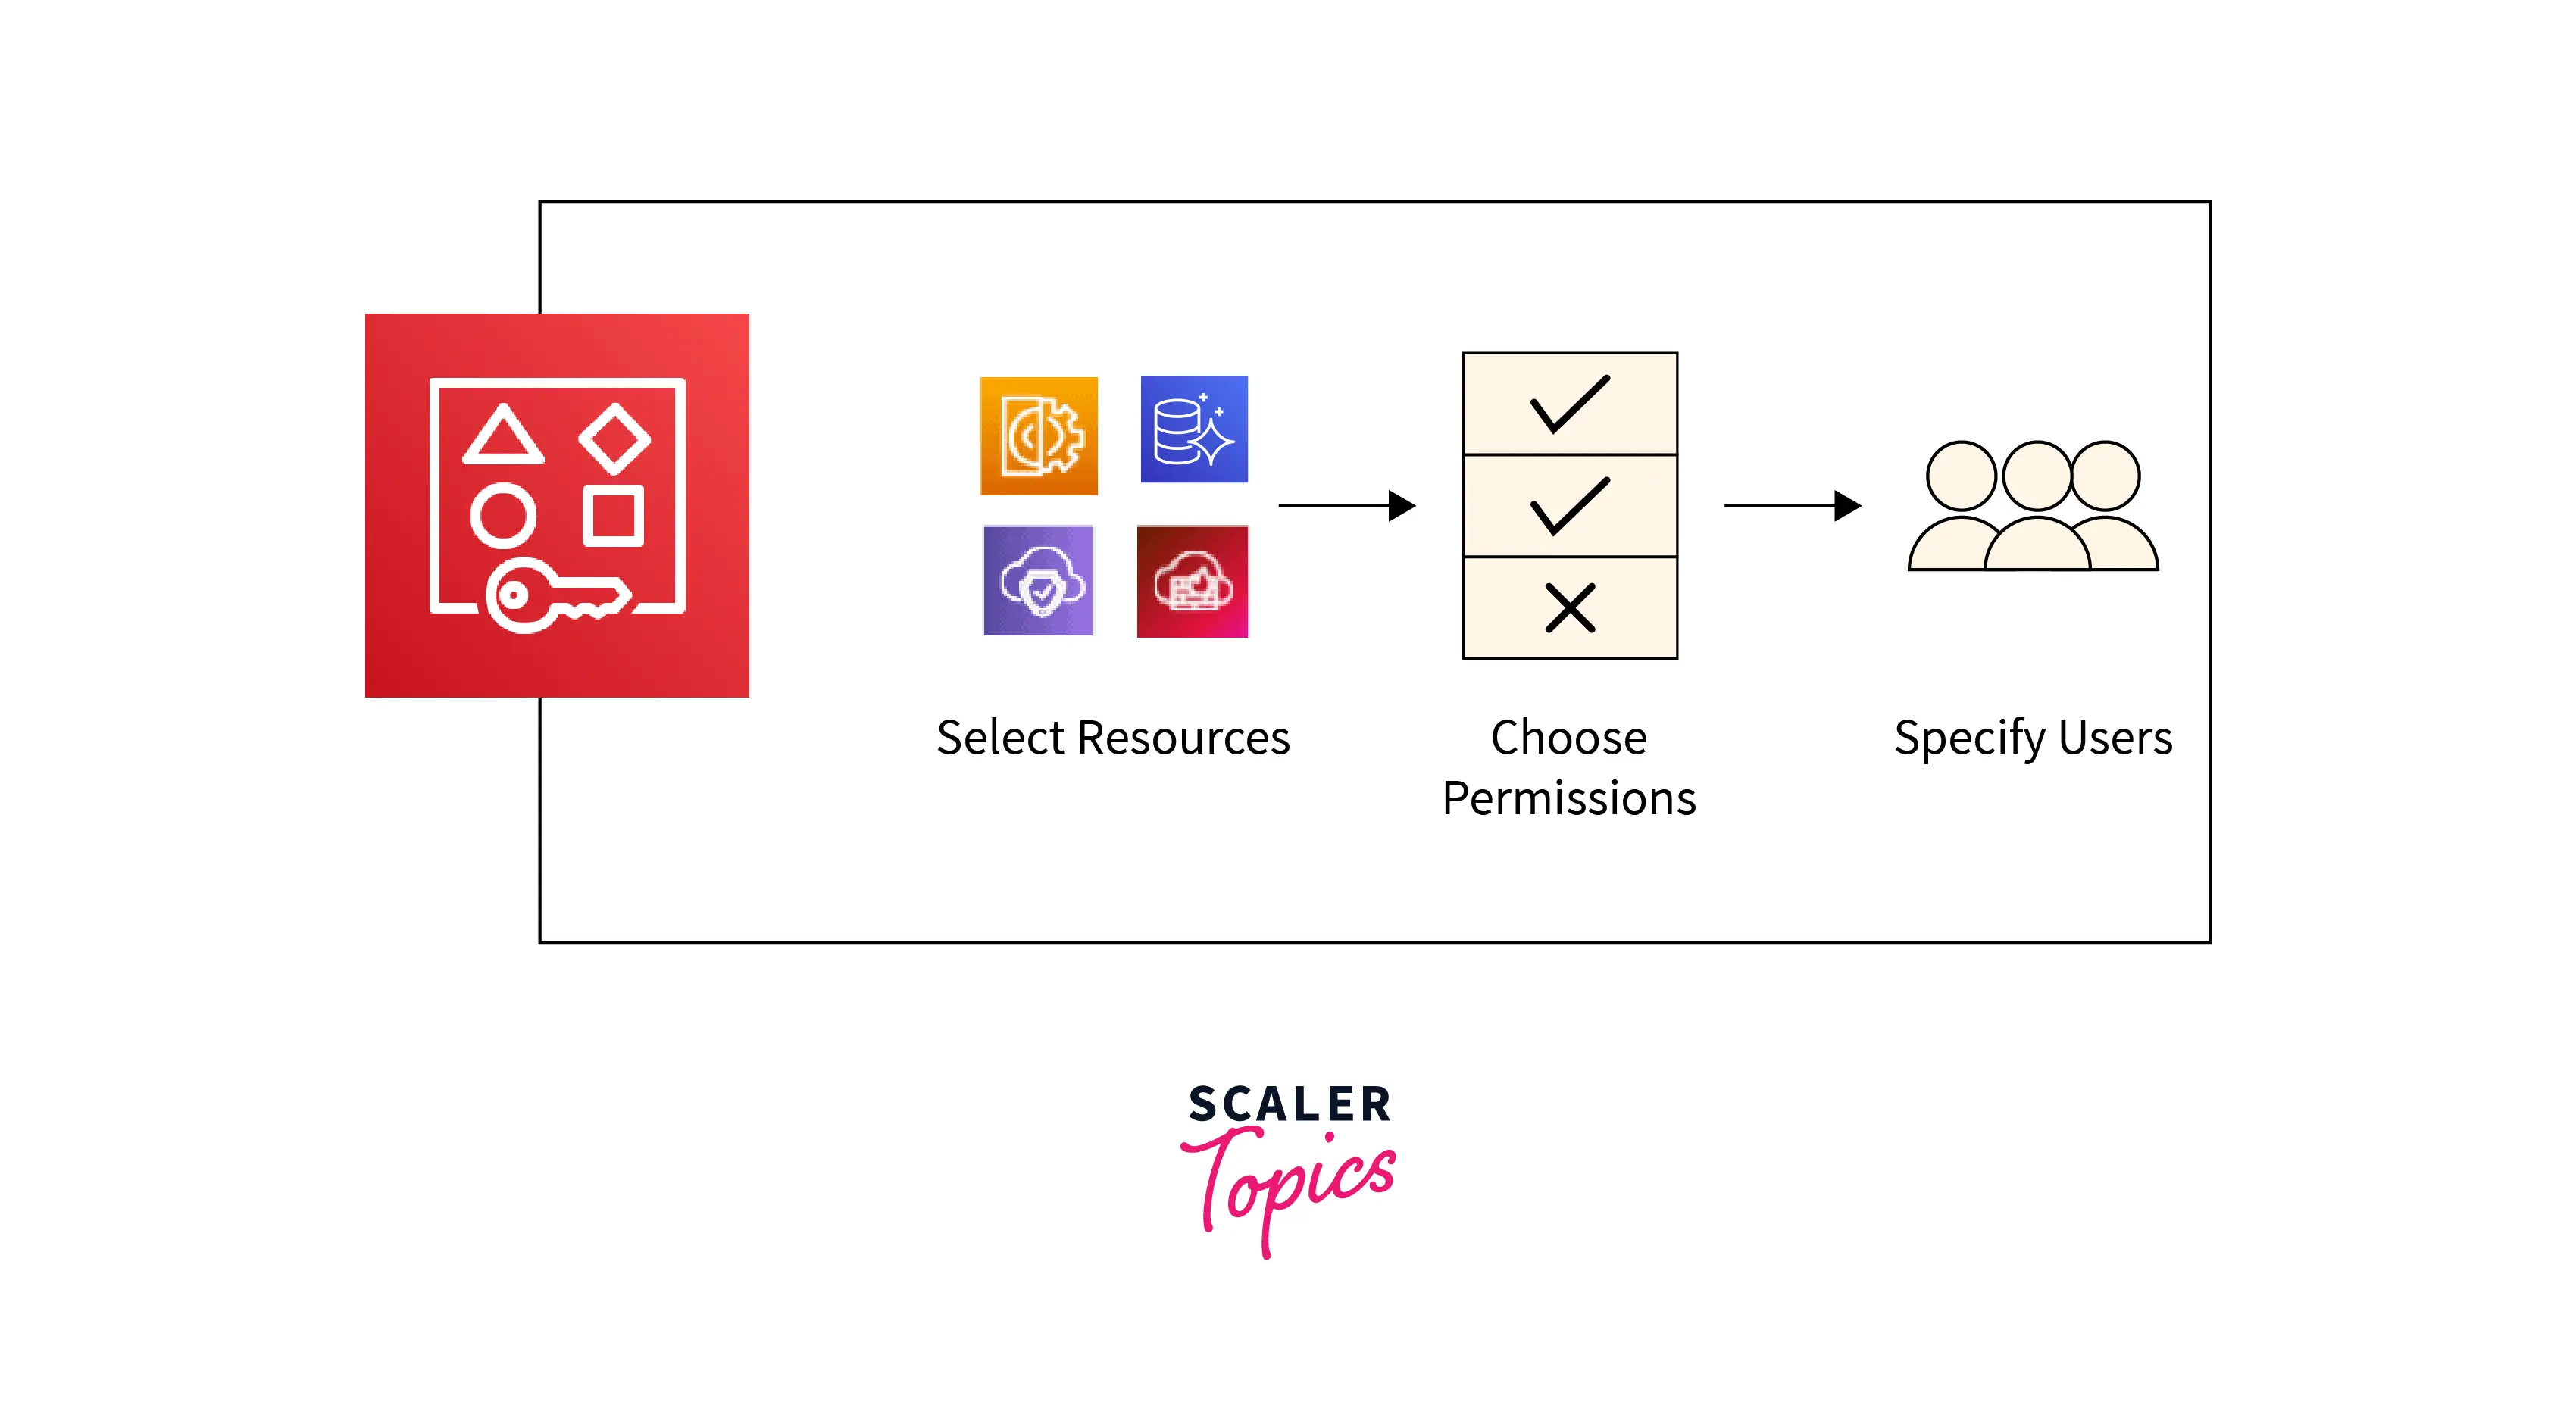
You create a resource share to distribute the resources you hold. When developing a resource share, you need to perform the following steps:
- Specify resource share details: Select the resource share details, like name and resource type, and assign them to the resource.
- Associate permissions: Choose which actions can be performed on each resource type in the resource share.
- Grant access to principals: Specify organizational unit (OU), AWS account(s), IAM role, and users.
- Review and create: The resources will now be accessible according to the specified permissions.
Principals can be individual AWS accounts, sections of an organisation, or the whole business. The assets you distribute remain solely the property of your account.
Any IAM policies and service control policies set in your account are put into effect when resources are shared with you.
Features of AWS Resource Access Manager
- Share resources with any AWS Account.
- Implement automated Platform-as-a-Service (PaaS) and Infrastructure-as-a-Service (IaaS) designs.
- Includes AWS Organizations integration.
- Govern the consumption of shared resources using IAM permissions.
- Utilize AWS Resource Access Manager to share resources and centrally procure AWS resources.
Transform Your Career
Choose from our industry-leading programs designed for career success
Modern Software and AI Engineering Program
Master full-stack development with AI integration

Modern Data Science and ML with specialisation in AI
Advanced data science techniques with AI specialization
Advanced AIML with Specialisation in Agentic AI
Deep dive into AIML with focus on Agentic systems
DevOps, Cloud & AI Platform Engineering
Build and manage AI-powered cloud infrastructure
AI Engineering Advanced Certification by IIT-Roorkee
Premier AI engineering certification from IIT-Roorkee
How Resource Sharing Works?
When you share a resource with another AWS account, it's called resource sharing. Principals in that account gain access to the shared resource. Each shareable resource type has at least one AWS Resource Access Manager (AWS RAM) managed authorization that governs what activities principals with access to those resources are permitted to do on them.
The restrictions and permissions that apply to the account you shared the resource also apply to the shared resource. The resources in the share appear to be native to the AWS accounts with whom they were shared.
Accessing AWS Resource Access Manager
Any of the following methods can be used to interact with AWS RAM:
AWS RAM Console
The AWS RAM console is the web-based user interface offered by AWS RAM. By logging into the AWS Management Console and selecting AWS RAM from the console's home page, you can access the AWS RAM interface if you've already created an AWS account.
You can also access the AWS RAM interface directly by launching your browser. Before the console shows, you are asked to sign in if you haven't already.
AWS CLI and Tools for Windows PowerShell
Direct access to the AWS RAM public API activities is made available through the AWS CLI and Tools for PowerShell. These tools are supported by AWS on Linux, macOS, and Windows. Consult the AWS Command Line Interface User Guide or the AWS Tools for Windows PowerShell User Guide for further details on how to get started.
AWS SDKs
For a wide range of programming languages, AWS offers API commands. Consult the AWS SDKs and Tools Reference Guide for further details on how to get started.
Query API
If you don't utilise one of the supported programming languages, you can still access AWS RAM and AWS through the AWS RAM HTTPS Query API. Using the AWS RAM API, you can send the service direct HTTPS inquiries. To use your credentials to use the AWS RAM API to digitally sign requests, you must incorporate code. Check out the AWS RAM API Reference for further details.


Getting Started with AWS Resource Access Manager
Using AWS Resource Access Manager, you can make resources under your control access to different individual AWS accounts. If an AWS Organization manages your account, you can also share resources with the other accounts in your company. You can also use resources that are shared with you by other AWS accounts.
Sharing your Resources
Scaler Placement Report and Statistics
Scaler learners achieved 2.5x salary growth with average post-Scaler CTC reaching ₹23L.
Enable Resource Sharing within AWS Organizations
When your account is managed by AWS Organizations, you can take advantage of that to share resources more easily. A person has the option of sharing their account with or without an organisation. If your account is a member of an organisation, you can communicate with specific accounts, all of the accounts in the organisation, or all of the accounts in an OU without identifying any specific accounts.
You must first activate resource sharing with AWS Organizations using the AWS RAM GUI or AWS Command Line(AWS CLI) Interface before sharing resources within an organization. AWS RAM doesn't invite principles when you share resources within your company. Executives from your company can use shared resources without exchanging invitations.
AWS RAM generates the AWSServiceRoleForResourceAccessManager service-linked role when you activate resource sharing within your company. The AWS-managed AWSResourceAccessManagerServiceRolePolicy gives the AWS RAM service authorization to retrieve data about the organization it is a part of when it assumes this role, which the AWS RAM service can only adopt.
Minimum Permissions
To run the procedures below, you must sign in as a principal in the organization's management account that has the following permissions:
- ram
- iam
- organizations
- organizations
Set up resource sharing by doing the following:
- Go to "settings" in the AWS RAM console.
- Select "Enable sharing with AWS Organizations", and click on Save settings.
Create a Resource Share
To share resources that you own, create a resource share. When you create a resource share, you do the following:
- Include the resources you wish to share.
- You must specify the permission to use each resource type you include in the sharing.
- You won't need to take any further action if a resource type only has the default permission available since AWS RAM will automatically associate that permission with the resource type.
- If there are additional permissions available in addition to the standard AWS RAM-controlled authorization, you must choose the permission to link to a resource type.
- It is important to identify the principles for whom you want access to the resources.
By creating a resource share with AWS RAM, you can share resources you own. To create a resource share, do the following :
- Go to AWS RAM console
- The proper AWS Region should be selected from the dropdown list in the console's upper right corner since AWS RAM resource sharing are only available in certain AWS Regions. The AWS Region must be set to US East (N. Virginia) in order to view resource shares that contain global resources (us-east-1). See Sharing Regional resources contrasted to global resources for additional details on sharing global resources.
- Choose to Create a resource share on the home page if you're new to AWS RAM. Otherwise, select Create resource share from the Shared by me: Resource shares page.
- In Step 1: Specify resource share details, do the following:
- For Name, enter a descriptive name for the resource share.
- Under Resources, choose resources to add to the resource share as follows:
- Choose the type of resource to share under Select resource type. This limits the list of resources that can be shared to those of the chosen kind.
- Check the boxes next to each resource you want to share from the list of resources that appears. The chosen resources are moved to the selected resources section.
- (Optional)Enter a tag key and value under Tags to add tags to the resource sharing. Select Add new tag to add other tags. You may need to repeat this step. Only the resource share itself is covered by these tags; the resources included in the resource share are not.
- Choose Next.
- If more than the default AWS RAM managed permission is available, you may select the permission to associate with the resource type
- In Step 2: Assign a Permission to Each Resource Type. AWS RAM automatically links the default permission with the resource type if just that option is available.
- Choose Next.
- In Step 3: Choose principals to grant access, do the following:
- For resource types that support it, the default setting of Allow sharing with external principals implies you can share resources with AWS accounts that are outside of your company. Resources like Amazon VPC subnets that can only be shared within a company are unaffected by this. To restrict resource sharing to only accounts and principals in your organization, choose Allow sharing with principals in your organization only.
- For Principals, do the following:
- If you select the organization (the ID begins with o-), then all AWS accounts in the organization can access the resource share.
- If you select an OU (the ID begins with ou-), then all AWS accounts in that OU and its child OUs can access the resource share.
- If you select an individual AWS account, then only that account can access the resource share.
- Select the principal type for each principal after specifying a principal by ID or ARN, including principals outside the organisation. You should then click Add after entering the ID (for an AWS account, organisation, or OU) or ARN (for an IAM user or role). The following are the possible primary kinds, ID, and ARN formats:
- AWS account – To add an AWS account, enter the 12-digit account ID. For example:123456789012
- Organization – To add all of the AWS accounts in your organization, enter the ID of the organization. For example
- Organizational unit (OU) – To add an OU, enter the ID of the OU. For example
- IAM role – To add an IAM role, enter the ARN of the role. Use the following syntax.
For example:
- IAM user – To add an IAM user, enter the ARN of the user. Use the following syntax.
For example:
- Choose Next.
- Step 4: Review and Create,Review the resource sharing configuration information in . Select the link that corresponds to the step you wish to go back to in order to modify the configuration for that phase.
- Select Create resource share once you've finished examining the resource share the resource and primary associations may take a while to finish. Before attempting to access the resource share, let this procedure finish.
- You can modify your resource share at any time by applying custom tags, adding or removing resources, and principals. For resource types that accept different permissions from the default permission and are part of your resource share, you can modify permission. When you no longer want to share the resources, you can delete your resource share. For more information, see Share AWS resources owned by you.
Using Shared AWS Resources
Respond to the Resource Share Invitation
You must accept the invitation to join the resource share in order to gain access to the shared resources. If you are a member of an organisation in AWS Organizations and sharing is enabled in your organization, principals in your organisation will immediately have access to the shared resources.
Turn Learning into Career Growth
Use the Resources that are Shared with You
Once you accept the invitation to join the resource pool, you can perform certain activities on the pooled resources. The activities vary according to the kind of resource. Details can be found under Shareable AWS resources. Access to each resource is made possible by the service console, API, and CLI commands. In the service console, API/CLI command, or wherever the resource is regional if it is, you must indicate the right AWS Region. If the resource is global, use the assigned home Region, US East (N. Virginia), us-east-1. To view the resource in AWS RAM, you must have access to the AWS Region where the resource share was created.
When a resource's owner shares it with your account, you can access it just as if your account owned it. You can use the applicable service's console, AWS Command Line Interface (AWS CLI) commands, and API actions to get to the resource. The API activities that principals in your account can conduct are determined by the AWS RAM authorization connected to the resource share and vary based on the resource type. All IAM rules and service control policies set up in your account apply, allowing you to keep your existing security and governance controls in place.
To respond to invitations
- In the AWS RAM console, access the Shared with me: Resource shares page.
- Take a look at the list of resource shares to which you have been given access. Your current level of resource share involvement is shown in the Status column. If You have been added to a resource sharing, but you haven't yet accepted or declined the invitation, it is shown by the Pending status.
- You can accept or reject the resource share invitation by selecting the resource share ID and selecting Accept resource share or Reject resource share, respectively. You cannot use the resources if you decline the invitation. You only get access to the resources if you accept the invitation.
AWS Resource Access Manager Use Cases
Share Resources in Multi-Account Environments
Share basic infrastructure, such as Amazon VPC subnets, across accounts to enable the deployment of application resources to the same subnet across several accounts.
Centrally Govern Access to Resources
To control costs and cut operational overhead, centrally manage resources like private certificate authority that permit certificate issuance across several accounts.
Least Privilege on Shared Resources
To grant the bare minimum of rights needed to perform actions on shared resources, use AWS RAM-controlled permissions.
AWS Resource Access Manager Pricing
There is no additional charge for using AWS Resource Access Manager.
Benefits of AWS Resource Access Manager
- Reduce Operational Overhead - Share resources with other accounts, such as subnets or License Manager setups, by procuring AWS resources centrally and using RAM. In a multi-account system, this avoids the need to provide duplicate resources in each account.
- Boost safety and visibility- To control the use of shared resources, RAM makes use of the current policies and permissions specified in AWS Identity and Access Management (IAM). RAM also offers a thorough insight into shared resources through interaction with Amazon CloudWatch and AWS CloudTrail, allowing users to trigger alarms and see logs.
- Reduce costs-You can use licenses in various departments of your business to enhance utilization and reduce expenses by sharing resources like AWS License Manager configurations across accounts.
Conclusion
- In this article we learned about what is AWS Resource Access Manager and how AWS RAM eliminates the need to duplicate resources in several accounts, minimizing the operational burden of maintaining those resources across all of your accounts.
- This article also covered some of the key features of how Resource Access Manager which described its automated Platform-as-a-Service (PaaS) and Infrastructure-as-a-Service (IaaS) designs. This article also described how to utilize RAM to share resources and centrally procure AWS resources.
- The article gave insight on getting started with using AWS Resource Access Manager. It covered both the aspects of Sharing your resources and Using shared AWS resources.
- At the end the article discussed some key benefits and use cases of using AWS RAM. It explained how Resource Access Manager reduces Operational Overhead and how we can share resources in multi-account environments.