AWS SAM (Serverless Application Model)
Overview
AWS SAM allows you to express functions, APIs, databases, and event source mappings using shorthand syntax. SAM translates and expands SAM syntax into AWS CloudFormation syntax during deployment, and then CloudFormation provides your resources with dependable deployment capabilities.
Transform Your Career
Choose from our industry-leading programs designed for career success
Modern Software and AI Engineering Program
Master full-stack development with AI integration

Modern Data Science and ML with specialisation in AI
Advanced data science techniques with AI specialization
Advanced AIML with Specialisation in Agentic AI
Deep dive into AIML with focus on Agentic systems
DevOps, Cloud & AI Platform Engineering
Build and manage AI-powered cloud infrastructure
AI Engineering Advanced Certification by IIT-Roorkee
Premier AI engineering certification from IIT-Roorkee
What is AWS Serverless Application Model (AWS SAM), and How Does It Work?
AWS SAM was created to simplify and ease the development of serverless applications. AWS SAM was created using an open-source license so that anybody may contribute to its development. A repository structure holds the code for the whole serverless application. This aids in the formation of development patterns.
The top issues developers utilizing the AWS SAM framework should not be concerned about are code duplication and complexity. This forces them to concentrate on developing better applications with clean, well-organized code.
Working:
-
AWS SAM is free and open source, with two main components: a template definition and a Command-Line Interface (CLI). The templates are an extension of Amazon's CloudFormation templates, particularly developed for serverless applications.
-
A developer can use a SAM template to specify frequently used resources for a serverless project, such as APIs, functions, and database tables, as a unified stack, rather than manually deploying and managing them separately.
-
A development team may then use the CLI to create and bundle an application based on those settings. A developer may also utilize the SAM CLI to call AWS Lambda functions to test and debug AWS-hosted apps.
-
Some SAM CLI commands, such as the SAM package in SAM and AWS CloudFormation package in CloudFormation, are identical to CloudFormation commands. The SAM CLI, on the other hand, provides several unique capabilities, such as template validation and local testing.
Components
You may define your serverless apps using AWS SAM. AWS SAM is made up of the following components:
AWS SAM Template Specification: This standard is used to define your serverless application. It offers straightforward terminology for describing the functions, APIs, permissions, settings, and events that comprise a serverless application. You utilize an AWS SAM template file to run your serverless application on a single, deployable, versioned entity.
The YAML-formatted template fragment is as follows:
Globals: It tells about the globals.
Description: This describes short information in the form of a String.
Metadata: It tells about the template metadata.
Parameters: Describes all sets of parameters.
Mappings: Tells about the set of mappings.
Conditions: Tells about the set of conditions.
Resources: Set of resources
Outputs: Set of outputs
AWS SAM Command Line Interface (AWS SAM CLI):
The goal of AWS SAM CLI is to help developers getting begin using SAM-based software creation and deployment. SAM CLI, like the Lambda environment, provides an environment for users to design, test, and debug applications.
These operations are carried out locally, and the applications are specified using SAM templates or AWS CDK. AWS SAM includes the ability to deploy built-in apps to AWS and develop CI/CD pipelines. The Apache 2.0 license governs AWS SAM and its CLI.
Following are the most used commands in the SAM CLI:
-
SAM INIT: This command, without any options, generates a Hello World program for the first-time user. You can provide the language (for example, NodeJS or Python) in which the code should be generated. The command creates an AWS SAM template and sample application code.
-
SAM Local Invoke and SAM Local start-api: These instructions generate local Lambda-like execution environments for testing and debugging before deploying it to the AWS cloud.
-
SAM Logs: Because functions are a component of the CloudFormation stack, you may use this command to get logs created by your Lambda function based on its logical id. This can help you test and troubleshoot your cloud-based application.
-
SAM Package: This command is used for packaging your application code and dependencies into a zip or jar file, sometimes referred to as a "deployment package." The deployment package is required to upload your application to the S3 bucket that the Lambda function will utilize.
-
SAM Deploy: This command is used to launch a serverless application on AWS. It creates AWS resources and assigns rights and other parameters given in the AWS SAM template.
Features of AWS SAM
-
AWS SAM interfaces with several Amazon cloud services inherent to the platform, including Cloud9 IDE, AWS CodeBuild, AWS CodeDeploy, and AWS CodePipeline. These tools operate with SAM and CloudFormation to create and run Lambda functions in AWS.
-
SAM allows a developer to communicate settings amongst resources as a single, versioned entity before deployment.
-
A developer can use AWS SAM Local to create and test Lambda functions offline. This helps speed testing because code updates on AWS might take several minutes.
-
A command in SAM Local runs a Docker container, simulating an API Gateway and Lambda environment on a developer's local workstation. Before the serverless application is updated on the AWS cloud, the developer may spot any possible code bugs and correct them locally.
-
The use of AWS SAM is completely free. In the same way, you would if you had created the AWS resources manually, you pay for those produced through SAM. Only what you use, as you use it, is charged. There are no minimum costs or up-front obligations.

Building a Serverless Application Using AWS SAM
Use the AWS SAM CLI to develop a serverless application that you can bundle and deploy in the AWS Cloud to start with AWS SAM. The application may be launched on the AWS Cloud or locally on your development host.
To install the AWS SAM CLI and everything else that must be installed or configured to utilize the AWS SAM CLI.
Now that you're familiar with AWS SAM, let's look at how to use it to develop a serverless application.
Scaler Placement Report and Statistics
Scaler learners achieved 2.5x salary growth with average post-Scaler CTC reaching ₹23L.
Installing SAM CLI
AWS SAM has a command line tool, the AWS SAM CLI, that allows you to construct and maintain serverless applications easily. To utilize the AWS SAM CLI, you must install and set up a few items.
Installing the AWS SAM CLI on Linux
The AWS SAM command line interface (CLI) is available on 64-bit versions of the latest CentOS, Fedora, Ubuntu, and Amazon Linux 2 distributions. You should extract or "unzip" the downloadable package to install the AWS SAM CLI. If your OS lacks the unzip command, use an alternative.
Follow these steps to install and setup the requirements for utilizing the AWS SAM CLI on your Linux host:
- Set up an AWS account.
- Set AWS IAM rights and credentials.
- Set up Docker: Docker is only required to test your application locally or use the — use-container option.
- Download and install the AWS SAM CLI.
Step 1: Sign up for an AWS account
If you don't already have an Amazon Web Services account, go to aws.amazon.com and select Create an AWS Account.
Step 2: Set up IAM access and AWS credentials
The IAM user you use with AWS SAM must have the rights to perform AWS service calls and manage AWS resources. Giving a user administrator access is the easiest approach to verify that they have the necessary permissions.
Step 3: Set up Docker
Docker only requires locally testing your application and producing deployment packages with the —use-container option. If you do not intend to utilize these functionalities immediately, you may skip this phase and install Docker later.
Docker is a program that allows you to run containers on your Linux workstations. AWS SAM offers a local Docker container environment similar to AWS Lambda. This container may develop, test, and debug serverless applications.
Docker must be installed and operational to run serverless applications and functions locally using the AWS SAM CLI. The AWS SAM CLI communicates with the Docker daemon through the DOCKER HOST environment option. The methods below demonstrate how to install, set up, and test a Docker installation for use with the AWS SAM CLI.
Docker is compatible with many operating systems, including the most recent Linux distributions, such as CentOS, Debian, and Ubuntu.
To install Docker on Amazon Linux 2, follow these steps:
- Update your instance's installed packages and package cache: sudo yum update -y.
Update the Docker Community Edition package to the most recent version. sudo amazon-Linux-extras docker install
- Launch the Docker service: sudo service docker start
Add the ec2-user to that same docker group to run Docker queries without any need for sudo. sudo usermod -a -G docker ec2-user
-
Log out again to activate the new docker group permissions. Close your current SSH terminal window and open a new one to reconnect to your instance. Your new SSH session should be granted docker group rights.
-
Check that the ec2-user can run Docker commands without the need for sudo. docker ps
Step 4: Install the AWS SAM CLI
You can follow these steps to install the AWS SAM CLI:
-
Download the AWS SAM CLI zip file to a convenient location.
-
Verify the downloaded installation files' integrity and validity by creating a hash value using the following command: sha256sum aws-sam-cli-linux-x86_64.zip
The output should look something like this:
SHA256 hash value of 64 characters> aws-sam-cli-linux-x86 64.zip
-
Compare the 64-character SHA256 hash result to the one in the AWS SAM CLI release notes on GitHub for your selected AWS SAM CLI version.
-
Install the files by unzipping them into the sam-installation/ folder. aws-sam-cli-linux-x86 64.zip unzip -d sam-installation
-
Download and run the AWS SAM CLI: sudo ./sam-installation/install
Check the installation: sam --version
If the installation was successful, you should get the following output: Version 1.18.0 of the SAM CLI
Installing the AWS SAM CLI on Windows
Install and setup the requirements for utilizing the AWS SAM command line interface (CLI) on your Windows host by following these steps:
- Create an Amazon Web Services Identity and Access Management (AWS) account.
- Set up IAM permissions and your AWS credentials.
- Set up Docker: Docker is only required for testing your application natively (or) by employing the — use-container option.
- Download and install the AWS SAM CLI.
Installing the AWS SAM CLI on macOS
Install and setup the requirements for utilizing the AWS SAM command line interface (CLI) on your macOS host by following these steps:
- Set up an AWS account.
- Set AWS IAM rights and credentials.
- Set up Docker. Docker is only required to test your application locally or use the the-use-container option.
- Set up Homebrew.
- Download and install the AWS SAM CLI.
Download a Sample AWS SAM Application
Prerequisite
The SAM CLI must be installed in your local environment. Homebrew may be used to install it on Linux.
$ brew tap aws/tap
$ brew install aws-sam-cli
After installing SAM CLI, you may use SAM commands to get a SAM template for a default Hello World application and an example code.
Run the following command: sam init
Follow the on-screen instructions to enter information such as the application's name, runtime, dependencies, and template.
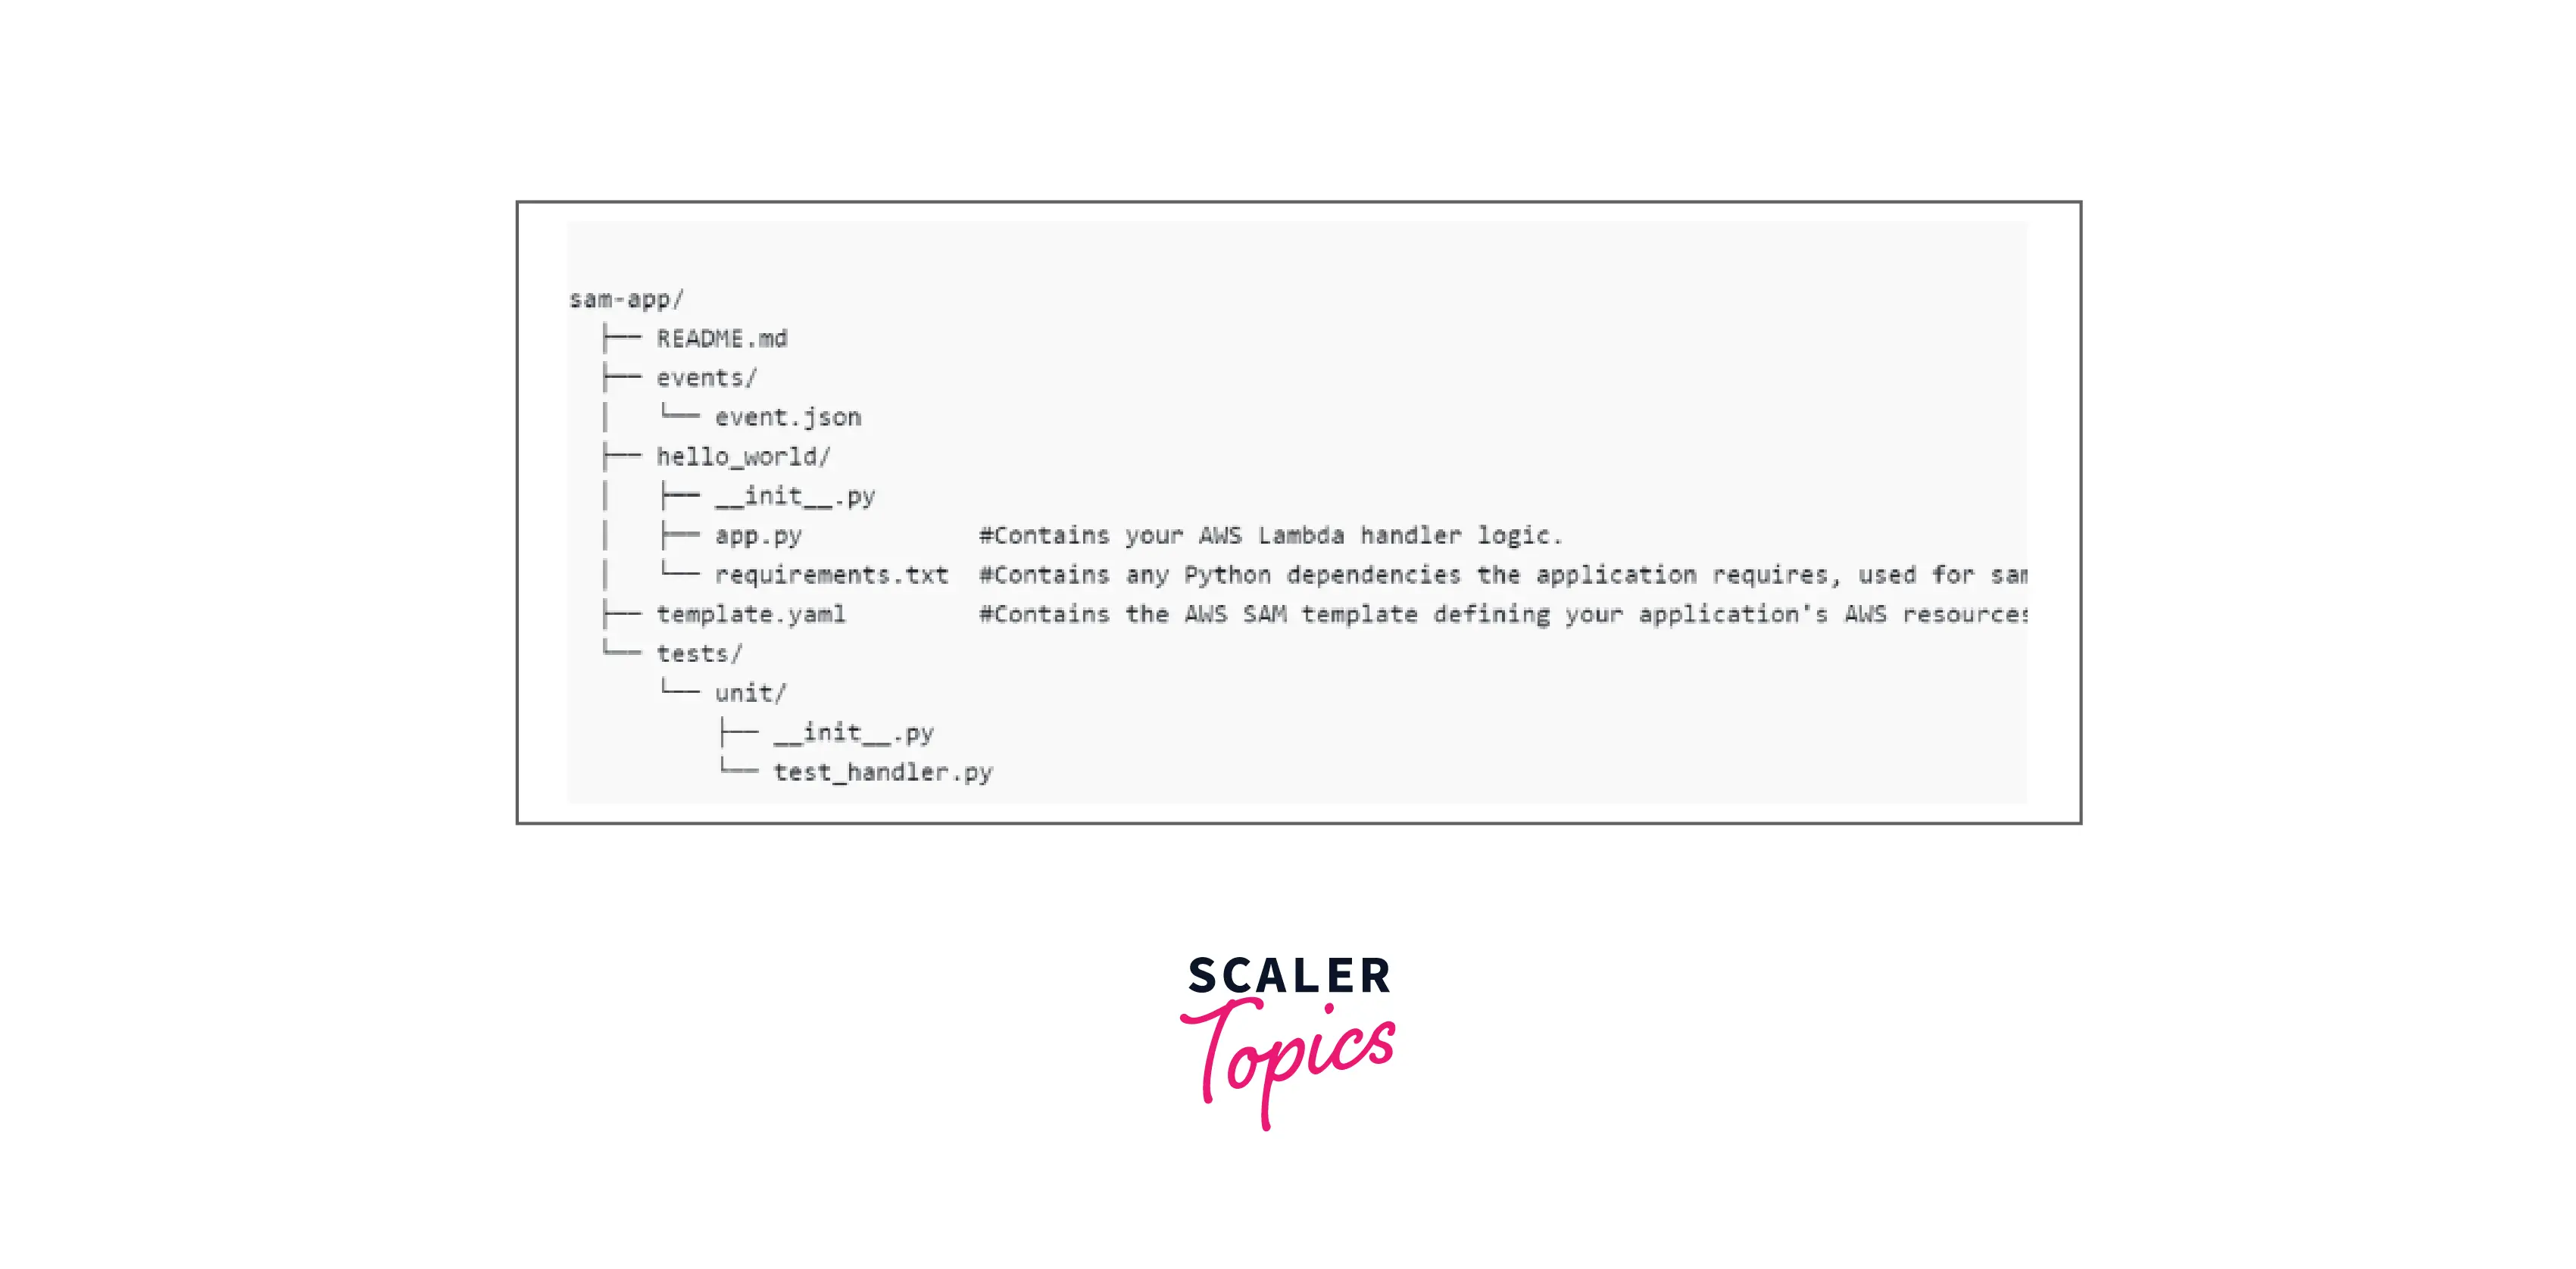
SAM will create a directory and produce code based on your chosen runtime and a template.yaml file. Here's an illustration:
Turn Learning into Career Growth
Building the Application
To create the application, go to the directory containing the template.yaml file. Then execute the following command: sam build
It will provide the following output:
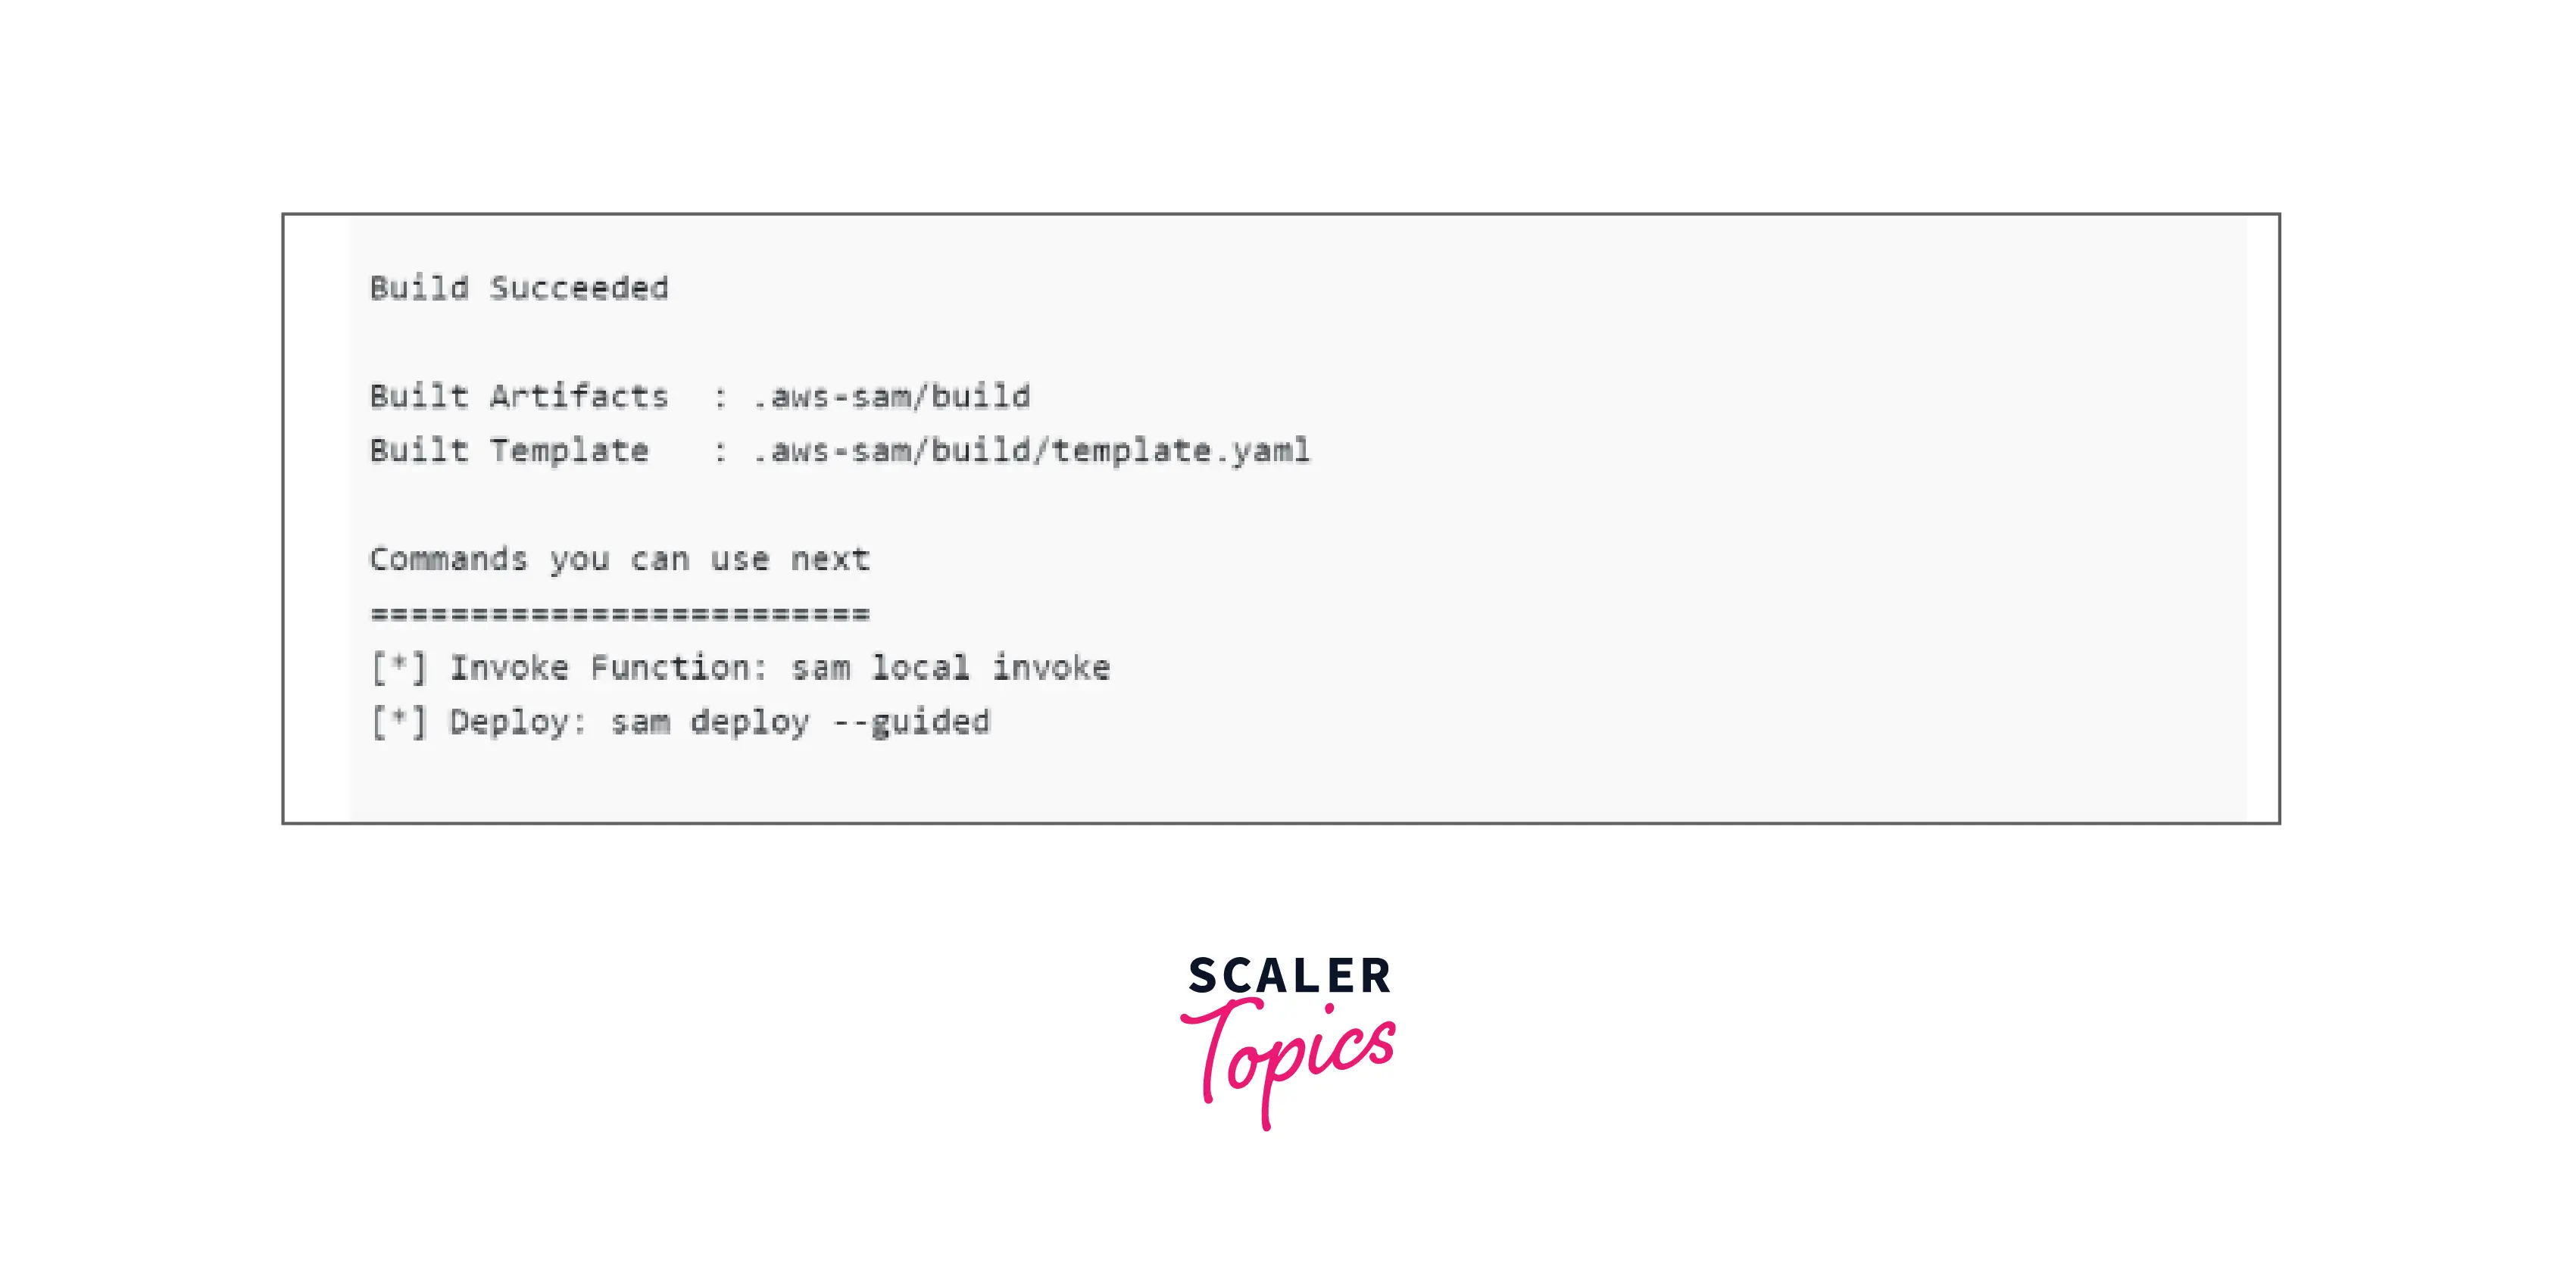
The SAM CLI will convert the SAM template to CloudFormation syntax, construct the dependencies, and place them in the build folder.
Deploying the Application to AWS Lambda
To deploy the application to the AWS cloud, we must compress the code and send it to S3, where the Lambda service will download and execute it.
Run the following command to deploy the application: sam deploy —guided.
It will display a series of questions on the screen. Respond to those and deploy it. The default responses will be accepted if you press the Enter key without entering any values. The result will be something like this:
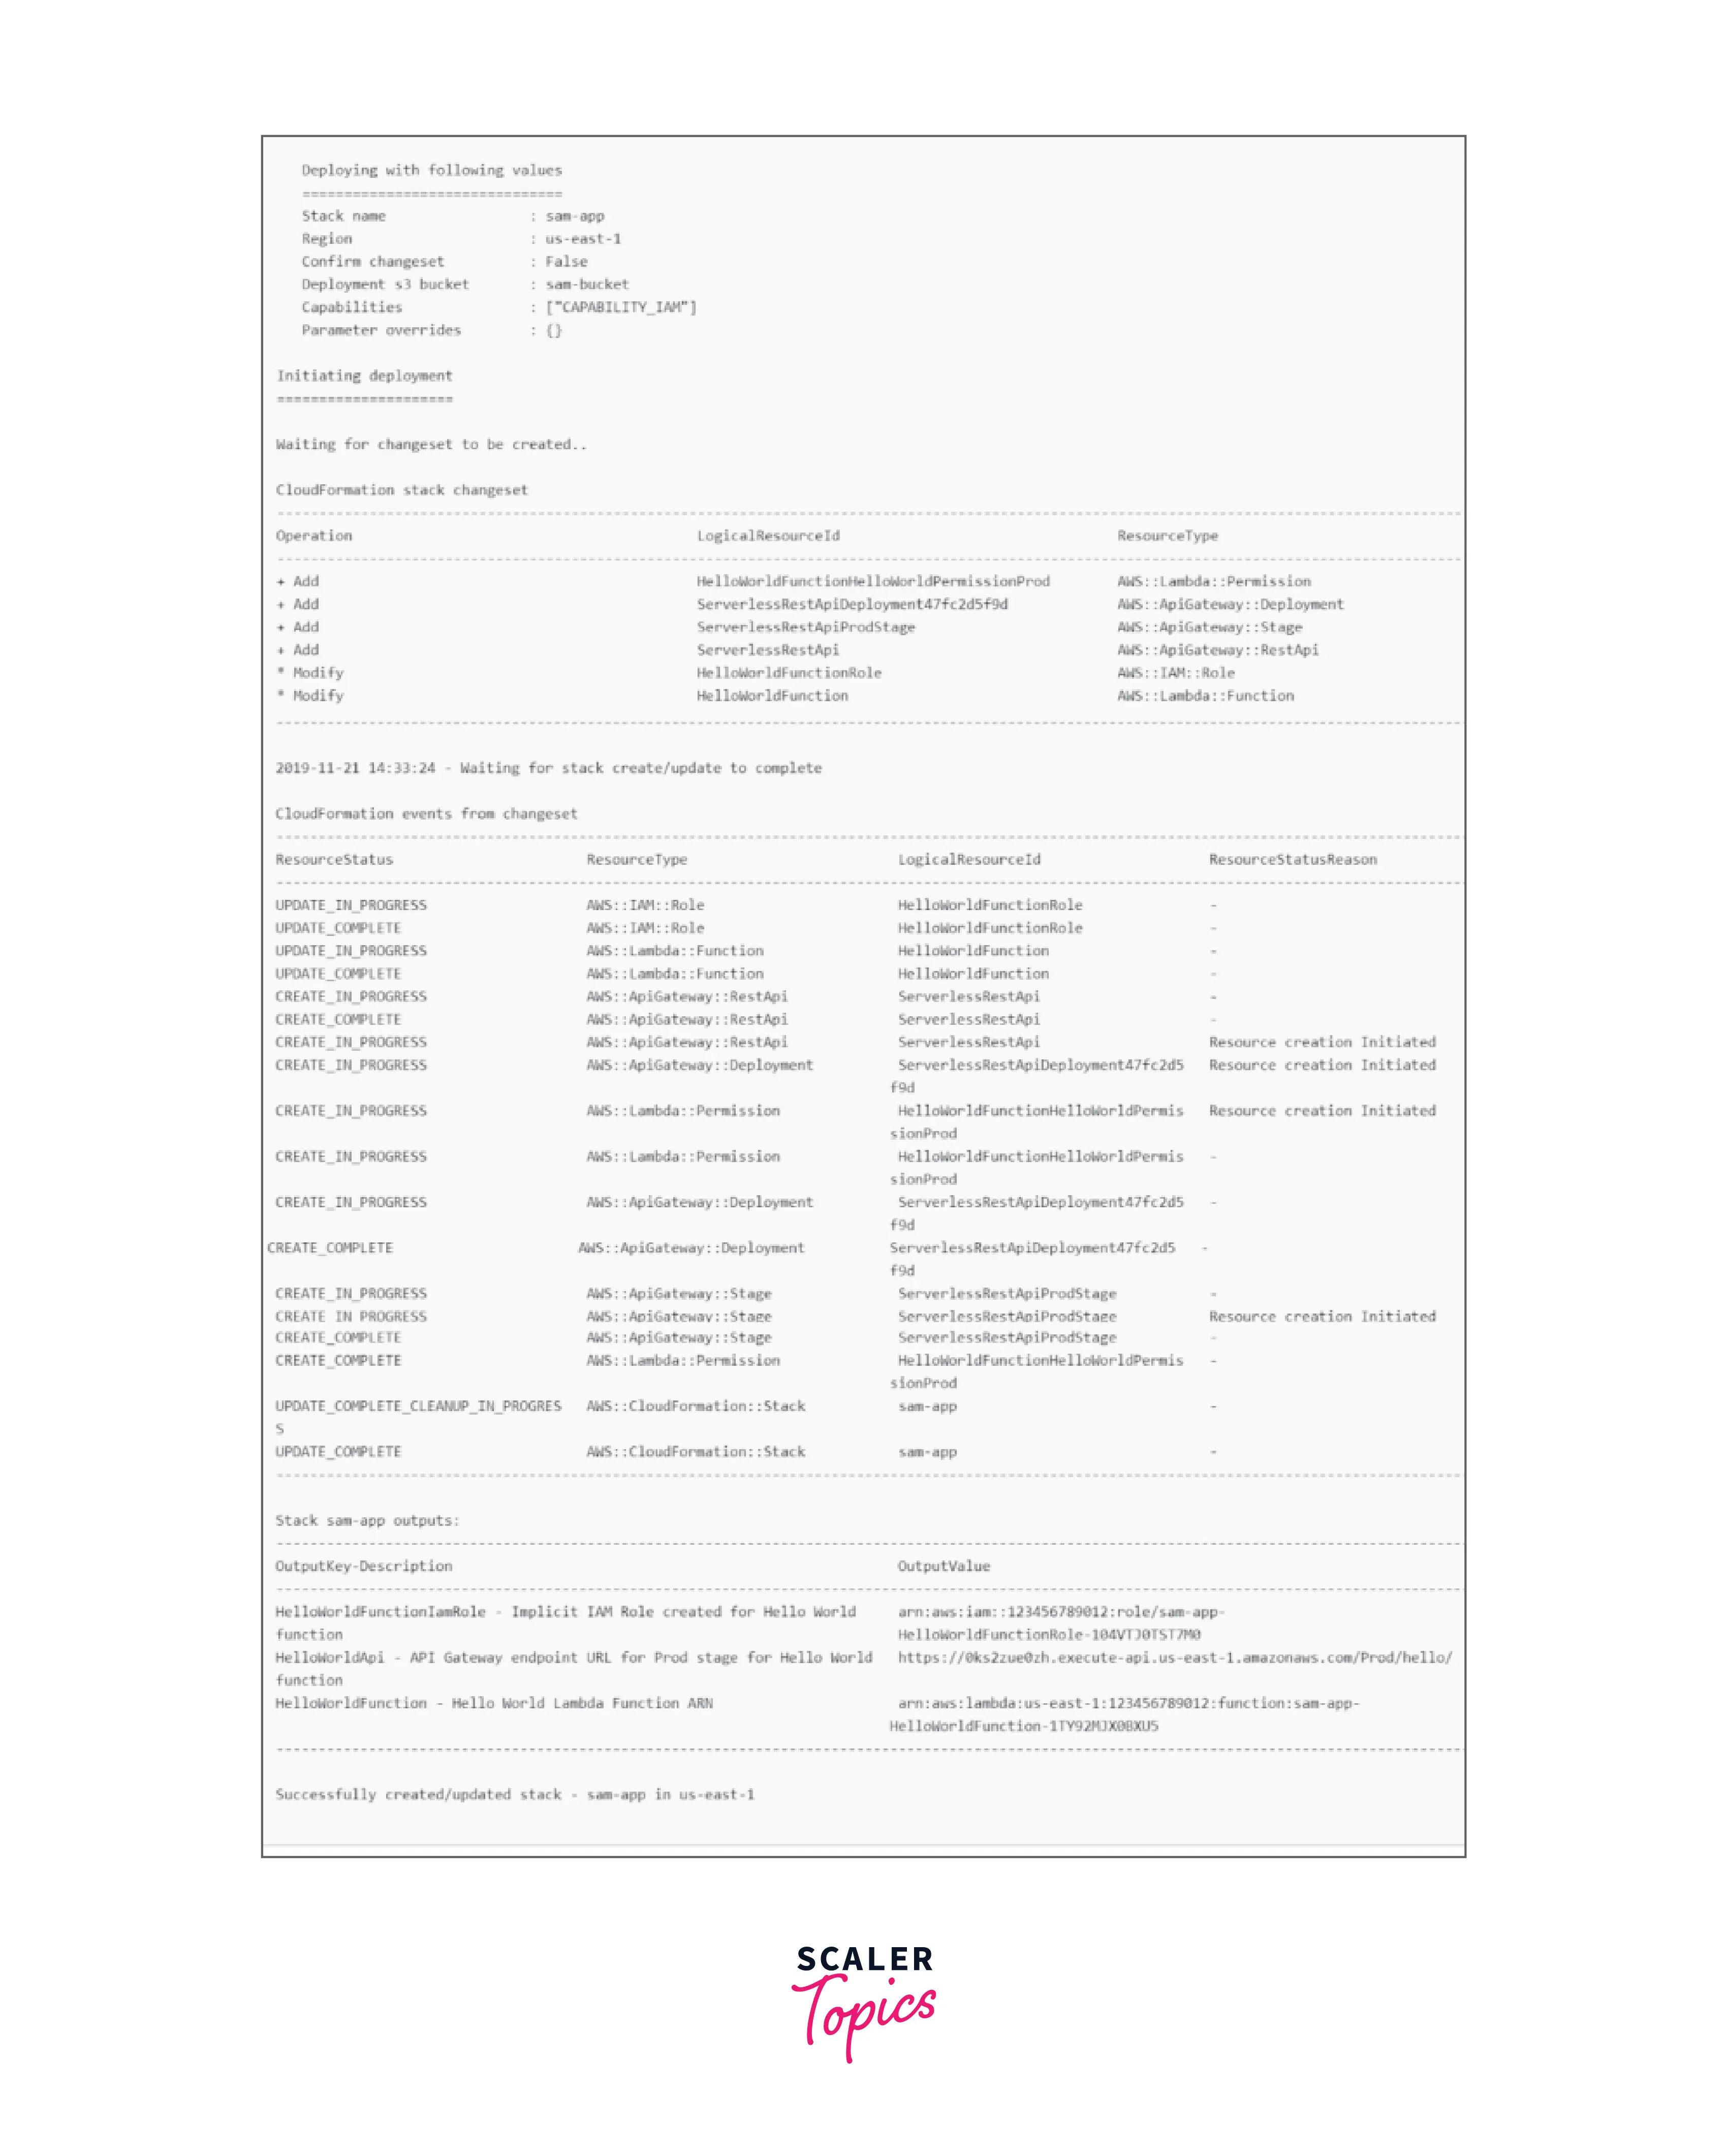
Through API Gateway, it will offer an HTTPS endpoint that can use to test the application. If you call the endpoint, you will receive the following JSON response: {'message': 'hello world'}.
Test the Application Locally
To execute this serverless application locally, AWS SAM provides a handful of commands. Run the following commands: start-api sam local
The start-api command creates a local endpoint that serves as a replica of your REST API endpoint. It downloads an execution container inside which your function may be executed locally. The outcome is the same as when you invoked your function on the AWS cloud.
To test the program, you only need to have Docker installed.
To test the application, perform the following curl command after it has started in the local environment: http://127.0.0.1:3000/hello curl
The answer will be the same JSON that we saw earlier.
Benefits of Using AWS SAM
-
Configuration for Single deployment: AWS SAM simplifies organizing and working on a single stack of linked components and resources. AWS SAM allows you to share configuration (such as RAM and timeouts) across resources and deploy all associated resources as a single, versioned entity.
-
AWS CloudFormation Expansion: Because AWS SAM is an extension of AWS CloudFormation, you gain AWS CloudFormation's dependable deployment features. In your AWS SAM template, you can define resources using AWS CloudFormation. You can also leverage the complete set of AWS CloudFormation resources, intrinsic functions, and other template capabilities.
-
Pre-Installed Best practices: AWS SAM may be used to define and deploy your infrastructure as a configuration. This allows you to utilize and enforce best practices such as code reviews. You can also enable safe deployments with CodeDeploy and tracing via AWS X-Ray with a few settings lines.
-
Local testing and debugging: The AWS SAM CLI allows you to build, test, and debug serverless applications locally specified by AWS SAM templates. Locally, the CLI provides a Lambda-like execution environment. It aids in detecting errors by providing parity with the actual Lambda execution environment. AWS SAM may be used in conjunction with AWS toolkits such as the AWS Toolkit for JetBrains, the AWS Toolkit for PyCharm, the AWS Toolkit for IntelliJ, and the AWS Toolkit for Visual Studio Code. This closes the feedback loop by allowing you to identify and fix issues that may arise in the cloud.
-
Integration with development tools is extensive: AWS SAM may be used with a set of AWS technologies to create serverless apps. New apps may be found in the AWS Serverless Application Repository. The AWS Cloud9 IDE may be used to write, test, and debug AWS SAM-based serverless applications. You may use CodeBuild, CodeDeploy, and CodePipeline to create a deployment pipeline for your serverless apps.
Conclusion
-
In this post, we examined AWS SAM, a widely used framework for automating the deployment of serverless applications based on Lambda, API Gateway, DynamoDB, and S3 services. It is far less complicated than CloudFormation scripts.
-
If the use case is simple, utilize AWS SAM instead of CloudFormation, unless you want the more complicated CloudFormation functionality that AWS SAM does not provide.
-
AWS SAM is open source and free, and it consists of two primary components: a template specification and a command-line interface (CLI). The templates are an extension of Amazon's CloudFormation templates, which were created specifically for serverless applications.
-
The AWS SAM CLI includes commands for validating AWS SAM template files, launching Lambda functions locally, debugging Lambda routines step by step, packaging and deploying serverless applications to the AWS Cloud, and so on.
-
There are no additional fees for utilizing AWS SAM. You pay for AWS resources produced with SAM the same way you would if you built them manually. You pay for what you use and only when you use it. There are no minimum costs or upfront commitments necessary.