Elastic Network Interface (ENI)
Overview
AWS (ENI), abbreviated as Elastic Network Interface, is a virtual network interface controller/card (NIC) that is attached to an EC2 in a Virtual Private Cloud(VPC).
They are used to enable network connectivity for your instances on the network.
What are Elastic Network Interfaces?
ENI is a virtual network interface controller/card (NIC) that is attached to an EC2 in a Virtual Private Cloud(VPC). Having several ENIs attached to one instance enables an instance to interact on two separate subnets.
Primary ENIs
Primary ENIs: Created alongside the instance. A primary ENI's lifecycle is the same as the instance to which it is attached. In primary ENI, the ENI cannot be detached from the instance to which it is attached.
Every instance has a primary network interface by default. This is shown as the instance is being generated.
IP will be assigned a Private IP address. If the option for the instance's subnet is enabled, it will also receive a public IP address.
Secondary ENIs
Secondary ENIs: Can be created independently. A secondary ENI can be attached to an instance and further can be detached as well.
Assume we have two instances, one of which is a primary instance that hosts a web application, and a secondary network interface has been assigned to this.
If the primary instance fails, then failover happens to the secondary instance.
The ENI moves to the secondary instance to ensure seamless failover from the primary to the secondary instance. For moving instances, subnets must be in the same availability zone.
Attributes
The attributes
-
Description ENI-related information such as ENI type (primary or secondary), zone, etc.
-
Private IP Address Mainly IP Address assigned by the user or system.
-
One public IPv4 address An ENI can be associated with at most one public IPv4 address.
-
Elastic IP Address An ENI can be associated with more than one elastic IP address (EIPs).
-
Secondary Private IP Address It must be an idle IP address within the IPv4 address range.
-
MAC Address A media access control (MAC) address is an ENI's globally unique identifier.
-
Security Group(s) At least one security group must be added to an ENI. The security group is in charge of the ENI's inbound and outbound traffic.
-
Source/Destination Check Flag Any traffic sent or received by the instance must have a source or destination.
Transform Your Career
Choose from our industry-leading programs designed for career success
Modern Software and AI Engineering Program
Master full-stack development with AI integration

Modern Data Science and ML with specialisation in AI
Advanced data science techniques with AI specialization
Advanced AIML with Specialisation in Agentic AI
Deep dive into AIML with focus on Agentic systems
DevOps, Cloud & AI Platform Engineering
Build and manage AI-powered cloud infrastructure
AI Engineering Advanced Certification by IIT-Roorkee
Premier AI engineering certification from IIT-Roorkee
ENI AWS Key Features
-
Every instance in Virtual Private Cloud (VPC) has a default network interface (eth0 — the primary network interface) that assigns a private IPv4 address from the IPv4 address range.
-
The default network interface of an instance cannot be removed.
-
Users may create secondary ENIs to instances in their VPC. These ENIs, however, must be generated inside the same availability zone as the EC2 instance to which you are attempting to link your secondary ENI.
-
The amount of network instances that can be attached varies according to the instance type.
-
Security Group is associated with an ENI rather than an EC2 instance. Users may have numerous routes to the same EC2 instance with varying security options using this strategy.
Working with Network Interfaces
1. Create A Network Interface
In a subnet, a network interface can be created. Once a network interface has been built, it cannot be moved to another subnet. A network interface must be connected to an instance in the same availability zone.
- Start up the EC2 console.
- Select Network Interfaces from the bar on the left of your screen.
- Create a network interface.
- In the Description area, enter an illustrative name.
- Choose a subnet under Subnet. Depending on the subnet type you choose (IPv4-only, IPv6-only, or dual-stack (IPv4 and IPv6)), different options are available in the following phases.
- Choose one of the following actions for a private IPv4 address:
- To let Amazon EC2 choose an IPv4 address from the Subnet, choose Auto-assign in option a.
- Select Custom and type an IPv4 address from the Subnet that you want.
- (Subnets with IPv6 addresses only) Consider one of the following when addressing IPv6:
- If you don't want to provide the network interface with an IPv6 address, select None.
- Select Auto-assign to provide Amazon EC2 the authority to choose an IPv6 address from the Subnet.
- Select Custom and type an IPv6 address from the Subnet that you want.
- Select Elastic Fabric Adapter, Enable to construct of an elastic fabric adapter.
- Choose one or more security groups under Security groups.
- Select Add new tag for each tag, then provide a tag key and an optional tag value.
- Select Create network interface.
2. View Details About A Network Interface
Every network interface in your account can be seen.
- Activate the EC2 console.
- Select Network Interfaces from the bar on the left of your screen.
- Select the network interface's ID to access the information page for that network interface. Alternatively, tick the box next to the network interface to display details without leaving the network interfaces page.
The Command Line To Describe A Network Interface
One of the following commands can be used:
- describe-network-interface-attribute (AWS CLI)
- Get-EC2NetworkInterface (AWS Tools for Windows PowerShell)
Using The Command Line, Define A Network Interface Attribute
One of the following commands can be used:
- describe-network-interface-attribute (AWS CLI)
- Get-EC2NetworkInterfaceAttribute (AWS Tools for Windows PowerShell)
3. Attach A Network Interface To An Instance
You may attach a network interface to any instance in the same availability zone as the network interface by using the Instances or Network Interfaces tab of the EC2 dashboard. Alternatively, you can supply the most recent network interfaces when launching instances. If the public IPv4 address for your instance is released while it has more than one network interface attached, the instance does not receive a new one.
Using The Instances Page, One Might Use A Network Interface To Attach To An Instance.
- Access the EC2 console.
- Select instances from the bar on the left of your screen.
- Select the instance's checkbox.
- Select the Networking option and then click Attach network interface.
- Choose a network interface. You can select a network card if the instance allows for multiple network cards.
- Select Attach
Utilizing The Command Line, Attach A Network Interface to an Instance
One of the commands listed below can be used:
- attach-network-interface (AWS CLI)
- Add-EC2NetworkInterface (AWS Tools for Windows PowerShell)
Turn Learning into Career Growth
4. Detach A Network Interface From An Instance
- Using the Instances or Network Interfaces pages of the Amazon EC2 console, you may always disconnect a secondary network interface connected to an EC2 instance.
- To determine which service created the linked resource, look at the Description of the network interface. When a resource is eliminated, its network interface is likewise destroyed.
Using The Instances Page, Remove a Network Interface From an Instance
- Activate the EC2 console.
- Select instances from the bar on the left of your screen.
- Select the instance’s checkbox. To confirm that the network interface is associated with an instance as a secondary network interface.
- Detach the network interface by selecting Actions, Networking.
- Choose Detach after selecting the network interface
Using The Command Line, Remove a Network Interface
One of the commands listed below can be used:
- detach-network-interface (AWS CLI)
- Dismount-EC2NetworkInterface (AWS Tools for Windows PowerShell)
5. Manage IP Addresses
The IP Addresses Which are Manageable for your Network Interfaces are:
- Elastic IP addresses (one per private IPv4 address)
- IPv6 addresses
- IPv4 addresses
Using The Console, Control a Network Interface's Elastic IP Addresses
- Activate the EC2 console.
- Select Network Interfaces from the bar on the left of your screen.
- The network interface checkbox should be selected.
- Do the following to link an elastic IP address:
- Select Associate address under Actions.
- Choose the Elastic IP address option under "IP address".
- Select the private IPv4 address you want to use in conjunction with the elastic IP address under the Private IPv4 address.
- Choose If the network interface is already connected to another instance or network interface, permit the Elastic IP address to be reassigned.
- Select Associate.
- Follow these steps to separate an Elastic IP address:
- Select Disassociate address under Actions.
- Choose the Elastic IP address under the Public IP address.
- Select Dissociate.
Using The Console, Control The IPv4 and IPv6 Addresses of a Network Interface
- Activate the EC2 console.
- Select Network Interfaces from the bar on the left of your screen.
- The network interface should be chosen.
- Select Manage IP addresses under Actions. Increase the network interface size.
- Change the IP addresses for IPv4 as necessary. Select Provide new IP address, then enter an IPv4 address from the subnet range or let AWS pick one for you to assign an IPv4 address. Select Unassign next to an IPv4 address to remove it from the assignment.
- Change the IP addresses for IPv6 as necessary. Select Provide new IP address, pick an IPv6 address from the subnet range, or let AWS choose one for you to assign an IPv6 address. Select Unassign next to an IPv6 address to remove it from the assignment.
- Select Save.
6. Modify Network Interface Attributes
The Following Network Interface Properties are Programmable:
- Description
- Security groups
- On termination, delete
- Check the source/destination.
1. Using The Console, Modify The Network Interface's Description/Security Groups/Delete on Termination/Source and Destination Check
- Launch the EC2 console.
- Select Network Interfaces from the bar on the left of your screen.
- The network interface checkbox should be selected.
- Select Actions, then change the Description/Security Groups/Termination Behavior /Source and Destination check.
- In the box labeled Description, type a description of the network interface. After deciding which security groups will be utilized under Associated security groups, choose Save (or). Remove it or select Delete on termination. Enable if required, then choose Save. For each network interface, you may either choose or uncheck the Source/destination checkbox, enable it as necessary, and then select Save.
Using The Command Line, Alter Network Interface Characteristics
One of the following commands can be used:
- modify-network-interface-attribute (AWS CLI)
- Edit-EC2NetworkInterfaceAttribute (AWS Tools for Windows PowerShell)
7. Add Or Edit Tags
You may add tags, which are metadata, to a network interface. The only people who can see your account can see your private tags. An optional value and key make up each tag.
Using The Console, One May Create or Modify Tags for a Network Interface.
- Activate the EC2 console.
- Select Network Interfaces from the bar on the left of your screen.
- The network interface checkbox should be selected.
- Select Manage tags from the Tags tab.
- Select Add new tag and provide a key and optional value for each tag you want to create. Choose Save once you're finished.
Using The Command Line, One May Create or Modify Tags for a Network Interface.
One of the following commands can be used:
- create-tags (AWS CLI)
- New-EC2Tag (AWS Tools for Windows PowerShell)
Scaler Placement Report and Statistics
Scaler learners achieved 2.5x salary growth with average post-Scaler CTC reaching ₹23L.
8. Delete A Network Interface
A network interface can be deleted to release all of its related characteristics and any private or elastic IP addresses for use by another instance. An active network interface cannot be deleted. You must first disconnect the network interface.
Using The Console, Remove a Network Interface.
- Launch the Amazon EC2 interface.
- Select Network Interfaces from the bar on the left of your screen.
- Choose Actions, and Delete after checking the network interface box.
- Select Delete when required for confirmation.
Using The Command Line, Remove a Network Interface
One of the following commands can be used:
- delete-network-interface (AWS CLI)
- Remove-EC2NetworkInterface (AWS Tools for Windows PowerShell)
Use Case Scenarios
-
High availability cluster deployment Within a high availability design, many ENIs can be connected to a single EC2 instance.
-
Low-cost redundancy To reroute traffic to the backup instance, unbind an ENI from a failed ECS instance and bind the ENI to another instance. This enables the speedy restoration of services.
-
Fine-grained network administration An instance can have numerous ENIs configured. Users can use some ENIs for internal management and other ENIs for Internet business access.
-
Multiple private IP addresses configuration for single instance An ENI can be assigned several secondary private IP addresses. If you manage numerous applications on your instance, you can assign each application an independent IP address to improve instance utilization.
-
Multiple public IP addresses configuration for a single instance An EC2 instance with no ENIs attached can only have one public IP address assigned to it. Users can attach EIPs with one or more ENIs of an instance to allocate multiple public IP addresses to it.
Scaler Placement Report and Statistics
Scaler learners achieved 2.5x salary growth with average post-Scaler CTC reaching ₹23L.
Network Management
Multiple ENIs can be attached to an EC2 instance.
For example, one ENI can be used for handling internal management traffic and another ENI for internet business access to separate management traffic from public traffic.
Specific Security groups can be configured for each ENI based on the source IP addresses, protocols, and ports. That controls the inbound and outbound traffic for the EC2 instance.
ENI allows to have public facing web servers, web applications, and database servers in the public subnet and locks down SSH access to private management subnet.
Using VPN user can connect to private management subnet and can access it as usual.
Let's understand this using simple diagram,
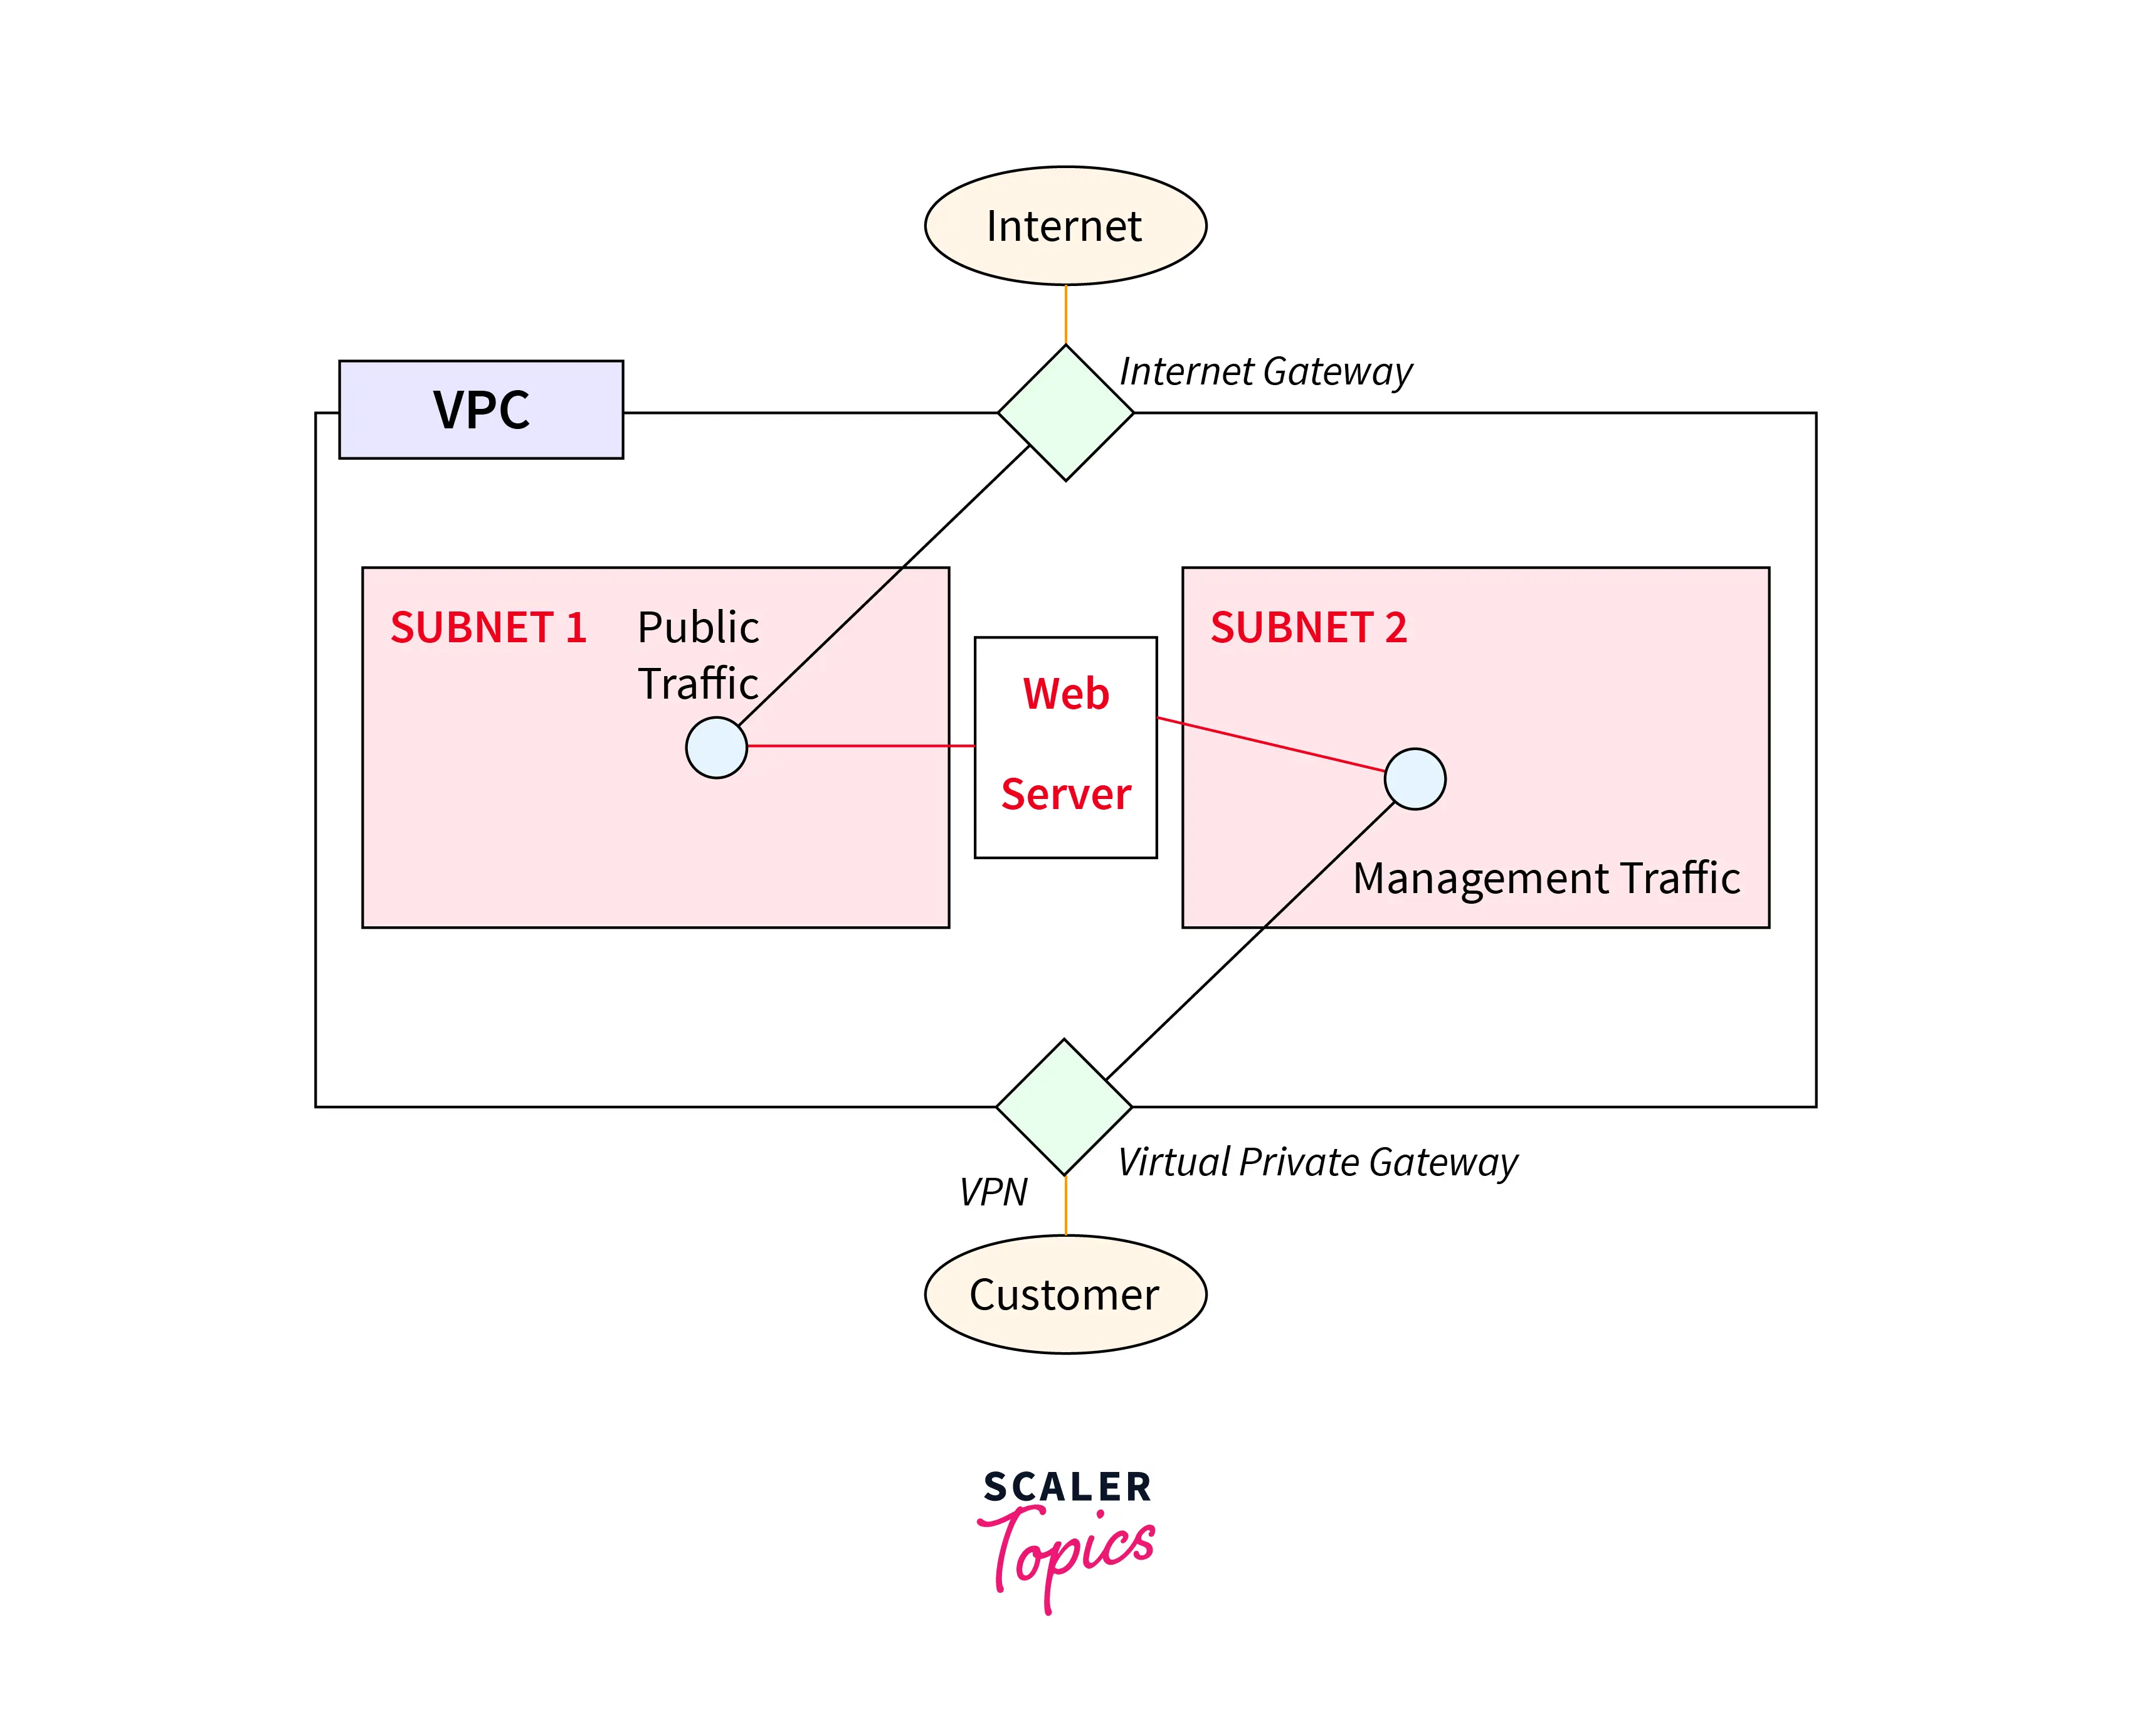
The subnet1 on the left is the public subnet, which communicates with the internet over the Internet Gateway for the VPC.
The subnet on the right is the private management subnet which allows the on-premises network to handle authentication and simply extends that network into the cloud. You could also use AWS Client VPN, which will run a VPN server that can be accessed with private key credentials.
Implementation of Cheap Failover Using ENI AWS
The steps for implementing Elastic Network Interface are as follows:
Step 1) To begin, we will establish two instances of the Amazon Machine Image type. These instances will be created in the same availability zone's subnet.
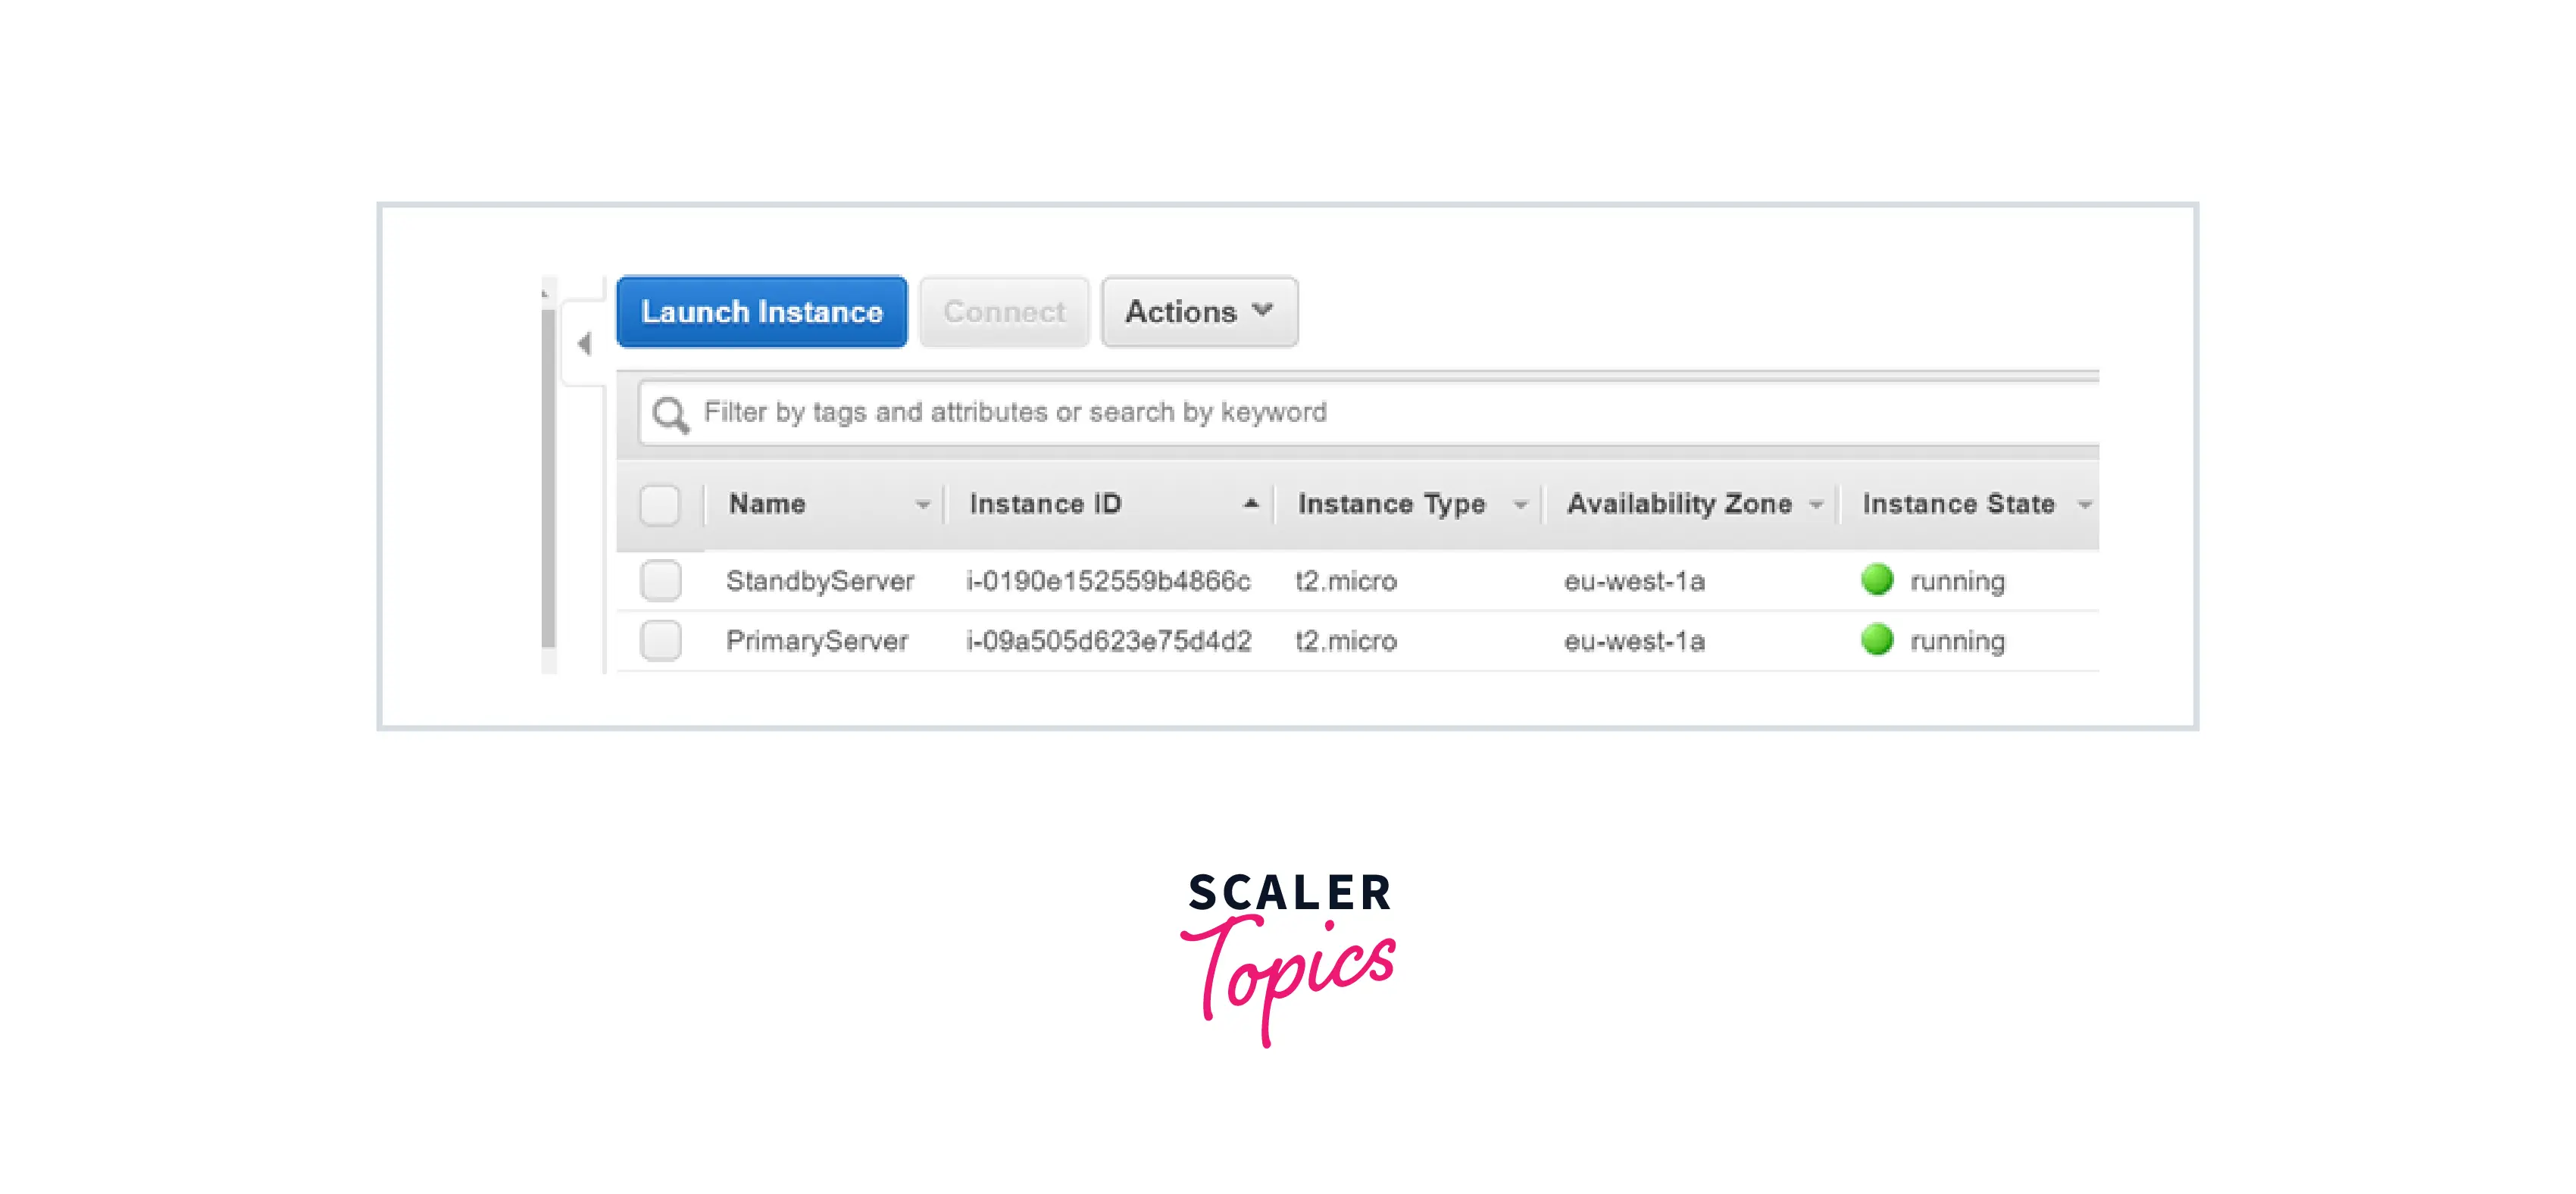
Servers are named primary and standby servers, which have only a primary network interface.
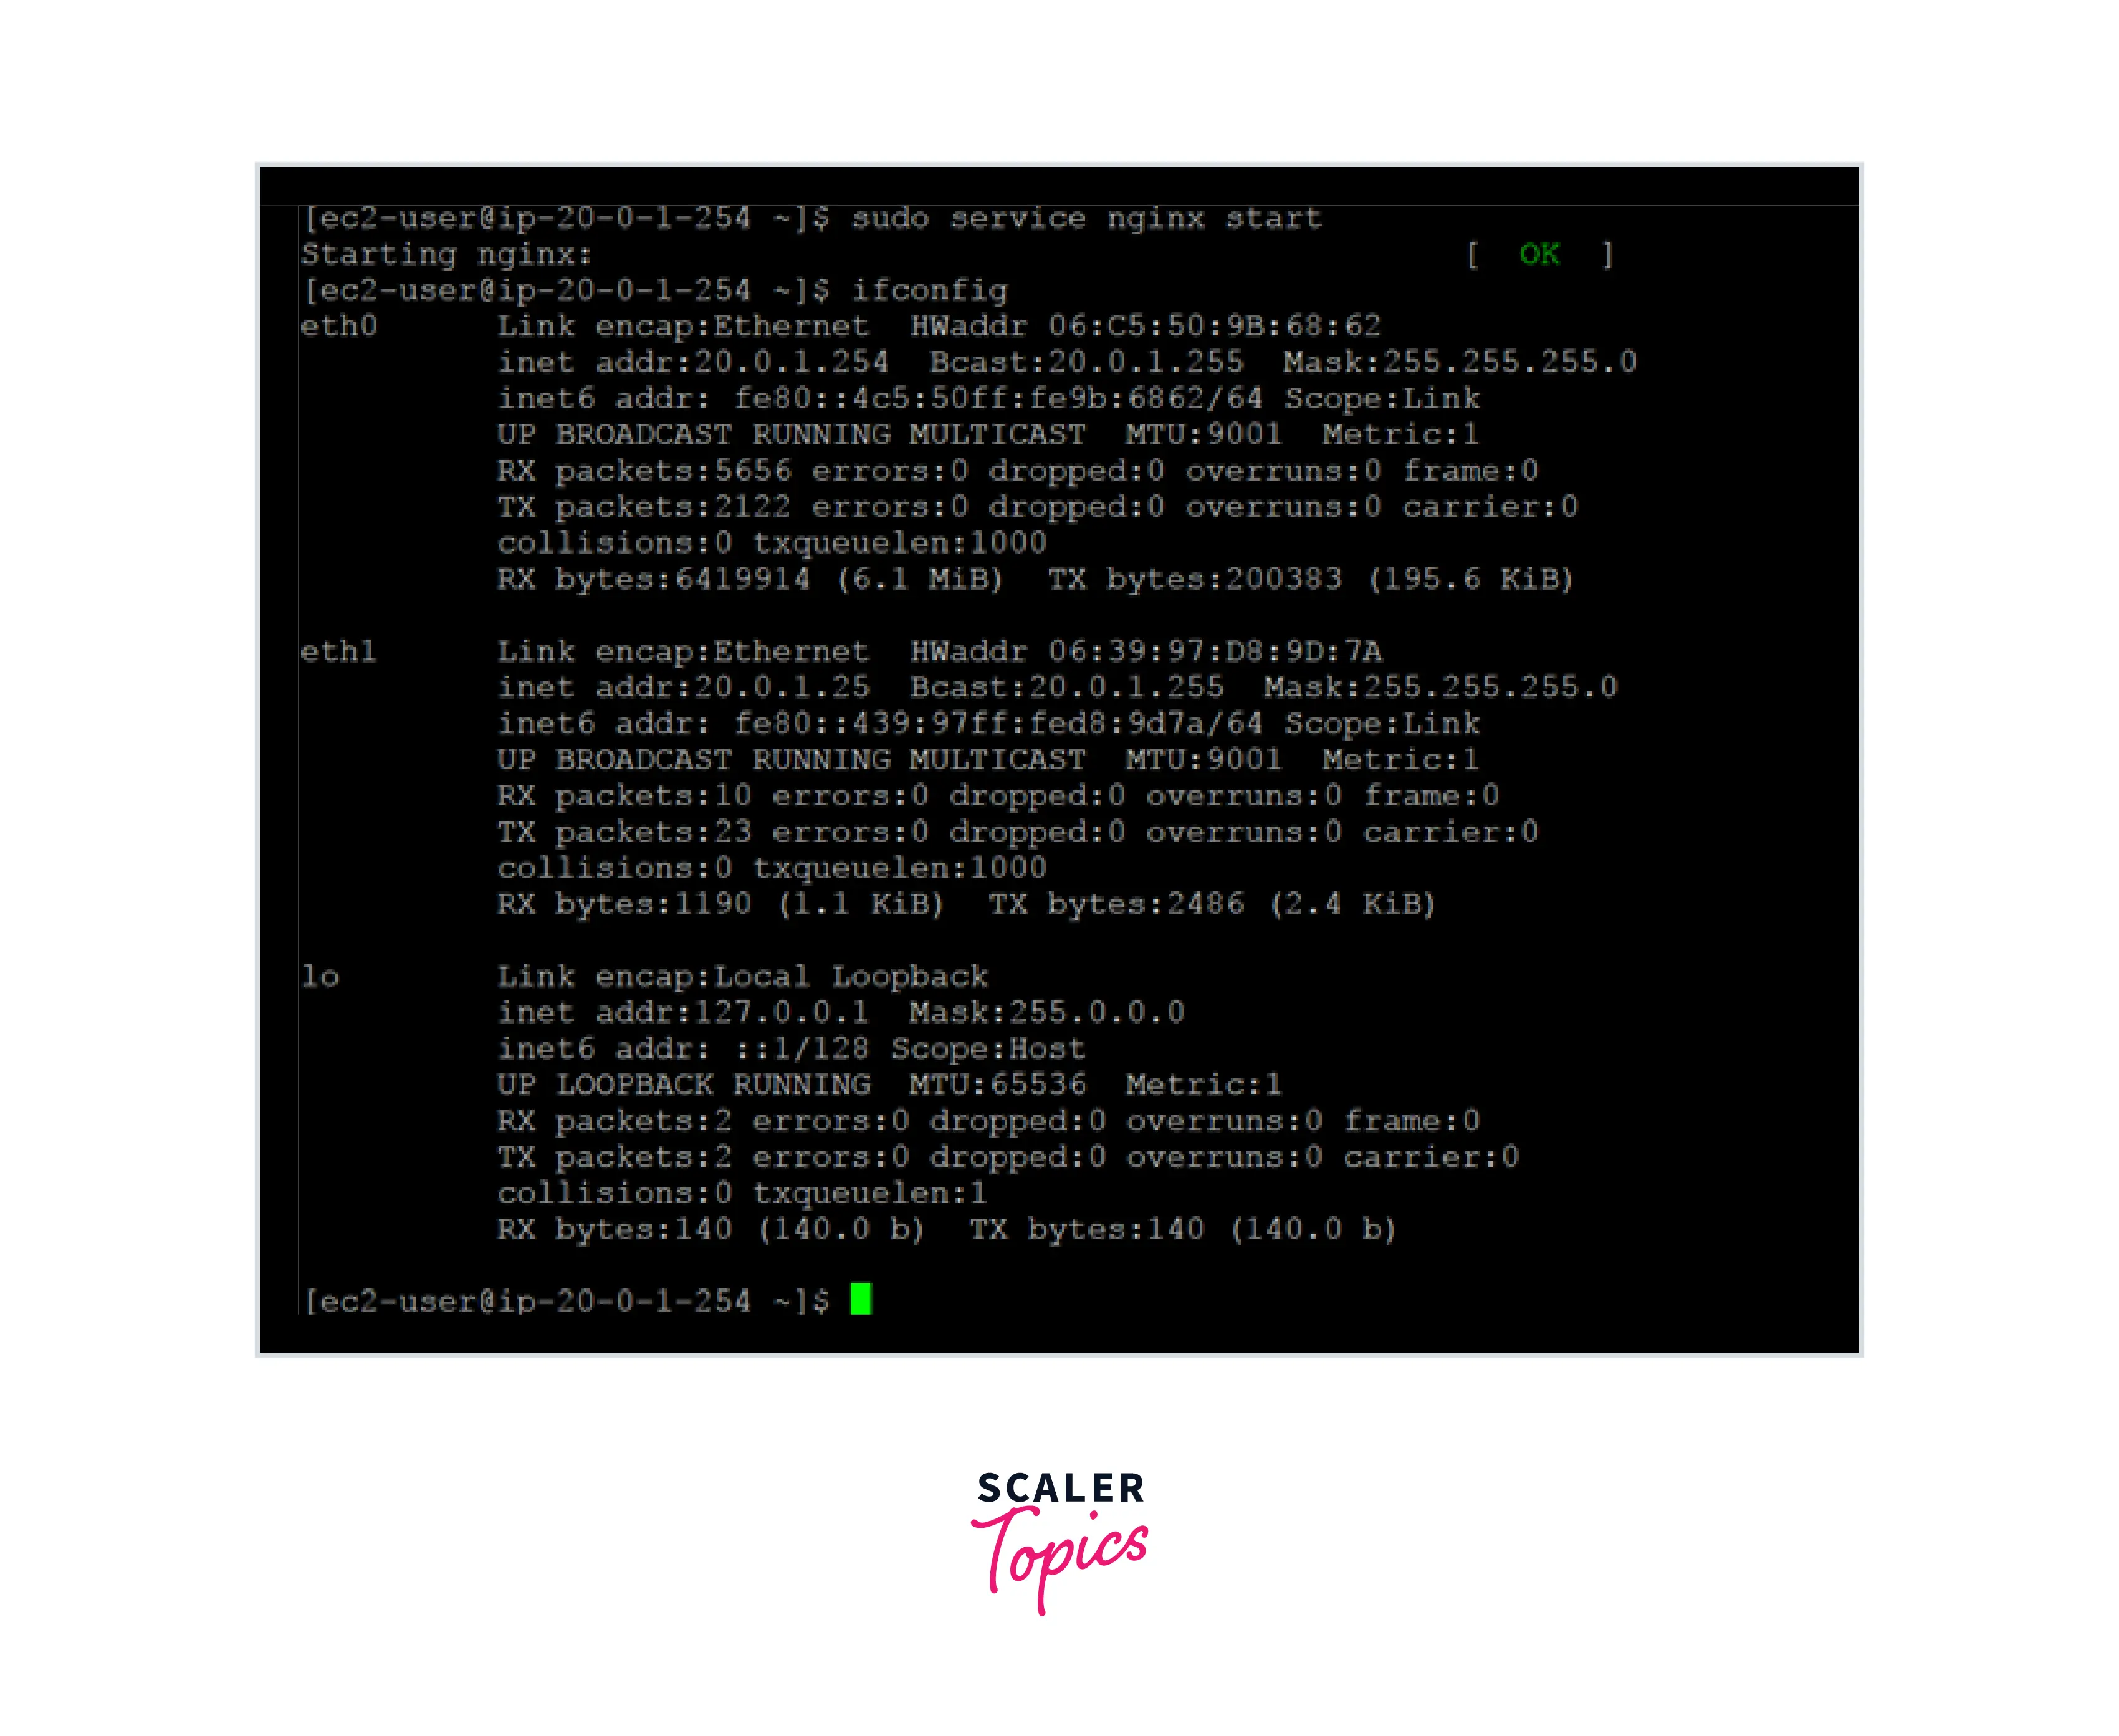
Step 2) Run the following commands on the Primary and Standby server to install the Nginx Web server.
Now start the nginx service on the primary server.
The following page should be visible when you browse to the Public IP of the Primary Server. Check that the PrimaryServer's Security Group permits communication on port 80.
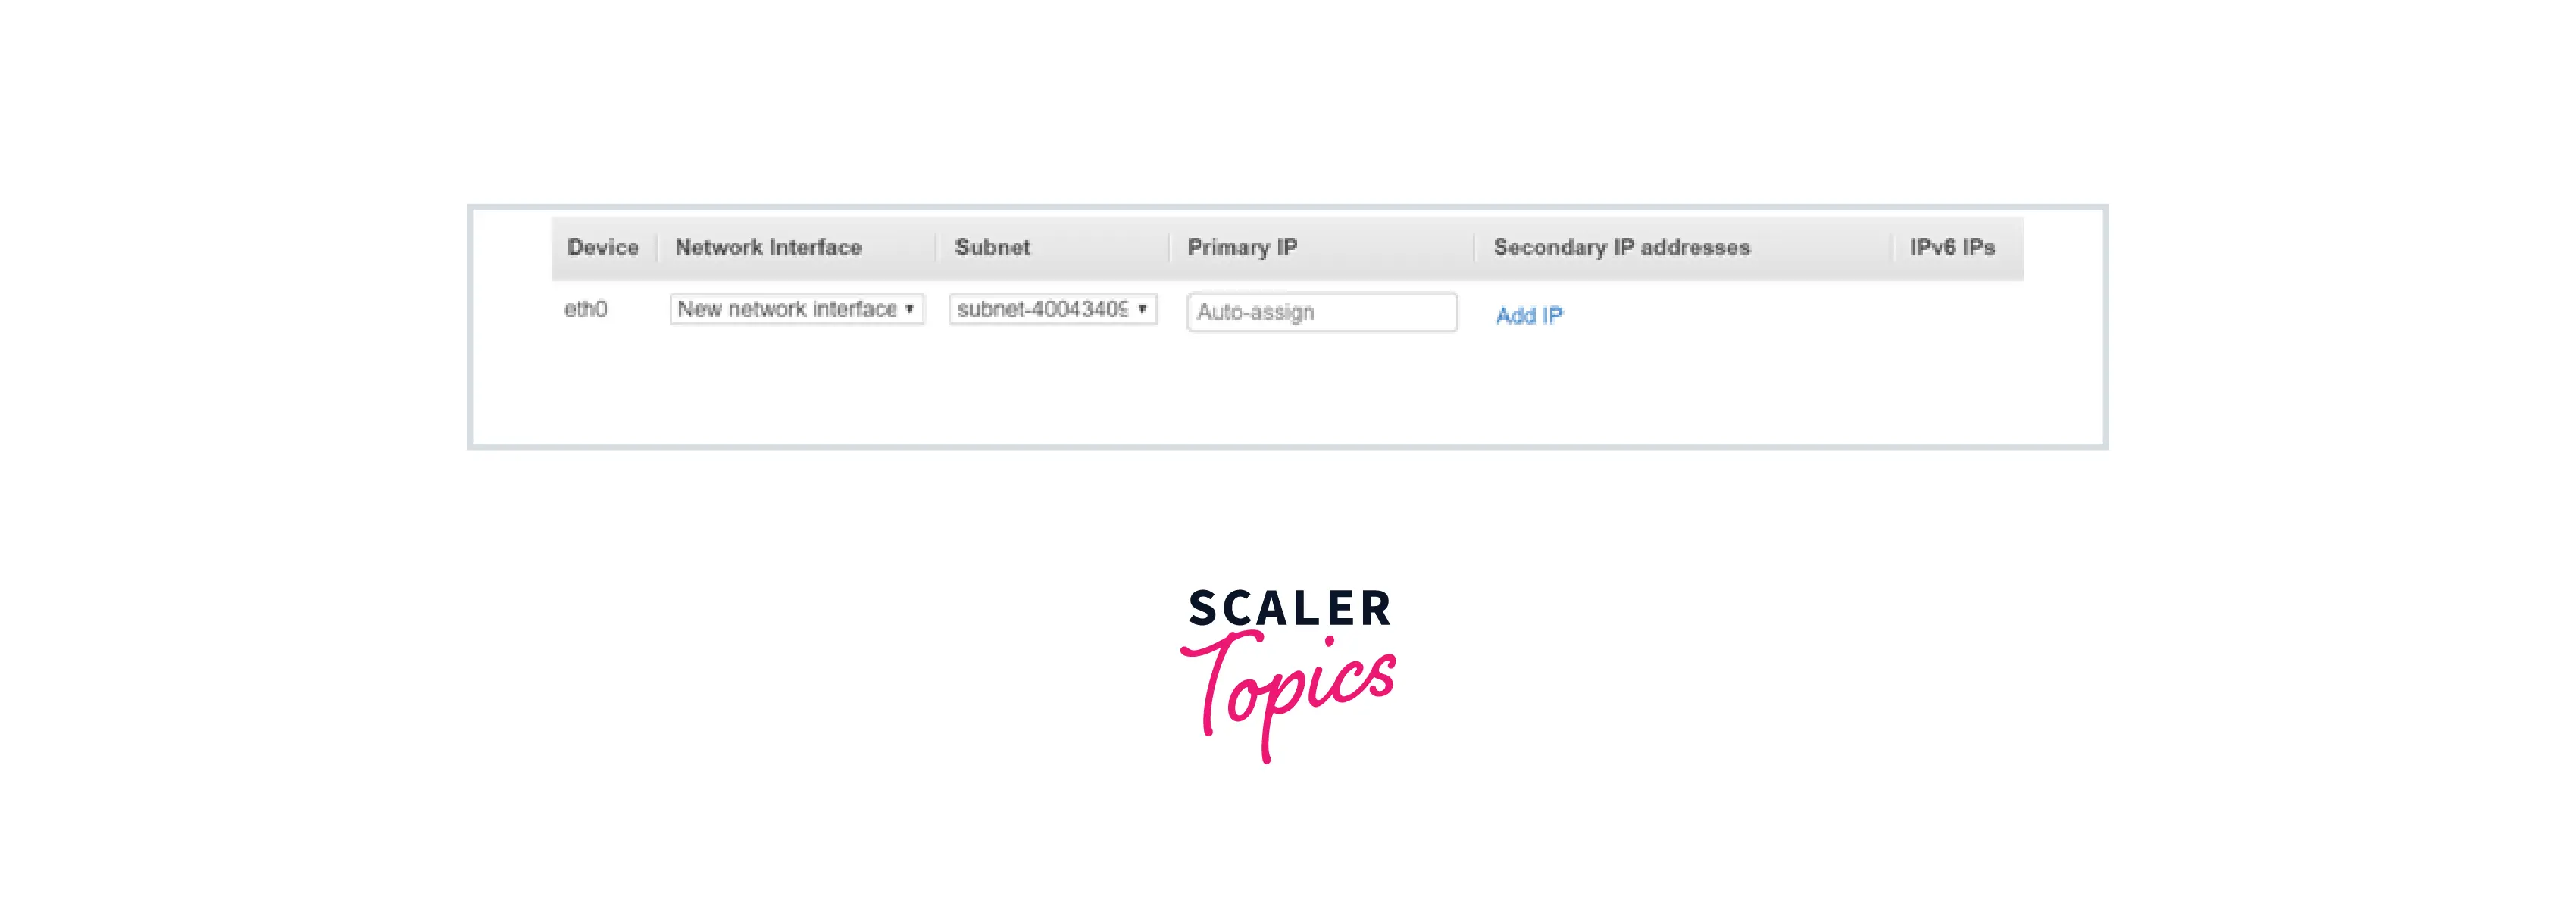
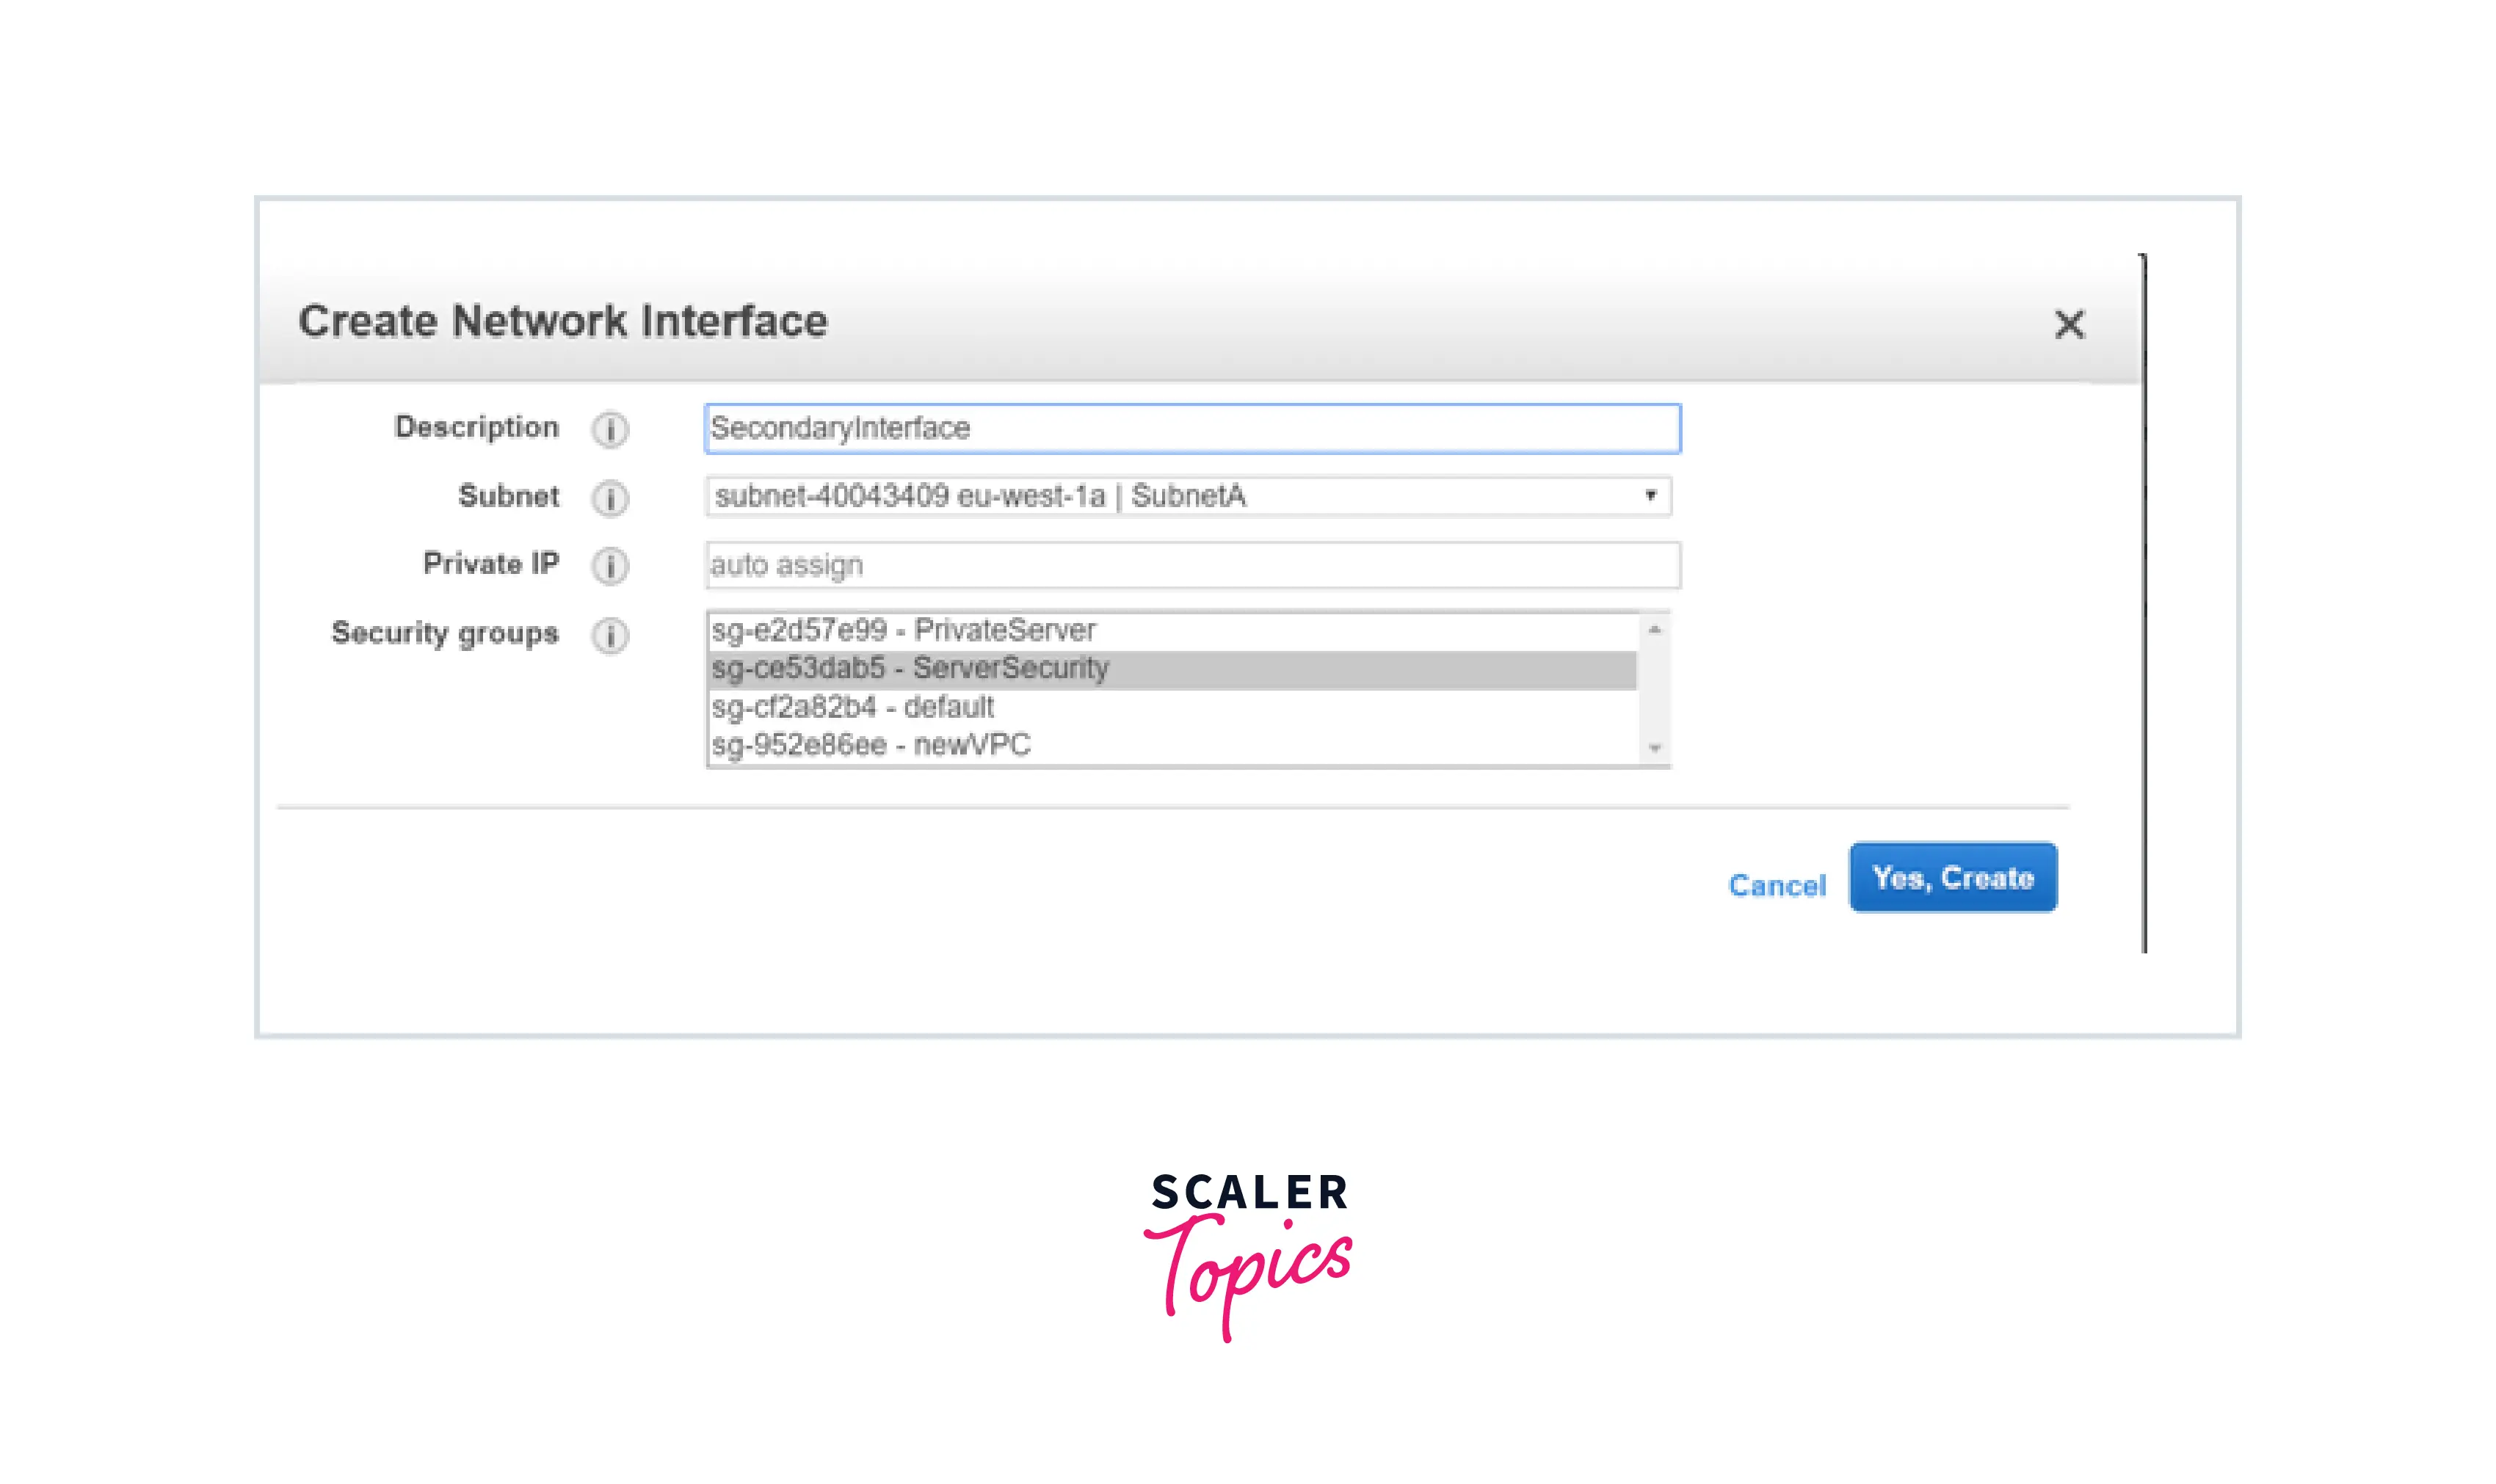
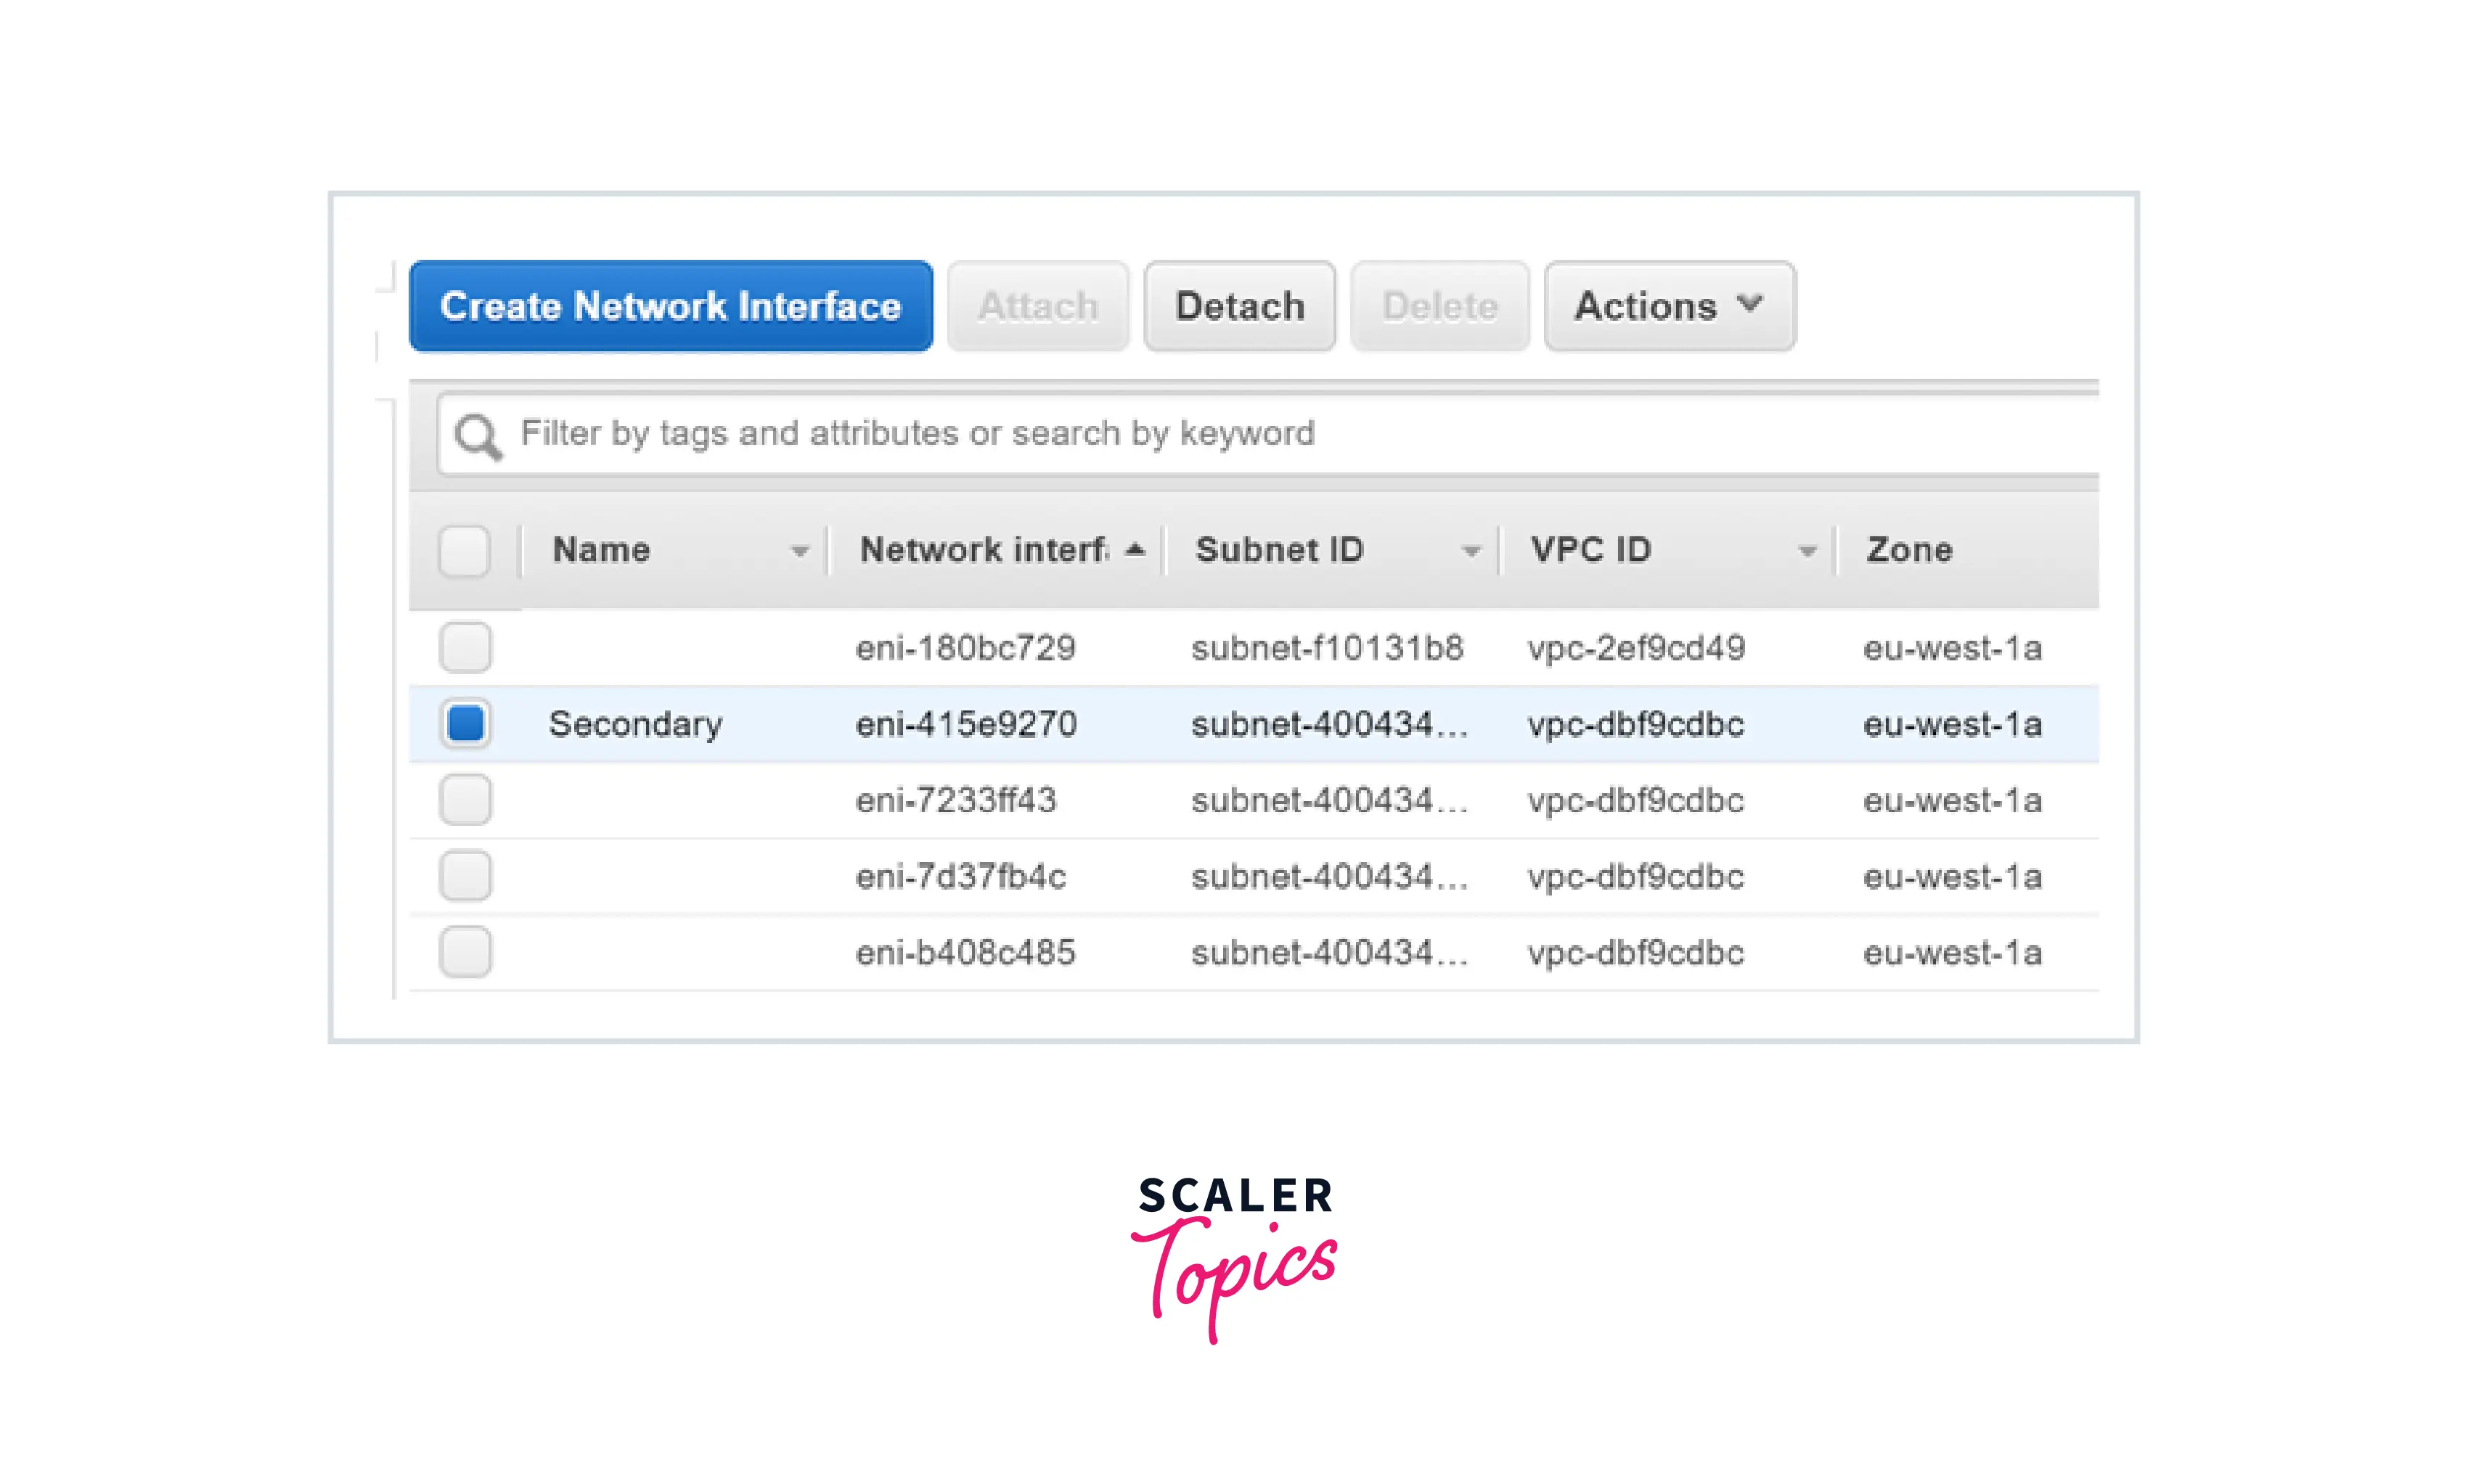
Step 3) Now create a Secondary Network Interface. This will be linked to the Main Server. Click on Create Network Interface on the EC2 Dashboard.
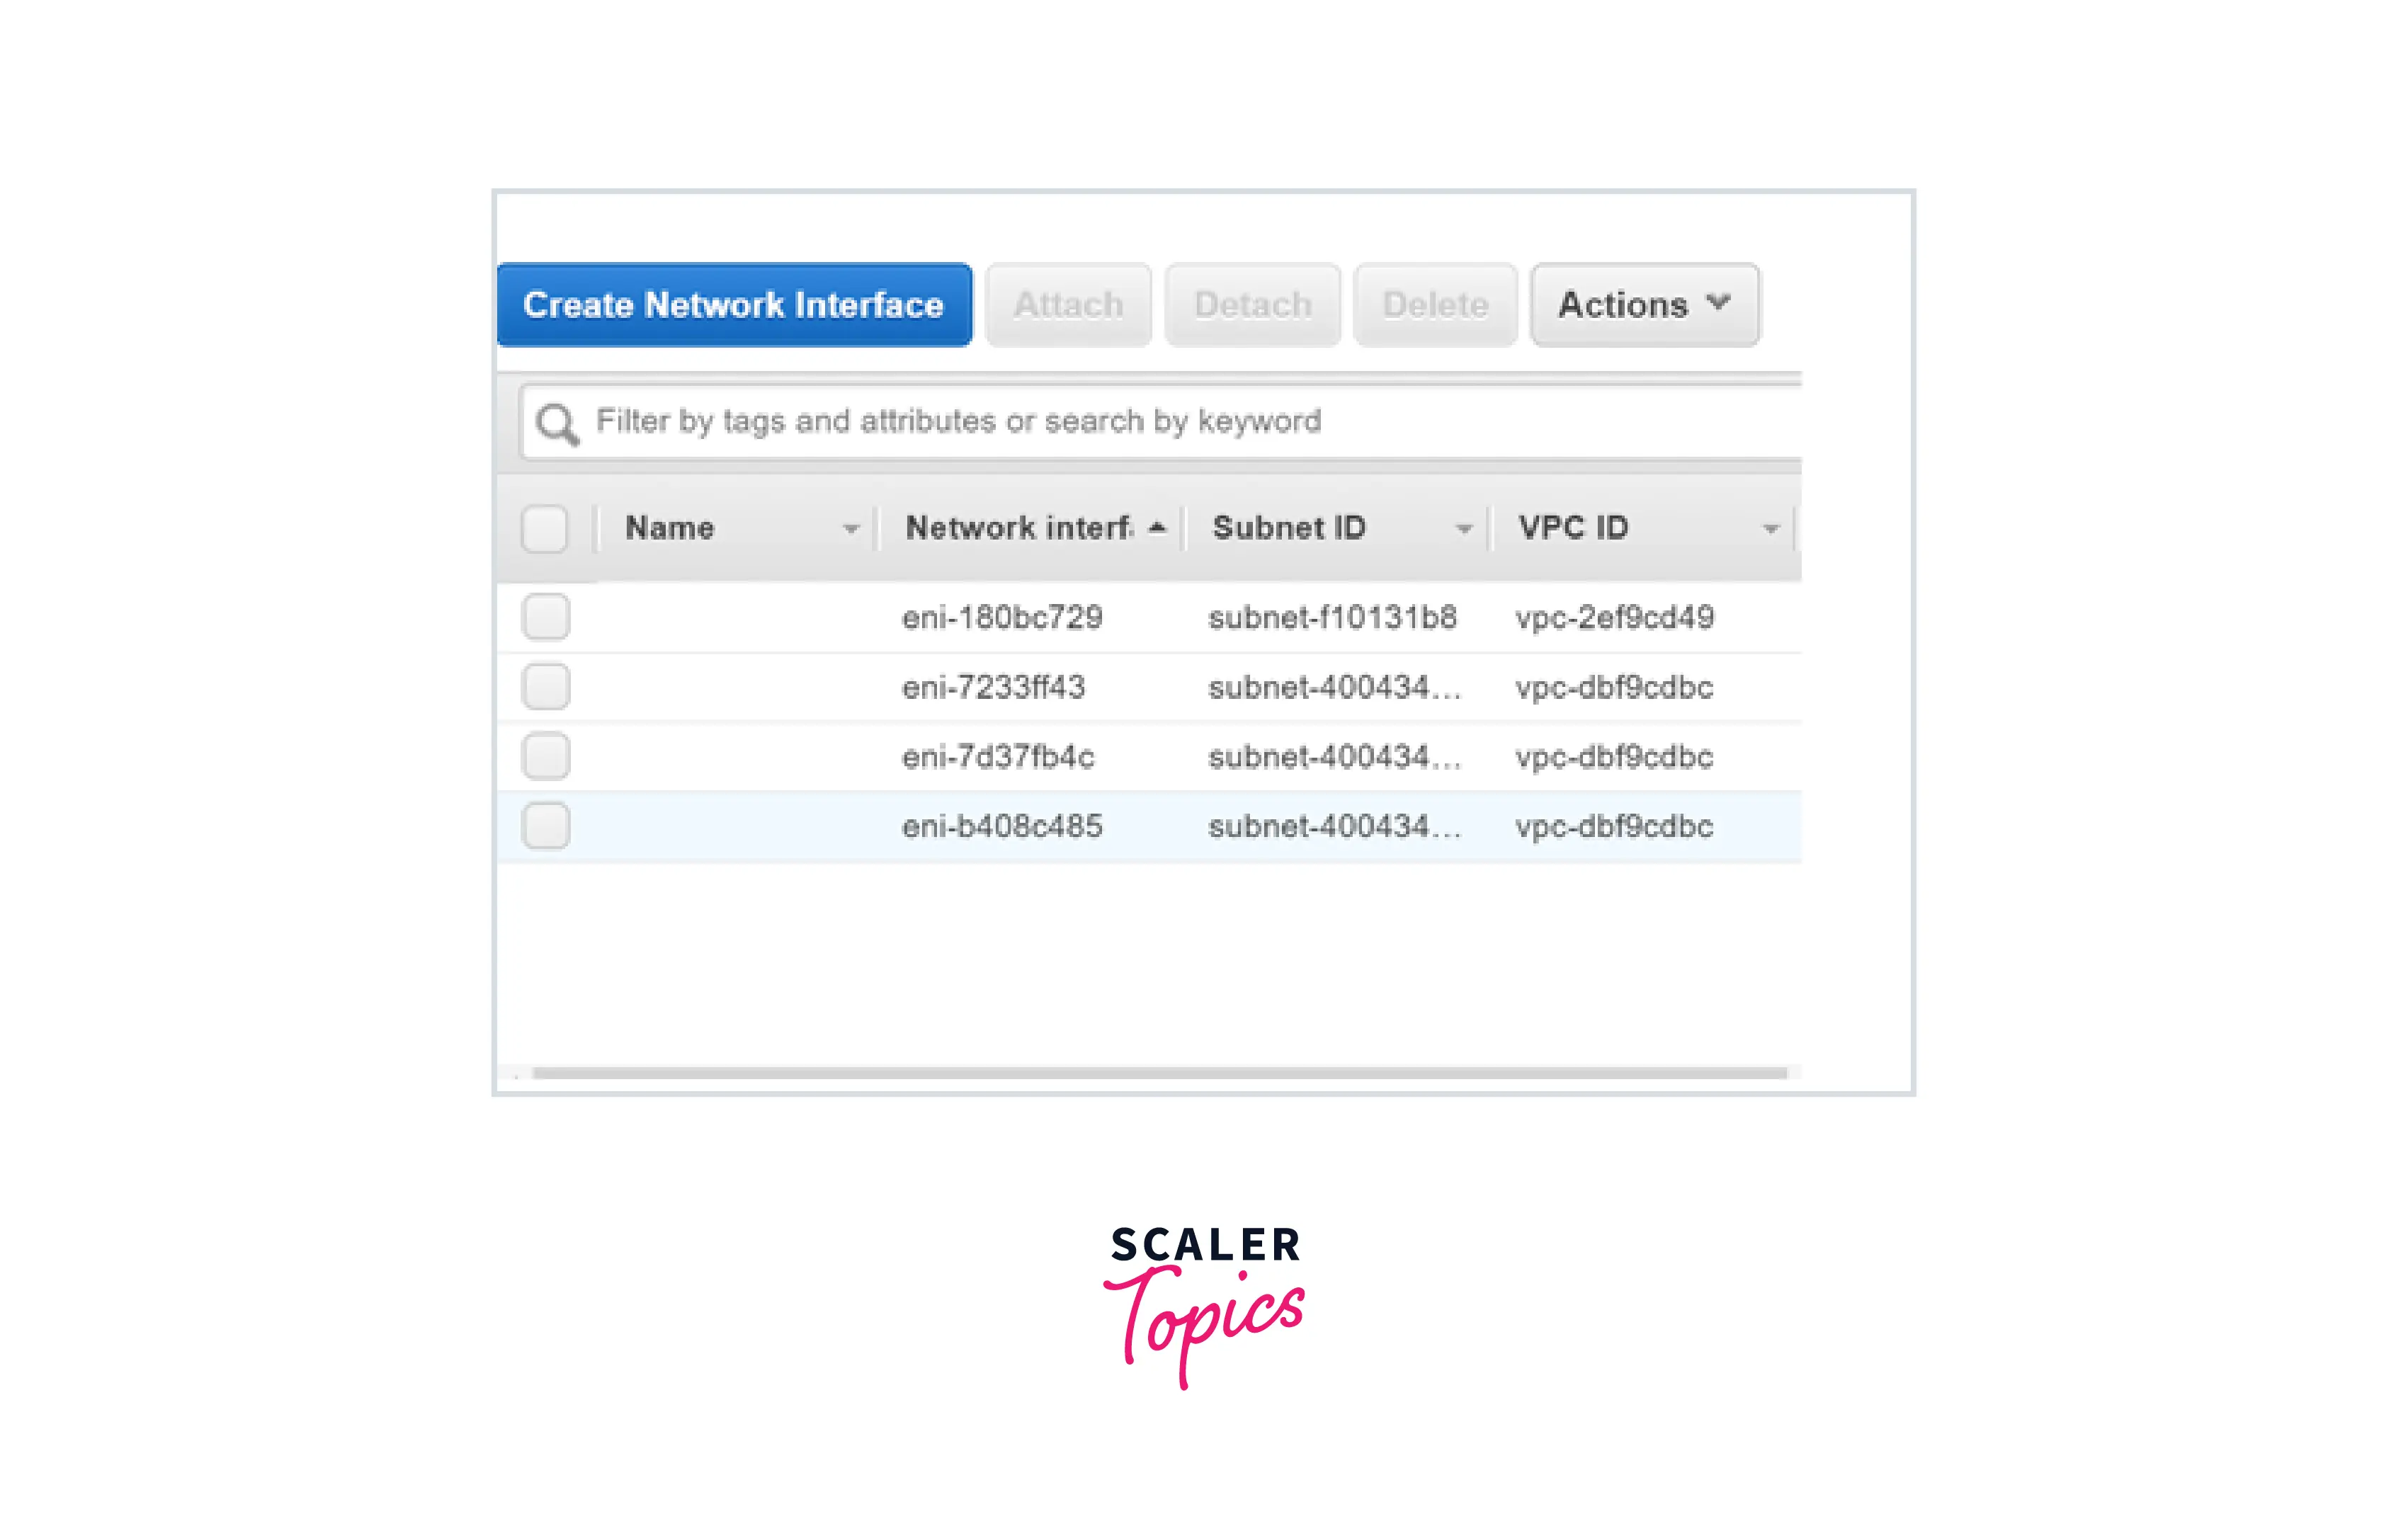
Give an overview of the new network interface. Create it in Subnet A, where the primary server is located. Connect the Primary Server's Security Group to the Elastic Network Interface.
Then create the interface.
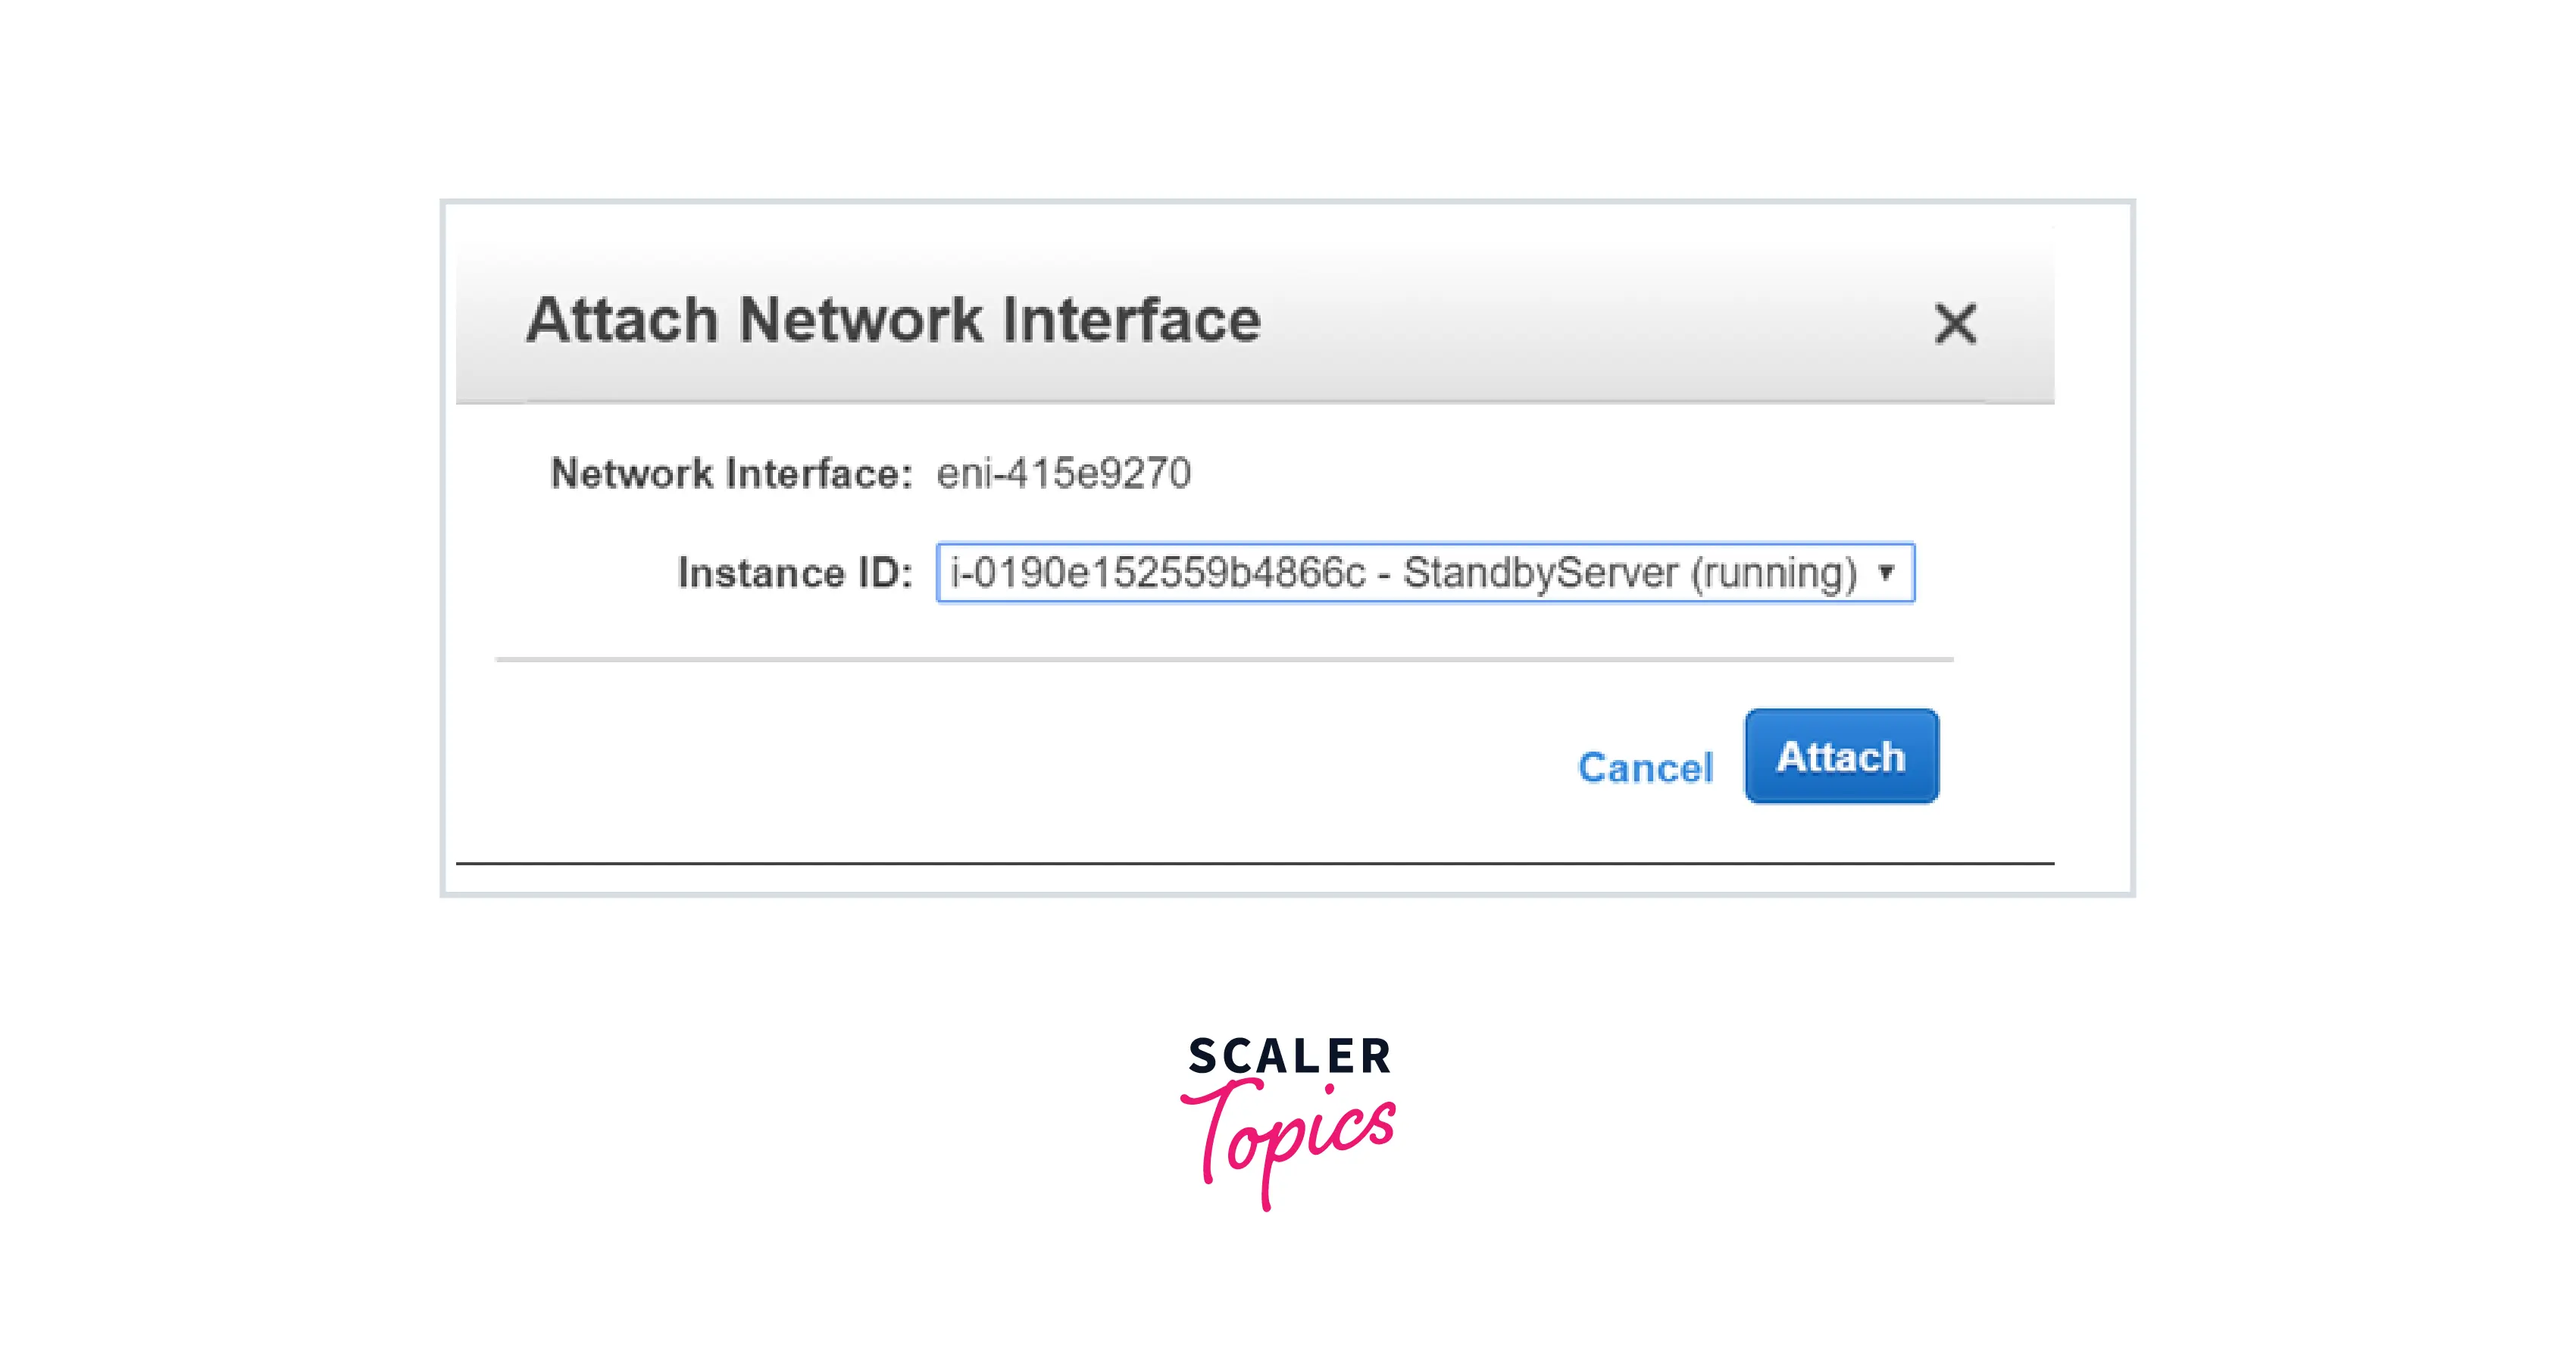
Once the interface has been created, click on the interface and select Attach.
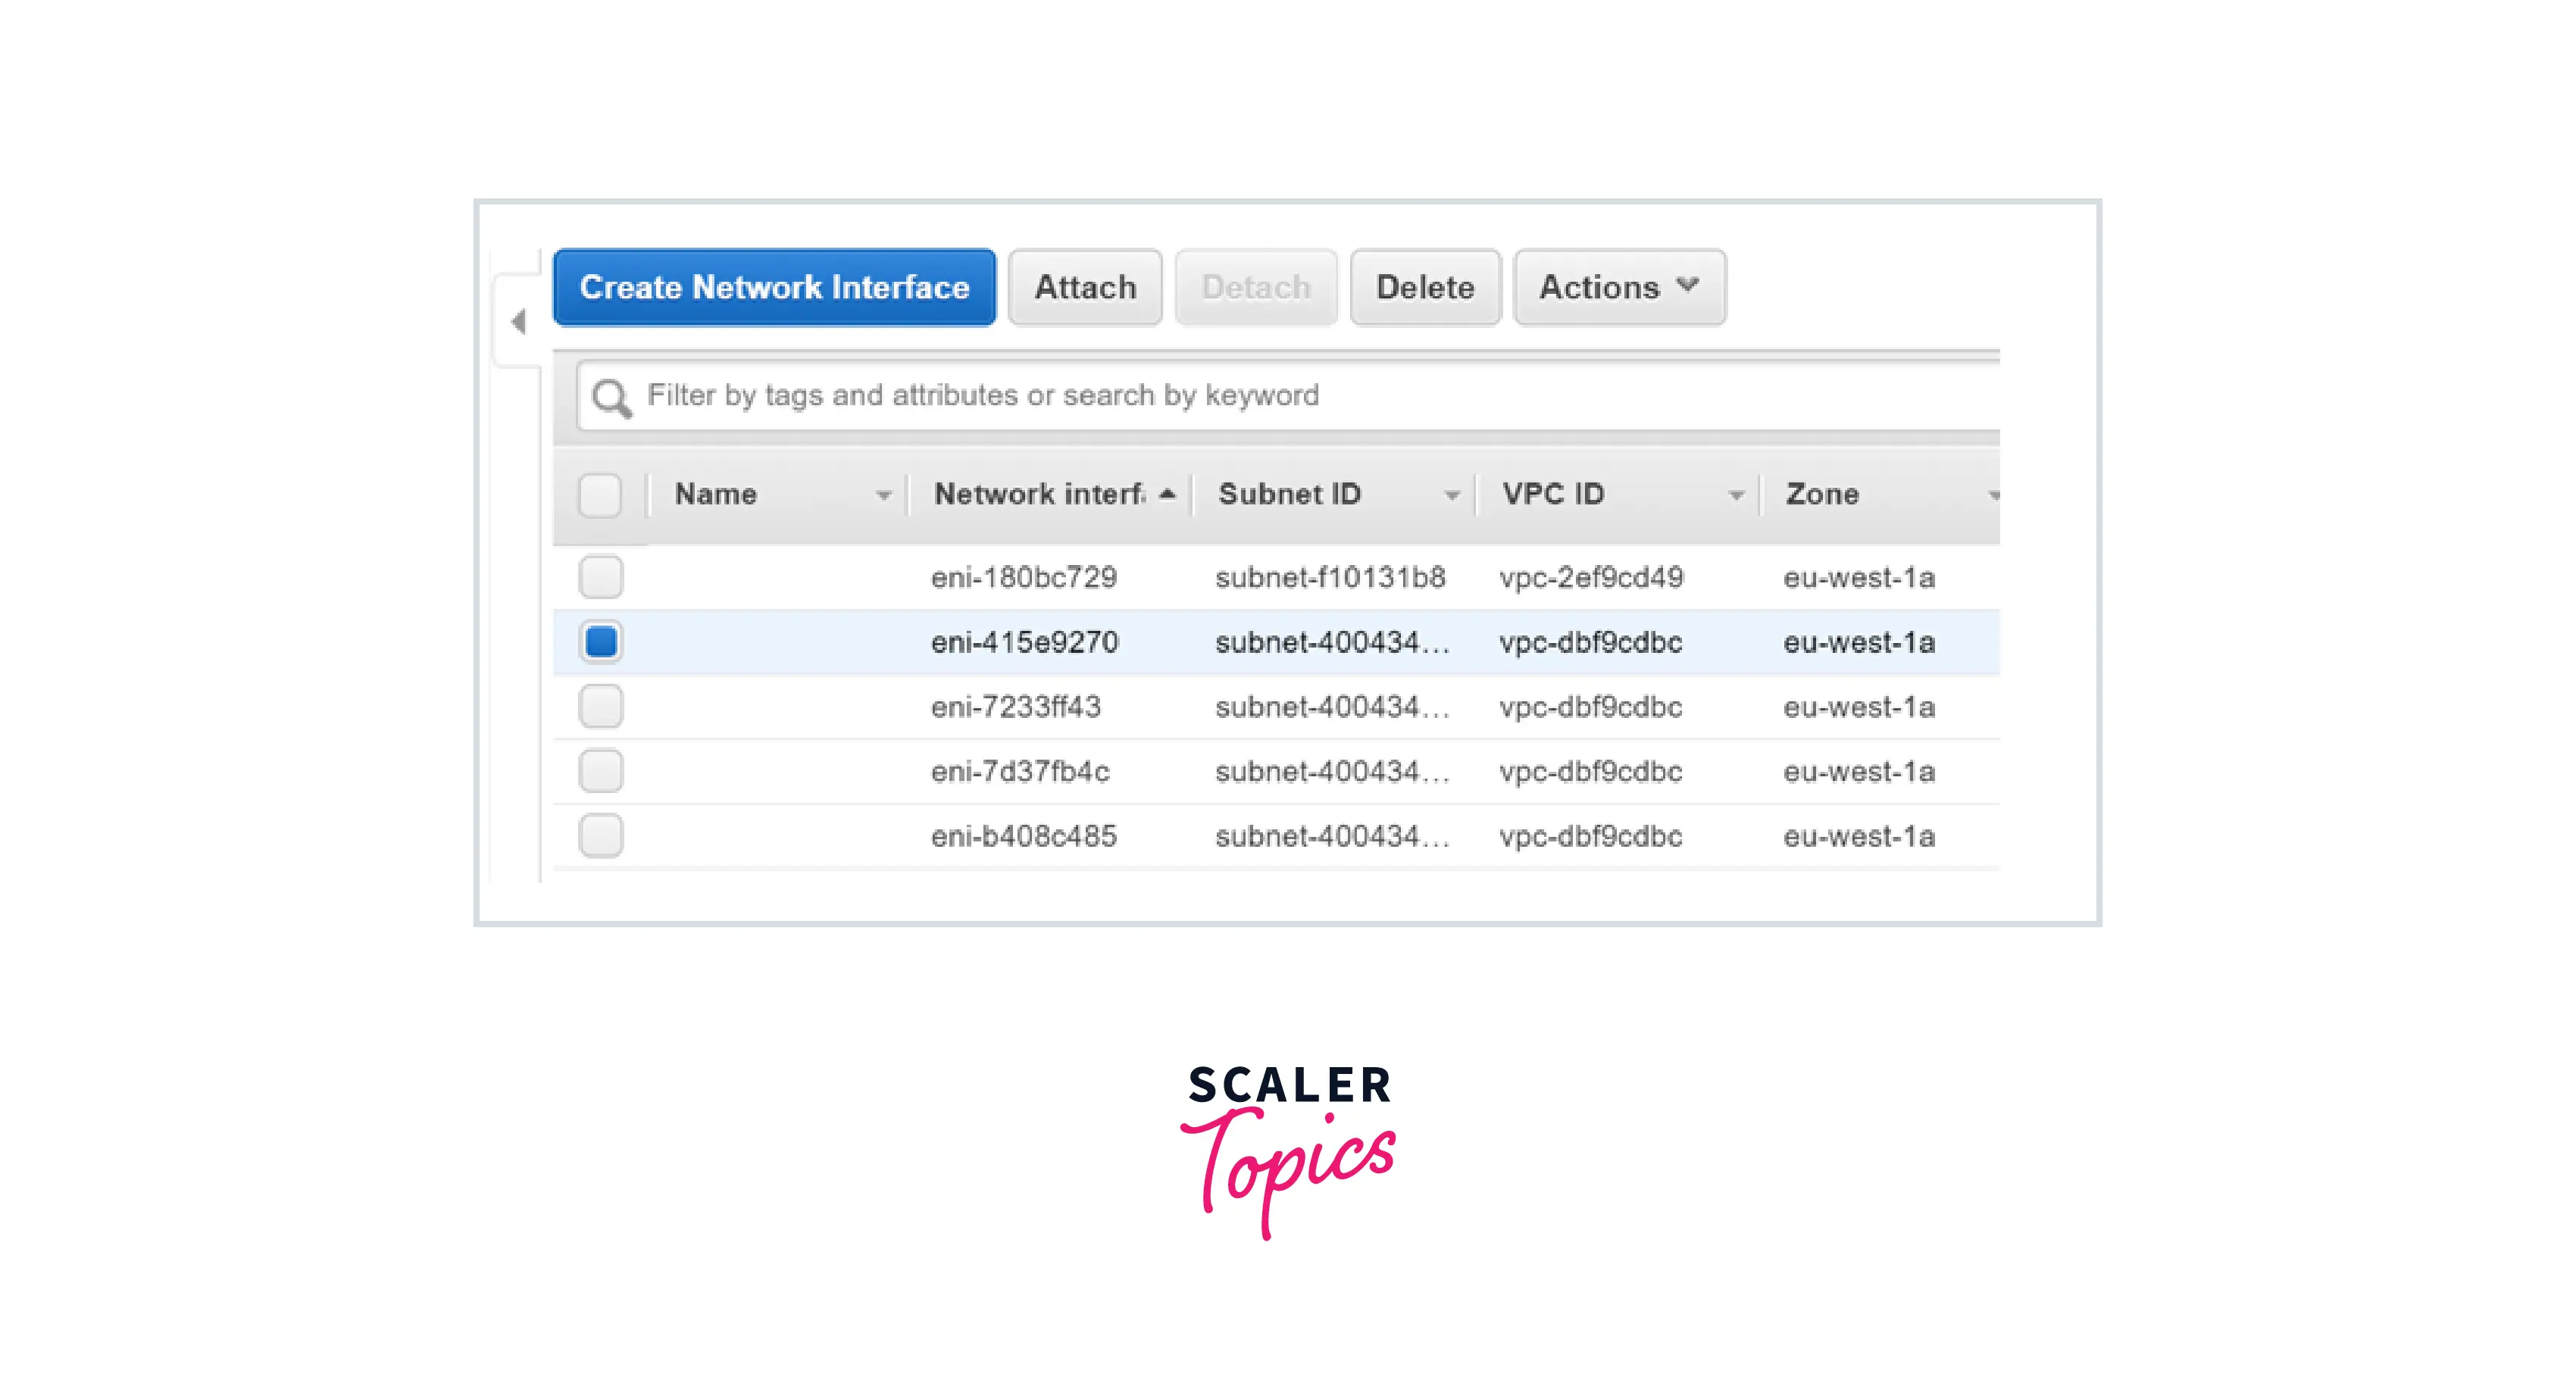
Attach it to the Primary Server.
Once the network interface is connected, the Instance settings will reflect this.
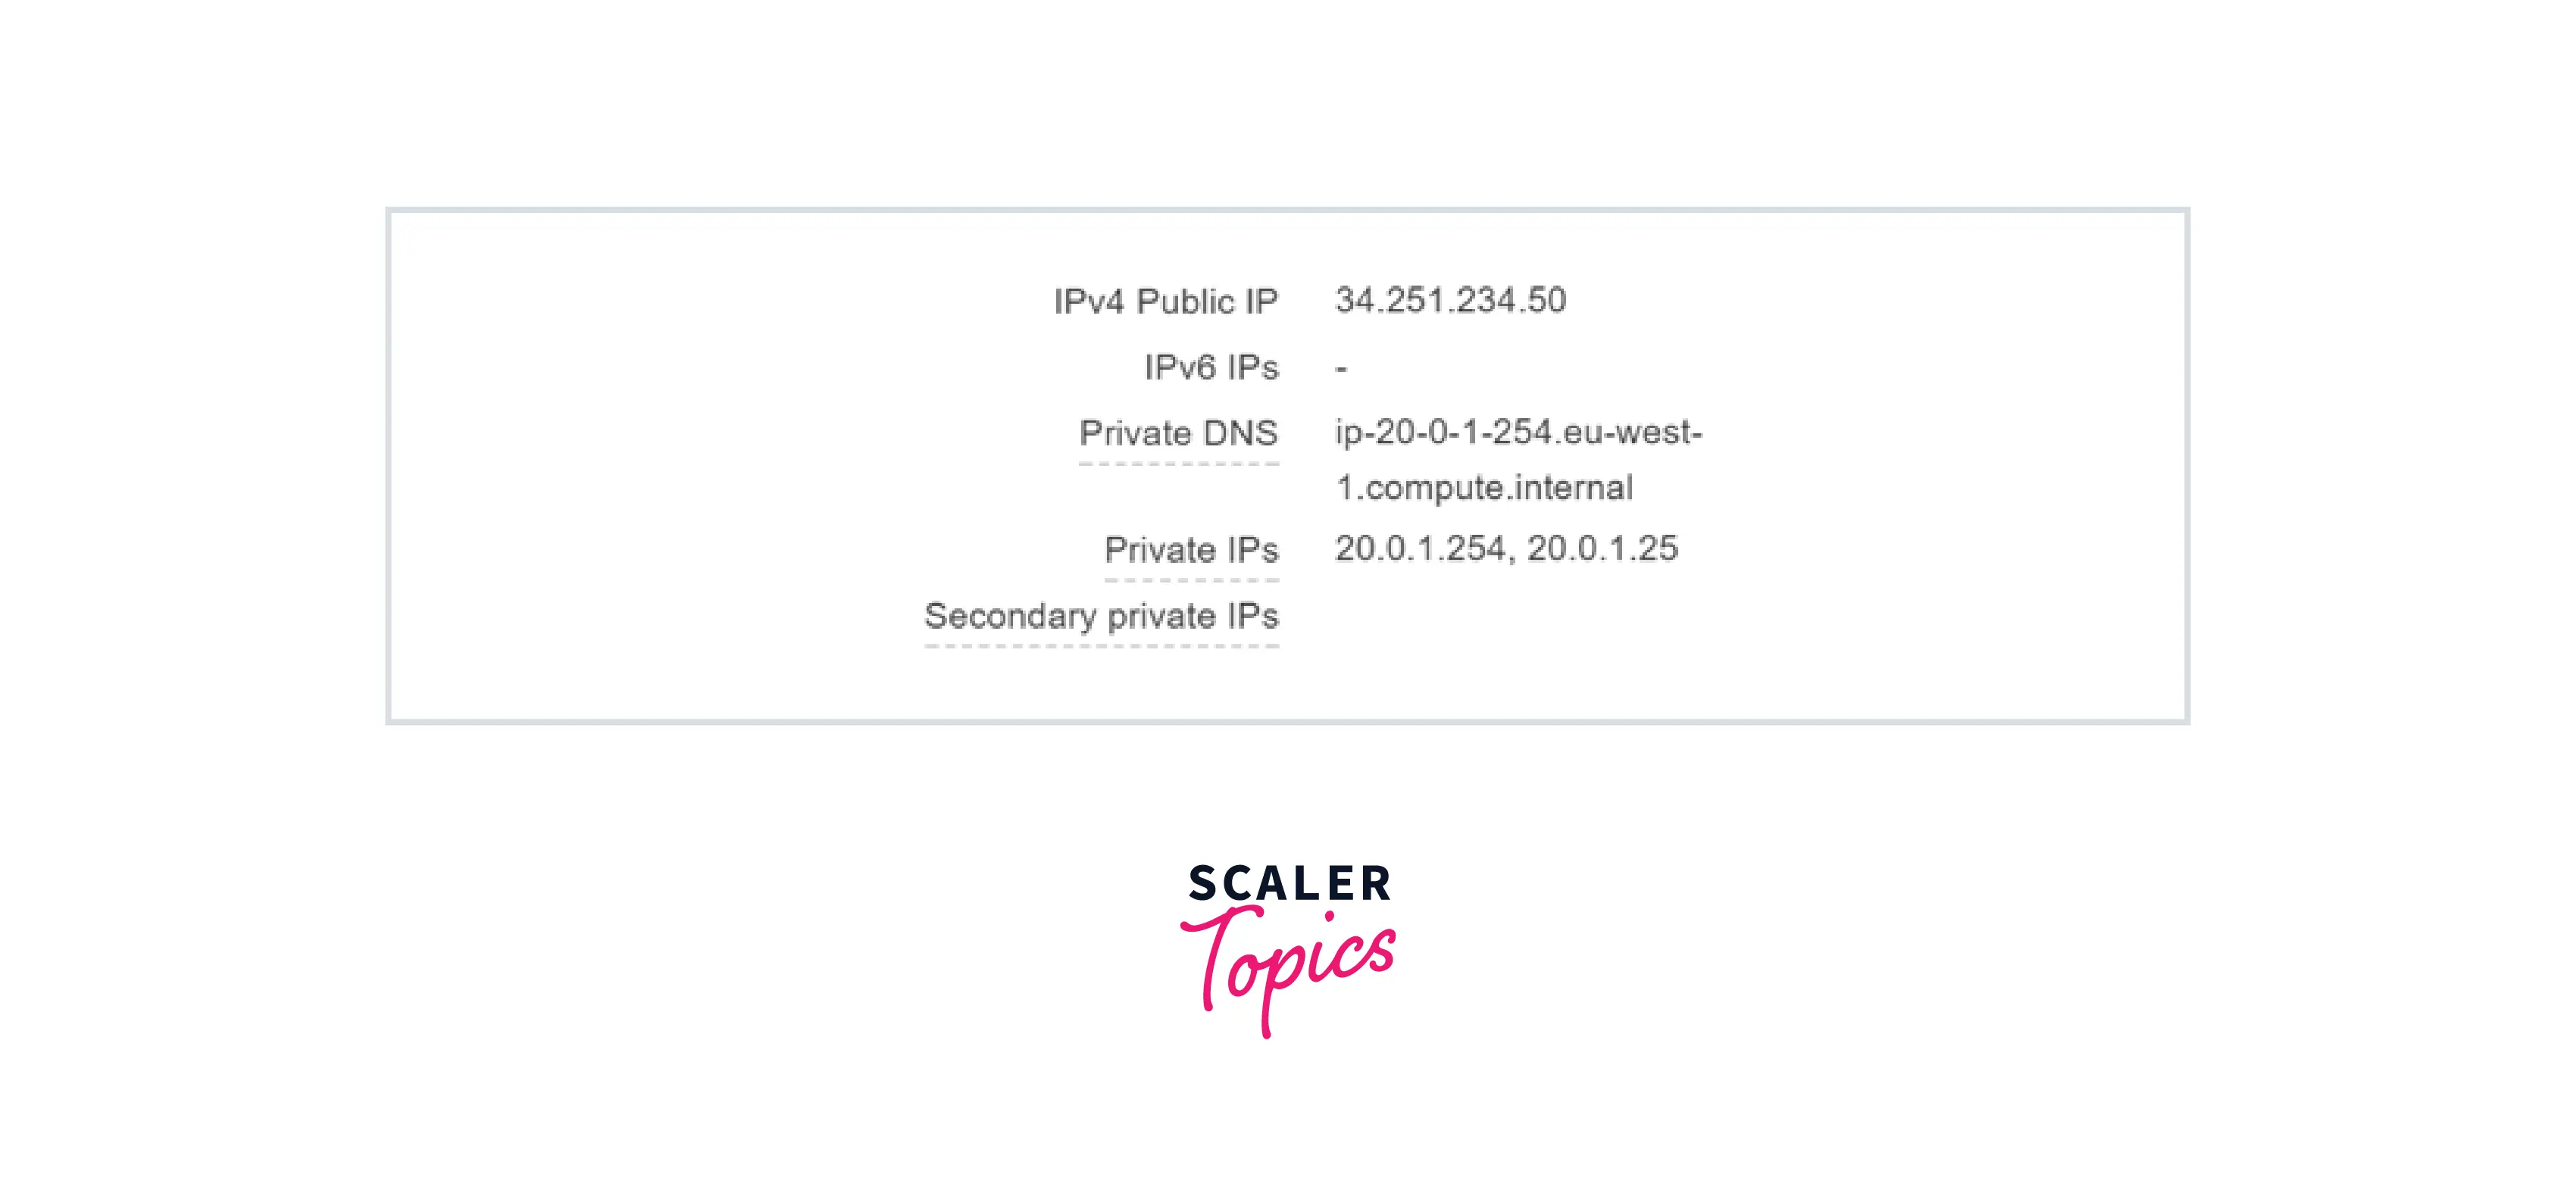
You will now notice two Private IP addresses on the EC2 dashboard for the Primary Server.
If you choose another Linux instance, such as Ubuntu, you must configure the secondary network interface manually.
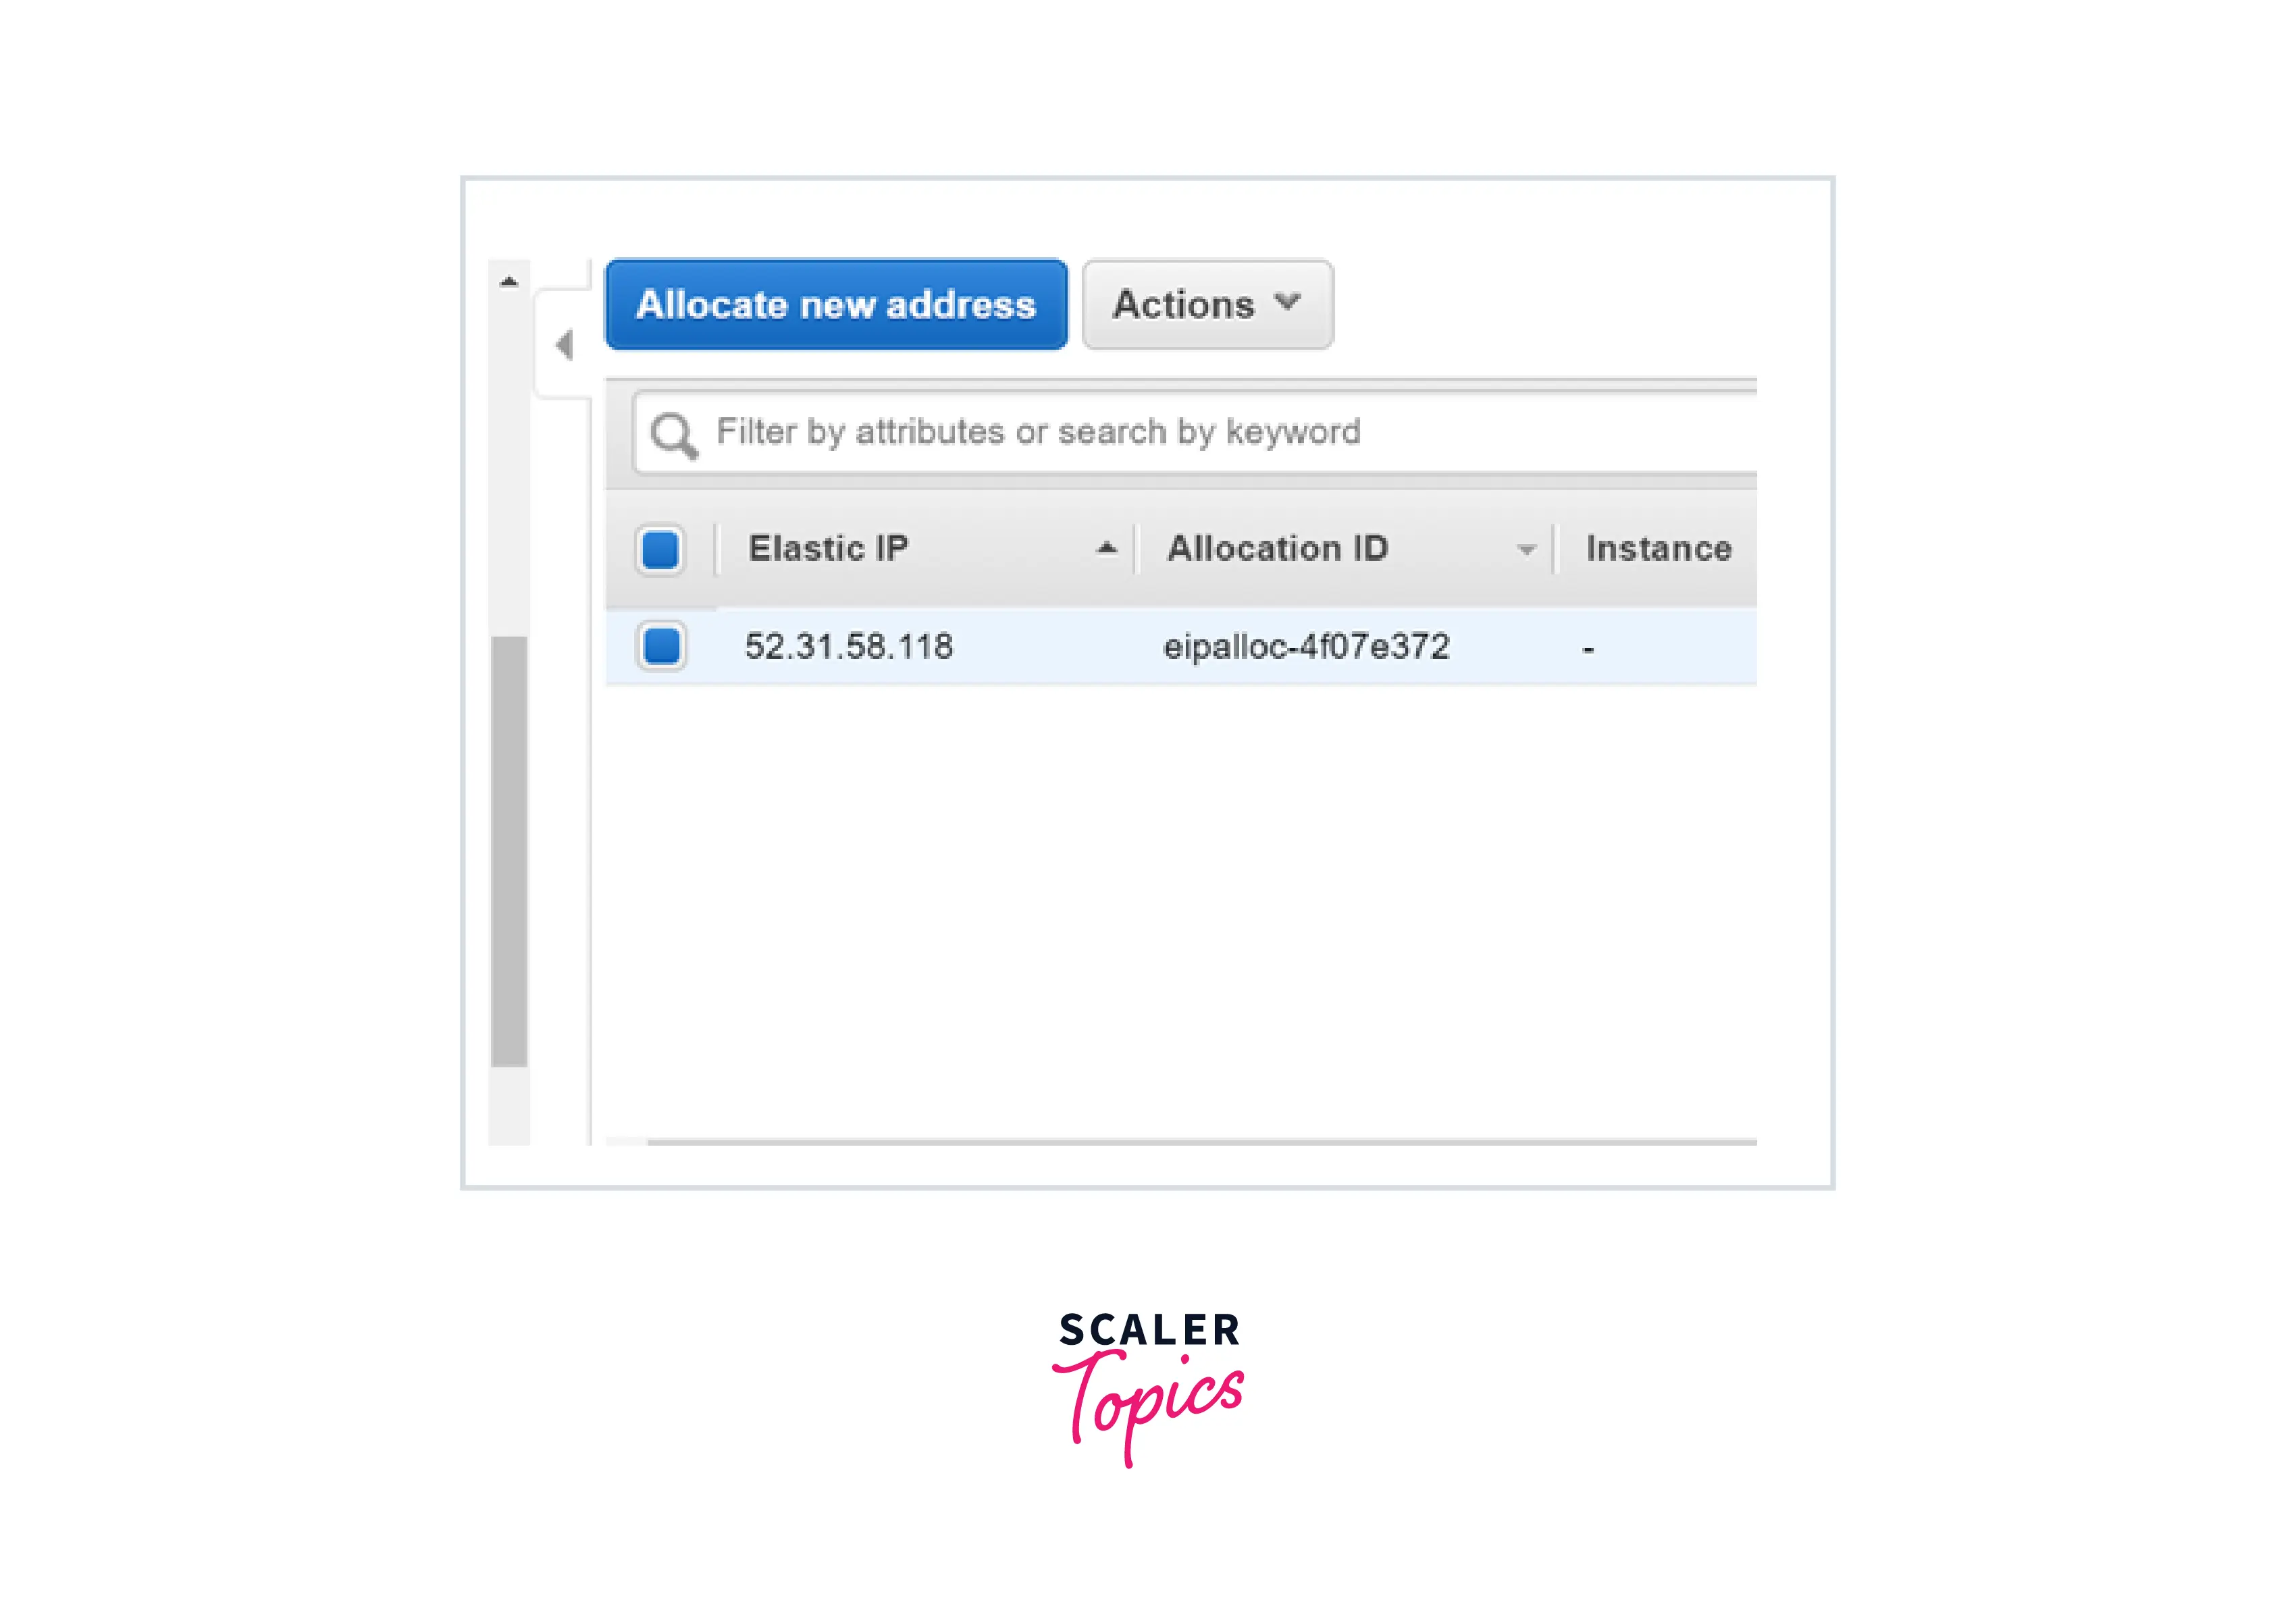
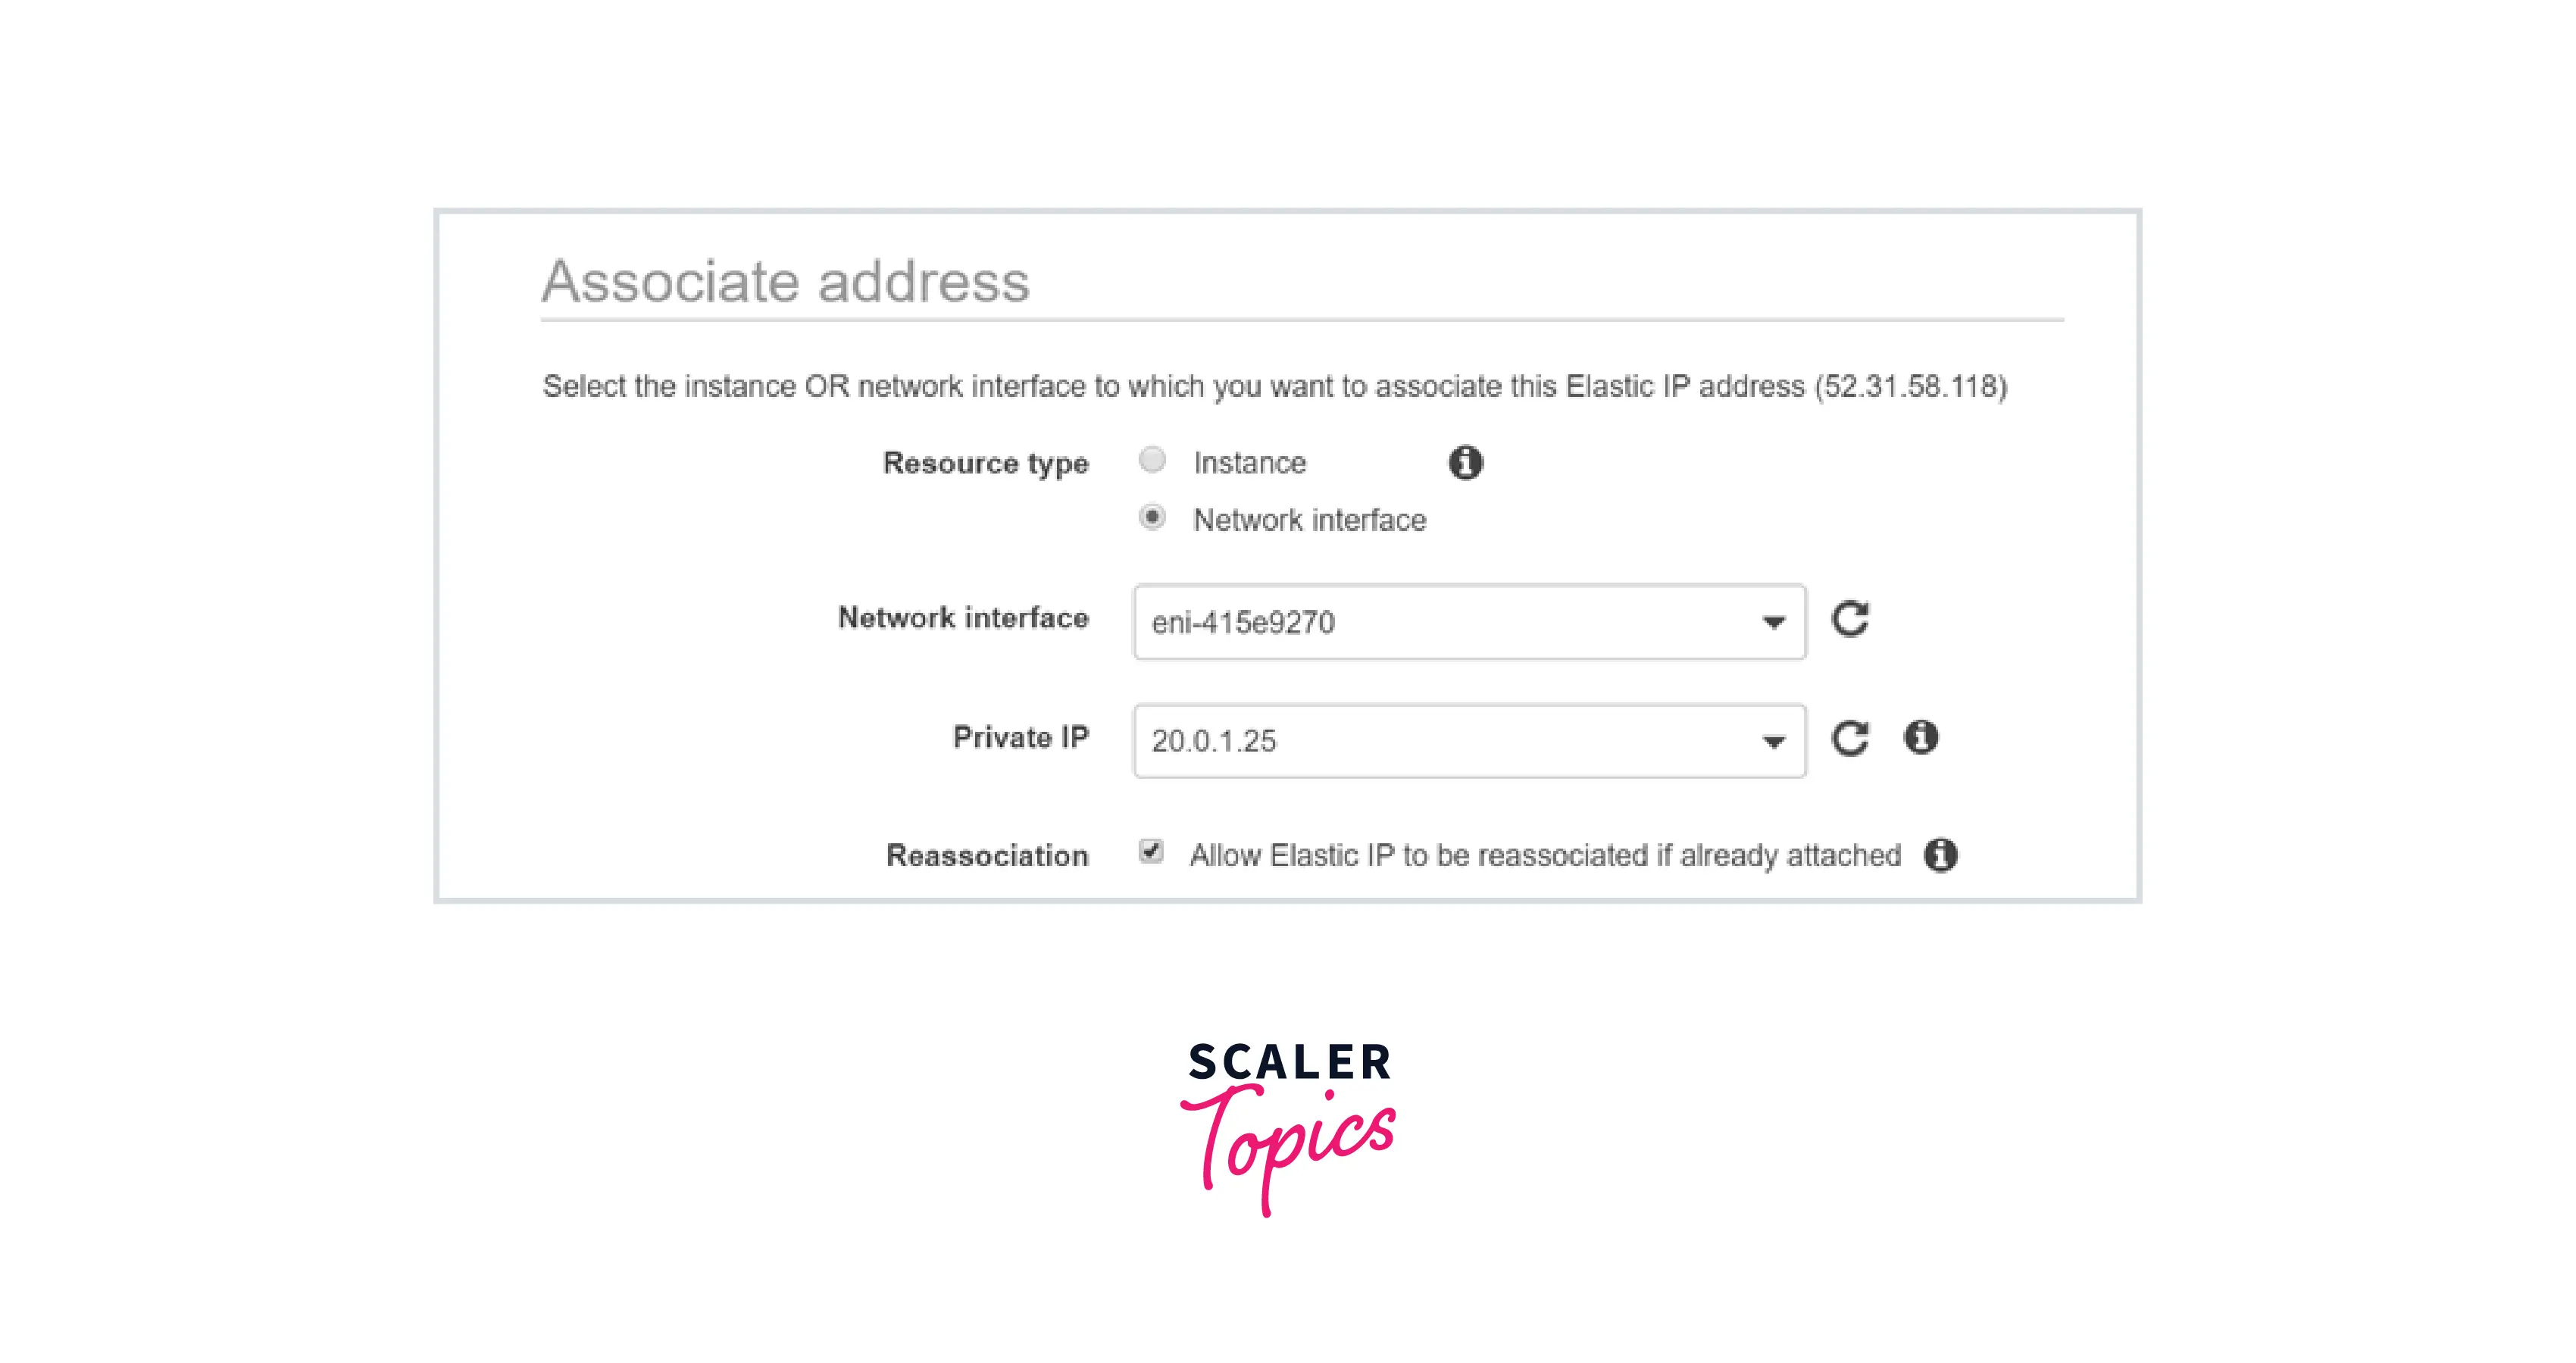
Step 4) Attach an Elastic IP to the *Secondary ENI *that we previously associated with the primary instance.
Navigate to the Elastic IP subsection. If no Elastic IP address is present, create one.
Let us now connect it to the Secondary Private IP address on the primary server.
Step 5) To verify that the web server is running on the Elastic IP of the primary server, ensure that the Secondary private IP is provided in the Web server configuration file. The setting is in the /etc/nginx/nginx.conf file for Nginx. Stop the Nginx server first, then replace the Private IP and port number with the ones listed below.
Then restart the Nginx server to ensure it is up and operating on the Elastic IP.
Step 6) To establish a proper failover, we must do the following.
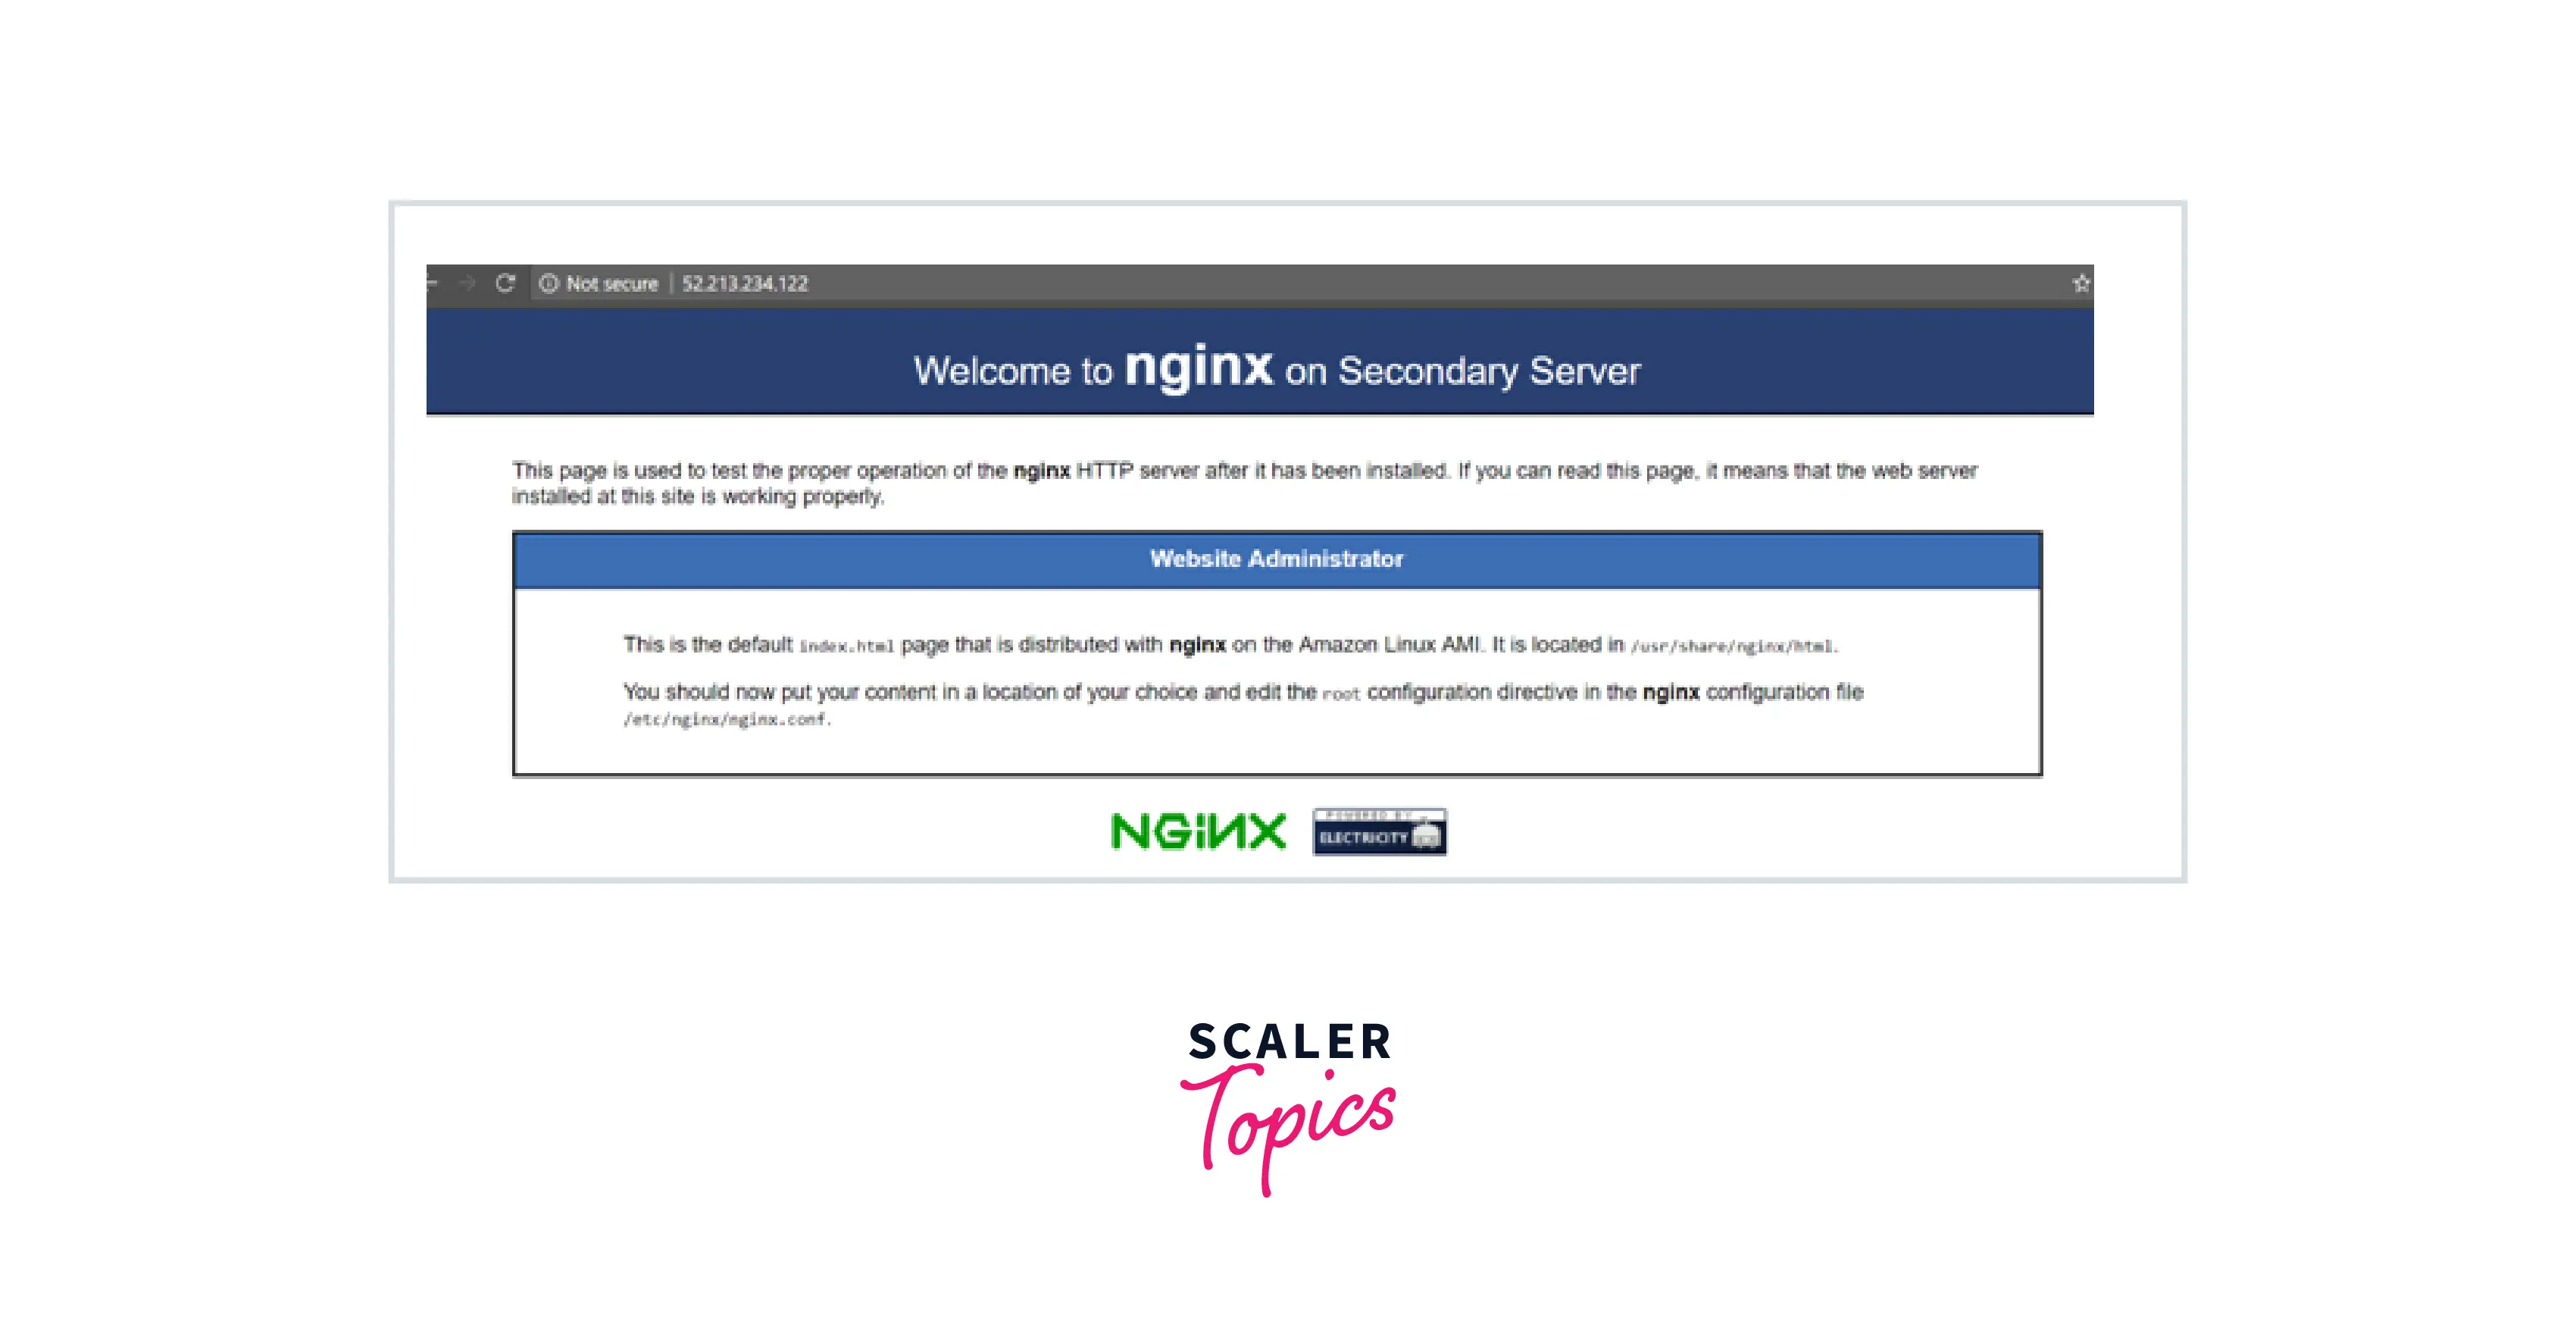
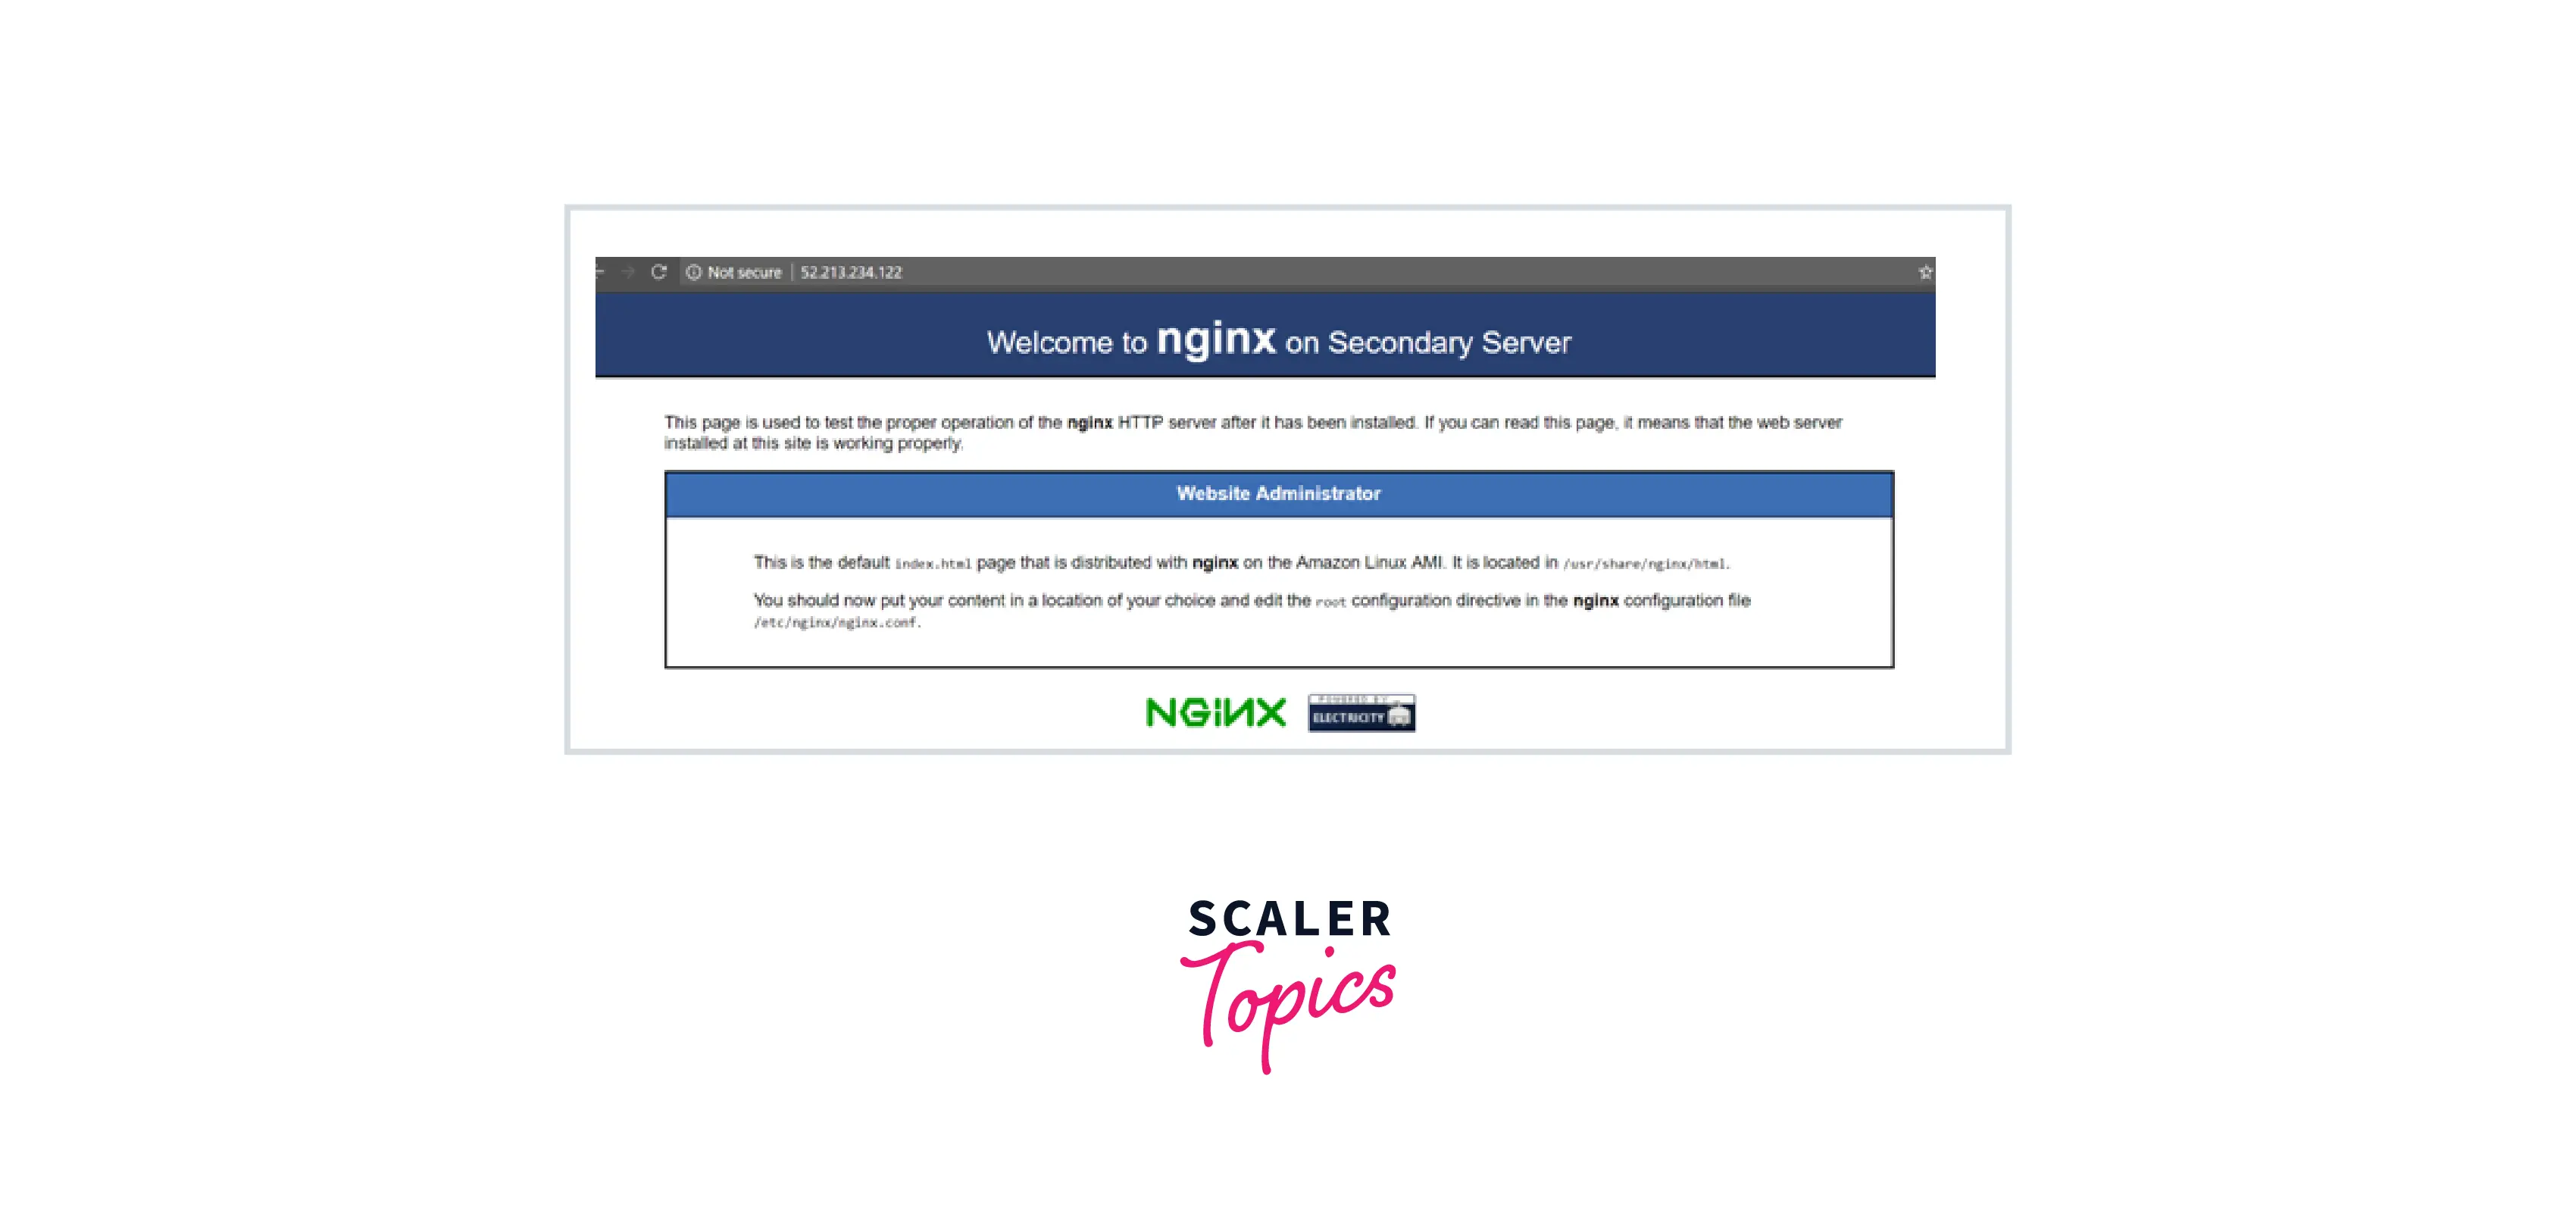
Install Nginx on the Secondary Server.
Now we will edit the Nginx home page in order to understand that when we navigate to this server, it reflects the page on this server.
We must change the index.html file in the /usr/share/nginx/HTML folder. So, if you go to the web server's home page on the Secondary Server, it will look like this:
Step 7) Switch the Secondary ENI from the primary to the backup server.
Detach the Secondary Network Interface first.
Attach it to the Standby Server once it has been disconnected.
When you navigate to the Elastic IP, you will now be sent to the Standby Server's home page.
Conclusion
-
ENIs are virtual network cards that attach to EC2 instances in VPC.
-
Primary ENI by default can't be detached but secondary ENI are detachable.
-
More than one ENI can be attached with single EC2 instance which helps in network management.
-
Multiple secondary private IP addresses can be assigned to an ENI.
-
ENI helps in the implementation of cheap failover.
-
Switching the ENI to the standby instance is simple, and automating the failover procedure is far more difficult. Hence ENI supports low cost and high availability.