Route Tables
Overview
For allowing access or redirecting traffic, incoming or outgoing, from our AWS resources, we can define some rules using Route tables. Route tables can be associated with VPC, Subnets, Gateways, etc. The route table contains routes that comprise of target and destination. The target can be the connection through which the traffic will cross. The destination is the IP address or range of IP addresses to which the network traffic can be redirected.
Route Table Concepts
Introduction
Before understanding the common concepts associated with route tables, let's first understand: What is Route Table?.
Route tables are a set of rules which help in deciding where the network traffic should be redirected. It decides the direction for network packets coming to a network server and the network packets going out from a network server. In other words, the routing table takes care of incoming and outgoing traffic.
Route tables define the destination address, which can be a single IP address or a range of IP addresses. VPC, subnets, etc., are crucial in route table formation.
Working
Let's understand the working of route tables with an example.
Suppose a college organizes a fest to which a renowned celebrity is invited. For the college organization, it becomes a priority to ensure the celebrity's security. To ensure security, the college administration takes the help of security guards. The administrative unit of the college gives instructions to the security guards to check for college ID cards and allow them in the auditorium if they have ID proof.
- Similarly, we have route tables. Suppose we deploy a VPC and create one or more subnets within the VPC on AWS.
- Within the subnets, we deploy our application code server in the public subnet and database server in the private subnet.
- This means we want to have different rules for each subnet. Here we can create different routing tables which decide the destination for the incoming traffic.
Let's take an example of route table rules with destination 0.0.0.0/0 and target igw-12345678901234567. Here the rule stands for the fact that the traffic traveling through the internet gateway, which is the target, can be forwarded to any destination address (as the destination address has 0.0.0.0/0).
Concepts Associated with Route Tables
Let's understand some concepts related to route tables before getting to what a routing table is.
- Main Route Table:
This is the routing table associated with the VPC by default. All the subnets and AWS services follow it within the given VPC by default. - Custom Route Table:
This is the customized routing table created for a particular VPC or VPCs by the user. - Subnet Route Table:
This is the routing table created for a given subnet. - Gateway Route Table:
This is the routing table created for a given gateway (either internet gateway or Virtual private gateway). - Local Gateway Route Table:
This is the routing table associated with the local gateway (Outposts local gateway). - Transit Gateway Route Table:
This is the routing table created for a given transit gateway. - Route Table Association:
Route table association is the association established between a Route table and a gateway, VPC, or subnet. - Edge Association:
Edge Association is the association/route established for routing incoming VPC traffic to an AWS resource within the VPC. - Destination:
Destination is the IP address or range of IP addresses where you want the network packets to reach. - Target:
Target is the connection through which the network packets need to cross to reach the destination. The target can be a gateway, network interface, etc. - Local Route:
In the VPC, we have a default route for sending traffic. This default route associated with the VPC is called the local route. - Propagation:
Using propagation, traffic is automatically routed through the virtual private gateway. No manual intervention is required.
Subnet Route Tables
- Subnet route tables help decide traffic rules from a subnet to the internet.
- This routing can usually take place across an Internet gateway.
- In this case, usually, the target is the internet gateway, and the destination can be any address over the internet.
- If we do not have a customized route table for the subnet, then the subnet gets associated with the main table by default.
Example of a route for Subnet Route tables:
| Destination | Target |
|---|---|
| 0.0.0.0/0 | igw-id |
Here igw-id stands for internet gateway ID. This article will cover the steps for associating a Route Table to the subnet.
Gateway Route Tables
- Gateways are of various types, primarily internet and virtual private.
- When a routing table is associated with a gateway, it is referred to as a gateway route table.
- They are used for determining the direction of the traffic entering a Virtual Private Cloud to which the gateway is attached.
- It ensures increased security of the resources contained within the VPC.
- For gateway route tables, the target is the gateway (for example, internet gateway, virtual private gateways, etc.), and the destination is the range of IP addresses to which the VPC can be connected.
Example of a route for Gateway Route tables:
| Destination | Target |
|---|---|
| 172.31.0.0/16 | eni-id |
| 172.31.0.0/20 | eni-id |
| 172.29.0.0/16 | eni-id |
Here eni-id stands for gateway ID.
Route Priority
Traffic is routed based on the most specific route to which it matches. This method is also known as the longest prefix match. In case it shows closeness to more than one route or some overlapping is seen, we have some additional rules applied to determine the traffic route.
- If we have one propagated route and another static route overlapping, then the static rule is prioritized. Here, the traffic gets routed based on the static route.
- If overlapping occurs between a propagated and static route, and the destination of both routes are same, then priority is decided based on the target of the routes. If the static route contains any gateways or connections or endpoints as targets, then the static route gets prioritized.
Route Table Quotas
There are some limitations to the number of route tables or routes that can be associated. These limits are referred to as quotas. Let's discuss in brief the quotas associated with route tables in AWS.
- By default, we can create only 200 route tables per VPC. This limit is adjustable. The main route table is included in this limit.
- For non-propagated routes, we can have 50 routes per route table by default. This limit is also flexible and can be changed based on need.
- We can have 100 routes per route table by default for propagated routes. This limit cannot be changed as per need.
Example Routing Options
We can associate the routing table with the following gateways or connections.
Internet Gateway
- For public subnet, an Internet gateway connects the subnet with the internet.
- We can associate the routing table with the Internet Gateway. In this case, the route will contain the target as the Internet Gateway, and the destination can be any IP over the internet, so 0.0.0.0/0.
NAT Device
- If we want to connect a private subnet to the internet, we make use of a NAT gateway or can create a NAT instance in the private subnet.
- Here, we can define the rules for the traffic going through the NAT gateway or NAT device using route tables.
- In this case, the target is the NAT Gateway/Device, and the destination is any IP on the internet.
Virtual Private Gateway
- Virtual Private Gateways establish a connection between the private network and the VPC.
- We can set rules for traffic going through the virtual private gateway using route tables.
- In this case, the target is the virtual private gateway, and the destination is the range of IP addresses for the private network.
VPC Peering Connection
- VPC Peering Connection is used for establishing a connection between two different VPCs.
- We can set rules for traffic going through the VPC Peering Connection using route tables.
- In this case, we need to update the routing table for both VPCs.
Gateway VPC Endpoint
- Gateway VPC Endpoint establishes a connection between a private VPC and an AWS service/resource.
- We can set rules for traffic going through the Gateway VPC Endpoint using route tables.
Transit Gateway
- Transit Gateway establishes a connection between the VPC and subnets. It can also route traffic across multiple VPCs attached to the same transit gateway.
- We can set rules for traffic moving across the transit gateway using route tables.
Gateway Load Balancer Endpoint
- Gateway Load Balancer Endpoint is used for distributing traffic across virtual appliance fleets, for example, firewalls.
- We can set rules for directing the traffic moving across Gateway Load Balancer Endpoint.
Work With Route Tables
This section will teach us how to work with route tables with hands-on experience.
Create a Custom Route Table
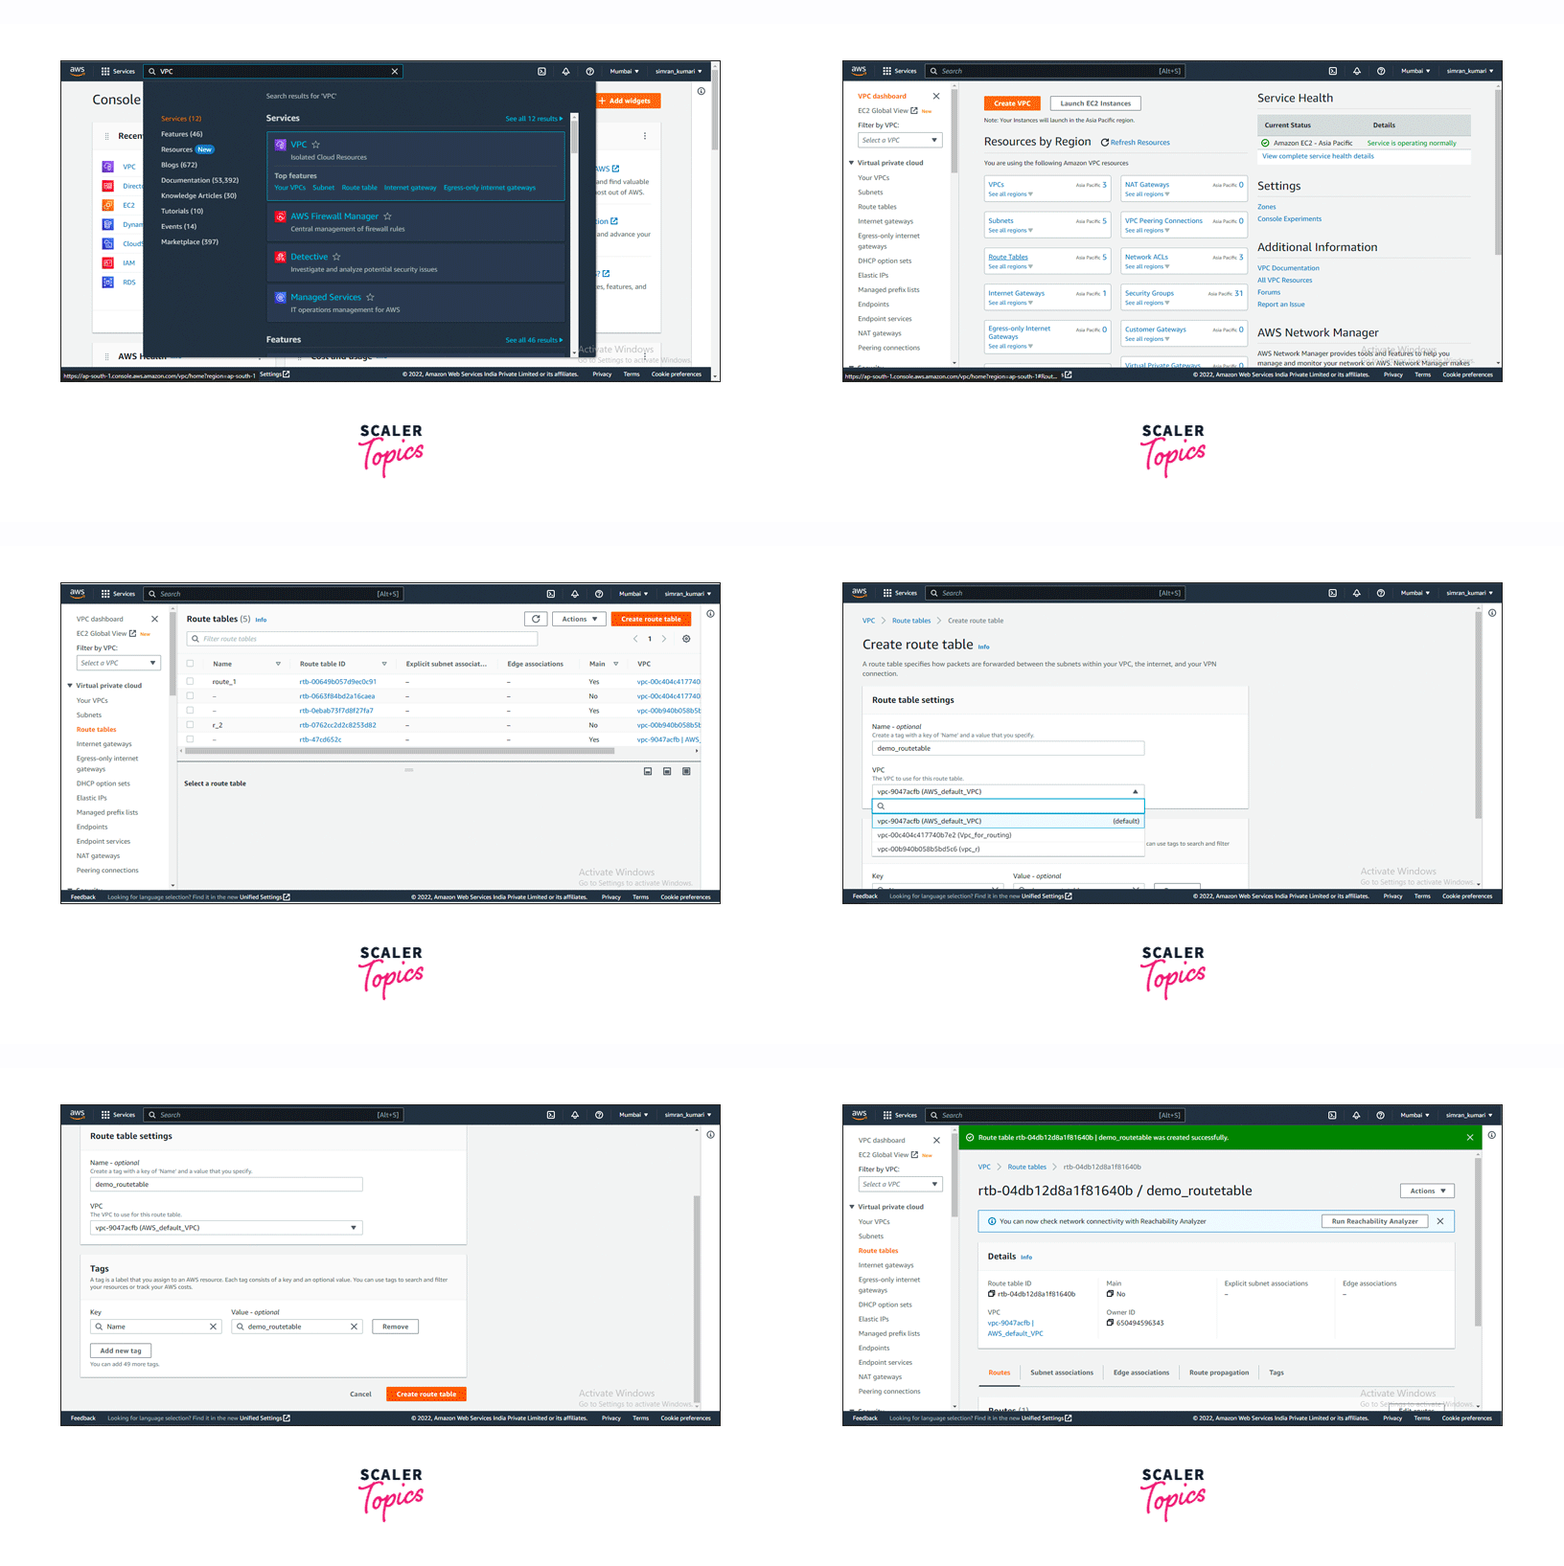
First, we will start by creating a custom route table. Follow the given steps to create a new custom route table.
- Login to the AWS console and search VPC in the search bar. Click on VPC.
- On the next page, Click on Route Tables.
- Click on Create route table.
- Fill in the details required for creating a routing table. Enter the name for the Route table and choose a VPC.
- Scroll down to fill in all the details needed and click on Create route table.
- The Route table is successfully created.
Add Routes to a Route Table
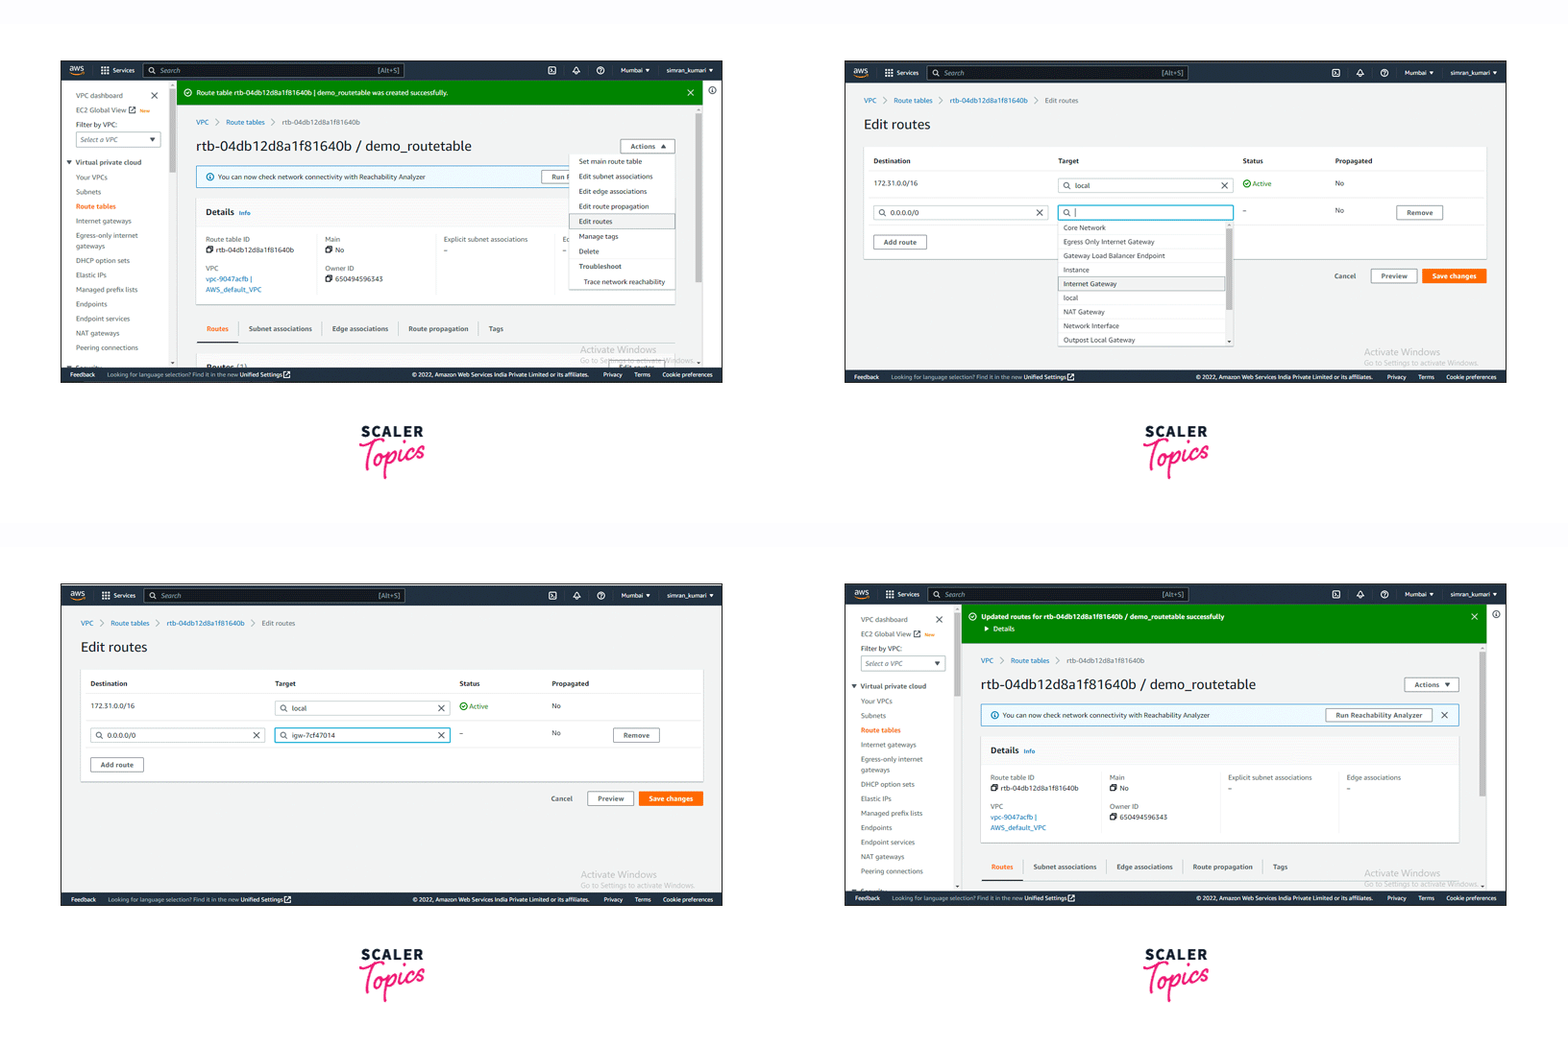
Once we have created the routing tables, we need to add routes to them. Follow the given steps to create and add routes to the routing table.
- To add a route to the Route Tables, Click on the Actions button and then click on Edit routes.
- Edit routes page opens. Click on Add Route. Fill in the Destination CIDR block or single IP address and choose a target.
- After choosing the target, click on Save Changes.
- We successfully added a route to the Route table.
Remove Routes from a Route Table
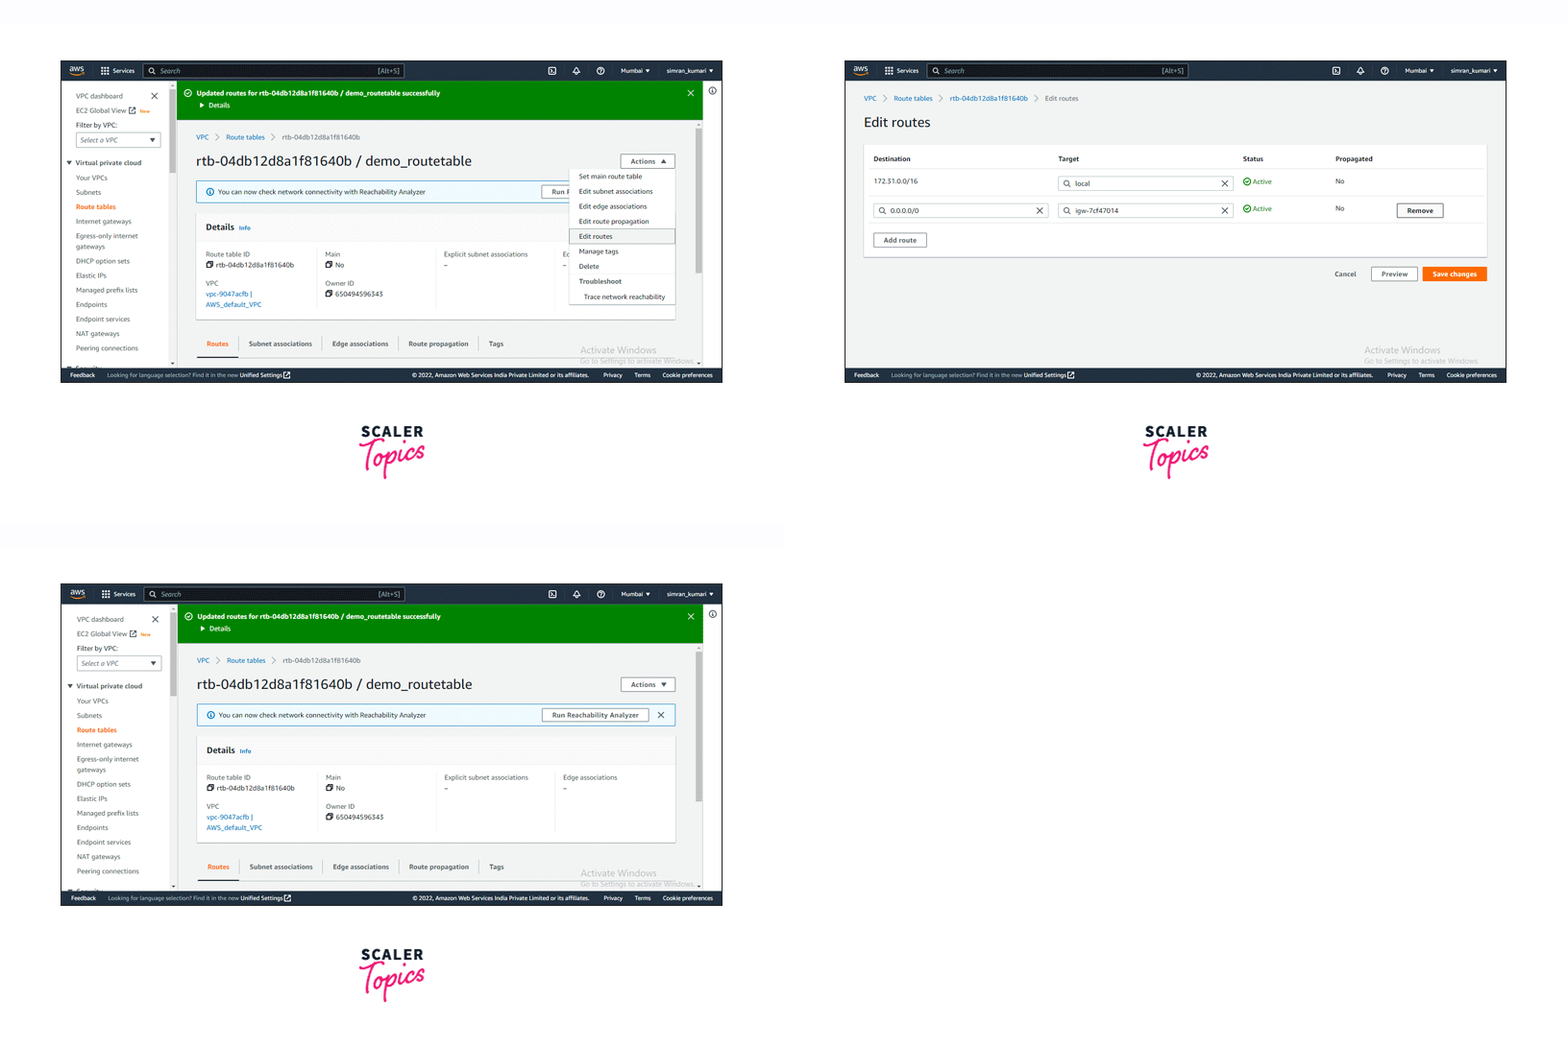
Having added routes, let us also learn about removing routes.
- To remove a route from the Route table, Click on the Actions button and then click on Edit routes.
- On the Edit routes page, Click on Remove for the route we want to remove. Click on Save changes.
- We successfully removed a route from the Route table.
Associate a Subnet with a Route Table
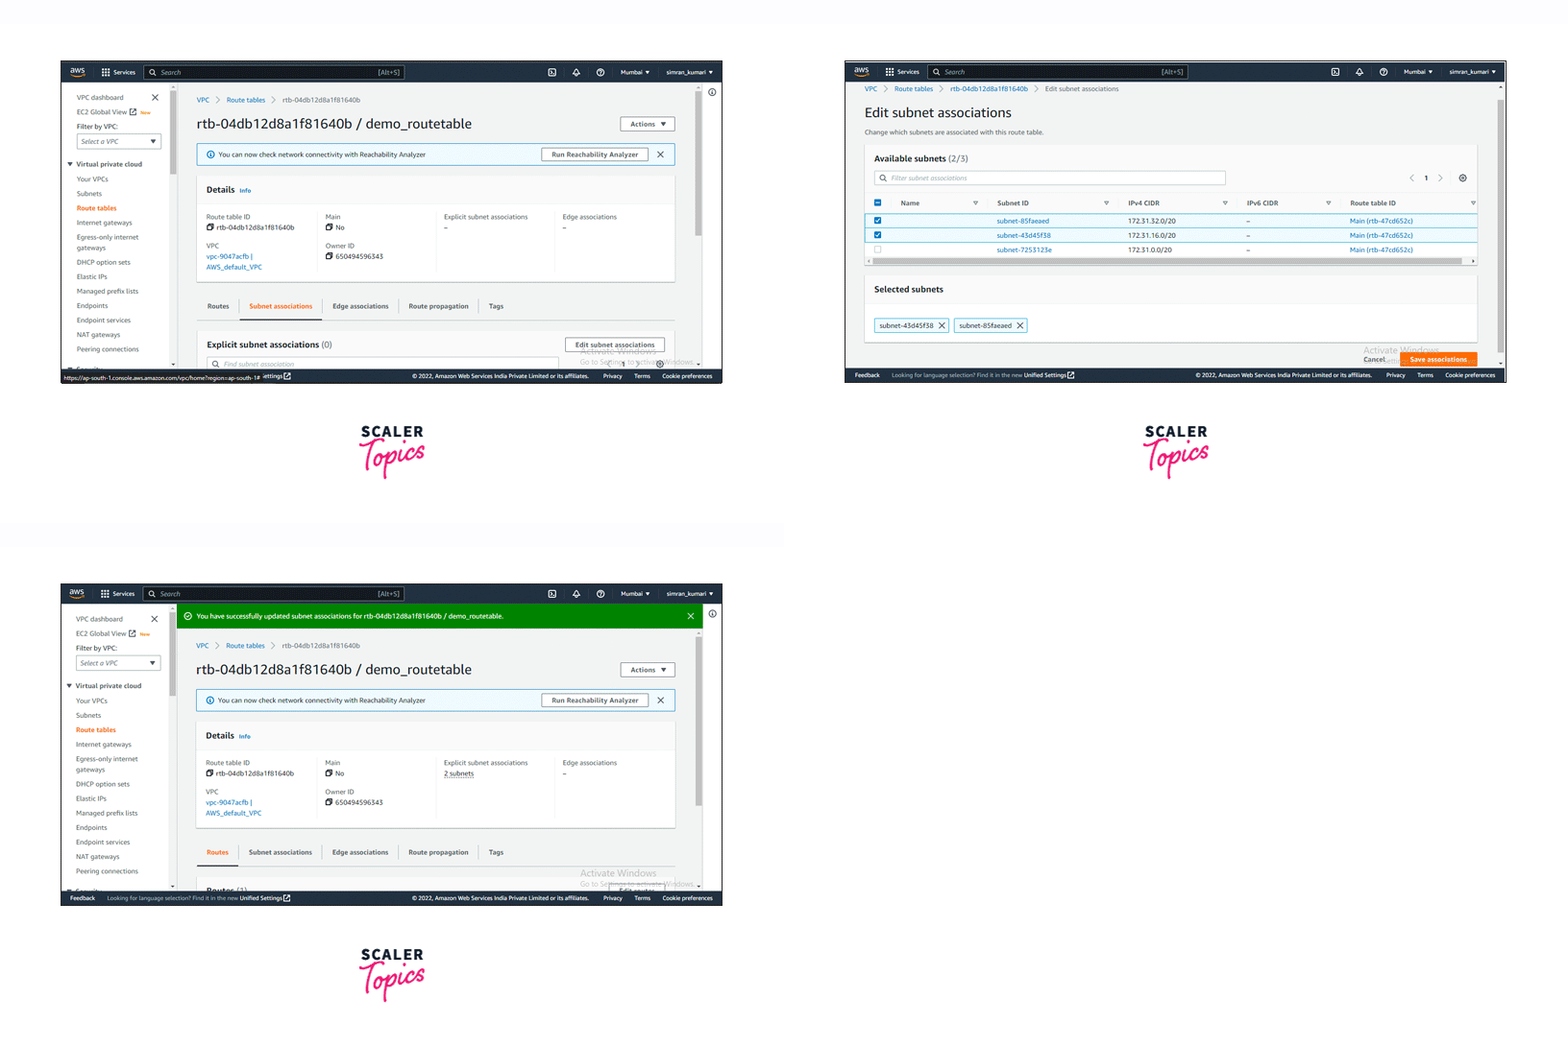
Having created the Route table, let's associate it with a subnet using the given steps.
- Open the created Route Table and click on the Subnet associations tab. Click on Edit subnet associations.
- On the next page, select the subnet ID we want to associate with the Route table. Click on Save associations.
- We successfully associated the subnet to the Route table.
Change the Route Table for a Subnet
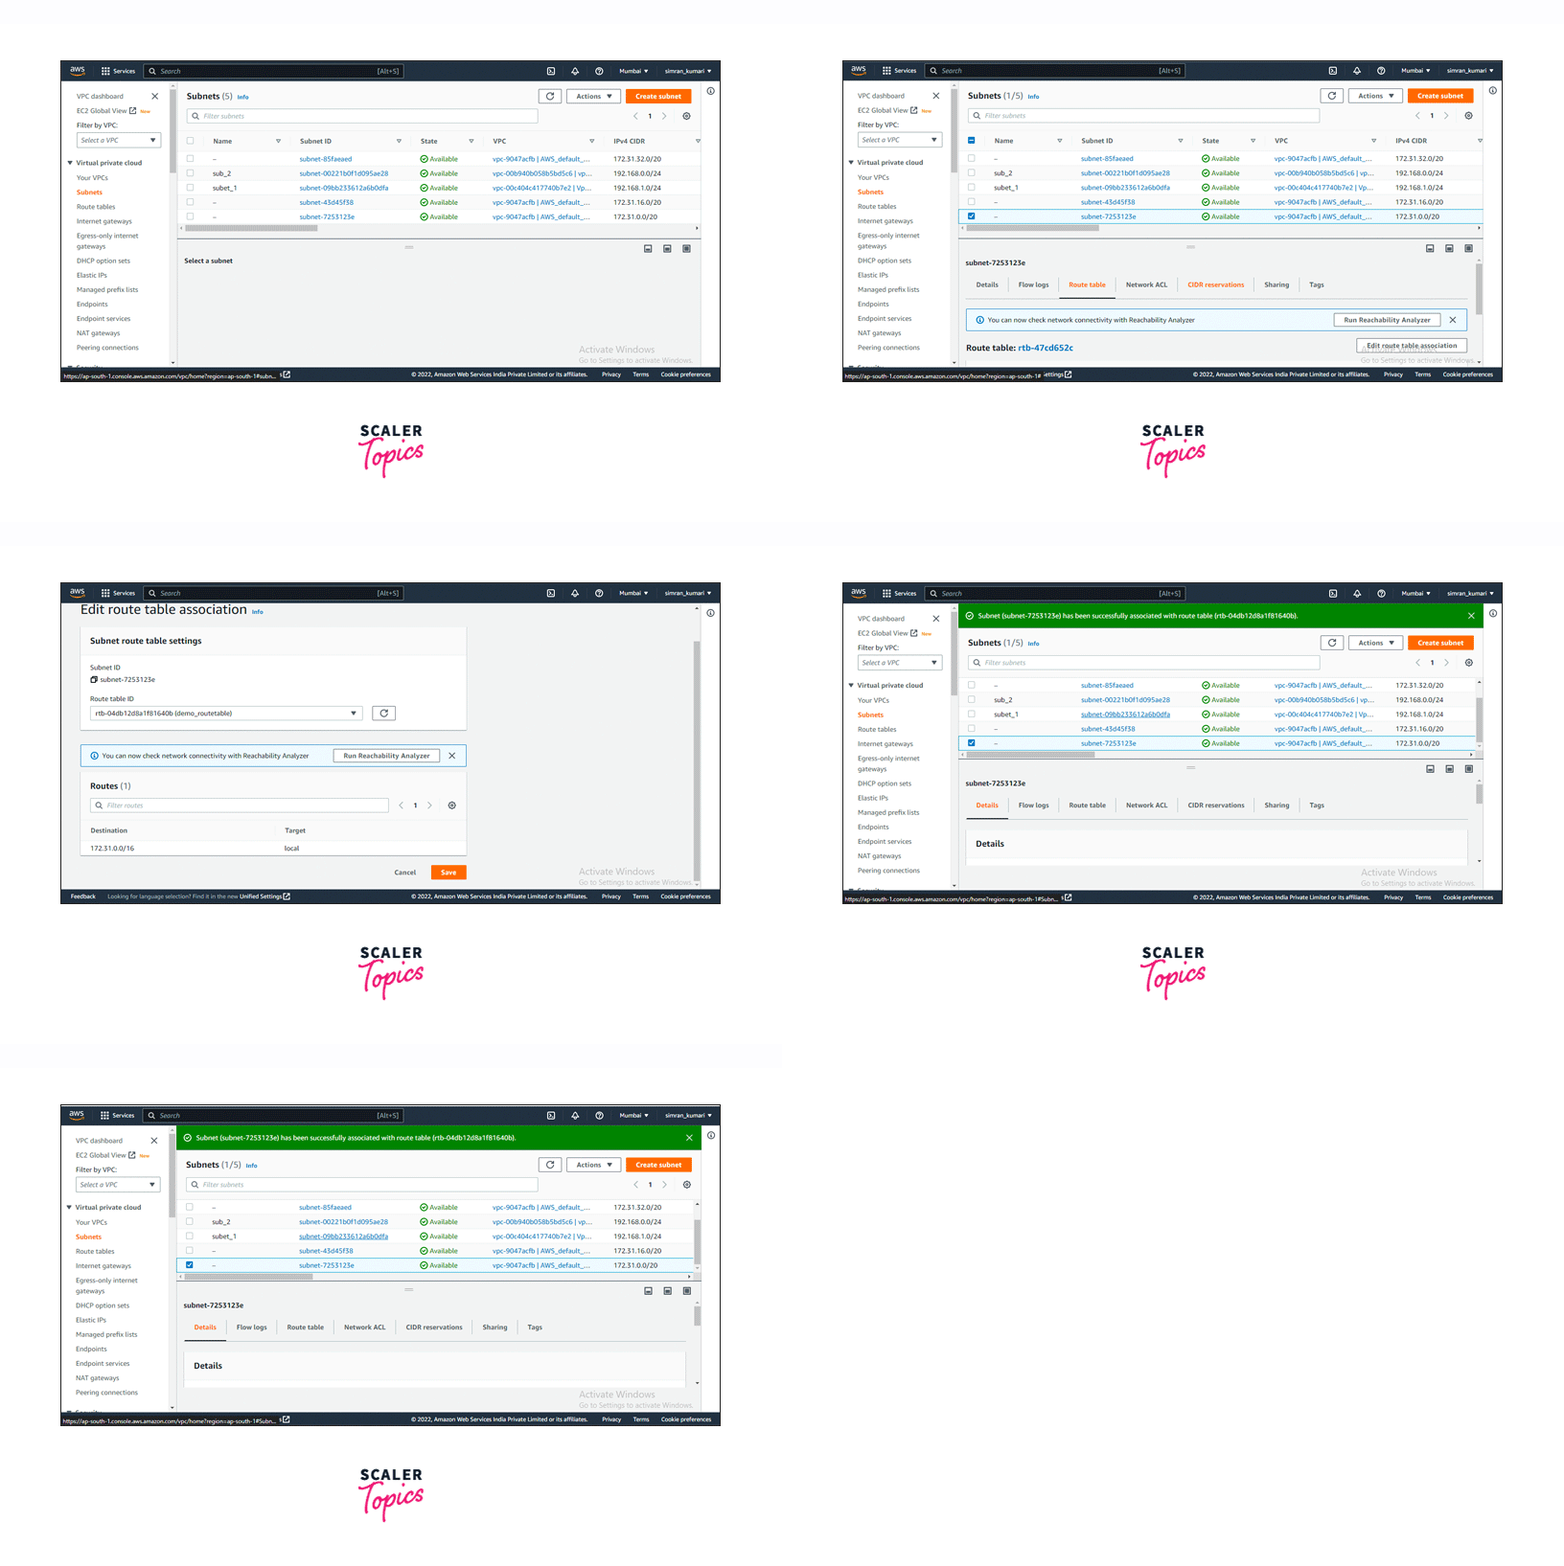
Follow the given steps to change route tables for a given subnet.
- Go to the Subnet page in the VPC console.
- Select a subnet and click on the Route table tab. Click on Edit route table association.
- Select the Route table ID you want and click on Save.
- We successfully changed the Route table for a subnet.
Disassociate a Subnet from a Route Table
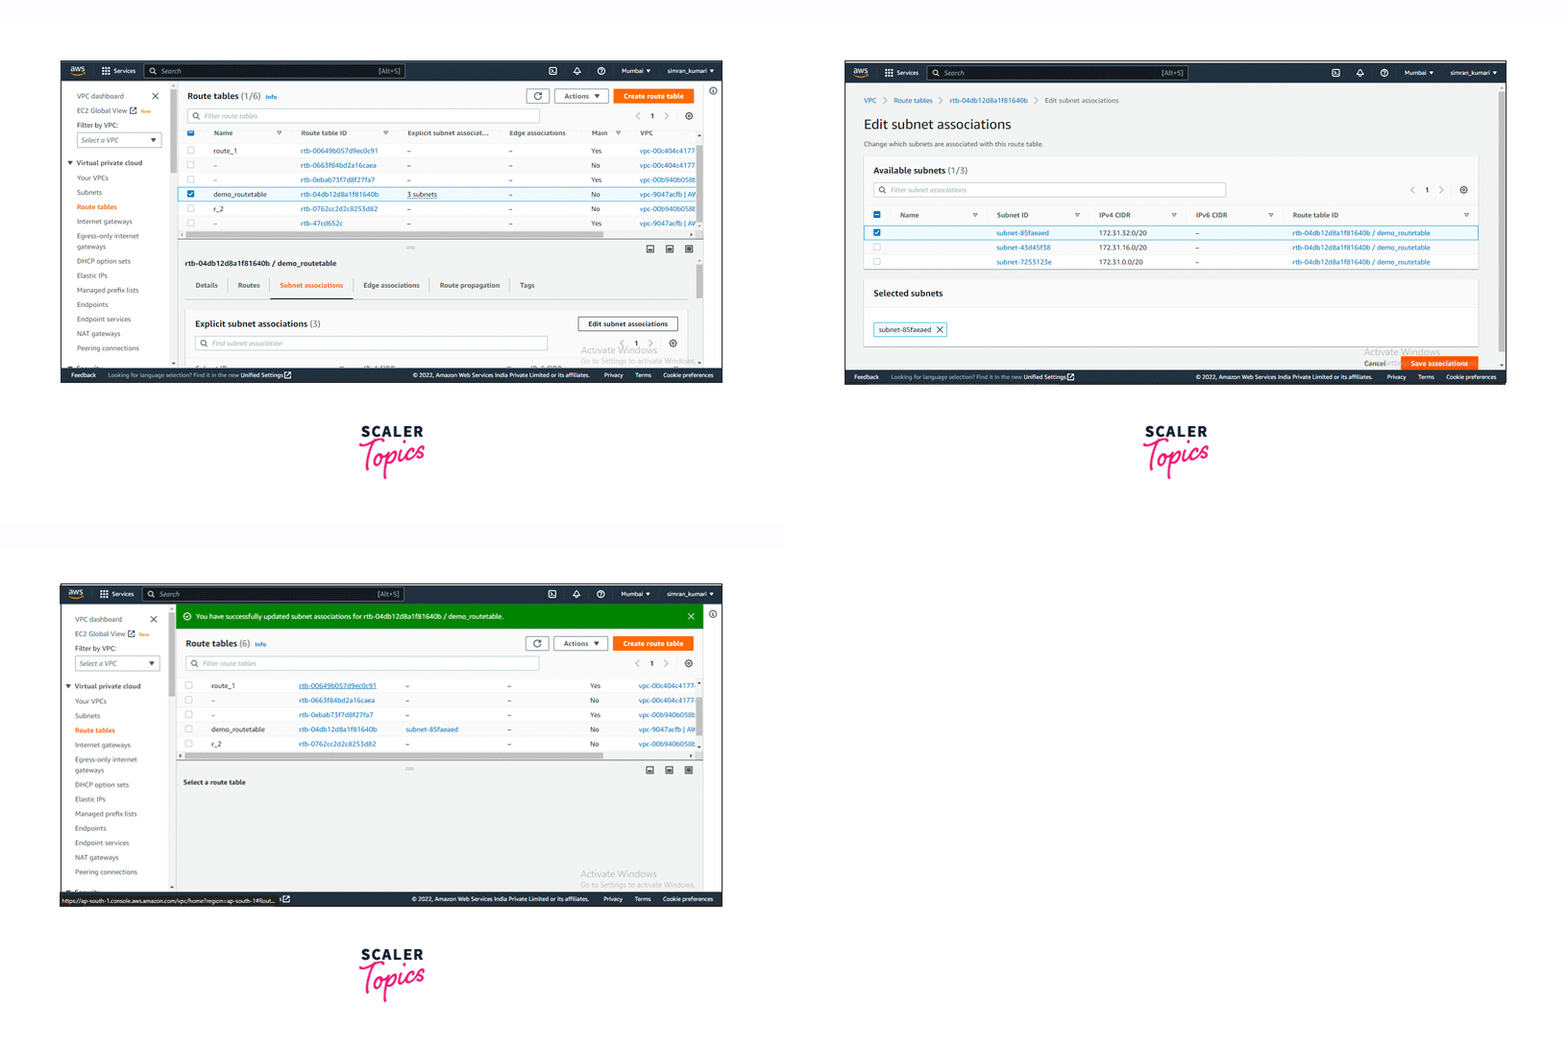
Now let's follow the given steps for disassociating route tables from a given subnet.
- Go to the Route tables page on the VPC console. Select the created route table and click on the Subnet associations tab. Click on Edit subnet associations.
- Uncheck the subnet which we want to disassociate and click on Save associations.
- We successfully disassociated a subnet from the Route table.
Replace the Main Route Table
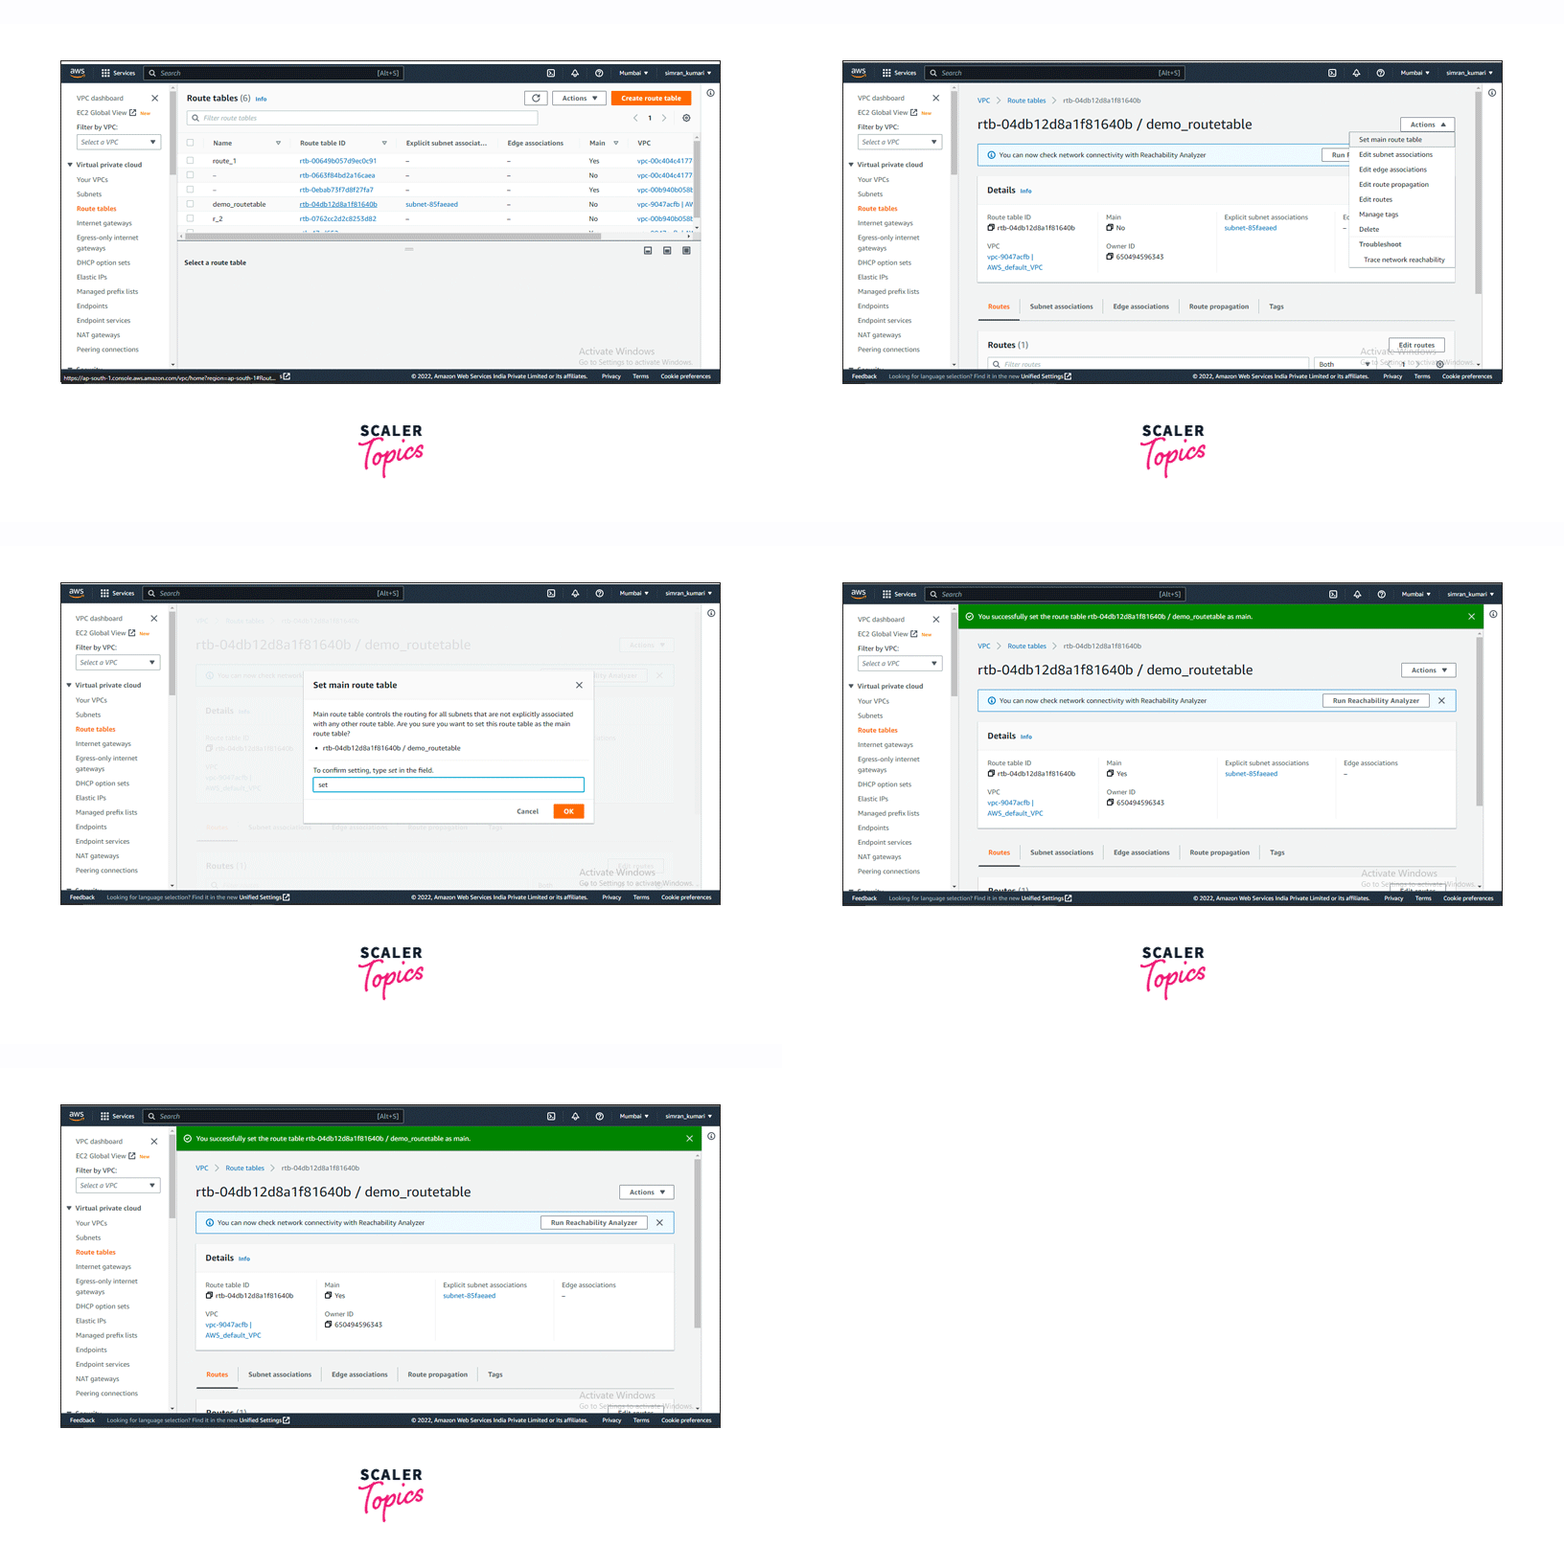
When we create a custom route table, we need to replace the main route table with the custom route table. Follow the given steps to replace the main route table.
- Go to the Route tables page on the VPC console. Open the Route table which we created, by clicking on its ID.
- Click the Actions button and choose Set main route table.
- Type set in the field provided and clicked on OK.
- We successfully replaced the main route table.
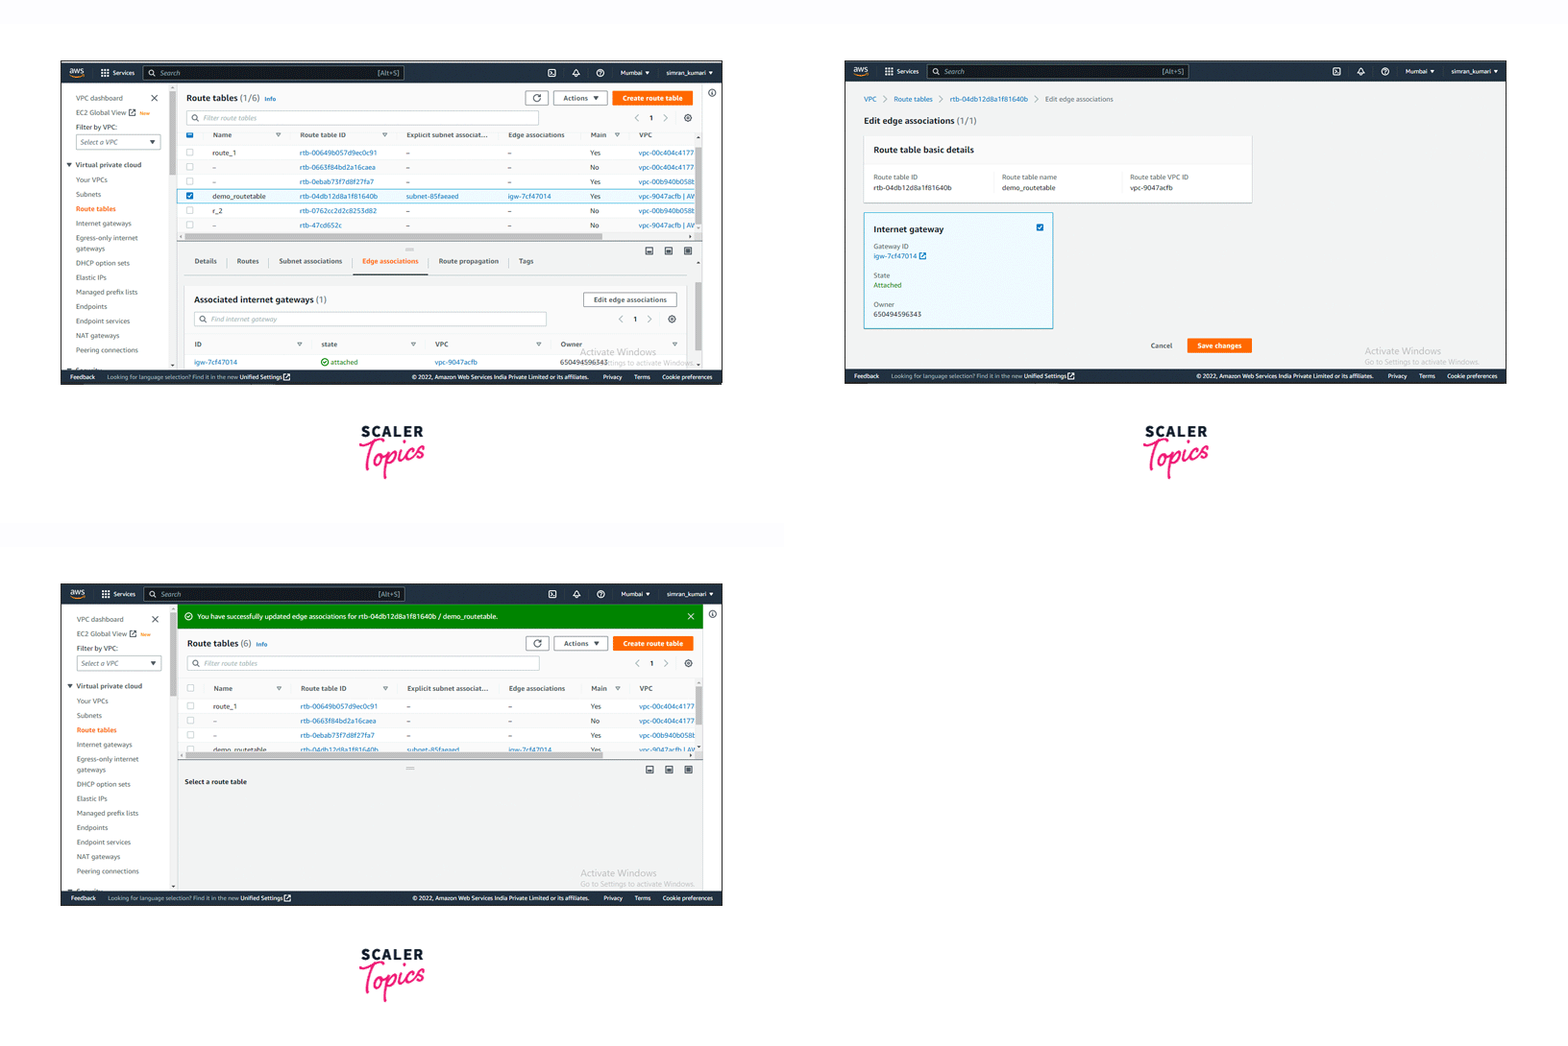
Associate a Gateway With a Route Table
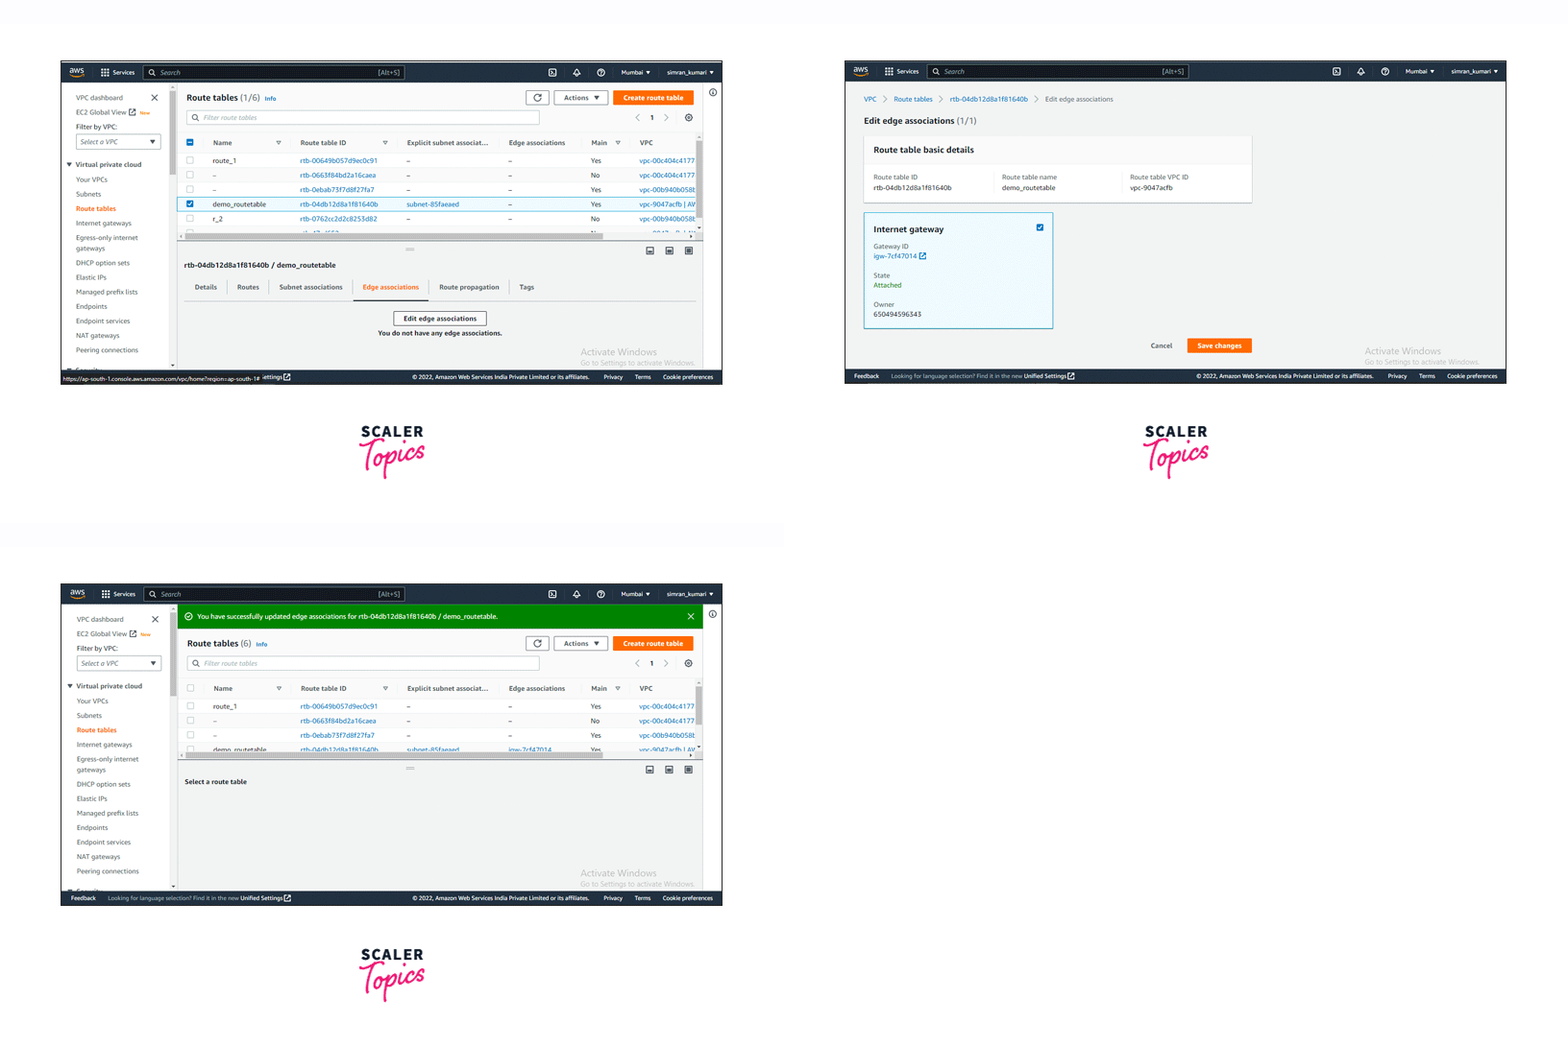
Let's learn the steps to associate the Route table with a gateway.
- Go to the Route tables page on the VPC console. Select the created route table and click on the Edge associations tab. Click on Edit edge associations.
- Select the Internet gateway and click on Save changes.
- The Gateway is successfully associated with the Route table.
Disassociate a Gateway from a Route Table
We can also disassociate the Route table from the gateway using the following steps.
- To disassociate a gateway from a Route table, go to the Route tables page on the VPC console. Select the created route table and click on the Edge associations tab. Click on Edit edge associations.
- Uncheck the internet gateway and click on Save changes.
- It will successfully disassociate the gateway from the Route table.
Replace The Target with a Local Route
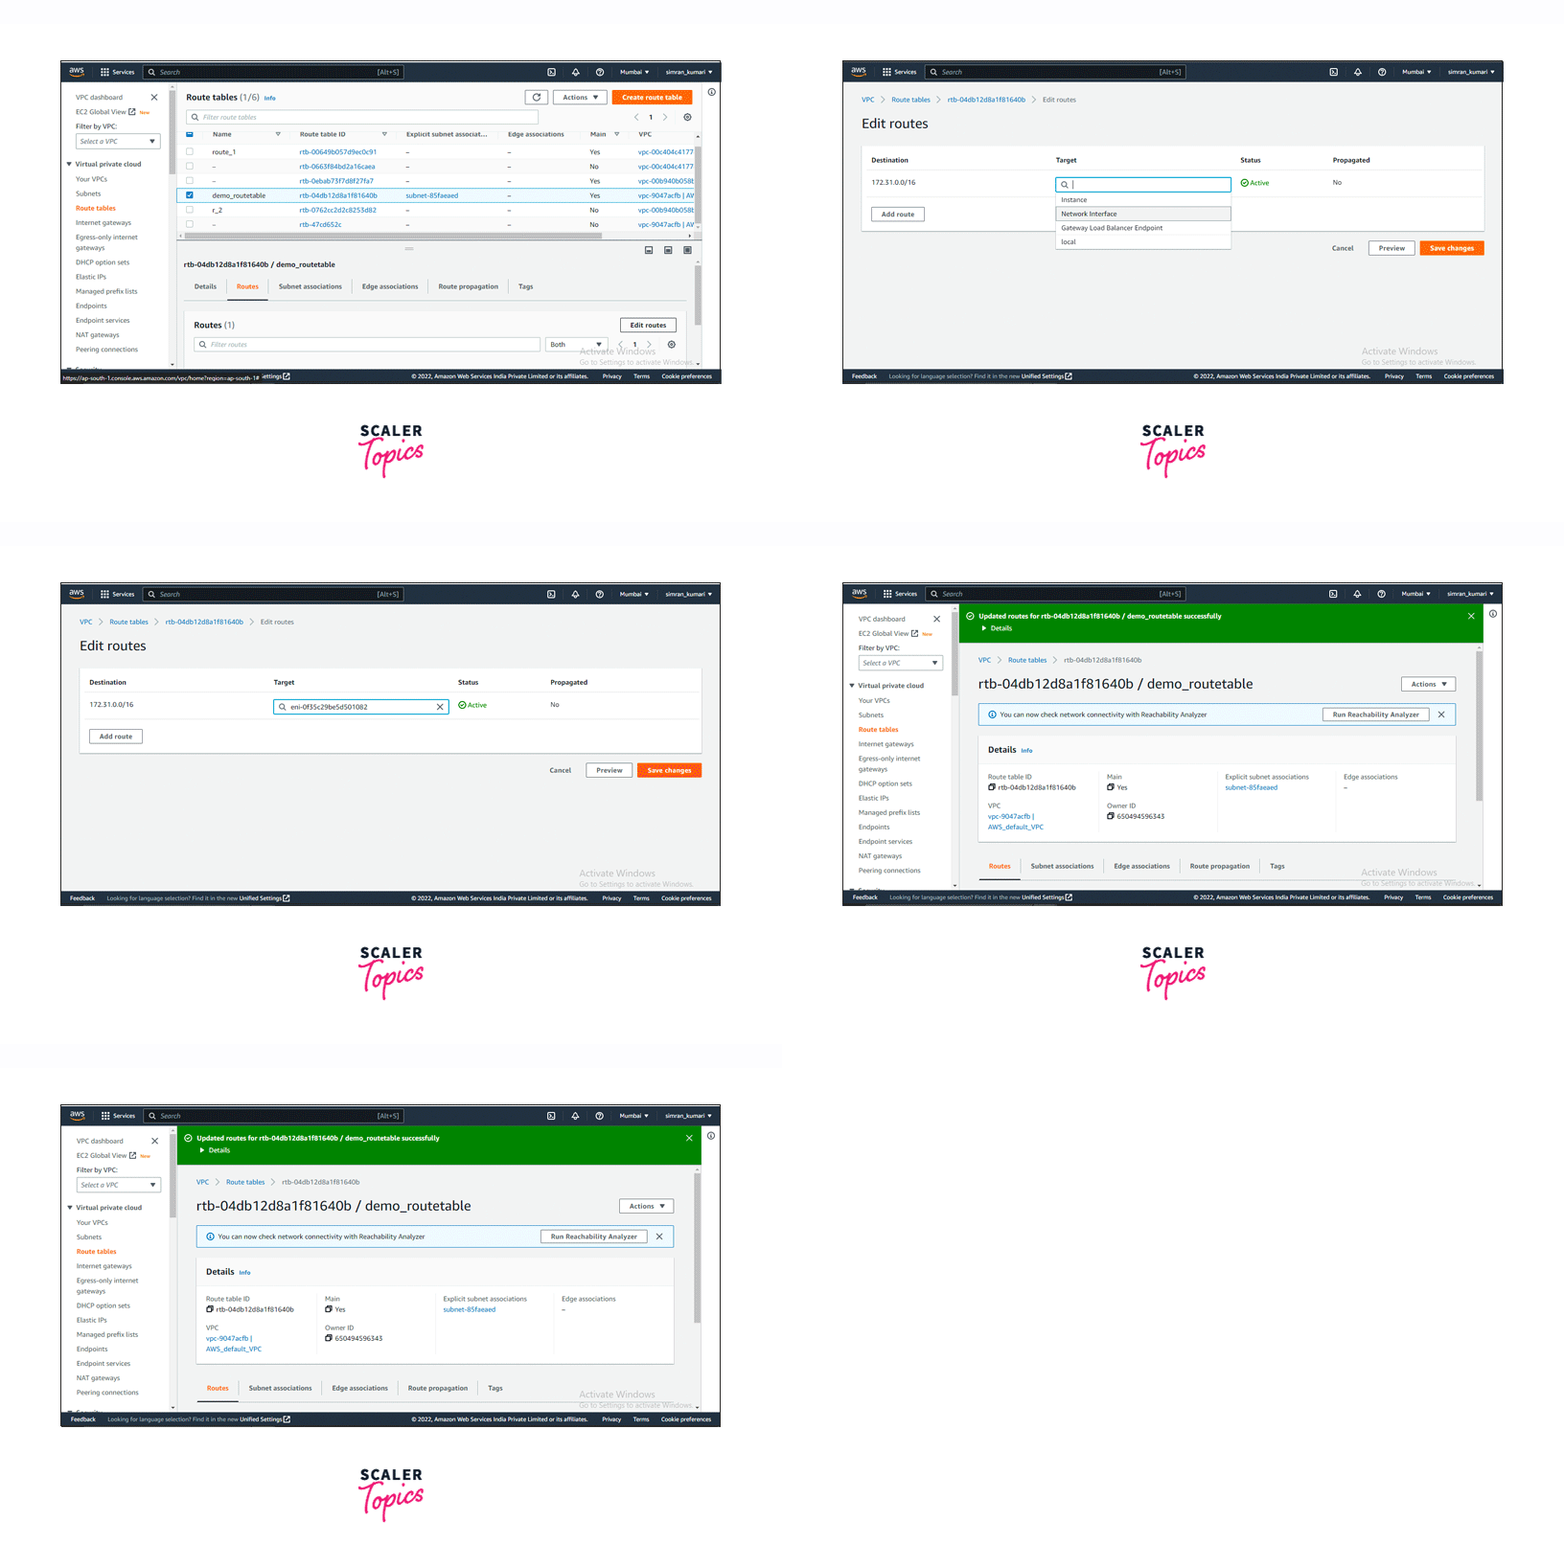
In addition to the above activities, we can replace the target with a local route. Follow the given steps to replace the target with a local route.
- Go to the Route tables page and select the created route table. Click on the Routes tab. Next, click on Edit routes.
- Replace the local route and choose a new target.
- Select the new target and click on Save changes.
- It will successfully replace the target in the routes.
Restore The Target for a Local Route
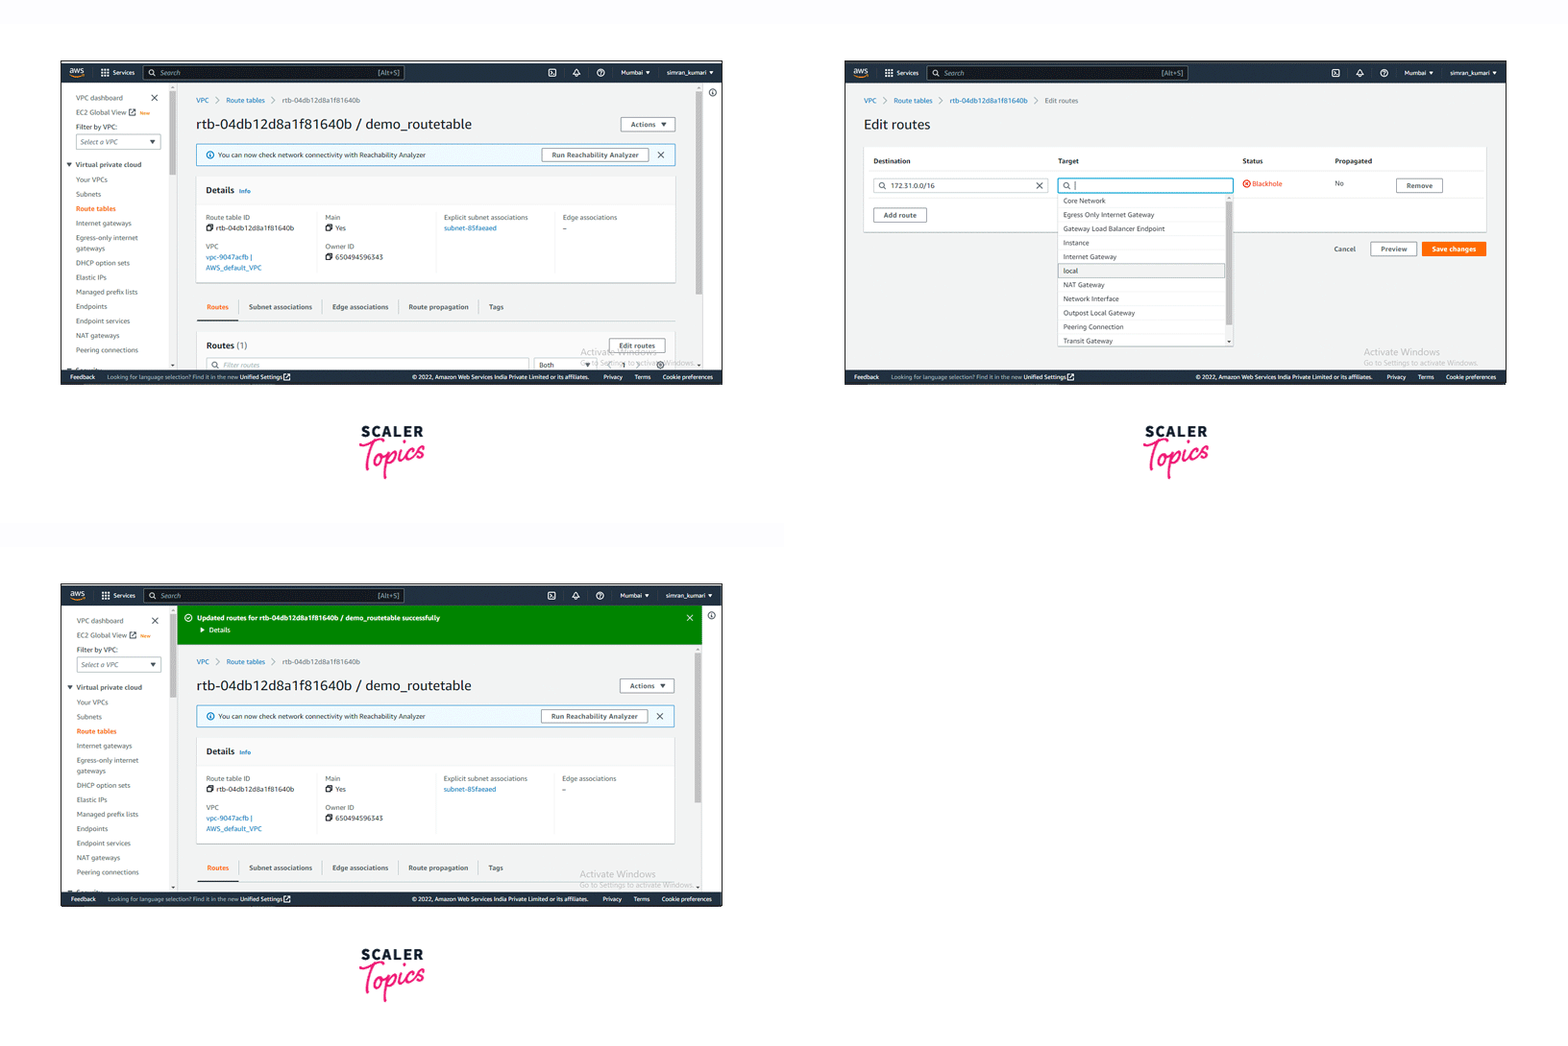
To restore the target for a local route, follow the given steps.
- To get back the local route or restore it, go to the Routes tab and click on Edit routes.
- Choose local in the Target and click on Save changes.
- We successfully restored the target for the local route.
Delete a Route Table
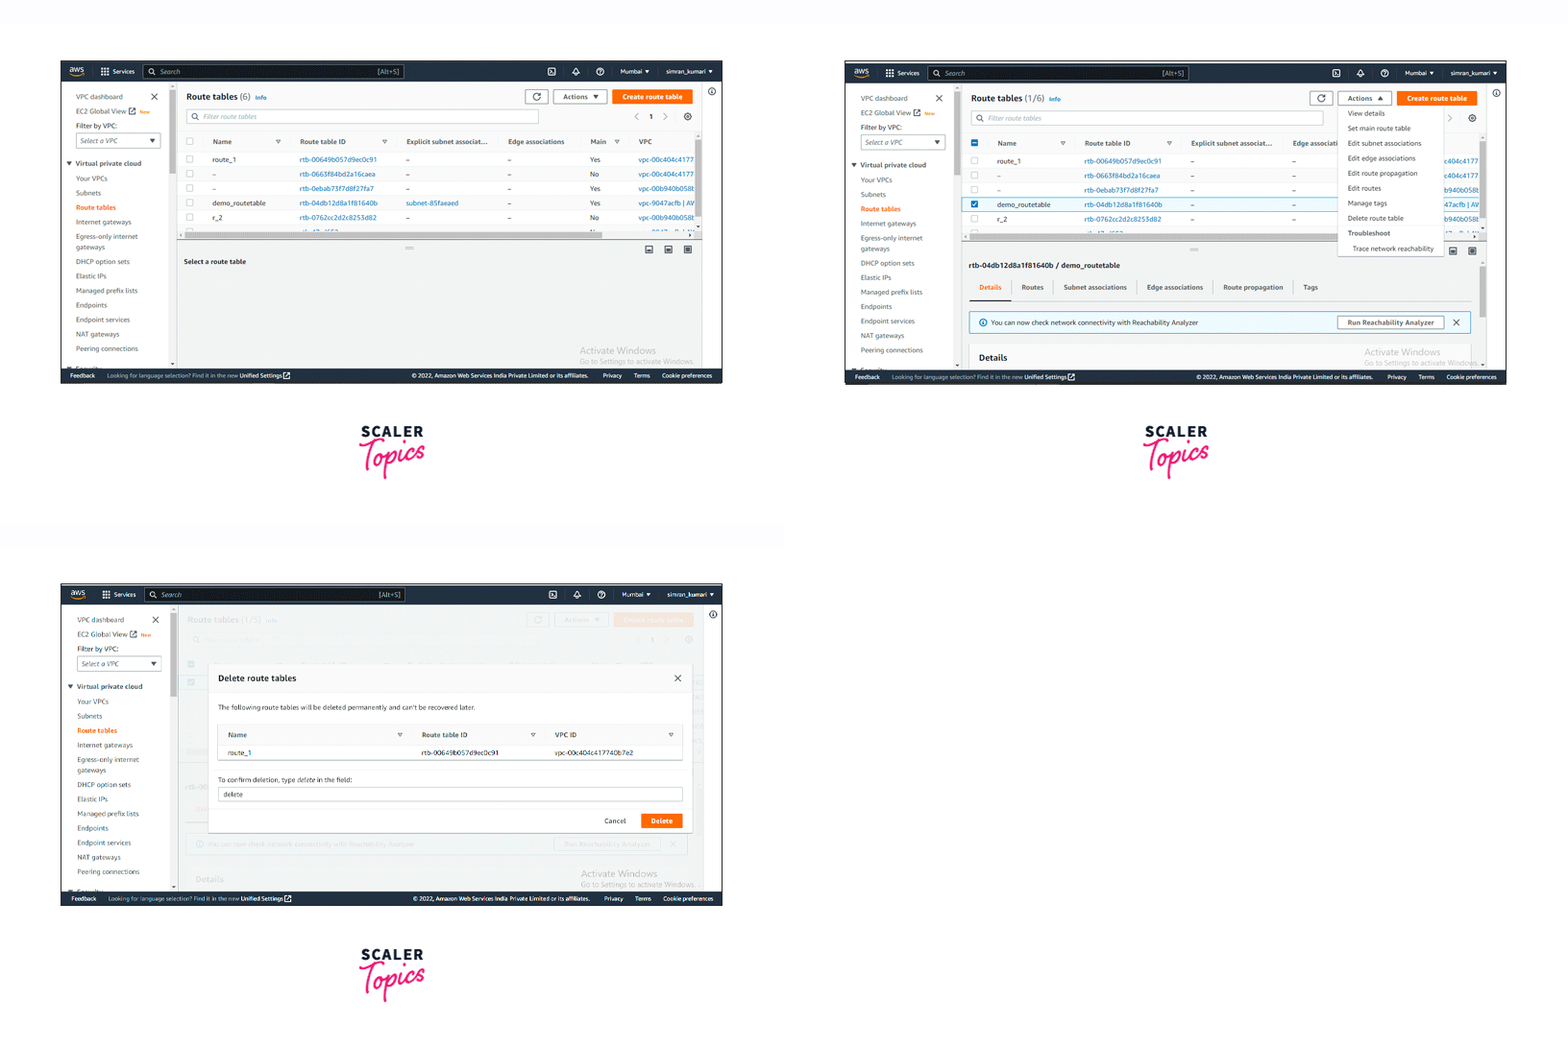
After executing some tasks, we may need to delete some route tables. We can make use of the following steps to delete the Route table.
- Go to the Route tables page and select the Route table which you want to delete.
- Click on Actions and choose the Delete route table option.
- Type delete in the box and click on Delete.
- We have successfully deleted the created Route table.
Middlebox Routing Wizard
The middlebox routing wizard automatically creates the necessary route tables and routes to redirect traffic as needed. It is used to gain greater control over the routing path of the traffic. It can be used through the VPC console of the AWS Management Console.
Middlebox Routing Wizard is helpful in the following scenarios:
- It helps route traffic through a middlebox appliance. For example, when an Amazon EC2 instance is used for security purposes, it serves as a middlebox appliance.
- It also comes helpful in transferring traffic across gateway load balancers.
Conclusion
- Route tables define rules for redirecting incoming and outgoing traffic.
- Route table rules are referred to as routes that contain destinations and targets.
- Targets are the ones through which the traffic travels, and the destination is the IP address or range of IP addresses to which the traffic can be redirected.
- Routing can occur through various targets like internet gateways, virtual private gateways, NAT gateways, etc.
- Every VPC contains a default route table attached to it, known as the main route table, which can be replaced with custom route tables.
- There are some limitations to the number of route tables that can be attached to the VPC or the number of routes that can be added to each route table. These limitations are referred to as Quotas.
- If a propagated route overlaps with a static route, then the static route is given more priority.
- For gaining stronger control over the routing path for the traffic, Middlebox Routing Wizard is used.
