CSS Selectors

Overview
To style HTML elements, we need to apply CSS to them, and to apply any CSS property to any HTML element, we first need to select that HTML element and then apply CSS properties to it. We will achieve this by using CSS selectors. CSS selectors are the combination of characters that tells the browser which HTML element to select. CSS selectors are part of the CSS ruleset. CSS selectors use id, class, type, attribute, etc of the HTML element to select them.
What is a Selector in CSS?
CSS selectors are the combination of character and special symbols that instructs the browser to apply specific CSS properties to the desired HTML element. CSS selectors use id name (begins with #), class name, type of the HTML tag (such as heading, div, etc.), attribute, etc of the HTML element to select them. The HTML element(s) that is/are selected by the selector is/are called the subject of the selector.
Transform Your Career
Choose from our industry-leading programs designed for career success
Modern Software and AI Engineering Program
Master full-stack development with AI integration

Modern Data Science and ML with specialisation in AI
Advanced data science techniques with AI specialization
Advanced AIML with Specialisation in Agentic AI
Deep dive into AIML with focus on Agentic systems
DevOps, Cloud & AI Platform Engineering
Build and manage AI-powered cloud infrastructure
AI Engineering Advanced Certification by IIT-Roorkee
Premier AI engineering certification from IIT-Roorkee
Types of Selectors
Basic CSS Selectors
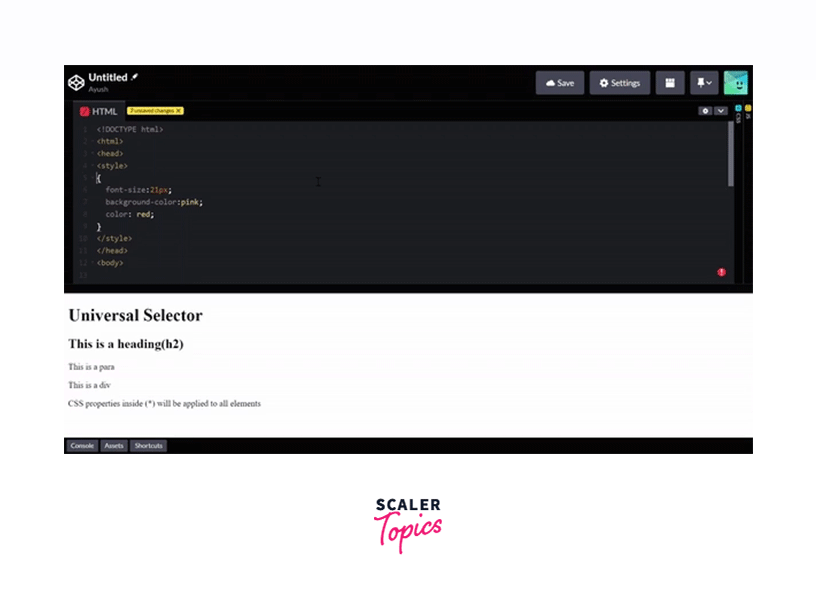
1. Universal Selector The very first CSS selector we will be discussing will be the universal selector, It selects all the HTML elements present on the HTML page. To use the universal selector, we need to use asterisks (*) and then define the CSS property and after that, all the elements will be selected. HTML elements inside other elements will also be selected, by using the CSS universal selector. (for eg.- If there is a paragraph element inside a div element, then by using the CSS universal selector, the para element which is inside the div element will also be selected)
Syntax
Example In this example, we will use the asterisk symbol (*) and will define a set of CSS properties inside it. As the definition of the universal selector says, the defined CSS properties will be applied to every HTML element. We will write a set of CSS properties and will see the output without the asterisk symbol and then after that, we will apply the asterisk symbol and see that every element in the webpage (output) will have the same CSS that we defined.
Output
2. Type Selectors
A type selector is also known as an element selector because it selects HTML tag(s)/element(s) in your document. The element selector selects HTML elements based on their name, a few of them are p (paragraph tag), h1 (heading 1), div (division tag), span, etc. To use a type selector, you just need to give the name of the HTML tag and then in the curly braces define the CSS properties.
Syntax
Example In this example, we will use different HTML tag names to select the HTML element, and then we'll apply different CSS properties to them. For the first set of CSS properties, we will use the <h1> element, and then we will define the properties inside the <h1> element. After that, we will select the <h2> element and will give a different set of CSS properties to it. Now after that, to understand better how we can select multiple HTML tags and apply the same properties to them, we will be using two different tags - <div> and <h3> and will give the same CSS properties to them.
Output

3. Class Selector
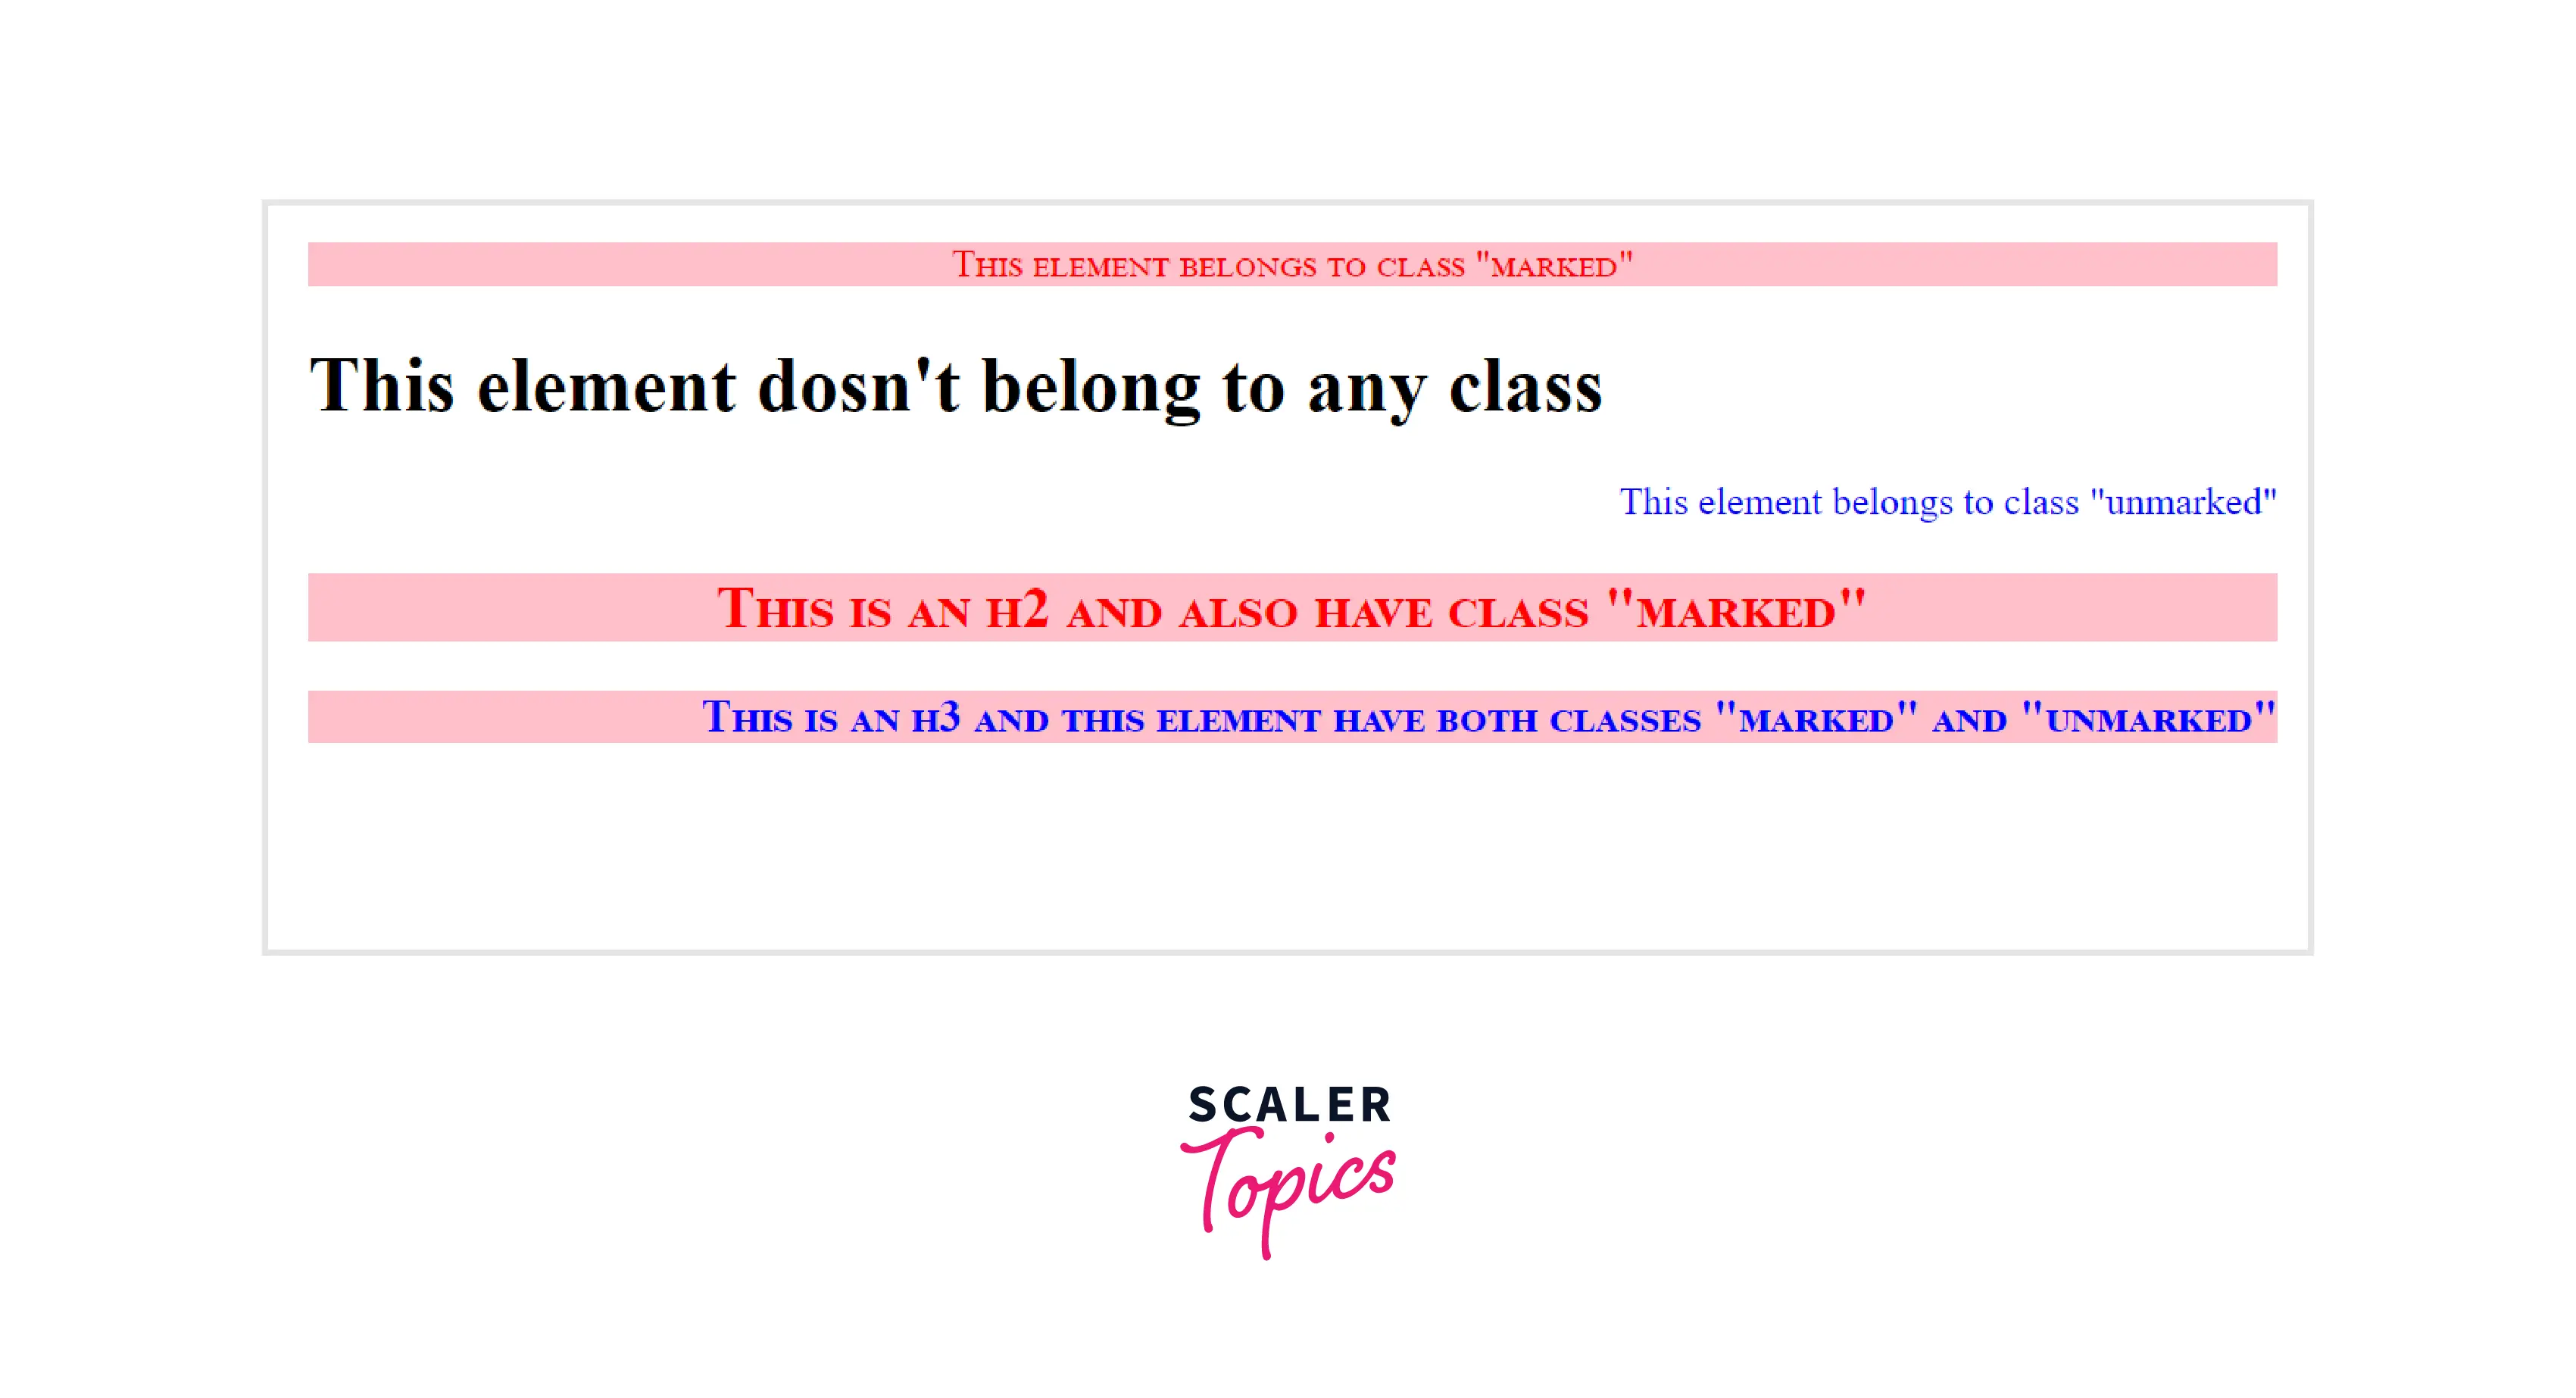
We generally use class to group HTML elements and to apply unique styling to them. The class selector in CSS selects elements that belong to a particular class attribute. To select elements with a specific class, write a period or full stop (.) character, and then the name of the class.
For example, If a div and h2 have the same class, say "mark". so, we can access them and apply the same styling by using only the name of the class, that is "mark". Syntax
Example In this example, we will use two different classes "marked" and "unmarked" and both will contain a different set of CSS properties. Different HTML elements will be used and then they will be grouped into classes. Now, for selecting the classes we will be using the CSS class selector. As the first element(para inside a div) belongs to the marked class, the defined CSS properties under the marked class will be applied to it. And similarly, some elements belong to either one of the classes or none. As HTML elements can also refer to more than one class the last element has both classes so that we can understand how to merge two different classes.
Output
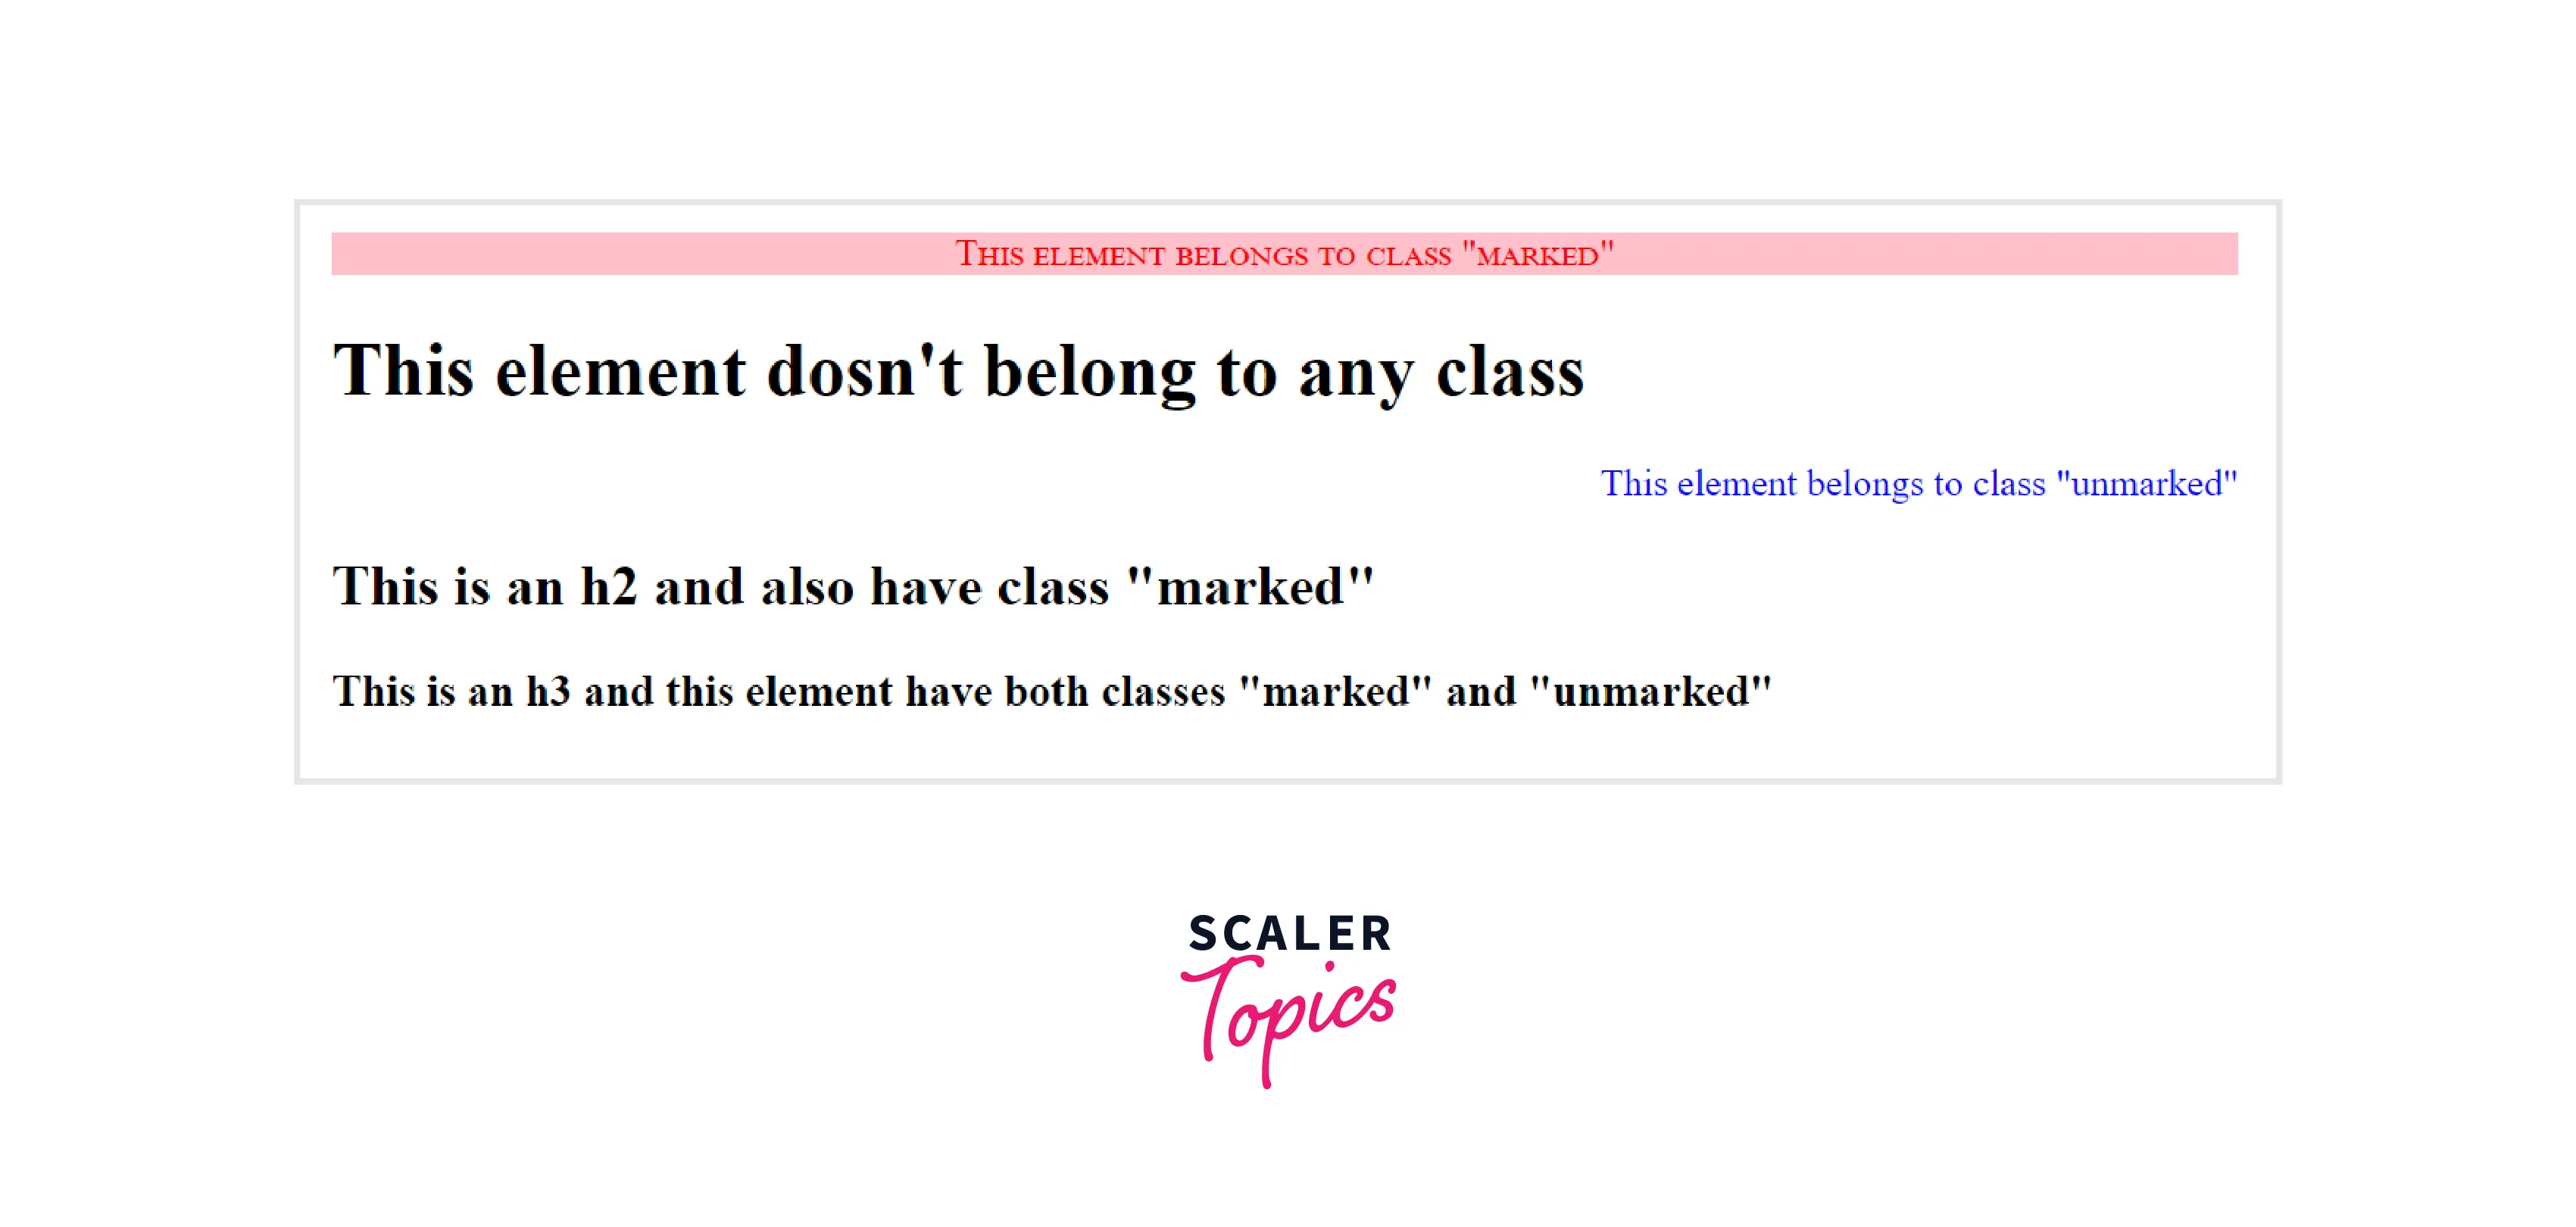
Now, suppose you have a set of CSS properties selected under a class name, and you only want to apply a specific CSS property to a specific HTML element under the class. For that specify the element name, then give the full stop/period(.) character, followed by the class name.
Example This example is the same as the previous example, the only difference that makes the output look different is the <p> tag, here we only selected the <p> element which will have class "marked" or "unmarked"
Output
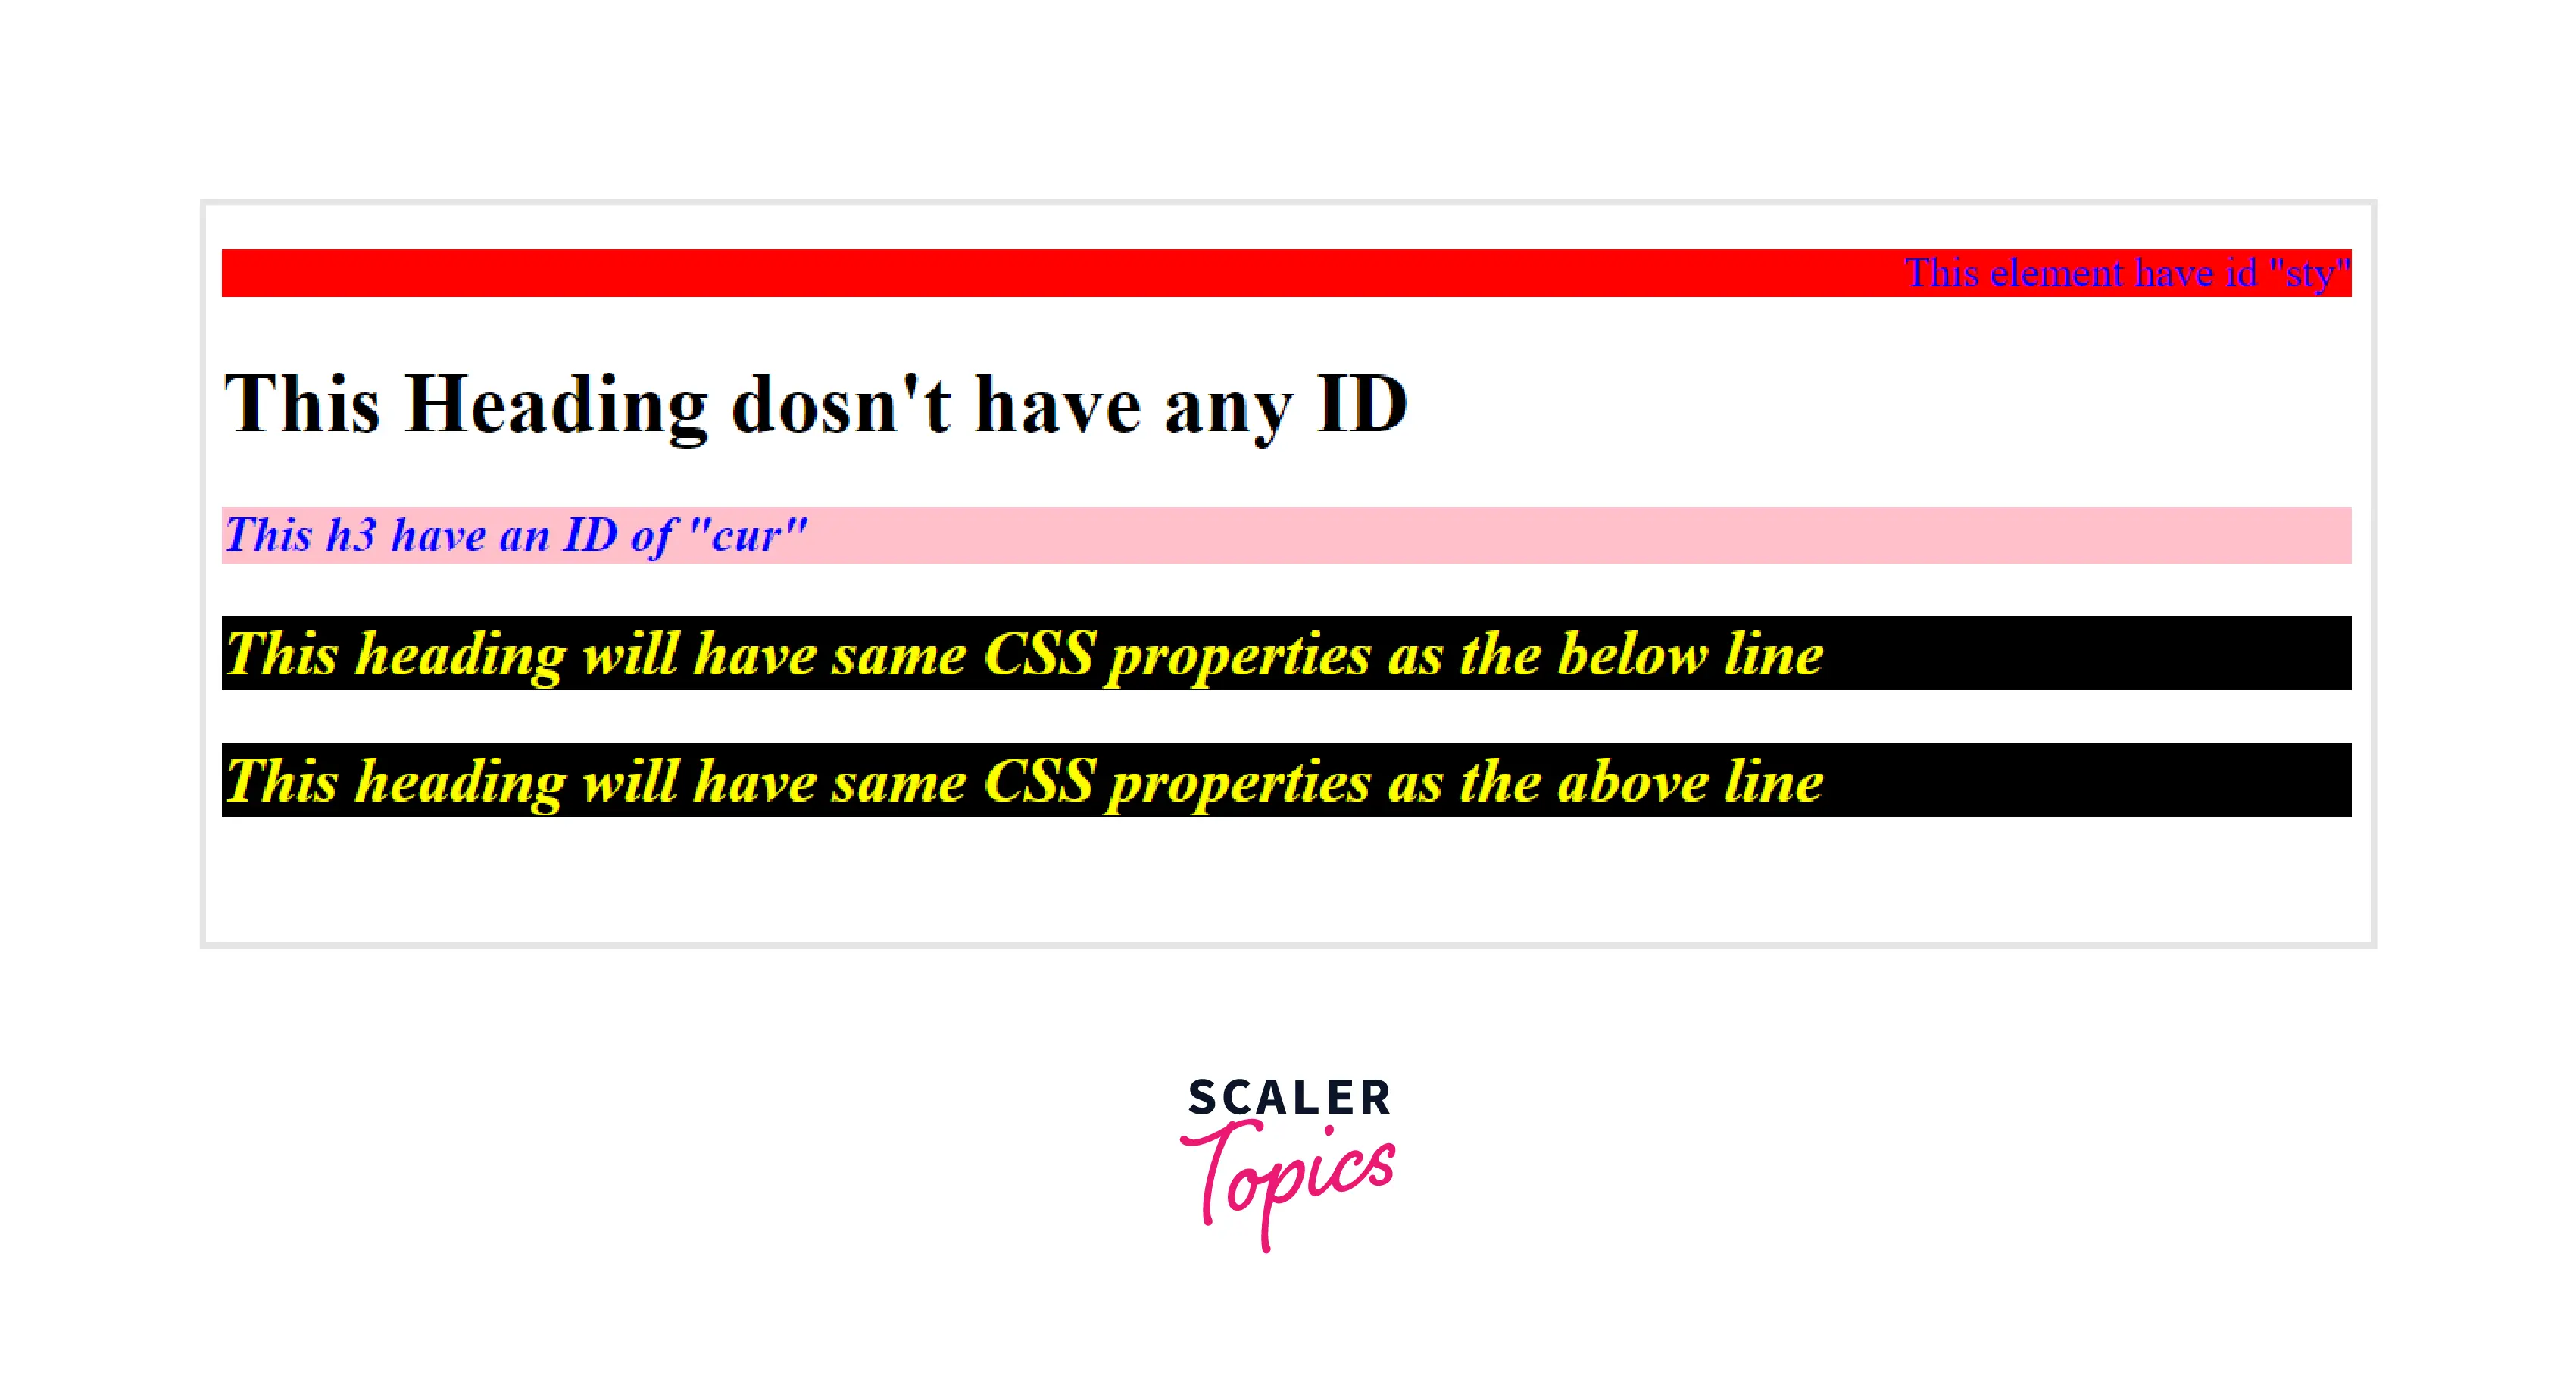
4. ID SELECTOR The CSS ID selector uses the HTML element’s ID attribute to select elements on a page and apply CSS properties on that. The id attribute is the unique identifier in an HTML document To use an ID selector in CSS, use a hashtag (#) followed by the name of the ID of the HTML element. The HTML element will only be selected if its id attribute matches exactly with the value given in the selector.
Syntax
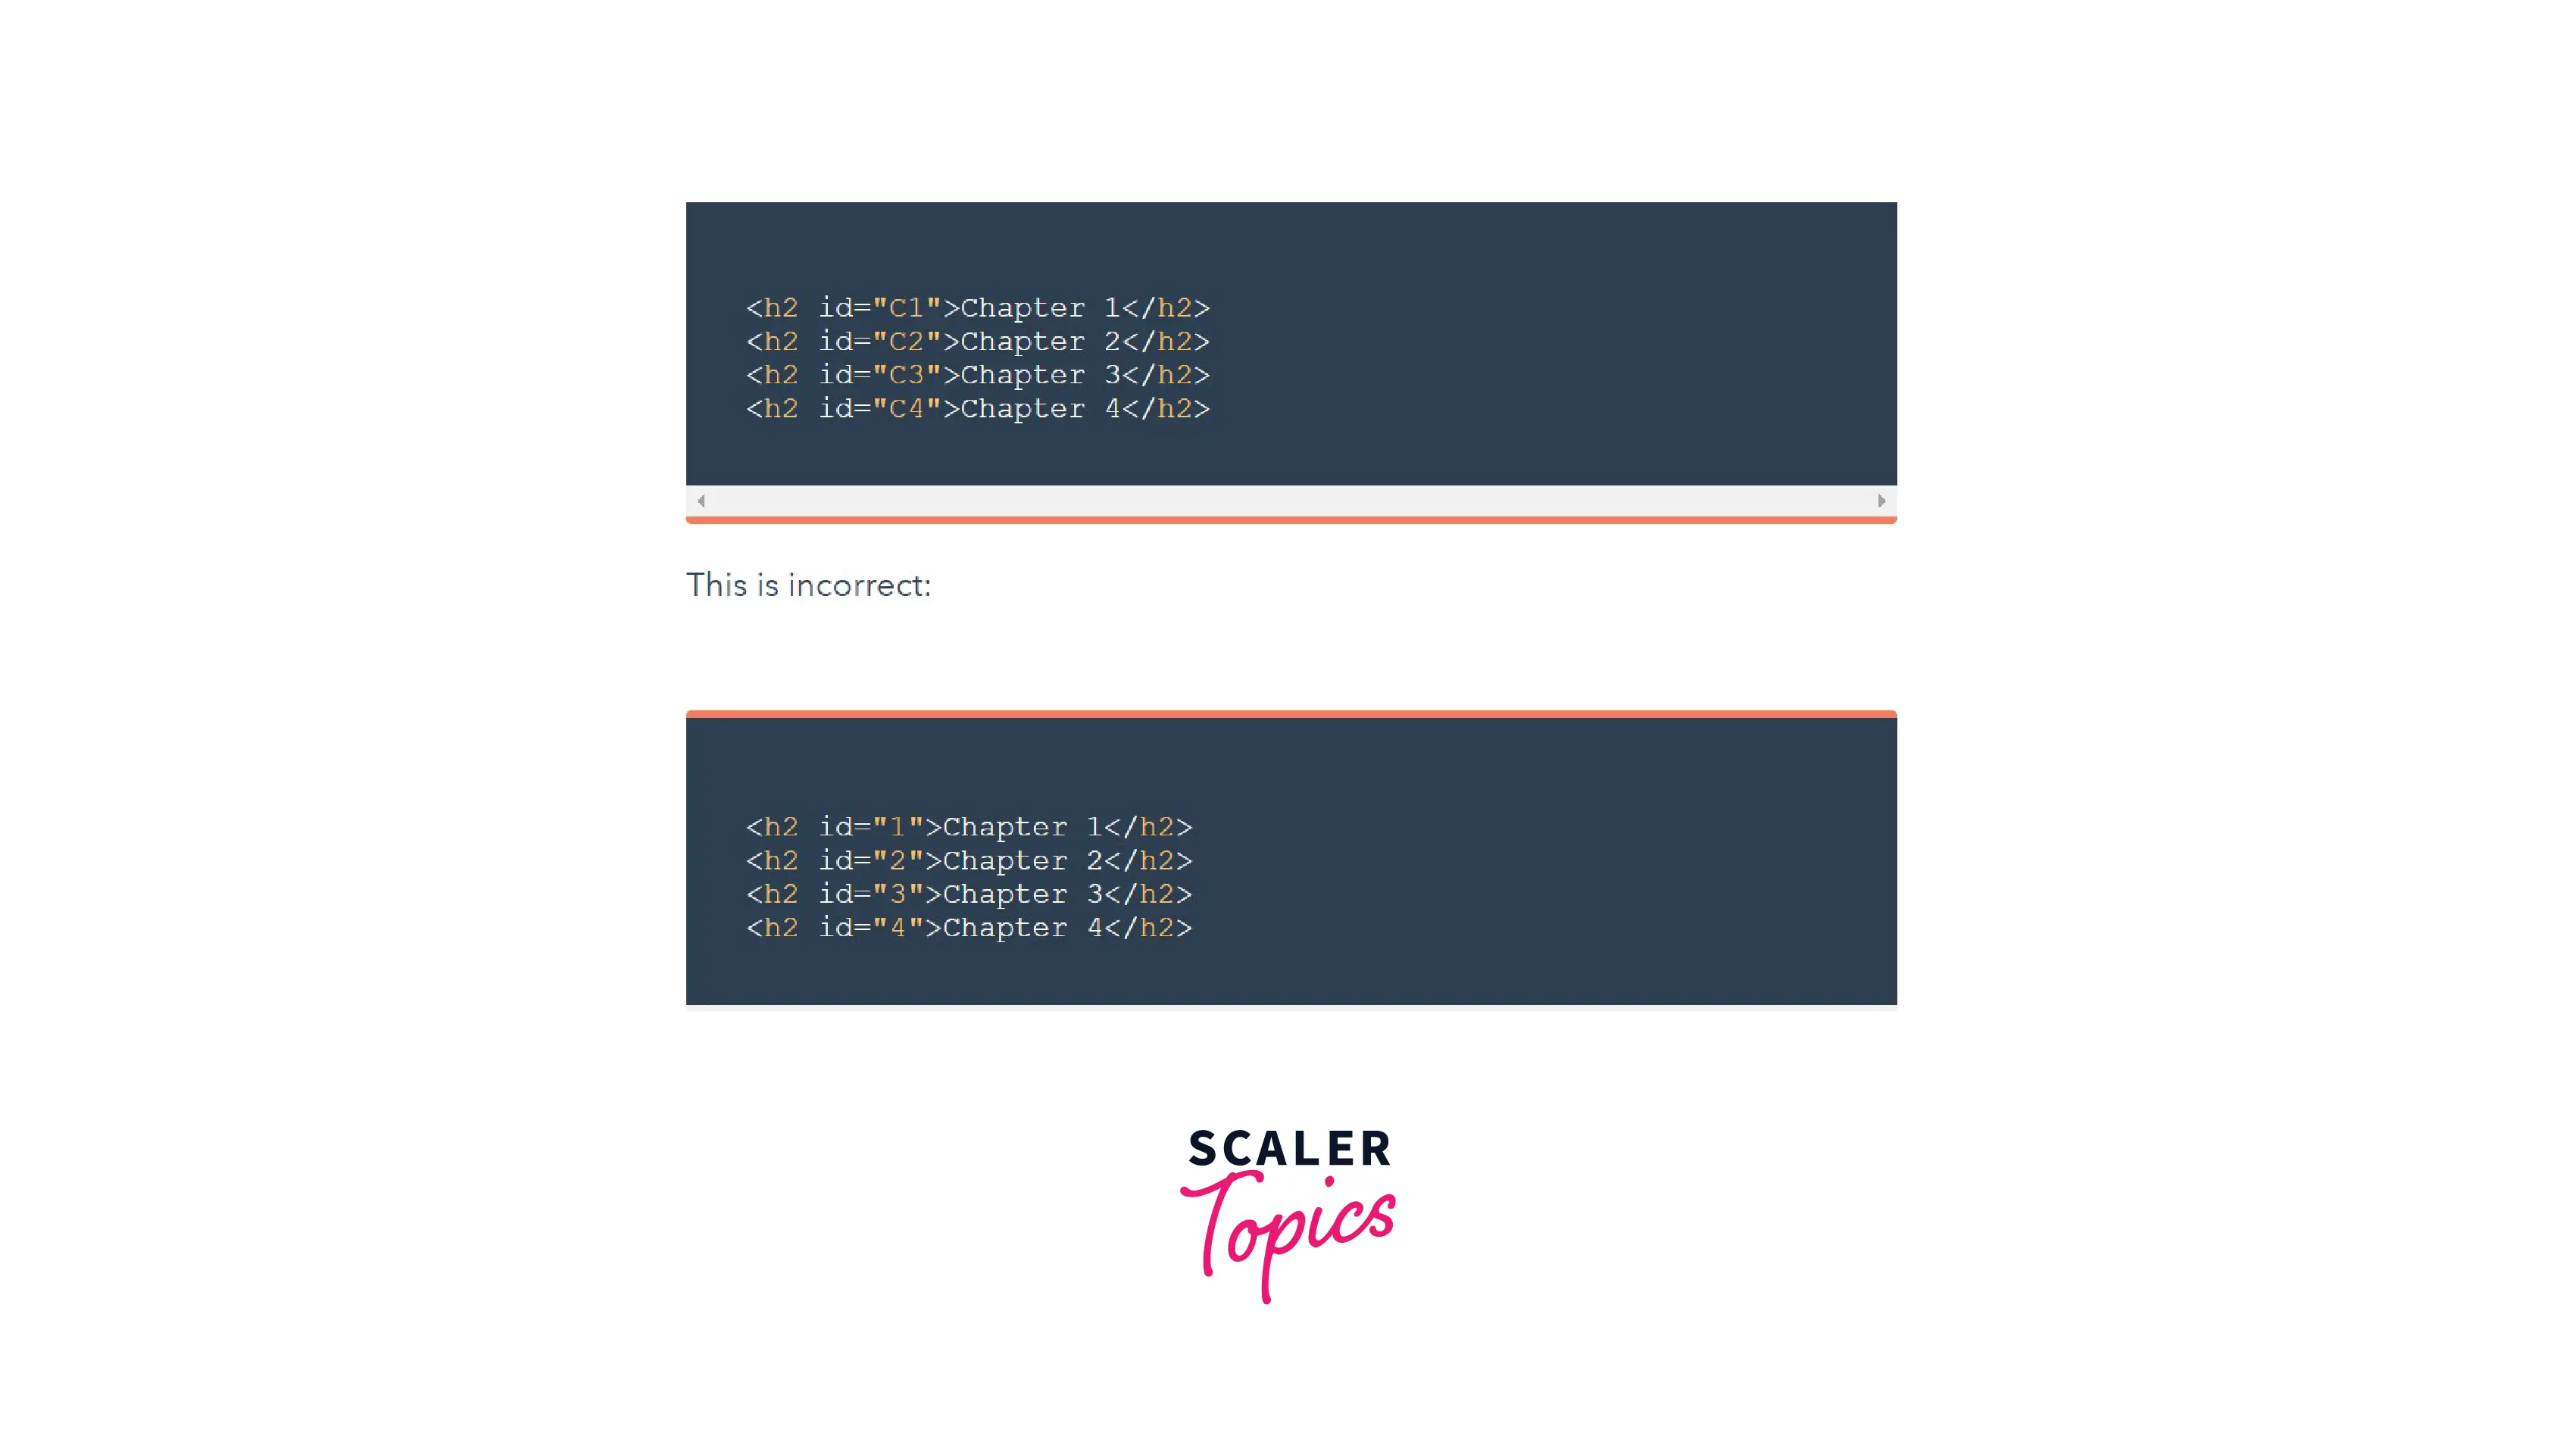
ID attribute must contain at least one character and cannot begin with a number.
Example Here in this example, we have used different HTML elements such as <h1>,<h2>, etc. and also they have a different value of ID. Now we have used the CSS ID selector and selected the IDs and defined different CSS properties for them.
The element associated with the ID will get the CSS properties that are defined under the ID. For a better understanding of how to use two different IDs for the same CSS properties, we took two IDs- id1 and id2. We merged these two and used a comma to separate them. The CSS properties defined under them will be applied to both the elements that use the ID.
Output
If an id selector is combined with another or more selectors, id selectors must be preceded with a #.
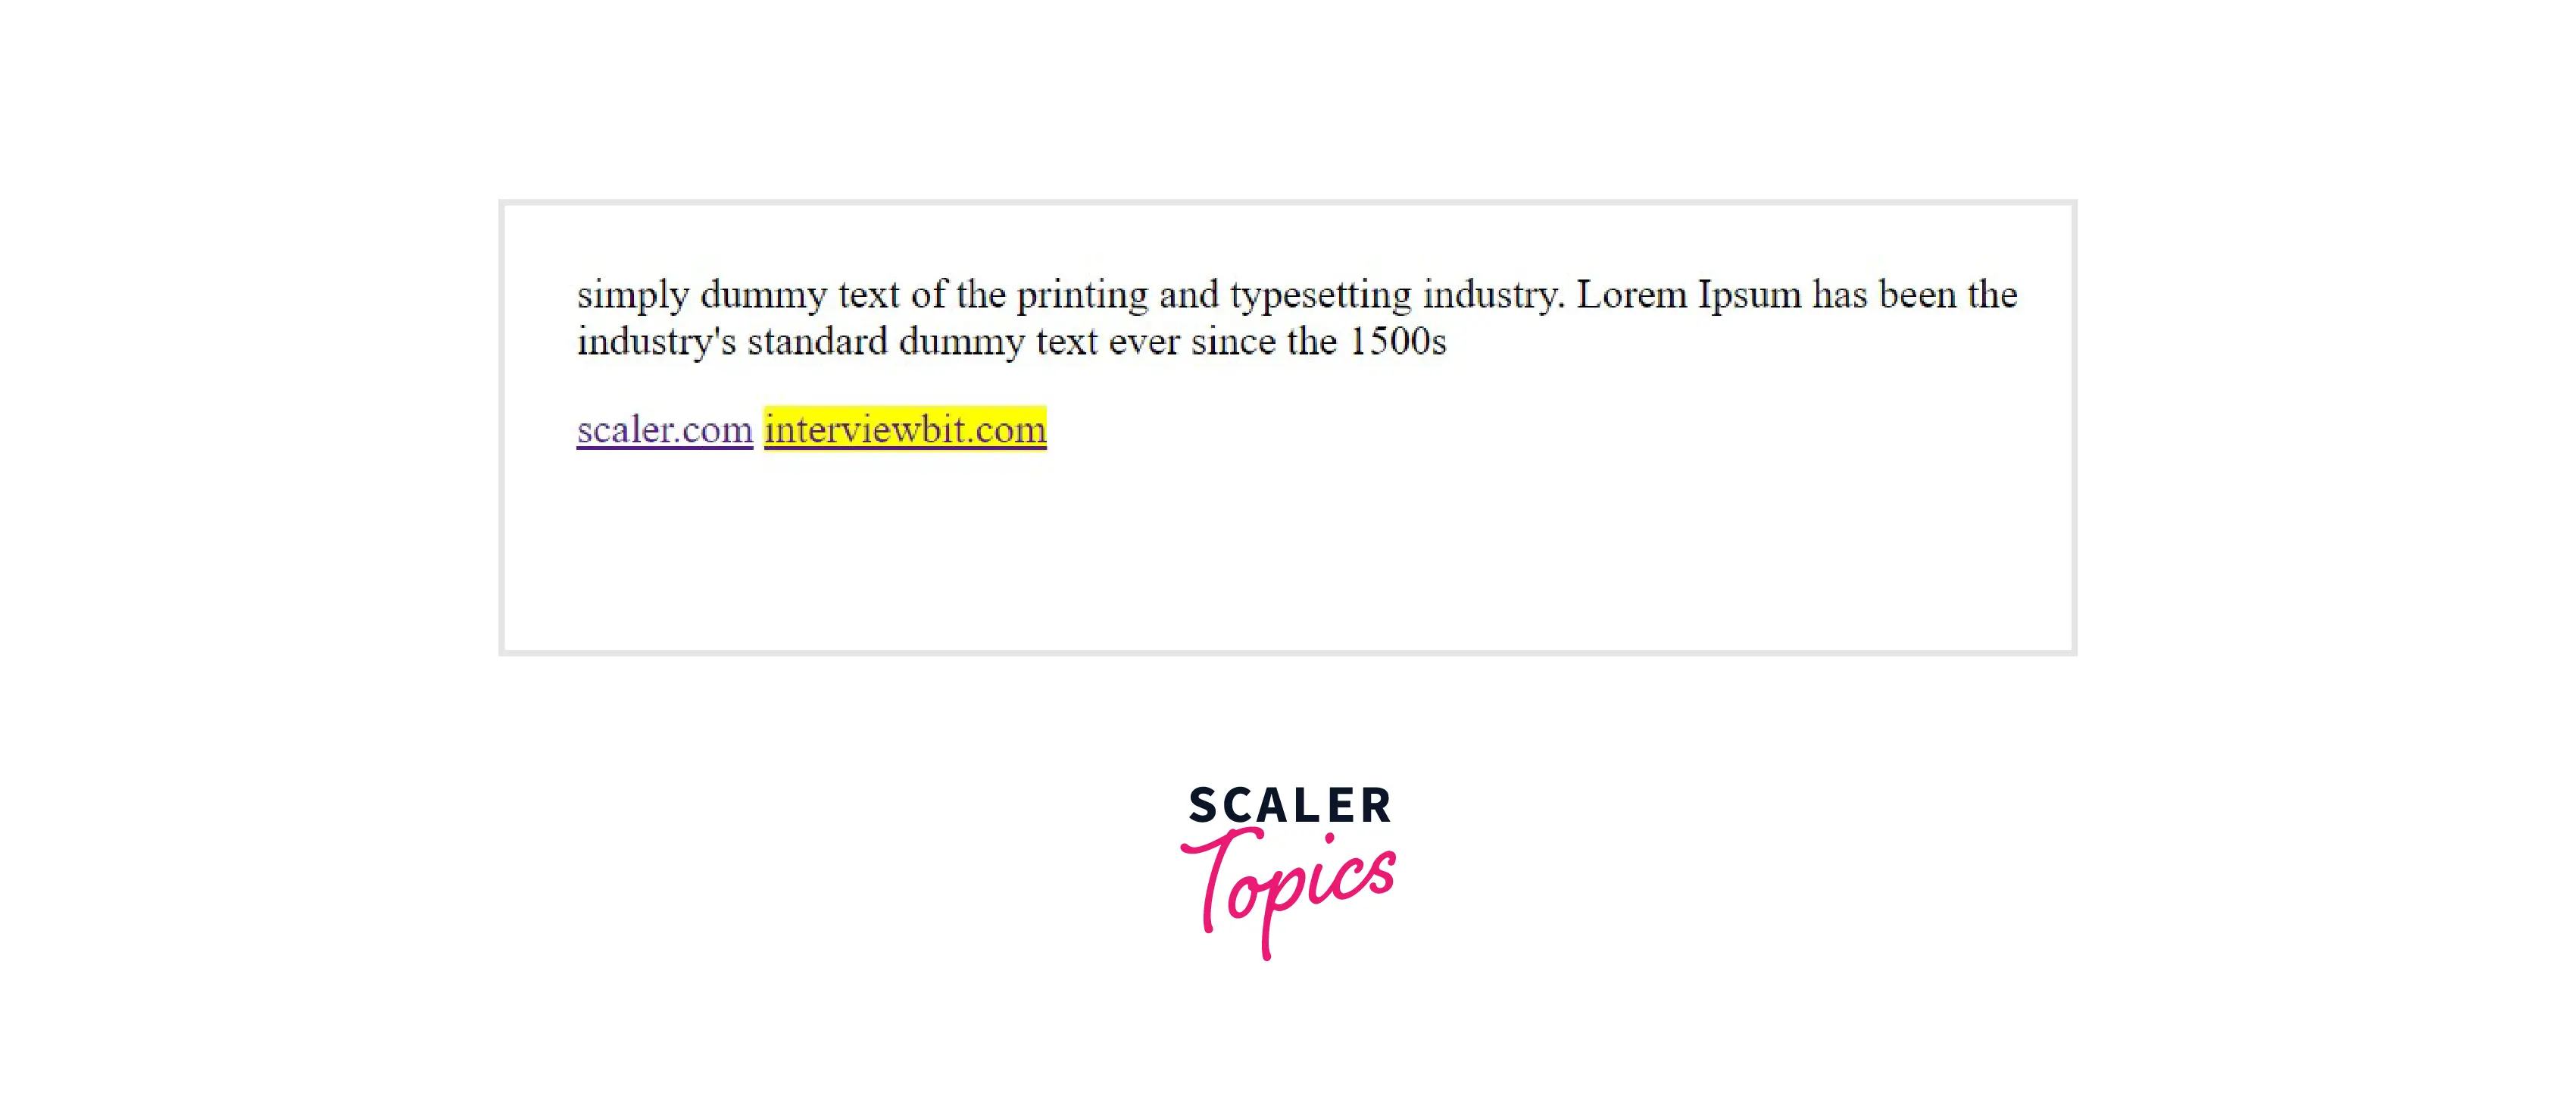
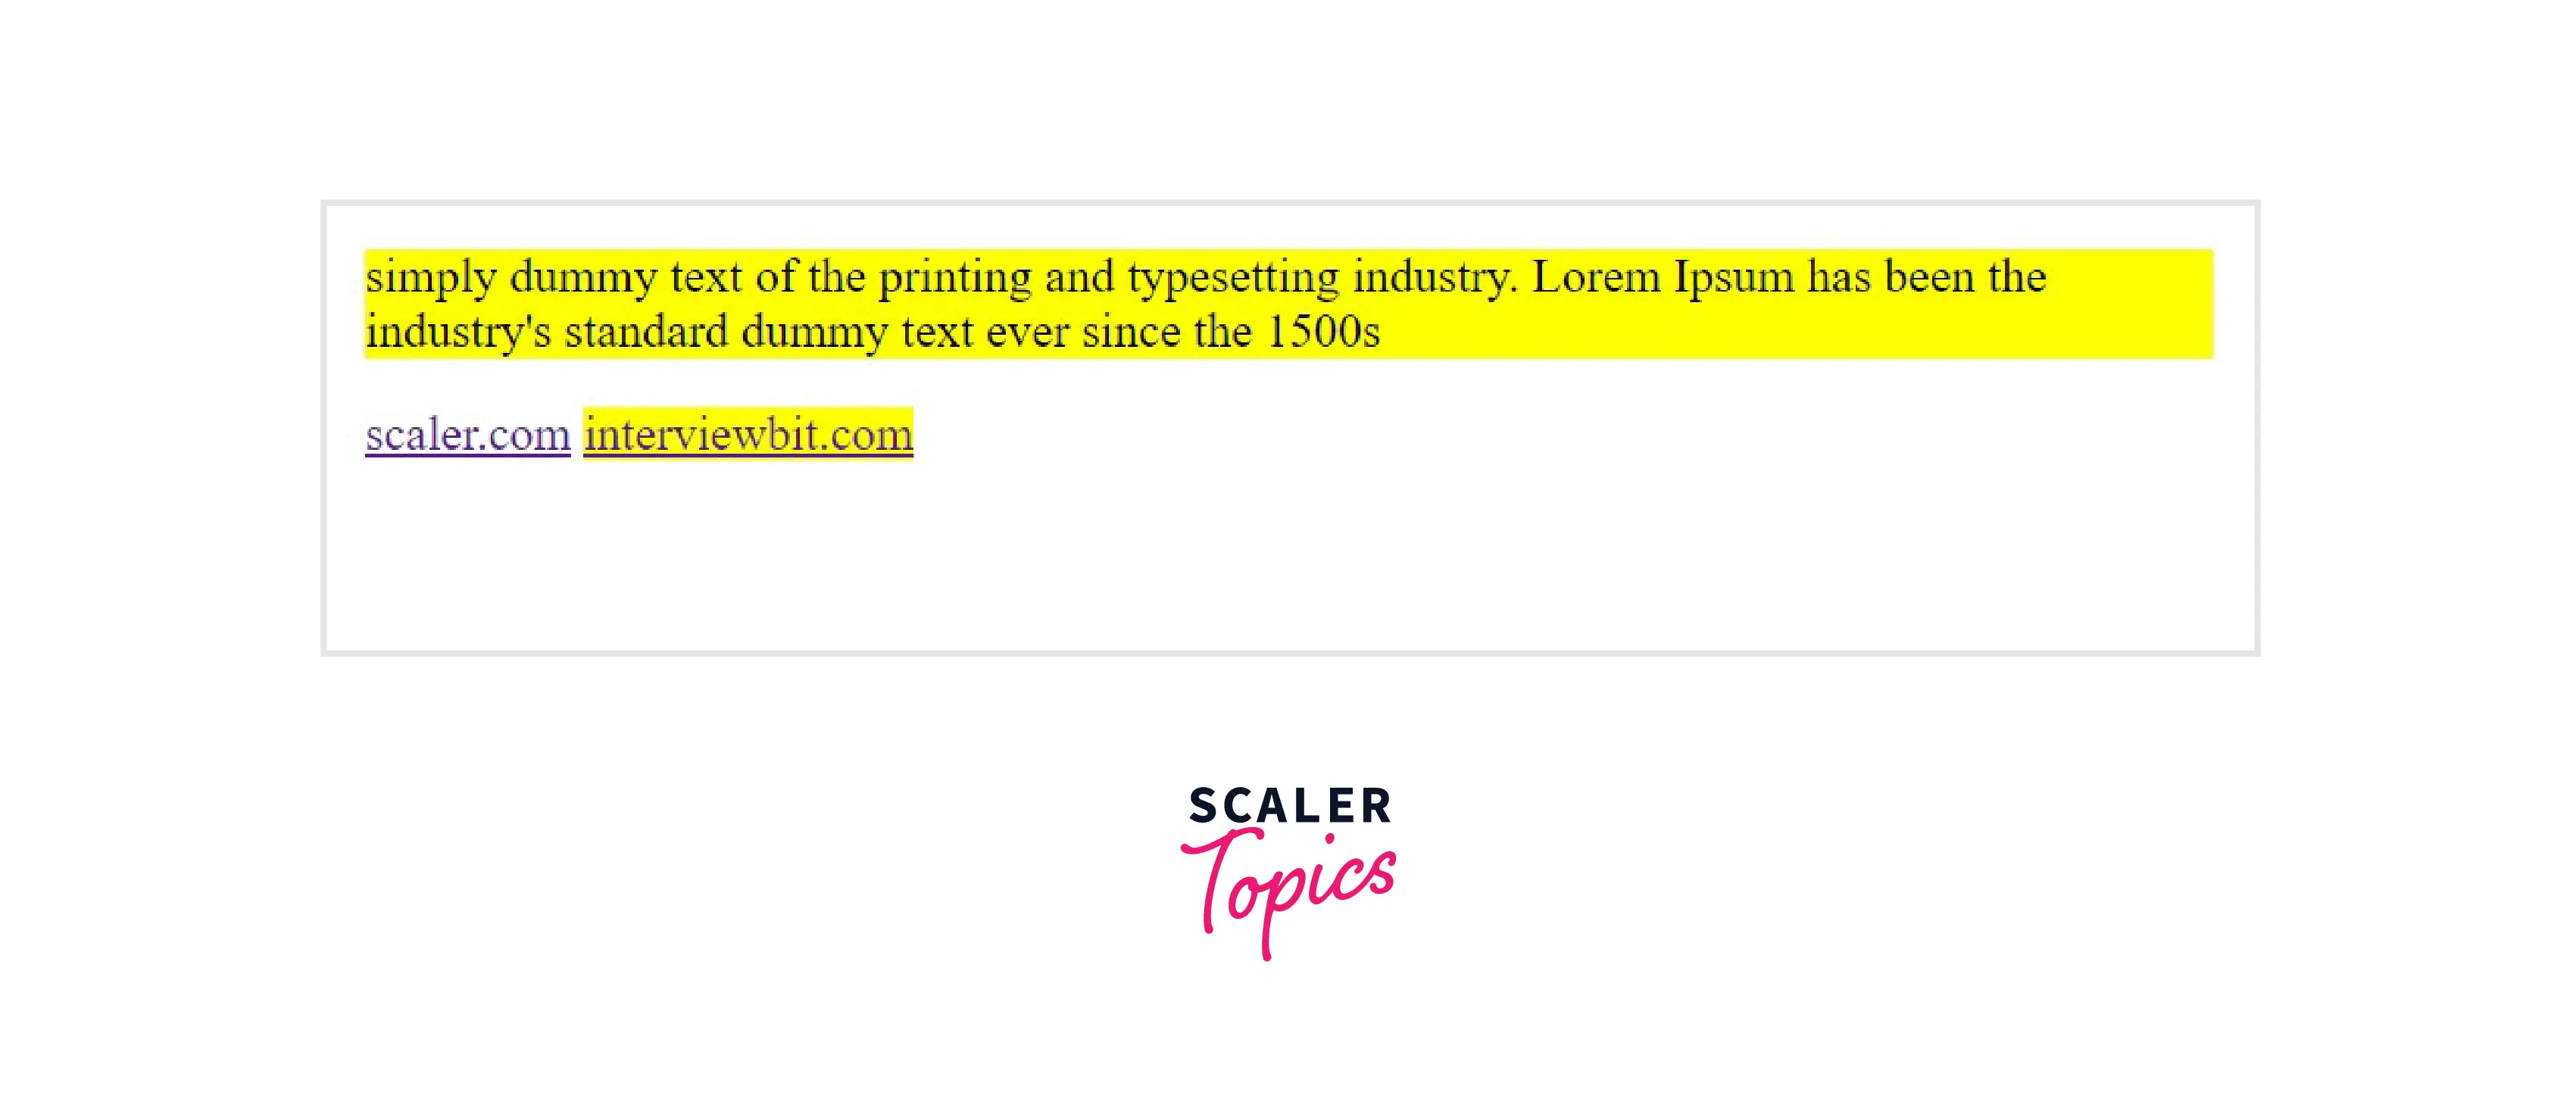
5. Attribute Selectors HTML elements can have one or more attributes, and any one of these attributes can be used to target and select HTML elements, they are selected if they match the condition being mentioned while selecting the attribute, and after selecting the attribute different CSS properties can be applied. The CSS Attribute Selector selects elements based on the existence of the given attribute or the value of the given attribute. There are various methods of selecting an attribute, which we are discussed below.
CSS [Attribute] selector In this type of attribute selector, the name of the element is used and then the name of the attribute is specified in the square brackets. The elements which match the name of the attribute specified in the square bracket are selected and the CSS properties are applied to them.
Syntax
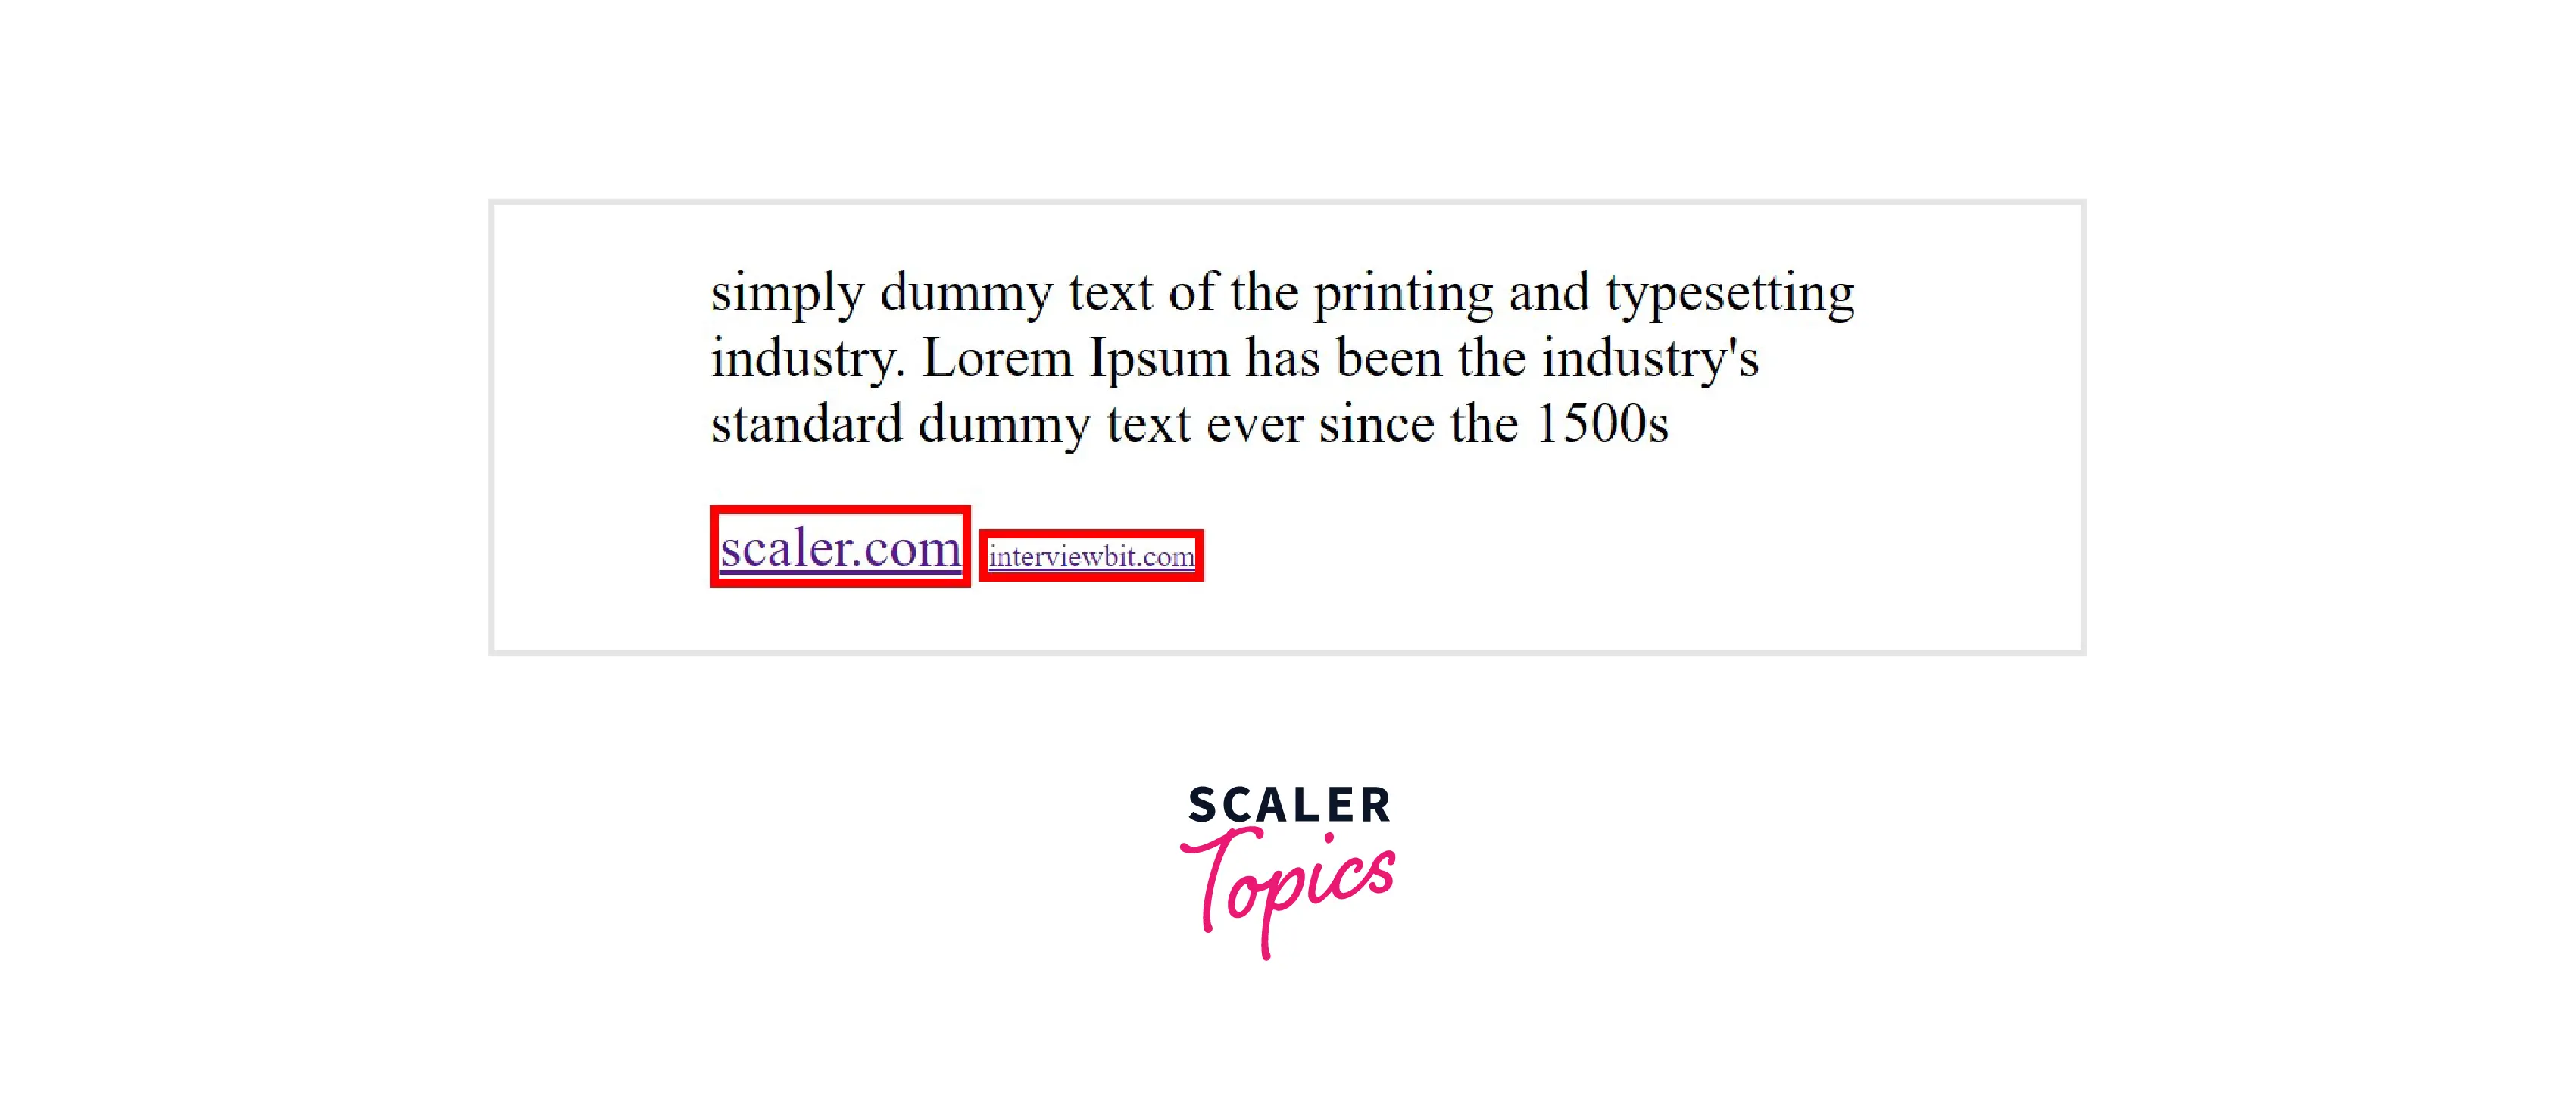
Example In the example given below, we are using the target attribute and the element we will select will be the <a> anchor element. So, any <a> element having the target attribute will be selected and the specified CSS property will be applied to it.
Output
If you want to apply specific CSS property to different elements containing the same attribute, In that case, you have to specify the different elements and separate them by comma(,).
Example
Output
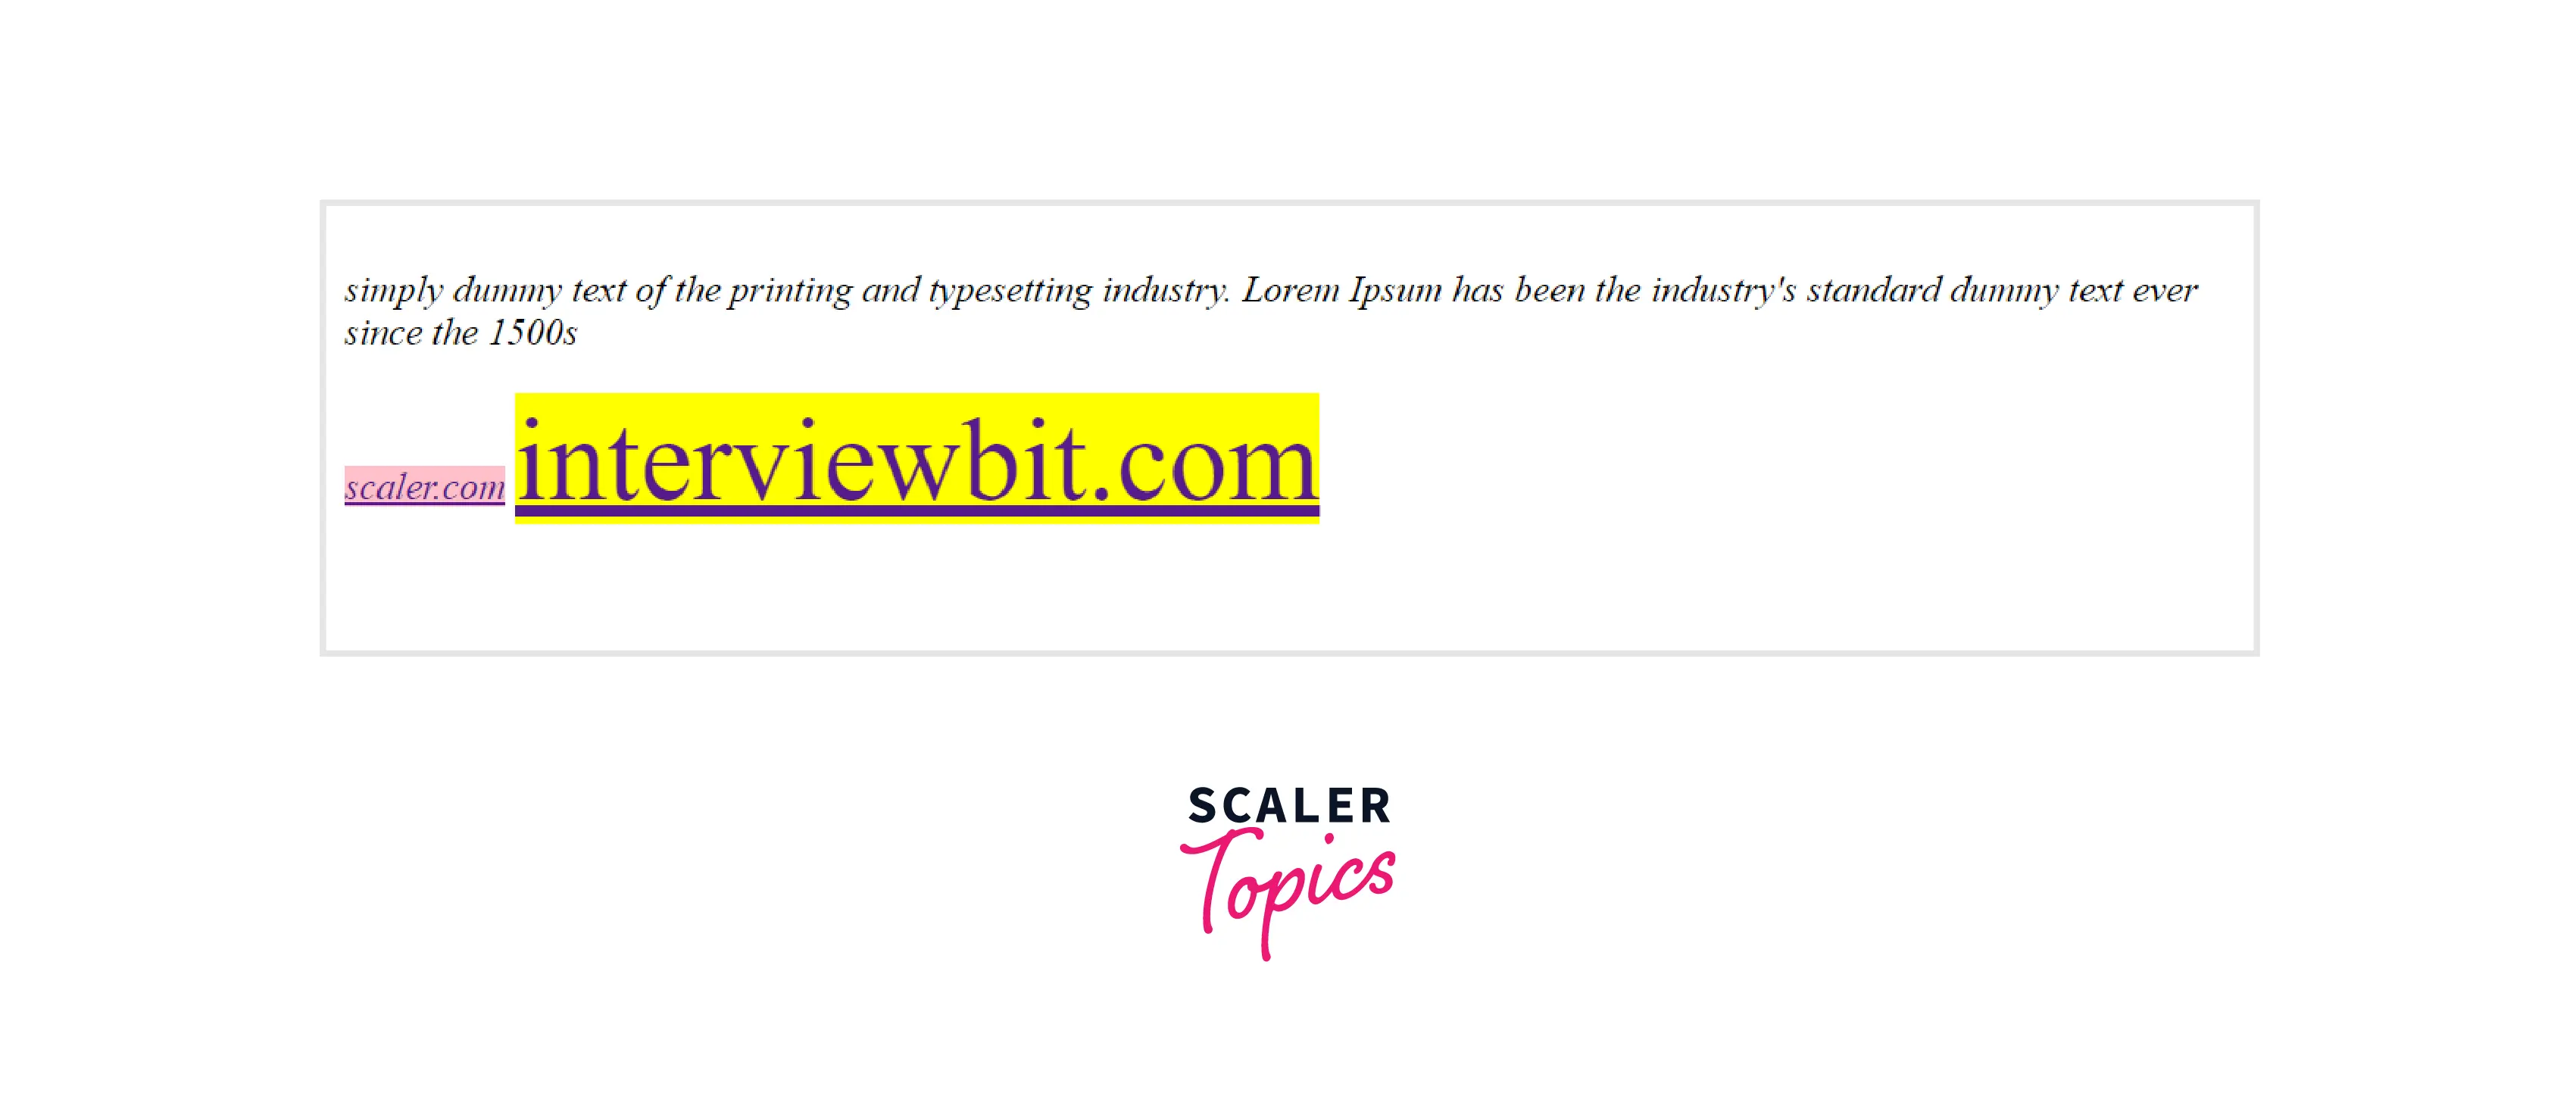
CSS [attribute = “value”] Selector
In this type of attribute selector, all the HTML elements whose attribute and attribute’s value (Attribute value is the string of the of characters that are assigned to the attribute of the HTML element. It mentioned inside the double quotes “ ”) matches exactly with the values specified in the selector are selected, and the CSS properties specified are applied.
Syntax
Example Here in this example, we have used two different HTML elements- Anchor <a> and the Paragraph tag <p> we have taken the target attribute and for the different values of the target attribute, we will get different results, as we have assigned different values while creating the HTML elements. we will first specify the value of the attribute to "abc", and the element we select will be the <p> paragraph element. Now, any <p> element having a target attribute and the target having the value of "abc" will be selected and the CSS properties will be applied to it. Similarly, we also changed the value of the target attribute to "xyz" and the element to <a> anchor tag, to see the different results.
Output
CSS [attr~=value] Selector
Using this type of attribute selection also, we select HTML elements based on attribute and their values, In this case, the element will be selected even if the value mentioned in the selector matches any value (as they can be a whitespace-separated list of words) in the element's attribute.
Syntax
Example In this example, we will use the title attribute and will give it two different values and two different sets of CSS styles. Now we will use different HTML elements and will apply these targets and see the output.
Output
CSS [attr|=value] Value
This attribute selector is used to select all the HTML elements whose attribute has a value of a hyphen-separated list of words, the element will be selected if the start of a hyphen-separated list of words in the attribute values matches the value specified in the selector. The value of the attribute can be a whole exact word either alone or should begin with the value immediately followed by a hyphen. (-)
Syntax
Example In this example, we will select the class attribute and will give it the value (|=) colored. So, if any element have class whose name starts from "colored" and is hyphen seperated will be selected.
Output
[attribute^="value"] Selector
As in the previous type of attribute selector, where the value of the attribute is a hyphen-separated list of words, and then we apply [attr|=val] selector to select them. But In the [attr^=val] type of attribute selector, the value need not be separated by hyphen or space, the value of the attribute just need to begin with the value specified in the selector. This selector comes in the category of Substring matching selectors.
Syntax
Example
In this example, we will select the class attribute and will give it the value (^=) "colored". So, if any element have class whose name starts from "colored" will be selected.
Output
CSS [attribute$="value"] Selector
Till now we have discussed that the starting/beginning of the attribute's value must match the selector's value, which means we are selecting HTML elements based on how to attribute value begins, Now in this type of attribute selector, we will select HTML elements whose attribute’s value ends with the specified value. The value need not be the whole word.
Syntax
Example In this example, we will select the target attribute and will assign the value ($=) "end" to it. So, if any element has a target attribute and the value of the target have an ending "end", then the element will be selected and the CSS styles will be applied to it.
Output

[attribute *= "value"] selector
In all the previously explained attribute selectors, we selected elements whose attribute value either matched from the end of the beginning. But to be more flexible, here in this type of attribute selector, we can select elements whose attribute value matches the value specified in the selector and the value can be present anywhere (if there is a list of words in the value).
Syntax
Example
Here, we will use the target attribute and will assign(*=) the value of "line" to it. So, if any element have the target attribute will be selected if there value contains "line" word anywhere.
Output

CSS Grouping Selector
The CSS grouping selector allows you to select multiple HTML elements having the same CSS properties and group them so that the style can be applied at once to all the elements. This reduces the code redundancy and makes code simpler, readable, re-usable. To group HTML elements, first, we need to check if there are elements whose CSS properties are the same??, if yes!! Then we will group those elements and separate them with a comma(,) and then you are free to implement the same style to all the selected elements.
Syntax
Example In this example, we will select <h1>,<h3> and will apply a set of CSS properties and then we will select <div>,<h2> and apply another set of CSS properties and will observe the output.
Output

Turn Learning into Career Growth
CSS Combinators
CSS selectors are used to selecting HTML elements, but when we use complex selectors(more than one selector being used to select the HTML elements) then the use of combinators explains the relationship between the two selectors. The Combinators combine the selectors in a specific manner to provide them with a useful relationship and the position of content in the document.
There are four types of combinators in CSS:
- Descendant selector (space)
- General Sibling selector (~)
- Adjecant Sibling selector (+)
- Child selector (>)
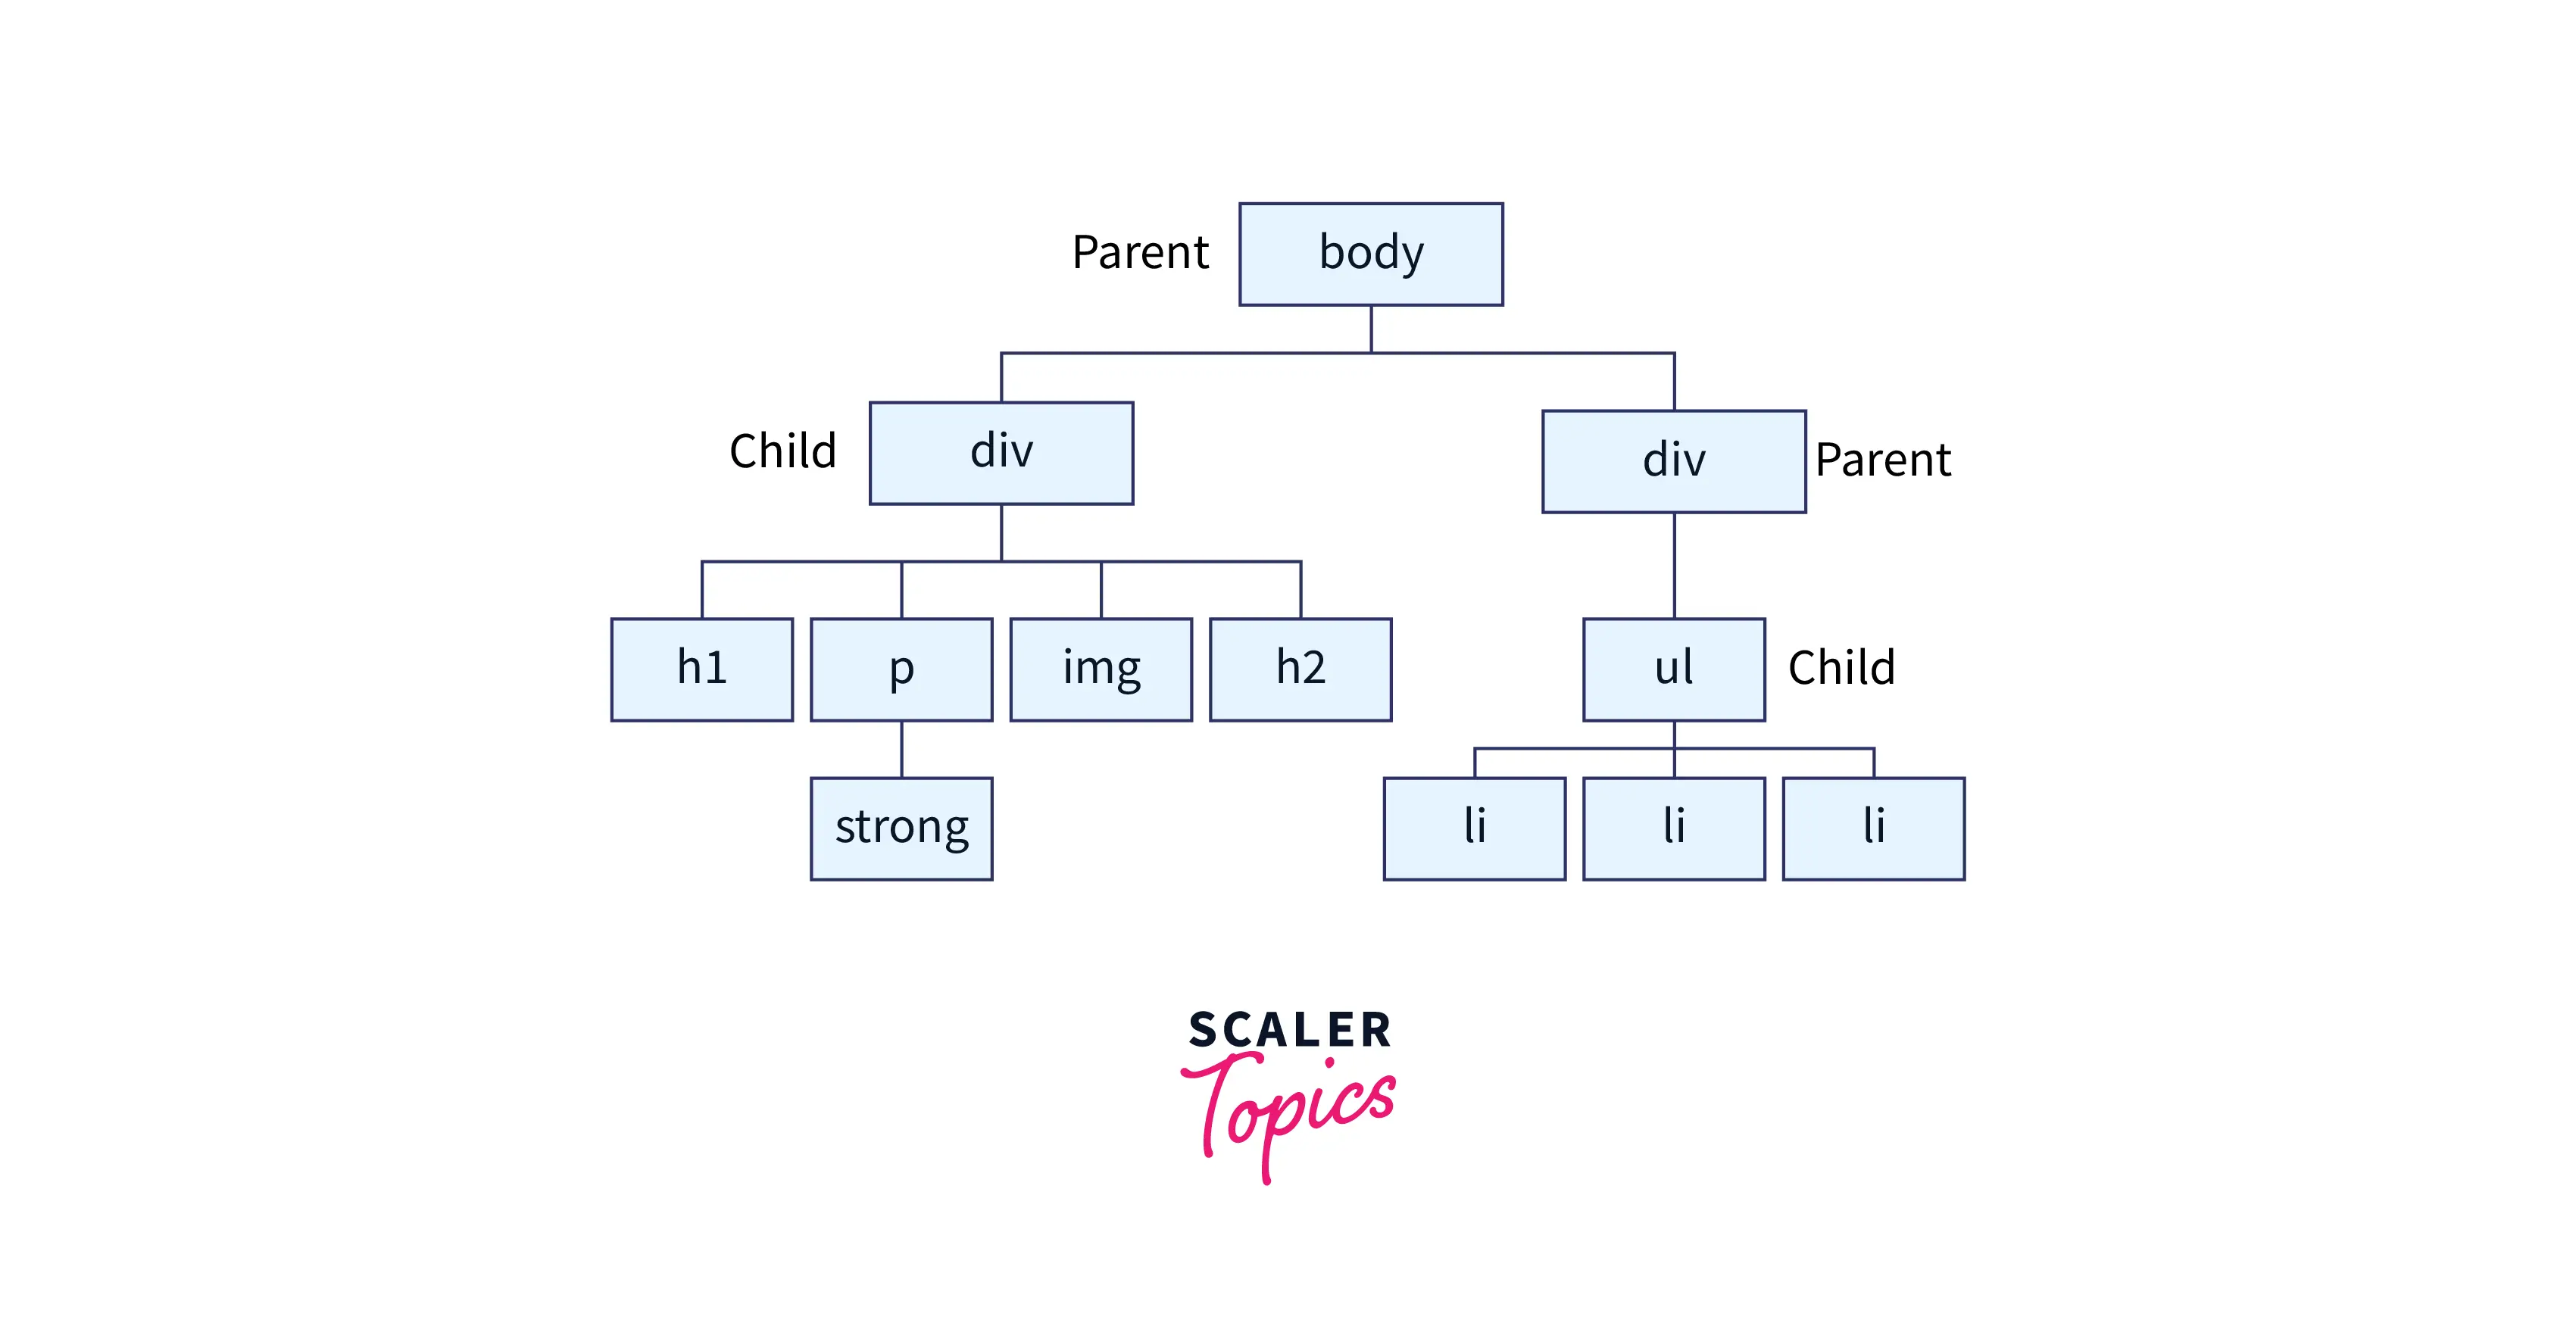
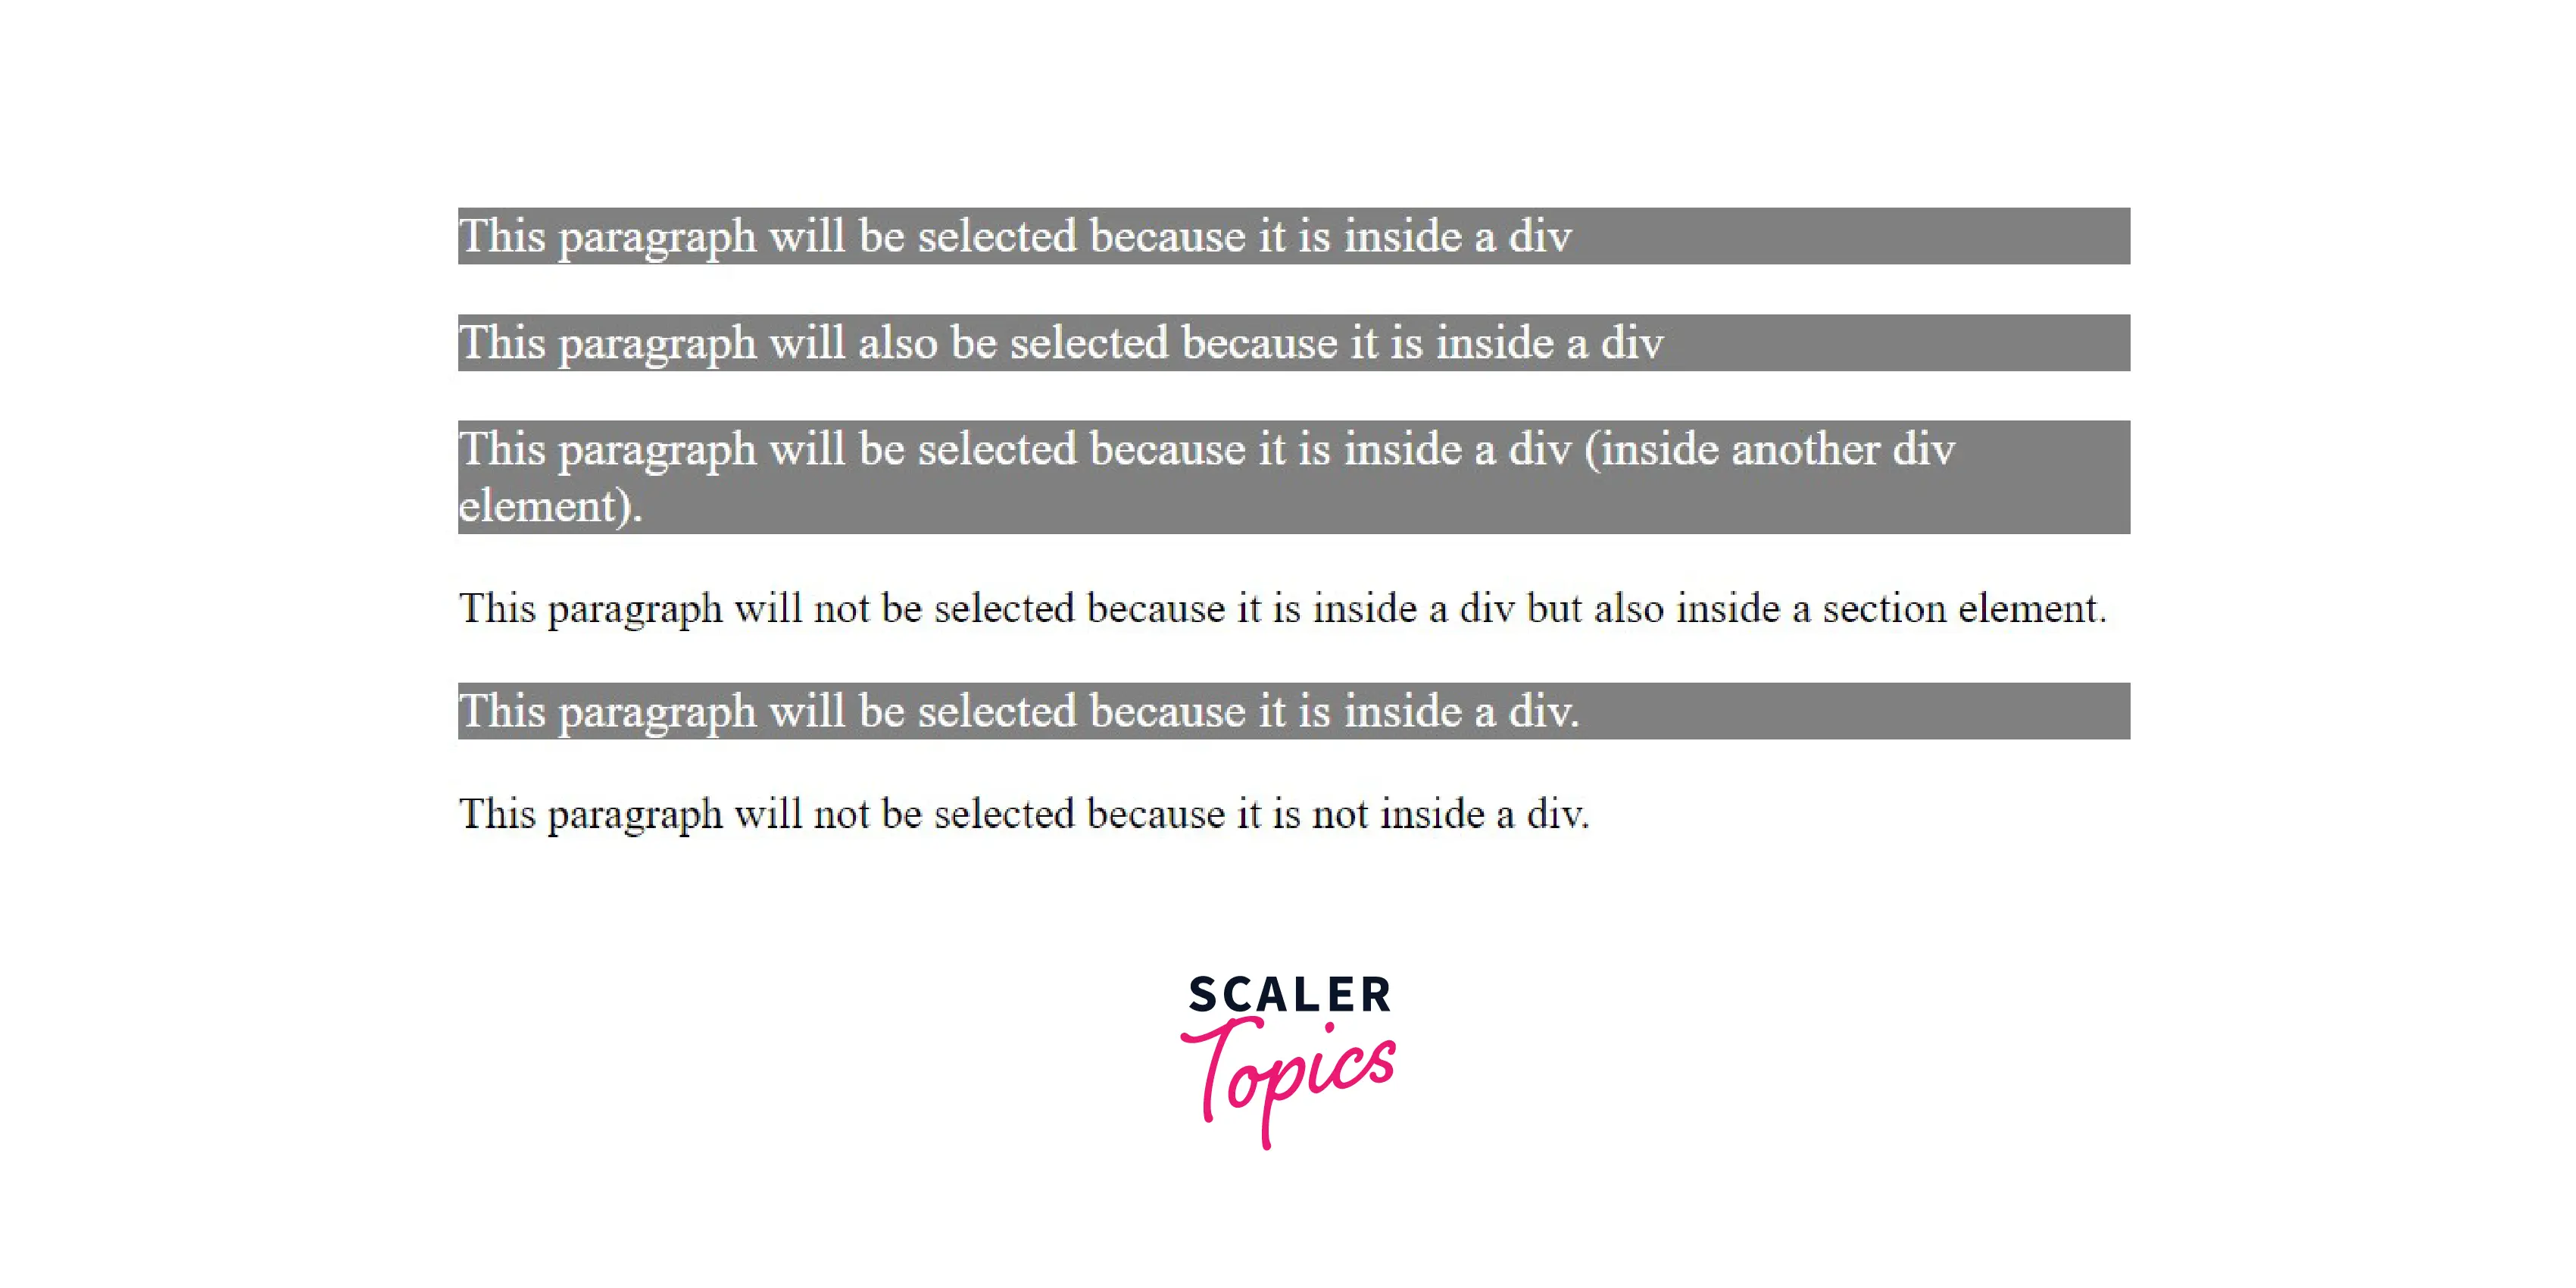
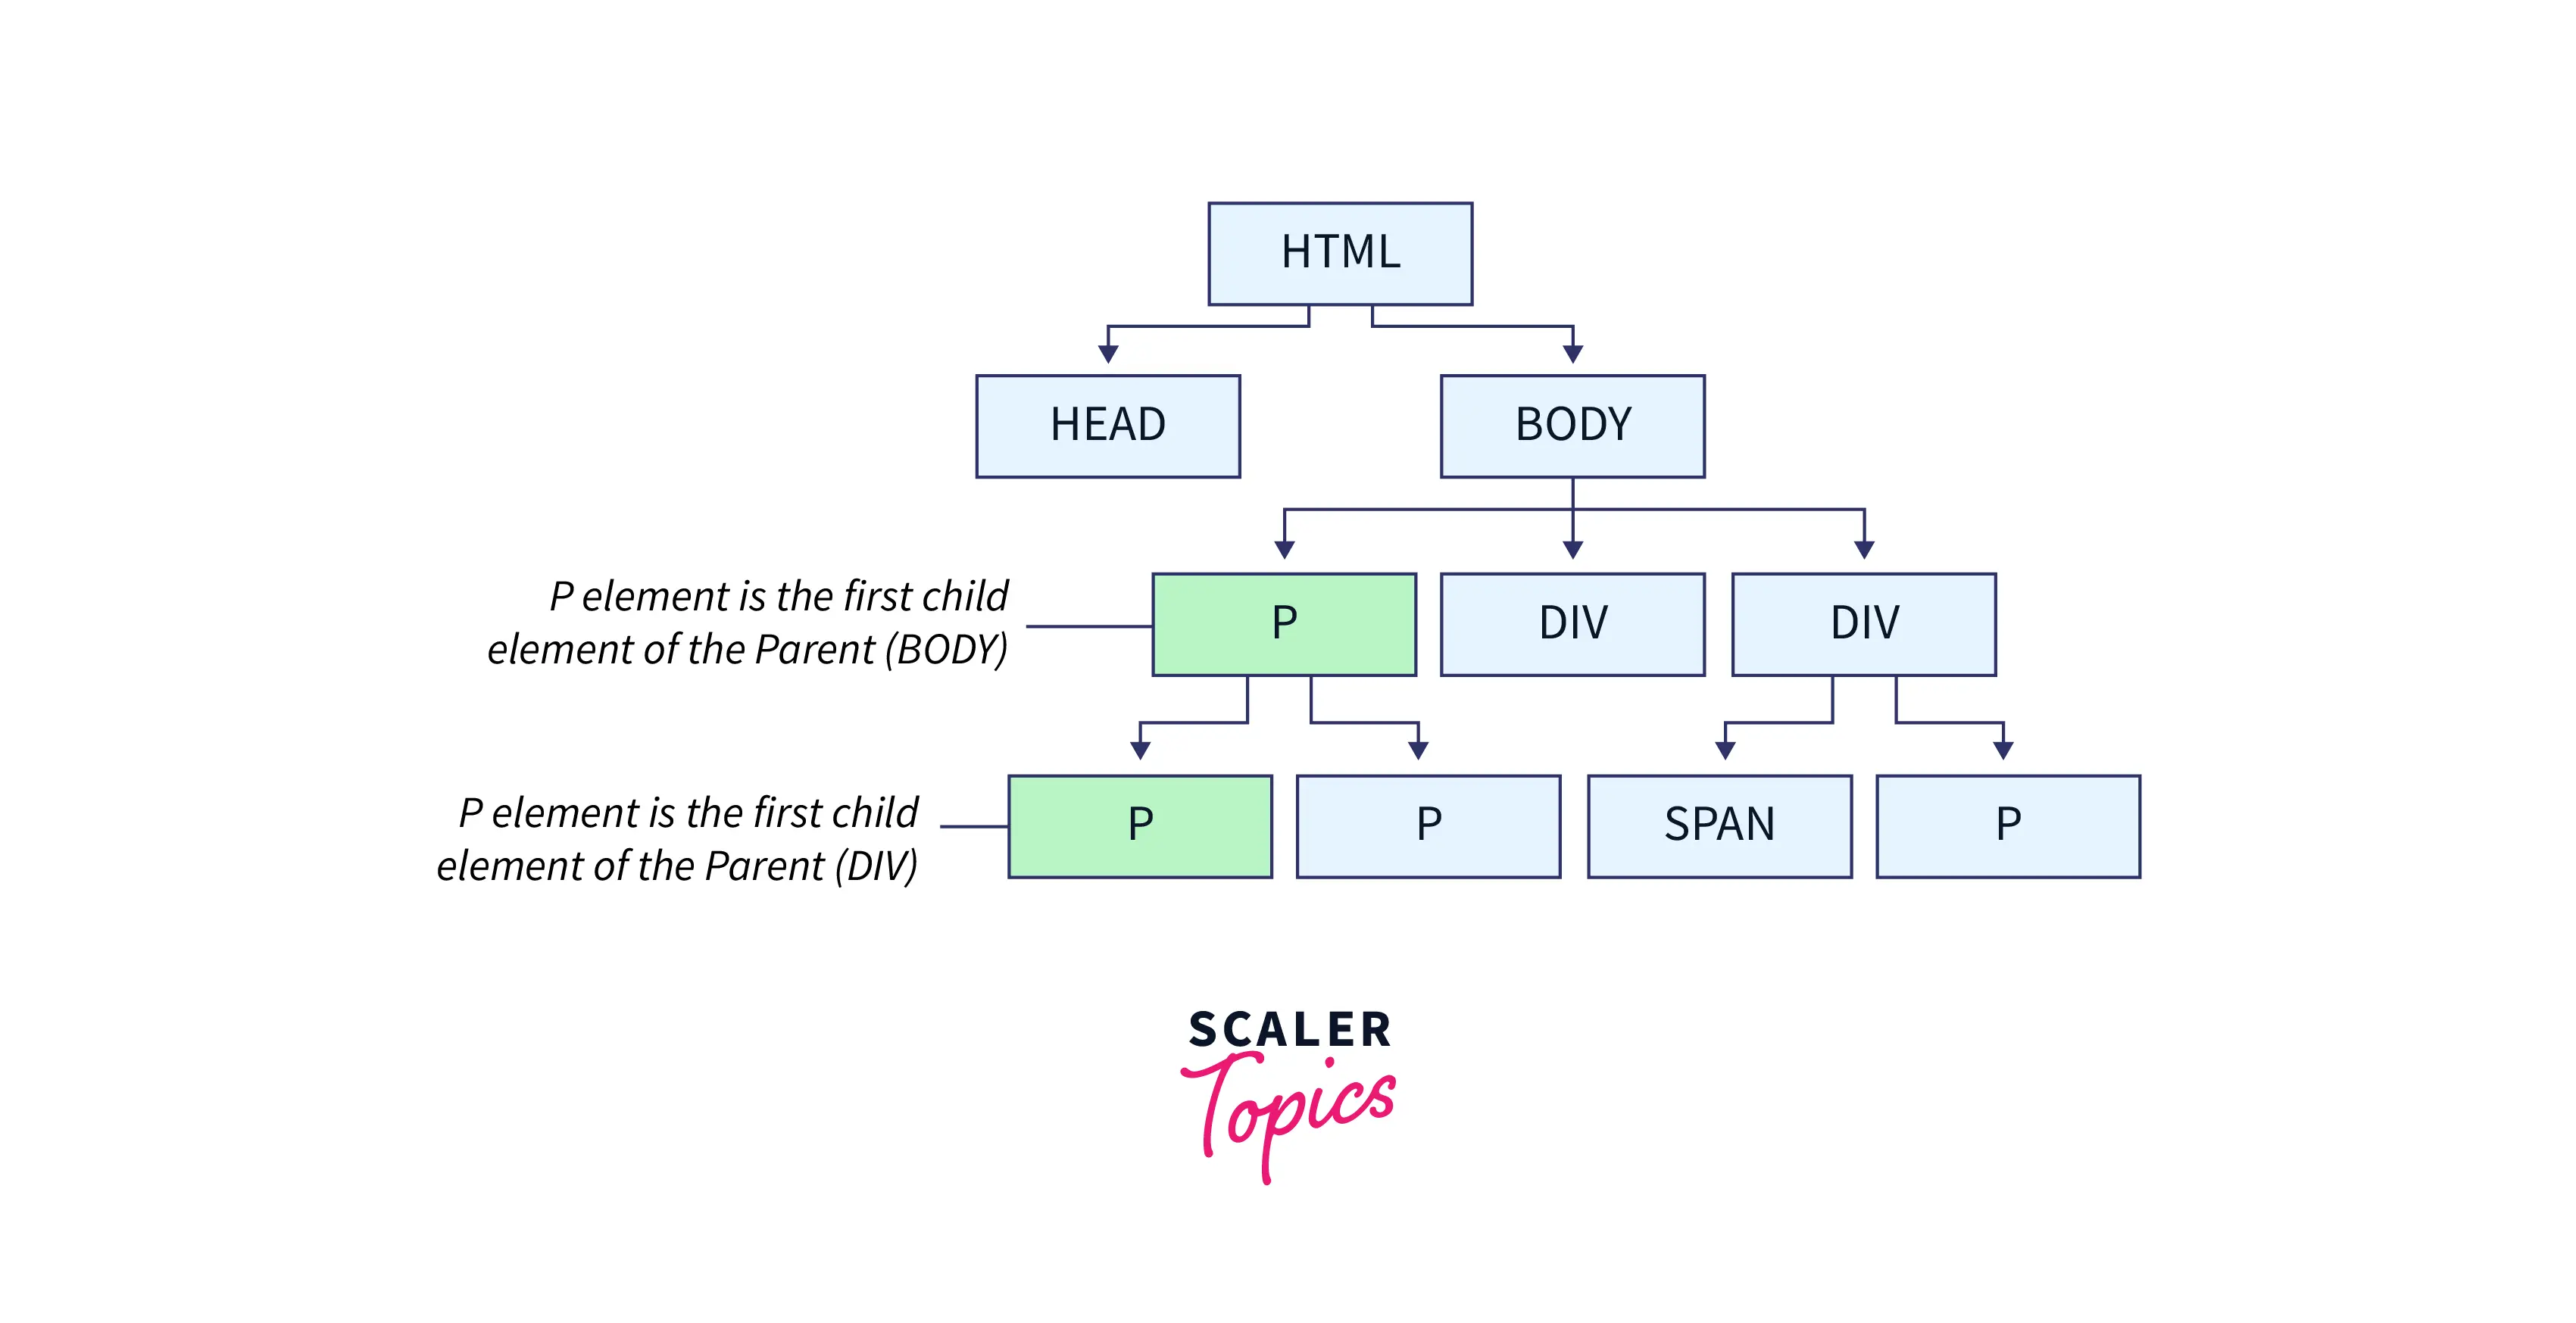
1. Descendant selector (space) The descendant selector in CSS selects all HTML elements that are descendants of a specified ancestor element. The descendant combinator is represented by a single space (" ") character. It combines two selectors in which the first selector represents an ancestor (parent, parent's parent, or ancestor of more than five levels), and the second selector represents descendants. It combines two selectors such that elements matched by the second selector are selected only if they have an ancestor element matching the first selector. The CSS selector that uses a descendant combinator is called descendant selectors.
Syntax
Example In this example, we will make <div> as the parnet element and then we will make <p> as the child element, So, if anywhere in the code <p> comes under <div>, then it will be selected.
Output

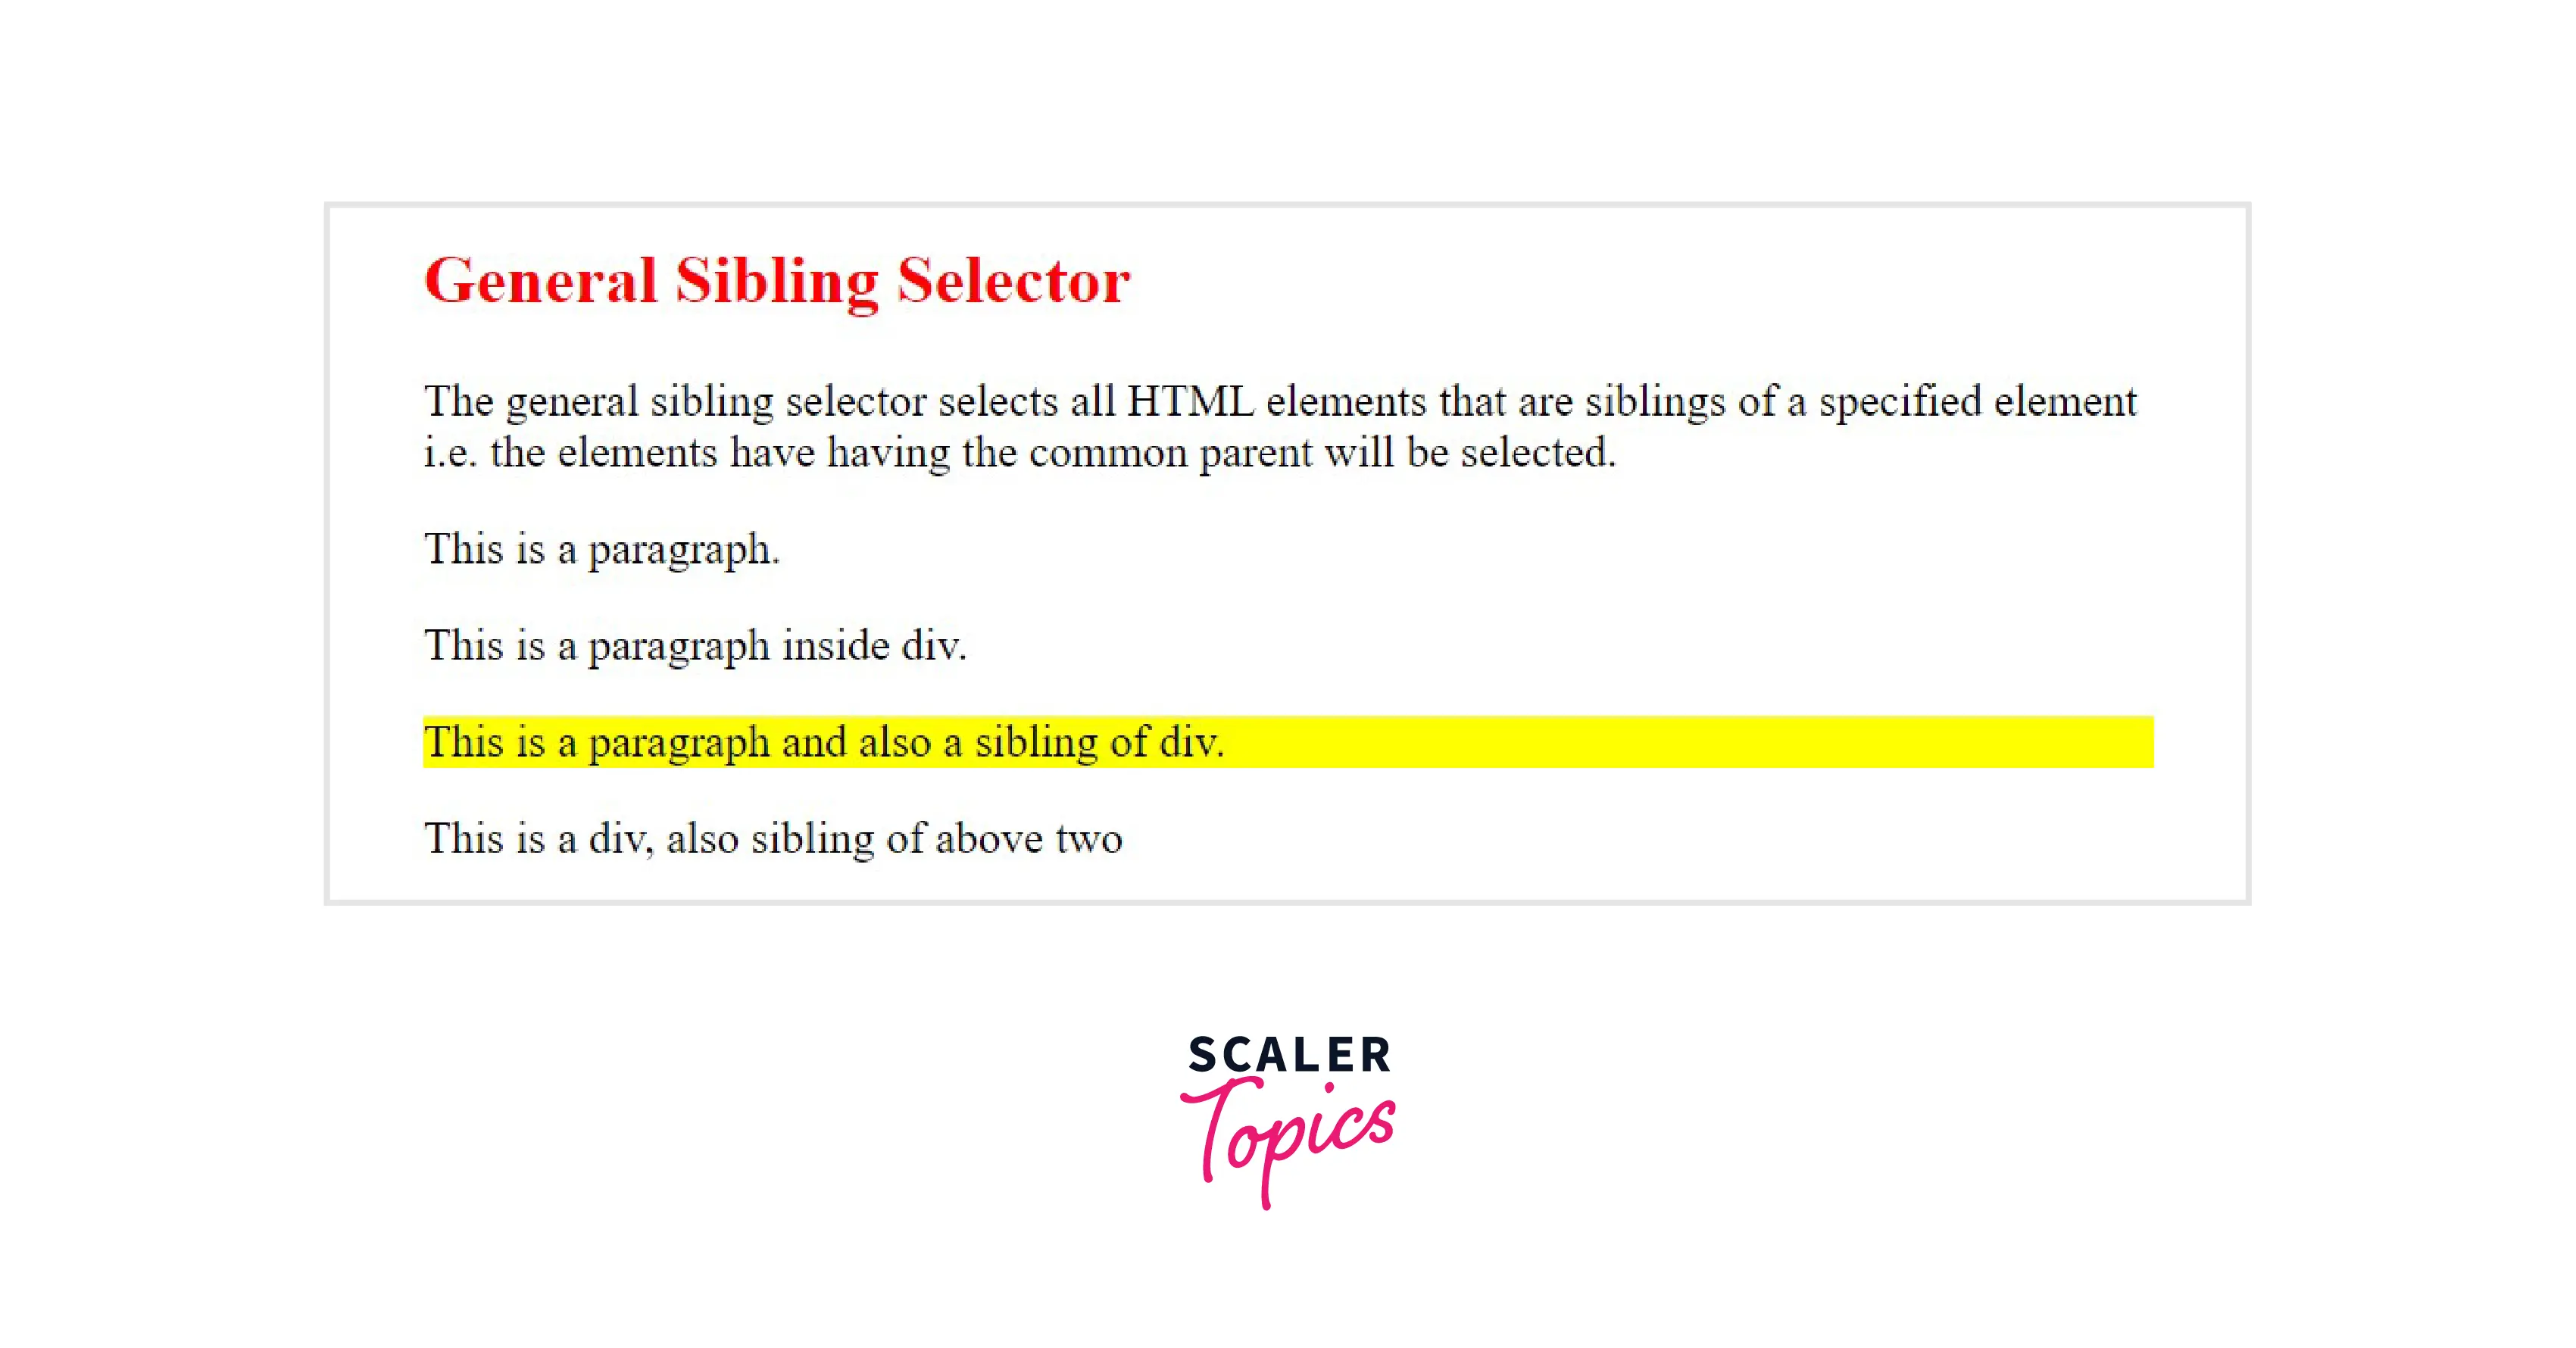
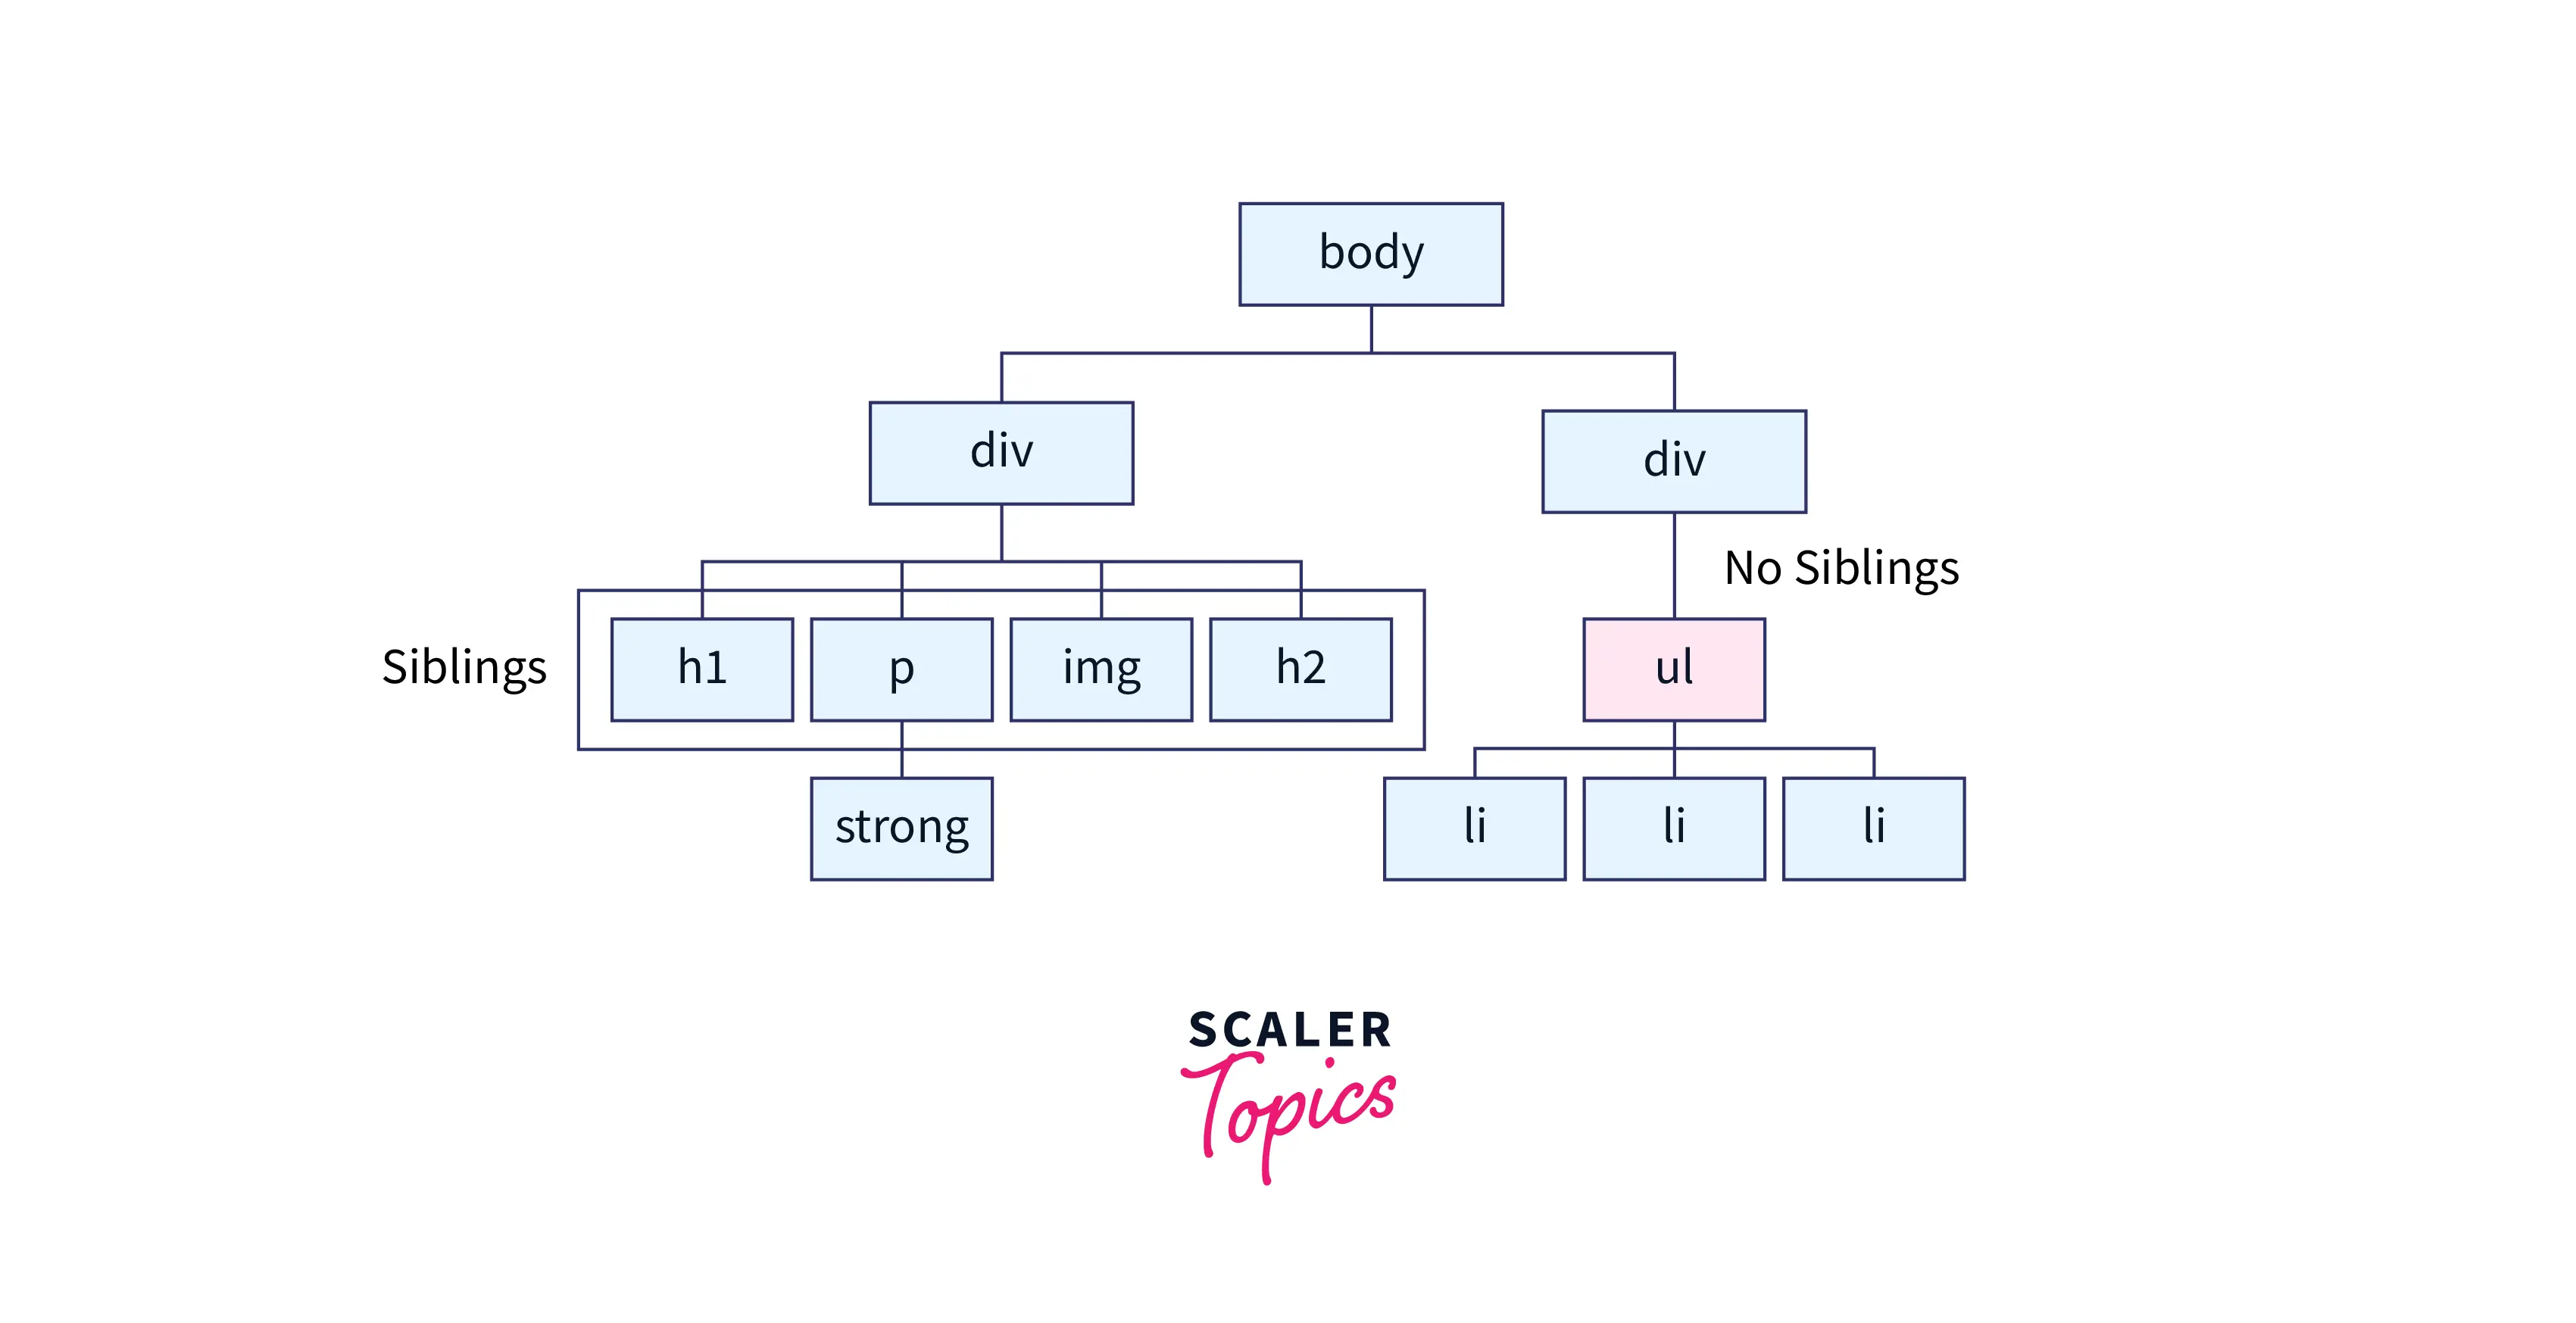
2. General Sibling Selector
The general sibling selector selects all HTML elements that are siblings of a specified element i.e. the elements that have to have the common parent will be selected. The second element is specified will be the element that is to be selected, and the first element specified will be the element whose sibling should be the second element, and then only it will be selected. It uses the tilde (~) sign to separate the elements. It can be used for selecting the group of elements that share the common parent element.
Syntax
Example In the example discussed below, The elements we will use will be <div> and <p> , To be selected they must be in the same level and the <p> must come after <div>. If in the code these two elements becomes siblings, then the <p> will be selected.
Output
3. Adjacent Sibling Selector (+)
The adjacent sibling selector is used to select an element that is adjacent to the first specified element and also the sibling of the first element.
It uses the plus (+) sign to combine the two elements. The second element is selected only when the element specified in the second place is immediately after the first element and the first and the second elements are siblings. This sibling selector selects the adjacent element, or we can say that the element is next to the specified tag.
Syntax
Example In this example we used <h2> and <p> , so <p> will only be selected if it comes immediately after <h2>.
Output

4. Child selector (>) The child selector selects all elements that are the immediate children of a specified element.
It uses the greater than (>) sign as the separator between the elements. The parent element must always be placed at the left of the ">". It only selects the elements that are the immediate child of the specified parent element. If we remove the greater than (>) symbol that designates this as a child combinator, then it will become the descendant selector.
Syntax
Example In the below-discussed example, we had used <h1> as parent element and <h1> as the child element. So, if later in the code <h1> comes immediately after <h1> element, then the
Output
CSS Pseudo Classes
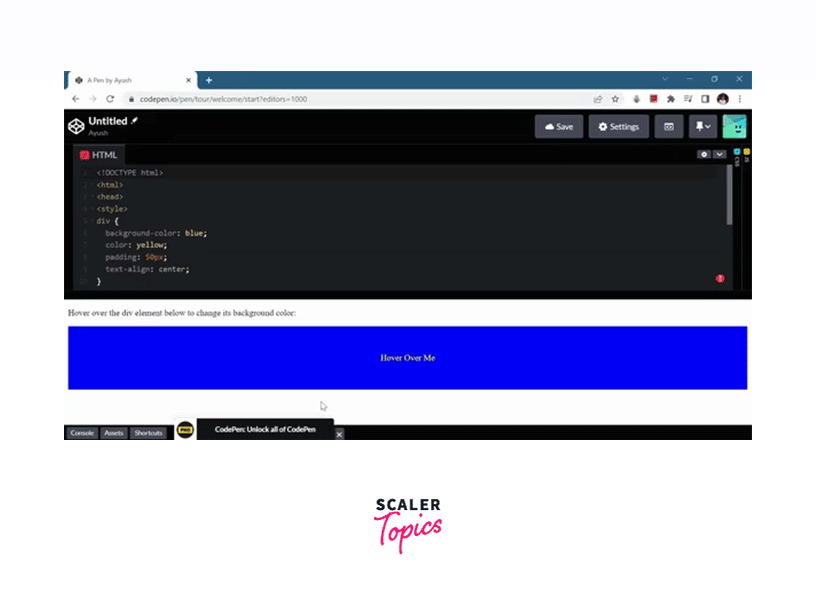
Ever wondered how the elements in some webpage change their property when you hover your mouse cursor over them?? Or how an element changes its property when you click them?? These are all possible by the use of CSS pseudo-class selectors. Pseudo-Class is a keyword added to a selector that gives a special state to the selected element(s) when they meet the desired condition. CSS pseudo-classes selector helps to add special effects to the HTML element based on the special state/condition of the element. A pseudo-class can also be understood as an assist that is combined with the simple selectors to change/highlight its property in the special condition. For example, ": hover" can be used to highlight/ add effect to an element when the mouse cursor hovers over them.
Syntax To use pseudo-class, we must use a colon (:) after the CSS element on which we want to apply effects on, and then use specify the pseudo-class.
Various CSS pseudo-classes are used in a website. Let's discuss them one by one:
1.
Syntax
Example Here in this example, we will first select the <div> element and will apply different CSS styles to it. After that, we will use hover pseudo class to give special effect when the element will be hovered with cursor.
Output
2.
Syntax
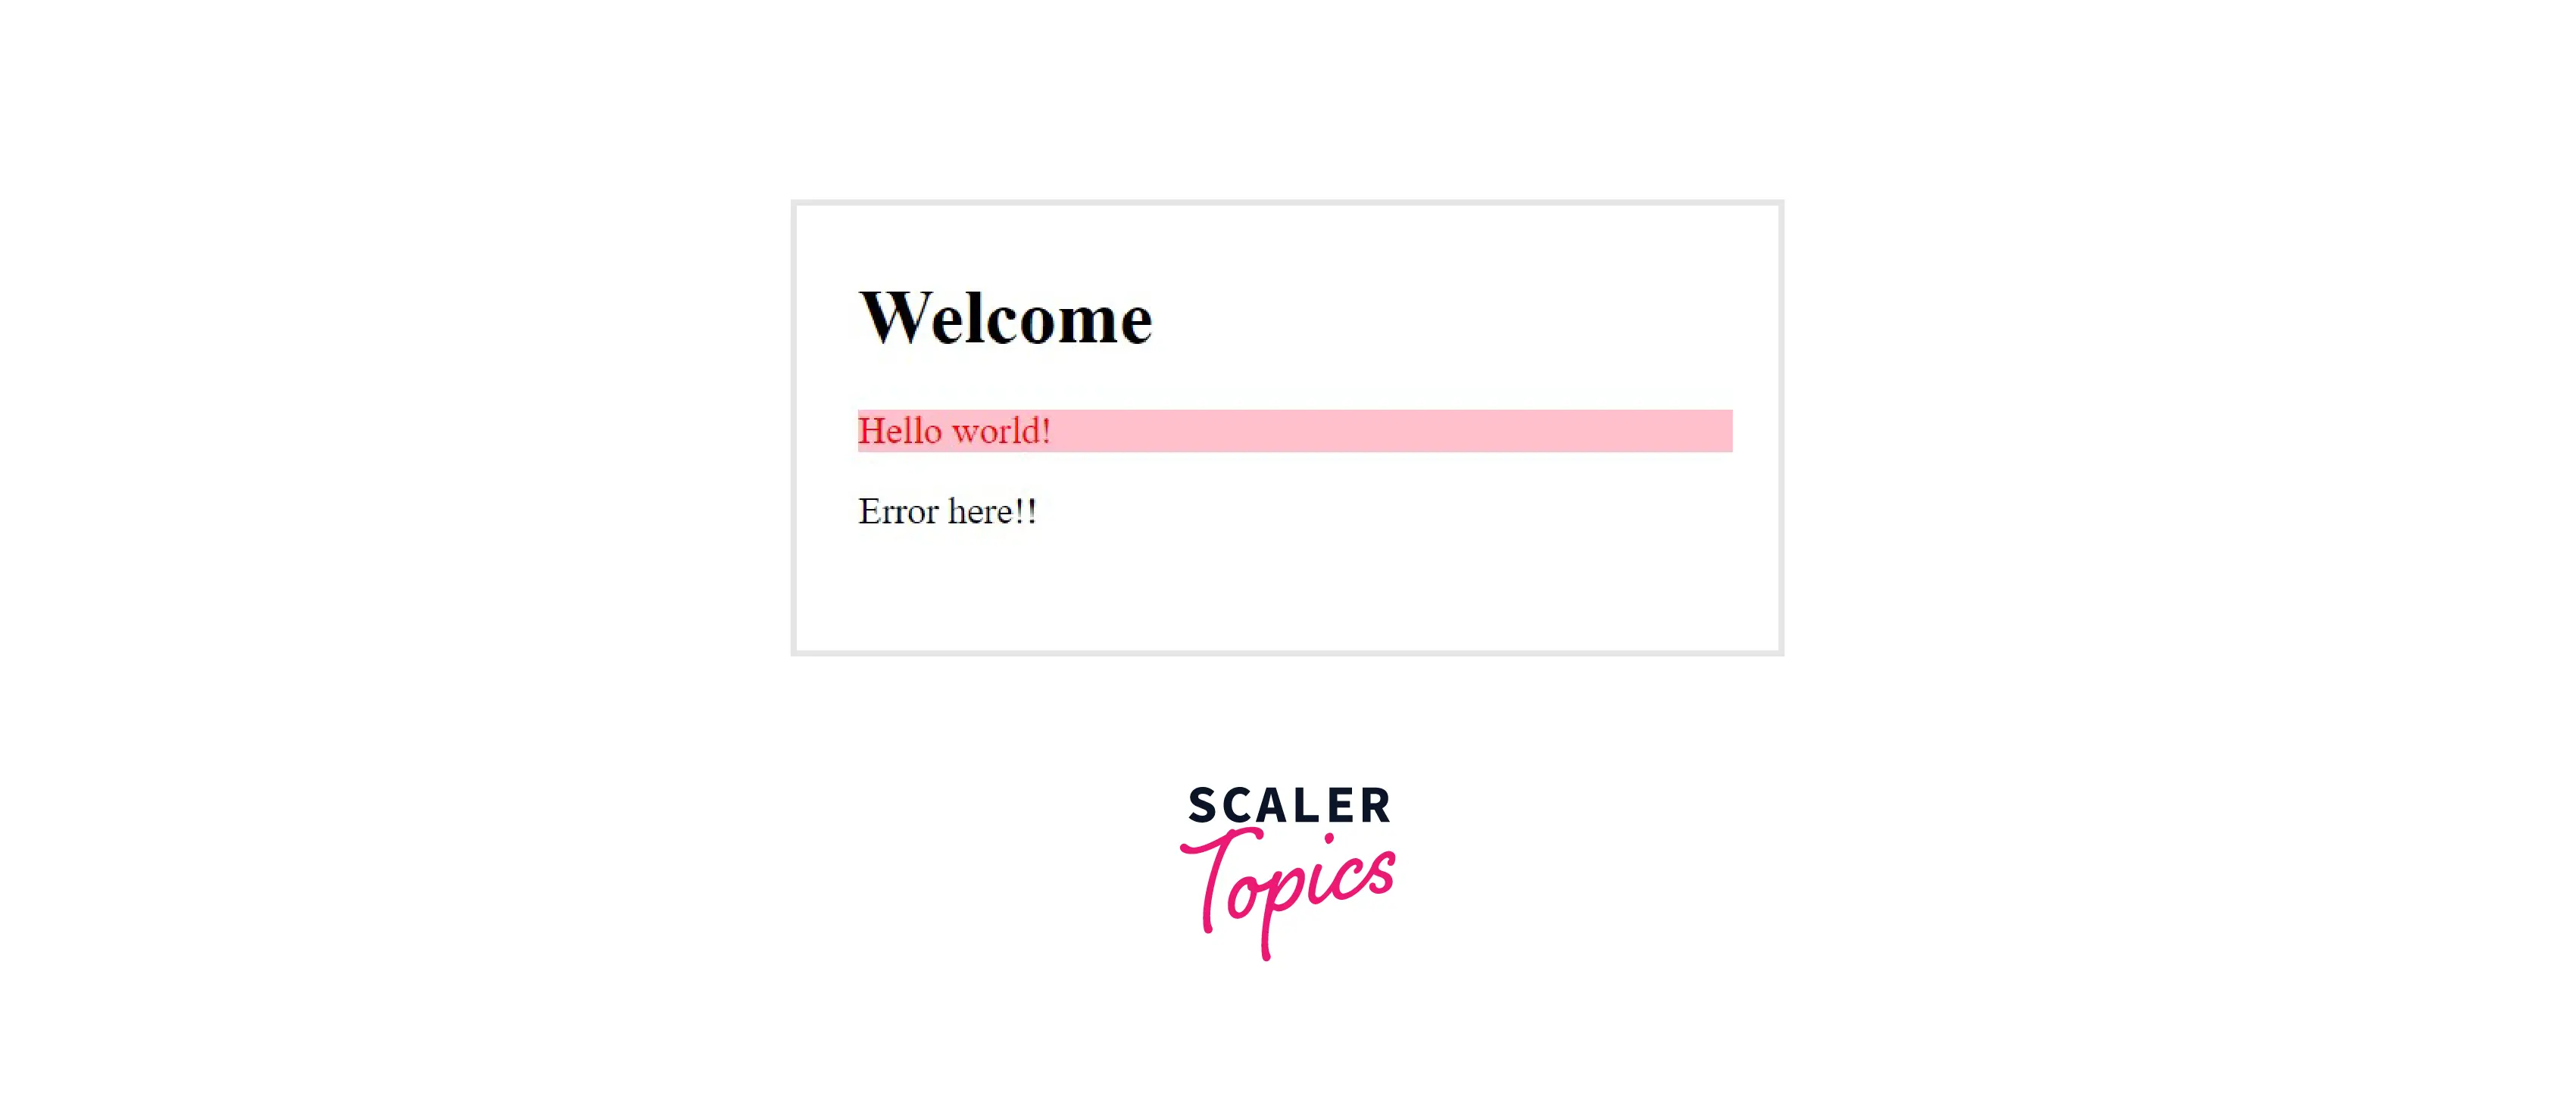
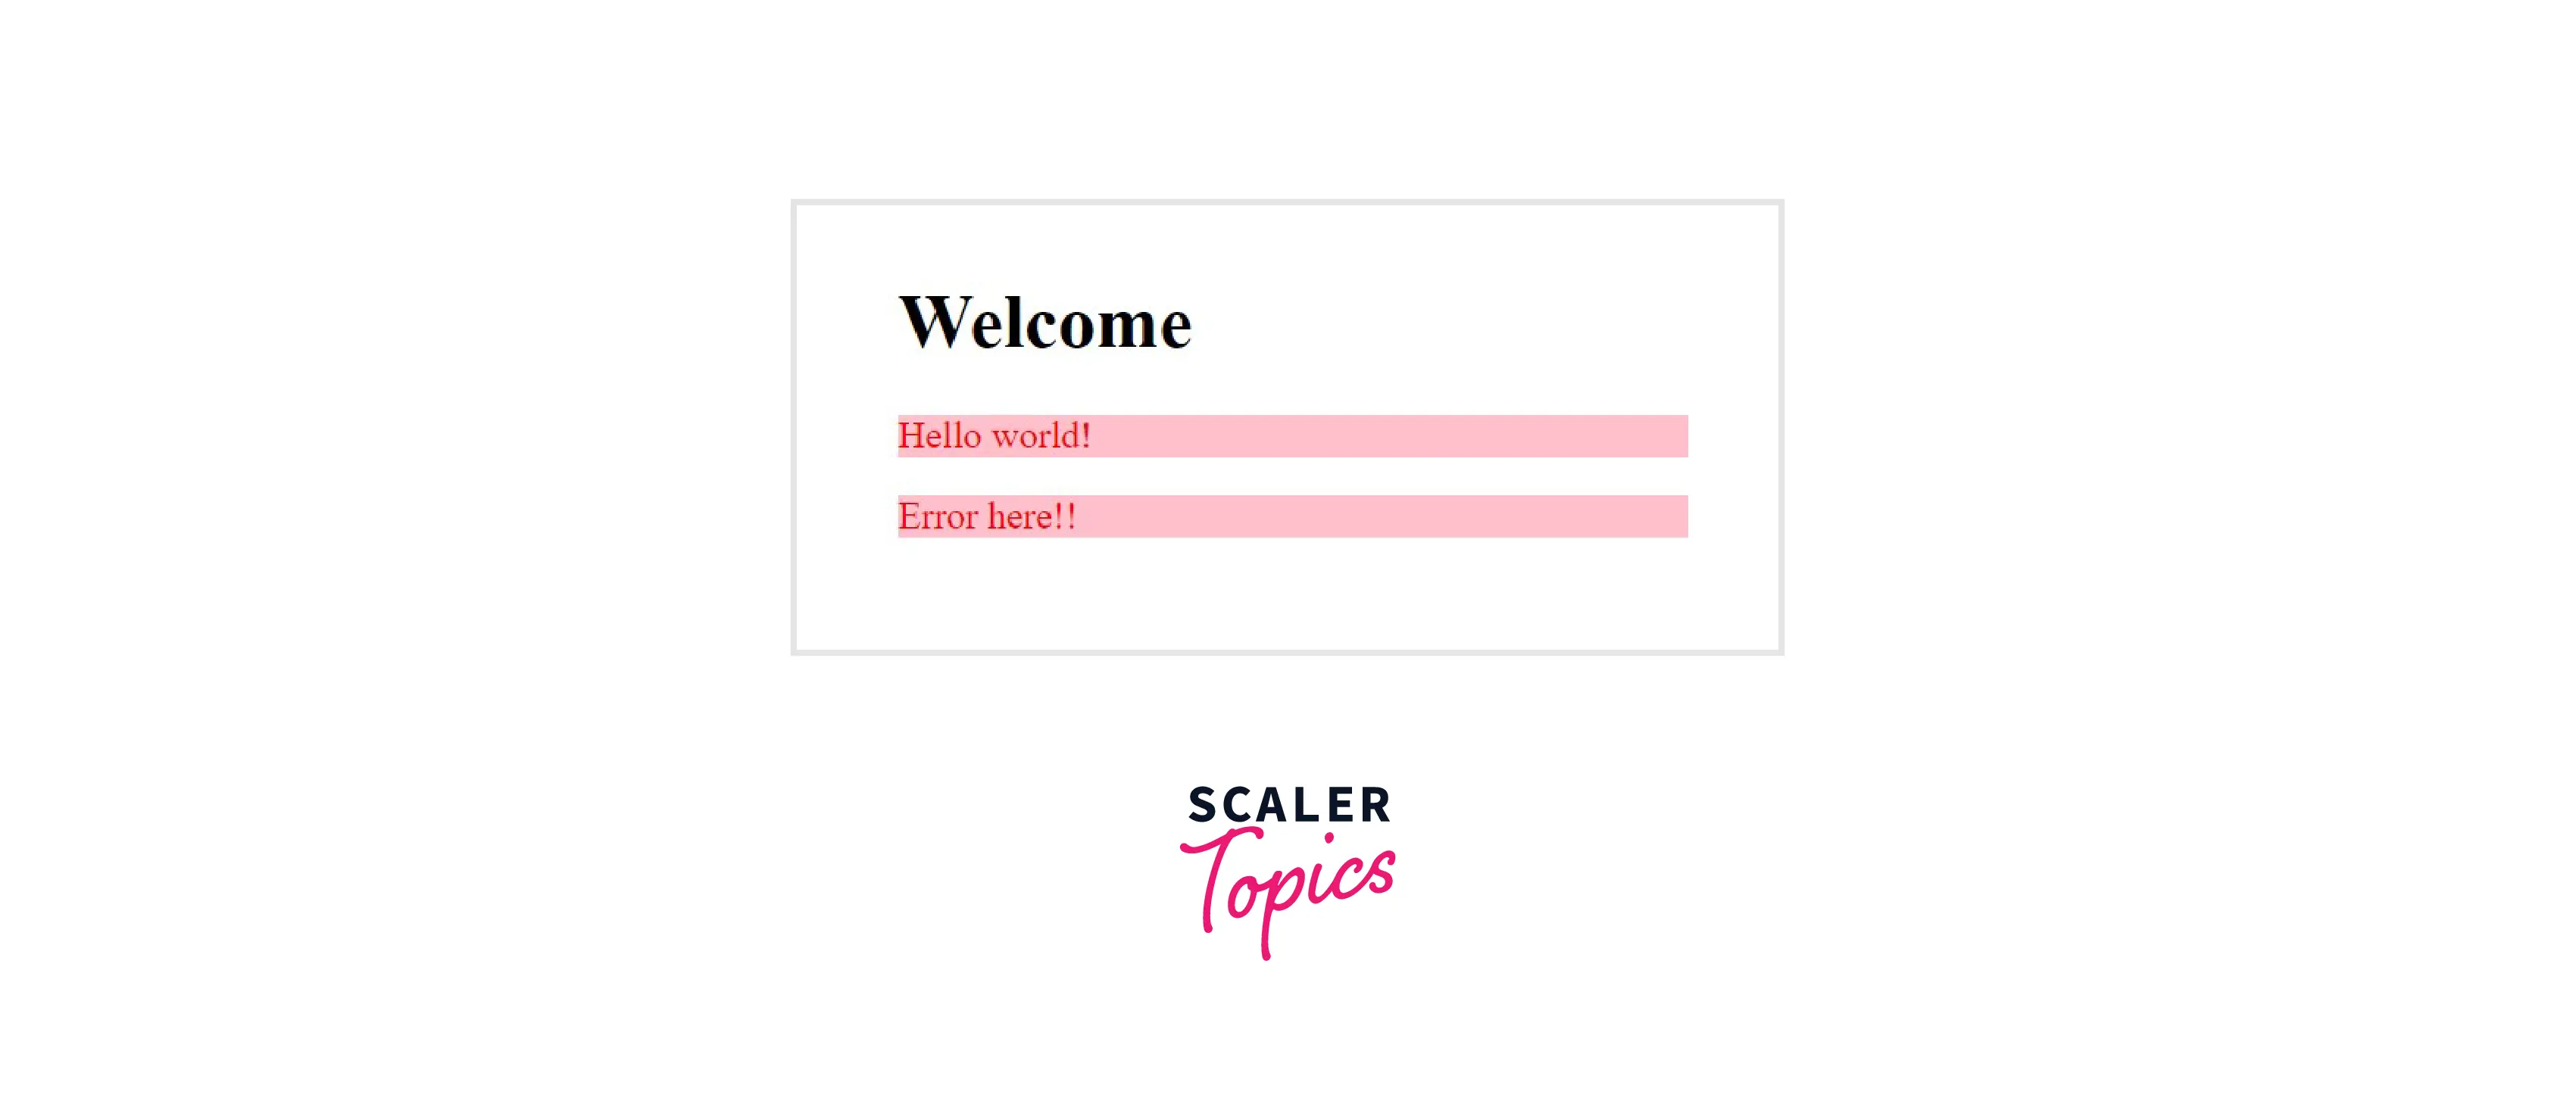
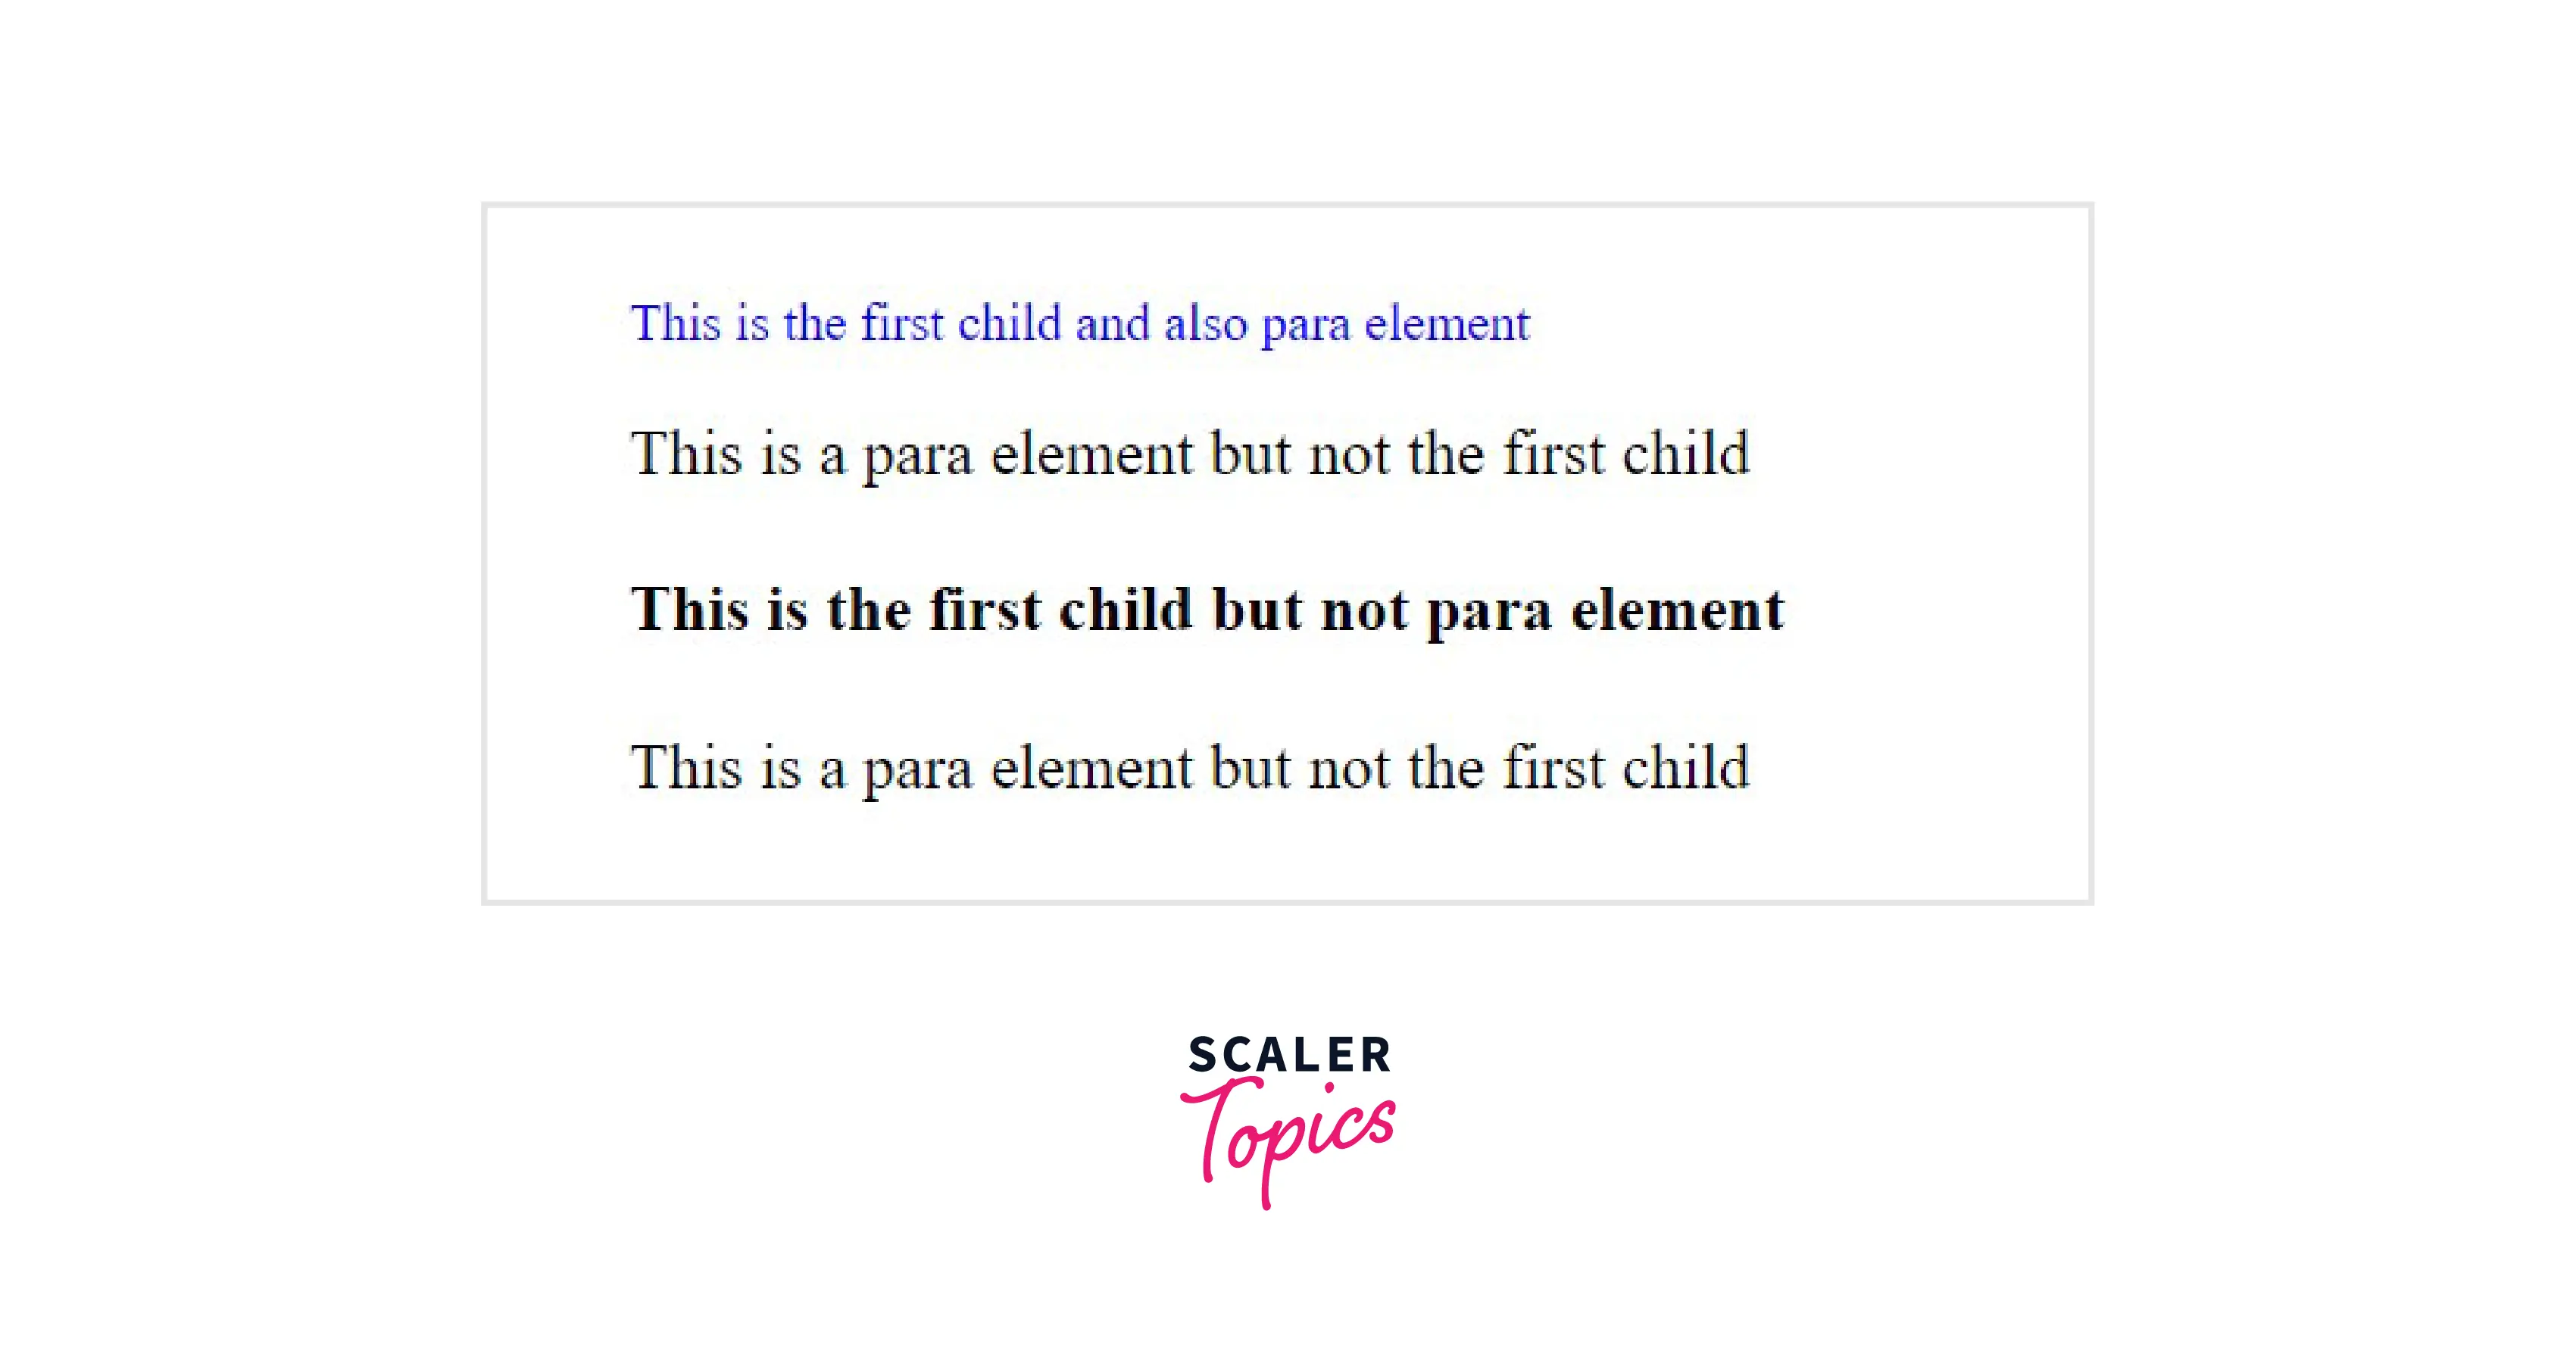
Example Here in this example, the <p> element will be selected only when it will be the first child of any element.
Output
3.
Syntax
Example
Output

Different CSS pseudo-class selectors are
- :dir – It is used to select an element based on its directionality determined by the document language. dir stands for directionality
- :lang- It is used to select an element based on the specific value of the lang (language) attribute.
- :link – it is used to show the links that are not visited yet on the webpage.
- :scope – The CSS style which will be defined in the scope will be applied to every element inside the parent element.
- :focus – it is used to select the elements that take input when they are in focus.
- :active – it is used to represent an element that is being selected by the input device.
- :playing – it is a resource state pseudo-selector and is used to Represent a media element that is capable of playing when that element is playing.
- :paused- it is a resource state pseudo-selector and is used to Represent a media element that is capable of playing when that element is paused.
- :checked – when the radio button or check-box is enabled they are selected using this selector.
- :enabled – helps to show the elements that are enabled.
- :disabled- helps to show the elements that are disabled. Similarly, there are plenty of pseudo-class selectors.
Scaler Placement Report and Statistics
Scaler learners achieved 2.5x salary growth with average post-Scaler CTC reaching ₹23L.
Pseudo-elements Selectors
A CSS pseudo-element is combined with the selector and is used to style a specific part of the selected HTML elements. The pseudo-class is used to style the element, whereas the pseudo-element will style the specific part of the element. To segregate the pseudo-class from pseudo-elements, we can use a double colon(::) instead of a single colon.
Syntax
The different pseudo-elements are
::first-line It is used to apply styles to the first line of the text. It can be applied only to block-level elements. The different properties that can be used with it are-
- font properties
- color properties
- background properties
- word-spacing
- letter-spacing
- text-decoration
- vertical-align
- text-transform
- line-height
- clear
Syntax
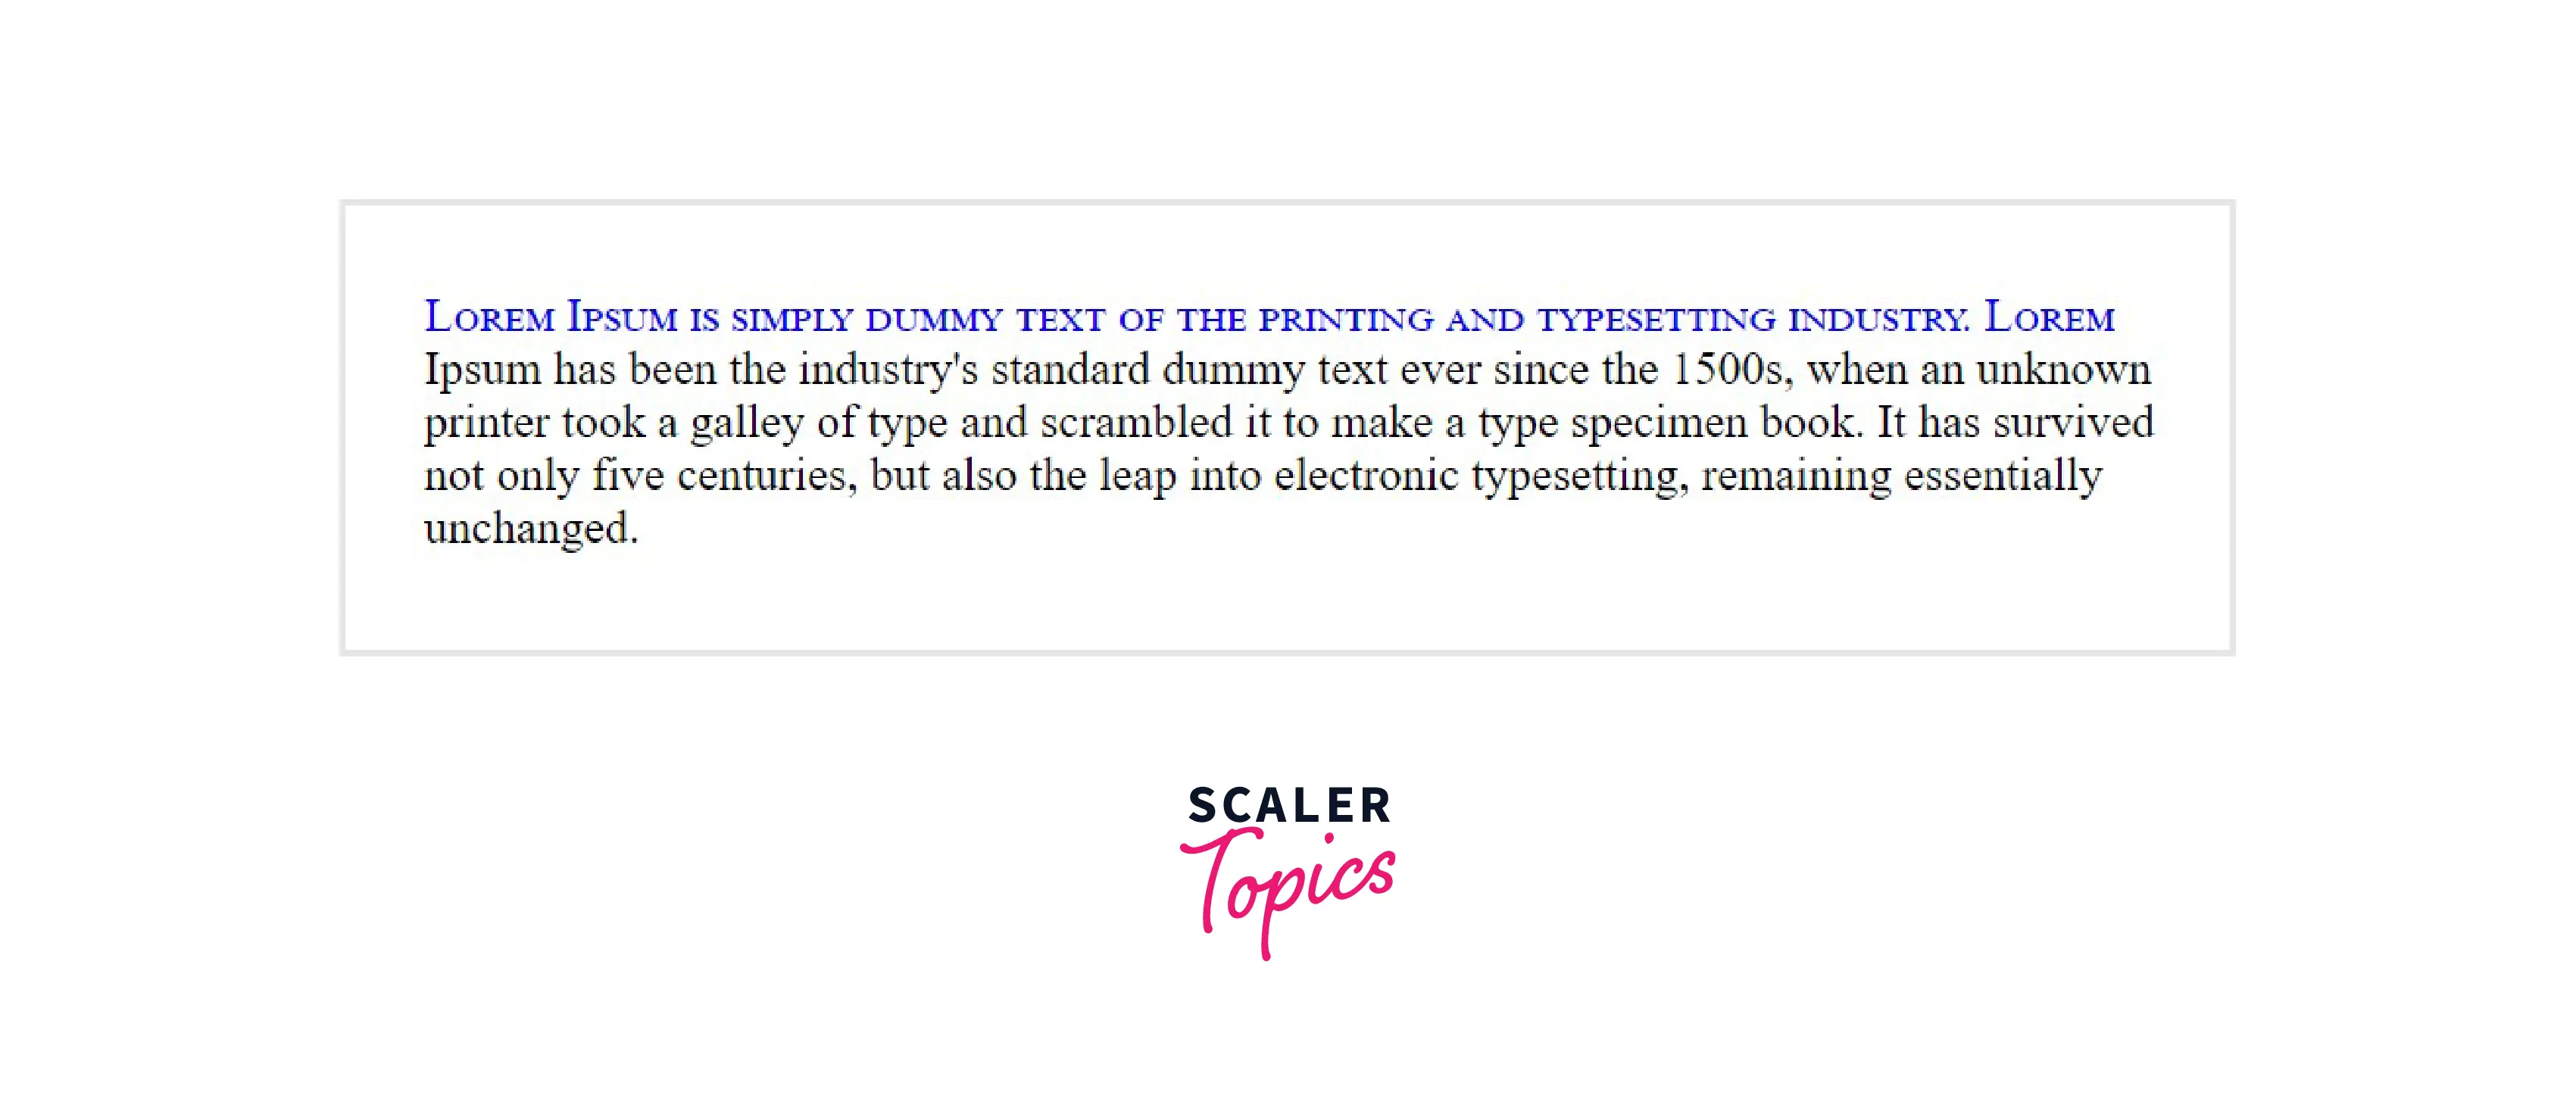
Example In this example, the first line of the content inside the <p> tag will be selected and the specified CSS styles will be applied to it.
Output
- font properties
- color properties
- background properties
- margin properties
- padding properties
- border properties
- text-decoration
- vertical-align (only if "float" is "none")
- text-transform
- line-height
- float
- clear
Syntax
Example In this example, the first letter of the content inside the <p> tag will be selected and the specified CSS styles will be applied to it.
Output

::before It is used to add content before the contents specific element. It is generally used to add fancy content to an element. It uses the content property.
Syntax
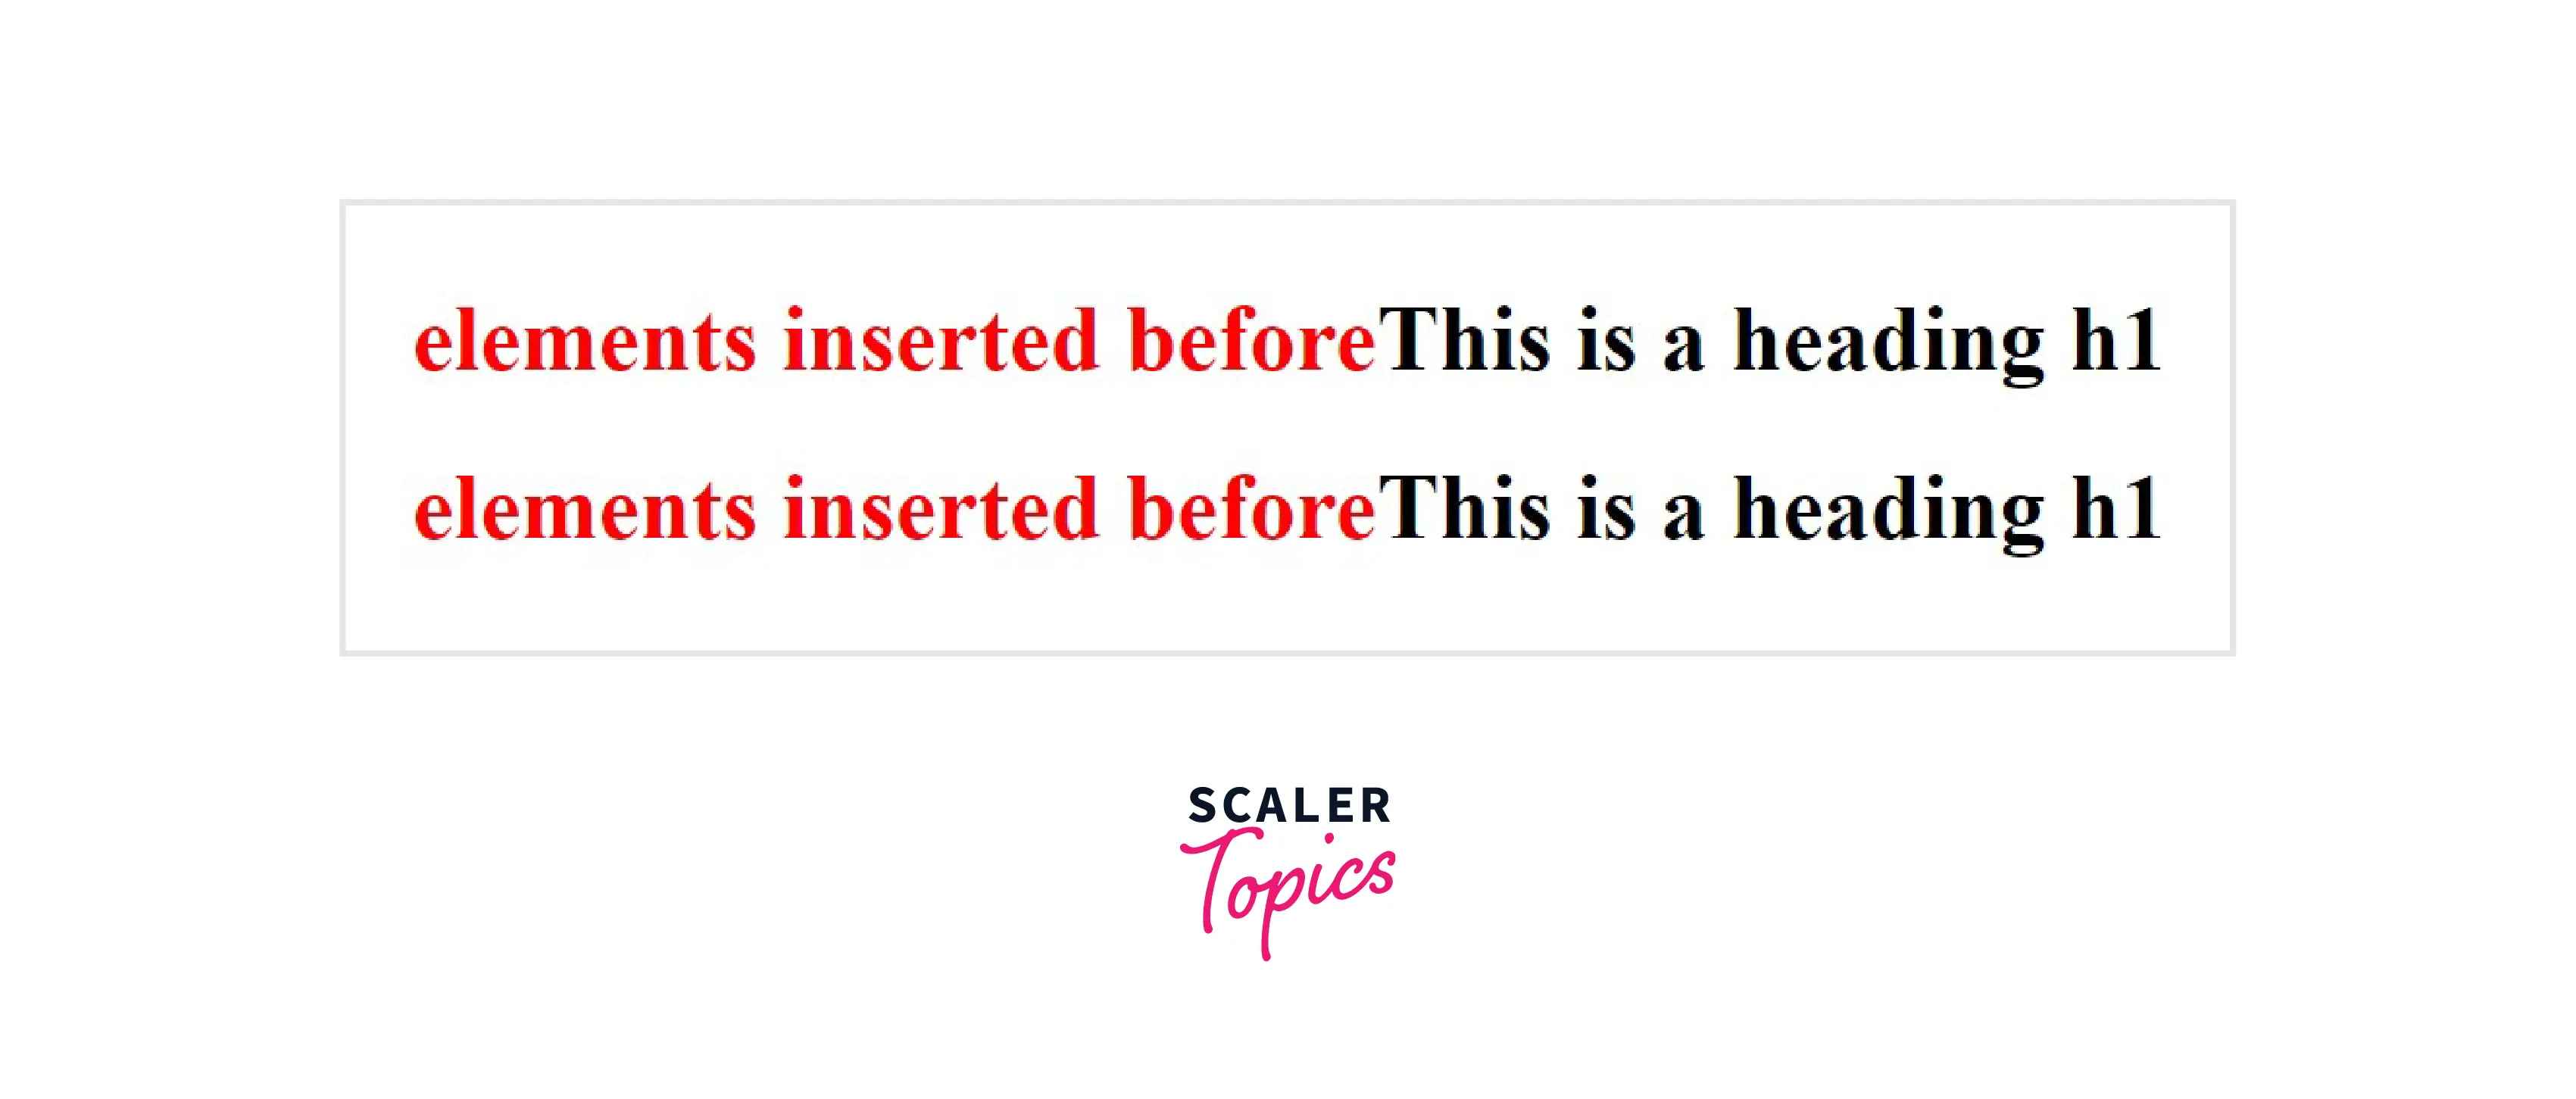
Example In the example given below, <h1> is selected as an element and then the contents will be inserted before the content of <h1>.
Output
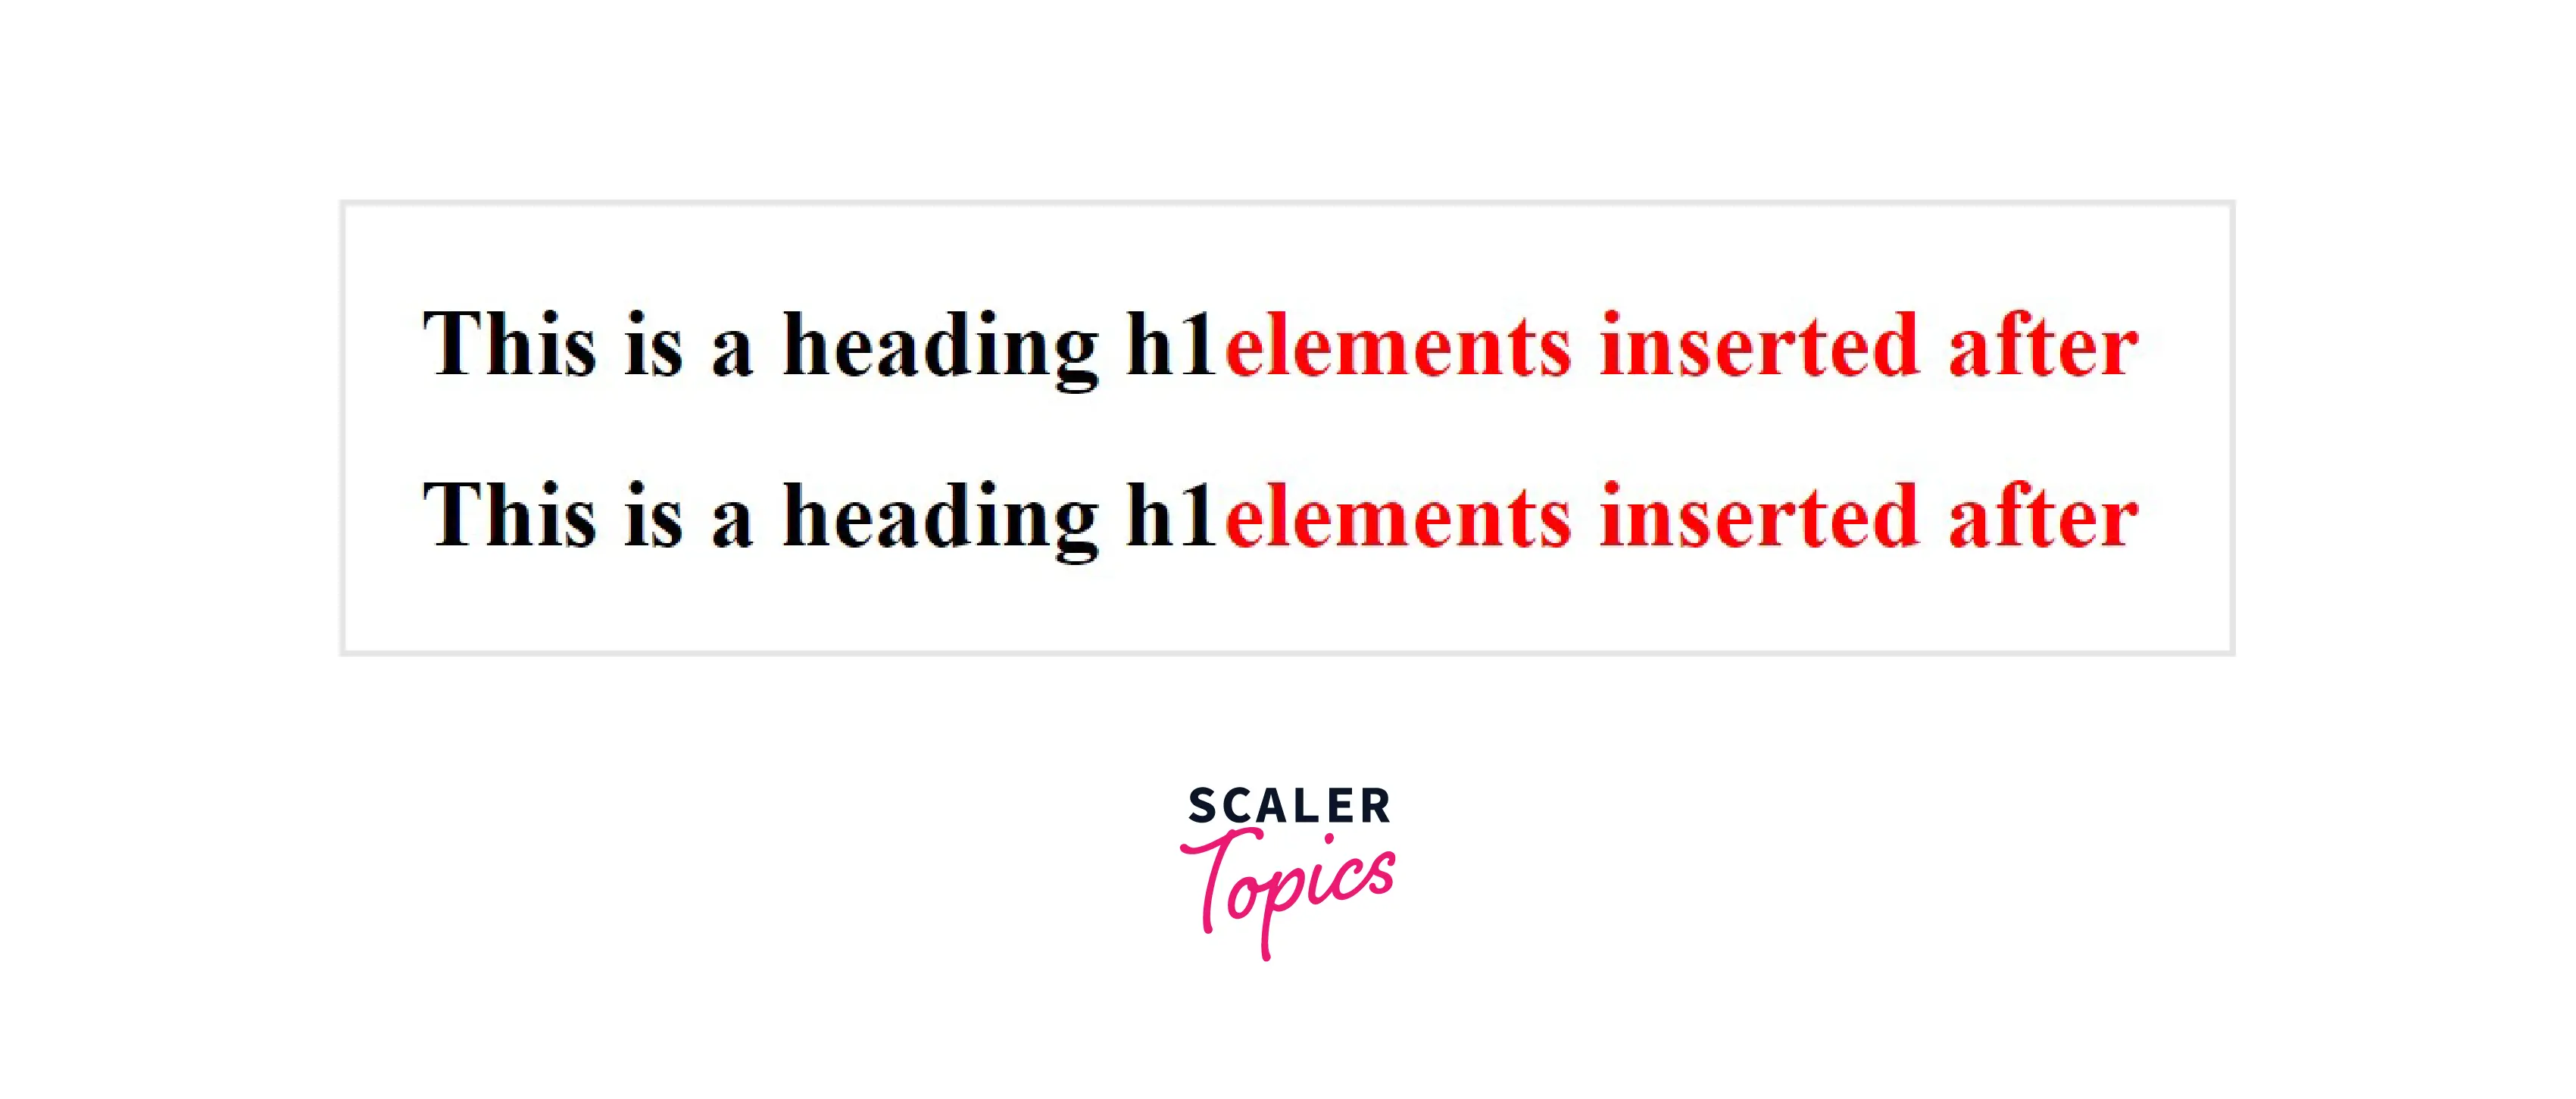
::after It works similar to the ::before pseudo-class but it adds the content after the contents of the specified element. It also used content property.
Syntax
Example In the example given below, <h1> is selected as an element and then the contents will be inserted after the content of <h1>.
Output
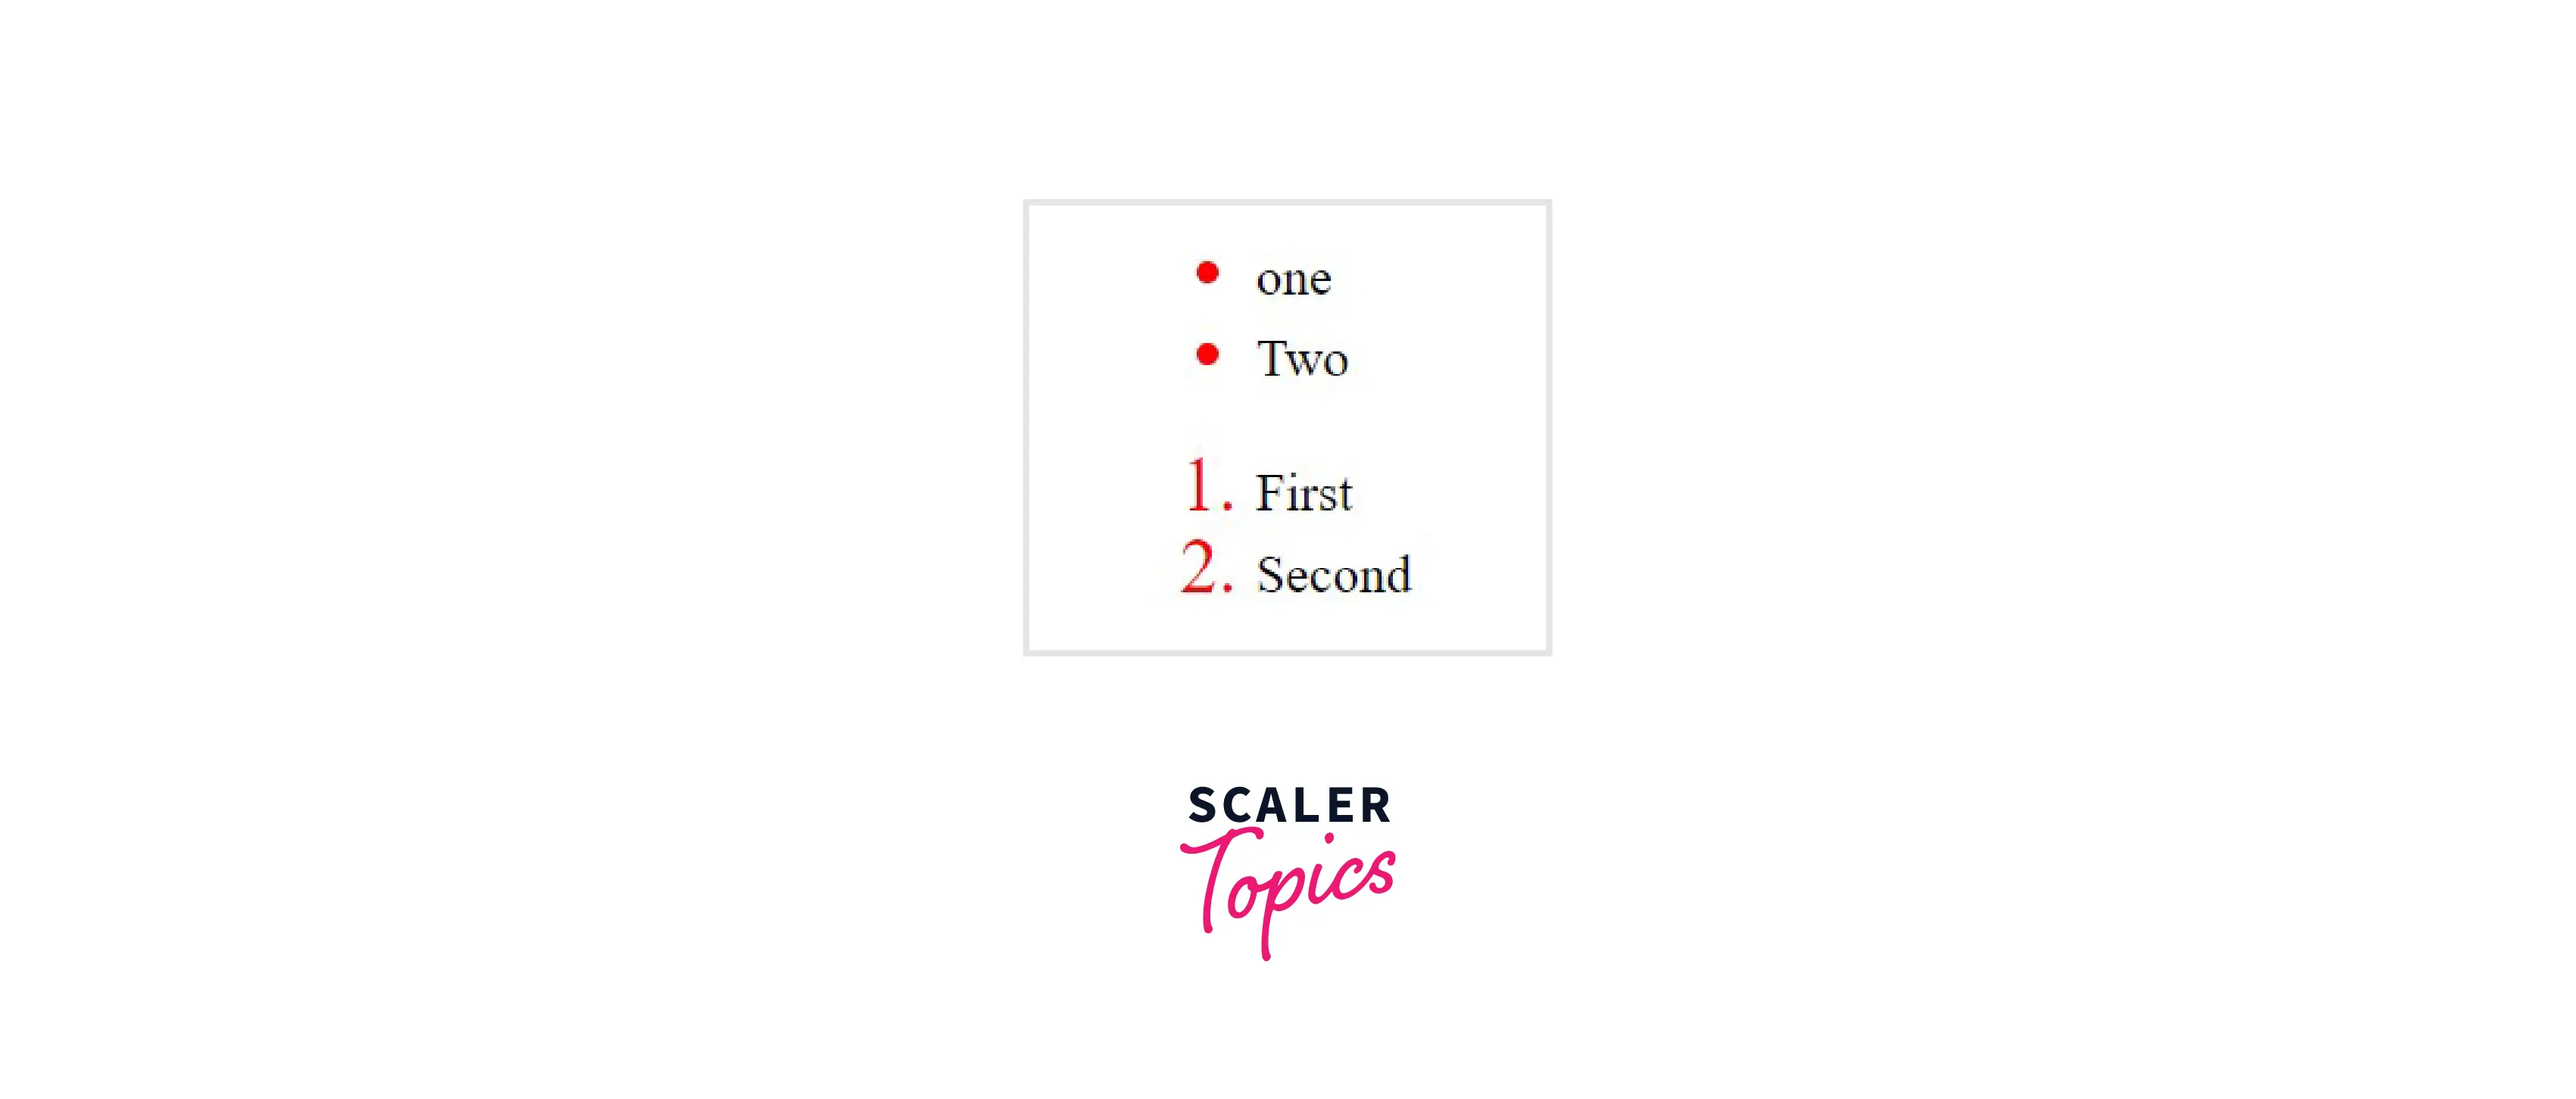
::marker This is used to select the bullet points or the number of the list items.
Syntax
Example In this example, we will apply marker pseudo element to the list items of ordered list and also to the unordered list.
Output
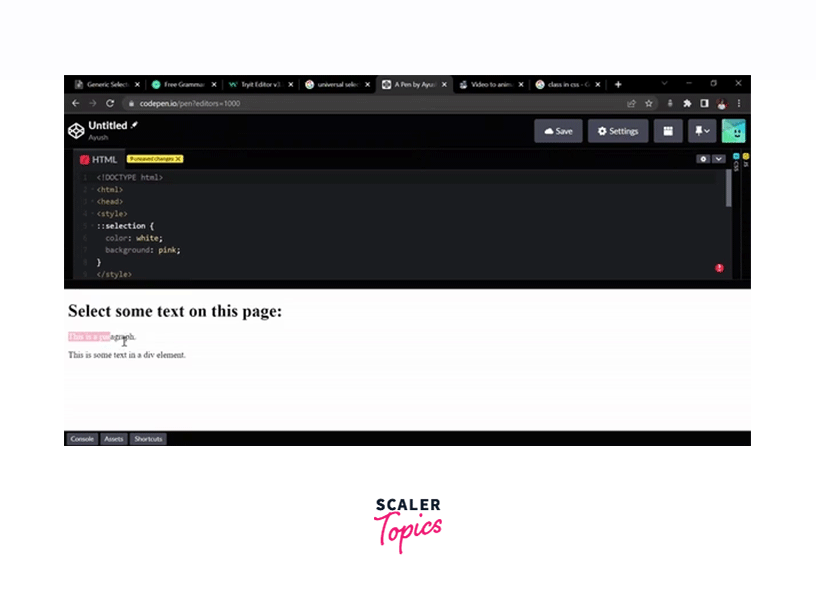
::selection The ::selection pseudo-element selects(highlights) the elements when the user selects the element with the cursor.
Syntax
Example In this example, we will demonstrate the selection pseudo element. The text which we will select using the mouse cursor will take the defined the CSS properties
Output
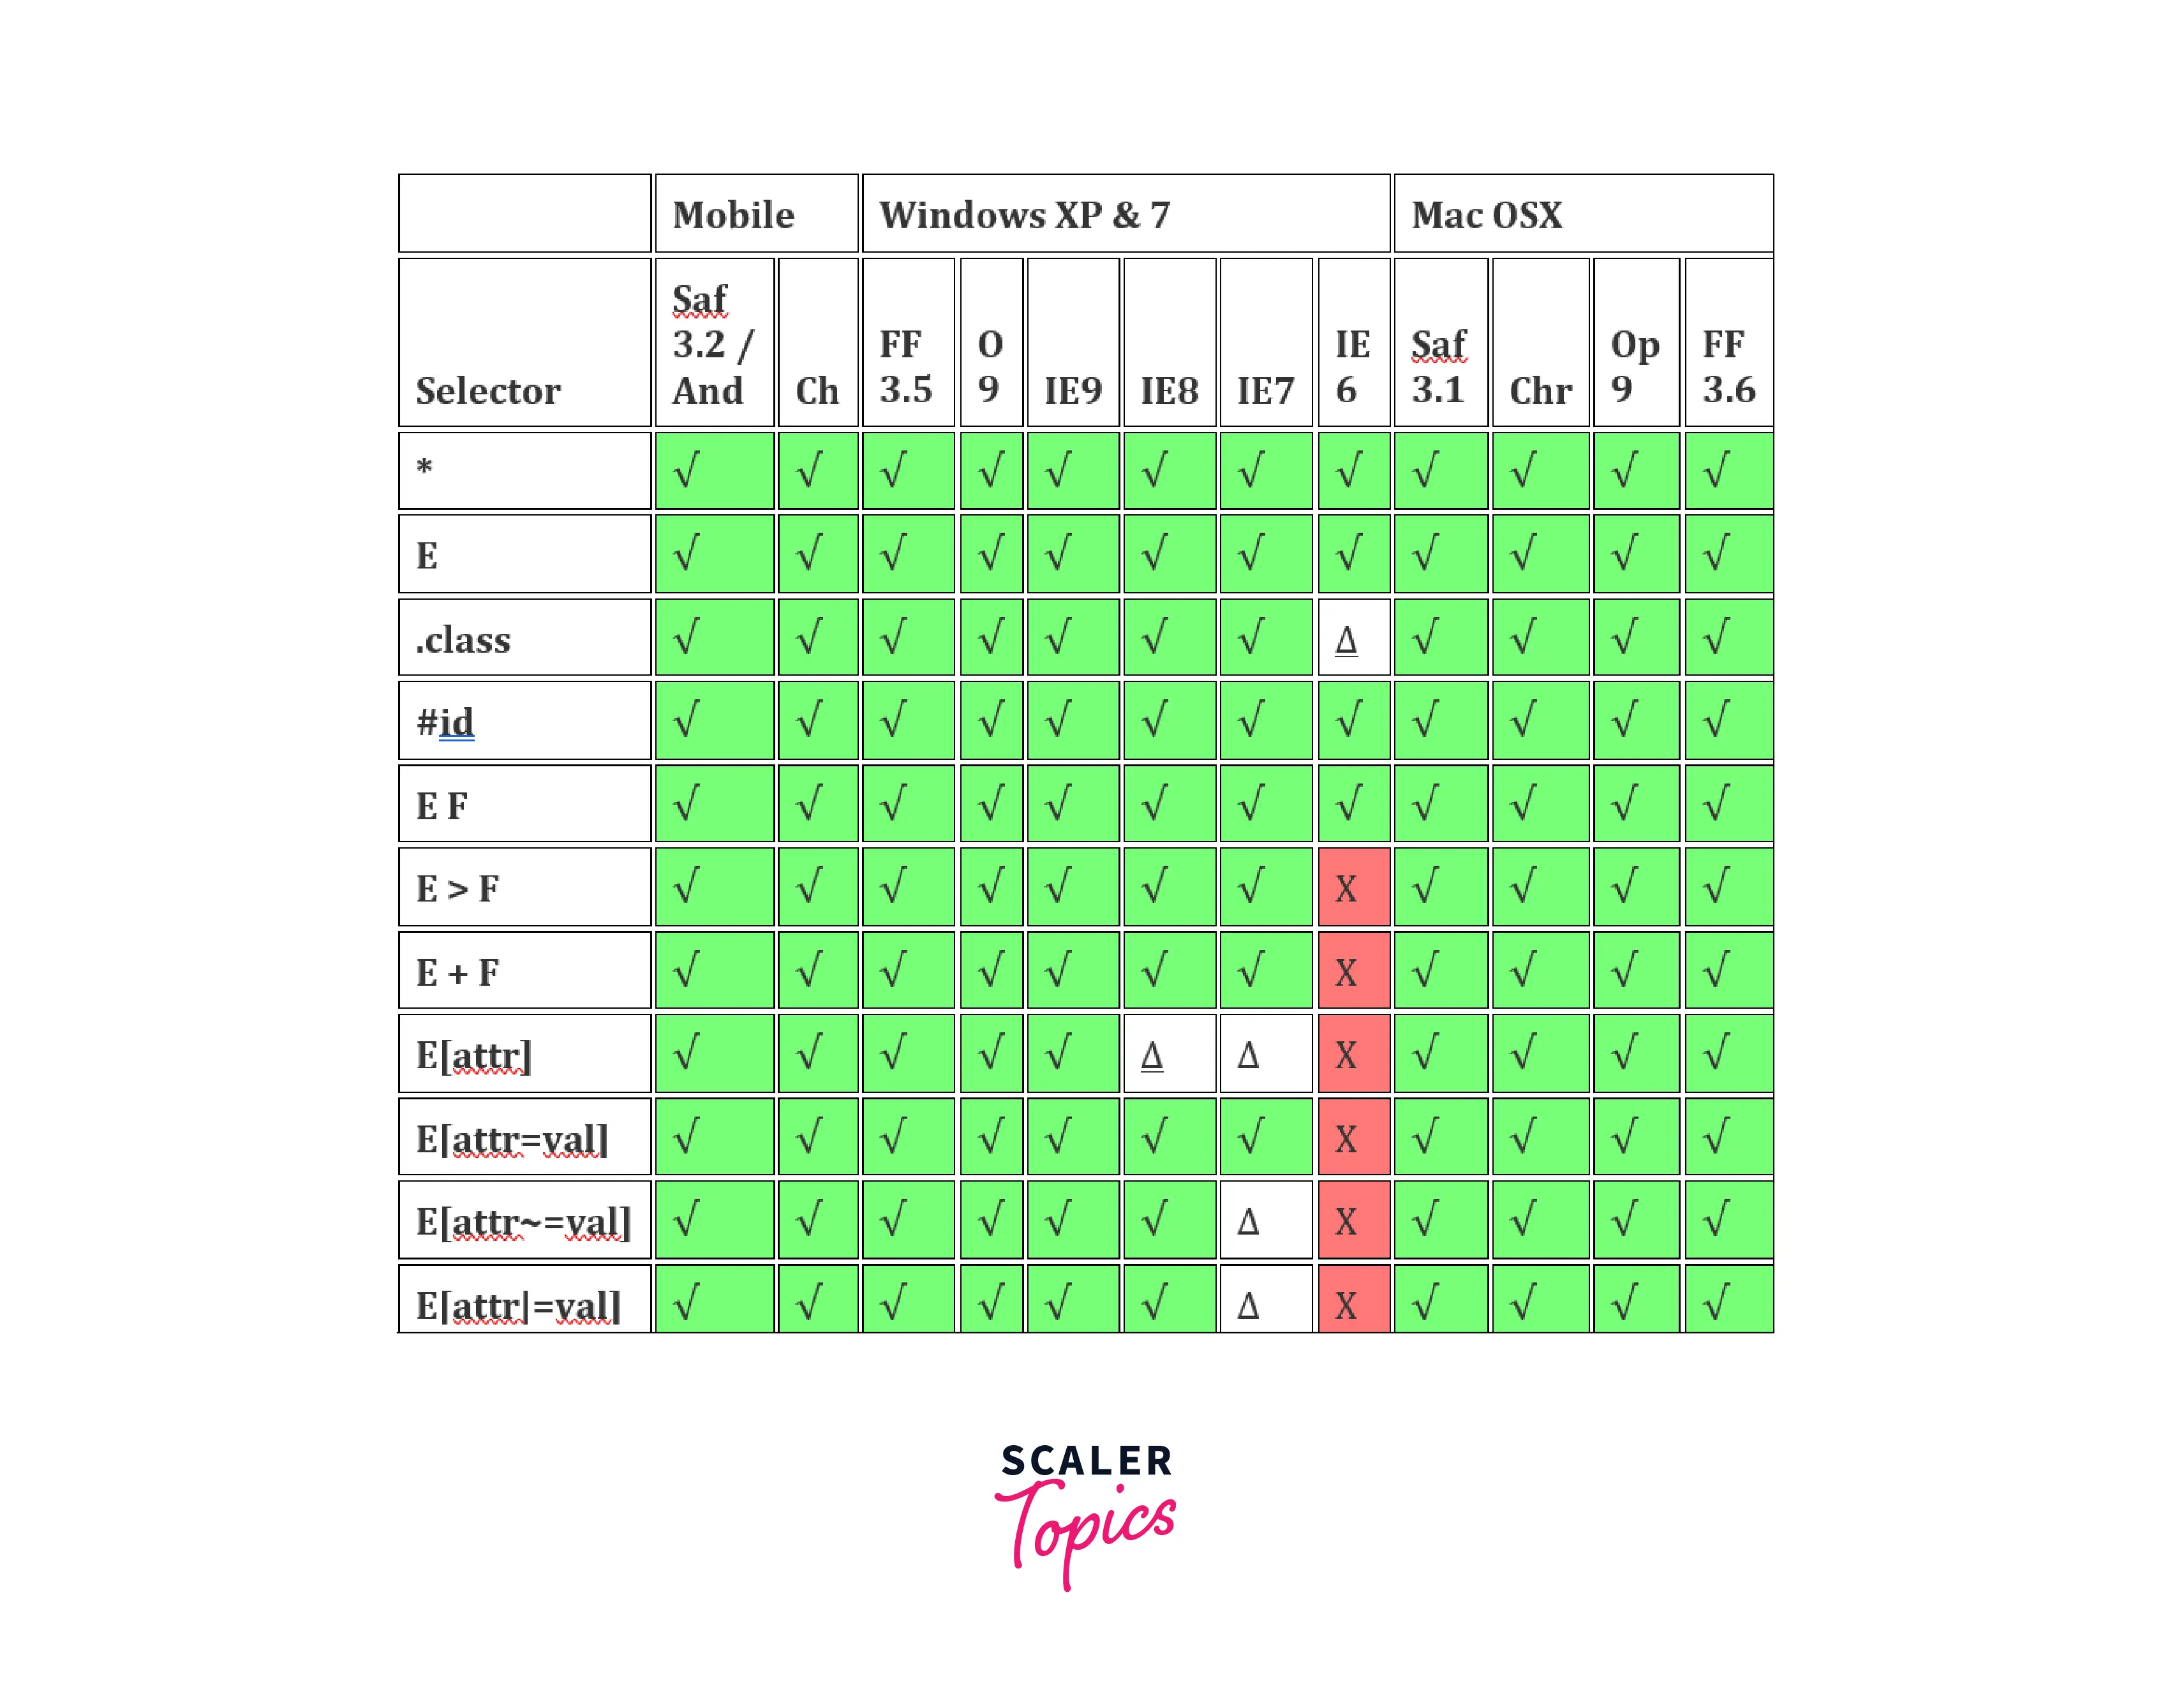
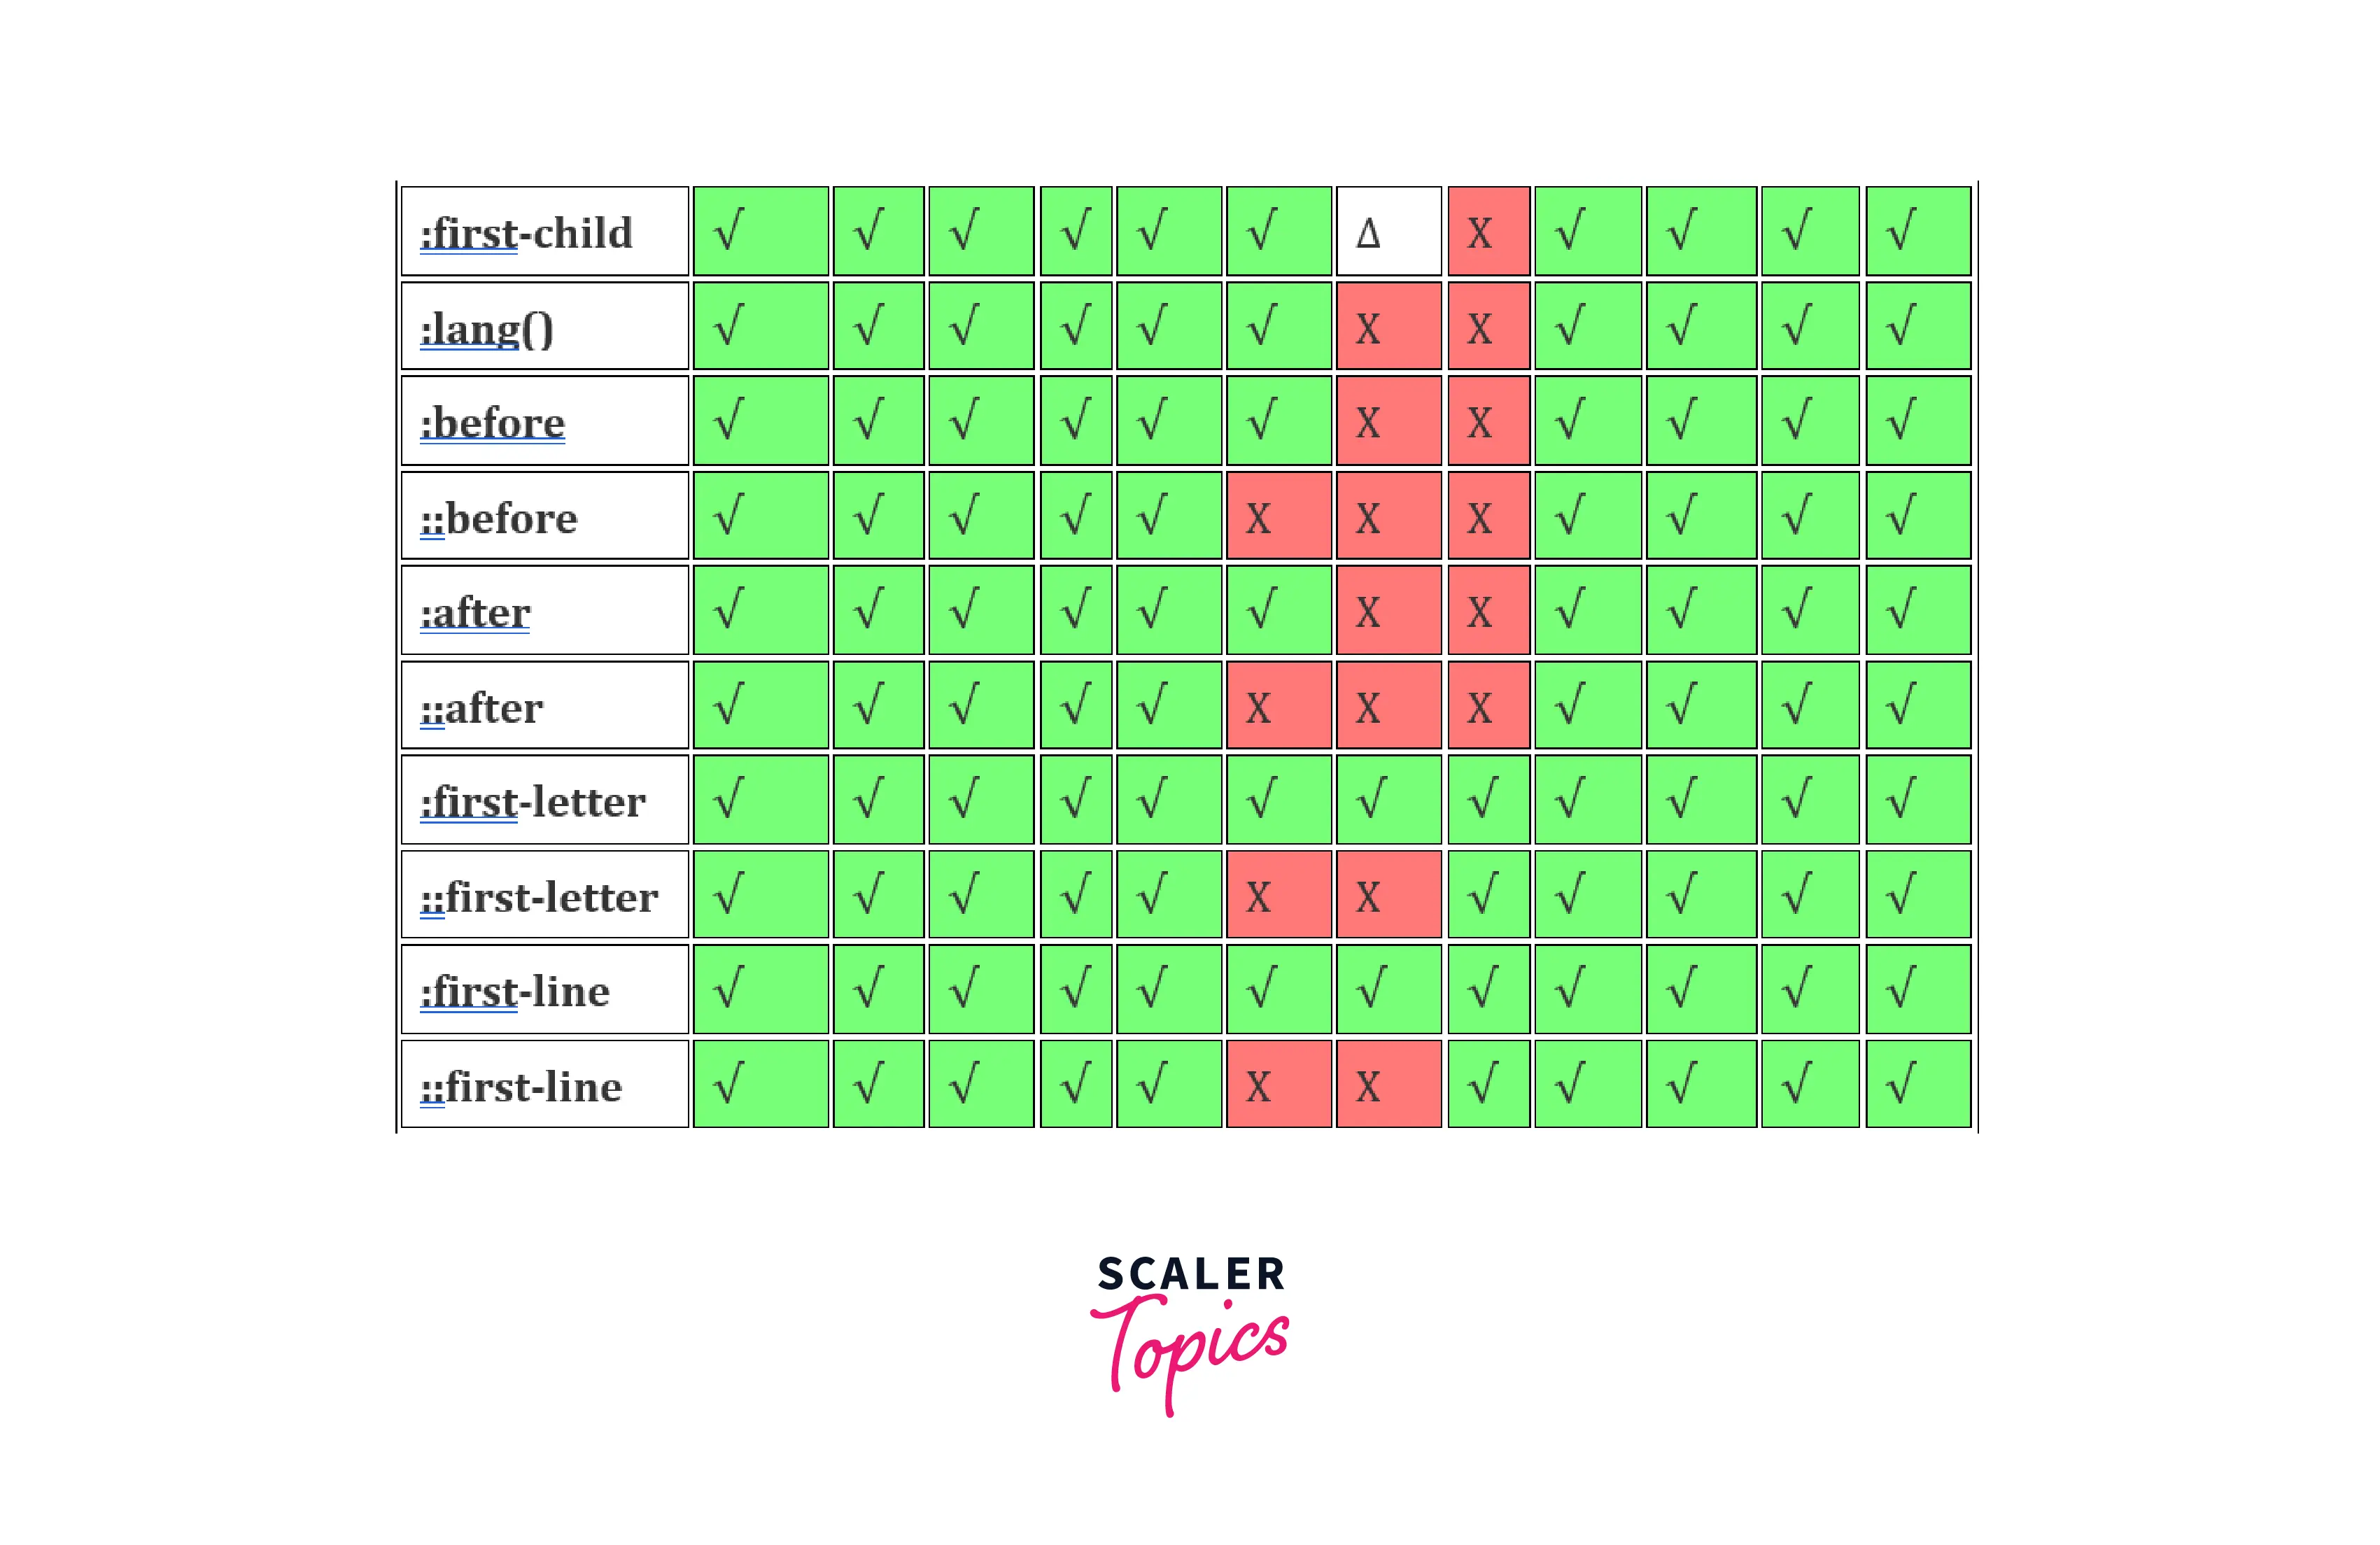
Specification
- Δ means that the browsers have some support for the selector.
- √ means current support.
- Χ means that the browser is non-compliant.
Conclusion
- There are different types of selectors that allows you to select different HTML elements and with different methods.
- CSS selectors use id, class, type, attribute, etc of the HTML element to select them.
- To use a universal selector, use asterisks (*) - It selects every element in the HTML page.
- To use a type selector, you just need to give the name of the HTML tag and then in the curly braces define the CSS properties.
- To use the CSS Class selector, write a period or full stop (.) character, and then the name of the class, after that define the CSS properties you want to apply in the particular class.
- The id attribute is the unique identifier in an HTML document.
- To use an ID selector in CSS, use a hashtag (#) followed by the name of the ID of the HTML element.
- The HTML elements can also be selected using the attribute, and there are various methods to use attribute selectors.
- When we use more than one selectors, then the use of combinators explains the relationship between the two selectors.
- There are four types of combinators in CSS:
- Descendant selector (space)
- General Sibling selector (~)
- Adjecant Sibling selector (+)
- Child selector (>)
- CSS pseudo-classes selector helps to add special effects to the HTML element based on the special state/condition of the element.
- CSS pseudo-element is combined with the selector and is used to style a specific part of the selected HTML elements.