Getting Started with Nessus
Overview
The Nessus Vulnerability Scanner from Tenable makes it simple to find software bugs, malware, missing security updates, and configuration issues on all of your connected devices. After being installed on Kali Linux, Nessus helps in prioritizing vulnerabilities and identifying corrective steps.
In this post, you'll learn what is nessus, and how to pair Nessus with Kali to add a robust network testing tool to an already capable Linux distribution.
What is Nessus?
Nessus by Tenable is a popular open-source Kali Linux program used by penetration testers. Many different security patches are offered using it. There are thousands of built-in penetration testing tools available. Nessus offers a penetration tester a plethora of tools that can help with the engagement, including:
- Locating both local and remote weaknesses
- Audits of compliance and configuration
- Examining default credentials
- Examining web applications
As a pen-tester, you should know what is Nessus and how to commonly use this program to check a server or website for potential vulnerabilities.
Prerequisites
The following prerequisites must be met to proceed with this lesson.
- Access to a Kali Linux system with internet connectivity at the administrative, or "root," level. Tenable's hardware guidelines state that the following minimum system requirements should be met:
- CPU: four 2GHz cores
- RAM Memory: 4 Gigabytes (`8 GB RAM recommended)
- Disk Space: 30 GB, not counting host operating system space The virtual machine (VM) utilized in this study runs on VMware Workstation Player and is a 64-bit version of Kali Linux (version 2020.4).
- Access to a browser that is Nessus-compatible. According to Tenable's specifications for software, Nessus supports the following browsers:
- `Google Chrome
- Apple Safari
- `Mozilla Firefox
- `Internet Explorer
- Obtain the Nessus activation code: Before beginning the installation procedure, Tenable advises that you get the Activation Code as Nessus cannot be configured without it. Tenable offers 3 versions of its Nessus Vulnerability Scanner: Nessus Expert, Nessus Professional, and Nessus Essentials. Although Nessus Essentials is free, it offers fewer features than its premium siblings, Nessus Professional and Nessus Expert.
For this lesson, Nessus Essentials will be used. Although the program is free, it does need a working activation code, as explained below.
-
Go to the Nessus Essentials Product Portal by clicking on https://www.tenable.com/products/nessus/activation-code
-
Your First Name, Last Name, and Email Address must be entered into the entry form.
-
To finish registering, hit the Register button.
-
Tenable will give you a confirmation once your registration has been successful. A thank-you message will then be displayed to you. 5. Check your email right away; you should see an activation code that looks like D234-C7CB-04AF-79A6-1555. If the registration email does not appear in your inbox, be sure to check your trash mail !
Installing and Configuring Nessus
Before installing Nessus, you must ensure that your setup meets the minimum system requirements.
Since Kali does not come with Nessus installed by default, you must first download the Nessus software package.
Download Nessus Package File on Kali Linux
Open a compatible web browser after starting the Kali Linux operating system. To get the required Nessus installation files, follow the instructions listed below.
- Go to the Nessus downloads webpage.
- Nessus is compatible with a variety of architectures and operating systems. Depending on your system requirements and setup, download the appropriate installation package.
- When asked, check the License Agreement and click Agree after clicking the download link.
Once the download is finished, it's time to check the installation package's integrity.
Transform Your Career
Choose from our industry-leading programs designed for career success
Modern Software and AI Engineering Program
Master full-stack development with AI integration

Modern Data Science and ML with specialisation in AI
Advanced data science techniques with AI specialization
Advanced AIML with Specialisation in Agentic AI
Deep dive into AIML with focus on Agentic systems
DevOps, Cloud & AI Platform Engineering
Build and manage AI-powered cloud infrastructure
AI Engineering Advanced Certification by IIT-Roorkee
Premier AI engineering certification from IIT-Roorkee
Verify the Nessus Package Integrity
When you download a file from a third party, such as a vendor website, verifying file integrity becomes much more crucial. Compare the computed hash of the downloaded Nessus installation package to the file's reported checksum, as shown below.
- On your Kali Linux desktop, you can launch a Terminal by right-clicking anywhere and choosing Open Terminal Here.
- Get the SHA256 hash from the downloads page by clicking the Checksum link.
- A popup window displaying an MD5 and SHA256 hash value will appear. Write down the SHA256 value.
Replace "checksum hash" with the SHA256 hash given on the download URL. Use an absolute path to swap out the path below with the location of your download.
Do not install the program if the output of your command does not imply that your installation package is valid.
Installing Nessus on Kali Linux
It is now time to install the Nessus program after you have confirmed the integrity of the package. As seen below, provide the downloaded installation package to the Debian Package Manager (pkg) utility using the I (install) argument.
The Nessus Vulnerability Scanner has just been set up on your Kali Linux operating system.
Scaler Placement Report and Statistics
Scaler learners achieved 2.5x salary growth with average post-Scaler CTC reaching ₹23L.
Starting And Enabling the Nessus Service
It is necessary to activate the nessusd system service before utilizing the Nessus application. Please follow the instructions below to start the nessusd service.
On your Kali Linux desktop, launch a terminal. Use the following command to launch the nessusd service:
By executing the following command, you can confirm that the service is active. The anticipated output should be Active: active (running)
To make the nessusd service run when the Kali Linux operating system boots, enter the following command.
The SSL certificate's improper configuration could trigger a warning. You have the option of moving beyond this warning or setting this up correctly by consulting the Nessus User Guide.
Configure Nessus
Now that you've gotten your activation code and launched the nessusd service, it's time to enable your Nessus installation. Follow the instructions below to activate your Nessus installation.
- On your Kali Linux operating system, open a web browser and go to https://localhost:8834.
- Choose the product version from the Welcome to Nessus screen.
- As you already have the activation code, choose to Skip on the Get an activation code screen.
- Enter your Activation Code on the Register Nessus screen. And then tap Next.
- Specify a Username and Password and press the Submit button when prompted to create a user account. The Nessus program is accessed using the specified login and password.
- Nessus completes the setup procedure, which might take a while. Now sign in to Nessus with your newly established administrator user account.
Create and Configure scans
Nessus is currently operational thanks to your efforts. It's time to test this useful tool's capabilities for vulnerability discovery. This section's remaining instructions explain how to set up and run a scan against your Kali Linux system.
Creating a Scan
Nessus is now ready for use after installation and launch, so you can begin scanning. You must first make a scan. You may make a scan by:
- Select Scans from the top navigation bar.`
- Select "New Scan" from the menu in the top-right corner of the My Scans page.
Turn Learning into Career Growth
Choose a Scan Template
Then select the desired scan template you wish to use. By identifying which parameters are programmable and how they may be changed, scan templates make the process easier. The Nessus User Guide's Scan and Policy Settings section contains a thorough overview of all the choices.
A scan policy is a predetermined collection of setup choices for running a scan. When you create a scan, you may use the newly created policy as a template in the User Defined tab. Refer to the Nessus User Guide for further details.
Configure Scan Settings
Configure the options offered by your chosen template to prepare your scan. The Basic Network Scan template comes with several default parameters already set up, making it simple for you to immediately run your first scan and check the findings. Run a fundamental scan by following these steps:
- Make the necessary adjustments to the Basic Settings section as per your needs.
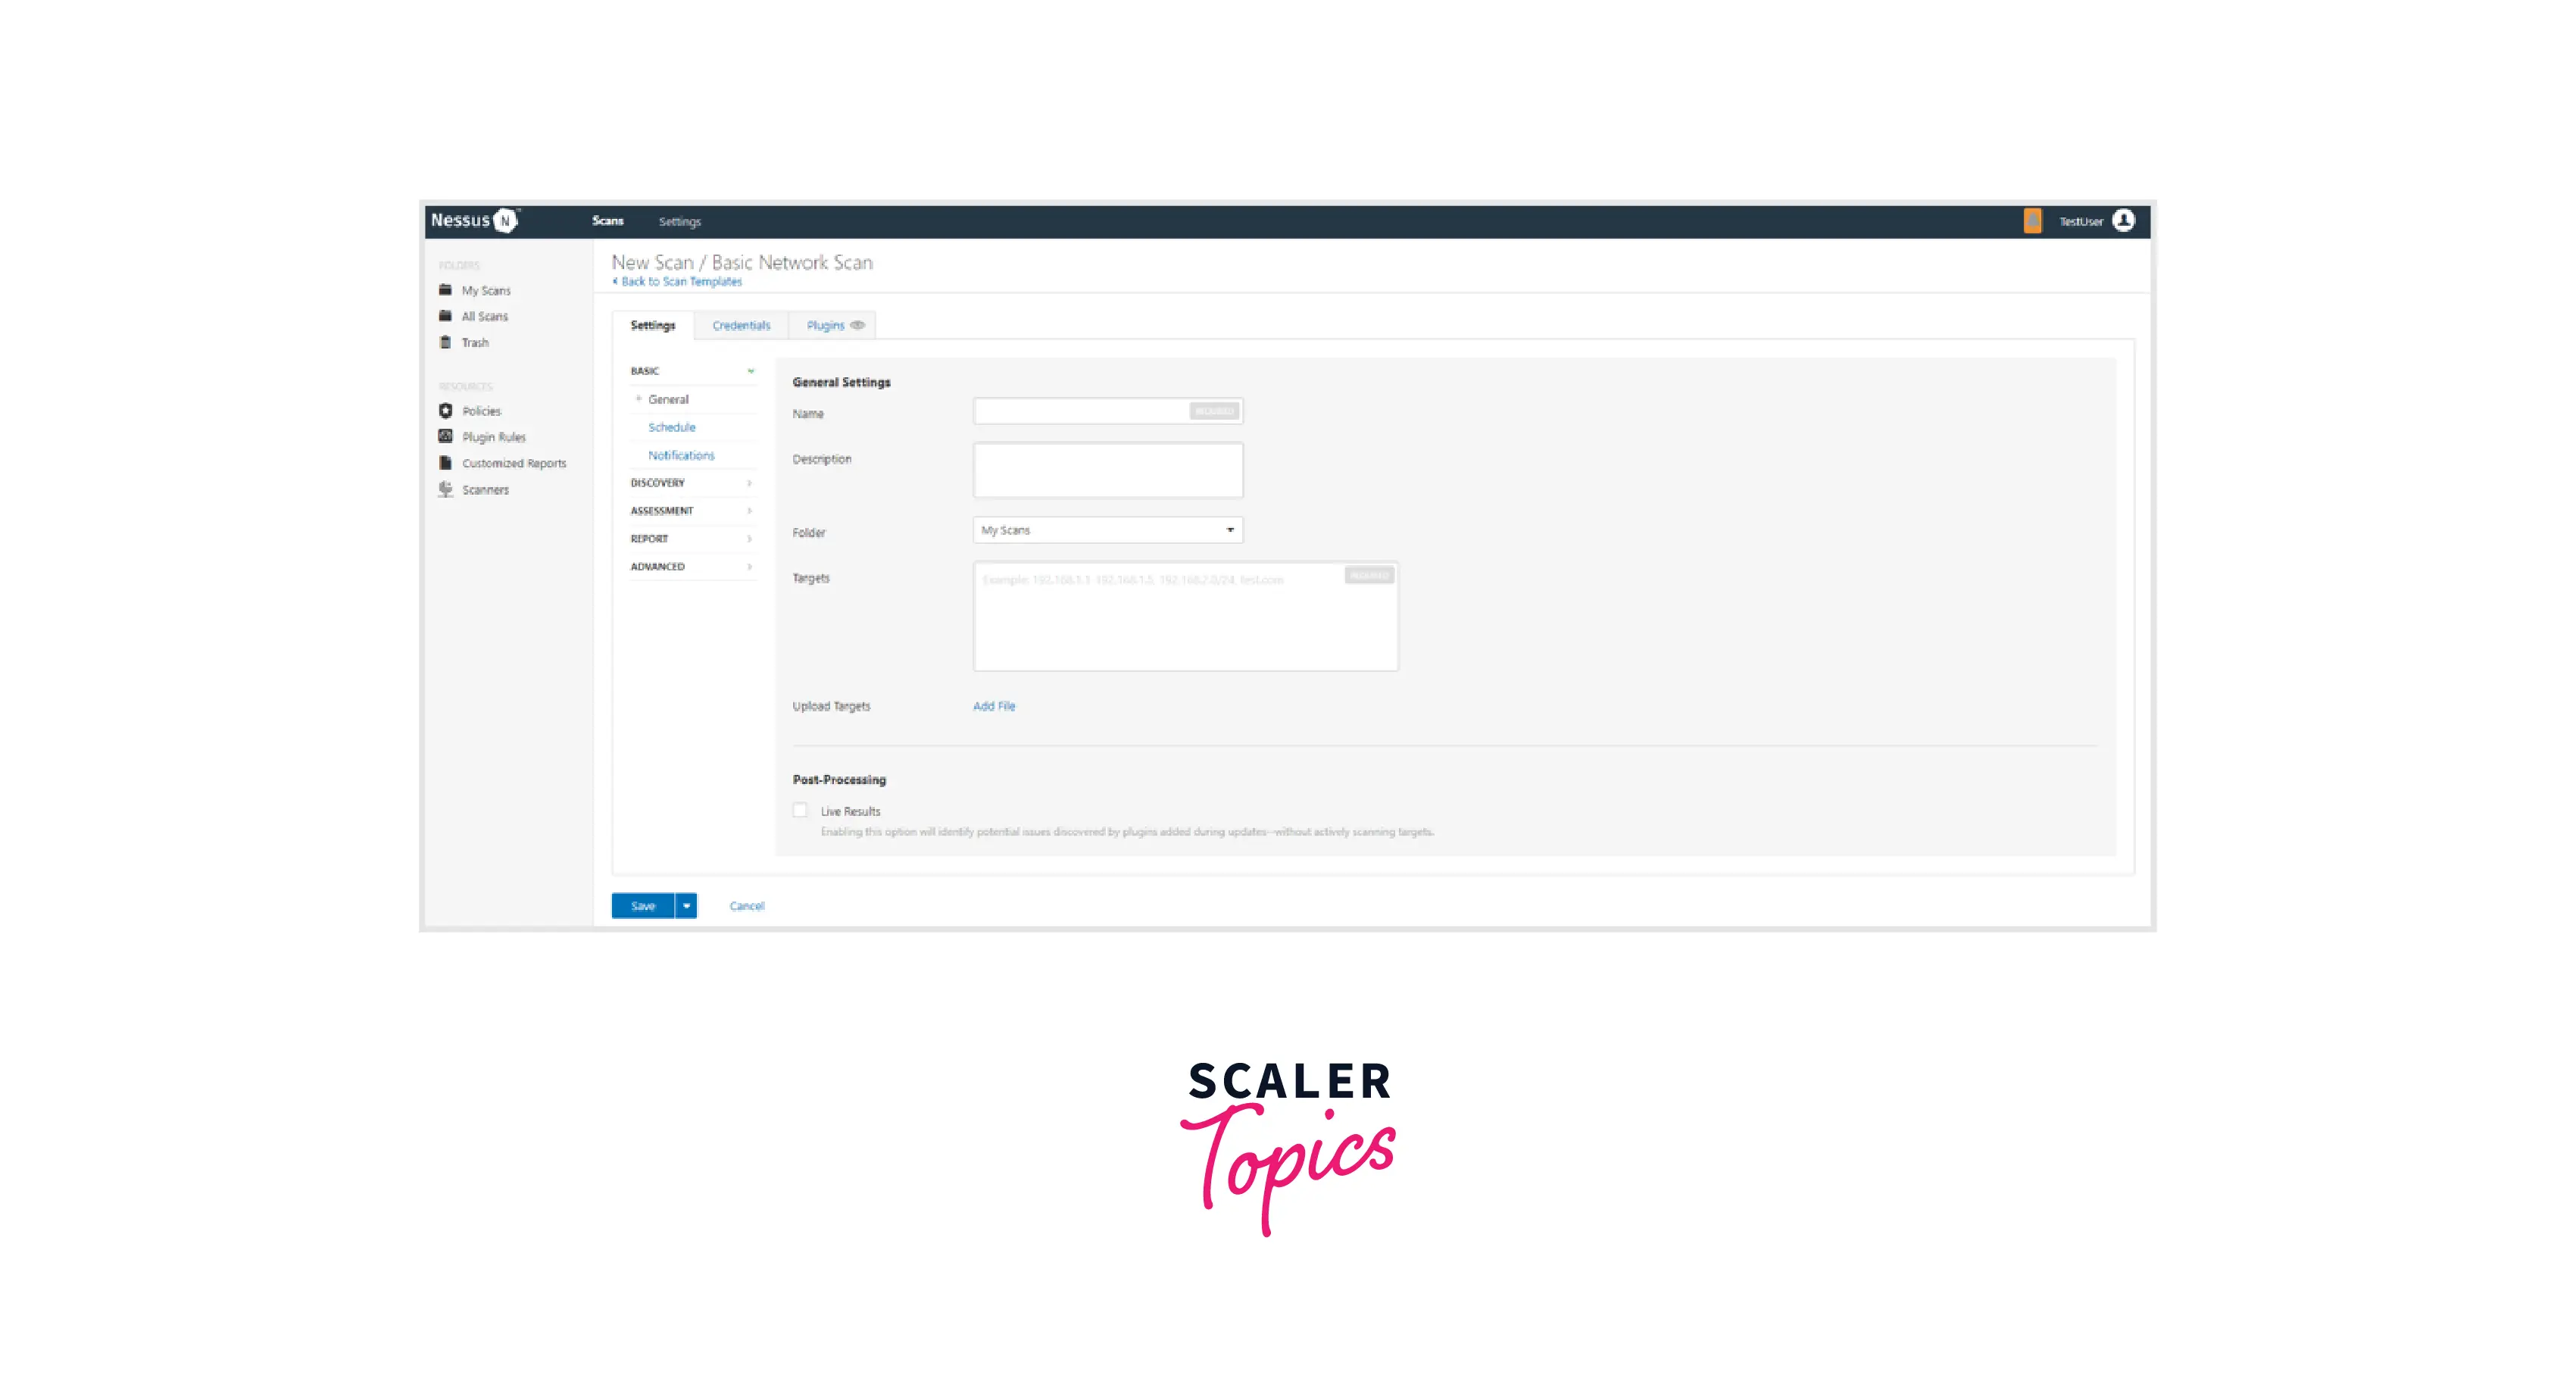
The following are the default settings:
| Setting | Description |
|---|---|
| Name | Names the scan or policy. |
| Description | (Optional) Provides information about the scan or policy. |
| Folder | Provides the location of the scan's stored folder. |
| Targets | Provides a list of targets to be scanned. You are not necessarily to have to provide extra targets if you choose a target group or upload a target file. |
- Complete the remaining configurations and credentials. Though the other options may be left at their pre-configured defaults, Tenable advises checking the Discovery, Assessment, Report, and Advanced settings to make sure they are suitable for your environment.
Credentials can be configured for a scan as an option. This enables certified scans to work, which can deliver far more comprehensive data and a more detailed analysis of the risks in your environment.
Launch the Scan
After finalizing all your options, you have the option to conduct the scan right now or later by clicking the Save button. Click the down arrow, then choose Launch to start the scan right now. It will also be saved when the scan is launched.
View and Analyze Scan Results
You may learn more about the security posture and weaknesses within your company by looking at scan findings. You may choose how you view the results from your scan thanks to adjustable display choices and color-coded indications`.
The following perspectives are available for viewing scan results:
| Page | Description |
|---|---|
| Hosts | Shows each target that was scanned. |
| Vulnerabilities | List of discovered vulnerabilities, arranged by importance. |
| Remediations | If the scan's findings contain information on remediation, this list shows all repair specifics, arranged according to the number of vulnerabilities. |
| Notes | Provides further details regarding the scan and its findings on display. |
| History | Lists all of the scans, along with their start and end times and statuses. |
Viewing scan findings based on vulnerabilities provides insight into possible threats to your assets.
Follow these procedures to see vulnerabilities:
- Select Scans from the top navigation bar.
- Select the scan whose findings you wish to see.
- pick one of the following:
- To display vulnerabilities discovered on a single host, click the host's name.
- To see every vulnerability, click the Vulnerabilities tab.
- (Optional) Click a column header row's property to arrange the vulnerabilities according to that column.
- When you click on a vulnerability row, you'll be sent to the vulnerability details page, which displays plugin details and results for each instance on a host.
Refine Nessus Settings
To examine certain scan results, search or apply filters. Using a variety of filters, you may narrow down the hosts and vulnerabilities you're interested in as well as design thorough and unique scan result screens.
Discovering Hosts:
- Select the Hosts tab from the scan results.
- Enter text to filter for hostname matches in the Search Hosts box located above the host's table. Nessus selects the results for you as you write based on the text you enter.
Discovering Vulnerabilities
- Pick one of the following:
- Click on any specific host to examine its vulnerabilities in the Hosts tab of the scan results.
- To examine all vulnerabilities in the scan results, select the Vulnerabilities tab.
- Enter words to filter for matches in vulnerability names in the Search Vulnerabilities box above the vulnerabilities table. Nessus selects the results for you as you write based on the text you enter.
Creating a Filter
- Pick one of the following:
- Select the Hosts tab from the scan results.
- To examine a host's vulnerabilities, click on it under the Hosts page of the scan results.
- To examine all vulnerabilities, select the Vulnerabilities tab in the scan results.
- Next to the search box, select Filter. A Filter window will display.
- Pick your filtering choices:
- matching any or all: When you choose All, only the results that satisfy all filters are displayed. When you choose Any, all of the filters' matching results are displayed.
- Plugin characteristic: The descriptions of the plugin attribute can be found in the table of plugin attributes.
- Argument filter: To clarify how the filter should match the selected plugin attribute, select is equal to, is not equal to, contains, or does not contain.
- Value: You can either enter a value or choose one from a drop-down menu depending on the plugin attribute you chose.
- (Optional) A new filter can be added by clicking.
- Select Apply
Your filters are applied by Nessus, and the table displays vulnerabilities that match them.
Conclusion
- Nessus is the most extensively used vulnerability assessment solution in the world.
- Nessus rapidly and precisely detects vulnerabilities, configuration problems, and infections in physical, virtual, and cloud systems to help you decide what has to be resolved initially.
- A superior pen testing toolbox that offers in-depth information into your network systems may be created by combining Nessus with Kali Linux.