How to Install Kali Linux?
Kali Linux, formerly BackTrack, stands as the go-to open-source Linux distribution for ethical hackers, boasting a comprehensive toolkit encompassing tools like Metasploit, John the Ripper, and Aircrack-ng. Installing Kali Linux for single boot, whether on bare metal or a guest VM, proves straightforward with optional partition encryption for heightened security. The OS supports amd64 and i386 platforms, favoring amd64 for optimal performance. Minimal hardware requirements make it versatile for both UEFI and BIOS systems. This guide will detail the installation process in a fresh VM, illustrating the procedure for users with various scenarios, emphasizing the adaptability of Kali Linux across diverse hardware setups.
Features of Kali Linux
Before getting into Kali Linux installation, let us explore some significant features of Kali Linux.
- Kali Linux has multi-lingual support. Thus almost anyone, irrespective of the language barrier across the globe can use it.
- It allows live booting. Anyone can place Kali Linux into a USB drive and boot the USB stick. By injecting the stick into the system, users can run Kali OS, which gets loaded into the memory & execute from there.
- This operating system is a favorite for penetration testers and hackers because it comes with 600+ preinstalled pen-testing tools.
- It is entirely open-source and free. Anyone with prior coding experience can change its code and internal configurations.
- Kali Linux can maintain Filesystem Hierarchy Standard & is compliant with the FHS system.
- Various other Kali Linux versions are there that can run on different devices.
- All its preinstalled repositories and packages are GPG-signed.
- Kali Linux delivers an encryption mechanism for its persistence volume(s). Thus, users can save any file securely without worrying about it. It uses LUKS Nuke containers.
- The undercover feature of Kali Linux is mind-blowing. Activating Kali Linux's "undercover" feature will blend Kali Linux's appearance with Windows OS. It becomes useful when a penetration tester performs pen-testing by sitting at the client's office, and random employees think they are using Windows and take things casually.
- Kali runs in Bare Metal, ARM, Cloud systems like Azure and AWS, Containers (Docker, LXD), etc. We can also install it in virtual machine systems like VMware or VirtualBox.
- It supports a wide range of wireless devices to perform penetration testing.
- It also features forensics mode.
- The kernel of Kali Linux is custom & gets patched regularly by the Kali Linux team to fix any vulnerability.
Need for Kali Linux
Kali Linux is an all-in-one package for hackers, penetration testers, information security professionals, and cybersecurity engineers to test various devices, systems, networks, and applications.
Hackers do not have the headache of installing any hacking or penetration testing tools separately. Through Kali Linux, security professionals can perform advanced penetration testing, state-of-the-art security auditing, information security check, etc.
It comes with several CLI and GUI tools that make it flexible for security professionals and ethical hackers to perform various auditing and pen-testing. The popular categories of security tools and apps that come with Kali Linux are:
- Vulnerability analysis tools
- Cryptographic tools
- Information gathering
- Web applications
- Exploitation tools
- Forensics tools
- Wireless attacks
- Hardware hacking
- Stress testing programs
- Mobile hacking tools
- Sniffing tools
- Network monitoring tools
- Spoofing tools
- Password cracking tools
- Honeypot-generating tools
- Maintaining access
Transform Your Career
Choose from our industry-leading programs designed for career success
Modern Software and AI Engineering Program
Master full-stack development with AI integration

Modern Data Science and ML with specialisation in AI
Advanced data science techniques with AI specialization
Advanced AIML with Specialisation in Agentic AI
Deep dive into AIML with focus on Agentic systems
DevOps, Cloud & AI Platform Engineering
Build and manage AI-powered cloud infrastructure
AI Engineering Advanced Certification by IIT-Roorkee
Premier AI engineering certification from IIT-Roorkee
System Requirements
Before installing Kali Linux operating system to your PC, you must know the minimum requirements Kali Linux needs for your system.
- Considering a low-end system, your Kali Linux requires a primary Secure Shell (SSH) server.
- It requires a minimum of 2 GB of hard disk drive (HDD) or solid-state drive (SSD). But considering a higher end, you can have a minimum of 20 GB of disk space at least.
- It requires very little, i.e., 128 MB of RAM (although the official Kali Linux website recommends 512 MB). Considering a higher-end system, you can keep a minimum of 2 GB to 8 GB RAM.
- Resource-extensive tools like Burpsuite, Nessus, etc., require more memory.
- In those scenarios, 8 GB is what the Kali Linux website recommends.
- It also requires a minimum Intel Core i3 or AMD E1 equivalent processor.
- Your system must have USB ports to support a USB stick (size: 6 GB or more). We need it, especially when you run Kali Linux Live.
Installation Prerequisites
- You will need an installer. You can download the Kali Linux installer from their official website.
- You will need a USB stick to run your Kali Linux live.
- You might also need virtual machine software if you want to install it on top of another operating system that your system already has.
- If you want to install it directly, you will need a CD/DVD drive or a USB stick. Use DVD burner software or Rufus to install Kali Linux on your computer and make it bootable.
How to Install Kali Linux?
There are different ways of Kali Linux installation into your system. Before jumping into the practical aspect to install Kali Linux, let us understand what these techniques do.
- Bootable Device: It is the fastest and the most prominent way of installing or using Kali Linux. It is non-restrictive, and if we use the USB to install it, we do not have to make any changes to our host system or hard drive. Since we make the USB bootable, we can easily carry it anywhere or use it on any computer. You can also configure the Kali Linux USB drive to have persistent storage. It makes the data stored and saved across multiple reboots. In the case of persistent storage, let's suppose you worked on something & stored/saved the data in persistent storage. The next time you reboot the system, you will get the saved data secured and encrypted persistent storage.
- Hard Disk Installation: You can also install Kali Linux directly into your hard disk as you do with other operating systems. It is a straightforward process. But it might require a system that is compatible & must have all the configurations that Kali Linux needs to run.
- Dual Boot: Dual booting is the practice of keeping two operating systems in two separate drives. We can thus keep other operating systems like Windows or other Linux distributions along with Kali Linux. But while executing this exercise, we have to take caution during the setup process so that the installation of Kali Linux does not mess up the existing host operating system.
- Virtualization: Many times, for practicing or learning Kali Linux for the first time, aspirants prefer installing it within a virtual machine. Virtual machines are software types that you install within the host operating system. Now within that software, you can install one or more operating systems.
Let us explore the step-by-step guidance on how to install Kali Linux in different ways. Before all of these, download Kali Linux from their official website.
Bootable Device
Here are the steps to install Kali Linux into a bootable device:
- We can use the balenaEtcher bootable maker to create a bootable Kali Linux USB drive.
- Insert a blank USB stick into any USB port.
- Now launch BalenaEtcher.
- Click Flash from a file, and navigate to the Kali Linux ISO/image file that you want to install into your USB.
- Click Select target and choose the USB drive where you want to make the bootable Kali Linux.
- Tap the "Flash!" button once you are ready to format and install Kali Linux.
- As soon as the software alerts you that Etcher has flashed the image, you can safely remove the USB and start booting Kali Linux from the USB.
Turn Learning into Career Growth
Install Kali Linux on a Hard Drive or SSD
Let us go through the different steps of installing Kali Linux on a hard drive or SSD:
- Start booting your computer and insert a bootable Kali Linux DVD or USB stick (you can choose anyone). Once you start the installation process, the Kali Linux boot screen will pop up to greet you. We can choose either the text mode or graphics mode.

- Let us continue by choosing Graphics Install.
- In the next step, the installation prompt will ask you to choose a language.

- In the third step, you have to specify the location.
- Next, you will choose your keyboard/keymap layout.
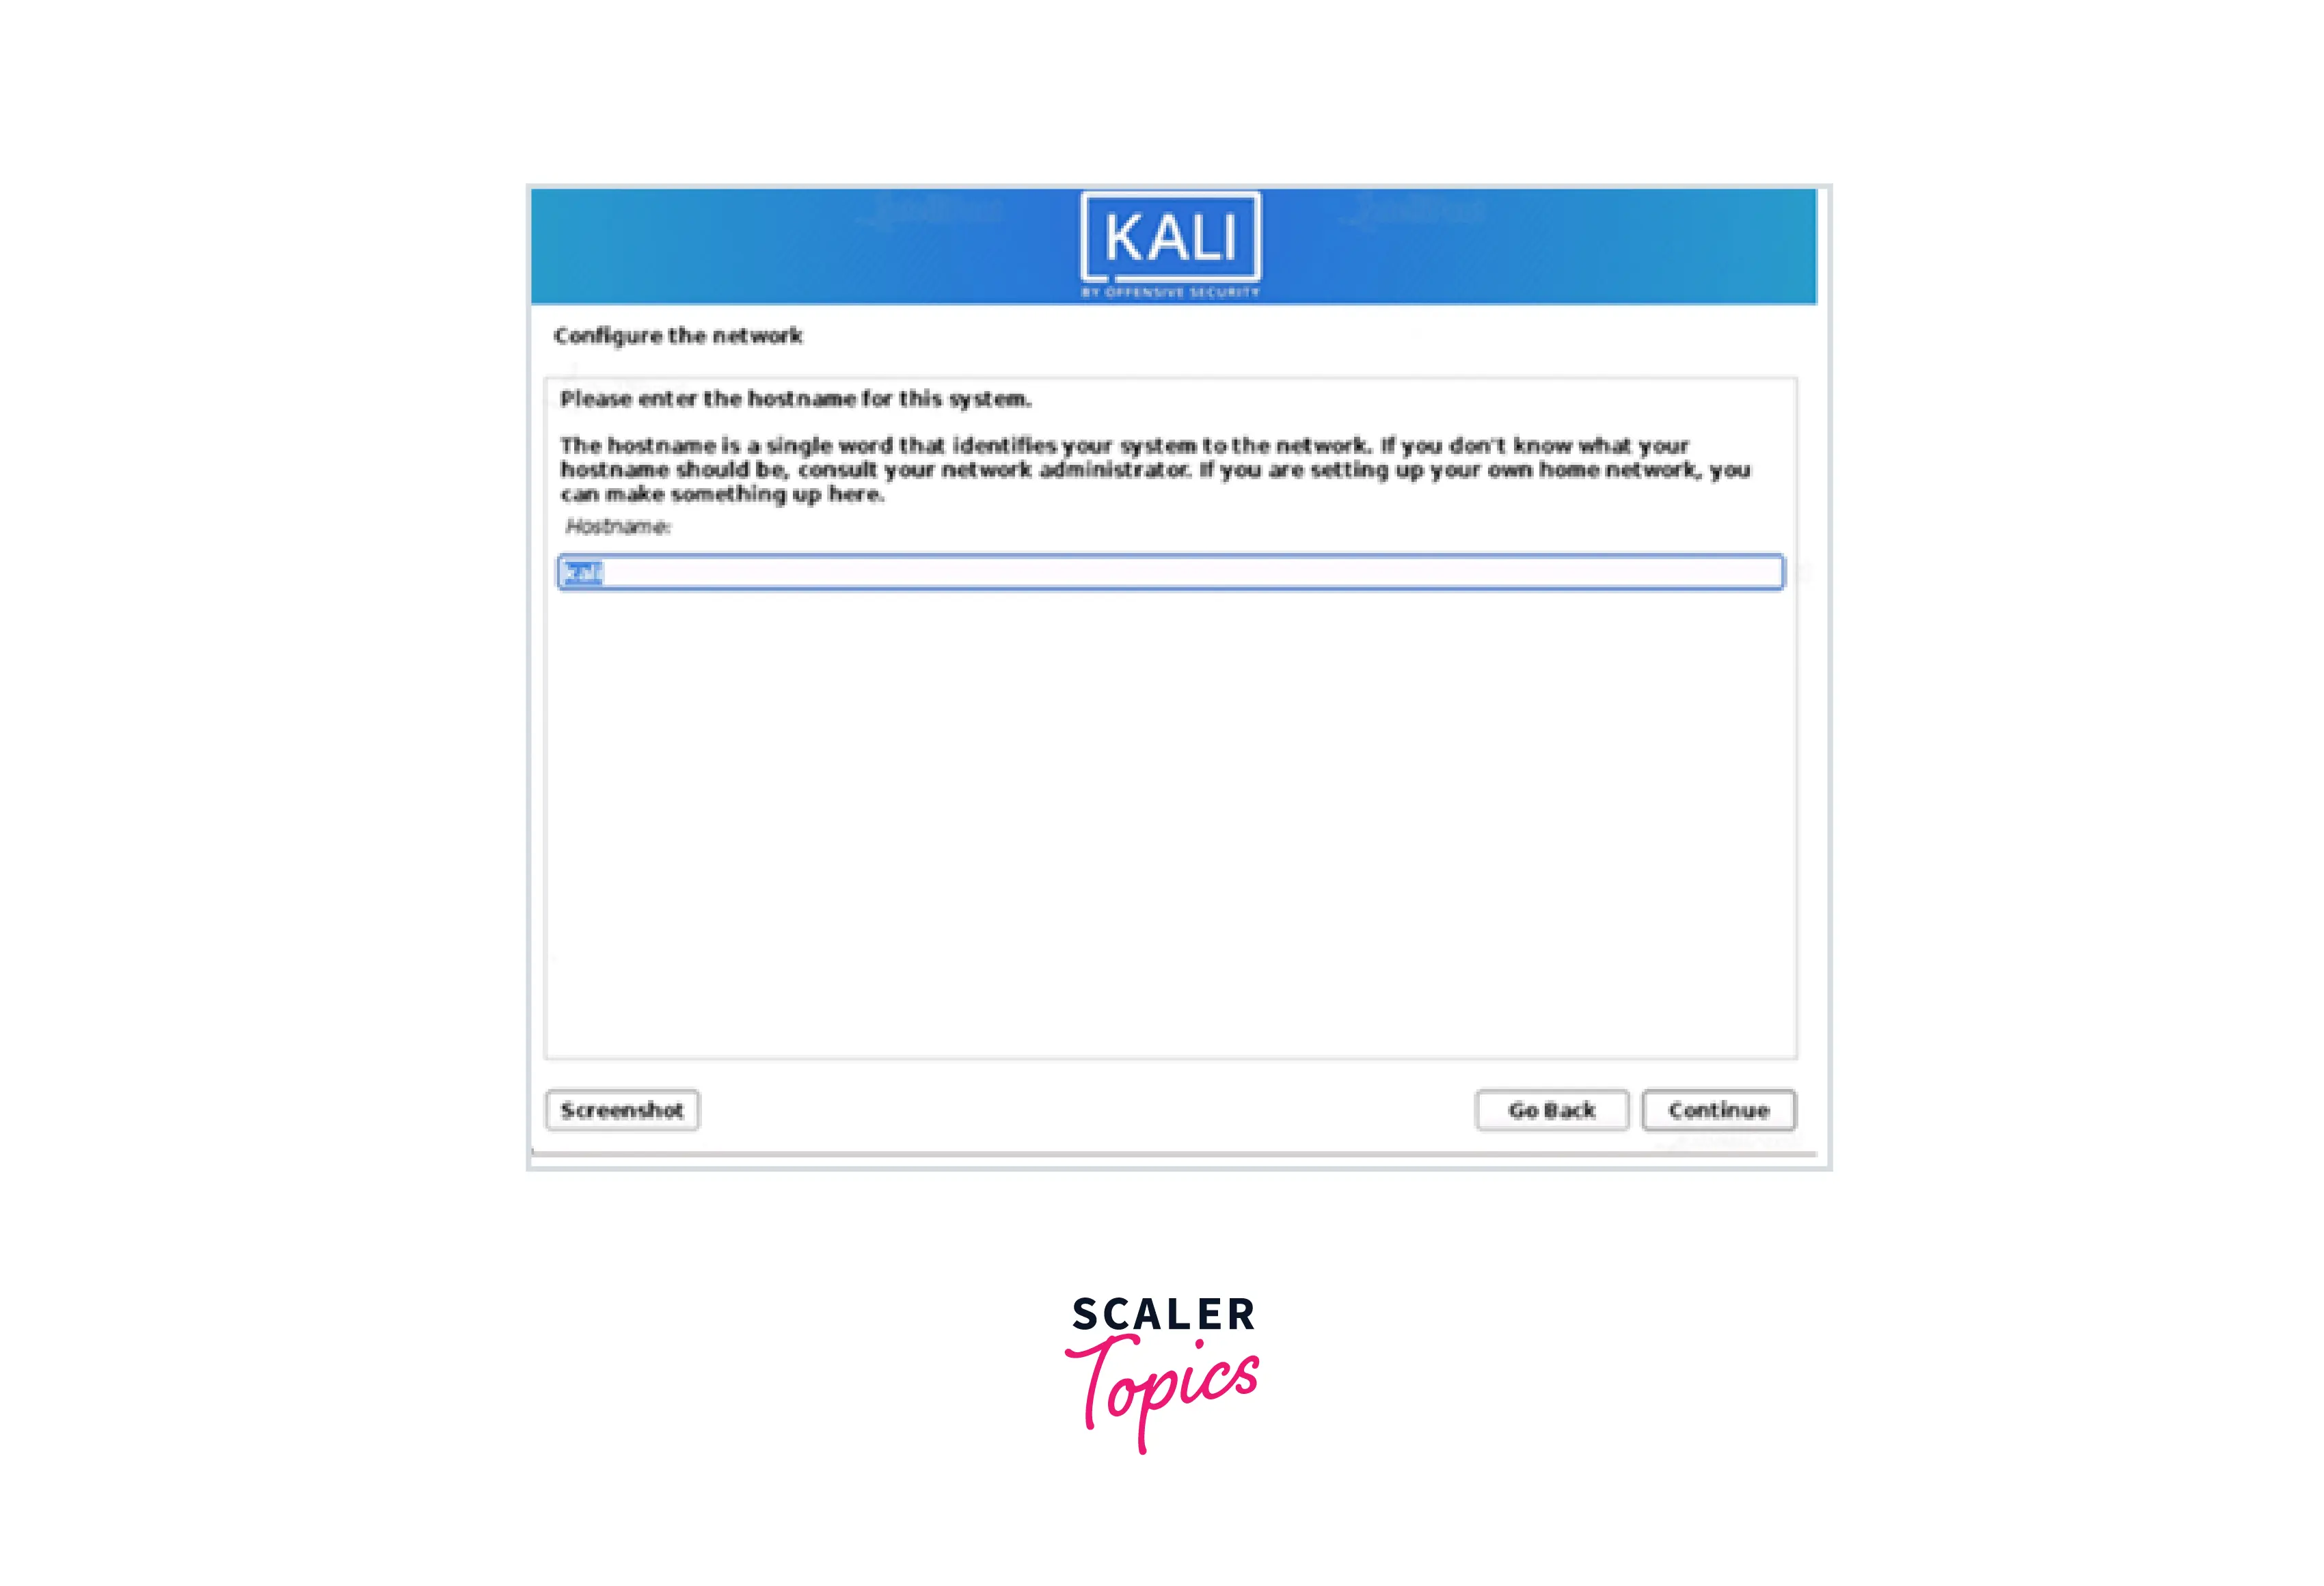
- In the next phase, the installation system will scan your network interfaces for DHCP servers. Then it will ask you to choose your hostname. Also, it will check for the NIC. If the NIC is not found, it will prompt you to install the driver. You will also get a prompt to your wireless network before asking you for a hostname if the selected NIC is 802.11-based.
- After configuring the network and providing the hostname, click "Continue."
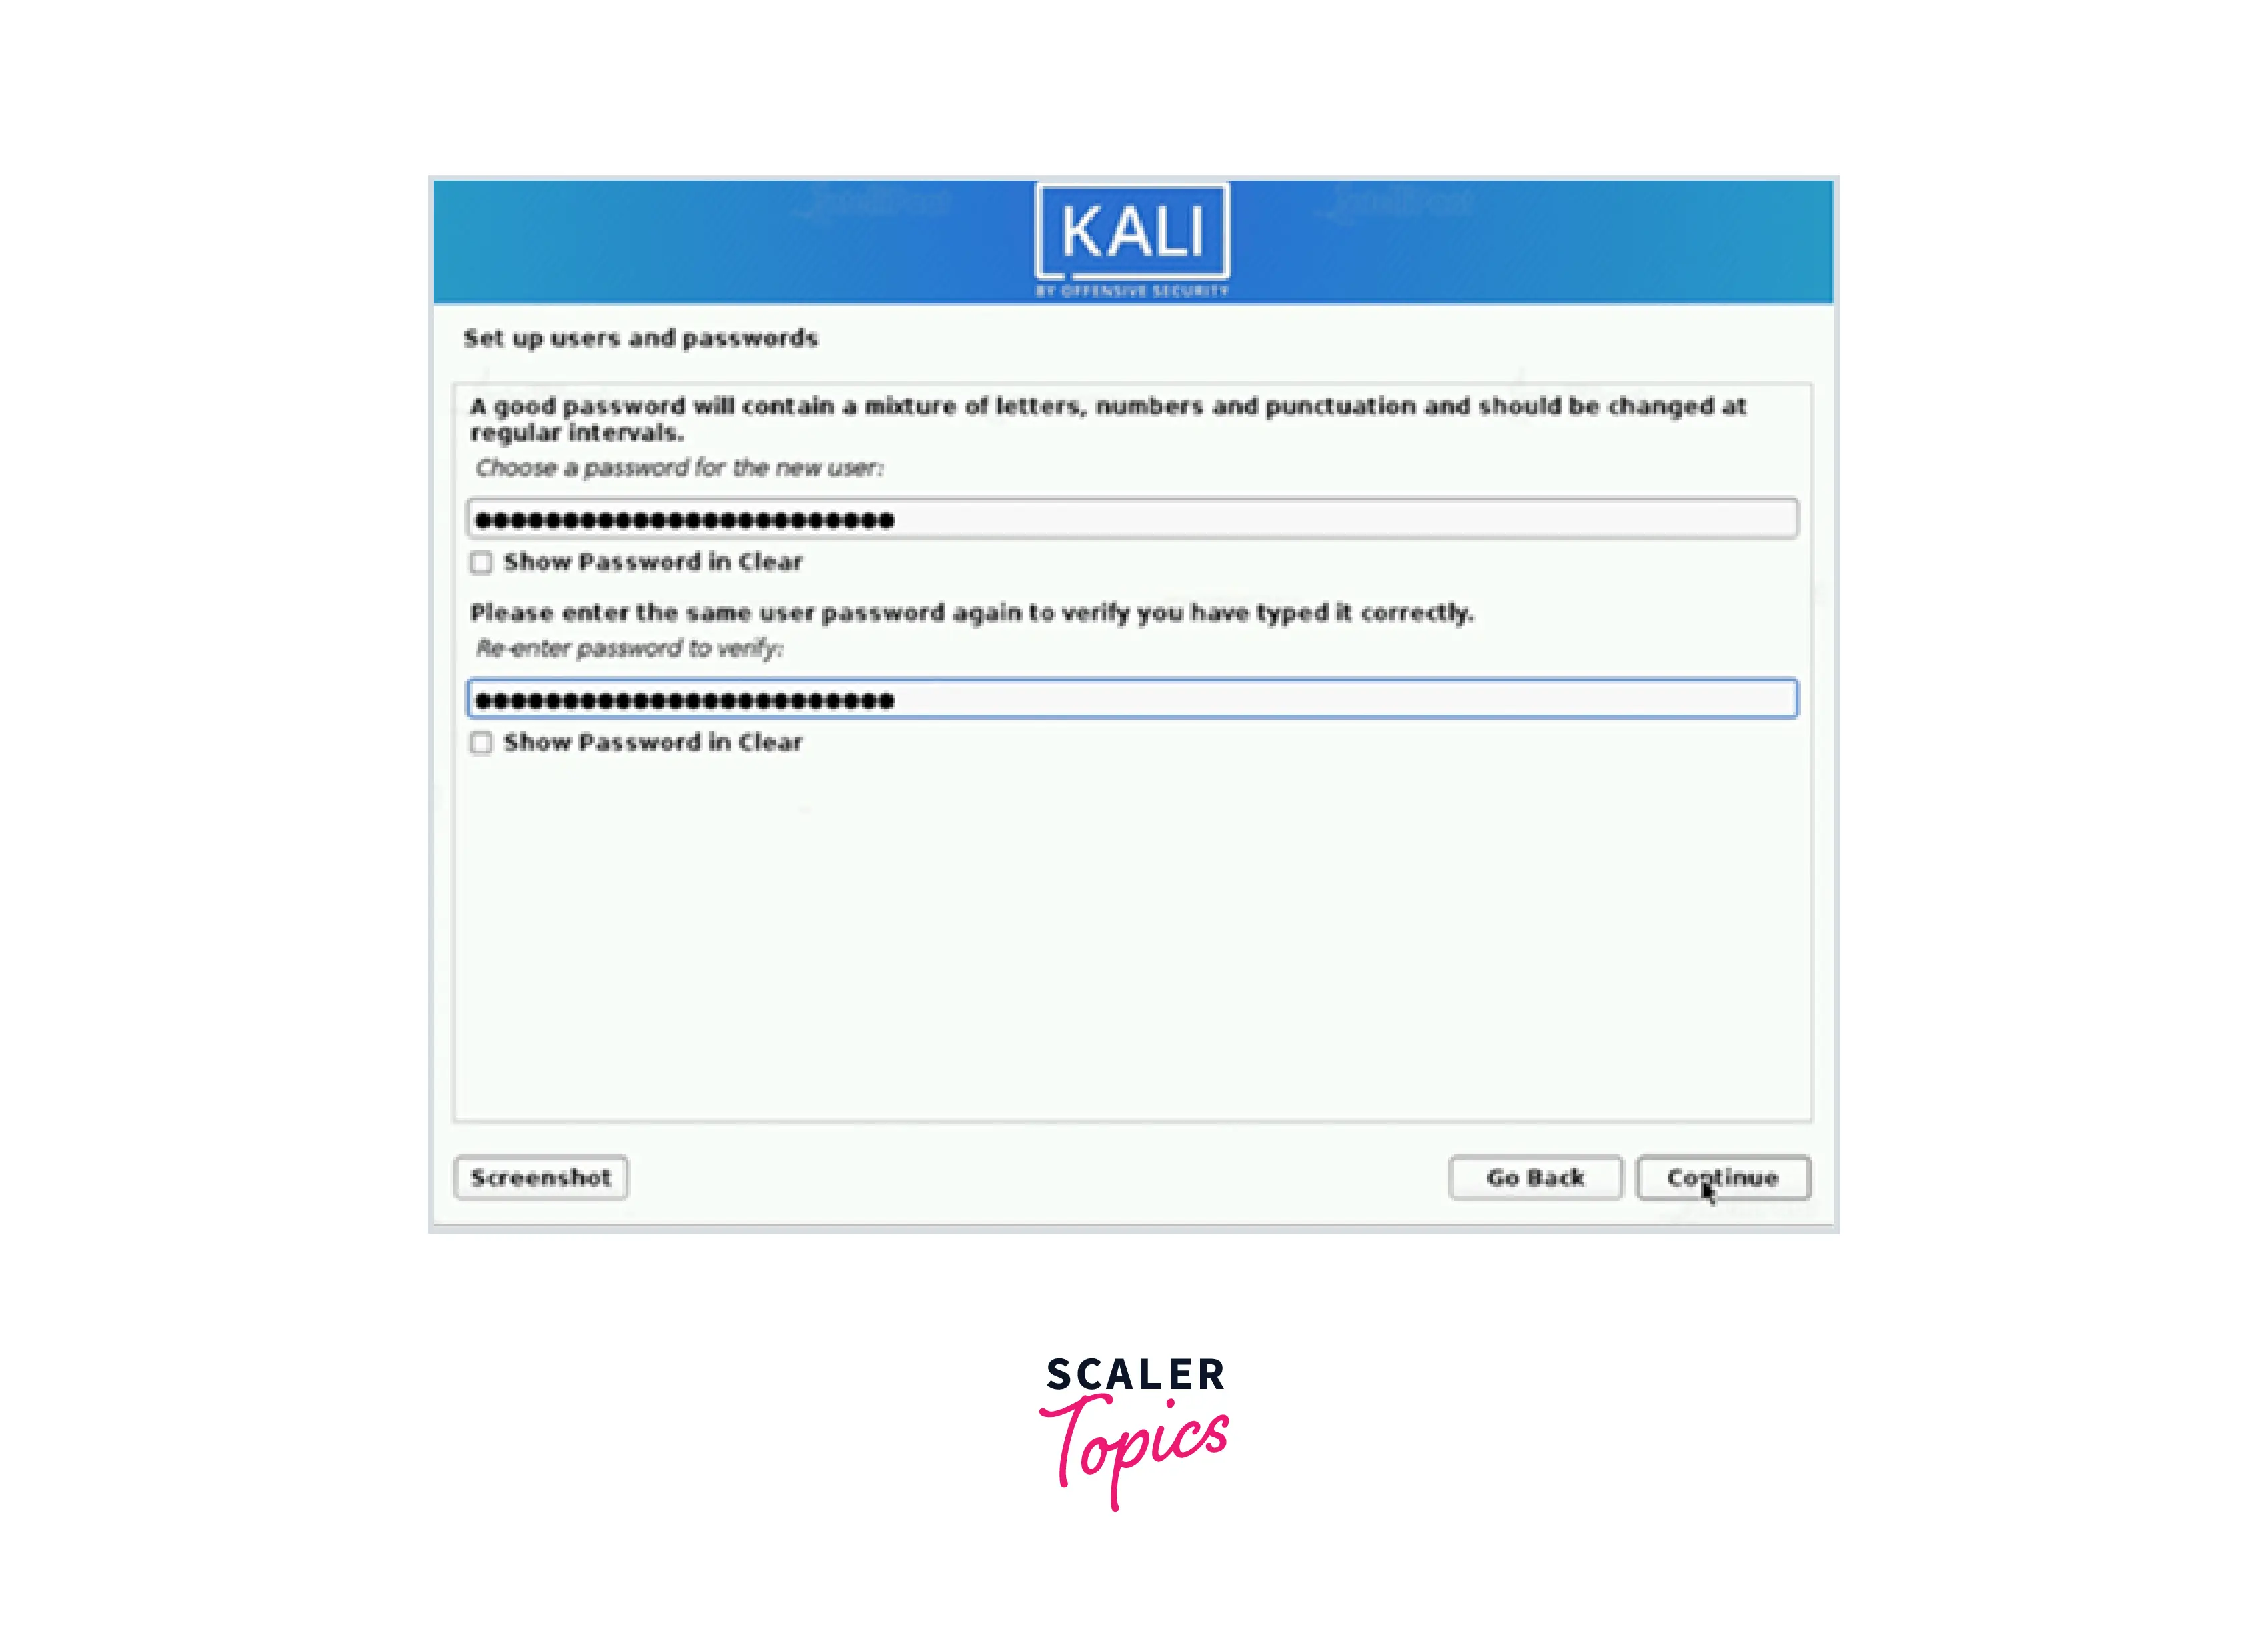
- Next, you have to build the system's user account by providing the full name, username, and a strong password. Click "Continue."
- Next, set a standard time zone.
- Now, you have to partition the disk. For this, the installer will analyze your drives and suggest several options. You can choose "Guided – use the entire disk" if your entire hard drive is vacant. Otherwise, you can choose "Guided – use the maximum continuous vacant space" as the ideal way to dual-boot with two operating systems. This option tells the setup not to change any existing data that is there within other drives.

- Select the disk drive and click "Continue."
- In the next phase, you can choose to keep all of your files in a single partition. That is the default option. In case, you have multiple drive partitions with one or more of the top-level directories, you can choose them depending on your needs. The installer will chalk out a permanent modification to your disk.
- Before requesting an LVM password, the setup will carry out a secure wipe of the hard disc if it remains enabled in the previous phase. Keep a strong password; otherwise, it will prompt a warning saying "weak passphrase."
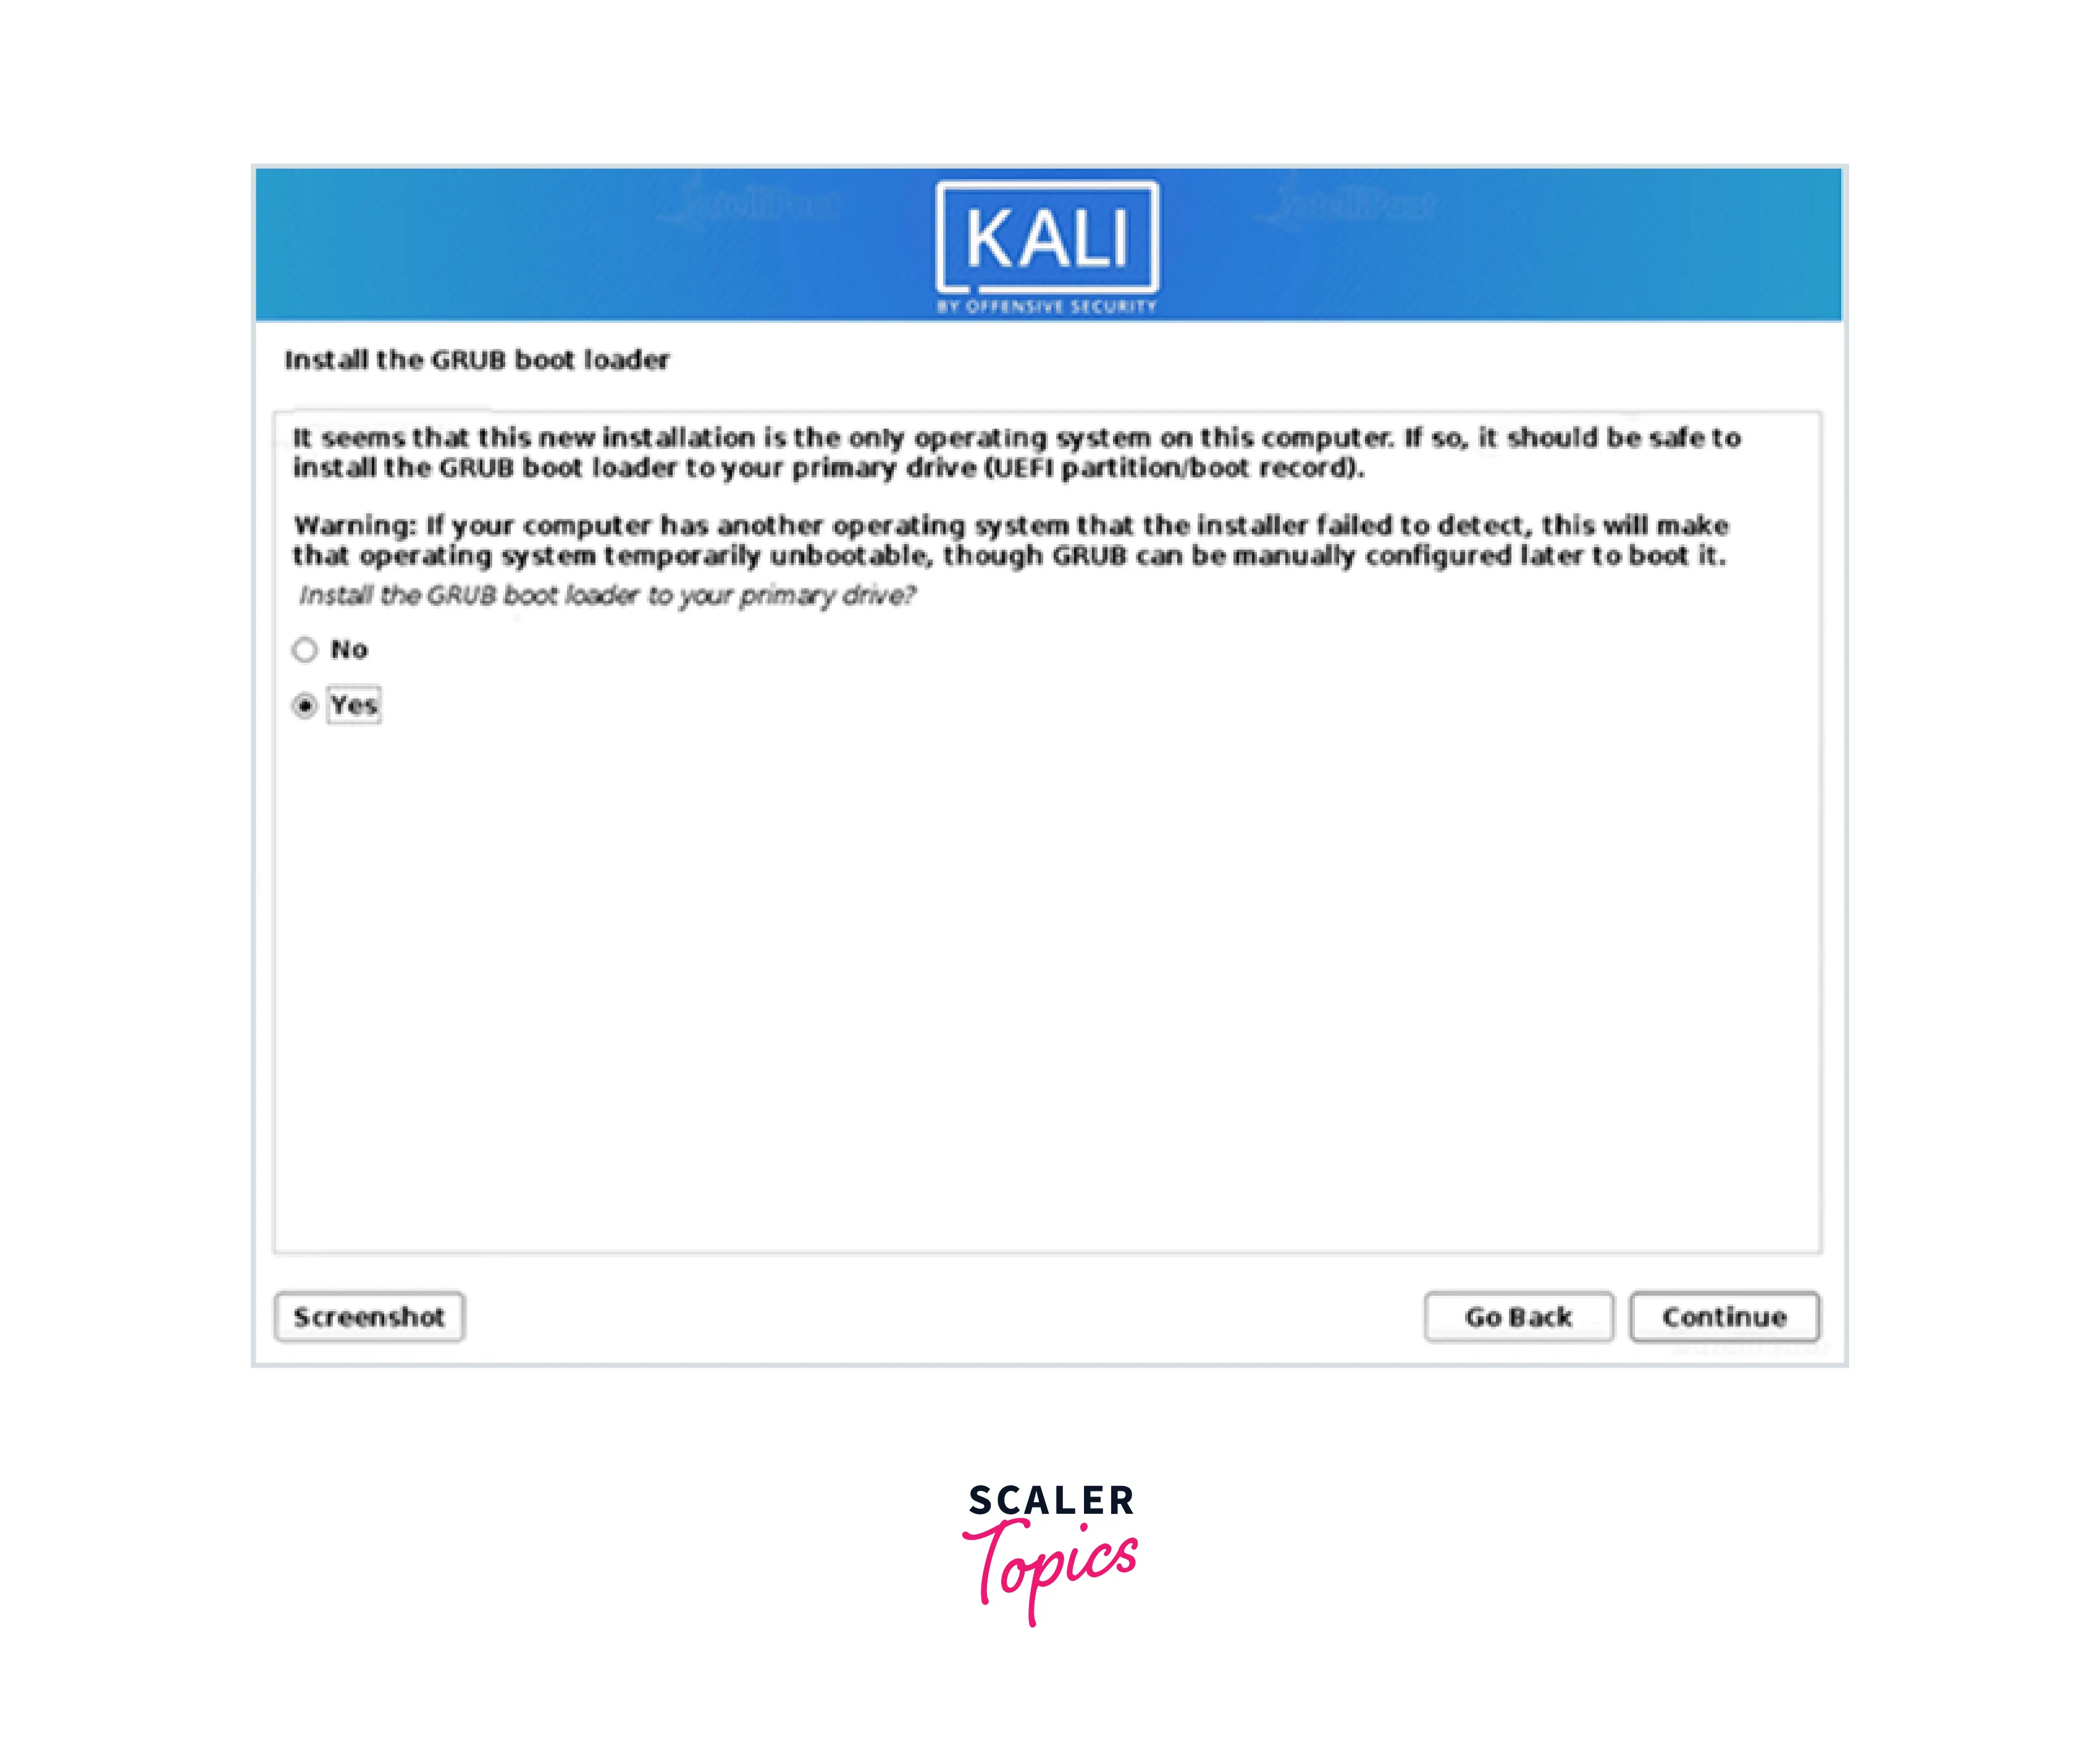
- The installation phase will also ask for confirmation to install the GRUB bootloader. Choose Yes (radio button) to install the Grub bootloader.
- Click "Continue" and allow the setup to complete the installation. Once, completed, restart your system and continue using Kali Linux.
Installing Kali Linux on the Virtual Machine
Let us understand how to install Kali Linux on your virtual machine (VM):
- Download and install any virtual machine like VirtualBox.
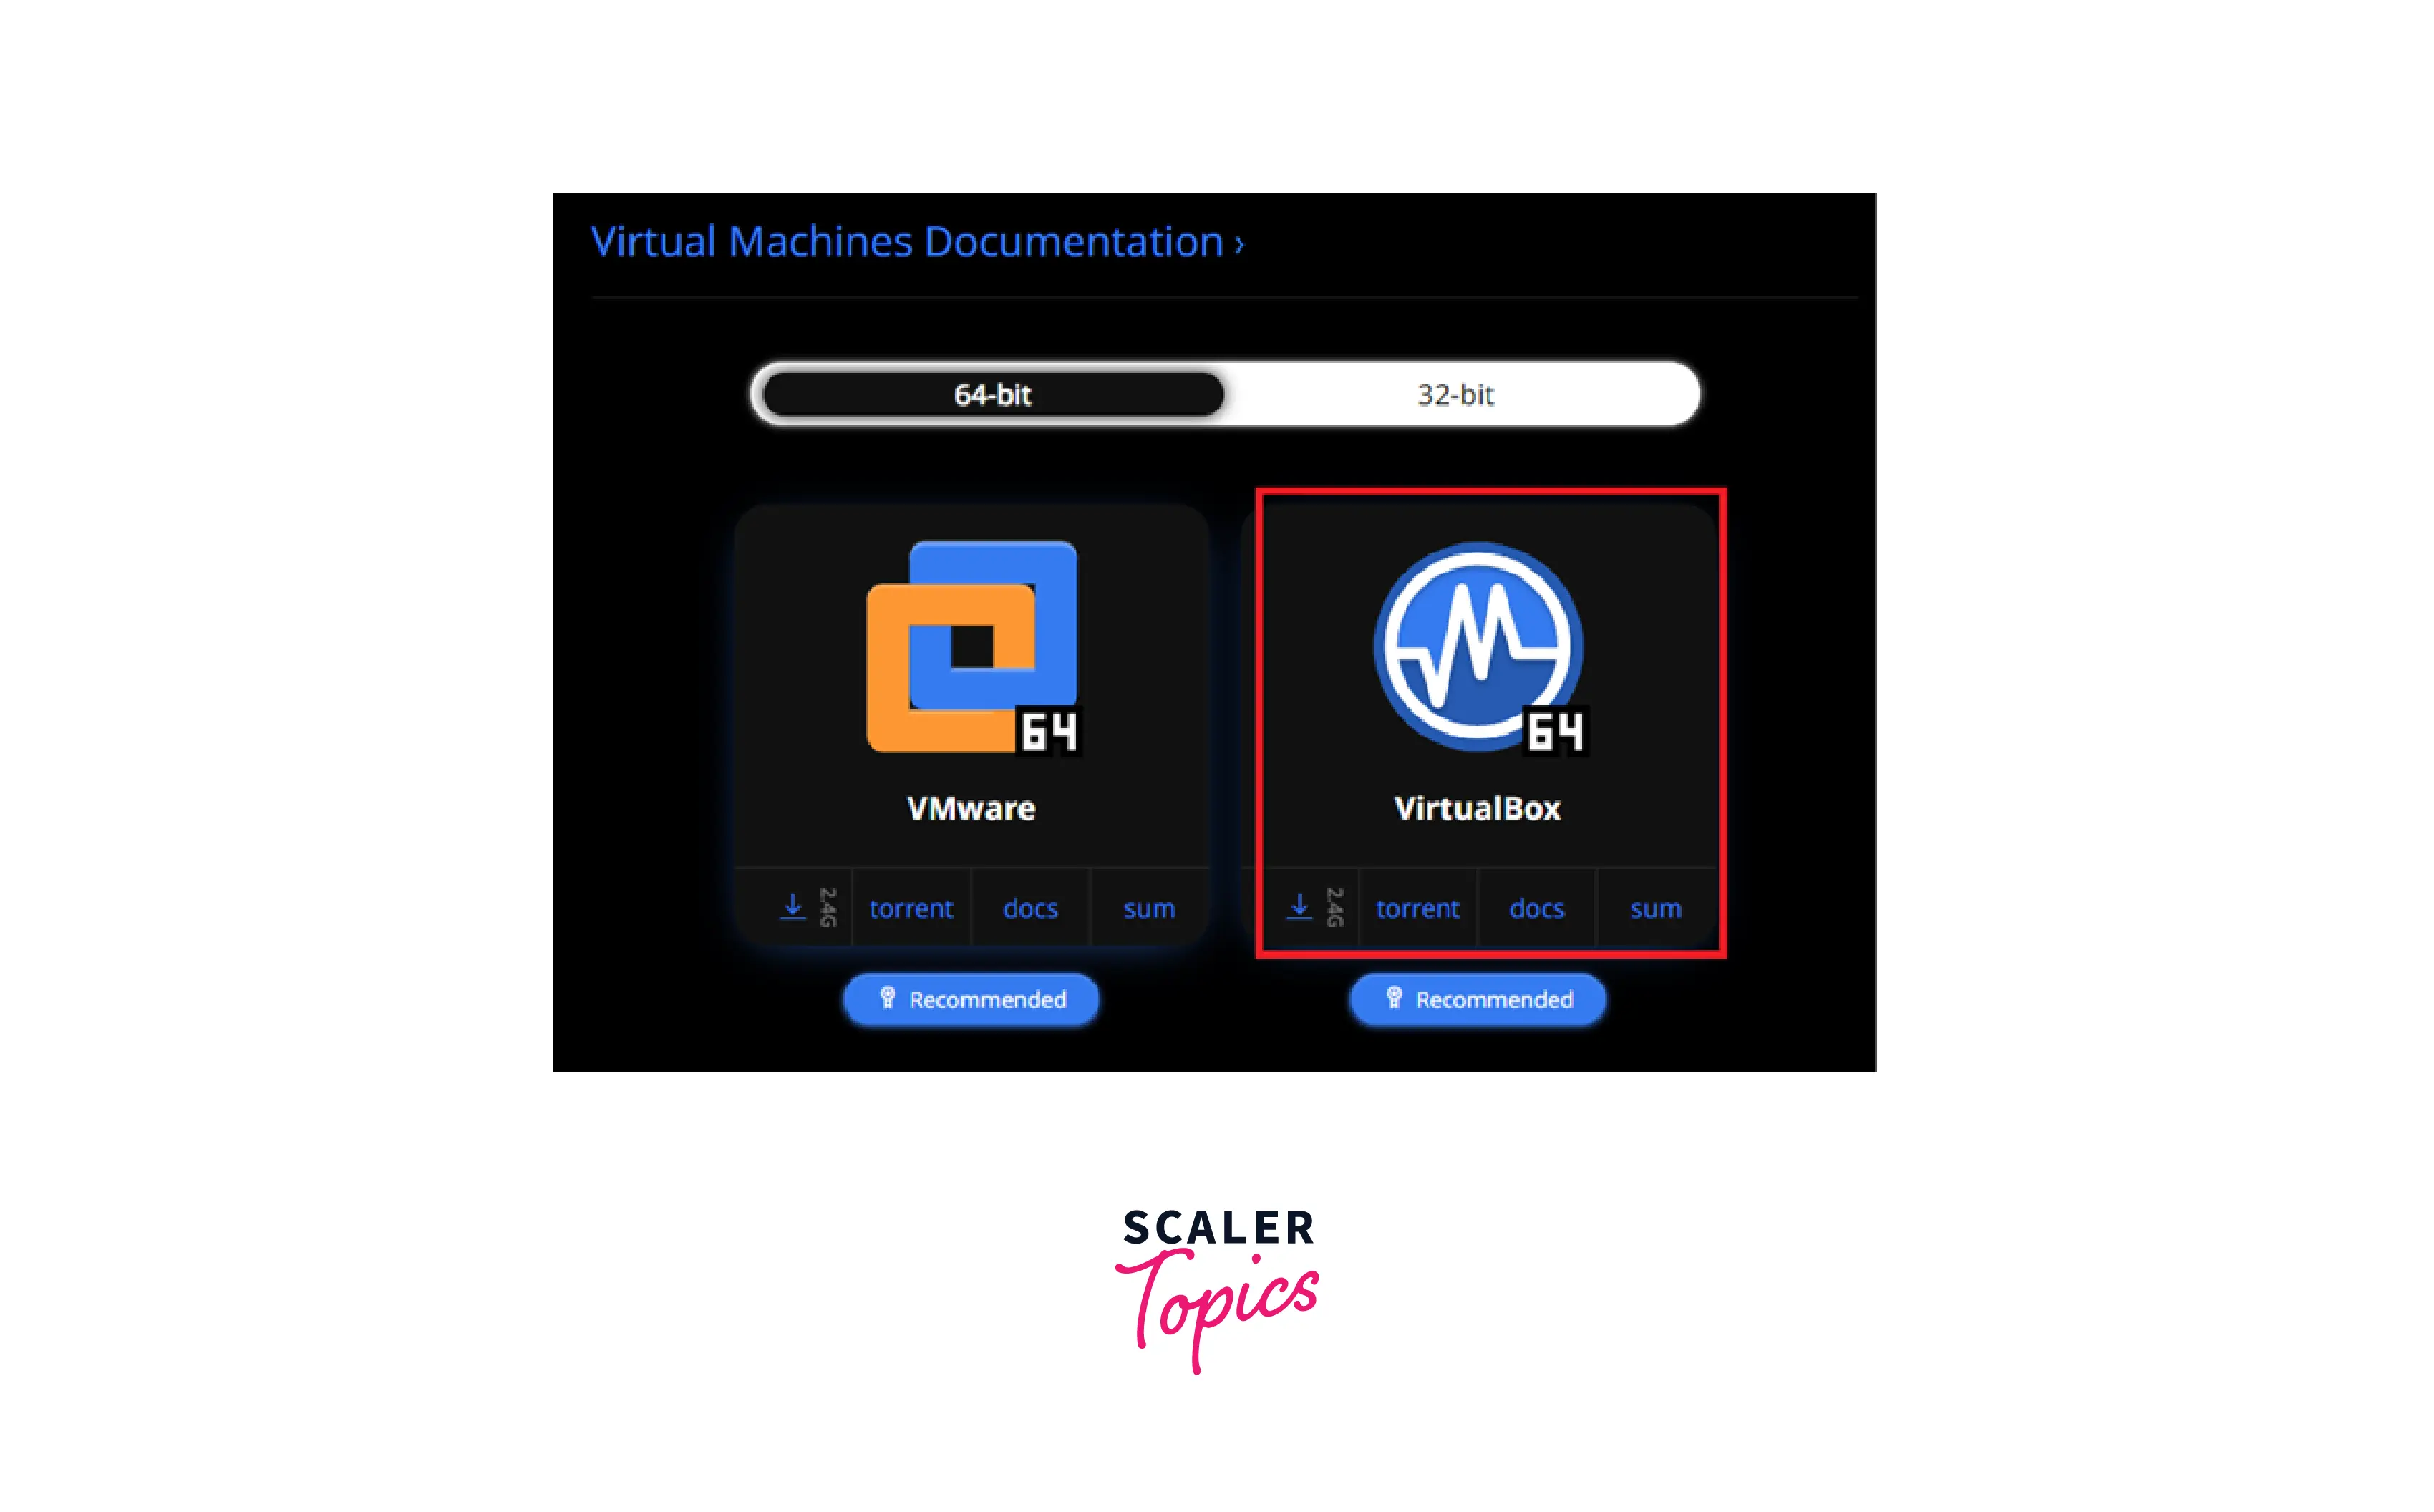
- Click Next > Next > Next > Yes > Finish to install the setup.
- Open VirtualBox.
- Go to Machine Menu** >** New.
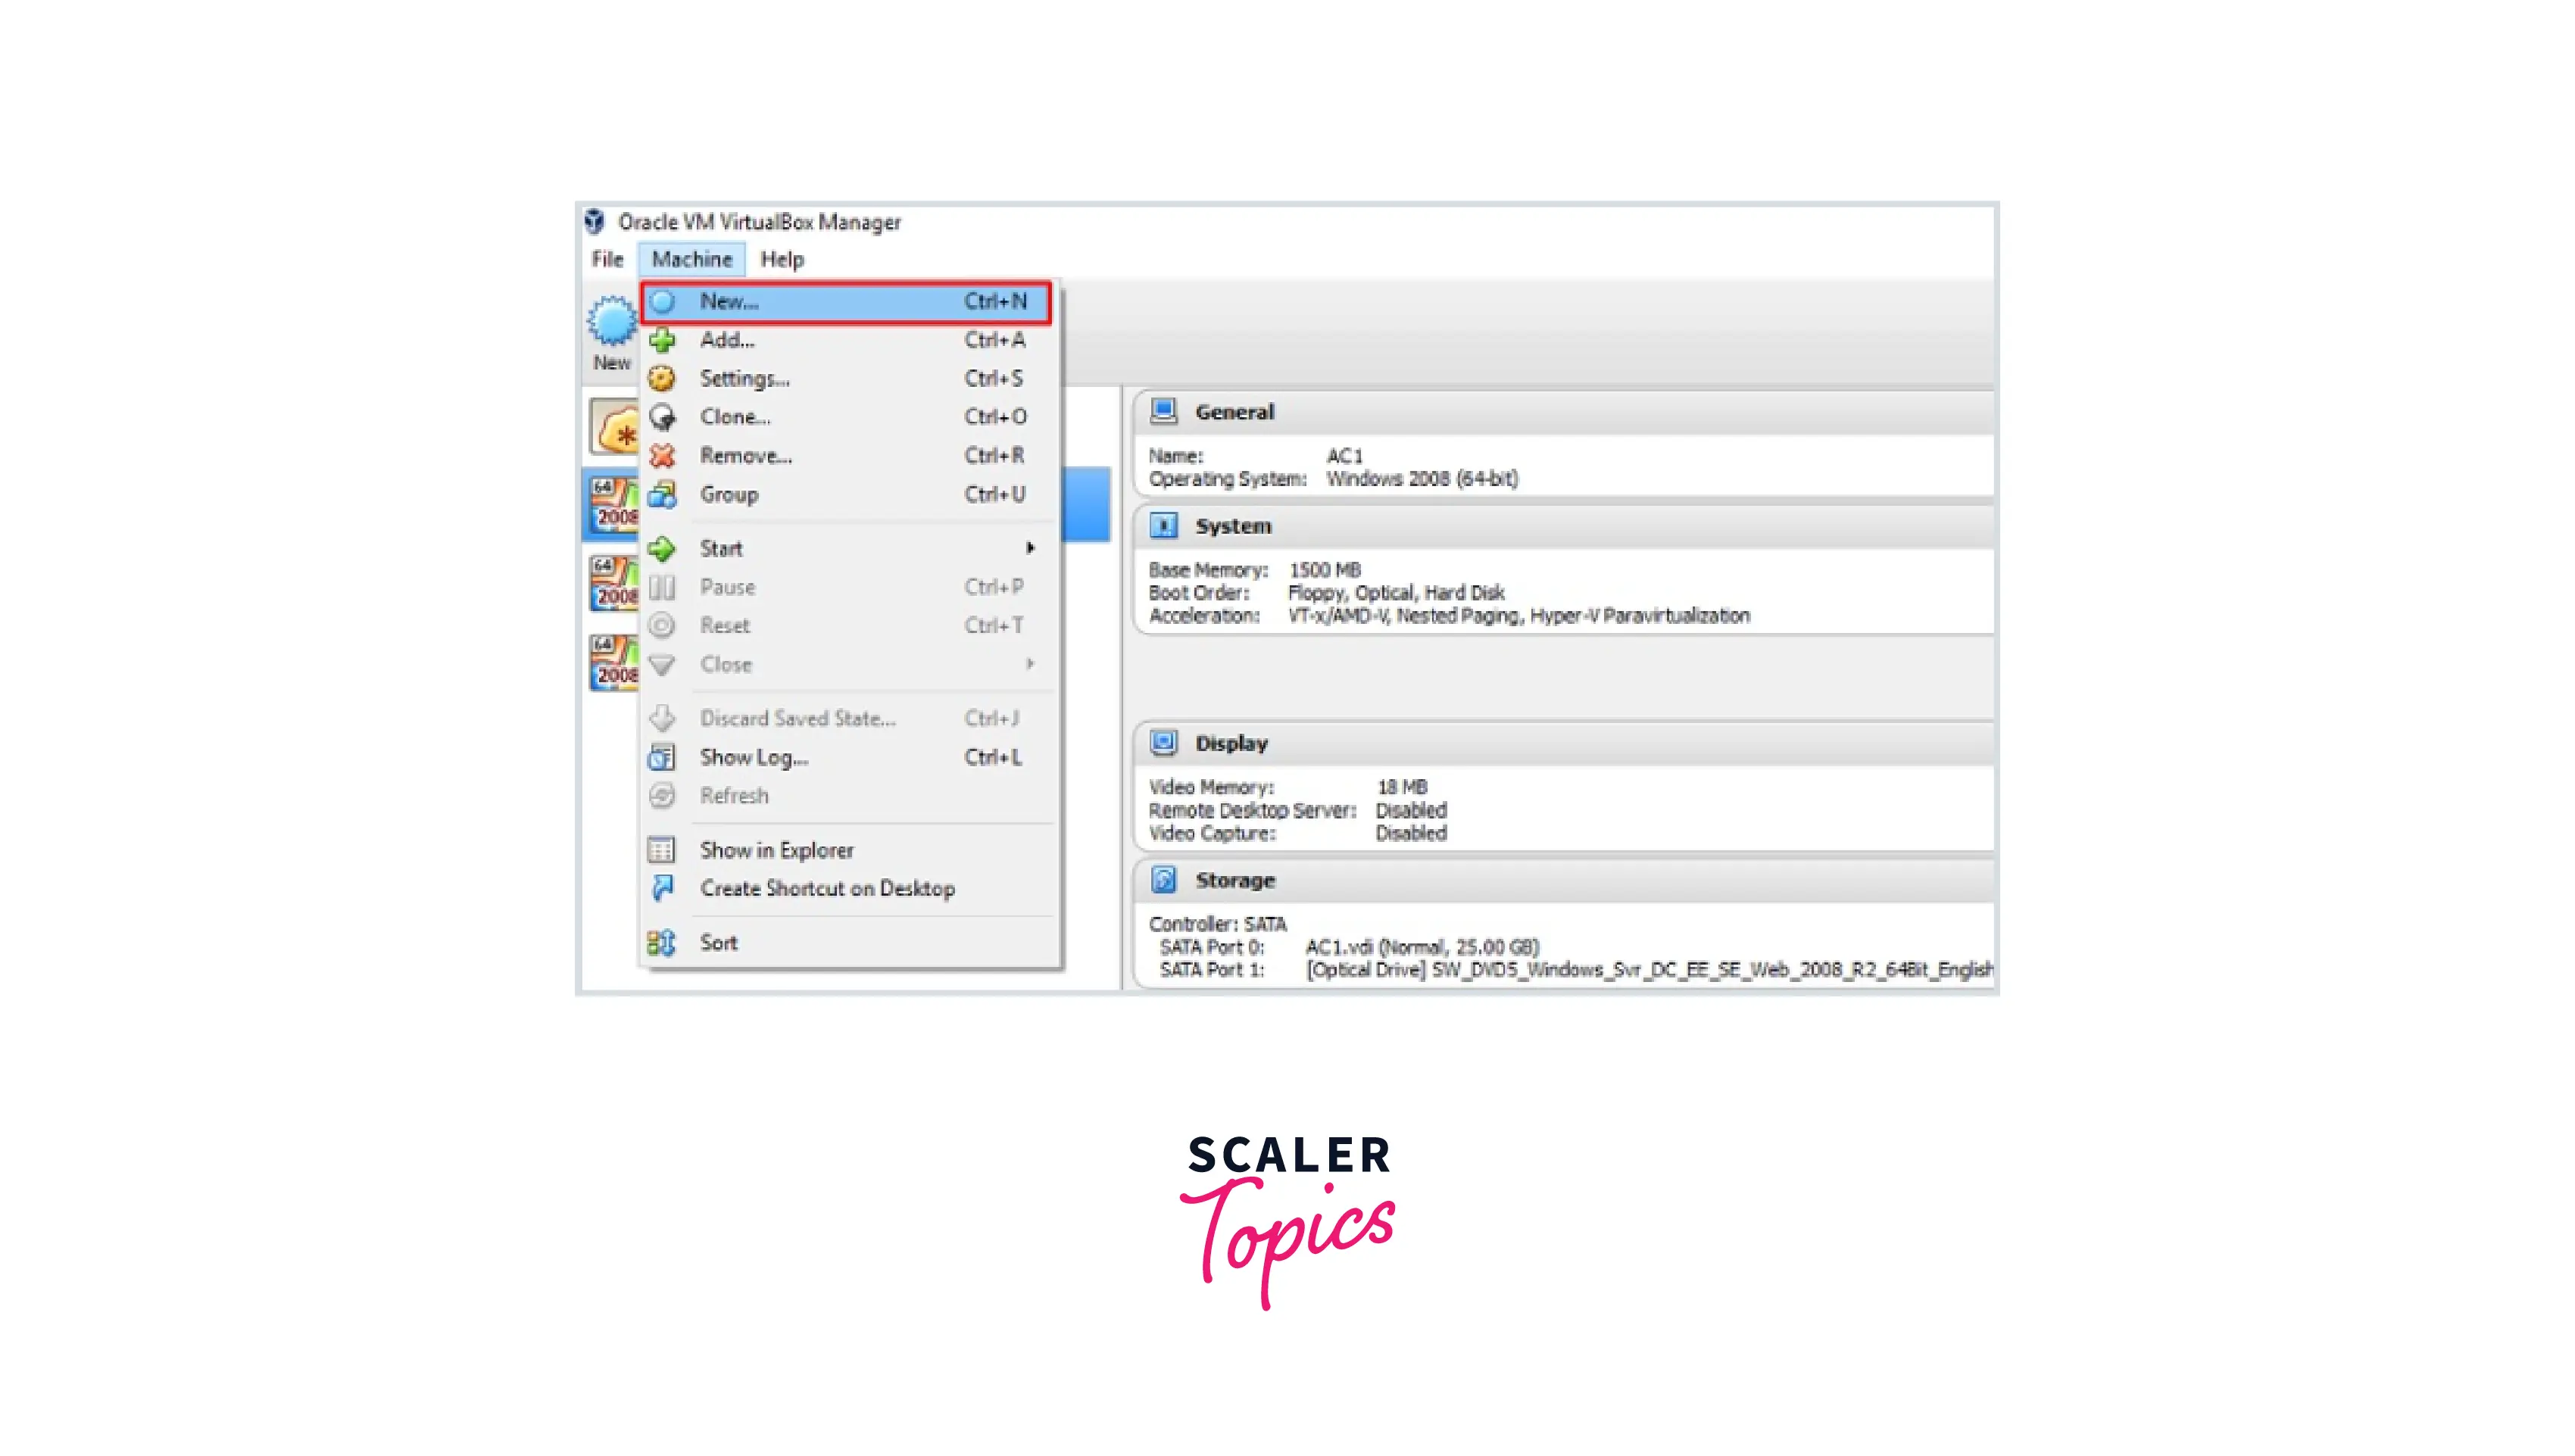
- Choose the virtual hard disk file (that you have downloaded) from the right window pane and click Open.
- Adjust the RAM required for running Kali Linux. Click Create.
- Kali's default username is "root" and the password is "toor" (without quotes).
Scaler Placement Report and Statistics
Scaler learners achieved 2.5x salary growth with average post-Scaler CTC reaching ₹23L.
Update the Kali Software
Since we have gathered a clear understanding of how to install Kali Linux; it is time to upgrade it. Once you have installed Kali Linux into your system, it will ask you to update the OS and provide a newer version to get advanced functionalities. To update Kali Linux, the steps are:
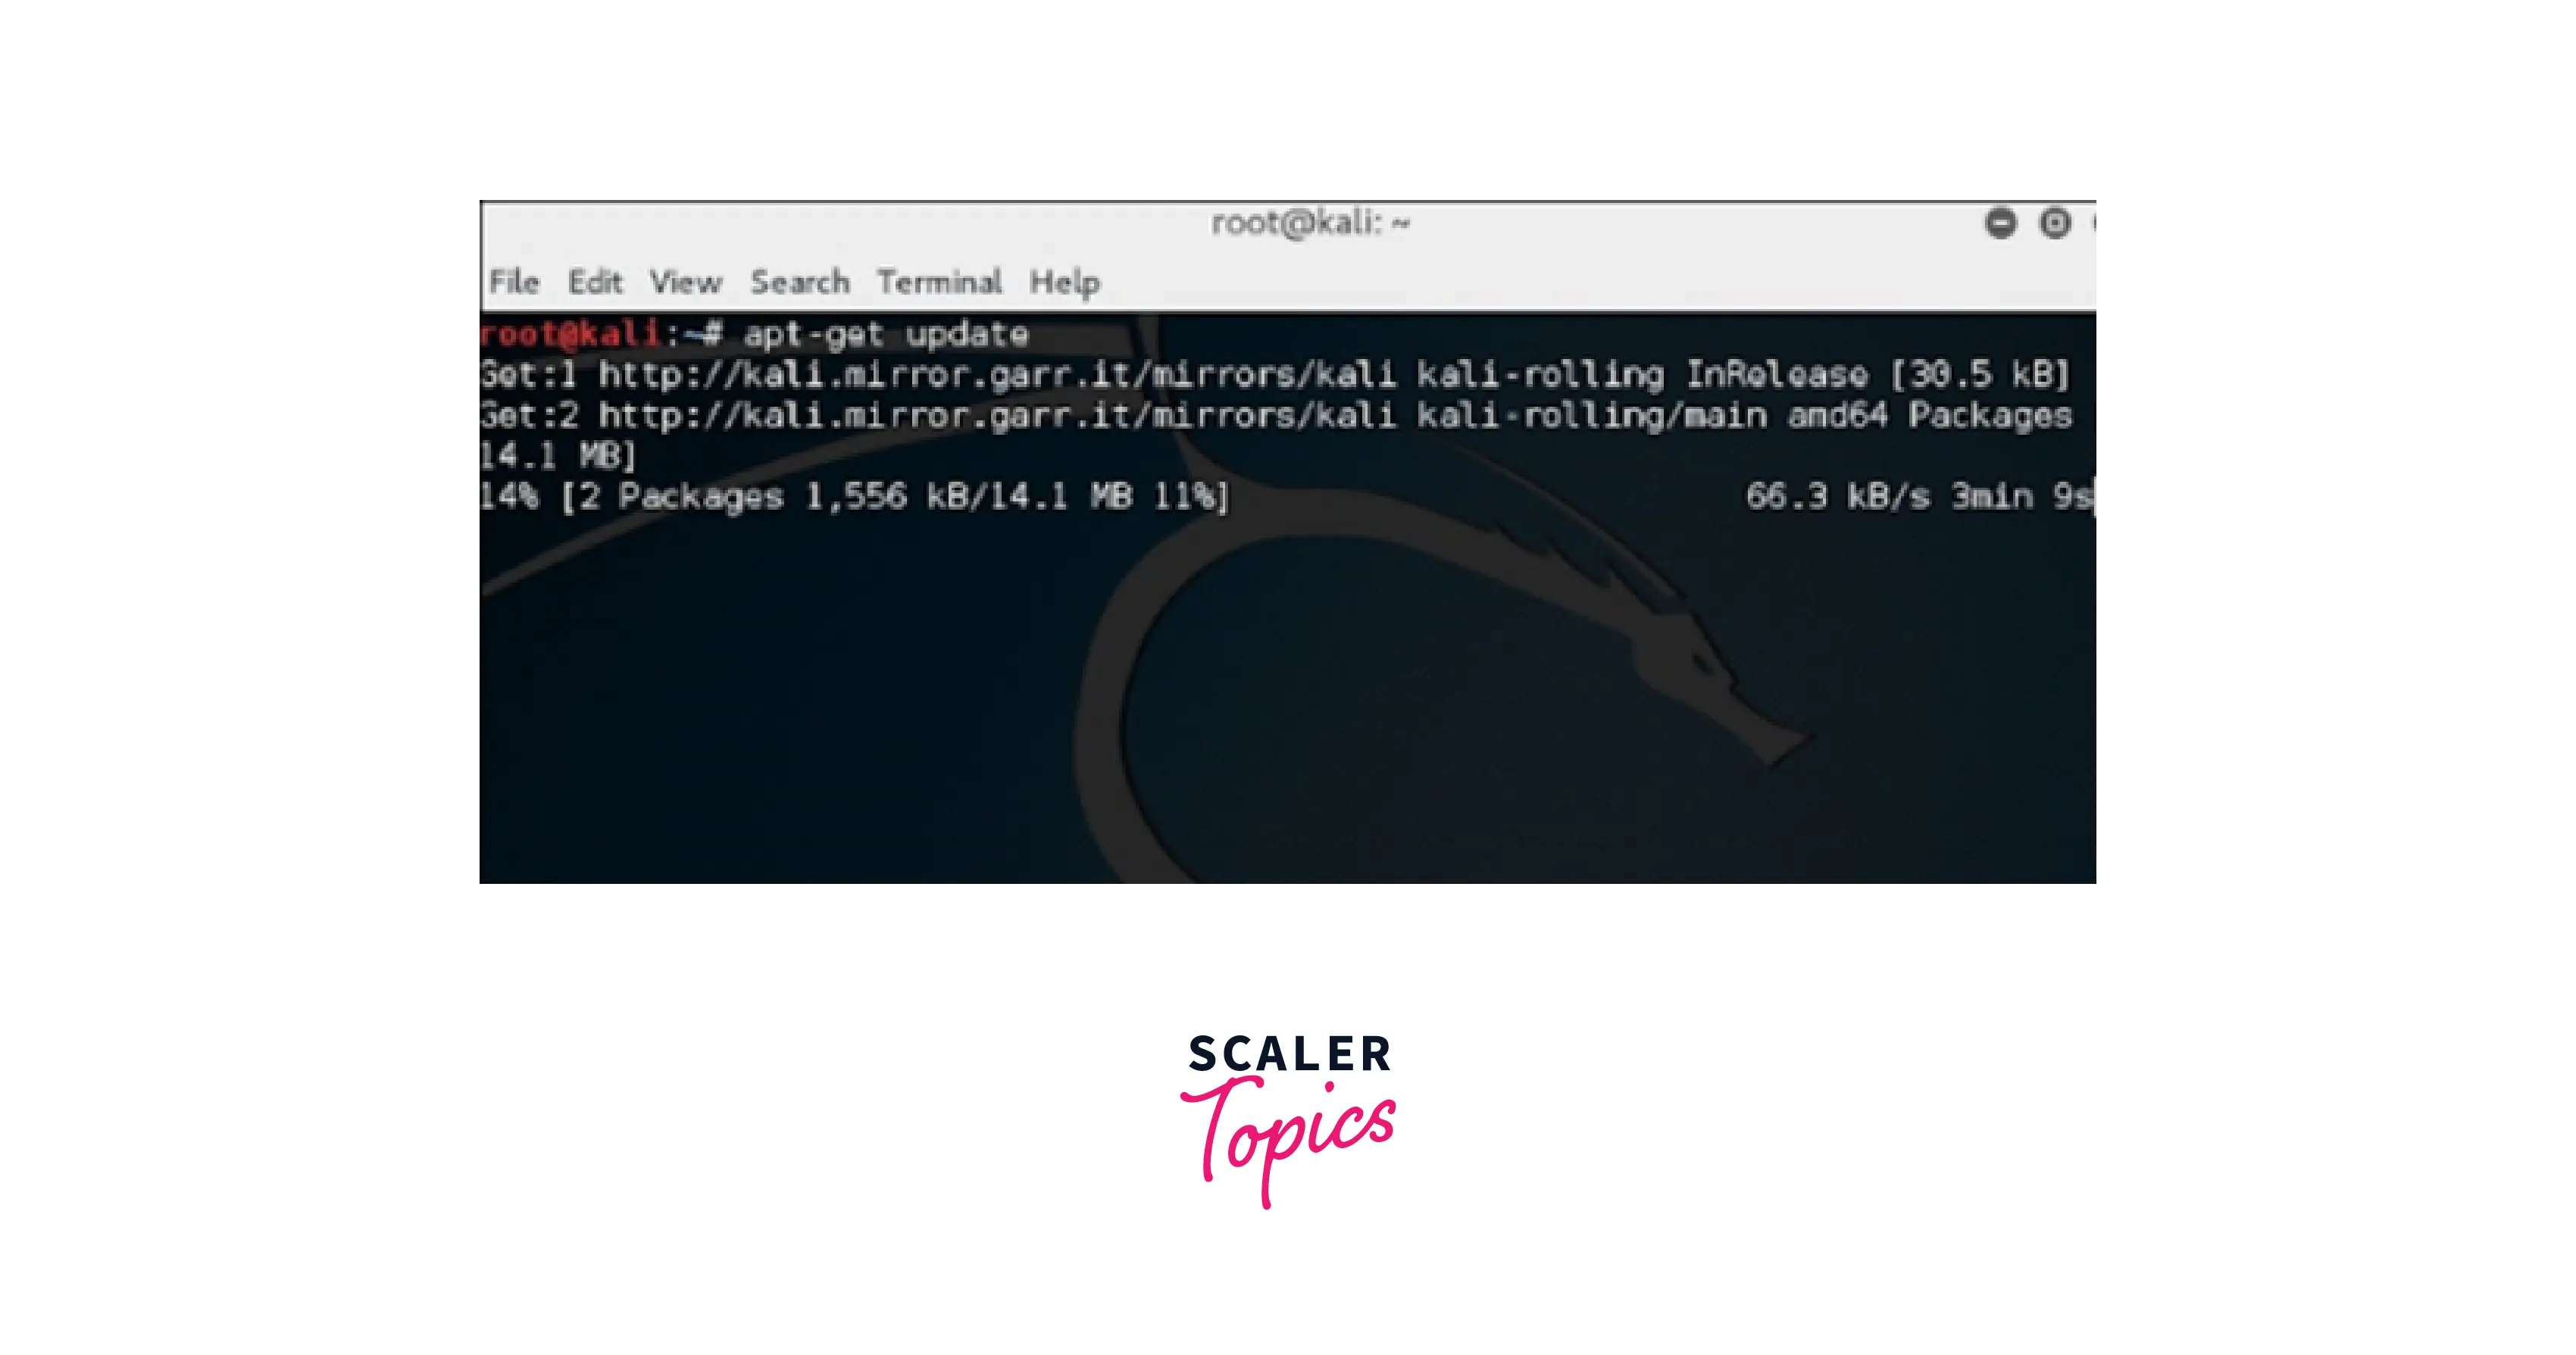
- First go to the application > Click on terminal > Type: "apt-get update" then give it some time to update.
- After some time, it might ask you to press "Y" to continue. Read the message and press "Y".
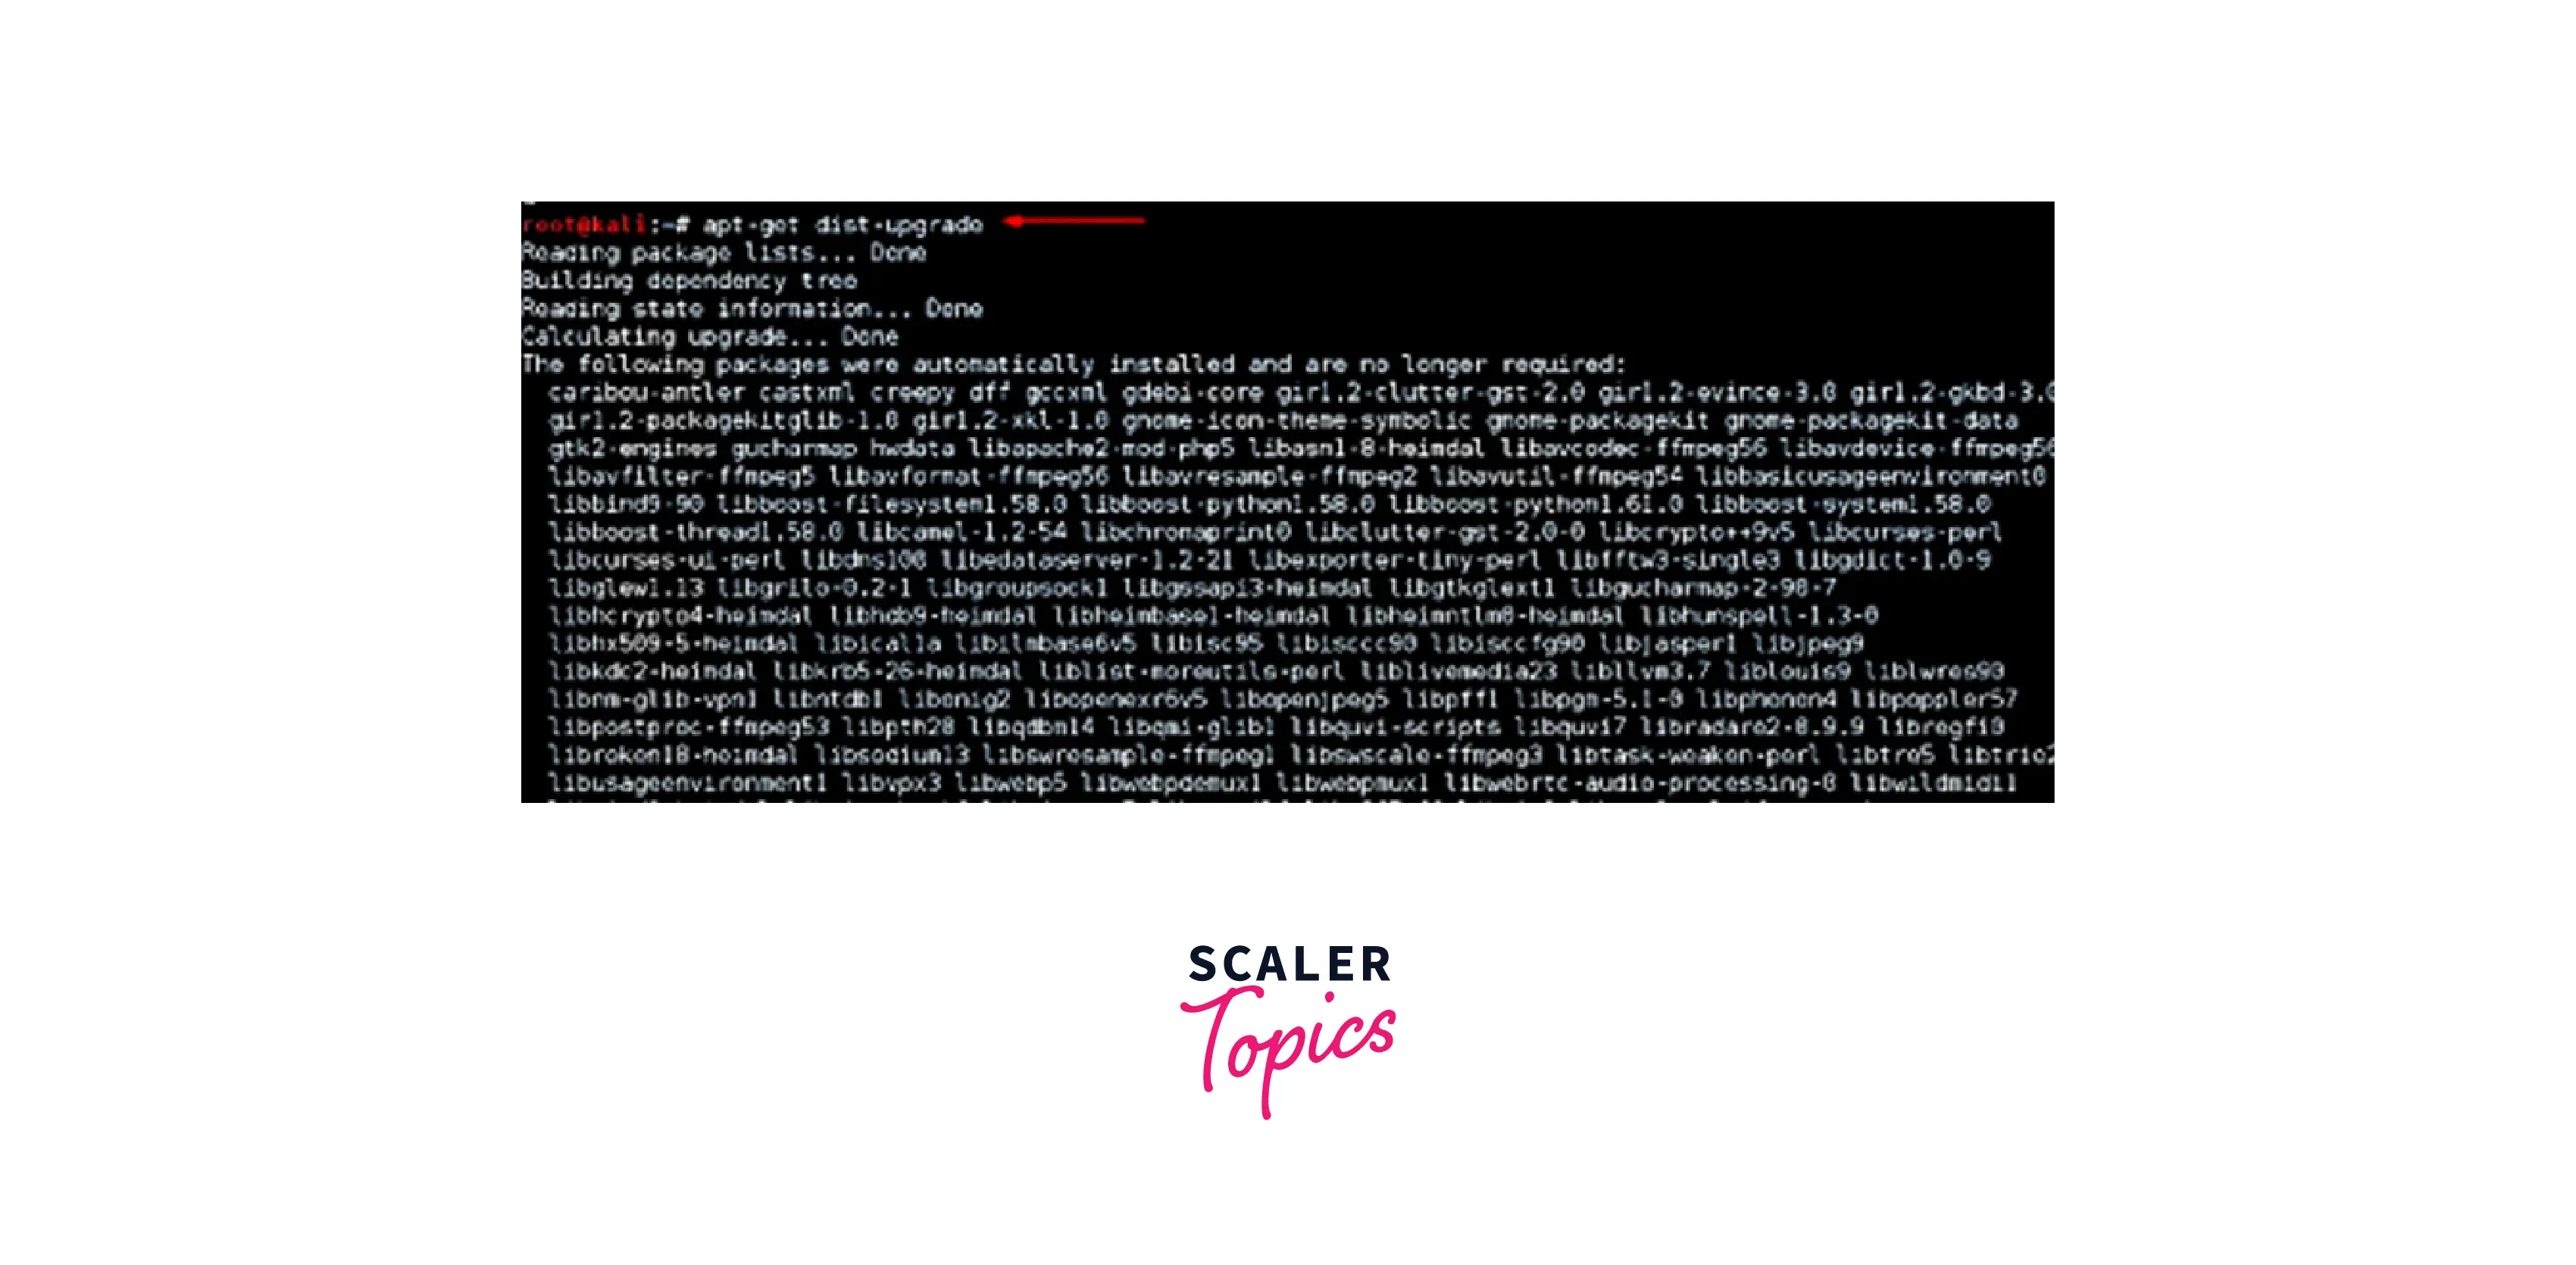
- To upgrade to any newer version of the Linux operating system > type "apt-get distupgrade". It will calculate the upgrades and will show Done.
Conclusion
- We hope this article has given a crisp idea of Kali Linux features and why companies and security professionals use it.
- Next, we understood the basic system requirements and Kali Linux installation prerequisites.
- We have also gathered a detailed view of how to install Kali Linux and different ways to install Kali Linux.
- Finally, we came across how to upgrade Kali Linux after Kali Linux installation.
Frequently Asked Questions (FAQs)
Q: Is Kali Linux installation more beneficial than installing Ubuntu?
A: Both Kali Linux and Ubuntu Linux are for different purposes. Ubuntu features everything you need to run at an office, home, or educational institute. Kali Linux is a penetration-testing OS that comes with 600+ pen-testing tools. So, most cybersecurity professionals and hackers use this operating system.
Q: When do we install Kali Linux?
A If you want to pursue a career as a cybersecurity professional or want to learn penetration testing to secure end-to-end business communication and systems, you can install Kali Linux. Here you can get all the penetration testing tools and apps within this operating system.
Q: How does Kali Linux installation provide a benefit to all security professionals across the globe?
A: Kali Linux has multilingual support. Any cybersecurity professional from any geographic location can use this operating system, irrespective of the language barrier across the globe can use it.